MODE D'EMPLOI 7080 DORO
Doro 7080
English
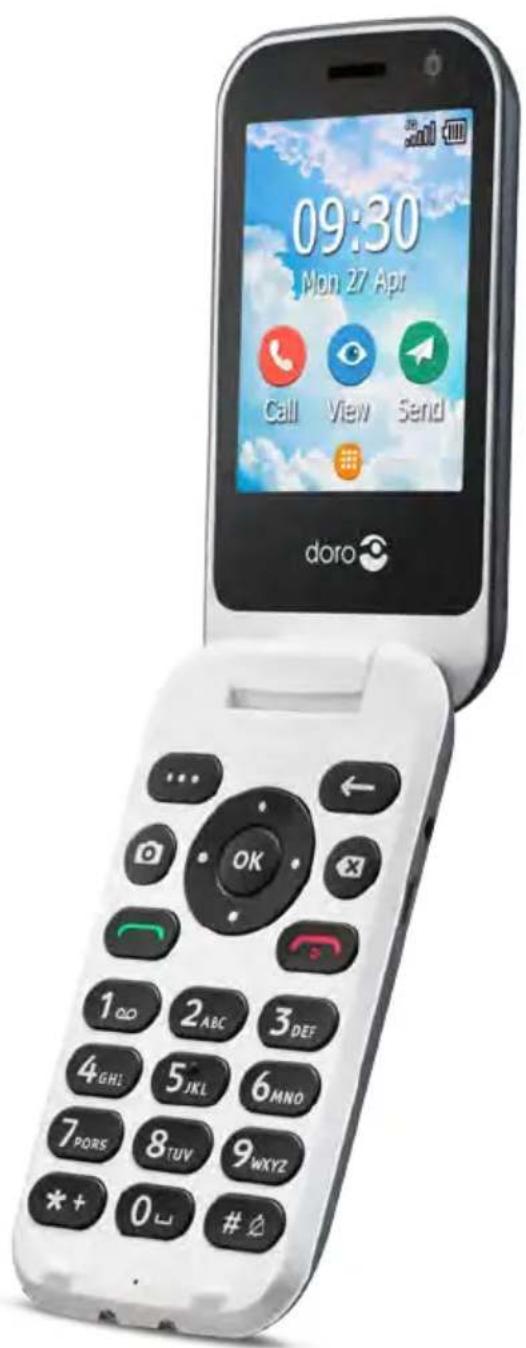
text_image
09:30
Mon 27 Apr
Call View Send
doro
OK
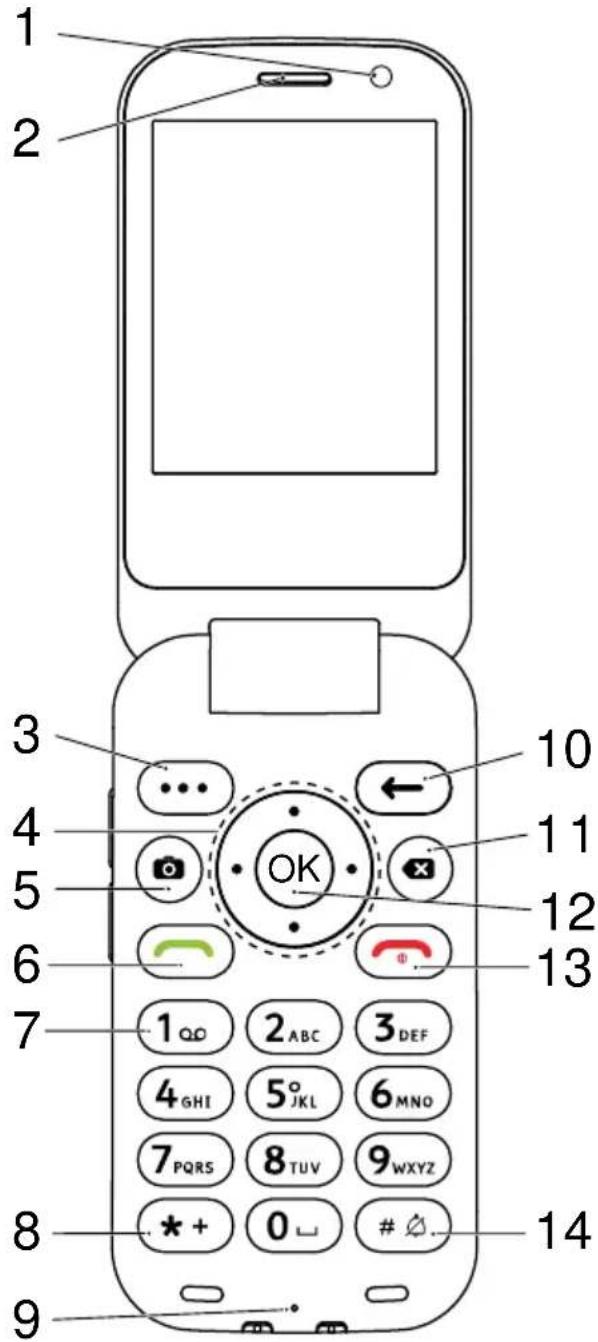
text_image
1
2
3
4
5
6
7
8
9
10
11
12
13
14
1
2 ABC 3 DEF
4 GHI 5° JKL 6 MNO
7 PQRS 8 TUV 9 WXYZ
* + 0 # Ø
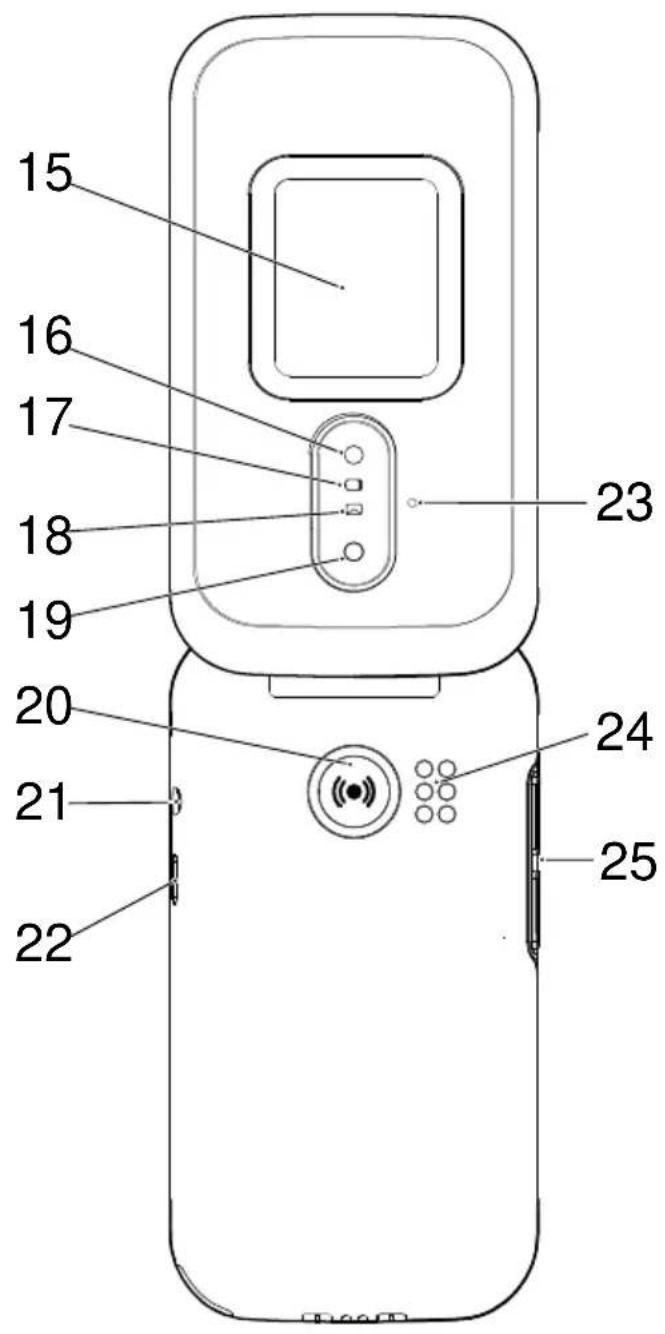
text_image
15
16
17
18
19
20
21
22
23
24
25
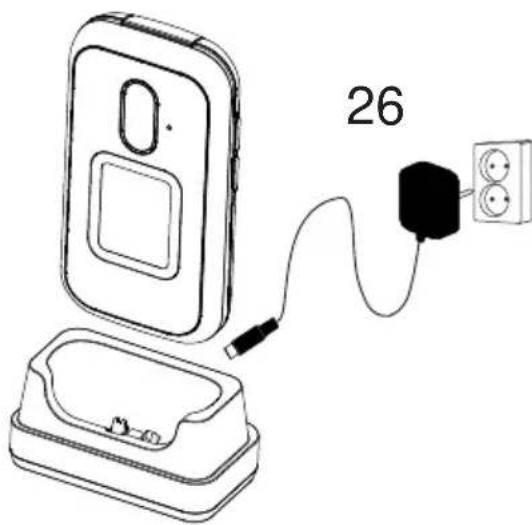
text_image
26
- Front camera
- Speaker
- Menu button
- Four-way navigation keys
- Camera shortcut
- Call button
- Voicemail
- International prefix/ Symbols
- Microphone
- Back button
- Clear button
- OK-button
- End call/ Power on/off
- Input method/ Silent mode
- External display
Note! All illustrations may not accurately depict the actual device.
The items supplied with your phone might vary depending on the software and accessories available in your region or offered by your service provider. You can obtain additional accessories from your local Doro dealer. The supplied accessories provide the best performance with your phone.
- Camera flash and Flashlight
- Red light = battery level low / charging
- Green light = New message / missed call
- Main camera
- Assistance button
- Headset socket
- Charging socket
- Second microphone
- Loudspeaker
- Volume keys
- Charging cradle (optional accessory)
Contents
Congratulations on your purchase 1
Getting started 1
Unbox your new phone 1
Insert SIM card, memory card and battery 2
Charge the phone.... 4
Save energy 5
Turn the phone on and off.... 5
Get to know your phone.... 6
Assistive functions.... 6
Start-up Wizard 6
External display 6
Phone indicators 6
Notification panel and status bar 7
Descriptions in this document 7
Basic phone operations.... 7
Navigate your phone.... 9
Sharing content.... 11
Enter text 12
Hearing aid compatible.... 13
Connect the phone to a computer 14
Calls 15
Make a call 15
Call from the phonebook 15
Receive a call.... 15
Call information.... 16
Call options.... 16
SOS calls 16
Call history.... 16
Call settings 17
Contacts.... 21
Add contact 21
Manage phonebook contacts 21
ICE (In Case of Emergency) 22
Phonebook settings.... 22
Assistance button.... 23
Setting the mode for the Assistance button 24
Assistance settings (basic mode) 24
Activation 24
Number list.... 25
Activate text messages (SMS).... 25
Position SMS.... 26
Signal type 26
Response by Doro 26
For the Responder 27
For the senior 28
Messaging.... 29
Create and send text message (SMS)/picture message (MMS)...... 29
Read and handle messages.... 30
Messaging options 31
WhatsApp.... 34
Facebook 34
Camera 34
Alarm 36
Media 36
Gallery 36
Music 37
FM Radio 38
Recorder.... 39
Videos.... 39
Email.... 39
Create and send e-mail 39
E-mail settings.... 41
Organiser 42
Calculator 42
Calendar 43
File manager.... 43
Notes 44
Web browser.... 44
Torch.... 44
Settings.... 44
Assistance settings 44
Network & Internet 44
Display 57
Sound.... 58
Storage 59
Calls 60
Security & location.... 60
Start-up Wizard 62
Tutorials.... 62
SIM Toolkit 62
System 62
Additional functions.... 65
Display status symbols 65
Display main symbols.... 66
Safety instructions.... 66
Network services and costs 66
Operating environment 66
Medical units.... 66
Areas with explosion risk 67
Li-Ion battery.... 67
Protect your hearing 67
Emergency calls.... 68
GPS/Location based functions 68
Vehicles 68
Protect your personal data 69
Malware and viruses.... 69
Care and maintenance.... 69
Warranty 70
Device OS software warranty 71
Specifications 71
Copyright and other notices 72
Hearing aid compatibility.... 73
Specific Absorption Rate (SAR) 74
Correct disposal of this product 74
Correct disposal of batteries in this product 74
EU Declaration of Conformity.... 75
Ecodesign declaration, energy efficiency for external power supply . 75
UK Declaration of Conformity.... 75
Congratulations on your purchase
Enjoy easy calling and messaging with this stylish phone that enables you to use WhatsApp over WiFi and high-speed 4G LTE networks. The large display and the widely separated, high contrast keys make everything you see and do all very easy, including taking great photos and videos with the camera. Other features include enhanced audio with HD voice, easy navigation, a torch and an assistance button, as well as reassuring safety features such as support for Response by Dowith GPS positioning. For more information about accessories or other Doro products please visit www.doro.com or contact our Helpline.
Getting started
When you get your phone, you will need to set it up before use.
Tip: Remember to remove any screen protector.
Unbox your new phone
The first step is to unbox the phone and assess the items and equipment included in the delivery. Make sure to read through the manual so you can familiarize yourself with the equipment and the basic functions.
- The items supplied with the device and any available accessories may vary depending on the region or service provider.
- The items supplied are designed for this device and might not be compatible with other devices.
- Appearances and specifications are subject to change without prior notice.
- You can purchase additional accessories from your local Doro retailer.
- Make sure accessories are compatible with the device before purchase.
- Only use batteries, chargers and accessories that have been approved for use with this particular model. Connecting other accessories may be dangerous and may invalidate the phone's type approval and warranty.
- Availability of accessories is subject to change depending on manufacturing availability. For more information about available accessories, refer to the Doro website.
Insert SIM card, memory card and battery
The SIM and memory card holder's are located inside the battery compartment.
Tip: Take care not to scratch the metallic contacts on the cards when inserting them into the card holders.
Remove the battery cover
IMPORTANT!
Turn off the phone and disconnect the charger before removing the battery cover.
Be careful not to damage your fingernails when you remove the battery cover. Do not bend or twist the battery cover excessively as it may get damaged.
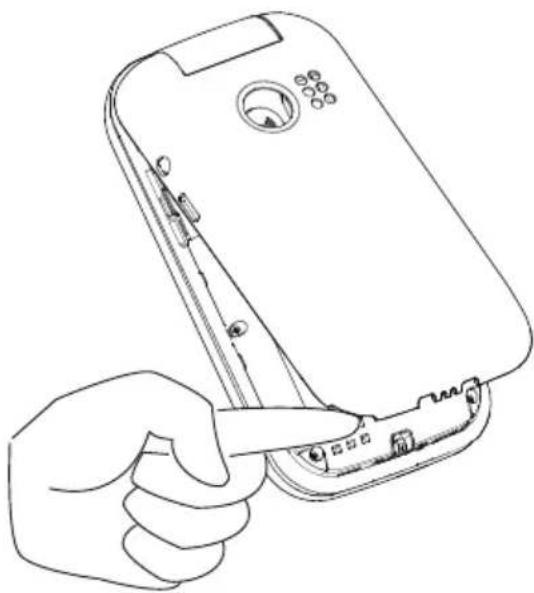
natural_image
Line drawing of a hand inserting a device into a smartphone (no text or symbols)
Insert the SIM and memory cards
Insert the nano-SIM () card by gently sliding it into the SIM card slot. Make sure that the SIM card's contacts are facing inwards and that the cut off corner is as shown. You can insert a second SIM card so you can have two phone numbers or service providers on a single device. Data transfer speeds may be slower, in some cases, if two SIM cards are inserted in the device than when one SIM card is inserted.
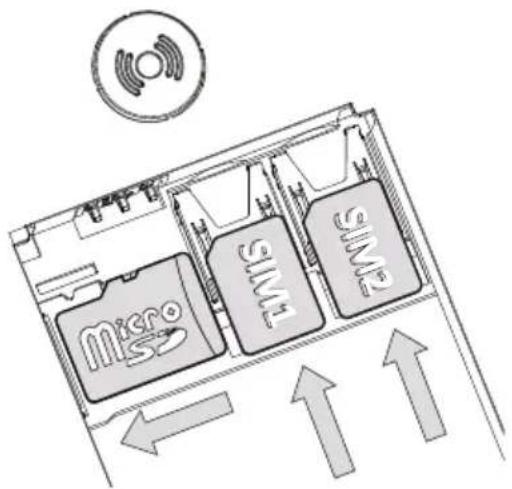
text_image
MicroSD
SIMS
SIMS
Take care not to scratch or bend the contacts on the SIM card. Should you need, but have problem to remove/replace the SIM card, use adhesive tape on the exposed part of the SIM card to pull it out.
You may optionally install a memory card in the phone to increase the storage space of your phone to be able to store more files, pictures, videos etc. Make sure that the memory card's contacts are facing downwards, as shown above. Compatible card type: microSD, microSDHC, microSDXC. Incompatible cards may damage the card itself, the device and corrupt data stored on the card.
See Storage, p.59 for additional info.
IMPORTANT!
This device accepts nano-SIM card or . Use of incompatible SIM cards may damage the card or the device, and may corrupt data stored on the card.
Use only compatible memory cards with this device. Compatible card types include microSD, microSDHC, microSDXC.
Incompatible memory cards may damage the card itself, the device and corrupt any data stored on the card.
Insert the battery
Insert the battery by sliding it into the battery compartment.
Replace the back cover.
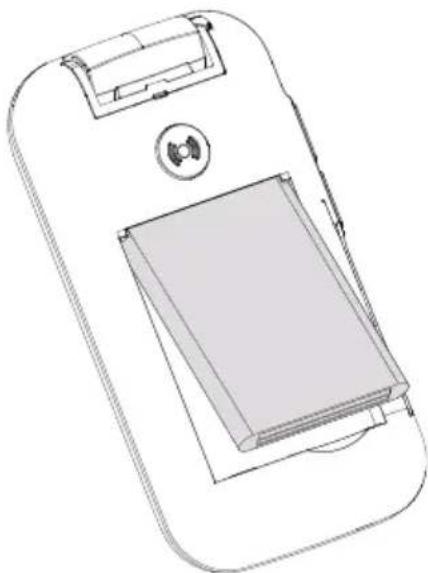
natural_image
Line drawing of a mobile phone with a rectangular device and a circular connector (no text or symbols)
Charge the phone
While it's possible that your phone will already come with enough power to be turned on right out of the box, we recommend charging the device fully before using it.

CAUTION
Only use batteries, chargers and accessories that have been approved for use with this particular model. Using unapproved accessories may be dangerous and may invalidate the phone's type approval and warranty.
When the battery is running low, is displayed and a warning signal is heard. When the charger is connected to the phone, is displayed briefly, and when it is disconnected. The battery charge indicator is animated while charging. It takes approximately 3 hours to fully charge the battery. If the phone is turned off when the charger is connected to the phone only the battery charge indicator will be shown on the display. When charging is completed, is displayed on the screen.
Use a wall power outlet to charge
-
Connect the small head of the charging cable to the charging socket on the phone.
-
Plug the power adapter to a wall power outlet.
Use a charging cradle to charge (optional)
- Connect the small head of the charging cable to the cradle. Place the phone in the cradle.
- Plug the power adapter to a wall power outlet.
Save energy
When the battery is fully charged, disconnect the charger from the device and unplug the charger from the wall outlet. To save power, the screen turns off after a while. Press any button to wake the screen up. Full batte capacity will not be reached until the battery has been charged 3–4 times. Batteries degrade over time, which means that call time and standby time will normally decrease with regular use. During extended operation, the device may feel warm. In most cases, this is normal. To save battery and energy even further, see Battery saver, p.56.
Turn the phone on and off
- Press and hold on the phone to turn it on or off. Press OK to Power off.
- If the SIM card is valid but protected with a PIN code (Personal Identification Number), Enter SIM PIN is displayed. Enter the PIN code and
press OK Delete entries with .
Attempts shows the number of PIN attempts left. When no more attempts remain, the SIM card must then be unlocked with the PUK code (Personal Unblocking Key).
Unlock with PUK code
- Enter the PUK code and press OK Delete entries with .
- Enter a new PIN code and press OK
- Re-enter the new PIN code and confirm with OK.
Note! If PIN and PUK codes were not provided with your SIM card, please contact your service provider. If you enter the wrong PUK code more than 10 times the SIM card gets permanently locked.
Get to know your phone
Assistive functions
Use the symbols below to guide you through supporting sections in the manual.

Seeing

Hearing

Handling

Safety
Start-up Wizard
When starting the device for the first time, a Start-up Wizard will be initiated to set some basic settings.
- Select the wanted language, the standard language is selected by the origin of the SIM card, and press.
- You will be provided a tutorial about the navigation of the phone. Press Next/OK to step through the tutorial. Press Skip to skip pass the tutorial. Press to step backward.
- Select:
• Standard setup to use the phone with the standard settings.
• Manual setup to customise the settings.
You can choose to adjust one or more settings by selecting and pressing OK
Select Finish when done.
- You will be provided a short tutorial of the phone's menu. Press Next/OK to step through the tutorial.
Tip: Launch the start-up wizard at any time. From standby mode, press
→ Settings Start-up Wizard.
External display
The external display shows the time, a number of status indicators, and notifications for calls, messages, etc. If the external display times out, press and hold any of the side keys +/- to turn it back on.
Phone indicators
Lights on the phone lid:
- Green light when you have a new notification for a message, missed call, etc.
- Red light when the battery is running low and during charging.
Notification panel and status bar
At the top of the main screen to the left you can see if there are any not-cations. The number will show how many notifications you have.
- To view the notifications, press the options/notifications button●.
- Press Clear all to remove all notifications.
Note! You do not delete the item itself, just the notification.
IMPORTANT!
When a new system software is available, a notification message is sent. Select to start downloading. The download time may vary depending on Internet connection. We recommend that you always update your device to the latest software version to get optimal performance and the latest enhancements. During an update your phone will be temporarily out of service, even for emergency calls. All contacts, photos, settings, etc. will remain safely stored in the phone, but we recommend you to regularly backup your phone. Do not interrupt the update process. See System, p.62 for more information. You need to have a working data connection to be able to perform the update with the firmware over-the-air (FOTA) service. See Mobile network, p.46 or Wi-Fi, p.45 on how to activate a data connection.
At the top of the main screen to the right you can see the status symbols such as network signal strength, battery level, Bluetooth activity and more.
Descriptions in this document
Descriptions in this document are based on your phone's setup at the time of purchase. Instructions normally start from the start screen. Press to reach the start screen. Some descriptions are simplified.
The arrow indicates next action in step-by-step instructions.
Basic phone operations
Call :
• Dial a number or answer incoming call.
- Enter the call log.
End call/Power on and off:
• End calls or return to the start screen.
- Long press to power on or off.
Back :
Return to the previous screen.
Assistance (●)
Press to make an assistance call.
Clear.
Press to clear the previous character.
Camera
Press to initiate the camera app and take a picture or a video.
Options • • •
The options button have multiple functions. In idle mode it will display eventual notifications. In different menus and features it will display available options for that feature. Try to always press this button to explore more options.
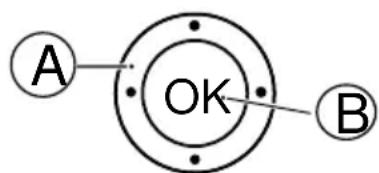
Navigation keys
• (A) Use the Four-way navigation keys to navigate up, down, left and right.
• (B) Use the OK to open the 📋 Menu and to confirm actions.
text_image
A
OK
B
Standby (idle mode)
When the phone is ready to use, and you have not keyed in any character, the phone is in standby.
- Press to return to standby mode.
- Press the options button to access the notices, if there's any.
Tip: You can always press to return to standby.
Volume keys + / -
- During a call the volume keys adjusts the call volume.
- From standby you can set your device to silent mode: press and hold # / until appears.
See also Volume, p.58 for more information.
Note! If you use a hearing aid or have hearing difficulties when using the telephone in a noisy environment, you can adjust the phone's audio settings, see Audio setup, p.58.
To enable and disable features and functions

enabled functions.
disabled functions.
Headset
When a headset is connected, the internal microphone in the phone is automatically disconnected. If available, use the answer key on the headset to answer and end calls.

CAUTION
Using a headset at high volume may damage your hearing. Adjust the volume level carefully when using a headset.
Navigate your phone
Meet “EVA” – “Enkel, Vänlig och för Alla” (Swedish) 📋 (Easy, friendly and for everyone)
Doro aim to take simplicity even further thanks to our intuitive, action-based interface, EVA. EVA makes using a phone even easier. It's like having someone who understands your needs always by your side. Users never need to look around for things they can't find. EVA simply gives them a few clear choices, and then does what the user wishes based on their response. She's also the perfect companion when starting up the phone for the first time, guiding the user every step of the way. And because she is designed by Doro, EVA makes the technology fun, available and easy for everyone.
Doro's unique telephone menu is action-based, that makes navigating the phone brilliantly simple. It allows you to navigate your phone, by just asking yourself, "What do I want to do?".
For example, if you want to send a message to a contact that is available your contact book.
- Tap the Send button. You are asked, Send What? and responds by selecting A message.
- You are asked To whom? and responds by selecting A contact.
- Select or search for a contact.
- Compose your message.
- Press to access more options.
- When done, select and press


Call
To call someone.

A number to enter a phone number, see Calls, p.15.

A contact to make a call from your contact book. For more info see Contacts, p.21.

A WhatsApp contact to make a call to a WhatsApp contact. For more info see WhatsApp, p.34.

A recent contact to call from the call history, see Call history, p.16

My voicemail to call your voicemail, see also Set Voicemail, p.20.

View
To see and view content reach many of the most frequently used apps.

My messages to view messages (SMS/MMS).

My contacts to see and handle your ICE card (In Case of Emergency), see Contacts, p.21.

My WhatsApp messages to view WhatsApp messages. For more info see WhatsApp, p.34.

My gallery to view your stored pictures and videos, see Gallery, p.36.

My call history to view your call history, see Call history, p.16.

My alarms to view your alarms or add a new one, see Alarm, p.36.

My organiser

Calculator to make some calculations, see Calculator, p.42.

Calendar to view the calendar and your events, see Calendar, p.43.

File manager to view stored videos, see File manager, p.43.

Notes to view your notes, see Notes, p.44.

My e-mails to view emails, create or add an email account, see Email, p.39

Send
To send and share messages, email, pictures and more from your phone.

A message to send a text (SMS), picture (MMS) message, see Create and send text message (SMS)/picture message (MMS), p.29.

A WhatsApp message to send a WhatsApp message. For more info see WhatsApp, p.34.

An email to send an email, see Create and send e-mail, p.39.

A picture to send a picture or video. To view stored images and videos, see Gallery, p.36

A recording to record and send a recorded sound, see Recorder, p.39.
Note! The action-based navigation telephone menu can be turned off.
SeeNavigation guides, p.57.
Press Menu to reach all the apps.
Sharing content
Share content by using various sharing options.
In many places of the phone menu you can press or: for more options.
Press Share to share a selected item:
- Messaging to send via a message. See Create and send text message (SMS)/picture message (MMS), p.29.
- Bluetooth to send to a Bluetooth device, see Bluetooth ^ , p.54.
- Email to send via e-mail, see Create and send e-mail, p.39.
- WhatsApp to send via WhatsApp, see WhatsApp, p.34.
Press Just once to use this app once or Always to always use this when sharing.
Note! If Always is selected, see Reset app preferences, p.64 on how to reset this and again get the option to select app.
Enter text
Enter text manually
Select character
- Press a numerical key repeatedly until the desired character is shown. Wait a few seconds before entering the next character. Press to erase characters.
Special characters
- Press ✪ for a list of special characters.
- Select the desired character using the Four-way navigation keys and press to enter it.
Move the cursor within text
• Use the Four-way navigation keys to move the cursor within the text
Upper case, lower case, numerals and predictive text
- Press # to choose between upper case, lower case, numerals and predictive text. Predictive text needs to be activated before use, see Predictive text, p.63.
Change writing language
- Press and hold # to change writing language.
Enter text with predictive text
In some languages you can use predictive text input method which uses a dictionary to suggest words.
- Press each key once, even if the displayed character is not the one you want. The dictionary will suggest words based on the keys you have pressed.
Example
- Press 3, 7, 3, 3 to write the word "Fred". Complete the word before looking at the suggestions.
- Use the Four-way navigation keys to move the cursor to view the suggested words.
- Press OK and continue with the next word.
Alternatively, press 0 to continue with the next word.
- If none of the suggested words are correct, use manual input mode.
Note! See Predictive text, p.63 for more information.
- Press # to change input mode. The icon on the top left of the display indicates the input mode.
| abc KT9 Predictive text |
| abc | lower case |
| Abc | Sentence case |
| ABC | UPPER CASE |
| 123 Numerals |
Hearing aid compatible
This phone is hearing aid compatible. Hearing aid compatibility is not a guarantee that a specific hearing aid will work with a specific phone. Mobile phones contain radio transmitters that may interfere with hearing aid performance. This phone has been tested for use with hearing aids, for some of the wireless technologies that it uses, but there may be some newer wireless technologies that have not been tested yet for use with hearing aids. To ensure that a specific hearing aid works well with this phone, test them together before making a purchase.
The standard for hearing aid compatibility contains two types of ratings:
- M: To use your hearing aid in this mode, make sure that your hearing aid is set to "M-mode" or acoustic coupling mode, and position the phones receiver near the hearing aid's built-in microphone. For the best results, try using the phone in different positions relative to your hearing aid—for example, placing the receiver slightly above the ear may result in better performance for hearing aids with microphones positioned behind the ear.
- T: To use your hearing aid in this mode, make sure that your hearing aid is set to "T-mode" or telecoil coupling mode (not all hearing aids have this mode). For the best results, try using the phone in different positions relative to your hearing aid—for example, placing the receiver slightly below or in front of the ear may result in better performance.
See also Audio setup, p.58 on how you can adjust the audio settings.
Connect the phone to a computer
Connect the phone to a computer and start transferring pictures, music and other file types. All you have to do is connect a USB cable between the phone and computer. From your computer's file explorer, you can drag and drop content between your phone and the computer.
Note! You might not be able to transfer some copyright protected material. USB storage allows a computer connected using a USB-cable to access files on the phone, but this can be disabled. See USB connection, p.55.
Enabling USB storage allows a computer or device connected using a USB-cable to access files on this phone.
Drag and drop content between phone and a computer
- Connect your phone to a computer using a USB cable.
- Wait until the phone or memory card appears as external disks in the file explorer.
- Drag and drop selected files between the phone and the computer.
Note! You can transfer files using a USB cable on most devices and operating systems supporting a USB Mass Storage interface.
Disconnect the USB cable safely
- Make sure to enable the hardware to be safely removed.
- Disconnect the USB cable.
Note! Computer instructions may vary depending on your operating system. See the documentation of your computer's operating system for more information.
Calls
Make a call
- Enter the phone number including the area code. Delete with
- Press to make a call.
Note! If you have more than one SIM card installed, you will be asked what SIM card to use. To set the preferred SIM card, see Dual SIM settings, p.53.
- Press to end the call.
Tip: For international calls, always use + before the country code for best operation. Press and hol* for the international prefix +.
Call from the phonebook
- Press Call A contact.
- Use √/to scroll through the phonebook, or to do a quick search by pressing the key corresponding to the first letter of the entry.
- Press to dial the selected entry. If needed, select the number. Alternatively, press to dial.
- Press to cancel the call.
Receive a call
- Open the phone and press to answer.
Press to reject the call (busy signal).
To not answer an incoming call by opening the phone, see Answer mode, p.21.
Tip: Press + or – to temporarily switch off the ring signal without opening the phone.
- Press to end the call.
During a call, the outgoing or incoming phone number and the elapsed call time is displayed. If the identity of the caller is withheld or unknown, Private number or Unknown are displayed.
Call options
Mute
Select and press to disable the microphone. Press to re-enable the microphone.
Loudspeaker
Select and press to activate loudspeaker mode. Speak clearly into the phone microphone at a maximum distance of 1 m. Press to deactivate loudspeaker mode.
Options • • •
During a call the options button●(●) give access to additional functions.
- Add call to call another number. When the second party is connected you can Merge and Swap.
- Manage is available during a conference call.
• Hold/Retrieve call to hold/retrieve the current call.
Note! For settings related to calling, see Call settings, p.17
SOS calls
As long as the phone is switched on, it is possible to place an SOS call by entering the main local emergency number for your present location followed by.
Some networks accept calls to emergency numbers without a valid SIM card. Contact your service provider for more information.
Call history
Received, missed and dialed calls are saved in a combined call log.
- Press
Alternatively, press

View → My call history.
- Calls are displayed as follows depending on call type:

Incoming call
Outgoing call
Missed call
- Select wanted entry and press to dial, or...
Select an entry and press to:
• Create new contact to save the number for a new contact.
- Add to a contact to add the number for an existing contact.
- Send a message to send a text message.
- Block number/Unblock number to block/unblock the number. You will not receive calls or messages from a blocked number. See Call blocking, p.20.
• Call details to show details for the selected call.
- Delete log to delete the selected entry in the call log.
Press to:
- Settings for call settings. See Call settings, p.17..
• Clear call history to delete all entries in the call log.
Call settings
You can access most of the call settings via Menu phone →...→ Settings.
Display options
Set in what order you sort and display your contacts.
Sort by
Set in what order you sort your contacts.
- Press Menu Phone Settings Display options → Sort by:

- Select First name or Surname.
Set how your contacts are displayed.
- Press Menu Phone Settings Display options → Name format:

2. Select First name first or Surname first.
Calls
Note! You need to select the SIM card you want to handle.
Fixed dialling numbers (FDN)
You can limit calls to certain numbers saved on the SIM card. The list of a lowed numbers is protected by your PIN2-code.
Note! The PIN2-code is needed to apply fixed dial. Contact your service provider to get the PIN2-code.

SIM card fixed dialling numbers:
- Enable FDN enter PIN2 to enable the feature.
• Change PIN2 to change the PIN2 code.
- FDN list → ... to add and enter the first allowed number.
You can add more numbers or edit or delete existing.
Note! You can save parts of phone numbers. For example, if you save 01234, allows calls to all numbers starting with 01234. It is possible to place an SOS call by entering the main local emergency number followed by even when fixed dial is activated. When fixed dial is activated you are not allowed to view or manage any phone numbers saved on the SIM card. You are not able to send any text messages either.
Call forwarding
You can divert calls to an answering service or to another phone number. Set up which calls should be diverted. Select a condition, enter number and then press Turn on. You can also select Turn off or Update.

SIM card call forwarding:
• Always forward to divert all voice calls.
- When busy to divert incoming calls if the line is busy.
- When unanswered to divert incoming calls if unanswered.
- When unreachable to divert incoming calls if the phone is turned off or out of range.
Call barring
Your phone can be restricted to disallow certain types of calls. Select a condition and select or .
Note! A password is needed to apply call barring. Contact your service provider to get the password.
- Press Menu Phone Settings calls select SIM card call barring.

- Mark the type of calls that you want to restrict:
• All outgoing calls to answer incoming calls but not calling.
• International outgoing calls to block calls to international numbers.
- International outgoing calls except to home PLMN to block international calls except to the country associated with the SIM card.
• All incoming calls to call but not to receive incoming calls.
- Incoming calls while roaming to block incoming calls while roaming (operating in other networks).
- Press Cancel all to cancel all call barring (password needed). Press OK to confirm.
- Press Change barring password to change the barring password.
Note! Changing the password might not be allowed by your service provider.
Additional settings
Caller ID
Display or hide your phone number on the recipient's phone when you call
Press Menu Phone Settings Calls select SIM card Additional settings Calls ID:

• Network default to use default setting by the network.
- Hide number to never show your number.
• Show number to always show your number.
Call waiting
You can handle more than one call at a time, put the current call on hold and answer the incoming call. When activated, an alert tone is heard if there is an incoming call while talking.
- During a call, press to answer the second call. The phone will automatically hold the first call. For more call handling, see Call options, p.16.
Activate call waiting
- Press Menu Phone Settings calls select SIM card Additional settings.

- Set Call waiting switch to enable call waiting.
Tip: Set switch to to disable call waiting.
Call blocking
You can compile a blacklist of phone numbers so that any phone number on your blacklist is blocked when calling or texting you.
Activate the function and add blacklist numbers
- Press Menu Phone Settings call blocking.

-
Press Add a number to add a number to list of blocked numbers.
-
Press Block to confirm.
Press Unblock to remove.
Tip: To remove an existing entry, select it and press Unblock.
You can add numbers directly from your call log, just press block number. See Call history, p.16
Set Voicemail
If your subscription includes an answering service, callers can leave a voice-mail message when you are unable to answer a call. Voicemail is a network service and you may need to subscribe to it first. For more information and for the voicemail number, contact your service provider.
-
Press Menu Phone Settings Voicemail select SIM card (if applicable) Advanced settings Setup Voicemail number.
-
Enter number and press OK to confirm.
Call voicemail
- Press and hold shortcut button 1.
Answer mode
- Press Menu Settings Calls Answer mode Open to answer:

- Enable the switch to answer incoming calls by opening the phone.
- Press 📋 Menu → Contacts → Create new contact and select where to save it.
- Enter First name, Surname, Phone and the type of phone number
Email and the type of email for the contact.
- Press for more options.
- Press Save.
- Press Menu Contacts.
-
Select a contact and press, then press :●●●
-
Add to favourites to set the entry as one of your favourite contacts.
- Call to call the contact.
• Edit to edit the contact. When done, press Save.
- Message to create a message. See Create and send text message (SMS)/picture message (MMS), p.29.
- Delete to delete the selected contact. Press delete again to confirm.
- Share to send the selected contact as a vCard via selected method.
- Set ringtone to choose a special ringtone for calls from the selected contact.
ICE (In Case of Emergency) ♥
First responders can access additional information such as medical information from the victim's phone ICE in case of emergency. In the event of a trauma, it is critical to have this information as early as possible to increase the chances of survival. All fields are optional, but the more information provided the better.
- Press Menu Contacts ICE.

- Press Edit to add or edit information in each entry.
• Name: enter your name.
• Birth date: enter your date of birth.
• Height: enter your height.
• Weight: enter your weight.
- Address: enter your home address.
• Language: enter your preferred language.
• Insurance: enter your insurance provider and policy number.
- Contact 1: add contact from phonebook.
- Contact 2: add contact from phonebook.
• Doctor: add contact from phonebook.
• Condition: enter any medical conditions or medical devices (e.g. diabetic, pacemaker).
• Allergies: enter any known allergies (e.g. penicillin, bee stings).
• Blood type: enter your blood type.
• Vaccination: enter any relevant vaccination.
• Medication: enter any medication that you are treated with.
- Other info: enter other information (e.g. organ donor, living will, consent to treat).
- When done, press Save.
Phonebook settings
-
Press Menu Contacts.
-
Press : ● ● ●
• My info to enter your personal contact details, such as First name, Surname, Phone and Email.
- Default account for new contacts to set where you save new contacts by default.
- Contacts to display to set what contacts that should be visible.
- Sort by to set in what order you sort and display your contacts. Select First name or Surname
- Import to copy contacts from/to phone, SIM card and shared memory.
- Export to export contacts from the phone to the shared memory.
- Blocked numbers handle the blacklist of phone numbers so that any phone number on your blacklist is blocked when calling or texting you.
- Press Add a number to add a number to list of blocked numbers.
- Press Block to confirm.
Press Unblock to remove.
- Set contact to Speed dial to set speed dial numbers to 0 and 2–9. Select the wanted speed dial number and add/replace/remove contacts.
Press and hold the corresponding key to speed dial.
- Delete all contacts to delete all contacts. Select the storage you want to delete the contacts from.
The assistance button can be used in two different modes, either the basic assistance mode or let the service Response by Doro handle it. With Response by Doro setup, relatives/helpers (Responder) can receive assistance alarm as well as check the status of the Doro phone and quickly assist with some basic phone settings via the smartphone app Response by Doro. See Response by Doro, p.26.
The assistance button (basic mode) allows easy access to contact your pre-defined help numbers should you need help. Make sure that the assistance function is activated and configured before use, enter recipients in the numbers list and edit the text message.

- Assistance to use the basic mode for the assistance button. To set up the feature, follow the descriptions in Assistance settings (basic mode), p.24.
- Response to use the service Response by Doro mode for the assistance button. To set up the service, follow the descriptions in Response by Doro, p.26.
Assistance settings (basic mode)
Make an assistance call

CAUTION
When an emergency call is activated the phone is pre-set to handsfree mode. Do not hold the device near your ear when the handsfree mode is in use, because the volume may be extremely loud.
- When help is needed, press and hold the assistance button for 3 seconds, or press it twice within 1 second.
The assistance call begins after a delay of 5 seconds. In this time you can prevent a possible false alarm by pressing.
- An assistance text message (SMS) is sent to all recipients.
- A positioning text message (SMS) is sent to all recipients.
- The first recipient in the list is called. If the call is not answered within 25 seconds, the next number is called. Calling is repeated 3 times or until the call is answered, or until is pressed.
Note! Some private security companies can accept automatic calls from their clients. Always contact the security company before using their phone number. Programming '999' into the assistance button is blocked.
Activation
Activate the assistance function using the assistance button.

- On normal to press and hold the button for approximately 3 seconds, or press it twice within 1 second.
• On (3) to press the button 3 times within 1 second.
- Off to disable the assistance button.
Number list
Add numbers to the list that is called when the assistance button is pressed.
IMPORTANT!
Always inform recipients in the numbers list that they are listed as your assistance contacts.
- Press Menu Settings Assistance Number list.
- Select Empty Manual to add names/numbers manually.
Alternatively, press Phonebook to add a contact from the phonebook.
- Press to confirm.
Tip: To edit or remove an existing entry, select it and make the change or press Delete.
Activate text messages (SMS)
A text message can be sent to the contacts in the numbers list when the assistance button is pressed.
- Press Menu Settings Assistance SMS.
- Set SMS switch to to activate the sending of the assistance message.
Note! It's helpful for the recipient of the assistance message if you include that it's an assistance alert and that it's from you.
Always inform recipients in the numbers list that they are listed as your assistance contacts.
Example: "This is an emergency message from John Smith."
Create assistance message
- Press Menu Settings Assistance SMS Message
- Press Edit and write the message.
- Press Save to save the message.

Note! There is no predefined message, so it's best if you write a personal message. Try to include that the it's an assistance alert and that it's from you.
Position SMS
This function sends a text message with the users position to the recipient in numbers list when an assistance call occurs. The message contains date, time, and the positioning information of the Doro 7080 user. If no position can be found the message contains the latest known position. The positioning message is sent after the editable assistance message, but before the assistance call sequence starts.
- Press Menu Settings Assistance Position SMS
- Set the switch to to activate the sending of the position message.
Signal type
Select the notification signal type for the assistance sequence.
- Press Menu Settings Assistance Signal type::→
• High to use loud signals (default).
- Low to use one low signal.
- Silent no sound indication, like a normal call.
Response by Doro
IMPORTANT!
You need an Internet connection to use this service. Contact your service provider for detailed data subscription costs before activating.
Before the assistance button can be used, the user of the Doro 7080 (called Senior) need at least one relative/helper (called Responder) that has created an account and connected with you.
The user of the Doro phone as well as the Responders (family and friends) needs to have an account for Response by Doro to use the service. A valid mobile phone number is needed to create a Response by Doro account
With 📋 Response by Doro setup, relatives/helpers (Responders) can receive assistance alarm as well as check the status of the Doro phone and
quickly assist with some basic phone settings, like sound and display settings, via the smartphone app Response.
There can be many helpers, but the first person that sets up an account and invites the Senior user will be the Admin for that Senior.
The Group of Responders can be just one Responder or several that can assist the Senior.
For the Responder
Download and install the app Response by Doro
Before you setup an account you need to download and install the app Response by Doro.
For iPhones For Android phones

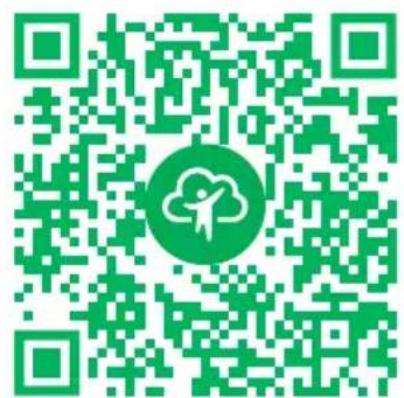
text_image
Green QR code with a circular logo containing a stylized human figure and cloud symbol in the center.
https://apps.apple.com/app/response-by-doro/id1437509312

text_image
GET IT ON
Google Play
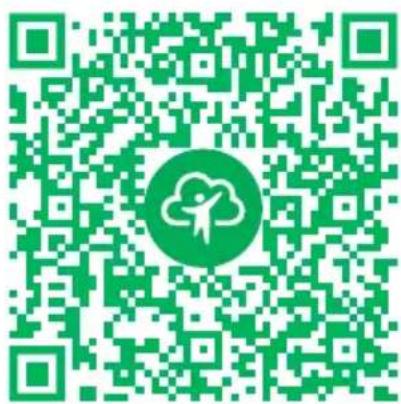
text_image
Green QR code with a circular logo containing a stylized human figure and cloud motif
https://play.google.com/store/apps/details?id=com.doro.apps.mydoro.relative
Create an account in the app Response by Doro
The first Responder that sets up an account and invites the Senior user will be the Admin for the Group of Responders.
- Start the app and grant the required privileges.
Note! If needed, you should also grant Response by Doro access when your phone is set to “Do Not Disturb”. Press back to return.
-
After a few short descriptions of the app, you need to agree with the terms and conditions for the service. Check the box and press Next.
-
Enter your mobile number and press Next.
- Enter your First name and Last name and press Next.
- You will receive a text message (SMS) shortly with an verification code. If you don't receive the message, make sure you have entered the correct number. Press Resend text to resent a the message.
- Your account has now been verified and now you should complete the set-up by inviting the Senior that you wish to be able to assist. See Add Senior, p.28.
Note! To help the Doro phone user remotely from a computer a Responder can also visit the web page www.mydoro.com.
The My Doro Manager helper application that is available through Play Store or App store is for older phone models and is NOT compatible with Doro 7080.
Add Senior
You should now complete the set-up by inviting the Senior that you wish to be able to assist. The Senior will receive an invitation text message/SMS explaining the service Response by Doro and how to set it up and accept your invitation. Always inform the Senior user that you will start the service as it will require actions from the Senior user also.
- Press Invite, or if you would like to add another Senior to assist, the press Add Senior.
- Find the wanted contact, change the name if wanted, then press Send.
- The Senior will receive an invitation text message/SMS explaining the service Response by Doro and how to accept your invitation. Press DONE.
For the senior

Accept the invitation on the Doro 7080
- You will receive an invitation via text message/SMS.
- Start the app Response and agree with the terms and conditions for the service. Check the box and press Next.
- Enter your mobile number and press Next.
-
You will receive a text message (SMS) shortly with a verification code. If you don't receive the message, make sure you have entered the correct number. Press Resend text to resent a the message.
-
Your account has now been verified and now you should complete the set-up by accepting the invitation.
- Press Open next to the name of the person who invited you and then Accept.
Senior and Responder are now connected and the Senior can make an alarm with the assistance button on the back of the Doro phone to test the service.
The Responder can now also use the app Response to check the status of the Doro phone and quickly assist with some basic phone settings, like sound and display settings.
Both the Senior and the Responder can now also invite more persons to act as Responders.
Messaging
Create and send text message (SMS)/picture message (MMS)
A text message (SMS) is a short text message that can be sent to other mobile phones. A picture message can contain text and media objects such as pictures, sound recordings and video. The settings for messaging are supplied by your service provider and can be sent to you automatically via text message.
- Press Menu Messaging New conversation.
- Press and select a recipient from your contacts.
Alternatively, enter number to add recipient manually.
Note! If you choose to add multiple recipients, you will be charged for each recipient.
- Go to the message field and write your message, see Enter text, p.12.
-
Press for more options:
-
Send to send the message
- Attach to select an attachment from:
- Pictures to add a picture from your library.
• Capture picture to use the camera to take a picture.
Note! If you add more than one picture, the following pictures are increasingly compressed by the phone (scaled down). This to allow you to send more pictures in one message. To keep best picture quality, send only one picture per message.
• Videos to add videos from your library.
• Capture video to use the camera to capture a video.
• Audio to add audio from your library.
• Record audio to record sound.
- Slideshow to make a slideshow.
- Contact to add a contact from your phonebook.
- Subject to enter a subject.
- Delete conversation to delete all messages in the selected conversation.
- When done, press to send the message.
Read and handle messages
Messages are grouped into message threads by contact. A thread can contain both text and multimedia messages.
- Press Menu Messaging.
- Select a message thread and press OK Press for the same options as described above.
- Select an individual message and press-for-more options:
• Detail to view the message details.
• Copy to copy the message.
- Forward to forward the message. Edit the message (if desired) and enter the recipient, then press to send.
- Delete to delete that individual message.
- Save attachment to save any attachment. Select: in the top right and press for options.
- Add to contact to save the number to a new or an existing contact.
Messaging options
Search
- Press Menu Messaging Search. →...→
- Enter a search phrase and press OK. The search phrase can be a contact or a message text.
Settings
Text message (SMS)
Request delivery report
You can select if you want the phone to notify you when your text message has reached the recipient.
Note! Contact your service provider for detailed subscription costs before activating.
-
Press Menu Messaging Settings Text message (SMS).
-
Check Request delivery report with to enable.
Manage SIM card messages
-
Press Menu Messaging Settings Text mes
sage (SMS) → Manage SIM card messages → select SIM card (if applicable):
-
View or delete messages saved on the SIM card.
SMS Service centre
Text messages requires a message center number, this is normally automatically set on your phone. The number can be obtained from the mobile carrier.
-
Press Menu Messaging Settings Text mes
sage (SMS) → select SIM card (if applicable) → SMS Service centre.
-
Enter the service center number.
- Press OK to confirm.
SMS storage location
Text messages requires a message center number, this is normally automatically set on your phone. The number can be obtained from the mobile carrier.
- Press Menu Messaging Settings next message (SMS) → select SIM card (if applicable) → SMS storage location.
- Select to save messages on Phone or SIM Card.
With Input method you can select to write your text messages with specia distinguishing language specific characters (Unicode) or to write with more simple characters. Unicode or Automatic allows special characters. Special characters takes up more space and the size of each message might be reduced to 70 characters. GSM alphabet converts any special character to plain alphabet characters, e.g. I becomes I. Each message can contain 160 characters.
- Press Menu Messaging Settings Next message (SMS) input mode.
- Select the input method:
• GSM alphabet to convert any special character to plain alphabet characters.
- Unicode to allow special characters, but each message will be limited to 70 characters.
• Automatic (default) to allow special characters if needed.
SMS Reminder
The reminder alerts you once if you haven't checked your messages within 10 minutes from receipt.
- Press Menu Messaging Settings Text message (SMS) SMS Reminder:
- Set the switch to to activate the reminder.
Check/unmark the functions as wanted.
- Press Menu Messaging Settings Multimedia message (MMS):
- Group messaging mark to allow to send multimedia messages (MMS) to multiple recipients.
Note! If you choose to add multiple recipients, you will be charged for each recipient.
- Request delivery report mark to be notified when your multimedia message has reached the recipient.
- Request read report mark to be notified when your multimedia message has been read by the recipient.
- Send read report to automatically send a read report to the sender.
• Auto-retrieve mark to automatically retrieve pictures, but only in home network.
- Roaming auto-retrieve mark to automatically retrieve pictures even when you are roaming.
IMPORTANT!
To receive and send picture messages (MMS) while roaming can be costly. Contact your service provider for data roaming rates before you use data roaming.
General
Cell broadcast
You can receive messages on various topics from your service provider, such as weather or traffic conditions in a particular region. For available channels and relevant channel settings, contact your service provider. Cell broadcast messages cannot be received when the device is roaming.
-
Press Menu Messaging Settings General
Cell broadcast select SIM card (if applicable).
-
Check Cell broadcast to activate the function.
- Press SIM card cell broadcast settings for more options:
• Language to select for what languages broadcast messages should be displayed.
- Add Channel to add a new channel to receive broadcast messages on. Set name, channel number and mark Enable the channel to activate it.
• Channel list to review your current list of channels.
Note! Not all operators have the cell broadcast messaging function activated in their network.
WAP Push messages
A WAP Push service is basically a specially encoded message which includes a link to a WAP address. On receiving a WAP Push, a WAP-enabled handset will automatically give the user the option to access the WAP content. When enabled, it directly opens the browser to display the WAP content, without user interaction.
- Press ☐ Menu → Messaging → ... → WAP Push messages:
- Set the switch to to activate the receiving of WAP Push messages.
Note! Not all operators have the WAP Push messaging function activated in their network.
WhatsApp
WhatsApp is a cross-platform messaging and Voice over IP (VoIP) service. The application allows you to send and receive text messages, voice calls, video calls, images and other media, documents, and user location. The service requires you to provide your mobile number. For more information, see www.whatsapp.com.
Facebook
Use Facebook to check you social network. For more information, see www.facebook.com.
Note! It's easier if you first set up an account for Facebook with a computer and then login to the service on the phone.
Camera
You can take photos, record videos and view your photos and videos using the camera menu.
To get sharp photos and videos, wipe the lens clean with a dry cloth.
- Press shortcut button 📄.
Alternatively press Menu Camera.
- Use / to switch between Photo and Video Mode.

Use to zoom in and out.
Note! Zoom may reduce picture quality.
- Press 📄 or the OK to take photo or start/stop video recording.
- Press for more options:
Note! Some options are only available in photo mode and some in video mode.
Go to Gallery
- The gallery displays all your taken photos and recorded videos. See more at Gallery, p.36.
Switch camera
- To switch between the front and the back camera.
Flash
• Auto to automatically use the flash/lamp depending on the surrounding light.
- Off to force the flash/lamp to off regardless of the surrounding light.
- On to force the flash/lamp to on regardless of the surrounding light.
Note! The flash setting made will remain until you change it.
Microphone
- Switch the microphone on or off when recording video.
Picture size/Video quality
- Set the level of quality for the photo/video. The higher, the better quality.
Note! Higher quality will consume more memory capacity.
Storage
• Phone to save pictures or videos on the phone memory.
• Memory Card to save pictures or videos on the memory card.
Note! This option is only available when a compatible external memory is inserted in the device. See Insert SIM card, memory card and battery, p.2.
- The photo/video is automatically saved if you don't decide to delete it.
Alarm
You can save up to 5 different alarms.
Note! The alarm will not work if the phone is turned off.
- Press

- Press Add new for a new alarm.
-
Select and set the different options:
-
Set the time for the alarm.
- Check Repeat to select what days the alarm should be active.
- Label to set a name for the alarm.
Snooze or turn off
- When the alarm goes off a signal will sound. Press Stop to turn off the alarm or press Snooze to repeat the alarm after 10 minutes.
Tip: Select an alarm and press to edit, enable or disable the alarm.
To delete an alarm, select the alarm and press delete to delete the alarm.
Gallery
View and manage your saved pictures and videos.
- Press Menu Media Gallery.
-
Press for folder/album options.
-
Switch to camera to open the camera to take more photos/videos.
-
Select album to select one or more folders/albums. Then press: for more options:
-
Share to share a folder/album. See more at Sharing content, p.11.
-
Delete to delete the selected folders/albums. Press OK to confirm.
-
Select a folder and press

-
Press for • picture/video options.
-
Switch to camera to open the camera to take more photos/videos.
- Slideshow to let the photos/videos be displayed in a slideshow.
- Select item to select one or more item. Then press: for more options:
• Share to share a folder/album. See more at Sharing content, p.11.
- Delete to delete the selected items. Press OK to confirm.
- Rotate left to rotate the selected items left.
- Rotate right to rotate the selected items right.
- Group by to group the photos. Select between Location and Time
- Select a photo/video and press

- Press for • picture/video options.
- Share to share a picture/video. See more at Sharing content, p.11.
- Rename to rename. Edit the name and press Done.
- Delete to delete the selected item. Press OK to confirm.
- Rotate left to rotate the selected item left.
- Rotate right to rotate the selected item right.
- Set picture as to use a photo as Wallpaper, Contact photo or WhatsApp profile photo.
• Details to view detailed information about the file, e.g. date, size, type.
Music
Use Music to play to different audio files, such as music or voice recordings.
- Press Menu Media Music.

- Select an audio file and press to play it or press for options.
• Now playing to open and show the audio file playing currently.
• Play all to play all audio files.
- Shuffle all to shuffle all audio files.
FM Radio
The FM Radio has a frequency range from 87.5 to 108.0 MHz. To listen to the radio you need to connect a compatible headset that works as antenna.
Turning the radio on/off
- Connect a headset to the headset socket.
- Press Menu Media FM Radio The radio is on. The tuned frequency is displayed. Pres to switch it off.
Tip: Press to return to standby mode. The radio will continue to play. Disconnecting the headset will turn off the radio.
Stations manual search
- Search station with orl.
- Fine tune manually with or.
Radio Stations
- Press Menu Media FM Radio Radio Stations. . . .
- The phone will automatically search for available radio stations.
- Press Refresh to again search for available radio stations.
- Select the station you want to listen to.
Loudspeaker
- Press Menu Media FM Radio loudspeaker...
- Use volume keys to adjust the sound volume.
- To turn off the speaker, press Headset.
Favourites
- Press Menu Media FM Radio
- Select a station and press...→ Add to favourite.
- Press Favourites to see your favourites.
Recorder
Use the sound recorder to record notes and messages.
- Press Menu Media Recorder.
- Press to start and to pause recording. Press when done.
- Press Save to save the recording. Press Discard to discard the recording.
- Press for the list of recordings and press to play the recording.
Recorder settings
- Press for options:
• Voice quality to set the recording quality.
Select between High, Mid and Low. High gives better quality, but consumes more memory space.
• Recording mode to set the most appropriate recording mode.
Videos
View and manage your saved pictures and videos.
- Press Menu Media Videos.
- Select a video and press to play it.
-
Press for video options. Select video and then press for more options:
-
Share to share a picture/video. See more at Sharing content, p.11.
- Delete to delete the selected items. Press OK to confirm.
- Details to view detailed information about the file, e.g. date, size, type.
Email
Create and send e-mail
IMPORTANT!
Using data services can be costly. We recommend that you check your data rates with your service provider.
You can send or receive e-mail messages using your an e-mail account. Your phone supports several types of e-mail accounts and allows you to have multiple e-mail accounts set up at one time. See Add and set up an email account, p.41 on how to setup your e-mail.
- Press Menu Email
-
Press > and then.
-
If you have more than one email account you can select from which account the message should be sent in the From field.
-
Select To and enter an e-mail address.
You will be provided suggested recipients from your phonebook and email history.
You can add multiple recipients.
Press > and then √ to add Cc (carbon copy) or Bcc (blind carbon copy) recipients.
-
Select Subject and enter a subject for the message.
-
Select the message field and write your message.
-
Press for the following options:
- Attach file to select different file types to attach.
- Press Send to send.
Note! You cannot send a message without a recipient.
- Save draft to save a message and finalise it later.
Note! To view a draft email message, press
- Discard to end the ongoing message composing.
- Settings to reach the email settings. See E-mail settings, p.41.
- Insert quick response to insert one of the predefined message texts.
Manage your emails
- Press Menu Email
- Select an email and press OK
-
Press for the following:
-
Delete to delete the message.
• Mark read/Mark unread to change the message reading status.
-
Move to to move the message to another folder.
-
Forward to forward the message.
• Reply to reply to the recipient in the address field.
- Reply all to reply to all recipients in the address field. This also includes recipients in the Cc field.
- You can also mark/unmark the star in the top right of the message to change status. Star mark your important messages to find them easier.
Press and hold on a message for further options.
Manage your Inbox and other email folders
- Press Menu Email
- Press to view other message folders like Sent, Drafts, etc.
You can also switch between accounts if you have more than one.
E-mail settings
Your phone supports several types of email accounts and allows you to have multiple e-mail accounts set up at one time. Before setting up an e-mail account, make sure you have the username (user ID), password, server name, etc., so you successfully can set up the account. You can use POP3, IMAP or Exchange ActiveSync to access your account.
- Press Menu Email
The first time you enter the email app you are requested to set up an email account. Enter your Email address, then press Next and continue from step 3 below.
Add and set up an email account
- Press Menu Email Settings.→...→
- Press Add account and enter the Email address and press Next.
- Enter your Password and press Next for the following options:.
- Sync frequency: to set how often your phone should check for new e-mails. The more often it's checked the more data is consumed and the quicker the battery is drained, but the quicker you get an email. If you set it to Never it will only check for new messages when you open the e-mail app.
- Notify me when emails arrive, mark to get notified when new email arrives.
- Sync emails from this account, mark to sync email from this account.
• Automatically download attachments when connected to Wi-Fi, mark to automatically download attachments.
Press Next when done
-
Your email account is now set up and you should finalise by:
-
Give this account a name (optional) to enter how the account should displayed in the phone.
- Your name (displayed on outgoing messages) to enter how you should be displayed at receivers of your emails.
Press Next when done.
More settings
Use the settings if you fail to login to your e-mail account or want to do more advanced settings. Contact your e-mail service provider for correct settings.
- Press Menu Email Settings → ... →
- Select General settings for some general settings.
- Select the wanted account for further settings related to that account.
- Select Add account to add further email accounts.
Note! Some e-mail accounts require you to change security settings before you are able to access the account from your new Doro phone. To avoid problems signing in, you may need to log-into your account with a computer and enable a security setting similar to “Allow less secure apps”. The setting might differ depending on e-mail provider.
Organiser
Calculator
The Calculator can perform basic mathematical operations.
- Press Menu Organizer Calculator.
- Enter the first number.
- Use the navigation key to select an operation (+, -, x, ÷).
-
Enter the next number.
-
Repeat steps 2–4 as necessary.
Calendar
Note! Calendar reminders will not work if the phone is turned off.
Add event
-
Press Menu Organizer Calendar.
-
Select a date and press for the following options:
• View to view events for day.
• New event, then enter your required information:
• Event name to enter a event name and other relevant text.
- Set the date.
- Set the time.
When done, press Done.
• View all to view events for day.
Note! Select an event and press...→ Edit to make changes on an existing event.
Calendar settings
Press Menu Organiser Calendar Settings


General settings:
• Show week number to display week numbers.
• Week starts on to set the day when the week should start.
- Default reminder time to set how long time in advance of an event that you should be reminded.
File manager
Manage the contents and properties of files. You can open, delete, move, copy and rename files.
- Press Menu Organizer File manager
- Select Internal shared storage or SD card and press OK.
- Select a folder, e.g. DCIM and press to open it.
- Select a file and press to open the file.
- Press to see the available options.
Notes
- Press Menu Organizer Notes.
- Press Add for a new note.
- Enter your note using the keypad, see Enter text, p.12.
- Press Save to save.

Tip: For more options select an existing note, and press.
Web browser
IMPORTANT!
This service requires an Internet connection. Using data services can be costly. We recommend that you check your data rates with your service provider.
Use the web browser
- Press Menu Browser.
- Navigate to the address field to type a web address.
Alternatively, press for more options.
Torch
- From idle screen, press 📋 Menu → Torch to turn it on.
- Press Off/On to turn it off/on.
Settings
Assistance settings
See Assistance button, p.23.
Network & Internet
Aeroplane mode
In Aeroplane mode you can't make or receive calls, surf the web or download emails, or do anything that requires an Internet connection, this is to prevent disturbance to sensitive equipment. You can still listen to music,
watch videos and other content, as long as all this content is saved on your memory card or internal storage.
When you take your phone abroad, you can keep it in flight mode. If you do that, there's no chance of data roaming charges, and you can still enable Wi-Fi. Enable Aeroplane mode when in areas with no network coverage to save battery since the phone repeatedly scans for available networks and this consumes power. You can be notified by alarms, if alarms are activated.
- Press 📋 Menu → Settings → Network & Internet → Aeroplane mode.
- Set the switch Aeroplane mode to to activate it. Set the switch to to deactivate.
Wi-Fi
Use Wi-Fi to connect your phone to the Internet instead of the mobile network. You may already have Wi-Fi in your home and it's often available at workplaces. Take advantage of free networks in coffee shops, hotels, trains and libraries. Connecting to the Internet with Wi-Fi doesn't incur additional data traffic costs, unless you have to pay to get on the wireless network. The only thing you have to do is to enter the Wi-Fi settings and configure an access point to connect your phone to the wireless network, enter pass word if applicable.
Activate Wi-Fi
- Press 📂 Menu → Settings → Network & Internet → Wi-Fi.
- Set the switch to to activate it. Set the switch to to deactivate.
Connect to available networks
- Press 📋 Menu → Settings → Network & Internet → Wi-Fi.
- If Wi-Fi is activated a list of available Wi-Fi networks will be displayed after a moment.
Note! If nothing is displayed although you know that there should be available networks, set the switch to off and then on again.
- Select your wanted network and press and enter the Password.
Note! Check Show password to see it in clear text.
- Press Advanced options if you need specific settings.
- Press Connect to connect.
A connected Wi-Fi network is displayed in the top of the list. Select it and press for connection details. Press Forget if it's an unwanted network, to disconnect from it and stop connecting to it automatically.
Connect to a network manually
You can also choose Add network to manually configure your network. This is usually done if the wireless network or SSID is hidden.
- Press 📄 Menu → Settings → Network & Internet → Wi-Fi.
- Press Add network to connect to a network with hidden SSID (Service Set Identifier).
- Enter the requested information needed to be able to connect. Press Save.
Wi-Fi preferences
- Press 📄 Menu → Settings → Network & Internet → Wi-Fi → Wi-Fi preferences:
• Install certificates to install and manage security certificates.
- WPS Push Button: First press the Wi-Fi Protected Setup button on your router. It may be called WPS or marked with this symbol
- WPS Pin Entry: Enter the given PIN code on the router/access point. The setup can take up to two minutes to complete.
Saved networks
View your saved networks. Select it and press OK. Press Forget if it's an unwanted network, to disconnect from it and stop connecting to it automatically.
Mobile network
You can see the active network operator. To change network operator, see Network operators, p.49.
Data roaming
Your phone automatically selects your (service providers) home network if within range. If not within range, you can use another network, provided
your network operator has an agreement that allows you to do so. This is called roaming. Contact your service provider for more information.
- Press 📋 Menu → Settings → Network & Internet → Mobile network → SIM card (if applicable).
- Set the switch Data roaming to to activate it or to deactivate.
IMPORTANT!
Using data services while roaming can be costly. Contact your service provider for data roaming rates before you use data roaming.
Preferred network type
Your phone automatically switches between the mobile networks that are available where you are. You can also manually set your phone to use a specific mobile network type. Different status icons are displayed in the status bar depending on the type of network that you are connected to.
-
Press 📋 Menu → Settings → Network & Internet → Mobile network select SIM card (if applicable) Preferred network type:
-
4G (recommended): to automatically switch for best service between 2G, 3G and 4G.
• 3G: to automatically switch for best service between 2G and 3G.
• 2G: for 2G service only.
IMPORTANT!
If you set your phone to use 2G or 3G, you will not be able to make any calls, including emergency calls, or use other features requiring a network connection, if the selected network type is unavailable.
Enhanced 4G LTE Mode
Set if voice calling over LTE network should be enabled or disabled. This menu is only visible if your service provider supports the feature.
- Press 📄 Menu → Settings → Network & Internet → Mobile network select SIM card (if applicable).
- Set the switch Enhanced 4G LTE Mode to activate it or to deactivate.
Note! Your network operator also needs to support this feature.
Wi-Fi calling
For improved voice communications over Wi-Fi.
-
Press 📄 Menu → Settings → Network & Internet → Mobile network → select SIM card (if applicable) → Wi-Fi calling.
-
Set the switch to on to activate it or to deactivate.
Note! Your network operator also needs to support this feature.
Access Point Names
An Access Point Name (APN) is the name of a gateway between a mobile network and another computer network, mostly the public Internet. The APN settings are used by services that communicates using other computer networks. The APN settings for most major service providers are already included from start. There are different APN settings for different services like message, data and AGPS.
Follow the steps below if your service provider's profile is not in the list of if you need to change any setting. Contact your service provider for correct settings.
-
Press 📄 Menu → Settings → Network & Internet → Mobile network → select SIM card (if applicable) → Access Point Names.
-
To change and existing APN profile, select a profile and press . If your service provider's profile is not in the list, press drew APN to enter settings for your service provider:
-
Name to enter a name for the APN.
• APN to enter the APN address.
- Proxy to enter HTTP proxy address.
- Port to enter HTTP proxy port.
- Username to enter user name.
- Password to enter password.
- Server to enter the server.
- MMSC to enter the MMSC.
• MMS proxy to enter MMS proxy address.
• MMS port to enter MMS proxy port.
- MCC to enter the operator MCC code.
-
MNC to enter the operator MNC code.
-
Authentication type to select the type of authentication to be used.
• APN type to enter the APN type.
• APN protocol to select the type of protocol to be used.
- APN roaming protocol to select the type of protocol to be used when roaming.
- APN enable/disable to set if these APN settings should be enabled/disabled.
-
Bearer to set the type of bearer.
• MVNO type to set the MVNO type.
• MVNO value to set the MVNO value.
-
Press...→ Save to save or Discard to return.
-
Select your new/modified profile's radio button and press to activate it.
You can also delete a profile by selecting one and press Delete APN.
Network operators
Your phone automatically selects the network operator that you have a subscription with. When roaming or if you otherwise have no signal you can try to manually select a network.
-
Press 📄 Menu → Settings → Network & Internet → Mobile network operators.
-
Wait for the list of operators and select the wanted operator or Choose automatically.
IMPORTANT!
If you select a network manually, your phone will lose network connection when the selected network is out of reach. Remember to set Choose automatically.
Data usage
Data Saver
You can reduce data usage by preventing some apps from sending or receiving data in the background. An app you're currently using can access
data, but may do so less frequently. This may mean, for example, that images don't display until you select them.
- Press 📋 Menu → Settings → Network & Internet → Data usage → Data Saver.
- Set the switch to on to activate it or to deactivate.
- Press Unrestricted data and set the switch to on for the apps that should have unrestricted data.
Note! If Data Saver is activated ⊕ is displayed in the status bar.
Mobile data
Use mobile data to access internet services and emails.
Note! If you have a Wi-Fi network setup and is available, that will always be the first choice for data communication.
IMPORTANT!
Using mobile data services can be costly. We recommend that you check your data rates with your service provider.
Enable/disable mobile data for services like software update. Select off to avoid data charges.
- Press 📋 Menu → Settings → Network & Internet → Data usage → select SIM card (if applicable)→ Mobile data.
- Set the switch to on to activate it or off to deactivate.
Mobile data usage
The Mobile data usage counter gathers traffic information from all apps using mobile data like internet browser, MMS and e-mail. You can keep track of the amount of data transferred to and from your device over the mobile network since last reset.
- Press 📋 Menu → Settings → Network & Internet → Data usage → select SIM card (if applicable) → Mobile data usage.
- See total mobile data usage as well as per app for the selected date interval shown on the top of the page.
- Press to set data notification limits and time periods.
Billing cycle
Set the data notification limits and time periods.
- Press 📋 Menu → Settings → Network & Internet → Data usage → select SIM card (if applicable) Billing cycle.
- Set the Set data warning switch to on to get a warning when you reached the mobile data usage limit of Data warning.
- Set the Set data limit switch to on to turn off mobile data when limit of Data limit is reached.
- Press Clear data usage to reset the mobile data usage counter and press Ok to confirm.
Wi-Fi data usage
See the data counters for Wi-Fi data traffic.
Press 📋 Menu → Settings → Network & Internet → Data usage →
Wi-Fi data usage.
Hotspot & tethering
IMPORTANT!
Using mobile data services can be costly. We recommend that you check your data rates with your service provider.
Allow other devices to share your phone's Internet connection by connecting via USB, Bluetooth or Wi-Fi. Internet sharing only works if you phone is connected to the Internet over the mobile data network and it will disable any existing Wi-Fi connection on the phone while active.
USB Tethering
Share your phone's Internet connection by connecting via USB cable. You must first connect the computer to the phone.
-
Press 📄 Menu → Settings → Network & Internet → Hotspot & tethering.
-
Set the USB Tethering switch to on to enable Internet sharing via the USB cable.
Note! The first time it might take some time before the connection is established.
Bluetooth tethering
Share your phone's Internet connection by connecting via Bluetooth. You must first establish the Bluetooth connection. See Bluetooth ^ p.54.
- Press 📄 Menu → Settings → Network & Internet → Hotspot & tethering.
- Set the Bluetooth tethering switch to on to enable Internet sharing via a Bluetooth connection.
Note! You must first establish the Bluetooth connection. See Bluetooth ^® , p.54.
Wi-Fi hotspot
Share your phone's Internet connection via Wi-Fi. If you want to change any setting, please do so before you turn on the feature.
IMPORTANT!
Always have the security turned on when your Wi-Fi hotspot is active to prevent unauthorized use of your internet connection. Turn off the Wi-Fi hotspot feature when you no longer need to share Internet access for other devices. When the feature is activated it will drain your phone's battery significantly.
- Press 📄 Menu → Settings → Network & Internet → Hotspot & tethering WiFi hotspot.
- Set the switch to on to enable Internet sharing via Wi-Fi.
- Press Keep Wi-Fi hotspot on to set if the Wi-Fi hotspot should automatically turn off after being idle for the set period of time:
• Always to have the Wi-Fi hotspot enabled until you manually turn it off.
- Turn off when idle for 5 min to automatically turn off after 5 minutes, if idle.
- Turn off when idle for 10 min to automatically turn off after 10 minutes, if idle.
- Press Set up Wi-Fi hotspot to set the configuration for the Wi-Fi hotspot:
• Network name to set the network name that will be shown to other devices. This is also called the SSID.
• Security to set the security type (always use WPA2 PSK if the connecting device supports it).
- Password: a password is used to prevent unauthorized access to your mobile network. This option is available only when the security type is WPA2(AES).
Note! Check Show password to see it in clear text.
- Press Save to confirm any changes.
-
Press WPS connect to connect to your phone using WPS:
-
Push button: First select this mode and the try to connect with the other device using WPS.
• PIN from client: Enter the given PIN code on the other device using WPS. The setup can take up to two minutes to complete.
Press Connect to initiate WPS connection.
- Below you can see connected and blocked devices.
Dual SIM settings
If you have more than one SIM card installed, you will be asked what SIM card to use. Here you can set the preferred SIM card for different types of mobile traffic.
- Press 📄 Menu → Settings → Network & Internet → Dual SIM settings.
- Set the switch to on for each SIM card slot you want enabled.
-
Select the preferred SIM card for the different types of mobile traffic.
-
Mobile data
- Calls
- Messaging
Reset Wi-Fi, mobile & Bluetooth
Here you can reset all network settings, including Wi-Fi, mobile data and Bluetooth settings.
- Press 📋 Menu → Settings → Network & Internet → Reset Wi-Fi, mobile & Bluetooth.
- Select SIM card if applicable and press Reset settings.
- Press Reset settings to confirm the reset.
Connected devices
Here you can see and control your connected devices.
Bluetooth®
IMPORTANT!
If you are not using Bluetooth connectivity, switch it off to save power. Do not pair with an unknown device.
Activate Bluetooth
- Press 📋 Menu → Settings → Connected devices → Bluetooth.
- Set the switch to on to enable.
Bluetooth settings
Visibility to other devices
Your phone is visible to other Bluetooth devices as long as you have the Bluetooth activated, the settings menu is open and the display is lit.
- Press 📋 Menu → Settings → Connected devices → Bluetooth.
- Keep the menu open and the display lit to make your device visible to other devices.
Device name
-
Press Menu Settings Connected devices Bluetooth → Device name.
-
DFC-0310 is displayed.
- Edit the new name.
- Press Rename to save and your new name should appear for other Bluetooth devices.
Received files
You can both send and receive files via Bluetooth. Here you can see the files received via Bluetooth. Files received via Bluetooth can also be displayed using the file manager, see File manager, p.43. Use the share function to send files via Bluetooth, see Sharing content, p.11.
- Press Menu Settings Connected devices Bluetooth → Received files.
- The files received via Bluetooth are displayed.
Paired devices
View already paired devices.
- Press Menu Settings Connected devices Bluetooth → Paired devices.
- See the list of paired devices. Select the device and press to connect/disconnect the device. When a device is connected the icons displayed in the status bar.
- Select the setting icon on a device from the list and press OK
• Name to edit the name of the paired Bluetooth device.
- Mark the type of service that should be enabled.
- Press OK to save changes.
- Press Forget to delete the device from the list of paired devices.
Pair new device
Search and pair available Bluetooth devices in your proximity.
-
Press Menu Settings Connected devices Bluetooth → Pair new device.
-
Make sure that the device you want to connect with is visible and in pairing mode.
- Wait for the search to display the wanted device to select it and press OK to connect. When connecting to another Bluetooth device you may need to enter a password or confirm a shared key.
Bluetooth address
Here you can see the Bluetooth address of your phone.
USB connection
USB storage is enabled by default and allows a computer or device connected using a USB-cable to access files on this phone. You can change that with the following settings.
- Press Menu Settings Connected devices USB.
- Set the wanted setting:
• Charge this device to only allow charging.
- Transfer files to allow access to the file system of the phone. Apple's Mac OS X doesn't include MTP support. Visit Android File Transfer to download a file transfer application for Mac OS X.
- Transfer photos (PTP) to appears to the computer as a digital camera. In this mode, your phone will work with digital camera applications that support PTP but not MTP. Apple's Mac OS X does support PTP, so you can use PTP mode to transfer photos to a Mac over a USB connection without any special software.
-
Use device as MIDI to connect the phone as a MIDI device (Musical Instrument Digital Interface is a technical standard that describes a communications protocol, digital interface, and electrical connectors that connect a wide variety of electronic musical instruments, computers, and related audio devices for playing, editing and recording music).
-
Press to confirm.
Battery
See your phone's battery status and activate power saving mode.
Standby intelligent power saving
Standby intelligent power saving helps to increase battery life by intelligently slow down processes to a minimum in idle mode.
- Press Menu Settings Battery.
- Set the switch Standby intelligent power saving to on to enable.
Note! This feature is by default turned on.
Battery saver
Once activated, the power saving mode, helps to increase battery life. The battery saver reduces your device's performance and limits vibration, location services, and most background data. Email, messaging, and other apps that rely on syncing may not update unless you open them. Battery saver turns off automatically when your device is charging. When activated, the status bar turns orange.
- Press Menu Settings Battery Battery saver
- Set the switch to on to manually activate it.
Turn on power saving mode automatically
Set the power saving mode to automatically start functioning when the battery level reaches a certain level.
- Press Menu Settings Battery Battery saver turn on automatically.

- Set at what remaining battery power level to automatically activate power saving mode.
Display
Main menu
You can select different styles for the main menu.
- Press Menu Settings Display Main menu:
- Select Grid or Single.
Navigation guides
The action-based navigation menu can be turned on/off.
-
Press Menu Settings Display. →→
-
Set the switch Navigation guides to off to disable.
Brightness level
You can adjust the brightness of the display.
- Press Menu Settings Display Brightness level.
- Set the brightness to comfortable level and press when done.
Note! The brighter the display is, the more batter power it will consume.
Wallpaper
- Press Menu Settings Display Wallpaper.
- Select wallpaper from:
• Wallpapers for predefined available wallpapers.
• Gallery for images available in your gallery.
Sleep
Select the delay time for the display backlight.
- Press Menu Settings Display Shep.
- Select the how long time the display lit.
- Press to confirm.
Font size
You can adjust the text size for the menu and messages.
- Press Menu Settings Display Port size.
- Select Normal or Large.
Colour inversion
Colour inversion exchanges colour values. For example, black text on a white screen becomes white text on a black screen.
-
Press Menu Settings Display Colour inversion.
-
Set the switch to on to enable this feature.
Block function
Select an app or function you want to block for usage.
- Press Menu Settings Display Block function.
- Select each app/function you want to disable and activate blocking with .
Sound
Volume C
Adjust the volume settings for various sounds on your device.
- Press Menu Settings Sound: →
- Select type of sound and use<>to adjust the volume.
• Media volume.
- Alarm volume.
- Ring volume.
- Press when done.
Audio setup
If you use a hearing aid or have hearing difficulties when using the device in a noisy environment, you can adjust the audio settings.
- Press Menu Settings Sound Audio setup.
• Normal for normal hearing in normal conditions.
• High for moderate hearing impairment or use in a very noisy environment.
• HAC mode for use with hearing aid.
- Press to confirm.
Note! Try different settings to find the one that suits your hearing the best.
Keypad tone
Select the sound you hear when you press the keys of the phone.
-
Press 📋 Menu → Settings → Sound → Keypad tone .
-
Select between
-
Silent
- Click
-
Tone
-
Press to confirm.
Vibrate for calls
Set to vibrate for incoming calls.
-
Press ☐ Menu → Settings → Sound → Also vibrate for calls.
-
Set the switch to on to enable this feature.
Ringtones and alerts
Select various ringtones and alerts on your device.
-
Press Menu Settings Sound.
-
Select the sound to set and select one of the available melodies, the melody will be played.
-
SIM1 Phone ringtone to set the ringtone for incoming calls on SIM1.
- SIM2 Phone ringtone to set the ringtone for incoming calls on SIM2.
- Default notification sound to set the tone for new notifications.
-
Default alarm sound to set the alarm tone.
-
Press to confirm.
Storage
View how much space is used by each category of files. See also File manager, p.43.
Calls
Set Open to answer to on to answer incoming calls by opening the phone.
- Press Menu Settings Calls Answer mode Open to answer:
- Enable the switch to answer incoming calls by opening the phone.

Security & location
Passwords
Change phone code
-
Press 📄 Menu → Settings → Security & location → Passwords → Phone code.
-
Enter current code and press OK.
-
Enter new code and press OK.
-
Confirm new code and press OK.
Note! The default phone code is 1234 and is used for e.g. resetting the phone.
Screen lock
The phone lock protects your phone from unwanted usage. When the phone is locked, the selected unlock method is needed. If PIN is selected, you also need to enter the PIN after restart of the phone.
-
Press 📄 Menu → Settings → Security & location → Screen lock.
-
Select the type of lock you want:
-
None: no lock. This option gives no security.
- Keypad lock: to unlock by first pressing the Options key • • • then *. This option gives very limited security.
- PIN: to unlock you type a PIN. A PIN consists of numbers only. Enter four numbers, and then Next to confirm the PIN. Press OK to confirm. This option gives medium security.
Automatically lock
The phone automatically locks after the set time period.
- Press 📄 Menu → Settings → Security & location → Automatically lock.
- Select after what time the phone automatically locks.
- Press to confirm.
Location
Global Positioning System (GPS) and additional supplemental information such as Wi-Fi and mobile networks are used to approximate your location. Location data may be used by apps and services, such as assistance calls.

CAUTION
If you turn off location, services such as assistance location cannot access your location information.
- Press 📄 Menu → Settings → Network & Internet → Location.
- Enable the switch to enable location positioning.
Mode
The GPS is quite battery consuming. If you want to reduce the battery consumption you can set Mode to Battery saving.
- Press 📄 Menu → Settings → Network & Internet → Location.
- Enable the switch to enable location positioning.
Select mode:
- High accuracy: for best location accuracy. This uses every service available: GPS, Wi-Fi, Bluetooth, and/or mobile networks in whatever combination available. This is quite battery consuming.
- Battery saving: to reduce battery consumption by disabling GPS. This mode uses less battery-intensive location sources (Wi-Fi, Bluetooth, and/or nearby mobile) to figure out where you are using location services. This will not be as accurate as using GPS.
• Device only: this mode relies solely on the GPS. This means it will work in places where you won't find enough Wi-Fi, cellular towers, and Bluetooth beacons to get a proper location.
SIM card lock
-
Press 📄 Menu → Settings → Security & location → SIM card lock select SIM card (if applicable).
-
Set the switch to activate the PIN code. You need to enter the PIN code every time the phone is started.
- Set the switch to deactivate the PIN code.
IMPORTANT!
If you deactivate the PIN code and the SIM card is lost or stolen it is unprotected and must be blocked by your service provider.
- Press Change SIM PIN to change you SIM PIN code.
- Enter the old PIN and press OK.
- Enter new PIN and press OK. Enter new PIN again and select OK once more. When done, SIM PIN changed successfully will appear.
Start-up Wizard
You can run the start-up wizard anytime you want.
Press Menu Settings Start-up Wizard and select the subject you want to change.
Tutorials
Here are some useful tutorials for various features.
Press Menu Settings Tutorials
Your service provider can provide some various value-added services.
Press 📋 Menu → Settings → SIM Toolkit → select SIM card (if applicable) for the provided services.
System
The default language for the phone menus, messages, etc. is determined by the SIM card. You can change this to any other language supported by the phone.
- Press 📋 Menu → Settings → System → Languages & input → Languages.
- Select a language.
Predictive text
- Press 📋 Menu → Settings → System → Languages & input → Predictive text.
- Set Predictive text on/off with .
Date & time
Tip: The phone is set to automatically update time and date according to current time zone. To turn off, select Date & time → Automatic date & time → Automatic update of date and time does not change the time you have set for the alarm clock or the calendar. They are in local time. Updating may cause some alarms you have set to expire depending on network support and subscription.
Set the time and date
- Press Menu Settings System Date & time.
• Automatic date & time, set to off to manually set the date and time.
• Automatic time zone, set to off to manually set the time zone.
- Set date to enter the date.
- Set time to enter the time.
- Select time zone to select your current time zone.
• Use 24-hour format set to off for 12-hour or on for 24-hour time format.
Software update
When a new system software is available, a notification message is shown. Press Software update → Check for updates to manually check if there's a software update available and perform it. Select it to start downloading. The download time may vary depending on Internet connection. We recommend that you always update your device to the latest software version to get optimal performance and the latest enhancements. You need to have a working data connection to be able to perform the update with the firmware over-the-air (FOTA) service. See Mobile network, p.46 or Wi-Fi, p.45 on how to activate a data connection.
-
Press Menu Settings System Software update.
-
Press Check for updates to manually check if there's a software update available.
- Press Settings for software update settings:
• Automatically check for update to set how often the phone automatically should check for new updates.
- Updates via Wi-Fi only, to only allow update packages to be downloaded over Wi-Fi network.
- Allow automatic download over Wi-Fi network to allow update packages to be downloaded automatically
Reset options
DRM reset
Digital Rights Management (DRM) is a management systems used to control how users access premium content. To be able to play files with DRM protection, you need the corresponding license. Here you can delete all licenses on this device.
- Press Menu Settings System Reset options DRM reset.

- Press OK to delete all the licenses on this device.
Reset app preferences
- Press Menu Settings System Reset options Reset app preferences.

- Press Reset apps to reset all preferences for: disabled apps, disabled app notifications, default applications for actions, background data restrictions for apps and any permission restrictions. You will not lose any app data.
Erase all data (factory reset)
- Press Menu Settings System Reset options Erase all data (factory reset).

- Press Reset phone to delete all data from your phone's internal storage, including: accounts, system and app data and settings, music, photos, videos and other user data (SIM card and memory card are not affected).
- Press Erase everything to confirm and continue to delete all your personal information.
Note! This action cannot be undone!
- Enter the phone code and press OK.
Tip: The default phone code is 1234.
Scheduled power on & off
Here you can set how to turn on and turn off your phone without press in the power button.
- Press Menu Settings System Reset options
Scheduled power on & off.

- Press On or Off for the following options.
• Time to set the time when the phone should be turned On or Off.
- Check Repeat to select what days the setting should be valid for.
- Press Done to confirm.
About phone
See information regarding your phone.
-
Press Menu Settings System About phone:
-
Status: to see the status for various items on your phone.
- Model: to see the model number.
• Build number: to see the build number.
- Custom build version: to see the custom build version.
Additional functions
Display status symbols
 | Signal strength | No network coverage |
 | Alarm active Data saver activated | |
 | Vibration only | Battery level |
 | Silent | Call divert activated |
 | Voicemail message received | Bluetooth on |
 | Notification (missed call, new message, etc...) | Bluetooth connected |
 | Headset connected | Aeroplane mode activated |
Display main symbols
 | Charger connected Charger | removed |
 | Error | ? Query |
 | Warning | √ Done (confirmed) |
 | Processing, please wait Battery level low |
 | Assistance button call | |
Safety instructions

CAUTION
The unit and the accessories can contain small parts. Keep all of the equipment out of the reach of small children.
The mains adapter is the disconnect device between the product and mains power. The mains socket outlet must be close to the equipment and easily accessible.
Network services and costs
Your device is approved for use on the 4G LTE FDD 1 (2100), 3 (1800), 7 (2600), 8 (900 MHz), 20 (800) MHz, WCDMA 1 (2100), 8 (900), 2 (1900) MHz, GSM 900/1800/1900 MHz networks. To use the device, you need a subscription with a service provider.
Using network services may result in traffic costs. Some product features require support from the network, and you may need to subscribe to them.
Operating environment
Follow the rules and laws that apply wherever you are, and always turn off the unit when ever its use is prohibited or can cause interference or hazards. Only use the unit in its normal user position.
Parts of the unit are magnetic. The unit can attract metal objects. Do not keep credit car or other magnetic media near the unit. There is a risk that information stored on them can be erased.
Medical units
The use of equipment that transmits radio signals, for example, mobile phones, can interfere with insufficiently protected medical equipment. Consult a doctor or the manufacturer of the equipment to determine if it has adequate protection against external radio signals, or if you have any questions. If notices have been put up at health care facilities instructing you to turn off the unit while you are there, you should comply. Hospitals and other health care facilities sometimes use equipment that can be sensitive to external radio signals.
Implanted medical devices
To avoid potential interference, manufacturers of implanted medical devices recommend a minimum separation of 15 cm between a wireless device and the medical device. Persons who have such devices should:
• Always keep the wireless device more than 15 cm from the medical device.
- Should not carry the phone in a breast pocket.
- Hold the wireless device to the ear opposite the medical device.
If you have any reason to suspect that interference is taking place, turn the phone off immediately. If you have any questions about using your wireless device with an implanted medical device, consult your health care provider.
Areas with explosion risk
Always turn off the unit when you are in an area where there is a risk of explosion. Follow all signs and instructions. There is a risk of explosion in places that include areas where you are normally requested to turn off your car engine. In these areas, sparks can cause explosion or fire which can lead to personal injury or even death.
Turn off the unit at filling stations, and any other place that has fuel pumps and auto repair facilities.
Follow the restrictions that apply to the use of radio equipment near places where fuel is stored and sold, chemical factories and places where blasting is in progress.
Areas with risk for explosion are often – but not always – clearly marked. This also applies to below decks on ships; the transport or storage of chemicals; vehicles that use liquid fu (such as propane or butane); areas where the air contains chemicals or particles, such as grain, dust or metal powder.
Li-Ion battery
This product contains a Li-Ion battery. There is a risk of fire and burns if the battery pack handled improperly.

WARNING
Danger of explosion if battery is incorrectly replaced. To reduce risk of fire or burns, do not disassemble, crush, puncture, short external contacts, expose to temperature above 60^ C ( 140^ F), or dispose of in fire or water. Never use a damaged or swollen battery. Take it to a service point or to your telephone retailer for inspection before continuing to use it. A damaged or swollen battery may present a risk of fire, explosion or leakage or other risk. Recycle or dispose of used batteries according to the local regulations or reference guide supplied with your product.
Protect your hearing
This device has been tested to comply with the Sound Pressure Level requirement laid down in the applicable EN 50332-1 and/or EN 50332-2 standards.


WARNING
Excessive exposure to loud sounds can cause hearing damage. Exposure to loud sounds while driving may distract your attention and cause an accident. Listen to a headset at a moderate level, and do not hold the device near your ear when the loudspeaker is in use.
Emergency calls
IMPORTANT!
Mobile phones use radio signals, the mobile phone network, the terrestrial network and user-programmed functions. This means that connection cannot be guaranteed in all circumstances. Therefore, never rely only on a mobile phone for very important calls such as medical emergencies.
GPS/Location based functions
Some products provide GPS/Location based functions. Location determining functionality is provided “As is”. No representation or warranty are made as to the accuracy of such location information. Use of location-based information by the device may not be uninterrupted or error free and may additionally be dependent on network service availability. Please note that functionality may be reduced or prevented in certain environments such as building interiors or areas adjacent to buildings.

CAUTION
Do not use GPS functionality in a manner which causes distraction from driving.
Vehicles
It is your responsibility to drive your vehicle safely. Never use your handheld device while driving, if it is prohibited by law.
If you must make or answer a call, stop your vehicle at a safe location first.
Radio signals can affect electronic systems in motor vehicles (for example, electronic fuel injection, ABS brakes, automatic cruise control, air bag systems) that have been incorrectly installed or are inadequately protected. Contact the manufacturer or its representative for more information about your vehicle or any additional equipment.
Do not keep or transport flammable liquids, gases or explosives together with the unit or its accessories. For vehicles equipped with air bags: Remember that air bags fill with air with considerable force.
Do not place objects, including fixed or portable radio equipment in the area above the airbag or the area where it might expand. Serious injuries may be caused if the mobile phone equipment is incorrectly installed and the airbag fills with air.
It is prohibited to use the unit in flight. Turn off the unit before you board a plane. Using wireless telecom units inside a plane can pose risks to air safety and interfere with telecommunications. It may also be illegal.
Protect your personal data
Protect your personal data and prevent leakage or misuse of sensitive information
- While using your device, be sure to back up important data.
- When disposing of your device, back up all data and then reset your device to prevent misuse of your personal information.
- Carefully read the permissions screen when downloading applications. Be particularly cautious with applications that have access to many functions or to a significant amount of your personal information.
- Check your accounts regularly for unapproved or suspicious use. If you find any sign of misuse of your personal information, contact your service provider to delete or change your account information.
- In the event your device is lost or stolen, change the passwords on your accounts to protect your personal information.
- Avoid using applications from unknown sources and lock your device with a pattern, password, or PIN.
Malware and viruses
To protect your device from malware and viruses, follow these usage tips. Failure to do so may result in damages or loss of data that may not be covered by the warranty service.
- Do not download unknown applications.
- Do not visit untrusted websites.
- Delete suspicious messages or email from unknown senders.
- Set a password and change it regularly.
- Deactivate wireless features, such as Bluetooth, when not in use.
- Do not edit registry settings or modify the device's operating system.
- If the device behaves abnormally, run an antivirus program to check for infection.
- Run an antivirus program on your device before you launch newly-downloaded applications and files.
Care and maintenance
Your unit is a technically advanced product and should be treated with the greatest care. Negligence may void the warranty.
- Protect the unit from moisture. Rain, snow, humidity, and all types of liquids can contain substances that corrode the electronic circuits. If the unit gets wet, you should immediately power off the phone, remove the battery and allow the unit to dry completely before you replace it.
- Do not use or keep the unit in dusty, dirty environments. The unit's moving parts and electronic components can be damaged.
- Do not keep the unit in warm places. High temperatures can reduce the lifespan for electronic equipment, damage batteries and distort or melt certain plastics.
- Do not keep the unit in cold places. When the unit warms up to normal temperature, condensation can form on the inside and can damage the electronic circuits.
- Do not try to open the unit in any other way than that which is indicated here.
- Do not drop or shake the unit. If it is treated roughly the circuits and precision mechanics can be broken.
- Do not use strong chemicals to clean the unit.
- Do not disassemble, open, crush, bend, deform, puncture or shred.
- Do not modify or remanufacture, attempt to insert foreign objects into the battery, immerse or expose to water or other liquids, expose to fire, explosion or other hazard.
- Only use the battery for the system for which it is specified.
- Only use the battery with a charging system that has been qualified with the system per IEEE-Std-1725. Use of an unqualified battery or charger may present a risk of fire explosion, leakage, or other hazard.
- Do not short circuit a battery or allow metallic conductive objects to contact battery terminals.
- Replace the battery only with another battery that has been qualified with the system per this standard, IEEE-Std-1725. Use of an unqualified battery may present a risk of fire, explosion, leakage or other hazard.
- Never use a damaged or swollen battery. Take it to a service point or to your telephone retailer for inspection before continuing to use it. A damaged or swollen battery may present a risk of fire, explosion or leakage or other risk.
- Promptly dispose of used batteries in accordance with local regulations.
- Battery usage by children should be supervised.
- Improper battery use may result in a fire, explosion or other hazard.
For devices that utilize a USB port as a charging source, the device's user manual shall include a statement that the device shall only be connected to CTIA certified adapters, products that bear the USB-IF logo or products that have completed the USB-IF compliance program.
The advice applies to the unit, battery, power adapter and other accessories. If the phone is not working as it should, please contact the place of purchase for service. Don't forget the receipt or a copy of the invoice.
Warranty
This product is guaranteed for a period of 24 months and for original accessories for a period of 12 months (such as the battery, charger, charging cradle or handsfree kit) which may be delivered with your device, from the date of purchase. In the unlikely event of a fault occurring during this period, please contact the place of purchase. Proof of purchase is required for any service or support needed during the guarantee period.
This guarantee will not apply to a fault caused by an accident or a similar incident or damage, liquid ingress, negligence, abnormal usage, non-maintenance or any other circumstances on the user's part. Furthermore, this guarantee will not apply to any fault caused by a thunderstorm or any other voltage fluctuations. As a matter of precaution, we recommend disconnecting the charger during a thunderstorm.
Please note that this is a voluntary manufacturer's warranty and provides rights in addition to, and does not affect statutory rights of end-users.
This guarantee does not apply if batteries other than DORO original batteries are used.
Device OS software warranty
By using the device, you accept to install any OS software updates provided by Doro, at earliest possibility after notification.
By updating your device, you help to maintain your device secure.
Doro will keep updates available for the duration of the guarantee/ statutory warranty period, providing that this is possible from a commercial and technical perspective.
Your device checks for available software updates automatically. Please follow the on-screen instructions when you are notified of an OS software update.
Please note:
- In some cases, regular OS upgrades may cause delays to planned security updates.
- Doro will always do our best to deliver the security updates at earliest possible time to applicable models. Delivery time of security patches may vary depending on the regions, S/W variants and models.

CAUTION
If you neglect to update your device after being notified, it may void your guarantee of the device. For software information and planned update schedule, refer to website: doro.com/softwareupdates
Specifications
Network bands (MHz):
| 2G GSM | 900, 1800, 1900 |
| 3G UMTS | 1 (2100), 2 (1900), 8 (900) |
| 4G LTE FDD | 1 (2100), 3 (1800), 7 (2600), 8 (900), 20 (800) |
| Wi-Fi (MHz): | WLAN IEEE 802.11 b/g/n, (2412 - 2472) |
| Bluetooth (MHz): | 4.2, (2402 - 2480) |
| GPS receiver: | Category 3 |
| Operating system: | DorOS |
| SIM card size: | nano-SIM () |
| Dimensions | 109 mm x 57 mm x 21 mm |
| Weight | 130 g (including battery) |
| Battery | 3.7 V / 1350 mAh Li-ion battery |
| Operating ambient temperature | Min: 0°C (32°F)Max: 40°C (104°F) |
| Charging ambient temperature | Min: 0°C (32°F)Max: 40°C (104°F) |
| Storage temperature | Min:-20°C (-4°F)Max: 60°C (140°F) |
Copyright and other notices
Bluetooth ^® is a registered trademark of Bluetooth SIG, Inc.
vCard is a trademark of the Internet Mail Consortium.
eZiType ^™ is a trademark of Zi Corporation.
Wi-Fi is a trademark or a registered trademark of the Wi-Fi Alliance.
microSD is a trademark of SD Card Association.
Java, J2ME and all other Java-based marks are trademarks or registered trademarks of Sun Microsystems, Inc. in the United States and other countries.
The contents of this document are provided "as is". Except as required by applicable law, no warranties of any kind, either express or implied, including, but not limited to, the implied warranties of merchantability and fitness for a particular purpose, are made in relation to the accuracy, reliability or contents of this document. Doro reserves the right to revise this document or withdraw it at any time without prior notice.
Google, Google Maps™, Gmail, Google Calendar, Google Checkout, Hangouts, YouTube, the YouTube logo, Picasa and Android are trademarks or registered trademarks of Google LLC.
This product is licensed under the MPEG-4 visual and AVC patent portfolio licenses for the personal and noncommercial use of a consumer for (i) encoding video in compliance with the MPEG-4 visual standard ("MPEG-4 video") or the AVC standard ("AVC video") and/or (ii) decoding MPEG-4 or AVC video that was encoded by a consumer engaged in a personal and non-commercial activity and/or was obtained from a video provider licensed by MPEG LA to provide MPEG-4 and/or AVC video. No license is granted or shall be implied for any other use. Additional information including that relating to promotional, internal and commercial uses and licensing may be obtained from MPEG LA, L.L.C. See www.mpegla.com. MPEG Layer-3 audio decoding technology licensed from Fraunhofer IIS and Thomson.
Other product and company names mentioned herein may be the trademarks of their respective owners.
Any rights not expressly granted herein are reserved. All other trademarks are property of their respective owners.
To the maximum extent permitted by applicable law, under no circumstances shall Doro or any of its licensors be responsible for any loss of data or income or any special, incidental, consequential or indirect damages howsoever caused.
Doro does not provide a warranty for or take any responsibility for the functionality, content, or end-user support of third-party apps provided with your device. By using an app,
you acknowledge that the app is provided as is. Doro does not make any representations, provide a warranty, or take any responsibility for the functionality, content, or end-user support of third-party apps provided with your device.
Content copyright
The unauthorised copying of copyrighted materials is contrary to the provisions of the Copyright Laws of the United States and other countries. This device is intended solely for copying non-copyrighted materials, materials in which you own the copyright, or materials which you are authorised or legally permitted to copy. If you are uncertain about your right to copy any material, please contact your legal advisor.
Open source licenses
You are entitled to receive a copy of the source code of software licensed under an open source license that gives you the right to receive the source code for that software (for example GPL or LGPL) to you on an appropriate media, against an administrative fee covering Doro AB's cost for handling the distribution and costs for media. Please direct such request to Doro AB, Open Source Software Operations, Jorgen Kocksgatan 1B, SE 211 20 Malmö, Sweden. To be valid, such a request must be made within three (3) years from the date of the distribution of this product by Doro AB, or in the case of code licensed under the GPL v3 for as long as Doro AB offers spare parts or customer support for this product model.
Hearing aid compatibility
Note! For hearing aid compatibility, turn off Bluetooth connectivity.
This phone is hearing aid compatible. Hearing aid compatibility is not a guarantee that a specific hearing aid will work with a specific phone. Mobile phones contain radio transmitters that may interfere with hearing aid performance. This phone has been tested for use with hearing aids, for some of the wireless technologies that it uses, but there may be some newer wireless technologies that have not been tested yet for use with hearing aids. To ensure that a specific hearing aid works well with this phone, test them together before making a purchase.
The standard for hearing aid compatibility contains two types of ratings:
- M: To use your hearing aid in this mode, make sure that your hearing aid is set to "M-mode" or acoustic coupling mode, and position the phones receiver near the hearing aid's built-in microphone. For the best results, try using the phone in different positions relative to your hearing aid—for example, placing the receiver slightly above the ear may result in better performance for hearing aids with microphones positioned behind the ear.
- T: To use your hearing aid in this mode, make sure that your hearing aid is set to "T-mode" or telecoil coupling mode (not all hearing aids have this mode). For the best results, try using the phone in different positions relative to your hearing aid—for example, placing the receiver slightly below or in front of the ear may result in better performance.
Your device meets the M4/T4 level rating.
Specific Absorption Rate (SAR)
This device meets applicable international safety requirements for exposure to radio waves. Your mobile device is a radio transmitter and receiver. It is designed not to exceed the limits for exposure to radio waves (radio frequency electromagnetic fields) recommended by international guidelines from the independent scientific organization ICNIRP (International Commission of Non-Ionizing Radiation Protection).
The World Health Organization (WHO) has stated that current scientific information does not indicate the need for any special precautions when using mobile devices. If you are interested in reducing your exposure, they recommend you reduce your usage or use a hands-free accessory to keep the device away from your head and body.
For information about SAR (Specific Absorption Rate) values for your device, please read the documentation provided together with your device.
Correct disposal of this product

(Waste Electrical & Electronic Equipment)
(Applicable in countries with separate collection systems)
This marking on the product, accessories or manual indicates that the product and its electronic accessories (e.g. charger, headset, USB cable) should not be disposed of with other household waste. To prevent possible harm to the environment or human health from uncontrolled waste disposal, please separate these items from other types of waste and recycle them responsibly to promote the sustainable reuse of material resources. Household users should contact either the retailer where they purchased this product, or their local government office, for details of where and how they can take these items for environmentally safe recycling. Business users should contact their supplier and check the terms and conditions of the purchase contract. This product and its electronic accessories should not be mixed with other commercial wastes for disposal. This product is RoHS compliant.
Correct disposal of batteries in this product
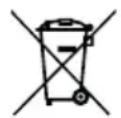
(Applicable in countries with separate collection systems)
The marking on the battery, manual or packaging indicates that the battery in this product should not be disposed of with other household waste. Where marked, the chemical symbols Hg, Cd or Pb indicate that the battery contains mercury, cadmium or lead above the reference levels in EC Directive 2006/66. If batteries are not properly disposed of, these substances can cause harm to human health or the environment.
To protect natural resources and to promote material reuse, please separate batteries from other types of waste and recycle them through your local, free battery return system
Hereby, Doro declares that the radio equipment type DFC-0310 (Doro 7080) is in compliance with Directives: 2014/53/EU and 2011/65/EU including delegated Directive (EU) 2015/863 amending Annex II. The full text of the EU declaration of conformity is available at the following internet address: www.doro.com/dofc.
Ecodesign declaration, energy efficiency for external power supply
Hereby, Doro declares the external power supply for this device is in compliance with Commission Regulation (EU) 2019/1782 regarding ecodesign requirements for external power supplies pursuant to Directive 2009/125/EC.
The full information regarding the ecodesign requirements is available at the following internet address: www.doro.com/ecodesign
Hereby, Doro declares that the radio equipment type DFC-0310 (Doro 7080) is in compliance with the relevant UK legislation.
The full text of the UK declaration of conformity is available at the following internet address: www.doro.com/dofc
English
Version 3.0


