RSB 10 - Fixation murale Fischer - Notice d'utilisation et mode d'emploi gratuit
Retrouvez gratuitement la notice de l'appareil RSB 10 Fischer au format PDF.

| Type de produit | Système de scellement chimique pour fixation murale |
| Marque | Fischer |
| Modèle | RSB 10 |
| Catégorie | Fixation murale |
| Matériau | Acier zingué (tige filetée), résine synthétique (cartouche) |
| Diamètre de tige | M10 (10 mm) |
| Profondeur d'ancrage standard | 90 mm |
| Diamètre de perçage | 12 mm |
| Support admissible | Béton fissuré et non fissuré |
| Température d'application | -20 °C à +40 °C |
| Température de stockage | Lieu frais et sec |
| Durcissement à +20 °C | 20 minutes |
| Durcissement à -10 °C | 30 heures |
| Charge maximale recommandée | Jusqu'à 20 kN (selon configuration) |
| Méthode de perçage | Marteau perforateur ou forage diamanté |
| Nettoyage du trou | Air comprimé, brosse, pompe manuelle |
| Outillage nécessaire | Pistolet à air comprimé, brosse adaptée, adaptateur SDS |
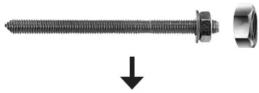
| Consommables inclus | Cartouche de résine RSB 10, tige filetée M10 |
| Numéro d'article | 518821 (standard) |
| Garantie | 2 ans (sous réserve des conditions d'installation) |
FOIRE AUX QUESTIONS - RSB 10 Fischer
Questions des utilisateurs sur RSB 10 Fischer
0 question sur cet appareil. Repondez a celles que vous connaissez ou posez la votre.
Poser une nouvelle question sur cet appareil
Téléchargez la notice de votre Fixation murale au format PDF gratuitement ! Retrouvez votre notice RSB 10 - Fischer et reprennez votre appareil électronique en main. Sur cette page sont publiés tous les documents nécessaires à l'utilisation de votre appareil RSB 10 de la marque Fischer.
MODE D'EMPLOI RSB 10 Fischer
RSB


| mm | d_o | h_ef | d_b | T_inst,max | 1 x2 x | RSB | ||
| RSB Art. No. | ||||||||
| RG M | M8 0 10 mm | 80 mm 11 | 10 1 x RB 8 518807 | |||||
| M10 0 12 mm | 75 mm 14 | 20 1 x RB 10 mini 518820 | ||||||
| 90 mm 14 | 20 1 x RB 10 518821 | |||||||
| 150 mm 14 | 20 2 x RB 10 mini 518820 | |||||||
| M12 0 14 mm | 75 mm 16 | 40 1 x RB 12 mini 518822 | ||||||
| 110 mm 16 | 40 1 x RB 12 518823 | |||||||
| 150 mm 16 | 40 2 x RB 12 mini 518822 | |||||||
| M16 0 18 mm | 95 mm 20 | 60 1 x RB 16 mini 518824 | ||||||
| 125 mm 20 | 60 1 x RB 16 518825 | |||||||
| 190 mm 20 | 60 2 x RB 16 mini 518824 | |||||||
| M20 0 25 mm | 170 mm 27 | 120 1 x RB 20 518827 | ||||||
| 210 mm 27 | 120 1 x RB 20 E / 24 518828 | |||||||
| M24 0 28 mm | 210 mm 30 | 150 1 x R$B 20 E / 24 518828 | ||||||
| M30 0 35 mm 280 mm | 40 300 1 x RSB 30 518829 | |||||||

text_image
Technical diagram illustrating a mechanical assembly with numbered components and cross-sectional views
flowchart
graph TD
    A["1"] --> B["2"]
    B --> C["3"]
    C --> D["4a"]
    C --> E["4b"]
    D --> F["5"]
    E --> G["6"]
    F --> H["7"]
    G --> H
    H --> I["T100"]
| -30 ~ -20 | -19 ~ -15 | -14 ~ -10 | -9 ~ -5 | -4 ~ ±0 | +1 ~ +5 | +6 ~ +10 | +11 ~ +20 | +21 ~ +30 | +31 ~ +40 | |
| 120 h | 48 h | 30 h | 16 h | 10 h | 45 min | 30 min | 20 min | 5 min | 3 min |
| mm | d_o | h_ef | d_b | T_inst,max^Inst | 1 x | RSB | |
| RSB Art. No. |
fischerwerke GmbH & Co. KG
Weinhalde 14-18
72178 Waldachtal, Germany
Tel. +49 7443 12-0 Fax +49 7443 12 4222
Fax +45 7443 12-4222 www.fiechor.do
www.mscbf.de
123919.47/2012-ZE
RSB
Superbond System


fischer innovative solutions


RA-SDS Art. No. 062420

Installation instruction

see ICC-ES Evaluation Report
No. 3572 at www.icc-es.org
Quality Control Agency IEA (AA -707)
fischer adhesive anchoring system RSB
fischer RSB is an adhesive anchoring system for fastenings in normal weight
concrete.
Important:
Before use, read and review the installation instructions and the SDS (safety data sheet). Do not use expired adhesive.
A Installation in hammer-drilled hole
- Drill the hole. Drill hole diameter d_0 and drill hole depth h_0 , see Table 2 or 3.
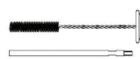
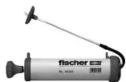
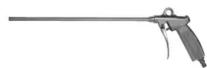
- Drill hole cleaning: Blow out the drill hole four times with oil-free compressed air (p ≥ 6 bar). The use of a manual blow-out pump is possible, if at the same time the drill hole diameter is less than 18 mm and the embedment depth h_ef is less than 10d.
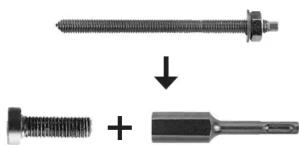
- Resin capsule RSB or two RSB mini, must be pushed into the drill hole by hand. Depending on the anchor being installed, a suitable setting tool should be used.
- Only use clean and grease-free anchors. Using a suitable adapter, drive the RG M into the capsule using a hammer drill set on rotary hammer action. Stop when the anchor reaches the bottom of the hole and is set to the correct embedment depth.
- When fully embedded, excess mortar must emerge from the mouth of the drill hole. If not, the anchor must be pulled out directly and a second resin capsule must be pushed into the drill hole. Setting process must be repeated, step (4).
- Wait for the specified curing time. T_cure see Table 1. Mounting the fixture T_inst,max see Table 3.
B Installation in diamond-drilled hole
- Drill the hole. Drill hole diameter d_0 and drill hole depth h_0 , see Table 2 or 3. Break the drill core and remove.
- Flush the drill hole until the water becomes clear.
- Blow out the drill hole two times, using oil-free compressed air (p > 6 bar). Brush the drill hole two times using a power drill. Blow out the drill hole two times, using oil-free compressed air (p > 6 bar).
- Resin capsule RSB or two RSB mini, must be pushed into the drill hole by hand. Depending on the anchor being installed, use a suitable setting tool.
- Only use clean and grease-free anchors. Using a suitable adapter, drive the RG M into the capsule using a hammer drill set on rotary hammer action. Stop when the
Table II
| Rodsmm | ∅inch | Drill bit d_o | Anchoring depth h_uf | Brush ∅ d_b | Capsule1 x2 x | ||||
| RSB | Item No. | ||||||||
| RG M | M8 | 3/8 | ∅ 10 mm | 80 mm | 11 | 1 x | RSB 8 | 518807 | |
| M10 | 15/32 | ∅ 12 mm | 75 mm 14 | 1 xRSB 10 mini | 518820 | ||||
| 90 mm 14 | 1 xRSB 10 | 518821 | |||||||
| 150 mm 14 | 2 xRSB 10 mini | 518820 | |||||||
| M12 | 9/16 | ∅ 14 mm | 75 mm 16 | 1 xRSB 12 mini | 518822 | ||||
| 110 mm 16 | 1 xRSB 12 | 518823 | |||||||
| 150 mm 16 | 2 xRSB 12 mini | 518822 | |||||||
| M16 | 1 1/16 | ∅ 18 mm | 95 mm 20 | 1 xRSB 16 mini | 518824 | ||||
| 125 mm 20 | 1 xRSB 16 | 518825 | |||||||
| 190 mm 20 | 2 xRSB 16 mini | 518824 | |||||||
| M20 | 1∅ 25 mm | 170 mm 27 | 1 xRSB 20 | 518827 | |||||
| 210 mm 27 | 1 xRSB 20 E / 24 | 518828 | |||||||
| M24 | 1 1/8 | ∅ 28 mm | 210 mm | 30 | 1 x | RSB 20 E / 24 | 518828 | ||
| M30 | 1 3/8 | ∅ 35 mm | 280 mm | 40 | 1 x | RSB 30 | 518829 | ||
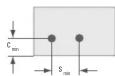
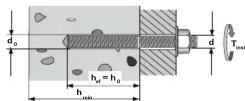
Table III Threaded rod
| d Drill mm | bit d_0 | Anchoring depth h_ef | Minimum member thickness h_min | Minimum spacing, edge distance s_min=c_min | Maximum torque T_inst,max | ||||||
| mm inch mm inch mm inch mm inch | Nm | f_t-l_b | |||||||||
| M8 10 | 3/8 | 80 | 3.15 | 40 | 1.57 | 10 | 7.35 | ||||
| M10 12 | 15/32 | 75 | 2.95 | 45 | 1.77 20 | 14.75 | |||||
| 90 | 3.54 | 45 | 1.77 20 | 14.75 | |||||||
| 150 | 5.91 | 45 | 1.77 20 | 14.75 h_ef+30h | |||||||
| M12 14 | 9/16 | 75 | 2.95 | 55 | 2.17 40 | 29.50 | |||||
| 110 | 4.33 | 55 | 2.17 40 | 29.50 | |||||||
| 150 | 5.91 | 55 | 2.17 40 | 29.50 | |||||||
| 95 | 3.74 | 55 | 3.56 | 69.44 35 | |||||||
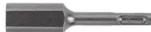
Brush with extension
Hand pump
Compressed air pistol
natural_image
Three types of mechanical fasteners shown: a threaded bolt, a flat screw, and a multi-pronged tool with a handle (no text or symbols)RA-SDS Art. No. 062420

SDS max 1/2" VK (M16 - M20)
Art. No. 001538