
DVX392H - Lecteur dvd LG - Notice d'utilisation et mode d'emploi gratuit
Retrouvez gratuitement la notice de l'appareil DVX392H LG au format PDF.


| Type de produit | Lecteur DVD de salon |
| Marque | LG |
| Modèle | DVX392H |
| Dimensions (L × H × P) | 430 × 35 × 200 mm (sans pied) |
| Poids net | 1,5 kg |
| Alimentation | AC 200-240 V, 50/60 Hz |
| Consommation électrique | 9 W |
| Formats de disque compatibles | DVD-Vidéo, DVD±R/RW, CD audio, CD-R/RW, CD-G |
| Formats de fichier supportés | DivX, MP3, WMA, JPEG |
| Port USB | Oui (version 1.1) |
| Sorties vidéo | Composite (RCA), YUV composante, HDMI, Péritel (SCART) |
| Sorties audio | Analogique stéréo (RCA), numérique coaxial, numérique optique |
| Fonctionnalités principales | Lecture de DVD, CD, DivX, MP3/WMA/JPEG ; USB ; HDMI avec upscaling jusqu'à 1080p ; zoom ; répétition A-B ; programmation de pistes ; diaporama avec musique |
| Code régional | 2 (Europe) ou selon l'étiquette au dos |
| Température de fonctionnement | 5 °C à 35 °C |
| Humidité de fonctionnement | 5 % à 90 % |
| Sécurité laser | Laser semiconductor de classe 1 – Ne pas ouvrir le boîtier |
| Entretien et nettoyage | Nettoyer avec un chiffon doux et sec ; ne pas utiliser de solvants |
| Accessoires fournis | Câble audio/vidéo, télécommande, piles |
| Réparabilité | Faire appel à un centre de service agréé pour toute réparation |
FOIRE AUX QUESTIONS - DVX392H LG
Questions des utilisateurs sur DVX392H LG
0 question sur cet appareil. Repondez a celles que vous connaissez ou posez la votre.
Poser une nouvelle question sur cet appareil
Téléchargez la notice de votre Lecteur dvd au format PDF gratuitement ! Retrouvez votre notice DVX392H - LG et reprennez votre appareil électronique en main. Sur cette page sont publiés tous les documents nécessaires à l'utilisation de votre appareil DVX392H de la marque LG.
MODE D'EMPLOI DVX392H LG

LG
ENGLISH
DVX382H / DVX392H


FOR THE GUARANTEE TERMS & CONDITIONS, PLEASE REFER TO BACK COVER OF THIS MANUAL.
Safety Precaution

CAUTION
RISK OF ELECTRIC SHOCK DO NOT OPEN

CAUTION: TO REDUCE THE RISK OF ELECTRIC SHOCK. DO NOT REMOVE COVER (OR BACK). NO USER-SERVICEABLE PARTS INSIDE. REFER SERVICING TO QUALIFIED SERVICE PERSONNEL.
This lightning flash with arrowhead symbol within an equilateral triangle is intended to alert the user to the presence of uninsulated dangerous voltage within the product's enclosure that may be of sufficient magnitude to constitute a risk of electric shock to persons.
The exclamation point within an equilateral triangle is intended to alert the user to the presence of important operating and maintenance (servicing) instructions in the literature accompanying the product.
WARNING: TO PREVENT FIRE OR ELECTRIC SHOCK HAZARD, DO NOT EXPOSE THIS PRODUCT TO RAIN OR MOISTURE.
WARNING: Do not install this equipment in a confined space such as a book case or similar unit.
CAUTION: Do not block any ventilation openings. Install in accordance with the manufacturer's instructions. Slots and openings in the cabinet are provided for ventilation and to ensure reliable operation of the product and to protect it from over heating. The openings should be never be blocked by placing the product on a bed, sofa, rug or other similar surface. This product should not be placed in a built-in installation such as a bookcase or rack unless proper ventilation is provided or the manufacturer's instruction has been adhered to.
CAUTION: This product employs a Laser System. To ensure proper use of this product, please read this owner's manual carefully and retain it for future reference. Should the unit require maintenance, contact an authorized service center.
Use of controls, adjustments or the performance of procedures other than those specified herein may result in hazardous radiation exposure.
To prevent direct exposure to laser beam, do not try to open the enclosure. Visible laser radiation when open. DO NOT STARE INTO BEAM.
CAUTION: The apparatus should not be exposed to water (dripping or splashing) and no objects filled with liquids, such as vases, should be placed on the apparatus.
CAUTION concerning the Power Cord
Most appliances recommend they be placed upon a dedicated circuit; That is, a single outlet circuit which powers only that appliance and has no additional outlets or branch circuits. Check the specification page of this owner's manual to be certain. Do not overload wall outlets. Overloaded wall outlets, loose or damaged wall outlets, extension cords, frayed power cords, or damaged or cracked wire insulation are dangerous. Any of these conditions could result in electric shock or fire. Periodically examine the cord of your appliance, and if its appearance indicates damage or deterioration, unplug it, discontinue use of the appliance, and have the cord replaced with an exact replacement part by an authorized service center.
Protect the power cord from physical or mechanical abuse, such as being twisted, kinked, pinched, closed in a door, or walked upon. Pay particular attention to plugs, wall outlets, and the point where the cord exits the appliance. To disconnect power from the mains, pull out the mains cord plug. When installing the product, ensure that the plug is easily accessible.
POWER: This DVD Recorder operates on a mains supply of 200-240V~, 50/60Hz. WIRING: This DVD Player is supplied with a BSI 1363 approved 13 amp mains plug, fused at 5 amp. When replacing the fuse always use a 5 amp BS 1362, BSI or ASTA approved type. Never use this plug with the fuse cover omitted. To obtain a replacement fuse cover contact your dealer. If the type of plug supplied is not suitable for the mains sockets in your home, then the plug should be removed and a suitable type fitted. Please refer to the wiring instructions below:
WARNING: A mains plug removed from the mains lead of this DVD Recorder must be destroyed. A mains plug with bared wires is hazardous if inserted in a mains socket. Do not connect either wire to the earth pin, marked with the letter E or with the earth symbol 12 or coloured green or green and yellow. If any other plug is fitted, use a 5 amp fuse, either in the plug, or at the distribution board.
IMPORTANT: The wires in this mains lead are coloured in accordance with the following codes:
- BLUE: NEUTRAL, BROWN: LIVE - As the colours of the wires in the mains lead of this DVD Recorder may not correspond with the coloured marking identifying the terminals in your plug, proceed as follows: The wire which is coloured blue must be connected to the terminal which is marked with the letter N or coloured black. The wire which is coloured brown must be connected to the terminal which is marked with the letter L or coloured red.
Disposal of your old appliance

- When this crossed-out wheeled bin symbol is attached to a product it means the product is covered by the European Directive 2002/96/EC
- All electrical and electronic products should be disposed of separately from the municipal waste stream via designated collection facilities appointed by the government or the local authorities.
- The correct disposal of your old appliance will help prevent potential negative consequences for the environment and human health.
- For more detailed information about disposal of your old appliance, please contact your city office, waste disposal service or the shop where you purchased the product.

This product is manufactured to comply with EMC Directive 2004/108/EC and Low Voltage Directive 2006/95/EC.
European representative :
LG Electronics Service Europe B.V.
Veluwezoom 15, 1327 AE Almere, The Netherlands
(Tel: +31-036-547-8940)
Manufactured under license from Dolby Laboratories. "Dolby" and the double-D symbol are trademarks of Dolby Laboratories.
HDMI, the HDMI logo and High-Definition Multimedia Interface are trademarks or registered trademarks of HDMI licensing LLC.
Contents
SafetyPrecaution 2
Types of Playable Discs 3
Hooking up the unit 4-5
Remote Control 6
Main Unit 7
Adjust the settings 8-9
Displaying Disc Information 9
Playing a Disc 10-11
Playing a DivX movie file 11
Listening to Music Disc or files 12
Viewing photo files 12-13
Using an USB Flash Drive 13
Language Codes 14
Area Codes 14
Troubleshooting 15
Specifications 15
Types of Playable Discs
| Type | Logo |
| DVD-VIDEO: Discs such as movies that can be purchased or rented. | DVD VIDEO |
| DVD-R: Video mode and finalized only | DVD R |
| DVD-RW: VR mode, Video mode and finalized only | DVD RW |
| DVD+R: Video mode only | RW DVD-R |
| DVD+RW: Video mode only | RW DVD-ReWristable |
| Audio CD: Music CDs or CD-R/CD-RW in music CD format that can be purchased. | COMPACT DISC DIGITAL AUDIO |
| This unit plays DVD±R/RW and CD-R/RW that contains audio titles, DivX, MP3, WMA and/or JPEG files. Some DVD±RW/DVD±R or CD-RW/CD-R cannot be played on this unit due to the recording quality or physical condition of the disc, or the characteristics of the recording device and authoring software. | |
About the Symbol Display
" " may appear on your TV display during operation and indicates that the function explained in this owner's manual is not available on that disc.
Regional Codes
This unit has a regional code printed on the rear of the unit. This unit can play only DVD discs labeled same as the rear of the unit or "ALL".
- Most DVD discs have a globe with one or more numbers in it clearly visible on the cover. This number must match your unit's regional code or the disc cannot play.
- If you try to play a DVD with a different regional code from your player, the message "Check Regional Code" appears on the TV screen.
Copyrights
It is forbidden by law to copy, broadcast, show, broadcast via cable, play in public, or rent copyrighted material without permission. This product features the copy protection function developed by Macrovision. Copy protection signals are recorded on some discs. When recording and playing the pictures of these discs picture noise will appear. This product incorporates copyright protection technology that is protected by method claims of certain U.S. patents and other intellectual property rights owned by Macrovision Corporation and other rights owners. Use of this copyright protection technology must be authorized by Macrovision Corporation, and is intended for home and other limited viewing uses only unless otherwise authorized by Macrovision Corporation. Reverse engineering or disassembly is prohibited.
CONSUMERS SHOULD NOTE THAT NOT ALL HIGH DEFINITION TELEVISION SETS ARE FULLY COMPATIBLE WITH THIS PRODUCT AND MAY CAUSE ARTIFACTS TO BE DISPLAYED IN THE PICTURE. IN CASE OF 525 OR 625 PROGRESSIVE SCAN PICTURE PROBLEMS, IT IS RECOMMENDED THAT THE USER SWITCH THE CONNECTION TO THE 'STANDARD DEFINITION' OUTPUT. IF THERE ARE QUESTIONS REGARDING OUR TV SET COMPATIBILITY WITH THIS MODEL 525p AND 625p UNIT, PLEASE CONTACT OUR CUSTOMER SERVICE CENTER.
Hooking up the unit
Audio and Video Connection
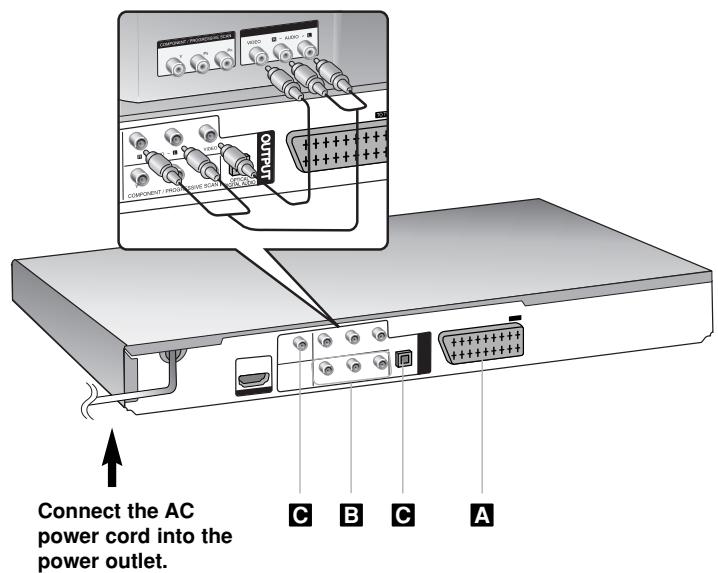
The unit Audio/Video jacks are color coded (yellow for video, red for right audio and white for left audio). If your TV has only one input for audio (mono), connect it to the left (white) audio jack on the unit.
Hooking up the unit - more you can do
A SCART Connection
Connect the TO TV jack on the unit and your TV using the SCART cable. For SCART connections, resolution must be set to 576i(480i) by pressing RESOLUTION button.
Caution: You must set the [TV Output Select] option to [RGB] on the setup menu to use this connection. (See page 8)
Component Video Connections
Connect the COMPONENT/PROGRESSIVE SCAN OUTPUT jacks on the unit to the corresponding input jacks on your TV using a YPbPr cable.
- You will still need to connect the left and right audio cables to the TV, or digital audio cable to your stereo.
Caution: You must set the [TV Output Select] option to [YPbPr] on the setup menu to use this connection. (See page 8)
Resolution Setting
- You can change the resolution for component video output. Press RESOLUTION repeatedly to select the desired resolution - 576i(480i), 576p(480p), 720p, 1080i, 1080p.
- For 720p and 1080p resolution on the component video output, only non-copy protected discs can be played back. If the disc is copy proteced, it will be displayed at the 576p(480p) resolution.
- Depending on your TV, some of the resolution settings may result in the picture disappearing or an abnormal picture appearing. In this case, press RESOLUTION repeatedly unit the picture re-appears.
C Digital Audio Output Connection
Connect one of the unit's DIGITAL AUDIO OUTPUT (COAXIAL or OPTICAL) jacks to the corresponding jack on your amplifier.
- If the audio format of the digital output does not match the capabilities of your amplifier, the amplifier will produce a strong, distorted sound or no sound at all.
- To see the audio format of the current disc in the on-screen display, press AUDIO.
- This unit does not perform internal (2 channel) decoding of a DTS sound track. To enjoy DTS multi channel surround, you must connect this unit to a DTS compatible amplifier via one of this unit's digital audio outputs.
Hooking up the unit
HDMI Connection
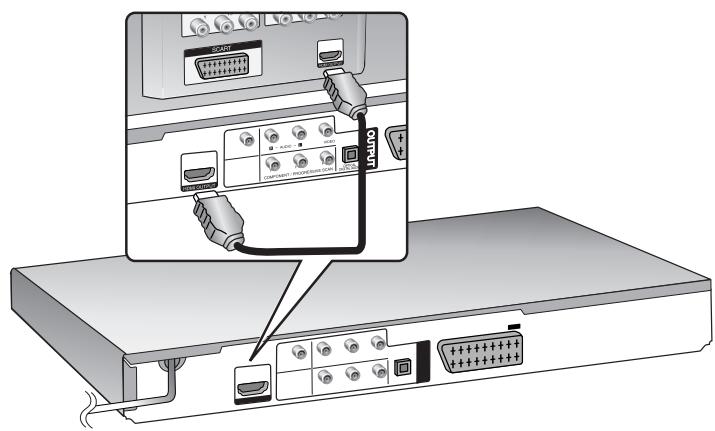
Connect the HDMI OUTPUT jack on the unit to the HDMI input jack on an HDMI compatible TV using an HDMI cable.
Hooking up the unit - more you can do
Resolution Setting
You can change the resolution for HDMI output. Press RESOLUTION repeatedly to select the desired resolution - 576i(480i), 576p(480p), 720p, 1080i, 1080p.
Note for 1080p resolution
The unit is able to provide a 1080p full HD image to most 1080p-capable TVs in the market today. However, there are some 1080p TVs available from certain companies that are limited in the types of 1080p images that can be accepted. Specifically, 1080p-capable TVs that don't accept images in 60Hz can't display an image from this unit.
About HDMI
HDMI (High Definition Multimedia Interface) supports both video and audio on a single digital connection for use with DVD Players, Set-Top Boxes, and other AV devices. HDMI was developed to provide the technologies of HDCP (High-bandwidth Digital Content Protection). HDCP is used to protect digital content transmitted and received.
HDMI has the capability to support standard, enhanced or high-definition video plus standard to multi-channel surround-sound audio, HDMI features include uncompressed digital video, a bandwidth of up to 5 gigabytes per second, one connector (instead of several cables and connectors), and communication between the AV source and AV devices such as DTVs.
Notes on HDMI connection
- If your TV is not capable of handling 96 kHz sampling frequency, set the [Sampling Freq.] option to [48 kHz] on the setup menu (See page 8).
- If your TV is not equipped with Dolby Digital and MPEG decoder, set the [Dolby Digital] and [MPEG] options to [PCM] on the setup menu (See page 8).
- Depending on your TV, some of the resolution settings may result in the picture disappearing or an abnormal picture appearing. In this case, press RESOLUTION repeatedly unit the picture re-appears.
- Changing the resolution when the unit is connected with HDMI connector may result in malfunctions. To solve the problem, turn off the unit and then turn it on again.
-
When you connect a HDMI or DVI compatible device make sure of the following:
-
Try switching off the HDMI/DVI device and this unit. Next, switch on the HDMI/DVI device and leave it for around 30 seconds, then switch on this unit.
- The connected device's video input is set correctly for this unit.
- The connected device is compatible with 720(1440)X576i(480i), 720X576p(480p), 1280X720p, 1920X1080i or 1920X1080p video input.
- The 1080p, 720p and 480p resolutions are the progressive scan applied resolution
- Not all HDCP-compatible DVI devices will work with this unit.
- The picture will not be displayed properly with non-HDCP device.

Remote control
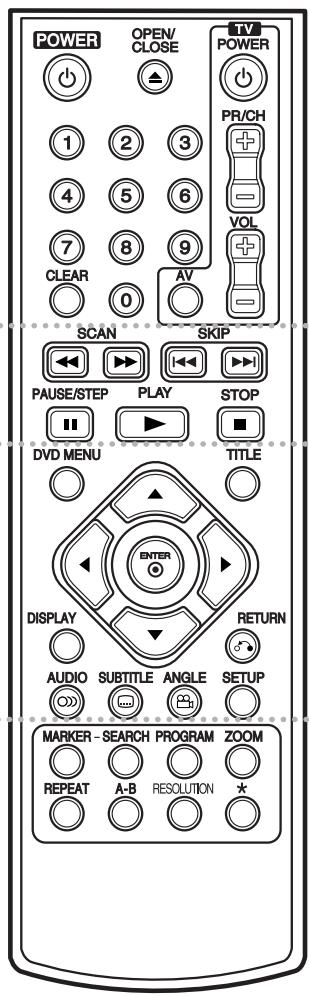
1
2
3
4
1 POWER () : Switches the unit ON or OFF. OPEN/CLOSE () : Opens and closes the disc tray. Numerical buttons: Selects numbered items in a menu. CLEAR: Removes a track number on the Program List or a mark on the Marker Search menu. TV: TV control buttons.
SCAN ( / ) : Search backward or forward.
SKIP (山 / 山) : Go to next or previous
chapter/track.
PAUSE/STEP (II) : Pauses playback temporarily/press repeatedly for frame-by-frame playback.
PLAY () :Starts playback.
STOP () : Stops playback.
3
DVD MENU : Access the DVD menu.
TITLE:Access the disc's title menu,if available.
:Navigates the menus.
ENTER () : Confirms menu selection.
DISPLAY:AccessesOn-ScreenDisplay.
RETURN () :Press to move backwards in the menu or exit the menu. Change the USB mode.
AUDIO (O) : Selects an audio language or audio channel.
SUBTITLE (口) : Selects a subtitle language.
ANGLE (圆) : Selects a DVD camera angle, if available.
SETUP:Accesses or exits the setup menu.
4
MARKER: Marks any point during playback.
SEARCH:Displays MARKER SEARCH menu.
PROGRAM:Enters the program edit mode.
ZOOM:Enlarges video image.
REPEAT: Repeats a chapter, track, title or all.
A-B:Repeats a section.
RESOLUTION: Sets the output resolution for HDMI jack.
* : This button is not available.
Controlling other TV's with the remote control
You can control the sound level, input source, and power switch of your LG TV with the supplied remote control. While holding down TV POWER button, press the number buttons to select the manufacturer code for your TV (see the table below). Release TV POWER button.
Code numbers of controllable TVs
If more than one code number is listed, try entering them one at a time until you find the one that works with your TV. Depending on your TV, some or all buttons may not function on the TV, ever after entering the correct manufacturer code.
| Manufacturer | Code Number |
| LG/GoldStar | 1 (Default), 2 |
| Zenith | 1, 3, 4 |
| Samsung | 6, 7 |
| Sony | 8, 9 |
| Hitachi | 4 |
Put the battery into the Remote Control
Remove the battery cover on the rear of Remote Control, and insert battery (size AAA) with + and - matched correctly.
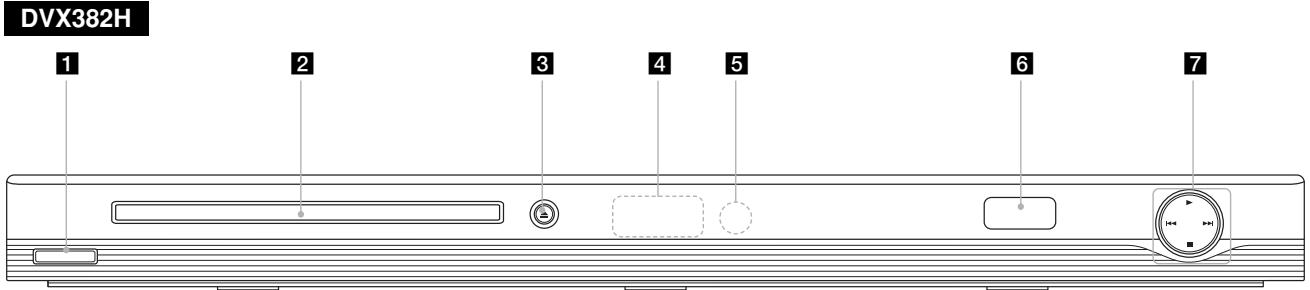
Main Unit

DVX392H

/ (Power)
Turn the unit ON or OFF.
2 Disc Tray
Insert a disc here.
3 (Open / Open)
Opens or closes the disc tray.
4 Display window
Shows the current status of the unit.
5 Remote sensor
Point the remote control here.
6 USB Port
Connect an USB Flash Drive.
7 · (Play)
Starts playback.
- (Stop)
Stops playback.
- (Skip)
Returns to the beginning of current chapter or track or go to the previous chapter or track.
- (Skip)
Go to next chapter or track.

Adjust the settings
ON REMOTE
| 1 Display setup menu: | SETUP |
| 2 Select a desired option on the first level: | ▲▼ |
| 3 Move to second level: | ► |
| 4 Select a desired option on the second level: | ▲▼ |
| 5 Move to third level: | ► |
| 6 Change the setting: | ▲▼ / ENTER |
Adjust the settings - more you can do
When you turn on for the first time
The menu for a language selection will appear when you turn on the unit for the first time. You must select a language to use the unit. Use to select a language then press ENTER and the confirm menu will appear. Use to select [Enter] then press ENTER.
Adjust the language settings
Menu Language - Select a language for the Setup menu and on-screen display.
Disc Audio/Subtitle/Menu - Select a language for the Disc Audio/Subtitle/ Menu.
[Original]: Refers to the original language in which the disc was recorded.
[Other]: To select another language, press number buttons then ENTER to enter the corresponding 4-digit number according to the language code list. (see page 14) If you make a mistake while entering number, press CLEAR to delete numbers then correct it.
[Off] (for Disc Subtitle): Turn off Subtitle.
Adjust the display settings
TV Aspect - Select which screen aspect to use based on the shape of your TV screen.
[4:3]: Select when a standard 4:3 TV is connected.
[16:9]: Select when a 16:9 wide TV is connected.
Display Mode – If you selected 4:3, you'll need to define how you would like widescreen programs and films to be displayed on your TV screen.
[Letterbox]: This displays a widescreen picture with black bands at the top and bottom of the screen.
[Panscan]: This fills the entire 4:3 screen, cropping the picture as necessary.
TV Output Select - Select an option according to the TV connection type.
[RGB]: When your TV is connected with the SCART jack.
[YPbPr]: When your TV is connected with the COMPONENT/PROGRESSIVE SCAN OUTPUT jacks on the unit.
Adjust the audio settings

Dolby Digital / DTS / MPEG - Selects the type of digital audio signal when using the DIGITAL AUDIO OUTPUT jack.
[Bitstream]: Select this when you connect this unit's DIGITAL AUDIO OUTPUT jack to an amplifier with a built-in Dolby Digital, DTS or MPEG decoder.
[PCM] (for Dolby Digital / MPEG): Select this when you connect this unit's DIGITAL AUDIO OUTPUT jack to an amplifier without a built-in Dolby Digital or MPEG decoder.
[Off] (for DTS): Select this when you connect this unit's DIGITAL AUDIO OUTPUT jack to an amplifier without a built-in DTS decoder.
Sample Freq. (Frequency) - Selects the sampling frequency of the audio signal.
[48 KHz]: The audio signals are always converted to 48 kHz.
[96 KHz]: The audio signals are output in their original format.
DRC (Dynamic Range Control) – Make the sound clear when the volume is turned down (Dolby Digital only). Set to [On] for this effect.
Vocal - Set to [On] only when a multi-channel karaoke DVD is playing. The karaoke channels on the disc mix into normal stereo sound.
Adjust the lock settings

You must set the [Area Code] option to use the lock options. Select [Area Code] option then press . Enter a 4-digit password then press ENTER. Enter it again then press ENTER to verify. If you make a mistake while entering number, press CLEAR then correct it.
If you forget your password you can reset it. Display setup menu then input the 6-digit number "210499". The "P CLr" appear in the display window and the password is deleted.
Rating - Select a rating level. The lower the level, the stricter the rating. Select [Unlock] to deactivate the rating.
Password - Sets or changes the password for lock settings.
[New]: Enter a new 4-digits password using the numerical buttons then press ENTER. Enter the password again to confirm.
[Change]: Enter the new password twice after entering the current password.
Area Code - Select a code for a geographic area as the playback rating level. This determines which area's standards are used to rate DVDs controlled by the parental lock. (See page 14)
Adjust the others settings

B.L.E. (Black Level Expansion) - To select the black level of playback pictures. Set your preference and monitor's ability.
DivX(R) VOD - We provide you with the DivX® VOD (Video On Demand) registration code that allows you to rent and purchase videos using the DivX® VOD service. For more information, visit www.divx.com/vod.
Press ENTER when [Select] icon is highlighted and you can view the registration code of the unit. All the downloaded videos from DivX® VOD can only be played back on this unit.
Displaying Disc Information
| ON REMOTE | |
| 1 Press DISPLAY: | DISPLAY |
| 2 Select a item: | ▲▼ |
| 3 Adjust the Display menu settings: | ▲▼/ENTER |
| 4 To return the exit: | DISPLAY |
Displaying Disc Information - more you can do
You can select an item by pressing and change or select the setting by pressing .
Current title (or track) number/total number of titles (or tracks)
5/42 Current chapter number/total number of chapters
0:13:45 Elapsed playing time
1 ENG Selected audio language or channel
OFF Selected subtitle
1/1 Selected angle/total number of angles
Symbol Used in this Manual
ALL All discs and file listed below
DVD DVD and finalized DVD± R / RW
MP3 MP3 files
WMA WMA files
ACD Audio CDs
CD-G CD-G discs
DivX DivX files
Playing a Disc
| ON REMOTE | |
| 1 Open the disc tray: | ▲ OPEN/CLOSE |
| 2 Insert a Disc: | - |
| 3 Close the disc tray: | ▲ OPEN/CLOSE |
| 4 Start playback: | ▶ PLAY |
| 5 To stop playback: | ■ STOP |
Playing a Disc - more you can do
Stops the playback
The unit records the stopped point depending on the disc. "■" appears on the screen briefly. Press PLAY (▶) to resume playback (from the scene point). If you press STOP (■) again or unload the disc ("■" appears on the screen), the unit will clear the stopped point.
(Resume Stop, Complete Stop)
The resume point may be cleared when a button is pressed (for example :POWER, OPEN/CLOSE, etc).
Playing a DVD that has a menu DVD
Most DVD now have menus which load first before the film begins to play. You can navigate these menus using or number button to highlight an option. Press ENTER to select.
Playing a DVD VR disc
This unit will play DVD-RW disc that is recorded using the Video Recording (VR) format. When you insert a disc DVD VR disc, the menu will appear on the screen. Use to select a title then press PLAY (▶). To display DVD-VR menu, press DVD MENU or TITLE.
Some DVD-VR disc are made with CPRM data by DVD RECORDER. Player does not support these kinds of discs.
Skip to the next/previous chapter/track ALL
Press SKIP (▶▶I) to move to the next chapter/track.
Press SKIP (▶) to return to the beginning of the current chapter/track.
Press SKIP (I) twice briefly to step back to the previous chapter/track.
Pause a playback ALL
Press PAUSE/STEP (II) to pause playback. Press PLAY (▶) to continue playback.
Frame-by-Frame playback DVD DivX
Press PAUSE/STEP (II) repeatedly to play Frame-by-Frame playback.
Playing repeatedly ALL
Press REPEAT repeatedly to select an item to be repeated. The current title, chapter or track will be played back repeatedly. To return to normal playback, press REPEAT repeatedly to select [Off].
Fast forward or fast reverse
DVD DivX ACD WMA MP3
Press SCAN (or) to play fast forward or fast reverse during playback. You can change the various playback speed by pressing SCAN (or) repeatedly. Press PLAY (to) to continue play at normal speed.
Repeating a specific portion (A-B) DVD DivX ACD
Press A-B at the beginning of the portion you wish to repeat and again at the end of the portion. Your selected portion will be repeated continually. To return to normal playback, press A-B to select [Off].
Selecting a subtitle language DVD DivX
During playback, press SUBTITLE (□) repeatedly to select a desired subtitle language.
Watching from a different angle DVD
If the angle indicator appears on the screen for a moment, you can select a different camera angle by pressing ANGLE (☑) repeatedly.
Hearing a different audio DVD DivX CD-G
During playback, press AUDIO (OM) repeatedly to switch between the available audio languages, channels or encoding methods.
Slow down the playing speed DivX (Forward only) DVD
While playback is paused, press SCAN (← or →) to slow down reverse or forward playback. You can change the various playback speed by pressing SCAN (← or →) repeatedly. Press PLAY (▶) to continue play at normal speed.
Watching a enlarged video image DVD DivX
During playback or pause mode, press ZOOM repeatedly to select zoom mode. You can move through the zoomed picture using buttons. Press CLEAR to exit.
Viewing the title menu DVD
Press TITLE to display the disc's title menu, if available.
Viewing the DVD menu DVD
Press DVD MENU to display the disc menu, if available.
Marking a favorite scene DVD DivX
You can mark positions by pressing MARKER at the desired position up to 9 markers. Also you can recall or clear positions by pressing SEARCH.
Use or to select a desired marker on the [MARKER SEARCH] menu, then press ENTER to recall it or CLEAR to clear it.
Starting play from selected time DVD DivX
Searches for the starting point of entered time code. Press DISPLAY then select clock icon. Enter a time then press ENTER. For example, to find a scene at 1 hours, 10 minutes, and 20 seconds, enter "11020" and press ENTER. If you enter the wrong number, press CLEAR to enter again.
Last Scene Memory DVD ACD
This unit memorizes last scene from the last disc that is viewed. The last scene remains in memory even if you remove the disc from the player or switch off the unit. If you load a disc that has the scene memorized, the scene is automatically recalled.
Screen Saver
The screen saver appears when you leave the unit in Stop mode for about five minutes. If the Screen Saver is displayed for five minutes, the unit automatically turns itself off.
System Select
You must select the appropriate system mode for your TV system. Remove any disc that might be in the unit, press and hold PAUSE/STEP (II) for more than five seconds to be able to select a system (PAL, NTSC).
Mixed disc or USB Flash Drive - DivX, MP3/WMA and JPEG
When playing a disc or USB Flash Drive contained with DivX, MP3/WMA and JPEG files together, you can select which menu of files you would like to play by pressing TITLE.
Playing a DivX movie file
| ON REMOTE | |
| 1 Open the disc tray: | ▲ OPEN/CLOSE |
| 2 Insert a disc: | - |
| 3 Close the disc tray: | ▲ OPEN/CLOSE |
| 4 Select a movie file from the menu: | ▲▼, DVD MENU |
| 5 Start playback: | ▶ PLAY |
| 6 To stop playback: | ■ STOP |
Playing a DivX movie file - more you can do
Changing the character set to display DivX® subtitle correctly
Press and hold SUBTITLE for 3 seconds during playback. The language code will appear. Press to select another language code until the subtitle is displayed properly and then press ENTER.
DivX file requirement
DivX file compatibility with this player is limited as follows:
Available resolution size: 720x576 (W x H) pixel.
- The file names of DivX and subtitle are limited to 56 characters.
DivX file extensions:“.avi”,“.mpg”,“.mpeg”
- Playable DivX subtitle: SubRip (.srt/.txt), SAMI (.smi), SubStation Alpha(.ssa./.txt), MicroDVD (.sub/.txt), SubViewer 2.0 (.sub/.txt), TMPlayer (.txt), DVD Subtitle System (.txt), VobSub(*.sub) Sub/idx, stream based format
- Playable Codec format: "DIVX3.xx", "DIVX4.xx", "DIVX5.xx", "MP43", "3IVX", "XviD"
- Only the playback function is supported with DivX 6.0 in the unit.
- Playable Audio format: "Dolby Digital", "DTS", "PCM", "MP3", "WMA"
- Sampling frequency: within 8 - 48 kHz (MP3), within 22 - 48 kHz (WMA)
- Bit rate: within 8 - 320 kbps (MP3), within 32 - 256 kbps (WMA), less than 8Mbps (DivX file)
- CD-R/RW, DVD±R/RW Format: ISO 9660
Maximum Files/Disc: Less than 650 (total number of files and folders)
Listening to Music Disc or files
| ON REMOTE | |
| 1 Open the disc tray: | ▲ OPEN/CLOSE |
| 2 Insert a disc: | - |
| 3 Close the disc tray: | ▲ OPEN/CLOSE |
| 4 Select a music from the menu: | ▲▼, DVD MENU |
| 5 Start playback: | ▶ PLAY |
| 6 To stop playback: | ■ STOP |
Listening to Music Disc or files - more you can do
Creating your own program
You can play the contents of a disc in the order you want by arranging the order of the musics on the disc. To add a music(s) on the program list, press PROGRAM to enter the program edit mode ( 電 mark appears on the menu). Select a desired music on the [List] then press ENTER to add the music to the program list. Select a music from the program list then press ENTER to start programmed playback. To clear a music from the program list, select the music you want to clear then press CLEAR in program edit mode. To clear all music from the program list, select [Clear All] then press ENTER in program edit mode. The program is cleared when the disc is removed or the unit is turned off.
Playing an CD-G disc
Once you insert an CD-G disc, a menu appears on the screen. Use V to select a track then press PLAY (▶). To display the CD-G menu during playback, press STOP (■) twice.
You can display the setup menu by pressing SETUP only when CD-G menu appears on the TV screen.
Displaying file information (ID3 TAG)
While playing a MP3 file containing file information, you can display the information by pressing DISPLAY repeatedly.
MP3/WMA music file requirement
MP3/WMA compatibility with this unit is limited as follows:
- File extensions:“.mp3”,“.wma”
-
Sampling frequency: within 8 - 48 kHz (MP3), within 22 - 48kHz (WMA)
-
Bit rate: within 8 - 320kbps (MP3), within 32 - 256kbps (WMA)
- CD-R/RW, DVD±R/RW Format: ISO 9660
Maximum Files/Disc: Less than 650 (total number of files and folders)
Viewing photo files
| ON REMOTE | |
| 1 Open the disc tray: | ▲ OPEN/CLOSE |
| 2 Insert a disc: | - |
| 3 Close the disc tray: | ▲ OPEN/CLOSE |
| 4 Select a photo file on the menu: | ▲▼, DVD MENU |
| 5 Display the selected file in full screen: | ▶ PLAY |
| 6 To return to the menu: | ■ STOP |
Viewing photo files - more you can do
Viewing photo files as a slide show
Use to highlight () icon then press ENTER to start slide show. You can change slide show speed using when () icon is highlighted.
Skip to the next/previous photo
Press SKIP (I or to view the previous/next photo.
Rotate a photo
Use to rotate the photo in full screen counterclockwise or clockwise while viewing a photo in full screen.
Pause a slide show
Press PAUSE/STEP (III) to pause a slide show. Press PLAY (▶) to continue the slide show.
Listening to music during slide show
You can listen to music during slide show, if the disc contains music and photo files together. Use to highlight (,) icon then press ENTER to start slide show.
Watching a enlarged photo image
While viewing a photo in full screen, press ZOOM repeatedly to select zoom mode. You can move through the zoomed photo using buttons. Press CLEAR to exit.
Photo file requirement
JPEG file compatibility with this unit is limited as follows:
- File extensions:“.jpg”
- Photo size: Less than 5MB recommended
CD-R/RW, DVD±R/RW Format: ISO 9660
Maximum Files/Disc: Less than 650 (total number of files and folders)
Using an USB Flash Drive
You can play MP3/WMA/JPEG/DivX files in the USB Flash Drive with version 1.1.
| ON REMOTE | |
| 1 Connect an USB Flash Drive to the USB port on the unit: | - |
| 2 Display the menu screen in stop mode: | RETURN |
| 3 Select a file: | ▲▼, DVD MENU |
| 4 Play the file: | PLAY |
| 5 Remove the USB Flash Drive: | - |
Notes an USB Flash Drive
- You can switch USB and DISC mode by pressing RETURN (♂) only in stop mode.
- Do not extract the USB device in operating.
- Aback up demands to prevent a data damage.
- If you use a USB extension cable or USB HUB, the USB device might not be recognized.
- Music files (MP3/WMA), photo files (JPEG) and DivX files can be played. For details of operations on each files, refer to relevant pages.
- This unit is not supported when the total number of files is more than 650.
- The USB function of this unit does not support all kinds of USB devices.
- Digital camera and mobile phone are not supported.
Language Codes
Use this list to input your desired language for the following initial settings: Disc Audio, Disc Subtitle, Disc Menu.
| Language | Code | Language | Code | Language | Code | Language | Code | Language | Code |
| Afar | 6565 | Croatian | 7282 | Hausa | 7265 | Lingala | 7678 | Quechua | 8185 |
| Afrikaans | 6570 | Czech | 6783 | Hebrew | 7387 | Lithuanian | 7684 | Rhaeto-Romance | 8277 |
| Albanian | 8381 | Danish | 6865 | Hindi | 7273 | Macedonian | 7775 | Rumanian | 8279 |
| Ameharic | 6577 | Dutch | 7876 | Hungarian | 7285 | Malagasy | 7771 | Russian | 8285 |
| Arabic | 6582 | English | 6978 | Icelandic | 7383 | Malay | 7783 | Samoan | 8377 |
| Armenian | 7289 | Esperanto | 6979 | Indonesian | 7378 | Malayalam | 7776 | Sanskrit | 8365 |
| Assamese | 6583 | Estonian | 6984 | Interlingua | 7365 | Maori | 7773 | Scots Gaelic | 7168 |
| Aymara | 6588 | Faroeese | 7079 | Irish | 7165 | Marathi | 7782 | Serbian | 8382 |
| Azerbaijani | 6590 | Fiji | 7074 | Italian | 7384 | Moldavian | 7779 | Serbo-Croatian | 8372 |
| Bashkir | 6665 | Finnish | 7073 | Javanese | 7487 | Mongolian | 7778 | Shona | 8378 |
| Basque | 6985 | French | 7082 | Kannada | 7578 | Nauru | 7865 | Sindhi | 8368 |
| Bengali; Bangla | 6678 | Frisian | 7089 | Kashmiri | 7583 | Nepali | 7869 | Singhalese | 8373 |
| Bhutani | 6890 | Galician | 7176 | Kazakh | 7575 | Norwegian | 7879 | Slovak | 8375 |
| Bihari | 6672 | Georgian | 7565 | Kirghiz | 7589 | Oriya | 7982 | Slovenian | 8376 |
| Breton | 6682 | German | 6869 | Korean | 7579 | Panjabi | 8065 | Spanish | 6983 |
| Bulgarian | 6671 | Greek | 6976 | Kurdish | 7585 | Pashto, Pushto | 8083 | Sudanese | 8385 |
| Burmese | 7789 | Greenlandic | 7576 | Laothian | 7679 | Persian | 7065 | Swahili | 8387 |
| Byelorussian | 6669 | Guarani | 7178 | Latin | 7665 | Polish | 8076 | Swedish | 8386 |
| Chinese | 9072 | Gujarati | 7185 | Latvian, Lettish | 7686 | Portuguese | 8084 | Tagalog | 8476 |
Area Codes
Choose a area code from this list.
| Area | Code | Area | Code | Area | Code | Area | Code | Area | Code |
| Afghanistan | AF | Costa Rica | CR | Greenland | GL | Maldives | MV | Paraguay | PY |
| Argentina | AR | Croatia | HR | Hong Kong | HK | Mexico | MX | Philippines | PH |
| Australia | AU | Czech Republic | CZ | Hungary | HU | Monaco | MC | Poland | PL |
| Austria | AT | Denmark | DK | India | IN | Mongolia | MN | Portugal | PT |
| Belgium | BE | Ecuador | EC | Indonesia | ID | Morocco | MA | Romania | RO |
| Bhutan | BT | Egypt | EG | Israel | IL | Nepal | NP | Russian Federation | RU |
| Bolivia | BO | El Salvador | SV | Italy | IT | Netherlands | NL | Saudi Arabia | SA |
| Brazil | BR | Ethiopia | ET | Jamaica | JM | Netherlands Antilles | AN | Senegal | SN |
| Cambodia | KH | Fiji | FJ | Japan | JP | New Zealand | NZ | Singapore | SG |
| Canada | CA | Finland | FI | Kenya | KE | Nigeria | NG | Slovak Republic | SK |
| Chile | CL | France | FR | Kuwait | KW | Norway | NO | Slovenia | SI |
| China | CN | Germany | DE | Libya | LY | Oman | OM | South Africa | ZA |
| Colombia | CO | Great Britain | GB | Luxembourg | LU | Pakistan | PK | South Korea | KR |
| Congo | CG | Greece | GR | Malaysia | MY | Panama | PA | Spain | ES |
Troubleshooting
| Symptom | Cause | Correction |
| No power. | The power cord is disconnected. | Plug the power cord into the wall outlet securely. |
| The power is on, but the unit does not work. | No disc is inserted. | Insert a disc. |
| No picture. | The TV is not set to receive the signal from the unit. | Select the appropriate video input mode on the TV. |
| The video cable is not connected securely. | Connect the video cable securely. | |
| No sound. | The equipment connected with the audio cable is not set to receive the signal from the unit. | Select the correct input mode of the audio amplifier. |
| The AUDIO options are set to the wrong position. | Set the AUDIO settings to the correct position. | |
| The unit does not start playback. | An unplayable disc is inserted. | Insert a playable disc. (Check the disc type and regional code.) |
| The rating level is set. | Change the rating level. | |
| The remote control does not work properly. | The remote control is not pointed at the remote sensor on the unit. | Point the remote control at the remote sensor of the unit. |
| The remote control is too far from the unit. | Operate the remote control closer to the unit. |
Specifications
General
Power requirements
Power consumption
Dimensions (Approx.)
Net Weight (Approx.)
Operating temperature
Operating humidity
Laser
Signal system
AC 200-240 V, 50/60 Hz
9W
430 × 35 × 200 mm
(W × H × D) without foot
1.5 kg
5^ C to 35^ C
5% to 90%
Semiconductor laser
PAL/NTSC
Outputs
Video Output
Component Video Output
HDMI Video/Audio Output
Audio Output
Digital Output (Coaxial)
Digital Output (Optical)
1.0 V (p-p), 75 Ω, sync negative,
RCA jack (L, R) x 1 /
SCART (TO TV)
(Y) 1.0V (p-p), 75 Ω, sync negative, RCA jack x 1
(Pb)/(Pr) 0.7 V (p-p), 75 Ω,
RCA jack x 2
19 pin(HDMI standard, Type A)
2.0 Vrms (1 KHz, 0 dB), 600 Ω,
RCA jack (L, R) x 1 /
SCART (TO TV)
0.5 V (p-p), 75 Ω, RCA jack x 1
3V (p-p), Optical X 1
Accessories
Video/Audio cable, Remote Control, Battery
Designs and specifications are subject to change without prior notice.

LG
Technology with the human touch
GUARANTEE
LG Electronics U.K. Ltd. will provide the following services in order to expedite this Guarantee.
- All faulty components which fail due to defective manufacture will be replaced free of charge for a period of 12 months from the original date of purchase.
- The dealer (or his service agent) who sold the product will be reimbursed for any labour provided in the repair of this LG equipment, for a period of 12 months from the original date of purchase. These claims must be made in accordance with the published scale of service charges and relevant claims procedure.
PLEASE NOTE:
A. The dealer may restrict the guarantee to the original purchaser.
B. The dealer is not obliged to carry out service under guarantee if unauthorized modifications are made to the apparatus, or if non standard components are used or if the serial number of the apparatus is removed, defaced, misused, or altered.
C. Any claims made under guarantee must be directed to the dealer from whom the equipment was originally purchased. The dealer may, before carrying out service under guarantee, require a receipted account as evidence of the date of purchase.
D. We respectfully point out that your dealer is not obligated to replace batteries if they become exhausted or worn in use.
E. Aerial alignment and consumer control adjustments are not covered by this guarantee.
This guarantee does not affect your statutory rights.
REQUIREMENTS TO MAINTAIN WARRANTY COVERAGE:
RETAIN YOUR RECEIPT TO PROVE DATE OF PURCHASE. A COPY OF YOUR RECEIPT MUST BE SURRENDERED AT THE TIME GUARANTEE SERVICE IS PROVED.
Product Registration Card : It is helpful to complete at least your name, address, phone, model & serial numbers and return it. This will enable LG to assist you in the future should you lose your receipt, your units be stolen, or should modifications be necessary.
To obtain information or assistance: Call 0870 873 5454 Monday-Friday 9.00am-4.30pm
| MODEL NO.* | SERIAL NO.* | DATE OF PURCHASE.* |
- Please complete for your own record
In all cases of difficulty - consult your LG dealer from whom the product was purchased
LGEUK Website: www.lge.co.uk
( service website : www.lgelectronics.co.uk )