
42PQ3000 - Télévision LG - Notice d'utilisation et mode d'emploi gratuit
Retrouvez gratuitement la notice de l'appareil 42PQ3000 LG au format PDF.


| Intitulé | Description |
|---|---|
| Type de produit | TV Plasma |
| Taille de l'écran | 42 pouces |
| Résolution | 1920 x 1080 pixels (Full HD) |
| Technologie d'affichage | Plasma |
| Alimentation électrique | AC 100-240V, 50/60Hz |
| Dimensions (L x H x P) | 1024 x 688 x 90 mm (sans pied) |
| Poids | 25 kg (sans pied) |
| Ports HDMI | 3 ports HDMI |
| Ports USB | 2 ports USB |
| Compatibilités | Compatible avec les normes de diffusion DVB-T, DVB-C |
| Fonctions principales | Mode photo, Mode cinéma, Mode sport |
| Entretien et nettoyage | Utiliser un chiffon doux et sec, éviter les produits chimiques agressifs |
| Pièces détachées et réparabilité | Réparabilité limitée, pièces disponibles auprès du fabricant |
| Sécurité | Ne pas exposer à l'humidité, respecter les instructions de sécurité du fabricant |
| Informations générales | Produit conçu pour une utilisation domestique, garantie de 2 ans |
FOIRE AUX QUESTIONS - 42PQ3000 LG
Questions des utilisateurs sur 42PQ3000 LG
0 question sur cet appareil. Repondez a celles que vous connaissez ou posez la votre.
Poser une nouvelle question sur cet appareil
Téléchargez la notice de votre Télévision au format PDF gratuitement ! Retrouvez votre notice 42PQ3000 - LG et reprennez votre appareil électronique en main. Sur cette page sont publiés tous les documents nécessaires à l'utilisation de votre appareil 42PQ3000 de la marque LG.
MODE D'EMPLOI 42PQ3000 LG
PLASMA TV OWNER'S MANUAL
PLASMA TV MODELS
42PQ20**
50PQ20**
42PQ30**
50PQ30**
42PQ60**
50PQ60**
50PS30**
50PS60**
DVB
Digital Video Broadcasting
Trade Mark of the DVB Digital Video Broadcasting Project (1991 to 1996)
ID Number(s): 6023: 42PQ2000-ZA
6320:42PQ2010-ZB
6024:50PQ2000-ZA
6319:50PQ2010-ZB
6025:42PO3000-ZA
6020:50PQ3000-ZA
6026:42PQ6000-ZA
6029:50PQ6000-ZA
6322:50PS3000-ZB
6341:50PS6000-ZC
Please read this manual carefully before operating your TV.
Retain it for future reference.
Record the model number and serial number of the TV.
Refer to the label on the back cover and quote this information.
To your dealer when requiring any service.

ENERGY STAR
This product qualifies for ENERGY STAR in the "factory default (Home Use mode)" setting and this is the setting in which power savings will be achieved.
Changing the factory default picture setting or enabling other features will increase power consumption that could exceed the limits necessary to qualify for Energy Star rating.
Ensure that the following accessories are included with your TV. If an accessory is missing, please contact the dealer where you purchased the TV.
Image shown may differ from your TV.
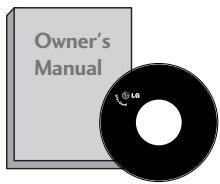
Owner's Manual
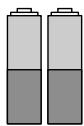
Batteries
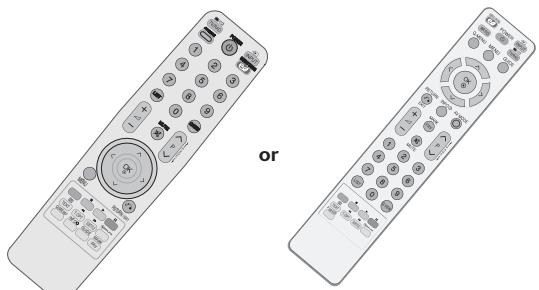
Remote Control
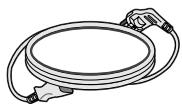
Power Cord
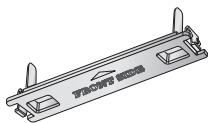
Protection Cover
(Refer to p.8)
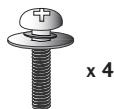
Bolts for stand assembly (Refer to p.8)
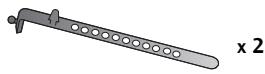
Cable Holder
(Refer to p.8)

Ferrite Core (This item is not included for all models.)
This item is not included for all models.

Polishing Cloth
Polishing cloth for use on the screen.
- Lightly wipe any stains or fingerprints on the surface of the TV with the polishing cloth.
Do not use excessive force. This may cause scratching or discolouration.
Wall Mounting Bracket (Separate purchase)
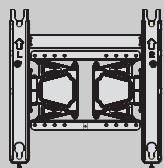
AW-50PG60MS
Use of ferrite core (This item is not included for all models.)
Ferrite core can be used to reduce the electromagnetic wave when connecting the power cord.
The closer the location of the ferrite core to the power plug, the better it is.
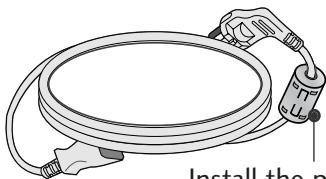
Install the power plug closely.
ACCESSIONS 1
PREPARATION
Front Panel Controls 4
Back Panel Information 7
Stand Installation 8
Back Cover for Wire Arrangement 8
Desktop Pedestal Installation 8
Careful installation advice 9
Wall Mount: Horizontal Installation 9
Antenna Connection 10
Swivel Stand 10
EXTERNAL EQUIPMENT SETUP
HD Receiver Setup 11
DVD Setup 13
VCR Setup 16
Insertion of CI Module 19
Digital Audio Out Setup 19
Other A/V Source Setup 20
Usb Setup 20
PC Setup 21
- Screen Setup for PC Mode 24
WATCHING TV / PROGRAMME CONTROL
Remote Control Key Functions 28
Turning on the TV 32
Programme Selection 32
Volume Adjustment 32
Quick Menu 33
On-Screen Menus Selection and Adjustment . . 34
AutoProgrammeTuning 35
ManualProgrammeTuning(InDigitalMode)..36
ManualProgrammeTuning(InAnalogueMode)..37
Programme Edit 39
Software Update 42
Diagnostics 43
CI[COMMON INTERFACE] INFORMATION .44
Selecting the Programme Table 45
Input List 46
SIMPLINK 47
Data Service 49
Input Label 49
AV Mode 50
Simple manual 51
Initializing (Reset to original factory settings) .52
TO USE A USB DEVICE
When connecting a USB device 53
Photo List 54
Music List 58
Movie List 61
DivX Registration Code 65
Deactivation 66
EPG (ELECTRONIC PROGRAMME GUIDE) (IN DIGITAL MODE)
- Switch on/off EPG 67
-SelectProgramme 67 - Button Function in NOW/NEXT Guide Mode . 68
-Button Function in 8 Day Guide Mode....68
-Button Function in Date Change Mode . . . . 69 - Button Function in Extended Description Box . . 69
- Button Function in Record/Remind Setting Mode . 70
- Button Function in Schedule List Mode . . . . 70
PICTURE CONTROL
Picture Size (Aspect Ratio) Control 71
E ENERGY SAVING. 73
Preset Picture Settings -Picture Mode-Preset 74
Manual Picture Adjustment
- Picture Mode-User option 75
Picture Improvement Technology 76
Expert Picture Control 78
Picture Reset 81
Image Sticking Minimization (ISM) Method 82
Demo Mode 83
Mode Setting. 84
SOUND & LANGUAGE CONTROL
AutoVolumeLeveler 85
Preset Sound Settings -Sound Mode 86
Sound Setting Adjustment -User Mode 87
SRS TruSurround XT 87
Clear Voice II 88
Balance 88
TV Speakers On/ Off Setup 89
Selecting Digital Audio Out 90
Audio Reset 91
Audio description 92
I/II
-
Stereo/Dual Reception (In Analogue Mode Only) ..... 93
-
NICAM Reception (In Analogue Mode Only) .94
-
Speaker Sound Output Selection 94
On-Screen Menu Language/Country Selection .. 95
Language Selection (In Digital Mode only) 96
TIME SETTING
Clock Setup 97
Auto On/ Off Timer Setting 98
Sleep Timer Setting 99
PARENTAL CONTROL / RATINGS
Set Password & Lock System 100
BlockProgramme 101
Parental Control 102
Input Block 103
Key Lock 104
TELETEXT
Switch on/off 105
SIMPLE Text 105
TOP Text 105
FASTEXT 106
Special Teletext Functions 106
DIGITAL TELETEXT
Teletext within Digital Service 107
Teletext in Digital Service 107
APPENDIX
Troubleshooting 108
Maintenance 110
Product Specifications 111
IR Codes 113
External Control Device Setup 115
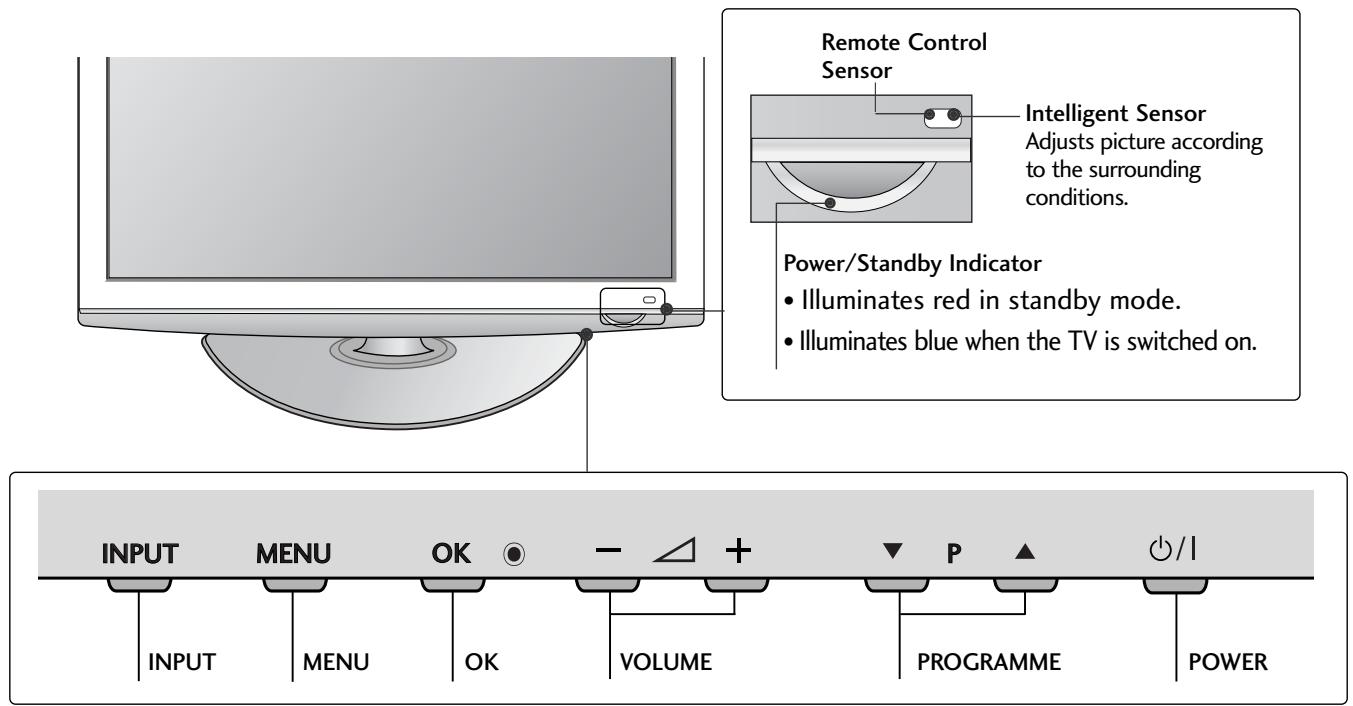
FRONT PANEL CONTROLS
Image shown may differ from your TV.

CAUTION
- When the TV cannot be turned on with the remote control, press the main power button on the TV (When the power is turned off with the main power button on the TV, it will not be turned on with the remote control.)
42/50PQ30**, 50PS30**
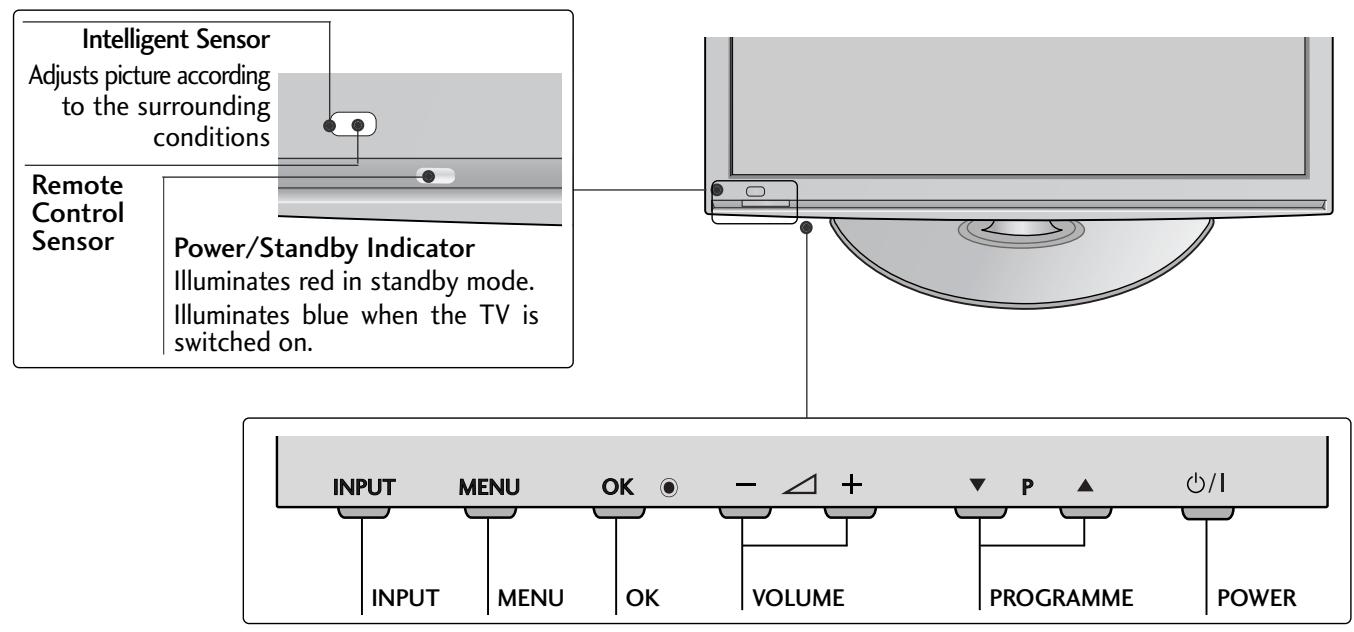
42/50PQ60, 50PS60
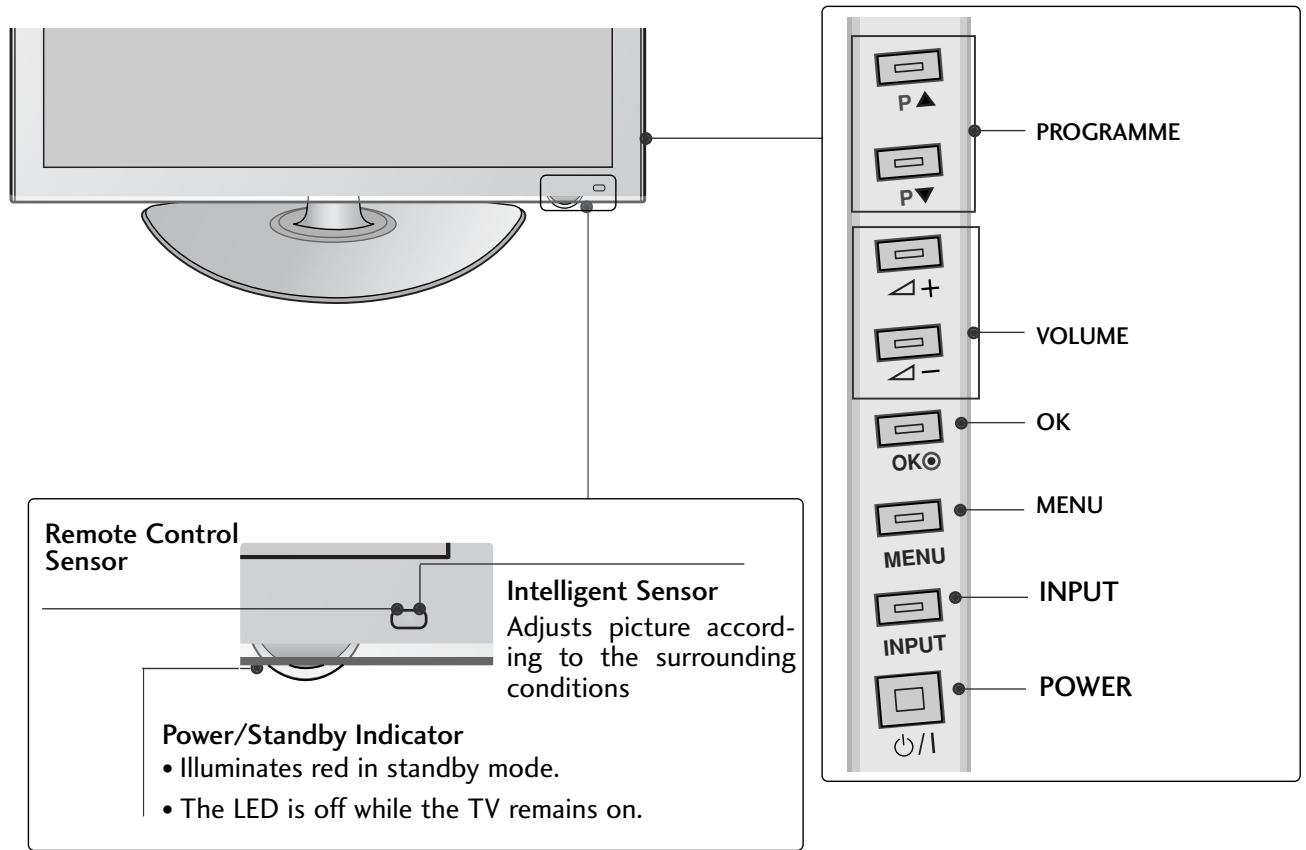
BACK PANEL INFORMATION
■ Image shown may differ from your TV.
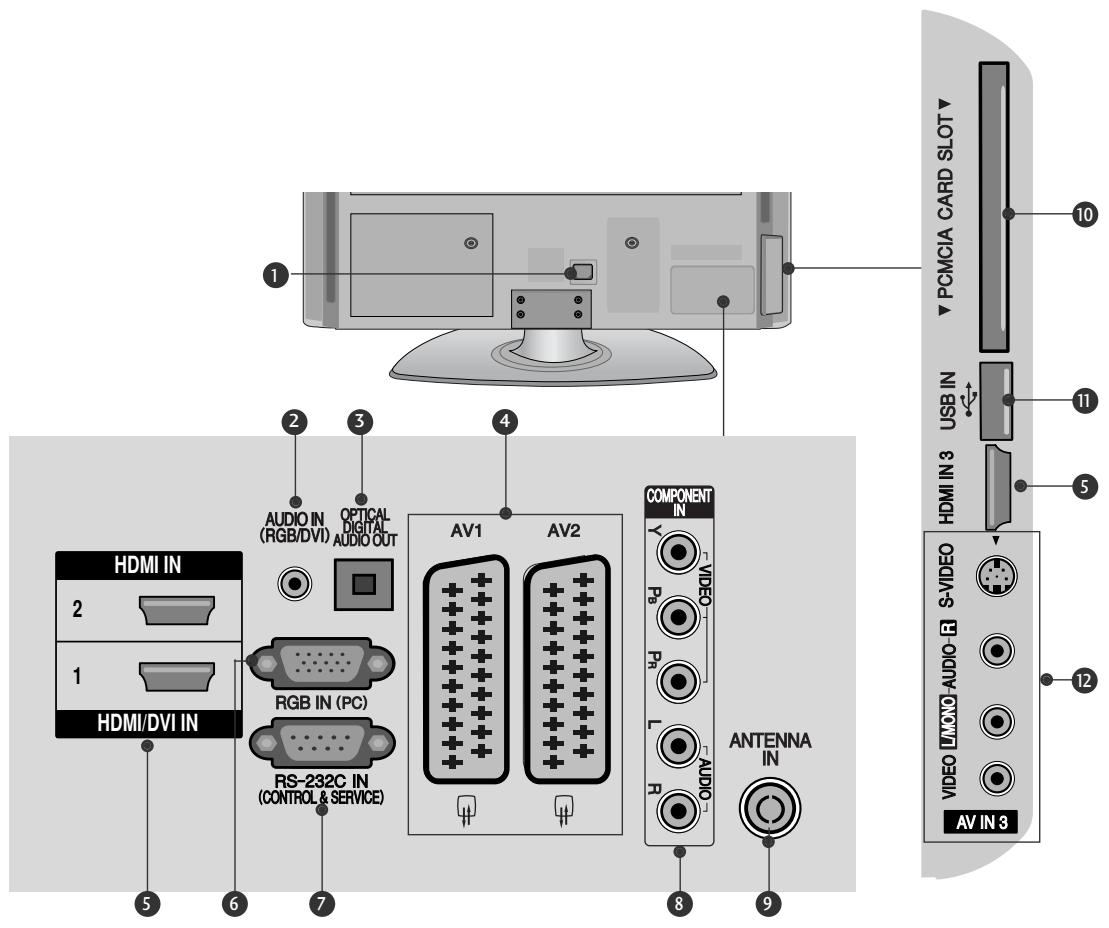
Power Cord Socket
This TV operates on an AC power. The voltage is indicated on the Specifications page. Never attempt to operate the TV on DC power.
RGB/DVI Audio Input
Connect the audio from a PC or DTV.
3 OPTICAL DIGITAL AUDIO OUT
Connect digital audio to various types of equipment.
Connect to a Digital Audio Component.
Use an Optical audio cable.
Euro Scart Socket (AV1/AV2)
Connect scart socket input or output from an external device to these jacks.
HDMI Input
Connect an HDMI signal to HDMI IN. Or DVI (VIDEO) signal to HDMI/DVI port with DVI to HDMI cable.
RGB Input
Connect the output from a PC.
RS-232C IN (CONTROL & SERVICE) PORT
Connect to the RS-232C port on a PC.
This port is used for Service or Hotel mode.
Component Input
Connect a component video/audio device to these jacks.
Antenna Input
Connect RF antenna to this jack.
10 PCMCIA (Personal Computer Memory Card International Association) Card Slot
(This feature is not available in all countries.)
USB Input
Connect USB storage device to this jack.
12 Audio/Video Input
Connect audio/video output from an external device to these jacks.
S-Video Input
Connect S-Video out from an S-VIDEO device.
STAND INSTALLATION
Image shown may differ from your TV.
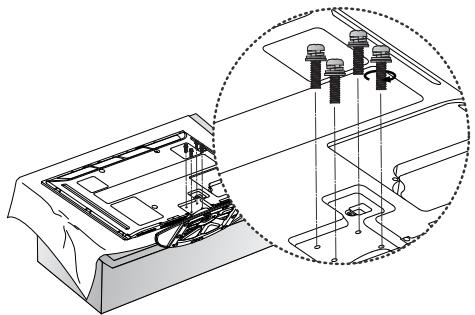
- When assembling the desk type stand, check whether the bolt is fully tightened. (If not tightened fully, the product can tilt forward after the product installation.) If you tighten the bolt with excessive force, the bolt can deviate from abrasion of the tightening part of the bolt.
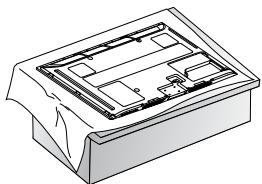
1 Carefully place the TV screen side down on a cushioned surface to protect the screen from damage.
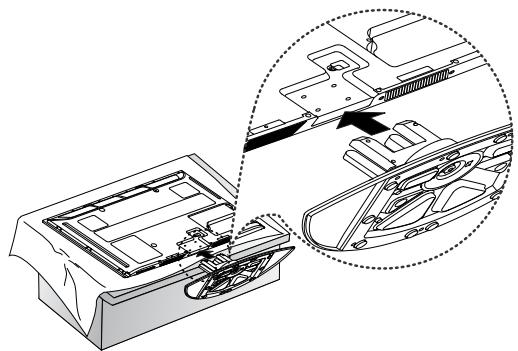
2 Assemble the TV as shown.
Fix the 4 bolts securely using the holes in the back of the TV.
NOTE
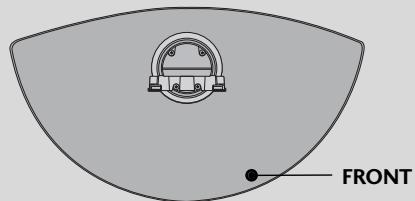
When assembling the stand, make sure to distinguish and assemble the front and rear side of the stand correctly.
BACK COVER FOR WIRE ARRANGEMENT
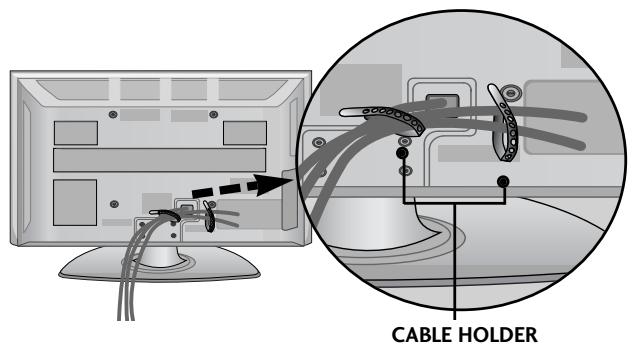
- Image shown may differ from your TV. After Connecting the cables as necessary, install CABLE HOLDER as shown and bundle the cables.
NOT USING THE DESK-TYPE STAND
- Image shown may differ from your TV.
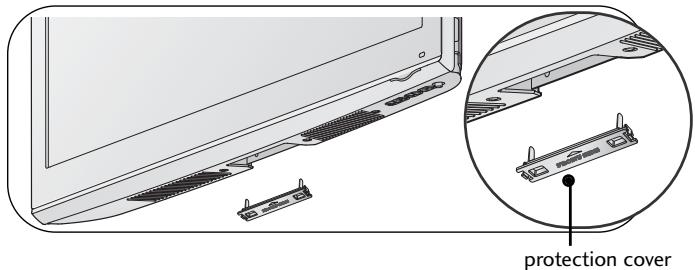
When installing the wall-mounted unit, use the protection cover. Insert the PROTECTION COVER into the TV until clicking sound.
DESKTOP PEDESTAL INSTALLATION
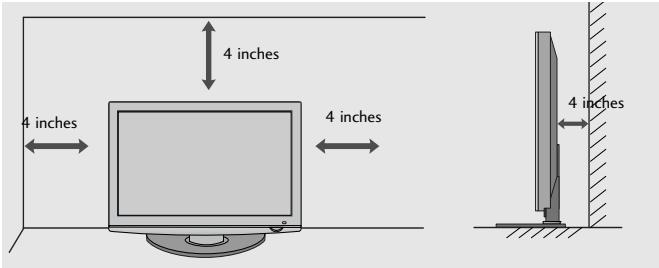
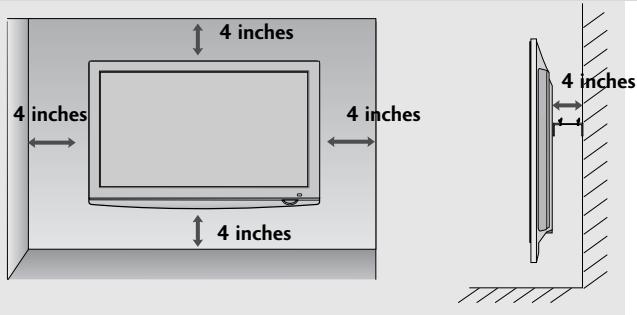
For adequate ventilation allow a clearance of 4" (10cm) all around the TV.
CAREFUL INSTALLATION ADVICE
You should purchase necessary components to fix the TV safety and secure to the wall from the market.
Position the TV close to the wall to avoid the possibility of it falling when pushed.
The instructions shown below are a safer way to set up the TV, by fixing it to the wall, avoiding the possibility of it falling forwards if pulled. This will prevent the TV from falling forward and causing injury. This will also prevent the TV from damage. Ensure that children do not climb or hang from the TV.
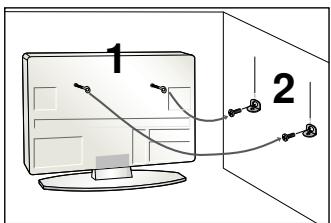
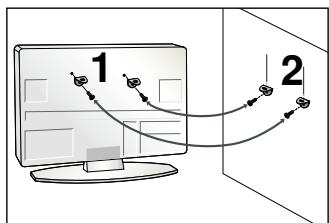
Use the eye-bolts or TV brackets/bolts to fix the product to the wall as shown in the picture. (If your TV has bolts in the eyebolts, loosen then bolts.) * Insert the eye-bolts or TV brackets/bolts and tighten them securely in the upper holes.
2 Secure the wall brackets with the bolts on the wall. Match the height of the bracket that is mounted on the wall.
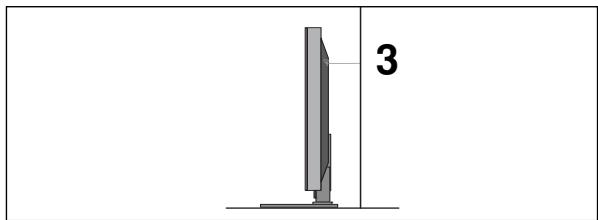
3 Use a sturdy rope to tie the product for alignment. It is safer to tie the rope so it becomes horizontal between the wall and the product.
NOTE
When moving the TV undo the cords first.
Use a platform or cabinet strong and large enough to support the size and weight of the TV.
To use the TV safely make sure that the height of the bracket on the wall and on the TV is the same.
EARTHING
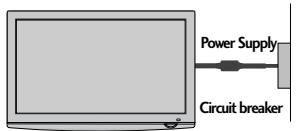
Ensure that you connect the earth wire to prevent possible electric shock. If grounding methods are not possible, have a qualified electrician install a separate circuit breaker.
Do not try to earth the TV by connecting it to telephone wires, lightening rods or gas pipes.
The TV can be installed in various ways such as on a wall, or on a desktop etc.
The TV is designed to be mounted horizontally.
WALL MOUNT: HORIZONTAL INSTALLATION
We recommend the use of a LG Brand wall mounting bracket when mounting the TV to a wall.
We recommend that you purchase a wall mounting bracket which supports VESA standard.
LG recommends that wall mounting be performed by a qualified professional installer.
NOTE
Should Install wall mount on a solid wall perpendicular to the floor.
Should use a special wall mount, if you want to install it to ceiling or slanted wall.
The surface that wall mount is to be mounted on should be of sufficient strength to support the weight of TV set; e.g. concrete, natural rock, brick and hollow block.
- Installing screw type and length depends on the wall mount used. Further information, refer to the instructions included with the mount.
LG is not liable for any accidents or damage to property or TV due to incorrect installation:
-
Where a non-compliant VESA wall mount is used.
-
Incorrect fastening of screws to surface which may cause TV to fall and cause personal injury.
- Not following the recommended Installation method.
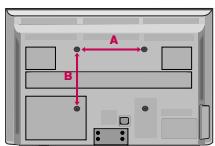
| Model | VESA (A * B) | Standard Screw | Quantity |
| 42PQ20** | 400 * 400 | M6 | 4 |
| 50PQ20** | 400 * 400 | M6 | 4 |
| 42PQ30** | 400 * 400 | M6 | 4 |
| 50PQ30** | 400 * 400 | M6 | 4 |
| 42PQ60** | 400 * 400 | M6 | 4 |
| 50PQ60** | 400 * 400 | M6 | 4 |
| 50PS30** | 400 * 400 | M6 | 4 |
| 50PS60** | 400 * 400 | M6 | 4 |
PREPARATION
To prevent damage do not connect to the mains outlet until all connections are made between the devices.
ANTENNA CONNECTION
For optimum picture quality, adjust antenna direction.
An antenna cable and converter are not supplied.


In poor signal areas, to achieve better picture quality it may be necessary to install a signal amplifier to the antenna as shown above.
If signal needs to be split for two TVs, use an antenna signal splitter for connection.
SWIVEL STAND
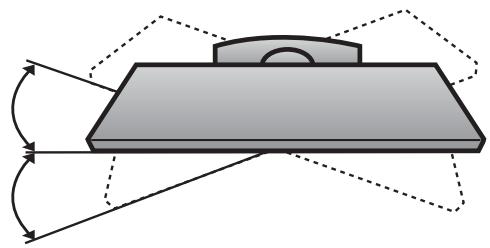
After installing the TV, you can adjust the TV manually to the left or right direction by 20 degrees to suit your viewing position.
EXTERNAL EQUIPMENT SETUP
- To avoid damaging any equipment, never plug in any power cords until you have finished connecting all equipment.
This section on EXTERNAL EQUIPMENT SETUP mainly uses diagrams for the 42PQ30** models.
Image shown may differ from your TV.
HD RECEIVER SETUP
This TV can receive Digital RF/Cable signals without an external digital set-top box. However, if you do receive Digital signals from a digital set-top box or other digital external device, refer to the diagram as shown below.
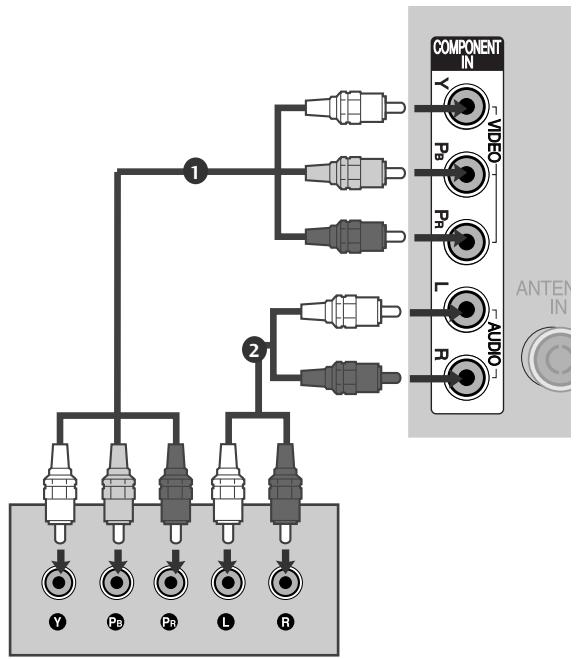
Connecting with a component cable
Connect the video outputs (Y, PB, PR) of the digital set top box to the COMPONENT IN VIDEO jacks on the TV.
Connect the audio output of the digital set-top box to the COMPONENT IN AUDIO jacks on the TV.
3 Turn on the digital set-top box. (Refer to the owner's manual for the digital set-top box.)
4 Select Component input source using the INPUT button on the remote control.
| Signal | Component | HDMI |
| 480i/576i | O | X |
| 480p/576p | O | O |
| 720p/1080i | O | O |
| 1080p | O (50/60Hz only) | O (24Hz/30Hz/50Hz/60Hz) |
Connecting a set-top box with an HDMI cable
1 Connect the digital set-top box to HDMI/DVI IN 1, HDMI IN 2 or HDMI IN 3 jack on the TV.
Turn on the digital set-top box. (Refer to the owner's manual for the digital set-top box.)
3 Select HDMI1, HDMI2 or HDMI3 input source using the INPUT button on the remote control.
NOTE
- Check your HDMI cable is over version 1.3. If the HDMI cables don't support HDMI version 1.3, it can cause flickers or no screen display. In this case use the latest cables that support HDMI version 1.3.
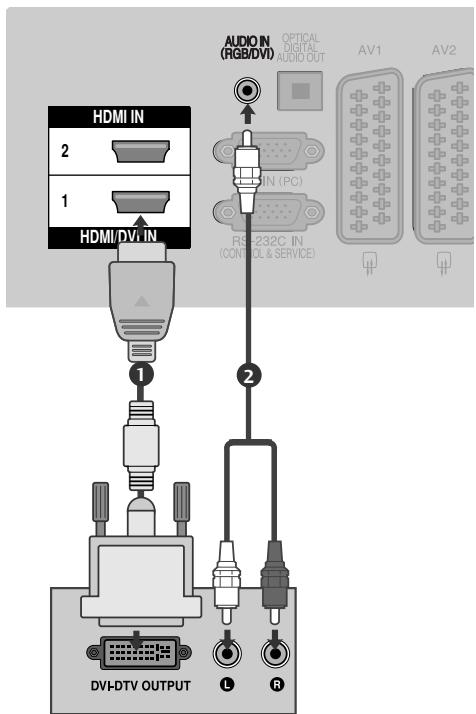
Connecting with an HDMI to DVI cable
1 Connect the digital set-top box to HDMI/DVI IN 1 jack on the TV.
2 Connect the audio output of the digital set-top box to the AUDIO IN (RGB/DVI) jack on the TV.
Turn on the digital set-top box. (Refer to the owner's manual for the digital set-top box.)
4 Select HDMI1 input source using the INPUT button on the remote control.
DVD SETUP
Connecting with a component cable
1 Connect the video outputs (Y, PB, PR) of the DVD to the COMPONENT IN VIDEO jacks on the TV.
Connect the audio outputs of the DVD to the COMPONENT IN AUDIO jacks on the TV.
3 Turn on the DVD player, insert a DVD.
4 Select Component input source using the INPUT button on the remote control.
Refer to the DVD player's manual for operating instructions.

Component Input ports
To achieve better picture quality, connect a DVD player to the component input ports as shown below.
| Component ports on the TV | Y | PB | PR |
| Video output ports on DVD player | Y | PB | PR |
| Y | B-Y | R-Y | |
| Y | Cb | Cr | |
| Y | Pb | Pr |
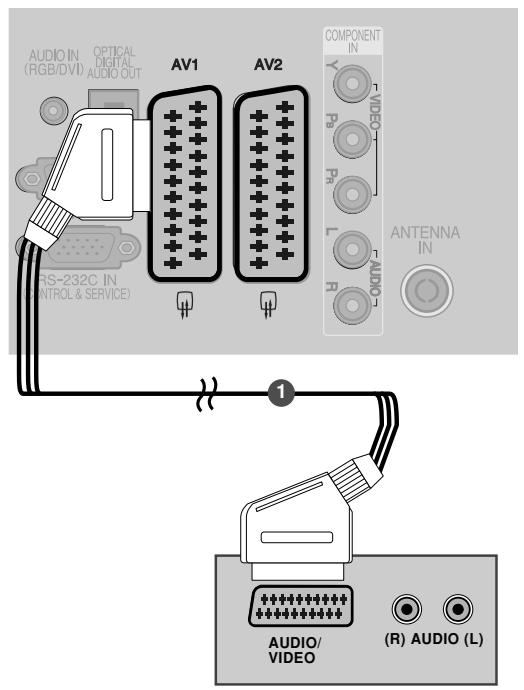
Connecting with a Euro Scart cable
1 Connect the Euro scart socket of the DVD to the AV1 Euro scart socket on the TV.
2 Turn on the DVD player, insert a DVD.
3 Select AV1 input source using the INPUT button on the remote control. If connected to AV2 Euro scart socket, select AV2 input source.
Refer to the DVD player's manual for operating instructions.
| Scart | Input | Output | ||
| Video | Audio | RGB | Video, Audio | |
| AV1 | O | O | O | ATV only |
| AV2 | O | O | X | ATV, DTV, AV1/2/3 output is available. |
| Output Type Current input mode | AV1 (TV Out) | AV2 (Monitor Out) | AV2 (When DTV scheduled recording is in progress using recording equipment.) |
| Digital TV | X | O | O |
| Analogue TV | O | O | O (The input mode is converted to DTV automatically.) |
| AV1/2/3 | O | O | O |
| Component/RGB/HDMI | O | X | O |
TV Out: Outputs analog TV video signals. Monitor Out: Outputs the current screen image.
NOTE
Any Euro scart cable used must be signal shielded.
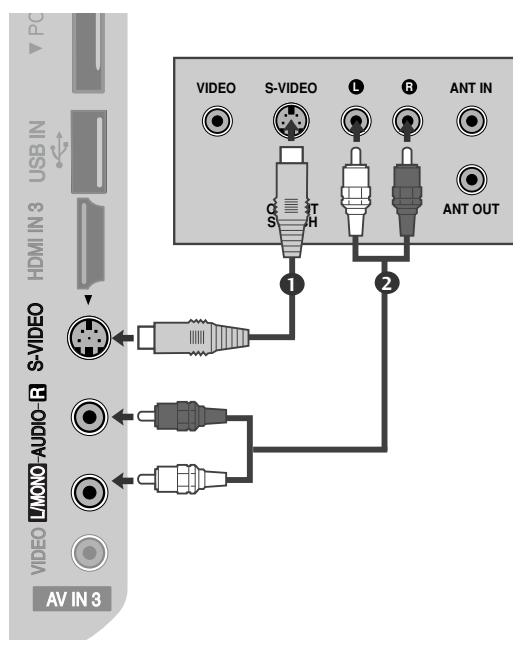
Connecting with a S-Video cable
Connect the S-VIDEO output of the DVD to the S-VIDEO input on the TV.
Connect the audio outputs of the DVD to the AUDIO input jacks on the TV.
3 Turn on the DVD player, insert a DVD.
4 Select AV3 input source using the INPUT button on the remote control.
Refer to the DVD player's manual for operating instructions.
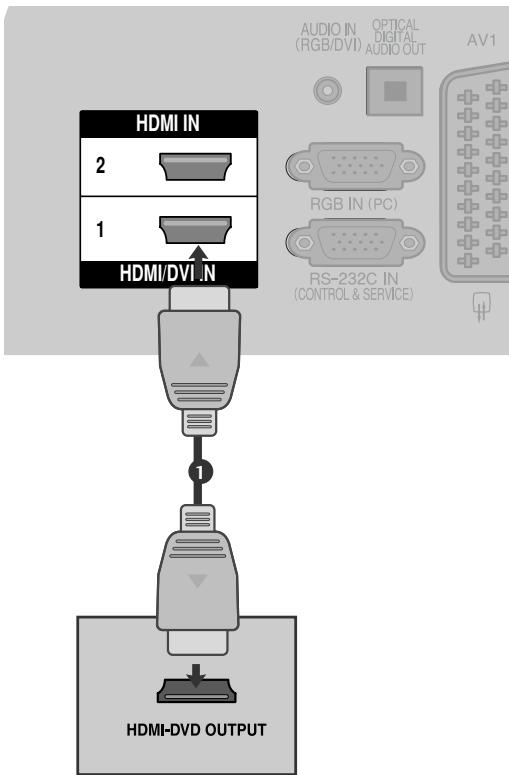
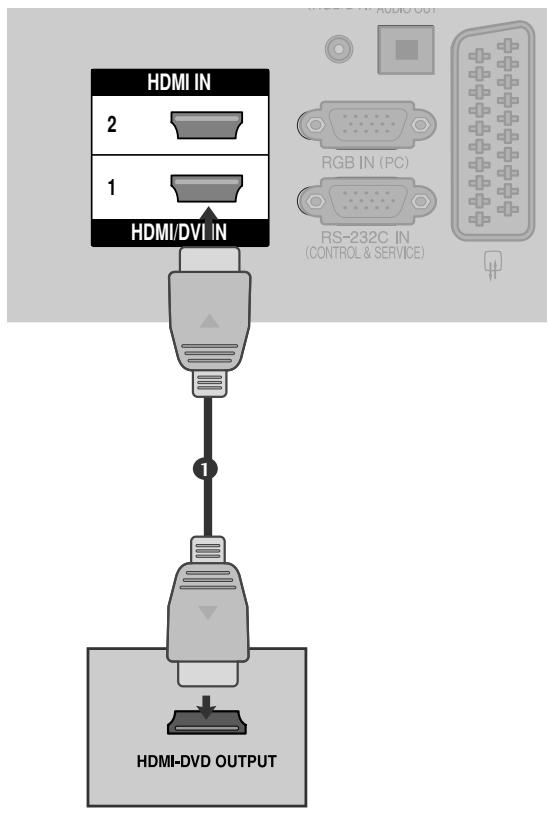
Connecting the HDMI cable
Connect the HDMI output of the DVD to the HDMI/DVI IN 1, HDMI IN 2 or HDMI IN 3 jack on the TV.
2 Select HDMI1, HDMI2 or HDMI3 input source using the INPUT button on the remote control.
Refer to the DVD player's manual for operating instructions.
NOTE
The TV can receive video and audio signals simultaneously when using a HDMI cable.
If the DVD does not support Auto HDMI, you must set the output resolution appropriately.
- Check HDMI cable over version 1.3.
If the HDMI cables don't support HDMI version 1.3, it can cause flickers or no screen display. In this case use the latest cables that support HDMI version 1.3.
EXTERNAL EQUIPMENT SETUP
VCR SETUP
To avoid picture noise (interference), allow adequate distance between the VCR and TV.
Connecting with a RF Cable
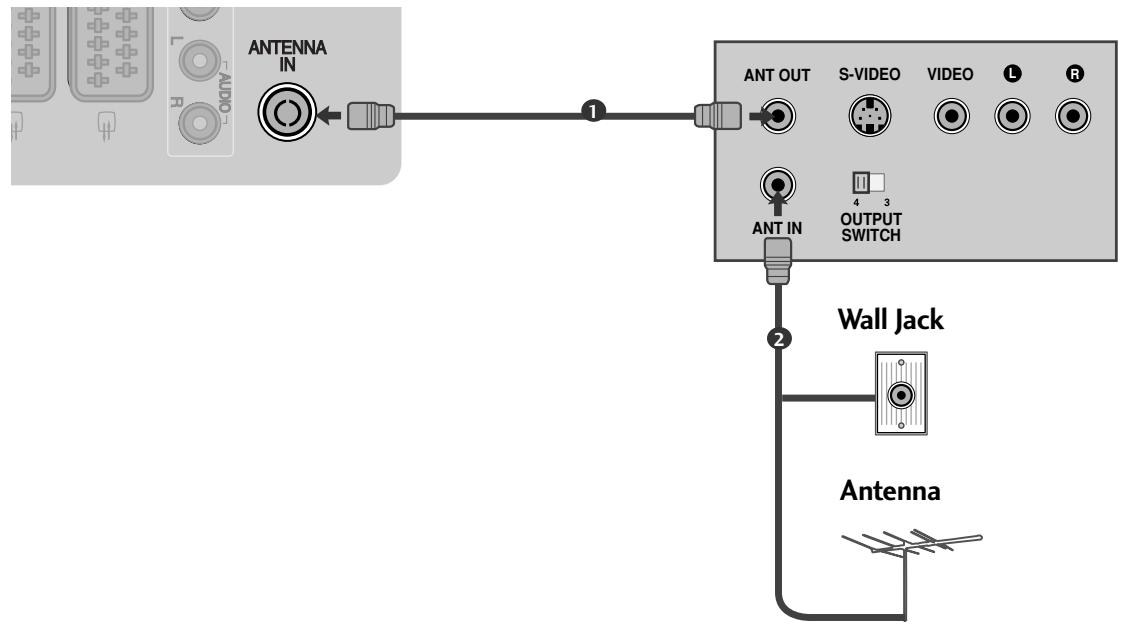
Connect the ANT OUT socket of the VCR to the ANTENNA IN socket on the TV.
2 Connect the antenna cable to the ANT IN socket of the VCR.
Press the PLAY button on the VCR and match the appropriate channel between the TV and VCR for viewing.
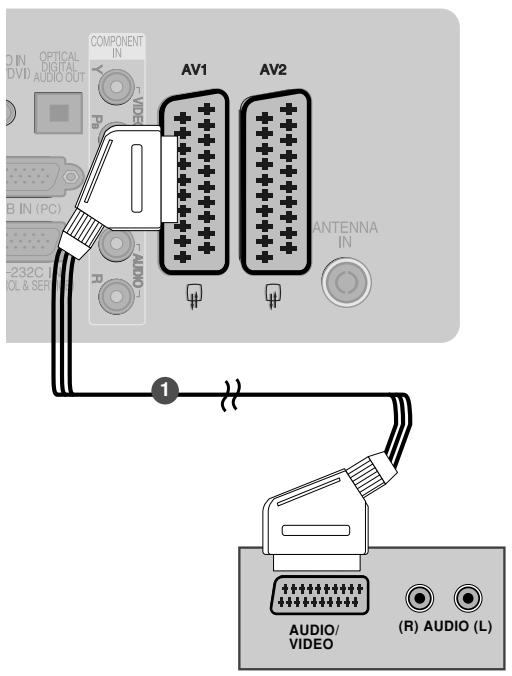
Connecting with a Euro Scart cable
Connect the Euro scart socket of the VCR to the AV1 Euro scart socket on the TV.
2 Insert a video tape into the VCR and press PLAY on the VCR. (Refer to the VCR owner's manual.)
3 Select AV1 input source using the INPUT button on the remote control.
4 If connected to AV2 Euro scart socket, select AV2 input source.
| Scart | Input | Output | ||
| Video | Audio | RGB | Video, Audio | |
| AV1 | O | O | O | ATV only |
| AV2 | O | O | X | ATV, DTV, AV1/2/3 output is available. |
| Output Type Current input mode | AV1 (TV Out) | AV2 (Monitor Out) | AV2 (When DTV scheduled recording is in progress using recording equipment.) |
| Digital TV | X | O | O |
| Analogue TV | O | O | O (The input mode is converted to DTV automatically.) |
| AV1/2/3 | O | O | O |
| Component/RGB/HDMI | O | X | O |
TV Out: Outputs analog TV video signals. Monitor Out: Outputs the current screen image.

NOTE
Any Euro Scart cable used must be signal shielded.
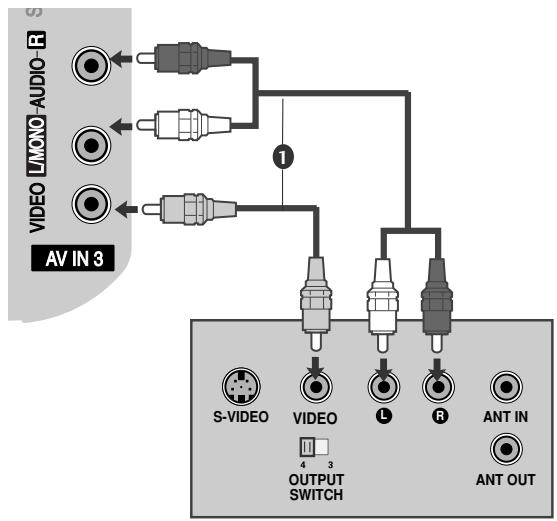
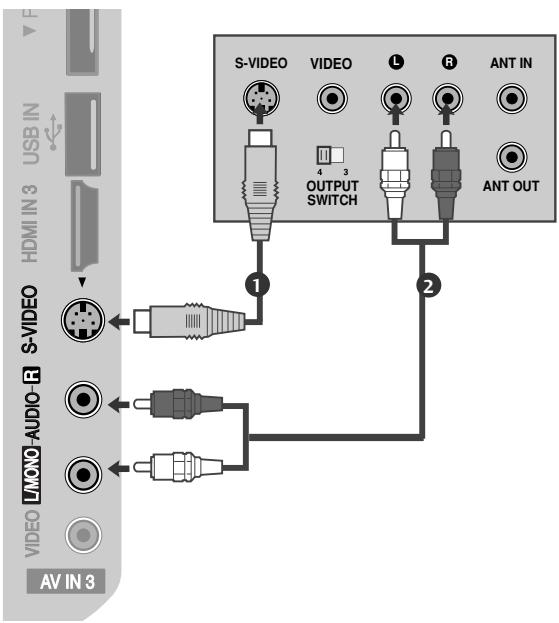
Connecting with a RCA cable
Connect the AUDIO/VIDEO jacks between TV and VCR. Match the jack colours (Video = yellow, Audio Left = white, and Audio Right = red)
2 Insert a video tape into the VCR and press PLAY on the VCR. (Refer to the VCR owner's manual.)
3 Select AV3 input source using the INPUT button on the remote control.
NOTE
If you have a mono VCR, connect the audio cable from the VCR to the AUDIO L/MONO jack of the TV.
Connecting with a S-Video cable
Connect the S-VIDEO output of the VCR to the S -VIDEO input on the TV set. The picture quality is improved; compared to normal composite (RCA cable) input.
2 Connect the audio outputs of the VCR to the AUDIO input jacks on the TV.
3 Insert a video tape into the VCR and press PLAY on the VCR. (Refer to the VCR owner's manual.)
4 Select AV3 input source with using the INPUT button on the remote control.
NOTE
If both S-VIDEO and VIDEO sockets have been connected to the S-VHS VCR simultaneously, only the S-VIDEO can be received.
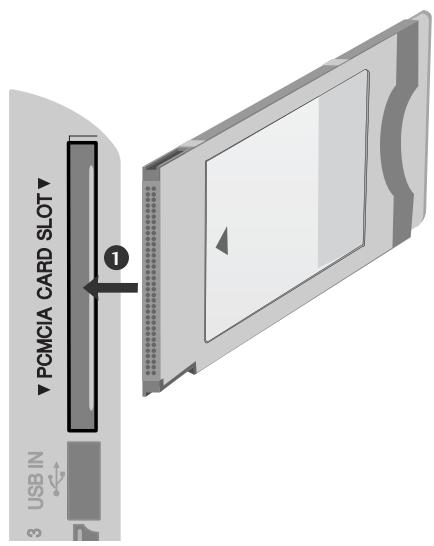
INSERTION OF CI MODULE
- To view the encrypted (pay) services in digital TV mode.
- This item is not included for all countries.
Insert the CI Module to PCMCIA (Personal Computer Memory Card International Association) CARD SLOT of TV as shown.
For further information, see p.44.
NOTE
- Check if the CI module is inserted into the PCMCIA card slot in the right direction. If the module is not inserted properly, this can cause damage to the TV and the PCMCIA card slot.
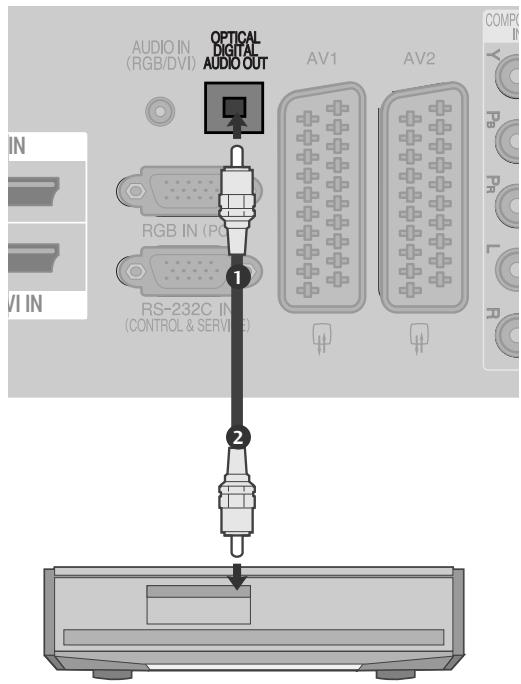
DIGITAL AUDIO OUT SETUP
Sending the TV's audio signal to external audio equipment via the Digital Audio Output (Optical) port. If you want to enjoy digital broadcasting through 5.1-channel speakers, connect the OPTICAL DIGITAL AUDIO OUT terminal on the back of TV to a DVD Home Theater (or amp).
1 Connect one end of an optical cable to the TV Digital Audio (Optical) Output port.
2 Connect the other end of the optical cable to the digital audio (Optical) input on the audio equipment.
3 Set the "TV Speaker option - Off" in the AUDIO menu. ( p.89) . Refer to the external audio equipment instruction manual for operation.
CAUTION
Do not look into the optical output port. Looking at the laser beam may damage your vision.
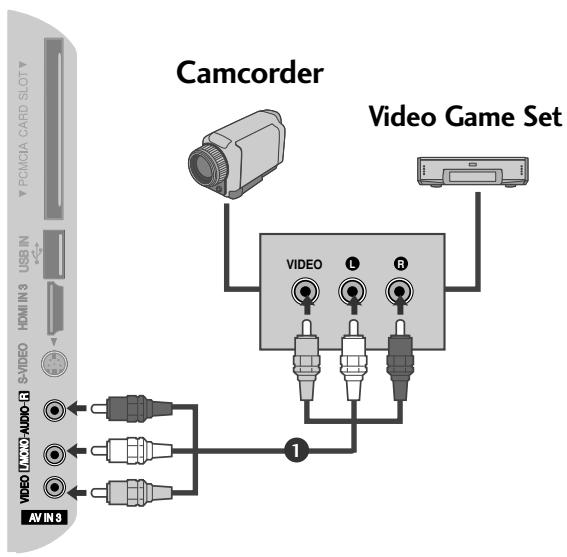
EXTERNAL EQUIPMENT SETUP
OTHER A/V SOURCE SETUP
1 Connect the AUDIO/VIDEO jacks between TV and external equipment. Match the jack colours. (Video = yellow, Audio Left = white, and Audio Right = red)
2 Select AV3 input source using the INPUT button on the remote control.
3 Operate the corresponding external equipment. Refer to external equipment operating guide.
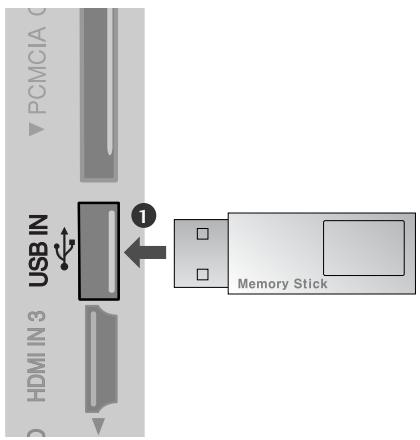
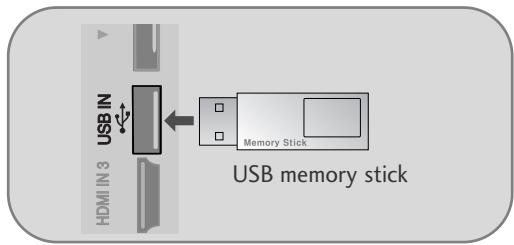
USB SETUP
1 Connect the USB device to the USB IN jacks on the side of TV.
After connecting the USB IN jacks, you use the USB function. (▶ p.53)
PC SETUP
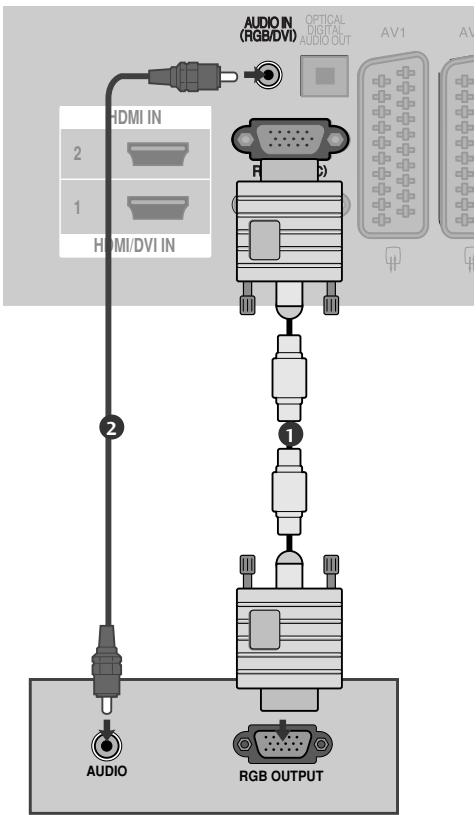
This TV provides Plug and Play capability, meaning that the PC adjusts automatically to the TV's settings.
Connecting with a D-sub 15 pin cable
Connect the RGB output of the PC to the RGB IN (PC) jack on the TV.
Connect the PC audio output to the AUDIO IN (RGB/DVI) jack on the TV.
3 Turn on the PC and the TV
4 Select RGB input source using the INPUT button on the remote control.
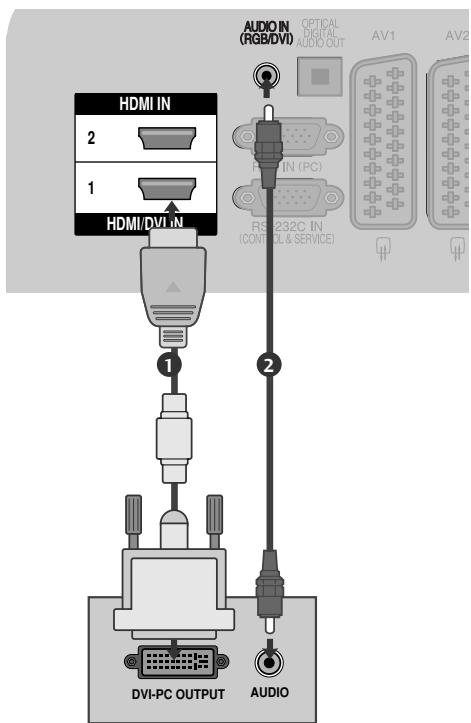
Connecting with a HDMI to DVI cable
Connect the DVI output of the PC to the HDMI/DVI IN1 jack on the TV.
Connect the PC audio output to the AUDIO IN (RGB/DVI) jack on the TV.
3 Turn on the PC and the TV.
4 Select HDMI11 input source using the INPUT button on the remote control.
Supported Display Resolution
RGB-PC, HDMI/DVI-PC mode
| Resolution | Horizontal Frequency(kHz) | Vertical Frequency(Hz) |
| 720x400 | 31.468 | 70.08 |
| 640x480 | 31.469 | 59.94 |
| 800x600 | 37.879 | 60.31 |
| 1024x768 | 48.363 | 60.00 |
| 1280x768 | 47.78 | 59.87 |
| 1360x768 | 47.72 | 59.8 |
| 1920x1080 | 67.50 | 60.00 |
HDMI/DVI-DTV mode
| Resolution | Horizontal Frequency(kHz) | Vertical Frequency(kHz) |
| 640x480 | 31.469 | 59.94 |
| 31.469 | 60 | |
| 720x480 | 31.47 | 59.94 |
| 31.50 | 60 | |
| 720x576 | 31.25 | 50.00 |
| 1280x720 | 37.50 | 50.00 |
| 44.96 | 59.94 | |
| 45.00 | 60 | |
| 1920x1080 | 28.125 | 50.00 |
| 33.72 | 59.94 | |
| 33.75 | 60 | |
| 27.00 | 24.00 | |
| 33.75 | 30 | |
| 56.25 | 50.00 | |
| 67.433 | 59.94 | |
| 67.50 | 60 |

NOTE
- Avoid keeping a fixed image on the set's screen for prolonged periods of time. The fixed image may become permanently imprinted on the screen; use a screen saver when possible.
- There may be interference relating to resolution, vertical pattern, contrast or brightness in PC mode. Change the PC mode to another resolution or change the refresh rate to another rate or adjust the brightness and contrast on the menu until the picture is clear. If the refresh rate of the PC graphic card can not be changed, change the PC graphic card or consult the manufacturer of the PC graphic card.
The synchronization input waveform for Horizontal and Vertical frequencies are separate.
We recommend using 1024x768, 60Hz (42/PQ20, 42/PQ30, 42/PQ60) / 1360x768, 60Hz (50/PQ20, 50/PQ30, 50/PQ60) / 1920x1080, 60Hz(50PS30, 50PS60) for the PC mode, they provide the best picture quality.
Connect the signal cable from the monitor output port of the PC to the RGB (PC) port of the TV or the signal cable from the HDMI output port of the PC to the HDMI IN (or HDMI/DVI IN) port on the TV.
Connect the audio cable from the PC to the Audio input on the TV. (Audio cables are not
included with the TV).
If using a sound card, adjust PC sound as required.
This TV uses a VESA Plug and Play Solution. The TV provides EDID data to the PC system with a DDC protocol. The PC adjusts automatically when using this TV.
DDC protocol is preset for RGB (Analog RGB), HDMI (Digital RGB) mode.
If required, adjust the settings for Plug and Play functionality
If the graphic card on the PC does not output analogue and digital RGB simultaneously, connect only one of either RGB or HDMI IN (or HDMI/DVI IN) to display the PC output on the TV.
If the graphic card on the PC does output analog and digital RGB simultaneously, set the TV to either RGB or HDMI; (the other mode is set to Plug and Play automatically by the TV.)
DOS mode may not work depending on the video card if you use an HDMI to DVI cable.
If you use an RGB-PC cable that is too long, there may be interference on the screen. We recommend using under 5m of cable. This provides the best picture quality.
EXTERNAL EQUIPMENT SETUP
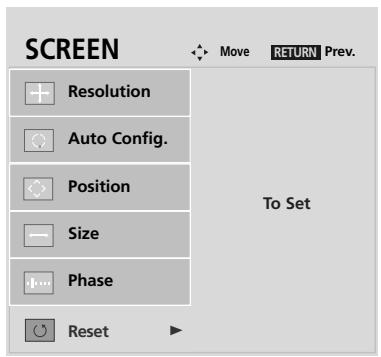
Screen Setup for PC mode
Screen Reset
Returns Position, Size and Phase to the factory default settings.
This function works in the following mode: RGB[PC].
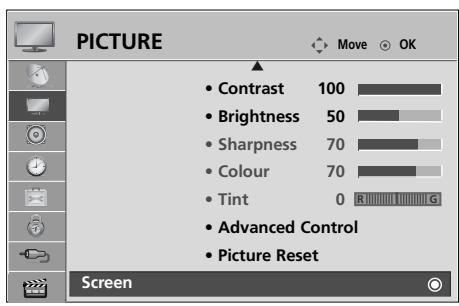


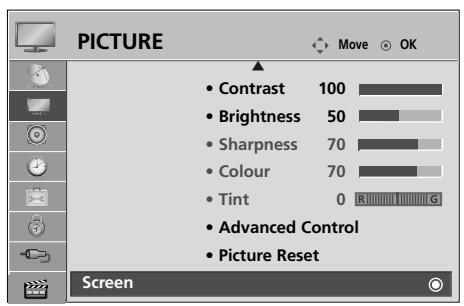
Select PICTURE.

Select Screen.

Select Reset.

Select Yes.

Run Reset.
- Press the MENU button to return to normal TV viewing.
- Press the RETURN button to move to the previous menu screen.
Adjustment for screen Position, Size, Phase
If the picture is not clear after auto adjustment and especially if characters are still trembling, adjust the picture phase manually.
This function works in the following mode: RGB[PC].
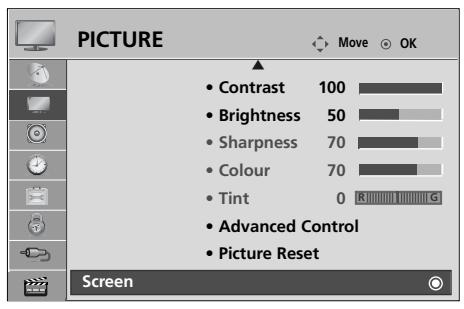

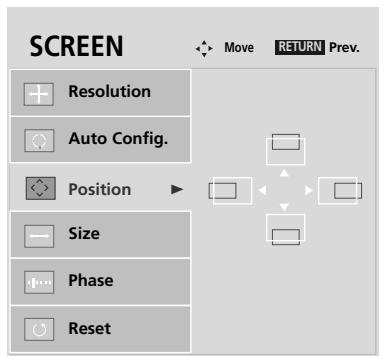
Select PICTURE.
Select Screen.
Select Position, Size or Phase.
Make appropriate adjustments.
- Press the MENU button to return to normal TV viewing.
- Press the RETURN button to move to the previous menu screen.
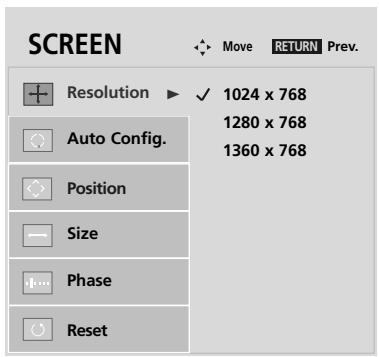
Selecting Resolution
To view a normal picture, match the resolution of RGB mode and selection of PC mode.
This function works in the following mode: RGB[PC]
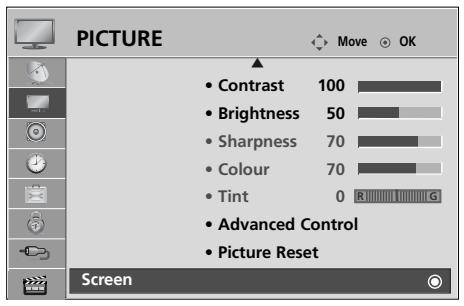


Select PICTURE.
Select Screen.
Select Resolution.
Select the desired resolution.
- Press the MENU button to return to normal TV viewing.
- Press the RETURN button to move to the previous menu screen.
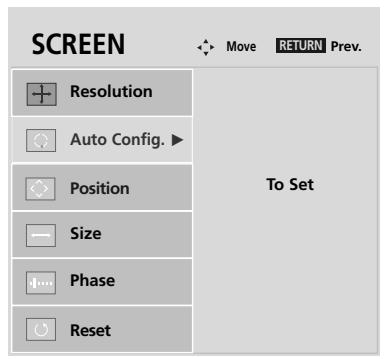
Auto Configure (RGB [PC] mode only)
Automatically adjust the picture position and minimizes image instability. After adjustment, if the image is still not correct, your TV is functioning properly but needs further adjustment.
Auto configure
This function is for automatic adjustment of the screen position, size, and phase. The displayed image will be unstable for a few seconds while the auto configuration is in progress.

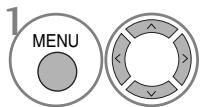
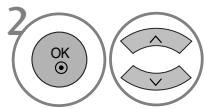
Select PICTURE.
Select Screen.
Select Auto Config..
Select Yes.

- If the position of the image is still not correct, try Auto adjustment again.
-
If picture needs to be adjusted again after Auto adjustment in RGB (PC), you can adjust the Position, Size or Phase.
-
Press the MENU button to return to normal TV viewing.
- Press the RETURN button to move to the previous menu screen.
WATCHING TV / PROGRAMME CONTROL
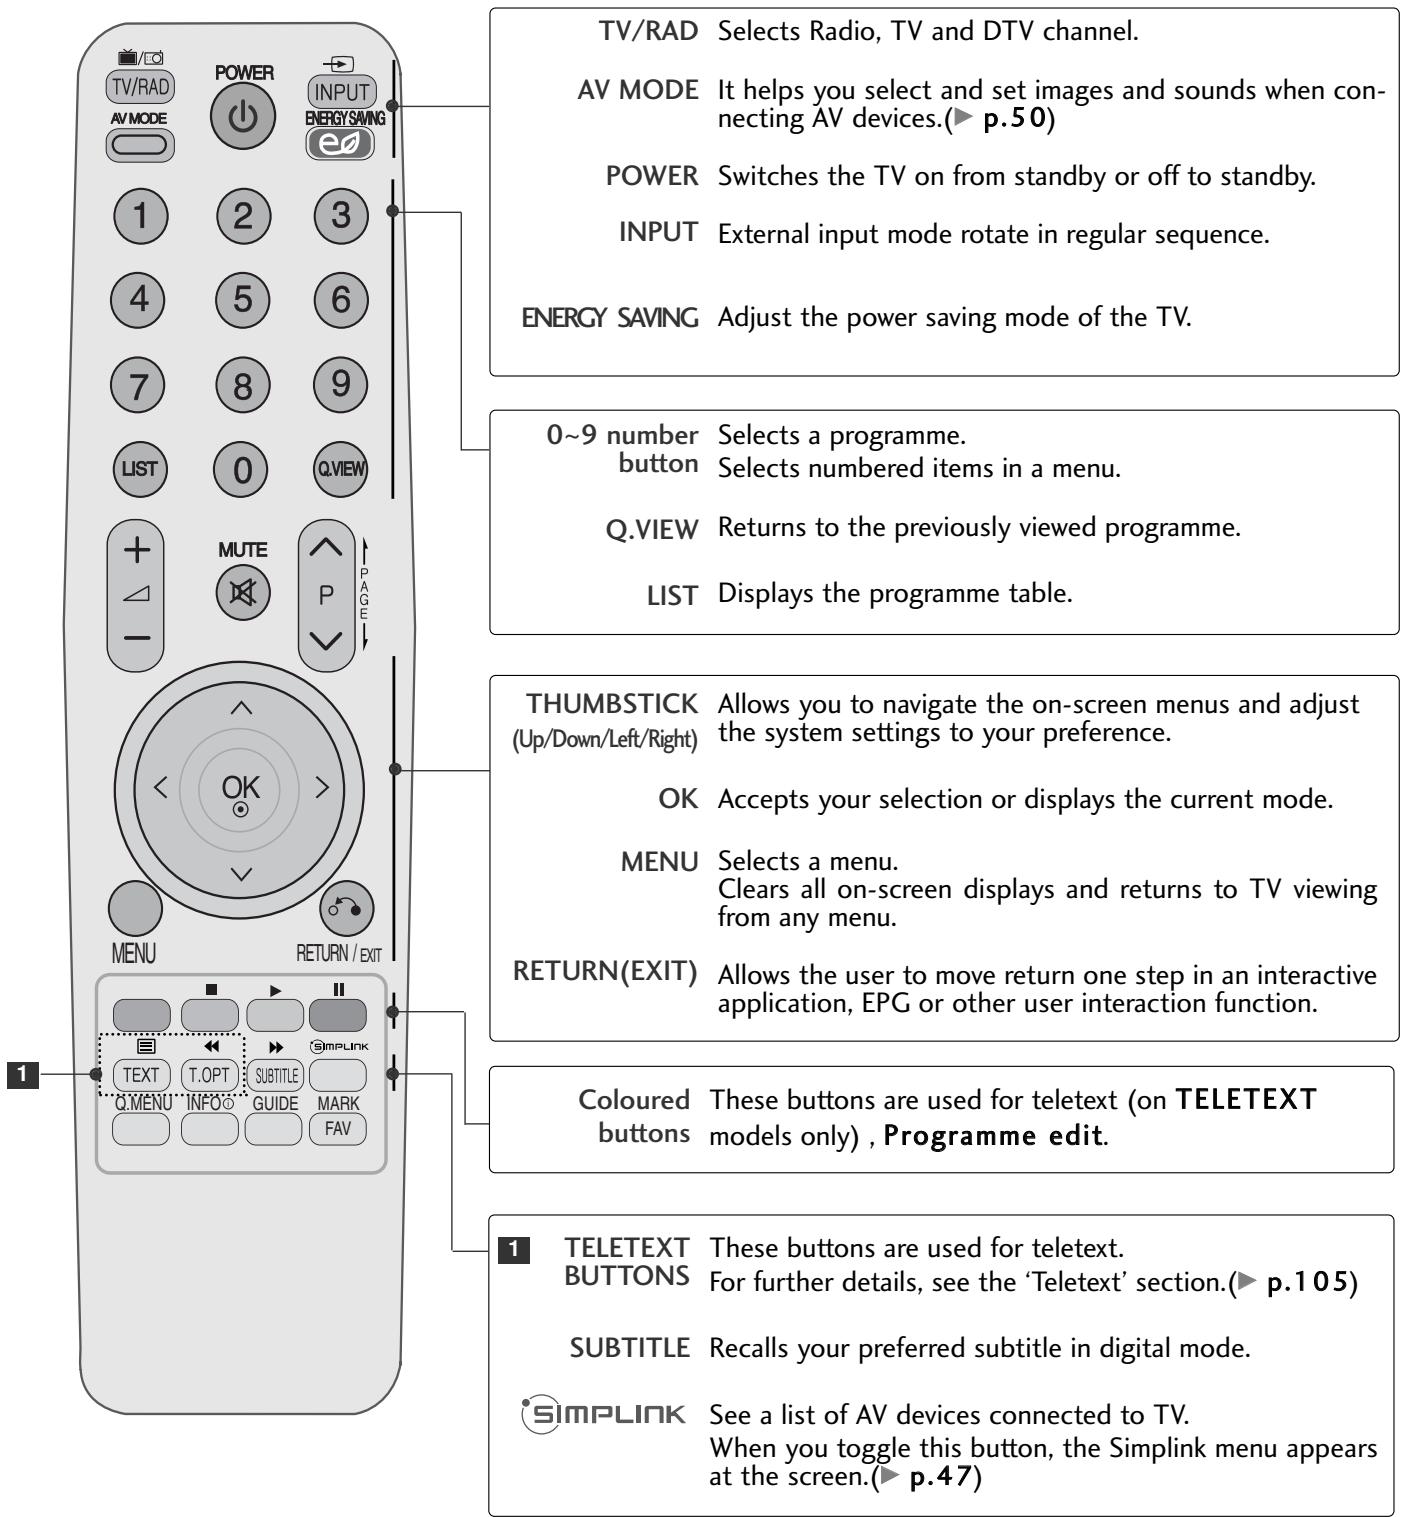
REMOTE CONTROL KEY FUNCTIONS
(Only 42/50PQ20, 42/50PQ30)
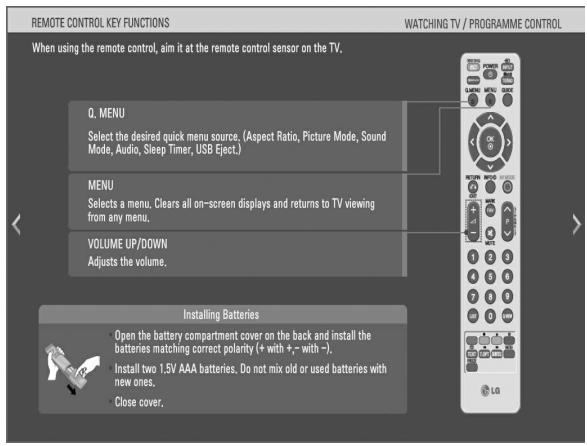
When using the remote control, aim it at the remote control sensor on the TV.
- Open the battery compartment cover on the back and install the batteries matching correct polarity (+with +,-with -).
Install two 1.5V AAA batteries. Do not mix old or used batteries with new ones.
Close cover.
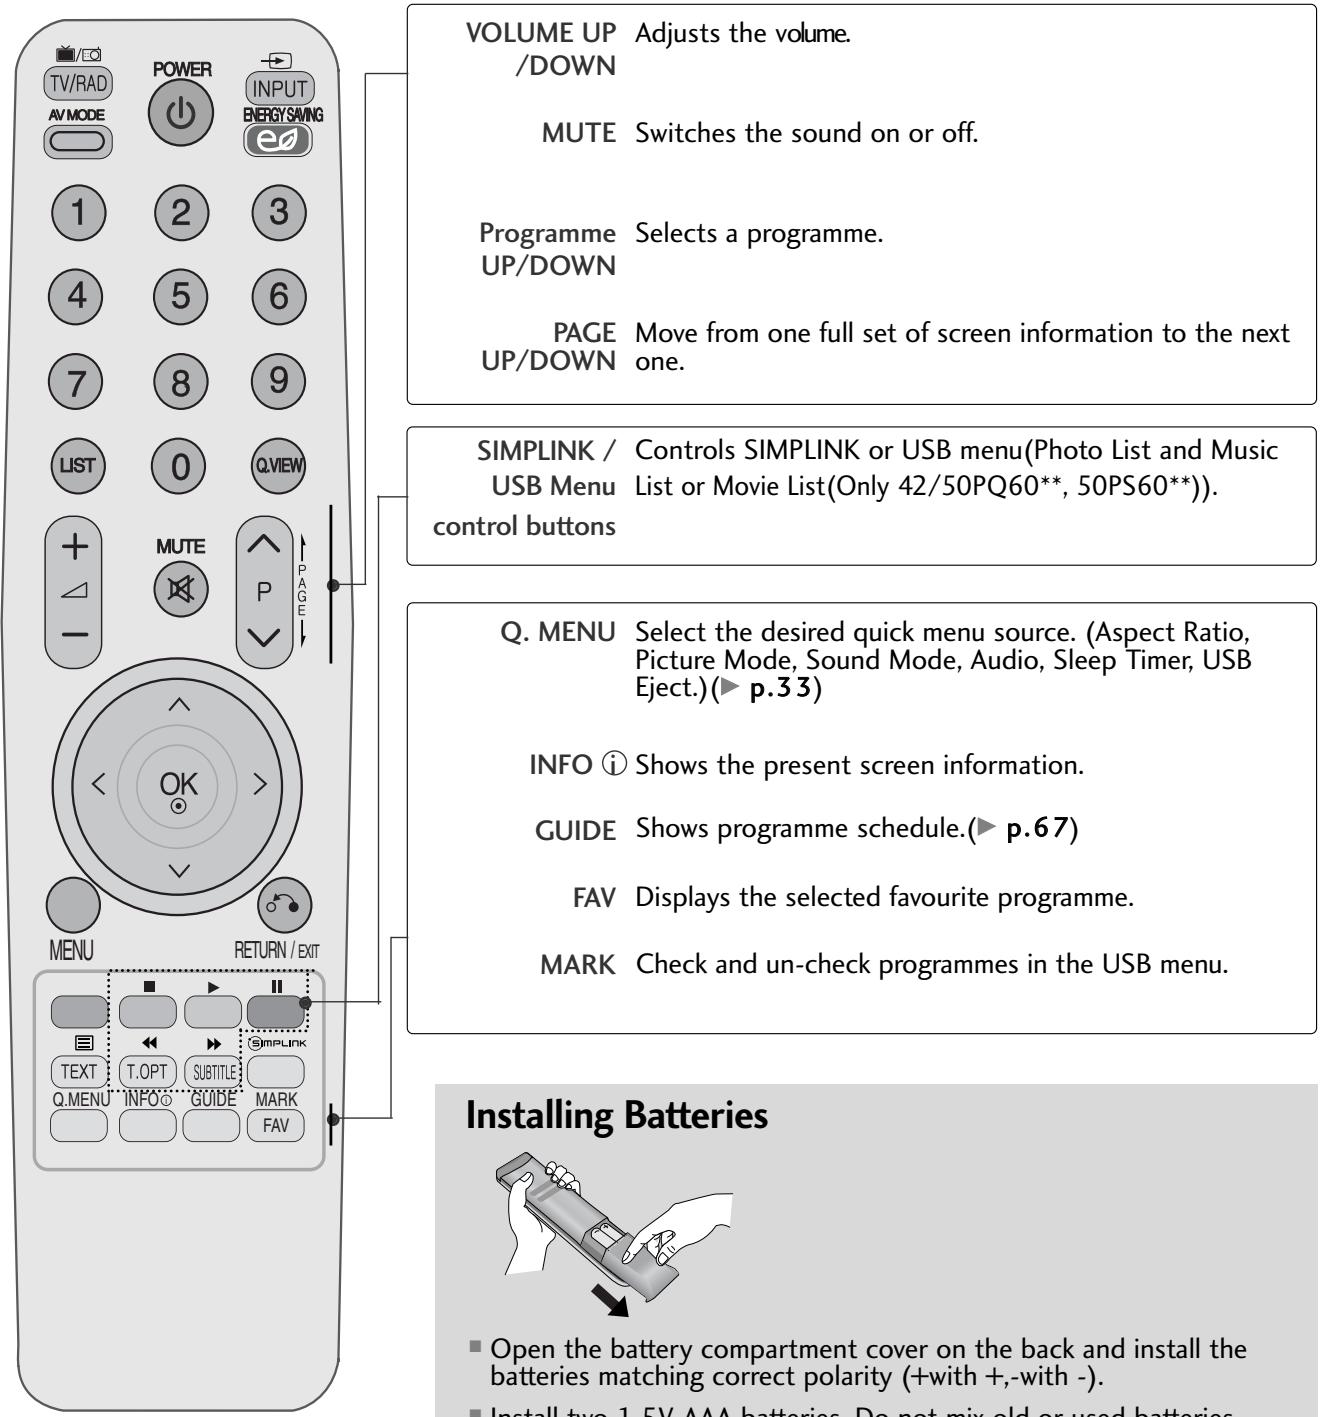
WATCHING TV / PROGRAMME CONTROL
(Except for 42 / 50 PQ 20^ , 42 / 50 PQ 30^ )
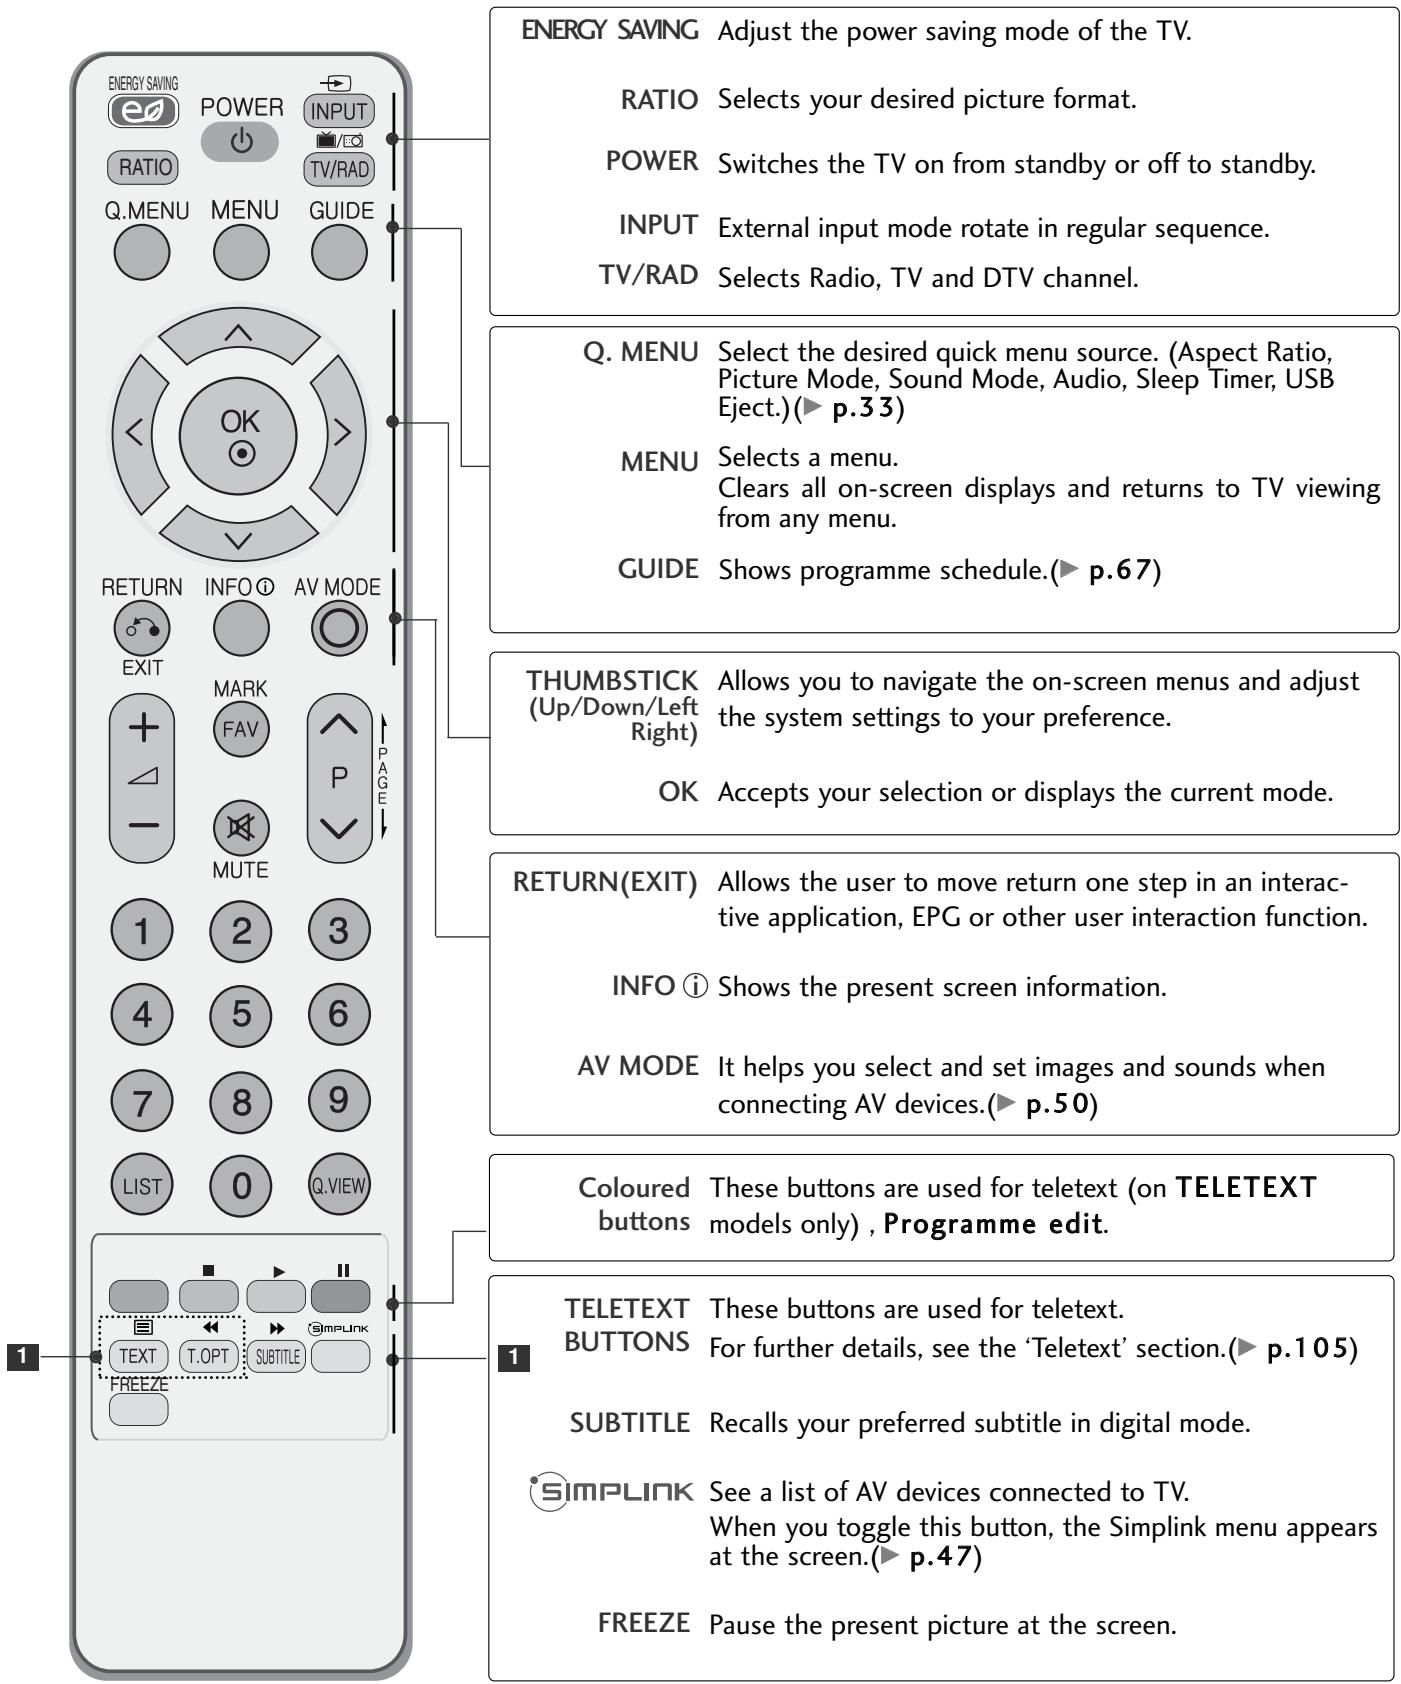
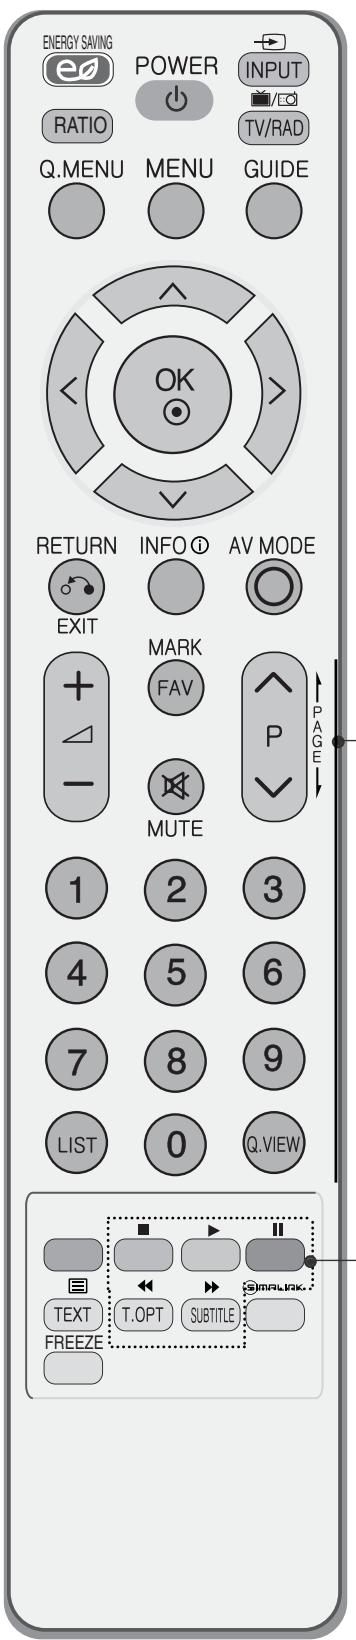
VOLUME UP Adjusts the volume. /DOWN
MARK Check and un-check programmes in the USB menu.
FAV Displays the selected favourite programme.
MUTE Switches the sound on or off.
Programme Selects a programme. UP/DOWN
PAGE Move from one full set of screen information to the next UP/DOWN one.
0~9 number Selects a programme. button Selects numbered items in a menu.
LIST Displays the programme table.
Q.VIEW Returns to the previously viewed programme.
SIMPLINK / Controls SIMPLINK or USB menu(Photos List and Music USB Menu List or Movie List(Only 42/50PQ60, 50PS60)). control buttons
Installing Batteries
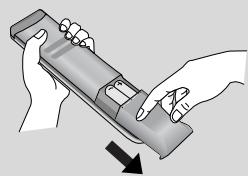
- Open the battery compartment cover on the back and install the batteries matching correct polarity (+with +,-with -).
Install two 1.5V AAA batteries. Do not mix old or used batteries with new ones.
Close cover.
TURNOING ON THE TV
- When your TV is turned on, you will be able to use its features.
1 Firstly, connect the power cord correctly and check the main power( /I ) on the TV.
Set ID: Off In standby mode to turn TV on, press the INPUT or P button on the TV or press the POWER button on the remote control and the TV will switch on.
Set ID : On
In standby mode to turn TV on, press the INPUT or P ▲▼ button on the TV or press the POWER, INPUT, P ∧ ∨ or NUMBER button on the remote control and the TV will switch on.
Initializing setup
If the OSD (On Screen Display) is displayed on the screen after turning on the TV, you can adjust the Language, Mode Setting, Country, Auto tuning.
Note:
a. If you close without completing the initial setting, the Initial Setting menu can be displayed again.
b. Press the RETURN button to change the current OSD to the previous OSD.
c. For those countries without confirmed DTV broadcasting standards, some DTV features might not work, depending on the DTV broadcasting environment.
d "Home Use" mode is the optimal setting for home environments, and is the TV's default mode.
e. "Store Demo" mode is the optimal setting for store environments. If a user modifies image quality data, "Store Demo" mode initializes the product to the image quality set by us after a certain period of time.
f. The mode (Home Use, Store Demo) can be changed by executing Mode Setting in the OPTION menu.
PROGRAMME SELECTION
Press the P or NUMBER buttons to select a programme number.
VOLUME ADJUSTMENT
Press the + or - button to adjust the volume.
If you wish to switch the sound off, press the MUTE button.
You can cancel this function by pressing the MUTE, + or -, AV Mode button.
QUICK MENU
Your TV's OSD (On Screen Display) may differ slightly from that shown in this manual.
Q.Menu (Quick Menu) is a menu of features which users might use frequently.
- Aspect Ratio: Selects your desired picture format. For Zoom Setting, select 14:9, Zoom and Cinema Zoom in Ratio Menu. After completing Zoom Setting, the display goes back to Q.Menu.
- Picture Mode : Selects your desired Picture Mode.
- Sound Mode: It is a feature to automatically set the sound combination which it deems the best for the images being watched. Selects your desired Sound Mode.
Audio: Selects the sound output.
- Sleep Timer: Sets the sleep timer.
- USB Eject: Selects "USB Eject" in order to eject USB device.
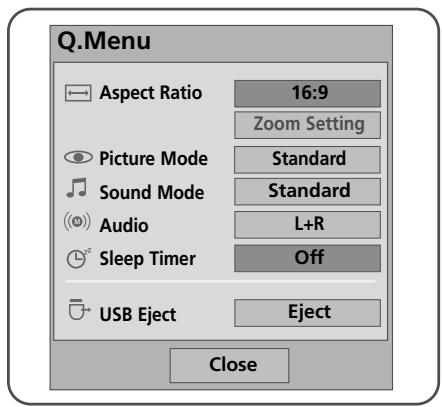
Display each menu.

Select your desired Source.
- Press the Q.MENU button to return to normal TV viewing.
- Press the RETURN button to move to the previous menu screen.
ON SCREEN MENUS SELECTION AND ADJUSTMENT
Your TV's OSD (On Screen Display) may differ slightly from that shown in this manual.
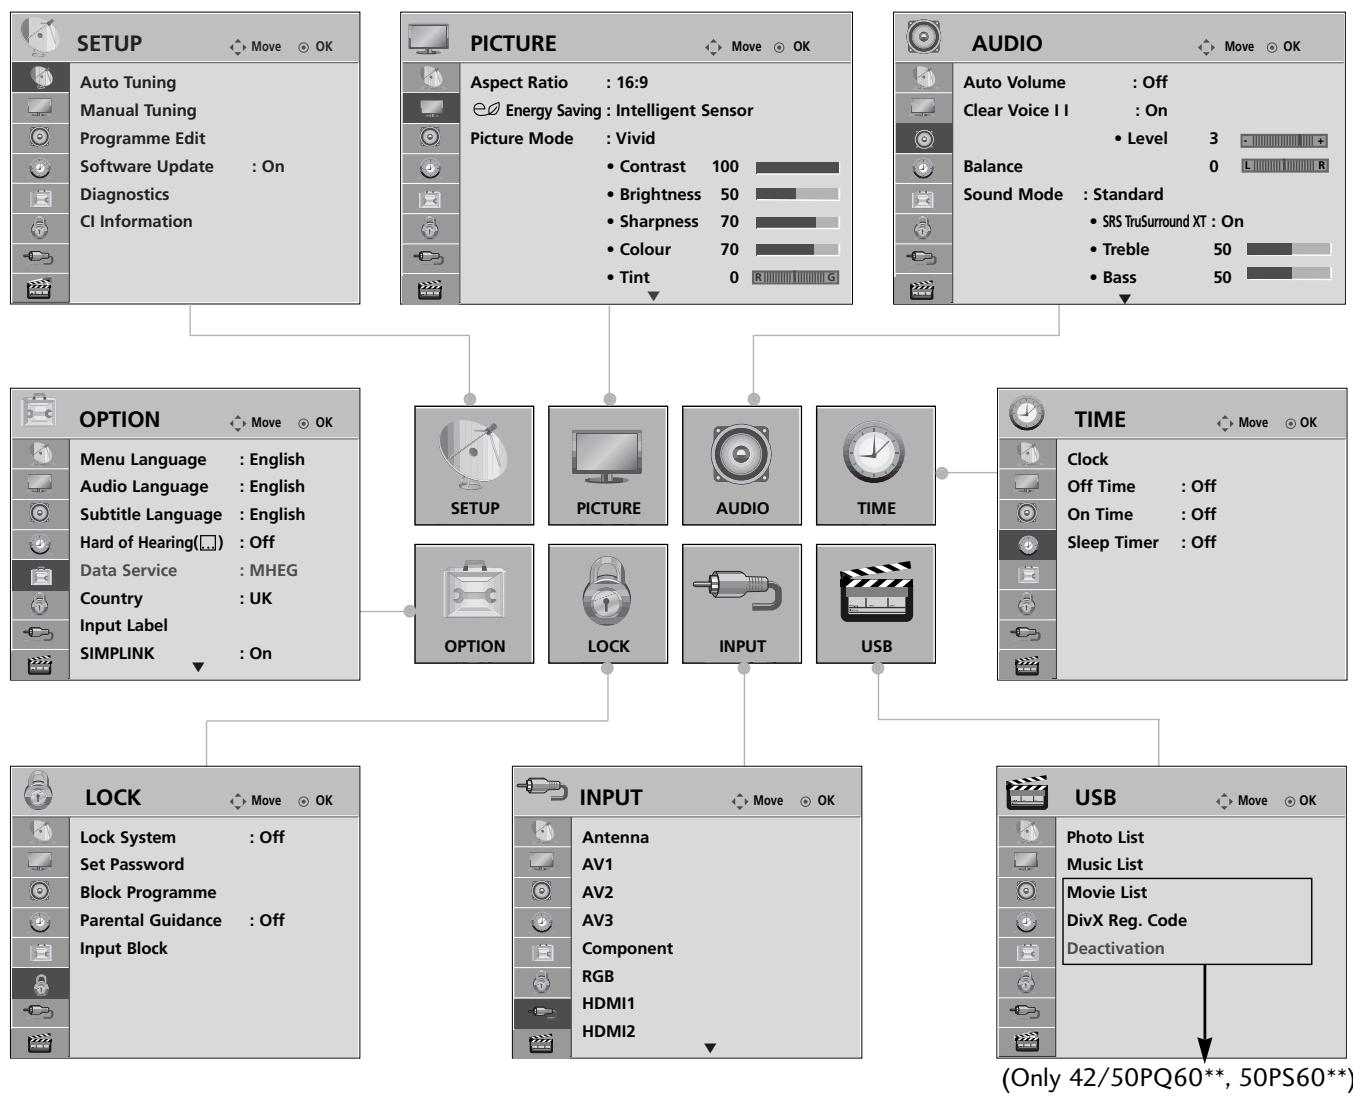

Display each menu.

Select a menu item.
Move to the pop up menu.
- Press the INFO button, you can check the Simple Manual Menu.
- Press the MENU button to return to normal TV viewing.
- Press the RETURN button to move to the previous menu screen.

NOTE
It is not possible to use CI Information in Analogue mode.
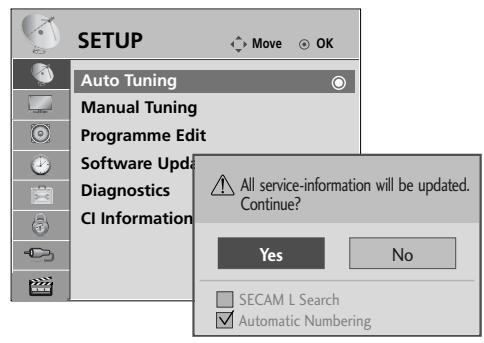
AUTO PROGRAMME TUNING
Use this to automatically find and store all available programmes.
When you start auto programming, all previously stored service information will be deleted.
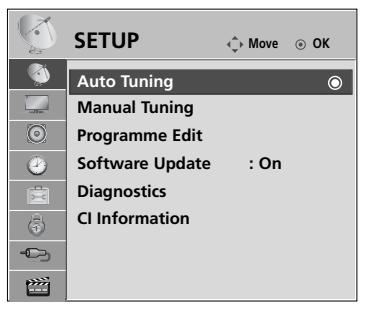

Select SETUP.
Select Auto Tuning.
Select Yes.

Run Auto Tuning.
- Use NUMBER buttons to input a 4-digit password in Lock System 'On'.
-
If you wish to keep on auto tuning select Yes using the < button. Then, press the OK button. Otherwise select No.
Automatic Numbering: Decide whether to use the programme numbers as sent by broadcasting stations for tuning. -
Press the MENU button to return to normal TV viewing.
- Press the RETURN button to move to the previous menu screen.
WATCHING TV / PROGRAMME CONTROL
MANUAL PROGRAMME TUNING (IN DIGITAL MODE)
Manual Tuning lets you manually add a programme to your programme list.
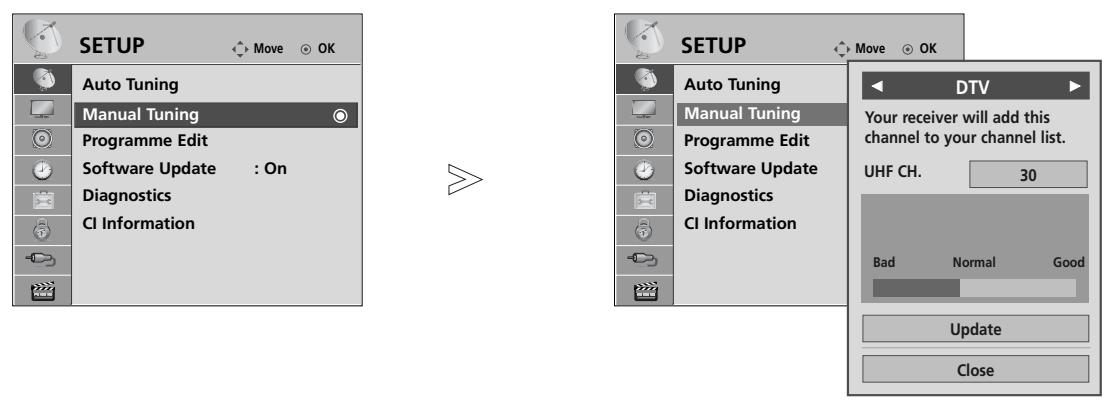

Select SETUP.

Select Manual Tuning.

Select DTV.


Select the desired channel number.
-
Use NUMBER buttons to input a 4-digit password in Lock System 'On'.
-
Press the MENU button to return to normal TV viewing.
- Press the RETURN button to move to the previous menu screen.
MANUAL PROGRAMME TUNING (IN ANALOGUE MODE)
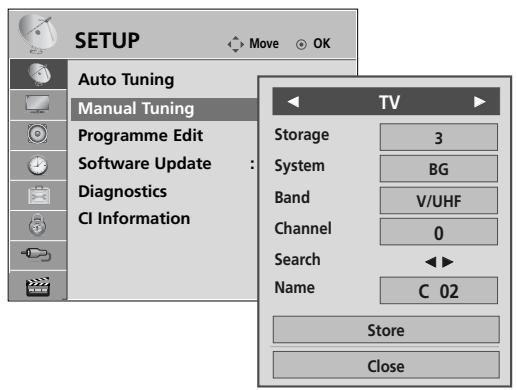
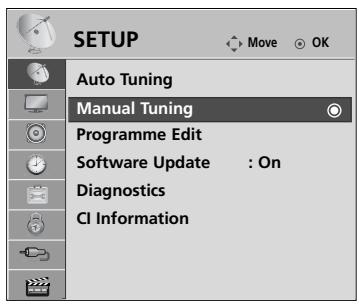
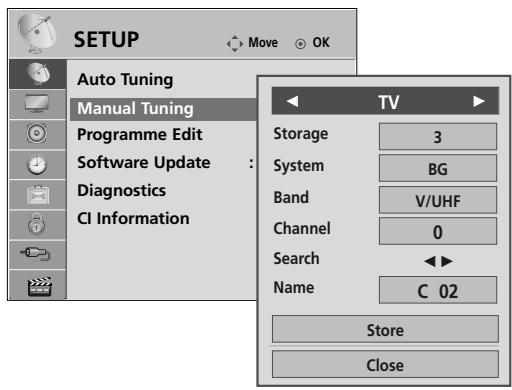
Manual Tuning lets you manually tune and arrange the stations in whatever order you desire.
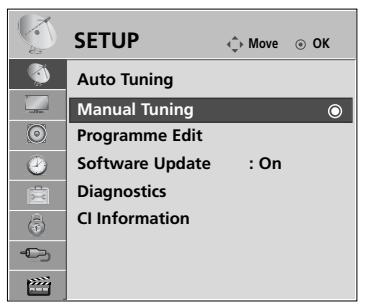

Select SETUP.
Select Manual Tuning.
Select TV.
or
Select the desired programme number on.
Select a TV system.
Select V/UHF or Cable.
Select the desired channel number.
Commencessearching.
Select Store.
- Press the MENU button to return to normal TV viewing.
-
Press the RETURN button to move to the previous menu screen.
-
Use NUMBER buttons to input a 4-digit password in Lock System 'On'.
L:SECAM L/L' (France)
BG: PAL B/G, SECAM B/G (Europe / East Europe / Asia / New Zealand / M.East / Africa / Australia)
I: PAL I/II (U.K. / Ireland / Hong Kong / South Africa)
DK: PAL D/K, SECAM D/K (East Europe / China / Africa / CIS)
- To store another channel, repeat steps 4 to 9.

■Assigning a station name
You can assign a station name with five characters to each programme number.
Select SETUP.
Select Manual Tuning.
Select TV.
Select Name.
Select the position and make your choice of the second character, and so on.
You can use an the alphabet A to Z, the number 0 to 9, +/ -, and blank.
Select Close.
Select Store.
- Press the MENU button to return to normal TV viewing.
- Press the RETURN button to move to the previous menu screen.
PROGRAMME EDIT
When a programme number is skipped, it means that you will be unable to select it using P button during TV viewing.
If you wish to select the skipped programme, directly enter the programme number with the NUMBER buttons or select it in the Programme edit menu.
This function enables you to skip the stored programmes.
In some countries it is possible to move a programme number by using the YELLOW button only.
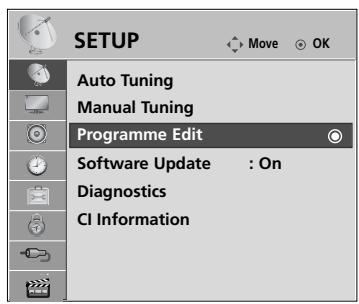

Select SETUP.
Select Programme Edit.
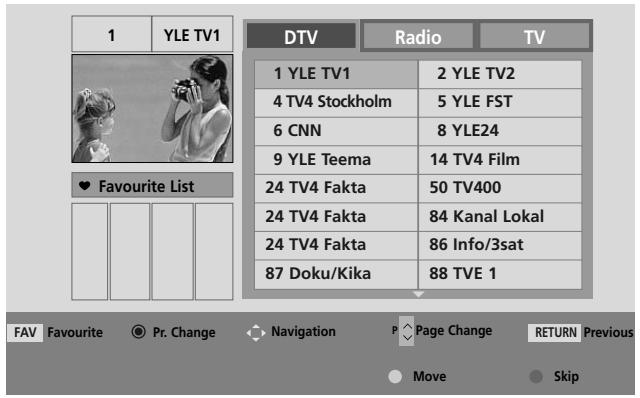
Enter the Programme Edit.

Select a programme to be stored or skipped.
-
Use NUMBER buttons to input a 4-digit password in Lock System 'On'.
-
Press the MENU button to return to normal TV viewing.
- Press the RETURN button to move to the previous menu screen.
(IN DTV/RADIO MODE)
■ Skipping a programme number

Select a programme number to be skipped.
BLUE)Turn the skipped programme number to blue.
BLUE) Release the skipped programme.
- When programmes are to be skipped, the skipped programme shows in blue and these programmes will not be selected by the P buttons during TV viewing.
- If you wish to select a skipped programme, directly enter the programme number with the NUMBER buttons or select it in the programme edit or EPG.
■ Selecting favourite programme


Select your favourite programme number.
- This will automatically include the selected programme into your favourite programme list.
IN TV MODE
This function enables you to delete or skip the stored programmes. You can also move some channels and use other programme numbers.
Auto Sort

- After activating Auto Sort once, you can no longer edit programmes.
- Deleting a programme

Select a programme number to be deleted.
- The selected programme is deleted, all the following programmes are shifted up one position.

Turn the deleted programme number to red.

Release the deleted programme.
■ Moving a programme

Select a programme number to be moved.

Turn the moved programme number to YELLOW.

Release the moved programme.
■ Skipping a programme number

Select a programme number to be skipped.
- When a programme number is skipped it means that you will be unable to select it using the P button during normal TV viewing.

Turn the skipped programme number to blue.

Release the skipped programme.
- If you wish to select a skipped programme, directly enter the programme number with the NUMBER buttons or select it in the programme edit or EPG.
Selecting a Favourite Programme
Select your favourite programme number.
- The selected programme will be added to the favourite programme list.
SOFTWARE UPDATE
Software Update means software can be downloaded through the digital terrestrial broadcasting system.
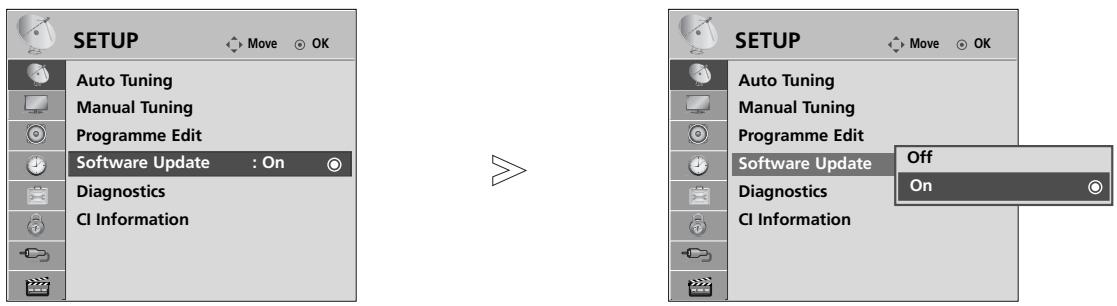
1 SELECT SETUP.
OK Select Software Update.
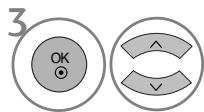
Select On or Off.
- If you select On, a user confirm message box will be displayed to notify that new software is found.

* When setting "Software Update"
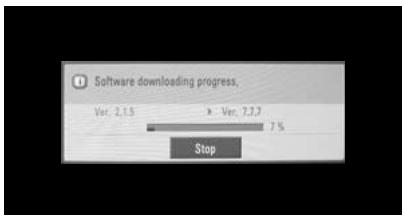
Occasionally, a transmission of updated digital software information will result in the following menu on the TV screen.
Select the YES using the < > button and you will see the following picture.
After the Software Update is complete, the System restarts.
When the Software Update menu is "Off", the message to change it to "On" appears.
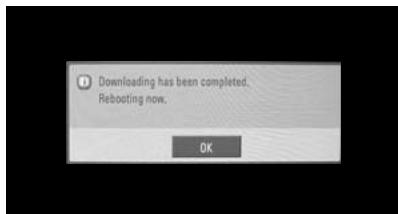
When the power is turned off, downloading starts.
When the power is turned on while updating, the progress status is displayed.
- During Progress of a Software Update, please note the following:
- Power to the TV must not be interrupted.
- The TV must not be switched off.
- The antenna must not be disconnected.
- After Software Update, you can confirm the updated software version in Diagnostics menu.
- It may take an hour to download the software, so make sure that the power stays on during the download.
DIAGNOSTICS
This function enables you to view information on the Manufacturer, Model/Type, Serial Number and Software Version.
This displays the information and signal strength of the tuned *MUX.
This displays the signal information and service name of the selected MUX.
(*MUX: A higher directory of channels in digital broadcasting (a single MUX contains multiple channels.))
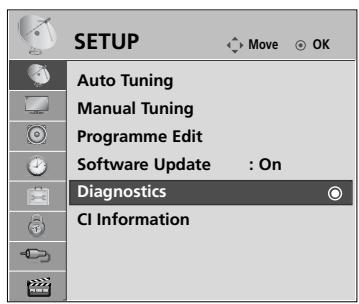

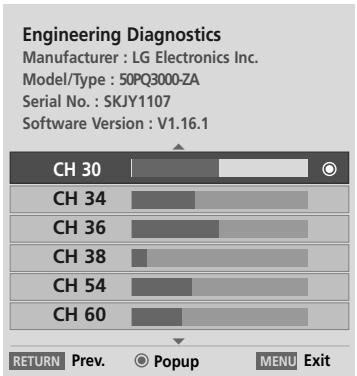
Select SETUP.
Select Diagnostics.
Display Manufacturer, Model/Type, Serial Number and Software Version.
Display the information of Channel.
- Press the MENU button to return to normal TV viewing.
- Press the RETURN button to move to the previous menu screen.
CI [COMMON INTERFACE] INFORMATION
This function enables you to watch some encrypted services (pay services). If you remove the CI Module, you cannot watch pay services.
When the module is inserted into the CI slot, you can access the module menu.
To purchase a module and smart card, contact your dealer. Do not repeatedly insert or remove a CI module from the TV. This may cause a malfunction. When the TV is turned on after inserting a CI Module, you may not have any sound output.
This may be incompatible with the CI module and smart card.
CI (Common Interface) functions may not be possible depending upon the country broadcasting circumstances.
![LG 42PQ3000 - CI [COMMON INTERFACE] INFORMATION - 1](/content/2025/01/69329/images/52e2ac72e13f9dd2121d14099f84156ab5b2c8fd78922ce89414f23997894ba3.jpg)
![LG 42PQ3000 - CI [COMMON INTERFACE] INFORMATION - 2](/content/2025/01/69329/images/fe0dce355d01c38572215c9ea46b47cf6bb14f4124037a11211dd8fd0760ec49.jpg)
![LG 42PQ3000 - CI [COMMON INTERFACE] INFORMATION - 3](/content/2025/01/69329/images/cb7755849eef429de79e80408ed41024ba60b659ef8f752aa4ff3cecb690967d.jpg)
Select SETUP.
![LG 42PQ3000 - CI [COMMON INTERFACE] INFORMATION - 4](/content/2025/01/69329/images/d555fb5b1d4b3433a8d794512262a97ab6170ab77970522a2b206ead4683d4f3.jpg)
![LG 42PQ3000 - CI [COMMON INTERFACE] INFORMATION - 5](/content/2025/01/69329/images/92ffd1421d2ee4d2926dc7c7e64b5adc65a88104e0f69eb5959d3907d3e8ce03.jpg)
Select CI Information.
![LG 42PQ3000 - CI [COMMON INTERFACE] INFORMATION - 6](/content/2025/01/69329/images/e086937d71ffbf5bd40b19c662c3d21732d47f2af041f118e6372353b62b0f69.jpg)
![LG 42PQ3000 - CI [COMMON INTERFACE] INFORMATION - 7](/content/2025/01/69329/images/40904bbaa60e8519dac68dd2d0fcf8c48aa8fa215679d066380b8f3f8272bc47.jpg)
Select the desired item: Module information, smart card information, language, or software download etc.
![LG 42PQ3000 - CI [COMMON INTERFACE] INFORMATION - 8](/content/2025/01/69329/images/fde49449a9afc8965a82f395b6c67e9abdb65a5ccd60ce5273ff9879451175c8.jpg)
Save.
- Press the MENU button to return to normal TV viewing.
- Press the RETURN button to move to the previous menu screen.
SELECTING THE PROGRAMME TABLE
You can check which programmes are stored in the memory by displaying the programme table

Displayed when the Locked Programme.
Displaying programme LIST

Display the Programme List.
- You may find some blue programmes. These have been set up to be skipped by auto programming or in the programme edit mode.
- Some programmes with the channel number shown in the programme LIST indicate there is no station name assigned.
Selecting a programme in the programme list

Select a programme.
Switch to the chosen programme number.

From the programme you are currently watching, the mode will change from TV to DTV to Radio.
Paging through a programme list
Turn the pages.

Return to normal TV viewing.
Displaying the favourite programme table
Display the Favourite Programme table.
WATCHING TV / PROGRAMME CONTROL
INPUT LIST
HDMI and AV1, 2 (SCART) can be recognized by a detect pin and thus enabled only when an external device approves voltage.
By using TV/RAD button, you can move from External Input to RF Input and to the last watched programme in DTV/RADIO/TV mode.
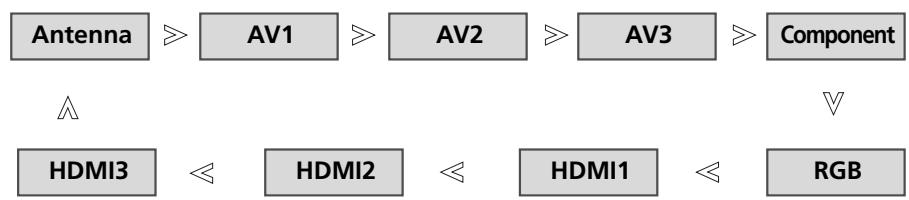
Select the input source.
- You can also adjust INPUT menu.
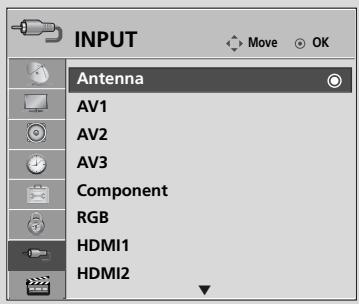
- Antenna: Select it when watching the DTV/TV.
- AV1, AV2, AV3: Select it when watching the VCR or external equipment.
- Component : Select it when using the DVD or the Digital set-top box depends on connector.
- RGB :Select it when using PC depends on connector.
- HDMI1, HDMI2, HDMI 3 : Select it when using DVD, PC or Digital set-top box depend on connector.

MPLINK
This function operates only with devices with the SIMPLINK logo.
Please check the SIMPLINK logo.
This TV might not function properly when using it with other products with HDMI-CEC function.
This allows you to control and play other AV devices connected to the display through HDMI cable without additional cables and settings.
If you do not want SIMPLINK menu,select "Off".
SIMPLINK function is not supported by HDMI IN 3 input.
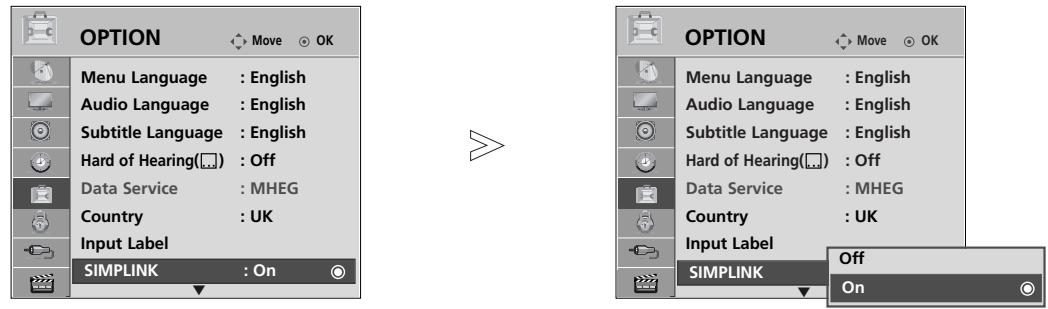
Select OPTION.
Select SIMPLINK.
- Press the MENU button to return to normal TV viewing.
- Press the RETURN button to move to the previous menu screen.
SIMPLINK Functions
Disc playback
Control connected AV devices by pressing the < > OK, , ,11, and buttons.
Direct Play
After connecting AV devices to the TV, you can directly control the devices and play media without additional settings.
Select AV device
Enables you to select one of the AV devices connected to the TV and operate it.
Power off all devices
When you switch off the TV, all connected devices are turned off.
Switch audio-out
Offers an easy way to switch audio-out.
Sync Power on
When the equipment with Simplink function connected HDMI terminal starts to play, The TV will change automatically to turn on mode.
- A device, which is connected to the TV through a HDMI cable but does not support SIMPLINK, does not provide this function.
Note: To operate SIMPLINK, an HDMI cable over Version 1.3 with CEC function should be used. (CEC: Consumer Electronics Control).
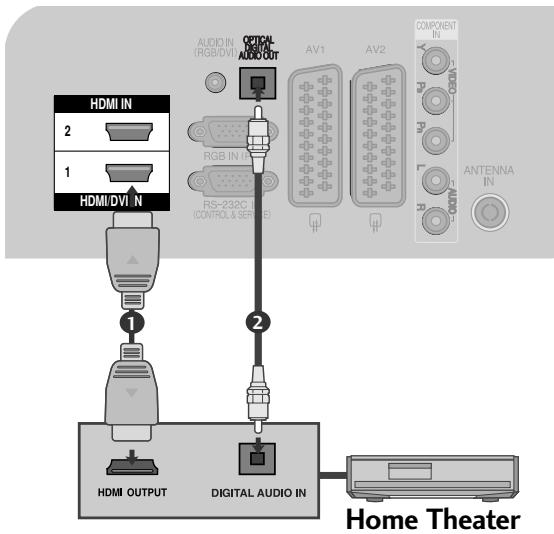
Connecting to Home Theater with the SIMPLINK logo.
Connect the HDMI/DVI IN 1 or HDMI IN 2 terminal on the back of the TV and the HDMI output terminal of the Home Theater using HDMI cables.
Connect the Digital Audio output terminal on the back of the TV and the Digital Audio input terminal of the Home Theater using optical cables.
3 Select Home Theater in the Speaker menu by pushing the SIMPLINK button.
- When you select or operate a media device with home theater function, the speaker automatically switches to home theater speaker (HT speaker).
NOTE
Connect the HDMI/DVI IN or HDMI IN terminal of the TV to the rear terminal (HDMI terminal) of the SIMPLINK device with the HDMI cable.
- When you switch the Input source using the INPUT button on the remote control, you can stop the operation of a device controlled by SIMPLINK.
SIMPLINK Menu
Press the < > button and then OK button to select the desired SIMPLINK source.
TV viewing: Switch to the previous TV programme regardless of the current mode.
DISC playback : Select and play connected discs. When multiple discs are available, the titles of discs are conveniently displayed at the bottom of the screen.
VCR playback : Play and control the connected VCR.
HDD Recordings playback : Play and control recordings stored in HDD.
Audio Out to Home theater/Audio Out to TV: Select Home theater or TV speaker for Audio Out.
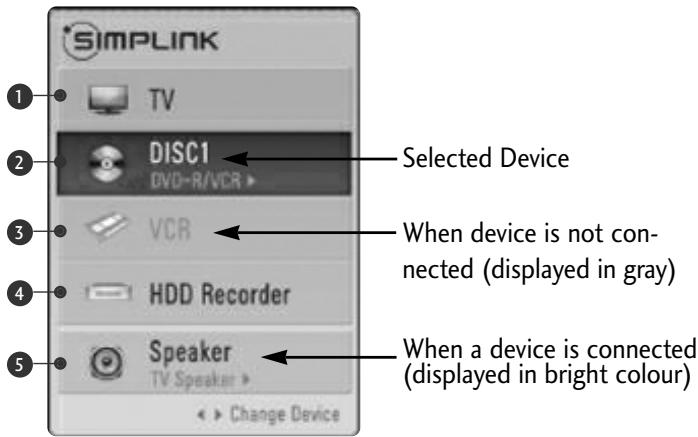
Home theater: Only one supported at a time
DVD, Recorder: Up to two supported at a time
- VCR: Only one supported at a time
DATA SERVICE
(This menu is enabled only in Ireland.)
This function allows users to choose between MHEG(Digital Teletext) and Teletext if both exist at the same time.
If only one of them exists, either MHEG or Teletext is enabled regardless of which option you selected.
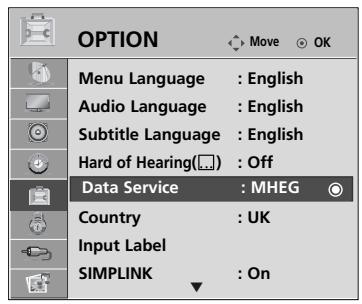
Select OPTION.
Select Data Service.
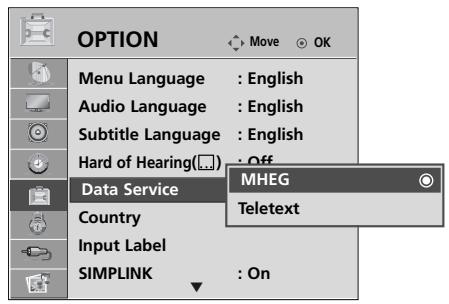
Select MHEG or Teletext.
- Press the MENU button to return to normal TV viewing.
- Press the RETURN button to move to the previous menu screen.
INPUT LABEL
Selects a label for each input source.
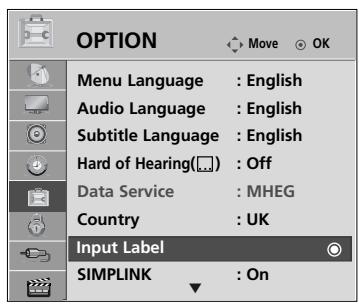

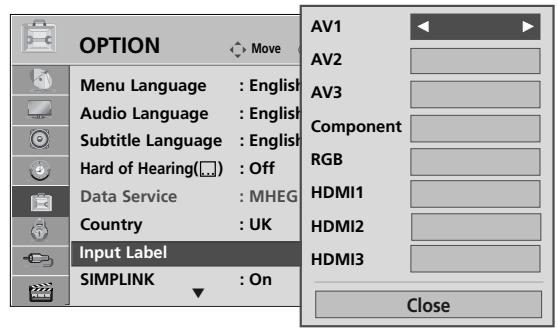
Select OPTION.
Select Input Label.
Select the source.
Select the label.
- Press the MENU button to return to normal TV viewing.
- Press the RETURN button to move to the previous menu screen.
WATCHING TV / PROGRAMME CONTROL
AV MODE
You can select the optimal images and sounds when connecting AV devices to external input.
Off Disables the AV MODE.
Cinema Optimizes video and audio for watching movies.
Sport Optimizes video and audio for watching sports events.
Game Optimizes video and audio for playing games.
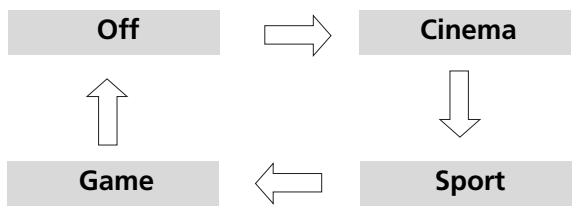
Press the AV MODE button repeatedly to select the desired source.

- If you select Cinema in AV mode, Cinema will be selected both for Picture Mode and Sound Mode in PICTURE menu and AUDIO menu respectively.
- If you select "Off" in AV mode, the picture and image which you initially set will be selected.
SIMPLE MANUAL
You can easily and effectively access the TV information by viewing a simple manual on the TV. During the Simple Manual operation, audio will be muted.
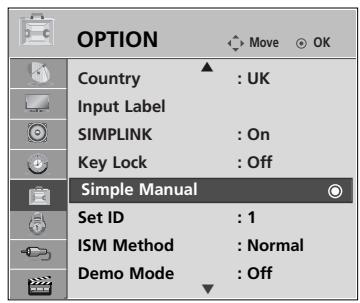

Select OPTION.
Select Simple Manual.
Select the part of the manual you want to see.
- Press the RETURN button to return to normal TV viewing.
WATCHING TV / PROGRAMME CONTROL
Initializing
(Reset to original factory settings)
This function initializes all settings.
But the settings of Day and Night of the Picture Mode cannot be initialized.
It is useful to initialize the product or when you move to other city or country.
When the Factory Reset is completed, you must restart the Initializing setup.
When the Lock System menu is "On", the message to enter the password appears.
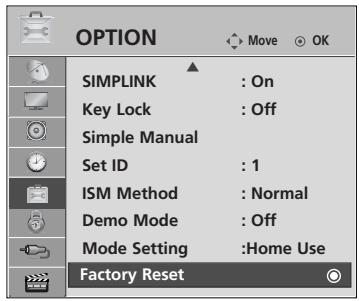

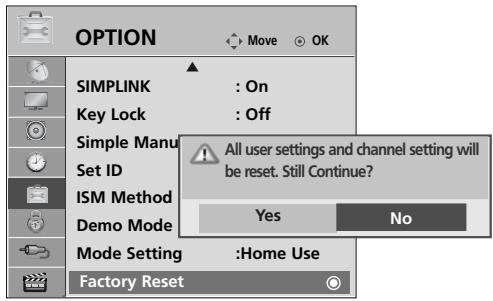

Select OPTION.


Select Factory Reset.
Select Yes.
Start Factory Reset.
-
In Lock System "On", if you forget your password, press '7', '7', '7', '7' on the remote control handset.
-
Press the MENU button to return to normal TV viewing.
- Press the RETURN button to move to the previous menu screen.
When connecting a USB device
When you connect a USB device, this pop up menu is displayed, automatically.
If the Pop Up menu does not appear, you can select Music List or Photo List or Movie List(Only 42/50PQ60, 50PS60) in the USB menu.
"POP UP MENU" will not be displayed while the OSD including Menu, EPG or Schedule list is activated. In USB device, you can not add a new folder or delete the existing folder.
1 Connect the USB device to the USB IN jacks on the side of TV.
Select PHOTO LIST or MUSIC LIST or MOVIE LIST(Only 42/50PQ60, 50PS60).

- This TV Supports on JPEG and MP3 and SD Divx.
When removing the USB device
Select the USB Eject menu before removing the USB device.
Select Eject

Precautions when using the USB device
Only a USB storage device is recognizable.
If the USB storage device is connected through a USB hub, the device is not recognizable.
A USB storage device using an automatic recognition programme may not be recognized.
A USB storage device which uses its own driver may not be recognized.
The recognition speed of a USB storage device may depend on each device.
Please do not turn off the TV or unplug the USB device when the connected USB storage device is working. When such device is suddenly separated or unplugged, the stored files or the USB storage device may be damaged.
- Please do not connect the USB storage device which was artificially maneuvered on the PC. The device may cause the product to malfunction or fail to be played. Never forget to use only a USB storage device which has normal music files or image files.
Please use only a USB storage device which was formatted as a FAT16, FAT32, NTFS file system provided with the Windows operating system. In case of a storage device formatted as a different utility programme which is not supported by Windows, it may not be recognized.
Data in a USB storage device cannot be deleted in the NTFS file system.
Please connect power to a USB storage device which requires an external power supply. If not, the device may not be recognized.
Please connect a USB storage device with cable is offered by USB maker. If connected with cable is not offered by USB maker or an excessively long cable, the device may not be recognized.
Some USB storage devices may not be supported or operated smoothly.
Maximum of 999 files and folders can be recognized.
Data in a USB storage device cannot be aligned. Up to 128 English characters can be recognized as a file name.
Please back up the important file because a data of USB device may be damaged. Data management is consumer's responsibility and in consequence the manufactures does not cover the product bearing data damage.
If the USB is connected in Standby Mode, specific hard disk will automatically be loaded when the TV is turned on.
The recommended capacity is 1 TB or less for a USB external hard disk and 32GB or less for USB memory.
Any device with more than the recommended capacity may not work properly.
If a USB external hard disk with a "Energy Saving" function does not work, turn the hard disk off and on again to make it work properly.

NOTE
Image shown may differ from your TV.
In order to avoid losing the USB memory stick, use the USB connector(sold separately) to fix the USB memory stick to the USB connector holder of the TV.
USB Connector (sold separately)
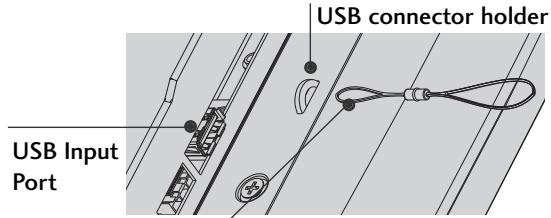
Fix the one end of the USB connector to the USB memory stick and the other end to the USB connector holder.
PHOTO LIST
The On Screen Display may be different from your TV. Images are an example to assist with the TV operation.
PHOTO(*.JPEG) supporting file
Baseline: 15360 × 8640
Progressive format : 1024 x 768
- You can play JPEG files only.
- Only baseline scan is supported among JPEG (SOF0, SOF1 only).
- Non-supported files are displayed in the form of bitmap.
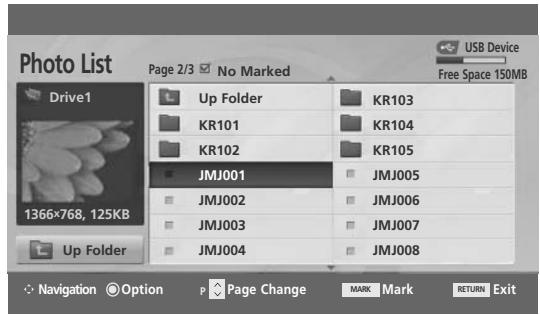
Screen Components
Select USB.
1 Moves to upper level folder
2 Current page/Total pages
3 Total number of marked photos
4 Usable USB memory
Corresponding buttons on the remote control


Select Photo List.

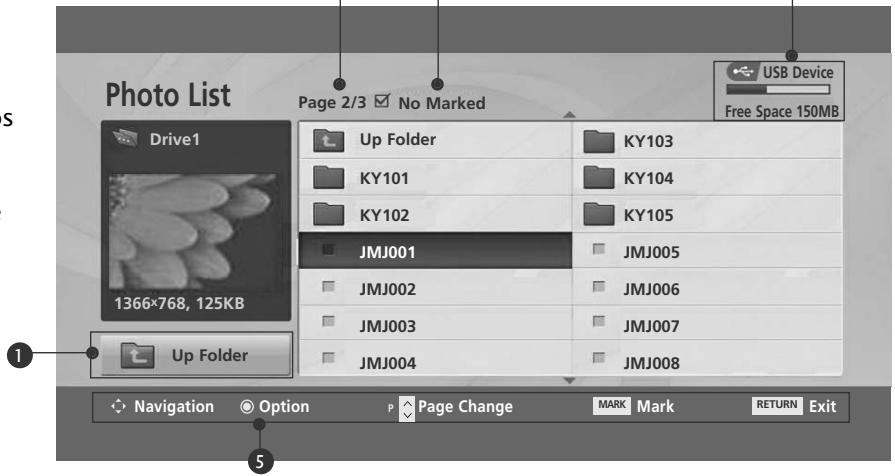
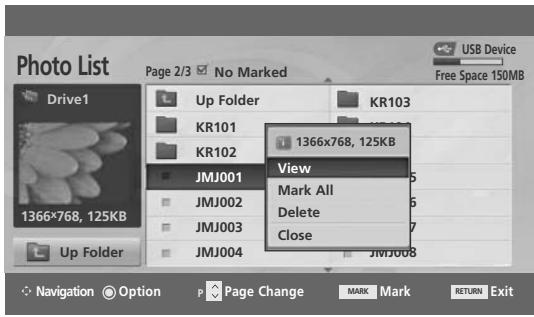
Photo Selection and PopUp Menu
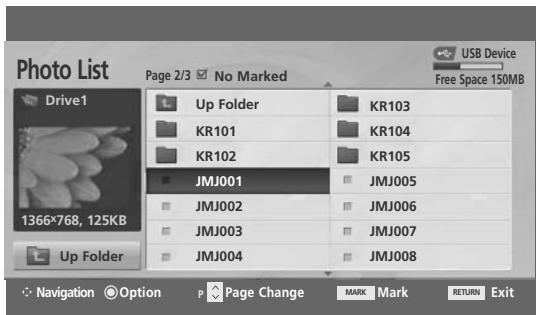

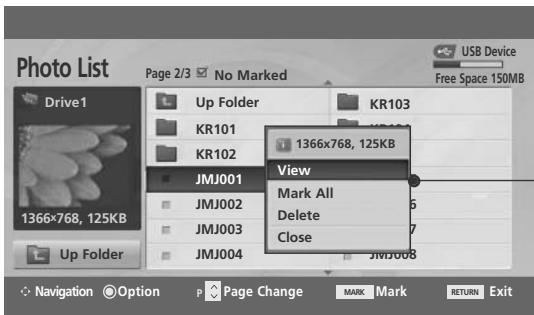
View:Display the selected item.
Mark All:Mark all photos on the screen.
Unmark All : Deselect all marked photos.
Delete:Delete the selected photo item.
Close: Close the pop-up menu.

Select the target folder or drive.
Select the desired photos.
Show the PopUp menu.
Select the desired PopUp menu.
- Use the P button to navigation in the photo page.
-
Use the MARK button to mark or unmark a photo. When one or more photos are marked, you can view individual photos or a slide show of the marked photos. If no photos are marked, you can view all photos individually or all photos in the folder in a slide show.
-
Press the RETURN button to return to normal TV viewing.
Set up the menu in Full-Sized Screen
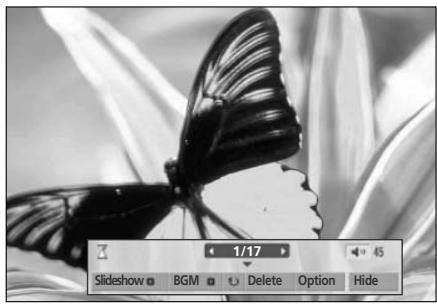
You can change the settings to display photos stored on a USB device, on a full-sized screen. Detailed operations are available on full-sized photo view screen.


The aspect ratio of a photo may change the size of the photo displayed on the screen in full size. Press the RETURN button to move to the previous menu screen.
Select the target folder or drive.

Select the desired photos.
Show the PopUp menu.
Select View.
The selected photo is displayed in full size.
- Use the P button to navigation in the photo page.
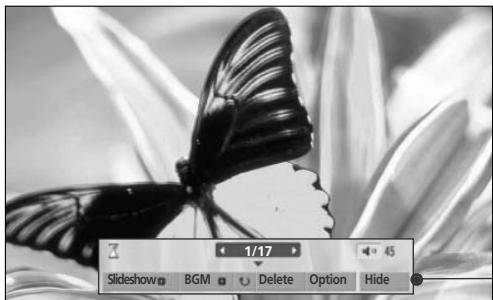
Select the Slideshow, BGM, (Rotate), Delete, Option or Hide.
- Use < button to select the previous or next photo.
- Use < button to select and control the menu on the full-sized screen.
▶ Slideshow : When no picture is selected, all photos in the current folder are displayed during slide show. When selected, the selected photos are displayed during slide show.
Set the time interval of the slide show in Option.
BGM : Listen to music while viewing photos in full size.
- Set the BGM device and album in Option.
(Rotate) : Rotate photos.
Rotates the photo 90^ , 180^ , 270^ , 360^ clockwise.
Delete:Delete photos.
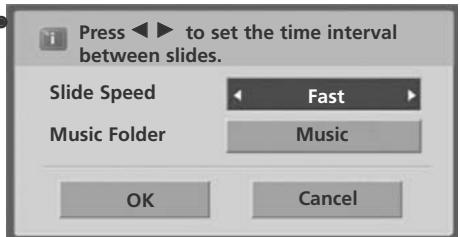
OPTION: Set values for Slide Speed and Music Folder.
Use < > button and OK button to set values. Then go to OK and press OK to save the settings.
- You cannot change Music Folder while BGM is playing.
- Hide: Hide the menu on the full-sized screen.
- To see the menu again on the full-sized screen, press OK button to display.
- Press the RETURN button to move to the previous menu screen.
MUSIC LIST
Purchased music files(*.MP3) may contain copyright restrictions. Playback of these files may not be supported by this model.
Music file on your USB device can be played by this unit.
The On Screen Display may be different from your TV. Images are an example to assist with the TV operation.
MUSIC (.MP3) supporting file
Bit rate 32 ~ 320kbps
- Sampling rate MPEG1 layer 3: 32kHz,44.1kHz,48kHz .
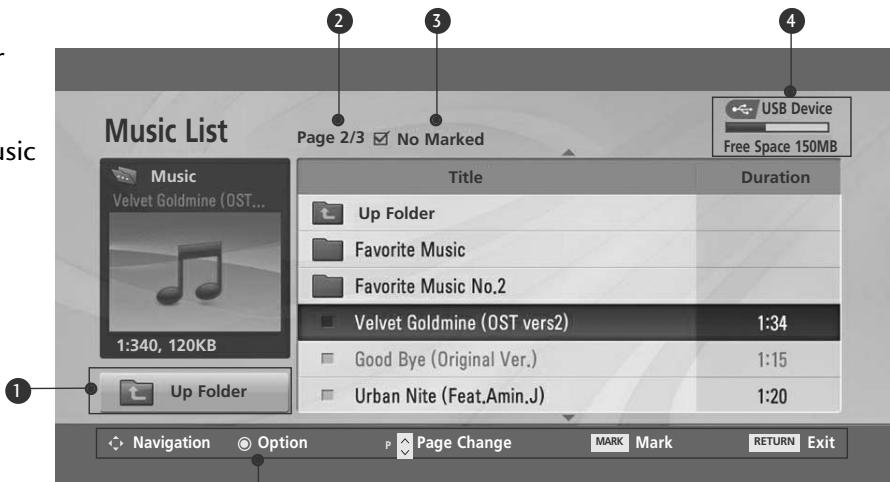
Screen Components
Select USB.



Select Music List
1 Moves to upper level folder
Current page/Total pages
Total number of marked music title
4 Usable USB memory
Corresponding buttons on the remote control
5
Music Selection and PopUp Menu
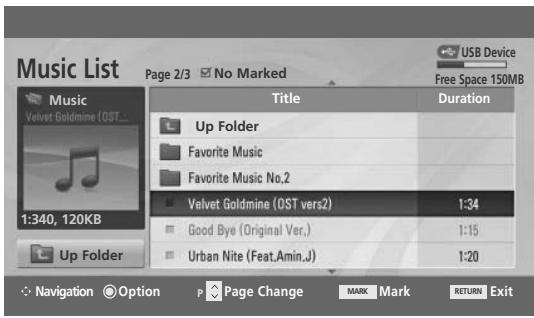
As shown, up to 6 music titles are listed per page.

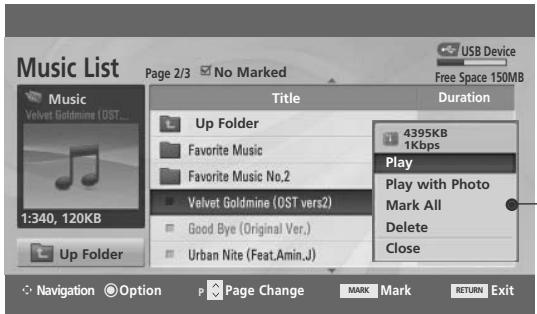
▶ Play (During stop): Play the selected music titles. Once a music finishes playing, the next selected one will be played. When there are no selected music titles to play, the next one in the current folder will be played. If you go to a different folder and press the OK button, the current music in playback will stop.
▶ Play Marked : Play the selected music titles. Once a music finishes playing, the next selected one will be played automatically.
Stop Play (During playback): Stop the playing music titles.
▶ Play with Photo : Start playing the selected music titles and then move to the Photo List.
Mark All:Mark all music titles in the folder.
Unmark All : Deselect all marked music titles.
Delete:Delete the selected music titles.
Close: Close the pop-up menu.
Select the target folder or drive.

Select the desired music title
Show the PopUp menu.
Select the desired PopUp menu.
- Use the P button to navigation in the music page.
-
Use MARK button to mark or unmark a music. When one or more music files are marked, the marked music title will be played in sequence. For example, if you want to listen to only one music repeatedly, just mark the music only and play it. If no music is marked, all the music in the folder will be played in sequence.
-
Press the RETURN button to return to normal TV viewing.
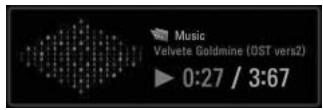
If you don't press any button for a while during the playing, the play information box (as shown in the below) will float as a screen saver.
The 'Screen Saver'?
Screen saver is to prevent screen pixel damage due to an fixed image remaining on the screen for a extended period of time.
NOTE
When music is playing, is displayed in back of the music title.
A damaged or corrupted music does not play but displays 00:00 in playtime.
A music downloaded from a paid service with copyright protection does not start but displays inappropriate information in playtime.
If you press OK, buttons, screen saver is stopped.
▶ The PLAY(▶), Pause(II), 🅥, 🅾 buttons on the remote control are also available in this mode.
▶ You can use the▶ button to select the next music and the button to select the previous music.
MOVIE LIST (Only 42/50PQ60**, 50PS60**)
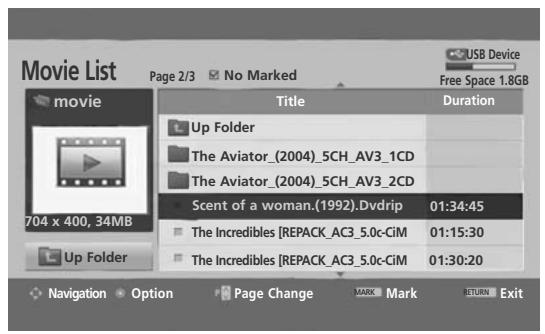
The movie list is activated once USB is detected. It is used when playing movie files on TV.
Displays the movies in the USB folder and supports Play.
Allows playback of all movies in the folder and user desired files.
Video editing is not supported but files can be deleted.
It is a movie list that displays folder information and Divx file.
Supports up to four drives.
MOVIE*.avi/*.Divx) supporting file
Video format : DivX3.xx, DivX4.xx, DivX5.xx , XVID1.1.1 , XVID1.1.2 , XVID1.1.3 , 3IV1 , 3IV2 , FVFW,
DMK2, RMP4, DIV3, DIV4, DIV5, DIV6, MP43, COL1, AP41, nAVI, DX50
Audio format : Mpeg, Mp3, PCM, Dolby Digital
Sampling frequency : within 8~48 khz(MP3)
Bit rate : within 8~320 kbps(MP3)
Subtitle format : .smi/ .srt/ .sub(MicroDVD, SubViewer 2.0)/ .ass/ .ssa/.txt(DVD Subtitle System)
- DivX may not be played depending on its types or recording methods.
- If the video and audio structure of recorded file is not interleaved, either video or audio is outputted.
- Max bitrate of playable DivX is 4 Mbps.
- Maximum FPS (Frame Per Second) can be reached only at SD level. FPS is 25 FPS (720576) or 30 FPS (720480) depending on Resolution.
- Files of 25 FPS or 30 FPS of higher may not be played properly.
Screen Components
Select USB.

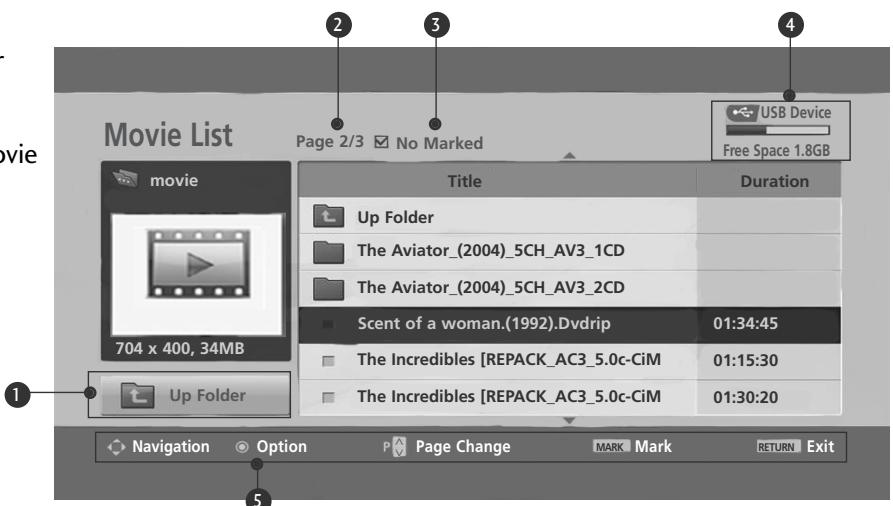
Select Movie List
1 Moves to upper level folder
2 Current page/Total pages
Total number of marked movie title
4 Usable USB memory
Corresponding buttons on the remote control
NOTE
A DivX movie file and its subtitle file must be located in the same folder.
A video file name and its subtitle file name must be identical for it to be displayed.
- Use the left/right ( < / > ) keys to move to a specific frame forward or backward while playing a movie. (The left/right ( < / > ) keys may not work properly for some files while playing a movie.)
Movie Selection and PopUp Menu
As shown, up to 6 movie titles are listed per page.

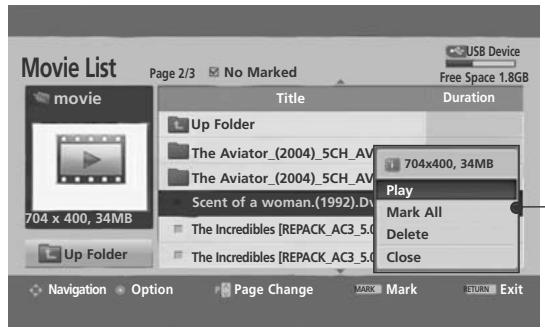
▶ Play: Play the selected movie titles. Divx Play is executed while screen changes.
Mark All:Mark all movie titles in the folder.
Unmark All : Deselect all marked movie titles.
Close: Close the pop-up menu.
Select the target folder or drive.
Select the desired movie titles.
Show the PopUp menu.
Select the desired PopUp menu.
-
In the case of files not supported, amessage regarding non-supported file is displayed.
-
Press the RETURN button to return to normal TV viewing.
DivX Audio Language & Subtitle Language
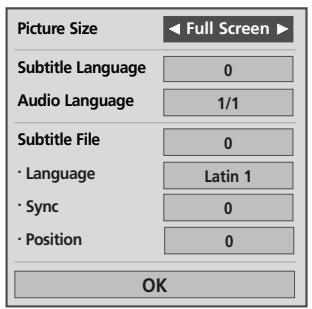

Select the desired option.
- When DivX is playing, if you press the RED button, this message is displayed.

Select Picture Size, Subtitle Language, Audio Language, Subtitle File, Language, Sync or Position.
- Press the MENU button to return to normal TV viewing.
- Press the RETURN button to move to the previous menu screen.
Using the remote control
| / | When playing, repeatedly, press the REW(▲) button to speed up ▲ -> ▲→ ▲→ |
| - > ▲→ ▲→ ▲→. repeatedly, press the FF(▷) button to speed up ▲-> ▲→ ▲→ -> ▲→ ▲→ ▲→ | |
| - > ▲→ ▲→ ▲→. ■ Pressing these buttons repeatedly increases the fast forward/reverse speed. | |
| II | During playback, press the Pause(II) button. ■ Still screen is displayed. |
| < > | ■ When using the < or > button during playback a cursor indicating the position can be viewed on the screen. |
| PLAY(▲) | Press the PLAY(▲) button to return to normal playback. |
DIVX REGISTRATION CODE (Only 42/50PQ60**, 50PS60**)
Confirm the DivX registration code number of the TV. Using the registration number, movies can be rented or purchased at www.divx.com/vod.
With a DivX registration code from other TV, playback of rented or purchased DivX file is not allowed. (Only DivX files matched with the registration code of the purchased TV are playable.)
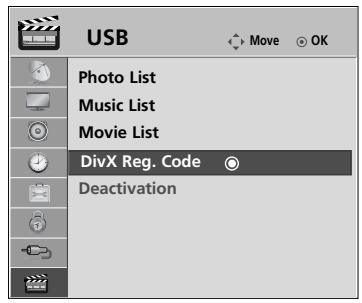

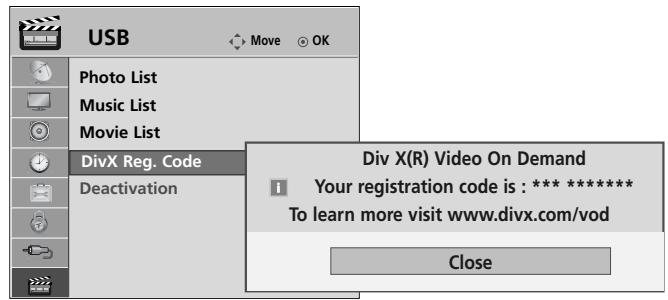
Select USB.
Select Divx Reg Code.
Display Divx Reg. Code.
- Press the MENU button to return to normal TV viewing.
- Press the RETURN button to move to the previous menu screen.

- Official DivX® Certified Product
- Plays all version of DivX® video (including DivX® 6) with standard playback of DivX® media files
- DivX, DivX Certified, and associated logos are trademarks of DivX, and are under license.

NOTE
Supported movie file
Resolution : under 720x576 WxH pixels.
Frame rate : under 30 frames/sec
▶ Video Codec : MPEG1, MPEG2, MPEG4, DivX3.xx, DivX4.xx, DivX5.xx, DivX6.xx, DivX VOD(DRM), XviD, , MPEG, AVI.
When loading, some buttons may not work.
DEACTIVATION (Only 42/50PQ60**, 50PS60**)
Delete the existing authentication information to receive a new DivX user authentication for TV. Once this function is executed, a DivX user authentication is required again to see DivX DRM files.
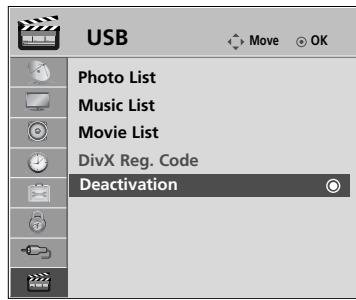
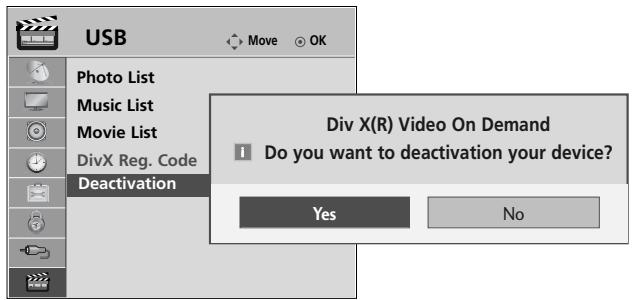

Select USB.


Select Deactivation.

Select Yes or No.
- Press the MENU button to return to normal TV viewing.
- Press the RETURN button to move to the previous menu screen.
EPG (ELECTRONIC PROGRAMME GUIDE)(IN DIGITAL MODE)
This system has an Electronic Programme Guide (EPG) to help your navigation through all the possible viewing options.
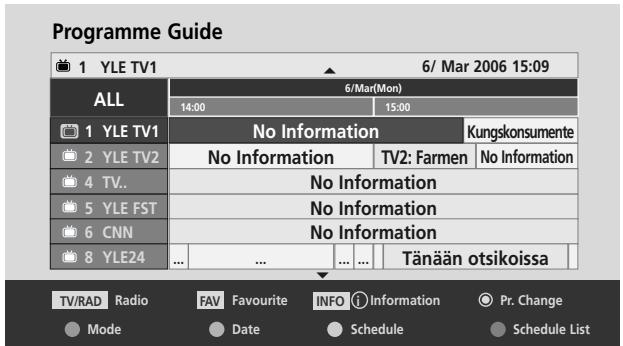
The EPG supplies information such as programme listings, start and end times for all available services. In addition, detailed information about the programme is often available in the EPG (the availability and amount of these programme details will vary, depending on the particular broadcaster).
This function can be used only when the EPG information is broadcast by broadcasting companies
The EPG displays the programme details for next 8 days.

Shows the present screen information.

Displayed with a DTV Programme.

Displayed with a Radio Programme.

Displayed with a MHEG Programme.

Displayed with a AAC Programme.

Aspect ratio of broadcasting programme.

Aspect ratio of broadcasting programme.

Displayed with a Teletext Programme.

Displayed with a Subtitle Programme.

Displayed with a Scramble Programme.

Displayed with a Dolby Programme.

Displayed with a Dolby Digital PLUS Programme.
480i/p, 576i/p, 720p, 1080i/p: Resolution of broadcasting programme
Switch on/off EPG

Switch on or off EPG.
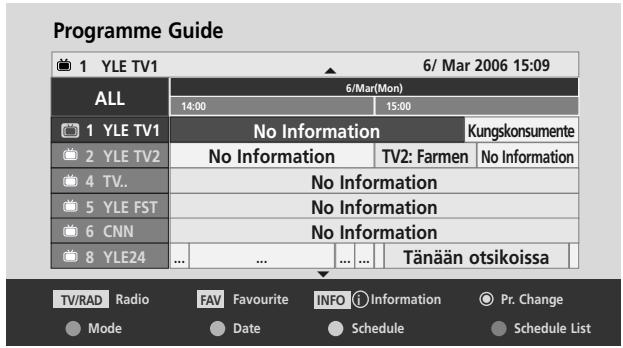
Select a programme

or
Select desired programme.
Display the selected programme.
EPG (ELECTRONIC PROGRAMME GUIDE)
Button Function in NOW/NEXT Guide Mode
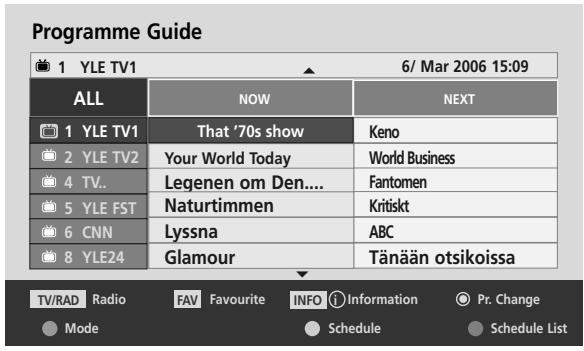
You can view a program being broadcasted and one scheduled to follow.

Change EPG mode.

Enter Timer Record/Remind setting mode.

Enter Timer Record/Remind list mode.

Change to the selected programme.

Select NOW or NEXT Programme.

Select the Broadcast Programme.
Page Up/Down.

or ( ) Switch off EPG.

Select TV or RADIO Programme.

Detail information on or off.
Button Function in 8 Day Guide Mode

Change EPG mode.
GREEN
Enter Date setting mode.

Enter Timer Record/Remind setting mode.
BLUE
Enter Timer Record/Remind list mode.

Change to the selected programme.

Select NOW or NEXT Programme.

Select the Broadcast Programme.
Page Up/Down.

or
Switch off EPC.

Select TV or RADIO Programme.

Detail information on or off
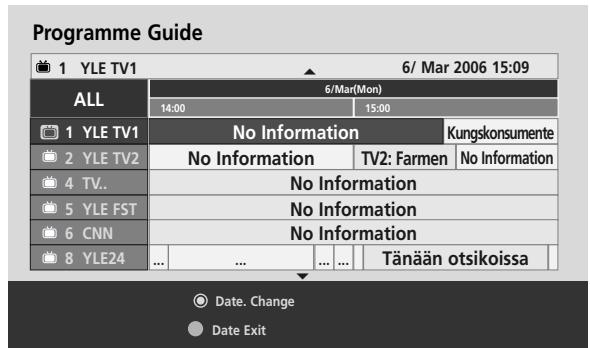
Button Function in Date Change Mode

Switch off Date setting mode.

Change to the selected date.

Select a date.

Switch off Date setting mode.

Switch off EPG.
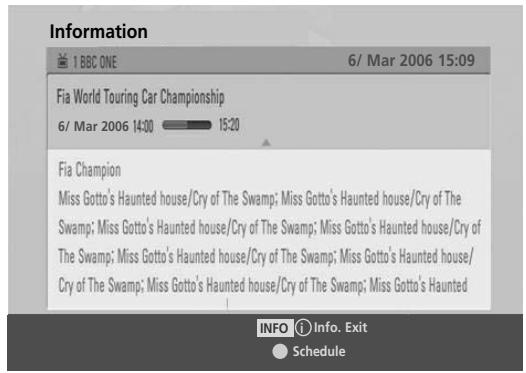
Button Function in Extended Description Box

Text Up/Down.

Enter Timer Record/Remind setting mode.

The detail information on or off.

Switch off EPG.
EPG (ELECTRONIC PROGRAMME GUIDE)
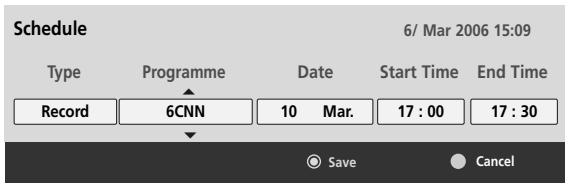
Button Function in Record/Remind Setting Mode
Sets a start or end time for recording, and sets a reminder only for a start time, with the end time grayed out.
- This function is available only when recording equipment that use pin8 recording signalling has been connected to the DTV-OUT(AV2) terminal, using a SCART cable.

Change to Guide or Timer list mode.

Save Timer Record/Remind.

Select Type, Programme, Date or Start/End time.

Function setting.
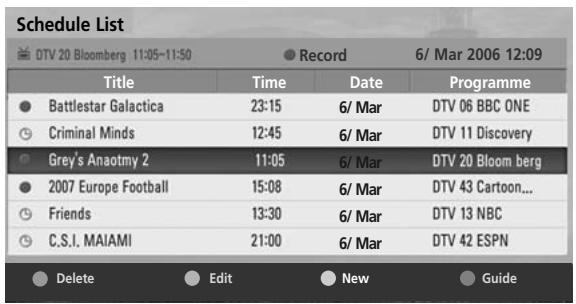
Button Function in Schedule List Mode
If you've created a schedule list, a scheduled program is displayed at the scheduled time even when you are watching a different program at the time.

Add new Manual Timer setting mode.

Enter Schedule List editing mode.

Delete the selected item.

Change to Guide mode.

Select Schedule List.
PICTURE CONTROL
PICTURE SIZE (ASPECT RATIO) CONTROL
You can watch the screen in various picture formats; 16:9, Just Scan, Original, 4:3, 14:9, Zoom, Cinema Zoom and Full Wide.
If a fixed image is displayed on the screen for a long time, that fixed image may become imprinted on the screen and remain visible.
You can adjust the enlarge proportion using button.
This function works in the following signal.
Select Aspect Ratio.
Select the desired picture format.
- You can also adjust Aspect Ratio in the PIC-TURE menu.
- For Zoom Setting, select 14:9, Zoom and Cinema Zoom in Ratio Menu. After completing Zoom Setting, the display goes back to Q.Menu.
16:9
The following selection will allow you to adjust the picture horizontally, in linear proportion, to fill the entire screen(useful for viewing 4:3 formatted DVDs)
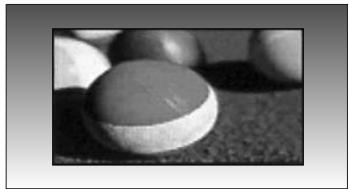
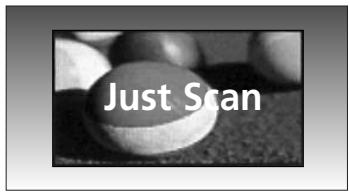
- Just Scan
Following Selection will lead to you view the picture of best quality without loss of original picture in high resolution image.
Note: If there is noise in original Picture, You can see the noise at the edge.
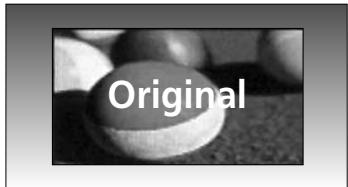
Original
When your TV receives a wide screen signal it will automatically change to the picture format broadcast.
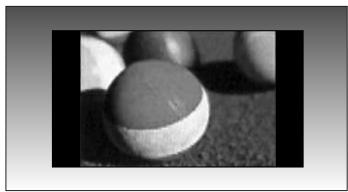
4:3
The following selection will allow you to view a picture with an original 4:3 aspect ration, gray bars will appear on both the left and right of the screen.
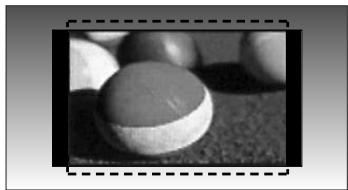
14:9
You can view a picture format of 14:9 or a general TV programme in the 14:9 mode. The 14:9 screen is viewed in the same way as in 4:3, but is magnified to the left and right.
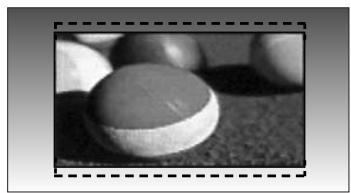
- Zoom
The following selection will allow you to view the picture without any alteration, while filling the entire screen. However, the top and bottom of the picture will be cropped.
- Cinema Zoom
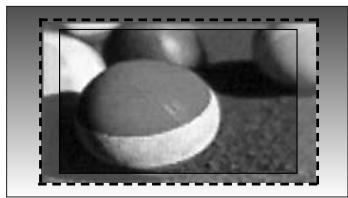
Choose Cinema Zoom when you wish the picture to be altered, both horizontally extended and vertically cropped. The picture adopting a compromise between alteration and screen coverage.
The adjustment range is 1-16.
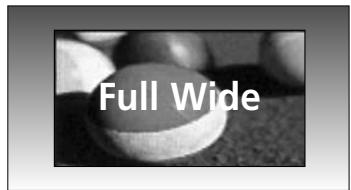
Full Wide
When TV receives the wide screen signal, it will lead you to adjust the picture horizontally or vertically, in a linear proportion, to fill the entire screen fully.
NOTE
▶ You can only select 4:3, 16:9 (Wide), 14:9, Zoom, Cinema Zoom in Component (under 720p), HDMI mode.
You can only select 4:3, 16:9 (Wide) in RGB/HDMI[PC] mode only.
In DTV/HDMI/Component (over 720p) mode, Just Scan is available.
eENERGY SAVING
It reduces the plasma display's power consumption.
The default factory setting complies with the Energy Star requirements and is adjusted to the comfortable level to be viewed at home.
You can increase the brightness of your screen by adjusting the Energy Saving level or by setting the Picture Mode.
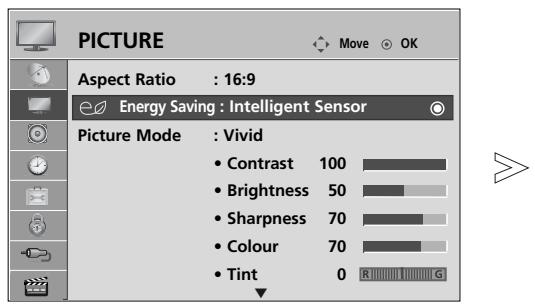
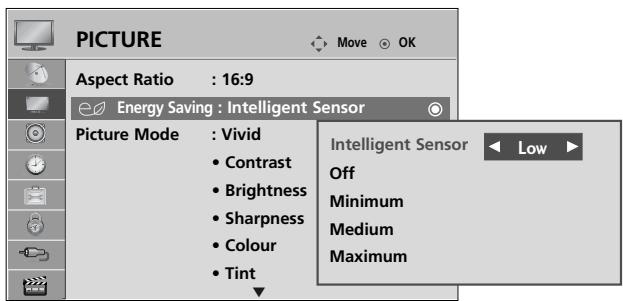

Select PICTURE.

Select Energy Saving.

Select Intelligent Sensor, Off, Minimum, Medium or Maximum.
When the Intelligent Sensor is selected,
Select Low, Middle or High.
- When the Intelligent sensor function is on, the most suitable picture is automatically adjusted according to the surrounding conditions.
-
Intelligent Sensor : Adjusts picture according to the surrounding conditions.
-
Press the MENU button to return to normal TV viewing.
- Press the RETURN button to move to the previous menu screen.
PRESET PICTURE SETTINGS
Picture Mode-Preset
Vivid Enhances contrast, colour and resolution.
Standard Displays the standard-quality screen.
Cinema Optimizes video for watching movies.
Sport Optimizes video for watching sports events.
Game Optimizes video for playing games.
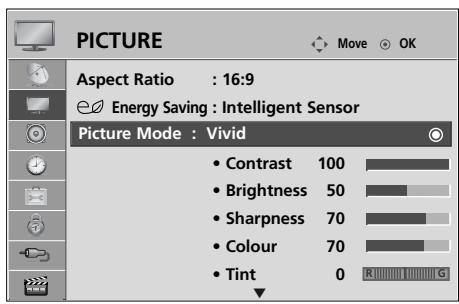

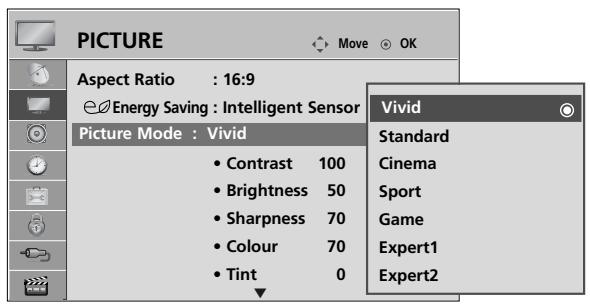
Select PICTURE.
Select Picture Mode.
Select Vivid, Standard, Cinema, Sport or Game.
- Picture Mode adjusts the TV for the best picture appearance. Select the preset value in the Picture Mode menu based on the programme category.
-
You can also adjust Picture Mode in the Q. Menu.
-
Press the MENU button to return to normal TV viewing.
- Press the RETURN button to move to the previous menu screen.
MANUAL PICTURE ADJUSTMENT
Picture Mode-User option
- Contrast
Adjusts the difference between light and dark levels in the picture.
- Brightness
Increases or decreases the amount of white in the picture.
- Sharpness
Adjusts the level of crispness in the edges between the light and dark areas of the picture.
The lower the level, the softer the image.
Colour
Adjusts intensity of all colours.
Tint
Adjusts the balance between red and green levels.


Select PICTURE.
Select Picture Mode.
Select Vivid, Standard, Cinema, Sport or Game.
Select Contrast, Brightness, Sharpness, Colour or Tint.
Make appropriate adjustments.
- Press the MENU button to return to normal TV viewing.
- Press the RETURN button to move to the previous menu screen.

NOTE
You cannot adjust colour, sharpness and tint in the RGB/HDMI[PC] mode.
When the Expert 1/2 is selected, you can select Contrast, Brightness, H Sharpness, V Sharpness, Colour or Tint.
PICTURE IMPROVEMENT TECHNOLOGY
You can calibrate the screen for each Picture Mode or set the video value according to the special video screen.
You can set the video value differently for each input.
To reset to the factory default screen after making adjustment to each video mode, execute the "Picture Reset" function for each Picture Mode.
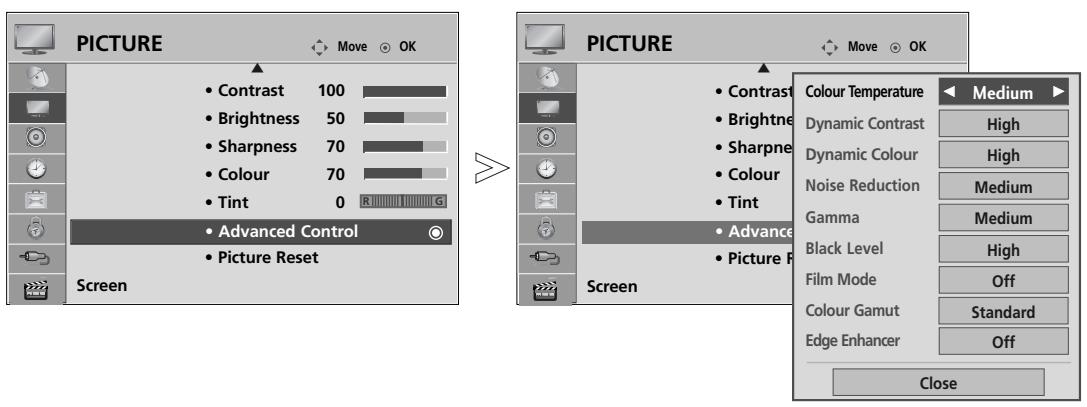
Select PICTURE.
Select Advanced Control.

Select your desired Source.: Colour Temperature, Dynamic Contrast, Dynamic Colour, Noise Reduction, Gamma, Black Level, Film Mode, Colour Gamut or Edge Enhancer.
Make appropriate adjustments.
- Press the MENU button to return to normal TV viewing.
- Press the RETURN button to move to the previous menu screen.
| Colour Temperature (Cool/Medium/Warm) | ■ Choose one of three automatic colour adjustments. Set to warm to enhance hotter colours such as red, or set to cool to see less intense colours with more blue. |
| Dynamic Contrast (Off/Low/High) | ■ Adjusts the contrast to keep it at the best level according to the brightness of the screen. The resolution of gradation is improved by making bright parts brighter and dark parts darker. This feature refers to dynamic contrast, and enhances the feeling of presence that contrast controls are intended to give by using dimming and other input signals. |
| Dynamic Colour (Off/Low/High) | ■ Adjusts screen colours so that they look livelier, richer and clearer. This feature enhances hue, saturation and luminance so that red, blue, green and white look more vivid. |
| Noise Reduction (Off/Low/Medium/High) | ■ Reduces screen noise without compromising video quality. This feature is also used to reduce recursive noise and MPEG noise (Mosquito/Block). |
| Gamma (Low/Medium/High) | ■ You can adjust brightness of dark area and middle gray level area of the picture. ·Low: Make dark and middle gray level area of the picture brighten. ·Medium: Express original picture gradation. ·High: Make dark and middle gray level area of the picture darken. |
| Black Level (Low/High) | ■ Low: The reflection of the screen gets darker. ·High: The reflection of the screen gets brighter. ·Auto: Realizing the black level of the screen and set it to High or Low automatically. ■ Makes dark parts on the screen look darker. Set black level of the screen to proper level. This function works in the following mode: AV (NTSC-M), HDMI or Component. This function enables to select “Low” or “High” in the following mode: AV(NTSC-M), HDMI or Component. Otherwise, “Black level” is set to “Auto”. |
| Film Mode (On/Off) | ■ Makes video clips recorded in film look more natural. This feature operates only in TV, AV and Component 480i/576i/1080i mode. |
| Colour Gamut (Wide/Standard) | ■ Change the colour gamut of the output image. ·Wide: Express rich colour tones using the maximum colour gamut available in the TV regardless of the input image. ·Standard: Express accurate colour tones by changing the colour gamut to meet international standards based on the input image data (resolution/format). |
| Edge Enhancer (Off/On) | ■ Show clearer and distinctive yet natural corners of the video. Emphasizes the frames of the video without over peaking. |
Expert Picture Control
By segmenting categories, Expert1 and Expert2 provide more categories which users can set as they see fit, offering the optimal picture quality for users.
As the detail item for video quality experts to fine tune the video using specific videos, this may not be effective for general videos.
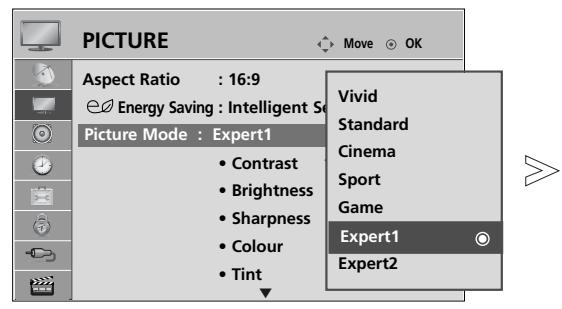
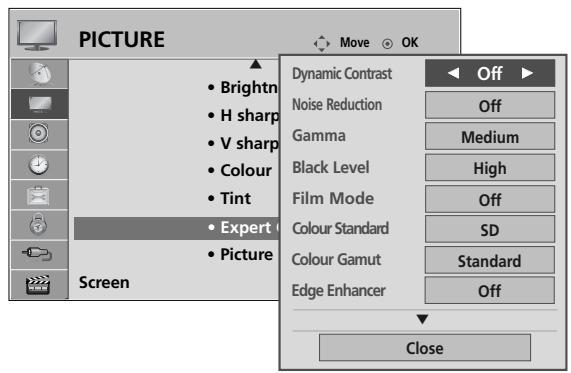
Select PICTURE.
Select Picture Mode.
Select Expert1 or Expert2.
Select Expert Control.
Select your desired Source.
Make appropriate adjustments.
- Press the MENU button to return to normal TV viewing.
- Press the RETURN button to move to the previous menu screen.
| Dynamic Contrast (Off/Low/High) | ■ Adjusts the contrast to keep it at the best level according to the brightness of the screen. The resolution of gradation is improved by making bright parts brighter and dark parts darker. This feature refers to dynamic contrast, and enhances the feeling of presence that contrast controls are intended to give by using dimming and other input signals. |
| Noise Reduction (Off/Low/Medium/High) | ■ Reduces screen noise without compromising video quality. This feature is also used to reduce recursive noise and MPEG noise (Mosquito/Block). |
| Gamma (Low/Medium/High) | ■ You can adjust brightness of dark area and middle gray level area of the picture. · Low: Make dark and middle gray level area of the picture brighten. · Medium: Express original picture gradation. · High: Make dark and middle gray level area of the picture darken. |
| Black Level (Low/High) | ■ Low: The reflection of the screen gets darker. · High: The reflection of the screen gets brighter. · Auto: Realizing the black level of the screen and set it to High or Low automatically. ■ Makes dark parts on the screen look darker. Set black level of the screen to proper level. This function works in the following mode: AV (NTSC-M), HDMI or Component. This function enables to select “Low” or “High” in the following mode: AV(NTSC-M), HDMI or Component. Otherwise, “Black level” is set to “Auto”. |
| Film Mode (On/Off) | ■ Makes video clips recorded in film look more natural. This feature operates only in TV, AV and Component 480i/576i/1080i mode. |
| Colour Standard (SD/HD) | ■ Select the international standard for the colour gamut that will be applied when the colour gamut is set to Standard. · SD: Increase colour accuracy by adjusting the output image to meet the EBU (European Broadcasting Union) Colour Coordinate Standard. · HD: Increase colour accuracy by adjusting the output image to meet ITU.BT-709 (High Definition Signal International Colour Coordinate Standard). |
| Colour Gamut (Wide/Standard) | ■ Change the colour gamut of the output image. · Wide: Express rich colour tones using the maximum colour gamut available in the TV regardless of the input image. · Standard: Express accurate colour tones by changing the colour gamut to meet international standards based on the input image data (resolution/format). |
| Edge Enhancer (Off/On) | ■ Show clearer and distinctive yet natural corners of the video. Emphasizes the frames of the video without over peaking. |
| White Balance (Medium/Warm/Cool) | ■ White Balance (Medium/Warm/Cool) · Adjust white balance. ■ Pattern (Inner/Outer) · Decide whether to use the Internal Pattern or External Pattern when adjusting white balance. ■ Red Gain/Green Gain/Blue Gain · Adjust high-level white balance. ■ Red Offset/Green Offset/Blue Offset · Adjust low-level white balance. |
| Colour Management System | ■ Colour (Red/Green/Blue/Yellow/Cyan/Magenta) · Adjust colour saturation by area. ■ Tint (Red/Green/Blue/Yellow/Cyan/Magenta) · Adjust colour tint by area. |
PICTURE RESET
Settings of the selected picture modes return to the default factory settings.
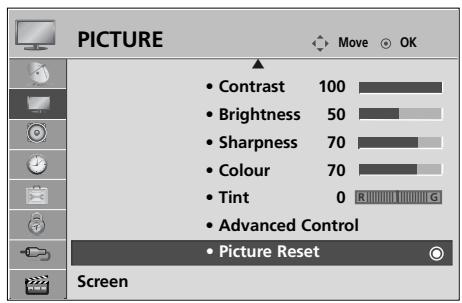
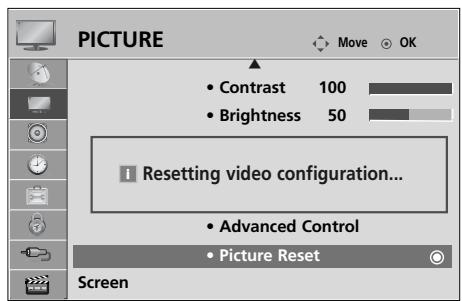
Select PICTURE.
Select Picture Reset.
Initialize the adjusted value.
- Press the MENU button to return to normal TV viewing.
- Press the RETURN button to move to the previous menu screen.
IMAGE STICKING MINIMIZATION (ISM) METHOD
A frozen or still picture displayed on the screen for prolonged periods will result in a ghost image remaining even when you change the image. Avoid allowing a fixed image to remain on the screen for prolonged periods.
Orbiter
Orbiter may help prevent ghost images. However, it is best not to allow any fixed image to remain on the screen. To avoid a permanent image on the screen, the screen will move every 2 minutes.
Colour Wash
The colour block with the screen moved a little and the white pattern are alternately displayed. It is difficult to sense the afterimage occurred while the temporary afterimage is removed and the colour pattern is operating.
White Wash
White wash removes permanent images from the screen.
Note: An excessive permanent image may be impossible to clear entirely with White Wash.
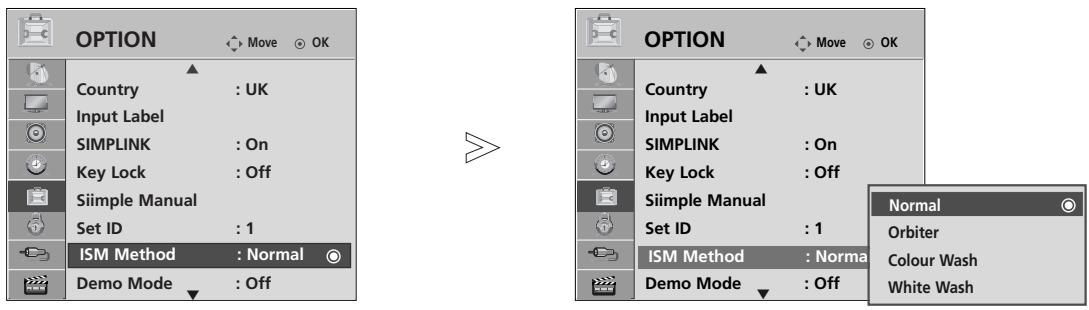
Select OPTION.
- If you do not need this function, set Normal.

Select ISM Method.
Select Normal, Orbiter, Colour Wash or White Wash.
- Press the MENU button to return to normal TV viewing.
- Press the RETURN button to move to the previous menu screen.
DEMO MODE
Use it to see the difference between XD Demo on and XD Demo off.
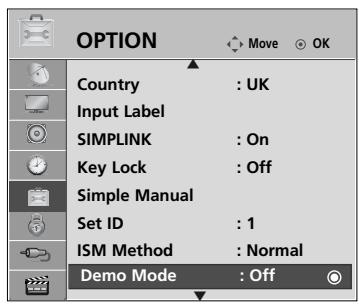

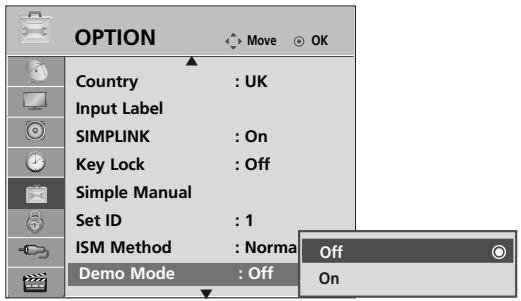
Select OPTION.
Select Demo Mode.
Select On or Off.
To stop the Demo Mode, press any button.
- Press the MENU button to return to normal TV viewing.
- Press the RETURN button to move to the previous menu screen.
MODE SETTING
We recommend setting the TV to "Home Use" mode for the best picture in your home environment. "Store Demo" mode is an optimal setting for displaying at stores.
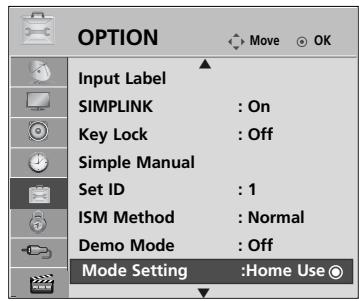

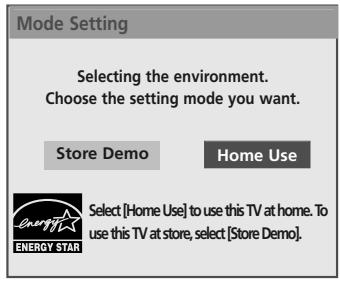
Select OPTION.

Select Mode Setting.
Select Store Demo or Home Use.
Save.
- Press the MENU button to return to normal TV viewing.
- Press the RETURN button to move to the previous menu screen.
SOUND & LANGUAGE CONTROL
AUTO VOLUME LEVELER
AVL automatically remains on the same level of volume if you change programmes.
Because each broadcasting station has its own signal conditions, volume adjustment may be needed every time the channel is changed. This feature allows users to enjoy stable volume levels by making automatic adjustments for each programme.
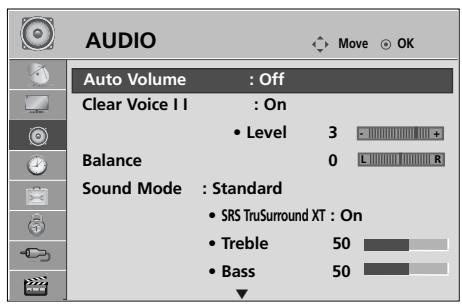
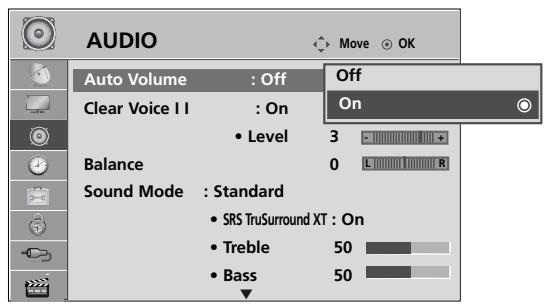
Select AUDIO.
Select Auto Volume.
Select On or Off.
- Press the MENU button to return to normal TV viewing.
- Press the RETURN button to move to the previous menu screen.
SOUND & LANGUAGE CONTROL
PRESET SOUND SETTINGS-SOUND MODE
You can select your preferred sound setting; Standard, Music, Cinema, Sport or Game and you can also adjust Treble, Bass.
Sound Mode lets you enjoy the best sound without any Special adjustment as the TV sets the appropriate sound options based on the programme content.
Standard, Music, Cinema, Sport and Game are preset for optimum sound quality at the factory.
Standard Offers standard-quality sound.
Music Optimizes sound for listening to music.
Cinema Optimizes sound for watching movies.
Sport Optimizes sound for watching sports events.
Game Optimizes sound for playing games.
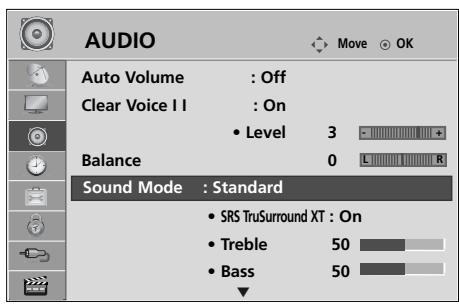

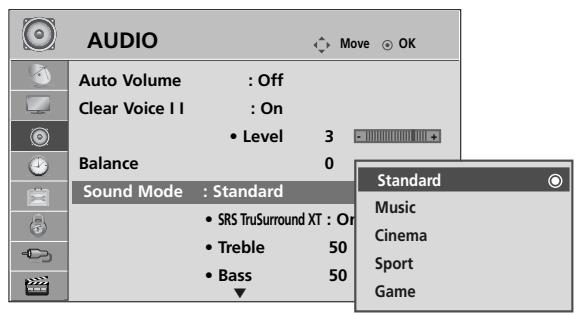
Select AUDIO.
Select Sound Mode.

Select Standard, Music, Cinema, Sport or Game.
-
You can also adjust Sound Mode in the Q. Menu.
-
Press the MENU button to return to normal TV viewing.
- Press the RETURN button to move to the previous menu screen.
SOUND SETTING ADJUSTMENT -USER MODE
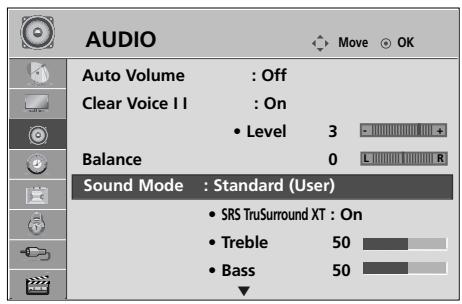

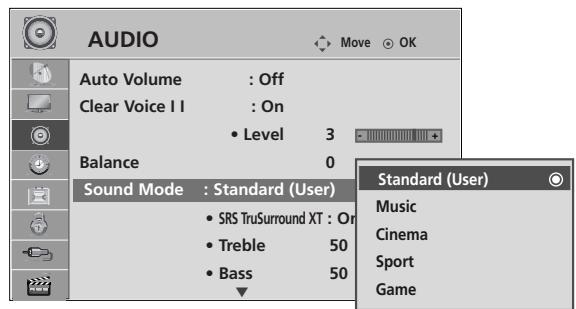
Select AUDIO.
Select Sound Mode.
Select Standard, Music, Cinema, Sport or Game.
Select Treble, Bass.
Set the desired sound level.
SRS TRUSURROUND XT
Select this option to sound realistic.
Select AUDIO.
Select SRS TruSurround XT.
Select On or Off.
- Press the MENU button to return to normal TV viewing.
-
Press the RETURN button to move to the previous menu screen.
-
SRS TruSurround XT : TruSurround XT is a patented SRS technology that solves the problem of playing 5.1 multicannel content over two speakers.
-
Press the MENU button to return to normal TV viewing.
- Press the RETURN button to move to the previous menu screen.
SRS is a trademark of SRS Labs, Inc.
TruSurround XT technology is incorporated under license from SRS Labs, Inc.
CLEAR VOICE II
By differentiating the human sound range from others, it helps users listen to human voices better.
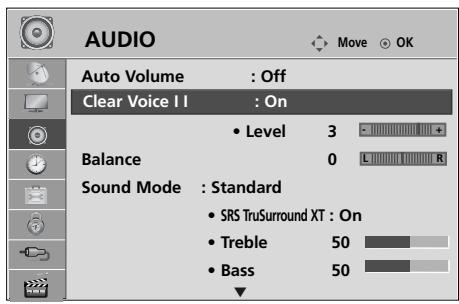

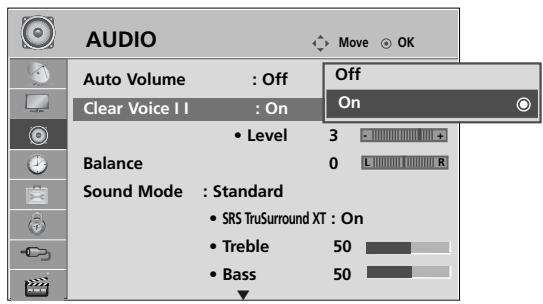
Select AUDIO.
Select Clear Voice II.
Select On or Off.
When the Clear Voice II is selected On,
- Select levels from -6' to +6' .
Select the desired Level.
- Press the MENU button to return to normal TV viewing.
- Press the RETURN button to move to the previous menu screen.
BALANCE
You can adjust the sound balance of the speakers to preferred levels.
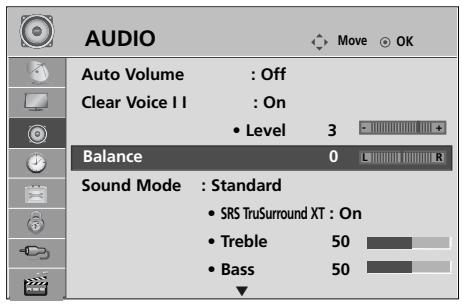

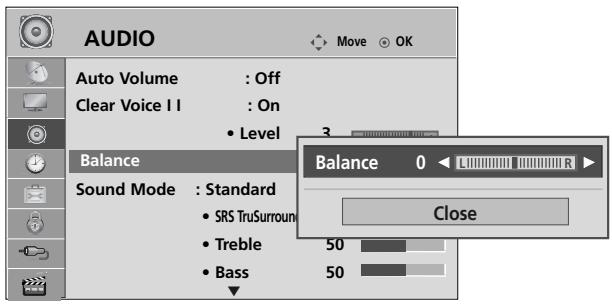
Select AUDIO.
Select Balance.
Make desired adjustment.
- Press the MENU button to return to normal TV viewing.
- Press the RETURN button to move to the previous menu screen.
TV SPEAKERS ON/ OFF SETUP
You can adjust the TV internal speaker status.
In AV1, AV2, AV3, COMPONENT, RGB and HDMI1 with HDMI to DVI cable, the TV speaker can be operational even when there is no video signal.
If you wish to use an external Hi-Fi system, turn off the TV internal speakers.
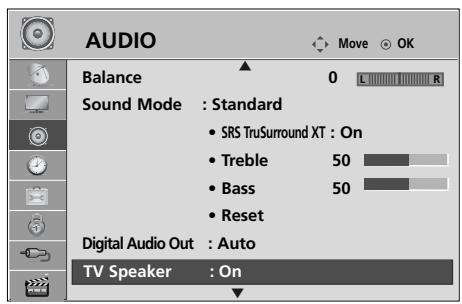

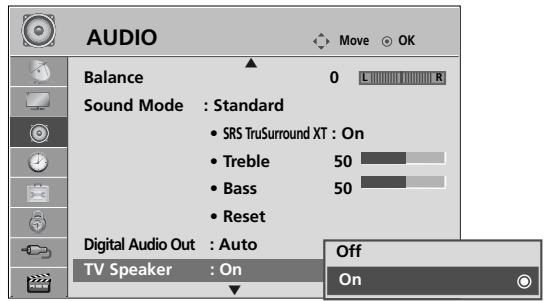
Select AUDIO.

Select TV Speaker.
Select On or Off.

NOTE
-
When the TV speaker is turned off while the Simplink home theater is operating, the sound output automatically switches to the Home theater speaker, but when the TV speaker is turned on, the sound output the TV speaker.
-
Press the MENU button to return to normal TV viewing.
- Press the RETURN button to move to the previous menu screen.
SELECTING DIGITAL AUDIO OUT
This function allows you to select your preferred Digital Audio Output.
The TV can only output DOLBY Digital if a channel is broadcast with Dolby Digital audio.
When Dolby digital is available, selecting Auto in the Digital Audio Out menu will set SPDIF(Sony Philips Digital Interface) output to Dolby Digital.
If Auto is selected in the digital audio out menu when dolby digital is not available, SPDIF output will be PCM(Pulse-code modulation).
Even if both Auto and Audio language have been set in a channel which broadcast Dolby Digital Audio, only Dolby Digital will be played.
If the sample rate converter on this chip does not support 44.1 to 48kHz , this content should always produce stereo PCM at digital output.
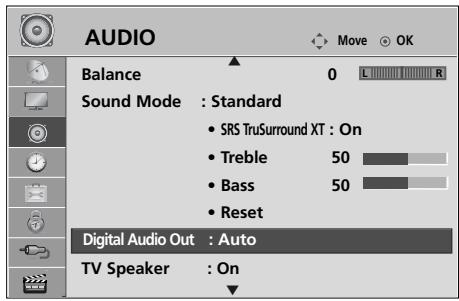

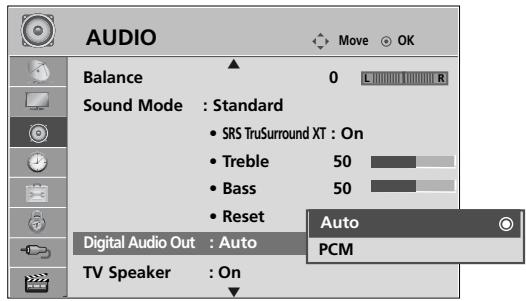
Select AUDIO.
Select Digital Audio Out.
Select Auto or PCM.
DOLBY
DIGITAL PLUS
Manufactured under license from Dolby Laboratories. "Dolby and the double-D symbol are trademarks of Dolby Laboratories.
-
There is a possibility that when HDMI mode, some DVD players do not make SPDIF sound. At that time, set the output of the digital audio of the DVD player to PCM.(In HDMI, DOLBY DIGITAL PLUS is not supported)
-
Press the MENU button to return to normal TV viewing.
- Press the RETURN button to move to the previous menu screen.
AUDIO RESET
Settings of the selected Sound Mode return to the default factory settings.
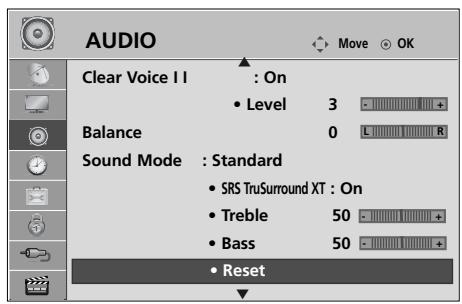
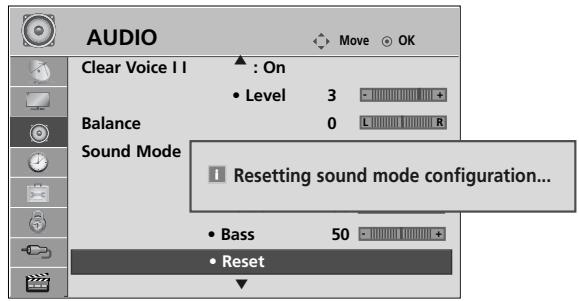

Select AUDIO.
Select Reset.
Initialize the adjusted value.
- Press the MENU button to return to normal TV viewing.
- Press the RETURN button to move to the previous menu screen.
AUDIO DESCRIPTION(IN DIGITAL MODE ONLY)
This function is for the blind, and provides explanatory audio describing the current situation in a TV programme in addition to the basic audio.
When Audio Description On is selected, basic audio and Audio Description are provided only for those programmes that have Audio Description included.
When Main Audio is AAC or Dolby Digital Plus Audio, Audio Description is not supported.
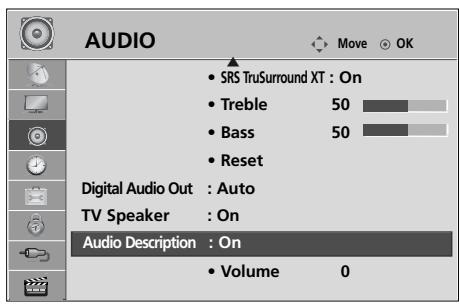

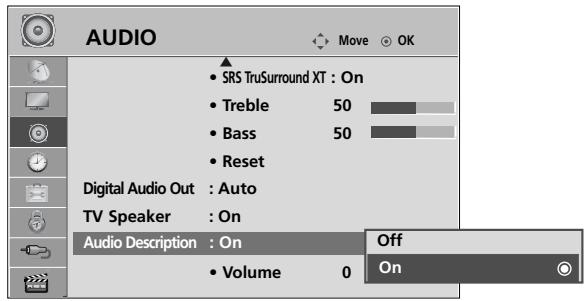

When the Audio Description is selected On,
- Press the MENU button to return to normal TV viewing.
- Press the RETURN button to move to the previous menu screen.
I/II
Stereo/Dual Reception (In Analogue Mode Only)
When a programme is selected, the sound information for the station appears with the programme number and station name.

Select Audio.
Select the sound output.
| Broadcast | On Screen Display |
| Mono | MONO |
| Stereo | STEREO |
| Dual | DUAL I, DUAL II, DUAL I+II |
Mono sound selection
If the stereo signal is weak in stereo reception, you can switch to mono. In mono reception, the clarity of sound is improved.
■ Language selection for dual language broadcast
If a programme can be received in two languages (dual language), you can switch to DUAL I, DUAL II or DUAL I+II.
DUAL I Sends the primary broadcast language to the loudspeakers.
DUAL II Sends the secondary broadcast language to the loudspeakers.
DUAL I+II Sends a separate language to each loudspeaker.
SOUND & LANGUAGE CONTROL
NICAM Reception (In Analogue Mode Only)
If the TV is equipped with a receiver for NICAM reception, high quality NICAM (Near Instantaneous Companding Audio Multiplex) digital sound can be received.
Sound output can be selected according to the type of broadcast received.
When NICAM mono is received, you can select NICAM MONO or FM MONO.
When NICAM stereo is received, you can select NICAM STEREO or FM MONO. If the stereo signal is weak, switch to FM MONO.
3 When NICAM dual is received, you can select NICAM DUAL I, NICAM DUAL II or NICAM DUAL I+II or FM MONO.
Speaker Sound Output Selection
In AV, Component, RGB and HDMI mode, you can select output sound for the left and right loudspeakers.
Select the sound output.
L+R: Audio signal from audio L input is sent to the left loudspeaker and audio signal from audio R input is sent to the right loudspeaker.
L+L: Audio signal from audio L input is sent to left and right loudspeakers.
R + R : Audio signal from audio R input is sent to left and right loudspeakers.
ON-SCREEN MENU LANGUAGE / COUNTRY SELECTION
The installation guide menu appears on the TV screen when it is switched on for the first time.
Select your desired language.
Select your country.
- If you want to change Language/ Country selection

Select OPTION.
Select Menu Language or Country.
Select your desired language or country.

- Press the MENU button to return to normal TV viewing.
- Press the RETURN button to move to the previous menu screen.

NOTE
If you do not finish the set-up Installation Guide by pressing RETURN or if you time out on the OSD (On Screen Display) the installation menu will continuously appear until the set up is completed whenever the TV is switched on
If you select the wrong local country, teletext may not appear correctly on the screen and some problems may occur during teletext operation.
The CI (Common Interface) function may not be applied based on country broadcasting circumstances.
DTV mode control buttons may not function based on country broadcasting circumstances.
In country that Digital broadcasting regulation isn't fixed, some DTV function may not work depending on digital broadcasting circumstances.
The Country Setting "UK" should only be activated in UK.
If the country setting is set to "---", European terrestrial digital standard broadcasting programmes are available, but some DTV functions may not work properly.
LANGUAGE SELECTION (IN DIGITAL MODE ONLY)
The Audio function allows selection of a preferred language.
If audio data in a selected language is not broadcast, the default language audio will be played.
Use the Subtitle function when two or more subtitle languages are broadcast. If subtitle data in a selected language is not broadcast, the default language subtitle will be displayed.
When the languages you selected as the primary for Audio Language and Subtitle Language are not supported, you can select language in secondary category.
Select OPTION.
Select Audio Language or Subtitle Language.
Select your desired language.
Save.
Select OPTION.

Select Hard of Hearing(□).
Select On or Off.
- Press the RETURN button to move to the previous menu screen.
< Audio Language Selection >
When two or more audio languages are broadcast, you can select the audio language.
- When AAC, Dolby Digital or Dolby Digital PLUS received, you cannot select the L+R, L+L or R+R.

Select Audio


Select an audio language.
Audio Language OSD Information
| Display | Status |
| N.A | Not Available |
| MPEG | MPEG Audio |
| DCL | Dolby Digital Audio |
| Audio for “Visual Impaired” | |
| ABC | Audio for “Hearing Impaired” |
| DCD+ | Dolby Digital Plus Audio |
| AAC | AAC Audio |
Select L + R, L + L or R + R .
- When two or more subtitle languages are broadcast, you can select the subtitle language with the SUBTITLE button on the remote control.
Press the button to select a subtitle language.
Subtitle Language OSD Information
| Display | Status |
| N.A | Not Available |
| [] | Teletext Subtitle |
| [ABC] | Subtitle for “Hard of Hearing” |
- The audio/subtitles can be displayed in a simpler form with 1 to 3 characters broadcast by the service provider.
- When you select supplementary Audio (Audio for "Visual/Hearing Impaired") the TV may output a part of the Main audio.
CLOCK SETUP
The clock is set automatically when receiving a digital signal. (You can set the clock manually only if the TV has no DTV signal.)
You must set the time correctly before using on/off timer function.
When you select a Time Zone city, the TV time is set by the time offset information based on Time Zone and GMT (Greenwich Mean Time) which is received with the broadcast signal and the time is set automatically by a digital signal.
Once Clock is set in DTV mode, you cannot change time, but if the city name in Time Zone is changed into offset, you can change time by 1 hour.
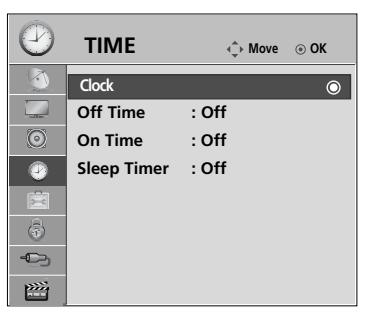

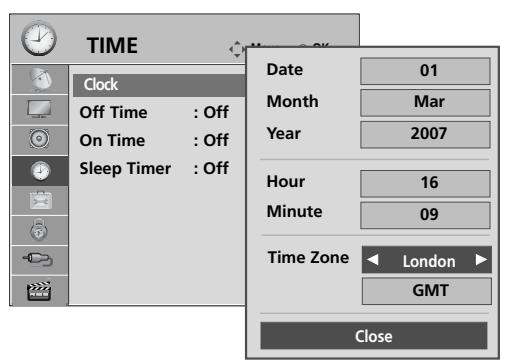
Select TIME.
Select Clock.
Select either the year, date, time or Time Zone option.
Set the year, date, time and Time Zone options.
- Press the MENU button to return to normal TV viewing.
- Press the RETURN button to move to the previous menu screen.
AUTO ON/OFF TIMER SETTING
The Off time function automatically switches the TV to standby at a preset time.
Two hours after the TV is switched on by the on time function it will automatically switch back to standby mode unless a button has been pressed.
The Off time function overrides the On timer function if both are set to the same time.
The TV must be in standby mode for the On timer to work.
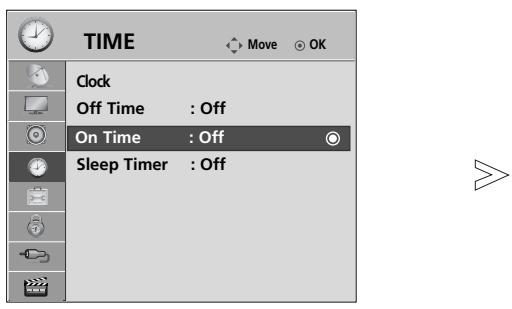
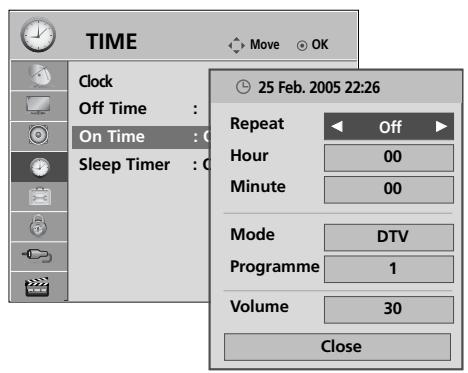

When the On Time is selected,


- To cancel On/Off Time function, select Off.
- For On Time function only
Select Mode.
Select TV, DTV, Radio, AV1~3, Component, RGB or HDMI1~3.
Set the programme.
Adjust volume level at switch-on.
- Press the MENU button to return to normal TV viewing.
- Press the RETURN button to move to the previous menu screen.
SLEEP TIMER SETTING
You do not have to remember to switch the TV off before you go to sleep.
The sleep timer automatically switches the TV to standby after the preset time has elapsed.
Select Sleep Timer.
Select Off, 10, 20, 30, 60, 90, 120, 180 or 240 Min.
- When you switch the TV off, the preset sleep timer is cancelled.
- You can also adjust Sleep Timer in the TIME menu.
PARENTAL CONTROL / RATINGS
SET PASSWORD & LOCK SYSTEM
Enter the password, press '0', '0', '0', '0' on the remote control handset.
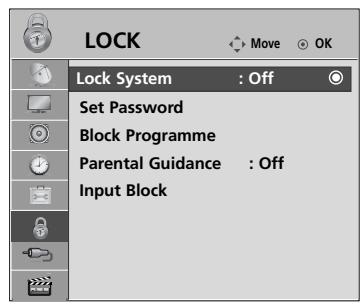

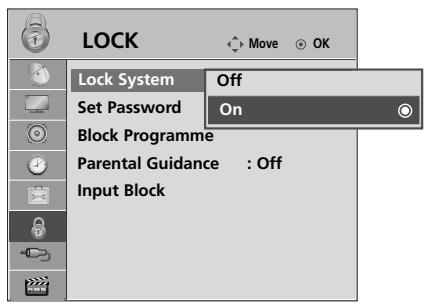
Select LOCK.
- If you forget your password, press '7'; '7'; '7'; '7' on the remote control handset.
Select Lock System.
Select On.
Set the password.
Input a 4-digit password.
Be sure to remember this number!
Re-enter new password for confirm.
- Press the MENU button to return to normal TV viewing.
- Press the RETURN button to move to the previous menu screen.
BLOCK PROGRAMME
Blocks any programmes that you do not want to watch or that you do not want your children to watch.
It is available to use this function in Lock System "On".
Enter a password to watch a blocked programme.
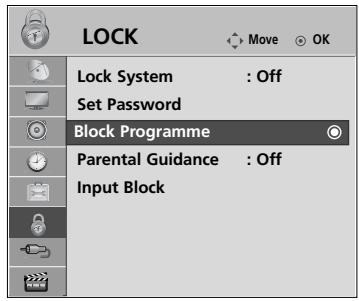

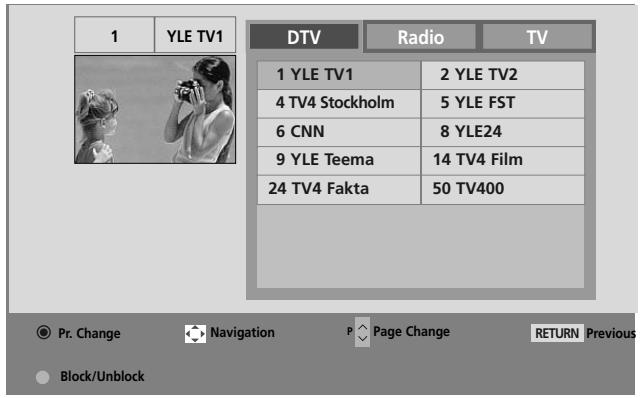
Select LOCK.
Select Block Programme.
Enter the Block Programme.
Select a programme to be locked.
- Press the MENU button to return to normal TV viewing.
- Press the RETURN button to move to the previous menu screen.
PARENTAL CONTROL / RATINGS
PARENTAL CONTROL (IN DIGITAL MODE ONLY)
This function operates according to information from the broadcasting station. Therefore if the signal has incorrect information, this function does not operate.
A password is required to gain access to this menu.
This TV is programmed to remember which option it was last set to even if you switch the TV off.
Prevents children from watching certain adult's TV programmes, according to the ratings limit set
Enter a password to watch a rated programme.
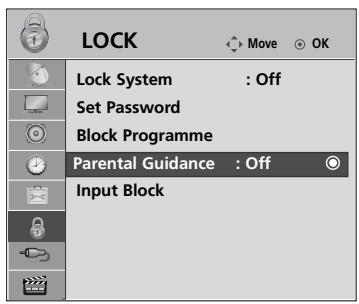

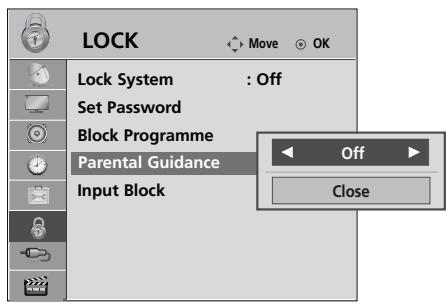
Select LOCK.
Select Parental Guidance.
Make appropriate adjustments.
Save.
- Press the MENU button to return to normal TV viewing.
- Press the RETURN button to move to the previous menu screen.
INPUT BLOCK
Enables you to block an input.
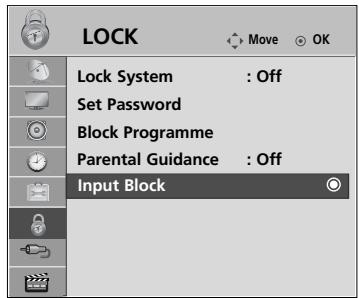

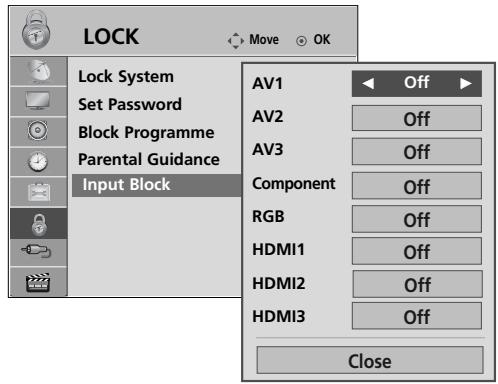
Select LOCK.
Select Input Block.
Select the source.
Select Off or On.
- Press the MENU button to return to normal TV viewing.
- Press the RETURN button to move to the previous menu screen.
PARENTAL CONTROL / RATINGS
KEY LOCK
The TV can be set so that the remote control is required to control it. This feature can be used to prevent unauthorized viewing.
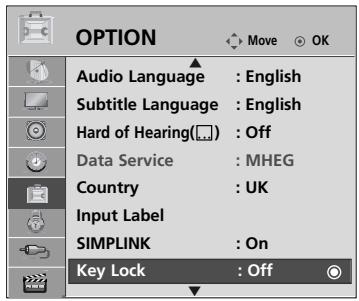
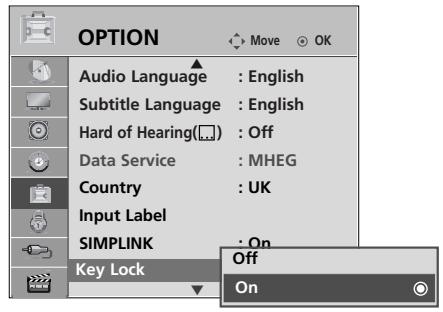
Select OPTION.
Select Key Lock.
Select On or Off.
- Set ID : Off
In Key Lock 'On', if the TV is turned off, press the INPUT, P ▲ or▼ button on the TV or POWER buttons on the remote control then the set will be turned on.
Set ID : On
In Key Lock 'On', if the TV is turned off, press the INPUT, P ▲ or▼ button on the TV or POWER, INPUT, P ∧∨ or NUMBER buttons on the remote control then the set will be turned on.
-
With the Key Lock On, the display ' × Key Lock On' appears on the screen if any button on the front panel is pressed while viewing the TV. (Except for 0/1 button)
-
Press the MENU button to return to normal TV viewing.
- Press the RETURN button to move to the previous menu screen.
This feature is not available in all countries.
Teletext is a free service broadcast by most TV stations which gives up-to-the-minute information on news, weather, television programmes, share prices and many other topics.
The teletext decoder of this TV can support the SIMPLE, TOP and FASTEXT systems. SIMPLE (standard teletext) consists of a number of pages which are selected by directly entering the corresponding page number. TOP and FASTEXT are more modern methods allowing quick and easy selection of teletext information.
SWITCH ON/OFF
Press the TEXT button to switch to teletext. The initial page or last page viewed appears on the screen.
Two page numbers, TV station name, date and time are displayed on the screen headline. The first page number indicates your selection, while the second shows the current page displayed.
Press the TEXT button to switch off teletext. The previous mode reappears.
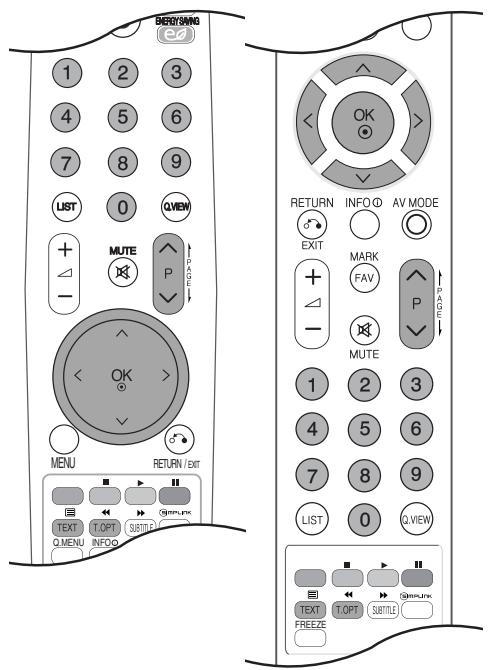
SIMPLE TEXT
Page selection
1 Enter the desired page number as a three digit number with the NUMBER buttons. If during selection you press a wrong number, you must complete the three digit number and then re-enter the correct page number.
The P button can be used to select the preceding or following page.
TOP TEXT
The user guide displays four fields-red, green, yellow and blue at the bottom of the screen. The yellow field denotes the next group and the blue field indicates the next block.
■ Block / group / page selection
1 With the blue button you can progress from block to block.
Use the yellow button to proceed to the next group with automatic overflow to the next block.
With the green button you can proceed to the next existing page with automatic overflow to the next group. Alternatively the P button can be used.
The red button returns to the previous selection. Alternatively the P button can be used.
Direct page selection
As with SIMPLE teletext mode, you can select a page by entering it as a three digit number using the NUMBER buttons in TOP mode.
FASTEXT
The teletext pages are colour coded along the bottom of the screen and are selected by pressing the corresponding coloured button.
Page selection
Press the T.OPT button and then use button to select menu. Display the index page.
You can select the pages which are colour coded along the bottom line with corresponding coloured buttons.
AS with SIMPLE teletext mode, you can select a page by entering its three digit page number with the NUM-BER buttons in FASTEXT mode.
The P button can be used to select the preceding or following page.
SPECIAL TELETEXT FUNCTIONS
Press the T. OPT button and then use button to select the Text Option menu.

Index
Select the each index page.

Time
When viewing a TV programme, select this menu to display the time at the top right hand corner of the screen.
In the teletext mode, press this button to select a sub page number. The sub page number is displayed at the bottom of the screen. To hold or change the sub page, press the RED/GREEN, < > or NUMBER buttons.
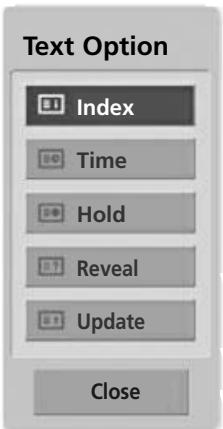

Hold
Stops the automatic page change which will occur if a teletext page consists of 2 or more sub pages. The number of sub pages and the sub page displayed is, usually, shown on the screen below the time. When this menu is selected the stop symbol is displayed at the top left-hand corner of the screen and the automatic page change is inactive.

■Reveal
Select this menu to display concealed information, such as solutions to riddles or puzzles.

Update
Displays the TV picture on the screen while waiting for a new teletext page. The display will appear at the top left hand corner of the screen. When the updated page is available then display will change to the page number. Select this menu again to view the updated teletext page.
*This function works in UK/ Ireland only.
The TV gives you access to digital teletext which is greatly improved in various aspects such as text, graphics etc. This digital teletext can access special digital teletext services and specific services which broadcast digital teletext.
You should select off in the subtitle language menu to display teletext by pressing the SUBTITLE button.
TELETEXT WITHIN DIGITAL SERVICE
Press the numeric or P button to select a digital service which broadcasts digital teletext. To know which are digital teletext services, refer to the EPG service list.
2 Follow the indications on digital teletext and move onto the next step by pressing TEXT, OK, < > , RED, GREEN, YELLOW, BLUE or NUMBER buttons and etc..
3 To change digital teletext service, select a different service by the numeric or P button.
TELETEXT IN DIGITAL SERVICE
Press the numeric or P button to select a certain service which broadcasts digital teletext.
Press the TEXT or coloured button to switch on teletext.
3 Follow the indications on digital teletext and move onto the next step by pressing OK, < > , RED, GREEN, YELLOW, BLUE or NUMBER buttons and so on.
4 Press the TEXT or colour button to switch off digital teletext and return to TV viewing.
Some services may allow you to access text services by pressing the RED button.
TROUBLESHOOTING
The TV does not operate properly.
The remote control does not work
- Check to see if there is any object between the TV and the remote control causing an obstruction. Ensure you are pointing the remote control directly at the TV.
■ Ensure that the batteries are installed with correct polarity (+ to +, - to -).
Install new batteries.
Power is suddenly turned off
■ Is the sleep timer set?
Check the power control settings. Has the Power supply been interrupted.
The TV goes into Standby mode automatically if no signal is received and no operation is performed for 15 minutes.
The video function does not work.
No picture & No sound
Check whether the TV is switched on.
Try another channel. The problem may be with the broadcast.
■ Is the power cord inserted correctly into the mains?
Check your antenna direction and/or location.
■ Test the mains outlet by plugging another TV into the same outlet.
Picture appears slowly after switching on
This is normal, the image is muted during the TV startup process. Please contact your service centre, if the picture has not appeared after five minutes.
No or poor colour or poor picture
Adjust Colour in menu option.
■Allow a sufficient distance between the TV and the VCR.
Try another channel. The problem may be with the broadcast.
Are the video cables installed properly?
Activate any function to restore the brightness of the picture.
Horizontal/vertical bars or picture shaking
Check for local interference such as an electrical appliance or power tool.
Poor reception on some channels
- Station or cable channel experiencing problems, tune to another station.
■ Station signal is weak, reposition the antenna to receive weaker stations.
Check for sources of possible interference.
Lines or streaks in pictures
- Check antenna (Change the position of the antenna).
No picture when connecting HDMI
Check HDMI cable over version 1.3.
If the HDMI cables don't support HDMI version 1.3, it can cause flickers or no screen display. In this case use the latest cables that support HDMI version 1.3.
| The audio function does not work. | |
| Picture OK & No sound | Press the ▲+ or - button. Sound muted? Press MUTE button. Try another channel. The problem may be with the broadcast. Are the audio cables installed properly? |
| No output from one of the speakers | Adjust Balance in menu option. |
| Unusual sound from inside the TV | A change in ambient humidity or temperature may result in an unusual noise when the TV is switched on or off and does not indicate a fault with the TV. |
| No sound when connecting HDMI or USB | Check HDMI cable over version 1.3. Check USB cable over version 2.0. *This feature is not available for all models. |
| There is a problem in PC mode. (Only PC mode applied) | |
| The signal is out of range (Invalid format) | ■ Adjust resolution, horizontal frequency, or vertical frequency. ■ Check the input source. |
| Vertical bar or stripe on background & Horizontal Noise & Incorrect position | ■ Use Auto configure or adjust clock, phase, or H/V position. (Option) |
| Screen colour is unstable or single colour | ■ Check the signal cable. ■ Reinstall the PC video card. |
| There is a problem with PICTURE settings. | |
| When the user changes the picture settings, the TV automatically converts back to the initial settings after a certain period of time. | ■ It means that the TV is currently set to Store Demo mode. To switch to Home Use mode you should do the followings: From the TV Menu, choose OPTION -> Choose Mode Setting -> Choose Home Use. Now, you have completed switching to the Home Use mode. |
MAINTENANCE
Early malfunctions can be prevented. Careful and regular cleaning can prolong the life of your new TV.
Caution: Be sure to switch the power off and unplug the power cord before you begin any cleaning.
Cleaning the Screen
A good way to keep the dust off your screen for a while is to wet a soft cloth in a mixture of lukewarm water and a little fabric softener or dish washing detergent. Wring the cloth until it is almost dry, and then use it to wipe the screen.
2 Ensure there is no excess water on the screen. Allow any water or dampness to evaporate before switching on.
Cleaning the Cabinet
To remove dirt or dust, wipe the cabinet with a soft, dry, lint-free cloth.
Do not to use a wet cloth.
Extended Absence
CAUTION
If you expect to leave your TV dormant for prolonged periods (such as a holiday), unplug the power cord to protect against possible damage from lightning or power surges.
PRODUCT SPECIFICATIONS
| MODELS | 42PQ20** | 50PQ20** | 42PQ30** | 50PQ30** | |
| 42PQ2000-ZA42PQ2010-ZB | 50PQ2000-ZA50PQ2010-ZB | 42PQ3000-ZA | 50PQ3000-ZA | ||
| Dimensions(Width x Height x Depth) | with stand | 1031.2 x 720.9 x 308.0 mm40.6 x 28.4 x 12.1 inches | 1216.7 x 818.1 x 353.0 mm47.9 x 32.2 x 13.9 inches | 1031.2 x 720.9 x 308.0 mm40.6 x 28.4 x 12.1 inches | 1216.7 x 818.1 x 353.0 mm47.9 x 32.2 x 13.9 inches |
| without stand | 1031.2 x 656.7 x 80.8mm40.6 x 25.9 x 3.2 inches | 1216.7 x 759.0 x 83.0 mm47.9 x 29.9 x 3.3 inches | 1031.2 x 656.7 x 80.8mm40.6 x 25.9 x 3.2 inches | 1216.7 x 759.0 x 83.0 mm47.9 x 29.9 x 3.3 inches | |
| Weight | with standwithout stand | 24.8 kg / 54.7 lbs22.7 kg / 50.1 lbs | 33.7kg / 74.3 lbs31.2 kg / 68.8 lbs | 24.8 kg / 54.7 lbs22.7 kg / 50.1 lbs | 33.7kg / 74.3 lbs31.2 kg / 68.8 lbs |
| Power requirementPower Consumption | AC100-240V~ 50/60Hz320W | AC100-240V~ 50/60Hz400W | AC100-240V~ 50/60Hz320W | AC100-240V~ 50/60Hz400W | |
| MODELS | 42PQ60** | 50PQ60** | |||
| 42PQ6000-ZA | 50PQ6000-ZA | ||||
| Dimensions(Width x Height x Depth) | with stand | 1040.8 x 725.8 x 308 mm41.0 x 28.6 x 12.1 inches | 1228.8 x 824.6 x 353.0 mm48.4 x 32.5 x 13.9 inches | ||
| without stand | 1040.8 x 669.2 x 76.8 mm41.0 x 26.4 x 3.1 inches | 1228.8 x 772.0 x 78.9 mm48.4 x 30.4 x 3.1 inches | |||
| Weight | with standwithout stand | 25.3kg / 55.8 lbs23.3 kg / 51.4 lbs | 35 kg / 772 lbs32.5 kg / 71.7 lbs | ||
| Power requirementPower Consumption | AC100-240V~ 50/60Hz320W | AC100-240V~ 50/60Hz400W | |||
| Television SystemProgramme CoverageExternal Antenna Impedance | PAL/SECAM B/G/D/K, PAL I/II, SECAM L/L'VHF: E2 ~ E12, UHF: E21 ~ E69, CATV: S1 ~ S20, HYPER: S21 ~ S4775 Ω | ||||
| Environment condition | Operating TemperatureOperating Humidity | 0 ~ 40°C / 32 ~ 104°FLess than 80% | |||
| Storage TemperatureStorage Humidity | -20 ~ 60°C / -4 ~ 140°FLess than 85% | ||||
The specifications shown above may be changed without prior notice for quality improvement.
| MODELS | 50PS30** | 50PS60** | |
| 50PS3000-ZB | 50PS6000-ZC | ||
| Dimensions (Width x Height x Depth) | with stand | 1216.7 x 818.1 x 353.0 mm | 1228.8 x 824.6 x 353.0 mm |
| 47.9 x 32.2 x 13.9 inches | 48.4 x 32.5 x 13.9 inches | ||
| without stand | 1216.7 x 759.0 x 83.0 mm | 1228.8 x 772.0 x 78.9 mm | |
| 47.9 x 29.9 x 3.3 inches | 48.4 x 30.4 x 3.1 inches | ||
| Weight | with stand | 35.4 kg / 78.0lbs | 36.3 kg / 80.0 lbs |
| without stand | 32.8 kg / 72.3 lbs | 33.8 kg / 74.5 lbs | |
| Power requirement | AC100-240V~ 50/60Hz | AC100-240V~ 50/60Hz | |
| Power Consumption | 490W | 490W | |
| Television System | PAL/SECAM B/G/D/K, PAL I/II, SECAM L/L' | ||
| Programme Coverage | VHF: E2 ~ E12, UHF: E21 ~ E69, CATV: S1 ~ S20, HYPER: S21 ~ S47 | ||
| External Antenna Impedance | 75 Ω | ||
| Environment condition | Operating Temperature | 0 ~ 40°C / 32 ~ 104°F | |
| Operating Humidity | Less than 80% | ||
| Storage Temperature | -20 ~ 60°C / -4 ~ 140°F | ||
| Storage Humidity | Less than 85% | ||
The specifications shown above may be changed without prior notice for quality improvement.
| MODELS | 42PQ60** | 50PQ60** | 50PS60** |
| 42PQ6000-ZA | 50PQ6000-ZA | 50PS6000-ZC | |
| Supported movie files | Refer to p.61 | ||
IR CODES
1. How to Connect
- Connect your wired remote control to the Remote Control port on the TV.
2. Remote Control IR Codes
Output waveform
Single pulse, modulated with 37.917KHz signal at 455KHz
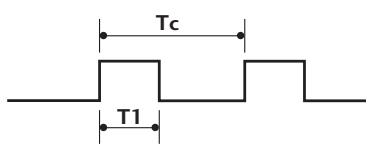
Carrier frequency
$$ F C A R = 1 / T c = f O S C / 1 2 $$
Duty ratio = 1Tc = 1 / 3
Configuration of frame
1stframe

Repeat frame

Lead code

Repeat code

Bit description
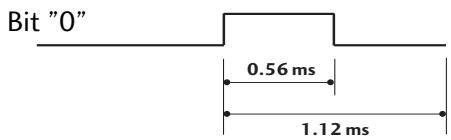
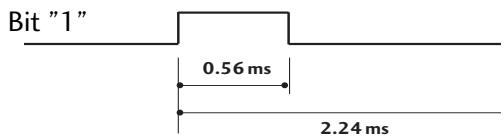
Frame interval: Tf
The waveform is transmitted as long as a key is depressed.

| Code (Hexa) | Function | Note |
| 08 | POWER | R/C BUTTON (POWER ON/OFF) |
| 0B | INPUT | R/C BUTTON |
| f0 | TV/RAD | R/C BUTTON |
| 45 | Q.MENU | R/C BUTTON |
| 43 | MENU | R/C BUTTON |
| AB | GUIDE | R/C BUTTON |
| 07 | Left (<) | R/C BUTTON |
| 06 | Right (> ) | R/C BUTTON |
| 40 | Up (^) | R/C BUTTON |
| 41 | Down (✓) | R/C BUTTON |
| 44 | OK(◎) | R/C BUTTON |
| 28 | RETURN/EXIT | R/C BUTTON |
| AA | INFO ① | R/C BUTTON |
| 30 | AV MODE | R/C BUTTON |
| 02 | ▲ + | R/C BUTTON |
| 03 | ▲ - | R/C BUTTON |
| 00 | P ^ | R/C BUTTON |
| 01 | P √ | R/C BUTTON |
| 1E | FAV(MARK) | R/C BUTTON |
| 09 | MUTE | R/C BUTTON |
| 10 ~19 | Number Key 0~9 | R/C BUTTON |
| 53 | LIST | R/C BUTTON |
| 1A | Q.VIEW | R/C BUTTON |
| 72 | RED Key | R/C BUTTON |
| 71 | GREEN Key | R/C BUTTON |
| 63 | YELLOW Key | R/C BUTTON |
| 61 | BLUE Key | R/C BUTTON |
| 20 | TEXT | R/C BUTTON |
| 21 | T.OPT(T.Option) | R/C BUTTON |
| 39 | SUBTITLE | R/C BUTTON |
| 7E | SIMPLINK | R/C BUTTON |
| 95 | ENERGY SAVING | R/C BUTTON |
| 65 | FREEZE | R/C BUTTON |
| 79 | RATIO | R/C BUTTON |
(Except for 42/50PQ20, 42/50PQ30)
EXTERNAL CONTROL DEVICE SETUP
RS-232C Setup
Connect the RS-232C (serial port) input jack to an external control device (such as a computer or an A/V control system) to control the product's functions externally.
Connect the serial port of the control device to the RS-232C jack on the product back panel.
Note: RS-232C connection cables are not supplied with the product.
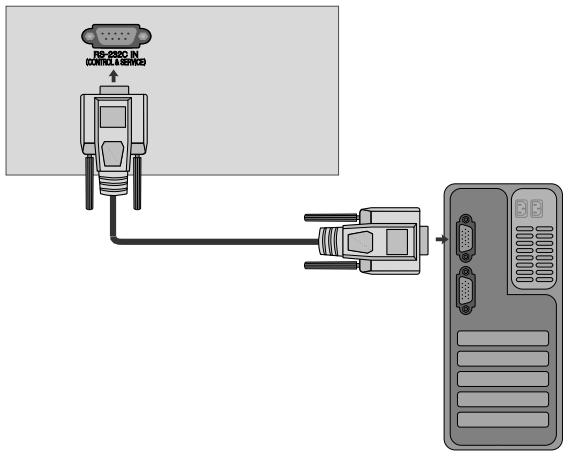
Type of Connector; D-Sub 9-Pin Male
| No. | Pin Name |
| 1 | No connection |
| 2 | RXD (Receive data) |
| 3 | TXD (Transmit data) |
| 4 | DTR (DTE side ready) |
| 5 | GND |
| 6 | DSR (DCE side ready) |
| 7 | RTS (Ready to send) |
| 8 | CTS (Clear to send) |
| 9 | No Connection |
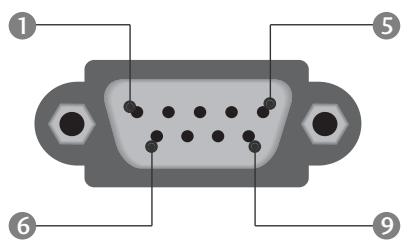
RS-232C Configurations
7-Wire Configurations (Standard RS-232C cable)
| PC | TV | ||
| RXD | 2 | 3 | TXD |
| TXD | 3 | 2 | RXD |
| GND | 5 | 5 | GND |
| DTR | 4 | 6 | DSR |
| DSR | 6 | 4 | DTR |
| RTS | 7 | 8 | CTS |
| CTS | 8 | 7 | RTS |
| D-Sub 9 | D-Sub 9 |
3-Wire Configurations(Not standard)
| PC | TV | ||
| RXD | 2●3 | 3 | TXD |
| TXD | 3●2 | 2 | RXD |
| GND | 5●5 | 5 | GND |
| DTR | 46 | 6 | DTR |
| DSR | 64 | 4 | DSR |
| RTS | 77 | 7 | RTS |
| CTS | 88 | 8 | CTS |
| D-Sub 9 | D-Sub 9 |
Set ID
Use this function to specify a set ID number.
Refer to 'Real Data Mapping'. ▷ p.120
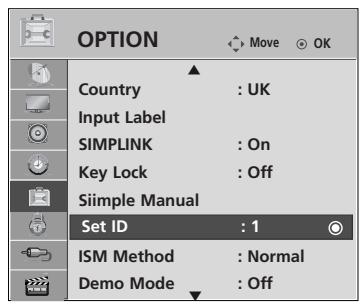
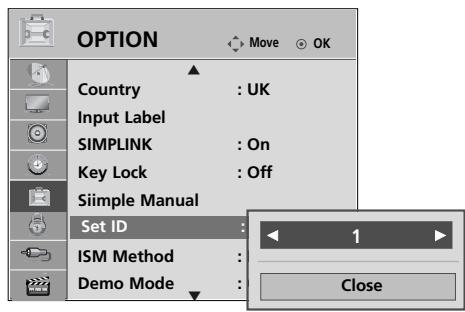
Select OPTION.
Select Set ID.
Adjust Set ID to choose the desired TV ID number.
The adjustment range of SET ID is 1 99
Communication Parameters
Baud rate: 9600 bps (UART)
Stop bit : 1 bit
Data length : 8 bits
■ Communication code : ASCII code
Parity : None
Use a crossed (reverse) cable.
Command Reference List
| COMMAND 1 | COMMAND 2 | DATA (Hexadecimal) | |
| 01. Power | k | a | 00 ~ 01 |
| 02. Aspect Ratio | k | c | Refer to p. 118 |
| 03. Screen Mute | k | d | Refer to p. 118 |
| 04. Volume Mute | k | e | 00 ~ 01 |
| 05. Volume Control | k | f | 00 ~ 64 |
| 06. Contrast | k | g | 00 ~ 64 |
| 07. Brightness | k | h | 00 ~ 64 |
| 08. Colour | k | i | 00 ~ 64 |
| 09. Tint | k | j | 00 ~ 64 |
| 10. Sharpness | k | k | 00 ~ 64 |
| 11. OSD Select | k | l | 00 ~ 01 |
| 12. Remote control lock mode | k | m | 00 ~ 01 |
| 13. Treble | k | r | 00 ~ 64 |
| 14. Bass | k | s | 00 ~ 64 |
| 15. Balance | k | t | 00 ~ 64 |
| 16. Colour Temperature | k | u | 00 ~ 02 |
| 17. Abnormal Status | k | z | FF |
| 18. ISM Method | j | p | Refer to p. 120 |
| 19. Energy Saving | j | q | Refer to p. 120 |
| 20. Auto Configuration | j | u | 01 |
| 21. Tune Command | m | a | Refer to p. 120 |
| 22. Channel Add/Skip | m | b | 00 ~ 01 |
| 23. Key | m | c | Sende IR-kode |
| 24.Input select (Main) | x | b | Refer to p. 121 |
- When setting the 17 24 , a menu does not appear on screen.
- Note: During USB operations such as Dvix or EMF, all commands except Power (ka) and Key (mc) are not executed and treated as NG.
Transmission / Receiving Protocol
Transmission
[Command1][Command2][ ][Set ID][ ][Data][Cr]
- [Command 1] : First command to control the TV. (j, k, m or x)
- [Command 2] : Second command to control the TV.
- [Set ID] : You can adjust the set ID to choose desired monitor ID number in option menu. Adjustment range is 1 ~ 99. When selecting Set ID '0', every connected set is controlled. Set ID is indicated as decimal (1~99) on menu and as Hexa decimal (0x0~0x63) on transmission/receiving protocol.
- [DATA] : To transmit command data. Transmit 'FF' data to read status of command.
- [Cr] : Carriage Return ASCII code '0x0D'
*[] : ASCII code 'space (0x20)'
OK Acknowledgement
[Command2][ ][Set ID][ ][OK][Data][x]
- The set transmits ACK (acknowledgement) based on this format when receiving normal data. At this time, if the data is data read mode, it indicates present status data. If the data is data write mode, it returns the data of the PC computer.
Error Acknowledgement
[Command2][ [Set ID][ [NG][Data][x]
- The set transmits ACK (acknowledgement) based on this format when receiving abnormal data from non-viable functions or communication errors.
Data 00: Illegal Code
01. Power (Command: k a)
To control Power On/Off of the set.
Transmission
[k][a][ ][Set ID][ ][Data][Cr]
Data 00 : Power Off 01 : Power On
Ack
[a][ ][Set ID][ ][OK/NG][Data][x]
To show Power On/Off.
Transmission
[k][a][ ][Set ID][ ][FF][Cr]
Ack
[a][ ][Set ID][ ][OK/NG][Data][x]
-
Similarly, if other functions transmit '0xFF' data based on this format, Acknowledgement data feed back presents status about each function.
-
OK Ack., Error Ack. and other message may display on the screen when TV is power On.
02. Aspect Ratio (Command: k c) (Main Picture Size)
To adjust the screen format. (Main picture format) You can also adjust the screen format using the Aspect Ratio in the Q.MENU. or PICTURE menu.
Transmission
[k][c][ ][Set ID][ ][Data][Cr]
Data 01 : Normal screen (4:3) 07 : 14:9
02:Wide screen (16:9) 09:Just Scan
04:Zoom OB:FullWide
06: Original 10~1F: Cinema Zom 1~16
Ack
[c][ ][Set ID][ ][OK/NG][Data][x]
-
Using the PC input, you select either 16:9 or 4:3 screen aspect ratio.
-
In DTV/HDMI (1080i 50Hz/60Hz, 720p 50Hz/60Hz, 1080p 24Hz/30Hz/50Hz/60Hz), Component( 720p, 1080i, 1080p 50Hz/60Hz) mode, Just Scan is available.
-
Full wide is supported only for Analogue, AV1,2,3.
03. Screen Mute (Command: k d)
To select screen mute on/off.
Transmission
[k][d][ ][Set ID][ ][Data][Cr]
Data 00: Screen mute off (Picture on) Video mute off
01 : Screen mute on (Picture off)
10 : Video mute on
Ack
[d][ ][Set ID][ ][OK/NG][Data][x]
- In case of video mute on only, TV will display On Screen Display(OSD). But, in case of Screen mute on, TV will not display OSD.
04. Volume Mute (Command: k e)
To control volume mute on/off.
You can also adjust mute using the MUTE button on remote control.
Transmission
[k][e][ ][Set ID][ ][Data][Cr]
Data 00 : Volume mute on (Volume off)
01 : Volume mute off (Volume on)
Ack
[e][ ][Set ID][ ][OK/NG][Data][x]
05. Volume Control (Command: k f)
To adjust volume.
You can also adjust volume with the VOLUME buttons on remote control.
Transmission
[k][f][ ][Set ID][ ][Data][Cr]
Data Min:00\~Max:64
- Refer to 'Real data mapping 1'. See page 120.
Ack
[f][ ][Set ID][ ][OK/NG][Data][x]
06. Contrast (Command: kg)
To adjust screen contrast.
You can also adjust contrast in the PICTURE menu.
Transmission
[k][g][ ][Set ID][ ][Data][Cr]
Data Min:00\~Max:64
- Refer to 'Real data mapping 1'. See page 120.
Ack
[g][ ][Set ID][ ][OK/NG][Data][x]
07. Brightness (Command: k h)
To adjust screen brightness.
You can also adjust brightness in the PICTURE menu.
Transmission
[k][h][ ][Set ID][ ][Data][Cr]
Data Min:00\~Max:64
- Refer to 'Real data mapping 1'. See page 120.
Ack
[h][ ][Set ID][ ][OK/NG][Data][x]
08. Colour (Command: ki)
To adjust the screen colour.
You can also adjust colour in the PICTURE menu.
Transmission
[k][i][ ][Set ID][ ][Data][Cr]
Data Min:00\~Max:64
- Refer to 'Real data mapping 1'. See page 120.
Ack
[i][ ][SetID][ ][OK/NG][Data][x]
09. Tint (Command: kj)
To adjust the screen tint. You can also adjust tint in the PICTURE menu.
Transmission
[k][j][ ] [Set ID][ ][Data][Cr]
Data Red:00\~Green:64 * Refer to Real data mapping 1'. See page 120.
Ack
[j][ ][Set ID][ ][OK/NG][Data][x]
10. Sharpness (Command: k k)
To adjust the screen sharpness. You can also adjust sharpness in the PICTURE menu.
Transmission
[k][k][ ][Set ID][ ][Data][Cr]
Data Min:00\~Max:64
- Refer to 'Real data mapping 1'. See page 120.
Ack
[k][ ][Set ID][ ][OK/NG][Data][x]
11. OSD Select (Command: k l)
To select OSD (On Screen Display) on/off when controlling remotely.
Transmission
[k][I][ ][Set ID][ ][Data][Cr]
Data 00 : OSD off 01 : OSD on
Ack
[I][ ][Set ID][ ][OK/NG][Data][x]
12. Remote control lock mode (Command: km)
To lock the front panel controls on the monitor and remote control.
Transmission
[k][m][ ][Set ID][ ][Data][Cr]
Data 00:Lock off 01:Lock on
Ack
[m][ ] [Set ID][ ] [OK/NG][Data][x]
-
If you are not using the remote control, use this mode. When main power is on/off, external control lock is released.
-
Local Power Key will work properly.
13. Treble (Command: k r)
To adjust treble. You can also adjust treble in the AUDIO menu.
Transmission
[k][r][ ][Set ID][ ][Data][Cr]
Data Min:00\~Max:64
- Refer to 'Real data mapping 1'. See page 120.
Ack
[r][ ][Set ID][ ][OK/NG][Data][x]
14. Bass (Command: k s)
To adjust bass. You can also adjust bass in the AUDIO menu.
Transmission
[k][s][ ][Set ID][ ][Data][Cr]
Data Min:00\~Max:64
- Refer to 'Real data mapping 1'. See page 120.
Ack
[s][ ][Set ID][ ][OK/NG][Data][x]
15. Balance (Command: k t)
To adjust balance. You can also adjust balance in the AUDIO menu.
Transmission
[k][t][ ][Set ID][ ][Data][Cr]
Data Min:00\~Max:64
- Refer to 'Real data mapping 1'. See page 120.
Ack
[t][ ][Set ID][ ][OK/NG][Data][x]
16. Colour Temperature (Command: k u)
To adjust colour temperature. You can also adjust Colour Temperature in the PICTURE menu.
Transmission
[k][u][ ][Set ID][ ][Data][Cr]
Data 00:Medium 01:Cool 02:Warm
Ack
[u][ ][Set ID][ ][OK/NG][Data][x]
17. Abnormal State (Command: k z)
To recognize an abnormal state.
Transmission
[k][z][ ][Set ID][ ][FF][ ][Cr]
Data FF : Read
Ack
[z][ ][Set ID][ ][OK/NG][Data][x]
Data 00: Normal (Power on and signal exist)
01: No signal (Power on)
02: Turn the TV off by remote control
03: Turn the TV off by sleep time function
04: Turn the TV off by RS-232C function
05:5V down
06: AC down
07: Turn the TV off by Fan Alarm function
08: Turn the TV off by Off time function
09: Turn the TV off by Auto sleep function a: Turn the TV off by AV board detection.
- This function is "read only".
18.ISMMethod(Command:jp)
To control the ISM method. You can also adjust ISM Method in OPTION menu.
Transmission
$$ [ j ] [ p ] [ ] [ \text {S e t I D} ] [ ] [ \text {D a t a} ] [ \mathrm {C r} ] $$
Data 02: Orbiter
04: White wash
08: Normal
20:Colour Wash
Ack
$$ [ p ] [ ] [ \text {S e t I D} ] [ ] [ O K / N G ] [ \text {D a t a} ] [ x ] $$
19. Energy Saving (Command: j q)
To reduce the power consumption of the TV. You can also adjust Energy Saving in OPTION menu.
Transmission
$$ [ j ] [ q ] [ ] [ \text {S e t} I D ] [ ] [ \text {D a t a} ] [ C r ] $$
Data 00: Off
01: Minimum
02:Medium
03: Maximum
10: Intelligent Sensor(Low)
11: Intelligent Sensor(Middle)
12: Intelligent Sensor(High)
Ack
$$ [ q ] [ ] [ \text {S e t} I D ] [ ] [ O K / N G ] [ \text {D a t a} ] [ x ] $$
20. Auto Configure(Command:ju)
To adjust picture position and minimize image shaking automatically. It works only in RGB (PC) mode.
Transmission
$$ [ j ] [ u ] [ ] [ \text {S e t I D} ] [ ] [ \text {D a t a} ] [ \mathrm {C r} ] $$
Data 01: To set
Ack
$$ [ u ] [ ] [ \text {S e t I D} ] [ ] [ O K / N G ] [ \text {D a t a} ] [ x ] $$
21.Tune Command (Command:m a)
Select channel to following physical number.
Transmission
$$ [ m ] [ a ] [ ] [ \text {S e t} I D ] [ ] [ \text {D a t a 0} ] [ ] [ \text {D a t a 1} ] [ ] [ \text {D a t a 2} ] [ \text {C r} ] $$
Data00 : High channel data
Data01:Low channel data
ex. No. 47 -> 00 2F (2FH)
No. 394 -> 01 88 (188H),
DTV No. 0 -> Don't care
Data020x00:ATV Main
0x10:DTV Main
0x20:Radio
Channel data range
Analogue - Min: 00 ~ Max: 63 (0~99)
Digital - Min: 00 ~ Max: 3E7 (0~999)
Ack
$$ [ a ] [ ] [ \text {S e t} I D ] [ ] [ O K / N G ] [ \text {D a t a} ] [ x ] $$
Data Min: 00 ~ Max: FF
22. Channel Add/Skip(Command: m b)
To set skip status for the current Programme.
Transmission
$$ [ m ] [ b ] [ ] [ \text {S e t I D} ] [ ] [ \text {D a t a} ] [ C r ] $$
Data 00 : Skip
01:Add
Ack
$$ [ b ] [ ] [ \text {S e t I D} ] [ ] [ O K / N G ] [ \text {D a t a} ] [ x ] $$
\* Real data mapping 1
00: Step 0
A:Step 10 (Set ID 10)
F:Step 15 (Set ID 15)
10:Step 16(Set ID 16)
64: Step 100
6E: Step 110
73:Step 115
74:Step 116
C7: Step 199
FE:Step254
FF:Step255
\* Real data mapping 2
00:40
01:-39
02:-38
中
28:0
:
4F: +38
4F:+39
50: +40
23. Key(Command: m c)
To send IR remote key code.
Transmission
[m][c][ ][Set ID][ ][Data][Cr]
Data Key code - Refer to page 114.
Ack
[c][ ][Set ID][ ][OK/NG][Data][x]
24. Input select (Command: x b) (Main Picture Input)
To select input source for main picture.
Transmission
[x][b][ ][Set ID][ ][Data][Cr]
Data Structure
MSB
LSB
| 0 | 0 | 0 | 0 | 0 | 0 | 0 | 0 |
| External Input | Input Number | ||||||
| External Input | Data | |||
| 0 | 0 | 0 | 0 | DTV |
| 0 | 0 | 0 | 1 | Analogue |
| 0 | 0 | 1 | 0 | AV |
| 0 | 1 | 0 | 0 | Component |
| 0 | 1 | 0 | 1 | RGB |
| 1 | 0 | 0 | 1 | HDMI |
| Input Number | Data | |||
| 0 | 0 | 0 | 0 | Input1 |
| 0 | 0 | 0 | 1 | Input2 |
| 0 | 0 | 1 | 0 | Input3 |
Ack
[b][ ][Set ID][ ][OK/NG][Data][x]