DP 860 - Lecteur CD KENWOOD - Notice d'utilisation et mode d'emploi gratuit
Retrouvez gratuitement la notice de l'appareil DP 860 KENWOOD au format PDF.
| Type de produit | Lecteur CD |
| Caractéristiques techniques principales | Compatible avec CD, CD-R, CD-RW, MP3 |
| Alimentation électrique | 230 V, 50 Hz |
| Dimensions approximatives | 430 x 300 x 90 mm |
| Poids | 3,5 kg |
| Compatibilités | Compatible avec amplificateurs et systèmes audio KENWOOD |
| Type de batterie | Non applicable |
| Tension | 230 V |
| Puissance | 15 W |
| Fonctions principales | Lecture de CD, fonction répétition, lecture aléatoire |
| Entretien et nettoyage | Nettoyer avec un chiffon doux, éviter les produits abrasifs |
| Pièces détachées et réparabilité | Disponibilité des pièces détachées à vérifier auprès du service client KENWOOD |
| Sécurité | Ne pas exposer à l'humidité, débrancher lors d'un nettoyage |
| Informations générales | Garantie de 2 ans, manuel d'utilisation inclus |
FOIRE AUX QUESTIONS - DP 860 KENWOOD
Questions des utilisateurs sur DP 860 KENWOOD
0 question sur cet appareil. Repondez a celles que vous connaissez ou posez la votre.
Poser une nouvelle question sur cet appareil
Téléchargez la notice de votre Lecteur CD au format PDF gratuitement ! Retrouvez votre notice DP 860 - KENWOOD et reprennez votre appareil électronique en main. Sur cette page sont publiés tous les documents nécessaires à l'utilisation de votre appareil DP 860 de la marque KENWOOD.
MODE D'EMPLOI DP 860 KENWOOD
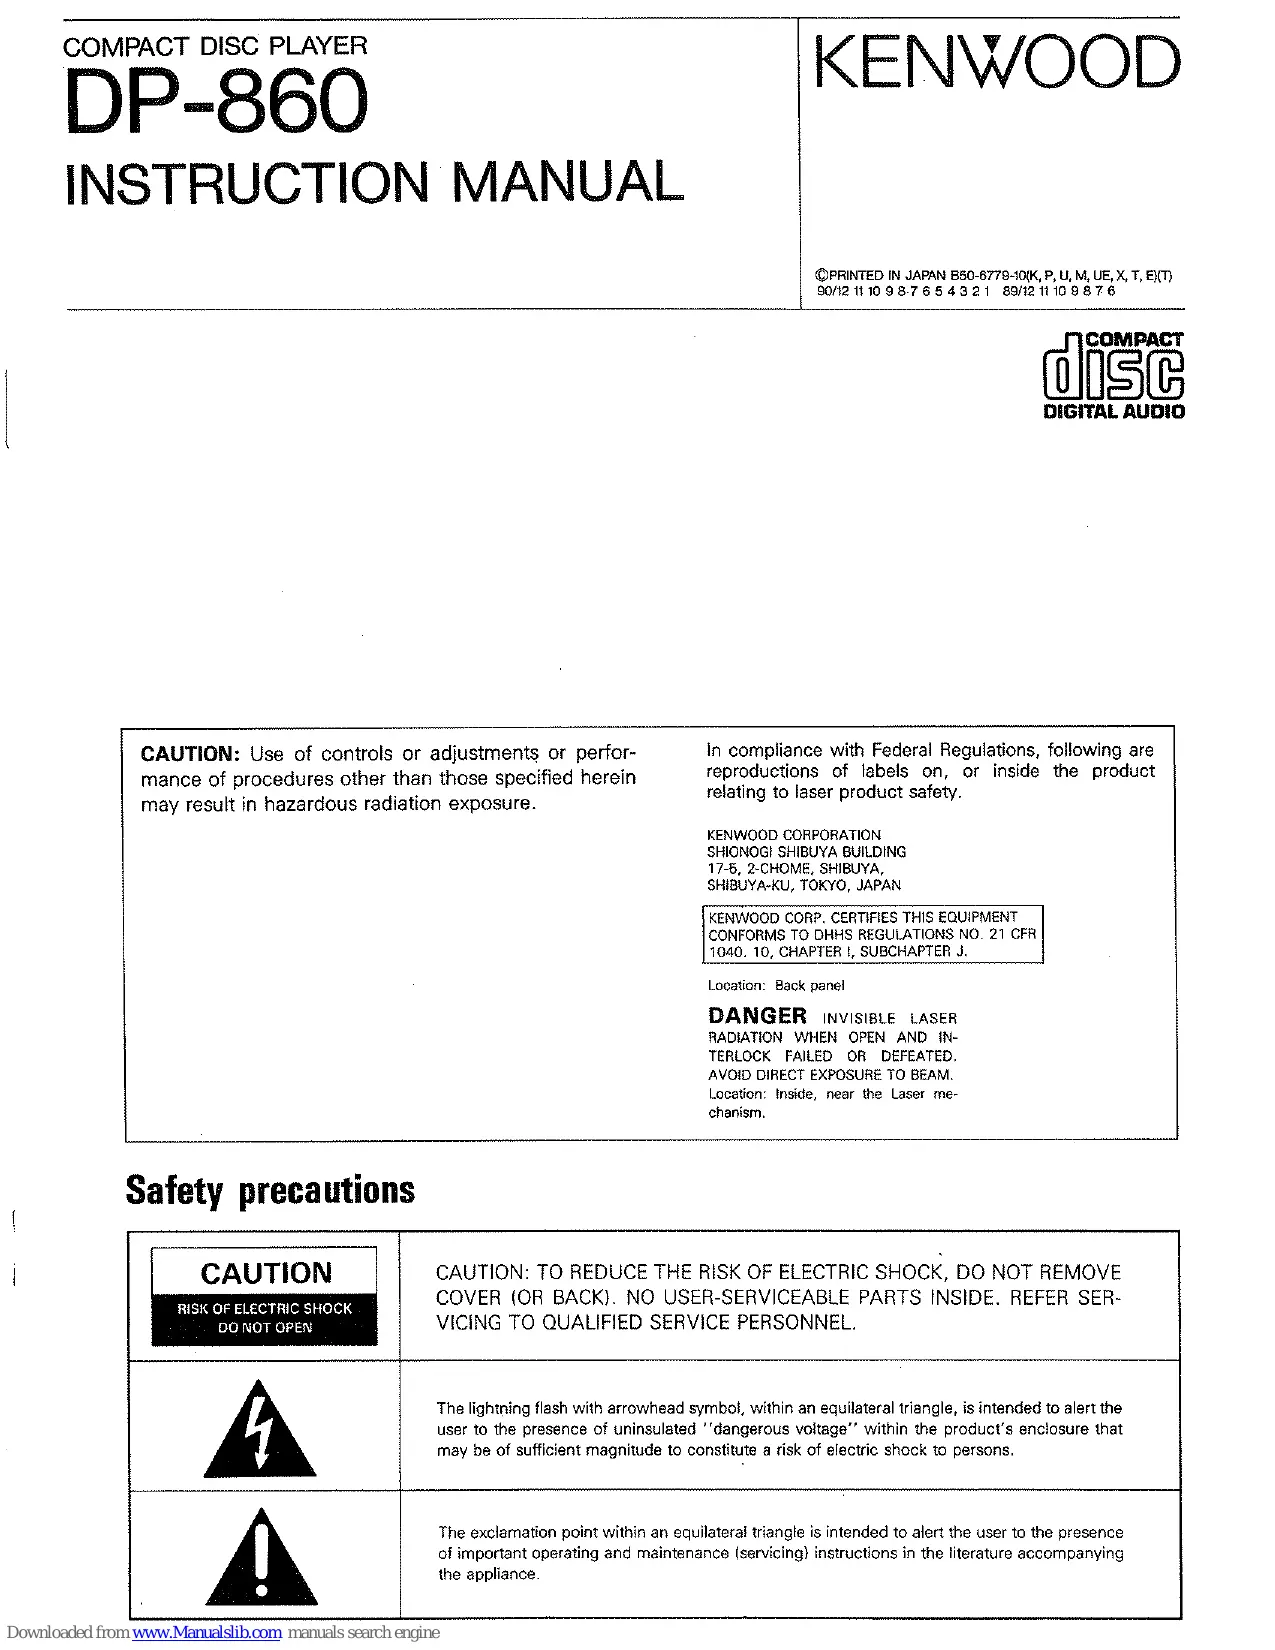
CAUTION: Use of controls or adjustments or performance of procedures other than those specified herein may result in hazardous radiation exposure.
In compliance with Federal Regulations, following are reproductions of labels on, or inside the product relating to laser product safety.
KENWOOD CORPORATION
SHIONOGI SHIBUYA BUILDING
17-5, 2-CHOME, SHIBUYA,
SHIBUYA-KU, TOKYO, JAPAN
KENWOOD CORP, CERTIFIES THIS EQUIPMENT
CONFORMS TO DHHS REGULATIONS NO. 21 CFR
- 10, CHAPTER I, SUBCHAPTER J.
Location: Back panel
DANGER INVISIBLE LASER
RADIATION WHEN OPEN AND IN
TERLOCK Failed OR DEFEATED.
AVOID DIRECT EXPOSURE TO BEAM.
Location: Inside, near the Laser me
chanism.
Safety precautions
CAUTION
RISK OF ELECTRIC SHOCK
DO NOT OPEN


CAUTION: TO REDUCE THE RISK OF ELECTRIC SHOCK, DO NOT REMOVE COVER (OR BACK). NO USER-SERVICEABLE PARTS INSIDE. REFER SERVICING TO QUALIFIED SERVICE PERSONNEL.
The lightning flash with arrowhead symbol, within an equilateral triangle, is intended to alert the user to the presence of uninsulated "dangerous voltage" within the product's enclosure that may be of sufficient magnitude to constitute a risk of electric shock to persons.
The exclamation point within an equilateral triangle is intended to alert the user to the presence of important operating and maintenance (servicing) instructions in the literature accompanying the appliance.
For your records
Record the serial number, found on the back of the unit, in the spaces designated on the warranty card, and in the space provided below. Refer to the model and serial numbers whenever you call upon your dealer for information or service on this product.
Model Serial number
After unpacking
After unpacking, we recommend that you inspect the unit for any possible shipping damage. If your unit is damaged or fails to operate, notify your dealer immediately. If your unit was shipped to you directly, notify the shipping company without delay. Only the consignee (the person or company receiving the unit) can file a claim against the carrier for shipping damage. We recommend that you retain the original carton and packing materials to prevent any damage should you transport or ship your unit in the future.
Before applying power
Important!
USA, Canada, Australia, U.K and Europe
Unit shipped to the above are not equipped with an AC voltage selector switch and the discussion of such a switch that follows should be disregarded.
All other countries
Units shipped to countries other than the above are equipped with an AC voltage selector switch on the rear panel. Refer to the following paragraph for the proper setting of this switch.
AC voltage selection
This unit operates on 120 volts or 220-240 volts AC. The AC voltage selector switch on the rear panel is set to the voltage that prevails in the area to which the unit is shipped. Before connecting the power cord to your AC outlet, make sure that the setting position of this switch matches your line voltage. If not, it must be set to your voltage in accordance with the following direction.
Note:
Our warranty does not cover damage caused by excessive line voltage due to improper setting of the AC voltage selector switch.
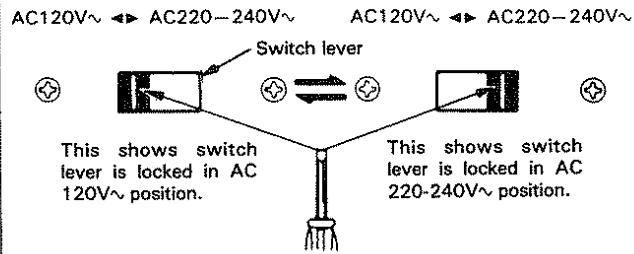
Move switch lever to match your line voltage with a small screwdriver or other pointed tool.
AC voltage selector switch
For United Kingdom
The mains plug must be removed from the wall socket prior to any internal examination.
Important
The wires in this mains lead are coloured in accordance with the following code:
Blue Neutral
Brown. Live
The wires in this mains lead must be connected to the terminals in the plug as follows:
Plug terminal marking
Blue N or Black
Brown. L or Red
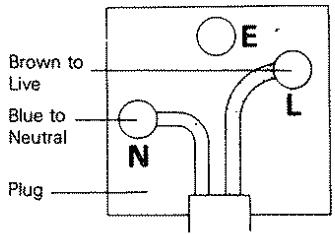
Notes:
1) If a 13-amp plug is used, this must be fitted with a 5-amp fuse.
2) If a 3-pin plug with earthing contact is used, no wire must be connected to the E terminal.
Before operation
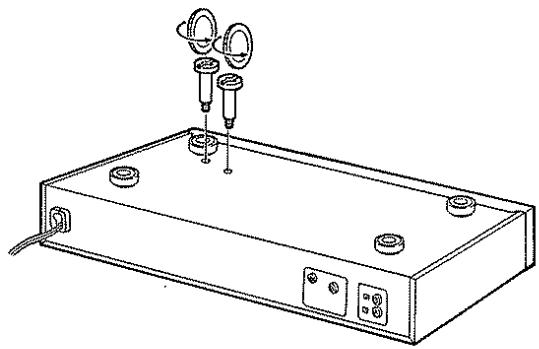
Transportation screw
Before operation, remove the two red screws attached to the bottom of the unit used during transport from the factory. Remove both screws using a coin, etc.. and, after removing, retain them together with the Warranty card and other documents. When the unit is to be transported again, be sure replace the two screws to their original position:
- For the procedure of attaching the transport screws, refer to page 12.
Beware of condensation
Water vapor in the air may condense on cold parts, forming "dew" on its surface.
For example, when a bottle is taken out of the refrigerator and brought into a warm room, droplets of water will form on the bottle surface. This phenomenon is called "condensation". If this occurs of the unit internally, the player may operate incorrectly or may not function at all.
This is not a malfunction, however, the player should be left until it is dry. (Turn the power of this unit ON and leave the player for a while. After several hours, even in the worst case, the player will stabilize and correct playback will be possible.) Be especially careful in the following cases:
- When the unit is suddenly brought from a cold place to a warm place (causing rapid temperature change).
- When the temperature of the room is raised suddenly using a heater, etc.
- When the unit is brought from a well-cooled (airconditioned) room to a damp and hot room.
- In conditions where the temperature difference between the surroundings and this unit might cause condensation.
Notes on installation
- Do not place the unit in a place which is exposed to direct sunlight, near a heating appliance, etc.
- Do not place a vase containing water, makeup, etc. on the unit. Do not use in a humid place.
- To maintain good ventilation, place the unit at least 10cm away from the walls.
- Choose a location that is relatively free from vibration or excessive dust.
- Keep the unit away from a source of magnetic fields such as TV sets, motorized toys, etc.
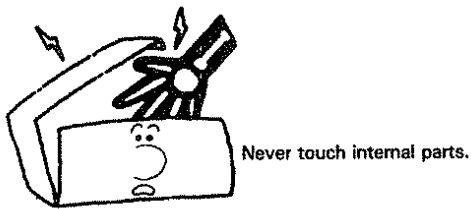
Safety precautions
Never remove the case. If the internal parts are touched accidentally, a serious electric shock might occur.
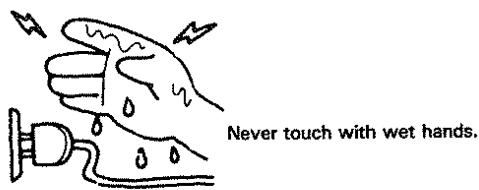
Touching the power plug when your hands are wet may result in a serious electric shock.
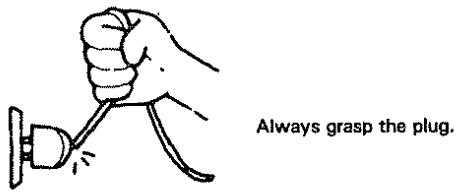
Never pull, bend or extend the power cord. This could damage the power cord, resulting in a broken cord or short-circuit.
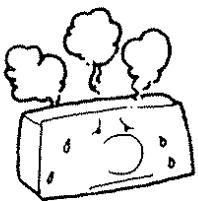
In case of abnormal smell
If an abnormal smell or smoke is detected, immediately turn the power OFF and pull out the power cord. Contact your dealer or nearest Service Station.
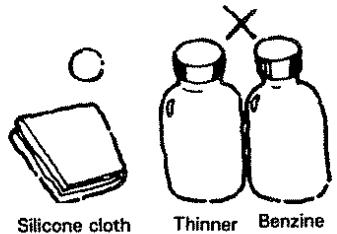
Cleaning
Do not use volatile solvents such as alcohol, paint thinner, gasoline, benzine, etc. to clean the cabinet. Use a silicone cloth or a clean dry cloth.
Controls and indicators
Numbers in circles correspond to the diagram, symbols in brackets correspond to front panel indications.
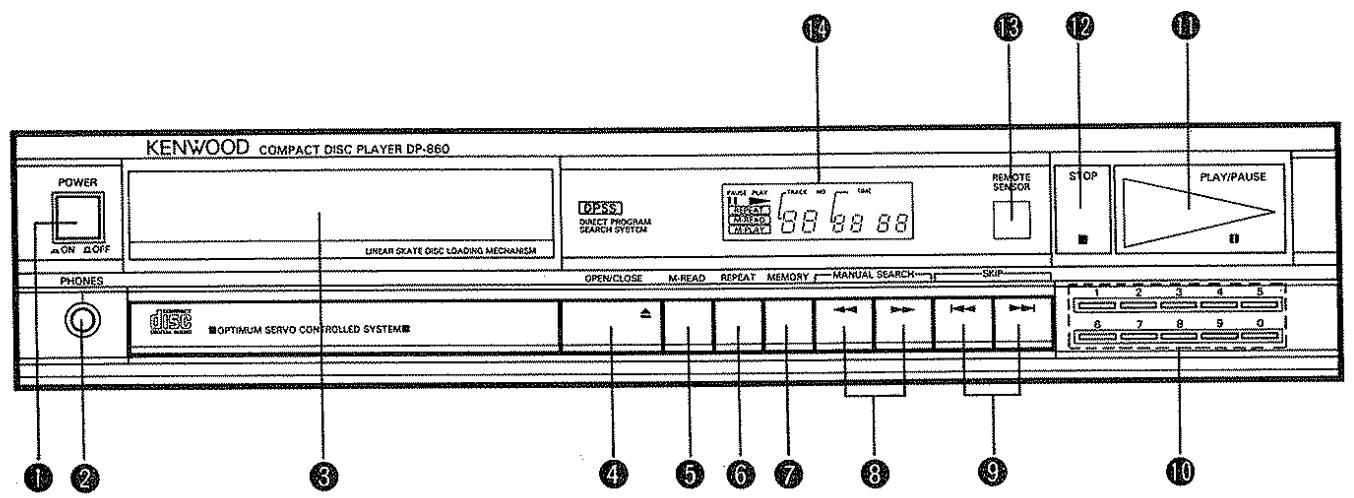
1 POWER switch
Press to turn the power on. Pressing again turns the power off.
2 PHONES (Headphones) jack
Connect headphones to this jack for private listening.
3 Disc tray
This will be opened or closed by pressing the OPEN/CLOSE (▲) key.
Place a disc on this tray with its label surface up.
4 OPEN/CLOSE key (▲)
Used to open/close the disc tray.
When this key is pressed during play, the disc rotation will stop and the disc tray will be opened.
- When this key is pressed with the tray closed, the tray is opened.
When it is pressed in the middle of tray opening, the tray will be closed.
- After the tray is closed, the disc information (TOC = Table Of Contents) will be read out and then the unit will enter the stop mode automatically.
M-READ key
Press to recall the memory contents for checking: the M-READ indicator lights and the memory contents are displayed every three seconds automatically.
6 REPEAT key
Press this key to play the disc repeatedly.
The repeat function will be cancelled pressing the REPEAT key again.
7 MEMORY key
Used to store the desired tunes for memory play. In the stop mode, select the desired tunes using the SKIP (I, I) keys and then press the MEMORY key. The M-READ indicator lights to show that the program tune is stored in memory.
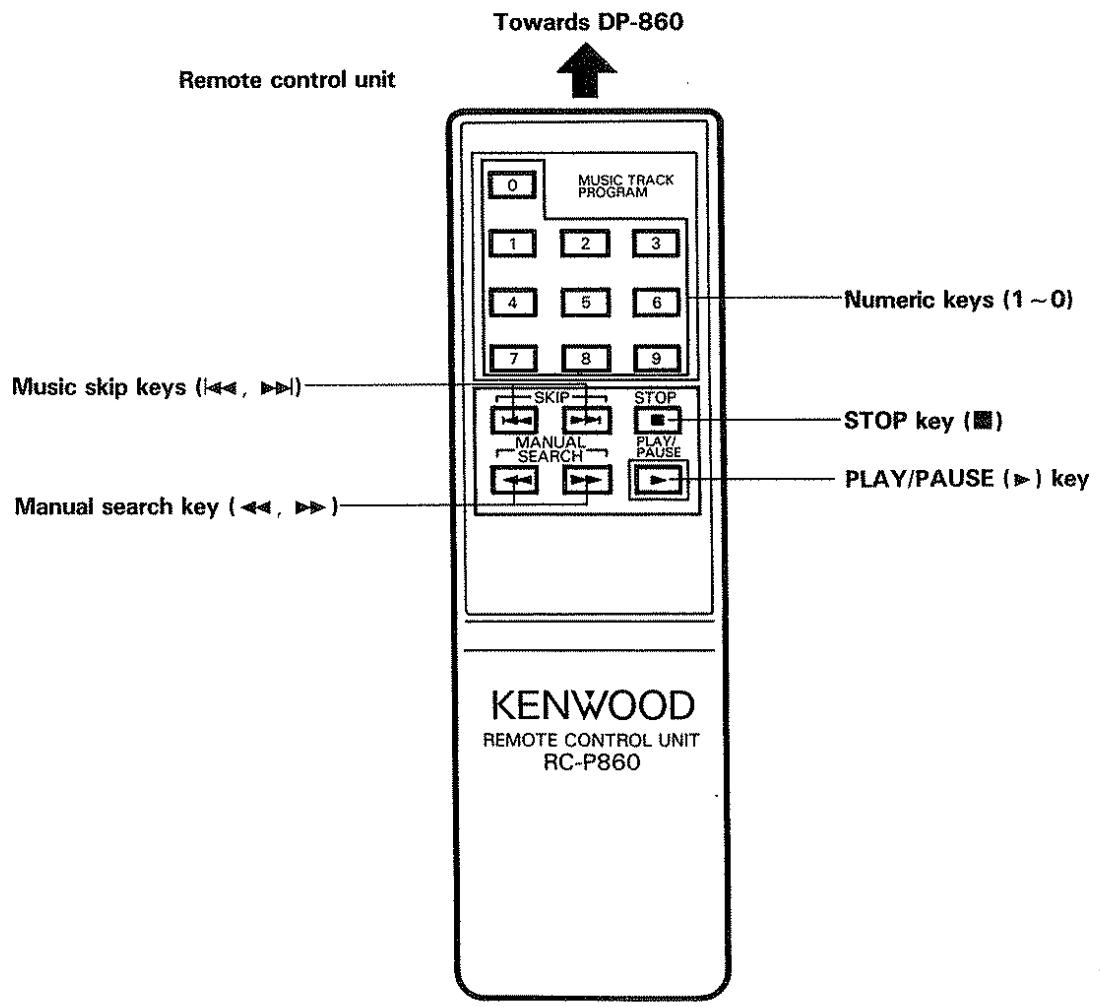
6 MANUAL SEARCH keys (←, →)
Press to go quickly in the forward or backward direction.
9. SKIP keys (▶,▶)
Press to play the next tune or the tune being played from the beginning.
10 Numeric keys (1 0)
Use these keys to input Track No. for tune selection or memory.
11 PLAY/PAUSE key ( , )
When this key is pressed, the PLAY indicator lights and the play starts. When it is pressed again, the PAUSE indicator lights and the unit enters the pause mode.
When the key is pressed with the tray opened, the tray is closed and then the play starts after the disc information (TOC) is read out. If the tunes are programmed using the MEMORY key, the memory play will be started.
STOPkey()
When this key is pressed during play, the play stops.
13 REMOTE SENSOR window
The signal from the supplied remote control unit is received through this window.
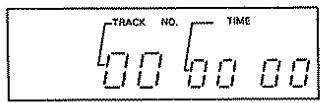
Display window
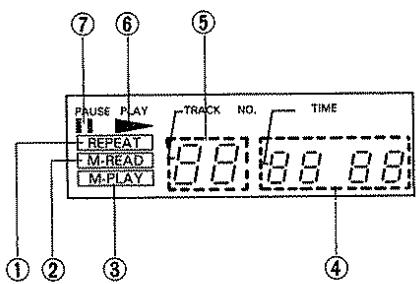
① REPEAT indicator
Lights in the repeat mode.
② M-READ indicator
Lights when the M-READ key is pressed.
③ M-PLAY indicator
Lights when the tunes are programming.
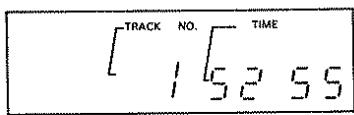
④ TIME display
- When a disc is loaded and the unit is set to stop mode, the total playing time of the disc is displayed.
- During play, the elapsed time of the tune being played is displayed.
- In the stop mode, when the tunes are programming, the total playing time of the programmed tunes is displayed.
⑤ TRACK NO. display
This shows the number of the track.
⑥ PLAYindicator(▶)
Lights during play.
⑦ PAUSE indicator (III)
Lights when the unit is in the pause mode.
System connections
- Make system connections with the power turned off.
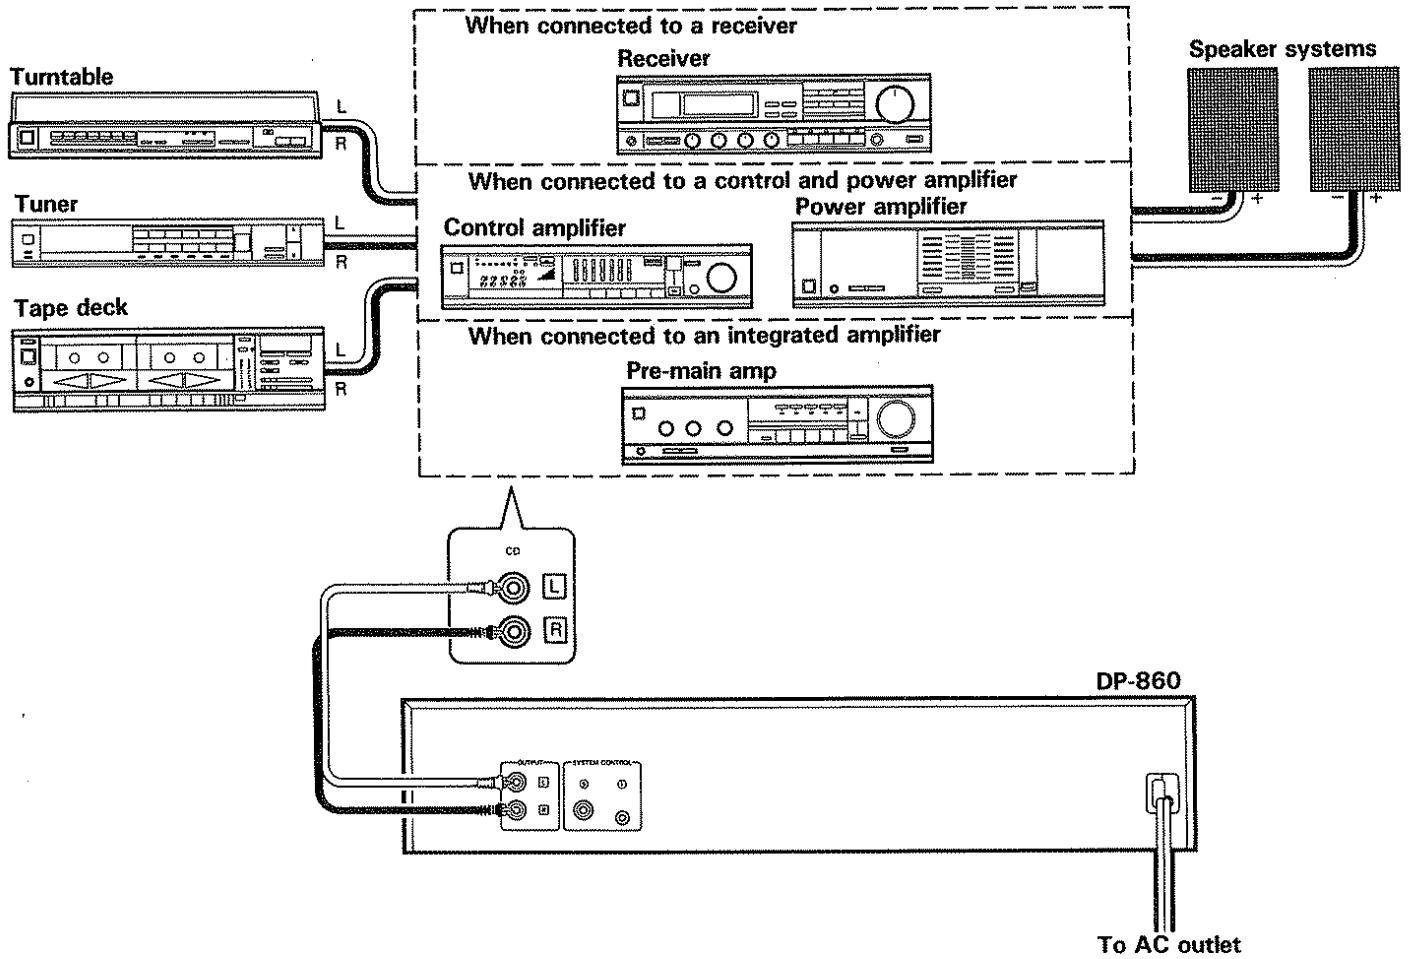
Power cord connection
Connect the power cord to a convenient AC outlet.
Connection to the amplifier
Connect the OUTPUT jacks to the right and left CD, TUNER, TAPE IN or AUX jacks of the amplifier.
Note:
Do not connect the OUTPUT jacks to the PHONO jacks of the amplifier.
System control
Refer to "System control jacks" on the page 14. (Except for some areas.)
Operating instructions
How to load a compact disc
Disc tray
Press the OPEN/CLOSE (▲) key to open or close the tray. The tray can also be closed by pressing the front of the tray lightly. The disc is inserted with the labeled side up.
Notes:
- Make sure of the side of the disc. The disc cannot be played if it is placed upside down.
- Do not place objects other than disc on the disc tray.
- Be sure to place a disc correctly.
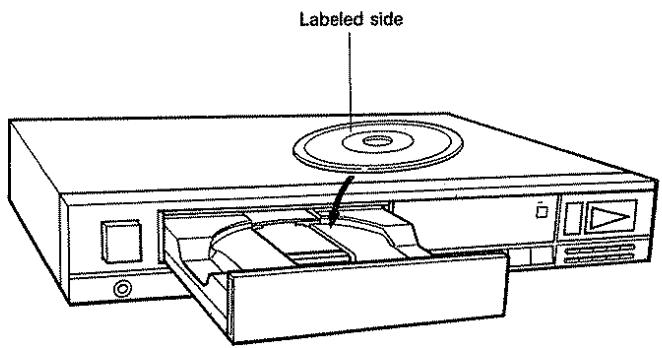
When the disc tray is closed with the OPEN/CLOSE (▲) key or the front panel of the tray is pressed, the display window shows the total playing time of the disc.
Manual playback
To play a disc
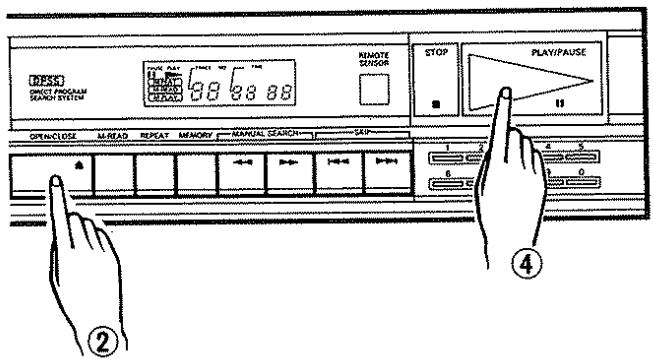
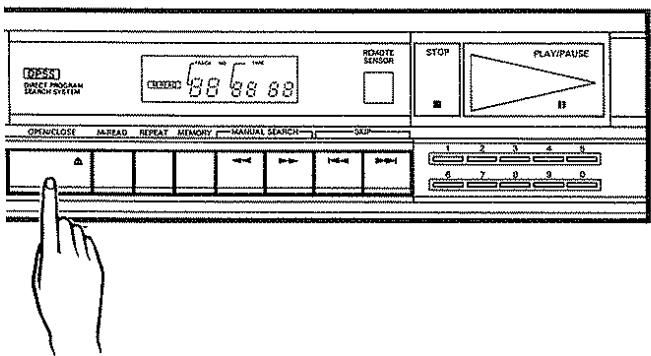
① Turn the POWER switch ON.
(2) Press the OPEN/CLOSE () key to open the disc tray.
(3) Place the disc on the tray with the label facing up.
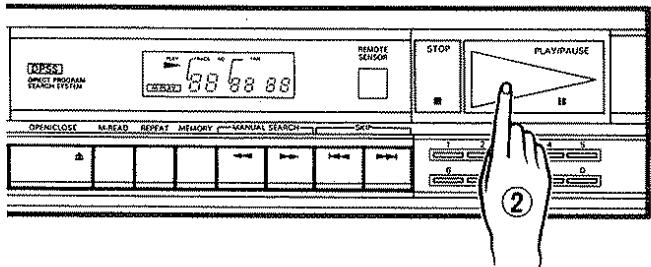
(4) Press the PLAY/PAUSE (▷, ¶) key.
- After the final selection has been played, the player will go into the stop mode.
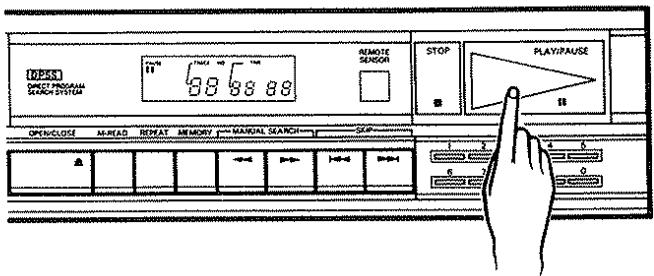
To use the pause mode
Press the PLAY/PAUSE (▶, ¶) key.
- The PAUSE indicator will light up and the pickup will stop at that point.
- Press the PLAY/PAUSE (▷, ¶) key again to restart playing from the point.
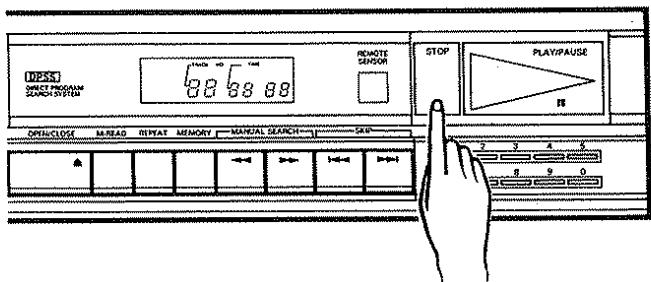
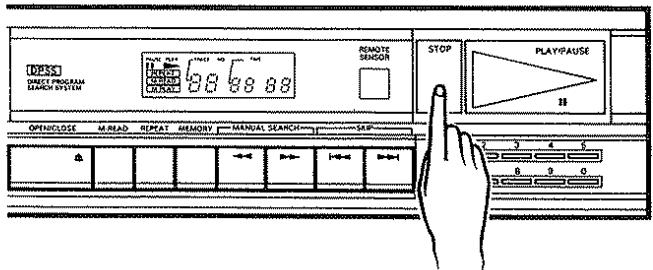
To stop disc play
Press the STOP (■) key.
Play will stop, the pickup will return to the beginning of the first selection.
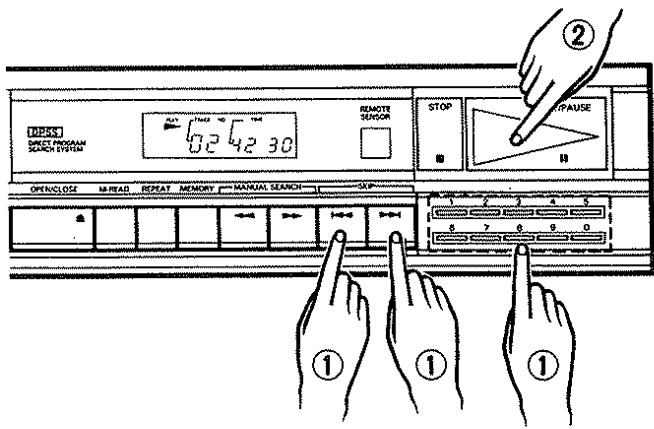
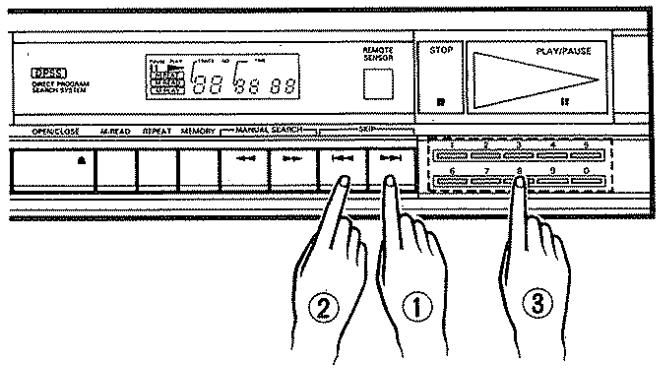
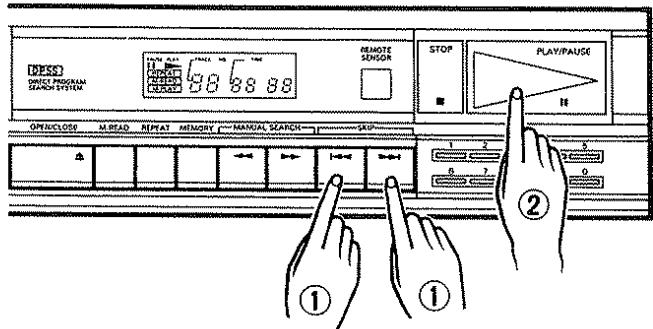
To play a particular track
① Select the desired Track No. using the numeric keys (1 0) or SKIP (▶,▶) keys.
② Press the PLAY/PAUSE (▷, III) key within about 3 seconds after selection.
- The Track No. and the PLAY indicator will light up. After the pickup has moved to the beginning of the tune, the player will begin play.
- After the final selection has been played, the pickup will automatically return to the beginning of the first selection.
To select another selection during play
① Press the SKIP (▶) key. The pickup will search the beginning of the next selection.
- When it is done during play of the final selection, the pickup will return to the beginning of the first selection.
A press of the SKIP (▶) key will move the pickup to the beginning of the selection being played.
③ When the numeric key is pressed, the player will stop playing and move the pickup to the beginning of the selected track. (When pressing two numeric keys, press within 4 seconds.)
(The player will start play in about 4 seconds after keying in the Track No. with these keys.)
- When the numeric key is pressed during pause, the pickup will come to the beginning of the selected track while remaining in the pause mode.
- Even with the disc tray open, a press of a numeric key on the SKIP (↓←, →←) keys, will display the selected track. A subsequent press of the PLAY/PAUSE (▷, ¶¶) key will automatically close the tray and start play from the selection. If the PLAY/PAUSE (▷, ¶¶) key is pressed again so that the PAUSE indicator, the pickup will go into the pause mode at the beginning of the selection.
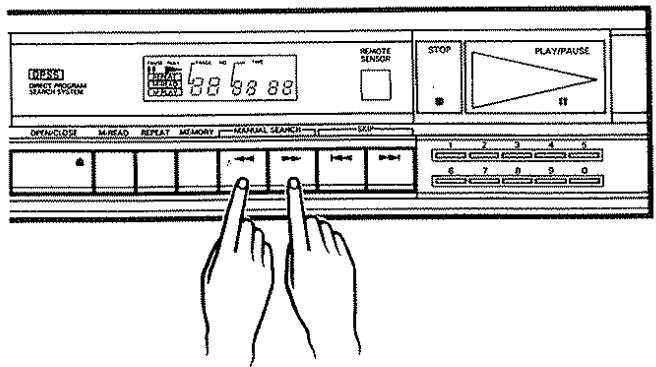
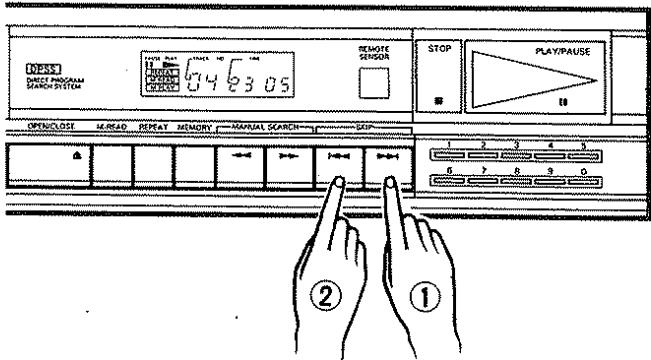
To play from the desired position
- Fast forward and fast backward operations
During playing or in the pause mode, press the MANUAL SEARCH (▶) key for fast forward play and press the MANUAL SEARCH (▲) key for fast reverse play.
- When one of the keys is pressed during play and held, a small sound is heard during fast movement. To start the play from the desired position, listen to the sound and release the key at the desired point. If the fast forward movement exceeds the end of the last tune or if the fast reverse movement exceeds the beginning of the first tune, the CD player enters the stop mode (as long as the REPEAT key has not been pressed).
Memory play
The memory play allows the desired tunes to be played in the desired order. The maximum of 20 selections can be put into memory.
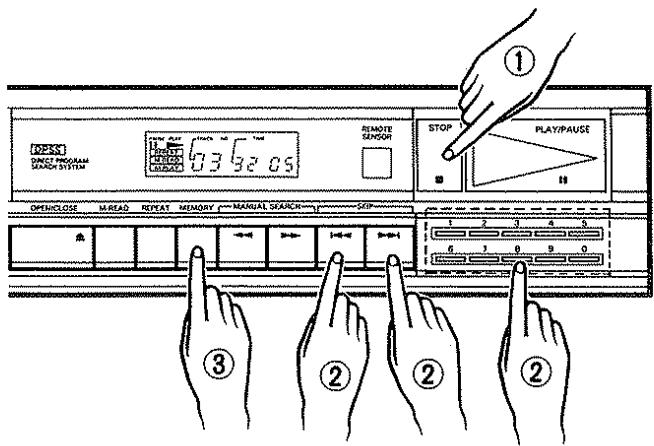
To program the selection
① Press the STOP (■) key.
② Select the desired Track No. using the numeric keys (1 0) or SKIP (▶,▶) keys.
③ Press the MEMORY key.
- The Track No. will be back lit, and the selected track will be memorized in Channel 1.
- Unless the MEMORY key is pressed within 3 seconds after selecting the Track No., the programming will be aborted.
④ To continue to program further selections, repeat the procedures in 2. and 3. The maximum number of selections for memory is 20. More than 20 selections cannot be memorized. Any attempt to program tunes exceeding the number will be cancelled. - To program quickly without waiting 2 or 3 seconds, select the next Track No. When the next Track No. is selected, the current memory operation is completed.
To confirm a memorized selection
Press the M-READ key.
- The Track No. and Channel No. of the memorized selections can be confirmed beginning at the Channel 1. Each channel contents will be displayed for about 3 seconds.
Memory indications will not appear when the selections are not in memory.
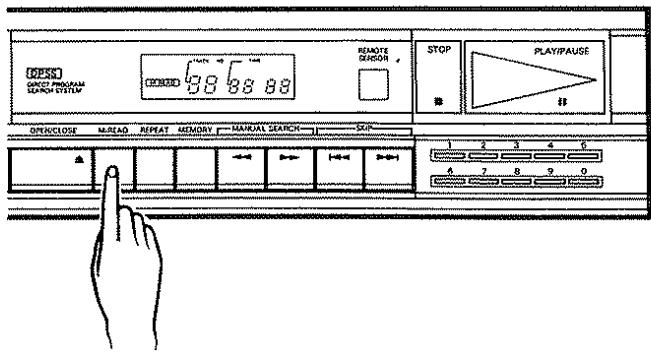
To erase the memory
Press the OPEN/CLOSE (▲) key.
- The memory will be erased when the disc tray is opened with the OPEN/CLOSE (▲) key or the power is turned off.
To play the memorized selections
① Program the desired selections in accordance with the procedures in "To program the selection" on page 8.
② Press the PLAY/PAUSE (▷, ¶) key.
- The M-PLAY indicator will light to show that the player is in the memory play mode.
- The player will play only memorized channels.
- In the memory play mode, a blank of more than 4 seconds will automatically be placed between selections.
To use the pause mode
Press the PLAY/PAUSE (▶, ¶) key once.
- The PAUSE indicator will light to stop play at the point where the PLAY/PAUSE (, ) key was pressed.
To resume play, press the PLAY/ ( ,) PAUSE key again.

To stop memory play
Press the STOP (■) key.
- Play is discontinued, the pickup returns to the beginning of the first selection of the disc, and the disc will stop.
To play from a specific selection
① Press the SKIP (I, >) keys to call on the desired channel.
② Press the PLAY/PAUSE (▷, ¶) key.
To select another selection during play
Press the SKIP (▶) key. Play will then be discontinued and the pickup will advance to the next selection on the disc.
When the key is pressed during play of the final selection, the pickup will return to the first channel of the memory.
② If the SKIP (1) is pressed, play will also be discontinued, and the pickup will return to the beginning of the selection under play.
- A continuous press of the key will reverse the pickup to the beginning of the previous selection.
- When the player is in the pause mode, the pickup will move to the beginning of the selected track.
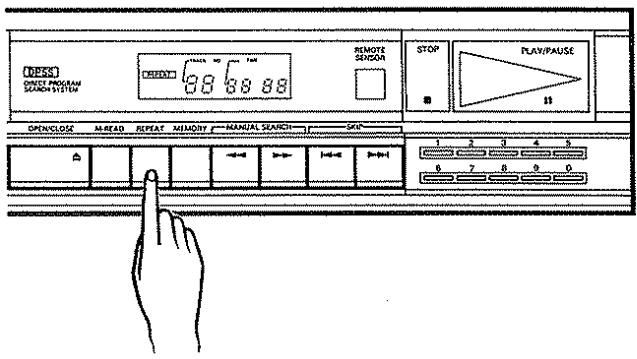
Repeat playback
Repeat playback can be activated or canceled any time, i.e. when the tray is open, during memory or normal playback. When the REPEAT key is pressed, the indicator will light.
- During memory playback, repeat playback is activated only from the tracks programmed in memory.
- During normal playback, all tracks are repeated.
- To cancel repeat playback, press the REPEAT key again, press the STOP key, or open the tray.
Note:
Repeat playback is also cancelled when TOC has been read.
Remote control unit
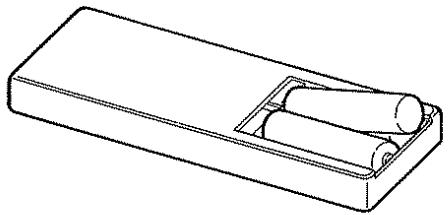
Batteries
Load two "R6", "AA" type batteries in the remote control unit as shown in the illustration.
- Remove the cover.
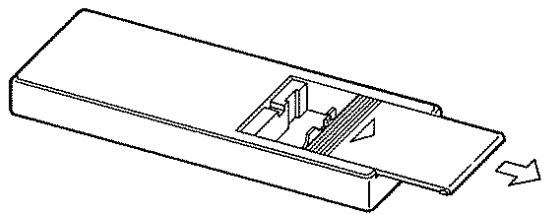
- Insert batteries with correct polarity, and close the cover.
Note:
The provided batteries are to be used for operation of the remote control unit, and it may have shorter life.
When the remote control unit becomes effective only for shorter distance or does not effective to operate, replace them with two new batteries.
Operating range of remote control unit
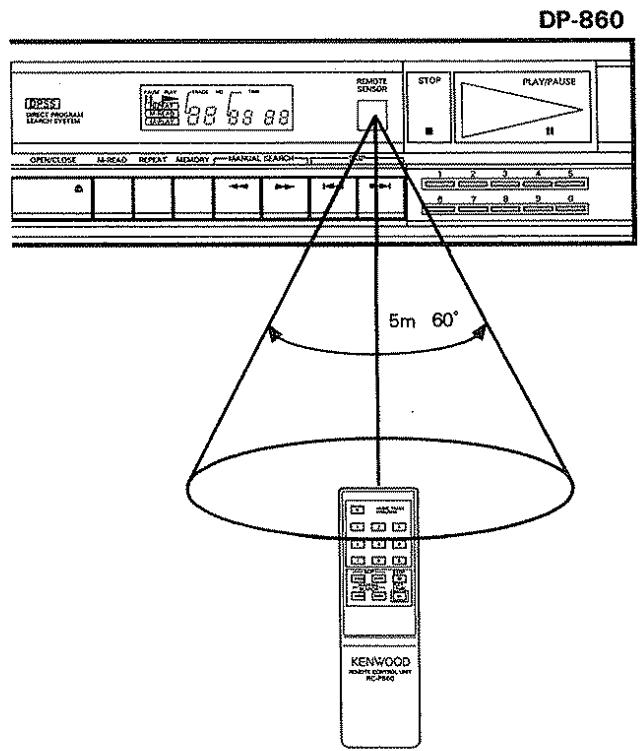
Operation method
For servicing
Should this unit require servicing, be sure to repack the unit with original carton box and material.
Sending the unit without repacking may result in damaged finish or malfunction.
Before repacking, be sure to secure the laser pick-up system with the transportation screws as follows.
- Turn the power ON without loading disc.
- Turn OFF the power after the display shows the following indication.
- Install the transportation screws.
Notes on handling compact discs
Handling
Compact discs are made of plastic (polycarbonate). When the recorded side of the compact disc is dirty or scratched, playback may be noisy or sound may be missed. Even when the label side is scratched, the recording may be damaged. Handle compact discs carefully. Do not stick tape, etc. to compact discs.
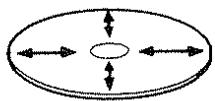
Cleaning
When a compact disc is contaminated with fingerprints, etc., wipe with a dry cloth in a radial direction. Never use chemical solvents, such as thinner, benzene, etc. and conventional record cleaners or aerosols.

Storage
Always replace the compact disc in its case and store it. Compact discs are adversely affected by heat and moisture. Do not store compact discs in a place exposed to direct sunlight or where humidity is high.
Additional precautions
When performing connections, always disconnect the power cord from the AC outlet. When setting the power switch (POWER) to OFF, always turn the volume control of the amplifier to minimum.
In case of difficulty
If your unit should not perform as expected, consult the table below to see if the problem can be corrected before seeking help from your dealer or service representative.
| Symptom | Possible cause | Remedy |
| Even when the POWER switch is turn-ed ON, the power is not supplied. | The power plug is not properly fitted. | Reconnect the power plug properly into the AC outlet. |
| When a disc is loaded, it does not start play. | 1. Disc is loaded upside down. 2. Disc is dirty. 3. Optical system collects dew. 4. The player is in the roulette play mode. | 1. Reverse the disc. 2. Clean the disc. 3. Keep the unit warm for an hour. 4. The amplifier should be switched out of the roulette play mode. |
| No sound. | Loose connection | Connect the connection cord tightly. |
| Sound skipped | 1. Disc is very dirty. 2. Disc is greatly damaged. 3. Vibration is transmitted to the unit. | 1. Clean the disc. 2. Replace the disc with the new one. 3. Move the unit to a place where no vibration is transmitted to the set. |
| Selection search time is extremely long. | Disc is dirty or damaged. | Clean the disc or replace it with the new one. |
| Tray does not open even after the OPEN/CLOSE (▲) key is pressed. | 1. Improper insertion of a power plug. 2. Transportation screws are not removed. | 1. Insert the power plug tightly into the AC outlet. 2. Remove the transportation screws. |
Specifications
Number of channels 2 channels
Frequency response. 5 Hz - 20 kHz, ±1 dB
Dynamic range 92 dB or more
Signal to noise ratio 94 dB
Total harmonic distortion 0.007% at 1 kHz
Channel separation 90 dB at 1 kHz
Wow & flutter. Unmeasurable limit
Line output level/impedance 1.6 V/3.3 kohms
Headphones output level/impedance 31 mW/32 ohms
Constant linear velocity 1.2 - 1.4 m/sec.
Quantization 16 bits linear 1 channel
Sampling frequency 44.1 kHz
Power consumptions. 15 W
Dimentions W 420 mm (16-9/16")
H 87 mm (3-7/16")
D 262 mm (10-5/16")
Weight (Net) 3.8 kg (8.36 lb)
Note:
We follow a policy of advancements in development. For this reason specifications may be changed without notice.
System control jacks (Except for some areas.)
Jack ①
Connect this jack to the system control jack for system control. For details, refer to "System control connections" on the 15 page.
Receivers KR-V126R, KR-V106R, KR-V86R, KR-V76R or KR-A56R can be connected to this jack (except some areas).
Jack ⑤
Connect this jack to the synchro control CD jack of the KR-V125R, KR-V95R or KR-V75R. For details, refer to the instruction manual of the unit.
Synchro operation
When this unit is used together with the KC-206 preamplifier or the KR- series receivers, the synchro operation becomes possible.
The remote control unit supplied with the KC-206 or the KR-series receivers can control the PLAY/PAUSE ( / II) , STOP (■) and SKIP (I▶/▶I) operations. The numeric keys on the remote control unit can also be used.
The synchro operation with the cassette deck used (KX-96W, KX-76R, KX-66CW/KX-66W) is also allowed.
For detailed information, refer to the Instruction Manual of the KC-206 preamplifier, KR- series receiver, or the KX-96W, KX-76R, KX-66CW/KX-66W cassette decks.
System control connections (Except Europe and U.K.)
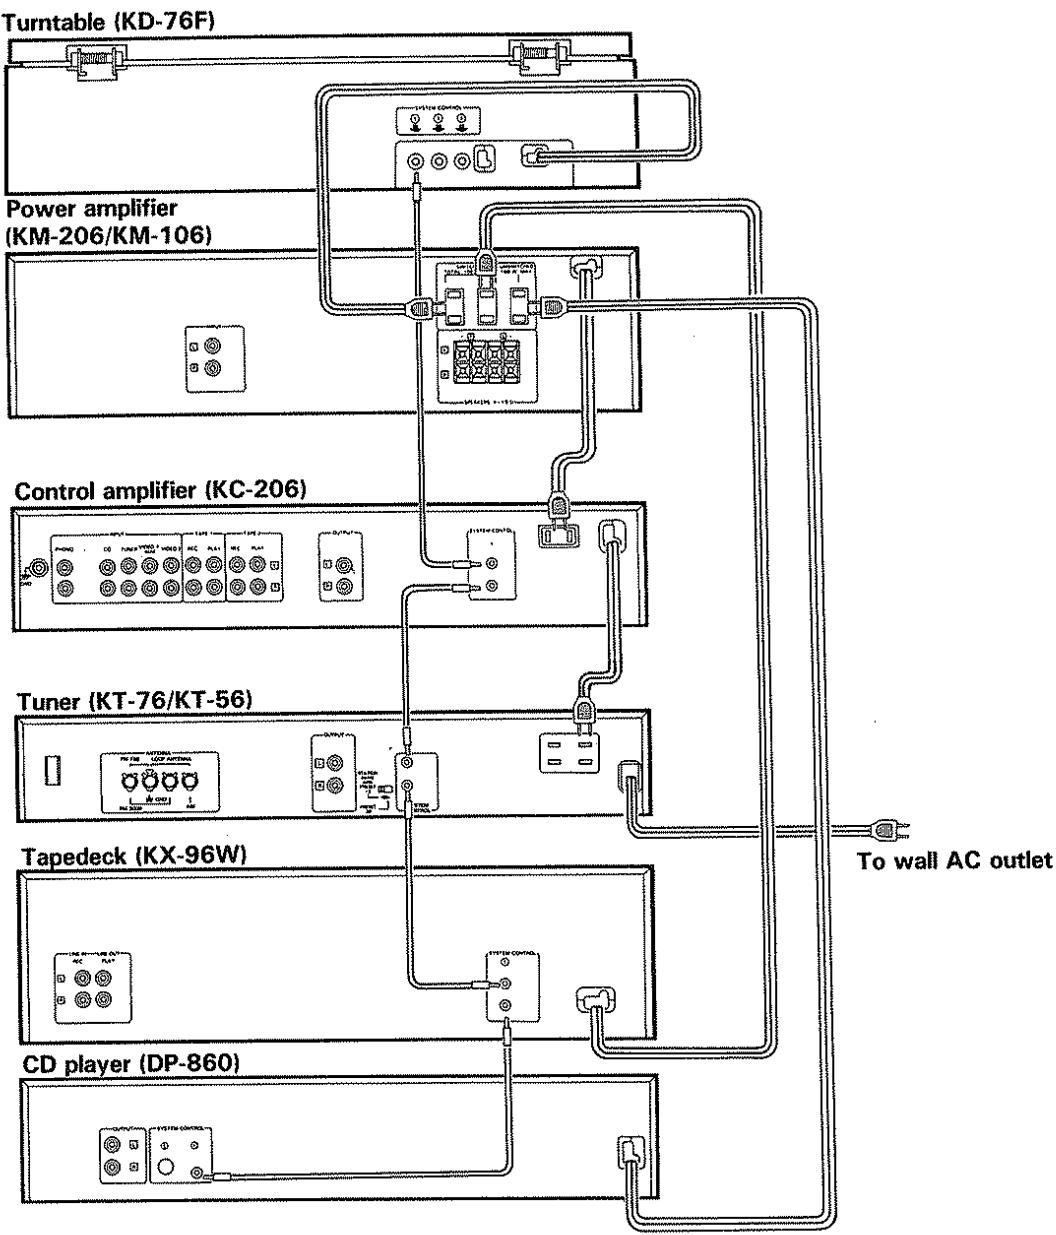
Notes:
1. For connections of the audio cords, refer to the "System connections" diagram.
2. In some models except KT-76, KT-56 the AC outlet is not provided. Obtain an extension cord to connect the power cords to the KT-76, KT-56.
The remote control socked on. This unit is only for use with associated models which are not available on the U.K. market.