
PB7 - Éclairage Qtx - Notice d'utilisation et mode d'emploi gratuit
Retrouvez gratuitement la notice de l'appareil PB7 Qtx au format PDF.
| Type de produit | Barre de PAR LED pliable avec 4 projecteurs |
| Marque | Qtx |
| Modèle | PB7 |
| Alimentation | 110-240 V CA, 50/60 Hz (prise IEC) |
| Consommation électrique | 100 W |
| Type de LED | 7 × 3 W RGB par projecteur (28 LEDs au total) |
| Angle du faisceau | 25° |
| Modes DMX | 1, 3, 7, 12 ou 16 canaux |
| Dimensions (déplié) | 1140 × 290 × 60 mm |
| Dimensions (plié) | 570 × 290 × 120 mm |
| Hauteur maximale du trépied | 1,69 m |
| Poids du sac de transport complet | 10,8 kg |
| Poids du trépied uniquement | 2,55 kg |
| Fonctions principales | Mode autonome, maître/esclave, DMX, commande par pédale, activation sonore |
| Calibrage de la sensibilité microphone | 0 à 100 % |
| Entretien et nettoyage | Débrancher avant nettoyage, utiliser un chiffon sec, ne pas exposer à l'humidité |
| Sécurité | Ne pas ouvrir le boîtier (haute tension), confier toute réparation à un personnel qualifié |
| Pièces détachées et réparabilité | Aucune pièce réparable par l'utilisateur ; contacter le revendeur en cas de problème |
FOIRE AUX QUESTIONS - PB7 Qtx
Questions des utilisateurs sur PB7 Qtx
0 question sur cet appareil. Repondez a celles que vous connaissez ou posez la votre.
Poser une nouvelle question sur cet appareil
Téléchargez la notice de votre Éclairage au format PDF gratuitement ! Retrouvez votre notice PB7 - Qtx et reprennez votre appareil électronique en main. Sur cette page sont publiés tous les documents nécessaires à l'utilisation de votre appareil PB7 de la marque Qtx.
MODE D'EMPLOI PB7 Qtx
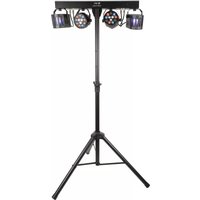
PB-7
High Power Foldable PAR Bar
Item ref: 151.558UK
User Manual
Please read through this manual thoroughly before use, any damage cause by misuse of product will not be covered by warranty.
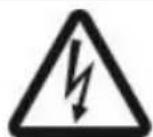
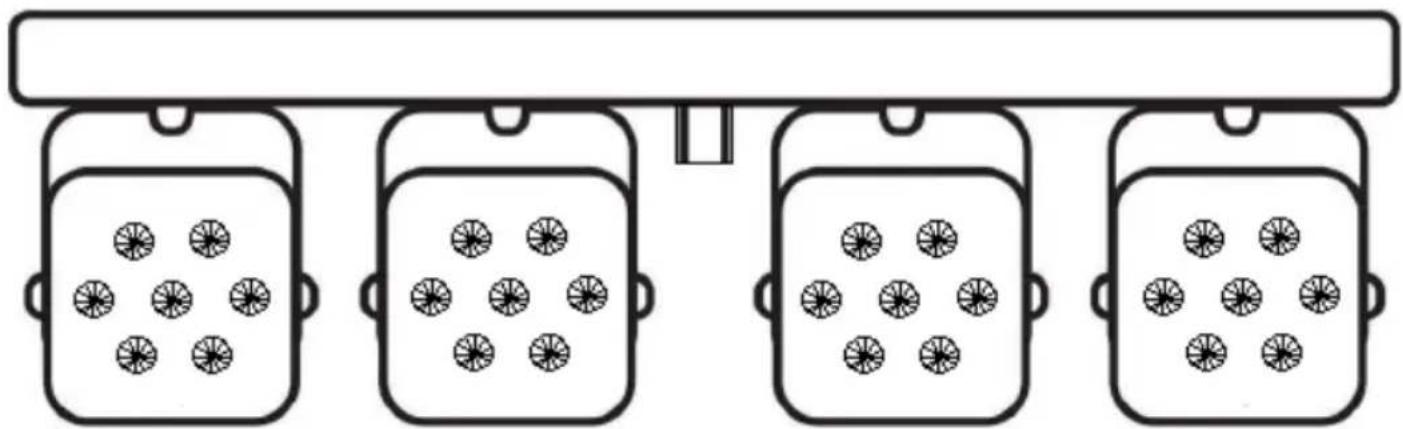
Thank you for choosing this QTX PB-7 PAR bar. A foldable PAR bar kit fantastic for mobile DJs and performers who need their lighting to be quick to set up and easily transportable. This PAR bar boasts 4 high power Cans, each fitted with 7 × 3W RGB LEDs. Smooth colour blending can be achieved by controlling with the included foot controller or via DMX.
In the box:
Your PB-7 should arrive to you in two separate cartons in good condition.
Carton 1:
PAR bar with 4 LED PAR Cans
- Foot controller
Foam carry case
- 2 × IEC mains lead (UK and EU)
Carton 2:
- 35mmØ tripod stand
- Stand bag
Warning:
To prevent risk of fire or electric shock, do not expose the unit to rain or damp environments. In the event of a spillage, disconnect the mains and allow the unit to dry out naturally. Qualified personnel should then check the unit before continuing use.

Please do not open cover, contain high voltage. This product is not serviceable or repairable by end user. Please refer to qualified personnel for service and repair.
- Always check the correct voltage and the condition of the IEC lead before connecting to a power outlet.
- Always ensure any DMX leads used are in good condition with no short connections or damaged plugs.
Setup:
Release the clasp that holds the top bar in the folded position and unfold to the open position as pictured below. There are two clasps at the back of the unit that need to be locked to keep the top bar in the open position.
The opened top bar can now be placed on to the supplied tripod stand and adjusted to desired height. Each LED PAR Can pans and tilts to face different directions and angles.

Back panel:
- LCD Display
- Manual control buttons
- DMX signal in (DMX male socket)
- DMX signal out (DMX female plug)
-
Foot controller socket
-
Built in mic
- IEC socket
- Earth connection screw DO NOT REMOVE
Manual control menu:
Press the "menu" button to enter the setting menu.
Press "up" and "down" to navigate through various setting options.
Press "enter" to enter the desired setting.
Choose set value by "up" and "down" buttons and confirm setting by pressing "enter".
| Display | Mode | Press ENTER for setting |
| Addr | DMX address | A001 to A512 |
| Chnd | DMX channel mode | 1Ch, 3Ch, 7Ch, 12Ch or 16Ch |
| SLnd | Slave mode | iA5E = master, SL_1 = slave 1, SL_2 = slave 2 |
| Shnd | Auto mode | Sh_0 to Sh_8 |
| SoUn | Sound activation | on= sound to light on, oFF = sound to light off |
| SEnS | Microphone sensitivity | 0 - 100 (0-100% gain) |
| bLnd | Blackout mode | no = on, YES = blackout |
| LED | LED display dimmer | oFF = display off after 20s on = constant display |
| dI SP | LED display inverted | dI SP / dSI P (normal or inverted display) |
| tE5E | Fixture test sequence | Fixture steps through all functions – press MENU to exit |
| hour | Fixture hours | Displays how many hours of use for the fixture |
Operation:
The PB-7 can operate in stand-alone, master, slave or DMX modes.
Stand-alone/master/slave:
For stand-alone mode, first choose whether sound to light is required by selecting on or off from Solln . Then select one of the eight pre-programmed modes from 5hnd option 5h_1 to 5h_B, select 5h_0 for random chase option. Further PB-7 units can be controlled by one master unit allowing synchronization. Ensure the master unit slave mode 5Lnd is set as iRST and the controlled unit slave mode is set as 5L_1 or 5L_2. Connect DMX out from the master unit to the DMX in of the slave unit.
DMX mode:
The PB-7 can be control by DMX signal, simply connect the DMX signal source to the DMX in of the unit via a balanced XLR lead. Extra fixtures can be controlled by the same DMX signal by looping through the DMX out on the PB-7. Ensure the correct DMX start address is set from the Addr option on the manual control.
Foot Controller:

ON/OFF - Switches the PAR bar on and off
MODE - Scroll through all programmed modes
UP - Choose setting value
col1 to col8 are 8 preset colours
5h_1 to 5h_8 are the 8 pre-programmed chase patterns
SP_1 to SP_8 are the speed option for the chase
CASE,SL_1,SL_2 are the Master/Slave mode
FLOOD - press to give maximum light output
DMX channel value reference:
1 channel mode:
| Channel | DMX Value | Function |
| Channel 1 sound to light active from 008-255 | 000-007 | Black out |
| 008-037 | Pre-programmed Chase 1 | |
| 038-067 | Pre-programmed Chase 2 | |
| 068-097 | Pre-programmed Chase 3 | |
| 098-127 | Pre-programmed Chase 4 | |
| 128-157 | Pre-programmed Chase 5 | |
| 158-187 | Pre-programmed Chase 6 | |
| 188-217 | Pre-programmed Chase 7 | |
| 218-247 | Pre-programmed Chase 8 | |
| 248-255 | Random Chase 1-8 |
3 channel mode:
| Channel | DMX Value | Function |
| Channel 1 | 000-255 | Red dimmer 000-0% to 255-100% |
| Channel 2 | 000-255 | Green dimmer 000-0% to 255-100% |
| Channel 3 | 000-255 | Blue dimmer 000-0% to 255-100% |
7 channel mode:
| Channel | DMX Value | Function |
| Channel 1 | 000-255 | Red dimmer 000-0% to 255-100% |
| Channel 2 | 000-255 | Green dimmer 000-0% to 255-100% |
| Channel 3 | 000-255 | Blue dimmer 000-0% to 255-100% |
| Channel 3 | 000-255 | Master dimmer 000-0% to 255-100% |
| Channel 5 | 000-007 | N/A |
| 008-247 | Strobe, speed 0%-100% | |
| 248-255 | Sound to light strobe | |
| Channel 6 | 000-007 | N/A |
| 008-022 | Preset colour change 1 | |
| 023-037 | Preset colour change 2 | |
| 038-052 | Preset colour change 3 | |
| 053-067 | Preset colour change 4 | |
| 068-082 | Preset colour change 5 | |
| 083-097 | Preset colour change 6 | |
| 098-112 | Preset colour change 7 | |
| 113-127 | Preset colour change 8 | |
| 128-142 | Preset colour change 9 | |
| 143-157 | Preset colour change 10 | |
| 158-172 | Preset colour change 11 | |
| 173-187 | Preset colour change 12 | |
| 188-202 | Preset colour change 13 | |
| 203-217 | Preset colour change 14 | |
| 218-232 | Preset colour change 15 | |
| 233-247 | Preset colour change 16 | |
| 248-255 | Colour chase to sound | |
| Channel 7 | 000-007 | N/A |
| 008-255 | Colour change speed 0-100% |
12 channel mode:
| Channel | DMX Value | Function |
| Channel 1 | 000-255 | PARcan1 Red dimmer 0-0% to 255-100% |
| Channel 2 | 000-255 | PARcan1 Green dimmer 0-0% to 255-100% |
| Channel 3 | 000-255 | PARcan1 Blue dimmer 0-0% to 255-100% |
| Channel 4 | 000-255 | PARcan2 Red dimmer 0-0% to 255-100% |
| Channel 5 | 000-255 | PARcan2 Green dimmer 0-0% to 255-100% |
| Channel 6 | 000-255 | PARcan2 Blue dimmer 0-0% to 255-100% |
| Channel 7 | 000-255 | PARcan3 Red dimmer 0-0% to 255-100% |
| Channel 8 | 000-255 | PARcan3 Green dimmer 0-0% to 255-100% |
| Channel 9 | 000-255 | PARcan3 Blue dimmer 0-0% to 255-100% |
| Channel 10 | 000-255 | PARcan4 Red dimmer 0-0% to 255-100% |
| Channel 11 | 000-255 | PARcan4 Green dimmer 0-0% to 255-100% |
| Channel 12 | 000-255 | PARcan4 Blue dimmer 0-0% to 255-100% |
16 channel mode:
| Channel | DMX Value | Function |
| Channel 1 | 000-255 | PARcan1 Red dimmer 0-0% to 255-100% |
| Channel 2 | 000-255 | PARcan1 Green dimmer 0-0% to 255-100% |
| Channel 3 | 000-255 | PARcan1 Blue dimmer 0-0% to 255-100% |
| Channel 4 | 000-255 | PARcan2 Red dimmer 0-0% to 255-100% |
| Channel 5 | 000-255 | PARcan2 Green dimmer 0-0% to 255-100% |
| Channel 6 | 000-255 | PARcan2 Blue dimmer 0-0% to 255-100% |
| Channel 7 | 000-255 | PARcan3 Red dimmer 0-0% to 255-100% |
| Channel 8 | 000-255 | PARcan3 Green dimmer 0-0% to 255-100% |
| Channel 9 | 000-255 | PARcan3 Blue dimmer 0-0% to 255-100% |
| Channel 10 | 000-255 | PARcan4 Red dimmer 0-0% to 255-100% |
| Channel 11 | 000-255 | PARcan4 Green dimmer 0-0% to 255-100% |
| Channel 12 | 000-255 | PARcan4 Blue dimmer 0-0% to 255-100% |
| Channel 13 | 000-255 | Master dimmer 0-0% to 255-100% |
| Channel 14 | 000-007 | N/A |
| 008-247 | Strobe, speed 0%-100% | |
| 248-255 | Sound to light strobe | |
| Channel 15 | 000-007 | N/A |
| 008-022 | Preset colour change 1 | |
| 023-037 | Preset colour change 2 | |
| 038-052 | Preset colour change 3 | |
| 053-067 | Preset colour change 4 | |
| 068-082 | Preset colour change 5 | |
| 083-097 | Preset colour change 6 | |
| 098-112 | Preset colour change 7 | |
| 113-127 | Preset colour change 8 | |
| 128-142 | Preset colour change 9 | |
| 143-157 | Preset colour change 10 | |
| 158-172 | Preset colour change 11 | |
| 173-187 | Preset colour change 12 | |
| 188-202 | Preset colour change 13 | |
| 203-217 | Preset colour change 14 | |
| 218-232 | Preset colour change 15 | |
| 233-247 | Preset colour change 16 | |
| 248-255 | Colour chase to sound | |
| Channel 16 | 000-007 | N/A |
| 008-255 | Colour change speed 0-100% |
Specifications
| Power | 110-240Vac, 50/60Hz (IEC) |
| Power consumption | 100W |
| Fuse rating | T7A |
| LED type | 3W RGB |
| Beam angle | 25° |
| DMX channels | 1, 3, 7, 12 or 16 |
| Maximum height | 1.69m |
| Dimensions : PAR bar | 1140 x 290 x 60mm |
| Dimensions : collapsed | 570 x 290 x 120mm |
| Dimensions : carry bag | 700 x 430 x 280mm |
| Weight : carry bag when full | 10.8kg |
| Weight : stand | 2.55kg |
| LED safety standard | BSEN62471:2008 |
Troubleshooting
| No power (mains) | Check mains voltage is correct and outlet is switched on |
| Check IEC lead and fuse (if fuse continually blows, refer to your dealer) | |
| No LED display | Press any control panel button and check LED setting in menu |
| No light output | Check control panel mode settings (standby, slave, sensitivity, DMX) |
| Check DMX settings from controller (dimmer levels, blackout etc.) | |
| No strobe output | Check strobe settings on control panel or from DMX controller |
| Unresponsive to DMX | Check DMX connection and leads |
| Check that DMX mode is enabled (set “Addr” on control panel) | |
| Overheating/ cutting out | Ensure that the unit is not too close to a heat source |

This product is classed as Electrical or Electronic equipment and should not be disposed with other household or commercial waste at the end of its useful life. The goods must be disposed of according to your local council guidelines.
Errors and omissions excepted.
Copyright© 2021 AVSL Group Ltd, Unit 2 Bridgewater Park,
Taylor Road, Trafford Park, Manchester. M41 7JQ.
AVSL (Europe) Ltd, Unit 3D North Point House, North Point Bus. Park, New Mallow Road, Cork, Ireland.

Marque : Qtx
Modèle : PB7
Catégorie : Éclairage