
TR631NOX - Lave-vaisselle ROSIERES - Notice d'utilisation et mode d'emploi gratuit
Retrouvez gratuitement la notice de l'appareil TR631NOX ROSIERES au format PDF.

| Type de produit | Lave-vaisselle encastrable 6 couverts |
| Marque | Rosieres |
| Modèle | TR631NOX |
| Dimensions (L x P x H) | 60 x 60 x 85 cm (estimation) |
| Poids | Environ 30 kg (estimation) |
| Tension d'alimentation | 220-240 V ~ 50 Hz |
| Puissance électrique | 2100 W (max) |
| Pression d'eau | 0,08 - 0,8 MPa |
| Consommation d'eau | 8 L par cycle (programme Eco) |
| Consommation d'énergie | 0,61 kWh (programme Eco) |
| Nombre de programmes | 5 programmes + prélavage à froid |
| Programmes disponibles | Universal, Hygiene+, Eco, Rapide 32', Prélavage froid |
| Fonction départ différé | Oui, jusqu'à 9 heures |
| Système de séchage | Par condensation avec agent de rinçage |
| Adoucisseur d'eau | Oui, réglable (5 niveaux) |
| Capacité du réservoir de sel | 1,5 kg |
| Capacité du réservoir de liquide de rinçage | 130 ml |
| Filtres | Filtre central, filtre plat, micro-filtre (auto-nettoyant) |
| Matériau de la cuve | Inox |
| Dispositif anti-débordement | Oui, sécurité intégrée |
| Niveau sonore | Environ 48 dB (estimation) |
| Indice de réparabilité | Disponibilité des pièces détachées (à vérifier) |
| Entretien | Nettoyage régulier des filtres et des bras de lavage |
FOIRE AUX QUESTIONS - TR631NOX ROSIERES
Questions des utilisateurs sur TR631NOX ROSIERES
0 question sur cet appareil. Repondez a celles que vous connaissez ou posez la votre.
Poser une nouvelle question sur cet appareil
Téléchargez la notice de votre Lave-vaisselle au format PDF gratuitement ! Retrouvez votre notice TR631NOX - ROSIERES et reprennez votre appareil électronique en main. Sur cette page sont publiés tous les documents nécessaires à l'utilisation de votre appareil TR631NOX de la marque ROSIERES.
MODE D'EMPLOI TR631NOX ROSIERES
ROSIÈRES
INSTRUCTIONS FOR USE AND INSTALLATION GB
NÁVOD K POUŽITÍ A INSTALACI CZ
GEBRAUCHS- UND INSTALLATIONSANLEITUNG DE
INSTRUCTIONS D'UTILISATION ET D'INSTALLATION FR
UPUTE ZA UPORABU I UGRADNJU HR
ISTRUZIONI PER L'INSTALLAZIONE E L'USO IT
INTRUKCJA UŻYTKOWANIA I INSTALACJI PL
INSTRUCTIUNI DE UTILIZARE ŞI INSTALARE RO
NÁVOD NA POUŽITIE A INŠTALÁCIU SK
natural_image
Exterior view of a modern stainless steel electric stove with open doors and internal cabin structure (no visible text or symbols)USINES DE ROSIÈRES - 30, rue Y. LACELLE - Rosières - 18400 - Lunery - France
SAFETY INSTRUCTIONS
- During cooking, moisture may condense inside the oven cavity or on the glass of the door. This is a normal condition. To reduce this effect, wait 10-15 minutes after turning on the power before putting food inside the oven. In any case, the condensation disappears when the oven reaches the cooking temperature.
- Cook the vegetables in a container with a lid instead of an open tray.
- Avoid leaving food inside the oven after cooking for more than 15/20 minutes.
- Children under 8 Year of age must be kept away from the appliance unless they are continuously supervised.
- This appliance can be used by children aged from 8 years and above and persons with reduced physical, sensory or mental capabilities or lack of experience and knowledge if they have been given supervision or instruction concerning use of the appliance in a safe way and understand the hazards involved.
- This appliance is not intended for use by persons (including children) with reduced physical, sensory or mental capabilities, or lack of experience and knowledge, unless they have been given supervision or instruction concerning use of the appliance by a person responsible for their safety
• Children must not play whit the appliance. - This appliances is intended to be used in household and similar applications such as:
- staff kitchen areas in shops, offices and other working environments;
- farm houses;
- by clients in hotels, motels and other residential type environments;
- bed and breakfast type environments.
A different use of this appliance from household environment or from typical housekeeping functions, as commercial use by expert or trained users, is excluded even in the above applications.
If the appliance is used in a manner inconsistent with this it may reduce the life of the appliance and may void the manufacturer's warranty.
Any damage to the appliance or other damage or loss arising through use that is not consistent with domestic or household use (even if located in a domestic or household environment) shall not be accepted by the manufacturer to the fullest extent permitted by law.
- The door should not be left in the open position since this could present a potential hazard (es. tripping).
- WARNING!
Knives and other utensils with sharp points must be loaded in the basket with their points down or placed in a horizontal position.
- When the appliance is located on a carpet floor, attention must be paid to ensure that there is no obstruction to the bottom vents.
Make sure that the plug on the appliance remains accessible after installation.
- The appliance must be connected to the water mains using new hose-sets.
- The old hose-sets should not be reused.
- Water pressure must be between 0,08 MPa and 0,8 MPa. If the pressure is below the minimum consult our service department for advice.
-
Before connecting the appliance to the mains supply it is important to ensure:
-
that the supply socket is properly earthed;
-
that your electricity supply is capable of meeting the consumption requirements listed on the rating plate of your appliance.
- No additional operation/setting is required in order to operate the appliance at the rated frequencies.
- WARNING!
Ensure that your product is properly earthed.
In the absence of adequate earthing you will notice that when touching the metal parts of your appliance an electrical dispersion can be felt, due to the presence of a radio interference suppressor.
- Manufacturer declines all responsibility for any damage due to non-earthing of the machine.
- Ensure that the dishwasher does not crush power cables.
- Do not remove the plug from the mains supply socket by pulling the mains cable or the machine itself.
- In general it is not advisable to use adaptors, multiple plugs and/or extension cables.
- Never touch the appliance when your hands or feet are wet or damp.
- Do not use when your feet are bare.
- Do not leave the appliance exposed to the elements (rain, sun etc).
SAFETY INSTRUCTIONS
- Leaning or sitting on the open door of the dishwasher could cause it to tip over.
- If the appliance breaks down or stops working properly, switch it off, turn off the water supply and do not tamper with it. Repair work should only be carried out by an approved service agent and only genuine spare parts should be fitted. Any failure to follow the above advice may have serious consequences for the safety of the appliance.
• Water left in the machine or on the dishes at the end of the wash programme should not be swallowed.
- The dishwasher is designed for normal kitchen utensils.
Objects that have been contaminated by petrol, paint, traces of steel or iron, corrosive chemicals, acids or alkalis must not be washed in the dishwasher.
- WARNING: The appliance and its accessible parts become hot during use. Care should be taken to avoid touching heating elements.
- Cleaning and user maintenance shall not be made by children without supervision
- WARNING: Unattended cooking on a hob with fat or oil can be dangerous and may result in fire.
- NEVER try to extinguish a fire with water, but switch off the appliance and then cover flame e.g. with a lid or a fire blanket.
- WARNING: Danger of fire: do not store items on the cooking surfaces.
- WARNING: If the surface is cracked, switch off the appliance to avoid the possibility of electric shock.
- During use the appliance becomes hot. Care should be taken to avoid touching h eating elements inside the oven.
- WARNING: Accessible parts may become hot during use. Young children must be kept away.
- Do not use harsh abrasive cleaners or sharp metal scrapers to clean the oven door glass, the glass hob lid or the glass hob surface since they can scratch the surface, which may result in shattering of the glass.
- Disconnect the appliance from the mains electricity supply before carrying out any work or maintenance on it.
- The oven must be switched off before removing the guard, after cleaning, the guard must be replaced in accordance with the instructions.
- Only use the temperature probe recommended for this oven.
- WARNING: Never remove the oven door seal.
- Only use the oven for its intended purpose, that is only for the cooking of foods: any other use, for example as a heat source, is considered improper and therefore dangerous. The manufacturer cannot be held responsible for any damage resulting from improper, incorrect or unreasonable usage.
- When you place the shelf inside, make sure that the stop is directed upwards and in the back of the cavity. The shelf must be inserted completely into the cavity.
- When inserting the grid tray pay attention that the anti-slide edge is positioned rearwards and upwards.
- Do not use a steam cleaner or high pressure spray for cleaning operations.
- Any spillage should be removed from the lid before opening.
- The hob surface must be allowed to cool down before closing the lid.
- CAUTION: glass lids may shatter when heated. Turn off all the burners before shutting the lid.
- If present, do not to stare into halogen lamp hob elements.
- Use only hob guards designed by the Manufacturer of the cooking appliance or indicated by the Manufacturer of the appliance in the instructions for use as suitable or hob guards incorporated in the appliance. The use of inappropriate guards can cause accidents.
- Do not put metallic objects such as knives, forks, spoons or lids on the hob. They could heat up.
- Do not touch the heat zones during operation or for a while after use.
- Do not place anything on control panel.
- WARNING: Avoid possibility of electric shock - ensure the appliance is switched off before replacing the lamp.
- If the range is placed on a base, measures must to be taken to prevent the appliance slipping off the base.
- The appliance must not be installed behind a decorative door in order to avoid overheating.
- The connection to the power source must be carried out by a suitably qualified professional. In order to have an installation compliant to the current safety legislation the product must be connected only placing an omnipolar breaker, with contact separation compliant to the requirements for overvoltage
SAFETY INSTRUCTIONS
category III, between the appliance and the power source. The omnipolar breaker must bear the maximum connected load and must be in line with current legislation. The yellowgreen earth cable should not be interrupted by the breaker. The omnipolar breaker used for the connection must be easily accessible when the appliance is installed. The connection to the power source must be carried out by a suitably qualified professional considering the polarity of the oven and of the power source. The disconnection must be achieved incorporating a switch in the fixed wiring in accordance with the wiring rules.
- If the power cable is damaged, it should be substituted with a cable or special bundle available from the manufacturer or by contacting the customer service department. This operation should be carried out by a suitably qualified professional. The type of power cable must be H05V2V2-F. The earth conductor (yellowgreen) must be approximately 10 mm longer than the other conductors. For any repairs, refer only to the Customer Care Department and request the use of original spare parts. Failure to comply with the above can compromise the safety of the appliance and invalidate the guarantee.
- If the supply cord is damaged, it must be replaced by the manufacturer, its service agent or similarly qualified persons in order to avoid a hazard.
- CAUTION::In order to avoid a hazard due to inadvertent resetting of the thermal cutout, this appliance must not be supplied through an external switching device, such as a timer, or connected to a circuit that is regularly switched on and off by the utility.
- The new hose-sets supplied with the appliance must to be used and the old hose-sets to be discarded.
- This appliance must be installed in accordance with the regulations in force and only used in a well ventilated space. Read the instructions before installing or using this appliance.
- These instructions are only valid if the country symbol appears on the appliance. If the symbol does not appear on the appliance, it is necessary to refer to the technical instructions which will provide the necessary instructions concerning modification of the appliance to the conditions of use of the country".
- Prior to installation, ensure that the local distribution conditions (nature of the gas and gas pressure) and the adjustment of the appliance are compatible";
- The adjustment conditions for this appliance are stated on the label (or data plate)";
- This appliance is not connected to a combustion products evacuation device. It shall be installed and connected in accordance with current installation regulations. Particular attention shall be given to the relevant requirements regarding ventilation.
- The use of a gas cooking appliance results in the production of heat and moisture in the room in which it is installed. Ensure that the kitchen is well ventilated: keep natural ventilation holes open or install a mechanical ventilation device (mechanical extractor hood). Prolonged intensive use of the appliance may call for additional ventilation, for example opening of a window, or more effective ventilation, for example increasing the level of mechanical ventilation where present.
- CAUTION::Accessible parts may be hot when the grill is in use. Young children must be kept away". An additional protective means to avoid contact with the oven door is available. This part should be fitted when young children are likely to be present."
- For a correct use of the oven it is advisable not to put the food in direct contact with the racks and trays, but to use oven papers and/or special containers.
- Never cook food directly on the glass ceramic hob. Always use the appropriate cookware.
• Always place the pan in the centre of the unit that you are cooking on. - Do not use the surface as a cutting board.
- Do not slide cookware across the hob.
- Do not store heavy items above the hob. If they drop onto the hob, they may cause damage.
- Do not use the hob as a working surface.
- Aluminium foil and plastic pans must not be placed on heating zones.
- It is strongly recommended to keep children away from the cooking zones while they are in operation or when they are switched off, so long as the residual heat indicator is on, in order to prevent the risks of serious burns.
• Caution, possibility of tilting - Anti-tip restraints must be applied. Follow the instruction provided with the brackets included in the product.

UNPACKING THE APPLIANCE
Inside the appliance, you will find the booklet and, for gas model, a bag containing :
- if you have to change the type of gas: new jets for the gas modifications, Butane Gas G30 28-30 mbar or Propane Gas G31-37 mbar,
- for connection by soft rubber tube, an end piece for Natural Gas and an end piece for Butane or Propane gas with seal.
RECOMMENDATIONS
READ THE INSTRUCTIONS CAREFULLY TO MAKE THE MOST OF YOUR APPLIANCE.
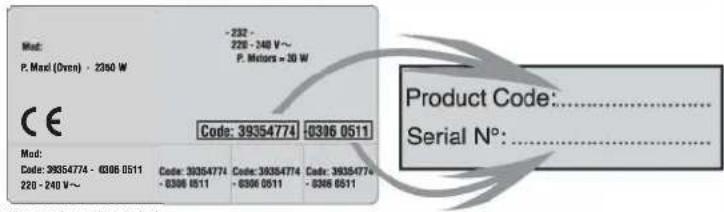
We recommend you keep the instructions for installation and use for later reference, and before installing the appliance, note its serial number below in case you need to get help from the after sales service.
. Identification plate is located at the back of the Trio.
THE COMPANY SHALL NOT BE LIABLE IF THE INSTRUCTIONS PROVIDED IN THIS DOCUMENT ARE NOT COMPLIED WITH.
IMPORTANT NOTES
- You should entrust the gas installation of your appliance and its electrical connection to an approved installer or technician with similar qualifications.
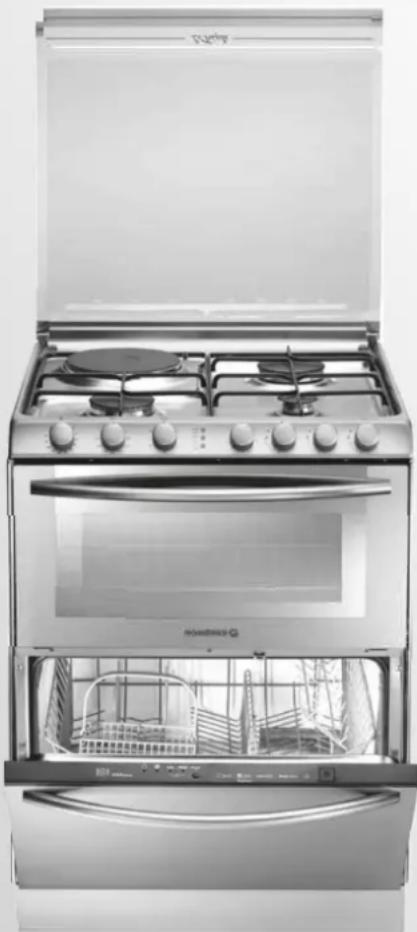
- The Trio consists of three elements, a hob, an oven and a diswasher. For safety reasons under no circumstances should any modifications be carried out to this appliance.
- This appliance is designed for domestic use only. - If the Trio shows even the smallest defect, do not connect it. Disconnect from the power supply and immediately contact an approved service agent.
- If the surface is cracked, switch off the appliance to avoid the possibility of electric shock
- Do not lean on the doors or not allow children to do so.
• After each use we recommend that some cleaning of the Trio is undertaken. This prevents the accumulation of dirt or grease which gets re-cooked and burns, generating unpleasant smells and smoke.
- Do not store flammable products in the Trio as they can catch fire if the appliance is inadvertenty switched on.
- In case of Hobs incorporating Halogen lamps, do not stare the plates during use.
- Use oven gloves when placing or removing a dish from the oven. - Do not line the oven walls with aluminium foil or single-use oven protectors available from some stores. Aluminium or any other protection, in direct contact with the hot enamel, risks melting the enamel or causing deterioration to the inside.
- When cooking with fats or oils, always take care to watch the cooking process as heated fats and oils can catch fire rapidly. - The hob lid (for gas model):
- While the cooker is in use, keep the lid in the upright position. - before opening the lid, remove any items from it, to avoid any spillage.
- before closing the lid, let all the hot parts of the cooker cool down. - do not store heavy or metallic objects on the lid.
- If you wish to dispose of an old dishwasher be careful to remove the door to eliminate the risk of children becoming trapped inside it.
• The dishwasher has been made from materials which can be recycled so that it can be disposed of in an environmentally friendly way.
- Ensure that the dishwasher does not crush power cables.
- It is not advisable to use adaptors, multiple plugs and/or extension cables.
- Any queries regarding the power supply cord should be referred to After Sales Service or a qualified technician.
- When the appliance is located on a carpet floor, attention must be paid to ensure that there is no obstructions to the bottom vents. Any failure to follow the above advice may have serious consequences for the safety of the appliance.
In order to improve the quality of the products, CANDY may carry out modifications linked to technical improvements.
This equipment, in the parts intended to come into contact with food, complies with the regulations laid down in EEC directives 89/109.
The appliance complies with European Directive 2009/142/EC (GAD) and starting from 21/04/2018 with Gas Appliances Regulation 2016/426 (GAR).
(GAR). By placing the CE mark on this product, we are confirming compliance to all relevant European safety, health and environmental requirements which are applicable in legislation for this product.
TECHNICAL DATA
| TRIO | |||
| TYPE / Reference | TRI 5S | TRI 5 | |
| 4 Gas | 3 Gas + 1 EL | 4 EL | |
| Position | |||
| Front left | Rapid burner | Rapid burner | hilight ∅180 |
| Rear left | Semi rapid bur. | .E.P. ∅180 | hilight ∅220 |
| Rear right | Ultra rap. bur. | Ultra rapid bur. | hilight ∅140 |
| Front right | Auxiliary bur. | Auxiliary bur. | hilight ∅140 |
| Flame failur device | Yes | - | |
| Ignition | Yes | - | |
| Installation class | 2 subclass 1 end 1 | - | |
| Installed gas type / power | |||
| Gas power kW | 8,75 | 7 | - |
| G20 20mbar (N.G.) l/h | 833 | 666 | - |
| Alternative injector kit for LPG gas available in the packaging | |||
| Gas power kW | 8,75 | 7 | - |
| G30/G31 28-30/37 mbar g/h | 636 | 509 | - |
| Dishwasher | |||
| Place setting EN50242 | 6 | 6 | 6 |
| Water consumption | 8 | 8 | 8 |
| Water pressure min 0,08 - max 0,08 MPa | |||
| Rated power input | |||
| Voltag (V)- Frequency(Hz) | 220-240 V - 50 Hz | ||
| Electrical power | 2100 | 3600 | 8700 |
The flexible tube shall be fitted in such a way that does not pass through any space where it may become crushed/kinked or damaged in any way.
INSTALLATION
WARNING:
Installing a domestic appliance can be a complicated operation which if not carried out correctly, can seriously affect consumer safety. It is for this reason that a professionally qualified person should undertake the task who will carry it out in accordance with the technical regulations in force.
In the event that this advice is ignored and the installation is carried out by an unqualified person, the manufacturer declines all responsibility for any technical failure of the product whether or not it results in damage to goods or injury to individuals.
In case of installation of the cooker on a base, measures have to be taken to prevent the appliance slipping from the base itself
GAS MODEL
1.1 SUITABLE LOCATION
- This appliance must be installed in accordance with the regulations in force and only used in a well ventilated space. Read the instructions before installing or using this appliance.
- A gas-powered cooking appliance produces heat and humidity in the area in which it is installed. For this reason you should ensure good ventilation either by keeping all natural air passages open or by installing an extractor hood with an exhaust flue. Intensive and prolonged use of the appliance may require extra ventilation, such as the opening of a window or an increase in speed of the electric fan, if you have one.
- If a hood can not be installed, an electric fan should be fitted to an outside wall or window to ensure that there is adequate ventilation. The electric fan should be able to carry out a complete change of air in the kitchen 3-5 times every hour. The installer should follow the relevant national standards.
- Before installing the appliance, the technician must :
- Check the compatibility between the Trio and the gas installation. The rating plate on the hob shows the type of gas with which it is designed to be used. Connection to the mains gas supply or gas cylinder should be carried out after having checked that it is regulated for the type of gas with which it will be supplied. If it is not correctly regulated see the instructions in the following paragraphs to change gas setting.

natural_image
Isometric line drawing of a kitchen cabinet with appliances and a door, labeled Figure 1 (no text or symbols on the diagram itself)The Trio is factory set for use with the gas type as stated on the packaging and repeated on the rating plate affixed to the cooker. Natural gas G 20-20 mbar / G 25-25 mbar : main gas
- If necessary, change the gas.
To adapt the gas burners cooker fit suitable jets that provide the nominal flow rate (as explained on paragraph changing the gas type).
- For installation the technician must :
All work must be carried out with the electricity supply disconnected.
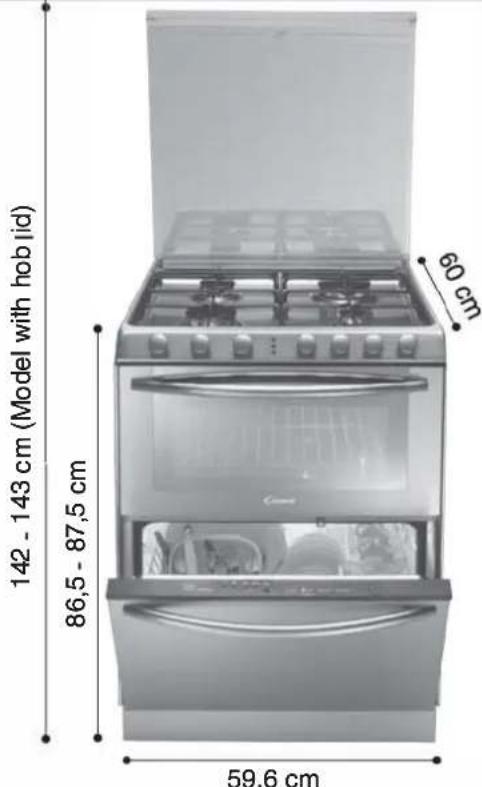
The Trio is Class2 - Sub class 1 ; furniture adjacent to the unit must not be higher than the top of the appliance.
- If the Trio is fitted next to a cabinet on either side, the distance between the Trio and the cabinet must be at least 15 cm (see Figure 1); while the distance between the Trio and the rear wall must be at least 5.5 cm. The distance between the Trio and any other unit or appliance above it (e.g. An extractor hood) must be no less than 70 cm (Figure 1).
- The cooker has adjustable feet for perfect levelling on the floor.
- Make the gas connection to the installation according to the gas supply.
- Connect the cooker electrically in compliance with the information given on paragraph electrical connection.
- If the gas type has been changed, adjust the minimum flow of each gas burner (as explained on paragraph changing the gas type).
- Connect the Trio to the water supply and the water drainage (see paragraph water connection).
ANY MODIFICATION MADE TO THE GAS SETTING SHOULD BE NOTED ON THE RATING PLATE AFFIXED TO THE COOKER.
• GAS CONNECTION
This must be done in compliance with the regulations in force in the installation country (For U.K. only: by law the gas installation \commissioning must be carried out by a "Gas Safe" installer). In all cases, on the gas feed pipe provide a stopcock, a regulator or regulator release device for propane gas. Only use valves, regulators ends and flexible tubes, regulators with the official mark of the installation country.
Gas connection according to installation :
Natural Rigid, Flexible hose with mechanical fittings (1) - Soft rubber tube (2)
Butane Rigid, Flexible hose with mechanical fittings (1) - Soft rubber tube (2)
Propane Rigid, Flexible hose with mechanical fittings (1) - Soft rubber tube (2)
1 - provided the flexible hose can be inspected for its entire length.
2 - provided the soft rubber tube can be inspected for its entire length, its length does not exceed 1.5 metres and it is fitted with suitable clamps at the ends.
1, 2 - soft tubes and flexible hoses with mechanical fittings must be arrange to be away from any flames, and not deteriorated by the combustion gases, hot cooker parts or by any spills of hot food.
The flexible tube shall be fitted in such a way that does not pass through any space where it may become crushed/ kinked or damaged in any way.
• THREE CONNECTION OPTIONS :
• RIGID PIPE CONNECTION
Connect directly to the manifold fittings.
• CONNECTION BY FLEXIBLE HOSE WITH MECHANICAL FITTINGS
We recommend this type of connection.
Screw the hose nuts directly onto the manifold fitting on the one hand and onto the stop cock of the piping on the other hand.
• CONNECTION BY SOFT RUBBER
We do not recommend this type of connection.
To be reserved solely for old installations not enabling any other option.
Screw the compliant end piece (2)
Fit the soft tube to the end piece on
the one hand and to the regulator or
to the valve outlet on the other hand.
(2) In all cases, make sure the seal is fitted. Following the connection operations, test the leak tightness using soapy water, testing by flame is strictly prohibited.
Warning: If gas can be smelt in the vicinity of this appliance turn off the gas supply to the appliance and call the engineer directly. Do not search for a leak with a naked flame.
CHANGING THE GAS TYPE :
WARNING:
Only professionally qualified person should undertake the task who will carry it out in accordance with the technical regulations in force and following instructions.
The calorific capacity and pressure of the gas vary according to the type of gas.
When changing the gas, the technician should successively :
1-Disconnect the appliance from power supply
2-Make the "GAS CONNECTION" to the installation as described above,
3-Close the gas valve before the appliance
4-CHANGE THE JETS
5-REGULATING THE MINIMUN FLAME
CHANGE THE JETS :
To adapt the Hob for use with different types of gas, carry out the following instructions:
- Remove the grids and burners
- Insert on hexagonal spanner (7 mm) into the burner support (Figure 2)
- Unscrew the injector and replace it with one suitable for the gasto be used (see gas type table)
JET
natural_image
Top-down view of a circular sink with a handle and screw base (no text or symbols visible)Figure 2
REGULATING THE MINIMUM FLAME
To regulate the minimum flame the technician carry out the following instruction:
-Remove the knobs,
CASE 1: regulating screw visible inside the valve shaft (see figure 3A)
After lighting the burners, turn the control knob to the minimum setting and then remove the knob (this can easily be removed by applying gentle pressure).
Using a small «Terminal» type screwdriver the regulating screw can be adjusted as in Figure 3A.
Turning the screw clockwise reduces the gas flow, whilst turning it anticlockwise increases the flow.
Use this adjustment to obtain a flame of approximately 3 to 4 mm in length and then replace the control knob.
When the gas supply available is LPG - the screw to set the idle flame must be turned (clockwise) to the end stop
Restore the knobs
CASE 2: regulating screw not visible (see figure 3B)
-Remove, grids, burners and lid.
-Remove the top plate
-Using a small screwdriver the regulating screw can be adjusted as in Figure 3C.
Turning the screw clockwise reduces the gas flow, whilst turning it anticlockwise increases the flow
-When the gas supply available is LPG the screw to set the idle flame must be turned (clockwise) to the end stop.
-When the gas supply available is NG gas the screw to set the idle flame must be turned anticlockwise of 1/2 turn from complete close position. (flame of approximately 3 to 4 mm in length)
-Restore the top plate, making sure to correctly reassemble each disassembled or disconnected piece and pay attention to not damage parts, (in case the technician must replace it with original spare parts.
-Restore burners, grids lid and knobs.
natural_image
Diagram of a mechanical device with a lever and starburst symbol, no text or labels presentFigure 3A Figure 3B Figure 3C

natural_image
Close-up of a circular mechanical component with no visible text or symbols
Warning : Never loosen the others screws !
natural_image
Close-up of a mechanical component with a magnified inset showing a circular feature labeled '20' (no readable text or symbols)ELECTRICAL CONNECTION
"The installation must conform to the standard directives". The manufacturer declines all responsibility for any damage that may be caused by unsuitable or unreasonable use.
Warning :
- Always check before any electrical operation, the supply tension shown on the electricity meter, the adjustment of the circuit-breaker, the continuity of the connection to earth to the installation and that the fuse is suitable.
- The electrical connection to the installation should be made via a socket with a plug with earth, or via an omni pole cut-out switch.
If the appliance has a socket outlet, it must be installed so that the socket outlet is accessible.
The manufacturer cannot be held responsible for any accidents resulting from the use of an appliance which is not connected to earth, or with a faulty earth connection continuity.
- Any queries regarding the power supply cord should be referred to After Sales Service or a qualified technician.
Warning! This appliance must be earthed. In the absence of adequate earthing you will notice that when touching the metal parts of your appliance an electrical dispersion can be felt due to the presence of a radio interference suppressor.
• TRIO 9501
A power cord is supplied with the Trio which allows it to be connected only to a power supply of 220-230 V between phases, or between phase and neutral. Connect to a 16 Amp socket.
• TRIO 9503
A power cord is not supplied with this Trio, but it is equipped with a terminal block that enables you to choose the correct connection for the particular power supply.
The terminal block is located at the back of the Trio.
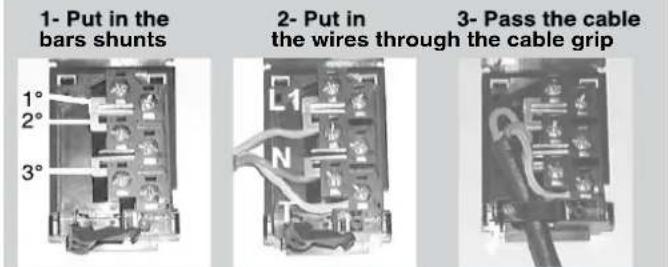
To open the terminal block :
. Locate the two tabs on the sides,
. place the screwdriver blade on the front of the tab, insert it (1) and press down (2)
. Lift the cover off.
Terminal block
To connect :
. unscrew the cable grip,
. pass the cable through the cable grip,
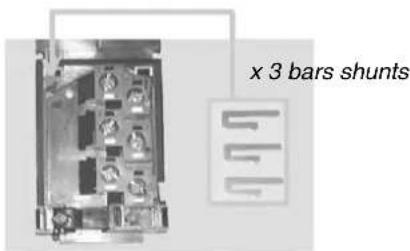
. strip the insulation off the end of the each wire and connect them to the according to the numbers shown in the table as well as the "bars shunts".
Example of connection in monophase
Caution: incorrect tightening can cause dangerous heating risks for the power supply cable.
When the connection operation to the appliance terminals is finished, tighten the cable clamp and close the cover.
| Monophase 220-230V~ | Three phases 220-230V3~ | Three phases 380-415V3N~ | ||||
| CABLE TYPE-AERA | H05V2V2-F 3 G 2,5 mm2 | H05V2V2-F 4 G 2,5 mm2 | H05V2V2-F 5 G 1,5 mm2 | |||
| CONNEC-TION TO THE TERMINAL BLOCK | 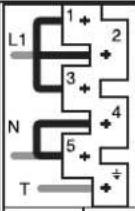 | 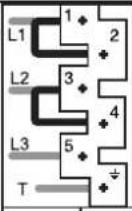 | 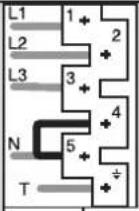 | |||
| To Shunt: make a bridge with a shunt bar | 2 Phase Shunt 1-2 Shunt 2-3 5 Neutral Shunt 4-5 T Earth | 1 Phase Shunt 1-2 3 Phase Shunt 3-4 5 Phase T Earth | 1 Phase 2 Phase 3 Phase 5 Neutral Shunt 4-5 T Earth | |||
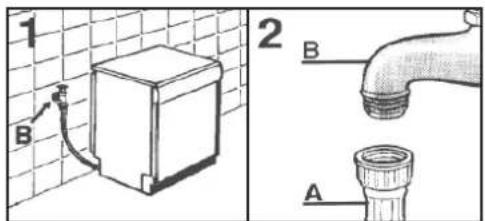
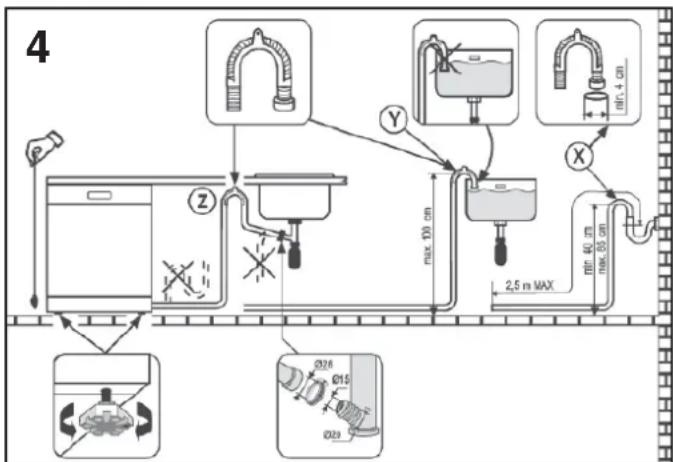
WATER CONNECTION - WATER DRAINAGE
WATER CONNECTION :
The inlet and drain hoses can be directed to left or right. The dishwasher can be connected to either cold or hot water, as long as it is no hotter than 60^ C.
Water pressure must be between 0,08 MPa and 0,8 MPa. If the pressure is below the minimum consult the service department for advice.
The inlet hose must be connected to a tap so that the water supply can be cut off when the machine is not in use (fig.1). The dishwasher inlet hose is fitted with a 3/4" threaded connector (fig.2). The inlet hose "A" should be tightly connected to a 3/4" tap "B".
The water connection of the dishwasher must be done exclusively with the pipe supplied. Do not use an old pipe.
If the machine is connected to new pipes or to pipes which have not been in use for long time, run water through for a few minutes before connecting the inlet hose. In this way no deposits of sand or rust will clog up the water inflow filter.
WATER DRAINAGE :
Take care not to bend or kink the drain hose when connecting it to the machine so that the water can drain freely from it (fig.4y). The drain hose must be at least 40 cm above floor level and it must have an internal diameter af at least 4 cm. It is advisable to fit an anti-odour air trap (fig.4x).
If necessary, the outlet hose can be extended up to 2,6 m, provided that it is kept at a maximum height of 85 cm above floor level. For this, contact Customer Service.
INSTALLATION
flowchart
graph TD
    A["Water Supply"] --> B["Pump"]
    B --> C["Condenser"]
    C --> D["Water Delivery Path"]
    D --> E["Outlet"]
    style A fill:#f9f,stroke:#333
    style B fill:#ccf,stroke:#333
    style C fill:#cfc,stroke:#333
    style D fill:#fcc,stroke:#333
    style E fill:#cff,stroke:#333
The hose can be hooked over the side of the sink (it must not be immersed in water, in order to prevent water from being siphoned back to the machine when this is in operation) Check that there are no kinks in the inlet and outlet hoses. To extend, if necessary the inlet hose, contact the Customer Service.
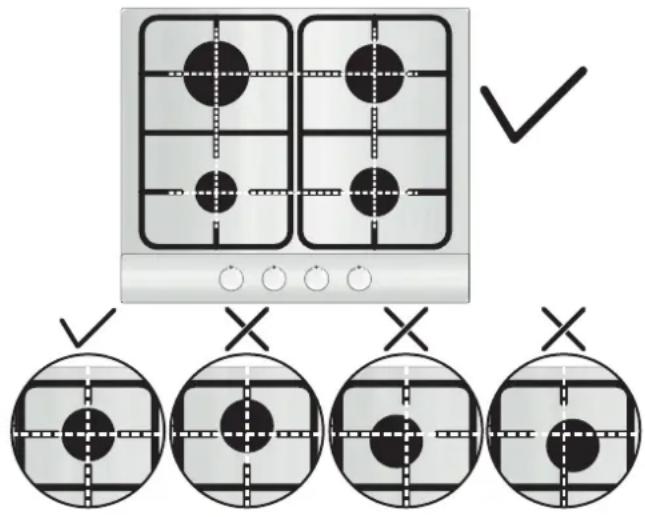
GAS BURNERS
This appliance must only be used for the purpose for which it is intended, domestic cooking, and any other use will be considered improper and could therefore be dangerous. The Manufacturer will not be responsible for any damage or loss resulting from improper use.
Before using burner, be sure, grid perimeters center the burner as below figure.
USE
Each burner is controlled by a tap with progressive settings allowing:
* a wider choice of settings from the maximum position to the lowest and most precise one,
* easier flame regulation according to the pan diameter,
* no risk of cutting off the flame or switching off when the flame is turned down quickly.
IGNITION
RECOMMENDATIONS: when the burners are not in service, the general gas supply tap should always be turned off.
Prior to switching on the gas hob ensure that the burner caps are correctly placed within their position.
- Turn on the gas tap,
- A symbol next to each control knob indicates which burner is lit.
ä Turn and press in the relevant burner control knob to the symbol, keeping it pressed in until the flame ignites. On models fitted with electronic ignition the flame is ignited by an electric spark. This is operated by the button or by pressing the knob (for models with ignition under the knob).
For models not fitted with electronic ignition, or if there is no electric power, light the flame with a match.
Warning: In any case if after 5 seconds the burner has not lit, stop operating the device and wait at least 1 min before attempting a further ignition of the burner
NB: for models fitted with the SAFETY thermocouple, keep the knob pressed in for a few seconds in order to activate the safety system. If the knob is released straightaway there is not time for the safety system to be activated and the flame goes out. If this happens, repeat the ignition procedure from the beginning waiting longer after the flame is lit.
The rapid thermocouple safety device automatically cuts off the gas supply if the flame is accidentally extinguished.
If there are particular local gas supply conditions which make ignition difficult, you are advised to repeat the ignition procedure, turning the knob to "minimum" (💡).
- Set the flame according to your cooking requirements. Intermediate positions are available between the ( 🔊) and ( 🔊) settings on the control knob.
• To turn the flame out, turn the control knob back to stop position. - If the burner is accidentally extinguished, turn the knob to "0", wait one minute and then try to ignite again.
PANS
For a proper use of the burners, choose pans which match the dimensions given below :
* Very fast ∅ 18 cm and more
* Fast ∅ from 16 to 26 cm
* Semi-fast ∅ 12 cm
Auxiliary ∅ 10 cm
- Pans with curved, ridged or warped bottoms are not recommended.
WARNING: If a flame is accidentally extinguished, turn the knob to the off position and do not attempt to re-ignite if for at least 1 minute.
If over the years the gas taps become stiff to turn it is necessary to lubricate them.
Such operation must be carried out only by qualified Service Engineers.
äAluminium pans may leave marks on the enamelled pan support. These marks can easily be removed with a damp cloth and a light abrasive product.
SOME TIPS ....
- Avoid boiling food too intensely. Food is not cooked any more quickly this way. In fact, it is subjected to severe agitation, which may cause the food to lose some of its flavour.
SAVING AND RESPECTING THE ENVIRONMENT
- To save gas, make sure that the flames do not overlap the bottom of the pan.
- Do not use the gas burner with an empty pan.
- Where possible use lid to cover the pan. Regulate the flame to not overlap the diameter of the pan.
THE VITROCERAMIC ZONE
ADVICES
The use of high quality utensils is important to obtain good cooking results :
• Always use good quality cookware with perfectly flat and thick bases.
- Ensure that the base of the pot or pan is dry.
- Use pans whose diameter is wide enough to completely cover the surface unit.
CHOOSING UTENSILS
The following information will help you to choose cookware which will give good performance.


On the label, check the mark that shows if the pan is compatible with the vitroceramic.
Stainless Steel: highly recommended. Especially good with a sandwich clad base. The sandwich base combines the benefits of stainless steel (appearance, durability and stability) with the advantages of aluminium or copper (heat conduction, even heat distribution).
Aluminium: heavy weight recommended. Good conductivity. Aluminium residues sometimes appear as scratches on the hob, but can be removed if cleaned immediately. Because of its low melting point, thin aluminium should not be used.
Cast Iron: usable, but not recommended. Poor performance. May scratch the surface.
Copper Bottom / stoneware: heavy weight recommended. Good performance, but copper may leave residues which can appear as scratches. The residues can be removed, as long as the hob is cleaned immediately. However, do not let these pots boil dry. Overheated metal can bond to glass hobs. An overheated copper pot will leave a residue that will permanently stain the hob.
Porcelain/enamel : Good performance only with a thinly smooth, flat base.
THE ZONES
- highlight zone: it is operational within 3 seconds and is suitable for steady, homogeneous and sustained cooking.
- Sprinter: with the sprinter facility, reduced cooking times of up to 15% can be achieved.
USE
- Locate the sign corresponding to the cooking zone that you need.
- It is recommended that heat setting is at its highest until it has properly warmed up and then lower to the desired cooking setting.


- The power-on indicator light comes on to show that the heat zone is operating.
- Each zone is linked to a residual heat indicator located on the hob. It lights up when the heat zone temperature reaches 60^ and above. It will stay on, even if the unit is switched off, until the surface has cooled down.
- To switch off a heat zone, turn the corresponding control knob until the position "0".
- Positions : the examples below are intended as a guide. When you become familiar with using your hob you will be able to work out the settings that suit you best.
| Positions Some Tips | |||
| 1 | 1-2 | Very Low | To keep a dish hot, melt butter and chocolate... |
| 2 | 3-4 | Low | Slow cooking, sauces, stews, rice pudding poached eggs... |
| 3 | 5-6 | Moderate | Beans, frozen foods, fruit, boiling water... |
| 4 | 7-8 | Medium | Steamed apples, fresh vegetables, pasta, crepes, fish... |
| 5 | 9-10 | High | More intense cooking, omelettes, steaks... |
| 6 | 11-12 | Very High | Steaks, chops, frying... |
SAVING AND RESPECTING THE ENVIRONMENT
- Use pans whose diameter is wide enough to completely cover the surface unit: the size of the pan should be no smaller than the heating area. If it is slightly wider the energy will be used at its maximum efficiency.
- To obtain the best efficiency of your hob, please place the pan in the centre of the cooking zone.
- Using a lid will reduce cooking times and save energy by retaining the heat.
- Minimise the amount of liquid or fat to reduce the cooking times.
- Start cooking on a high setting and reduce the setting when the food has heated through.
OVEN EQUIPMENT (According to the model)
It is necessary to do an initial cleaning of the equipment before the first use of each of them. Wash them with a sponge. Rinse and dry off.
- THE SHELF: it is for holding dishes, plates, and meat joints when cooking with the grill. It is fitted with rails which enables the drip tray to be slid into.
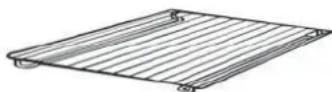
Thanks to its special shape, the shelf always remains horizontal, even when pulled to its fullest extent towards the front of the oven, thus avoiding the risk of dishes sliding off or tipping over.
• THE DRIP TRAY : collects meat and grilling juices during grilling. It can be put on the shelf, or slid under it. Unless used with the grill, the drip tray must not be stored in the oven while in use
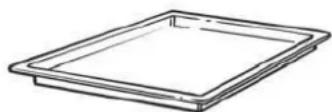
Never use the drip tray as a roasting tray. This would cause smoke to be produced, fat to be splashed and the oven would become rapidly stained.
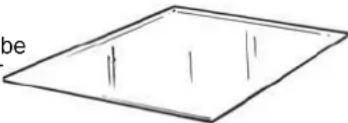
• THE PASTRY TRAY must be placed on the shelf. It is for cooking small pastries like choux, biscuits, meringues, etc...
natural_image
Simple line drawing of a tilted rectangular shape with three vertical lines and the letter 'be' on the left (no text or symbols within the shape)Never place the pastry tray directly on the oven bottom.
- THE ROTISSERIE is equipped with a skewer and an handle, two forks and a skewer support.
When the oven is in use, any unused accessories should be removed.
• THE CIRCUIT-BREAKER TIMER
- It takes in charge the functioning of the oven, for between 1 and 120 minutes, with immediate start and automatic stop. When the time is up, the timer automatically cuts off the power supply to the oven.
• However, the oven could be used
without programming. In this case, turn the control knob to the Hand position.
Nota : to set a time, turn the control knob clockwise up to the 120 minutes mark and then turn it back to the required time.
THE OVEN USE
VERY IMPORTANT : the oven and the dishwaher cannot be used at the same time.
To use the oven, you have to close the dishwasher.
IMPORTANT : always keep small children away from the Trio while it is in use. If the Trio is fitted with a lid, lift it up before use.
THE COOKING METHODS (According to the model)
- Convection + Fan 📄: We recommend you use this method for poultry, pastries, fish and vegetables. Heat penetrates into the food better and both the cooking and preheating times are reduced. You can cook different foods at the same time with or without the same preparation in one or more positions. This cooking method gives even heat distribution and the smells are not mixed. Allow about ten minutes extrawhen cooking foods at the same time.
- Grill - : using the top-heating element. Success is guaranteed for mixed grills, kebabs and "gratin dishes". Five minutes preheating is required to get the element hot.
- Grill + Turnspit : using the top-heating element in conjunction with the rotisserie providing the real flavour of a traditional roast. Remove all accessories from the oven.
- Place the drip tray on the oven bottom.
. Skewer the food to be cooked and centre it between the two forks.
. Fit the skewer into the bracket and slide the bracket and skewer on to the second level. The end of the skewer will then be facing the slot in the drive mechanism.
. Fit the skewer into the drive mechanism. - Convection + Turnspit ⇌: using in the same time the rotisserie and the conventional cooking. It allows to save time when cooking. However, you have to take care of placing the shelf with rails up side down, with rails towards the top and place the drip tray on it.
- Master bake: This function allows to cook in a healthier way, by reducing the amount of fat or oil required. The combination of heating elements with a pulsating cycle of air ensures a perfect baking result.
- Conventional ☐: Both top and bottom heating elements are used. Preheat the oven for about ten minutes. This method is ideal for all traditional roasting and baking. For seizing red meats, roast beef, leg of lamb, game, bread, foil wrapped food (papillotes), flaky pastry. Place the food and its dish on a shelf in mid position.
- Turn the control knob on the requesting cooking method and set a temperature :
* Conventional Temperature from 65°C to 250°C

Grill
Temperature 200°C

Grill + Turnspit
Temperature 200°C

Convection + Turnspit
Temperature from 65°C to 250°C
* Master Bake Temperature from 65°C to 250°C

Convection + Fan
Temperature from 65°C to 250°C
* Tested in accordance with the CENELEC EN 60350-1 used for definition of energy class.
- Turn the control knob of the circuit-breaker timer to the hand position or on a programming duration.


- The regulator indicator light indicates that the thermostat is working. It goes on and off regularly during the cooking time.
COOKING ADVICES
MEAT:
It is better not to salt meats until after cooking as salt encourages the meat to splatter fat.
This will dirty the oven and make a lot of Joints of white meat, pork, veal, lamb and fish can be put into the oven cold. The cooking time is longer than in a preheated oven, but it cooks through to the centre better as the heat has more time to penetrate the joint.
CORRECT PRE-HEATING IS THE BASIS OF SUCCESSFUL RED MEAT COOKERY.
CAKE - PASTRIES AND BISCUITS :
Avoid using shiny moulds because they reflect heat and can spoil your cakes. If your cakes brown too quickly, cover them with greaseproof paper or aluminium foil.
Caution : the correct way to use foil is with the shiny side inwards. If not the heat is reflected by the shiny surface and does not penetrate the cake.
Avoid opening the door during the first 20 to 25 minutes of cooking: sponge cake, soufflés, brioche, etc., will tend to fall. You can check if cakes are done, by pricking the centre with a knife blade or metal knitting needle. If the blade comes out nice and dry, your cake is ready, and you can stop the cooking. If the blade comes out moist or with bits of cake attached, continue baking but slightly lower the thermostat so that it finished off without burning.
The following instructions are for guidance only. You may wish to alter them according to your own experience or your personal taste.
Pre-heating times :
. 20 minutes between 210 and 250°C
. 15 minutes between 140 and 190°C
. 10 minutes between 65 and 115°C
| QUANTITY | FOOD | Oven Temperature in °C | Shelf position from the bottom | Cooking time in minutes |
FISH
| Trout 200 | 1 | 15 / 25 | |
| 1 kg | Whiting 190 | 1 | 50 |
MEAT
| 1 - 1,5 kg | Roast-beef | 190 | 1 | 90 |
| 1 kg | Roast veal | 150 / 160 1 | 120 / | 150 |
| 2 kg | Blanquette of veal | 170 / 190 1 | 60 / | 90 |
| 1 - 1,5 kg | Leg of lamp | 150 / 160 1 | 60 / | 75 |
| 1 - 1,5 kg | Leg of mutton | 150 / 160 1 | 50 / | 60 |
POULTRY
| 2 kg | Pigeons | 150 / 160 1 | 45 | |
| 4 kg | Goose | 160 | 1 | 240 / 270 |
| 2 - 2,5 kg | Duck 175 | 1 | 90 / 150 | |
| 1 - 1,5 kg | Chicken | 170 | 1 | 60 / 80 |
VARIOUS
| Lasagne | 200 | 1 | 40 | |
| Soufflès | 200 | 1 | 20 | |
| Fritter | 200 | 1 | 20 | |
| Pizza | 200 | 1 | 20 |
PASTRY
| Buckwheat cake | 175 | 1 | 40 / 50 | |
| Tart with fruits | 180 / 190 | 1 | 20 / 30 | |
| Biscuit (leaven dough) | 160 | 1 | 40 / 45 | |
| Meringue | 100 | 1 | 90 | |
| Puff pastry | 200 | 1 | 20 |
smoke SAVING AND RESPECTING THE ENVIRONMENT
Where possible, avoid pre-heating the oven and always try to fill it. Open the oven door as infrequently as possible, because heat from the cavity disperses every time it is opened. For a significant energy saving, switch off the oven between 5 and 10 minutes before the planned end of the cooking time, and use the residual heat that the oven continues to generate. Keep the seals clean and in order, to avoid any heat dispersal outside of the cavity.
DISHWASHER CONTROLS

A Programme selection indicator lights
B Programme selection button
C Programme description
D On/off button
SELECTING THE PROGRAMMES AND SPECIAL FUNCTIONS
The dishwasher and the oven cannot be used simultaneously.
Setting a programme
Open the door and press the On/off button ; the 4 Program selection LEDs start flashing.
- Set the required programme by pressing Programme selection button, LED of the chosen programme will turn on (2 LEDs for COLD RINSE programme).
- Close the door (after audible signal), the chosen programme will start automatically.
USE THE DISHWASHER
Opening the door
Grip the handle in the front panel and pull forward. If the machine comes open while it is working, an electrical safety device automatically switches everything off. For the machine to work properly, the door should not be opened while it is in operation.
Closing the door
Place the basket in the dishwasher. Make sure that the spray arm is free to rotate and is not obstructed by cutlery, crockery or pans. Close the door, pressing on it to make sure it is firmly shut.
Interrupting a programme
It is not recommended that the door be opened while a programme is running, and especially not during the main wash phase and final drying.
However, the appliance stops automatically when the door is opened.
When the door is closed again, the programme continues automatically.
If you wish to change or cancel a programme that is running, carry out the following procedure:
- Hold the "PROGRAMME SELECTION" button down for at least 5 seconds. The programme indicator lights will turn on and off individually and sequentially and some audible signals will sound. - The running programme will be cancelled and all the programme indicator lights will flash.
Before starting a new programme, you should check that there is still detergent in the dispenser. If necessary, top up the dispenser. WARNING: if the door is opened during the drying phase, an intermittent audible signal is activated to advise that the cycle is not yet completed.
A 5 seconds alarm will sound (if not muted) 3 times at 30 seconds intervals to signal that the programme has ended. The selected programme indicator light (2 indicator lights for the "COLD RINSE" programme) will start to flash. Dishes can now be removed and the dishwasher turned off by pressing the "ON/OFF" button or dishes can be loaded for new cycle.
The alarm for the programme end may be muted as follows:
IMPORTANT
The dishwasher must ALWAYS be offbefore start of this procedure.
- Hold down the "PROGRAMMESELECTION" button and at the same time switch on the dishwasher by pressing the "ON/OFF" button (a brief audible signal will sound).
- Keep the "PROGRAMME SELECTION" button pressed for at least 15 seconds (during this time, 2 audible signals will sound).
- Release the button when the second audible signal sounds (3 "PROGRAMME SELECTION" indicator lights will come on).
- Press the same button again: the 3 indicator lights (which indicate that the alarm is activated) will start flashing (to indicate that the alarm is off).
- Turn off the dishwasher by pressing the "ON/OFF" button to confirm the new setting.
To turn the alarm on again, follow the same procedure.

WARNING!
If any problem occurs, turn the dishwasher off by pressing the "ON/OFF" button and start the procedure again from the beginning.
Memorization of the last programme used
The last programme used can be memorized by following the below:
IMPORTANT
The dishwasher must ALWAYS be off before start of this procedure.
- Hold down the "PROGRAMME SELECTION" button and at the same time switch on the dishwasher by pressing the "ON/OFF" button (a brief audible signal will sound).
- Keep the "PROGRAMME SELECTION" button pressed for at least 30 seconds (during this time, 3 audible signals will sound).
- Release the button when the THIRD audible signal sounds (all the indicator lights will flash).
- Press the same button again: the flashing indicator light (memorization off) will stop flashing and remain on (memorization on).
- Turn off the dishwasher by pressing the "ON/OFF" button to confirm the new setting.
To disable the memorization, follow the same procedure.

WARNING!
If any problem occurs, turn the dishwasher off by pressing the "ON/OFF" button and start the procedure again from the beginning.
If there is any break in the power supply while the dishwasher is operating, a special memory stores the selected programme and, when the power is restored, it continues where it left off.
Attention - The dishwasher is equipped with an anti-overflow safety device which in the event of anomaly intervenes by evacuating water in excess.
Fault Signals
If malfunctions or faults occur when a program is running, the LED that corresponds to the selected cycle (2 LEDS for COLD RINSE programme) will blink rapidly and an audible signal will be activated. In this case, turn the dishwasher off by pressing the On / Off button. After checking to make sure the water inlet hose tap is open, that the drain hose is not bent and that the siphon or filters are not clogged, re-start the selected program. If the anomaly persists, contact Customer Service.
Important!
To ensure the correct operation of the anti-overflow safety device, it is recommended not to move or to tilt the dishwasher during operation.
If it is necessary to move or to tilt the dishwaher, first make sure the washing cycle is finished and that no water is left in the tank.
PRELIMINARY OPERATIONS AND CLEANING THE FILTER UNIT
The filtering system is composed of :
- a central filter cup which traps the largest food particles.
- a flat filter which continuously filters the washing water.
the micro filter, situated under the
flat filter, which traps the smallest food particles ensuring a perfect rinse.
For best results, the filter unit should be checked and cleaned after each wash.
To remove the filter unit, simply grip the handle and lift the whole unit out.
The central cup is just resting on top for easy cleaning. The dishwasher is fitted with a self cleaning micro filter, which only requires checking about once every 15 days.
However, it is advisable to check after every wash, that the central cup and the flat filter are not clogged.
NB : After cleaning the filters, make sure that they are correctly reassembled, one inside the other, and that the flat filter is properly positioned at the bottom of the dishwasher.
A poor seating of the filter unit could have an adverse effect on the efficiency of the appliance.
Important : Never use the dishwasher without filter.
LOADING DISHES
The basket has been carefully designed to make loading easy. For good wash performance, remove any debris from the dishes (bones, tooth picks, the remains of meat and vegetables) to avoid blocking the filters, water outlet and washing arm nozzle and, as a result, reducing washing efficiency.
Warning ! to avoid any injury from cutlery with blades or sharp points, they can be placed with the handles upwards.
LOADING A 6 PLACES SETTING (EN 60436)
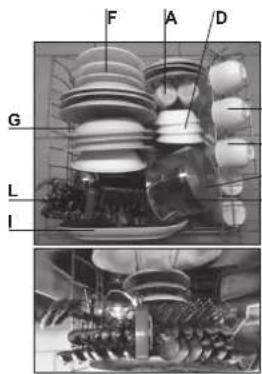
A- 6 glasses
B- 6 dessert plates
C-6 saucers
D-Small bowl
E- 6 tea or coffee cups
F - 6 flat plates
G- 6 deep plates
H- Medium bowl
I - Serving dish
L - Cutlery
LOADING 4 PLACE SETTINGS PLUS CASSEROLES
Casseroles, salad bowls, souppans, lids etc., can be loaded on the basket. It is advisable to arrange the cutlery
in the basket provided for that purpose. If there is any cutlery with narrow handles, it should be placed with handles upwards, to avoid falling through the bottom of the basket and blocking the washing arm. Do not put wooden handled lids in the basket, or any whose lids are bonded with resin.
LOADING THE DETERGENT
It is essential to use a detergent that is specifically designed for dishwashers either in powder, liquid or tablet form. Unsuitable detergents, (like those for washing up by hand) do not contain the proper ingredients for use in a dishwasher and impede the efficient functioning.
Normal wash
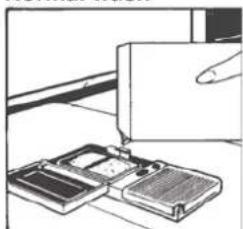
natural_image
Illustration of a hand inserting a component into a device with an open lid (no text or symbols visible)The detergent dispenser is inside the door. The dispenser lid should be closed before every wash. To open it, simply press the catch. At the end of each wash cycle the lid is always open and ready for the next time the dishwasher is used. The amount of detergent to be used varies according to how dirty the dishes are and the type of wash. A 15g dose is normally recommended. If the water is hard or the
dishes are exceptionally dirty, 25g of detergent should be loaded. After pooring the detergent into the dispenser, close the lid, since not all detergents are the same and the instructions on the boxes of detergent can vary.
We should just like to remind users that too little detergent does not clean the dishes properly whilst too much detergent not only does not produce better results but is also a waste. Do not use an excessive amount of detergent and help limit damage to the environment at the same time.
Intensive washing
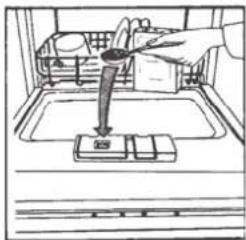
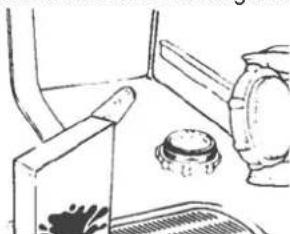
natural_image
Line drawing of a hand using a tool to press down a small object inside a kitchen appliance (no text or symbols)When using the intensive wash programme, add a second dose of detergent of about 15g (1 soup spoonful).
This extra dose should be put in the small tank (see immage)
FILLING THE RINSE AID DISPENSER
The rinse aid dispenser "B" is to the right of the detergent dispenser and has a capacity of about 130 ml.
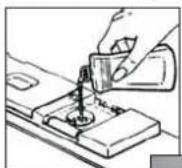
Open the lid and pour in enough liquid, which will last several washes. Try to avoid overloading. Close the lid.
This additive, which is automatically released during the last rinse cycle, helps the dishes to dry quickly and prevents spots and stains
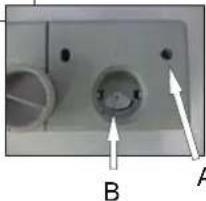
natural_image
Close-up of a mechanical component with labeled points A and B, showing circular features and arrows indicating direction (no readable text or symbols beyond labels)FULL - Dark

forming. It is always advisable to use rinse aid.
Check the rinse aid level through the indicator eye "A" which is situated in the centre of the dispensers.
EMPTY - Bright

REGULATING THE RINSE AID (from 1 to 4).
The regulator control "B" is below the indicator and can be turned with the finger, the recommended position is "3". The hardness of the water can be judged by incrustation or by the level of dryness.
It is therefore important that the correct dosage of Rinse Aid is regulated to give the best results.
After the wash,
. if streaks occur on the dishes, decrease the amount by one position.
. if whitish spots occur, increase the amount by one position.
LOADING THE SALT
The dishwasher is fitted with a softener that clears the water of lime which could cause scale and damage the dishwasher. On the bottom of the diswasher there is a salt dispenser for regenerating the softener.
The filter element of the softener unit should be recharged with a salt specially produced for dishwashers. This salt can be bought either as tablets or as granules.
natural_image
Simple line drawing of a kitchen sink with a bowl and a container (no text or symbols)To add salt, unscrew the cap of the salt dispenser on the bottom and refill the dispenser.
During this operation a little water will overflow but keep adding salt until the dispenser is fill, clean the thread of salt residue and retighten the cap.
If the dishwasher is not required straightaway, set the programme Cold rinse ("Eco+Rapid, 2 Leds") so that the salt solution which has overflowed is discharged from the washing tank.
The salt dispenser has a capacity of between 1.5 kg for efficient use of the appliance, it should be refilled from time to time according to the regulation of the water softener unit.
NB: it is necessary to add water until the dispenser overflows. Only install the dishwasher completely filling the salt dispenser.
Regulating the water softener with electronic programmer
The water softener can treat water with a hardness level of up to 60^ Fh (French grading) or 33^ Dh (German grading) through 5 settings. The settings are listed in the panel below:
| Level | Water hardness | Water hardness | Use of regenerating salt | Water softener setting |
| °fH (French) | °dH (German) | |||
| 0 | 0-8 | 4 | no | |
| 1 | 9-20 | 5-11 | yes | Indicator light 1 |
| 2 | 21-30 | 12-17 | yes | Indicator light 1+2 |
| 3 | 31-40 | 18-22 | yes | Indicator light 1+2+3 |
| 4 | 41-60 | 23-33 | yes | Indicator light 1+2+3+4 |
IMPORTANT
The dishwasher must ALWAYS be off before start of this procedure.
- Hold down the "PROGRAMME SELECTION" button and at the same time switch on the dishwasher by pressing the "ON/OFF" button (a brief audible signal will sound).
- Keep the "PROGRAMME SELECTION" button pressed for at least 5 seconds, UNTIL an audible signal sounds. Some "PROGRAMME SELECTION" indicator lights will come on to indicate the current water softener setting level.
- Press the same button again to select the required water softener level: each time the button is pressed, one indicator light will come on (the water softener level is indicated by the number of lights on). For level 5, 4 lights will flash, for level 0 all lights will be off.
- Turn off the dishwasher by pressing the "ON/OFF" button to confirm the new setting.

WARNING!
If any problem occurs, turn thedishwasher off by pressing the "ON/OFF" button and start the procedure again from the beginning (STEP 1).

WASHING PROGRAMME
Information for the test laboratories General programme comparison
Ref. EN 60436 standards:
1) Normal load
2) Shine setting: "4"
3) Amount of detergent: 4 gr. for pre-wash, 10 gr. for whash.
| CONSUMPTION (main programmes)* | ||
| Programme | Energy (kWh) Water (L) | |
| Universal | 1,25 | 15 |
| Hygiene+ | 0.93 | 12 |
| Eco | 0.61 | 8 |
| Rapid 32' | 0,60 | 8 |
| Power consumption of the off-mode and of the left-on mode: 0,5 W / 1 W | ||
| * Values are measured in a laboratory according to European Standard EN 60436 (consumption may vary according to conditions of usage). | ||
| Programme | Description | |
| Normal | Once a day - for normal soiled pans and any other items that have been left all day for washing | |
| Hygiene+ | Once a day - for heavily soiled pans and any other items that have been left all day for washing. | |
| ECO 45°C | Eco | Programme for normally soiled tableware (the most efficient in terms of its combined energy and water consumption for that type of tableware).Programme standardised to EN 60436. |
| R 32' 50°C | Rapid 32' | Quick wash for dishes which are to be washed immediately after the meal.Wash load of 4/6 persons. |
| Cold pre-wash | Short cold pre-wash for items that are stored in the dishwasher until you are ready to wash a full load. | |
| Check list | Programme contents | Duration | |||||||||
| Detergent for soaking | Detergent for washing | Clean filter | Check rinse aid dispenser | Check salt dispenser | Hot pre-wash | Cold Pre-wash | Main wash | First rinse | Second rinse cold | Rinse with rinse aid | With cold water |
| 65°C | 80 | ||||||||||
| 75°C | 90 | ||||||||||
| 45°C | 193 | ||||||||||
| 50°C | 32 | ||||||||||
| 6 | |||||||||||
USE
SOME PRACTICAL HINTS ....
- To carry out a wash programme with a full load of dishes load the machine correctly after each meal and do a cold pre-wash between each load to get rid of stains and remove the larger residues of food.
HOW TO GET GOOD WASH RESULTS
1) Place the dishes face downwards.
2) Try to place the dishes in such a way that they are not touching one another. If they are loaded properly you will get better results.
3) Before placing the dishes in the dishwasher remove any remaining food (bones, shells, pieces of meat or vegetables, coffee grounds, skin of fruit, cigarette ash etc. that could clog up the outflow and the washing arm jets.
4) After loading the dishes, check that the washing arm can rotate freely.
5) Pans and other dishes that have particularly stubborn food particles or remnants of burnt food should be left to soak in water with dishwasher detergent.
6) To wash silver properly:
a) - rinse the silver immediately after use especially if it has been used for mayonnaise, eggs, fish etc.
b) - do not sprinkle detergent onto it.
c) - keep it separate from other metals.
WHAT TO DO IF ...
You want to stop the dishwasher to put in more dishes whilst it is in the middle of a wash. Open the door, put in the dishes, and close the door, the machine will start up again automatically.
WHAT NOT TO WASH ...
It should also be remembered that not all dishes are suitable for washing in a dishwasher. We advise again using the dishwasher to wash items in thermoplastic, cutlery with wooden or plastic handles, saucepans with wooden handles, items in aluminium, crystal, leaded glass unless otherwise stated.
Certain decorations may fade. It is therefore a good idea before loading the whole batch to wash just one of the items first so as to be sure that others like it will not fade.
It is also a good idea not to put silver cultery with non-stainless steel handles into the dishwasher as there could be a chemical reaction between them.
NB: when buying new crockery or cutlery always make sure that they are suitable for washing in a dishwasher.
AFTER USE - After each wash, close the tap which supplies the water to the dishwasher and press the On/Off button to the Off position. If the dishwasher is not going to be used for some time, the following precautions are advisable:
1 - carry out a wash programme, but with no dishes, to degrease the machine,
2 - pull the plug out,
3 - turn off the water supply tap,
4 - fill the rinse aid dispenser
5 - leave the door slightly ajar,
6 - leave the inside of the machine clean,
7 - if the machine is to be left in a place where the temperature is below 0^ C, the water left in the dispenser could freeze.
Therefore, it is advisable to raise the temperature above 0^ C, approximately 24 hours before using the machine again.
CLEANING
- Before carrying out any cleaning, you must :
ä Disconnect the appliance from the electrical supply and wait for all the hot parts to cool.
Never use abrasives, corrosive detergents, bleaching agents or acids. Avoid any acid or alkaline substances (lemon, juice, vinegar etc.) on the enamelled, varnished or stainless steel sections.
• THE ENAMELLED PARTS:
When cleaning the enamelled, varnished or chrome sections, use warm soapy water or a non caustic detergent. For stainless steel use an appropriate cleaning solution.
THE VITROCERAMIC HOB
Do not use a sponge that is too wet. It is advisable to keep away from the hob all substances which are liable to melt, such as plastic items, sugar, or sugar-based products.
Maintenance :
- place a few drops of a specialist cleaning product on the hob surface.
- rub any stubborn stains with a soft cloth or with slightly damp kitchen paper.
- wipe with a soft cloth or dry kitchen paper until the surface is clean.
- Never use abrasive cleaners, wire wool or sharp objects to clean the glass oven door, as this may result in shattering of the glass
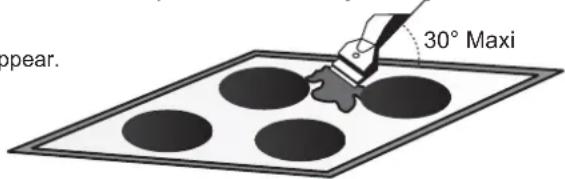
Stubborn stains :
- place a few drops of a specialist cleaning product on the hob surface.
- scrape with a scraper, holding it at an angle of 30^ to the hob, until the stains disappear.
- wipe with a soft cloth or dry kitchen paper until the surface is clean.
- repeat the operation if necessary.
A scraper with a razor blade will not damage the surface, as long as it is kept at an angle of 30^ . Never leave a scraper with a razor blade within reach of children.
A few hints :
Frequent cleaning leaves a protective layer which is essential for preventing scratches and wear.
Make sure that the surface is clean before using the hob again.
To remove marks left by water, use a few drops of white vinegar or lemon juice. Then wipe with absorbent paper and a few drops of specialist cleaning fluid.
The glass ceramic surface will withstand scraping from flat-bottomed cooking vessels, however, it is always better to lift them when moving.
CLEANING
• OVEN LIGHTING
The bulb and its cover are made of material resistant to high temperatures: 230 V\~ - E 14 base - 15 W - Temperature 300°C mini. Replacing the bulb : disconnect the power supply from the oven before attempting to replace the lamp. Wait for the oven to cool down before doing any operation.
To change a defective bulb, just unscrew the glass cover, unscrew the bulb, replace it with the same type, after replacing the defective bulb, screw back the protective glass cover.
• THE ACCESSORIES
The oven shelf - the pastry tray : do not clean the oven shelf with harsh abrasives, scouring pads or sharp objects. Simply use a cloth wrung out in hot soapy water. Rinse with clean water and then dry.
The drip tray : after grilling, remove the drip tray from the oven and pour the grease into a container. Wash and rinse the drip tray in very hot water, using a sponge and washing powder. If still stained withs sticky food, immerse in soapy water. The drip tray can be clean in the dishwasher. Never put the drip tray back in the oven if still dirty.
• THE OVEN DOOR GLASS
It is recommended to wipe the oven door glass with absorbent paper after each cooking cycle. If there is heavy staining, the glass can be cleaned with a sponge cleaning agent.
• OVEN DOOR :
it is possible to clean the oven door while in position or after removal.
To remove the door, carry out the following :
. open the door fully,
. release the hooks,
. pull the door upwards, closing it partially, until it is free.
To refit it, make sure you reposition the hinges carefully; a notch located below them lets you fit he hinges correctly.
After the door is put back on its supports, fit the hinges in their initial position.
- GAS BURNERS: The burners can be cleaned with soapy water. To restore their original shine, use a household stainless steel cleaner. After cleaning, dry the burners and replace.
It is important the burners are replaced correctly.
Chromed grids and burners
Chromed grids and burners have a tendency to discolour with use.
This does not jeopardize the functionality of the hob
- Caution: Be careful not to let any water get into the burners.
Our After Sales Service Centre can provide spare parts if required.
- LID : once the Trio has cooled down, simply clean with soapy water and dry with a clean cloth. Before lifting the lid, make sure that anything that might spill over has been removed.
• WASTE MANAGEMENT AND ENVIRONMENTAL PROTECTION
This appliance is labelled in accordance with European Directive 2012/19/EU regarding electric and electronic appliances (WEEE). The WEEE contain both polluting substances (that can have a negative effect on the environment) and base elements (that can be reused). It is important that the WEEE undergo specific treatments to correctly remove and dispose of the pollutants and recover all the materials. Individuals can play an important role in ensuring that the WEEE do not become an environmental problem; it is essential to follow a few basic rules:
- TheWEEE should not be treated as domestic waste;
- The WEEE should be taken to dedicated collection areas managed by the town council or a registered company.
In many countries, domestic collections may be available for large WEEEs. When you buy a new appliance, the old one can be returned to the vendor who must accept it free of charge as a one-off, as long as the appliance is of an equivalent type and has the same functions as the purchased appliance.
SAVINGANDRESPECTING THEENVIRONMENT
Where possible use lid to cover the pan. Regulate the flame to not overlap the diameter of the pan.
REMEMBER! the oven and the dishwasher cannot be used in the same time.
Should the dishwasher fail to operate, before contacting the Service Centre, make the following checks:
| FAULT | CAUSE REMEDY | |
| 1 - Machine completely dead | Plug is not connected correctly | Connect electric plug |
| O/I button has not been pressed | Press button | |
| No electricity | Check the electricity supply | |
| Door is open | Close door | |
| 2 - Machine does not drawwater | See causes for No 1 | Check |
| Water tap is turned off | Turn water tap on | |
| Programme selector is not at correct position | Turn programme selector to correct position | |
| The inlet hose is bent | Eliminate the bends in the hose | |
| The inlet hose filter is blocked | Clean the filter at the end of the hose | |
| 3 - Machine does not discharge water | Filter is dirty | Clean filter |
| Outlet hose is kinked | Straighten outlet hose | |
| The outlet hose extension is not correctly connected | Follow the instructions forconnecting the outlet hose carefully | |
| The outlet connection on the wall is pointing downwards not upwards | Call a qualified technician | |
| 4 - Machine discharges water continuously | Position of outlet hose is too low | Lift outlet hose to at least 40 cm above floor level |
| 5 - Spray arm is not heard to rotate | Excessive amount of detergent | Reduce amount of detergent |
| Item prevents arm from rotating | Check | |
| Plate and cup filter very dirty | Clean plate and cup filter | |
| 6 - On electronic appliance without a display: "Eco" indicator light and indicator light "No 1", with audible signal | Water inlet tap turned off | Switch off the appliance - Turn on the tap - Re-set the cycle |
| 7 - Load of dishes is only partially washed | See causes for No 5 | Check |
| Bottom of saucepans have not been washed well | Burnt on food remains must be soaked before putting pans indishwasher | |
| Edge of saucepans have not been washed well | Reposition saucepans | |
| Spray arm is blocked | Remove spray arm by unscrewing ring nut clockwise and wash under running water | |
| The dishes have not been properly loaded | Do not place the dishes too closely together | |
| The end of the outlet hose is in thewater | The end of the outlet hose must not come into contact with the outflow water | |
| The incorrect amount of detergent has been measured out; the detergent is old and hard | Increase the measure according to how dirty the dishes are and change detergent | |
| The tap of the salt dispenser is not closed very well | Tighten it fully. | |
| The wash programme is not thorough enough | Choose a more vigorous programme | |
| 8 - Presence of white spots on dishes | Water is too hard | Check salt and rinse aid level and regulate amount. Should the fault persist, contact Service Centre |
| 9 - Noise during wash | The dishes knock against one another | Load dishes better onto the basket |
| The revolving arm knock against the dishes | Load dishes better | |
| 10 - The dishes are not completely dry | Inadequate air flow | Leave the dishwasher door ajar at the end of wash program to allow dishes to dry naturally |
BEZPEČNOSTNÍ POKYNY
- Během pečení může dojít ke kondenzaci vlhkosti uvnitř vnitřního prostoru nebo na skle dvířek trouby. Jedná se o normální stav. Aby se tento jev omezil, po zapnutí trouby počkejte 10–15 minut, než do ní vložíte pokrm. V každém případě kondenzace zmizí, až trouba dosáhne teploty pečení.
- Zeleninu nepřipravujte v otevřeném pekáči, ale v nádobě s víkem.
- Po upečení nenechávejte pokrm uvnitř trouby déle než 15–20 minut.
- Děti mladší osmi let se nesmí přibližovat ke spotřebiči, pokud nejsou pod nepřetržitým dohledem.
- Tento spotřebič mohou používat děti starší osmi let a osoby s omezenými fyzickými, smyslovými nebo duševními schopnostmi nebo osoby nezkušené a neznalé za předpokladu, že mají zajištěný dohled nebo byly poučeny o bezpečném používání spotřebiče a chápou související rizika.
- Tento spotřebič není určen k používání osobami (včetně dětí) s omezenými fyzickými, smyslovými nebo duševními schopnostmi nebo osobami nezkušenými a neznalými, pokud nejsou pod dohledem nebo nebyly poučeny o používání spotřebiče osobou odpovědnou za jejich bezpečnost.
- Děti si nesmějí hrát se spotřebičem.
- Tento spotřebič je určen k použití v domácnostech a podobných oblastech, například:
- v kuchyňkách pro personál v obchodech, kancelářích a na dalších pracovištích;
- na chalupách;
- zákazníky v hotelech, motelech a dalších obytných objektech;
- v ubytovacích zařízeních typu penzionu se snídání.
Používání tohoto spotřebiče jinde než domácnostech nebo k jiným účelům, než je vedení domácnosti, například komerční používání odborníky nebo školenými uživateli, je vyloučeno, a to i ve výše uvedených oblastech.
Pokud se spotřebič používá způsobem, který se s tím neslučuje, může dojít ke zkrácení jeho životnosti a zneplatnění záruky poskytované výrobcem.
Výrobce nebude akceptovat žádné poškození spotřebiče nebo jiné škody či ztráty vzniklé v důsledku použití neslučitelného s použitím v domácnosti (i když se spotřebič nachází v prostředí domácnosti) v rozsahu, v jakém to povolují právní předpisy.
- Dvířka se nesmí nechávat v otevřené poloze, protože by mohla představovat potenciální nebezpečí (např. zakopnutí).
• VAROVÁNÍ!
Nože a další náčiní s ostrými hroty se musí vkládat do koše tak, aby byly hroty obrácené dolů, nebo ve vodorovné poloze.
- Když je spotřebič umístěn na podlaze pokryté kobercem, je nutné zajistit, aby nic nezakrývalo spodní větrací otvory.
Zajistěte, aby po instalaci zůstala přístupná zástrčka na spotřebiči.
- Spotřebič se musí připojit k přívodu vody pomocí nových hadicových sad.
- Nesmí se znovu použít staré hadicové sady.
- Tlak vody musí být mezi 0,08 MPa a 0,8 MPa. Pokud je tlak nižší než minimální hodnota, požádejte o radu servisní oddělení.
- Před připojením spotřebiče k síťovému napájení je důležité se ujistit:
-
že síťová zásuvka je náležitě uzemněná;
-
že přívod elektřiny je schopen splnit požadavky na spotřebu uvedené na typovém štítku spotřebiče.
• K provozování spotřebiče při jmenovitých frekvencích nejsou nutné žádné další úkony ani nastavování.
• VAROVÁNÍ!
Ujistěte se, že výrobek je náležitě uzemněný.
V případě nedostatečného uzemnění zjistíte, že když se dotknete kovových součástí spotřebiče, ucítíte jemné proudění elektrického proudu způsobené nainstalovaným vysokofrekvenčním odrušovacím filtrem.
- Výrobce odmítá veškerou odpovědnost za jakoukoli újmu vzniklou v důsledku neuzemnění spotřebiče.
- Zajistěte, aby myčka nestlačovala napájecí kabely.
- Nevytahujte zástrčku ze síťové zásuvky taháním za síťový kabel nebo samotný spotřebič.
- Všeobecně se nedoporučuje používat adaptéry, rozdvojky, ani prodlužovací kabely.
- Nikdy se nedotýkejte spotřebiče, když máte vlhké nebo mokré ruce nebo nohy.
- Neobsluhujte spotřebič s bosýma nohama.
- Nevystavujte spotřebič povětrnostním vlivům (dešti, slunečnímu světlu atd.).
- Neopírejte se o otevřená dvířka, ani si na ně nesedejte, jinak by se mohla myčka převrátit.
BEZPEČNOSTNÍ POKYNY
- Pokud se spotřebič porouchá nebo přestane správně fungovat, vypněte ho, vypněte přívod vody a neprovádějte žádné neodborné zásahy. Opravy by měl provádět pouze oprávněný servisní zástupce a měly by se instalovat pouze originální náhradní díly. Nedodržený výše uvedeného doporučení by mohlo mít vážné následky pro bezpečnost spotřebiče.
• Voda, která po skončení mycího programu zůstane ve spotřebiči nebo na talířích, se nesmí polykat. - Myčka je určena pro běžné kuchyňské nádobí.
Nesmí se v ní mýt předměty znečištěné benzínem, nátěry, částečkami oceli nebo železa, korozivními chemikáliemi, kyselinami nebo zásadami.
- VAROVÁNÍ: Spotřebič a jeho přístupné součásti jsou během používání horké. Je třeba dávat pozor, abyste se nedotkli topných těles.
- Děti nesmějí provádět čištění a uživatelskou údržbu bez dozoru.
- VAROVÁNÍ: Příprava pokrmů s tukem nebo olejem na varné desce bez dozoru může být nebezpečná a vést ke vzniku požáru.
- NIKDY se nepokoušejte hasit požár vodou, ale vypněte spotřebič a potom zakryjte plamen, např. pokličkou nebo hasicí rouškou.
• VAROVÁNÍ: Nebezpečí požáru: neskladujte předměty na varném povrchu.
• VAROVÁNÍ: Pokud je povrch prasklý, vypněte spotřebič, aby nedošlo k případnému úrazu elektrickým proudem.
- Během používání je spotřebič horký. Je třeba dávat pozor, abyste se nedotkli topných těles uvnitř trouby.
- VAROVÁNÍ: Přístupné součásti mohou být během používání horké. Je nutné zabránit přístupu malých dětí ke spotřebiči.
- K čištění skla ve dvířkách trouby, skleněného víka varné desky nebo skleněného povrchu varné desky nepoužívejte drsné čisticí prostředky s brusným účinkem ani ostré kovové škrabky, protože by mohly poškrábat povrch, což by mohlo vést k roztříštění skla.
- Před prováděním jakékoli práce na spotřebiči nebo údržby odpojte spotřebič od síťového napájení.
- Před odstraněním zábrany trouby je nutné vypnout troubu a po vyčištění se musí zábrana podle pokynů vrátit zpět na místo.
- Používejte pouze takovou teplotní sondu, která je doporučena pro tuto troubu.
• VAROVÁNÍ: Nikdy neodstraňujte těsnění dvířek trouby.
- Používejte troubu pouze ke stanovenému účelu, kterým je pečení pokrmů; jakékoli jiné použití, například jako zdroj tepla, je považováno za nevhodné a proto nebezpečné. Výrobce nemůže nést odpovědnost za případné škody vzniklé nesprávným či nevhodným používáním.
- Když dovnitř vkládáte rošt, ujistěte se, že zarážka je obrácena nahoru a nachází se v zadní části vnitřního prostoru. Rošt musí být úplně zasunutý do vnitřního prostoru.
- Při zasunování roštů dávejte pozor, aby byla hrana s ochranou proti posunu umístěna vzadu a nahoře.
- K čištění nepoužívejte parní čistič ani vysokotlaký postřik.
- Před otevřením by se měly z víka odstranit veškeré rozlité tekutiny.
- Před zavřením víka je nutné nechat povrch varné desky vychladnout.
- POZOR: Skleněná víka se mohou po ohřátí roztríštit. Před zavřením víka vypněte všechny hořáky.
- Pokud má varná deska prvky s halogenovými žárovkami, nedívejte se přímo na ně.
- Používejte pouze takové zábrany na varné desky, které výrobce spotřebiče sám navrhl nebo označil v návodu k použití jako vhodné, případně zábrany začleněné do spotřebiče. Používání nevhodných zábran může vést k nehodám.
- Nepokládejte na varnou desku kovové předměty, například nože, vidličky nebo pokličky. Mohly by se ohřát.
- Za provozu nebo určitou dobu po použití se nedotýkejte varných zón.
- Nepokládejte žádné předměty na ovládací panel.
• VAROVÁNÍ: Před výměnou žárovky se ujistěte, že spotřebič je odpojený, aby se předešlo úrazu elektrickým proudem.
- Pokud je spotřebič umístěn na podstavci, je nutné přijmout taková opatření, která zabrání sklouznutí spotřebiče z podstavce.
- Spotřebič se nesmí instalovat za dekorační dvířka, aby se zamezilo přehřívání.
- Připojení ke zdroji energie musí provést odborník s vhodnou kvalifikací. Výrobek musí být zapojen za vícepólovým jističem se vzdáleností kontaktů vyhovující požadavkům na kategorii přepětí III, který se nachází mezi spotřebičem a zdrojem energie, aby byla instalace v souladu s platnými bezpečnostními
BEZPEČNOSTNÍ POKYNY
předpisy. Vícepólový jistič musí být dimenzován na maximální připojené zatížení a musí být v souladu s platnými právními předpisy. Žlutozelený zemnicí kabel by neměl být přerušen jističem. Vícepólový jistič používaný k připojení by měl být snadno přístupný při instalaci spotřebiče. Připojení ke zdroji energie musí provést odborník s vhodnou kvalifikací. Je nutné dodržet polaritu trouby a síťového napájení. K odpojování se musí používat vypínač začleněný do pevné kabeláže v souladu s elektroinstalačními předpisy.
- Pokud je napájecí kabel poškozený, měl by být nahrazen kabelem nebo speciálním svazkem dostupným od výrobce nebo servisního oddělení. Tento úkon by měl provést odborník s vhodnou kvalifikací. Napájecí kabel musí být typu H05V2V2-F. Zemnicí vodič (žlutozelený) musí být přibližně o 10 mm delší než ostatní vodiče. V případě jakýchkoli oprav kontaktujte pouze oddělení péče o zákazníky a požadujte použití originálních náhradních dílů. Nedodržení výše uvedených pokynů může narušit bezpečnost spotřebiče a způsobit ztrátu záruky.
- Pokud se poškodí napájecí kabel, výměnu musí provést výrobce, jeho servisní zástupce nebo osoba s podobnou kvalifikací, aby se vyloučilo riziko.
- POZOR: Aby se vyloučilo riziko vzniklé v důsledku neúmyslného resetování jističe s tepelnou ochranou, tento spotřebič nesmí být napájen přes externí vypínací zařízení, například přes časovač, ani nesmí být připojen k okruhu, který je pravidelně zapínán a vypínán dodavatelem elektrické energie.
- Je nutné použít nové hadicové sady dodané se spotřebičem a vyhodit staré hadicové sady.
- Tento spotřebič se musí nainstalovat podle platných předpisů a používat pouze v dobře větraném prostoru. Před instalací nebo používáním tohoto spotřebiče si přečtěte pokyny.
- Tyto pokyny jsou platné pouze v případě, že na spotřebiči je umístěn symbol příslušné země. Pokud takový symbol na spotřebiči není, je nutné se řídit technickým návodem, v němž budou uvedeny potřebné pokyny týkající se úpravy spotřebiče podle podmínek používání v příslušné zemi.
- Před instalaci ověřte kompatibilitu podmínek místního rozvodu (typ a tlak plynu) s nastavením spotřebiče.
- Podmínky nastavení pro tento spotřebič jsou uvedeny na štítku s údaji (nebo na typovém štítku).
- Tento spotřebič není připojen k zařízení na odvod produktů spalování. Musí být nainstalován a připojen v souladu s platnými instalačními předpisy. Je třeba věnovat zvláštní pozornost příslušným požadavkům týkajícím se větrání.
- Při používání plynového spotřebiče na vaření dochází ke vzniku tepla a vlhkosti v místnosti, v níž je nainstalován. Zajistěte dobré větrání kuchyně; nechte otevřené otvory pro přirozené větrání, nebo nainstalujte mechanické ventilační zařízení (mechanický odsavač par). Dlouhodobé intenzivní používání spotřebiče může vyžadovat další větrání, například otevření okna, nebo účinnější větrání, například zvýšení výkonu mechanické ventilace, jestliže je nainstalována.
- POZOR: Pokud se používá gril, přístupné součásti mohou být horké. Je nutné zabránit přístupu malých dětí ke spotřebiči. K dispozici jsou doplňkové ochranné prostředky zamezující kontaktu s dvířky trouby. Tato součást by se měla nainstalovat v případě, že nelze vyloučit přítomnost dětí.
- S ohledem na správné používání trouby se doporučuje zamezit přímému kontaktu pokrmů s rošty a plechy a používat pečicí papír a/nebo speciální nádoby.
- Nikdy nepřipravujte pokrm přímo na sklokeramicé varné desce. Vždy používejte vhodné nádobí.
- Vždy pokládejte hrnec doprostřed jednotky, na které vaříte.
- Nepoužívejte povrch jako krájecí prkénko.
- Neposunujte nádobí po varné desce.
- Nad varnou deskou neskladujte těžké předměty. Kdyby spadly na varnou desku, mohly by způsobit poškození.
- Nepoužívejte varnou desku jako pracovní plochu.
- Do varných zón se nesmí pokládat nádobí z hliníkové fólie a plastu.
- Důrazně se doporučuje zamezit přístupu dětí k varným zónám, jestliže se používají nebo jsou vypnuté, ale stále svítí kontrolka zbytkového tepla, aby se předešlo riziku vážných popálenin.
- Pozor, možnost převrácení
- Je nutné použít zábrany proti převrácení. Řid'te se pokyny dodanými s držáky, které jsou součástí výrobku.
VYBALENÍ SPOTŘEBIČE
Uvnitř spotřebiče najdete brožuru a v případě plynového modelu také sáček obsahující:
- nové trysky pro úpravu plynu, pokud je nutné změnit typ plynu: G30 28–30 mbar pro butan nebo G31–37 mbar pro propan;
- koncovku pro zemní plyn a butan nebo propan s těsněním pro propojení gumovou hadicí.
DOPORUČENÍ
POZORNĚ SI PŘEČTĚTE POKYNY, ABYSTE MOHLI VYUŽÍVAT VŠECH MOŽNOSTÍ SPOTŘEBIČE.
Doporučujeme, abyste si uschovali návod k instalaci pro pozdější použití a před instalaci spotřebiče si poznamenali jeho níže uvedené sériové číslo pro případ, že budete potřebovat pomoc od poprodejního servisu.
. Identifikační štítek se nachází na zadní straně spotřebiče Trio.
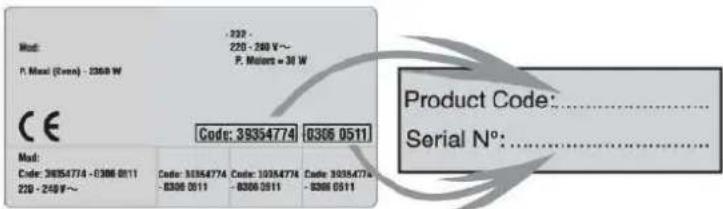
SPOLEČNOST NEPONESE ODPOVĚDNOST, POKUD NEBUDOU DODRŽENY POKYNY UVEDENÉ V TOMTO DOKUMENTU.
DŮLEŽITÁ UPOZORNĚNÍ
- Instalaci přívodu plynu a elektrické zapojení spotřebiče byste měli svěřit pověřenému instalačnímu technikovi nebo technikovi s podobnou kvalifikací.
- Spotřebič Trio je tvořen třemi prvky: varnou deskou, troubou a myčkou. Z bezpečnostních důvodů se za žádných okolností nesmí provádět jakékoli úpravy tohoto spotřebiče.
- Tento spotřebič je určen pouze k používání v domácnosti.
- Pokud se na spotřebiči Trio objeví sebemenší závada, nezapojujte ho. Odpojte ho od napájení a ihned se obrat'te na pověřeného servisního zástupce.
- Pokud je povrch prasklý, vypněte spotřebič, aby se předešlo úrazu elektrickým proudem.
- Neopírejte se o dvířka a nedovolte to ani dětem.
• Po každém použití doporučujeme spotřebič Trio trochu vyčistit. Tím se předejte hromadění nečistot nebo tuku, který se při přípravě dalších pokrmů připaluje, čímž vzniká nepříjemný zápach a kouř.
- Ve spotřebiči Trio neskladujte hořlavé látky, protože v případě neúmyslného zapnutí mohou vzplanout.
- Jestliže jsou ve varné desce halogenové žárovky, během používání se nedívejte přímo na ně.
- K vkládání pokrmů do trouby a jejich vyjímání používejte kuchyňské rukavice.
- Nevykládejte stěny trouby hliníkovou nebo jednorázovou
ochrannou fólii dostupnou ve specializovaných prodejnách. U hliníkové fólie nebo jakékoli jiné ochrany hrozí při přímém kontaktu s horkým smaltem riziko tavení smaltu nebo poškození vnitřku.
- Při přípravě pokrmů s použitím tuku nebo oleje vždy sledujte průběh, protože ohřátý tuk a olej může rychle vzplanout.
• Víko varné desky (pro plynový model):
- Během používání sporáku nechte víko ve vzpřímené poloze.
- Před otevřením odstraňte z víka všechny předměty, aby se nic nerozlilo.
- Před zavřením víka nechte vychladnout všechny horké části sporáku.
- Nepokládejte na víko těžké nebo kovové předměty.
- Chcete-li se zbavit staré myčky, je nutné odstranit dvířka, aby se vyloučilo riziko, že uvnitř uvíznou děti.
- Myčka je vyrobena z recyklovatelných materiálů, proto ji lze zlikvidovat způsobem šetrným k životnímu prostředí.
- Zajistěte, aby myčka nestlačovala napájecí kabely.
- Nedoporučuje se používat adapté, rozdvojky, ani prodlužovací kabely.
- Jakékoli dotazy týkající se napájecího kabelu je třeba adresovat poprodejnímu servisu nebo kvalifikovanému technikovi.
- Když je spotřebič umístěn na podlaze pokryté kobercem, je nutné zajistit, aby nic nezakrývalo spodní větrací otvory.
Nedodržený výše uvedeného doporučení by mohlo mít vážné následky pro bezpečnost spotřebiče.
V zájmu zlepšování kvality výrobků může společnost CANDY provádět úpravy související s technickým vylepšením.
Tento spotřebič v místech přicházejících do kontaktu s potravinami splňuje požadavky stanovené ve směrnici EHS 89/109.
Spotřebič vyhovuje evropské směrnici 2009/142/ES (o spotřebičích plynných paliv) a od 21.04.2018 nařízení 2016/426 (o spotřebičích plynných paliv).
Umístěním symbolu CE na tento výrobek potvrzujeme shodu se všemi příslušnými evropskými směrnicemi týkajícími se bezpečnosti, ochrany zdraví a ochrany životního prostředí, které lze použít pro tento výrobek.
TECHNICKÉ ÚDAJE
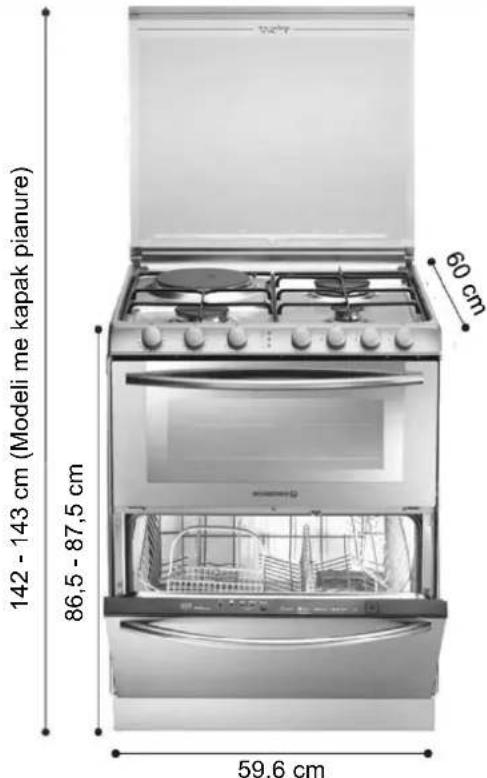
| TRIO | |||
| TYP/označení | TRI 5S | TRI 5 | |
| 4x plyn | 3x plyn + 1x el. | 4x el. | |
| Umístění | |||
| Přední levá | Rychlý hořák | Rychlý hořák | Hilight ∅ 180 |
| Zadní levá | Polorychlý hořák | . E. P. ∅180 | Hilight ∅ 220 |
| Zadní pravá | Ultrarychlý hořák | Utrarychlý hořák | Hilight ∅ 140 |
| Přední pravá | Pomocný hořák | Pomocný hořák | Hilight ∅ 140 |
| Ochrana proti zhasnutí | Ano | - | |
| Zapalování | Ano | - | |
| Třída instalace | 2, podtřída 1, zakončení 1 | - | |
| Instalovaný typ plynu/výkon | |||
| Plynový výkon kW | 8,75 | 7 | - |
| G20 20 mbar (zemní plyn) l/h | 833 | 666 | - |
| V balení je k dispozici alternativní injektorová sada pro LPG | |||
| Plynový výkon kW | 8,75 | 7 | - |
| G30/G31 28–30/37 mbar g/h | 636 | 509 | - |
| Myčka | |||
| Sady nádobí dle EN 50242 | 6 | 6 | 6 |
| Spotřeba vody | 8 | 8 | 8 |
| Tlak vody min. 0,08–max. 0,08 MPa | |||
| Jmenovitý příkon | |||
| Napětí (V) – frekvence (Hz) | 220–240 V – 50 Hz | ||
| Elektrický výkon | 2100 | 3600 | 8700 |
Hadice musí být nainstalována tak, aby neprocházela žádným prostorem, v němž by se mohla stlačit/zalomit nebo jakkoli poškodit.
INSTALACE
VAROVÁNÍ:
Instalace domácího spotřebiče může představovat složitý úkon, který může vážně ohrozit bezpečnost spotřebitele, pokud nebude proveden správně. Proto by měla být tato práce provedena osobou s odbornou kvalifikací, která ji provede v souladu s platnými technickými předpisy.
Pokud bude toto doporučení ignorováno a instalaci provede nekvalifikovaná osoba, výrobce odmítá veškerou odpovědnost v případě jakékoli technické závady výrobku bez ohledu na to, zda bude mít za následek materiální škodu nebo zdravotní újmu. V případě instalace na podstavec je nutné přijmout taková opatření, která zabrání sklouznutí spotřebiče z podstavce.
PLYNOVÝ MODEL
1.1 VHODNÉ MÍSTO
- Tento spotřebič se musí nainstalovat podle platných předpisů a používat pouze v dobře větraném prostoru. Před instalací nebo používáním tohoto spotřebiče si přečtěte pokyny.
- Každý plynový spotřebič na vaření vytváří teplo a vlhkost v místě, kde je nainstalován. Z tohoto důvodu byste měli zajistit dobrou ventilaci bud tak, že necháte všechny přirozené průchody vzduchu otevřené, neb nainstalujete odsavač par s odsávacím kanálem. Intenzívní a dlouhodobé používání spotřebiče může vyžadovat další větrání, například otevření okna nebo zvýšení otáček elektrického ventilátoru, pokud nějaký máte.
- Pokud nelze nainstalovat odsavač, měl by se do vnější stěny nebo okna umístit ventilátor, který zajistí dostatečné větrání. Elektrický ventilátor by měl schopen zajistit úplnou výměnu vzduchu v kuchyni 3–5krát za hodinu. Instalační technik by měl dodržovat příslušné vnitrostátní normy.
- Pred instalací spotřebiče musí technik:
- Zkontrolovat kompatibilitu mezi spotřebičem Trio a plynovým rozvodem. Na typovém štítku varné desky je uveden typ plynu, s nímž se má spotřebič používat. Připojení k hlavnímu přívodu plynu nebo plynové láhvi se musí provést teprve po ověření, že má regulaci pro typ plynu, s nímž se má spotřebič používat. Pokud není správně regulován, viz pokyny pro změnu nastavení plynu v následujících odstavcích.
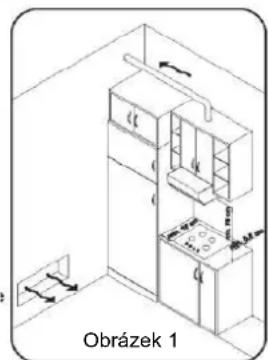
natural_image
Isometric line drawing of a kitchen interior with cabinets and appliances, labeled 'Obrázek 1' (no text or symbols on the diagram itself)Spotřebič Trio je z výroby nastaven na používání s typem plynu uvedeným na obalu a znovu na typovém štítku připevněném ke spotřebiči. Zemní plyn G 20–20 mbar / G 25–25 mbar: hlavní přívod plynu
- V případě potřeby změňte typ plynu.
Sporák je vybaven vhodnými tryskami pro přizpůsobení plynových hořáků, které zajišťují jmenovitý průtok (jak je vysvětleno v odstavci o změně typu plynu).
- Při instalaci musí technik zajistit následující:
Veškerá práce se musí provádět s odpojeným přívodem elektriny.
Spotřebič Trio patří do třídy 2 a podtřídy 1; nábytek sousedící se spotřebičem nesmí převyšovat horní stranu spotřebiče.
- Pokud se spotřebič Trio instaluje vedle skřině na jedné straně, vzdálenost mezi ním a skříní musí být alespoň 15 cm (viz obrázek 1), zatímco vzdálenost mezi spotřebičem Trio a zadní stěnou musí být alespoň 5,5 cm. Vzdálenost mezi spotřebičem Trio a jakoukoli jinou jednotkou nebo spotřebičem nad ním (např. odsavačem par) nesmí být menší než 70 cm (obrázek 1).
- Sporák má nastavitelné nohy pro ideální vyrovnání na podlaze.
- Připojení plynu k systému musí odpovídat danému typu plynu.
- Připojení sporáku k elektrickému napájení musí být v souladu s informacemi uvedenými v odstavci o elektrickém zapojení.
- Pokud byl změněn typ plynu, nastavte minimální průtok každého plynového hořáku (jak je vysvětleno v odstavci o změně typu plynu).
- Připojte spotřebič Trio k přívodu a odtoku vody (viz odstavec o připojení vody).
JAKÁKOLI PROVEDENÁ ÚPRAVA NASTAVENÍ PLYNU BY MĚLA BÝT UVEDENA NA TYPOVÉM ŠTÍTKU PŘIPEVNĚNÉM KE SPORÁKU.
• PŘIPOJENÍ PLYNU
Připojení se musí provést podle předpisů platných v zemi instalace (pouze pro Velkou Británii: podle zákona musí instalaci plynového zařízení a uvádění do provozu provádět instalační technik uvedený v registru „Gas Safe“). Ve všem případech je nutné vybavit přívodní plynovou trubku uzavíracím ventilem, regulátorem nebo zařízením na regulaci propanu. Používejte pouze ventily, koncovky regulátorů, hadice a regulátory s oficiálním označením země instalace.
Připojení plynu podle plynového rozvodu:
Zemní plyn s pevným vedením, ohebná hadice s mechanickými tvarovkami (1) – měkká gumová hadice (2)
Butan s pevným vedením, ohebná hadice s mechanickými tvarovkami (1) – měkká gumová hadice (2)
Propan s pevným vedením, ohebná hadice s mechanickými tvarovkami (1) – měkká gumová hadice (2)
1 - za předpokladu, že ohebnou hadici lze kontrolovat po celé délce.
2 - za předpokladu, že měkkou hadici lze kontrolovat po celé délce, její délka nepřekračuje 1,5 metru a na obou koncích je vybavena vhodnými svorkami.
1, 2 – měkká a ohebná hadice s mechanickými tvarovkami musí být vedeny mimo jakékoli plameny a nesmí je poškodit spaliny, horké části sporáku ani jakékoli rozlité horké pokrmy.
Hadice musí být nainstalována tak, aby neprocházela žádným prostorem, v němž by se mohla stlačit/zalomit nebo jakkoli poškodit.
INSTALACE
• TŘI MOŽNOSTI PŘIPOJENÍ
• PŘIPOJENÍ POMOCÍ PEVNÉ TRUBKY
Připojte přímo k tvarovkám na rozvodném potrubí.
- PŘIPOJENÍ POMOCÍ OHEBNÉ HADICE S MECHANICKÝMI TVAROVKAMI
Doporučujeme tento typ připojení.
Přišroubujte matice hadice na jedné straně přímo k tvarovce na rozvodném potrubí a na druhé straně k uzavíracímu ventilu na trubce.
- PŘIPOJENÍ POMOCÍ MĚKKÉ HADICE
Tento typ připojení nedoporučujeme.
Tato možnost je určena výhradně pro staré rozvody, které neumožňují žádný jiný způsob připojení.
Našroubujte vyhovující koncovku (2).
Nasad'te měkkou hadici na jednom
konci na koncovku a na druhém
konci na regulátor nebo výstup
ventilu.
(2) Ve všech případech se ujistěte, že je nainstalováno těsnění. Po připojení vyzkoušejte těsnost pomocí mýdlové vody; testování plamenem je přísně zakázáno.
Varování: Pokud je v blízkosti tohoto spotřebiče cítit plyn, vypněte přívod plynu do spotřebiče rovnou zavolejte technika. Nehledejte místo úniku otevřeným plamenem.
ZMĚNA TYPU PLYNU:
VAROVÁNÍ:
Tuto práci smí provádět pouze osoba s odbornou kvalifikací, která ji provede v souladu s platnými technickými předpisy a podle pokynů.
Výhřevnost a tlak se liší podle typu plynu.
Při změně plynu musí technik postupně:
1-Odpojit spotřebič od síťového napájení.
2-Provést „PŘIPOJENÍ PLYNU“ k systému podle výše popsaného postupu.
3-Zavřít plynový ventil před spotřebičem.
4-VYMĚNÍT TRYSKY
5-NASTAVIT MINIMÁLNÍ PLAMEN.
VÝMĚNA TRYSEK:
Chcete-li přizpůsobit varnou desku jinému typu plynu, proved'te následující kroky:
- Odstraňte rošty a hořáky.
- Nasad'te šestihranný klíč (7 mm) na držák hořáku (obrázek 2).
- Odšroubujte injektor a nahrad'te ho jiným, vhodným pro plyn, který se má používat (viz tabulka typů plynu).
TRYSKA
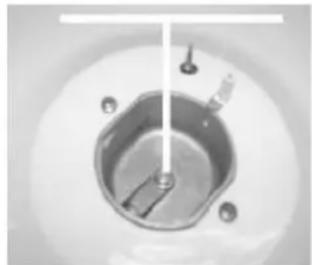
natural_image
Top-down view of a circular mechanical component with a central shaft and mounting holes (no text or symbols visible)Obrázek 2
NASTAVENÍ MINIMÁLNÍHO PLAMENE
Technik musí nastavit minimální plamen podle následujících pokynů:
-Odstraňte otočné regulátory.
PŘÍPAD 1: Regulační šroub je viditelný uvnitř dříku ventilu (viz obrázek 3A)
Po zapálení hořáků otočte otočný regulátor na minimální nastavení a potom ho odstraňte (lze jej snadno odstranit mírným tlakem).
Regulační šroub lze nastavovat malým „seřizovacím“ šroubovákem, jak je znázorněno na obrázku 3A.
Otáčením šroubu doprava se průtok plynu snižuje, zatímco otáčením doleva se zvyšuje.
Tímto způsobem nastavte plamen na délku přibližně 3 až 4 mm a potom vraťte otočný regulátor.
Jestliže je přiváděný plyn typu LPG, šroub pro nastavování klidového plamene se musí otočit (doprava) až na doraz.
Vrat'te otočné regulátory.
PŘÍPAD 2: Regulační šroub není vidět (viz obrázek 3B)
-Odstraňte rošty, hořáky a víko.
-Odstraňte horní desku.
-Regulační šroub lze nastavovat malým šroubovákem, jak je znázorněno na obrázku 3C.
Otáčením šroubu doprava se průtok plynu snižuje, zatímco otáčením doleva se zvyšuje.
-Jestliže je přiváděný plyn typu LPG, šroub pro nastavování klidového plamene se musí otočit (doprava) až na doraz..
-Jestliže je priváděný plyn typu NG, šroub pro nastavování klidového plamene se musí otočit doleva o polovinu otáčky préd úplně uzavřenou polohou. (Délka plamene je približně 3 až 4 mm.)
-Vratte horní desku; je nutné správně namontovat každý odmontovaný nebo odpojený kus a dávat pozor, aby se žádná část nepoškodila
(v případě poškození musí technik při výměně použít náhradní díly).
-Vratte hořáky, mřížku, víko a otočné regulátory.

Varování:
Nikdy
nepovolujte
ostatní šrouby!

natural_image
Diagram of a mechanical device with a lever and star symbol, no text or labels presentObrázek 3A

natural_image
Close-up of a camera lens with no visible text or symbolsObrázek 3B
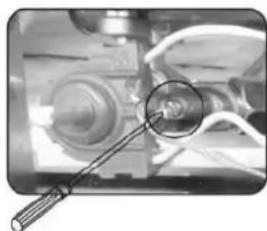
natural_image
Close-up of a mechanical component with a magnified inset showing a circular detail (no visible text or symbols)Obrázek 3C
ELEKTRICKÉ ZAPOJENÍ
„Instalace musí vyhovovat standardním nařizením.“ Výrobce odmítá veškerou odpovědnost za jakékoli škody, které mohou být způsobeny nevhodným nebo nepřiměřeným používáním.
Varování:
- Před jakoukoli manipulací s elektrinou vždy zkontrolujte napájecí napětí na měřicím přístroji, nastavení jističe, neporušenost připojení instalace k uzemnění a pojistku, zda má vhodné parametry.
- Instalace bý se měla připojit k elektrickému napájení prostřednictvím zásuvky s uzemněním nebo vícepólového vypínače.
Pokud má spotřebič síťovou zásuvku, musí být nainstalován tak, aby byla zásuvka přístupná.
Výrobce nemůže nést odpovědnost za žádné nehody vzniklé v důsledku používání spotřebiče, který není připojen k uzemnění nebo má přerušené spojení s uzemněním.
- Jakékoli dotazy týkající se napájecího kabelu je třeba adresovat poprodejnímu servisu nebo kvalifikovanému technikovi.
Varování! Tento spotřebič musí být uzemněný. V případě nedostatečného uzemnění zjistíte, že když se dotknete kovových součástí spotřebiče, ucítíte jemné proudění elektrického proudu způsobené nainstalovaným vysokofrekvenčním odrušovacím filtrem.
• TRIO 9501
Spotřebič Trio se dodává s napájecím kabelem, který umožňuje připojení pouze k sit'ovému napájení s napětím 220–230 V mezi fázemi nebo mezi fází a nulovým vodičem. Zapojte ho do 16A zásuvky.
• TRIO 9503
Tento spotřebič Trio se nedodává s napájecím kabelem, ale je vybaven svorkovnicí, která umožňuje zvolit správné připojení ke konkrétnímu napájení.
Svorkovnice se nachází na zadní straně spotřebiče Trio.
Chcete-li otevřit svorkovnici:
. Najděte dva výstupky po stranách.
. Umístěte břit šroubováku na přední stranu výstupku, zasuňte ho (1) a zatlačte ho dolů (2).
. Zdvihněte a sejměte kryt.
Svorkovnice

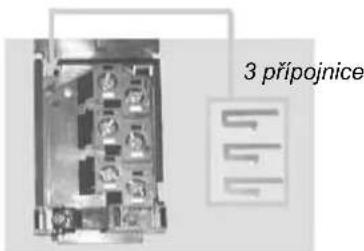
Postup připojení:
. Odšroubujte kabelové oko.
. Protáhněte kabel kabelovým okem.
. Stáhněte izolaci z konců jednotlivých vodičů a zapojte je podle čísel uvedených v tabulce a rovněž na „přípojnicích“.
Příklad připojení k jednofázovému napájení
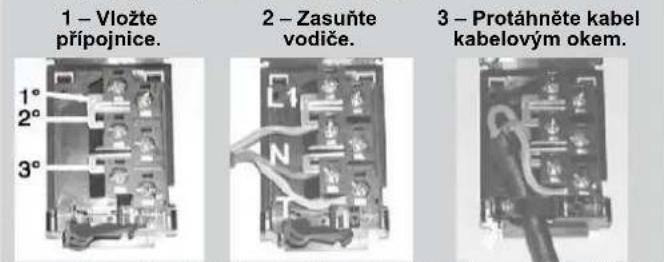
Pozor: Nesprávné utažení může způsobit nebezpečné ohřívání napájecího kabelu.
Až dokončíte připojení ke svorkám spotřebiče, utáhněte kabelovou svorku a zavřete kryt.
| Jednofázové220–230~ | Trojfázové220–230 V, 3~ | Trojfázové380–415 V, 3N~ | |
| TYP A PRŮŘEZKABELU | H05V2V2-F3 G 2,5 mm ^2 | H05V2V2-F4 G 2,5 mm ^2 | H05V2V2-F5 G 1,5 mm ^2 |
| PŘIPOJENÍ KESVORKOVNICI | 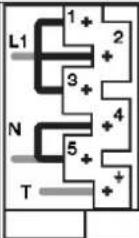 | 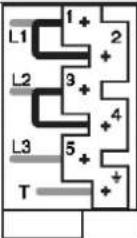 | 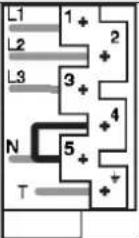 |
| Přípojky:přemostětepřípojnicí | 2 fázePřípojka 1–2Přípojka 2–35 nulovýPřípojka 4–5T zem | 1 fázePřípojka 1–23 fázePřípojka 3–45 fázeT zem | 1 fáze2 fáze3 fáze5 nulovýPřípojka 4–5T zem |
PRIPOJENÍ VODY A ODTOKU
PRIPOJENÍ VODY:
Přívodní a vypouštěcí hadici lze nasměrovat doleva nebo doprava. Myčku lze připojit bud' ke studené, nebo k teplé vodě, pokud nemá vyšší teplotu než 60 °C.
Tlak vody musí být mezi 0,08 MPa a 0,8 MPa. Pokud je tlak nižší než minimální hodnota, požádejte o radu servisní oddělení. Přívodní hadice musí být připojena ke kohoutku, aby bylo možné přerušit přívod vody, když se spotřebič nepoužívá (obr. 1). Přívodní hadice myčky je opatřena přípojkou se závitem 3/4" (obr. 2). Přívodní hadice „A“ by se měla pevně připojit ke 3/4" kohoutku „B“.
Myčka se musí připojít k přívodu vody výhradně pomocí dodané trubky. Nepoužívejte starou trubku.
Pokud se spotřebič připojuje k novým trubkám nebo k trubkám, které se dlouho nepoužívaly, před připojením přívodní hadice jimi nechte několik minut protékat vodu. Pak nedojde k ucpání vstupního vodního filtru usazeninami pisku nebo rzi.
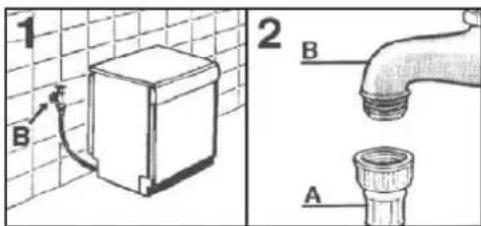
ODTOK VODY:
Dejte pozor, aby se vypouštěcí hadice při připojování ke spotřebiči neohnula nebo nezalomila, jinak by jí nemohla volně protékat voda (obr. 4Y). Vypouštěcí hadice musí být alespoň 40 cm nad podlahou a musí mít vnitřní průměr alespoň 4 cm. Doporučuje se nainstalovat sifon proti zápachu (obr. 4X).
V případě potřeby lze výstupní hadici prodloužit až na 2,6 m za předpokladu,
že je vedena v maximální výšce 85 cm nad podlahou. Za tímto účelem se obrat'te na zákaznický servis.
INSTALACE
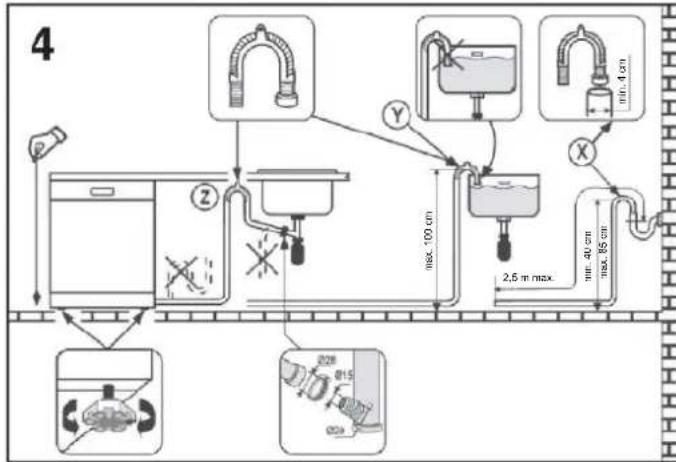
flowchart
graph TD
    A["Water Supply"] --> B["Reactor"]
    B --> C["Drain"]
    C --> D["Storage Tank"]
    D --> E["Outlet"]
    style A fill:#f9f,stroke:#333
    style B fill:#ccf,stroke:#333
    style C fill:#cfc,stroke:#333
    style D fill:#fcc,stroke:#333
    style E fill:#ffc,stroke:#333
Hadici lze zaháknout za stranu umyvadla (nesmí být ponořena ve vodě, aby se předešlo nasátí vody zpět do spotřebiče za provozu). Zkontrolujte, zda nejsou přívodní a výstupní hadice zalomené. Pokud je zapotřebí prodloužit přívodní hadici, obraťte se na zákaznický servis.
PLYNOVÉ HOŘÁKY
Tento spotřebič se musí používat pouze k účelu, k němuž je určen, a tím je vaření v domácnosti. Jakékoli jiné použití bude považováno za nesprávné, a proto by mohlo být nebezpečné. Výrobce neponese odpovědnost za žádné škody nebo ztráty vzniklé v důsledku nesprávného použití. Před použitím se ujistěte, že průsečíky roštu jsou vystředěné na hořáky, jak je znázorněno na obrázku níže.
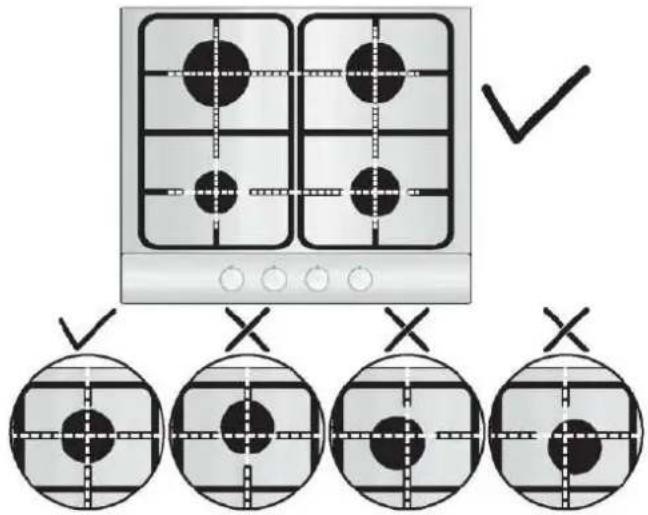
POUŽÍVÁNÍ
Každý hořák se ovládá kohoutem se spojitou regulací, který umožňuje:
- širší výběr nastavení od maximální do minimální, nejpřesnější polohy;
- snadnější regulaci plamene podle průměru hrnce;
- rychlé stažení plamene bez rizika, že se přeruší nebo vypne.
ZAPALOVÁNÍ
DOPORUČENÍ: Když se hořáky nepoužívají, ventil hlavního přívodu plynu by se měl vždy zavřít.
Než zapnete plynovou varnou desku, ujistěte se, že víčka hořáků jsou na správných místech.
- Otevřete plynový kohout.
- Symboly védle jednotlivých otočných regulátorů signalizují, který hořák je zapálen.
- Stiskněte otočný regulátor příslušného hořáku a otočte no na symbol, držte ho stisknutý, dokud se nezapálí plamen.
U modelů vybavených elektronickým zapalováním se plamen zapaluje elektrickou jiskrou. Ta se ovládá tlačítkem nebo stisknutím otočného regulátoru (v případě modelů se zapalováním pod otočným regulátorem).
U modelů, které nejsou vybaveny elektrickým zapalováním nebo v případě výpadku elektrického napájení zapalte plamen zápalkou. Varování: Pokud se hořák po pěti sekundách nezapálí, v každém případě přestaňte používat spotřebič a počejte nejméně jednu minutu, než se opět pokusíte zapálit hořák
POZNÁMKA: U modelů vybavených BEZPEČNOSTNÍM termočlánkem držte otočný regulátor několik sekund stisknutý, aby se aktivoval bezpečnostní systém. Pokud přímo uvolnite otočný regulátor, nebude dost času na aktivaci bezpečnostního systému a plamen zhasne. Dojdeli k tomu, zopakujte postup zapalování od začátku s tim, že po zapálení plamene počkáte déle.
Pokud dojde k neúmyslnému uhašení plamene, rychlé bezpečnostní zařízení s termočlánkem automaticky vypne přívod plynu.
Jestliže stav místního přívodu plynu znesnadňuje zapálení, doporučuje se zopakovat postup zapalování s regulátorem otočeným na „minimum“ (6).
- Nastavte plamen podle svých požadavků na vaření. Na otočném regulátoru jsou k dispozici mezilehlé polohy mezi nastaveními (♂) a (♀).
- Chcete-li vypnout plamen, otočte regulátor do polohy zastavení.
- Pokud hořák náhodou zhasne, otočte regulátor do polohy „0“, počkejte jednu minutu a potom ho zkuste znovu zapálit.
NÁDOBY
Ke správnému používání hořáků je třeba zvolit nádoby odpovídající níže uvedeným rozměrům:
* Velmi rychlý ∅ 18 cm a větší
* Rychlý ∅ od 16 do 26 cm
* Polorychly ∅ 12 cm
* Pomocný ∅ 10 cm
- Nedoporučuje se používat nádoby se zakřiveným, rýhovaným nebo zdeformovaným dnem.
VAROVÁNÍ: Pokud plamen náhodou zhasne, otočte regulátor do vypnuté polohy a alespoň jednu minutu se nepokoušejte znovu zapálit plamen.
Pokud se během let ztíží otáčení regulátorů, bude třeba je namazat. Tento úkon smí provádět pouze kvalifikovaný servisní technik.
• Hliníkové nádoby mohou zanechávat stopy na smaltované podpěře hrnců. Tyto stopy lze snadno odstranit vlhkou látkou a mírně abrazivním prostředkem.
NĚKOLIK TIPŮ....
- Vyhýbejte se příliš intenzivnímu vaření pokrmů. Nijak se tím nezrychlí doba vaření. Vlastně tím dochází k silnému proudění, což může mít za následek, že pokrm ztratí část své chuti.
ŠETRNOST A OHLEDUPLNOST K ŽIVOTNÍMU PROSTŘEDÍ
- Dbejte na to, aby plamen nesahal přes dno nádoby, abyste šetřili plyn.
- Nepoužívejte plynový hořák s prázdnou nádobou.
- Pokud možno zakrývejte nádoby pokličkami. Regulujte plamen, aby nesahal přes průměr nádoby.
SKLOKERAMICKÁ ZÓNA
RADY
K dosažení dobrých výsledků vaření je důležité používat vysoce kvalitní náčiní:
- Vždy používejte kvalitní nádobí s naprosto rovným a silným dnem.
- Ujistěte se, že spodní strana hrnce nebo pánve je suchá.
- Používejte nádoby s dostatečně velkým průměrém, který úplně zakryje povrch zóny.
VÝBĚR NÁČINÍ
Následující informace vám pomohou vybrat takové nádobí, s níž dosáhnete dobré účinnosti.


Zkontrolujte, zda je na štítku značka, která znamená, že nádoba je kompatibilní se sklokeramickým povrchem.
Nerezová ocel: Důrazně se doporučuje. Je vhodná zejména se sendvičově prokládaným dnem. Sendvičové dno slučuje výhody nerezové oceli (vzhled, odolnost a stabilitu) s výhodami hliníku nebo mědi (vedení tepla, rovnoměrné rozvádění tepla).
Hliník: Doporučuje se velká hmotnost. Dobrá vodivost. Na varné desce se občas objevují zbytky hliníku, které vypadají jako škrábance, ale lze je odstranit okamžitým vyčištením. Tenký hliník by se neměl používat kvůli nízkému bodu tavení.
Litina: Lze ji použít, ale nedoporučuje se. Slabá účinnost. Mohla by poškrábat povrch.
Měděné dno/kamenina: Doporučuje se velká hmotnost. Dobrá účinnost, ale měd' může zanechávat zbytky, které vypadají jako škrábance. Tyto zbytky lze odstranit, pokud se varná deska okamžitě vyčistí. Zamezte však vyvaření vody v těchto nádobách. Přehřátý kov může přilnout ke skleněné varné desce. Přehřátá měděná nádoba zanechá zbytek, který trvale znečistí varnou desku. Porcelán/smalt: Dobrá účinnost pouze s tenkým, hladkým a plochým dnem.
ZÓNY
- Zóna Highlight: Je připravena k provozu během 3 sekund a je vhodná k rovnoměrnému, homogennímu a delšímu vaření.
- Sprinter: Pomocí funkce Sprinter lze dosáhnout zkrácení doby vaření až o 15 %.
POUŽÍVÁNÍ
- Najděte značku odpovídající varné zóně, kterou potřebujete.
- Doporučuje se nastavit výkon na nejvyšší hodnotu, dokud se zóna řádně neohřeje, a potom ji snížit na požadovanou hodnotu prvaření.
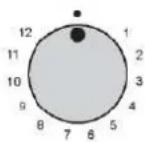


- Rozsvítí se kontrolka zapnutí signalizující zónu, která je v provozu.
- Každá zóna je propojena s kontrolkou zbytkového tepla na varné desce. Rozsvítí se v případě, že teplota dané varné zóny dosáhne 60 °C nebo vyšší hodnoty. Zůstane svítit i po vypnutí, dokud povrch nevychladne.
- Chcete-li vypnout určitou varnou zónu, otočte odpovídající regulátor až do polohy „0“.
- Polohy: Níže uvedené příklady jsou pouze ilustrativní. Až se seznámíte s používáním vaší varné desky, budete moci určit taková nastavení, která vám budou nejlépe vyhovovat.
| Polohy | Několik tipů | ||
| 1 | 1–2 | Velmi nízký | K udržování teplého pokrmu, rozpouštění másla a čokolády... |
| 2 | 3–4 | Nízký | Pomalé vaření, omáčky, dušení, rýžový pudink, sázená vejce... |
| 3 | 5–6 | Mírný | Fazole, mražené potraviny, ovoce, vaření vody... |
| 4 | 7–8 | Střední | Jablka v páře, čerstvá zelenina, těstoviny, lívance, ryby... |
| 5 | 9–10 | Vysoký | Intenzivnější vaření, omelety, bifteky... |
| 6 | 11–12 | Velmi vysoký | Bifteky, kotlety, smažení... |
ŠETRNOST A OHLEDUPLNOST K ŽIVOTNÍMU PROSTŘEDÍ
- Používejte nádoby s dostatečně velkým průměrem, který úplně zakryje povrch zóny: velikost nádoby by neměla být menší než topná plocha. Pokud je poněkud širší, využije se s maximální účinností.
- Abyste dosáhli nejlepší účinnosti vaší varné desky, umistěte hrnec doprostřed varné zóny.
- Použití pokličky zkrátí délku vaření a šetří energii, protože zadržuje teplo.
- Minimalizujte množství tekutiny nebo tuku, abyste zkrátili délku vaření.
- Začněte vařit s nastavením na vysoký stupeň a až se pokrm prohřeje, snižte nastavení.
VYBAVENÍ TROUBY (podle modelu)
Před prvním použitím je nutné nejprve vyčistit vybavení. Omyjte ho houbou. Opláchněte a vysušte.
- ROŠT: Slouží jako opora mís, talířů a masa při pečení s použitím grilu. Je vybaven lištami, do kterých lze zasunout odkapávací plech.
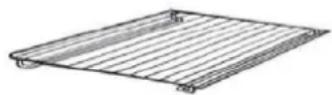
Díky svému speciálnímu tvaru zůstává rošt vždy ve vodorovn poloze, i když je úplně vytažený z přední strany trouby, takži nehrozí riziko sklouznutí nebo převrácení nádoby.
• ODKAPAVACI PLECH:
Zachytává šťávu z masa během grilování. Lze ho položit na rošt nebo zasunout pod něj. Pokud se negriluje, odkapávací plech se nesmí nechávat v troubě během jejího používání.
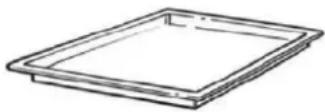
Nikdy nepoužívejte odkapávací plech jako pekáč. Způsobilo by to vznik kouře, rozstřikování tuku a trouba by se rychle znečistila.
- PLECH NA PEČIVO se musí pokládat na rošt. Je určen k pečení malých kusů pečiva, jako jsou choux, sušenky, pusinky atd.
natural_image
Simple line drawing of a square with three vertical lines inside, no text or symbols present.Plech na pečivo nikdy nepokládejte přímo na dno trouby.
- OTOČNÝ ROŽEŇ obsahuje rožeň s klikou, dvě vidlice a držák rožně.
Během pečení v troubě je nutné vyjmout veškeré nepouživané příslušenství.
• ČASOVAČ
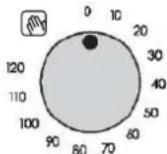
- Stará se o chod trouby v délce mezi 1 a 120 minutami s okamžitým spouštěním a automatickým zastavováním. Po uplynutí nastaveného času časovač automaticky vypne napájení trouby.
- Avšak troubu lze používat i bez nastavování času. V takovém případě otočte ovladač do polohy ručního ovládání
Poznámka: Chcete-li nastavit čas, otočte ovladač doprava až na značku 120 minut a potom ho otočte zpět na požadovaný čas.
POUŽÍVÁNÍ TROUBY
VELMI DÜLEŽITÉ: Troubu a myčku nelze používat současně. Chcete-li používat troubu, musíte zavřít myčku.
DÜLEŽITÉ: Během používání vždy zabraňte přístupu malých dětí ke spotřebiči Trio. Pokud je spotřebič Trio vybaven víkem, před použitím ho zvedněte.
ZPŮSOBY PEČENÍ (podle modelu)
- Staticky + ventilátor 📄: Doporučujeme používat tento způsob pro drůbež, pečivo, ryby a zeleninu. Teplo proniká do pokrmu lépe a zkrátí se také doba pečení a předehřevu. Můžete péct různé pokrmy zároveň se stejnou přípravou nebo bez přípravy v jedné nebo více pozicích. Tato metoda pečení zajišťuje rovnoměrnou distribuci tepla a zabraňuje smísení vůní. Při současném pečení více pokrmů nastavte o deset minut delší dobu.
- Gril: Využívá se horní topné těleso. Úspěch je zaručen pro kombinované grilované pokrmy, kebaby a „gratinované pokrmy“. K rozžhavená tělesa je nutné pětiminutové předehřívání.
- Grill + rožen: Využívá se horní topné těleso společně s otočným rožněm, který zajistí pravou chuť tradiční pečeně. Vyjměte ze spotřebiče veškeré příslušenství.
. Položte odkapávací plech na dno trouby.
. Napíchněte připravovanou potravinu na rožeň a vystředťe ji mezi oběma vidlicemi.
. Vložte rožen do držáku a zasušte držák s rožněm do druhé pozice. Pak bude konec rožně obrácen k otvoru v pohonném mechanismu.
. Vsuňte rošt do pohonného mechanismu. - Konvekční + rožení : Využívá se otočný rožení současně s konvekčním pečením. Umožňuje šetřit čas při pečení. Musíte však dát pozor na to, abyste vložili rošt s lištami spodní stranou vzhůru, także lišty budou nahoře. Položte na ně odkapávací plech.
- Master bake 📄: Tato funkce umožňuje zdravější vaření, protože snižuje potřebné množství tuku nebo oleje. Kombinace topných prvků s pulzujícím cyklem vzduchu zajišťuje dokonalý výsledek pečení.
-
Konvenční : Používají se současně horní i dolní topná tělesa. Předehrivejte troubu po dobu zhruba deseti minut. Tato metoda je ideální pro jakékoli tradiční pečení. Pro přípravu červeného masa, hovězí pečeně, jehněčí kýty, zvěřiny, chleba, pokrmů ve fólii (papillotes), listového těsta. Umístěte pokrm a jeho nádobu na roštu do střední pozice.
-
Otočte ovladač na požadovaný způsob pečení a nastavte teplotu:

radar
| Angle (°) | Value | |---|---| | 0 | 65 | | 30 | 90 | | 60 | 115 | | 90 | 140 | | 120 | 165 | | 150 | 190 | | 180 | 210 | | 210 | 250 |

Konvenční
Teplota od 65 °C do 250 °C

Gril
Teplota 200 °C

Gril + rožeň
Teplota 200 °C

Konvekční + rožeň
Teplota od 65 °C do 250 °C

Master bake
Teplota od 65 °C do 250 °C

Konvekční + ventilátor
Teplota od 65 °C do 250 °C
*Testováno v souladu s normou CENELEC EN 60350-1 používanou k definování energetické třídy.
- Otočte ovladač časovače do polohy ručního ovládání nebo na určitou dobu trvání.


- Svítící kontrolka regulátoru signalizuje, že termostat je v chodu. Během pečení se střídavě rozsvěcuje a zhasíná.
RADY K PEČENÍ
MASO:
Je lepší maso osolit až po upečení, protože sůl podporuje rozstřikování tuku z masa.
Tím se znečišťuje trouba a vzniká spousta kouře. Do studené trouby lze dávat kusy bílého, vepřového, telecího a jehněčího masa a ryby. Pečení trvá déle než v předehřáté troubě, ale maso se uvnitř lépe propeče, protože teplo má více času proniknout dovnitř.
SPRÁVNÉ PŘEDEHŘÁTÍ JE ZÁKLADEM ÚSPĚŠNÉHO PEČENÍ ČERVENÉHO MASA.
KOLÁČE, PEČIVO A SUŠENKY:
Nepoužívejte lesklé formy, protože odrážejí teplo a mohly by vám zkazit koláče. Pokud koláče příliš rychle zhnědnou, zakryjte je nepromastitelným papírem nebo hliníkovou fólií.
Pozor: Správný způsob použití fólie je lesklou stranou dovnitř. V opačném případě bude lesklý povrch odrážet teplo a to nepronikne do koláče.
Během prvních 20 až 25 minut pečení neotvírejte dvířka; piškotová buchta, suflé, brioška apod. by mohly ztratit tvar. Chcete-li zkontrolovat, zda jsou koláče hotové, pichněte doprostřed ostřím nože nebo kovovou pletací jehlicí. Pokud je ostří po vytažení čisté a suché, koláč je hotový a můžete zastavit pečení. Pokud je ostří po vytažení vlhké a s kusy přilepeného koláče, pokračujte v pečení, ale trochu snižte nastavení termostatu, aby se koláč dopekl, ale nespálil se.
Následující pokyny jsou pouze informativní. Můžete si je přizpůsobit podle vlastních zkušeností nebo vlastní chuti.
Doby předehřevu:
. 20 minut mezi 210 a 250 °C
. 15 minut mezi 140 a 190 °C
. 10 minut mezi 65 a 115 °C
| MNOŽSTVÍ | POTRAVINY | Teplota trouby ve °C | Pozice roštu odspodu | Doba pečení v minutách |
| RYBY | ||||
| Pstruh | 200 | 1 | 15/25 | |
| 1 kg | Bělice | 190 | 1 | 50 |
| MASO | ||||
| 1–1,5 kg | Hovězí pečeně | 190 | 1 | 90 |
| 1 kg | Telecí pečeně | 150/160 | 1 | 120/150 |
| 2 kg | Zadělávané telecí | 170/190 | 1 | 60/90 |
| 1–1,5 kg | Jehněčí kýta | 150/160 | 1 | 60/75 |
| 1–1,5 kg | Skopová kýta | 150/160 | 1 | 50/60 |
| DRŮBEŽ | ||||
| 2 kg | Holubi | 150/160 | 1 | 45 |
| 4 kg | Husa | 160 | 1 | 240/270 |
| 2–2,5 kg | Kachna | 175 | 1 | 90/150 |
| 1–1,5 kg | Kuře | 170 | 1 | 60/80 |
| RŮZNÉ | ||||
| Lasagne | 200 | 1 | 40 | |
| Suflé | 200 | 1 | 20 | |
| Plněné lívance | 200 | 1 | 20 | |
| Pizza | 200 | 1 | 20 | |
| PEČIVO | ||||
| Pohankový koláč | 175 | 1 | 40/50 | |
| Ovocný dort | 180/190 | 1 | 20/30 | |
| Sušenky (kynuté těsto) | 160 | 1 | 40/45 | |
| Pusinky | 100 | 1 | 90 | |
| Křehké pečivo | 200 | 1 | 20 | |
ŠETRNOST A OHLEDUPLNOST K ŽIVOTNÍMU PROSTŘEDÍ
Kdykoli je to možné, vyhněte se předehřívání trouby a vždy se ji snažte naplnit. Otevírejte dvířka trouby co možná nejméně často, protože při každém otevření uniká teplo z vnitřního prostoru. Vypněte troubu 5 až 10 minut před plánovaným koncem doby pečení a využijte zbytkové teplo, které trouba dále vytváří. Dosáhnete tak významné úspory energie. Udržujte těsnění v čistotě a v pořádku, aby nedocházelo k unikání tepla z trouby.
OVLÁDACÍ PRVKY MYČKY

A Kontrolky výběr programu
B Tlačitko výběru programu
C Popis programu
D Tlačítko vypínače
VYBÍRÁNÍ PROGRAMŮ A SPECIÁLNÍCH FUNKCÍ
Myčku a troubu nelze používat současně.
Nástavení programu
Otevřete dvířka a stiskněte tlačítko vypínače; začnou blikat čtyři kontrolky výběru programu.
- Stisknutím tlačítka výběru programu nastavte požadovaný program a rozsvítí se kontrolka zvoleného programu (dvě kontrolky pro program oplachování studenou vodou).
- Zavřete dvířka (až se ozve zvukový signál) a zvolený program se automaticky spustí.
POUŽÍVÁNÍ MYČKY
Otevirání dvířek
Uchopte madlo dvířek na předním panelu a zatáhněte dopředu. Pokud se spotřebič otevře za chodu, elektrické bezpečnostní zařízení automaticky všechno vypne. Aby spotřebič správně fungoval, za chodu by se neměla otvírat dvířka.
Zavírání dvířek
Vložte koš do myčky. Ujistěte se, že stříkací rameno se může volně otáčet a příbory, nádobí ani hrnce mu nebrání v pohybu. Zavřete dvířka a zatlačte je, aby bylo jisté, že jsou pevně zavřené.
Přerušení programu
Nedoporučuje se otvírat dvířka za chodu programu, zejména během fáze hlavního myti a konečného sušení.
Po otevření dvířek se nicméně spotřebič automaticky zastaví. Až se dvířka opět zavřou, program bude automaticky pokračovat. Chcete-li změnit nebo zrušit probíhající program, provedte následující postup:
- Podržte tlačítko „VÝBĚR PROGRAMU“ alespoň 5 sekund. Postupně se budou rozsvěcovat a zhasínat kontrolky programů a budou se ozývat zvukové signály.
- Běžící program se zruší a kontrolky všech programů budou blikat.
Před spuštěním nového programu byste měli zkontrolovat, zda je v dávkovači stále mycí prostředek. V případě potřeby doplňte dávkovač.
VAROVÁNÍ: Pokud se otevřou dvířka během fáze sušení, aktivuje se přerušovaný zvukový signál, který signalizuje, že cyklus dosud neskončil.
Ukončení programu je signalizováno třemi zvukovými signály o délce pěti sekund v 30sekundových intervalech (pokud nejsou vypnuté).
Začne blikat kontrolka vybraného programu (dvě kontrolky pro program „OPLACHOVÁNÍ STUDENOU VODOU“). Nyní lze vyjmout nádobí a vypnout myčku stisknutím tlačítka „VYPÍNAČ“ nebo vložit nádobí pro nový cyklus.
Alarm signalizující konec programu lze vypnout takto:
DÜLEŽITÉ
Před zahájením tohoto postupu musí být myčka VŽDY vypnutá.
- Držte tlačitko „VÝBĚR PROGRAMU“ a zároveň stisknutím tlačitka „VYPÍNAČ“ zapněte myčku (ozve se krátký zvukový signál).
- Držte dále stisknuté tlačitko „VÝBĚR PROGRAMU“ alespoň 15 sekund (během této doby se ozvou dva zvukové signály).
- Až se ozve druhý zvukový signál, uvolněte tlačitko (rozsvítí se tři kontrolky „VÝBĚR PROGRAMU“).
- Znovu stiskněte totéž tlačitko; tři kontrolky (které signalizují aktivovaný alarm) začnou blikat (což signalizuje vypnutí alarmu).
- Vypněte myčku stisknutím tlačítka „VYPÍNAČ“, abyste potvrdili nové nastavení.
Chcete-li alarm opět zapnout, znovu proved'te stejný postup.

VAROVÁNÍ!
Pokud dojde k nějakému problému, vypněte myčku stisknutím tlačítka „VYPÍNAČ“ a zahajte postup znovu od začátku.
Uložení naposledy použitého programu do paměti
Následujícím postupem lze uložit naposledy použitý program do paměti:
DŮLEŽITÉ
Před zahájením tohoto postupu musí být myčka VŽDY vypnutá.
- Držte tlačítko „VÝBĚR PROGRAMU“ a zároveň stisknutím tlačítka „VYPÍNAČ“ zapněte myčku (ozve se krátký zvukový signál).
- Držte dále stisknuté tlačitko „VÝBĚR PROGRAMU“ alespoň 30 sekund (během této doby se ozvou tři zvukové signály).
- Až se ozve TŘETÍ zvukový signál, uvolněte tlačítko (všechny kontrolky budou blikat).
- Znovu stiskněte totéž tlačítko; blikající kontrolka (ukládání do paměti vypnuto) přestane blikat a zůstane svítit (ukládání do paměti zapnuto).
- Vypněte myčku stisknutím tlačítka „VYPÍNAČ“, abyste potvrdili nové nastavení.
Chcete-li deaktivovat ukládání do paměti, znovu proved'te stejný postup.

VAROVÁNÍ!
Pokud dojde k nějakému problému, vypněte myčku stisknutím tlačítka „VYPÍNAČ“ a zahajte postup znovu od začátku.
Pokud dojde k jakémukoli výpadku napájení za chodu myčky, vybraný program se uloží do speciální paměti a po obnovení napájení bude pokračovat od bodu, v němž byl přerušen.
Pozor – myčka je vybavena bezpečnostním zařízením proti přetečení, které v případě problému zasáhne a vypustí nadbytečnou vodu.
Signály závad
Pokud dojde k závadě nebo poruše za chodu programu, bude rychle blikat kontrolka odpovídající vybranému cyklu (dvě kontrolky pro program OPLACHOVÁNÍ STUDENOU VODOU) a aktivujete se zvukový signál. V takovém případě vypněte myčku stisknutím tlačítka vypínače. Zkontrolujte, zda je otevřený kohout na hadici přívodu vody, není ohnutá vypouštěcí hadice a nejsou ucpané filtry nebo sifon, a potom znovu spustěte vybraný program. Pokud problém přetrvává, obratte se na zákaznický servis.
Důležité!
V zájmu zajištění správného fungování bezpečnostního zařízení proti přetečení se doporučuje nepřemist'ovat ani nenaklánět myčku za chodu.
Pokud je třeba myčku přemístit nebo naklonit, nejprve se ujistěte, že cyklus mytí skončil a v nádrži nezůstala žádná voda.
PŘÍPRAVA A ČIŠTĚNÍ FILTRAČNÍ JEDNOTKY
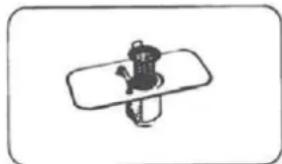
natural_image
Simple line drawing of a small animal on a rectangular object (no text or symbols)Filtrační systém je tvořen:
- centrální filtrační miskou, která zachytává velké částečky jídla; - plochým filtrem, který nepřetržitě filtruje promývací vodu;
- mikrofiltrem umístěným pod plochým filtrem, který zachytává nejmenší částečky jídla, což zaručuje dokonalé oplachování.
Aby se dosáhlo nejlepších výsledků, filtrační jednotka by se měla kontrolovat a čistit po každém mytí.
Chcete-li vyjmout filtrační jednotku, jednoduše uchopte držadlo a vytáhněte celou jednotku ven.
Centrální miska je pouze položena nahoře, aby se snadno čistila. Myčka je vybavena samočisticím mikrofiltrem, který je třeba kontrolovat pouze jednou za 15 dnů.
Po každém mytí se však doporučuje zkontrolovat centrální misku a plochý filtr, zda nejsou ucpané.
Pozn.: Po vyčištění filtrů je nutné součásti opět správně sestavit jednu do druhé a ujistit se, že plochý filtr je správně umístěn ve dně myčky.
Nedostatečné usazení filtrační jednotky by mohlo nepříznivě ovlivnit účinnost spotřebiče.
Důležité: Nikdy nepoužívejte myčku bez filtru.

- ROSIÈRES
- SAFETY INSTRUCTIONS
- UNPACKING THE APPLIANCE
- RECOMMENDATIONS
- READ THE INSTRUCTIONS CAREFULLY TO MAKE THE MOST OF YOUR APPLIANCE.
- IMPORTANT NOTES
- INSTALLATION
- WARNING:
- GAS MODEL
- SUITABLE LOCATION
- - Before installing the appliance, the technician must :
- - For installation the technician must :
- • GAS CONNECTION
- • THREE CONNECTION OPTIONS :
- • RIGID PIPE CONNECTION
- • CONNECTION BY FLEXIBLE HOSE WITH MECHANICAL FITTINGS
- We recommend this type of connection.
- • CONNECTION BY SOFT RUBBER
- We do not recommend this type of connection.
- CHANGING THE GAS TYPE :
- CHANGE THE JETS :
- REGULATING THE MINIMUM FLAME
- CASE 1: regulating screw visible inside the valve shaft (see figure 3A)
- CASE 2: regulating screw not visible (see figure 3B)
- ELECTRICAL CONNECTION
- Warning :
- • TRIO 9501
- • TRIO 9503
- To connect :
- WATER CONNECTION - WATER DRAINAGE
- WATER CONNECTION :
- WATER DRAINAGE :
- GAS BURNERS
- USE
- IGNITION
- RECOMMENDATIONS: when the burners are not in service, the general gas supply tap should always be turned off.
- PANS
- SOME TIPS ....
- SAVING AND RESPECTING THE ENVIRONMENT
- THE VITROCERAMIC ZONE
- ADVICES
- CHOOSING UTENSILS
- THE ZONES
- OVEN EQUIPMENT (According to the model)
- When the oven is in use, any unused accessories should be removed.
- • THE CIRCUIT-BREAKER TIMER
- THE OVEN USE
- THE COOKING METHODS (According to the model)
- COOKING ADVICES
- MEAT:
- CORRECT PRE-HEATING IS THE BASIS OF SUCCESSFUL RED MEAT COOKERY.
- CAKE - PASTRIES AND BISCUITS :
- Pre-heating times :
- smoke SAVING AND RESPECTING THE ENVIRONMENT
- SELECTING THE PROGRAMMES AND SPECIAL FUNCTIONS
- The dishwasher and the oven cannot be used simultaneously.
- Setting a programme
- USE THE DISHWASHER
- Opening the door
- Closing the door
- Interrupting a programme
- IMPORTANT
- WARNING!
- Memorization of the last programme used
- Attention - The dishwasher is equipped with an anti-overflow safety device which in the event of anomaly intervenes by evacuating water in excess.
- Fault Signals
- Important!
- PRELIMINARY OPERATIONS AND CLEANING THE FILTER UNIT
- LOADING DISHES
- LOADING A 6 PLACES SETTING (EN 60436)
- LOADING 4 PLACE SETTINGS PLUS CASSEROLES
- LOADING THE DETERGENT
- FILLING THE RINSE AID DISPENSER
- REGULATING THE RINSE AID (from 1 to 4).
- LOADING THE SALT
- Regulating the water softener with electronic programmer
- WASHING PROGRAMME
- SOME PRACTICAL HINTS ....
- HOW TO GET GOOD WASH RESULTS
- WHAT TO DO IF ...
- WHAT NOT TO WASH ...
- CLEANING
- • THE ENAMELLED PARTS:
- THE VITROCERAMIC HOB
- Maintenance :
- Stubborn stains :
- A few hints :
- • OVEN LIGHTING
- • THE ACCESSORIES
- • THE OVEN DOOR GLASS
- • OVEN DOOR :
- It is important the burners are replaced correctly.
- Chromed grids and burners
- • WASTE MANAGEMENT AND ENVIRONMENTAL PROTECTION
- SAVINGANDRESPECTING THEENVIRONMENT
- BEZPEČNOSTNÍ POKYNY
- VYBALENÍ SPOTŘEBIČE
- DOPORUČENÍ
- DŮLEŽITÁ UPOZORNĚNÍ
- INSTALACE
- VAROVÁNÍ:
- PLYNOVÝ MODEL
- VHODNÉ MÍSTO
- - Pred instalací spotřebiče musí technik:
- - Při instalaci musí technik zajistit následující:
- • PŘIPOJENÍ PLYNU
- • TŘI MOŽNOSTI PŘIPOJENÍ
- • PŘIPOJENÍ POMOCÍ PEVNÉ TRUBKY
- - PŘIPOJENÍ POMOCÍ OHEBNÉ HADICE S MECHANICKÝMI TVAROVKAMI
- Doporučujeme tento typ připojení.
- - PŘIPOJENÍ POMOCÍ MĚKKÉ HADICE
- Tento typ připojení nedoporučujeme.
- ZMĚNA TYPU PLYNU:
- VÝMĚNA TRYSEK:
- NASTAVENÍ MINIMÁLNÍHO PLAMENE
- PŘÍPAD 1: Regulační šroub je viditelný uvnitř dříku ventilu (viz obrázek 3A)
- PŘÍPAD 2: Regulační šroub není vidět (viz obrázek 3B)
- ELEKTRICKÉ ZAPOJENÍ
- PRIPOJENÍ VODY A ODTOKU
- PRIPOJENÍ VODY:
- ODTOK VODY:
- PLYNOVÉ HOŘÁKY
- POUŽÍVÁNÍ
- ZAPALOVÁNÍ
- NÁDOBY
- NĚKOLIK TIPŮ....
- ŠETRNOST A OHLEDUPLNOST K ŽIVOTNÍMU PROSTŘEDÍ
- SKLOKERAMICKÁ ZÓNA
- RADY
- VÝBĚR NÁČINÍ
- ZÓNY
- VYBAVENÍ TROUBY (podle modelu)
- • ODKAPAVACI PLECH:
- Během pečení v troubě je nutné vyjmout veškeré nepouživané příslušenství.
- • ČASOVAČ
- POUŽÍVÁNÍ TROUBY
- ZPŮSOBY PEČENÍ (podle modelu)
- RADY K PEČENÍ
- MASO:
- SPRÁVNÉ PŘEDEHŘÁTÍ JE ZÁKLADEM ÚSPĚŠNÉHO PEČENÍ ČERVENÉHO MASA.
- KOLÁČE, PEČIVO A SUŠENKY:
- Následující pokyny jsou pouze informativní. Můžete si je přizpůsobit podle vlastních zkušeností nebo vlastní chuti.
- Doby předehřevu:
- OVLÁDACÍ PRVKY MYČKY
- VYBÍRÁNÍ PROGRAMŮ A SPECIÁLNÍCH FUNKCÍ
- Myčku a troubu nelze používat současně.
- Nástavení programu
- POUŽÍVÁNÍ MYČKY
- Otevirání dvířek
- Zavírání dvířek
- Přerušení programu
- DÜLEŽITÉ
- Před zahájením tohoto postupu musí být myčka VŽDY vypnutá.
- VAROVÁNÍ!
- Uložení naposledy použitého programu do paměti
- DŮLEŽITÉ
- Signály závad
- Důležité!
- PŘÍPRAVA A ČIŠTĚNÍ FILTRAČNÍ JEDNOTKY
- Filtrační systém je tvořen:
Marque : ROSIERES
Modèle : TR631NOX
Catégorie : Lave-vaisselle