ETST50 AXE ARGB - Ventilateur ENERMAX - Notice d'utilisation et mode d'emploi gratuit
Retrouvez gratuitement la notice de l'appareil ETST50 AXE ARGB ENERMAX au format PDF.
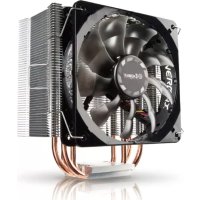
| Type de produit | Ventilateur de refroidissement CPU (dissipateur avec ventilateur) |
| Marque | Enermax |
| Modèle | ETST50 AXE ARGB |
| Compatibilité socket Intel | LGA775/115X/1366/2011/2066 |
| Compatibilité socket AMD | AM3(+)/AM2(+)/FM1/FM2(+) |
| Taille du ventilateur | 120 mm |
| Type de roulement | Roulement hydraulique (estimation) |
| Vitesse du ventilateur | 300-1600 tr/min (estimation) |
| Niveau sonore | 14-26 dBA (estimation) |
| Débit d'air maximal | 72 m³/h (estimation) |
| Pression statique | 1,5 mmH2O (estimation) |
| Connecteur ventilateur | 4 broches PWM |
| Connecteur ARGB | 3 broches (5V) pour synchronisation avec la carte mère |
| Éclairage | ARGB adressable, compatible avec les logiciels de la carte mère |
| Pâte thermique incluse | Oui, avec spatule d'application |
| Guide d'air ajustable | Oui, rotation à 360° pour diriger le flux d'air |
| Dimensions du dissipateur | 140 x 80 x 158 mm (estimation) |
| Poids | Environ 600 g (estimation) |
| Alimentation | Via connecteur PWM 4 broches et ARGB 3 broches (5V) |
| Entretien et nettoyage | Dépoussiérer régulièrement le ventilateur et le dissipateur avec de l'air comprimé. Ne pas utiliser d'eau ou de solvants. |
| Sécurité | Assurez-vous que le ventilateur est correctement fixé pour éviter les vibrations. Évitez tout contact avec les pales en rotation. |
| Pièces détachées et réparabilité | Ventilateur remplaçable (standard 120 mm). Pâte thermique et kit de montage disponibles séparément. |
FOIRE AUX QUESTIONS - ETST50 AXE ARGB ENERMAX
Questions des utilisateurs sur ETST50 AXE ARGB ENERMAX
0 question sur cet appareil. Repondez a celles que vous connaissez ou posez la votre.
Poser une nouvelle question sur cet appareil
Téléchargez la notice de votre Ventilateur au format PDF gratuitement ! Retrouvez votre notice ETST50 AXE ARGB - ENERMAX et reprennez votre appareil électronique en main. Sur cette page sont publiés tous les documents nécessaires à l'utilisation de votre appareil ETST50 AXE ARGB de la marque ENERMAX.
MODE D'EMPLOI ETST50 AXE ARGB ENERMAX

ENERMAX
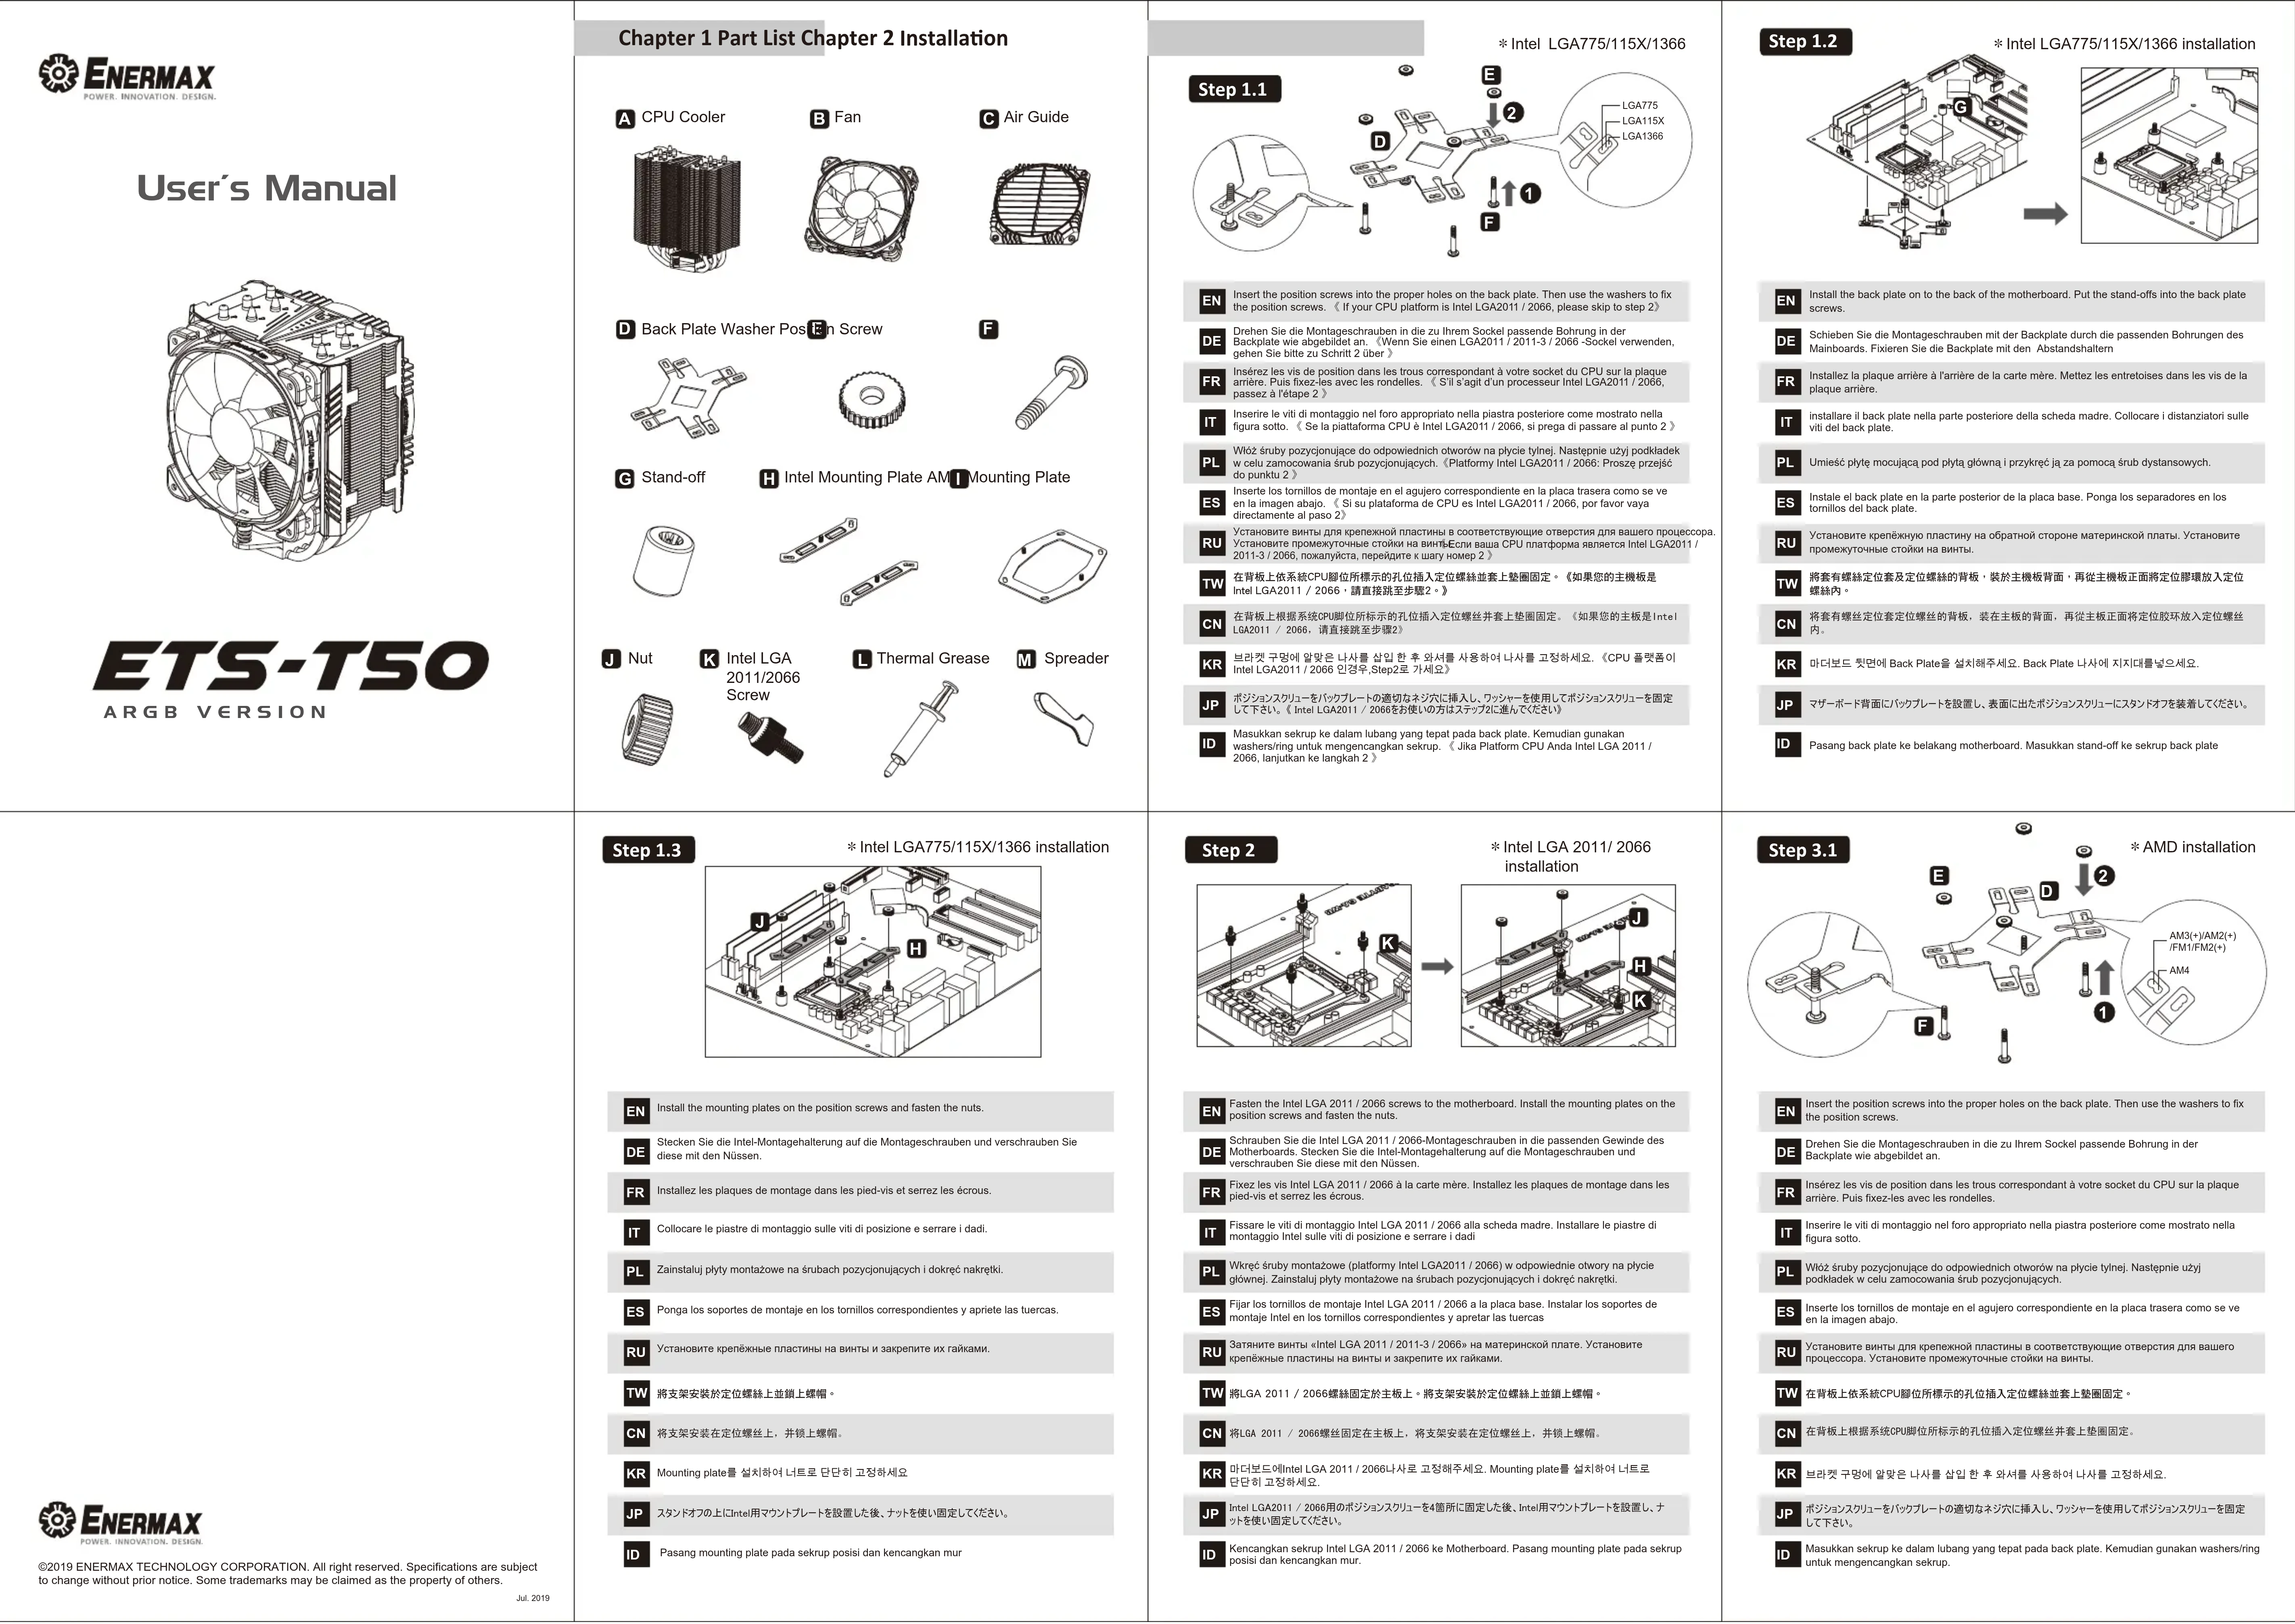
User's Manual
ETS-T50
ARGB VERSION
Chapter 1 Part List Chapter 2 Installation
A CPU Cooler

B Fan

Air Guide

F
D Back Plate Washer P
osfin Screw


Mounting Plate
G Stand-off
Intel Mounting Pl


J Nut
Intel LGA
2011/2066
Screw


L Thermal Grease

M Spreader

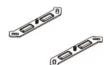
*Intel LGA775/115X/1366
text_image
Step 1.1 LGA775 LGA115X LGA1366EN Insert the position screws into the proper holes on the back plate. Then use the washers to fix the position screws. ( If your CPU platform is Intel LGA2011 / 2066, please skip to step 2)
Drehen Sie die Montageschreiben in die zu Ihrem Sockel nassende Rohnung in der
DE
Backplate wie abgebildet an. (W gehen Sie bitte zu Schritt 2 über)
Insérez les vis de position dans les trous correspondant à votre socket du CPU sur la plaque
FR arrière. Puis fixez-les avec les rondelles. « S'il s'agit d'un processeur Intel LGA2011 / 2056, passez à l'étape 2 »
Inserire le viti di montaggio nel foro appropriato nella piastra posteriore come mostrato nella
figura sotto. ( Se la piattaforma CPU è Intel LGA2011 / 2066, si prega di passare al punto 2
Wląż śruby pozycjonujące do odpowiednich otworów na płycie tylnej. Następnie użyj podkłade
w celu zamocowania śrub pozyqonujących. (Platformy Intel LGA2011 / 2066: Proszę przejd do punktu 2)
Inserte los tornillos de montaje en el agujero correspondiente en la placa trasera como se ve
ES en la imagen abajo. (SI su plataforma de CPU es Intel LGA2011 / 2006, por favor vaya directamente al paso 2)
Установите винты для крепежной пластины в соответствующие отверстия для вашего процессора. Установите Implementation и дейки на дуб. Гелу-длина СРН аербинара ресурса IncU Q42014 /
Установите промежуточные стойки на винтресли ваша СРО платформа является Trend CGA20117 2011-3 / 2066, пожалуйста, перейдите к шагу номер 2)
在背板上依系統CPU腳位所標示的孔位插入定位螺絲並套上墊圈固定。《如果您的主機板是
Intel LGA2011 / 2066 · 請直接跳至步驟2。》
在背板上根据系统CPU脚位所标示的孔位插入定位螺丝井套上垫圈固定。(如果您的主板是Intel
LGA2011 / 2066. 调直接跳至步骤2
KR 브라켓 구멍에 맞맛은 나사를 삽입한 후 와서를 사용하여 나사를 고정하세요.《CPU 플랫폼》
Intel LGA2011/2066 인증주,Step2로 가세요)
JP ボジションスクリューをバックプレートの適切なネジ穴に挿入し、ワッシャーを使用してボジションスクリューを固定
して下さい。《Intel LGA2017 / 2006をお使いの方はステップに進むください》
ID Masukkan sekrup ke dalam lubang yang tepat pada back plate. Kemudian gunakan washers/ring untuk mengencangkan sekrup. Jika Platform CPU Anda Intel LGA 2011
2066, lanjutkan ke langkah 2
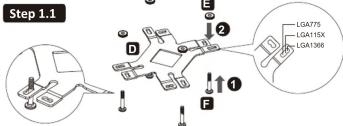
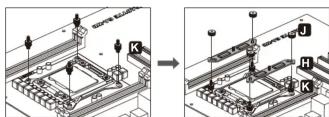
Step 1.2
* Intel LGA775/115X/1366 installation

text_image
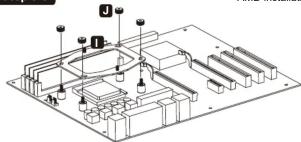
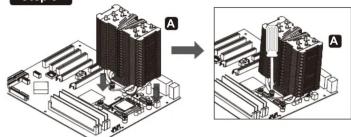
Technical diagram showing a computer motherboard with labeled components and an arrow indicating assembly or transformation.EN Install the back plate on to the back of the motherboard. Put the stand-offs into the back plate screws.
■ 2017.
DE Schieben Sie die Montageschrauben mit der Backplate durch die passenden Bohrungen des Mainboards. Fixieren Sie die Backplate mit den Abstandshaltern
■ 本报告书全文及摘要中涉及的其他信息均属于《中国证券报》、《上海证券报》和巨潮资讯网。
FR Installez la plaque arrière à l'amère de la carte mère. Mettez les entredoises dans les vis de la plaque arrière.
installare il bank plate nella norte posteriore della sebodo madre. Colloassore i distanziatori sulle
It installare il back plate nella parte posenore della scheda maure. Conocare i srlanzazioni sulle viti del back plate.
■
PL Umieść płytę mocującą pod płytą główną i przykręć ją za pomocą śrub dystansowych.
Instale el back plate en la parte posterior de la placa base. Ponga los separadores en los
ES Inscoto el dosel plate en la parte posterior de la plada base. Yonga los separadores en los tornillos del back plate.
Установите крепёжную пластину на обратной стороне материнской платы. Установите
RU промежуточные стойки на винты.
將套有螺絲定位套及定位螺絲的背板,裝於主機板背面,再從主機板正面將定位膠環放入定位
Iw 螺絲內。
将套有螺丝定位套定位螺丝的背板,装在主板的背面,再從主板正面將定位腔环放入定位螺丝
CN 内。
KD 마더바드 뒤명에 Rock Plate을 선히stä세요 Rock Plate 나사에 지지대루넘요세요
KAI BIOMA AENVI DACK P300000000000000000000000000000000000000000000
ID ヌザーボード表面に仮めゴルートを設着し、表面に出たボジンマスクリューに7ダメガラを装着した(だち)
SF マダーホー 〒骨质化リンスタルターを設置する。軽面化リンネスタルスタルとしてリンスタルオール装着するもの
ID: Parang back plate ke belakang motherboard. Marukkan stand-off ke sekrun back plate
1. Using back plate 1c be lacking motion board. Muskmian stand-off 1c be up back plate

ENERMAX
©2019 ENERMAX TECHNOLOGY CORPORATION. All right reserved. Specifications are subject to change without prior notice. Some trademarks may be claimed as the property of others.
Jul. 2019
Step 1.3
* Intel LGA775/115X/1366 installation
EN Install the mounting plates on the position screws and fasten the nuts.
DE Stecken Sie die Intel-Montagehalterung auf die Montageschrauben und verschrauben Sie diese mit den Nüssen.
FR Installez les plaques de montage dans les pied-vis et serrez les écrous.
IT Collocare le piastre di montaggio sulle viti di posizione e serrare i dadi.
PL Zainstaluj płyty montażowe na śrubach pozycjonujących i dokręć nakrętki.
ES Ponga los soportes de montaje en los tornillos correspondientes y apriete las tuercas.
RU Установите крепёжные пластины на винты и закрепите их гайками
TW 將支架安裝於定位螺絲上並鋼上螺帽。
CN 将支架安装在定位螺丝上,井锁上螺帽。
KR Mounting plate를 설치하여 너트로 단단히 고정하세요
JP スタンドオフの上にIntel用マウントプレートを設置した後、ナットを使い固定してください。
ID Pasang mounting plate pada sekrup posisi dan kencangkan mur
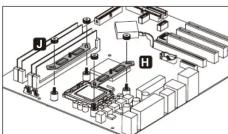
Step 2
* Intel LGA 2011/ 2066
installation
EN Fasten the Intel LGA 2011 / 2066 screws to the motherboard. Install the mounting plates on the position screw and faster the mode
Schrauben Sie die Intel LGA 2011 / 2066-Montageschrauben in die passenden Gewinde des Motherhogards. Stecken Sie die Intel-Montagehalterung auf die Montageschrauben und
verschrauben Sie diese mit den Nüssen.
FR Fixez les vis Intel LGA 2011 / 2066 à la carte mère. Installez les plaques de montage dans le
Fissare le viti di montaggio Intel LGA 2011 / 2066 alla scheda madre. Installare le piastre di
PI Wkręć śruby montażowe (platformy Intel LGA2011 / 2066) w odpowiednie otwory na płycie
Fijar los tomillos de montaje Intel LGA 2011 / 2066 a la placa base. Instalar los soportes de
Затяните винты «Intel LGA 2011 / 2011-3 / 2066» на материнской плате. Установите
TW 將LGA 2011 / 2066螺絲固定於主板上。將支架安裝於定位螺絲上並銷上螺帽
CN 将LQA 2011 / 2066螺丝固定在主板上,将支架安装在定位螺丝上,井锁上螺帽。
KR 마더보드에Intel LGA 2011 / 2066나사로 고정해주세요. Mounting plate를 설치하여 네트로 단단한 고정합니다.
JP Intel LGA2011 / 2066用のポジションスクリューを4箇所に固定した後、Intel用マウントプレートを設置し、
ID Kencangkan sekrup Intel LGA 2011 / 2066 ke Motherboard. Pasang mounting plate pada sekrup posisi dan kencangkan mur.
Step 3.1

* AMD installation
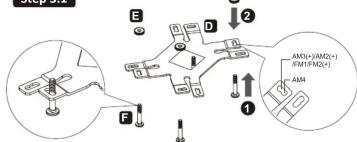
text_image
E D 2 F 1 AM3(+)/AM2(+) FM1/FM2(+) AMEN Insert the position screws into the proper holes on the back plate. Then use the washers to fix the position screw.
the position screws.
Drehen Sie die Montageschrauben in die zu Ihrem Sockel passende Bohrung in der
DE Backplate wie abgebildet an.
Insérez les vis de position dans les trous correspondant à votre socket du CPU sur la plaque
FR arrière. Puis fixez-les avec les rondelles.
Inserire le viti di montaggio nel foro appropriato nella piastra posteriore come mostrato nella
figura sotto.
PI Włóż śruby pozycjonujące do odpowiednich otworów na płycie tyłnej. Następnie użyj
podkładek w celu zamocowania śrub pozycjonujących.
ES Inserte los tornillos de montaje en el agujero correspondiente en la placa trasera como se ve en la imagen abra.
en la imagen abajo.
RU Установите винты для крепежной пластины в соответствующие отверстия для вашего
процессора. Установите промежуточные стояки на винты.
TW 在背板上依系统CPU即位所標示的孔位插入定位螺栓单套上垫圈固定
CN 在背板上根据系统CPU脚位所标示的孔位插入定位螺丝并套上垫圈固定
KR 보라켓 구멍에 알맞은 나사를 삽입한 후 와셔를 사용하여 나사를 고정하세요.
JP ポジションスクリューをパッケプレートの適切なネジ穴に挿入し、ワッシャーを使用してポジションスクリューを固定
■ して下さい。
ID Masukkan sekrup ke dalam lubang yang tepat pada back plate. Kemudian gunakan washers/ring untuk mengepanganan sekrup.
Step 3.2
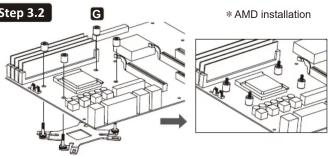
text_image
Step 3.2 G * AMD installationEN Install the back plate on to the back of the motherboard. Put the stand-offs into the back plate screws.
DE Schieben Sie die Montageschrauben mit der Backplate durch die passenden Bohrungen des Mainboards, Fixieren Sie die Backplate mit den Abstandshaltem.
FR Installez la plaque arrière à l'arrière de la carte mère. Mettez les entretoises dans les vis de la plaque arrière.
installare il back plate nella parte posteriore della scheda madre. Collocare i distanziatori sulle viti del back plate.
PL Umieść płytę mocującą pod płytą główna i przykręć ją za pomocą śrub dystansowych.
ES Instale el back plate en la parte posterior de la placa base. Ponga los separadores en los tornillos del back plate.
RU Установите крепёжную пластину на обратной стороне материнской платы. Установите промежуточные стойки на винты.
TW 將套有螺絲定位套及定位螺絲的背板,裝於主機板背面,再從主機板正面將定位膠環放入定位螺絲內。
CN 将套有螺丝定位套及定位螺丝的背板,装在主板背面。再從主板正面將定位胶环放入定位螺丝內。
KR 마더보드 뒷면에 Back Plate을 설치해주세요. Back Plate 나사에 지지대를넣으세요.
JP マザーボード背面にバックプレートを設置し、表面に出たポジションスクリューにスタンドオフを装着してください。
ID Pasang back plate ke belakang motherboard. Masukkan stand-off ke sekrup back plate
Step 3.3
*AMD installation
natural_image
Isometric technical diagram of a mechanical assembly with no visible text or symbolsEN Install the AMD mounting plates on the position screws and fasten the nuts.
DE Stecken Sie die AMDI-Montagehalterung auf die Montageschrauben und verschrauben Sie diese mit den Nüssen.
FR Installez les plaques de montage dans les pied-vis et serrez les écrous.
IT Collocare le piastre di montaggio AMD sulle viti di posizione e serrare i dadi.
PL Zainstaluj płyty montażowe na śrubach pozycjonujących i dokręć nakrętki
ES Ponga los soportes de montaje AMD en los tornillos correspondientes y apriete las tuercas
RU Установите крепёжные пластины на винты и закрепите их гайками.
TW 將支架安裝於定位螺絲上並鎮上螺帽。
CN 将支架安装在定位螺丝上,井锁上螺帽。
KR Mounting plate를 설치하여 너트로 단단히 고정하세요
JP スタンドオフの上にAMD用マウントプレートを設置した後、ナットを使い固定してください。
ID Pasang mounting plate pada sekrup posisi dan kencangkan mut
Step 4 St
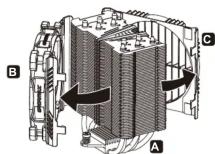
EN Remove the fan and the air guide before installing the cooler.
DE Nehmen Sie den Lüfter und den Air Guide vor der Installation des Kühlers ab.
FR Retirez le ventilateur et le guide-air C avant d'installer le refroidisseur.
IT Prima di installare il dissipatore rimuovere la ventola e la guida per il flusso d'aria.
PL Przed instalacją elementu chłodzącego należy odłączyć wentylator i prowadnicę powietrza.
ES Antes de instalar el disipador remover el ventilador y la guía del flujo de aire
RU Удалите вентилятор и направитель потока воздуха перед установкой купера
TW 安装散熱器前請先移除風扇和導風罩
CN 安装散热器前请先移除风扇和导风罩
KR 콜러를 설치하기에 앞서 fan과 air guide를 제거하세요.
JP クーラー本体を設置する前にファンとエアガイドを取り外してください。
ID Lepaskan fan dan air guide sebelum memasang cooler
The Ground Truth image displays a single, solid horizontal line. According to Rule 2 (UNDERSCORE & LINE RULES), this is a stylistic or background line, not a placeholder underscore. Therefore, the OCR result must ignore it and output nothing or only meaningful text. The provided OCR content is "____", which consists of four underscores. This is an incorrect interpretation of the line as a placeholder, violating the rule that stylistic lines must be ignored. The OCR has hallucinated underscores where none should exist based on the GT's visual context. Hence, the OCR result is inconsistent with the Ground Truth.
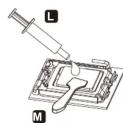
EN Apply the thermal grease evenly onto the CPU surface with spreader. Remove the protective film from the cooler base.
DE Tragen Sie eine dünne Schicht Wärmeleitpaste auf die Oberfläche der CPU auf. Entfernen Sie die Sicherheitsfolie von der Bodenplatte des CPU-Kühlers.
FR Appliquez la graisse thermique uniformément sur la surface du processeur à l'aide de la spatule M. Retirez le film de protection de la base du refroidisseur.
IT Applicare omogeneamente la pasta termica sulla superficie della CPU con la spatola Rimuovere la pellicola protettiva dalla base del disspatore.
PL Nanieś równo szpachelką paste termoprzewodzącą na powierzchnię CPU. Zdjąć folię ochronną z podstawy chłodzenia.
ES Aplicar la pasta térmica de manera uniforme en la superficie de la CPU. Remover la capa protectiva de la base del disipador.
RU Нанесите термопасту равномерно на поверхность процессора. Пожалуйста, удалите защитную крышку с охлаждающей пластины. удалите защитную крышку с охлаждающей
TW 使用塑膠刮刀將散熱膏均勻地塗抹於CPU表面,並取下散熱器底座之保護膜
CN 用塑胶刮刀将散热膏均匀地涂抹在OPU的表面,并取下散热器底座的保护膜
KR 스프레더를 사용하여 CPU 표면에 써멀그리스를 곧고루 바르세요.클러 베이스에 있는 별흐질류을 제간해주세요.
JP 付属のヘラを使ってCPUの表面にサーマルグリスを均等に塗布してください。必ずクーラーベースから保護フィルムを取り外してください。
ID Oleskan thermal pasta secara merata ke permuksan CPU dengan spreader. Lepaskan film/pita pelindung dari dasar kotak pendingin.
Step 6
natural_image
Diagram showing two views of a computer motherboard with labeled components (no text or symbols present)EN Place the cooler on the CPU and tighten the spring screws on base.
DE Platzieren Sie den Kühler auf der Intel/AMD-Montagehalterung und ziehen Sie die Federschrauben fest.
FR Placez le refroidisseur sur le CPU et serrez les vis à ressort sur la base
IT Posizionare il dissipatore sulla CPU e fissare le viti a motta sulla base.
PL Umieść element chłodzący na CPU i dokręć śruby sprężynowe na podstawie
ES Posicionar el disipador en la CPU y fijar los tornillos con muelle en la base.
RU Установите купер на процессоре, затем закрепите их пружинными винтами.
TW 將散热器置於CPU上並訓上底座彈簧螺絲
CN 将散热器放置于CPU上,井锁紧底座弹簧螺丝
KR CPU에 콜러를 설치하여 스프링 나사로 베�이스를 단단히 조여주세요
JP GPU上に本体を設置し、スプリングスクリューを締め、マウントプレートに本体を固定してください。t
ID Tempatkan cooler pada CPU dan kencangkan sekrup pada dasarmya.
Step 7
text_image
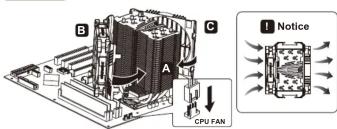
B C A CPU FAN NoticeAttach the fan and the air guide to the cooler. Connect the fan 4 pin header to the CPU fan power socket on the motherboard.
Install the fan and air guide as illustrated way gives best cooling airflow. Refractige Sie den Lüfter und den Air Guide am Kühler, Schlößen Sie den 4 Ein B
DE CPU-FAN-Sockel Ihres Mainboards an.
■ Die beste Leistung erzielen Sie, wenn Sie den Lüfter und Air Guide wie abgebildet ontieren, des Lüfters auf die Luftstromrichtung, um die bestmögliche Kühleistung zu gewährleisten.
FR Fixez le ventilateur et le guide-air au refroidisseur. Branchez le connecteur PWM à 4 broches sur le connecteur CPU FAN de la carte mère.
1 Installez le ventilateur et le guide-air comme illustré pour donner le meilleur flux d'air de refroidissement
Installare la ventola e la guida per il flusso d'aria sui dissipatore. Collegare il connettore a 4 pin della
IT ventola al socket CPU fan della scheda madre.
E installare la ventola e la guida del flurso d'
Przymocuj wentylator i prowadnice powietrza do elementu chłodzącego. Podłącz wtyczkę PWM terłaścza wębłaścza do oprzda, "CRILEAN" na płycie okwnej
PL Zainstaluj wentylator i prowadnicę powietrza, jak pokazano na ilustracji, aby uzyskać najlepszy
Instalar el ventilador y la guía del flujo de aire en el disipador. Conectar el conector de 4 pines del ventilador al echitude CPU fan de la placa base.
El instalar el ventilador y la guía del flujo de aire como enseñado en el manual para tener mejores prestaciones.
RU Установите вентилятор и направитель потока воздуха. Подключите 4-Pin разъём PWM к материнской плате.
1 Обратите при этом внимание на направление воздушного потока.
TW
将風盾與導風罩依圖示方式安裝能提供最佳散熱氣流。
CN 将风扇与导风罩固定回散热器上,将PWM风扇4pin接头与主板连接。将风扇与导风罩传图示方式安装将提供最佳散热复流。
一、本次发行前公司全体股东的表决情况
KR 불러에 fan과 air guide를 부착하세요. PWM 4핀 를 마더보드의 CPU Fan head 에 연결해 주세요 (참조!그림과 같이 fan과 air guide를 설치하면 최상의 airflow를 제공합니다)
IP 冷却ファンの4ピンコネクターをマザーボード上のCPUファン給電ソケットに接続してください。
67 帰卸ノブ及び、本体の向きに注意ください
ID Pasang fan dan air guide pada cooler. Hubungkan PWM 4 pin ke header Fan CPU pada motherboard.
Memasang fan dan air guide seperti ilustrasi memberikan aliran udara terbaik pada cooler
Chapter 3 Supplement –Air Guide
text_image
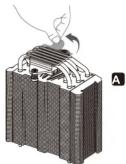
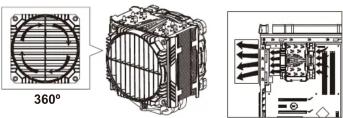
360°EN Rotate the grill of air guide for preferred airflow direction adjustment.
DE Drehen Sie den Grill des Air Guides, um den Luftstrom in die gewünschte Richtung zu lenken.
FR Tournez la grille du guide-air pour régler la direction du flux d'air.
IT Ruotare la griglia della guida per il flusso d'aria per scegliere la direzione del flusso d'aria.
PL Obróć kratkę prowadnicy powietrza w celu ustawienia preferowanego kierunku przepływu powietrza.
ES Girar la guía para escoger la dirección del flujo de aire.
RU Поверните направитель потока воздуха в нужную сторону.
TW 依系統散熱需求旋轉導風罩以調整風流方向
CN 根据系统散热需求旋转导风罩以调整风流方向
KR 선호하는 airflow 방향(쪽)으로 air guide를 조정하세요
JP エアガイドを回転させることによりエアフローの方向を変えることが出来ます。
ID Putar lubang udara air guide untuk menyesuaikan allran udara yang lebih disukai.
Chapter 4 Motherboard Sync
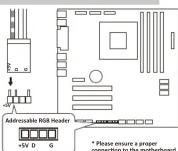
EN Connect the sync cable to a supported motherboard with ARGB header.
DE Verbinden Sie das Sync-Kabel mit einem kompatiblen Motherboard mit ARGB-Header.
FR Si la carte mère prend en charge le connecteur RGB (ADD headers): connectez le câble de synchronisation ARGB à la carte mère.
Se la scheda madre è fornita di connettori ARGB compatibili, collegare il cavo ARGB Sync alla scheda madre.
PL Jeśli płyta główna OBSŁUGUJE adresowalne nagłówki RGB (ADD): podłącz kabel synchronizacyjny ARGB do płyty głównej.
ES Si su placa base está equipada con conectores ARGB compatibles, conecte el cable ARGB Sync a la placa base.
RU Если материнская плата поддерживает функцию ARGB, подключите кабель огидрет<|rotate_right|>ности ARGB к материнской плате.
TW 若您的主機板有支援addressable RGB (ADD headers)功能:將RGB同步線連接到主機板的ARGB 4Pin接口。
CN 若您的主板有支援addressable RGB (ADD headers)功能:将RGB同步线连接到主板的ARGB 4Pin接口。
KR 마더보드가 RGB (ADD 헤더를) 지원하는 경우: ARGB 동조 케이블을 마더보드에 연결하십시오.
JP マザーボードがアドレッサブル型ARGBに対応している場合、ARGB SYNC用ケーブルをマザーボードに接続してください。
ID Jika motherboard tidak mendukung header RGB (ADD) yang dapat dialamatkan : sambungkan kabel ARGB Sync ke motherboard.