AP14003W - Climatisation EDGESTAR - Notice d'utilisation et mode d'emploi gratuit
Retrouvez gratuitement la notice de l'appareil AP14003W EDGESTAR au format PDF.


| Type de produit | Climatisation portable |
| Marque | EdgeStar |
| Modèle | AP14003W |
| Couleur | Blanc |
| Dimensions (L x H x P) | 46,7 x 76,5 x 39,7 cm |
| Poids | 33 kg |
| Alimentation | 115 V ~ 60 Hz |
| Puissance absorbée | 1580 W |
| Courant | 11,9 A |
| Réfrigérant | R-410A |
| Minuterie | 24 heures |
| Télécommande | Oui |
| Fonction sommeil | Oui |
| Modes de fonctionnement | Auto, Refroidissement, Déshumidification, Ventilation |
| Vitesses de ventilation | Basse, Moyenne, Haute, Auto |
| Filtre | Pré-filtre lavable |
| Drainage | Continu (déshumidification) et manuel (refroidissement) |
| Sécurité | Fiche LCDI (détection de fuite de courant) |
| Garantie | 1 an pièces et main-d'œuvre, 3 ans limité compresseur |
FOIRE AUX QUESTIONS - AP14003W EDGESTAR
Questions des utilisateurs sur AP14003W EDGESTAR
0 question sur cet appareil. Repondez a celles que vous connaissez ou posez la votre.
Poser une nouvelle question sur cet appareil
Téléchargez la notice de votre Climatisation au format PDF gratuitement ! Retrouvez votre notice AP14003W - EDGESTAR et reprennez votre appareil électronique en main. Sur cette page sont publiés tous les documents nécessaires à l'utilisation de votre appareil AP14003W de la marque EDGESTAR.
MODE D'EMPLOI AP14003W EDGESTAR
EDGESTAR®
natural_image
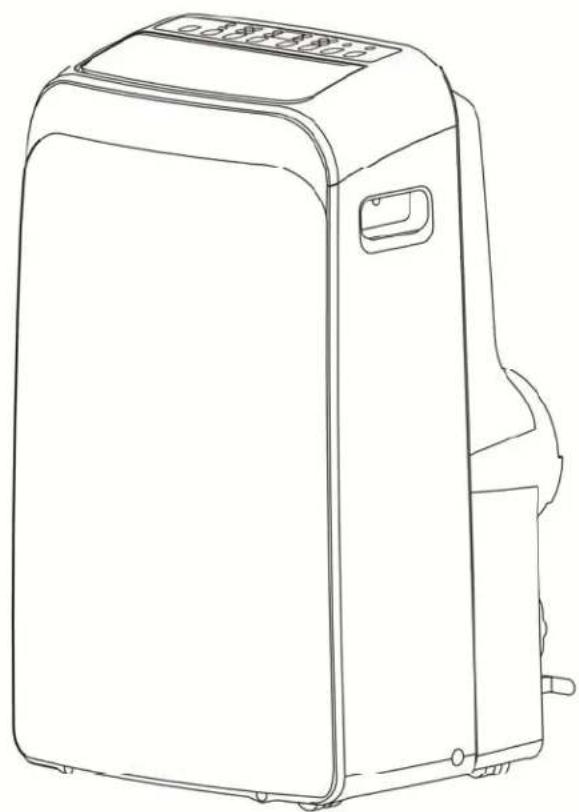
Line drawing of a portable air conditioner unit (no text or symbols)AP14003W
Portable Air Conditioner Owner's Manual
For more information on other great EdgeStar products on the web, go to http://www.edgestar.com
Important Safety Information
Improper handling can cause serious damage to the appliance and/or to the user. Please read the following safety information.
Electrical Safety
• This unit is designed for indoor use only.
- Do not use the unit in extremely humid or wet environments.
- Do not spray water and wet the housing or control panel.
• Do not pull the unit by the cord.
• Always turn the unit off and unplug it from the outlet when cleaning.
- Unplug the unit if it is not going to be used for a long period of time.
- Do not operate the unit with a damaged plug or a loose socket.
• Use only the correct power supply with appropriate amperage.
- If the power cord is damaged, it must be replaced by the manufacturer, a service agent, or qualified technician.
- Do not remove any part of the casing unless instructed by an authorized technician.
General Safety
• This portable air conditioner is not intended to be used by children.
- Children should be supervised to ensure that they do not play with this product.
- Do not allow children to play with the controls or drop any objects into the air outlets or vents.
- Do not place objects or let any person sit on top of the unit.
- Only use in the upright position on a flat, level surface and provide at least 20 inches of clearance from any walls or objects.
- Route the power cord carefully to avoid a tripping hazard.
- This unit is intended for domestic use only. Do not use the portable air conditioner for industrial or commercial use. Any other use may invalidate the warranty.
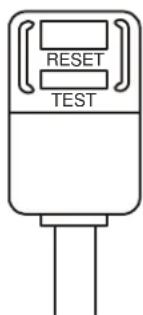
Your portable air conditioner is supplied with a Leakage-Current Detection and Interruption (LCDI) safety plug. This device provides protection to reduce the risk of fire due to arcing faults in the power supply cord. Before using your portable air conditioner, follow the instructions below to ensure that the LCDI plug is working properly:
- Plug the power cord to a grounded outlet.
- Press the TEST button on the LCDI plug. This should trip the plug and cut the power to the air conditioner. If the plug does not trip and you are able to turn on the unit, please contact EdgeStar support.
DO NOT USE YOUR PORTABLE AIR CONDITIONER IF THE TEST FAILS.
Press the RESET button to start using your air conditioner.
Do not use the TEST and RESET buttons as an ON/OFF switch.
Electrical products should not be disposed of with household waste. Please contact your local recycling center for more information on how to recycle electronic waste.
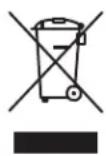
Table of Contents
IMPORTANT SAFETY INFORMATION......I
INTRODUCTION ....1
PARTS IDENTIFICATION....2
FRONT VIEW 2
PARTS KEY: 2
BACK VIEW 2
WINDOW KIT AND EXHAUST HOSE INSTALLATION INSTRUCTIONS ...... 3
PREPARATIONS FOR INSTALLING THE WINDOW KIT 3
INSTALLATION OF THE EXHAUST HOSE 5
NOTES ABOUT THE EXHAUST HOSE 7
DRAINING THE UNIT....8
CONTROL PANEL OVERVIEW....9
USING THE CONTROL PANEL/ REMOTE CONTROL 10
LED DISPLAY 10
MODE INDICATOR LIGHTS....10
POWER BUTTON 10
AUTO-RESTART: 10
REMOTE CONTROL SENSOR 11
TIMER....11
SLEEP 11
INCREASE/DECREASE....11
FAN INDICATOR LIGHTS....11
MAINTENANCE 14
CLEANING THE UNIT 14
CLEANING THE PRE-FILTER 14
PREPARATION FOR STORAGE....14
TROUBLESHOOTING 15
ROUBLESHOOTING CONTINUED....16
SPECIFICATIONS....17
WARRANTY 18
Introduction
Thank you for purchasing this EdgeStar portable air conditioner. We are glad you chose us. We believe that your purchase of this product opens a relationship between you and EdgeStar. EdgeStar appliances are built to enhance and celebrate the modern lifestyle. Please visit www.edgestar.com for our full list of products.
This manual contains important information regarding the proper installation, use and maintenance of your portable air conditioner. Following this manual will help to ensure that your product will work at its peak performance and efficiency.
Please save the original product packaging in case you need to safely transport your portable air conditioner.
For Your Records:
Please write down the model number and serial number below for future reference. Both numbers are located on the rating label on the back of your unit and are needed to obtain warranty service. You may also want to staple your receipt to this manual as it is the proof of your purchase, and is also needed for service under your warranty.
Model Number:
Serial Number:
Date of Purchase:
To better serve you, please do the following before contacting customer service:
- If you received a damaged product, immediately contact the dealer where you purchased this item.
- Read and follow this instruction manual carefully to help with installation, proper use and maintenance of your portable air conditioner.
- Read the troubleshooting section of this manual as it will help you diagnose and solve common issues.
- Visit us on the web at http://www.edgestar.com to register your product, download product guides, additional troubleshooting resources and up-to-date information.
- If you need warranty service, our friendly customer service representatives are available via email at service@edgestar.com or by telephone at 1 (866) 319-5473.
Parts Identification
Front View
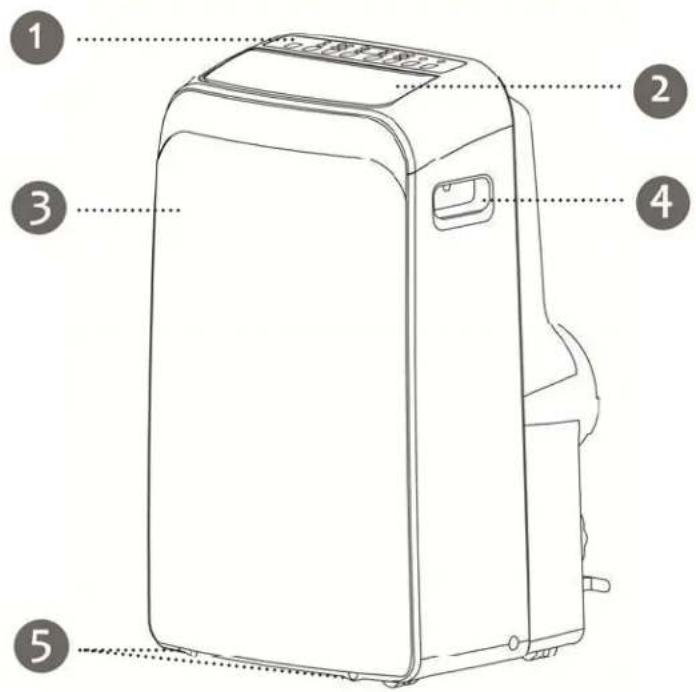
Parts Key:
- Control Panel
- Louver-Air Flow
- Handle
- Front Panel
- Castors (4)
- Upper Air Filter (behind grill)
- Upper Air Intake (Evaporator)
- Drain Outlet (Continuous Drain -Dehumidify mode)
- Air Outlet (Heat Exhaust)
-
- Power Cord Outlet
- Lower Air Filter (behind grill)
- Power Cord Buckle for Storage
- Lower Air Intake (Condenser)
- Power Plug Hooks (for storage use)
- Bottom Tray Drain Outlet (Manual Drain)
Back View
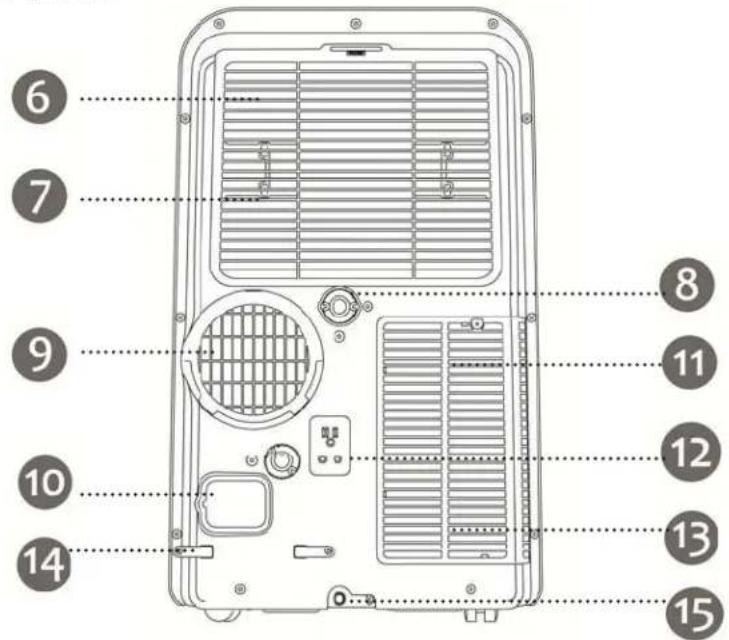
Window Kit and Exhaust Hose Installation Instructions
Preparations for installing the window kit
You must vent your portable air conditioner when running in it cooling mode. Your unit includes a window exhaust kit that can be used to vent the unit out of a window.
Before you begin, make sure you have all the parts necessary for installation and a location is picked.
Window Kit Parts List:
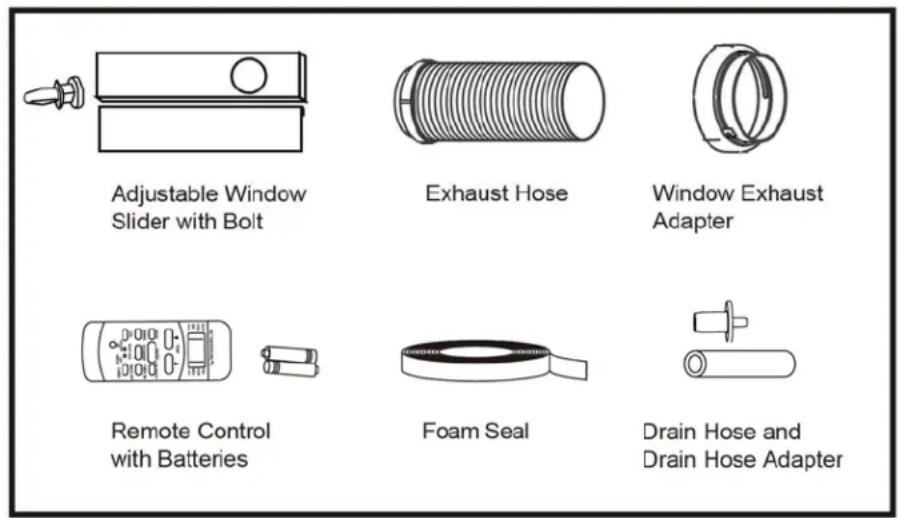
If you have multiple windows, choose one that is near an electrical outlet that will be able to provide sufficient power to your unit. See the power requirements listed on the product label printed on the side, or on the back of your portable air conditioner.
Your window kit can be installed on a horizontal or vertical sliding window as shown in the following pictures and instructions. Follow the instructions for which desired window kit installation.
NOTE: You may need to contact your electrician if your room's circuit is not able to power your unit.
Installation in a sliding sash window (horizontal)
Step 1:
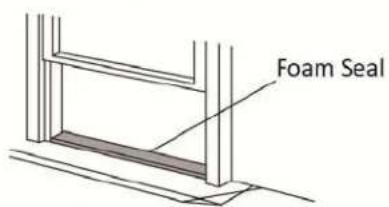
Step 1: Cut the foam seal to the proper length and attach it to the window sill.
Step 2:
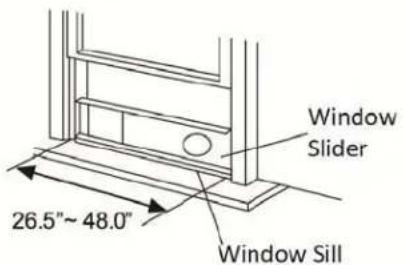
Step 2: Attach the window slider kit to the window sill. Adjust the length of the window slider kit according to the width of the window. Shorten the adjustable window kit if the width of the window is less than 26.5 inches. Open the window sash and place the window slider kit on the window sill.
Step 3:
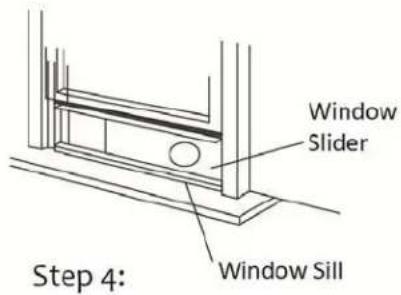
Step 3: Cut the foam seal to the proper length and attach it on the top of the window slider kit. Close the window sash securely against the window slider kit.
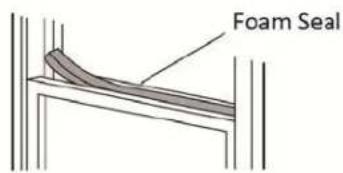
Step 4: Finally, cut the foam seal to an appropriate length and seal the open gap between the top window sash and outer window sash.
Installation in a sliding sash window (vertical)
Step 1:
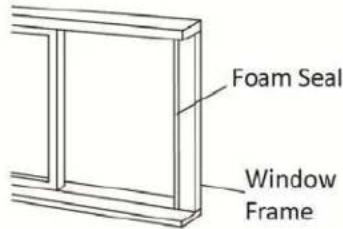
Step 1: Cut the foam seal to the proper length and attach it to the window frame.
Step 2:
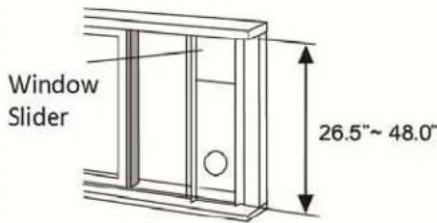
Step 2: Attach the window slider kit to the window frame. Adjust the length of the window slider kit according to the height of the window. Shorten the adjustable window kit if the height of the window is less than 26.5 inches. Open the window sash and place the window slider kit on the window sill against the frame securely.
Step 3:
natural_image
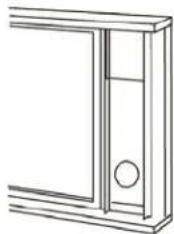
Line drawing of a cabinet or cabinet frame with a circular vent and side panel (no text or symbols)Step 3: Cut the foam seal to the proper length and attach it on the top of the window slider kit. Close the window sash securely against the window slider kit.
Step 4:
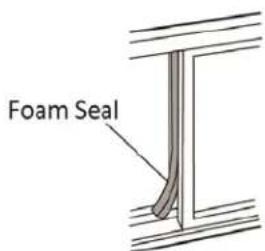
Step 4: Finally, cut the foam seal to an appropriate length and seal the open gap between the top window sash and outer window sash.
Installation of the exhaust hose
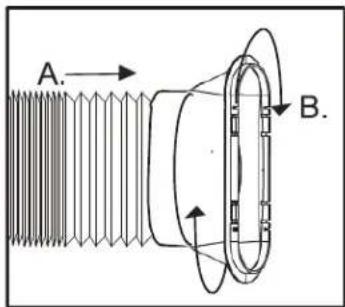
Step 1: Attaching the oval adapter to the exhaust hose.
Extend the end of the exhaust hose and the thread the Window Exhaust Adapter A (as listed in parts section). Turn the adapter onto the hose clockwise until you cannot turn anymore and the adapter is secure to the exhaust hose.
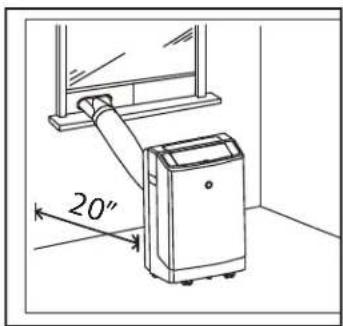
Step 2: Roll the unit towards the window kit you have installed already.
Make sure to leave a space that is at least 20 inches from the wall.
natural_image
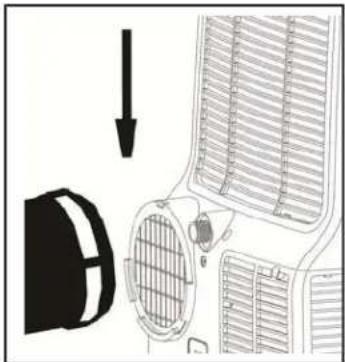
Diagram showing airflow or ventilation system with a black arrow pointing to a component (no text or symbols present)Step 3: Connecting the exhaust hose to unit.
Align the slots on the hose adapter to the air outlet and slide downward as pictured on the left.
natural_image
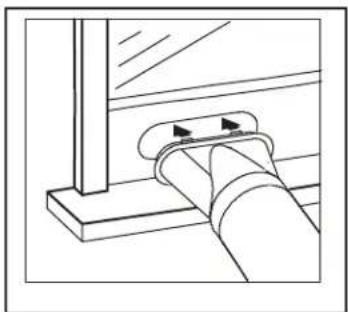
Technical line drawing of a pipe connection with a valve and base (no text or symbols)Step 4: Connect oval adapter to the window kit.
Push the oval adapter through the window kit hole until it snaps in place. After you have installed the exhaust hose and window kit, you can plug in your portable air conditioner and power on.
Notes about the exhaust hose
Your portable air conditioner is designed to exhaust condensate water that is collected from the air. This water, in either gaseous or droplet form, will be expelled out the exhaust port of the unit. Please take this into account when deciding how to vent it.
- The exhaust hose supplied with the portable air conditioner can be extended up to approximately 48 inches; however for maximum efficiency, use the shortest length possible.
- Try to prevent any kinks or bends in the exhaust hose. Kinks or bends may trap exhaust air which can radiate heat into the room or potentially cause the portable air conditioner to overheat and shut itself off.
- The exhaust hose supplied with the portable air conditioner has been specifically designed for this air conditioner. Do not lengthen the hose by adding additional hoses or attachments. Do not replace it with any other hose.
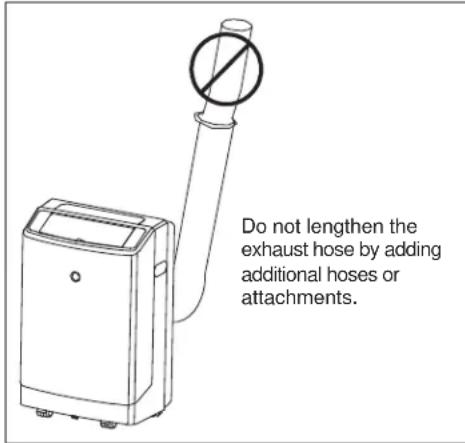
Warning: Longer hoses are not recommended.
The exhaust hose must be installed or removed in accordance with the usage modes:
A: You must install the exhaust hose if the unit is in Cooling Mode.
B: You must remove the exhaust hose if the unit is in Fan Mode or Dehumidify mode.
NOTE: The exhaust hose may be compressed or extended according to your installation requirements; however, it is recommended to keep the exhaust hose length at a minimum.
Draining the Unit
When the portable air conditioner is in cooling mode, or dehumidify mode, it will remove moisture from the air. The condensed water from the air will be collected in an internal reservoir and will be evaporated and exhausted out of the exhaust hose. However, in very humid conditions, the internal reservoir may fill completely. This causes the air conditioner to turn off to avoid overflowing the internal reservoir, the fan will continue to operate.
Continuous Drain (pictured below):
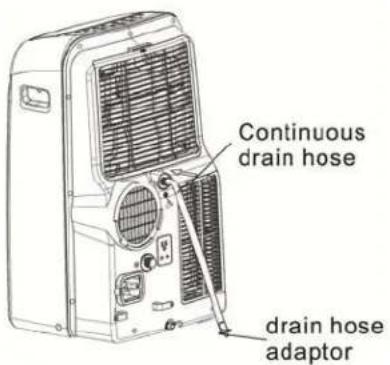
During dehumidifying mode, remove the upper drain plug from the back of the unit. Attach a 14 " hose that can be locally purchased to the continuous drain outlet. Connect the drain hose adapter to end of hose and place the open end of the adapter directly over the drain area.
Manual Drain (pictured below):
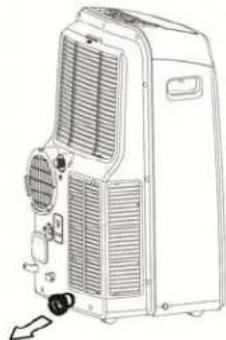
natural_image
Line drawing of an air conditioner unit with ventilation grilles and cooling fans (no text or symbols)During cooling mode the once the water level of the bottom tray reaches capacity the unit will beep several times and the digital display on the control panel will read “P1” to indicate the water must be manually drained. Carefully move the unit to a drain location and remove the bottom drain plug and connect the drain hose to the drain outlet. The portable air conditioner will now drain through the drain hose. Please note that this unit has no drain pump; all water will drain with gravity only, i.e., only “downhill.” Once unit is fully drained reinstall the bottom drain plug and restart the machine until the “P1” symbol disappears. If the error repeats call for service.
Control Panel Overview
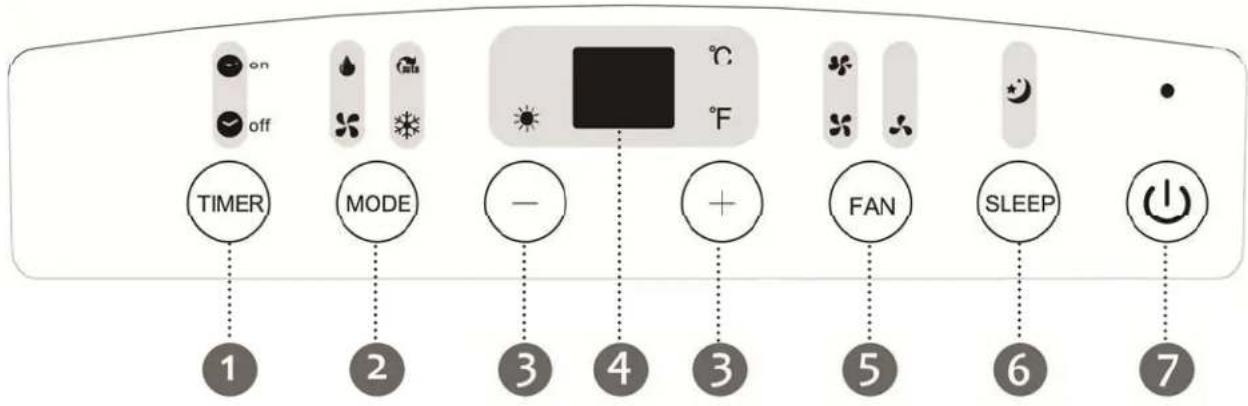
| 1 | Timer | Used to initiate the AUTO ON start time and AUTO OFF stop time program, in conjunction with the UP and DOWN buttons. |
| 2 | Mode Selector | Selects the appropriate operating mode. |
| 3 | Increase / Decrease | Used to adjust temperature settings or the TIMER setting. |
| 4 | LED Display | In Auto / Cooling Mode shows the set temperature. In Dehumidify / Fan it shows the current temperature of the room. |
| 5 | Fan Selector | Press to select the fan speed in two speeds- LOW, MED, HIGH and AUTO. |
| 6 | Sleep (“Economy” on Remote) | Select to initiate the SLEEP operation. |
| 7 | Power | Powers the unit on and off. |
Using the Control Panel/Remote Control
LED Display
In cooling mode and auto-timer setting the display will show the set temperature in either °C or °F. In dehumidify or fan mode the display will show the current temperature of the room.
Mode Indicator Lights
Select the desired mode setting. Each time you press the “mode” button a mode is selected in a sequence: AUTO – COOL – DEHUMIDFY – FAN. The mode indicator light illuminates under the different mode settings.

COOLING

DEHUMIDIFY (DRY)

FAN

AUTO
Cooling Operation: Press the MODE button until the COOL indicator light comes on. Press the UP and DOWN arrows to select your desired room temperature. Press the FAN button to choose the fan speed. Dry Operation (Dehumidify): Press the MODE button until the DRY indicator light comes on. Under this mode you cannot select a fan speed or adjust the temperature.
Auto Operation: Press the MODE button until the AUTO indicator light comes on. When the air conditioner is set in AUTO mode it will automatically select cooling or fan depending on what temperature you have selected and the current ambient temperature. Under this mode you cannot select the fan speed.
Fan Operation: Press the MODE button until the FAN indicator light comes on. Press the FAN button to choose the fan speed. The temperature cannot be adjusted.
Power Button
Use the Power button to turn the portable air conditioner on and off.
By default when you first use the power button, the unit will begin to operate in cooling mode. The unit will remember the last used mode/settings if you shut down and restart.
Auto-Restart: If power to the unit is interrupted, the air conditioner will restart itself in its last used mode/settings once power is restored. The compressor will restart after 3 minutes.
EdgeStar Portable Air Conditioner
| Remote Control Sensor | The remote control sensor receives infrared signals given by the remote control. |
| Timer | When the unit is on, press the timer button to initiate the Auto-off stop program, the TIMER OFF indicator light will illuminate. Press the UP or DOWN button to select the desired time. Press the TIMER button again within five seconds, the Auto-on start program is initiated and the TIMER ON indicator light will illuminate. Press the UP or DOWN button to select the desired Auto-on start time.When the unit is off, press the TIMER button to initiate the Auto-on start program, press it again within five seconds and the Auto-off stop program will initiate.Press or hold the UP or DOWN button to change the Auto time by 0.5 hour increments, up to 10 hours, then at 1 hour increments up to 24 hours. The control will count down the time remaining until the unit starts. The system will automatically revert back to display the previous temperature setting if there is no operation in a five second period. |
| Sleep | Select to initiate the SLEEP operation. On the remote this function is labeled as “ECONOMY”. Press this button; the set temperature will increase by 1^/2^ in 30 minutes. The set temperature will then increase by another 1^/2^ after an additional 30 minutes. This new temperature will be maintained for 7 hours before it returns to the originally selected temperature. This ends the SLEEP mode and the unit will continue to operate as originally programmed. This feature is only available in COOLING and AUTO mode. |
| Increase/Decrease | Used to adjust (increasing/decreasing) temperature settings ( 1^/2^ increments) in a range of 17^(62^) to 30^(88^) or the TIMER setting in a range of 1-24 hrs.The control panel is capable of displaying temperature in Fahrenheit or Celsius. To convert from one to the other, press and hold the UP and DOWN buttons at the same time for 3 seconds. |
| Fan Indicator Lights | Press to select the fan speed in two speeds- LOW, MED, HIGH and AUTO. The fan speed indicator light illuminates under different fan settings. |
| 11 |
Your portable air conditioner comes with a remote control that has identical functions as on your control panel with two additions:
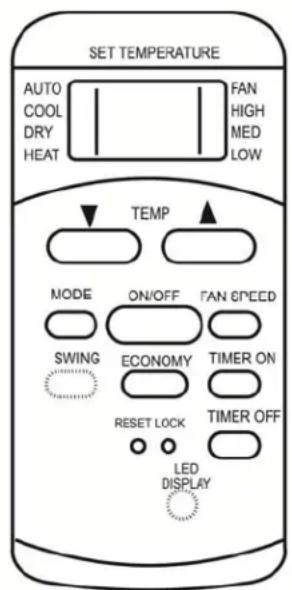
LOCK button (remote control only): Press this recessed button to lock all current settings, the controller will not accept any new operations until the LOCK button is pressed again to release. A lock symbol will display on the LED display to indicate this function is active.
RESET button (remote control only): Press this recessed button to cancel all current settings, the unit will return to initial settings.
ERROR CODES on LED display:
E1- Room temperature sensor error.
E2- Evaporator temperature sensor error.
E3- Display panel communication error.
For all error codes, unplug the unit and plug it back in, if error repeats call for service.
PROTECTION CODES on LED display:
P1- Room temperature sensor error. Connect the drain hose and drain the collected water away. If error repeats call for service.
Energy Saving Guide
Read and follow the guide below to get the best performance and efficiency from your portable air conditioner:
- Do not cover the air outlet (exhaust) while in use.
- Do not place the unit in front of curtains or drapes- to ensure they do not obstruct the air intake.
- Minimize the length of the exhaust hose.
- Make sure the exhaust hose is as straight as possible and avoid kinks or bends.
- Keep curtains, blinds or drapes closed during the sunniest part of the day.
- Use the timer to operate the unit before it is needed. For example, set the timer to turn on the unit in cooling mode for 3 or more hours to cool the room before you arrive. You may want to operate the unit all day if you live in a warmer climate.
- Minimize the heat sources (direct sunlight, computers, servers, people, etc.) in the room.
- Close all windows and doors.
- Use the unit in a contained room. For example, a room with four walls and a ceiling, instead of a partitioned studio, or warehouse.
• Make sure the unit is on a level surface. - Minimize the amount of humidity in the room. For example, run the unit as a dehumidifier.
- To prolong the compressor's life, please wait at least 3 minutes before turning the unit back on after shutting it off.
- Inspect and keep the pre-filters clean by cleaning regularly.
• Perform routine maintenance.
Maintenance
Clean the air conditioner and filters regularly to maximize performance and efficiency, and prolong the unit's life. Be sure to always unplug the air conditioner from the power outlet before cleaning.
Cleaning the unit
Use a soft dry cloth to wipe the body clean. If necessary, use lukewarm water to dampen a cloth to clean the unit.
Use a soft bristle brush to clean between the vents.
Carefully use a vacuum cleaner to clean the condenser coils.
Never use abrasive chemicals, volatile substances, gasoline, detergents, chemically treated cloths, or other cleaning solvents that may damage the cabinet exterior.
Never spray water directly on the unit.
Cleaning the pre-filter
To clean the pre-filter, follow the steps below:
1) Power off the unit and remove the pre-filter.
2) Use a vacuum cleaner or tap the filter lightly to remove loose dust and dirt, then rinse thoroughly under lukewarm running water (below 104^ F). You may use a mild soap and water solution if needed. Allow the pre-filter to air dry in a cool and shaded place. Dry thoroughly before reinstalling.
Warning: Never operate the unit without the pre-filter.
Clean the pre-filter periodically. If the unit is used in a dusty environment you may need to clean it on a weekly basis.
Preparation for Storage
If you are not going to be using the unit for an extended period of time, follow the instructions below before storing your unit:
1) Drain all the water from the unit's reservoir. Operate the unit in fan mode for a few hours to thoroughly dry any moisture left on the coils inside the unit.
2) Power off the unit, and clean or change the filters.
3) Unplug and carefully wind the power cord.
4) Remove the exhaust hose and adapters and keep them in a safe place.
EdgeStar Portable Air Conditioner
Troubleshooting
Follow the troubleshooting guide below to resolve common issues.
| Issue | Possible Cause | Solution |
| My air conditioner is not functioning at all. | Unit is not receiving power. | Make sure the unit is plugged in to a grounded outlet. |
| LCDI power cord is tripped. | Press the Reset button on the LCDI cord. | |
| Insufficient power. | Move the unit to another outlet. Check your circuit breaker. (Refer to the rating label on the back of the unit to determine the Amperage draw). | |
| Water reservoir is full. | Drain the unit and restart. | |
| Control panel is disconnected. | If no indicator lights turn on, contact customer service. | |
| My remote control does not work and the indicator light on remote does not turn on. | Batteries not installed. | Install new batteries. |
| Bad batteries. | Replace the batteries. | |
| Batteries installed incorrectly. | Reinstall the batteries correctly. | |
| A defective remote control. | Contact customer service. | |
| My air conditioner is making a loud noise. | The unit is not level. | Make sure the unit is on a level surface. |
| A foreign object has jammed the fan. | Remove the object from the fan. | |
| The floor below the unit is uneven. | Move the unit to a level surface. | |
| My air conditioner is making a continuous metallic knocking or pinging sound. | Unit may have been shipped on its side. | Shut off the unit. Let the unit sit on a level surface for at least 24 hours and restart. |
| Damaged compressor. | Contact customer service. | |
| My air conditioner is leaking. | Drain plug is removed. | Attach the drain plug. |
| Cracked base pan. | Contact customer service. | |
| My air conditioner runs for a little while and then it trips the power cord or the circuit breaker. | The air conditioner may be plugged into an outlet that can not supply the correct amount of current. | Contact an electrician if the unit works in a different room or circuit. |
| The control panel lights blink randomly. | Unit may have a faulty control panel. | Contact customer service. |
| No air comes out the left side of the air vent. | The unit is designed to blow air from the right. | This is normal operation. |
Troubleshooting continued
| Issue | Possible Cause | Solution |
| My air conditioner is not cooling at all. | Unit is not operating in cooling mode. | Set the unit to be in cooling mode, and lower the set temperature (pg. 13). |
| The compressor is not on. | The compressor may take up to 3 minutes to turn on, or longer if it is too warm. | |
| The ambient temperature is too high. | Lower the room temperature to be below 90°F degrees. | |
| The filter may be dusty or blocked. | Clean the filters. (pg. 16) | |
| Blocked exhaust port. | Remove any obstructions in the exhaust hose and port. | |
| My air conditioner blows cold air, but does not lower the room temperature. | The unit is not vented. | The unit must be vented. (pg. 4) |
| The area of the room is too large. | Minimize the size of the area to be cooled, i.e. adding a drop ceiling. Use more than one unit to cool the area, or use a larger unit. | |
| Open windows and doors. | Close any open doors and windows. | |
| Too many heat sources. | Remove or shut off additional heat sources such as radio equipment, servers, etc. | |
| The room/garage may be inadequately insulated. | Properly insulate the room to be cooled, i.e. using fiberglass. | |
| The ambient temperature is too high. | The unit may not work if the room temperature is above 90°F. | |
| Direct sunlight is heating the room. | Close curtains or pull down blinds, and minimize the direct sunlight into the room. | |
| The filter may be dusty or blocked. | Clean the filter and replace it if needed. | |
| Dirty condenser coils. | Carefully vacuum the coils clean. | |
| Obstructed air intake or exhaust ports. | Remove anything blocking the ports. |
NOTE: If the ambient temperature is above 90^ F the unit may not blow cold air.
TIP: Run the unit before it is needed. For example, run the unit in the morning before the area gets hot, and continue to run the unit all day long in order to maintain a low temperature.
Specifications
| Description of product Portable Air Conditioner | |
| Model | AP14003W |
| Voltage/Frequency | AC 115V~60Hz |
| Input Power 1580W | |
| Current | 11.9A |
| Color | White |
| Coolant | R-410A |
| Timer | 24 Hc |
| Dimensions WxHxD | 18 3/8" x 30 1/8" x 15 5/8" |
| Weight 72.8 lbs. | |
EDGESTAR®
Product Warranty
| Warranty Period | Edgestar will be responsible for: | Consumer will be responsible for: |
| 1st year | All costs for repairing or replacing parts and/or unit which proves to be defective. All transportation costs in the first 90 days. | All transportation costs after 90 days. |
| Limited 2nd-3rd year (compressor only) | Repairing or replacing any compressor which proves to be defective. (Labor not included) | Labor and all transportation costs. |
This product is warranted by EdgeStar and is subject to any conditions set forth as follows:
WHAT IS COVERED:
One Year Parts and Labor: For one year from the date of original retail purchase, EdgeStar will repair or replace any part free of charge including labor that fails due to a defect in materials or workmanship. EdgeStar will be responsible for all transportation costs for the first 90 days from original purchase date, after 90 days the consumer will be responsible. Labor will be performed free of charge at an authorized EdgeStar repair facility and EdgeStar will supply new, rebuilt, or refurbished parts free of charge. EdgeStar may request a defective part be returned in exchange for the replacement part. After the 12 month period, EdgeStar will no longer be responsible for labor charges incurred or replacement parts. All defective products and parts covered by this warranty will be repaired or replaced on a mail-in basis to an EdgeStar authorized repair facility.
Three Year Limited Warranty (Compressor– Labor Not Included): In the second through third year from the date of original retail purchase, EdgeStar will replace the compressor free of charge. The consumer will be responsible for all transportation and labor costs. EdgeStar will supply a new, rebuilt, or refurbished compressor and may request for the defective compressor to be returned in exchange. This limited 3-Year warranty is for the compressor only and does not include labor.
All warranties apply to the original purchaser only, and only covers defects in workmanship experienced during operation of the product under normal service, maintenance, and usage conditions. This warranty applies to the purchase and use of this product in residential settings within the United States of America. All products and parts replaced by EdgeStar under warranty service become the property of EdgeStar. All defective products and parts covered by this warranty will be repaired or replaced on a mail-in basis to an EdgeStar authorized repair facility.
Exceptions: Commercial or Rental Use Warranty: 90 days labor and parts from date of original purchase. No other warranty applies.
WHAT IS NOT COVERED- The following limitations apply to the coverage of this warranty. This warranty does not cover:
Labor charges for installation, setup or training to use the product. Shipping damage, and any damage caused by improper packaging for shipment to an authorized service center, and any damaged caused by improper voltage or any other misuse, including abnormal service, handling, or usage. Cosmetic damage such as scratches and dents. Normal wear and tear on parts or replacement of parts designed to be replaced, e.g. filters, cartridges, batteries. Service trips to deliver, pick-up, or repair, install the product, or to instruct in proper usage of the product. Damages or operating problems resulting from misuse, abuse, operation outside environmental specifications, uses contrary to instructions provided in the owner's manual, accidents, acts of God, vermin, fire, flood, improper installation, unauthorized service, maintenance negligence, unauthorized installation or modification, or commercial use. Labor, service transportation, and shipping charges for the removal and replacement of defective parts, beyond the initial 12 month period. Products that have been modified to perform outside of specifications without the prior written permission of EdgeStar. Products lost in shipment, or theft. Products sold AS IS or from an unauthorized reseller. Products that have had their serial numbers removed, defaced, or with serial numbers that have been invalidated. Damage from other than normal household use. Replacement or repair of household fuses, circuit breakers, wiring or plumbing. Damage to personal property from use of product. Damage from service other than from an authorized EdgeStar repair facility. Hoses, knobs, lint trays and all attachments, accessories and disposable parts. Any service charges not specifically identified as normal such as normal service area or hours. Any special or consequential damages arising out of the use of the product.
OBTAINING WARRANTY SERVICE: If you believe your product is defective, contact EdgeStar Customer Support for troubleshooting assistance and warranty service at www.edgestar.com or call 1-866-319-5473. Before contacting Customer Support you are required to have your model number, serial number and proof of purchase available upon request. Once an EdgeStar authorized representative has confirmed that your product is defective and eligible for warranty service, the product must be returned to an EdgeStar authorized repair facility. EdgeStar is not responsible for damage resulting from shipper mishandling or improper packaging. Do not return a defective product to the place of purchase. Products received without a return authorization number will be refused.
THIS WARRANTY IS IN LIEU OF ANY OTHER WARRANTY, EXPRESS OR IMPLIED, INCLUDING WITHOUT LIMITATION, ANY WARRANTY OF MERCHANTABILITY OR FITNESS FOR A PARTICULAR PURPOSE. TO THE EXTENT ANY IMPLIED WARRANTY IS REQUIRED BY LAW, IT IS LIMITED IN DURATION TO THE EXPRESS WARRANTY PERIOD ABOVE. NEITHER THE MANUFACTURER NOR ITS DISTRIBUTORS SHALL BE LIABLE FOR ANY INCIDENTAL, CONSEQUENTIAL, INDIRECT, SPECIAL, OR PUNITIVE DAMAGES OF ANY NATURE, INCLUDING WITHOUT LIMITATION, LOST REVENUES OR PROFITS, OR ANY OTHER DAMAGE WHETHER BASED IN CONTRACT, TORT, OR OTHERWISE. SOME STATES DO NOT ALLOW THE EXCLUSION OF INCIDENTAL OR CONSEQUENTIAL DAMAGES, SO THE ABOVE EXCLUSION MAY NOT APPLY TO YOU. THIS WARRANTY GIVES YOU SPECIFIC LEGAL RIGHTS. YOU MAY HAVE OTHER RIGHTS THAT VARY FROM STATE TO STATE.
EDGESTAR®
EdgeStar Products
500 N. Capital of TX Hwy, Bldg 5
Austin, TX 78746
Toll Free: 1-866-319-5473
Web: http://www.edgestar.com
E-mail: service@edgestar.com
Register your product, download owner's manuals, access additional troubleshooting resources, and obtain more information on other great EdgeStar products on the web at: http://www.edgestar.com
Product contents and specifications may change without notice.
Copyright © 2013 Living Direct, Inc. All rights reserved.

- EDGESTAR®
- AP14003W
- Portable Air Conditioner Owner's Manual
- Important Safety Information
- Electrical Safety
- General Safety
- Table of Contents
- IMPORTANT SAFETY INFORMATION......I
- INTRODUCTION ....1
- PARTS IDENTIFICATION....2
- WINDOW KIT AND EXHAUST HOSE INSTALLATION INSTRUCTIONS ...... 3
- DRAINING THE UNIT....8
- CONTROL PANEL OVERVIEW....9
- USING THE CONTROL PANEL/ REMOTE CONTROL 10
- MAINTENANCE 14
- TROUBLESHOOTING 15
- ROUBLESHOOTING CONTINUED....16
- SPECIFICATIONS....17
- WARRANTY 18
- Introduction
- For Your Records:
- Parts Identification
- Parts Key:
- Window Kit and Exhaust Hose Installation Instructions
- Installation in a sliding sash window (horizontal)
- Installation in a sliding sash window (vertical)
- Installation of the exhaust hose
- Notes about the exhaust hose
- The exhaust hose must be installed or removed in accordance with the usage modes:
- Draining the Unit
- Using the Control Panel/Remote Control
- LED Display
- Mode Indicator Lights
- Power Button
- ERROR CODES on LED display:
- PROTECTION CODES on LED display:
- Energy Saving Guide
- Maintenance
- Cleaning the unit
- Cleaning the pre-filter
- Preparation for Storage
- Troubleshooting
- Product Warranty
- WHAT IS COVERED:
Marque : EDGESTAR
Modèle : AP14003W
Catégorie : Climatisation