MODE D'EMPLOI NW-S203F SONY
SONY®

WALKMAN®
text_image
* 2 6 9 9 3 1 2 1 4 * (1)
© 2006 Sony Corporation Printed in Malaysia
2-699-312-14 (1)
Owner's Record
The model and serial numbers are located on the back of the player. Record them in the space provided below. Refer to these numbers in the spaces whenever you call upon your Sony dealer regarding this product.
Model No. ____
Serial No. ____
The use of the player is described in this “Quick Start Guide,” in the “Operation Guide” (PDF file), and in the SonicStage Help (accessible from within SonicStage software).
- Quick Start Guide: Explains basic operation of the player, including importing, transferring, and playing music songs.
– Operation Guide: Explains advanced features of the player and offers troubleshooting information.
– SonicStage Help: Explains details of using the SonicStage software.
If you have any questions about or issue with this product, visit the following web sites.
For customers in the USA: http://www.sony.com/walkmansupport
For customers in Canada: http://www.sony.ca/ElectronicsSupport/
For customers in Europe: http://www.support-nwwalkman.com
For customers in Latin America: http://www.sony-latin.com/pa/info/
For customers in other countries/regions: http://www.css.ap.sony.com
For customers who purchased the overseas models: http://www.sony.co.jp/overseas/support/
Table of Contents
Introduction......6
Getting Started 8
Supplied Items....8
Installing SonicStage....11
Importing Music 14
Transferring Music.... 16
Playing Music.... 18
Basic Operation – Parts and Controls....18
Play Modes and Settings 22
Using SPORTS MODE 26
Using STOPWATCH 27
Listening to FM Radio (NW-S202F/S203F/S205F only)...... 28
FAQ....30
To learn about advanced features of the player
- For information about advanced features of the player and about troubleshooting technical issues, refer to the Operation Guide (PDF file). To view the Operation Guide (PDF file), click “Start” – “All Programs” – “SonicStage” – “NW-S200 Series Operation Guide.”
- You need Adobe Acrobat Reader 5.0 or later, or Adobe Reader software in your computer. Adobe Reader can be downloaded from the Internet for free.
For Customers in Russia
Цифровой музыкальный проигрыватель
Изготовитель: Сони Корпорейшн
Адрес: 1-7-1 Конан,
Минато-ку, Токио 108-0075, Япония
Страна-производитель: Малайзия
Notice for users
- The recorded song is limited to private use only. Use of the song beyond this limit requires permission of the copyright holders.
- Sony is not responsible for incomplete recording/downloading or damaged data due to problems of the player or computer.
- The ability to display the languages on your SonicStage will depend on the installed OS on your PC. For better results, please ensure that the installed OS is compatible with the desired language you want to display.
- We do not guarantee all the languages will be able to be displayed properly on your SonicStage.
- User-created characters and some special characters may not be displayed.
- Depending on the types of the text and characters, the text shown on the player may not be displayed properly on device. This is due to:
- The capacity of the connected player.
– The player is not functioning normally.
- The ID3 TAG information for the song is written in the language or the character that is not supported by the player.
On static electricity from the human body
On rare occasions, you may not be able to operate the player due to strong static electricity from the human body. If this happens, leave the player for about 30 seconds to one minute. You will then be able to operate the player normally again.
- SonicStage and the SonicStage logo are trademarks or registered trademarks of Sony Corporation.
- OpenMG, ATRAC, ATRAC3, ATRAC3plus, and their logos are trademarks of Sony Corporation.
- “WALKMAN” and “WALKMAN” logo are registered trademarks of Sony Corporation.
- Microsoft, Windows, Windows NT, and Windows Media are trademarks or registered trademarks of Microsoft Corporation in the United States and/or other countries.
- Adobe and Adobe Reader are trademarks or registered trademarks of Adobe Systems Incorporated in the United States and/or other countries.
- MPEG Layer-3 audio coding technology and patents licensed from Fraunhofer IIS and Thomson.
- IBM and PC/AT are registered trademarks of International Business Machines Corporation.
• Macintosh is a trademark of Apple Computer, Inc.
- Pentium is a trademark or a registered trademark of Intel Corporation.
- CD and music-related data from Gracenote, Inc., copyright © 2000-2004 Gracenote.
Gracenote CDDB' Client Software, copyright 2000-2004 Gracenote. This product and service may practice one or more of the following U.S. Patents: #5,987,525; #6,061,680; #6,154,773, #6,161,132, #6,230,192, #6,230,207, #6,240,459, #6,330,593, and other patents issued or pending. Services supplied and/or device manufactured under license for following Open Globe, Inc. United States Patent 6,304,523. Gracenote and CDDB are registered trademarks of Gracenote.
The Gracenote logo and logotype, and the “Powered by Gracenote” logo are trademarks of Gracenote.
- All other trademarks and registered trademarks are trademarks or registered trademarks of their respective holders. In this manual, ^TM and ^ marks are not specified.
Program ©2006 Sony Corporation
Documentation ©2006 Sony Corporation
On sample audio data
The player is pre-installed with sample audio data so that you can try it out right away. To delete this audio data, delete it using SonicStage.
Thank you for purchasing the NW-S202F/S203F/S205F/S202*.
To begin using the player, first import music songs into your computer using the SonicStage software, and then transfer them to the player.
After transferring the music songs to the player, you can enjoy them wherever you go.
Be sure to install the “SonicStage” software from the supplied CD-ROM in your computer.
flowchart
graph LR
    A["1 Getting Started\n(See page 8)"] --> B["2 Importing Music\n(See page 14)"]
    B --> C["3 Transferring Music\n(See page 16)"]
    C --> D["4 Playing Music\n(See page 18)"]
    D --> E["You can charge the player's battery by connecting the player to your computer with the supplied USB cable."]
* Depending on the country/region in which you have purchased the player, some models may not be available.
You can charge the player's battery by connecting the player to your computer with the supplied USB cable.
Make sure to charge it before using the player for the first time.
For details on charging times, see the Operation Guide (PDF file).
1 Getting Started
Supplied Items
Check the following items.
□ Headphones (1)
□ USB cable (1)
□ Arm band* (1)
□ Clip ^* (1)
This is used to clip onto your clothes when carrying the player.
□ CD-ROM** (1)
- SonicStage software
- Operation Guide (PDF file)
☐ Quick Start Guide (this manual) (1)
* The supplied items may differ depending on the country/region in which you have purchased the player.
** Do not attempt to play this CD-ROM in an audio CD player.
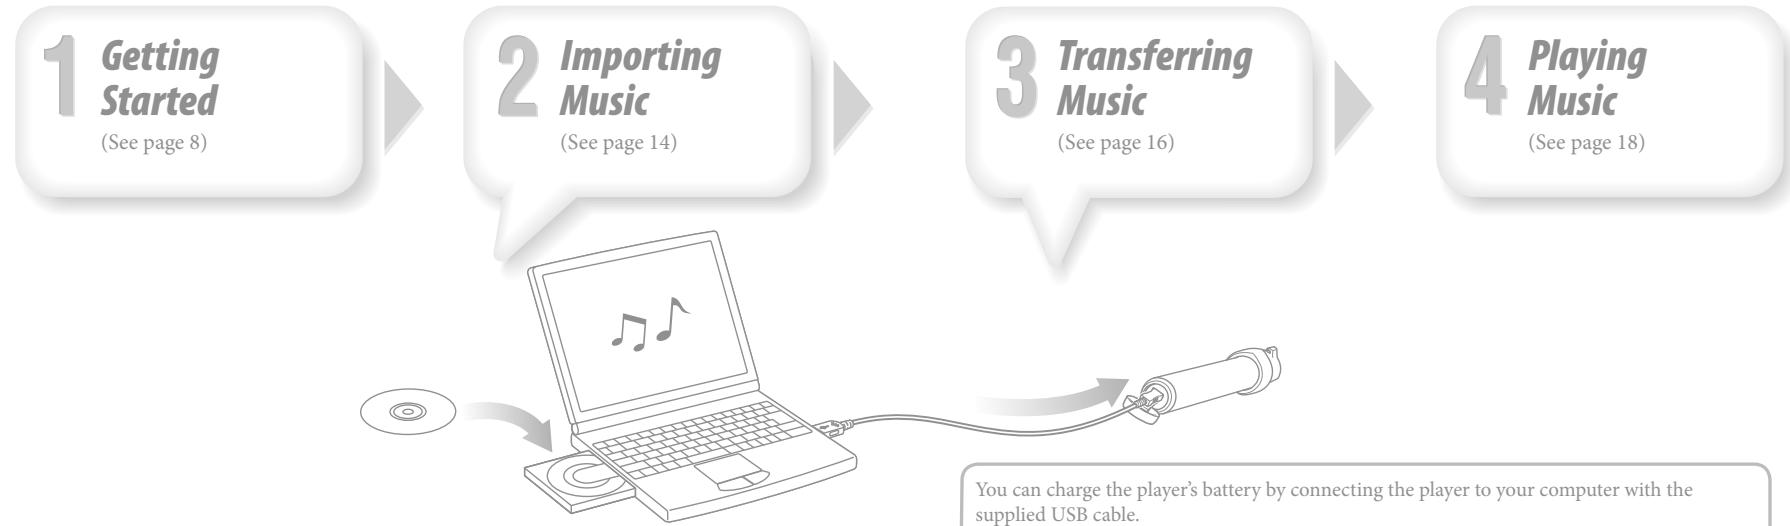
Attaching the player with the arm band
Attach the player with the arm band following the procedure below.
1 Open the touch fastener, put your arm through the arm band, and then close the touch fastener temporarily.
2 Slide the player (display facing up) into the holder of the arm band. Insert the player fully.
natural_image
Illustration of a hand gripping a wrist with a device, showing a close-up of the grip and motion (no text or symbols)
3 Adjust the display for best viewing angle, and fasten the belt with the touch fastener securely, so it was not fall off.
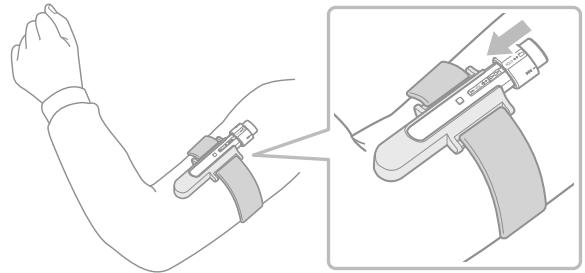
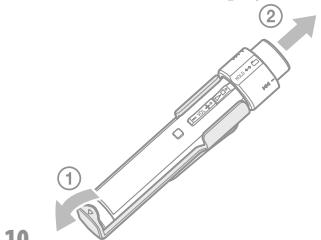
To remove the player from the arm band
Pull the tab on the undersurface of the arm band's holder in the direction of the arrow ① to detach the player, then release the player from the arm band's holder ②.
text_image
Diagram of a mechanical device with labeled parts and directional arrows indicating movement or force
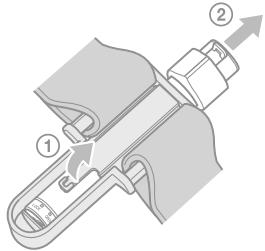
Attaching the player with the clip
Slide the player (display facing up) on the clip. Insert the player fully.
To remove the player from the clip
Flex open the bottom position of the clip slightly in the direction of to detach the player ①, then release the player from the clip ②.
text_image
Technical diagram of a mechanical device with numbered components and directional arrows indicating motion or assembly.
Installing SonicStage
Install SonicStage according to the following instructions.
If SonicStage is already installed, it will be overwritten. All functions and audio data from the previous installation will be preserved on the new installation.
Notes on before installing
- Do not format the built-in flash memory of the player using Windows Explorer. When formatting, select “Format” from the menu on the player. For details, see the Operation Guide (PDF file).
- Necessary computer system environment for using the player:
- Computer:
IBM PC/AT or compatible computer preinstalled with the following Windows operating systems.
Windows 2000 Professional (Service Pack 3 or later)/Windows XP Home Edition/Windows XP Professional/Windows XP Media Center Edition/Windows XP Media Center Edition 2004/Windows XP Media Center Edition 2005
OSs other than those indicated above are not supported.
– CPU: Pentium III 450 MHz or higher
- RAM: 128 MB or more
- Hard Disk Drive: 200 MB or more of available space (1.5 GB or more is recommended). More space may be required depending on the version of the operating system.
Additional space is required for storing music data.
- Display:
Screen Resolution: 800 × 600 pixels (or higher) (recommended 1,024 × 768 or higher) Colors: High Color (16 bit) (or higher) (SonicStage may not operate properly at color settings at or below 256 colors.)
Not supported by the following environments:
– Personally constructed PCs or operating systems
- An environment that is an upgrade of the original manufacturer-installed operating system
- Multi-boot environment
- Multi-monitor environment
- Macintosh
1 Turn on the computer and start Windows.
Log on as an administrator.
2 Quit all activated software programs on your computer.
Be sure to quit any anti-virus software as it may strain the CPU.
2 Insert the supplied CD-ROM into your computer.
The install wizard will start automatically and the Main Menu appears.
The install wizard may not start automatically depending on your computer. Right-click the CD-ROM on Windows Explorer and double-click SetupSS.exe. The main menu for when installing appears.
4 Install SonicStage and Operation Guide (PDF file).
Click “Install SonicStage” from the Main Menu, and follow the on-screen instructions. Installation may take 20 to 30 minutes depending on your computer. If prompted, restart the computer after installing.
To install the Operation Guide (PDF file)
Click “Install Hardware Operation Guide (PDF)”, and then follow the on-screen instructions.
When installation is not successful
Visit the following web sites:
For customers in the USA: http://www.sony.com/walkmansupport
For customers in Canada: http://www.sony.ca/ElectronicsSupport/
For customers in Europe: http://www.support-nwwalkman.com
For customers in Latin America: http://www.sony-latin.com/pa/info/
For customers in other countries/regions: http://www.css.ap.sony.com
For customers who purchased the overseas models: http://www.sony.co.jp/overseas/support/
If the issue persists:
Consult your nearest Sony dealer.
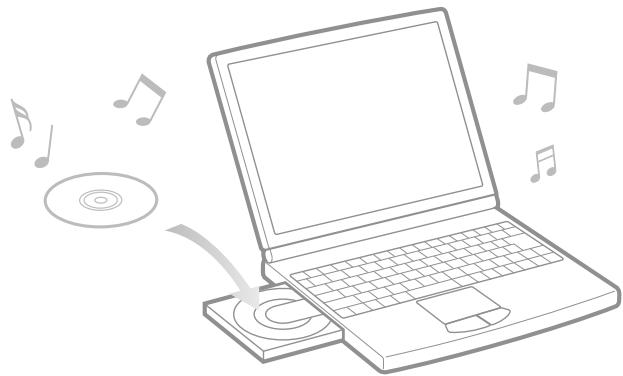
2 Importing Music
Import audio data to your computer using the SonicStage.
The methods of importing songs of CD are described here.
natural_image
Line drawing of a laptop with CD, CD/DVD, and musical notes floating around it (no text or symbols)
1 Double-click 👍 icon on the desktop.
SonicStage starts up.
2 Insert the audio CD that you want to import to hard drive of your computer.
You can obtain CD information (song name or artist name, etc.) while connected to the Internet.
3 Place the pointer over [Music Source] at the top of the screen and click [Import a CD].
The screen for importing is displayed, and the song list of the CD appears.
4 Click → at the right of the screen.
Importing audio data starts.
Hint
- SonicStage also offers the following additional features. For details, refer to SonicStage Help.
- Importing audio files downloaded from the Internet and audio files stored on your computer, such as MP3, AAC or ATRAC format audio files*.
- Importing only selected audio files from a CD.
- Changing the audio formats and bit rates of audio songs.
* WMA/AAC format audio files that are copyright-protected cannot be played back on the player.
Note
- When you use the SonicStage with the CD drive for the first time, a CD drive check will be performed. Follow the on-screen instructions.
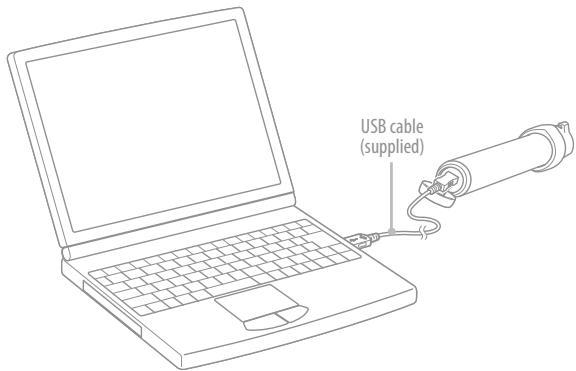
3 Transferring Music
Connect the player to your computer and transfer the audio data to the player.
text_image
USB cable
(supplied)
The player's battery is recharged while connected to a computer.
When the remaining battery indication of the display shows FULL, charging is complete.
When you use the player for the first time, or if you have not used the player for a long time, recharge it fully, and then transfer the data to the player.
For information on recharging time, see the Operation Guide (PDF file).
1 Double-click the SonicStage icon on the desktop.
SonicStage starts up.
2 Connect the player to your computer with the supplied USB cable.
3 Place the pointer over [Transfer] and select [ATRAC Audio Device] from the transfer destination list.
4 Select an audio file(s) or album you want to transfer.
5 Click → to start transferring.
To stop transferring, click
Notes
- Do not disconnect the USB cable while data is being transferred.
- Do not leave the player connected for extended periods to a laptop computer that is not connected to AC power, because the player may discharge the computer's battery.
Hints
- You can create and transfer playlists that group your favorite songs into a list. For details, refer to SonicStage Help.
- To delete songs of the player, use the SonicStage software on your computer.
Basic Operation – Parts and Controls
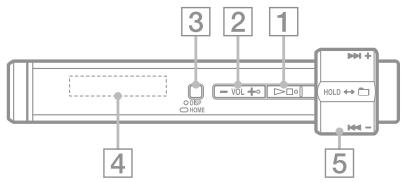
text_image
3
2
1
VOL +
HOLD ↔
OPEN
4
5
Starts song playback. When starting playback, ▶ appears at the bottom left of the display, and if the ▶■ button is pressed again, ■ appears and playback stops. When you press the ▶■ button, just after purchasing the player or after disconnecting the supplied USB cable from the computer, playback starts from the first song on the player.
Hint
- There is no power button on the player. When you stop song playback or FM reception (NW-S202F/S203F/S205F only) by pressing the ▶■ button, after about a few seconds, the display goes off automatically and the player enters Sleep status. In this case, if you press any button, the player returns to the previous status.
When the G Sensor menu is deactivated in Sleep status, the player consumes very little battery power.
Adjusts the volume.
When you press this button while the player is in play or stop mode, you can change the display. For details, see the Operation Guide (PDF file).
Press and hold this button to display the HOME screen ( page 22).
4 Display
See page 21.
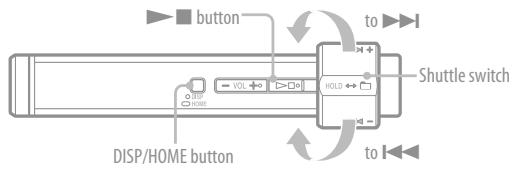
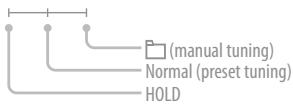
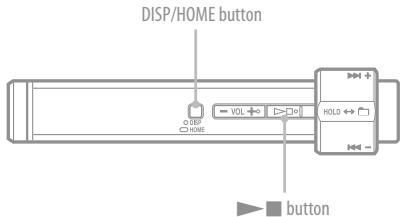
5 Shuttle switch
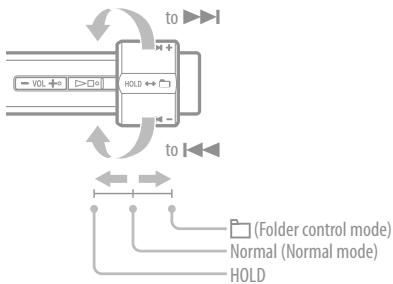
By rotating the shuttle switch, you can select a menu item, skip to the beginning of the song, or fast-forward/fast-rewind. You can also set to the Folder control mode, Normal mode or HOLD by sliding the shuttle switch.
* There are tactile dots. Use them to help with button operation.
flowchart
graph TD
    A["To"] --> B["Central Control Block"]
    B --> C["To"]
    C --> D["(Folder control mode)"]
    C --> E["Normal (Normal mode)"]
    C --> F["HOLD"]
To operate the player with the shuttle switch
| To | Operation |
| Normal mode (In play mode) |
| Skip to the beginning of the next song. | Rotate the shuttle switch to ▶▶ briefly. |
| Skip to the beginning of the current song. | Rotate the shuttle switch to ◀◀ briefly. |
| Fast-forwards the current song. | Rotate the shuttle switch to ▶▶ and release it at the desired point. |
| Fast-rewinds the current song. | Rotate the shuttle switch to ◀◀ and release it at the desired point. |
| Normal mode (In stop mode) |
| Skip to the beginning of the next song, and if held longer, continues to skip through the next song(s). | Rotate and hold the shuttle switch to ▶▶. |
| Skip to the beginning of the current song, and if held longer, continues to skip through the previous song(s). | Rotate and hold the shuttle switch to ◀◀. |
| To | Operation |
| Folder control mode (In play mode) |
| Skip to the beginning of the next album/artist. | Rotate the shuttle switch to ▶▶1 briefly. |
| Skip to the beginning of the current album/artist. | Rotate the shuttle switch to ◀◀◀ briefly. |
| Folder control mode (In stop mode) |
| Skip to the beginning of the next album/artist, and if held longer, continues to skip through the next album/artist(s). | Rotate and hold the shuttle switch to ▶▶1. |
| Skip to the beginning of the current album/artist, and if held longer, continues to skip through the previous album/artist(s). | Rotate and hold the shuttle switch to ◀◀◀. |
HOLD function
You can protect the player against accidental operation by using the HOLD function when carrying it. By sliding the shuttle switch to the HOLD position, all operation buttons are disabled. If you press buttons or rotate the shuttle switch while the HOLD function is activated, the current time, "HOLD" and
(remaining battery indication) appear in the display.
If you slide the shuttle switch back to the Folder control or Normal mode, the HOLD function is released.
text_image
Headphones
VOL
HOLD
6
OPEN
LOCK
7
8
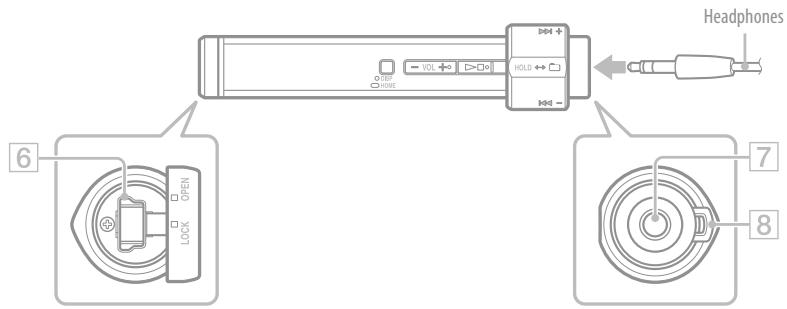
6 USB jack
Rotate the lid to the left to set the OPEN position, and then open. Connect the player to the small connector of the supplied USB cable.
To close the lid, rotate it to set the OPEN position and close, then rotate it to the right to set the LOCK position.
7 Headphone jack
For connecting the headphones.
Connect until it clicks into place.
If the headphones do not connect properly, it may not sound right.
8 Strap hole
This is used to attach a strap (sold separately).
Display
flowchart
graph TD
    A["9"] --> B["Album 1"]
    C["10"] --> B
    D["11"] --> B
    E["12"] --> B
    F["13"] --> B
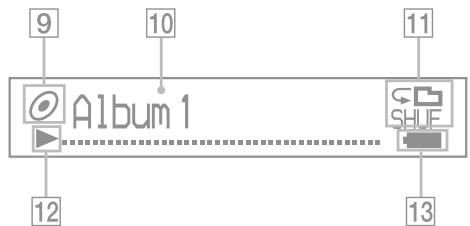
9 Sorting status indication (Sort) / 🎯 icon
During playback operation, the 🎶 icon or the current song order icon (● (Artist order), Ⓞ (Album order) or ⓘ (Albums by artist order)) appears.
In Normal mode, the 🎯 icon appears, and in Folder control mode, the song order icon appears.
10 Text/graphic information display
Displays album title, artist name, song name, current date and time, messages and menu.
During playback operation in Normal mode, “song title/artist name, album name” appears.
During playback operation in Folder control mode, “album title/artist name/playlist name” appears.
To change the display mode, press the DISP/ HOME button. Switch the display to Power Save mode when you do not operate the unit for a while.
11 Play mode indication (Play Mode)
Displays the current play mode icon. If the play mode is set to “Normal,” no icon appears.
12 Playing status indication
Displays the current playback mode
(▶: playback, ■: stop, ◀◀ (▶▶): fast-rewinds (fast-forwards), ◀◀ (▶▶)]: skips to the beginning of the current (or next) song).
13 Remaining battery indication
Displays the remaining battery power.

- For information on the FM tuner display (NW-S202F/S203F/S205F only), see the Operation Guide (PDF file).
Play Modes and Settings
The HOME screen appears when you press and hold the DISP/HOME button of the player. The HOME screen is the starting point to play audio, search for songs, and change settings.
HOME Screen\*

text_image
Screenshot of a software toolbar with icons for search, running, music note, FM, play, and folder
* 5 of the 7 icons appear in the display with the current selection in the centre. The current icon changes depending on the function you use. By rotating the shuttle switch, you can select an icon and press the ▶■ button to confirm.
| SEARCH | Searches for songs of the player. |
| SPORTS MODE | Plays songs in sports mode. ( page 26) |
| STOPWATCH | Enables to use stop watch. ( page 27) |
| ALL SONGS | Plays all songs of the player. |
| FM* | Enables to use listen to FM. ( page 28) |
| PLAYLIST | Plays songs which are registered in playlists. |
| SETTINGS | Displays setting menu. |
* NW-S202F/S203F/S205F only
Operating the HOME screen
When menu items appear on the HOME screen, rotate the shuttle switch to select the item and press the ▶■ button to confirm.
When menu items appear on the HOME screen and press the DISP/HOME button, the screen returns to the previous menu. If you press and hold it, the screen returns to the HOME screen.
For example, when you want to change the play mode to select ⏻ (SETTINGS) on the HOME screen during playback, the screen changes as follows.

flowchart
graph TD
    A["HOME screen"] --> B["List of SETTINGS item"]
    B --> C["List of Play Mode"]
    C --> D["Now Playing screen"]
    B -->|Press the DISP/ HOME button.| A
    B -->|Press the DISP/ HOME button.| A
    C -->|Select (SETTINGS) and press the button.| B
    C -->|Select "Play Mode>" and press the button.| B
    C -->|Select (Repeat All) and press the button.| D
Hint
- For details on the functions of the HOME screen or how to use the player, see the Operation Guide (PDF file).
G Sensor setting
The player's built-in G Sensor recognizes speed variations and provides functions such as step count, distance covered, and calories consumed (counter function). You can change the play mode by shaking the player 3 times (Shuffle Shake).
① Select □ (SETTINGS) - “Advanced Menu>” - “G Sensor>” from the HOME screen and press the ▶ button to confirm.
- ON-MusicPB: Activates the G Sensor during playback or FM reception (NW-S202F/S203F/S205F only). (Default setting)
• ON-Anytime: Activates G Sensor always.
• OFF: The G Sensor is not activated.
Counter function
By activating G Sensor, the player can count steps, distance and calories. By pressing the DISP/HOME button while the player is in play or stop mode, the display will be changed then you can check the count steps, distance or calorie-count. If you choose the step display, the number of steps and distance appear. If you choose the calorie display, icons such as 📄 appear, depending on calories consumed.
Furthermore, by selecting ⏻ (SETTINGS) – “Advanced Menu>” from the HOME screen, you can display the step count history (Count History), and set the weight, height and step length (Height/Weight).
Shuffle Shake
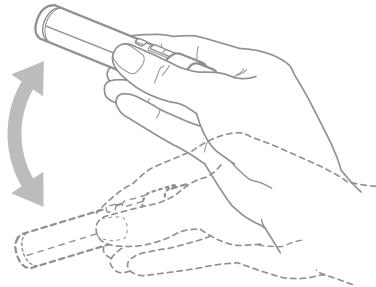
When G Sensor is activated, you can change the play mode (shuffle activated or deactivated) by shaking the player 3 times during playback.
Holding the player as illustrated below (display facing up), shake the player up and down 3 times in rhythm within two seconds. A sound effect is heard when shaking to change play mode.
When the player is shaken 3 times again, the play mode returns to the previous mode.
natural_image
Illustration of a hand holding a pen with an arrow indicating rotation (no text or symbols)
Note
- You cannot use this function when:
- 1 (Repeat 1 Song) is set
- Music Pacer is activated in SPORTS MODE ( page 26)
Using SPORTS MODE
SPORTS MODE is a function that enables you to set the target items, such as time, calories and distance and play songs until the target item is achieved.
Furthermore, you can play songs in shuffle mode using the automatic selection function in which the player changes the playlist automatically depending on your pace of movement (Music Pacer).
① Select 📄 (SPORTS MODE) – “Set Target>” from the HOME screen and press the ▶ button to confirm.
② Select the target item and set its value.
③ Select "Start" then press the ▶■ button to confirm.
Playback starts and the set target value starts counting down. When the target value is achieved, playback stops.
To stop SPORTS MODE
Select 📁 (SPORTS MODE) – “OFF” from the HOME screen and press the ▶ button to confirm.
Note
- (SPORTS MODE) does not appear during FM reception or when using the stop watch function.
Music Pacer
When Music Pacer is activated, the “Walk Music” or “Run Music” playlist is played back in shuffle mode, depending on your pace of movement.
① Select (SPORTS MODE) - “Music Pacer>” - “ON” from the HOME screen and press the ▶ button to confirm.
Playlists for “Walk” and “Run” are preinstalled into the player.
You can also create playlists using the SonicStage software on your computer.
Using STOPWATCH
① Select ⏻ (STOPWATCH) from the HOME screen and press the ▶■ button to confirm. Press the DISP/HOME button to start measuring time. If you press it again, measuring stops. If you press the DISP/HOME button while measuring is stopped, measuring is reset.
To stop STOPWATCH
Select ♪ (ALL SONGS) or ▶ (PLAYLIST), or FM (FM) (NW-S202F/S203F/S205F only) from the HOME screen and press the ▶ button to confirm.
Note
- While using the stop watch function, the screen for measurement of time appears.
text_image
button
to
Shuttle switch
DISP/HOME button
VOL
WOLD
flowchart
graph TD
    A[" "] --> B["(manual tuning)"]
    A --> C["Normal (preset tuning)"]
    A --> D["HOLD"]
1 Press and hold the DISP/HOME button until the HOME screen appears.
2 Rotate the shuttle switch to select FM (FM) and press the ▶ button to confirm.
The FM tuner screen appears.
3 Select broadcast stations.
Manual Tuning
1 Slide the shuttle switch to the folder (manual tuning) position to display M.
2 Select the previous (or next) frequency by rotating the shuttle switch to ◀◀◀ (▶▶◀).
Preset Tuning
(see "Hint")
1 Slide the shuttle switch to the Normal (preset tuning) position to display P.
2 Select the previous (or next) preset number by rotating the shuttle switch to ◀◀◀ (▶▶◀).

In Preset Tuning, you cannot select broadcast stations if no preset stations are entered. Preset receivable broadcast stations in your area automatically by selecting “FM Auto Preset” in the SETTINGS menu. This is convenient when you use the FM tuner for the first time or when you change to a new area.
① Press and hold the DISP/HOME button until the HOME screen appears.
② Rotate the shuttle switch to select 📋 (SETTINGS) and press the ▶ button to confirm.
③ Rotate the shuttle switch to select "FM Auto Preset>" and press the ▶■ button to confirm.
④ Rotate the shuttle switch to select "OK" and press the ▶■ button to confirm.
For details on Preset Tuning, refer to the Operation Guide (PDF file).
Q Which operating systems can be used with the player?
A IBM PC/AT or compatible computer preinstalled with one of the following Windows operating systems:
Windows 2000 Professional (Service Pack 3 or later)/Windows XP Home Edition/Windows XP Professional/ Windows XP Media Center Edition/Windows XP Media Center Edition 2004/Windows XP Media Center Edition 2005 Not supported by operating systems other than above.
Q An error message appears on the computer when installing.
A Make sure the operating system ( page 11) of your computer can be used with the player.
Q The computer does not start automatically when inserting the supplied CD-ROM.
A The install wizard may not start when inserting the CD-ROM, depending on the computer setting.
In this case, right-click the CD-ROM on Windows Explorer to open, and double-click SetupSS.exe. The main menu for installing appears.
Q A computer does not recognize the player.
A Connect to another USB connector of your computer.
Q Some functions are restricted by SonicStage.
A When you use SonicStage, log on as an administrator.
Q Transferred songs from a computer cannot be played by the player.
A When transferring songs to the player, be sure to use SonicStage. Songs transferred from other than SonicStage cannot be played by the player.
Q To reset the player. The player does not work properly.
A Press the DISP/HOME button and
▶■ button at the same time for more about 7 seconds to reset the player.
All the songs and settings stored on the player will not be erased even when you reset it.
text_image
DISP/HOME button
VOL
HOLD
-
OISP
HOME
button
A Be sure to format the built-in flash memory using the Menu mode on this player following the procedure below. (Check all contents before formatting as all data stored will be erased.)
1 Press and hold the DISP/HOME button in the play or stop mode until the HOME screen appears.
2 Select (SETTINGS) – "Advanced Menu>" – "Initialize>" – "Format>" – "OK," in this order.
Rotate the shuttle switch to select the item and press the ▶ button to confirm. After selecting “OK” and confirming, “FORMATTING...” appears and formatting starts. When formatting is complete, “COMPLETE” appears.

