BackUp - Logiciel audio et/ou vidéo AVAST - Notice d'utilisation et mode d'emploi gratuit
Retrouvez gratuitement la notice de l'appareil BackUp AVAST au format PDF.
| Caractéristiques | Détails |
|---|---|
| Type de logiciel | Logiciel de sauvegarde audio et vidéo |
| Compatibilité | Windows, macOS |
| Fonctionnalités principales | Sauvegarde automatique, restauration de fichiers, gestion des versions |
| Interface utilisateur | Interface intuitive et conviviale |
| Options de stockage | Stockage local, cloud |
| Maintenance | Mises à jour régulières, support technique disponible |
| Sécurité des données | Chiffrement des fichiers, protection par mot de passe |
| Exigences système | Processeur moderne, 4 Go de RAM minimum |
| Assistance et documentation | Documentation en ligne, tutoriels vidéo |
FOIRE AUX QUESTIONS - BackUp AVAST
Questions des utilisateurs sur BackUp AVAST
0 question sur cet appareil. Repondez a celles que vous connaissez ou posez la votre.
Poser une nouvelle question sur cet appareil
Téléchargez la notice de votre Logiciel audio et/ou vidéo au format PDF gratuitement ! Retrouvez votre notice BackUp - AVAST et reprennez votre appareil électronique en main. Sur cette page sont publiés tous les documents nécessaires à l'utilisation de votre appareil BackUp de la marque AVAST.
MODE D'EMPLOI BackUp AVAST

text_image
avast! be freeavast! BackUp
User Guide
Contents
Part 1: Backing up and restoring your files via the avast! BackUp client....3
How to install avast! Backup....4
Using the Settings window....8
Backup Sets tab....9
File System tab....10
Options tab....11
History tab....13
Restore tab....14
Restoring files through the right-click menu....15
Restoring files from a virtual drive....16
Part 2: Using your avast! BackUp account to restore your files via the web after a complete data loss....17
Restoring all of your files....18
Restoring individual files or sets of files....19
Searching for files....19
Browsing for files 20
Backup sets tab....20
Restoring a single file....22
Restoring several files....22
Restoring a file deleted from your computer....23
Restoring an older version of a file 24
Restoring a BackUp set ....25
Choosing the delivery method....25
Viewing the status of your restore....26
Getting your restored files....27
Replacing a computer....29
Uninstalling avast! BackUp....31
Frequently Asked Questions....32
Part 1: Backing up and restoring your files via the avast! BackUp client
avast! BackUp is a secure online backup and data recovery service.
Through the easy-to-use interface, you can select exactly which files you want to back up and schedule a time for regular automatic backups of your data. avast! BackUp retains a 30-day history of all backed up files to enable you to restore all your files should they become damaged or lost, for example in the event of any permanent damage to your computer.
text_image
Avast Backup - Settings Welcome Backup Sets File System Options History Restore Backup Set Files Size My Documents 20/285 1.9 GB Photos and Images 0/4558 347.0 MB Word Processing Documents 105/265 152.0 MB Spreadsheets and Databases 125/125 81.5 MB Presentations 0/43 80.6 MB Email and Contacts (Outlook) 1/1 58.9 MB Music 18/18 14.2 MB Firefox Favorites 0/28 488.3 KB Financial Data 1/1 10.4 KB IE Favorites 19/19 2.0 KB Name In Folder Size Type □ Default sites □ Usersriley... 2 KB Rename □ New sites in □ Usersriley... 1 KB Cnfs ✓ ChatLog Ave... □ C:\Usersriley... 1 KB Rich T ✓ RecentPlace... □ Usersriley... 1 KB Shorts ✓ Wedding sc... □ C:\Usersriley... 31 KB Micron + Connect to... □ C:\Usersriley... 1 KB Micron + NewSQL Sc... □ C:\Usersriley... 1 KB Micron □ SEBITOP RBS... □ Usersriley... 1 KB Cnfs □ HOLIDUCO... □ C:\Usersriley... 0 KB Icon □ desktop.mv... □ Usersriley... 1 KB Cnfs □ Favorites.vss □ Usersriley... 0 KB Micron □ Outlook.pst... □ Usersriley... 2 KB TMA □ riley@avast... □ Usersriley... 1,728,081... Outlines IMG_0002.jpg □ Usersriley... 1,265 KB JPEG a IMG_0008.jpg □ Usersriley... 1,210 KB JPEG a IMG_0022.jpg □ Usersriley... 1,270 KB JPEG a IMG_0027.jpg □ Usersriley... 1,329 KB JPEG a IMG_0031.jpg □ Usersriley... 1,190 KB JPEG a * Decrease Limit: 15.0% of quotas used Change settings that are currently unavailable. Support OK Cancel Limit: 2.0 GB Used: 306.6 MB Remaining: 1.7 GB Files: 558Any backed up files that you delete on your computer will be retained by avast! BackUp for 30 days, so you will still have the opportunity to restore them. After 30 days, the backed up files will also be deleted.
avast! BackUp encrypts your data locally before it is sent to the avast! data center over an SSL connection. Your backups are then stored in the avast! data center with either 448-bit Blowfish or 256-bit AES encryption to ensure your data is protected.
In the event that you need to restore your files, you can use avast! BackUp to restore them to your, or any other computer.
To secure your data with avast! BackUp client, just register at www.avast.com, download and install the client, select the files you need to back up, and you're set to go.
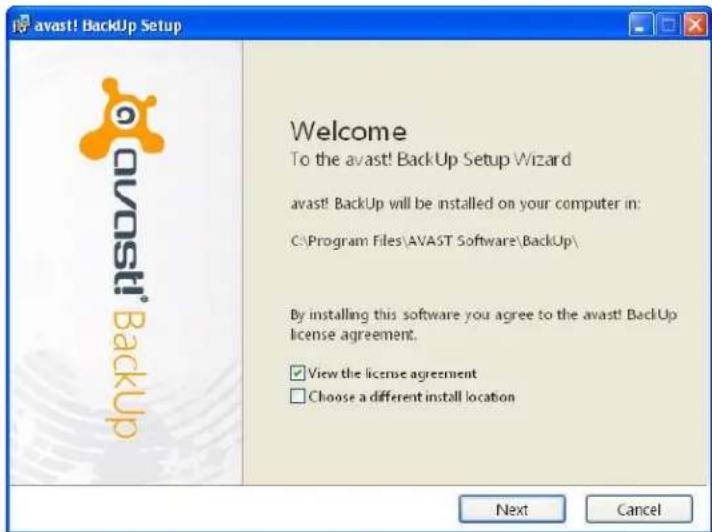
How to install avast! BackUp
Avast! BackUp is very easy to install. First, just download the installation file and save it somewhere on your computer, where you will be able to locate it later. When you are ready to install it, locate the file on your computer and double-click it.
The installation wizard will then start and will guide you through the rest of the installation process.
text_image
avast! Backup Setup Welcome To the avast! Backup Setup Wizard avast! Backup will be installed on your computer in: C:\Program Files\AVAST Software\BackUp\ By installing this software you agree to the avast! Backup license agreement. ✓View the license agreement ☐Choose a different install location Next CancelBy default, the program will be installed in your program files folder, but you can specify a different location simply by checking the "Choose a different install location" box. Then just click "Install" to continue:
text_image
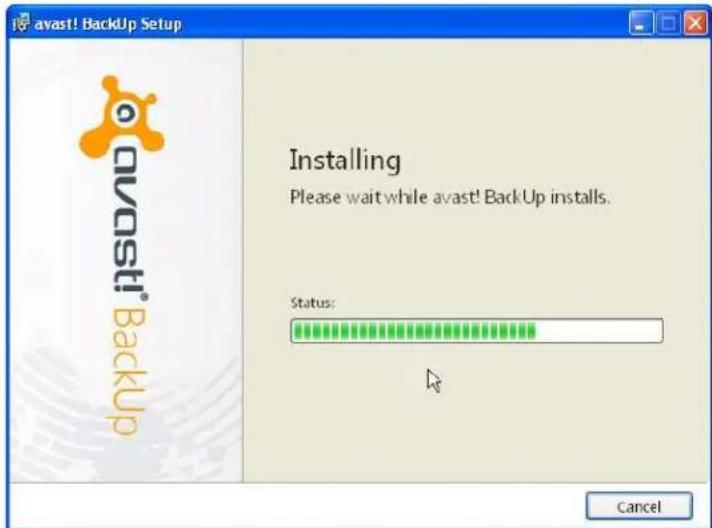
avast! BackUp Setup Avast! Backup Installing Please wait while avast! BackUp installs. Status: CancelOnce installed, you will see a new screen asking you to enter your license key.
text_image
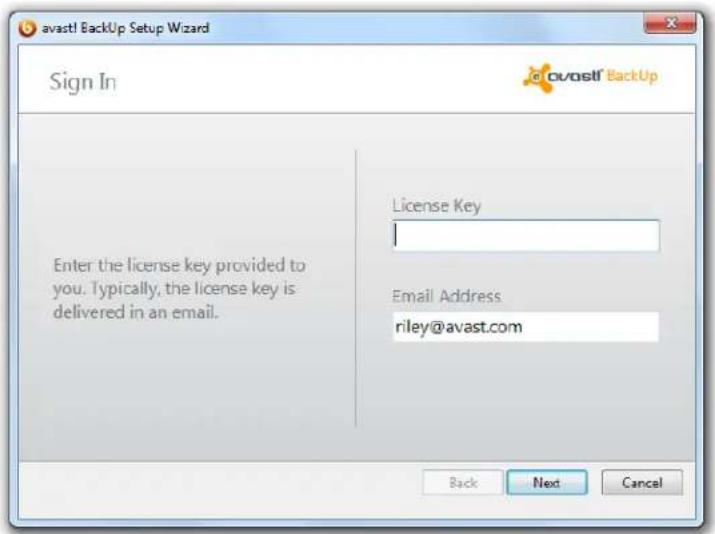
avastl Backup Setup Wizard Sign In pvastl' BackUp License Key Enter the license key provided to you. Typically, the license key is delivered in an email. Email Address riley@avast.com Back Next CancelYou can find your license key in the email that was sent to you after you purchased the software.
- In the License Key field, type or copy the license key that you received in the email.
• In the Email Address field, type the email address that received the email. - Click Next to sign in and proceed to the next step.
You will then be presented with a second screen where you can create login details and your own personal password.
Once this is done, avast BackUp will connect to the online server and will automatically scan your computer for files which are recommended to be backed up.
The next screen will list all of the files that are recommended to be backed up, grouped according to the file type.
text_image
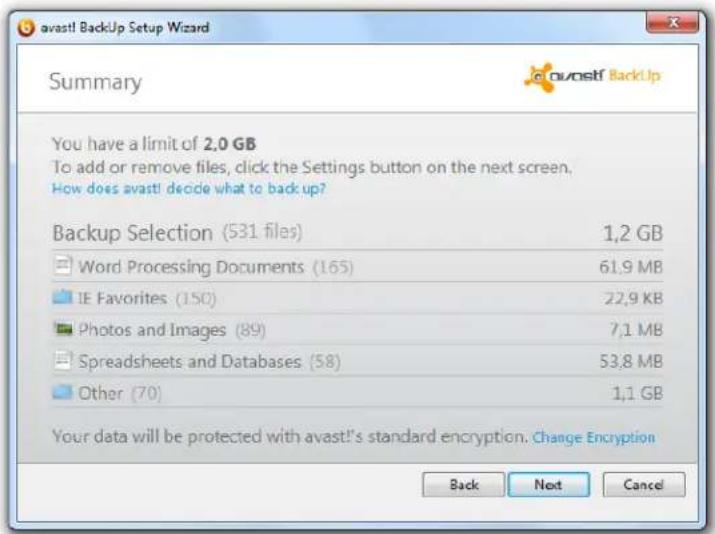
avast! Backup Setup Wizard Summary You have a limit of 2,0 GB To add or remove files, click the Settings button on the next screen. How does avast! decide what to back up? Backup Selection (531 files) 1,2 GB Word Processing Documents (165) 61.9 MB IE Favorites (150) 22.9 KB Photos and Images (89) 7.1 MB Spreadsheets and Databases (58) 53.8 MB Other (70) 1.1 GB Your data will be protected with avast!!s standard encryption. Change Encryption Back Next CancelYou have a total backup limit of 2GB, 25GB or 75GB, depending on the license purchased. On the next screen you can open the settings where you will have the option to remove any files that you do not want to back up, or to add any other files that should be backed up.
This is particularly important if the total of the files to be backed up exceeds the limit. In the settings you can add or remove files, or de-select one or more file types until the total is within the permitted limit. If you proceed without deselecting any files, your files will be backed up until the limit is reached and any files above the limit will not be backed up.
Click Next to proceed with the backup of the recommended files, or to add or remove any files.
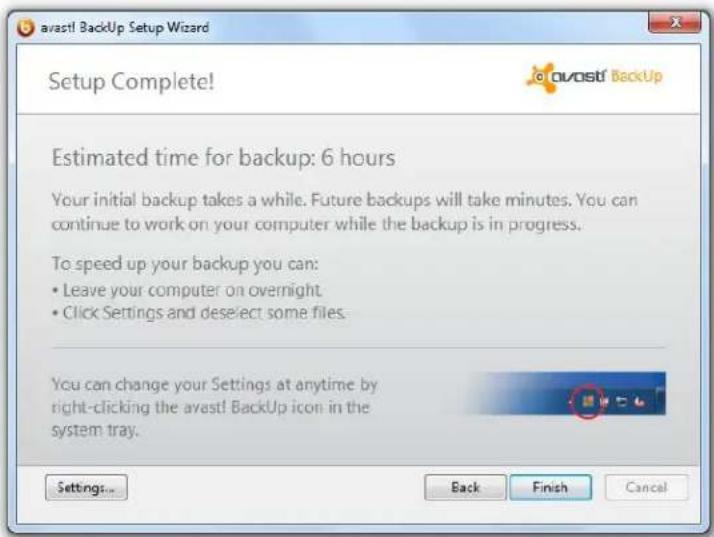
The next screen will tell you how much time it is estimated the back up will take.
The first backup may take a long time because all of your selected files must be encrypted and then sent to the backup server. The time to complete the initial backup depends on the how busy your computer is and the speed of your Internet connection.
Future backups will be much faster because avast! employs incremental backups – in other words, only files which are new, or which have changed will be re-encrypted and sent again to the avast! BackUp server.
At this point, you can add or remove any files by clicking the "Settings" button. This may reduce the amount of time needed for the backup, but more importantly, it allows you to specify which files should or should not be backed up if the total of all files exceeds the limit. This is described later in the section "Using the Settings window".
text_image
avast! BackUp Setup Wizard Setup Complete! Estimated time for backup: 6 hours Your initial backup takes a while. Future backups will take minutes. You can continue to work on your computer while the backup is in progress. To speed up your backup you can: • Leave your computer on overnight • Click Settings and deselect some files. You can change your Settings at anytime by right-clicking the avast! BackUp icon in the system tray. Settings... Back Finish CancelOnce you are satisfied that all the files to be backed up have been selected, and the total is within the permitted limit, click "Finish"
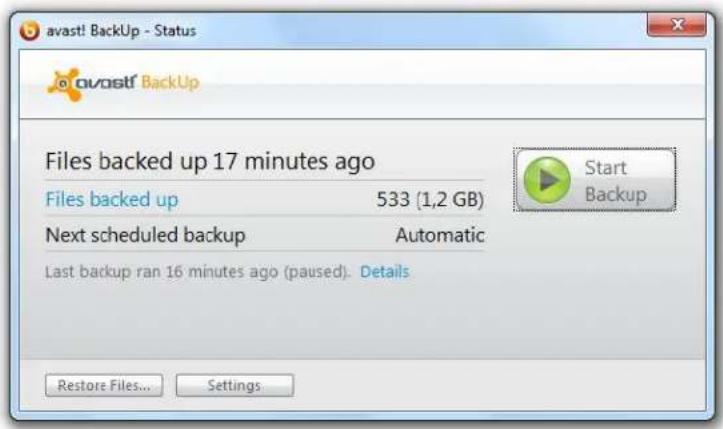
Once the backup is complete, a Status box will be displayed confirming the number of files backed up, together with the Settings menu.
text_image
avast! BackUp - Status ovast! BackUp Files backed up 17 minutes ago Files backed up 533 (1,2 GB) Next scheduled backup Automatic Last backup ran 16 minutes ago (paused). Details Restore Files... Settings Start BackupBoth of these can be accessed at any time via the Windows Start button.
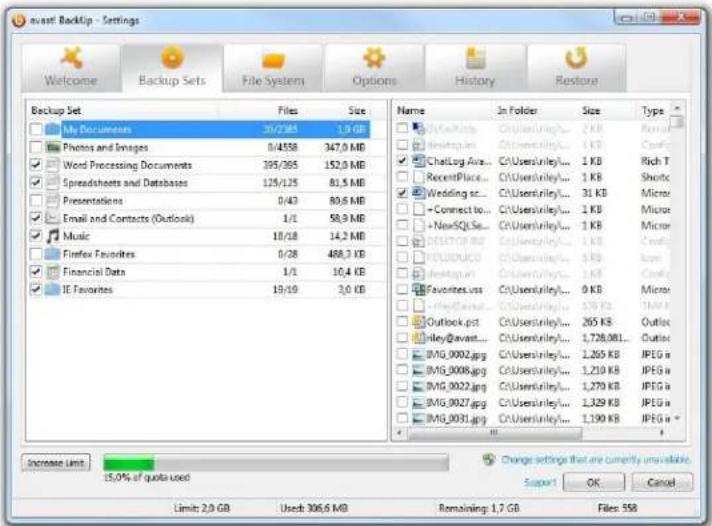
Using the Settings window
You can access the avast! BackUp settings at any time via the Start Menu, or by right clicking the avast! BackUp icon in your system tray and then clicking "Settings".
Here you can specify files or groups of files to be backed up, schedule a time for your backups to be run, view a history of all previous backups and select any files that you want to restore.
text_image
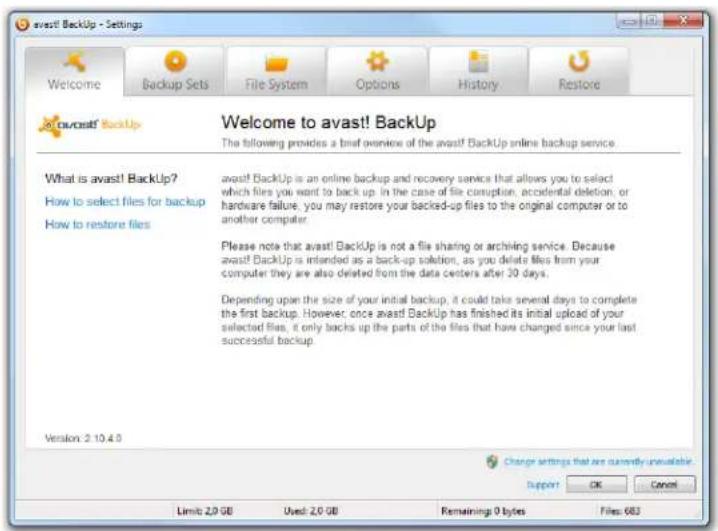
avast! Backup - Settings Welcome Backup Sets File System Options History Restore Avast! Backup Welcome to avast! Backup The following provides a brief overview of the avast! Backup online backup service What is avast! Backup? How to select files for backup How to restore files avast! Backup is an online backup and recovery service that allows you to select which files you want to back up. In the case of file corruption, accidental deletion, or hardware failure, you may restore your backed-up files to the original computer or to another computer. Please note that avast! Backup is not a file sharing or archiving service. Because avast! Backup is intended as a back-up solution, as you delete files from your computer they are also deleted from the data centers after 30 days. Depending upon the size of your initial backup, it could take several days to complete the first backup. However, once avast! Backup has finished its initial upload of your selected files, it only backs up the parts of the files that have changed since your last successful backup. Version: 2.10.4.0 Change settings that are currently unavailable Support OK Cancel Limit: 2.0 GB Used: 2.0 GB Remaining: 0 bytes Files: 683Backup Sets tab
The second tab, called "Backup Sets" enables you to specify particular groups of files which should be backed up, for example, all word processing documents, all spreadsheets and databases, or all photos and images.

text_image
Avast Backup - Settings Welcome Backup Sets File System Options History Restone Backup Set Files Size My Documents 20/2385 1.9 GB Photos and Images 0/4558 347.0 MB Word Processing Documents 395/265 152.0 MB Spreadsheets and Databases 125/125 81.5 MB Presentations 0/43 80.6 MB Email and Contacts (Outlook) 1/1 58.9 MB Music 18/18 14.2 MB Firefox Favorites 0/28 488.3 KB Financial Data 1/1 10.4 KB IE Favorites 19/19 3.0 KB Name In Folder Size Type ● Default... C:\Users\riley/... 2 KB Premed ● Jeddlog.in C:\Users\riley/... 1 KB Cratic ● ChatLog Axis... C:\Users\riley/... 1 KB Ritch T ● RecentPlace... C:\Users\riley/... 1 KB Shotc ● Wedding sc... C:\Users\riley/... 31 KB Micron ● = Connect to... C:\Users\riley/... 1 KB Micron ● = NewSQL Se... C:\Users\riley/... 1 KB Micron ● DESLTCP 3B... C:\Users\riley/... 1 KB Cratic ● HOLDINJACO... C:\Users\riley/... 5 KB,Span ● Jensupin... C:\Users\riley/... 1 KB Cratic ● Favorites.vss... C:\Users\riley/... 0 KB Micron ● Ilay@avast... C:\Users\riley/... 378 KB 1M Y ● Outlook.pst... C:\Users\riley/... 265 KB Outloc ● riley@avast... C:\Users\riley/... 1,728,081..Outloc ● IMG_0002.jpg C:\Users\riley/... 1,265 KB JPEG i ● IMG_0008.jpg C:\Users\riley/... 1,210 KB JPEG i ● IMG_0022.jpg C:\Users\riley/... 1,270 KB JPEG i ● IMG_0027.jpg C:\Users\riley/... 1,329 KB JPEG i ● IMG_0031.jpg C:\Users\riley/... 1,190 KB JPEG i * Increase Limit: 15.0% of quota used Change settings that are currently unavailable Support OK Cancel Limit: 2.0 GB Used: 306.6 MB Remaining: 1.7 GB Files: 558Once a particular file type is selected for backup, any new files of that type which are saved on your computer are automatically included in the backup.
If you click on the name of a backup set listed in the left pane, all the files identified and included in the backup set will be displayed in the right pane.
Some files may be listed for one or more backup sets that have not been selected. This is because the files match some other selection criteria e.g. they have been explicitly selected – see the next tab, the "File System" tab.
You can also create your own custom backup sets - just right-click on the left pane and select "Add Backup Set". You can set various rules to determine exactly which files should be included or excluded. You can then additionally select this set to be included in the backup.
Alternatively, to EXCLUDE this or any other backup set, first make sure that the box "Show advanced backup set features" is checked in the "Advanced" tab under "Options". Then, edit the backup set by double-clicking it and check the box "Files matching this set will be EXCLUDED from the final backup set".
File System tab
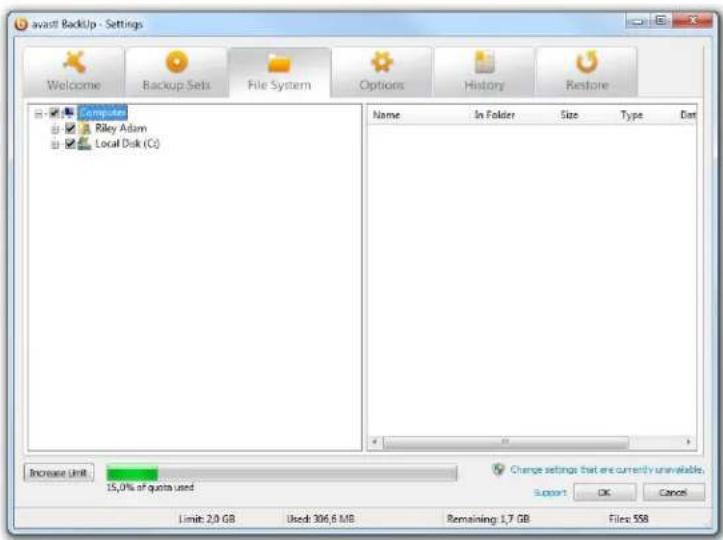
In the third tab, you can specify individual folders or files to be backed up, rather than the general file type:
text_image
Avastl Backup - Settings Welcome Backup Sets File System Options History Restore Computer Riley Adam Local Disk (C:) Name In Folder Size Type Dat Increase limit 15.0% of quotes used Change settings that are currently unavailable. Support OK Cancel Limit: 2.0 GB Used: 306.6 MB Remaining: 1.7 GB Files: 558Any files selected (or deselected) here will also appear as selected (or deselected) in their respective backup sets, and vice-versa.
When any folder is selected, all of its sub-folders are also selected.
Click on any folder to see all of the individual files displayed in the right pane. You can then select or deselect individual files that you want to include or exclude from the backup.
You can also add files to your backup list through Windows Explorer. Just right click on the file or folder that you want to add and select "Add to avast! backups" Note however that files can only be removed through the Settings Window.
Options tab
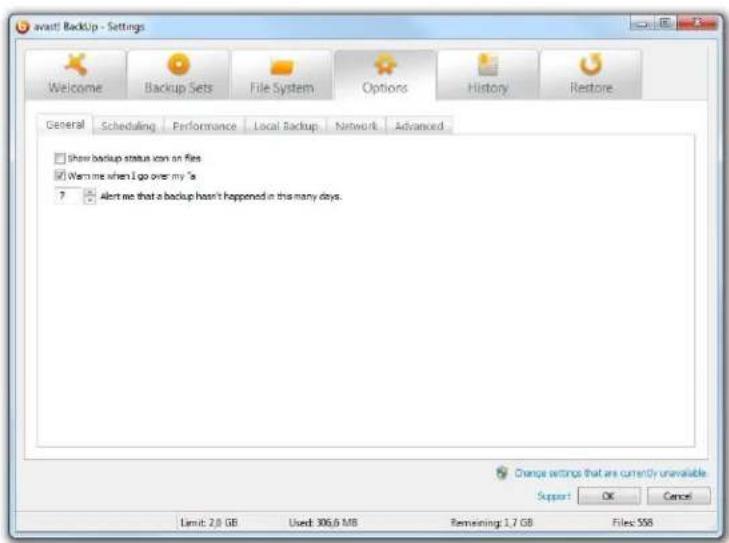
The third tab contains the more detailed settings, further split into 5 sub-tabs. These settings enable you to customize how and when your backups are carried out, however, in most cases the default settings should be sufficient.
- In the "General" sub-tab, you can set up various warnings and alerts according to your personal preferences.
- In the sub-tab "Scheduling", you can specify the exact day and time when your backups should be done:
text_image
Avast! Backup - Settings Welcome Backup Sets File System Options History Restore General Scheduling Performance Local Backup Network Advanced Show backup status von on files Warn me when I go over my 's 7 Alert me that a backup hasn't happened in this many days. Change settings that are currently unavailable Support OK Cancel Limit: 2.0 GB Used: 306.6 MB Remaining: 1.7 GB Files: 558You can adjust the Automatic Parameters to ensure that a backup does not start unless various conditions are all met, e.g. the computer has been idle for at least a specified period of time.
You can also specify exactly when the backup should start. You can select either daily or weekly backups and the day and/or time when the backup should start.
Under this tab you can also temporarily suspend backups, or specify that backups should start even if no network connection is detected or if the computer is running on batteries.
You do not need to be logged in to Windows for your backup to start, however your computer must be turned on, not in sleep/hibernation mode, and must be connected to the internet.
- In the "Performance" tab, you can adjust various parameters that affect the speed of your backups (how much of your computer's resources are dedicated to encrypting and backing up your files), and how much of your bandwidth is used for backups (by adjusting the throttling you can specify how much of your bandwidth is used between certain hours).
- The "Local Backup" tab enables you to back up exactly the same files to a drive which is attached to your computer. As a result, you will always have a local copy of your last backup, which you can use immediately rather than waiting for your files to be restored. In addition to the convenience, this provides a second level of protection.
To set up a local backup, if you intend to use a removable drive for the backups, such as a USB or external hard drive, first make sure it is connected. Then just check the box "Enable local backup" and in the "Drive" field, select the drive where you want your backup files to be stored.
Local backups are carried out simultaneously with your online backups, but are completely independent of one another. If your online backup stops for any reason, your local backup will continue. And if your local back up drive is unavailable, your online backup will continue as scheduled. Your local backup will be carried out as soon as the local drive is available again.
Unlike your online backup, the files which are backed up locally are not encrypted so they can be accessed by anyone who has access to the local drive. If you access your local backup files directly and delete any of them, it will not be possible to use the local backup to restore those files. However, as the online backup stores files for 30 days, they can still be restored from the online backup.
The maximum size of the local backup is the same as the online backup limit.
- In the "Advanced" tab, it is possible to further configure the software according to your own personal preferences.
History tab
In the fourth tab, you can see the history of your previous backups and restores, the size of each, when it was run etc.

text_image
Avast! Backup - Settings Welcome Backup Sets File System Options History Restore Start Time Type During... Result Fil... Size Files Enco... Size Enco... Files Transfer... Size Transfer... 14.11.2011 13:42 Local A... 00:01:34 LocalBackupError0 54... 2,4 GB 0 0 bytes 14.11.2011 13:40 Autom... 00:03:11 AccountError0 54... 2,4 GB 1373 197,0 MB 1 39,8 MB 10.11.2011 17:05 Local A... 00:01:46 LocalBackupError0 54... 2,3 GB 0 0 bytes 10.11.2011 17:03 Autom... 00:03:54 AccountError0 54... 2,3 GB 1350 173,5 MB 1 22,7 MB 09.11.2011 16:29 Local A... 00:00:52 LocalBackupError0 47... 2,3 GB 0 0 bytes 09.11.2011 16:27 Autom... 00:02:15 AccountError0 47... 2,3 GB 848 90,5 MB 1 5,6 MB 08.11.2011 16:10 Local A... 00:04:24 LocalBackupError0 48... 2,3 GB 0 0 bytes 08.11.2011 16:08 Autom... 00:06:23 AccountError0 48... 2,3 GB 1706 118,2 MB 1 25,4 MB File Path Patch Size Encoding... Transfer Ti... Transfer Ra... Other Details fwd_back_mp.png C:\Users\niley\Desktop...\n924 bytes client_restone_status.jpg C:\Users\niley\Desktop...\n27,3 KB 00:00:00 help.png C:\Users\niley\Desktop...\n1,0 KB b63.jpg C:\Users\niley Documents...\n2,3 KB clock.png C:\Users\niley Documents...\n882 bytes call 25911.txt C:\Users\niley\Desktop...\n396 bytes print_button.gif C:\Users\niley\Desktop...\n5,9 KB cfe23.jpg C:\Users\ndie\Documents...\n7,9 KB Clear history Change settings that are currently unavailable. Support GK Cancel Limit: 2,0 GB Used: 386,6 MB Remaining: 1,7 GB Files: 558You can see details of all backups and restores, both online and local, but for local backups, you will only see whether or not the backup or restore was successful.
For online backups and restores, you will see full details, including the number of files backed up, the backup size etc.
By clicking on a particular backup or restore in the top pane, you can see a list below in the bottom pane of all the files included in the backup or restore.
To clear the history, just click the "Clear History" button in the bottom-right corner.
Restore tab
The final tab is the "Restore" tab.
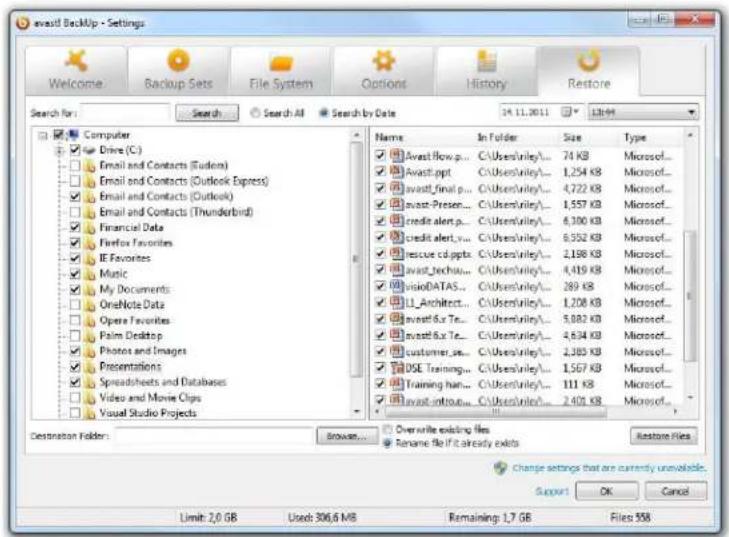
text_image
avast Backup - Settings Welcome Backup Sets File System Options History Restore Search for: Search Search All Search by Date 34.11.2011 12:04 Computer Drive (C:) Email and Contacts (Fudien) Email and Contacts (Outlook Express) Email and Contacts (Outlook) Email and Contacts (Thunderbird) Financial Data Firebox Favorites IE Favorites Music My Documents OneNote Data Opera Favorites Palm Desktop Photos and Images Presentations Spreadsheets and Databases Video and Movie Clips Visual Studio Projects Name In Folder Size Type Avast flow.p... C:\Users\riley\... 74 KB Microsoft... Avast.ppt C:\Users\riley\... 1,254 KB Microsoft... avast_final.p... C:\Users\riley\... 4,722 KB Microsoft... avast_Presen... C:\Users\riley\... 1,557 KB Microsoft... credit alert.p... C:\Users\riley\... 6,100 KB Microsoft... credit alert.v... C:\Users\riley\... 6,552 KB Microsoft... rescue cd.pptx C:\Users\riley\... 2,198 KB Microsoft... avast_techu... C:\Users\riley\... 4,419 KB Microsoft... visioDATAS... C:\Users\riley\... 289 KB Microsoft... L1_Architect... C:\Users\riley\... 1,208 KB Microsoft... evast6.x Te... C:\Users\riley\... 5,082 KB Microsoft... evast6.x Te... C:\Users\riley\... 4,634 KB Microsoft... customer.as... C:\Users\riley\... 2,385 KB Microsoft... DSE Training... C:\Users\riley\... 1,567 KB Microsoft... Training han... C:\Users\riley\... 111 KB Microsoft... evast.outout... C:\Users\riley\... 2,401 KB Microsoft... Overwrite existing files Rename file if it already exists Destination Folders: Browse... Restore Files Limit: 2.0 GB Used: 306.6 MB Remaining: 1.7 GB Files 558 Support OK Cancel Change settings that are currently unavailable. SupportThis enables you to specify which files should be restored to your computer.
Unless you specify a different destination folder (in the bottom left corner of the screen), files that are restored through the Restore tab are restored to the folders they were in originally, at the time they were backed up.
You can restore a single file, several files or all of your files and you can choose whether to restore the last backup, or an older version.
First of all, you need to decide whether you want to backup the most recent version of your files, or a previous version. If you want to restore the most recent version, select "Search All" and the most recent version of all your backed up folders and back up sets containing all your backed up files will be displayed.
To restore from a backup made at a specific date and time, select "Search by Date" then in the top right corner, choose the relevant date and time.
If you want to restore a specific file, you can search for it by typing its name, or part of its name in the Search box to locate it.
Alternatively, by selecting any particular folder or backup set in the left pane, you can see all of the backed up files in the right pane. You can then select or deselect the files to be restored.
By default if the file name already exists on your computer, it will be preserved and the restored file will instead be renamed. However you can change this by selecting "overwrite existing file" and the existing file will then be replaced.
Finally, click on "Restore files" and a new status window will open showing you the progress of the files being restored.
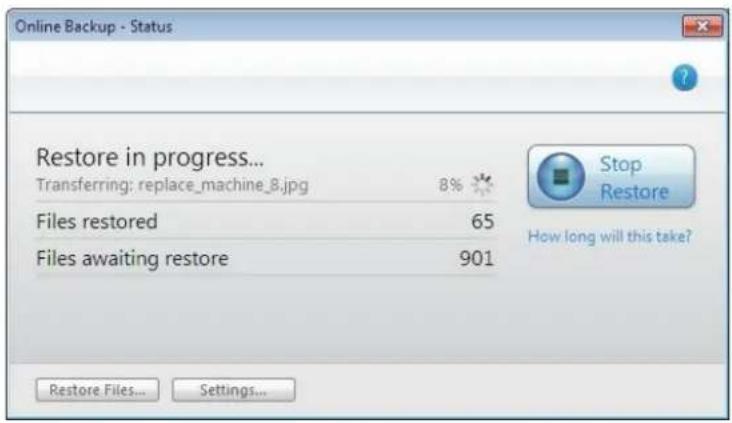
text_image
Online Backup - Status Restore in progress... Transferring: replace_machine_8.jpg 8% Files restored 65 Files awaiting restore 901 Restore Files... Settings... Stop Restore How long will this take?Note: if you have previously backed up your files to a local drive and this drive is connected to your computer, avast! BackUp will try to restore files first from the local drive. Any files that cannot be restored from the local drive, for example if you have selected to restore files which are not the most recent version, will be restored from the avast! server.
Restoring files through the right-click menu
This option allows you to restore a small number of files by simply right-clicking on the relevant files in Windows explorer. This allows you to quickly restore one or more files in the event of accidental loss, deletion or corruption. To restore more files across multiple directories, use the Restore tab in the Settings Window.
To restore a file or a folder, first locate it on your computer using your Windows Explorer.
If you want to restore all files in a folder, locate the folder then right-click a blank area in the Windows Explorer window. If you want to restore a single file, right click on the file and select "Restore Previous Version".
A new window will open in which you can select the files available to be restored, or the previous versions of the selected file.
Select the files, or file versions you want to restore, then right click on the selected files and select either:
- Restore – to restore the files or folders to the same location. If the filename already exists, you will need to further specify whether to rename the restored file, overwrite the existing file, or cancel the restore, or
- Restore to – to restore the selected files and folders to a specified location. Browse to the location where you want the restored files to be saved and click "save".
The status window will then open showing you the progress of the files being restored.
Restoring files from a virtual drive
This is very similar to the right-click restore described above.
First locate the virtual drive e.g. a network folder in your Windows Explorer and navigate to the files or folders that you want to restore. You may need to select from a range of available dates and times of backed up files.
Select the folder or files that you want to restore, then right-click on the folder or files and select "Restore". If a file of the same name already exists, you will need to further specify whether to overwrite the existing file or rename the restored file. If in doubt, choose the option to rename the file.
The status window will then open showing you the progress of the files being restored.
Part 2: Using your avast! BackUp account to restore your files via the web after a complete data loss
You can use the avast! BackUp Web Restore feature to restore your files to another computer if your original computer is lost, damaged, or stolen. You can also use it to restore your files if you have:
- Upgraded or reinstalled your operating system
• Upgraded or installed a new hard drive
• Changed to a new computer
You can then continue to use avast! BackUp to back up your files from your new computer.
If you can no longer use your old computer, you should restore all your files to your new computer before you reinstall avast! BackUp on your new computer – see the section "Replacing a computer".
The reason for this is that if you reinstall avast! BackUp first and it detects files which are backed up but which are not present on the new computer, it will assume they are to be deleted and they will be marked for deletion from the avast! BackUp server after 30 days. It is therefore recommended to restore all your files first to your new computer, and then reinstall avast! BackUp.
If you can still use your old computer, you may find it just as easy to simply move the files from your old computer to the new one using some external medium for transferring files.
To log in to your online account, go to https://admin.backup.avast.com/login/user and log in using your email address and the password that you created during the initial installation.
Restoring all of your files
After logging in, select the name of the computer to which you want to restore your files.
If you want also to restore files that you deleted within the last 30 days, just check the box "Show deleted files".
Finally click "Restore All" and select how you want your restored files to be delivered to you.
For most users, the recommended method is "Direct Download". This restores all your files in real-time, and if your internet connection is interrupted, it will resume where it left off. All your files will be restored to their original location.
Alternatively, for very large restores, you can select "Archive package" which will compress your restored files into one or more smaller files for faster downloading. This option is described later in the section "Choosing the delivery method".
Note that when using the "Restore all" option, only the most recent versions of your files are restored. If you want to restore only specific files (e.g. if you need a few files urgently), or if you want to restore older versions of backed up files, see the next section – "Restoring individual files or sets of files".
After you have restored all your files, you should then re-install avast! BackUp on your new computer – see the section "Replacing a computer".
Your first backup after restoring all your files should not take as long as the initial backup as the files on your computer should automatically be associated with those on the avast! backup server, so they don't need to be re-encrypted and transferred.
Restoring individual files or sets of files
To locate specific files or folders to restore, you can search for the filename, or part of the filename, or you can Browse the folder structure. Alternatively, in the Backup sets tab, you can select entire sets of similar files to restore, or specific files from within a backup set.
Searching for files
You can locate files or folders by entering their file name, or any part of their file name in the Search box, then clicking 📄. You must type at least two characters (letters, numbers or symbols), and you can use the wildcard (*) as long as it's the last character.
text_image
avostf BackUp Home Browse Backup Sets Search Results Search Results for "retention" Name Type Size Date Versions Versions for retention tdt 8 bytes 03/20/11 Backed up at 09/16/73 10:05 tdt 8 bytes 03/20/11 Backed up at 04/25/11 17:02 tdt 8 bytes 03/20/11 Backed up at 04/24/11 17:02 tdt 8 bytes 04/24/11 Backed up at 04/23/11 17:02 tdt 8 bytes 04/23/11 Backed up at 04/22/11 17:02 tdt 8 bytes 04/22/11 Detail Name: Versions for retention Location: C:\Documents and Settings\Hues Type: tdt Size: 8 bytes Creation Date: 03/22/11 17:15 Last Modified: 03/20/11 07:03 Last Backup: 04/25/11 17:02 (Version)- To use one of the five search terms you used previously, click ▶ and choose one of the search terms.
• To clear text while entering it in the Search box, click ✗.
• To stop a search before it finishes, click ✗.
• To clear the last search results and return to the previous view, click ✗
You can download a single file immediately, provided it is not more than 100MB – see the section "Restoring a single file" - or you can add it to a set of files to be restored to your computer later.
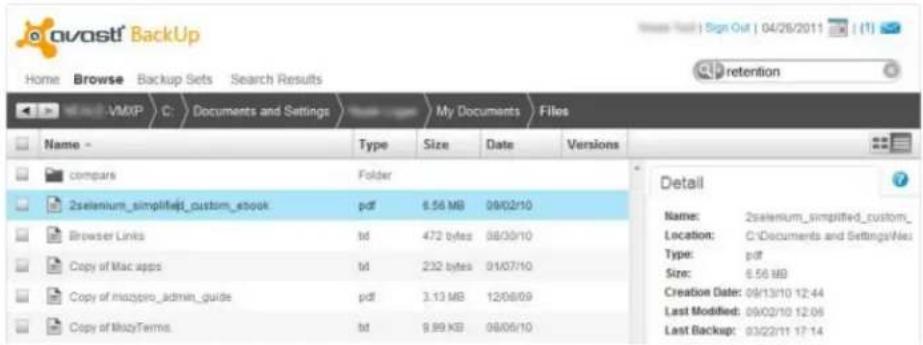
Browsing for files
In the Browse tab, you can see your backed up files in a folder structure, in the same way as they were arranged on your computer.
If you want to restore specific folders and files and you know where they are, you can navigate through the folder structure using the Browse view. Once you find the specific folders or files, you can add them to a set of files to be restored, or you can download a single file immediately, provided it is not more than 100MB – see the section "Restoring a single file".
text_image
avast! BackUp Home Browse Backup Sets Search Results VMXP C: Documents and Settings My Documents Files Name - Type Size Date Versions compars Folder 2selenium_simplified_custom_ebook.pdf 6.56 MB 08/02/10 Browser Links bd 472 bytes 08/30/10 Copy of Mac apps bd 232 bytes 01/07/10 Copy of mazpro_admin_guide.pdf 3.13 MB 12/08/09 Copy of MazyTerms bd 9.89 KB 08/05/10 Detail Name: 2selenium_simplified_custom_ Location: C:\Documents and Settings\Nes Type: pdf Size: 6.56 MB Creation Date: 09/13/10 12:44 Last Modified: 09/02/10 12:06 Last Backup: 03/22/11 17:14Backup sets tab
In avast! BackUp, the most common file types are grouped into backup sets and are automatically selected for back up.
In the Backup sets tab, you can see all your back up sets which are available for restoring.
text_image
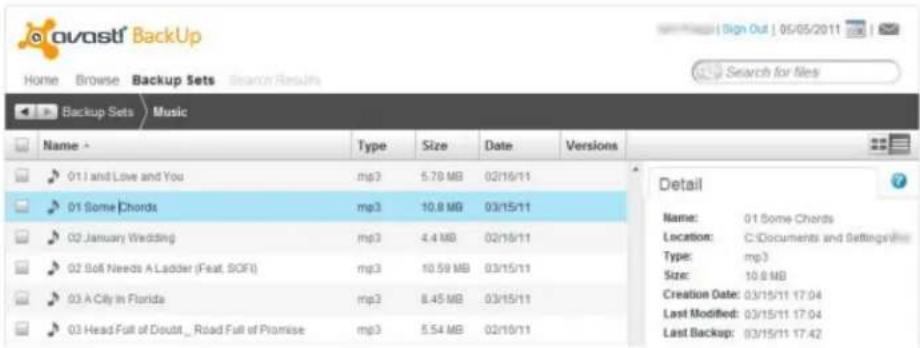
Avast! BackUp Home Browse Backup Sets Search Results Backup Sets Music Name Type Size Date Versions 01 I and Love and You mp3 5.78 MB 02/16/11 01 Some Chords mp3 10.8 MB 03/15/11 02 January Wedding mp3 4.4 MB 02/16/11 02 Soft Needs A Ladder (Feat, SOFI) mp3 10.59 MB 03/15/11 03 A City in Florida mp3 8.45 MB 03/15/11 03 Head Full of Doubt, Road Full of Promise mp3 5.54 MB 02/16/11 Detail Name: 01 Some Chords Location: C:\Documents and Settings\type: mp3 Size: 10.8 MB Creation Date: 03/15/11 17:04 Last Modified: 03/15/11 17:04 Last Backup: 03/15/11 17:42The Backup Sets page is useful if you know what kind of file you want to restore, but you have no idea what it might be called or where it might be on your computer.
It is also useful if you need to quickly restore a specific category of files. For example, the standard backup set for Music shows all your backed up music files, regardless of what drives or folders they were in. Restoring the backup sets may therefore be more convenient than searching for and selecting files across separate drives.
The Backup Sets page never shows files you deleted from your computer in the last 30 days.
You can select an entire backup set to restore, by clicking the checkbox for that backup set, or to choose specific files or folders from within a backup set, navigate inside the backup set, then click the checkbox for the required file or folder.
Restoring a single file
You can download a single file immediately, with one exception. If the file is larger than 100 MB, you must instead add it to a new "restore set" and download that set once you are notified that it is ready.
To restore a single file, use the Search, Browse, or Backup Set tab to find the file to restore.
- If the file is smaller than 100MB, click 🔒 for the file you want to download. The file will then be downloaded immediately to your computer. Depending on your Web browser, the file is saved or opened on your computer the same as any other file that you download from the internet.
- If the file is larger than 100MB, click the checkbox for the file. The file is added to the Restore Summary pane.
- Click Submit, then choose how you want your restored files to be delivered to you.
Restoring several files
To get several files or folders, you need to add them to a restore set.
If the set is small, downloading is the best choice. If the set is very large, it may take some time before you get notification that the download is ready. Downloading a large set also takes some time. Therefore, if your set of files is very large, it may be better to have them shipped to you. If you don't want to have them shipped to you, you can create as many smaller sets as you wish which will download more quickly than a very large set.
To add several files or folders to a set use the Search, Browse, or Backup Set tab to find the files to restore.
- Click the checkbox for the files or folders you want to add to the set.
- Click Submit, then choose how your restored files will be delivered to you.
Restoring a file deleted from your computer
If you delete a file or folder from your computer but the file was previously backed up, you have 30 days to restore it. The file is marked for deletion, but is not deleted from the online backup immediately. However, after 30 days the deletion is considered intentional and the file or folder is permanently deleted from your online backup.
Files marked for deletion from your online backup are kept in the same folder structure as on your computer until they are permanently deleted.
To restore a file or folder that you deleted from your computer, use the Search or Browse option to find the files to restore. Note that the BackUp sets tab never shows deleted files.
On the Browse or Search Results page, click Show Deleted Files.
| Name - | Type | Size | Date | Versions |
| BD18234_(Deleted) | wmf | 1.84 KB | 08/24/98 | |
| BD18235_(Deleted) | wmf | 1.81 KB | 08/24/98 | |
| BD18236_(Deleted) | wmf | 1.71 KB | 08/24/98 | |
| BD18237_(Deleted) | wmf | 1.5 KB | 08/24/98 | |
| BD18238_(Deleted) | wmf | 1.55 KB | 08/24/98 | |
| BD18239_(Deleted) | wmf | 36.95 KB | 09/10/98 | |
| BD18241_(Deleted) | wmf | 2.7 KB | 09/10/98 | |
| BD18242_(Deleted) | wmf | 2.04 KB | 08/24/98 | |
| BD18243_(Deleted) | wmf | 2.04 KB | 08/24/98 | |
| BD18244_(Deleted) | wmf | 1.73 KB | 08/24/98 | |
| BD18245_(Deleted) | wmf | 3.66 KB | 08/24/98 | |
| BD18246_(Deleted) | wmf | 2.55 KB | 08/24/98 | |
| BD18247_(Deleted) | wmf | 3.36 KB | 08/24/98 | |
| BD18248_(Deleted) | wmf | 3.37 KB | 08/24/98 | |
| BD18249_(Deleted) | wmf | 2.16 KB | 08/24/98 | |
| BD18250_(Deleted) | wmf | 5.05 KB | 08/24/98 |
Notice that files or folders marked for deletion from your online backup are shown as (Deleted).
• To add a file or folder to a set, click the checkbox.
- Click Submit, then choose how you want your restored files to be delivered to you.
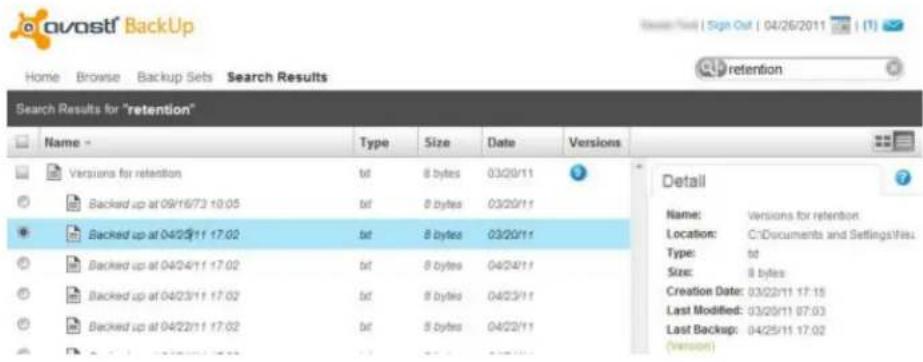
Restoring an older version of a file
As you edit files over time, different versions of those files are backed up. When you choose files to restore, you can select an older version of any file. You can download a single, older version of a file immediately. Or you can add an older file version to a set of files to restore.
Within a single set of files to restore, you can only download one version of the same file. In other words, you cannot create a set that contains a file that was backed up yesterday and also version of that file that was backed up last week.
If you do need to restore more than one version of a file, you can download them separately, being sure that you save them on your computer with different names or locations.
To restore an older version of a file, use the Search, Browse, or Backup Set tab to find the files to restore.
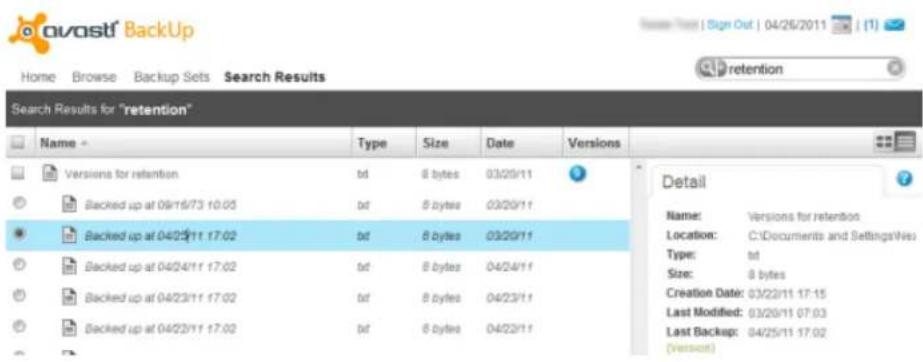
Look in the "versions" column to see if there are at least two versions of a file available. This will be indicated by a colored ball with a number inside.
text_image
ovasti BackUp Home Browse Backup Sets Search Results Search Results for "retention" Name Type Size Date Versions Versions for retention bd 8 bytes 03/20/11 Backed up at 09/16/73 10:03 bd 8 bytes 03/20/11 Backed up at 04/25/11 17:02 bd 8 bytes 03/20/11 Backed up at 04/24/11 17:02 bd 8 bytes 04/24/11 Backed up at 04/23/11 17:02 bd 8 bytes 04/23/11 Backed up at 04/23/11 17:02 bd 8 bytes 04/23/11 Detail Name: Versions for retention Location: C:\Documents and Settings\Wes Type: bd Size: 8 bytes Creation Date: 03/22/11 17:15 Last Modified: 03/20/11 07:03 Last Backup: 04/25/11 17:02 (Version)The number in the ball tells you the number of versions available to restore. Click it and a list of the available versions will appear, sorted by the date and time they were backed up.
- To add an older version of a file to a restore set, click Ⓧ to select it, then click that file's checkbox.
- Note that you can restore only one version of a file in any single restore set.
- Click Submit, then choose how you want your restored files to be delivered to you.
Restoring a BackUp set
To select an entire backup set to restore, in the BackUp tab click the checkbox for the required backup set.
Alternatively, to select specific files or folders from within a backup set, click on the backup set to open it then click the checkbox to select the required file or folder.
Then click Submit, and choose how you want your restored files to be delivered to you.
Choosing the delivery method
After you click Restore All, or after you click Submit at the bottom of the Restore Summary pane, you must then choose the delivery method for your restored files.
If you wish, you can provide a name for your set of restored files, which can be up to 64 characters. Otherwise each set of restored files is assigned a unique ID number, which you will see in the restore status and in emails that you receive from avast! BackUp informing you about the restore status.
The usual form of delivery is "direct download". When you select this method, your restored files are downloaded directly to your computer into the same folder from which they were backed up, or any other folder that you choose.
Archive Package requires manual download and un-compressing. You can see the status of your archive package in the Restore Status pane – see the next page - and you will be notified when the archive package is ready for you to download.
Selecting "Archive package" will compress all your files into a single file so that it downloads faster. For a large restore, it may still take some time to create the compressed file, but you will be notified when it is ready to download. For very large restores e.g. 1,000GB or more, a number of compressed files may be created to reduce the individual download times. However, using this method will not restore the files to their original location. You will need to extract them first and then manually move them to where you want them.
However, even for large restores of 200GB or more, it may make more sense to restore using the Direct download method as you can download your files in batches, so you can download your most important files first and start using them while you are still downloading your less critical files.
Viewing the status of your restore
On the Home page, the Restore Status pane shows information about all the restore sets you have requested. You can see the status and details of each restore, and you can download or cancel a restore.
To see the Restore Status pane, you must be on the Home page. Scroll to the bottom of the window and click 🔊.

text_image
Restore Status ID - Name Request Date Type Restore Status Restore Details 46022 10/19/10 16:44 Archive Pack ✗ Expired 46019 10/19/10 15:50 Media 1 of 3 - Preparing Files 45933 test 10/15/10 17:49 Direct Downi Processing 45921 test 10/15/10 14:50 Archive Pack ✗ Expired Previous | 2 3 4 5 6 Next (31 - 40 / 327 items) Refresh Restore IDName: 46019 Total Files/Size: 2 Files / 8.71 MB (Verifying...) Media Restore Status: Your requested restore is being prepared.You can scroll through up to ten restores on a single page. If you have more than ten restores, you can also use the pagination controls to page and scroll through your entire list.
Note: The Restore Status pane refreshes automatically after five minutes. To refresh the Restore Status pane at any other time, click Refresh. You may need to refresh the Restore Status pane if you just requested a small set of files to download and are waiting for it to be ready.
Getting your restored files
With avast! BackUp, you can choose to download a single file immediately, download a set of files, or have a set shipped to you.
If you clicked ⬆ to download a single file immediately, the file is downloaded to your computer immediately. Depending on your Web browser, the file is saved or opened on your computer in the same as any other file that you download from the internet.
If you added files to a set and chose Direct Download:
- On the avast! BackUp Home page, find the restore you want to download in the Restore Status pane, then click Waiting.
- In the Direct Download window, click Download to download the avast! BackUp Restore Manager. The avast! BackUp Restore Manager downloads to your browser's default location.
- Locate and run the avast! BackUp Restore Manager. The avast! BackUp Restore Manager login window appears.
- Enter your Email and Password, then click Next. All your Direct Download restore sets are listed in the next window.
- Select your current restore, then click Next.
- Choose a destination for your restored files, then click Next.
- Confirm the details of your restore, then click Start. If you pause the restore or lose your connection, avast! BackUp Restore Manager picks up where it left off when you resume the restore.
Your files are restored to the location you chose.
avast! BackUp – Quick Start Guide
If you added files to a set and chose Archive Package:
- In the Restore Status pane, look for the restore you want to download.
- Select the restore, then under Restore Details, click the link to download the restore.
- Save the compressed restore file to your Desktop. This file may resemble a folder. It contains all your restored files in a compressed (or zipped) file, to make the file as small as possible so you can download it faster.
- Extract your compressed files.
Replacing a computer
As mentioned in the section "Restoring your data after a complete data loss", if you can no longer use your old computer, you should restore all your files to your new computer before you reinstall avast! BackUp – see the section "Replacing a computer".
The reason for this is that if you reinstall avast! BackUp first and it detects files which are backed up but which are not present on the new computer, it will assume they are to be deleted and they will be marked for deletion from the avast BackUp server after 30 days. You should therefore restore all your files first to your new computer, and then reinstall avast! BackUp.
If you install avast! BackUp on your new computer before all your files are restored, you will have 30 days in which to restore all the files you need, otherwise any unrestored files will be marked for deletion and deleted at the end of 30 days.
Please note the following limitations:
- Once you have updated your existing account with your new computer, you will no longer be able to perform backups on the replaced computer, however you will still be able to restore files from that computer for a period of 30 days.
- You cannot restore your data to a new computer that uses a different platform (e.g. if you change from Windows to a Mac)
To replace a computer:
First, download and start installing the latest version of avast! BackUp on the replacement computer. For instructions on downloading and installing avast! BackUp, see "How to install avast! BackUp" on page 4.
When prompted during the install, enter your license key and email address.
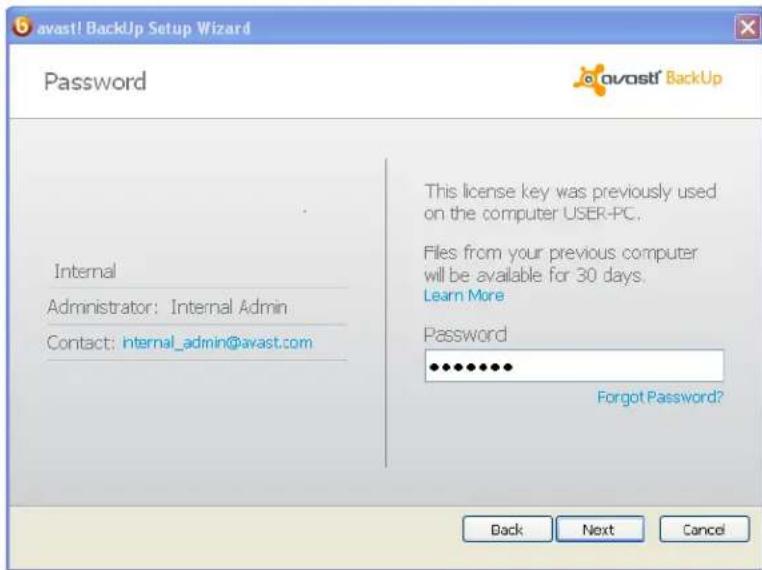
avast! BackUp will automatically recognize that you are using a different computer and will ask you to enter your password:
text_image
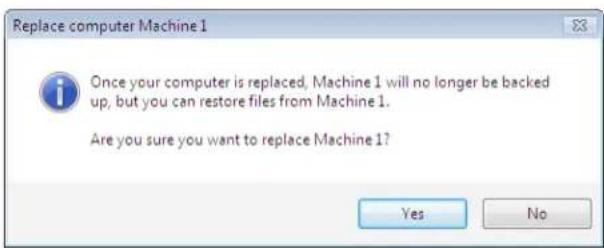
avast! BackUp Setup Wizard Password This license key was previously used on the computer USER-PC. Files from your previous computer will be available for 30 days. Learn More Password Forgot Password? Back Next CancelClick "Next" and a new dialog box will appear asking you to confirm the replacement. Click "Yes" to continue.
text_image
Replace computer Machine 1 Once your computer is replaced, Machine 1 will no longer be backed up, but you can restore files from Machine 1. Are you sure you want to replace Machine 1? Yes NoThe Setup wizard will then continue with setting up your computer as described earlier in this guide.
Uninstalling avast! BackUp
In case you need to reinstall avast! BackUp later, you should save your settings file, which contains your backup sets and other settings.
-
Open Windows Explorer and navigate to: Computer > (C:) Drive > Program Files > avast! BackUp > Config.
-
Right-click on conf.dat and select Copy.
-
Right-click and Paste the file onto your desktop.
You should also take a note of your License Key and User E-mail before uninstalling.
-
Right-click on the avast! BackUp icon in your system tray (usually located in the lower right corner by your system clock).
-
Select About.
-
Copy the key and paste it into a document so you can reinsert it later.
To uninstall avast! BackUp:
- Click Start > All Programs > avast! BackUp > Uninstall avast! BackUp.
- Click Yes to confirm you want to uninstall avast! BackUp.
- When prompted to restart, click Yes.
Uninstalling avast! BackUp does not cancel your account and does not remove your files from the avast! servers. Therefore, if you replace your computer, you can associate your backed up files to the new computer, so you can resume backing up and restore your files if and when necessary. For more information, see "Replacing a computer" on page 30.
If you want to re-install avast! BackUp on the same, or a different computer, just follow the installation steps as described in the section "How to install avast! BackUp" on page 4.
Lastly, you need to put your config dat file back. Please follow these steps:
- Go to your desktop, right-click on the file conf.dat, and select Cut.
- Open Windows Explorer and navigate to Computer > (C:) Drive > Program Files > avast! BackUp > Config.
- Right-click and select Paste to put the conf.dat file back.
If all your files are present on the computer when you reinstall and if you have saved your settings file, all or some of your files may not need to be re-uploaded again during the first back up. Instead they will be re-associated to the files backed up on the avast! servers. While this process takes some time, it is faster than a full first backup.
Frequently Asked Questions
How long does it take to back up?
For a typical system on a typical broadband line, and if you continue working on your computer during the backup, avast! backs up data at the rate of about 2-4 GB per day. If left undisturbed on a fast connection, however, over 9 GB in a single day is possible. You may experience faster or slower speeds depending on your connection. During installation, avast! tests your bandwidth to ensure your Internet connection is fast enough. If you want to get an estimate of the transfer rate before you begin your initial backup, you may want to use a bandwidth meter to measure your broadband connection speed. We recommend using the meter from Speakeasy.net or Speedtest.net.
After your initial backup, subsequent backups are relatively quick and you may not even notice them. This is possible because avast! performs what are called incremental backups, which means that it only backs up the files that have changed since the last time they were backed up. This saves lots of time, bandwidth and storage space.
Why does the first backup take so long?
Two things affect your initial back up time:
1. The amount of data to back up
avast! BackUp automatically determines the files to back up using backup sets. Your first backup has to copy all of the selected files to the server. How long this first backup takes depends on the amount of data selected to be backed up.
One way to shorten the first backup is to deselect some non-critical files for the initial backup using the avast! BackUp Settings, and then add them to your backup later on.
Subsequent backups take minutes because only the files that have changed are uploaded to the servers.
2. Upload speed
While today's Internet connections are much faster, more applications such as email are also using your Internet connection. Since many of these tasks need access to the Internet, avast! BackUp gives these programs priority, using the left-over bandwidth to send your data to the backup servers. This lets you continue working on your computer doing other tasks such as email or surfing the Web.
Since the amount of bandwidth available to avast! BackUp is limited, the first backup takes longer because there is so much data to send to the servers.
Can I Test My Bandwidth?
You can test the speed of your internet connection using free sites such as Speakeasy.net or Speedtest.net.
Compare the results of your speed test to the Internet service you purchased. You can try to increase your bandwidth by setting up bandwidth throttling or closing other applications that are accessing the Internet.
If you repeat the test, you will probably get a different reading because the amount of congestion on the Internet is always changing and applications on your computer that are accessing the Internet are also changing. However, your numbers should not change by more than 50%.
How does avast! BackUp Determine What Files to Back Up?
During the installation, avast! BackUp scans your harddrive and categorizes all of your data files into backup sets such as word processing documents, digital photos, music files, and so on.
So as to not waste your bandwidth, avast! BackUp does not backup your operating system, application, or temporary Internet files. These files are best restored by reinstalling the software so that they are configured correctly with your system. Other files avast! BackUp omits are disk images (.iso), virtual drives (.vmc, .vhd, .vmsn), system configuration and driver files (.sys), and application files (.exe, .dll).
How can I do a web restore?
You can restore your files from the web, for example in the event of a complete data loss due to a lost or damaged computer, by logging in to your user account via this URL: https://admin.backup.avast.com/login/user
How to restore your files from the web is described in Part 2 of this guide (page 18) or you can read the avast! Help file which details exactly how to restore some or all of your files from the web. You can find the help file here: http://help.avast.com/backup/en/
Thank you for choosing avast!