
N64 - Console NINTENDO - Notice d'utilisation et mode d'emploi gratuit
Retrouvez gratuitement la notice de l'appareil N64 NINTENDO au format PDF.
| Type de produit | Console de jeux vidéo 64 bits |
| Marque | Nintendo |
| Modèle | N64 |
| Alimentation | Adaptateur secteur 120 V CA, 60 Hz |
| Dimensions (approx.) | 260 x 190 x 83 mm (L x P x H) |
| Poids (approx.) | 1,1 kg |
| Connecteurs vidéo/audio | Sortie AV stéréo (RCA) et RF (via modulateur optionnel) |
| Nombre de manettes | Jusqu'à 4 (prises sur la façade) |
| Support de jeu | Cartouches N64 (Game Pak) |
| Fonctions principales | Jeux 3D, son stéréo, mémoire extensible (Expansion Pak optionnel) |
| Entretien et nettoyage | Nettoyer les manettes avec une brosse à dents et de l'eau chaude. Éviter les détergents. |
| Sécurité | Ne pas utiliser d'adaptateur non homologué. Ne pas obstruer les fentes de ventilation. Débrancher en cas de non-utilisation. |
| Pièces détachées disponibles | Adaptateur secteur, câble AV, switch RF, modulateur, manettes, etc. (voir liste dans la notice) |
| Réparabilité | Service après-vente Nintendo : 1-800-255-3700. Centres de réparation agréés. |
| Garantie matériel | 12 mois à compter de la date d'achat |
| Garantie accessoires | 3 mois |
| Informations générales | Console 64 bits lancée en 1996. Manuel d'instructions fourni. |
FOIRE AUX QUESTIONS - N64 NINTENDO
Questions des utilisateurs sur N64 NINTENDO
0 question sur cet appareil. Repondez a celles que vous connaissez ou posez la votre.
Poser une nouvelle question sur cet appareil
Téléchargez la notice de votre Console au format PDF gratuitement ! Retrouvez votre notice N64 - NINTENDO et reprennez votre appareil électronique en main. Sur cette page sont publiés tous les documents nécessaires à l'utilisation de votre appareil N64 de la marque NINTENDO.
MODE D'EMPLOI N64 NINTENDO
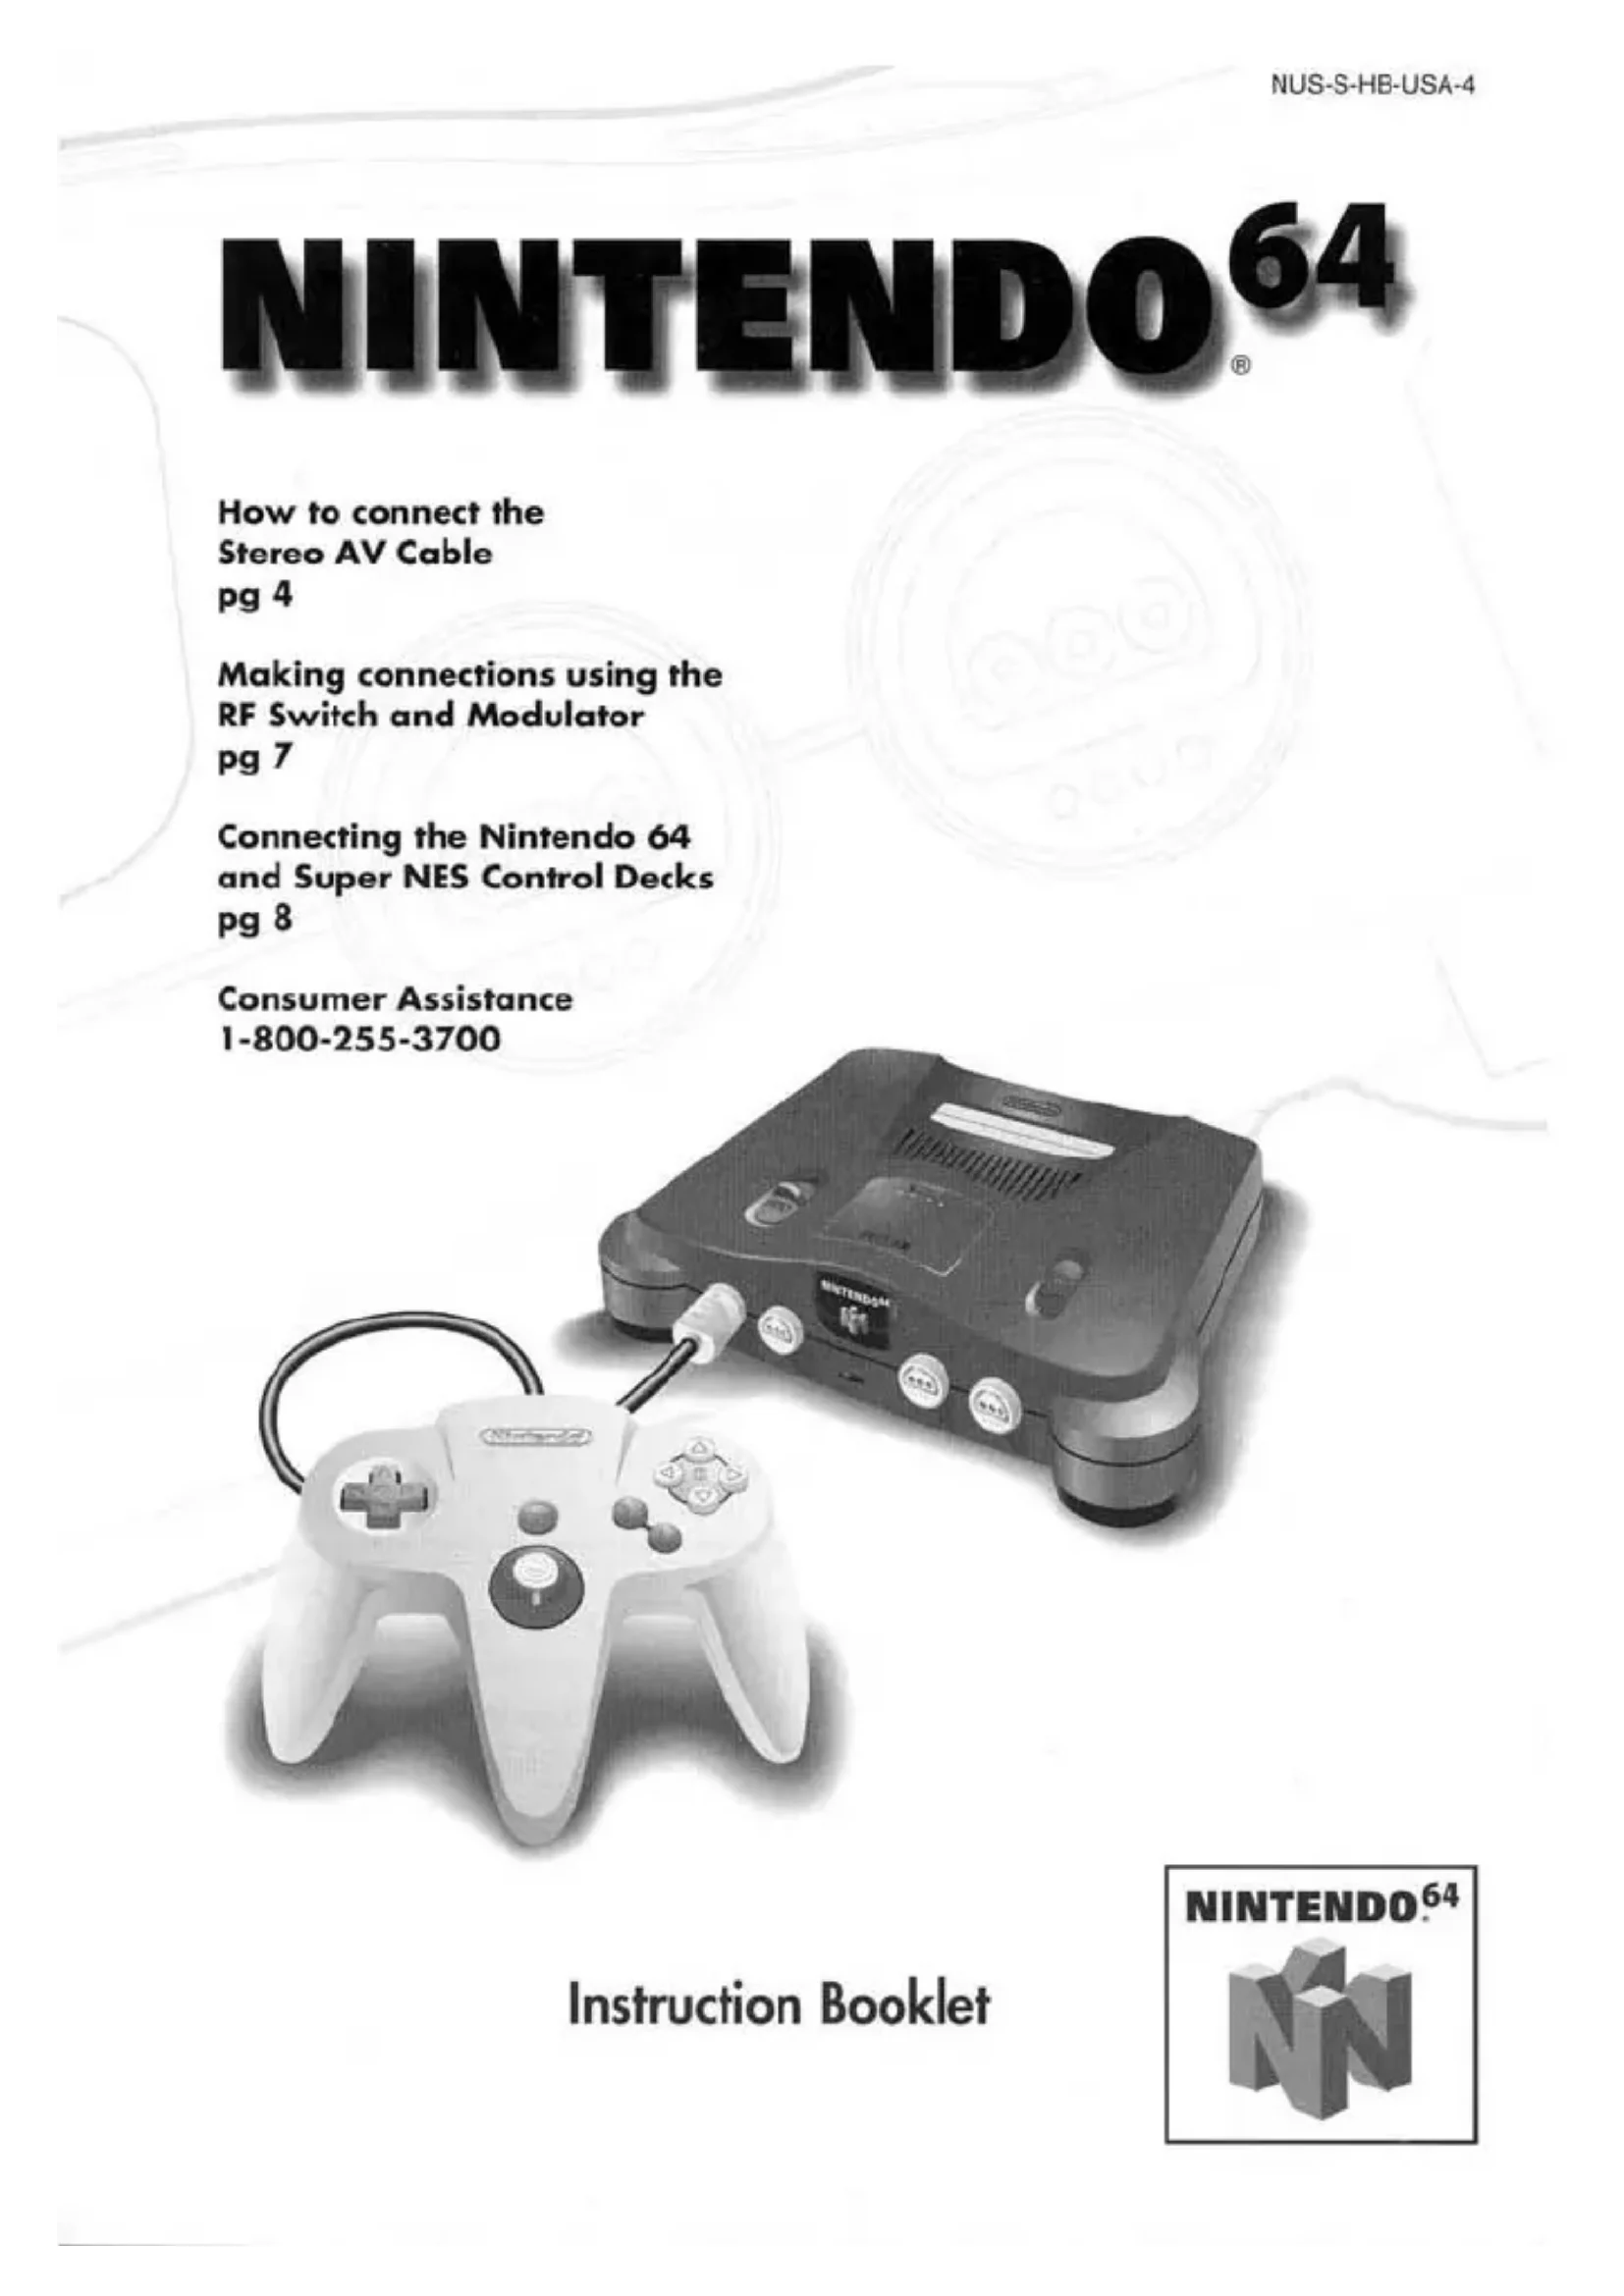
NINTENDO 64
How to connect the
Stereo AV Cable
pg 4
Making connections using the
RF Switch and Modulator
pg7
Connecting the Nintendo 64
and Super NES Control Decks
pg8
Consumer Assistance
1-800-255-3700

Instruction Booklet
NINTENDO.64
WARNING
PLEASE CAREFULLY READ THE CONSUMER INFORMATION AND PRECAUTIONS BOOKLET INCLUDED WITH THIS PRODUCT BEFORE USING YOUR NINTENDO® HARDWARE SYSTEM, GAME PAK OR ACCESSORY. THIS BOOKLET CONTAINS IMPORTANT SAFETY INFORMATION.
WARNING
TO PREVENT ELECTRIC SHOCK HAZARD, DO NOT CONNECT THE AC POWER CORD PLUG TO AN OUTLET, RECEPTACLE OR EXTENSION CORD UNLESS THE PLUG BLADES CAN BE FULLY INSERTED.
A DAMAGED POWER CORD MAY CAUSE A FIRE OR SHOCK HAZARD. DO NOT OPERATE IF THE POWER CORD IS BROKEN, SPLIT, OR DAMAGED IN ANY WAY.
CAUTION
THE NINTENDO 64 GENERATES REALISTIC IMAGES AND 3.D SIMULATIONS. WHILE PLAYING OR WATCHING CERTAIN VIDEO IMAGES, SOME PEOPLE MAY EXPERIENCE DIZZINESS, MOTION SICKNESS OR NAUSEA. IF YOU OR YOUR CHILD EXPERIENCE ANY OF THESE SYMPTOMS, DISCONTINUE USE AND PLAY AGAIN LATER.
Throughout this Instruction Booklet, you will see sections beginning with WARNING, CAUTION, and NOTE. Each section has a different level of meaning, as follows:
WARNING
Warns you about incorrect use of the Nintendo 64 that could result in serious personal injury.
CAUTION
Cautions you about incorrect use of the Nintendo 64 system that may result in (1) personal injury or (2) damage to the Nintendo 64 Control Deck, components or accessories.
NOTE: Points out important information on using or maintaining your Nintendo 64 system.
Contents
Section 1 Nintendo 64 Instruction Booklet page 2
Components page 3
Section 2 Connection and Installation page 4
Audio/Video Cable Connections page 4
RF Switch/RF Modulator Connections page 7
Connecting Both the Nintendo 64 and Super NES page 8
Connecting the AC Power Supply page 9
Connecting the Controller(s) page 10
Section 3 How to Operate page 11
Removing a Game Pak page 14
Returning to Regular TV page 14
Section 4 Troubleshooting page 15
Section 5 Warranty and Service Information page 19
Parts List and Order Form page 20
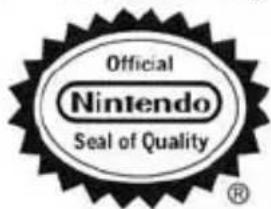
This official seal is your assurance that Nintendo has reviewed this product and that it has met our standards for excellence in workmanship, reliability
and entertainment value. Always look for this seal when buying games and accessories to ensure complete compatibility with your Nintendo product.
All Nintendo products are licensed by sale for use only with other authorized products bearing the Official Nintendo Seal of Quality.
NINTENDO 64 INSTRUCTION BOOKLET
Congratulations on your purchase of the Nintendo 64, the world's most advanced 64-bit video game entertainment system, featuring CD-quality stereo sound, incredibly smooth and realistic graphics and the most exciting video games ever experienced!
Read both the setup instructions and the separate Consumer Information and Precautions Booklet before attempting to connect the Nintendo 64 Control Deck to your TV or VCR. If, after reading all setup instructions, you are still unable to hook up your system, please call the Consumer Assistance Hotline at the number listed below.
Need Help with Installation, Maintenance or Service?
Mon. - Sat., 6:00a.m. - 9:00p.m.; Sun., 6:00a.m. - 7:00p.m., Pacific Time (Times subject to change)
You can visit our web-site at www.nintendo.com for additional set-up information, product news, and game information.
Nintendo also has a free automated information line available for product news and game information, call the Powerline at 1-425-885-7529. This may be a regular long distance phone call. Please ask permission from whomever pays the phone bill.
Control Deck
Game Pak Slot
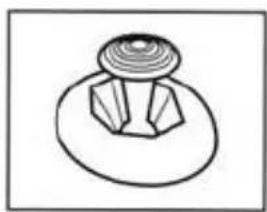
Memory Expansion
Do not remove the Jumper Pak from the Memory
Expansion connector - the Control Deck will not operate.
Controller Sockets 1-4
Expansion Connector (on bottom)
Power Indicator Light
Back View of Control Deck
Nintendo 64 Controller
Bottom View of Controller

On the bottom of the controller is a connector slot for loading an N64 Controller PakTM or Rumble PakTM (sold separately). Look for Game Paks displaying the N64 Controller Pak and/or Rumble Pak icons.
AC Power Supply
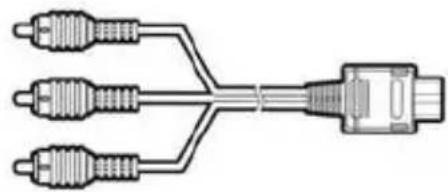
Stereo Audio/Video Cable
Section Two
Connection & Installation
Connect the Nintendo 64 to either your TV or VCR using the Stereo Audio/Video Cable. Choose one of the connection methods on pages 4-6 that matches the connections for your TV or VCR; you will only need to make one kind of connection.
If your TV or VCR does not have audio/video connections (i.e., the illustrations on pages 4-6 do not match your TV or VCR), then turn to page 7 for other types of connection methods. You will need to use a Nintendo 64 RF Switch and RF Modulator (sold separately).
If you currently have a Super Nintendo Entertainment System connected to your TV or VCR and want to connect both the Super NES and Nintendo 64 Control Decks, then turn to page 8.
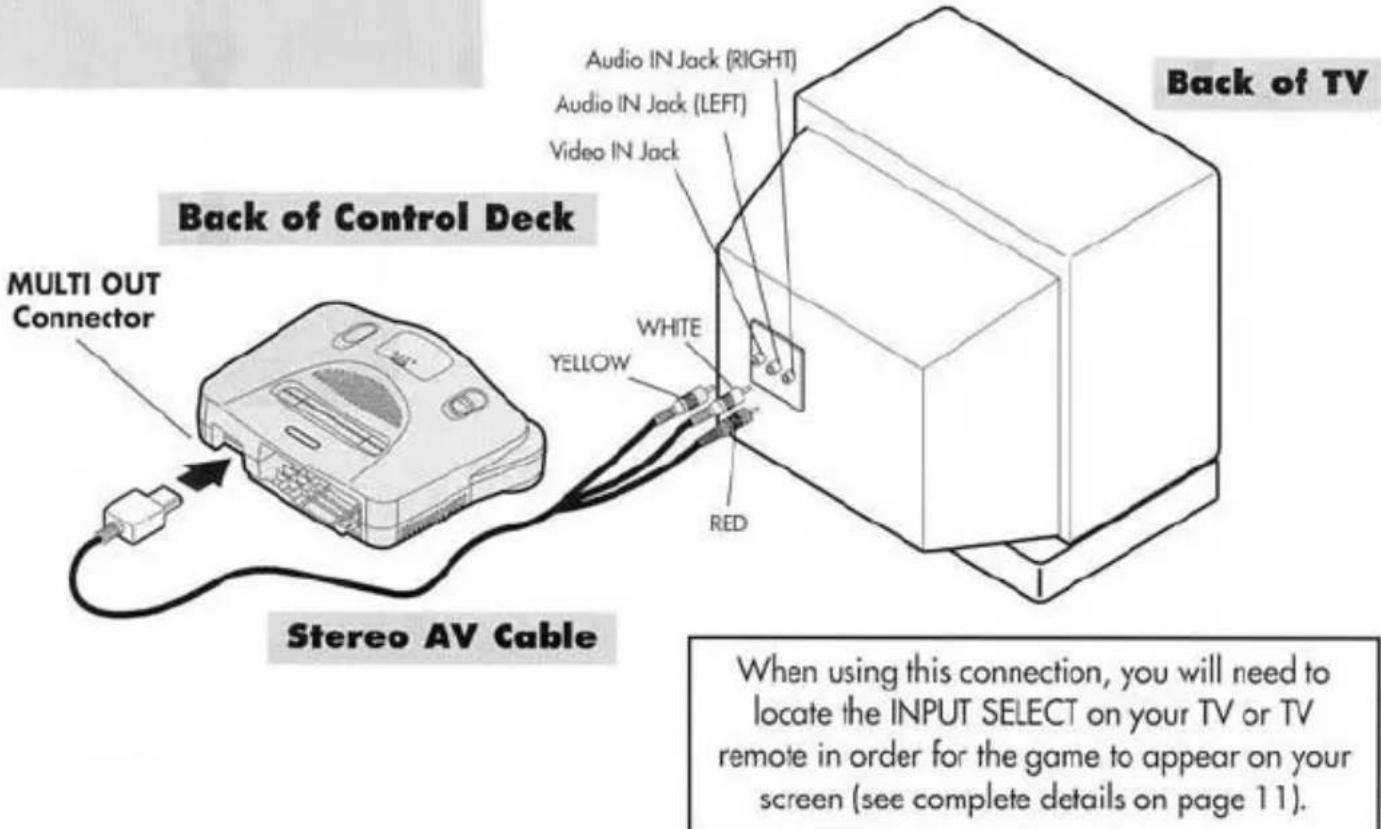
Audio/Video Cable Connections
A Connecting to a Stereo TV
Make sure to plug the Audio/Video Cable into the "INPUT" connections of your TV (Do not use connections labeled "OUTPUT").

Connecting to a Stereo VCR
Make sure to plug the Audio/Video Cable into the "INPUT" connections of your VCR (Do not use connections labeled "OUTPUT").
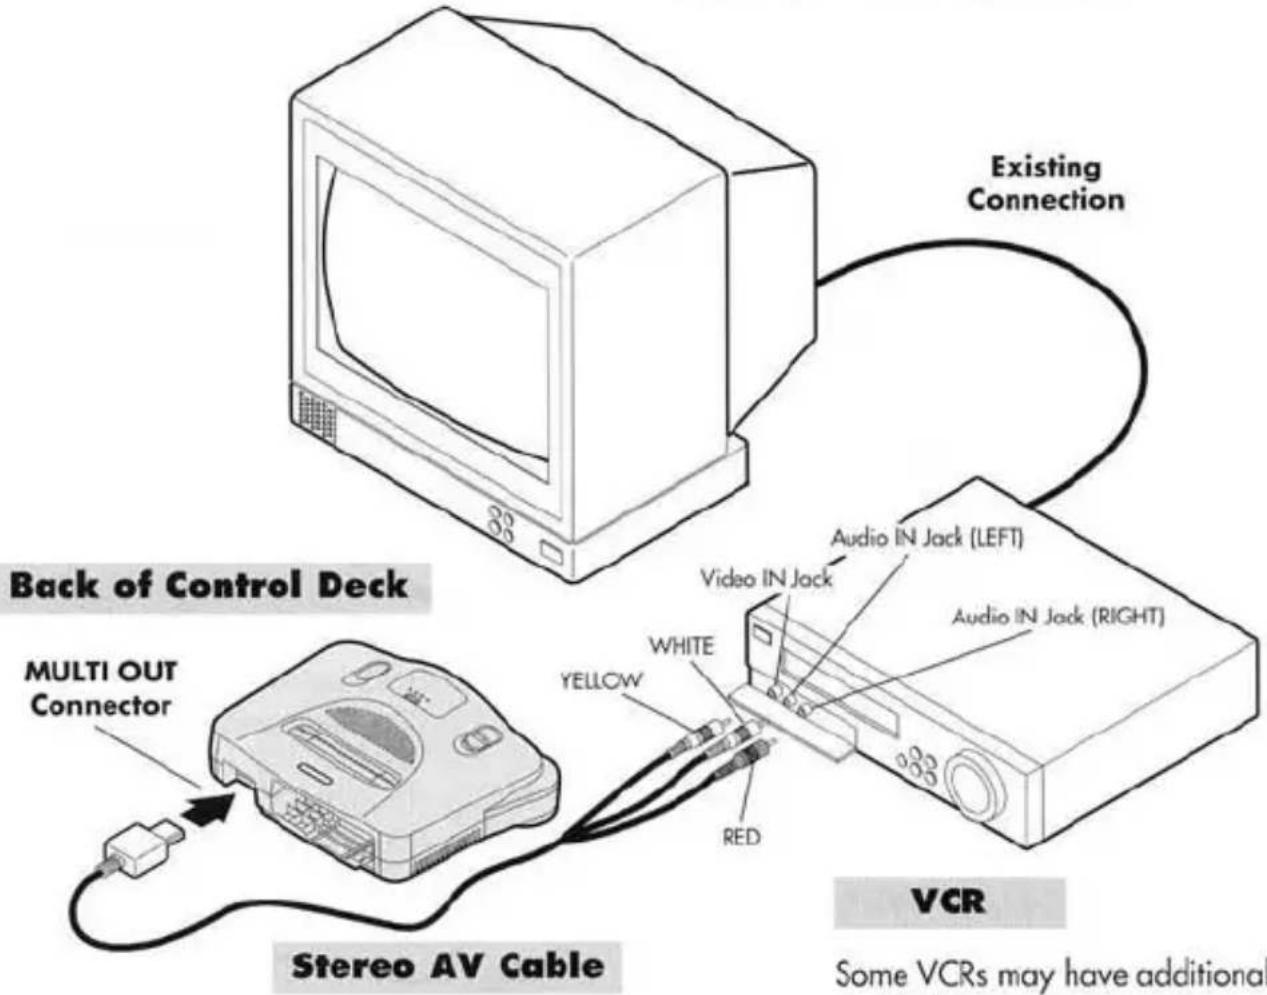
Some VCRs may have additional Audio/Video Input Connections on the back. For more information, see your VCR's instruction manual.
When using this connection, you will need to locate the INPUT SELECT on your VCR or VCR remote in order for the game to appear on your screen (see complete details on page 11).
C Connecting to a MONO TV or VCR (No Stereo Sound)
Make sure to plug the Audio/Video Cable into the "INPUT" connections of your TV or VCR (Do not use connections labeled "OUTPUT").
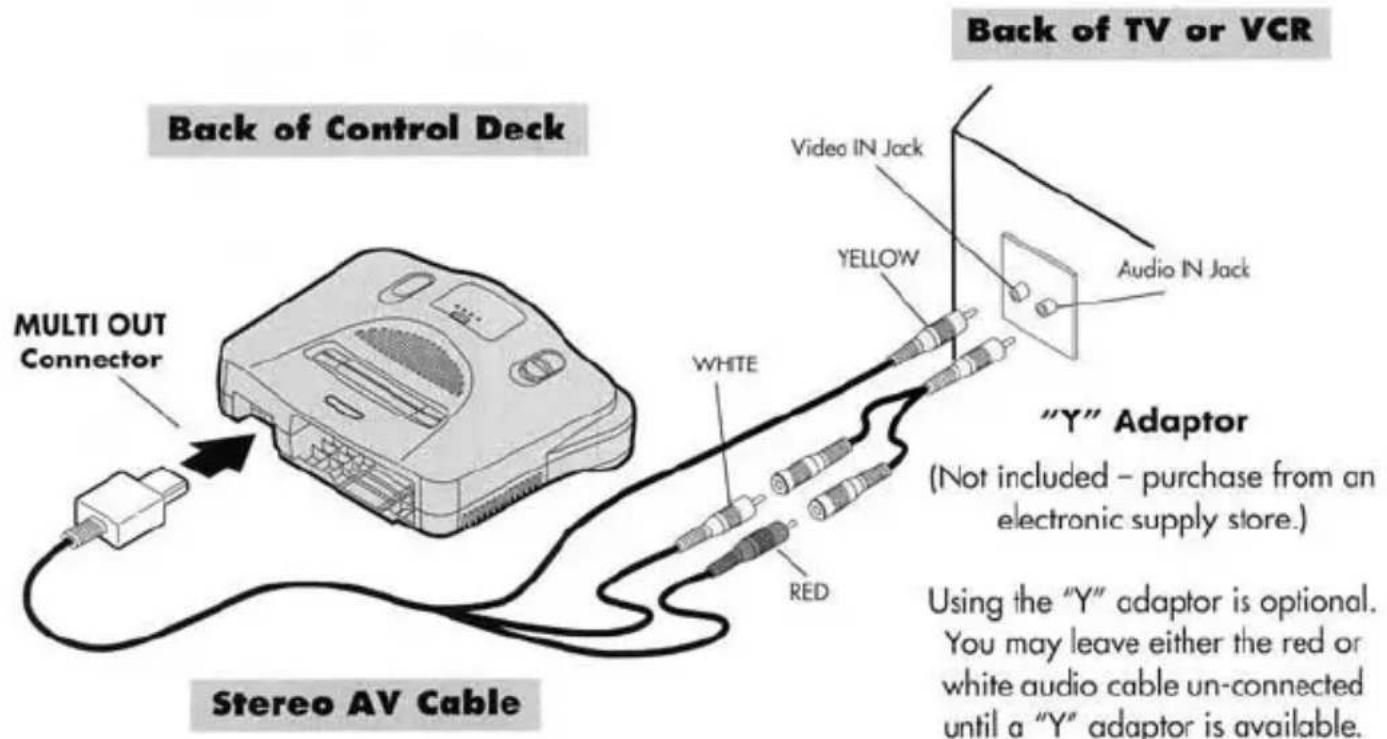
When using this connection, you will need to locate the INPUT SELECT on your TV and/or VCR or remote in order for the game to appear on your screen (see complete details on page 11).
D Connecting to a TV Without Audio/Video Connections
NOTE: This method of connection will produce mono sound only (the left and right stereo channels will be mixed).
If your TV or VCR does not have audio/video connections, you will need to use a Nintendo 64 RF Switch and RF Modulator (sold separately), to complete your connections.
You can purchase the Nintendo 64 RF Switch and RF Modulator (packaged together as a set) from most retail stores where Nintendo products are sold, or see the parts list and order form on page 20 in this booklet.
Note: Be sure to use only the Nintendo 64 RF Switch and RF Modulator displaying the Official Nintendo Seal of Quality to ensure the highest picture quality.
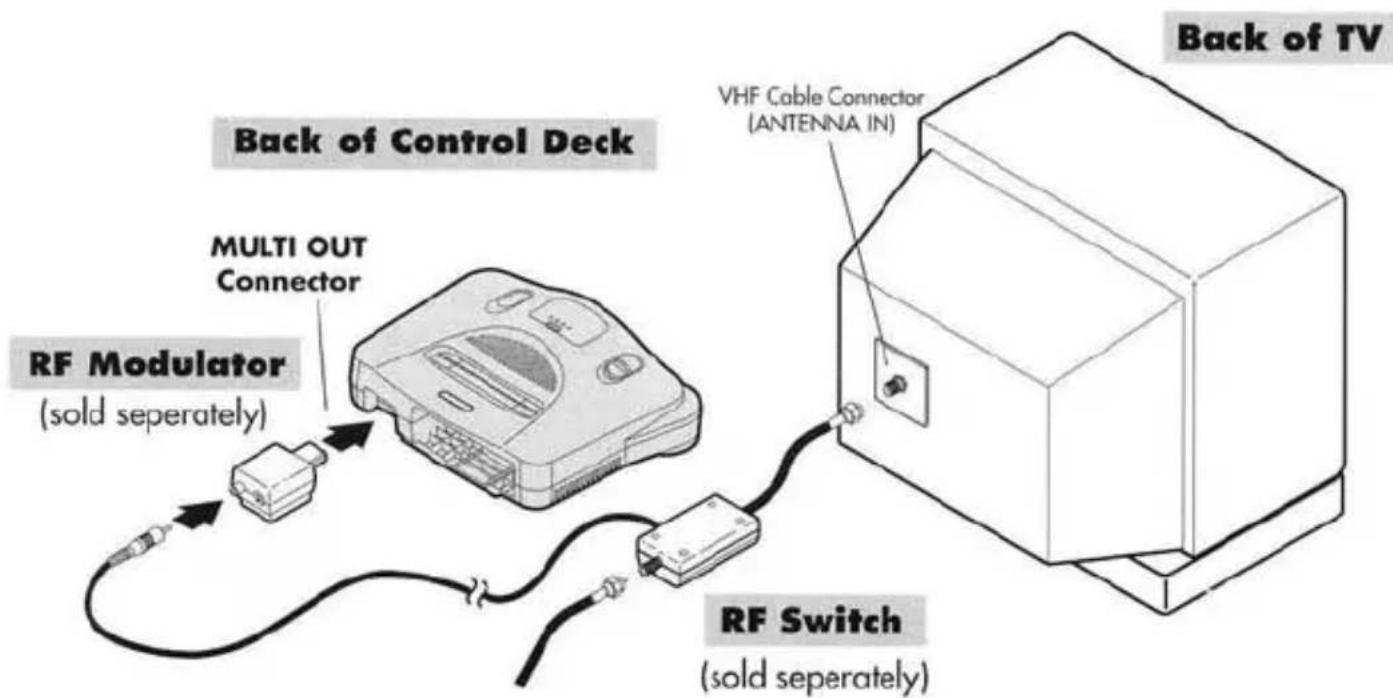
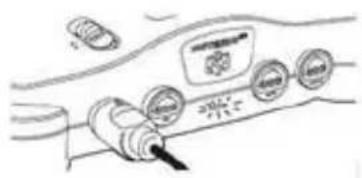
Remove the existing cable connected to the back of your TV and reconnect it to the RF Switch as shown.
There is no reason to disconnect your Super NES; you can connect both the Nintendo 64 and the Super NES! Use one of the connections described below to connect the Super NES and Nintendo 64, then enjoy playing games on both systems.
If the Super NES is currently connected to your TV using an RF Switch, then use the Stereo Audio/Video Cable to connect the Nintendo 64 Control Deck to your TV (see diagram #1 below). For connection details, use method A on Page 4.
If the Super NES is currently connected to your TV using an RF Switch and your TV has no AV inputs, connect the Nintendo 64 Control Deck to your VCR (see Diagram #2 below). For connection details, use method B on page 5.
If the Super NES is currently connected to your TV using an RF Switch and your TV or VCR does not have any audio/video connections, then connect both the N64 and Super NES Control Decks by using two RF Switches (see Diagram #3 below).
If the Super NES is currently connected to your TV or VCR using an audio/video cable, then use the Stereo Audio/Video Cable that came with the Nintendo 64 to connect the Control Deck to either your TV or VCR. Follow one of the connection methods shown on pages 4-6. If there are no additional audio/video connections available, then connect the Nintendo 64 using the existing audio/video cable connection (so you can enjoy the stereo sound and best picture quality) and connect the Super NES Control Deck by using an RF Switch (use the RF Switch that came with your Super NES). (See Diagram #1 below.)
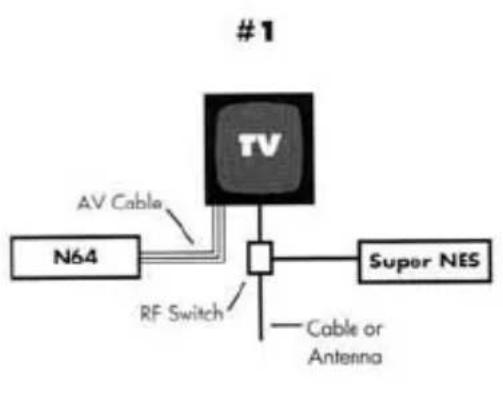
(See page 4 for N64 to TV hook-up)
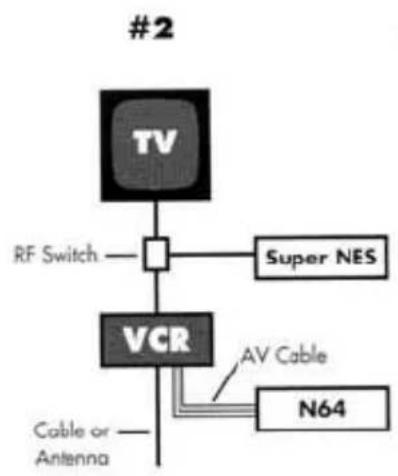
(See page 5 for N64 to VCR hook-up)

(See page 7 for N64 to TV RF Switch hook-up)
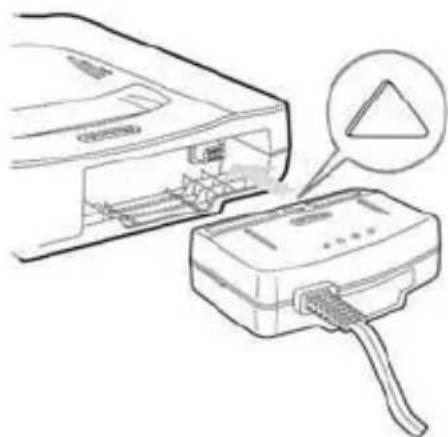
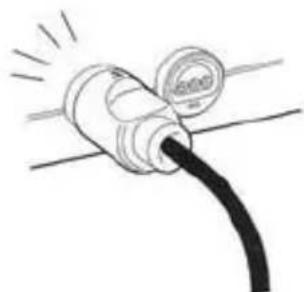
Make sure the Power Switch is in the OFF position before connecting the AC Power Supply.
Connect the AC Power Supply, with the triangle on top as shown, into the port in the back side of the Control Deck. Insert the AC Power Supply into the Control Deck until you hear a click.
WARNING
To prevent electric shock or damage to the Control Deck, do not try to use any other type of AC adapter or power supply.
Insert the plug from the power cord into a standard (120-volt AC) wall outlet.
If you need to remove the AC Power Supply from the Control Deck, first make sure the power switch is in the OFF position, then disconnect the power cord from the wall outlet. Press the lock release button on the bottom of the AC Power Supply and pull it out of the Control Deck.
WARNING
To prevent electric shock or cord damage, carefully disconnect any plugs from the Control Deck or electrical outlet by pulling the plug, not the cord.
CAUTION
To avoid excessive wear to the AC power supply connector, do not disconnect the AC Power Supply from the Control Deck even when storing your Nintendo 64. To save energy, unplug the power cord plug from the wall outlet when the Nintendo 64 is not being used.
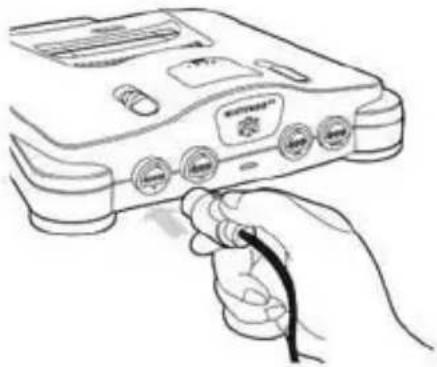
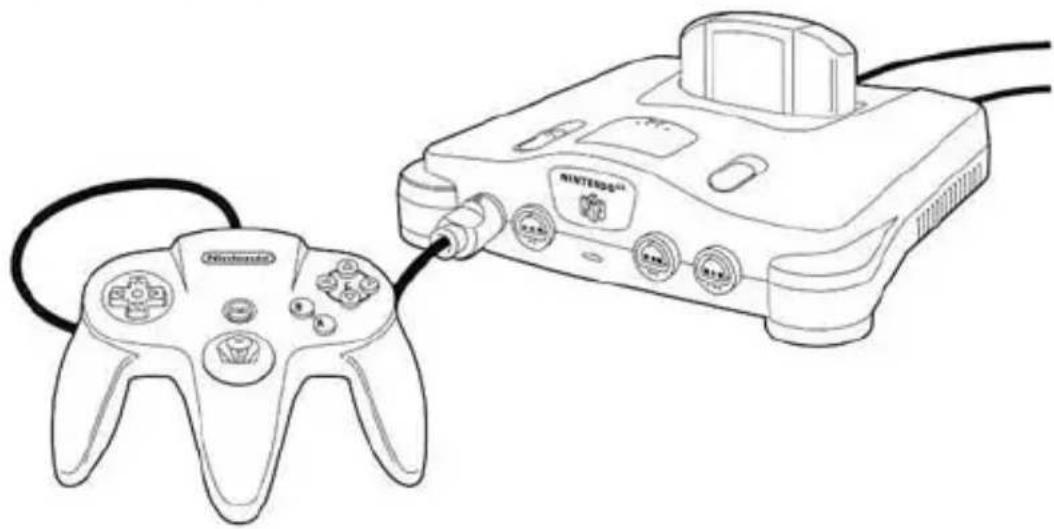
Plug the Nintendo 64 Controller into the socket on the front of the Control Deck as shown.
Up to four controllers can be connected at the same time, but for most games, only the controller plugged into socket number one will operate the START button.
CAUTION
Foreign materials (such as food or beverage residue) may cause the controller buttons to stick. To avoid this problem, keep food and beverages away from the controller and always wash your hands before playing.
Each game may have different functions for each of the buttons, + Control Pad and Control Stick. Depending on the game, the controller will be held in one of the three positions shown. For further instructions, consult the instruction booklet for the Game Pak you are using.

Right position
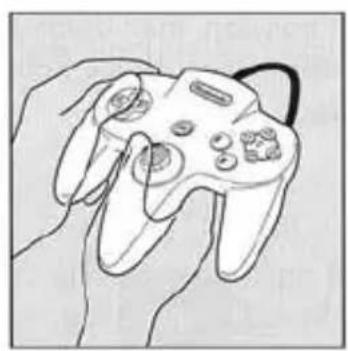
Left position
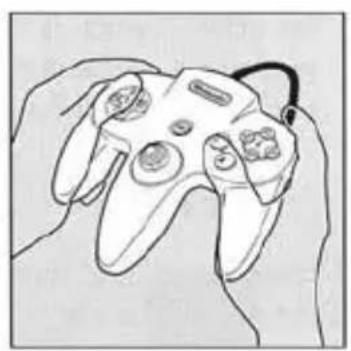
Home position
Once all connections are made, turn to the next page for operating instructions.
Section Three
How to Operate
After making the necessary connections shown in Section 2, place the Control Deck on a hard, flat surface, such as a television stand, table top or cabinet. Be sure to allow plenty of space around the Control Deck for ventilation. Once the Control Deck is properly located, continue with the following instructions:
CAUTION
The Control Deck has several ventilation slots in the housing designed to maintain adequate ventilation. Do not operate the Control Deck on a carpet, bed, sofa or other soft surface, or in any location where any of the ventilation slots may become covered or obstructed.
- Turn your television ON. If the Nintendo 64 Control Deck is connected to your VCR, turn the VCR power ON also and set the VCR to "VCR" mode.
2A. If you are using an AV connection to your TV or VCR (connection method A, B or C), you will need to set the appropriate input select setting for your TV and/or VCR.
Input Select Information
NOTE: The most common locations for an "Input Select" are: a button somewhere on the front of the TV or VCR, a button on the remote control, a high-numbered channel on the TV or VCR, or an on-screen menu selection. Manufacturers of TVs and VCRs use different names and locations for "Input Select". The common names for the input select are: input, select, input select, line, line in, source, in, EXT, AUX. Consult your TV or VCR instruction manual for details.
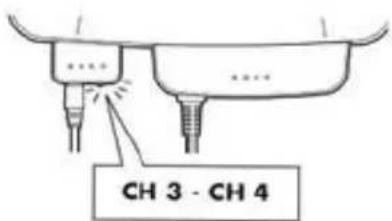
2B. If you are using an RF Switch
connection to your TV (connection method D), then set your TV to Channel 3. Also set the switch on the back of the Nintendo 64 RF Modulator to Channel 3. If Channel 3 is broadcasting in your area, change the switch on the back of the RF Modulator and your TV to Channel 4.
- Make sure the Power Switch of the Control Deck is turned OFF.
CAUTION
Always make sure that the Power Switch of the Control Deck is OFF and that you have checked the Game Pak edge connector for foreign material (which can damage the Control Deck) before attempting to load a Game Pak into the Control Deck.
- If not already connected, insert the Controller(s) into the socket(s) on the front of the Control Deck. (Be sure the N64 Power switch is still OFF.)
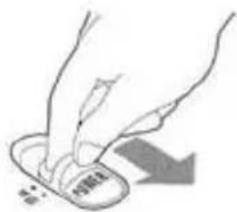
NOTE: When turning the Control Deck power ON, do not move the Control Stick from its neutral position on the controller.
If the Control Stick is held at an angled position (as shown below in the picture on the left) when the power is turned ON, this position will be set as neutral. This will cause games using the Control Stick to operate incorrectly.
To reset the neutral position once the game has started, let go of the Control Stick so it can return to its center position, as shown below in the picture on the right, then press START while holding down the L and R buttons.
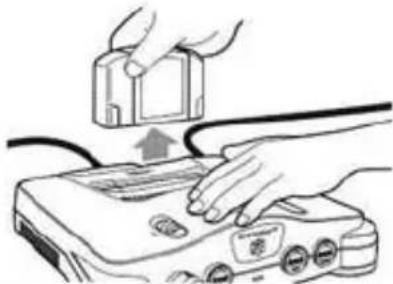
- Load a Nintendo 64 Game Pak into the top of the Control Deck as shown. Push it down all the way.
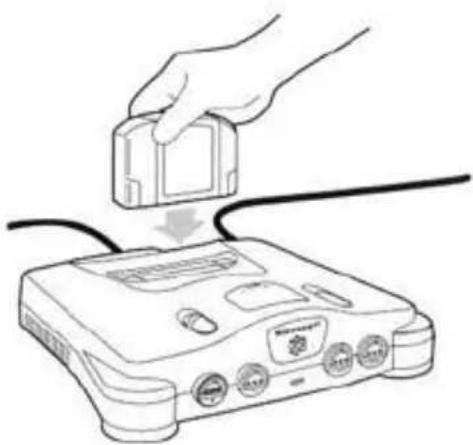
CAUTION
Do not load the Game Pak upside down or otherwise force the Game Pak into the Control Deck. Load only an N64 Game Pak. Do not attempt to use Super NES, or any other type of Game Paks.
- Slide the N64 Power Switch to the ON position.
NOTE: If you have both a Nintendo 64 and a Super NES Control Deck connected, turn ON only one or the other.
Make sure the red power indicator light on the front of the Control Deck is ON (if not, check the AC Power Supply and plug connection). Push the Reset button and release. After a moment, a game display should appear on the TV.
NOTE: If there is no game display, or a distorted picture appears on the TV screen, slide the Power Switch OFF and remove the Game Pak. Start over from step 3. If you are still having problems, consult the troubleshooting section on page 15, or call the Consumer Assistance Hotline at 1-800-255-3700.
- Press START on the Controller plugged into socket number one to start the game. For further instructions, consult the instruction booklet for the Game Pak you are using.
- Slide the Power Switch to the OFF position.
CAUTION
Always slide the Power Switch to the OFF position before loading or removing a Game Pak, N64 Controller Pak, controller or accessory.
- Place one hand on top of the Control Deck and carefully remove the Game Pak from the Control Deck with the other hand.
Returning to Regular TV
After you have finished playing, slide the Power Switch of the Control Deck to the OFF position. Set the TV/VIDEO or Input Select switch on the television back to "TV". If you were using a VCR, set the Input Select switch back to receive cable or antenna input, then turn the VCR OFF.
There is no need to disconnect the RF Switch, AV Cables, AC Power Supply, etc.
For additional maintenance, care and precautions, refer to the separate Consumer Information and Precautions Booklet.
Section Four
Troubleshooting
Before seeking repair service, check the problem against the list below:
Problem
No game display image on TV screen.
Solution(s)
Make sure the Power Switch on the Control Deck is turned ON.
If the power light on the Control Deck does not come on, see the next section.
If using an AV connection to your TV, make sure the Input switch is switched to video (see Input Select note on page 11 for details, or your TV instruction manual.)
If you are connecting the Control Deck to a VCR, make sure the VCR is ON and the Input switch on the VCR is set to the correct input (see Input Select note on page 11 for details, or your VCR instruction manual.)
If you are using an RF Switch connection, make sure that the Control Deck and the antenna or cable are connected to the RF Switch properly and that the RF Switch is connected to the TV (see page 7).
If you are connecting the Control Deck to your TV using an RF Switch, make sure the CH3 - CH4 switch on the RF Modulator is set to Channel 3 and that the TV is set to Channel 3.
Make sure the Game Pak is loaded into the Control Deck correctly (see pages 11-13).
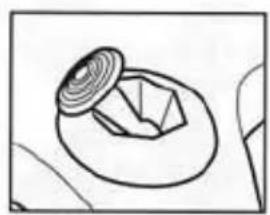
Make sure the Jumper Pak (or optional Expansion Pak) is inserted correctly into the Memory Expansion slot on the top of the Control Deck.
Problem
Power light on the Control Deck does not come on, or turns off during game play
Solution(s)
Make sure the AC Power Supply and power cord plug are plugged in.
If there is still no power to the Control Deck, disconnect the AC Power Supply plug from the wall outlet for at least 2 minutes to reset the circuit, then insert the plug back into the wall outlet and turn the Control Deck ON.
If the power still does not come on, or turns off again, remove any Game Pak, controllers or accessories connected to the Control Deck. After removal, follow the above reset procedure. If the power now stays on it may indicate a problem with the accessory or Game Pak.
Continued on next page.
Problem
Game display is on the TV screen, but the picture is rolling or the screen has bars or lines.
Solution(s)
- Adjust the vertical or horizontal hold controls on your TV until the picture becomes steady.
If using RF, make sure to use only a licensed Nintendo RF switch and modulator (look for the Official Nintendo Seal of Quality.)
Problem
Picture quality is good, but the sound buzzes.
Solution(s)
If using an AV connection, check the audio (red and white) connections of the audio/video cables (see pages 4-6). Be sure you are connected to the audio "Inputs" not outputs.
If using an RF Switch connection and there is interference on Channel 3, change the CH3 - CH4 switch on the RF Modulator and your TV to Channel 4.
A particularly strong TV station (or cable TV) may be broadcasting on Channel 3 or 4 in your area and causing interference. Try disconnecting the antenna wire from the RF Switch. (You will have to reconnect it again for regular TV viewing.)
If using RF, make sure to use only a licensed Nintendo RF switch and modulator (look for the Official Nintendo Seal of Quality.)
Problem
When not playing, regular TV will not come in.
Solution(s)
Make sure the Power Switch of the Control Deck is turned OFF.
If using an AV connection, change the Input switch on your TV or VCR back to "TV" (see the TV or VCR instructions).
If using a RF Switch connection, make sure that the antenna or cable is properly connected to the RF Switch and that the RF Switch is connected to the TV (see page 7).
If regular TV programs will still not come in, unhook the RF Switch from your TV and hook up the antenna or cable directly. (In order to play, you will have to hook up the RF Switch again.) Or, use a video switch (not included).
Problem
Game display is on the TV screen, but the picture is fuzzy, has no color or has snow on it. (For RF Switch connections only.)
Solution(s)
Make sure that the Control Deck and antenna or cable are properly connected to the RF Switch and that the RF Switch is connected to the TV (see page 7).
Adjust the fine tuning and contrast controls on your TV to receive the clearest picture possible.
If your TV has an automatic fine tuning control (AFC), turn it OFF and use the manual fine tuning dial to adjust the picture. If turning OFF the AFC causes your TV to display in only black and white, then leave the AFC ON.
If the Control Deck is too close to the TV, the Control Deck may cause some interference. Try moving the Control Deck farther from the TV.
If there is interference on Channel 3, change the CH3 - CH4 switch on the RF Modulator and your TV to Channel 4.
A particularly strong TV station (or cable TV) may be broadcasting on Channel 3 or 4 in you area and causing interference. Try disconnecting the antenna wire from the RF Switch. (You will have to reconnect it again for regular television viewing.) Or, use a video switch (not provided).
Make sure the short, thick "co-axial" cable of the RF Switch (marked "TV"), is connected to the VHF input on your TV.
Make sure to use only a licensed Nintendo RF switch and modulator (look for the Official Nintendo Seal of Quality.)
Problem
Game sound is missing or not working correctly.
Solution(s)
Make sure the TV volume is turned up to an adequate level.
The sound in some Game Paks begins only after START is pressed.
If using an RF Switch connection to your TV, adjust the fine tuning control until the sound is clear.
If using an AV connection, check the audio (red and white) connections of the audio/video cables (see pages 4-6). Make sure they are plugged into audio "Inputs", not outputs.
If you have a mono TV or VCR and you left one of the audio cables un-connected (page 6) you may not get all the game sounds until a "Y" adaptor is used.
If your TV or VCR has a mono or stereo option, make sure it is set to the correct setting based on your connections.
Check the instruction booklet for the Game Pak you are using for a volume control option and/or a mono/stereo option.
Problem
Picture is blinking or scrambled.
Solution(s)
Try pushing the RESET button. If there is no improvement, slide the Control Deck Power Switch OFF, then remove the Game Pak and re-load it. Slide the Power Switch back to the ON position and push the RESET button.
Problem
The controller does not work or game characters move on their own.
Solution(s)
- Make sure the Power Switch on the Control Deck is in the OFF position before plugging in the controller.
Make sure the Control Stick on the controller is in the neutral (center) position when you turn the Power Switch of the Control Deck to the ON position. (See page 12 for details) - Make sure the controller plug is firmly plugged into socket number one (on the left side of the Control Deck).
Problem
Controller buttons occasionally stick.
Solution(s)
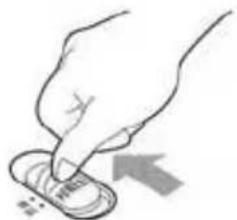
Clean the buttons on the controller using the following procedure:
- Disconnect the controller from the Control Deck.
- Get an unused toothbrush and hot tap water.
(Do not use boiling water or any type of soap or detergent).
- Dip the toothbrush in the hot water and shake off the excess, then lightly scrub the area of the controller where the button(s) stick by working the bristles down around the sides of the buttons and into the cracks.
- After cleaning the controller, use a towel to dry it then let the controller air dry for at least 2 hours.
- Test the buttons to see if they are still sticking and repeat the cleaning process again if necessary. (Do not pour or submerge the controller in any type of liquid.
If you are still unable to solve the problem, please call the Consumer Assistance Hotline at 1-800-255-3700.
You may also want to consult our web-site at www.nintendo.com for additional set-up and troubleshooting information.
WARRANTY AND SERVICE INFORMATION
REV K
You may need only simple instructions to correct a problem with your product. Call the Consumer Assistance Hotline at 1-800-255-3700 rather than going to your retailer. Hours of operation are 6 a.m. to 9 p.m., Pacific Time, Monday - Saturday, and 6 a.m. to 7 p.m., Pacific Time, on Sundays (times subject to change). If the problem cannot be solved over the telephone, you will be offered express factory service through Nintendo or referred to the nearest NINTENDO AUTHORIZED REPAIR CENTER. Please do not send any products to Nintendo without calling us first.
HARDWARE WARRANTY
Nintendo of America Inc. ("Nintendo") warrants to the original purchaser that the hardware product shall be free from defects in material and workmanship for twelve (12) months from the date of purchase. If a defect covered by this warranty occurs during this warranty period, Nintendo or a NINTENDO AUTHORIZED REPAIR CENTER will repair the defective hardware product or component, free of charge. The original purchaser is entitled to this warranty only if the date of purchase is registered at point of sale or the consumer can demonstrate, to Nintendo's satisfaction, that the product was purchased within the last 12 months.
GAME PAK & ACCESSORY WARRANTY
Nintendo warrants to the original purchaser that the product (Game Paks and accessories) shall be free from defects in material and workmanship for a period of three (3) months from the date of purchase. If a defect covered by this warranty occurs during this three (3) month warranty period, Nintendo or a NINTENDO AUTHORIZED REPAIR CENTER will repair the defective product, free of charge.
SERVICE AFTER EXPIRATION OF WARRANTY
Please call the Consumer Assistance Hotline at 1-800-255-3700 for troubleshooting assistance and/or referral to the nearest NINTENDO AUTHORIZED REPAIR CENTER. In some instances, it may be necessary for you to ship the complete product, FREIGHT PREPAID AND INSURED FOR LOSS OR DAMAGE, to the nearest service location. Please do not send any products to Nintendo without calling us first.
WARRANTY LIMITATIONS
THIS WARRANTY SHALL NOT APPLY IF THIS PRODUCT: (a) IS USED WITH PRODUCTS NOT SOLD OR LICENSED BY NINTENDO (INCLUDING, BUT NOT LIMITED TO, NON-Licensed GAME ENHANCEMENT AND COPIER DEVICES, ADAPTERS, AND POWER SUPPLIES); (b) IS USED FOR COMMERCIAL PURPOSES (INCLUDING RENTAL); (c) IS MODIFIED OR TAMPERED WITH; (d) IS DAMAGED BY NEGLIGENCE, ACCIDENT, UNREASONABLE USE, OR BY OTHER CAUSES UNRELATED TO DEFECTIVE MATERIALS OR WORKMANSHIP; OR (e) HAS HAD THE SERIAL NUMBER ALTERED, DEFACED OR REMOVED.
ANY APPLICABLE IMPLIED WARRANTYES, INCLUDING WARRANTYES OF MERCHANTABILITY AND FITNESS FOR A PARTICULAR PURPOSE, ARE HEREBY LIMITED IN DURATION TO THE WARRANTY PERIODS DESCRIBED ABOVE (12 MONTHS OR 3 MONTHS, AS APPLICABLE). IN NO EVENT SHALL NINTENDO BE LIABLE FOR CONSEQUENTIAL OR INCIDENTAL DAMAGES RESULTING FROM THE BREACH OF ANY IMPLIED OR EXPRESS WARRANTY. SOME STATES DO NOT ALLOW LIMITATIONS ON HOW LONG AN IMPLIED WARRANTY LASTS OR EXCLUSION OF CONSEQUENTIAL OR INCIDENTAL DAMAGES, SO THE ABOVE LIMITATIONS MAY NOT APPLY TO YOU.
This warranty gives you specific legal rights, and you may also have other rights which vary from state to state. Nintendo's address is as set forth on the back cover of this booklet.
This warranty is only valid in the United States.
Nintendo 64 Parts List and Order Form
To order by phone (requires VISA or MASTERCARD) Call: 1-800-255-3700,
Mon.-Sat., 6:00a.m. - 9:00p.m.; Sun., 6:00a.m. - 7:00p.m., Pacific Time.
Please have your VISA or MASTERCARD number and expiration date ready.
Most items are also available at your local Nintendo Authorized Repair Center.
For the repair center nearest you, call: 1-800-255-3700. Prices may vary.
Part No.
Part
Cost US$
34390
Nintendo 64 - AC Power Supply
25.00
21636
RF Switch (works with Super NES and Nintendo 64)
11.00
34271
RF Modulator
14.00
34394
RF Switch/RF Modulator Set
25.00
21638
300/75Ω Converter
3.00
21639
75/300Ω Converter
3.00
35846
Stereo AV Cable
19.95
22425
S-VHS Cable
19.95
34377
Nintendo 64 - Instruction Booklet
2.50
34391
Nintendo 64 - Consumer Info. & Precautions Booklet
no charge
xxxxxx
Nintendo 64 Game Pak Booklet (please specify)
2.00
35543
Memory Expansion Cover
1.50
35544
Expansion Connector Cover
1.50
"Ninendo cannot supply Game Pak booklets for "licensed" games. These games are identified by the words "Licensed by Ninendo" on the packaging or booklet. For these booklets, please contact the game licensee (whose name is also on the packaging) directly for these items. (You may call Nintendo at 1-800-255-3700 for the licensee's address and telephone number.)
Subtotal
WA State Residents add 8.6% sales tax
Postage & Handling $2.50
For expedited shipping service (2-day air freight)
please add on additional $2.50
Total Amount Due
To order by mail, please complete the following:
- Name
Phone
Street Address
City
State
State
State
State
State
State
State
State
State
State
State
State
State
State
State
State
State
State
State
State
State
State
State
State
State
State
State
State
State
State
State
State
State
State
State Zip
- Enclose check, money order or credit card authorization for total amount due.
If paying by VISA or MASTERcard:
Please charge total amount due of $
to my

VISA

MASTERCARD
Card #
Expiration Date
Name on card (print)
Signed
31 + u + 4q = 1 + u + uq dH
Mail to: Nintendo of America Inc., P.O. Box 97032, Redmond, WA 98073-9732
Allow 3 weeks for delivery. We cannot accept cash, stamps, or C.O.D. orders. Prices are applicable within the
United States only and are subject to change without notice.

NEED HELP WITH INSTALLATION, MAINTENANCE, OR SERVICE?

Nintendo
AUTHORIZED REPAIR CENTERS
1-800-255-3700
www.nintendo.com
Nintendo
Nintendo of America Inc.
P.O.Box 957,Redmond,WA 98073-0957 U.S.A.

- NINTENDO 64
- WARNING
- CAUTION
- Contents
- NINTENDO 64 INSTRUCTION BOOKLET
- Control Deck
- Game Pak Slot
- Back View of Control Deck
- Nintendo 64 Controller
- Bottom View of Controller
- AC Power Supply
- Stereo Audio/Video Cable
- Section Two
- Connection & Installation
- Audio/Video Cable Connections
- A Connecting to a Stereo TV
- D Connecting to a TV Without Audio/Video Connections
- Section Three
- How to Operate
- Input Select Information
- 2B. If you are using an RF Switch
- Returning to Regular TV
- Section Four
- Troubleshooting
- Problem
- Solution(s)
- WARRANTY AND SERVICE INFORMATION
- HARDWARE WARRANTY
- GAME PAK & ACCESSORY WARRANTY
- SERVICE AFTER EXPIRATION OF WARRANTY
- WARRANTY LIMITATIONS
- Nintendo 64 Parts List and Order Form
- Part No.
- Part
- Cost US$
- Subtotal
- WA State Residents add 8.6\% sales tax
- To order by mail, please complete the following:
- Nintendo
- AUTHORIZED REPAIR CENTERS
- 1-800-255-3700
Marque : NINTENDO
Modèle : N64
Catégorie : Console