DVP739 X2 - Lecteur DVD portable LENCO - Notice d'utilisation et mode d'emploi gratuit
Retrouvez gratuitement la notice de l'appareil DVP739 X2 LENCO au format PDF.


| Caractéristiques | Détails |
|---|---|
| Type de produit | Lecteur DVD portable |
| Écran | Écran LCD de 7 pouces |
| Formats supportés | DVD, CD, MP3, JPEG |
| Autonomie de la batterie | Environ 2 à 3 heures |
| Connectivité | Ports USB et SD pour lecture de fichiers externes |
| Dimensions | Environ 22 x 17 x 5 cm |
| Peso | Environ 1 kg |
| Utilisation | Idéal pour les voyages, compatible avec les voitures grâce à l'adaptateur allume-cigare |
| Maintenance | Nettoyer l'écran avec un chiffon doux, éviter l'exposition à l'humidité |
| Sécurité | Ne pas exposer à des températures extrêmes, débrancher après utilisation |
| Informations générales | Vérifier la compatibilité des formats avant l'achat, garantie de 2 ans |
FOIRE AUX QUESTIONS - DVP739 X2 LENCO
Questions des utilisateurs sur DVP739 X2 LENCO
0 question sur cet appareil. Repondez a celles que vous connaissez ou posez la votre.
Poser une nouvelle question sur cet appareil
Téléchargez la notice de votre Lecteur DVD portable au format PDF gratuitement ! Retrouvez votre notice DVP739 X2 - LENCO et reprennez votre appareil électronique en main. Sur cette page sont publiés tous les documents nécessaires à l'utilisation de votre appareil DVP739 X2 de la marque LENCO.
MODE D'EMPLOI DVP739 X2 LENCO
Lenco
USER MANUAL DVD-MPEG4-CD-MP3-PLAYER
natural_image
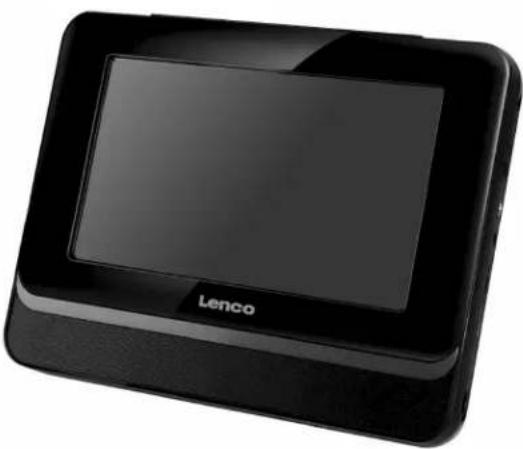
Black Lenco remote control device with a screen and logo (no visible text or symbols on the device body)DVP-739 X2
Please read this User Manual carefully to ensure proper use of this product and keep this manual for future reference.
For information and support, www.lenco.eu
Content
Important Safety Instructions ....2
Main Panel Illustration.... 3
Remote Control....4
Connecting to a TV set.... 6
MP3/WMA/MPEG4 playing....7
Picture CD Playback 8
System Setup.... 9
Trouble-shooting.... 12
Specifications.... 13
Important Safety Instructions
* Warning: To reduce the risk of electric shock, do not remove the cover or back. There are no user-serviceable parts inside. Refer servicing to qualified personnel.
* Warning: To prevent fire or electric shock hazard, do not expose the unit to rain or moisture.
* Do not expose the Adaptor and Digital Photo Frame to water (dripping or splashing) and no objects filled with liquids, such as vases, should be placed on the unit.
* Keep the product away from direct sunlight and heat source such as radiators or stoves.
* Do not block the ventilation openings. Slots and openings on the unit are provided for ventilation. The openings should never be blocked by placing your product on a cushion, sofa or other similar surface.
* Do not place the product on unstable cart, stand, tripod, bracket or table. The unit may fall, resulting in possible damage or injury.
* Never place heavy or sharp objects on the LCD panel or frame.
* Only use the AC adapter included with product. Using any other adapter will void your warranty.
* Unplug the power from the outlet when the unit is not in use.
* Attention should be drawn to the environmental aspects of battery disposal.
* WARNING: The battery (battery or batteries or battery pack) shall not be exposed to excessive heat such as sunshine, fire or the like.
* WARNING: Excessive sound pressure from earphones or headphones can cause hearing loss.
* WARNING: Only use attachments/accessories specified provided by the manufacturer, the product is supplied by AC adapter, the AC adapter is used as disconnect device, the disconnect device shall remain readily operable.
Caution: Danger of explosion if battery is incorrectly replaced, replaced only with the same or equivalent type (Lithium battery).
For the electrostatic discharge (ESD) test of EN55020, It was found that manual operation (by switch power ON/OFF switch) is need to resume normal operation as intended after the test.
* WARNING: Prolonged exposure to high volume from audio players can cause temporary or permanent hearing loss
* The USB drive must be connected directly to the unit.
To prevent data loss by interference and transfer, do not use USB extension cords.
This marking indicates that this product should not be disposed with other household wastes throughout the EU. To prevent possible harm to the environment or human health from uncontrolled waste disposal, recycle it responsibly to promote the
sustainable reuse of material resources.
To return your used device, please use the return and collection systems or contact the retailer where the product was purchased.
They can take this product for environmental safe recycling.
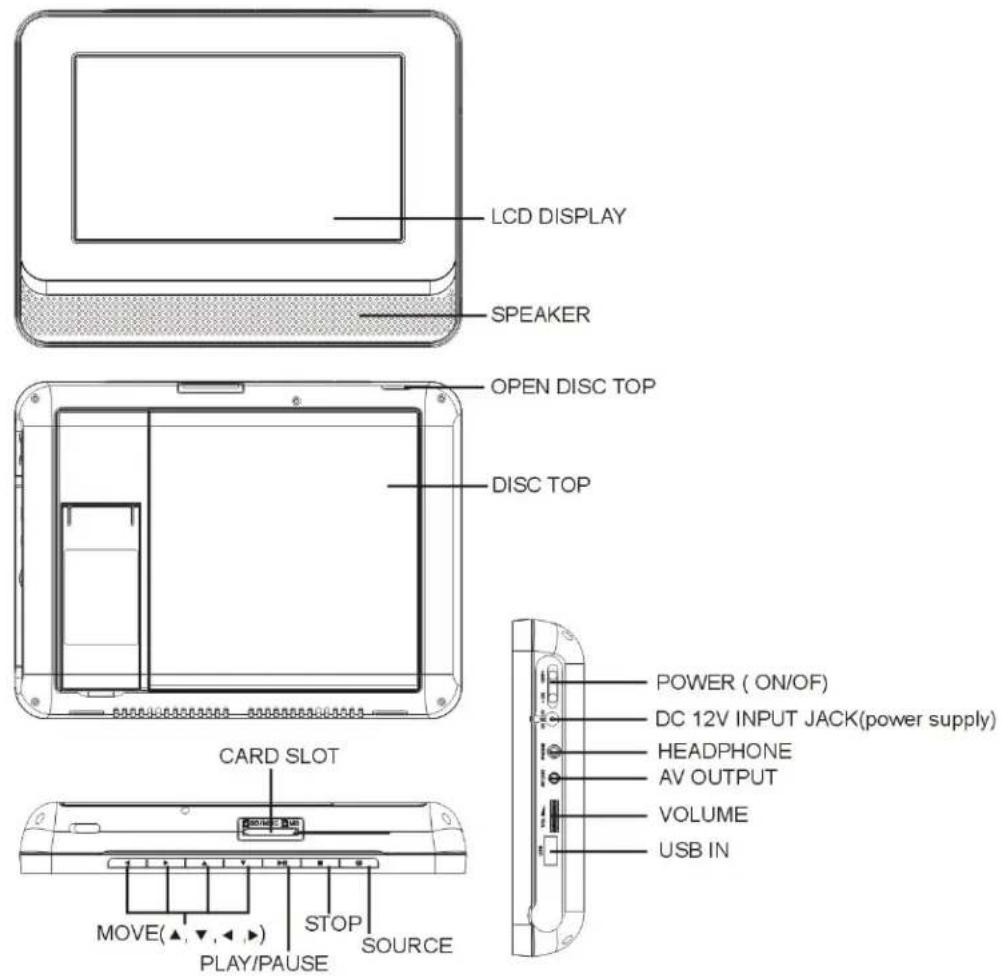
Main Panel Illustration
Remote Control
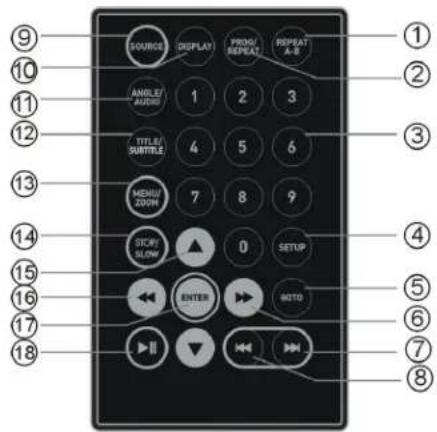
text_image
SOURCE DISPLAY PROG/ REPEAT REPEAT A-B ANGLE/ AUDIO 1 2 3 TITLE/ SUBTITLE 4 5 6 MEDIA/ 200M 7 8 9 STICKY SLOW ▲ 0 SETUP ENTER BOTO ▶▶▶▶▶▶▶▶▶▶▶▶▶▶▶▶▶▶▶▶▶▶▶▶▶▶▶▶▶▶▶▶▶▶▶▶▶▶▶▶▶▶▶▶▶▶▶▶▶▶▶▶▶▶▶▶▶▶▶▶▶▶▶▶▶▶▶▶▶▶▶▶▶▶▶▶▶▶▶▶▶▶▶▶▶▶▶▶▶▶▶▶▶▶▶▶▶▶▶▶> ⑨ ⑩ ⑪ ⑫ ⑬ ⑭ ⑮ ⑯ ⑰ ⑱ ⑲ ⑳ ⑴ ⑵ ⑶ ⑷ ⑧1.A-B Repeat
press 1x: set A, prss 2x: set B, press3x: disable the function
2.Prog/Repeat
Short press: Repeat mode, Long press (2Sec.): DVD program mode
3.0-9 Number Keys
- Setup: Open the setup menu
5.Goto: Goto a specific time index
6. Fast Forward
- Next: Next chapter or file
8.Previous: Previous chapter or file
9.SOURCE: Input mode selection
- Display: Display detailed informations of the current file or disc.
11. Angle / Audio:
Short press: Changes the audio mode (if different modes are available)
Long press (2Sec.): Changes the angle mark (if different modes are available)
- Title / Subtitle: Short press: Change subtitle mode (if subtitles are available) Long press (2Sec.): DVD Title menu
13. MENU / ZOOM
Short press: Zoom in Long press (2Sec.): Menu key for DVD Menu
-
STOP / SLOW: Short press: Stop Long press (2Sec.): Slow motion
-
Direction keys ( )
-
Fast Rewind
17. ENTER
To confirm and enter options or to play files.
- Play / Pause
Preparation of the Remote Control
Place the remote control on an even surface and insert the supplied button cell into the remote control as follows.
- Push the button towards left.
- Pull the battery loader out.
- Insert the battery into the recep tacle Make sure the polarity matches the marks inside the component.
- Insert the receptacle into the remote control.
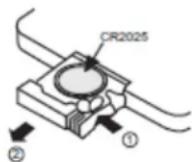
Cell data
Battery type: 1x CR2025, 3 V
Service life: approximately 1 year (for normal use and room temperature)
Using Of Remote Control
Point the remote control towards the main unit when operating.
The remote control works best at a distance less than 5 m and at an angle of up to 30 to the front of the unit. No obstacles may stand in the way between remote control and infrared sensor and do not place the remote control in direct sunlight. If the remote control unit fails to work even when it is operated near the player, replace the battery.
Notes on batteries
If the remote control is not used for a long period of time, please remove the battery from the compartment.
Do not heat batteries or dispose of them in fires.
Do not dismantle, deform or modify batteries.
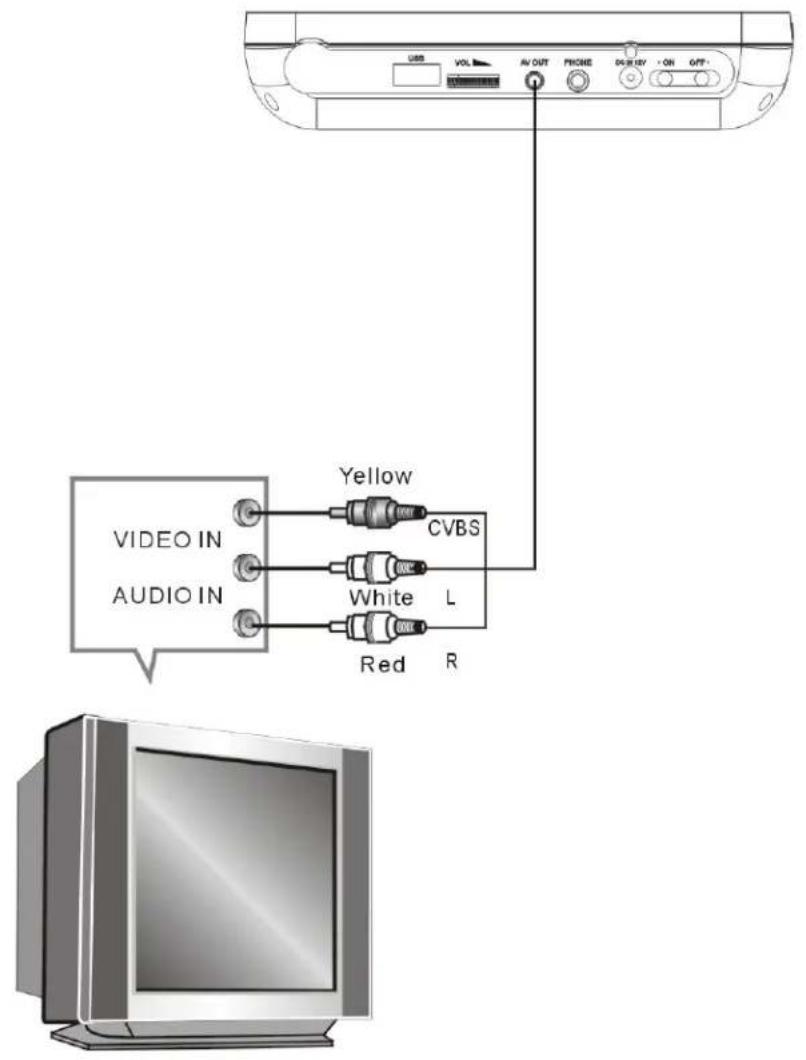
Connecting to a TV Set
text_image
UBS VOL AV OUT PHONE DISPLAY ON GFP+ VIDEO IN AUDIO IN Yellow CVBS White L Red RMP3/WMA/MPEG4 Playing
text_image
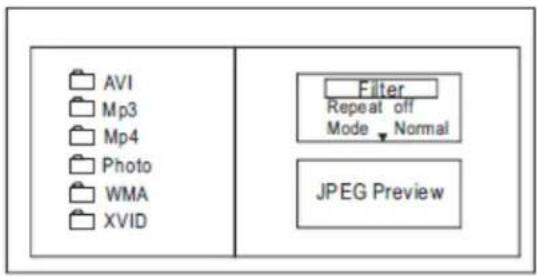
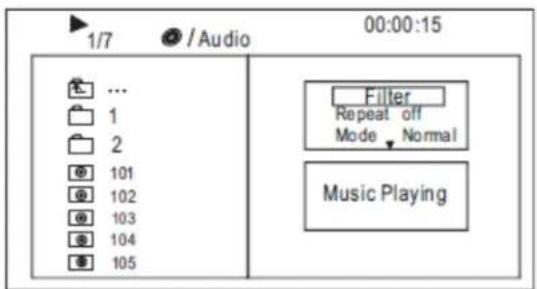
AVI Mp3 Mp4 Photo WMA XVID Filter Repeat off Mode ▼ Normal JPEG PreviewThe MP3/WMA/MPEG4 disc has such a directory structure as shown in the . Press Direction key to choose the root directory and then press ENTER button to enter into the sub directory. Press Direction key to choose the desired track and then press ENTER or PLAY to enjoy the music or movie.
If you want to return to the upper menu, press Direction key to choose
the icon and press ENTER button.
Filter: Allows selecting the categories of files displayed in the browser list. This selection is done among the 3 categories: Audio, Photo and Video.
Repeat: To switch different repeat playing mode picture Mode: Select different playing mode
text_image
1/7 /Audio 00:00:15 ... 1 2 101 102 103 104 105 Filter Repeat off Mode Normal Music PlayingNormal: Shuffle mode is cancelled by toggling to a different Mode Option. Shuffle: Shuffle mode enabled. When playback reaches the end of the current chapter/track, playback jumps to a random chapter/track. At the end of each chapter/track is reached, another random chapter/track will be played until all tracks/chapters have been played or the Shuffle mode is cancelled by toggling to a different Mode Option.
Music Intro: In this mode, the media will play to 10 seconds then skip to next media Edit Mode: To enable programmed playback mode. When you select the mode, press LEFT Direction key to directory and press ENTER to choose the desired track and press Add to program to add in programmed playback
Program view: Display program track.
Brower view: Display track directory.
Add to program: Choose the track press Add to program to add the track of the program play directory.
Clear program: In the complete stop state(press the STOP button twice), choose the track press Clear program to delete the track of the program play directory.
Picture CD Playback
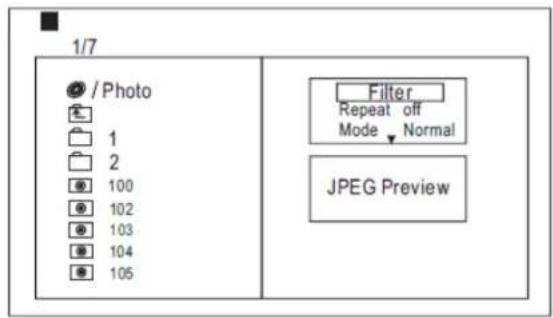
The PICTURE CD disc has such a directory structure structure as shown in the following picture.
text_image
1/7 ● / Photo 1 2 100 102 103 104 105 Filter Repeat off Mode ▼ Normal JPEG PreviewPress Direction key to choose the root directory and then press ENTER button to enter into the sub directory. Press Direction key to choose the desired picture and then press ENTER or PLAY to enjoy the picture. If you want to return to the upper menu, press
Direction key to choose the icon and press ENTER button.
Image rotation
In picture play state, press Direction key to rotate the picture, press ANGLE button to change the picture scan mode.
System Setup
MENU OPERATION
Press the SETUP button on the remote control, the SETUP MENU(main) will be displayed.
After accessing the setup menu, press the direction buttons for up and down movement to select an item desired, then press the ENTER button to confirm.
Press LEFT direction button return to the menu of upper level.
To exit the setup, press the SETUP button again. In the SETUP MENU, you may choose any of the following options as you like.
LANGUAGE SETUP
Select Language in the setup menu, and display the Language submenu:
| Language | OSD Language SubtitleMPEG4 SubtitleAudioDVD Menu |
| Video | |
| Rating | |
| Misc |
OSD Language
Use this item to select the language of the setup menu and screen display.
Subtitle
This option provides the preset subtitle language.
Follow the operating instructions stated in DVD MENU SETUP In combination with the desired option.
MPEG4 Subtitle
Choice different MPEG4 subtitle encoding option.
Audio
Follow the operating instructions stated in DVD MENU SETUP In Combination with the desired option.
This option provides the built-in disc dubbing language options.
DVD Menu
This option provides the film s menu language options.
Follow the operating instructions stated in DVD MENU SETUP In combination with the desired option.
VIDEO SETUP
Select Video in the setup menu, and display the Video submenu:
| Language | Aspect RatioTV SystemSmart Picture |
| Video | |
| Rating | |
| Misc |
Aspect Ratio
The image display ratio is related to the recorded disc format. Some disc can not display images in the aspect ratio you choose. If you play a disc recorded in 4:3 format on a widescreen TV, black bars will appear on the left and right side of the screen. You must adjust the screen setting depending on the type of the television you have.
TV System
This product supports output of various system, including NTSC, PAL.
If your TV set has only NTSC or PAL system, the screen will blink and become colorless when a wrong system is selected.
Note: For more information of output format, refer to the instructions or your TV set.
Smart picture
Adjust display effect for video output:
Standard: default effect.
Bright: internal setting for bright view effect.
Soft: internal setting for soft view effect.
Dynamic: user adjust brightness, contrast, color etc.
RATING SETUP
Select Rating in the setup menu, and display the Rating submenu:
Note: Not all DVD support ratings.
| Language | Parental ControlSet Password |
| Video | |
| Rating | |
| Misc |
Parental Control
Selecting a Rating allows the user to set the parental control feature of the player
Select Parental Control, and press ENTER to change the different mode.
Note: Unlock the password before setting Parental Control.
Set Password
Use the 0-9 keys to input four digits(password), then press ENTER to confirm.
Note: If you forget your password, please use the universal password 6666 to unlock.
Set Password
Gebruik de toetsen 0-9 om vier cijfers in te voeren (wachtwoord), druk vervolgens ter bevestiging op ENTER.
Opmerking: Als u het wachtwoord bent vergeten, gebruik dan het universele wachtwoord 6666.
MISC SETUP
Select MISC in the setup menu, and display the submenu:
* Use Default Settings Reset setup data to factory default and re-load disc.
| Language | Use Default Settings |
| Video | |
| Rating | |
| Misc |
Trouble-shooting
Carry out the problem-solving measures described in the following section before contacting Customer Support.
Turn off the DVD player immediately as soon as you suspect a malfunction. Unplug the power plug and check whether the DVD player is unusually warm or whether smoke is rising from it.
| Problem Possible cause Remedy | ||
| The DVD player does not work | Disc cover not closed Close disc cover | |
| No disc inserted Insert disc | ||
| Disc inserted the wrong way Insert disc with label facing up | ||
| Disc dirty or deformed Clean disc, or insert other disc | ||
| Regional code of the player does not match the regional code of the DVD | Purchase DVD with corresponding regional code | |
| Moisture on lens Remove disc and turn off DVD player for at least two hours | ||
| No audio | Device not properly connected Check connexions and connect device in the correct way | |
| Headphones connected (loudspeaker off) Pull out the headphones | ||
| DVD sound settings incorrect Check sound settings and set sound correctly | ||
| Disc dirty or deformed Clean disc, or insert other disc | ||
| No video | TV screen is off or in the incorrect video mode | Turn on LCD screen and/or set correct video mode |
| Device not properly connected Check connexions and connect device in the correct way | ||
| Poor video and/or audio quality | Disc dirty or deformed Clean disc, or insert other disc | |
| playback of a section | Loop mode is switched on Exit the loop mode Repeated | |
| Disc dirty or deformed Clean disc, or insert other disc | ||
| Remote control does not work | Obstacle between remote control and DVD player | Remove obstacle |
| Remote control not pointed at DVD player Point remote control directly at DVD player | ||
| Remote control battery inserted the wrong way | Check the battery's polarity and, if necessary, insert battery correctly | |
| Battery too low or completely discharged | Insert new battery | |
Other possible causes for problems:
Static discharges or other external interferences can cause the DVD player to malfunction. When this happens, disconnect the power plug from the mains socket and plug it back in.
If the problem persists, disconnect the device from the mains again and contact Customer Service or a repair shop.
Specifications
| Play mode NTSC/PAL | |
| Disc mode DVD,VCD, CD, MP3, CD-R, CD-RW, JPEG,DVD+ -R/W, MPEG4, | |
| Video characteristic | |
| Video S/N ratio | ≥ 65dB. |
| AV out resolution | ≥ 500 lines |
| Audio characteristic | |
| Frequency response fs 96KHz: 20Hz-20KHz:+/-1dB | |
| Audio S/N ratio | ≥ 90dB |
| Dynamic range | ≥80dB |
| Distortion < 0.01% | |
| D/A Converter 96KHz/24-bit | |
| Output characteristic | |
| Display Device Color TFT-LCD | |
| Screen Size 7 inches | |
| Video output | 1Vp-p(75 Ω) |
| Audio output 2CH | |
| Power Voltage DC IN 12V | |
| Power consumption | ≤ 12W |
| Size 212x160x35mm | |
| Weight 0.66kg | |
Specifications are subject to change without notice.
