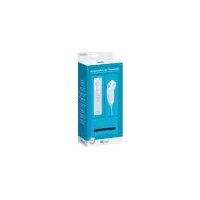
Nunchuk Wii - Contrôleur NINTENDO - Notice d'utilisation et mode d'emploi gratuit
Retrouvez gratuitement la notice de l'appareil Nunchuk Wii NINTENDO au format PDF.

| Type de produit | Contrôleur Nunchuk pour Wii |
| Marque | Nintendo |
| Modèle | Nunchuk Wii |
| Dimensions (L x l x h) | Environ 11 x 3,5 x 2 cm |
| Poids | Environ 50 g (sans câble) |
| Alimentation | Alimenté par la Wii Remote via le connecteur d'extension |
| Longueur du câble | Environ 1,5 m |
| Connectivité | Filaire (connecteur propriétaire vers Wii MotionPlus ou Wii Remote) |
| Capteurs | Accéléromètre tridimensionnel, joystick analogique |
| Boutons | Bouton C, bouton Z |
| Joystick | Joystick analogique unidirectionnel |
| Fonctions principales | Contrôle des mouvements, rotation, pointage (avec Wii Remote), interaction dans les jeux compatibles |
| Compatibilité | Wii Remote avec Wii MotionPlus ou connecteur d'extension standard |
| Entretien et nettoyage | Essuyer avec un chiffon doux légèrement humide (eau uniquement). Ne pas utiliser de solvants ni immerger. |
| Sécurité | Toujours utiliser la dragonne incluse. Ne pas agiter violemment. Tenir hors de portée des jeunes enfants. |
| Réparabilité | Aucune pièce détachable disponible. En cas de dysfonctionnement, contacter le support Nintendo. |
| Garantie | 3 mois (accessoires) dans le cadre de la garantie constructeur |
| Informations générales | Contrôleur complémentaire à la Wii Remote. Utilise les mouvements du poignet pour des interactions immersives. |
| Couleur | Blanche (standard), autres couleurs possibles selon les éditions |
| Contenu de l'emballage | Nunchuk uniquement (la dragonne est fixée) |
FOIRE AUX QUESTIONS - Nunchuk Wii NINTENDO
Questions des utilisateurs sur Nunchuk Wii NINTENDO
0 question sur cet appareil. Repondez a celles que vous connaissez ou posez la votre.
Poser une nouvelle question sur cet appareil
Téléchargez la notice de votre Contrôleur au format PDF gratuitement ! Retrouvez votre notice Nunchuk Wii - NINTENDO et reprennez votre appareil électronique en main. Sur cette page sont publiés tous les documents nécessaires à l'utilisation de votre appareil Nunchuk Wii de la marque NINTENDO.
MODE D'EMPLOI Nunchuk Wii NINTENDO
Ninfendo
Wii ™
1055052
Wii Operations Manual System Setup
Nintendo
PROOF OF AN INTRODUCTION
NEED HELP WITH INSTALLATION, MAINTENANCE OR SERVICE?
Mindspring Customer Service SUPPORT: NINTENDX.COM
BESIDON A DIALE F O U R I L L'ATTALATION L'ENTERTIRE OU LA REPARATION?
Serving 1/2 cup medium heat broth. SUPPORT: NITINOMO CO.
LIE CHERESITA IYAS DE INSTITUTIONAL, MONTKRIENTIMO E SANSICPOVIO
SART 301/CHINA MINEERS SUPPORT. INTENDO.COM S.A.S.
27744 PAVTEDHCHN
To protect your health and safety, and for correct use of the Wii system, please read and follow the instructions in this operation manual before setup or use.
Throughout this manual, you will see this symbol Δ , followed by WARMIRE or CAUTION. These terms have different levels of meaning:
WARNING: We see you about contact use of the WE system that could possibly be serious personal injury.
CURLTON:Causes you about incorrect use of the All system that could result in personal injury or damage to the WF system, components, games or accessories.
IMPORTANT NOTE FOR PARENTS
Before allowing any child to use the Will system, a parent or other responsible adult should determine whether the Will system is appropriate for the child. Only children who are old enough and capable of wearing the wrist strap and properly suing the Will Signature should use the system. You may also consider using the system in conjunction with other games, connecting to the Internet, and/or downloading games. Be careful to explain all safety and health information and instructions to any children who are going to use the system. Failure to do so may result in injuries or damage to the system or other property.
NOTE: This product only applies WI Game, Dimes and hitori GameCube™ Game Dics labeled with "For use only in USA, Canada, Mexico and Latin America". This product does not play CO or DVD discs. This WI console is for use only in the United States, Canada, Mexico or Latin America.
The official seal is year assurance that this product is licensed or manufactured by Nintendo. Always look for this seal when buying video game systems, accessories, games and related products.
N. 1. and 2. The type of operation is classified in "Secondary < CDRP" (Primary Right Pounds), "Secondary < CDRP" (Primary Left Pounds), and "Secondary < CDRP" (Primary Right Left Pounds). The description of the domain, section and parity, coding, and title of the Daliak Sakai and Literaturally
Contents
Français - Page 41
Espanol-Pagina 83
Health and Safety Information 2-3
System Components
Wii Console 4-5 Wii BalanceX 4
WiMotionPlusV
Nunshukm 1
Sensor Bar 8
Wii AC Adapter 9
Wu MV Cable 9
With Consist System Setup
Wii Console 10-11
Wii AV Cable 12
Sensor Bar 13-17
Wii AC Adapter 17
14 1
Setup of vill Remote
Encknepion Xue Niu Pompato and Wili Cogale
Synchronizing 1 Using Game Discs
Wi System Play Guidelines
Using the Wi Remote
Using the Nunchux
Using Nintendo GameCube Controllers
Using Memory Cards Troubleshooting
ECGInformation 40
Warranty and Service Information
19-23
24-25
26
2
28-29
305205
32.5 34.21
34.526.30
(一)
40
Health and Safety Information
IMPORTANT SAFETY INFORMATION - READ THE FOLLOWING
WARNING BEFORE SETUP OR USE OF THE WILL IF THIS PRODUCT WILL BE USED BY YOUNG CHILDREN. THIS MANUAL
PRODUCT WILL BE USED BY YOUNG CHILDREN, THIS HANDLER SHOULD BE READ AND EXPLAINED TO THEM BY AN ADULT.
FALING TO DO SO MAY CAUSE INJURY.
PLEAES CAREFULLY REVIEW THE INSTRUMENT BOOKLET FORTHE GAME WIRE, PREPAREDNESS FOR ADDITIONAL HEALTH AND
THE GAME YOU ARE PLAYING FOR ADDITIONAL HEALTH AND SAFETY INFORMATION
WARNING-Seizures
Some people call it 4000, may have seizures or blackouts triggered by light flashes or parestheses, and this may occur while they are watching TV or playing video games. They may also be unaware of the danger.
Anyone who has had a seizure, loss of awareness, or other symptom linked to an epileptic condition should consult a doctor before playing a video game.
Parents should watch their children play while games. Stop playing and consult a doctor if you or your child has any of the following symptoms:
Cnuusns Epcr mae twnch ng of awesness
Abered is an Involuntary movemens Deontation
To reduce the likelihood of a seizure when playing video games:
- Sit or stand as far from the screen as possible.
- May video games on the smallest available television screen.
- It not play any are limited to need shoes.
- 100 pay for your home visit
- Flow in a well-it pomm.
Take a 10 to 15 minute break every hour.
WARNING - Repetitive Motion Injuries and Eyestrain
Playing video games can make your muscles, joints, skin or eyes hurt. Fellow classmates should avoid problems such as tendinitis, carpal tunnel syndrome, skin and soft tissue injury.
- Avoid excessive play. Parents should make their children for appropriate play.
Take a 10- to 15-minute break away home, if necessary, don't walk down the street or read it.
- Take a few minutes to finish your meal, even if you don't finish your meal.
- If your hands, wrists, arms or eyes become tired or sore while playing, or if you feel
symptoms such as tingling, numbness, burning or stiffness, stop and rem for several hours before playing again.
- if you continue to have any of the above symptoms or other discomfort during or after your pregnancy, please contact a doctor.
WARNING-Electric Shock
To avoid electric shock when you use this system
Do not use the will during a lightning storm. There may be a risk of electric shock from lightning.
Use only the AC Adapter that comes with your system.
- Do not use the AC Adapter if it has damaged, split or broken cords or wires.
- If there is a "Cable" that has been cut by the user, the cable must be
- Wake sure that the AC controller is fully inserted into the well outlet or extension cord.
Always carefully discontant all plugs by pulling on the plug and not on the cord.
Waste sure the skin powder suction is burned up before removing the KC Risper cord from an outlet.
CAUTION-Motion Sickness
Playing video games can cause motion sickness in some players. If you or your child feel dizzy or nauseous when playing video games, stop playing and test. Do not drive or engage in other demanding activity until you feel better.
WARNING - Radio Frequency Interference
The Wi console and Wi Remote can emit radio waves that can affect the operation of nearby electronics, including cardio pacemakers.
Do not operate the WiI console or remote within 9 inches of a pcemaker.
If you have a pateaker or other implantmed medical device do not use one We resele or remeet without test contingent your doctor of the
Manufacturer of your medical devices:
CAUTION-Laser Device
The "NII Consolis is a Class I laser product. Do not attempt to disassemble the NI
tanae: Hemsre eaeiing to quanlized perees only. Caution: Use of cortics or adjuvants or procedures other than these specified.
herein may result in hazardous radiation exposure.
1
eep
NOTE: This product does not contain lutein.
This product complies with applicable laws banning the use of toxic materials such as
lead, mercury, cadmium, hexavalent chromium, PBB or PBDC in consumer products.
Components
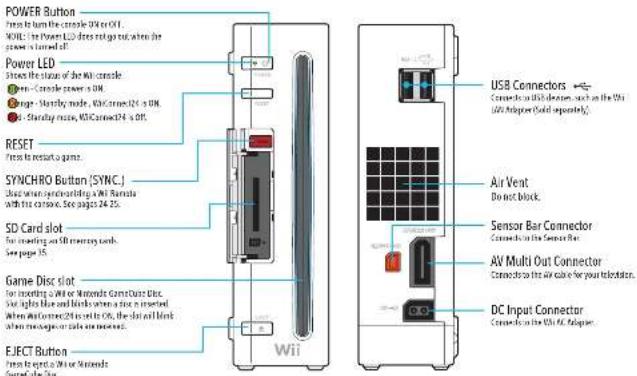
Wii Console Wii Console
4
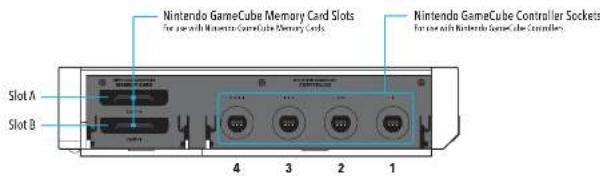
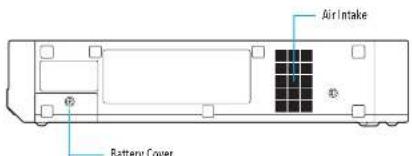
For purposes to the CEI Trust (see [12(6)02]), Perdimitra Material - special handling may apply. More information on the bind of Haplo-Perdimitra is available at http://www.perdimitra.org. Please also refer to the general public website for further information.
5
Components
Wii Remote
(Shown with the Wil Motion accessory removed and the Wil Remote Jacket attached.)
Pointer Lens
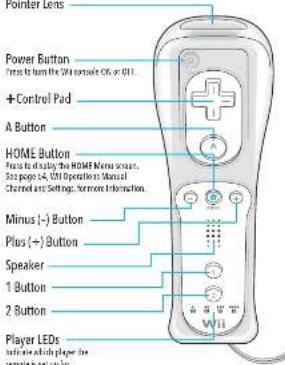
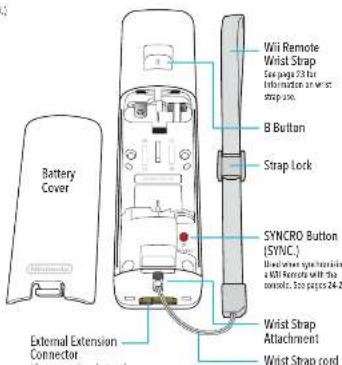
External Extension
Connector
Allowconvectionofzonal zonemassuchastheKints
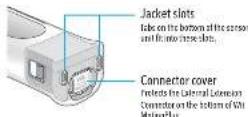
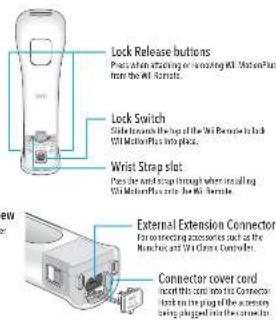
Wii MotionPlus
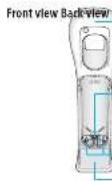
[Shown with the 'Mi Remote removed.]
)
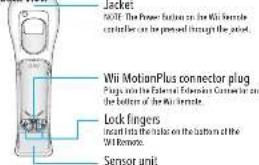
Bottom view
COWTED 2017
To take advantage of the features of the Wii MotionPlus apposess, you must use Wii game software that supports Wii MotionPlus gameplay features. Look for this icon on game packaging for games that are designed to be used with Wii MotionPlus.
NOTE: Your Wii Remote will still function normally with games that do not include Wii MotionPlus gameplay features. The Wii Remote does not need to be disconnected from Wii MotionPlus once it is installed, unless you are using your Wii Remote with the Wii ZapperTM, Wii WheelTM, or other accessories that attach in a similar way.

Components
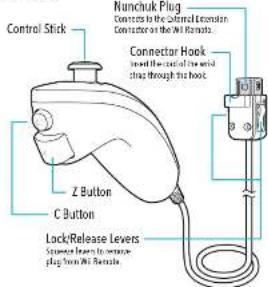
NunchukTM
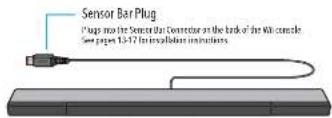
Sensor Bar
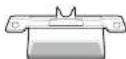
Sensor Bar Stand
Seepage in relation to
To take advantage of the features of the Nunchuk accessory, you must use Wi-Fi connection to play on the device. The Wi-Fi connection is a key part of the game packaging for games that are designed to be used with Nunchuk.

NOTE: If the Control Stick is moved out of neutral position when the Win power is turned ON, or when connecting to the remote, that position will be set as neutral position, causing incommensurate game control during play. Game play to Control Stick, allow it to return to the normal neutral position, then simultaneously hold down the δ , E , [Flux(+)] and Mirius(-) on the controls for three seconds.
To avoid this from occurring, do not move the Control Stick when:
- Limping the 90° tool on top
- Suggesting the fan/rator into the 90° zone
- Moving the channel to the left
- Believing in the 90° channel from source to channel.

Wii AC Adapter
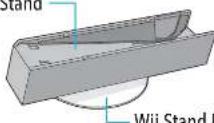
Wii Console Stand
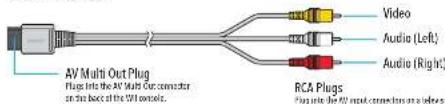
Wii AV Cable
Wii Stand Plate
NOTE: The VI-Consocius Stand and VI-Stand Place are already assembled together, as shown above.
System Setup
Wii Console Usage Precautions
Please read and follow the precautions listed below when setting up and using the Wi console. Failure to do so may result in damage to your Wi system or accessories.
Do not use AC Adapter other than the one provides with your system
- We should consider also the choice of a budget to be used in our budgeting.
- Do not pick the currency in any basket when these costs may increase or decrease, for example, as prices are going to be slightly reduced space.
- Keep this clear if any of these or other foreign investments.
- Go not disassemble assembly repair the VIM variable accessories or components. Doing so prevents your warranty.
- After you have finished playing to see how the game ends in the
- Can't see the ANI console in a formal park, as his feet is in any location when it may called dt, gpt, ttt, etc.
- Do not drop a Wi-Fi or other network above the Wi-Fi cable components or accessories.
When determining any parts from the cross-section or yield lift, use Blum's formula as above. Then carefully put by the plug itself rather than by the cross.
To not stop on happy culorions any wits or cakes.
- Do not expose the will to visit; components of access to extremes heat or cold.
- Let a be any liquid of any color, compose a collection.
To obtain one cell we shall simply attach it. Use water only above the template.
Wii Console Placement
NOTE: Choose a location to set up the console that has enough room to allow for free flow of ventilation around the console.
The Wii console can be placed in a vertical or horizontal position. It located in a vertical position. It should be placed in the Wii console stand.
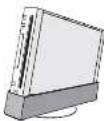
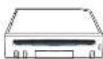
Vertical Horizontal
CAUTION-Console Damage
The console can be damaged if mounted over, especially if the console during operation of the disk drive. The Will stand plate has been included to increase stability of the Will console, and should be used if the console is placed in a vertical position.
Vertical Placement (NOI: These components are already described if they become separated).
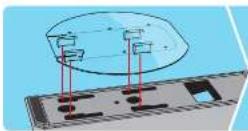
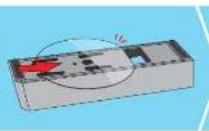
2. Fully divide the stand plate into slices in the direction shown.
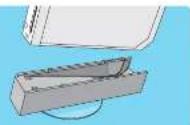
3. Place the console stand on a flat surface and place the console into the stand. Lower the console straight down into the console stand rather than sliding it in front of the front.
Horizontal Placement
Pace the Wi console on a flat horizontal surface. Retain the Wi console stand and stand plate for future use in case you want to switch the orientation of the console.
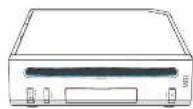
System Setup
Connecting the AV Cable
Wii Console TV Inputs
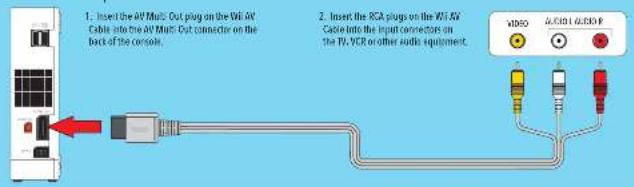
IMPORTANT: The Wii console will not work with any AV cable other than the model supplied with your Wii system or the component video cable listed below.
NOTE: For higher quality video, the VIII component video cable (Modi No. FVL-011) can be ordered through Nittendo's web site at support.nittendo.com (USA/Canada only) or by calling Customer Service Center for more information regarding ordering, check to make sure your TV has component video inputs.
CAUTION-TV Screen Damage
Some subscribers can be damaged as the display of a stationary image, because the image may be permanently "touched" into the display. Selecting adverse images with stationary images in patterns, or rotating static images on head or pose, may lead to this type of damage. After taking a break, since the image is opaque and thus the TV still turns you easily to play again. Before using your Wii system with any TV, especially front and rear projection or displays models, be sure to review all documentation included with your TV to find any problems that could affect the TV without damaging it. If not intended, contact the manufacturer of the TV. Either Kritemirne or any of Nintertrex licenses will have trouble for damage to your TV.
Sensor Bar Setup
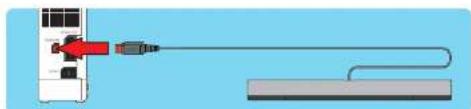
Connecting the Sensor Bar
Insert the Sensor Bar plug into the Sensor Bar connector on the back of the console.
Placing the Sensor Bar
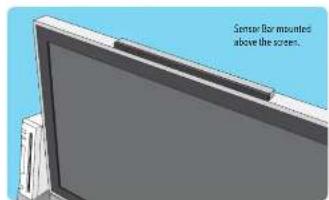
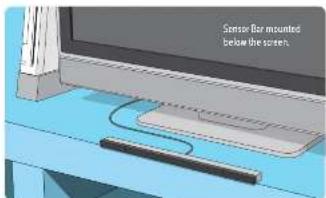
The Sensor Bar can be placed either above or below the TV screen.
See page 14 for instructions on mounting the Sensor Bar and the top of the TV. See page 15 for instructions on mounting the Sensor Bar below the TV screen.
System Setup
Mounting the Sensor Bar Above the Screen
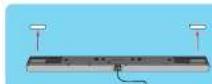
1. Remove the protective film from the foam pad on the hems of the Scree Box.

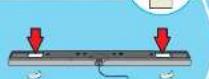
2. For additional stability, you can add adhesive backed foam tape from the supplied sheet.
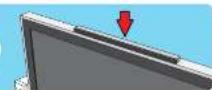
3 Mount the Sensor Bar to the top of the TV
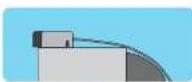
- The front of the Sensor Bar should be aligned close to the front of the TV.
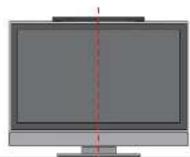
- The center of the Sensor Bar should be aligned with the center of the TV.
Mounting the Sensor Bar Below the Screen
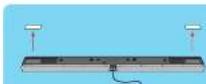
1. Remove the protective film from the foam pods on the bottom of the Sensor Bar.

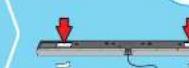
2. For additional stability, you can add adhesive backed form tape from the supplied sheet.
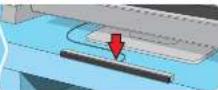
3. Bound the Sensor Bar to the front edge of the surface the TV is sitting on. Do not place the sensor bar below the surface so that the TV is sitting on; for example, it swerves below the TV.
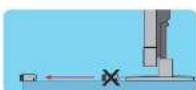
- The front of the Sensor Bar should be aligned with the front of the surface the TV is sitting on.
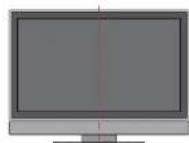
- The center of the Sensor Bar should be aligned with the center of the TV.
System Setup
Using the Sensor Bar Stand
Communication between the Wi-Fi Remote and the Sensor Bar may be improved in some situations by mounting the Sensor Bar on the Sensor Bar stand, for example, if the Wi-Fi is sitting on the floor.

-
Remove the protective film from the foam pads on the bottom of the Sensor Box stand.
-
For additional stability, you can add adhesive broken foam tape from the supplied sheet. These can be applied to both the top and bottom of the stand.

- If you are using the extra foam tape, remove the protective film from the stand on the holes in the bottom of the Sensor Bar.
pece on the top of the Sensor Bar stand.
-
Mount the Sensor Stand to:
-
the front edge of the surface the TV is sitting on, or
- to the top of the TV.
Do not place the Sensor Bar stand below the TV. Place it on the TV, sitting on; for example, on shelves below the TV.
Be sure to:
Align the center of the Sensor Bar with the center of the TV.
- Align the front of the Sensor Bar with the front edge of the TV, or with the front edge of the surface that the TV is sitting on.
1617
The Sensor Bar Stand can also be used on top of the TV part of the TV blocks, or prevents proper installation of the Sensor Bar.
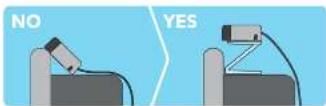
Make sure the Soren has to be hematotrical and it is not bleached by the TV.
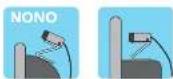
Sensor Bar cable position
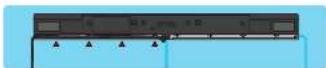
If desired, the Sensor Bar cable can be laid through a channel on the bottom of the Sensor Bar to orient the table to the left or right.
Wii AC Adapter
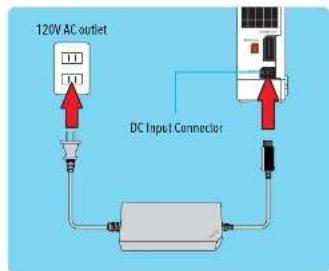
1 Insert the DC plug on the W36 AC motor into the DC input connector on the back of the console.
2. Insert the AC plug into a 120V AC wall outlet. Make sure the power is off the Power LED is red when unplugging the AC Adapter.
CAUTION: To prevent electric shock, match the wide blade of the plug to the wide slot and insert fully into outlet.
System Setup
TV and Audio/Video Settings
After you have completed all steps of the setup procedure and are ready to use the Wi system, you will need to set the appropriate "input select" command. The input select command is shown in Figure 1.
- Turn Off the power for your TV and any audio equipment connected to your apartment setup and the power on the TV console.
- Select the current input setting for your Wi (see Input Select Information at right)
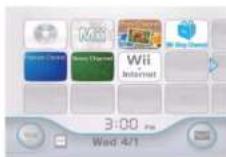
- The Wiki Menu (See below) should appear on the TV screen. See the Wiki Menu for Operations Manual - Channels and Settings, for more information on this feature.
If the VIII Menu screen does not appear, check to make sure your input setting is correct and review the Troubleshooting section on pages 36-39.
Input Select Information
The input select allows you to switch between the different inputs of your TV or SCD.
Manufactures of Ws and VCs use different names and locations for 'input select'. The common names for the input select are: input, selected, input select, line, time, source, in ST, and A&L. Consult your TV or VCR instruction manual for details. Please also contact the company to get more information on our web site at support.internen.com/censor/inputscripts.html
Lecture the input selection for the component that the Wi-AV Cable is connected to be either the TV or KVR. The most common locations for input selected are:
A. a bouton on the horn of the IV or VCR A. a bouton on the percrete control
- A high number of low numbered channel (52, 99, 00, or 01) on the TV or VCR.
- An in-screen menu selection.
Setup of the Wii Remote
The Wi Remote comes with the Wi MotionPlus accessory installed.
-
Be sure that the jacket is installed during gameplay to reduce the risk of harm to the玩家, surrounding objects, or people.
-
I may be necessary to remove the jacket - for example, to replace the jacket with another one. If you do remove the jacket, as before to replace it - before it further play.
Installinng Batteries
The Vii Remote uses 42 batteries. hintero nonreversible high quality all-elite batteries for best performance and longevity of battery life. If you use rechargeable nickel metal hydride (NiMH) batteries, be sure to follow the manufacturer's guidelines for safety and proper usage.
WARNING-Battery Leakage
Leakage of battery fluid can cause potential injury as well as damage to your remote. If battery leakage occurs, thoroughly wash the affected skin and clothes. Keep batteries hard away from your eyes and mouth. Leaking batteries may make popping sounds. To avoid battery leakage,
- Do not mix used and new batteries (replace all batteries at the same time).
- Do not mix different brands of batteries.
- Nintend recommends alkaline batteries. Do not use lithium ion, nickel cadmium (NiCd), or carbon zinc batteries.
- Do not leave facilities to the remote for long periods of non-use.
- In no realse alkaline or ion-schramable bitrates.
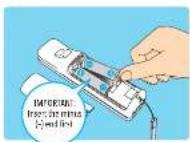
- Do not put the batteries in awkwardly. Make sure this, the positive (+) and negative (·) ends are facing in the correct direction. Enter the negative end first. Enter the positive end second.
- Do not use damaged, defoluted or leaking batteries.
- It is not done of damages in a few.
See page 20 for Instructions on removing the jacket and installing batteries.
System Setup
Installinng Batteries (cont.)
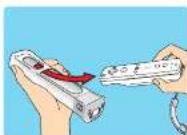
- Slide the disk switch on the basis of the Vi DiMe Plus accessory down, towards the bottom of the Vi Remote.

- Peace and hold the release butons and pull the accessory out of the External Excessor Constrictor on the bottom of the device. The device is then removed from the command unit down and onwards the back of the VII. Remotus.

NOTE: Battery life can be checked by pressing the Home Button. See pages 64-65, VIII Operations Manual - Channels and Settings, for more information.
20
-
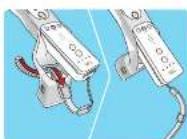
Pull the strap out through the hole.
IMPOSSMENT: Pull carefully to ensure that the steps do not cash on the jacket. -
Pull the Wi Remote out of the pocket.
-
Remove the battery cover and insert the batteries into the battery compartment. Be sure to insert the minus (-) end fin when installing new batteries, and then move the pins end fin when replacing the batteries. Replace the battery cover.
Installling the Wii MotionPlus accessory
-
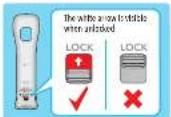
Make sure the lock on the back of the accessory is the unlocked position, with the arrow visible.
-
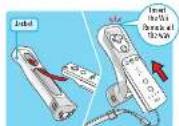
Insert the VI element all along the way into the Mill Motion Plus Axis.
-
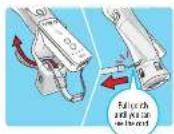
Insert the only stop through the hole from the inside of the jacket and pull completely through until you can see the card.
- Add a new stop. Pull carefully to see the stop does not attach on the jacket.
-
White stinging slightly, gently pull the sensor unit down and over the end of the Wi homekey.
-
Hold down the lock release button on both sides of the accessory and insert the plug into the External Extension Connector on the bottom of the Wi-Fi antenna.
-
More sure that neither the wet strip or actant is pinched between the Wi Remote and the accessory.
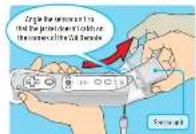
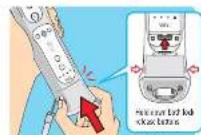
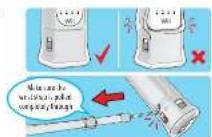
21
System Setup
Installling the Wii MotionPlus accessory (cont.)
- Lock the accessory in place by sliding the bolt in the direction of the arrow.
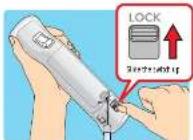
- The MIU MotionPlus accessory can be left installed on your MIU Remote oven with games that do not include MIU MotionPlus features. You do no need to remove it to play those games.
IMPORTANT: If you remove the Vili MotionPlus accessory from the Vili Remote, be sure to install the original Vili Remote Jacket back onto the Vili Remote.
CAUTION - Damage to objects or people
The sensor unit must be used with the included jacket. Follow these guidelines to prevent damage to the MRI female, surrounding objects, or injury to other people.
In this section, we analyze the same issue but with different methods. We begin with the following proposition: If z is any sequence
Where occurring the WI Resource from WI Media files, or maybe relying on the WI Resource schema, do not appear in the patient's unit.
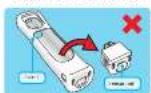
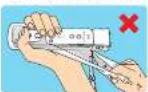
CAUTION-Use the Wrist Strap
Will gameplay with the Will Remote can involve rapid or vigorous melee. The Will Remote is a powerful skill that allows the character to cast damage and causing damage to the remote or surrounding objects, or injury to other people.
WEAR THE WRIST STRAP WHEN USING THE WII REMOTE.
-
Make all plus tuples use the swap strand and that the swap codec is correctly lightened to make sure that the string between multiple players, make sure each sentence uses the wrong properly.
-
Weaning the wild sheep will prevent us from accidentally drowning or drowning out of water. The sheep will hurt damage the remote or surrounding subjects, or cause injury to other people.
DO NOT LET GO OF THE REMOTE DURING GAME PLAY.
Read the instruction booklet for the game you are playing and follow all game
Aims include: for the purpose of the W-1586 or AB2000 Commutators. The aim is to determine the optimal choice of the two-way mechanism, as it may cause you to lose the removal and may break the契机 strip.
If your hands become moist, stop and dry your hands.
ALLOW ADEQUATE ROOM AROUND YOU DURING GAME PLAY.
Stay at least there [2] feet away from the television.
- So you may move around during gametime, make sure objects and other people are out of your range of movement or arm motion to prevent damage or injury.
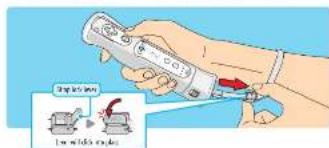
Wearing the Wii Remote Wrist Strap
- Open the lever on the strap link and place your hand through the wrist strap. Hold the remote firmly in your hand.
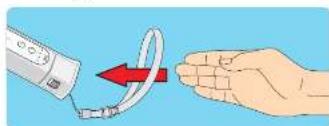
- Slide the step into up so that the step will not fall off your waist. Do not wear tightshoes; the step look so that it's uncomfortable. It should just be enough to hold the upper step in place. Clean the lever to hold the step near in place.
System Setup
Synchronizing Your Wii Remote with the Wii Console
This procedure allows the remote to communicate with the console.
The Will Remote Included with your Will system has been synchronized with the console at the factory.
There are two different modes of synchronizing [sɛnʒ] a Wi-Fi remote with your console.
STANDARD MODE - The Standard Mode procedure is used when adding additional Will Remotes to your system or if you want to re-synchronize your original remote. Once synchronized, the remote will snap up to the console until you know what this setting is bySyncing the remote to a different console.
ONE TIME MODE - This mode allows you to temporarily use your remote on a console other than your can or to use his friends remote on your console. It does not delete the Standard Mode setting stored in the remote. In this mode, the remote will be able to set up a new console. The remote is open. On the phone it is turned off, all the remote will have its syns with the console.
- Only a Wi-Fi Remote in Standard Mode can turn the console power ON or OFF.
Standard Mode Synchronization
NOTE: Make sure you have placed batteries in the WI Remote.
1. Press the Power button on the Wi console to turn it on.
2. Remove the battery cover on the back of the remote, Press and release the SYNC button inside the cover. The Player LEDs will blink.
3. Open the S3 Card Sizer cover on the front of the Nii console. Press and release the SYNC button on the inside of the compartment.
4. When the Flyer LED blinking stops, completion is complete. The LED thus is illuminated indicates the player number:
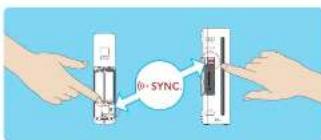
This procedure must be followed for each additional Will Remote added to your system.
NOTE: This image shows the Wii Remote with the Wii MotionPlus accessory removed.
One Time Mode Synchronization
NOTE: This mode temporarily removes the Standard Mode synchronization setup for all monostics until the power of the KIN oscillos turn off. When the power is turned back on again, the Standard Mode settings will return.
- Press the HOME Button on a remove that is synchronized with the console
-
Select the Wt Remote Settings: option 1, and select the Wt Remote Settings... option 2, then select the Reconnect option.
-
Prescribe the 1 and 2 buttons simultaneously on the remote that you want to synchronize with the console.
The order in which you synchronize remodelers will set the player order for multiplayer games.
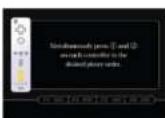
- The Player ID: will slant curing the dancing process. When the baking stage, the connection is complete. See diagram at right on a description of this, the baking indicators.
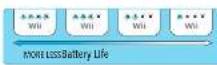
During the synting process, the number of LEDs that blink will show the battery life of the remote thus is being synchronized.

After the sampling process, HD that it is shows the player number for that remove.
KOTE: One Time Mode synchronization is temporary. The Will Remote will lose this synchronization under the following conditions:
- When you turn all the console by pressing the Power button on either the remote or the console.
- When starting up a game or Channel from the VTI Menu
- When returning to the Wii Menu after editing from a game or channel, use the above command from the HOME menu program.
When you press the Reset button on the inset of the cones,
IMPORTANT: IF YOUR REMOTE LOSES IT'S SYNCHRONIZATION WITH THE CONSOLE AND YOU ARE UNABLE TO RE-SYNCT IT, REVIEW THE WILL REMOTE TROUBLESHOOTING PROCEDURES ON PAGE 37.
Using Game Dlscs
Wii System Play Guidelines
Playing a Wii or Nintendo GameCube Game Disc
Before Inserting a Disc
- lnt 2017 the power for your TV and any audio equipment connected to your
Select the correct input setting for your TV. Go page 18, TV and Audio Waves Settings...
Insert a Game Disc
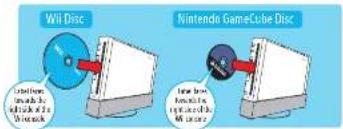
Insert your Game Disk into the Game Disk slot on the front of the cassette. The Wi console will turn ON automatically.
If your console is placed vertically, the disc label will face to the right.
-
Starting the Game
- Using the Mini Remote, move the cursor over the Dis Channel option on the Mini Menu screen and press the A button to make a selection.
NOTE: Please read the Disc Channel section in the Operations manual included with your Wii system for complete information on using Game Disks in the Wii console.
- Select "L06" on the game title screen to begin the game. Review the game booklet for the game you are playing for specific game information.
26 27
Game Disc Usage Precautions
Please read and follow the presentations listed below when using Will or None as a tool. The tool may not detect damage to your Will system or game files.
-
To avoid pinching your finger, do not load the disc with your finger in the hole. Always handle the disc by the edges.
-
Do not touch the bottom unprinted surface of the Game Disc. Always handle the disc by the edges.
Do not use coded-dbf-roed or repaired keys.
Do not bend or put excess pressure on discs when bending into console
The best way to obtain the balance of space on high, medium or soft, dust or other contaminants.
-
When not using dimes, store them in their case to prevent them from getting suspicious, dirty or damaged.
-
Do not write on piece section on any part of the dist
-
If a disk becomes dirty or contaminated with fingerprints, the system may not be able to read the game data correctly. If necessary, clean the abs with a
soft, slightly damp (corn dust; use water only). Clean the disk from center towards the edges; do not use a similar molar.
NOTE: A GameCube controller is required for playing GameCube games.
For best results when using the Wii system, follow these recommendations.
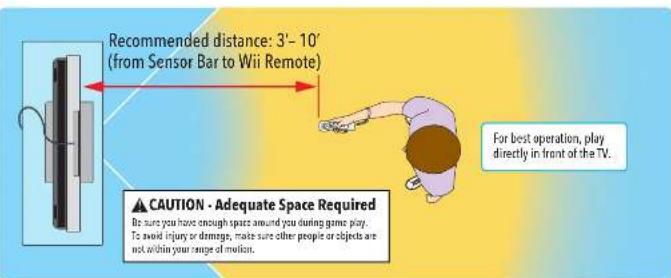
For best use of the Wll Remote, follow these guidelines:
- Avoid blocking the signal between the remote, the Sensor Err and Use will consist with objects.
- Use the remote the correct distance from the Sensor Bar. The optimal distance is 10 feet and 10 feet.
- Avoid light light sources, including sunlight, behind or near the TV, shining towards the remote or illuminating all of the screen.
-
Avid highy relective surfaces near the Sensor Bar.
-
World source of information in the gameplay area such as electric, pressure or some other means, frames from telephones or satellites, and stones or other sources of heat.
- If the remote seems to operate emotionally, check and adjust the sensor Bar sensitivity if necessary. See page 52 in the 'Skill Operations Manual'. Charnish and Sittings;
Be sure to read the following pages on using the Wii Remote, Nunchak and Nintendo GameCube Controllers before using the Wii system.
Using the Wii Remote
Wii Remote Configurations
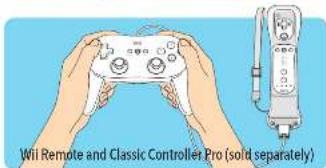
Dispensing on the game, the way you hold and update the remote will vary. You may need to hold the remote in either and two hands. Read the instruction booklet for the instructions. The remote is used to send the message to the player who has the most active equipment that game. The remote can be used by itself, or in different configurations when connected up to other Wi-Fi accessories. These configurations can be used right or left hands.
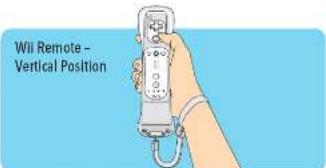
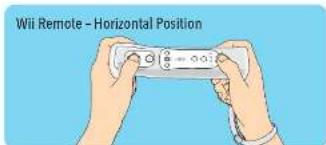
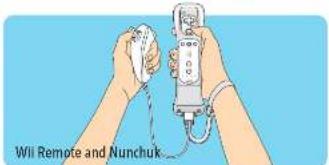
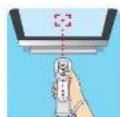
Basic Operations
Point
Point the remote at a specific place on the TV screen.

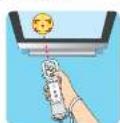
Molding or Grabbing
Paint the remote at a specific place on the TV screen and move the remote while holding down a button.
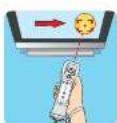
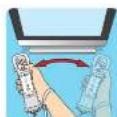
Waving
Where the remote back and forth from side to side

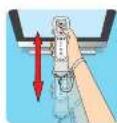
shing or Pulling
Move the remote forward and backward
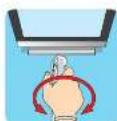
Twisting
Move the remote in a testing motion by rotating your arm.
Using the Nunchuk
Setup and Use of the Nunchuk
CAUTION · Use the Wrist Trap
VIII gameplay with the VIII Remote and Nunchuk can involve rapid or vigorous motion. Please use the wrist strap to prevent losing your grip on the remote and causing damage to the remote and surrounding objects, or Injury to other people.
B
Connecting the Nunchuk to the Wii MotionPlus accessory
- Remove the connector cover from the bottom of WI Motion Plus. Group the cover by the sides as shown.
- Remove the external plug into the External Extension Connector on the bottom of the remote unit until "it's" into place.
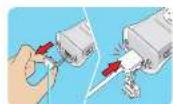
Connector cover
- Pass the Connection Center (C) through the connector hook on the base of the connector.
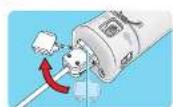
Connector hook
-
Insert the lid on the edge of the connector cover into the connector head. Press this connector cover firmly into place on the connector plug;
-
Place your hand through the wrist strap and against the strap lock so that the strap will not fall off your wrist. Do not over tighten the strap lock so that it's uncomfortable. It should just be tight enough to hold the wrist strap in place. Close the knot of your strap lock as even until it touches to hold the strap lock in place.
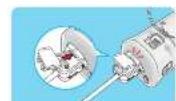
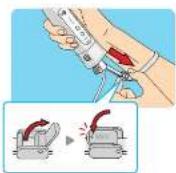
Holding the Nunchuk and Wii Remote
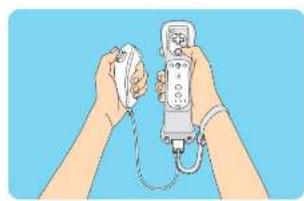
Disconnecting the Nunchuk
Follow these procedures to remove the Nutschuck. Classic Controller or other controllers that you have connected to will WinSoft Plus.
- Remove the connector cover from the accessory connector plug.
- Be sure to pull the connector cover straight out of the connector hook.
- To prevent damage to the tab on the adjust of the cover.
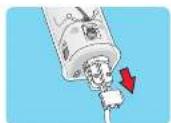
-
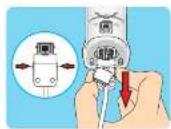
Press the two release letters on the side of the assembly connector plug and pull the plug straight out of the connector.
-
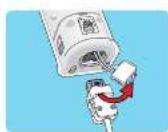
Remove the connector cover and from the accessory plugs connector hook.
-
Insert the connector cover into the Fatorial Extension Connector on the bottom of WJ Motion Plus.
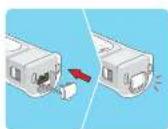
Using Nintendo GameCube™ Controllers
Setup of Nintendo GameCube Controllers
NOTE: When using GameCube Controllers with the VIII console, be sure and use the stand plate to help prevent the console from being tipped over by pulling on the controller cable. (See page 11, Vertical Placement.)
Optionally, the console can be placed horizontally. When using GameCube Controllers in the horizontal position, the controller socket cover can be removed to allow the console to lay flat.
Connecting GameCube Controllers
KOT: GgameCube controllers only work when playing GameCube games on the 19th console.
- Flag the controller into the GameCube Controller sockets on the side of the console.
- Review the Instruction booklet for the game you are playing for the number and color of the blocks.
The Will Classic Controller does not work with SameCube games
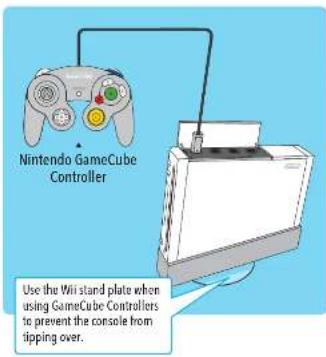
Removing the Controller Socket Cover
if you are using the Will console in a horizontal position, you must remove the controller socket cover when using GameCube Controllers to allow the console to fly completely flat.

Horizontal Position

- Stand the Vi to cross upright as shown and squeeze gently until you feel a slight click.
-
Remove the cover by pulling straight up out of the console.
-
The cover can be replaced by reinserting the cover straight down into the console until it clicks into place.
NOTE: The GameCube Memory Slot Cover can be removed with the same procedure, and should be removed if you are using GameCube Memory Cards when the VIII console is placed horizontally.
Using Memory Cards
Using SD Memory Cards
3D Cards are used in many digital cameras and cell phones and for data storage on PCs. The Wi-Fi console accepts only 5E or SDHC Cards [32 GB maximum], including miniSD or SDHC and microSD or SDHC cards when used with their respective chapters.
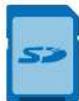
SD Card SDHC Card

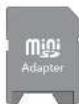

miniSD Card and Adapter
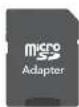

microSD Card and Adapter
A5: SD memory card can be used to store the following data from the Mllsystem memory.
Game game information from Will games depending on the game, some information about the variant of games
Information Sheet is copied to SD channels:
- Cointing data from the Wi-Fi channel applications
- Games downloaded through the Wi Shop Channel such as Visual Console and MSOffice apps.
Add-on content downloaded within a game
NOTE: Games and add-on content copied to an SD Card cannot be used with a different HTU template.
To use an SD Card, open the S0 Card slot over the front of the ramess and insert the S0 Card until it discards into place.
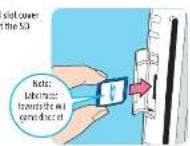
See the SD Card Menu and Photo Channel sections in the Will Operations Manual - Channels and Settings for more information on using SD Cards with the Will system.
If purchasing a new 500 CD, a list of notes that have been filed with the Milccans can be found in the All Systems and Accessories section of http://www.milccans.com
Using Nintendo GameCube Memory Cards
NOTE: Nintendo GameCube Memory Cards can only be used to save game information for Nintendo GameCube Game Discs.
To use a Nintendo GameCube Memory Card, open the slot cover and insert the memory card as shown below.
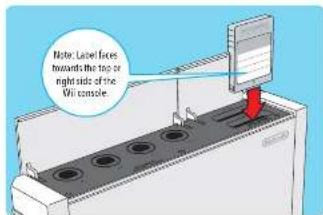
CUNION: Do not insert or remove memory cards when reading or writing Information to or from the card or initializing the card. Doing so may damage the With Contents or memory card, or permanently destroy data.
Troubleshooting (Before seeking assistance, review the following problems and solutions.)
No picture on TV screen
Make sure you have completed all steps, in the order that they appear on the Quir
Setup sheet included with your system.
a
- Mise up the cable connections are mostly installed and all clips are secured.
sugp into the appropriate connectors.
- Make sure that the IRPUJ settings are correct for your particular setup. (Review page 13)
No sound is heard or sound quality is poor
- Make sure the TV volume is not turned off or turned off.
- Make sure that all audio connections are correctly installed and that all plugs are screwed unplugged into the unsupplied connection.
- Make sure the Nii AV Cable is plugged into the "input" connection on the
Towver notthe output - Make sure that the IRUI settings are correct for your particular setup (Review section 10.1, input Select information).
- The sound in some games doesn't begin until the game begins.
- if you have a mono TV or VCR and have left one of the audio cables unconnected to the computer, then you will be able to connect the cable to the
you may not get in game stones. Use a * P * as a letter to get both letters and letters.
If your TV or WCR has both mono and stereo options, make sure it is set to match
your setup.
- Check the introduction book for the game you are playing to see if there are
The console Power LED does not come on, or goes off during game play
Make sure the AC Adapter is plugged into both the wall outlet and the back of
the console.
minutes and plug it back into the outlet. Turn the console power ON.
System unable to read disc or game disc will not
NOTE: Game discs will not start automatically. You must start disc games from the Disc Manager on the Internet screen.
- Make sure the disc is inserted correctly. The label side all the disc must face to the right if the W3 console is set up vertically, or must late up if the W3 console is set up horizontally.
- Check to be sure that the Game Disk is clean and in good condition. If dirty, wipe with a soft cloth, from the center to the outside. Do not wipe with a croaker moth. You can also try using the Vinyl Lens Cleaning Kit sold separately to clean the internal lens.
- eject the Game Disc, and turn the power OFF and then ON. Reinsert the disc and try
siny the gme gian.
- check out the USU's 2013 work on our version of the 2013 system and only work with game files made for use in the USU, Canada, Mexico and Latin America.
Game Disc slot does not light blue or lights briefly
This is the normal operation of the Game Disc slot. The slot only lights temporarily
when the system is turned on by a) reading a message line; b) using main button on the KILL Prescror or else using the Press Hutton on the Kill prescror
The Game Decis will also light temporally if you receive a message via
wiCnneed24 this feature must be turned on to receive messages, see page 62 in
The Wi Operations Manual - Channels and Settings for more information.
Wii Remote lights blink, but don't stay lit (remote does not sync)
- Review the Sensor Bar setup instructions in this manual to ensure proper placement.
Make sure batteries are not depleted.
- Try resetting the Wii Remote - remove the ballers, wait one minute, then replace the extra or what a few coins, and then try recombining the gems on it.
If you are unable to use the remote, try the following procedure:
1. Turn off the power of the Wi console with the POWER Button on the front of
the complete. 2. Find the power and from the well out of by the second, then put it by
in assie
3. Turn on the power of the Wi dong.
4. When you see the Health and Safety screen, press and hold the SYNCHBD button to stop the program from running.
Button on the console down for 15 seconds. He will clear any spy information left on the console.
5. Synchronize your Mile Remotes using the procedure on page 24.
Wii Remote or controller accessory buttons stick
Clean sticking budgets using the following procedure:
1. For the vii Remote, remove batteries and disconned any accessories before cleaning.
2. Use an unused toothbrush and hot tap water. Do not use boiling water, soap or detergent.
2. Die the toothbrush in solution and shake off excess amount. Lightly soud
3.1.2. The button on the left side of the button is fixed in the middle of the button. Right: 10 to sticking buttons, working the bricks around sides of buttons and into cracks.
Dry controler with soft cloth or towel and let air dry for at least 2 hours.
5. Test humans and repeat procedure if necessary Do not submerge in, or pour
any type of liquid onto a controller or accessory
Wii Remote doesn't properly respond to player motion
email hand cueor, can't swing bat. cant bawl, etc.)
Review the Sensor Bar setup instructions in this manual to ensure proper placement.
-
Wate the objects blocking the signal between the sensor slit, the Wi console, and the Wi Remote.
-
Mone sae ples are prilised
-
Use the Sensor Bar Stand if the Sensor Bar is located below the TV.
Check and adjust the Sensor Bar sensitivity if necessary. (See page 52 in the Wt
Operations Manual Channel and Settings
The following conditions can interfere with the operation of the remote:
-
Using the remote too close or too far from the Sensor Bar. The optimal distance
-
Bright light count, including sunlight, behind or near the TV, shining awards
the image or reflecting all the TV screens.
-
Highly reflective surfaces near the sensor bar.
-
Sources of infrared light in the gameplay area such as electric, propane or
beroseheaters, fames from fireplaces or candelies, and stones or other sources
of host
- Radio frequency interference may damage the Wi-Fi router or work critically. Check hardware reports for any wireless devices that cause problems.
e
mss
nne or reccrict the course of interference.
Troubleshooting
The Will Remote with Will MotionPlus attached does not respond
- Make sure the Wii MotionPlus connector plug is fully inserted into the Wii Remote.
- Review the setup procedure and make sure Wii MotionPlus has been installed correctly.
- Make sure the batteries have been installed correctly and are not depleted.
- Keep the HOME Button on the Wii Remote to check battery life from the device.
- Check the game package and manual for the Wii Shop Channel screen. If it was downgraded, for the game you are paying to make sure it includes Wii
- If more of the above steps resolve the problem, remove and insert the Wt file into the Wt file. The command on the button of the Wt file denotes several times that could be omitted.
The cursor on the TV screen moves when the Wii Remote is not being moved or moves differently than when the Wii Remote is moved
- At MotionPlus may need to be recalibrated due to the following:
1. Shrimp bacteria in the Wt Remise during summer play
. Discontrolling and recenrenching Will MotleyPlus during gameplay ,3000 Moiik Moklplus has a cool endurance from a team side
To recirculate the Wii MotionPlus accessory, place it on a flat horizontal surface with the buttons lining down. Wait for a few seconds and check the operation. Also, review the Instruction Manual for the game you are playing for more information.
NOTE: This procedure must be done during gameplay, and with the Wii MotionPlus accessory attached to the Wii Remote controller.
The Wii Remote with Wii MotionPlus attached responds slowly
Some paintings process graphics internally for input signals. This may delay the display of graphics but does not damage the KTI Console, KTI Remote, WiI MotionPlus, or the television.
The jacket has been removed and I'm having difficulty replacing it.
- The Jacket is important for proper and safe operation of the Wii MotionPlus accessory. Please see the next page for instructions on correctly replacing the jacket if this becomes定制.
Can't get past the Language Select screen
- Synchronizys your Will Remodeling using the procedure map page 24.
- Review the Service Bar setting instructions in pages 13 to ensure proper placement and installation.
If your Wii system still does not operate correctly after trying the troubleshooting steps, DO NOT return the console to the store. You will lose saved game data and all Wii Shop Channel downloads and Wii Points. Visit support.mintendo.com for assistance and additional troubleshooting and repair options or call 1-800-255-3700.
Replacing the Wii MotionPlus accessory jacket
1. Hold the jacket and accessory so they both have flosses.
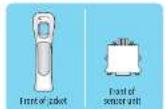
- Prepare the sensor unit into the bottom of the jar, being careful not to damage the connector or other parts of the accessory.
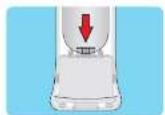
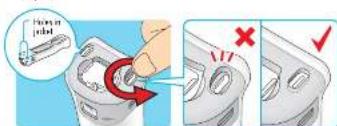
- In the two separate protonons on the inside of the pocket into the holes on the bank of the sensor unit.
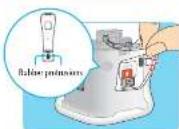
- Using your finger tips, work the bottom of the jacket around so that the plastic hooks on the bottom of the sensor unit fit snugly into the holes in the jacket.
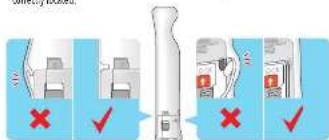
- Check the fit of the robot to make sure the nails are not prinched between the NiR Remote and the sensor unit, and that the rubber protrusions are correctly located.
FCC Information
Regulations for Equipment Use in U.S.A. and Canada
FCC and Industry Canada Information
In order to comply with FCC radio-frequency radiation exposure guidelines for an uncontrolled exposure, this device and its antenna must not be co-located or operating in conjunction with any other antenna or transmitter. This device complies with Part 15 of the FCC Rules and RSS-210 of Industry Canada. Operation is subject to the following two conditions: (1) this device may not cause harmful interference, and (2) this device must accept any interference received, including interference that may cause undesired operation. Changes or modifications not expressly approved by the manufacturer could void the user's authority to operate this device.
NOTE: This equipment has been tested and found to comply with the limits for a Class B digital device, pursuant to part 15 of the FCC Rules. These limits are designed to provide reasonable protection against harmful interference in a residential installation. This equipment generates, uses and can radiate radio frequency energy and, if not installed and used in accordance with the instructions, may cause harmful interference to radio communications. However, there is no guarantee that interference will not occur in a particular installation. If this equipment does cause harmful interference to radio or television reception, which can be determined by turning the equipment off and on, the user is encouraged to try to correct the interference by one or more of the following measures:
Reorient or relocate the receiving antenna.
- Increase the separation between the equipment and receiver.
- Connect the equipment into an outlet on a circuit different from that to which the receiver is connected.
- Consult the dealer or an experienced radio/TV technician or call Nintendo Consumer Service at 1-800-255-3700 for assistance.
The user may find the following booklet prepared by the Federal Communications Commission helpful: How to Identify and Resolve Radio-TV Interference Problems. This booklet is available from the U.S. Government Printing Office, Washington, D.C., 20402, Stock No. 004-000-00345-4.
The term IC before the certification/registration number only signifies that the Industry Canada technical specifications were met.
Warranty and Service information
You may need only simple instructions to correct a problem with your product. Try our website at support.nintendo.com or call our Consumer Assistance Hotline at 1-800-255-3700, rather than going to your retailer. Hours of operation are 6 a.m. to 7 p.m., Pacific Time, Monday - Sunday (times subject to change). If the problem cannot be solved with the troubleshooting information available online or over the telephone, you will be offered express factory service through Nintendo. Please do not send any products to Nintendo without contacting us first.
HARDWARE WARRANTY
Nintendo of America Inc. ("Nintendo") warrants to the original purchaser that the hardware product shall be free from defects in material and workmanship for twelve (12) months from the date of purchase. If a defect covered by this warranty occurs during this warranty period, Nintendo will repair or replace the defective hardware product or component, free of charge. The original purchaser is entitled to this warranty only if the date of purchase is registered at point of sale or the consumer can demonstrate, to Nintendo's satisfaction, that the product was purchased within the last 12 months.
GAME & ACCESSORY WARRANTY
Nintendo warrants to the original purchaser that the product (games and accessories) shall be free from defects in material and workmanship for a period of three (3) months from the date of purchase. If a defect covered by this warranty occurs during this three (3) month warranty period, Nintendo will repair or replace the defective product, free of charge.*
SERVICE AFTER EXPIRATION OF WARRANTY
Please try our website at support.nintendo.com or call the Consumer Assistance Hotline at 1-800-255-3700 for troubleshooting information and repair or replacement options and pricing.
* In some instances, it may be necessary for you to ship the complete product, FREIGHT PREPAID AND INSURED FOR LOSS OR DAMAGE, to Nintendo. Please do not send any products to Nintendo without contacting us first.
WARRANTY LIMITATIONS
THIS WARRANTY SHALL NOT APPLY IF THIS PRODUCT: (a) IS USED WITH PRODUCTS NOT SOLD OR LICENSED BY NINTENDO (INCLUDING, BUT NOT LIMITED TO, NON-Licensed GAME ENHANCEMENT AND COPIER DEVICES, ADAPTERS, AND POWER SUPPLIES); (b) IS USED FOR COMMERCIAL PURPOSES (INCLUDING RENTAL); (c) IS MODIFIED OR TAMPERED WITH; (d) IS DAMAGED BY NEGLIGENCE, ACCIDENT, UNREASONABLE USE, OR BY OTHER CAUSES UNRELATED TO DEFECTIVE MATERIALS OR WORKMANSHIP; OR (e) HAS HAD THE SERIAL NUMBER ALTERED, DEFACED OR REMOVED. ANY APPLICABLE IMplied WARRANTY, INCLUDING WARRANTY OF MERCHANTABILITY AND FITNESS FOR A PARTICULAR PURPOSE, ARE HEREBY LIMITED IN DURATION TO THE WARRANTY PERIODS DESCRIBED ABOVE (12 MONTHS OR 3 MONTHS, AS APPLICABLE). IN NO EVENT SHALL NINTENDO BE LIABLE FOR CONSEQUENTIAL OR INCIDENTAL DAMAGE RESULTING FROM THE BREACH OF ANY IMPLIED OR EXPRESS WARRANTY. SOME STATES DO NOT ALLOW LIMITATIONS ON HOW LONG AN IMPLIED WARRANTY LASTS OR EXCLUSION OF CONSEQUENTIAL OR INCIDENTIAL DAMAGE, SO THE ABOVE LIMITATIONS MAY NOT APPLY TO YOU.
This warranty gives you specific legal rights. You may also have other rights which vary from state to state or province to province. Nintendo's address is: Nintendo of America Inc., P.O. Box 957, Redmond, WA 98073-0957 U.S.A. This warranty is only valid in the United States and Canada.
Rev. Q
Unlicensed Accessories: Do not attach unlicensed accessories to the Wii Remote, as the use of unlicensed accessories may lead to injury to yourself or others and may cause performance issues and/or damage to the system. Use of any such unlicensed accessories will invalidate your Nintendo product warranty.

- IMPORTANT NOTE FOR PARENTS
- CONTENTS
- HEALTH AND SAFETY INFORMATION 2-3
- HEALTH AND SAFETY INFORMATION
- WARNING-SEIZURES
- WARNING - REPETITIVE MOTION INJURIES AND EYESTRAIN
- WARNING-ELECTRIC SHOCK
- CAUTION-MOTION SICKNESS
- WARNING - RADIO FREQUENCY INTERFERENCE
- CAUTION-LASER DEVICE
- COMPONENTS
- WII REMOTE
- WII MOTIONPLUS
- SYSTEM SETUP
- WII CONSOLE USAGE PRECAUTIONS
- WII CONSOLE PLACEMENT
- CAUTION-CONSOLE DAMAGE
- HORIZONTAL PLACEMENT
- CONNECTING THE AV CABLE
- CAUTION-TV SCREEN DAMAGE
- SENSOR BAR SETUP
- USING THE SENSOR BAR STAND
- BE SURE TO
- SENSOR BAR CABLE POSITION
- WII AC ADAPTER
- TV AND AUDIO/VIDEO SETTINGS
- INPUT SELECT INFORMATION
- SETUP OF THE WII REMOTE
- INSTALLINNG BATTERIES
- WARNING-BATTERY LEAKAGE
- INSTALLINNG BATTERIES (CONT.)
- INSTALLLING THE WII MOTIONPLUS ACCESSORY
- INSTALLLING THE WII MOTIONPLUS ACCESSORY (CONT.)
- CAUTION - DAMAGE TO OBJECTS OR PEOPLE
- CAUTION-USE THE WRIST STRAP
- WEAR THE WRIST STRAP WHEN USING THE WII REMOTE
- DO NOT LET GO OF THE REMOTE DURING GAME PLAY
- ALLOW ADEQUATE ROOM AROUND YOU DURING GAME PLAY
- WEARING THE WII REMOTE WRIST STRAP
- SYNCHRONIZING YOUR WII REMOTE WITH THE WII CONSOLE
- STANDARD MODE SYNCHRONIZATION
- ONE TIME MODE SYNCHRONIZATION
- USING GAME DLSCS
- WII SYSTEM PLAY GUIDELINES
- PLAYING A WII OR NINTENDO GAMECUBE GAME DISC
- GAME DISC USAGE PRECAUTIONS
- USING THE WII REMOTE
- WII REMOTE CONFIGURATIONS
- BASIC OPERATIONS
- USING THE NUNCHUK
- SETUP AND USE OF THE NUNCHUK
- CAUTION · USE THE WRIST TRAP
- CONNECTING THE NUNCHUK TO THE WII MOTIONPLUS ACCESSORY
- HOLDING THE NUNCHUK AND WII REMOTE
- DISCONNECTING THE NUNCHUK
- USING NINTENDO GAMECUBE™ CONTROLLERS
- SETUP OF NINTENDO GAMECUBE CONTROLLERS
- CONNECTING GAMECUBE CONTROLLERS
- REMOVING THE CONTROLLER SOCKET COVER
- USING MEMORY CARDS
- USING SD MEMORY CARDS
- USING NINTENDO GAMECUBE MEMORY CARDS
- TROUBLESHOOTING (BEFORE SEEKING ASSISTANCE, REVIEW THE FOLLOWING PROBLEMS AND SOLUTIONS.)
- NO PICTURE ON TV SCREEN
- NO SOUND IS HEARD OR SOUND QUALITY IS POOR
- SYSTEM UNABLE TO READ DISC OR GAME DISC WILL NOT
- GAME DISC SLOT DOES NOT LIGHT BLUE OR LIGHTS BRIEFLY
- WII REMOTE OR CONTROLLER ACCESSORY BUTTONS STICK
- TROUBLESHOOTING
- FCC INFORMATION
- REGULATIONS FOR EQUIPMENT USE IN U.S.A. AND CANADA
- FCC AND INDUSTRY CANADA INFORMATION
- WARRANTY AND SERVICE INFORMATION
- HARDWARE WARRANTY
- GAME & ACCESSORY WARRANTY
- SERVICE AFTER EXPIRATION OF WARRANTY
- WARRANTY LIMITATIONS
Marque : NINTENDO
Modèle : Nunchuk Wii
Catégorie : Contrôleur