
APEX M800 - Logiciel informatique STEELSERIES - Notice d'utilisation et mode d'emploi gratuit
Retrouvez gratuitement la notice de l'appareil APEX M800 STEELSERIES au format PDF.



| Type de produit | Clavier mécanique RGB |
| Caractéristiques techniques principales | Switches mécaniques SteelSeries QX2, rétroéclairage RGB personnalisable, anti-ghosting, N-Key Rollover |
| Alimentation électrique | USB 2.0 |
| Dimensions approximatives | 440 x 130 x 36 mm |
| Poids | 1,2 kg |
| Compatibilités | Windows, Mac OS |
| Type de connexion | Câble USB |
| Fonctions principales | Programmation des touches, profils de jeu, enregistrement de macros |
| Entretien et nettoyage | Utiliser un chiffon doux et sec, ne pas immerger dans l'eau |
| Pièces détachées et réparabilité | Switches remplaçables, possibilité de remplacer les keycaps |
| Sécurité | Conforme aux normes CE, RoHS |
| Informations générales utiles | Garantie de 2 ans, support technique disponible en ligne |
FOIRE AUX QUESTIONS - APEX M800 STEELSERIES
Questions des utilisateurs sur APEX M800 STEELSERIES
0 question sur cet appareil. Repondez a celles que vous connaissez ou posez la votre.
Poser une nouvelle question sur cet appareil
Téléchargez la notice de votre Logiciel informatique au format PDF gratuitement ! Retrouvez votre notice APEX M800 - STEELSERIES et reprennez votre appareil électronique en main. Sur cette page sont publiés tous les documents nécessaires à l'utilisation de votre appareil APEX M800 de la marque STEELSERIES.
MODE D'EMPLOI APEX M800 STEELSERIES
osteelseries ENGINE 3
User Guide: Windows and Mac
Table of Contents
Installation 4
Installation Requirements 4
SteelSeries Engine 3: The Basics 4
Background Processes v. Interface 4
Opening and Closing SteelSeries Engine 3 4
Taskbar/Menu Bar Icon 5
Application Icon 5
My Gear 6
Hide Device 7
About Device – firmware version 7
Firmware Updates 8
Software Updates 8
Application Settings 8
Library 10
Adding an Application 10
Adding a Device With a Specific Configuration 11
Editing Configurations from the Library 11
Configuration Management 12
Configuration List 12
New Configuration 12
Delete 13
Edit 13
Rename 13
Change Autolaunch Applications 13
Duplicate 14
Configuring Your Devices 14
Save/Revert 14
Live Preview 14
Common Widgets 14
LED Illumination 14
Macro Editor 15
Recording and Editing Macros 16
Macro Recording 16
Editing and Deleting Events 16
Insert Delay 16
Delay Options 16
Macro Management 16
Siberia Elite Configuration Window 17
Widgets 17
Dolby Surround Sound 17
Equalizer 18
Mic Noise Reduction 19
Auto Mic Compression 19
Mic Sidetone 19
Mic Volume 19
Rival Configuration Window 20
Widgets 20
Sensitivity (CPI 1 & 2) 20
Polling Rate 20
Acceleration/Deceleration 20
Angle Snapping 21
LED Illumination 21
Button Actions 22
Actions List and Changing Actions 22
Quickset Toolbar 22
Quickset Macros 23
Appendix A: Enabling Dolby 24
Welcome
to the SteelSeries Engine 3 User Guide for Windows
and Mac! SteelSeries Engine 3 has been developed by SteelSeries to help deliver the best gamer experience:
- Uniform Platform SteelSeries Engine 3 is a unified platform built to support all of your newest SteelSeries products.
- Small Footprint Optimized with the latest technologies, the reduced footprint of SteelSeries Engine 3 leaves your machine's resources available for gaming and other tasks.
- Seamless Deployment Automatically deploy your saved device settings when switching between your favorite games or applications, meaning more time for gaming and less time configuring a device.
This user guide is intended to introduce you to all aspects of SteelSeries Engine 3, including its setup and its usage. If you have any questions that are not answered or covered in this user guide, please visit our website: faq.steelseries.com
Installation
Visit http://steelseries.com/engine to find the download link SteelSeries Engine 3. Selecting this link and choose Windows or Mac based on your operating system.
Once the download completes, open the installer on your computer and follow the installation instructions. After installation, the SteelSeries Engine background processes will start and the SteelSeries Engine 3 interface will open automatically. An icon that allows you to quickly open or quit SteelSeries Engine 3 will appear in your taskbar, on Windows, or your Menu Bar, on Mac OS X.
By default, SteelSeries Engine 3 will be located in your Program Files folder on Windows, or your Applications folder on Mac OS X.
Installation Requirements
SteelSeries Engine 3 requires 100 MB of free hard drive space and one of the currently supported platforms:
Windows XP (32 and 64 bit) Mac OS X 10.7
Windows Vista (32 and 64 bit) Mac OS X 10.8
Windows 7 (32 and 64 bit) Mac OS X 10.9
Windows 8 (32 and 64 bit)
Windows 8.1 (32 and 64 bit)
SteelSeries Engine 3: The Basics
Background Processes v. Interface
SteelSeries Engine has a process that runs in the background on your machine, which is required to run many of the features in SteelSeries Engine 3. Automatic deployment of your custom device configurations and executing macros in game are examples of features that require SteelSeries Engine background processes.
Then SteelSeries Engine 3 interface is independent from the background processes. It provides an easy, intuitive way to configure your SteelSeries gear. When you are done making configuration changes, close the interface windows to free up your computer's operating resources for other games and applications.
Opening and Closing SteelSeries Engine 3
After installation the SteelSeries Engine background processes will start and the interface will open automatically. When your computer starts up only the background processes of SteelSeries Engine will launch automatically. You also have the option of disabling this through the settings menu in the interface's main window (details in Application Settings).
Taskbar/Menu Bar Icon
When background processes are running a SteelSeries icon is conveniently located on the Windows Taskbar or Mac OS X Menu Bar. This icon is an indicator that these processes are running and a dropdown with options to open the interface or exit/quit. If you exit/quit, the interface and background processes will shutdown, disabling configuration deployment. To allow the background processes to run, close all the interface windows instead of exiting/quitting SteelSeries Engine 3.
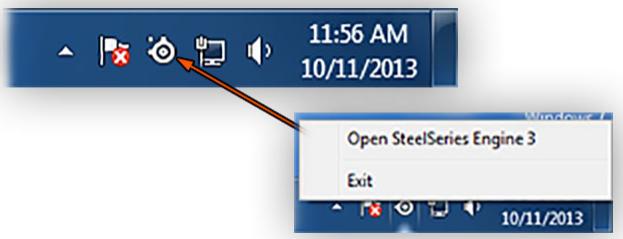
text_image
11:56 AM 10/11/2013 Open SteelSeries Engine 3 Exit 10/11/2013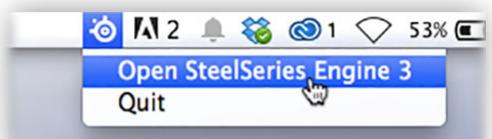
text_image
Open SteelSeries Engine 3 QuitApplication Icon
If SteelSeries Engine background processes are not running, the Taskbar/Menu Bar Icon will not be present and you should open SteelSeries Engine 3 as you would any other application. By default, SteelSeries Engine 3 is located in the Programs file on Windows and the Applications folder on Mac OS X. Double-clicking on the SteelSeries Engine 3 application icon will start the background processes and open the interface.
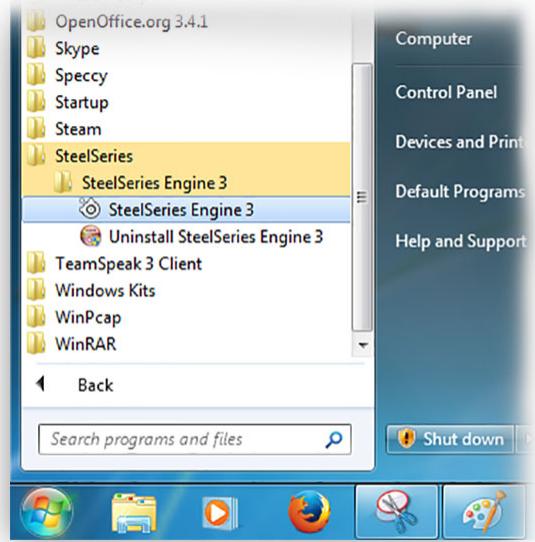
text_image
OpenOffice.org 3.4.1 Skype Speccy Startup Steam SteelSeries SteelSeries Engine 3 SteelSeries Engine 3 Uninstall SteelSeries Engine 3 TeamSpeak 3 Client Windows Kits WinPcap WinRAR Back Search programs and files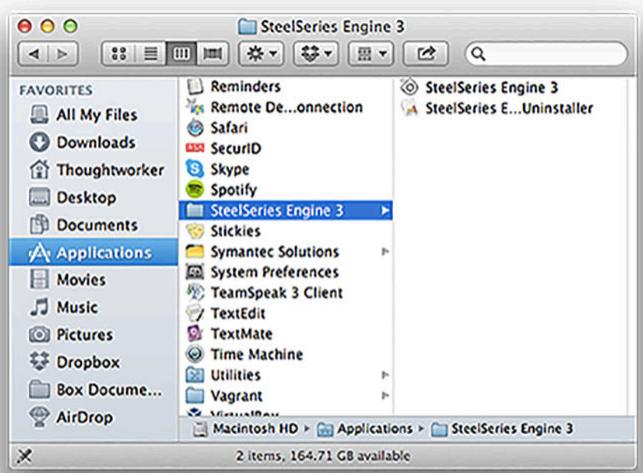
text_image
SteelSeries Engine 3 FAVORITES All My Files Downloads Thoughtworker Desktop Documents Applications Movies Music Pictures Dropbox Box Docume... AirDrop Reminders Remote De...onnection Safari SecurlD Skype Spotify SteelSeries Engine 3 Stickies Symantec Solutions System Preferences TeamSpeak 3 Client TextEdit TextMate Time Machine Utilities Vagrant Macintosh HD > Applications > SteelSeries Engine 3 2 items, 164.71 GB availableMy Gear
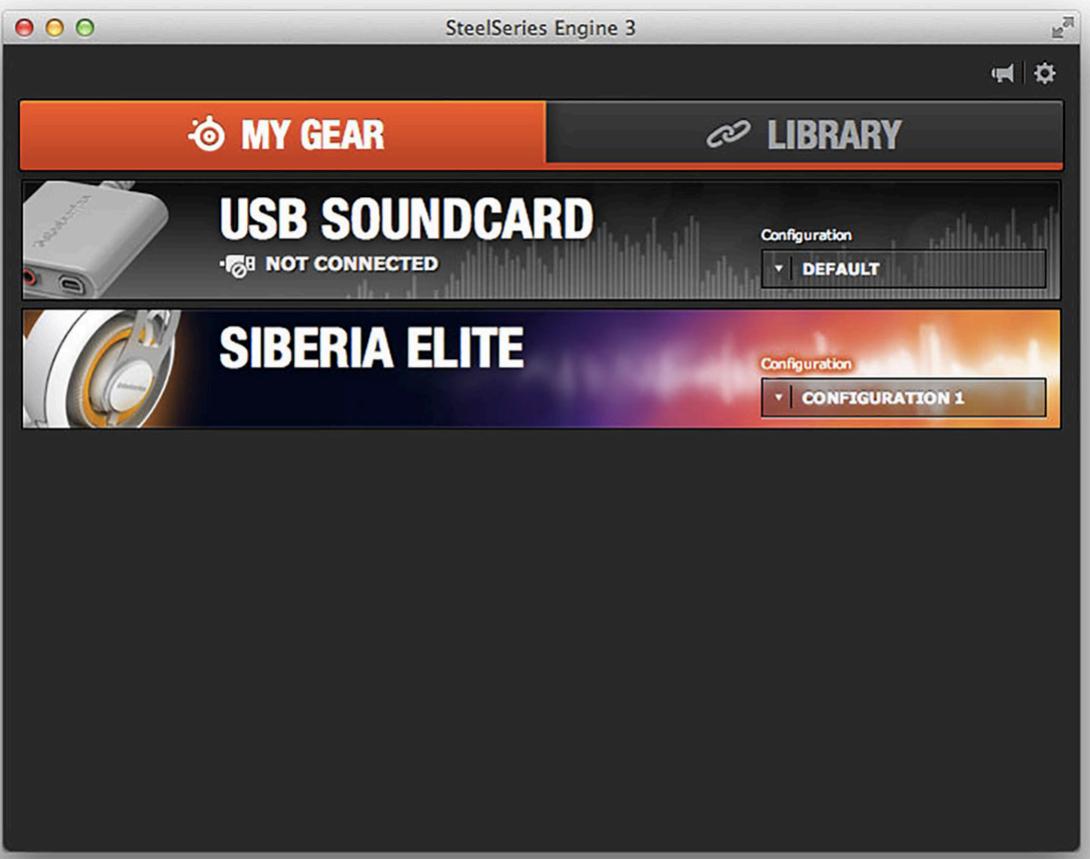
All of your SteelSeries devices in one place
text_image
SteelSeries Engine 3 MY GEAR LIBRARY USB SOUNDCARD NOT CONNECTED Configuration DEFAULT SIBERIA ELITE Configuration CONFIGURATION 1Device Cards
When you connect a SteelSeries device, SteelSeries Engine 3 remembers it and adds a Device Card to My Gear. All of your devices are easily accessible from the My Gear tab, regardless of type, connection status, or which applications they are assigned to.
Connection status
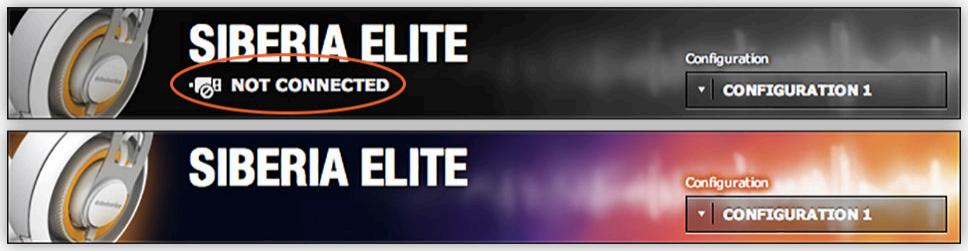
When SteelSeries Engine 3 recognizes that a device is connected, its Device Card changes from gray scale to color and the “NOT CONNECTED” icon disappears.
text_image
SIBERIA ELITE • No NOT CONNECTED Configuration ▼ CONFIGURATION 1 SIBERIA ELITE Configuration ▼ CONFIGURATION 1Configuration Dropdown Menu
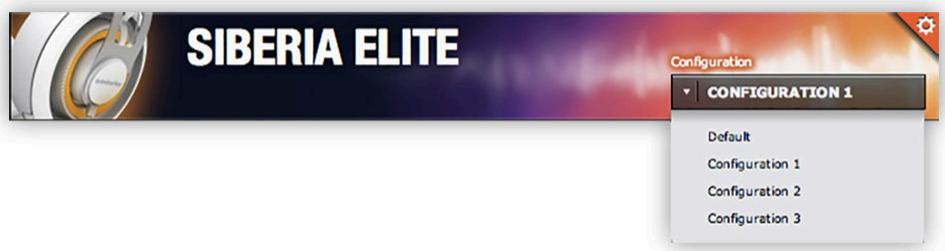
SteelSeries Engine 3 will deploy the configuration shown in the lower right when you are using games or applications that do not have other configurations assigned to them. To quickly change this configuration, select the Configuration Dropdown Menu.
text_image
SIBERIA ELITE Configuration CONFIGURATION 1 Default Configuration 1 Configuration 2 Configuration 3Hide Device
You can hide Device Cards to keep My Gear free of devices that you no longer use. To do this, hover over the device card to reveal a gear icon in the upper right corner. Select this icon and select the “Hide Device” form the dropdown menu. You can unhide the device by reconnecting it to your computer.

text_image
SIBERIA ELITE NOT CONNECTED Configuration DEFAULT Hide Device AboutAbout Device – firmware version
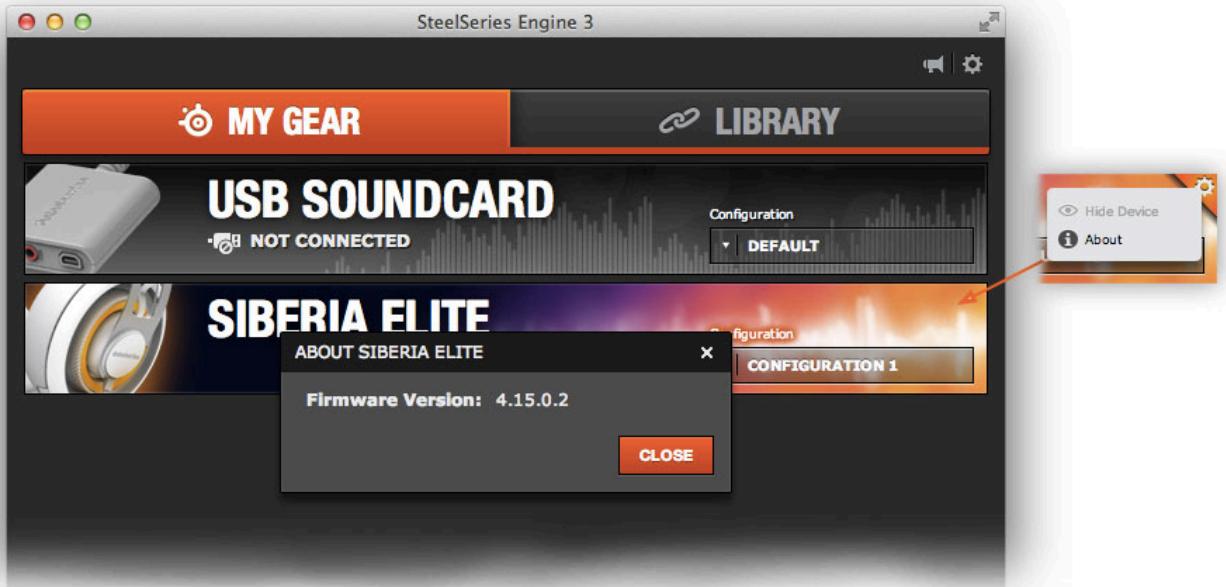
Hover over a device card to reveal the gear icon in the upper right corner. Select this icon to open a dropdown menu and select the “About” option to view the firmware version.
text_image
SteelSeries Engine 3 MY GEAR LIBRARY USB SOUNDCARD NOT CONNECTED Configuration DEFAULT SIBERIA ELITE ABOUT SIBERIA ELITE Firmware Version: 4.15.0.2 CONFIGURATION 1 CLOSE Hide Device AboutFirmware Updates
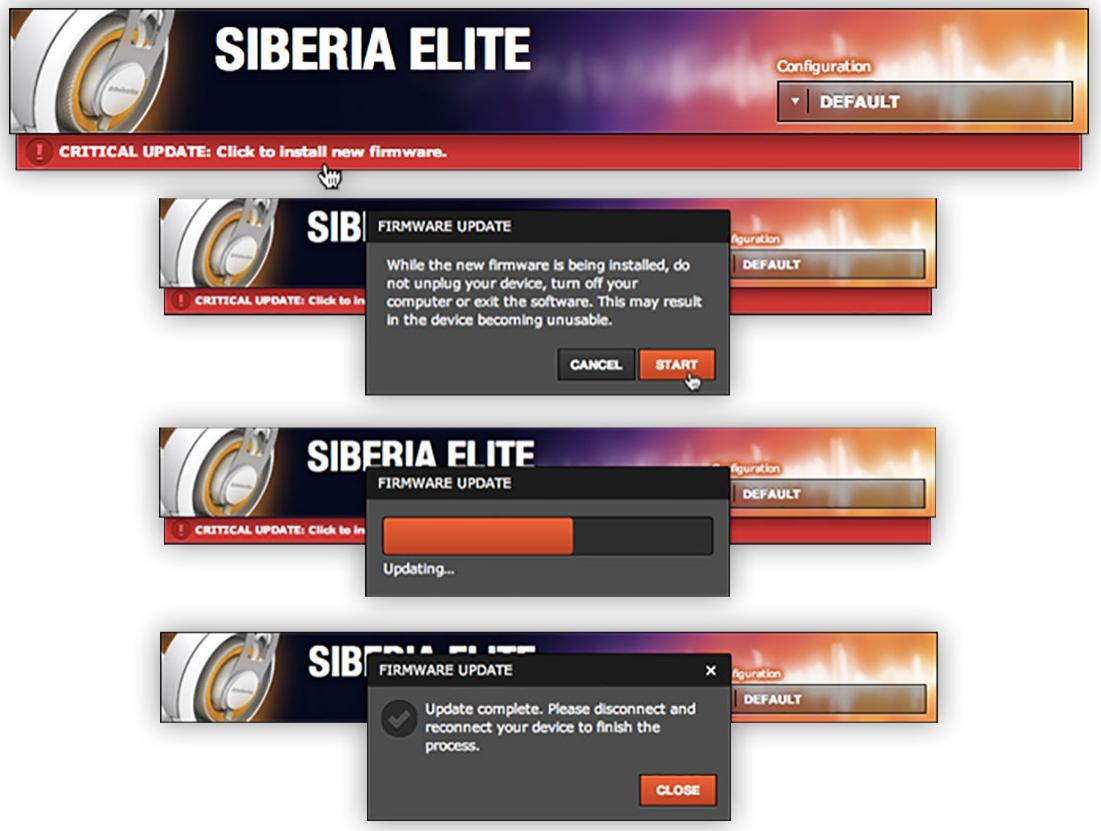
SteelSeries Engine 3 will alert you when firmware updates are available for your devices. To update firmware, select the alert, choose Start, and keep your device connected until the update is complete. Then disconnect and reconnect to finish the process.
Software Updates
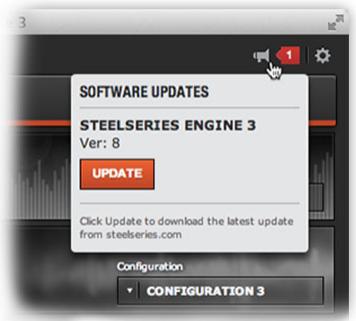
The megaphone at the top right corner of the Main Window is the Notification Icon. When it indicates that an update is available, select the icon to open the Software Updates Dropdown. Selecting Update will open SteelSeries.com in your default web browser where you can download the software update. Then install it on your computer.
text_image
SOFTWARE UPDATES STEELSERIES ENGINE 3 Ver: 8 UPDATE Click Update to download the latest update from steelseries.com Configuration CONFIGURATION 3Application Settings
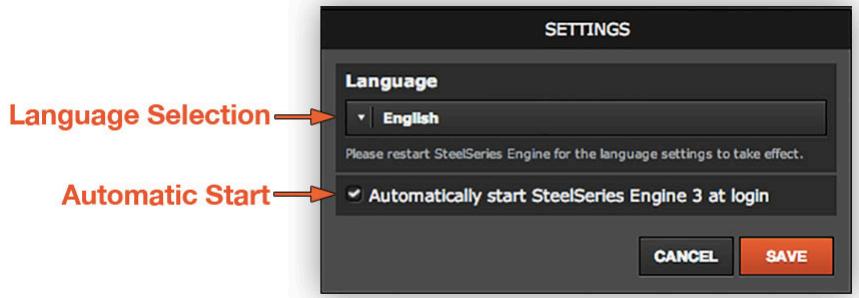
In Settings you can change languages and choose whether you want SteelSeries Engine 3 background processes to run automatically when you start-up your computer. Open Settings by selecting the gear icon at the top right corner of the Main Window.
To change languages, select a language from the dropdown, select Save, close the interface, and then reopen it (see Opening and Closing SteelSeries Engine 3).
Selecting Automatic Start will start SteelSeries Engine background processes automatically when you start-up your computer (the interface will not open). Automatically starting the background processes means that configurations will immediately be deployed to your devices without interrupting your experience.
text_image
SETTINGS Language English Please restart SteelSeries Engine for the language settings to take effect. Automatic Start Automatically start SteelSeries Engine 3 at login CANCEL SAVELibrary
Quickly set up your configurations to autolaunch with an application

text_image
GEAR LIBRARY Add Another Counter Strike... Configurations Ninjas in P... Ninjas in P... Add Another Device Diablo 3 Configurations Wizard Wizard Add Another Device Dota 2 Configurations Natus Vinc... Natus Vinc... Add Another Device Guild Wars 2 Configurations PvE Config PvE Config Add Another Device League of Legend.. Configurations FNatic FNatic Add Another Device Starcraft 2 Configurations Invictus G... Invictus G... Add Another Device World of Warcraft Configurations PvP Config PvP Config Add Another DeviceApplications
You can choose to have configurations deploy automatically whenever you use a specific game or application. Add any number of applications to your library and SteelSeries Engine 3 will seamlessly change the configurations of your devices as you switch between them.
Adding an Application
To add an application to Library, select Add An Application and browse your computer for the application. Applications are commonly stored in the Program Files folder on Windows and Applications folder on Mac OS X.
Adding a Device With a Specific Configuration
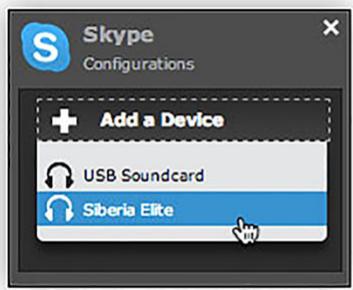
To assign a device/configuration pair to an application, select Add a Device and choose from the list of your SteelSeries devices. Then open the dropdown for that device and select the configuration you would like deployed when using this application. Each application can only be matched with one device/configuration pair.
text_image
Skype Configurations + Add a Device USB Soundcard Siberia Elite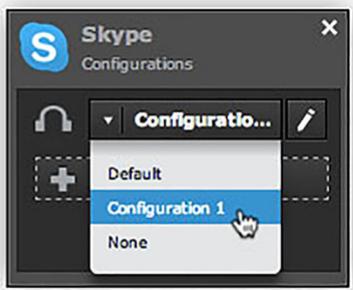
text_image
Skype Configurations Configuration... Default Configuration 1 NoneEditing Configurations from the Library
You can edit a device's configuration directly from the Library by selecting the edit button (pencil icon) next to the configuration that you want to edit. This will open the device's Configuration Window with that configuration.
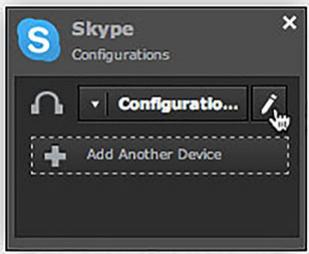
text_image
Skype Configurations Configuration... Add Another DeviceConfiguration Management
All configurations for your device in one place
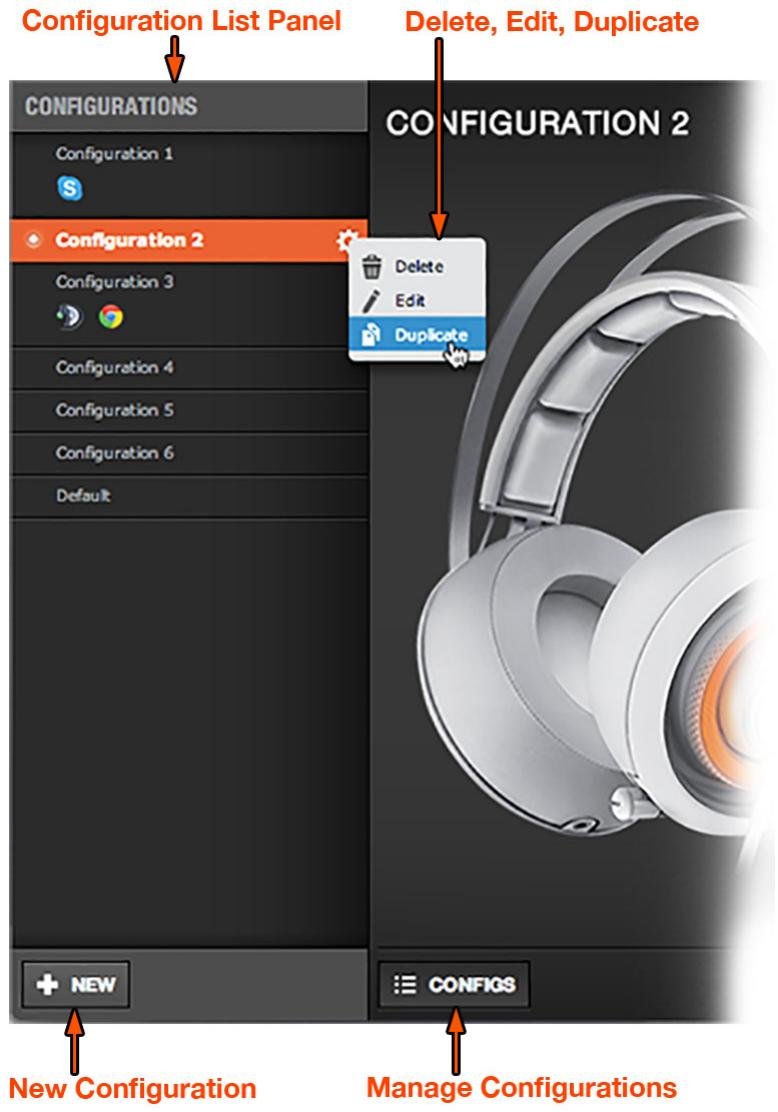
text_image
Configuration List Panel Delete, Edit, Duplicate CONFIGURATION 2 CONFIGURATION 1 Configuration 2 Configuration 3 Configuration 4 Configuration 5 Configuration 6 Default New Configuration Manage ConfigurationsConfiguration List
Configuration Windows are unique to their devices and each of them includes a collapsible Configuration List Panel of all the configurations for that device. That is opened and closed by selecting a Manage Configurations button at the bottom of each Configuration Window.
New Configuration
You can create a new configuration by selecting the New button at the bottom of the Configuration List Panel. This will open the New Configuration Window where you can enter a name and choose which applications the configuration should autolaunch with.
Adding applications to “Autolaunch” means that this configuration will automatically deploy whenever you launch or switch to one of these applications. This has the same effect as changing a device/configuration pair assignment to the application in Library. Applications can only have one device/configuration pair. Add applications by selecting the Add Application button and browse your computer for the desired application. To delete an application, select it and then select trashcan icon.
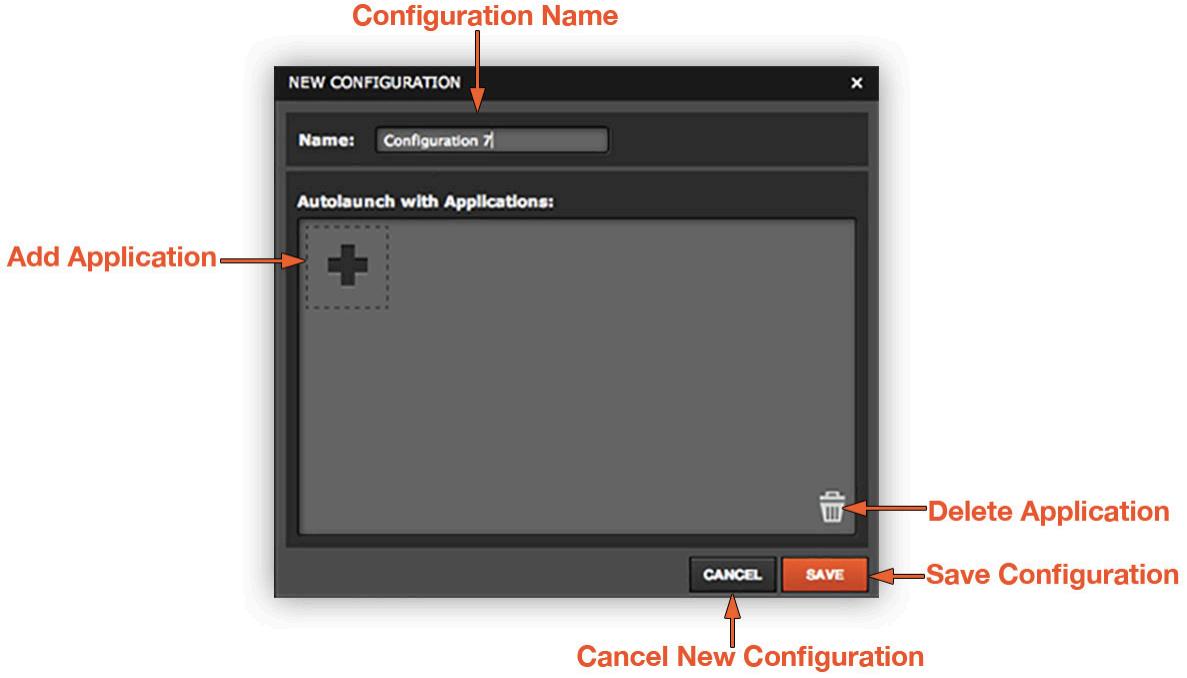
text_image
Configuration Name NEW CONFIGURATION Name: Configuration 7 Add Application Autolaunch with Applications: Delete Application Cancel Save Configuration Cancel New ConfigurationDelete
To permanently delete a configuration, hover over it, select the gear icon that appears, and select Delete from the dropdown. You will receive a confirmation window that will ask you if you are sure that you want to delete the configuration.
Edit
Rename
You can rename configurations in the Edit Configuration window. To open it, hover over the configuration, select the gear icon that appears, and select Edit from the dropdown. Enter a new name in the Configuration Name text field.
Change Autolaunch Applications
You can change which applications autolaunch your configuration in the Edit Configuration window. To open it, hover over the configuration, select the gear icon that appears, and select Edit from the dropdown. Add applications by selecting the Add Application button and browse your computer for the desired application. To delete an application, select it and then select trashcan icon. For more on autolaunch see New Configuration section.
Duplicate
To duplicate a configuration, hover over it, select the gear icon that appears, and select Duplicate from the dropdown. This creates an identical configuration and opens a window where you can give it a unique name and choose which applications it will Autolaunch with. For more on autolaunch see New Configuration section.
Configuring Your Devices
You can custom configurations for SteelSeries devices in their Configuration Windows. The top left displays the name of the configuration you are viewing, the body features widgets for customizing various functions of the device, and at the bottom are Save/Revert buttons, a Live Preview toggle, and a button to open/close the collapsible Configuration List Panel.
Save/Revert
Configuration changes are not written to the database until you select Save. This gives you freedom to experiment, knowing that you can select Revert to undo changes. Save overwrites the previous configuration with the changes. If you try to leave the Configuration Window without choosing Save or Revert, SteelSeries Engine 3 will remind you to do so.
Live Preview
Live Preview gives you the full experience of your configuration's look, feel, and sound while you are editing it. Live Preview implements all the features of your edited configuration, however, it is disrupted by switching to other applications before choosing Save or Revert. Live Preview can be turned on and off by selecting the toggle.
Common Widgets
Each widget allows you to customize a certain aspect of your device. Ones that are common to all or most SteelSeries devices are described below and others that are unique to specific devices are described in their own sections.
LED Illumination
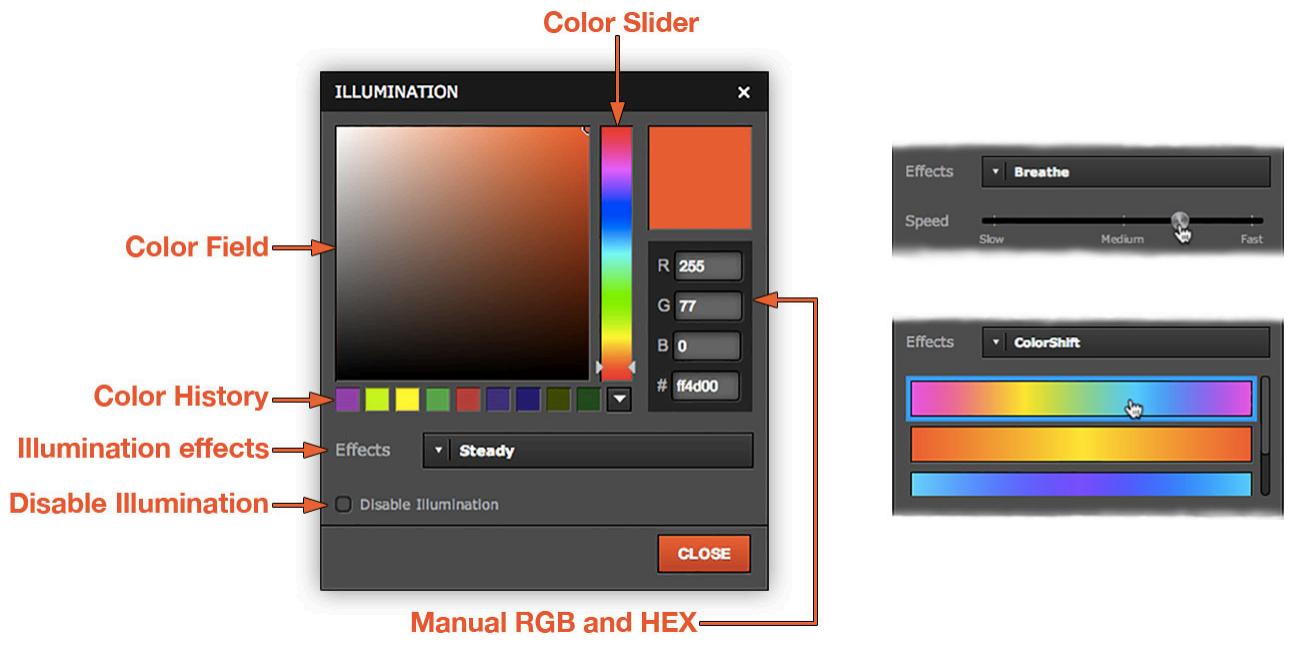
Many SteelSeries devices have LEDs that add an aesthetic wow-factor. To customize them, open the Illumination widget by selecting the LED box near the illumination zone on the device image.
Select a color by adjusting the color field and color slider or manually entering RGB and Hexadecimal values. Previous color selections are stored in the color history, which you can expand by selecting the dropdown arrow beneath the color slider.
The Effects dropdown provides lighting options. Steady holds LEDs at a constant level. Breathe fades LEDs in and out according to the Speed slider. ColorShift fades the color of the LEDs through one of different preset color spectrums. You can also disable the LEDs by selecting Disable Illumination. Some Headsets have an additional effect called Audio Volume Trigger, which brightens LEDs in response to audio volume.
text_image
Color Slider ILLUMINATION Color Field R 255 G 77 B 0ff4d00
Color History Illumination effects Effects Steady Disable Illumination CLOSE Manual RGB and HEX Effects Breathe Speed Slow Medium Fast Effects ColorShiftMacro Editor
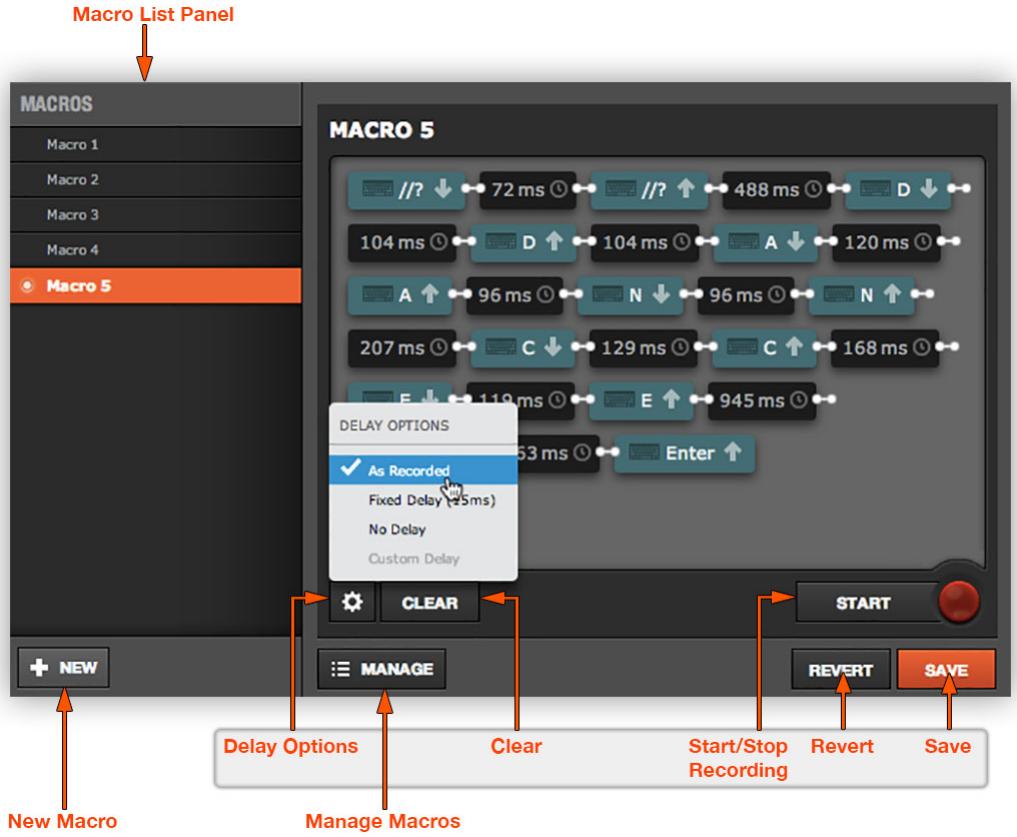
Some SteelSeries devices allow you to use macros to perform a series of actions with the click of a button. They can include any custom combination of key and button presses.
flowchart
graph TD
    A["Macro List Panel"] --> B["MACROS"]
    B --> C["Macro 1"]
    B --> D["Macro 2"]
    B --> E["Macro 3"]
    B --> F["Macro 4"]
    B --> G["Macro 5"]
    G --> H["New Macro"]
    H --> I["Delay Options"]
    I --> J["Clear"]
    J --> K["Start/Stop Recording"]
    K --> L["Revert"]
    L --> M["Save"]
    M --> N["Revert"]
    N --> O["SAVE"]
    O --> P["START"]
    P --> Q["Clear"]
    Q --> R["Clear"]
    R --> S["Clear"]
    S --> T["Clear"]
    T --> U["Clear"]
    U --> V["Clear"]
    V --> W["Clear"]
    W --> X["Clear"]
    X --> Y["Clear"]
    Y --> Z["Clear"]
    Z --> AA["Clear"]
    AA --> AB["Clear"]
    AB --> AC["Clear"]
    AC --> AD["Clear"]
    AD --> AE["Clear"]
    AE --> AF["Clear"]
    AF --> AG["Clear"]
    AG --> AH["Clear"]
    AH --> AI["Clear"]
    AI --> AJ["Clear"]
    AJ --> AK["Clear"]
    AK --> AL["Clear"]
    AL --> AM["Clear"]
    AM --> AN["Clear"]
    AN --> AO["Clear"]
    AO --> AP["Clear"]
    AP --> AQ["Clear"]
    AQ --> AR["Clear"]
    AR --> AS["Clear"]
    AS --> AT["Clear"]
    AT --> AU["Clear"]
    AU --> AV["Clear"]
    AV --> AW["Clear"]
    AW --> AX["Clear"]
    AX --> AY["Clear"]
    AY --> AZ["Clear"]
    AZ --> BA["Clear"]
    BA --> BB["Clear"]
    BB --> BC["Clear"]
    BC --> BD["Clear"]
    BD --> BE["Clear"]
    BE --> BF["Clear"]
    BF --> BG["Clear"]
    BG --> BH["Clear"]
    BH --> BI["Clear"]
    BI --> BJ["Clear"]
    BJ --> BK["Clear"]
    BK --> BL["Clear"]
    BL --> BM["Clear"]
    BM --> BN["Clear"]
    BN --> BO["Clear"]
    BO --> BP["Clear"]
    BP --> BQ["Clear"]
    BQ --> BR["Clear"]
    BR --> BS["Clear"]
    BS --> BT["Clear"]
    BT --> BU["Clear"]
    BU --> BV["Clear"]
    BV --> BW["Clear"]
    BW --> BX["Clear"]
    BX --> BY["Clear"]
    BY --> BZ["Clear"]
    BZ --> CA["Clear"]
    CA --> CB["Clear"]
    CB --> CC["Clear"]
    CC --> CD["Clear"]
    CD --> CE["Clear"]
    CE --> CF["Clear"]
    CF --> CG["Clear"]
    CG --> CH["Clear"]
    CH --> CI["Clear"]
    CI --> CJ["Clear"]
    CJ --> CK["Clear"]
    CK --> CR["Clear"]
    CR --> CS["Clear"]
    CS --> CT["Clear"]
    CT --> CU["Clear"]
    CU --> CV["Clear"]
    CV --> CW["Clear"]
    CW --> CX["Clear"]
    CX --> CY["Clear"]
    CY --> CZ["Clear"]
Recording and Editing Macros
Macro recording and editing is done using the buttons highlighted in the diagram above.
Macro Recording
You can record a new macro or rerecord by selecting Start. When the editor is recording, the red light will blink and the Start button will become a Stop button that ends recording. If you forget to select Stop, recording times-out after two minutes of inactivity. Recording will also stop when you have reached the maximum number of events.
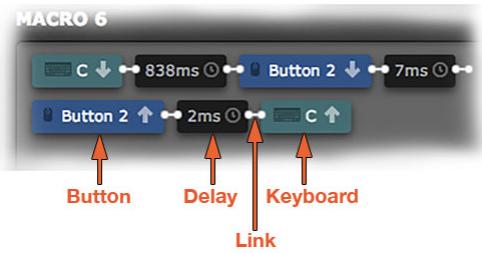
There are three different types of events: keyboard, button, and delay. Keyboard and button events come in down/up pairs (for when the key/button is pushed down and let up).
flowchart
graph LR
    A["C"] --> B["Button 2"]
    B --> C["Button 2"]
    C --> D["Button 2"]
    D --> E["838ms"]
    E --> F["Button 2"]
    F --> G["7ms"]
    G --> H["Button 2"]
    H --> I["2ms"]
    I --> J["Button 2"]
    J --> K["Button 2"]
    K --> L["Button 2"]
    L --> M["Button 2"]
    M --> N["Button 2"]
    N --> O["Button 2"]
    O --> P["Button 2"]
    P --> Q["Button 2"]
    Q --> R["Button 2"]
    R --> S["Button 2"]
    S --> T["Button 2"]
    T --> U["Button 2"]
    U --> V["Button 2"]
    V --> W["Button 2"]
    W --> X["Button 2"]
    X --> Y["Button 2"]
    Y --> Z["Button 2"]
    Z --> AA["Button 2"]
    AA --> AB["Button 2"]
    AB --> AC["Button 2"]
    AC --> AD["Button 2"]
    AD --> AE["Button 2"]
    AE --> AF["Button 2"]
    AF --> AG["Button 2"]
    AG --> AH["Button 2"]
    AH --> AI["Button 2"]
    AI --> AJ["Button 2"]
    AJ --> AK["Button 2"]
    AK --> AL["Button 2"]
    AL --> AM["Button 2"]
    AM --> AN["Button 2"]
    AN --> AO["Button 2"]
    AO --> AP["Button 2"]
    AP --> AQ["Button 2"]
    AQ --> AR["Button 2"]
    AR --> AS["Button 2"]
    AS --> AT["Button 2"]
    AT --> AU["Button 2"]
    AU --> AV["Button 2"]
    AV --> AW["Button 2"]
    AW --> AX["Button 2"]
    AX --> AY["Button 2"]
    AY --> AZ["Button 2"]
    AZ --> BA["Button 2"]
    BA --> BB["Button 2"]
    BB --> BC["Button 2"]
    BC --> BD["Button 2"]
    BD --> BE["Button 2"]
    BE --> BF["Button 2"]
    BF --> BG["Button 2"]
    BG --> BH["Button 2"]
    BH --> BI["Button 2"]
    BI --> BJ["Button 2"]
    BJ --> BK["Button 2"]
    BK --> BL["Button 2"]
    BL --> BM["Button 2"]
    BM --> BN["Button 2"]
    BN --> BO["Button 2"]
    BO --> BP["Button 2"]
    BP --> BQ["Button 2"]
    BQ --> BR["Button 2"]
    BR --> BS["Button 2"]
    BS --> BT["Button 2"]
    BT --> BU["Button 2"]
    BU --> BV["Button 2"]
    BV --> BW["Button 2"]
    BW --> BX["Button 2"]
    BX --> BY["Button 2"]
    BY --> BZ["Button 2"]
Editing and Deleting Events
You can easily make adjustments to macros by editing, inserting, or deleting events rather than rerecording them entirely. Delete events by right-clicking them in the macro editor and selecting Delete from the dropdown menu. This deletes up/down pairs and corresponding delays for key and button events. The dropdown menu for delays and keyboard events also includes Edit. Selecting this option or double-clicking the event changes it into an editable field. Type your custom value and click off the event.
Insert Delay
If you right-click on a link between non-delay events you have the option to insert a delay. The default value of this newly inserted delay is 15ms.
Delay Options
In addition to typing custom values and inserting delays there is a Delay Options menu that you can open by selecting the gear icon. Fixed Delay inserts a user-specified value for delays between all events and No Delay deletes all delays. They also alter delays while recording. As Recorded sets delays to their originally recorded values. Custom Delay becomes selected after you edit delay events, but it is disabled again after you revert these changes by selecting one of the other delay options.
Macro Management
Macro management is similar to configuration management. The collapsible Macro List Panel and New button echo configuration management. The only actions available in the Macro List Panel are creating, deleting, and renaming macros. Select New to create a new macro and right click or select the gear icon of a macro to open a menu with Delete and Rename options.
Siberia Elite Configuration Window
text_image
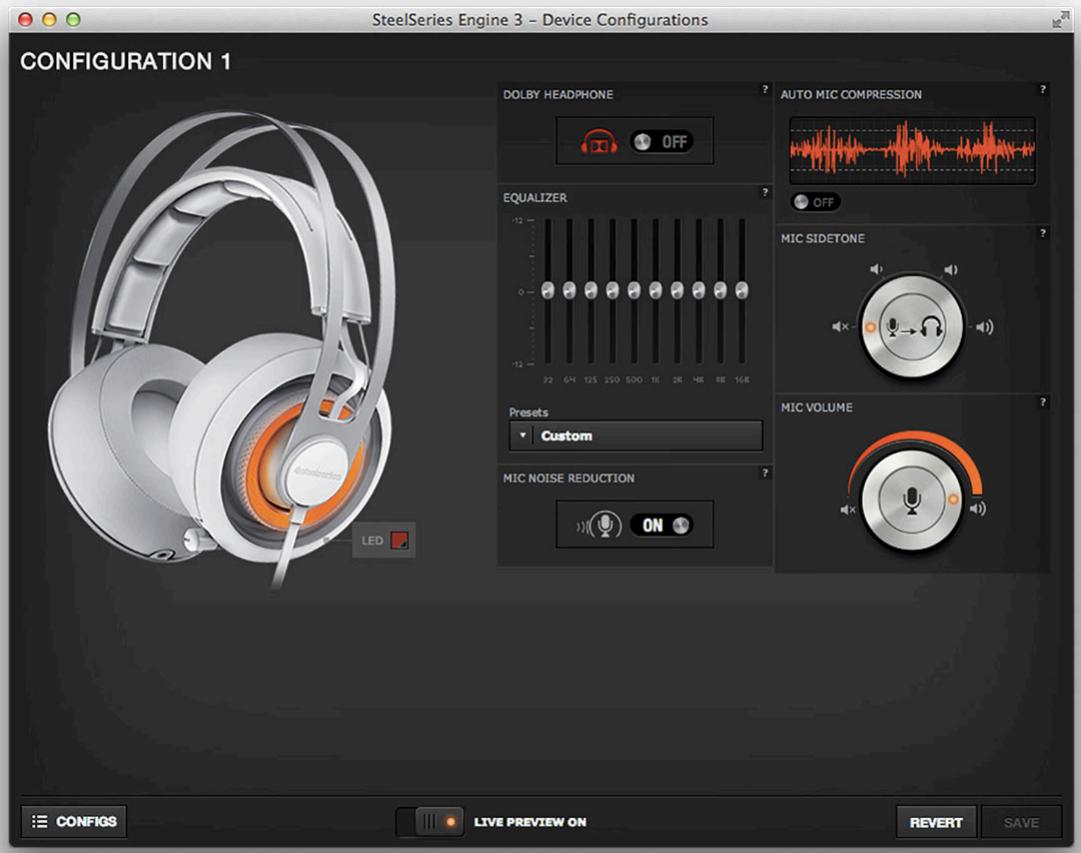
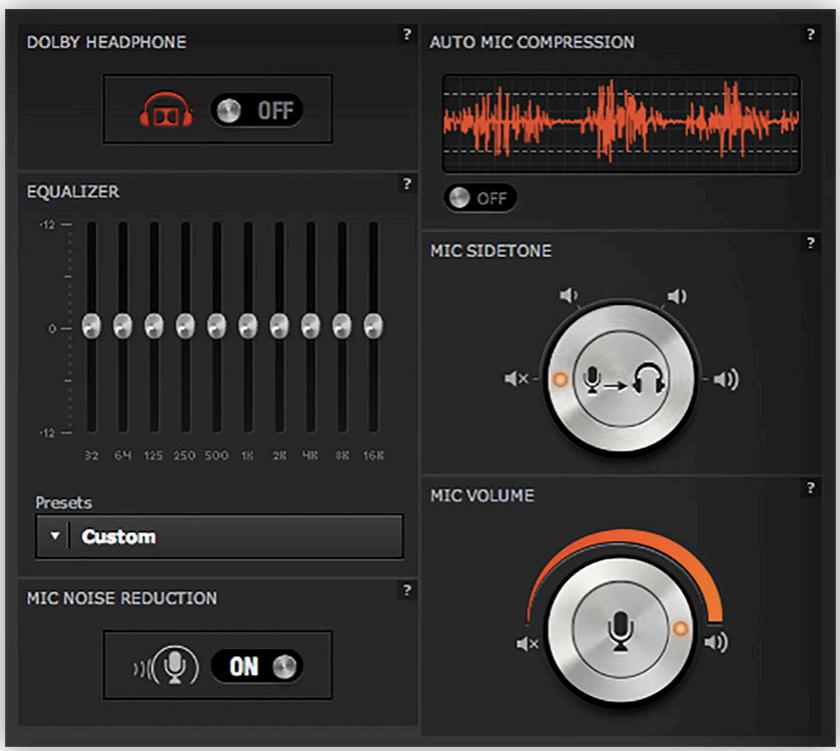
SteelSeries Engine 3 - Device Configurations CONFIGURATION 1 DOLBY HEADPHONE OFF EQUALIZER 12 0 -12 32 64 125 250 500 1K 2K 4K 8K 16K PRESets Custom MIC NOISE REDUCTION ON AUTO MIC COMPRESSION OFF MIC SIDETONE MIC VOLUME CONFIGS LIVE PREVIEW ON REVERT SAVESiberia Elite's configuration window includes unique widgets for customizing LED lighting, sound quality, and microphone settings.
Widgets
Dolby Surround Sound
The Siberia Elite provides Dolby Headphone technology for a truly unparalleled experience. As the creators describe it:
Dolby Headphone accurately creates the sensation of up to five loudspeakers in a room by using powerful digital signal processing (DSP) technology. The result is a more vibrant and natural listening experience.
For more information on Dolby technology visit the Dolby website: http://www.dolby.com/us/en/consumer/technology/home-theater/dolby-headphone.html To experience full surround sound with your Siberia Elite, you must configure your Siberia Elite soundcard to be recognized as a 7.1 channel device. To configure your soundcard to receive 7.1 channel audio, please see Appendix A: Enable Dolby or on our website FAQ: http://faq.steelseries.com/questions/511/How+do+I+enable+Dolby+on+my+SteelSeries+Headset%3F
text_image
DOLBY HEADPHONE OFF EQUALIZER 32 64 125 250 500 1K 2K 4K 8K 16K PRESets Custom MIC NOISE REDUCTION ON AUTO MIC COMPRESSION OFF MIC SIDETONE MIC VOLUMEEqualizer
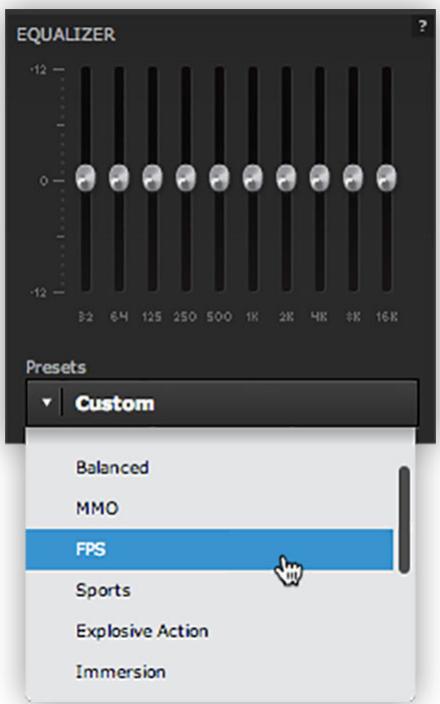
The Equalizer allows you to amplify or mute certain tones to enhance your listening experience for specific types of audio. Sound is composed of different frequencies: higher numbers correspond to higher pitched sounds; lower numbers correspond to lower pitched sounds. The Equalizer is made up of ten vertical sliders that control specific frequencies indicated by the numbers beneath the sliders. Adjust these sliders to customize the way that Siberia Elite delivers sound from each of your applications so that it enhances the specific sound profile of the content. If fine-tuning your soundscape is too time intensive, simply select one of the 11 presets for different genres of gaming or types of entertainment.
text_image
EQUALIZER Presets Custom Balanced MMO FPS Sports Explosive Action ImmersionMic Noise Reduction
Mic Noise Reduction filters out background noise and excess static, so that your voice sounds clearer.
Auto Mic Compression
Auto Mic Compression helps stabilize your microphone so that soft whispers and victorious cheers all come through at within an optimal volume range. This allows other people to hear you clearly without any extra work on your part to adjust mic distance or consciously monitor your volume level.
Mic Sidetone
Mic Sidetone softly feeds your own voice back to you through the headset, so that you know your microphone is working properly. This can be useful if gaming at an event where there is a lot of noise and you need to be certain your teammates can hear you. The Mic Sidetone widget lets you choose from three different volume levels or completely mute Mic Sidetone.
Mic Volume
The Mic Volume widget allows you to change the volume of your microphone or mute it. If your voice typically sounds especially loud or quiet in a particular game or application, you could use this widget to help you compensate when you create a configuration for it.
Rival Configuration Window
text_image
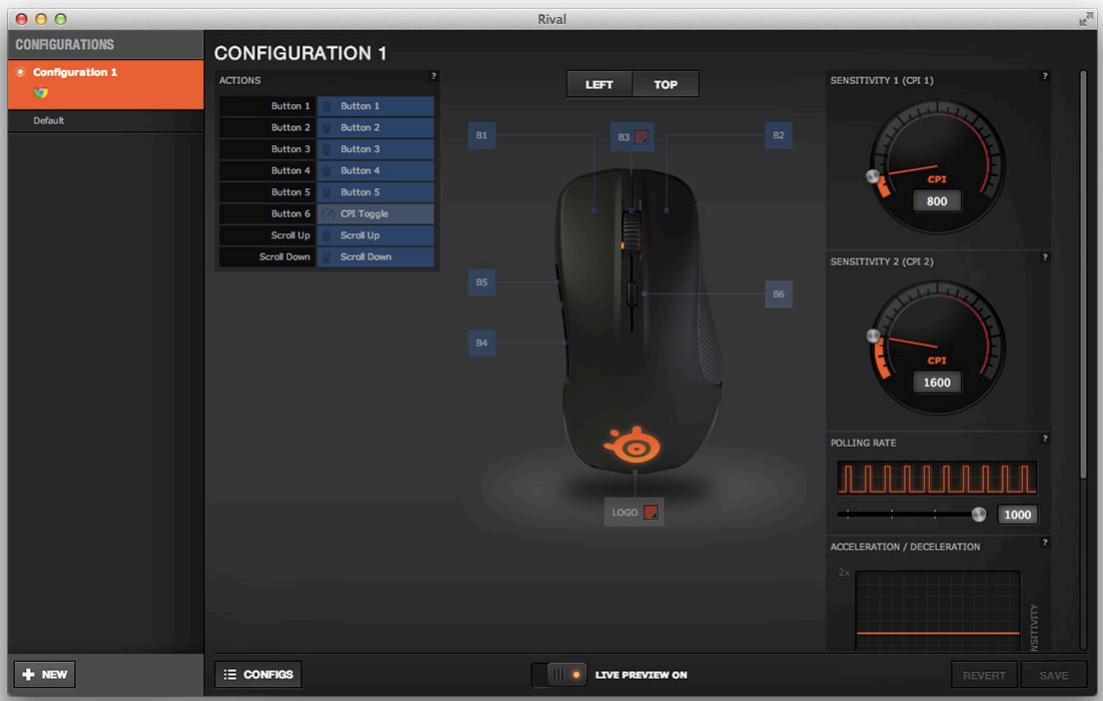
CONFIGURATIONS Configuration 1 Default Rival CONFIGURATION 1 ACTIONS LEFT TOP B1 B3 B2 SENSITIVITY 1 (CPI 1) 800 SENSITIVITY 2 (CPI 2) 1600 POLLING RATE 1000 ACCELERATION / DECELERATION LOGO NEW CONFIGS LIVE PREVIEW ON REVERT SAVERival's configuration window includes widgets for customizing mouse sensitivity, mouse/computer communication, and auto-correction for horizontal and vertical paths.
Widgets
Sensitivity (CPI 1 & 2)
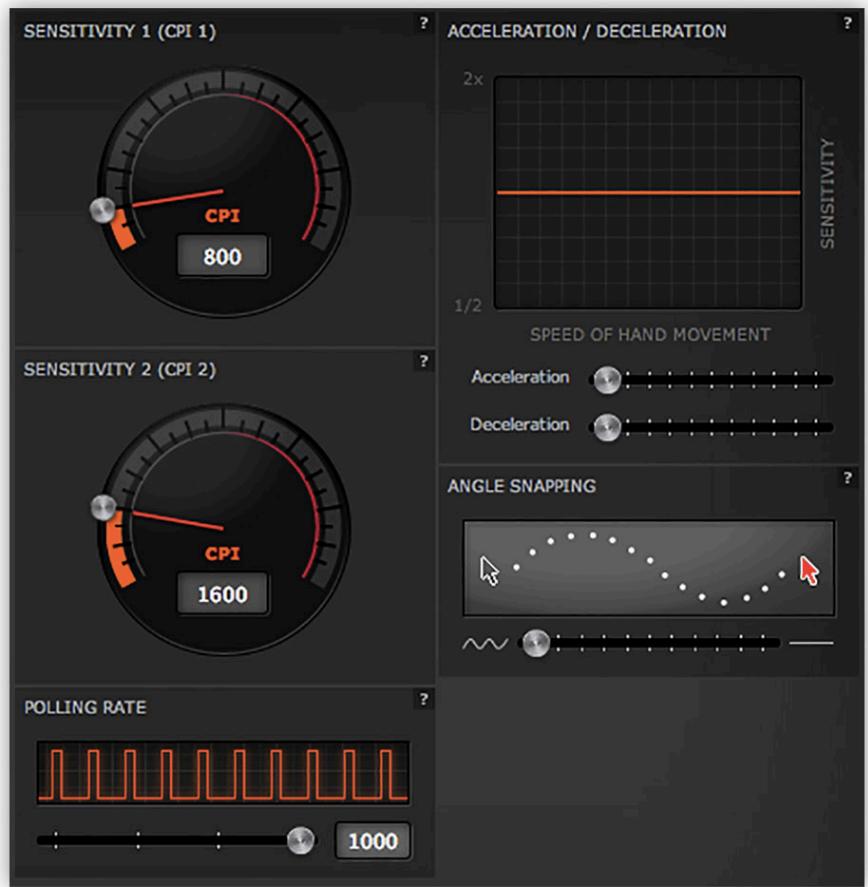
Rival has two sensitivity widgets so that you can switch between mouse sensitivities using the CPI toggle (Button 6 by default) in order to perform specialized tasks. Mouse sensitivity is measured in CPI (counts per inch), which refers to how far the cursor on the screen moves relative to the distance the mouse moves. Higher CPIs represent higher sensitivity.
Polling Rate
Polling rate refers to how often your mouse and computer communicate. Typically you want to set the polling rate as high as possible, but if your computer is particularly slow decreasing your polling rate may alleviate some of the strain on your computer.
Acceleration/Deceleration
By analyzing your hand movement speed SteelSeries Engine 3 can determine if you want your cursor to fly across the screen or move with great precision. When hand movement is especially fast, acceleration kicks in and multiplies the CPI of your Sensitivity setting by the factor set in your Acceleration widget. This makes your cursor move faster relative to your hand movement. The opposite happens when your hand movement is particularly slow.
Angle Snapping
Angle Snapping corrects minor imperfections when you try to move your mouse in straight horizontal or vertical paths. This can increase precision if you are simultaneously turning and shooting in a first person shooter or drawing lines in a graphics editing application.
LED Illumination
Many SteelSeries devices have LEDs that you can aesthetically personalize by color and illumination effect. Rival has two illumination zones: the Logo and Button 3/scroll wheel. You can change their appearances individually or set them to match. For more on the LED widget see LED Illumination in the Common Widgets section of Configuring Your Devices.
Button Actions
SteelSeries Engine 3 provides a convenient interface for changing the actions bound to your Rival mouse buttons.
Actions List and Changing Actions
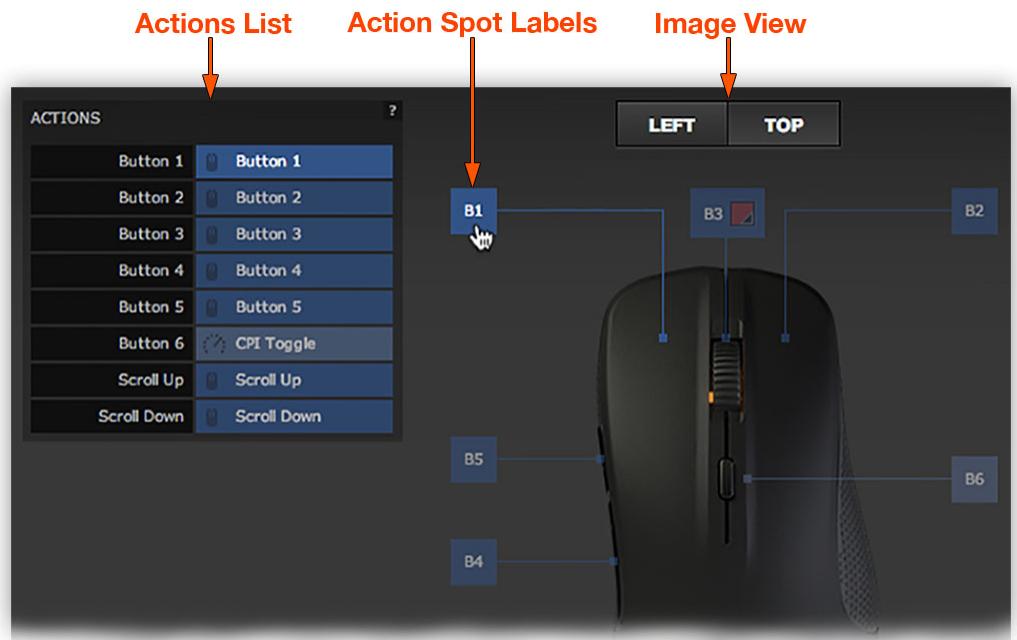
In the Action List, Rival mouse buttons are in the left column and actions they are bound to in the right. To change button bindings, open the Quickset Toolbar by selecting the action or its corresponding Action Spot Label. Hovering over either highlights the other. Notice that you can view the Rival from multiple angles using the Image View buttons.
text_image
Actions List Action Spot Labels Image View ACTIONS B1 LEFT TOP B3 B2 B5 B6 B4Quickset Toolbar
To change button bindings, open the Quickset Toolbar by selecting the action or its corresponding Action Spot Label. Hovering over either highlights the other. Select the button or keyboard action's type in the Quickset Toolbar's dropdown and then find it in the list that appears. You can deactivate buttons by selecting Deactivate in the dropdown.

text_image
Use dropdown to switch between these menus in Quickset Toolbar Mouse Buttons Button 1 Button 2 Button 3 Button 4 Button 5 Button 6 CPI Toggle Scroll Up Scroll Down CANCE Cancel Done Keyboard Buttons Quick Record ALPHANUMERIC NUMPAD FUNCTION MODIFIERS SYMBOLS NAVIGATION ARROWS EDITING TYPING MODE COMMANDS Media Buttons Mute Next Play/Pause Previous Volume Up Volume Down Deactivate CANCEL DONE CANCEL Cancel DoneQuickset Macros
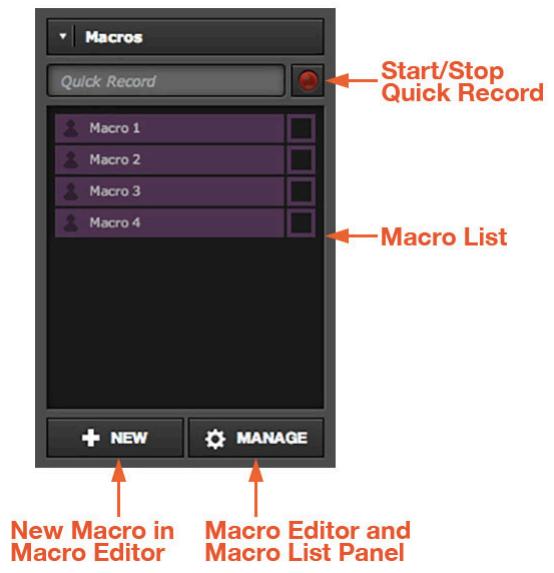
The Macros option in Quickset Toolbar lets you create custom actions with multiple events. For short macros, use the Quick Record box to record by selecting the red light to start/stop recording. For longer Macros, use the macro editor by selecting New, which will open the Macro Editor and create a new macro. To edit, rename, or delete macros select Manage. For more information, see Macro Editor section.
text_image
Macros Quick Record Macro 1 Macro 2 Macro 3 Macro 4 + NEW MANAGE Start/Stop Quick Record Macro List New Macro in Macro Editor Macro Editor and Macro List PanelThank you for downloading SteelSeries Engine 3.
Appendix A: Enabling Dolby
Taking advantage of Dolby Surround 7.1 is a two-step process - enable it in your operating system and enable it in the SteelSeries Engine 3.
Windows
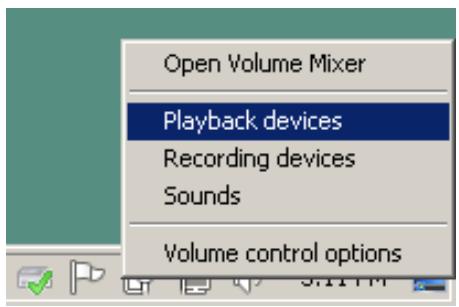
- On the desktop right click on the volume control icon and select "Playback Devices"
text_image
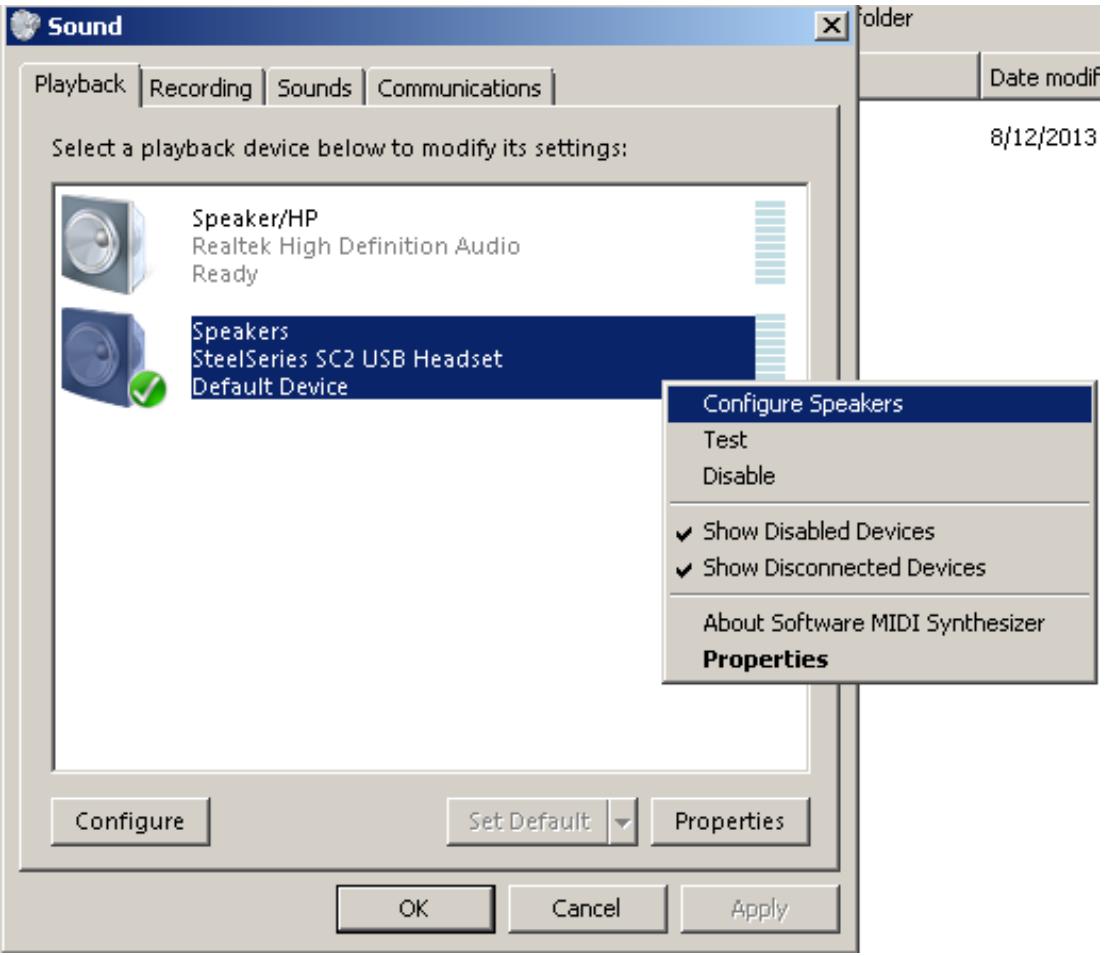
Open Volume Mixer Playback devices Recording devices Sounds Volume control options- Right click on the sound card and select "Configure Speakers".
text_image
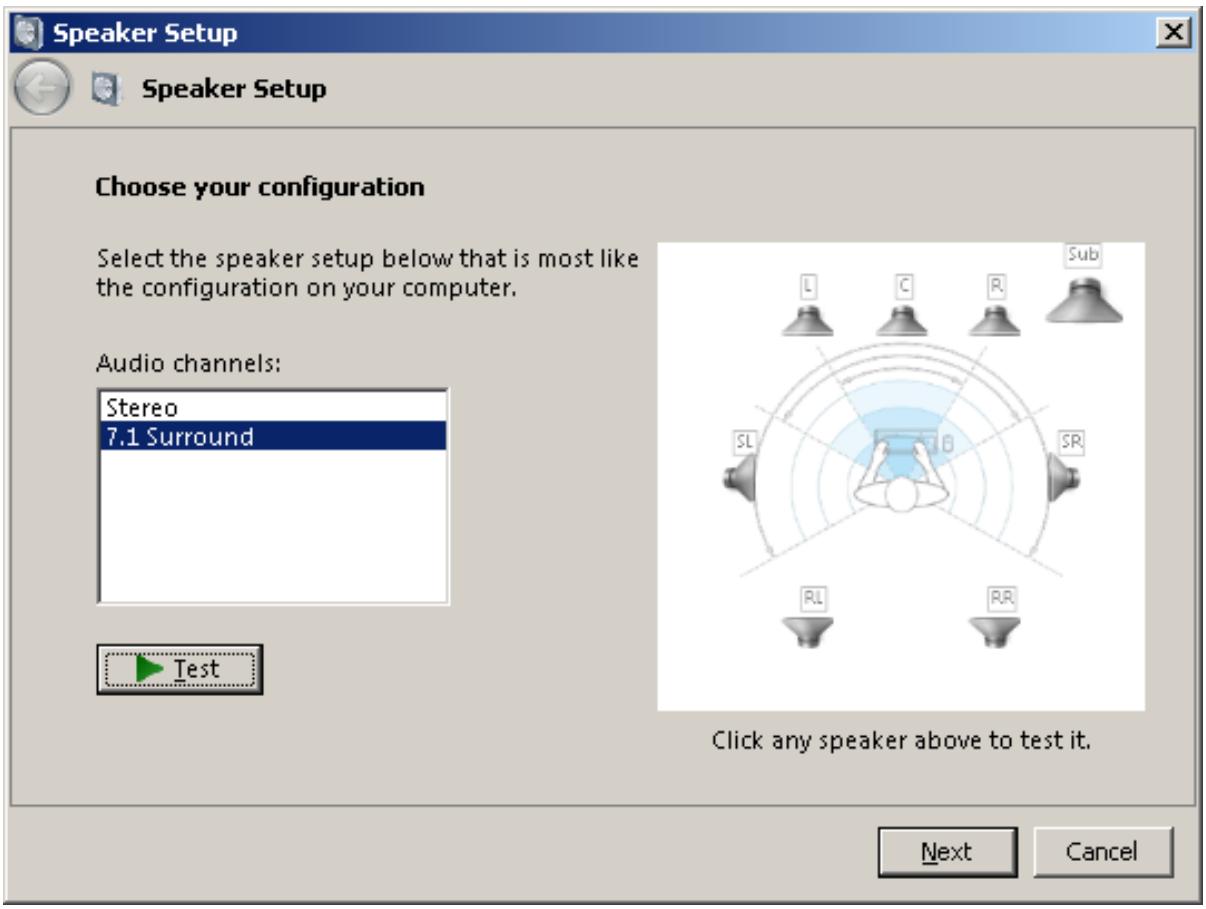
Sound Playback Recording Sounds Communications Select a playback device below to modify its settings: Speaker/HP Realtek High Definition Audio Ready Speakers SteelSeries SC2 USB Headset Default Device Configure Speakers Test Disable ✓ Show Disabled Devices ✓ Show Disconnected Devices About Software MIDI Synthesizer Properties Configure Set Default Properties OK Cancel Apply 8/12/2013 Folder Date modif- Select "7.1 Surround." On this screen you can also test the speakers if you want. Otherwise proceed by pressing "Next" and finish the setup.
text_image
Speaker Setup Speaker Setup Choose your configuration Select the speaker setup below that is most like the configuration on your computer. Audio channels: Stereo 7.1 Surround Test Click any speaker above to test it. Next CancelMac
- Open the program “Audio MIDI Setup” in the Utilities folder under Applications. Or use Spotlight to search for Audio MIDI Setup by name.
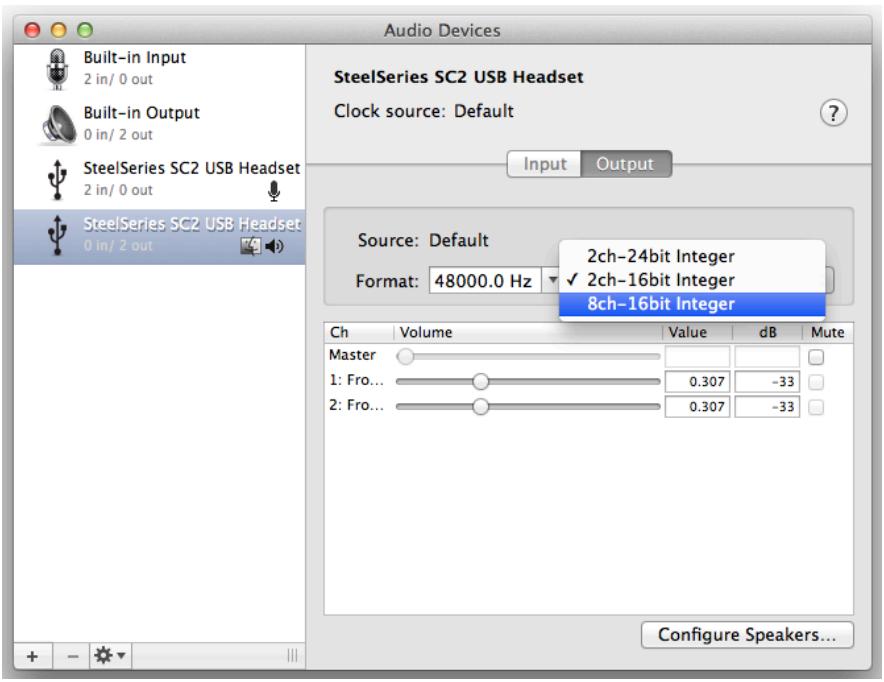
- With SteelSeries SC2 USB Headset selected on the sidebar (the one that says 2 out underneath) select "8ch-16bit Integer" in the drop down menu to the right.
text_image
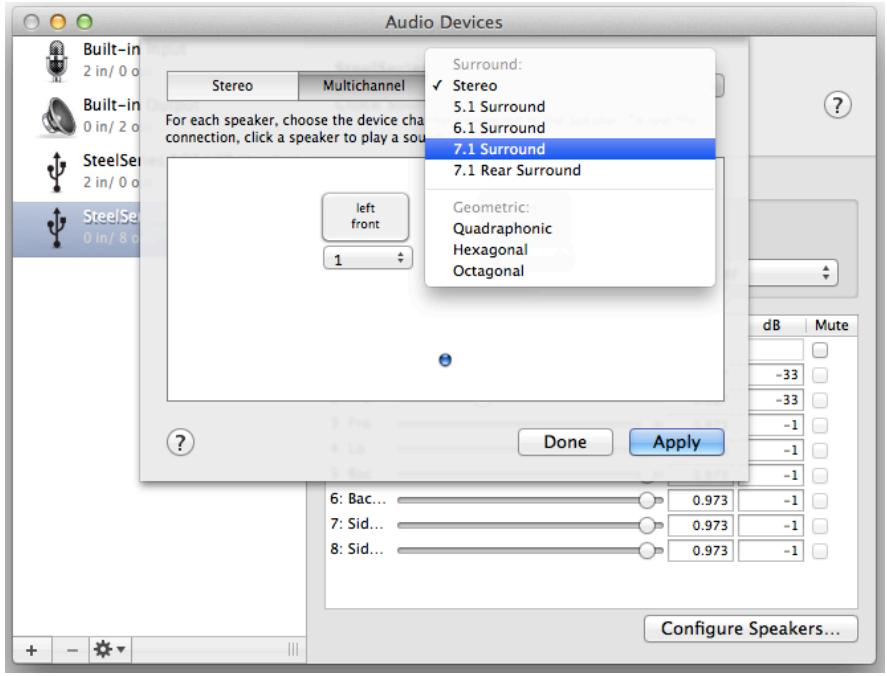
Audio Devices Built-in Input 2 in/ 0 out Built-in Output 0 in/ 2 out SteelSeries SC2 USB Headset 2 in/ 0 out SteelSeries SC2 USB Headset 0 in/ 2 out SteelSeries SC2 USB Headset Clock source: Default Input Output Source: Default 2ch-24bit Integer Format: 48000.0 Hz ✓ 2ch-16bit Integer 8ch-16bit Integer Ch Volume Value dB Mute Master 1: Fro... 2: Fro... 0.307 -33 0.307 -33 Configure Speakers...- Now press the “Configure Speakers...” button in the bottom-right of the window. On the screen that drops down click “Multichannel” and select “7.1 Surround”
text_image
Audio Devices Built-in 2 in/ 0 o Built-in 0 in/ 2 o SteelSe 2 in/ 0 o SteelSe 0 in/ 8 o Stereo Multichannel For each speaker, choose the device cha connection, click a speaker to play a sour left front 1 Surround: ✓ Stereo 5.1 Surround 6.1 Surround 7.1 Surround 7.1 Rear Surround Geometric: Quadraphonic Hexagonal Octagonal Done Apply 6: Bac... 7: Sid... 8: Sid... 0.973 0.973 0.973 -1 -1 -1 -1 -33 -33 -1 -1 -1 -1 -1 -1 -1 Configure Speakers...- Now you can arrange and test the speakers if you want or you can press "Apply" then "Done" to finish.
