
ATC MINI ACT.CAM. HD - Caméra sportive OREGON SCIENTIFIC - Notice d'utilisation et mode d'emploi gratuit
Retrouvez gratuitement la notice de l'appareil ATC MINI ACT.CAM. HD OREGON SCIENTIFIC au format PDF.


| Type de produit | Caméra sportive |
| Marque | Oregon Scientific |
| Modèle | ATC MINI ACT.CAM. HD |
| Dimensions | 30 (H) x 30 (L) x 82 (P) mm |
| Poids | 75 g (avec batterie) |
| Alimentation | Batterie rechargeable LiPo 3,7 V / 445 mAh |
| Consommation électrique | 0,92 W |
| Résolution vidéo | 720p (1280 x 720 pixels) à 30 images/s |
| Résolution photo | 1,3 mégapixels |
| Champ de vision | 110° |
| Format vidéo | AVI |
| Audio | Mono |
| Interface USB | USB 2.0 |
| Étanchéité | Jusqu’à 20 m (avec batterie correctement installée) |
| Résistance aux chocs | Oui (résistant, non incassable) |
| Support carte mémoire | MicroSD (non incluse) |
| Montage | Fixation rapide, trépied, casque, surf, guidon (accessoires vendus séparément) |
| Fonctions principales | Enregistrement vidéo, photo unique, rafale (9 photos), visualisation sur écran |
| Systèmes d’exploitation compatibles | Windows XP/Vista/7, Mac OS X 10.6 ou supérieur |
| Entretien | Nettoyer l’objectif avec un chiffon doux ; ne pas démonter |
| Sécurité | Éviter les températures extrêmes ; ne pas court-circuiter la batterie ; ne pas utiliser de batterie endommagée |
FOIRE AUX QUESTIONS - ATC MINI ACT.CAM. HD OREGON SCIENTIFIC
YYYY.MM.DD
hh:mm:ss
xxHz
Remplacez YYYY par l’année, MM par le mois, DD par le jour, hh:mm:ss par l’heure (24h), et xx par la fréquence secteur (50 ou 60 Hz). Insérez la carte et allumez la caméra pour mettre à jour la date et l’heure.
Questions des utilisateurs sur ATC MINI ACT.CAM. HD OREGON SCIENTIFIC
0 question sur cet appareil. Repondez a celles que vous connaissez ou posez la votre.
Poser une nouvelle question sur cet appareil
Téléchargez la notice de votre Caméra sportive au format PDF gratuitement ! Retrouvez votre notice ATC MINI ACT.CAM. HD - OREGON SCIENTIFIC et reprennez votre appareil électronique en main. Sur cette page sont publiés tous les documents nécessaires à l'utilisation de votre appareil ATC MINI ACT.CAM. HD de la marque OREGON SCIENTIFIC.
MODE D'EMPLOI ATC MINI ACT.CAM. HD OREGON SCIENTIFIC
ATKMini
ACTION CAMERA
User Manual
Smart Living
Item No.: ATCMini
Oregon Scientific, Inc.
19861 SW 95th Avenue
Tualatin, OR 97062, USA
Hotline: 1-800-853-8883
Service: http://us.oregon scientific.com/service
Website: http://us.oregonscientific.com
Oregon Scientific (UK) Limited
Unit 1, Switchback, Gardner Road
Maidenhead, Berkshire SL6 7RJ, UK
Tel: 441628580154
Fax: 441628634981
Website: www.oregonscientific.co.uk
Email: technical@oregonuk.com
Oregon Scientific Australia Pty Limited
85 George St, Parramatta, NSW 2150
Australia
Hotline number: 61 1 300 300 155
Email: info@oregon scientific.com.au
Website: www.oregonscientific.com.au
Contents
Precautions
Camera. 2
Battery 3
Waterproof 4
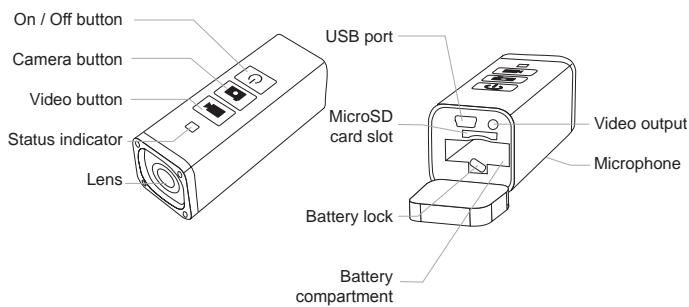
Operating Elements
Main Unit 5
Battery Installation and Charging 6
Date and Time Setting 7
MicroSD Card Insertion and Formatting 8
Operation
Main Buttons 9
Connecting to Monitor 10
On-Screen Menu 11
On-Screen Menu Index & Connecting to Computer 12
Table of Indications 13
Mounting
Basic and Tripod Mounting. 14
Other Mounting Options 15
Specification 16
FCC Compliance Statement 17
Disclaimer 18-19
Advanced Mounting
Vented Helmet Mount. 20
Surf Mount 21
Hardshell Helmet Mount. 22
Handlebar Mount 23
ATC Conversion Set. 24
Precautions - Camera
Notice the following guidelines when using your camera
The camera is shock resistant, not shock proof.
- Do not let operating the camera distract you from your immediate surrounding.
- Do not place the camera in areas prone to dust or damp for long periods of time. This may cause a fire or an electric shock.
- Do not leave the camera in places exposed to extremely high temperatures, such as under direct sunlight, for long periods of time. This may affect the camera housing and internal components.
- Clean the lens with a soft cloth to remove fingerprints or dust.
- Do not disassemble the camera.
- Turn the camera off before removing the rechargeable battery or the MicroSD card. The card and the data may be damaged if the MicroSD card is inserted or removed while the camera is still on.
- Remove the rechargeable battery and the MicroSD card before storing the camera for long periods of time. Keep it in a well-ventilated place to prevent mould.
- Shielded USB cable and RCA cable with ferrite must be used with this unit to ensure compliance with the class B FCC limits.
Precautions - Battery
If the rechargeable battery is mishandled, it can burst, cause a fire or even chemical burns. Observe the following cautions:
- Never charge the battery around or in area of any inflammable materials.
- Do not incinerate or dispose of the battery in fire.
- Do not short circuit and do not allow metal objects to come into contact with the battery terminals.
- Do not expose the battery to extreme temperatures below 0^ (32^) or above 40^ (104^) .
- Keep the rechargeable battery out of the reach of small children.
- Do not crush or dismantle the rechargeable battery or expose it to any shock or force such as hammering, dropping or stepping on it.
Always inspect batteries before charging. - Never use or charge a LiPo battery with any damage, swelling or disfigurement.
- Never charge LiPo battery unattended.
- Replace the battery only with the same type recommended by Oregon Scientific.
- Only charge the battery via the main unit.
CAUTION
There is a risk of explosion if you replace the battery with an incorrect type. Dispose of used batteries according to your local environmental guidelines. Do not puncture, drop, or incinerate the battery.
Precautions - Waterproof
- The camera is waterproof up to 20m (60ft). Oregon Scientific will not assume any responsibility for camera malfunction caused by liquid entering the camera as a result of misuse by the user. Liquid may get inside the camera if the battery cover is not firmly closed.
If the camera gets wet, wipe the liquid off as soon as possible with a dry cloth. - Other camera accessories may not be waterproof.
- Don't use the camera in extreme temperatures as this may cause the camera to malfunction.
Waste electrical and electronic equipment

The crossed-out wheeled bin indicates the product needs to be disposed of separately and not as domestic waste.
Battery disposal

Do not dispose of used batteries with domestic waste.
Notes on copyright:
Users are asked to note that the transfer of memory containing photos or data protected under copyright laws is only permissible within the restrictions imposed.
Users assume all responsibility in the event that copyrights are violated by the use of this camera.
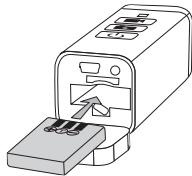
Operating Elements - Battery Installation & Charging
- Insert the provided battery to the battery compartment. The metal contacts should face toward the camera.
- Lever the latch to pull the battery out.

Make sure the battery is locked in place.
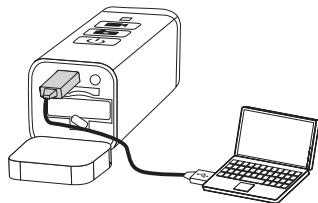
- Connect the camera to a USB port through USB cable. The status indicator will flash green and red alternately and two beeps will be generated.
- When charging is finished, the status indicator turns green and a long beep will be generated. Remove the camera from the USB port.

Recharge the battery when the status indicator flashes green. The battery is low.
Please fully charge the battery before first use.
Operating Elements - Date & Time Setting
- Create SETTINGS.txt file with Notepad (Windows) or TextEdit (Mac).
- Type in the predicted time when you insert the MicroSD card in the following format*
YYYY.MM.DD
hh:mm:ss
xxHz
Please note that both filename and the content are case sensitive.
- Save the .txt file in the root folder of the MicroSD card.
-
Insert the MicroSD card and turn on the ATCMini, the camera will be updated the date and time.
-
YYYYY = year; MM = month; DD = day;
hh = hour in 24-hour format; mm = minute; ss = second;
xx = local mains frequency (50Hz or 60Hz).

Note on mains frequency
Input the correct local mains frequency. The shutter frequency will match the local mains frequency to reduce banding and flicker effect while recording under certain types of lighting, such as fluorescent or mercury vapour lamp.
If you are uncertain about the local mains frequency, test both 50Hz and 60Hz and choose the one that produces the best results.
Operating Elements - MicroSD Card Insertion & Formatting
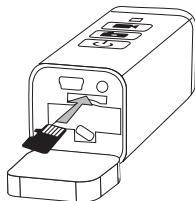
MicroSD card insertion
- Insert the MicroSD card until it clicks into place, the metal contacts should be facing upward.
- To remove the MicroSD card, push it further into the camera and it will spring out from the camera for being pulled out.

Insert or remove the MicroSD card only when the camera is turned off.
MicroSD card formatting
- Press and hold to turn on the camera.
- Press and hold l , l and to format the MicroSD card.
- Press after the beep to confirm. The status indicator flashes in blue and red alternately.
- When formatting is finished, the camera will give two beeps and the status indicator will light green.

When the available memory of MicroSD card is less than 10% , the status indicator flashes blue.
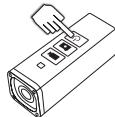
Operation - Main Buttons
Video recording
Press to start.
Press the button again to stop.
Camera beeps once and status indicator turns red.

RED
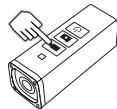
Photo shooting
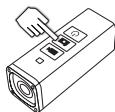
Single mode:
Press to take one photo.
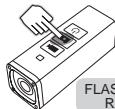
Continuous mode:
Press and hold to take 9 photos consecutively.
Camera beeps and status indicator flashes red whenever a photo is taken.

FLASHES RED
Power on / Off
Press and hold to turn on / off the camera.
Operation - Connecting to Monitor
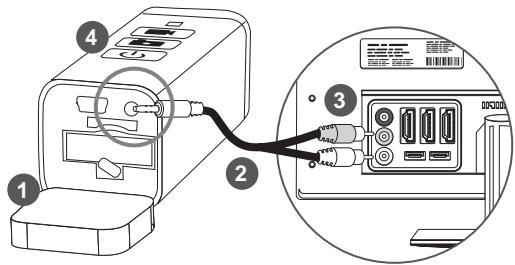
- Open the rear part of camera.
- Insert the 2.5mm stereo plug to the camera video output.
- Connect the RCA plugs to the monitor, yellow plug to video input and white plug to audio input.
- Turn on the camera.
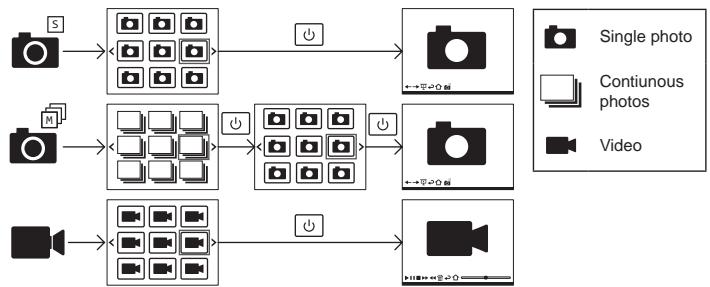

After the start up screen, the home page will appear will the four icons, , , and
- Use or to navigate and to confirm / select.
- The toolbar hides automatically when no button is pressed for 2 seconds. Press any buttons to show the toolbar again.
Operation - On-Screen Menu index & Connecting to Computer
On-Screen Menu Index
| On-screen icon | Function |
| Video | |
| Single photo | |
| Continuous photos | |
| Delete all files | |
| ← | Previous |
| → | Next |
| On-screen icon | Function |
| Slide show | |
| ✓ | Confirm |
| × | Cancel |
| ▲ | Play |
| II | Pause |
| ■ | Stop |
| On-screen icon | Function |
| ▶ | Fast forward |
| ← | Rewind |
| Delete | |
| → | Return |
| Return to homepage | |
| Delete selected file |
Connecting to a computer with Windows operating system
- Connect the camera to a computer with the provided USB cable.
- Turn on the camera. The computer will recognise the camera as a "removable disk".
- Open the "DCIM" folder of the removable disk.
- Double click on a file to open it.
Connecting to a Mac
Connect the camera to a Macintosh with the provided USB cable and then turn on the camera.
The Macintosh will recognise the camera automatically as an external hard drive.
Please note that in order to completely remove the deleted files from the MicroSD card, empty the trash before ejecting the camera.
Table of Indications
| Conditions | Indicator Color | Sound |
| Battery Charging | ||
| Camera connected with USB cable | Flashes Green / Red | 2 beeps |
| Finished battery charge | Green | Long beep |
| MicroSD Card | ||
| Memory is less than 10% memory | Flashes blue | -- |
| Finished card format | Green | 2 beeps |
| Camera Operating | ||
| Video recording | Red | 2 beeps |
| Photo shooting in continuous mode | Flashes red | 1 beep |
Basic mounting
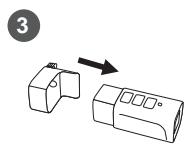
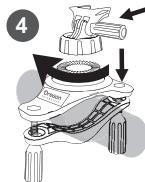
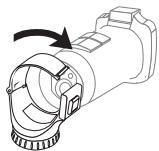
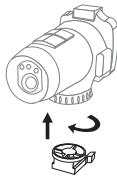
- Insert the camera to the quick release bracket.
- Tighten the screw to secure the camera.
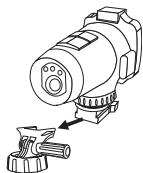
- The quick release bracket can be attached to different mounts.
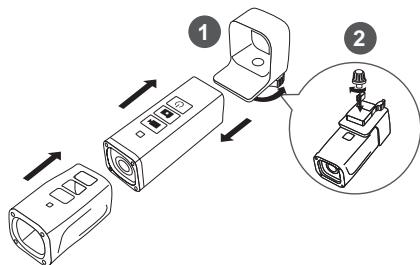
Tripod Mounting
Slide the quick release bracket to the tripod mount.
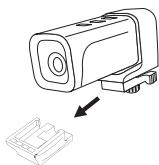
Mounting - Other Mounting Options
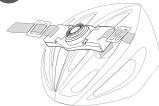
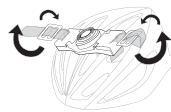
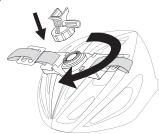
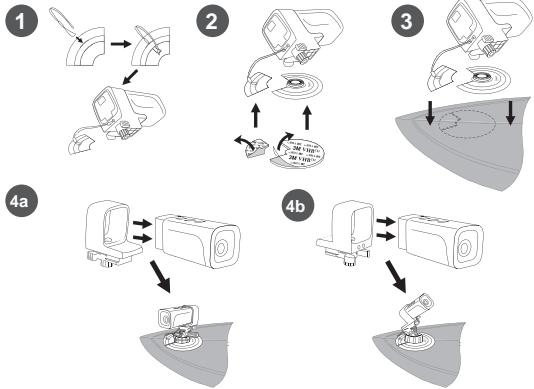
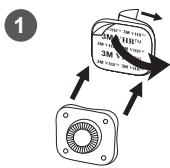
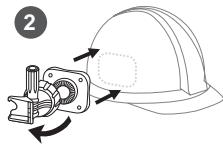
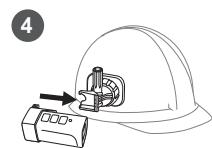
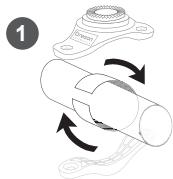
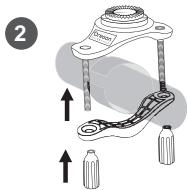
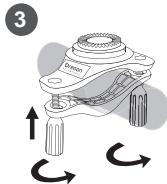
The camera can be mounted on hardshell helmet, surfboard or handlebar of bicycle or motorcycle with designated mounts.
Other cameras from the ATC series can also utilise those mounts through conversion set. The camera grip of the ATC conversion set can be used for ATC3K & ATC9K. ATC5K users can make use of the existing ATC5K grip along with the ATC conversion set's quick release to work with our new mounting series.
Mounting instructions can be found in the "Advanced Mounting".
Optional mounts and conversion set are sold separately.

Mountings warnings
Make sure the mounting is secure before embark.
- Do not modify the mounting object structurally to mount the camera.
Clean the mounting surface before applying the adhesives.
- Apply the adhesives at room temperature (18^ 38^) .
- Leave the mount unloaded for 72 hours to strengthen the bond.
- Do not use abrasive powders or solvents, such as benzene or thinner to clean the product.
Specification
| Power consumption: | DC3.7V; 0.92W |
| Battery | 3.7V LiPo; 445mAh / 1.65Wh |
| Photograph resolution | 1.3 MP |
| Field of view | 110° |
| Video format | AVI |
| Video quality* | 720p (1280 x 720 pixels); 16:9; 30fps; ~8Mbit/s data rate, approximately 15 minutes of video per 1 Gbyte |
| Audio format | Mono |
| USB interface | USB 2.0 |
| Operating systems | Windows XP / Vista / Windows 7 or Apple Mac OS X 10.6 or above |
| Dimensions | 30 (H) x 30 (W) x 82 (L) mm |
| Weight | 75g with battery, excluding quick release and mounts |
- 720p video playback is only available with computer playback.
FCC Compliance Statement
This device complies with part 15 of the FCC Rules. Operation is subject to the following two conditions: (1) This device may not cause harmful interference, and (2) this device must accept any interference received, including interference that may cause undesired operation.
WARNING
Changes or modifications not expressly approved by the party responsible for compliance could void the user's authority to operate the equipment.
FCC Note
This equipment has been tested and found to comply with the limits for a Class B digital device, pursuant to Part 15 of the FCC Rules. These limits are designed to provide reasonable protection against harmful interference in a residential installation.
This equipment generates, uses and can radiate radio frequency energy and, if not installed and used in accordance with the instructions, may cause harmful interference to radio communications.
However, there is no guarantee that interference will not occur in a particular installation. If this equipment does cause harmful interference to radio or television reception, which can be determined by turning the equipment off and on, the user is encouraged to try to correct the interference by one or more of the following measures:
Reorient or relocate the receiving antenna.
- Increase the separation between the equipment and the receiver.
- Connect the equipment into an outlet different from that to which the receiver is connected.
- Consult the dealer or an experienced radio / TV technician for help.
- Shielded USB cable and RCA cable with ferrite must be used with this unit to ensure compliance with the class B FCC limits.
Disclaimer
DEFINITION:
"Oregon Scientific" shall mean Oregon Scientific Global Distribution Limited, its subsidiaries, parent companies, affiliated companies, directors, officers, employees, agents, representatives and distributors.
DISCLAIMER:
Oregon Scientific do not warrant against loss of any data (including data stored on Product), and assume no liability for such loss. Purchaser assumes all liability, and as such releases us from any liability, for any accident, injury, damage, death, loss, illegal activity or any other claim that may occur resulting from or during use of the Product, whether or not such use is foreseeable by Oregon Scientific.
ALL IMPLIED WARRANTY OF MERCHANTABILITY OR FITNESS FOR A PARTICULAR PURPOSE ARE LIMITED TO THE DURATION OF THE APPLICABLE EXPRESS WARRANTY. ALL OTHER EXPRESS OR IMplied CONDITIONS, REPRESENTATIONS AND WARRANTY, INCLUDING ANY IMPLIED WARRANTY OF NON-INFRINGEMENT, ARE DISCLAIMED TO THE MAXIMUM EXTENT ALLOWED BY THE APPLICABLE JURISDICTION.
All third party software provided with the Product is provided "AS IS". Purchaser assumes the entire risk as to the quality, performance, accuracy and effect of such software, and should it prove defective, Purchaser, and not Oregon Scientific, assumes the entire cost of all necessary servicing or repair.
TO THE EXTENT NOT PROHIBITED BY LAW, IN NO EVENT WILL OREGON SCIENTIFIC BE LIABLE FOR ANY LOST DATA, REVENUE OR PROFIT, OR FOR SPECIAL, INDIRECT, CONSEQUENTIAL, INCIDENTAL OR PUNITIVE DAMAGES, HOWEVER CAUSED REGARDLESS OF THE THEORY OF LIABILITY, ARISING OUT OF OR RELATED TO THE USE OF OR INABILITY TO USE THE PRODUCT, EVEN IF WE HAVE BEEN ADVISED OF THE POSSIBILITY OF SUCH DAMAGES. IN NO EVENT WILL OREGON SCIENTIFIC LIABILITY EXCEED THE AMOUNT PAID BY PURCHASER FOR THE PRODUCT.
Disclaimer
The foregoing limitations will apply even if any warranty or remedy provided herein fails of its essential purpose. Some jurisdictions do not allow the exclusion or limitation of incidental or consequential damages, so the above limitation or exclusion may not apply to Purchaser.
All purchasers, users, and any or all parties involved or engaging in the use the Product understand and agree that:
Oregon Scientific do not promote or endorse use of the Product in high risk, careless and / or dangerous actions.
Oregon Scientific are not responsible for personal injuries or property damage incurred during such use.
Oregon Scientific are not liable for any use or misuse of the Product or any video captured that may be considered illegal.
Oregon Scientific are not responsible for any illegal actions taken while recording, attempting to record, or editing video that was captured with the Product.
The Product's primary purpose is for recording legal sports activities as seen by all applicable laws and regulations.

Pb

m = 311 ;
C

Oregon Scientific encourages you to recycle this package. Countries RTTE Approval Complied All EU countries Switzerland 已 and Norway 已
Further information can be found on: http://www.oregon scientific.com

1
2
3
4

5)

1
2
3
www.oregonscientific.com
- ATKMini
- ACTION CAMERA
- Oregon Scientific, Inc.
- Oregon Scientific (UK) Limited
- Oregon Scientific Australia Pty Limited
- Contents
- Precautions
- Operating Elements
- Operation
- Table of Indications 13
- Mounting
- Specification 16
- FCC Compliance Statement 17
- Disclaimer 18-19
- Advanced Mounting
- Precautions - Camera
- Precautions - Battery
- CAUTION
- Precautions - Waterproof
- Waste electrical and electronic equipment
- Battery disposal
- Notes on copyright:
- Operating Elements - Battery Installation & Charging
- Operating Elements - Date & Time Setting
- YYYY.MM.DD
- hh:mm:ss
- xxHz
- Operating Elements - MicroSD Card Insertion & Formatting
- MicroSD card insertion
- MicroSD card formatting
- Operation - Main Buttons
- Video recording
- Photo shooting
- Power on / Off
- Operation - Connecting to Monitor
- Operation - On-Screen Menu index & Connecting to Computer
- Connecting to a computer with Windows operating system
- Connecting to a Mac
- Basic mounting
- Tripod Mounting
- Mounting - Other Mounting Options
- Mountings warnings
- Specification
- FCC Compliance Statement
- WARNING
- FCC Note
- Disclaimer
- DEFINITION:
- DISCLAIMER:
Marque : OREGON SCIENTIFIC
Modèle : ATC MINI ACT.CAM. HD
Catégorie : Caméra sportive