
CE210 EG - Réfrigérateur IGNIS - Notice d'utilisation et mode d'emploi gratuit
Retrouvez gratuitement la notice de l'appareil CE210 EG IGNIS au format PDF.
| Type de produit | Réfrigérateur / Congélateur coffre |
| Marque | IGNIS |
| Modèle | CE210 EG |
| Classe climatique | SN (10-32°C), N (16-32°C), ST (16-38°C), T (16-43°C) |
| Réfrigérant | R134a ou R600a (voir plaque signalétique) |
| Alimentation électrique | 220-240 V / 50 Hz (standard) |
| Fonctions principales | Congélation rapide, réglage de température (3 niveaux), alarme visuelle LED rouge |
| Dégivrage | Manuel, recommandé lorsque l’épaisseur de glace atteint 5-6 mm |
| Entretien et nettoyage | Nettoyage intérieur avec éponge et eau tiède/savon doux après dégivrage ; nettoyage du condenseur arrière annuel |
| Sécurité | Verrouillage de couvercle (selon modèle), interdiction de stocker substances explosives, protection enfant (surveillance) |
| Indicateurs LED | LED verte (marche/température), LED rouge (alarme température insuffisante) |
| Capacité de congélation | Non spécifiée dans la notice |
| Classe énergétique | Non spécifiée |
| Dimensions (approx.) | Non spécifiées |
| Poids | Non spécifié |
| Accessoires fournis | Panier (selon modèle), protège-condenseur |
| Installation | Espace arrière min. 7 cm, côtés min. 7 cm, surface plane et résistante |
| Conditions ambiantes | Éviter sources de chaleur, exposition directe au soleil |
| Pièces détachées et réparabilité | Contactez le service après-vente pour les pièces (ampoule, joints) |
| Garantie | Non spécifiée |
FOIRE AUX QUESTIONS - CE210 EG IGNIS
Questions des utilisateurs sur CE210 EG IGNIS
0 question sur cet appareil. Repondez a celles que vous connaissez ou posez la votre.
Poser une nouvelle question sur cet appareil
Téléchargez la notice de votre Réfrigérateur au format PDF gratuitement ! Retrouvez votre notice CE210 EG - IGNIS et reprennez votre appareil électronique en main. Sur cette page sont publiés tous les documents nécessaires à l'utilisation de votre appareil CE210 EG de la marque IGNIS.
MODE D'EMPLOI CE210 EG IGNIS
INSTRUCTIONS FOR USE
IMPORTANT SAFETY INSTRUCTIONS
- WARNING: to avoid a hazard due to instability, positioning or fixing of the appliance must be done in accordance with the manufacturer instructions.
- WARNING: keep the appliance ventilation openings clear of obstruction.
- WARNING: do not damage the appliance refrigerant circuit pipes.
- WARNING: Do not use mechanical, electric or chemical means other than those recommended by the Manufacturer to speed up the defrost process.
- WARNING: Do not use or place electrical devices inside the appliance compartments if they are not of the type expressly authorised by the Manufacturer.
Information: This appliance does not contain CFCs. The refrigerant circuit contains R134a (HFC) or R600a (HC) (see the rating plate inside the appliance).
-
Appliances with Isobutane (R600a): isobutane is a natural gas without environmental impact, but is flammable. Therefore, make sure the refrigerant circuit pipes are not damaged. Keep special attention in case of damaged pipes emptying the refrigerant circuit.
-
This product may contain Fluorinated Greenhouse Gases covered by the Kyoto Protocol; the refrigerant gas is inside a hermetically sealed system. Refrigerant gas: R134a has a Global Warming Potential of (GWP) 1300.
- C-Pentane is used as blowing agent in the insulation foam and it is a flammable gas. Pay special attention during disposal operations.
- This appliance is intended to be used in household and similar applications such as
- staff kitchen areas in shops, offices and other working environments;
- farm houses and by clients in hotels, motels and other residential type environments;
- bed and breakfast type environments;
- catering and similar non-retail applications
- Do not store explosive substances such as aerosol cans with a flammable propellant in this appliance.
- This appliance can be used by children aged from 8 years and above and persons with reduced physical, sensory or mental capabilities or lack of experience
INSTRUCTIONS FOR USE
and knowledge if they have been given supervision or instruction concerning use of the appliance in a safe way and understand the hazards involved.
- Cleaning and user maintenance shall not be made by children without supervision.
- To avoid the risk of children becoming trapped and suffocating, do not allow them to play or hide inside the appliance.
- It must be possible to disconnect the appliance from the power supply by unplugging it if plug is accessible, or by means of an accessible multi-pole switch installed upstream of the socket in conformity with national safety standards.
-
Plug the appliance into a grounding socket: the appliance must be correctly connected to an approved earthing system.
-
Do not use single/multi adapters or extension cords.
- During installation, make sure the appliance does not damage the power cable.
- Do not pull the appliance power cable
- The appliance must be handled and installed by two or more persons.
- Installation and maintenance including replacement of the supply cord must be carried out by the manufacturer or a qualified technician, in compliance with the manufacturer's instructions and the local safety regulations in force. In order to avoid a hazard do not repair or replace any part of the appliance including the supply cord, unless specifically stated in the user manual.
SAFEGUARDING THE ENVIRONMENT
1. Packing
The packing material is 100% recyclable and bears the recycling symbol . For disposal, comply with the local regulations. Keep the packing materials (plastic bags, polystyrene parts, etc.) out of the reach of children, as they are a potential source of danger.
2. Scrapping/Disposal
The appliance is manufactured using recyclable material.
This appliance is marked in compliance with European Directive 2002/96/EC on Waste Electrical and Electronic Equipment (WEEE). By ensuring the correct disposal of this appliance, you can help prevent potentially negative consequences for the environment and the health of persons.
The symbol on the appliance, or on the
accompanying documents, indicates that this appliance should not be treated as domestic waste but must be taken to a special collection centre for the recycling of electrical and electronic equipment. When scrapping the appliance, make it unusable by cutting off the power cable and removing the doors and shelves so that children cannot easily climb inside and become trapped.
Scrap the appliance in compliance with local regulations on waste disposal, taking it to a special collection centre; do not leave the appliance unattended even for a few days, since it is a potential source of danger for children.
For further information on the treatment, recovery and recycling of this product, contact your competent local office, the household waste collection service or the shop where you purchased the appliance.
INSTRUCTIONS FOR USE
C
Declaration of conformity
- This appliance has been designed for preserving food and is manufactured in compliance with Regulation (CE) No. 1935/2004.
- This appliance has been designed, manufactured
and marketed in compliance with:
- safety objectives of the "Low Voltage" Directive 2006/95/CE (which replaces 73/23/CEE and subsequent amendments);
- the protection requirements of Directive "EMC" 2004/108/EC.
BEFORE USING THE APPLIANCE
To ensure best use of your appliance, carefully read the operating instructions which contain a description of the product and useful advice. Keep these instructions for future reference.
- After unpacking the appliance, make sure it is not damaged and that the door closes properly. Any
damage must be reported to the dealer within 24 hours of delivery of the appliance.
- Wait at least two hours before switching the appliance on, to ensure that the refrigerant circuit is fully efficient.
- Clean the inside of the appliance before using it.
PRECAUTIONS AND GENERAL RECOMMENDATIONS
INSTALLATION
- Be careful not to damage the floors (e.g. parquet) when moving the appliance.
- Make sure the appliance is not near a heat source.
- Install and level the appliance on a floor strong enough to take its weight and in a place suitable for its size and use.
- The appliance is arranged for operation in places where the temperature comes within the following ranges, according to the climatic class given on the rating plate. The appliance may not work properly if it is left for a long time at a temperature outside the specified range.
| Climatic Class | Amb. T. (°C) |
| SN | From 10 to 32 |
| N | From 16 to 32 |
| ST | From 16 to 38 |
| T | From 16 to 43 |
- Make sure the voltage specified on the rating plate corresponds to that of your home.
SAFE USE
- Do not store or use petrol, flammable liquids or gas in the vicinity of this or other electrical appliances. The fumes can cause fires or explosions.
-
Do not swallow the contents (non-toxic) of the ice packs (in some models).
-
Do not eat ice cubes or ice lollies immediately after taking them out of the freezer since they may cause cold burns.
- For products designed to use an air filter inside an accessible fan cover, the filter shall be always in position when the refrigerator is in function.
- Before carrying out any maintenance or cleaning operation, unplug the appliance or disconnect it from the power supply.
- Use the refrigerator compartment only for storing fresh food and the freezer compartment only for storing frozen food, freezing fresh food and making ice cubes.
- Do not store glass containers with liquids in the freezer compartment since they may break.
- Avoid storing unwrapped food in direct contact with internal surfaces of the refrigerator or freezer compartments.
- "The bulb used inside the appliance is specifically designed for domestic appliances and is not suitable for general room lighting within the home (EC Regulation 244/2009)".
The Manufacturer declines any liability for injury to persons or animals or damage to property if the above advice and precautions are not respected
INSTRUCTIONS FOR USE
ENERGY-SAVING TIPS
- Install the appliance in a dry, well ventilated room far away from any heat source (e.g. radiator, cooker, etc.) and in a place not exposed directly to the sun. If required, use an insulating plate.
- To guarantee adequate ventilation follow installation instructions.
- Insufficient ventilation on back of the product increases energy consumption and decreases cooling efficiency.
- The internal temperatures of the appliance may be affected by the ambient temperature, frequency of door opening, as well as location of the appliance. Temperature setting should take into consideration these factors.
-
Allow warm food and drinks to cool down before placing in the appliance.
-
After placing the food check if the door of compartments closes properly, especially the freezer door.
- Reduce to a minimum door opening.
- When thawing frozen food, place them in the refrigerator. The low temperature of the frozen products cools the food in the refrigerator.
- Damaged gasket must be replaced as soon as possible.
- High energy class products are fitted with high efficiency motors that remain operational for longer, but have a low power consumption. Do not worry if the engine continues to run for longer periods.
DESCRIPTION AND USE
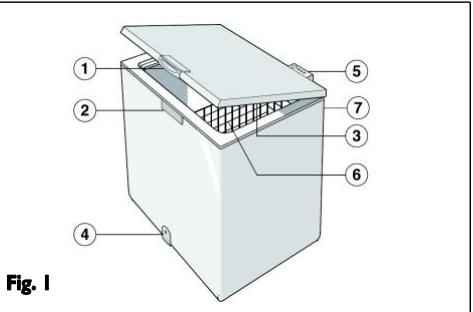
DIAGRAM OF THE APPLIANCE (Fig. 1)
- Lid handle.
- Lock (if provided).
- Seal.
- Defrost water drain plug (depending on model).
- Control panel.
- Basket (depending on model).
- Condenser (located at the rear).
INSTALLATION
Refer to chapter "Before using the appliance".
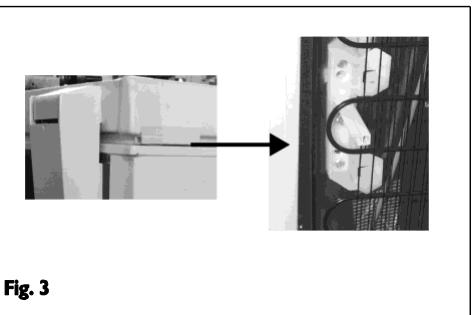
- Unpack the appliance.
- Remove the 4 protection pieces inserted between lid and appliance (Fig 3).
- Warning: two of the four protection pieces must be fitted in the seat of the condenser plastic supports, located at the rear of the product
(Fig. 3).
This is necessary to ensure the correct distance from the wall.
- Ensure that the defrosting water drainage plug (if provided) is correctly positioned (4).
- For best operation of the appliance and in order to avoid damage when the lid is opened, leave a space of at least 7cm from the rear wall and 7cm at the sides.
- Fit the accessories (if provided).
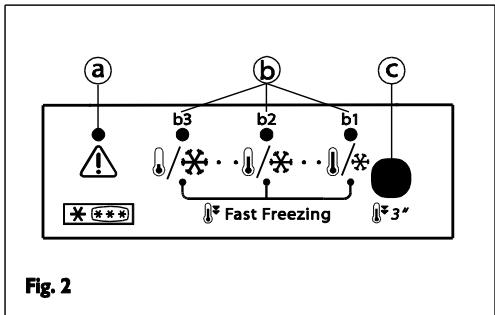
DIAGRAM OF THE CONTROL PANEL (Fig. 2)
a. Red LED: when flashing, it indicates that an alarm condition is present see
TROUBLESHOOTING GUIDE"
b. Green LEDs: they indicate that the appliance is in operation, and the temperature has been set as follows:
b1 less cold temperature (right light on), use this setting with partial loads will optimize energy consumption.
b2 middle temperature (center light on)
b3 very cold temperature (left light on)
ALL Green LEDs ON: FAST FREEZING function is active; see the section "freezing fresh food".
C. Temperature setting button: to adjust the set temperature and to activate/deactivate the fast freezing operations.
To select the desired temperature, repeatedly press the setting button (3): each time the button is pressed, the set temperature is updated.
To activate/deactivate fast freezing function, pressing for approximately 3 seconds: all green LEDs flash simultaneously 3 times and then remain lit.
Note:
The settings will be saved in the memory even if a power cut occurs. The time needed for the temperature inside the freezer to reach the set value, can vary depending on climatic conditions and the set temperature itself.
Switching on the appliance
INSTRUCTIONS FOR USE
- Plug in the appliance.
- The green LED lights up (middle temperature).
- The red LED flashes to indicate that the temperature inside the appliance is not yet sufficiently low for food storage. The red LED will normally switch off within the first six hours after the appliance is switched on.
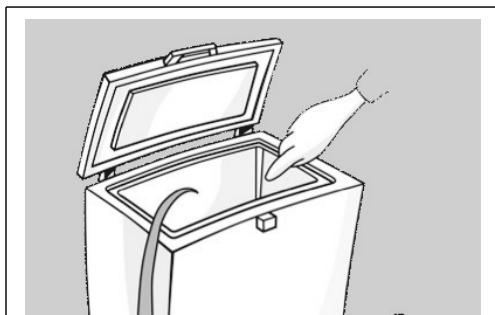
- Place food inside the product only when the red LED has switched off.
Note:
Thanks to the efficient lid seal, the appliance lid will not reopen easily immediately after closing.
Wait a few minutes before re-opening the lid of the appliance.
FREEZING FOOD
Preparation of fresh food for freezing
- Before freezing, wrap and seal fresh food in: Aluminium foil, cling film, air and water-tight plastic bags, polyethylene containers with lids, provided they are suitable for freezing foods.
- Food must be fresh, mature and of prime quality in order to obtain high quality frozen food.
- Fresh vegetables and fruit should preferably be frozen as soon as they are picked to maintain the full original nutritional value, consistency, colour and flavour.
- Always leave hot food to cool before placing in the appliance.
Freezing fresh food
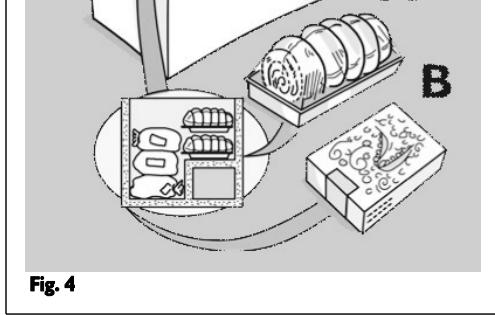
- Place foods to be frozen in direct contact with the walls of appliance (Fig. 4)
A) -foods to be frozen,
B) -foods already frozen.
- Avoid placing foods to be frozen in direct contact with food already frozen.
- For best and fastest freezing, foods should be split into small portions; this will also be useful when the frozen items are to be used.
1. At least 24 hours before storing fresh foods inside the product for freezing, activate the fast freezing function by pressing button c for approximately 3 seconds. All green LEDs (b) comes on.
2. Introduce the food to freeze inside the appliance, and keep the door of the appliance closed for 24 hours. After this period the food will be frozen. The fast freezing function can be deactivated pressing button C for approximately 3 seconds.
If the fast freeze function is not manually deactivated, it will be automatically deactivated by the appliance after 50 hours.
FOOD STORAGE
Refer to the table on the appliance.
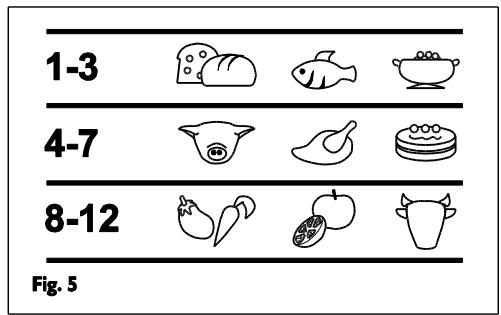
Classification of frozen foods
Put the frozen products into the appliance and classify them; the storage date should be indicated on the packs, to allow use within expiry dates listed in months in Fig. 5 for each type of food.
Advice for storing frozen food
When purchasing frozen food products:
- Ensure that the packaging is not damaged (frozen food in damaged packaging may have deteriorated). If the package is swollen or has damp patches, it may not have been stored under optimal conditions and defrosting may have already begun.
- When shopping, leave frozen food purchases until last and transport the products in a thermally insulated cool bag.
- Once at home, place the frozen foods immediately in the appliance.
- Avoid, or reduce temperature variations to the minimum Respect the best-before date on the package.
- Always observe the storage information on the package.
Note:
Eat fully or partially defrosted foods immediately. Do not refreeze unless the food is cooked after it has thawed. Once cooked, the thawed food can be refrozen. If there is a long power failure:
- Do not open the appliance lid except to place ice packs (if provided) over the frozen foods on the right and left of the appliance. This will slow down the rise in temperature.
DEFROSTING THE APPLIANCE
The appliance should be defrosted when the thickness of ice on the walls reaches 5-6 mm.
- Disconnect the appliance from the mains power supply.
- Remove the packs of food from the appliance and wrap them close together in newspaper and store in a very cool place or thermally insulated bag.
- Leave the appliance lid open.
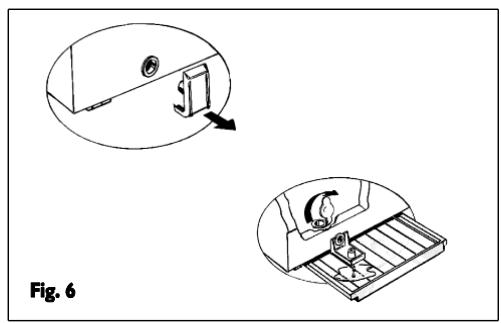
- Remove the internal defrost water drain plug (depending on model) (Fig. 6)
- Remove the external defrost water drain plug (depending on model) and reposition it as shown in the figure 6
- Place a bowl beneath the drainage channel to collect the residual water. If available, use the divider (Fig. 6)
- Speed up defrosting by using a spatula to detach the ice from the appliance walls.
- Remove the ice from the bottom of the appliance.
- In order to avoid permanent damage to the appliance interior, do not use pointed or sharp metal instruments for removing the ice.
INSTRUCTIONS FOR USE
- Do not use abrasive products or heat up the interior artificially.
- Dry the interior of the appliance thoroughly.
- On completion of the defrosting, refit the plug.
CARE AND MAINTENANCE
- Remove the ice from the upper edge (see the Troubleshooting Guide).
- Clean the inside after defrosting, using a sponge dampened with warm water and/or mild detergent.
- Clean the side motor cooling grille (depending on model).
- Remove dust from the condenser on the rear of the appliance.
Before carrying out maintenance, unplug the appliance.
Do not use abrasive products, scourers or stain-removers (e.g. acetone, trichloroethylene) to clean the appliance.
To obtain the best results from your appliance, carry out cleaning and maintenance at least once a year.
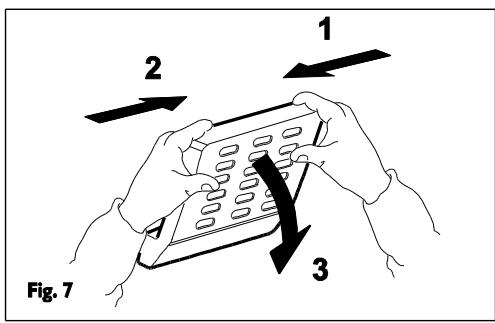
CHANGING THE LID LIGHT BULB (if provided)
- Disconnect the appliance from the mains power supply.
- Remove the diffuser by following the sequence of steps shown in the figure 7.
- Unscrew the light bulb and replace it with an identical bulb of the same wattage and voltage.
- Refit the diffuser and plug in the appliance.
TROUBLESHOOTING GUIDE
1. The red LED flashes.
- Is there a power failure?
- Is a defrosting operation in progress?
- Is the appliance lid properly closed?
- Is the appliance placed near a heat source?
- Are the ventilation grille and condenser clean?
2. All LEDs flash at the same time.
- Contact the After-Sales Service.
3. The appliance is too noisy.
Is the appliance perfectly horizontal?
- Is the appliance in contact with other furniture or objects that may cause vibrations?
- Has the packaging been removed from under the appliance?
Note: Gurgling noises from the refrigerating circuit after the compressor cuts out are perfectly normal.
4. All LEDs are off and the product is not working.
- Is there a power failure?
-
Is the plug properly inserted in the socket?
-
Is the electric cable intact?
5. All LEDs are off and the product is working.
- Contact the After-Sales Service.
6. The compressor runs continuously.
- Have hot foods been put in the appliance?
- Has the appliance lid been left open for a long time?
- Is the appliance placed in a very warm room or near heat sources?
- Has the fast freeze function been activated? (all Green LEDs ON)
7. Too much ice on the upper edge.
- Are the defrost water drainage plugs correctly positioned?
- Is the appliance lid properly closed?
- Is the appliance lid seal damaged or deformed? (See chapter "Installation")
- Have the 4 protection pieces been removed? (See chapter "Installation")
8. Formation of condensate on the external walls of the appliance.
- It is normal for condensation to form under certain atmospheric conditions (humidity above 85% ) or if the appliance is located in a damp or poorly ventilated room. The performance of the appliance is in no way affected.
9. The layer of ice on the internal walls of the appliance is not uniform.
- This phenomenon is quite normal.
AFTER-SALES SERVICE
Before contacting After-Sales Service:
- See if you can solve the problem yourself.
- Switch the appliance on again to see if the problem has been solved. If it has not, disconnect the appliance from the power supply and wait for about an hour before switching on again.
- If the problem persists after this course of action, contact After-Sales Service.
Specify:
the nature of the fault
the model
- the service number (the number after the word SERVICE on the rating plate on the rear of the appliance)
- your full address
- your telephone number and area code.

- INSTRUCTIONS FOR USE
- IMPORTANT SAFETY INSTRUCTIONS
- SAFEGUARDING THE ENVIRONMENT
- Packing
- Scrapping/Disposal
- C
- Declaration of conformity
- BEFORE USING THE APPLIANCE
- To ensure best use of your appliance, carefully read the operating instructions which contain a description of the product and useful advice. Keep these instructions for future reference.
- PRECAUTIONS AND GENERAL RECOMMENDATIONS
- INSTALLATION
- SAFE USE
- ENERGY-SAVING TIPS
- DESCRIPTION AND USE
- DIAGRAM OF THE APPLIANCE (Fig. 1)
- (Fig. 3).
- DIAGRAM OF THE CONTROL PANEL (Fig. 2)
- TROUBLESHOOTING GUIDE"
- Note:
- Switching on the appliance
- FREEZING FOOD
- Preparation of fresh food for freezing
- Freezing fresh food
- FOOD STORAGE
- Refer to the table on the appliance.
- Classification of frozen foods
- Advice for storing frozen food
- DEFROSTING THE APPLIANCE
- CARE AND MAINTENANCE
- Before carrying out maintenance, unplug the appliance.
- CHANGING THE LID LIGHT BULB (if provided)
- TROUBLESHOOTING GUIDE
- The red LED flashes.
- All LEDs flash at the same time.
- The appliance is too noisy.
- All LEDs are off and the product is not working.
- All LEDs are off and the product is working.
- The compressor runs continuously.
- Too much ice on the upper edge.
- Formation of condensate on the external walls of the appliance.
- The layer of ice on the internal walls of the appliance is not uniform.
- AFTER-SALES SERVICE
- Before contacting After-Sales Service:
- Specify:
Marque : IGNIS
Modèle : CE210 EG
Catégorie : Réfrigérateur