
NA8005 - Lecteur réseau audio MARANTZ - Notice d'utilisation et mode d'emploi gratuit
Retrouvez gratuitement la notice de l'appareil NA8005 MARANTZ au format PDF.


| Type de produit | Lecteur réseau audio |
| Marque | Marantz |
| Modèle | NA8005 |
| Dimensions (L x H x P) | 440 x 105 x 340 mm |
| Poids | 8,2 kg |
| Alimentation | Secteur 120 V / 230 V, 50/60 Hz |
| Consommation électrique (en fonctionnement) | 35 W |
| Consommation en veille | 0,3 W (réseau activé : 2,5 W) |
| Fonctions principales | Lecture réseau (DLNA, AirPlay, Internet Radio, Spotify Connect), DAC USB (DSD, PCM jusqu'à 192 kHz), lecture USB/iPod, écoute via casque |
| Formats audio supportés | MP3, WMA, AAC, WAV, FLAC, ALAC, AIFF, DSD (via USB-DAC) |
| Connectivité | Ethernet (RJ45), USB-A (avant), USB-B (arrière pour DAC), entrées/sorties numériques optiques et coaxiales, sorties analogiques RCA, sortie casque 6,35 mm |
| Convertisseur numérique-analogique | DAC intégré avec filtre haute performance, compatible DSD et PCM 192 kHz/24 bits |
| Afficheur | OLED 3 lignes |
| Circuit audio | Amplificateur HDAM® SA2, condensateurs audiophiles, châssis double couche |
| Télécommande | Oui, fournie (pile AAA) |
| Entretien et nettoyage | Débrancher l'appareil avant nettoyage ; utiliser un chiffon doux et sec. Ne pas utiliser de produits abrasifs ou liquides. |
| Sécurité | Ne pas exposer à l'humidité, à la pluie ou à des sources de chaleur. Débrancher en cas d'orage ou de non-utilisation prolongée. |
| Pièces détachées et réparabilité | Les pièces détachées sont disponibles auprès des centres de service agréés Marantz. Pour toute réparation, contacter un professionnel qualifié. |
| Informations générales | Garantie : selon pays ; manuel d'utilisation fourni sur CD-ROM et en ligne. |
FOIRE AUX QUESTIONS - NA8005 MARANTZ
Questions des utilisateurs sur NA8005 MARANTZ
0 question sur cet appareil. Repondez a celles que vous connaissez ou posez la votre.
Poser une nouvelle question sur cet appareil
Téléchargez la notice de votre Lecteur réseau audio au format PDF gratuitement ! Retrouvez votre notice NA8005 - MARANTZ et reprennez votre appareil électronique en main. Sur cette page sont publiés tous les documents nécessaires à l'utilisation de votre appareil NA8005 de la marque MARANTZ.
MODE D'EMPLOI NA8005 MARANTZ

marantz
Network Audio Player NA8005
You can print more than one page of a PDF onto a single sheet of paper.
Owner's Manual
Accessories 5
About the remote control 6
Inserting the batteries 6
7
Marantz "Hi-Fi Remote" app 7
Main features 8
High quality sound 8
High performance 9
Part names and functions 10
Front panel 10
Rear panel 12
Remote control unit 14
Connections
Connecting an amplifier 18
Connecting to a device with digital audio input connectors 19
Connecting to a device with digital audio output connectors 20
Connecting a PC or Mac 21
Connecting an iPod or USB memory device to the USB port 22
Connecting to a home network (LAN) 24
Wired LAN 24
Required system 25
Other connections 26
RS-232C connector 26
FLASHER IN jack 27
REMOTE CONTROL jack 28
Connection 28
Setting 28
Connecting the power cord 29
Playback
Basic operation 31
Turning the power on 31
Selecting the input source 32
Switching the display's brightness 33
Stopping digital outputs 33
Using the sleep timer 33
Listening to Internet Radio 34
Listening to Internet Radio 35
Using vTuner to add Internet Radio stations to favorites 37
Playing back files stored on a PC and NAS 38
Applying media sharing settings 39
Playing back files stored on PC and NAS 40
Performing repeat playback 41
Performing random playback 41
Listening to Pandora® 43
Connecting to Pandora 44
Creating a new station 45
Listening to an existing station 46
Listening to created radio stations at random 46
Giving feedback and managing stations 46
Sign Out 47
Listening to SiriusXM Internet Radio 48
Listening to SiriusXM Internet Radio 49
Sign Out 50
Spotify Connect function 51
Playing Spotify music with this unit 51
Favorite function 52
Registering stations or files to the favorites list 53
53
54
Playing back an iPod 55
Playing an iPod 56
Performing repeat playback 57
Performing random playback 57
Disconnecting the iPod 58
Charging the iPod 58
Playing a USB memory device 59
Playing files stored on USB memory devices 60
Performing repeat playback 61
Performing random playback 61
Removing the USB memory device 61
AirPlay function 63
Playing iPhone, iPod touch music with this unit 64
Playing iTunes music with this unit 65
Selecting multiple speakers (devices) 65
Remote play function 66
Settings required for each device 67
Web control function 69
Using as a D/A converter (USB-DAC) 72
Connecting and playing back from a computer (USB-DAC) 73
Connect and playback from a digital device (Coaxial/Optical) 81
Settings
| Menu map | 82 |
| Inputting characters | 85 |
| General | 87 |
| Audio Out | 87 |
| Volume Limit | 87 |
| Language | 87 |
| Auto-Standby | 88 |
| Firmware | 88 |
| Network | 91 |
| Network Information | 91 |
| Network Control | 91 |
| Friendly Name | 91 |
| Settings | 92 |
| Switching the function of the volume buttons on the remote control | 94 |
| Set the function of the volume buttons on the remote control to “Variable” | 94 |
| Set the function of the volume buttons on the remote control to “AMP” | 94 |
Tips
| Contents | 95 |
| Tips | 96 |
| Troubleshooting | 97 |
| Resetting factory settings | 105 |
| Appendix | |
| Playing back a USB memory devices | 106 |
| D/A converter | 107 |
| Playing back Internet Radio | 108 |
| Playing back files stored on a PC and NAS | 109 |
| Explanation of terms | 111 |
| Trademark information | 114 |
| Specifications | 115 |
| Index | 118 |
| License | 120 |
Thank you for purchasing this Marantz product.
To ensure proper operation, please read this owner's manual carefully before using the product.
After reading this manual, be sure to keep it for future reference.
Accessories
Check that the following parts are supplied with the product.
| Quick Start Guide | Owner's Manual (CD-ROM) | Safety Instructions |
| Warranty (for USA/for CANADA) | Remote control unit (RC003NA) | R03/AAA batteries |
| Power cord | Audio cable | Remote connector cable |
About the remote control
Inserting the batteries
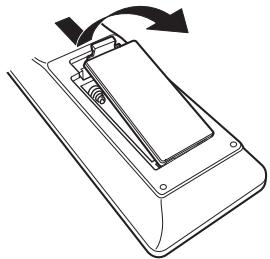
① Remove the rear lid in the direction of the arrow and remove it.
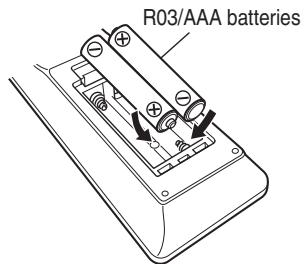
② Insert two batteries correctly into the battery compartment as indicated.
③ Put the rear cover back on.
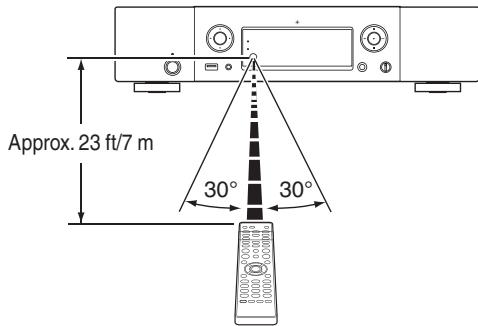
Operating range of the remote control unit
Point the remote control unit at the remote sensor when operating it.
Marantz "Hi-Fi Remote" app
Marantz "Hi-Fi Remote" app is a unique application developed for the iPad, iPhone, iPod touch and Android smartphone.
This application enables you to control Marantz network devices that are connected to your home network.
Install the App onto your iPad, iPhone, iPod touch or Android smartphone to control this device.

- Bidirectional communication is performed.
- The Marantz "Hi-Fi Remote" app can be downloaded for free from the Apple App Store or Google Play store.
Main features
High quality sound
Large-capacitance block capacitor
A large capacitance 3,300 F capacitor carefully selected for its acoustic characteristics is incorporated into the power supply circuit.
- Audiophile-grade film capacitors and electrolytic capacitors
The unit's features the same audiophile-grade film capacitors and electrolytic capacitors specifically used in top-range models.
- Peripheral circuitry off function minimizes audio output signal interference
In order to minimize noise from peripheral circuitry which could interfere with the analog audio signal, this unit is equipped with a peripheral circuitry off function which turns off the digital output circuit and the display.
- Low noise amp due differential input HDAM, and equipped with a low distortion filter circuit due to high speed HDAM®SA2 delivery amp
- Double-layered chassis
- High-grade machined analog audio output connectors
High grade headphone circuit
The high-grade headphone circuit incorporates HDAM®SA2 amplifier to enable headphones listening of high quality sound reproduction, late at night or in other such situations.
High performance
- Equipped with a USB-DAC function that is compatible with playback of DSD files
- Playback of DSD and FLAC files via USB and networks
This unit supports the playback of high resolution audio formats such as DSD and FLAC 192 kHz files. It provides high quality playback of high resolution files.
- Can be used as a D/A converter
Digital audio signals input from an external device or computer into this unit can be converted and output as analog signals using this unit's D/A converter.
- Support for High Quality Audio playback
WAV/FLAC/ALAC (Apple Lossless Audio Codec)/AIFF/DSD
- Support for Gapless playback
Supports Internet Radio and music streaming Supports AirPlay® (p. 63)
- Plays USB memory devices (MP3/WMA/AAC/WAV/FLAC/ALAC/AIFF/DSD) and iPod®/iPhone®
DLNA ver. 1.5 support for audio networks
Playback with no gap between music files. (for WAV/FLAC/ALAC/AIFF/DSD only)
-
Smart recharge control starts recharging the iPod® when it is connected, and after recharging optimizes power consumption in accordance with the status of this unit (p. 22)
-
Compatible with Marantz "Hi-Fi Remote" app for performing basic operations of the unit with an iPad®, iPhone® or Android smartphone
- OLED (Organic Light Emitting Diode) display that can display 3 lines
- Equipped with auto standby mode function that reduces power consumption
Part names and functions
For buttons not explained here, see the page indicated in parentheses ( ).
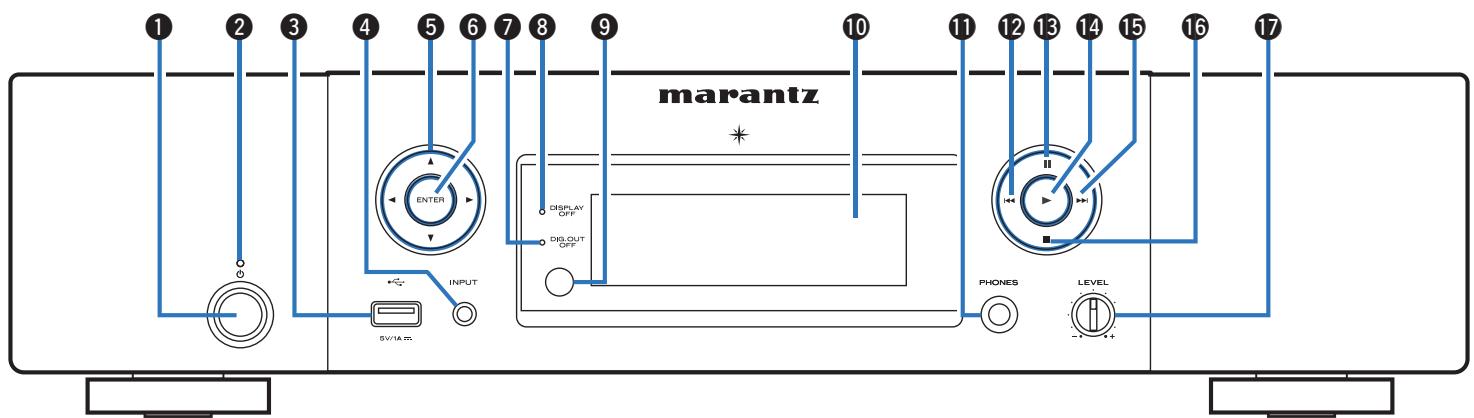
Front panel
1 Power operation button (Φ)
This turns the power on/off (standby). (p. 31)
Power indicator
The standby indicator changes as shown below according to the status of the unit.
Power on : Off
- Normal standby: Red
- When "Network Control" is set to "On": Orange
- iPod charge standby : Orange
3 USB port
Used to connect iPod or USB memory devices. (p. 22)
Input source select buttons
These select the input source. (p. 32)
Cursor buttons (△∇<|>
These select items.
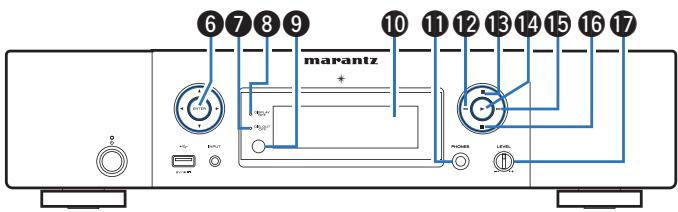
ENTER button
This determines the selection.
Digital output off indicator (DIG. OUT OFF)
This indicator lights up when the digital output setting is set to off. (p. 33)
DISPLAY OFF indicator
This indicator lights up when the display is off. (p. 33)
Remote control sensor
This receives signals from the remote control unit.
Display
Various information is displayed here.
1 Headphones jack (PHONES)
Used to connect headphones.
NOTE
To prevent hearing loss, do not raise the volume level excessively when using headphones.
Fast-reverse/Reverse-skip button (1
Returns to the start of the currently playing track. Press and hold to fast-reverse the track. (p. 42, 58, 62)
Pause button (II)
Pauses playback. (p. 42, 58, 62)
Play button ()
Playback starts. (p. 42, 58, 62)
Fast-forward/Forward-skip button (▶▶I)
Plays the next track. Press and hold to fast-forward the track.
$$ (p. 4 2, 5 8, 6 2) $$
16 Stop button (■)
Stops playback. (p. 42, 58, 62)
17 Headphone volume control knob (LEVEL)
Adjusts the headphone volume.
Rear panel
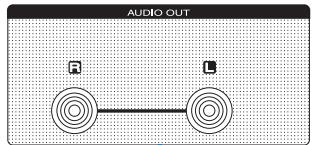
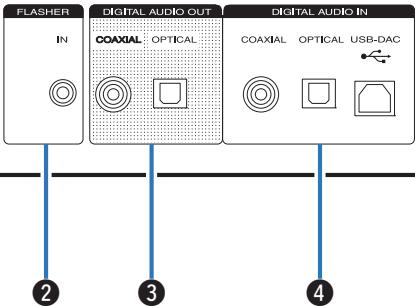
1 AUDIO OUT connectors
Used to connect devices equipped with analog audio inputs connectors or an external power amplifier. (p. 18)
2 FLASHER IN jack
Used to connect a control box, etc. (p. 27)
DIGITAL AUDIO OUT connectors
Used to connect an AV receiver or D/A converter that has a digital input connectors. (p. 19)
DIGITAL AUDIO IN connectors
Used to connect a computer or devices equipped with digital audio output connectors. (p. 20)
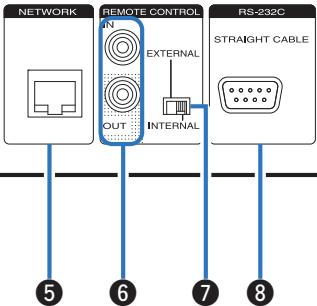
5 NETWORK connector
Used to connect to a LAN cable when connecting to a wired LAN network. (p. 24)
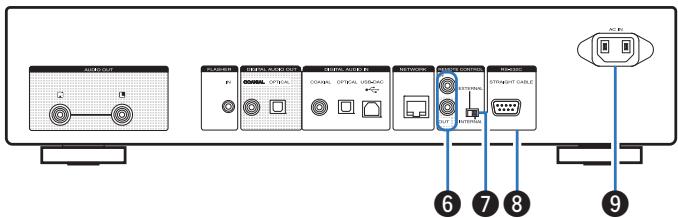
Remote control input/output connectors (REMOTE CONTROL IN/OUT)
Used to connect to a Marantz amplifier that is compatible with the remote control function. (R p. 28)
EXTERNAL/INTERNAL switch
Turn this switch to "EXTERNAL" to operate the unit by pointing the remote control at the amplifier connected to this unit using the remote control connection. (p. 28)
RS-232C connector
Used to connect home automation controller devices fitted with RS-232C terminals. (p. 26)
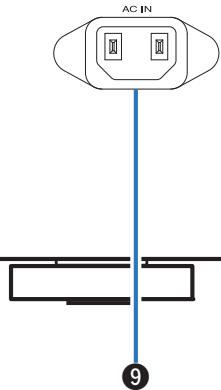
AC inlet (AC IN)
Used to connect the power cord. (p. 29)
Remote control unit
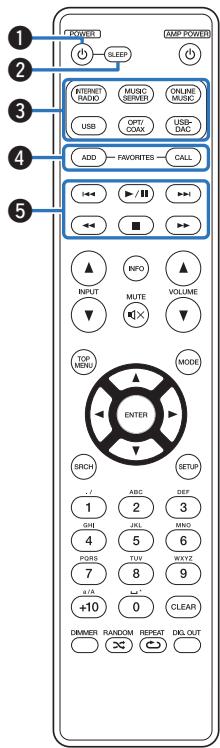
The included remote control unit can be used to operate Marantz amplifiers. When using it, also refer to the operating instructions of the other devices.
- The remote control may not operate some devices.
1 POWER button (b)
This turns the power on/off (standby). (p. 31)
SLEEP button
This sets the sleep timer. (p. 33)
3 Input source select buttons
These select the input source. (p. 32)
FAVORITES ADD /CALL buttons
- To add radio stations or files to the favorite list, press ADD button.
- To call up a radio station or file registered in the favorite list, press CALL button. (p. 53)
System buttons
These perform playback related operations. (p. 42, 58, 62)
- Skip buttons (I▲, ▷▶I)
- Play/pause button (▶/II)
- Fast-reverse / Fast-forward buttons (▲▲, ▲▶)
- Stop button (■)
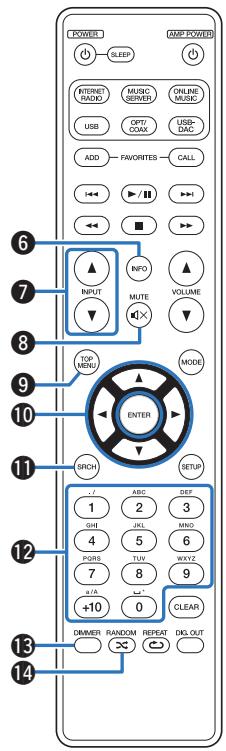
Information button (INFO)
This switches display items such as the album name and title name in the playback screen. (p. 35, 42, 58, 62)
7 Input source select buttons (INPUT ▲V)
This switches the input source of the amp connected to this unit. (p. 32)
MUTE button (X)
This mutes the sound of the amp connected to this unit.
9 TOP MENU button
To back to the top of the menu.
10 Cursor buttons ( < >)
These select items. (p. 34, 52, 55, 59)
Search button (SRCH)
This displays the search menu.
(p.35,42,62)
12 Number buttons (0 - 9, + 10)
These enter letters or numbers into the unit. (p. 53, 86)
DIMMER button
Adjust the display brightness of this unit. (p. 33)
18 RANDOM button (必)
Switches the random playback. (p.41, 57, 61)
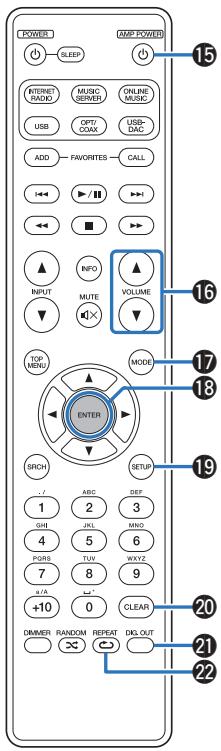
15 AMP POWER button (B)
This turns the power of the amp connected to this unit on or off.
16 Amplifier volume adjustment buttons (VOLUME ▲V)
This adjusts the volume of the amp connected to this unit.
MODE button
This switches the playback mode. (p. 56, 58)
18 ENTER button
This determines the selection. (p. 34, 52, 55, 59, 84)
19 SETUP button
The setting menu is displayed on the display. (p. 84)
20 CLEAR button
This cancels the settings. (p. 86)
2 Digital audio output switch button (DIG. OUT)
This switches the digital audio output on/off.
(p.33)
REPEAT button (C)
Switches the repeat playback. (p. 41, 57, 61)
Contents
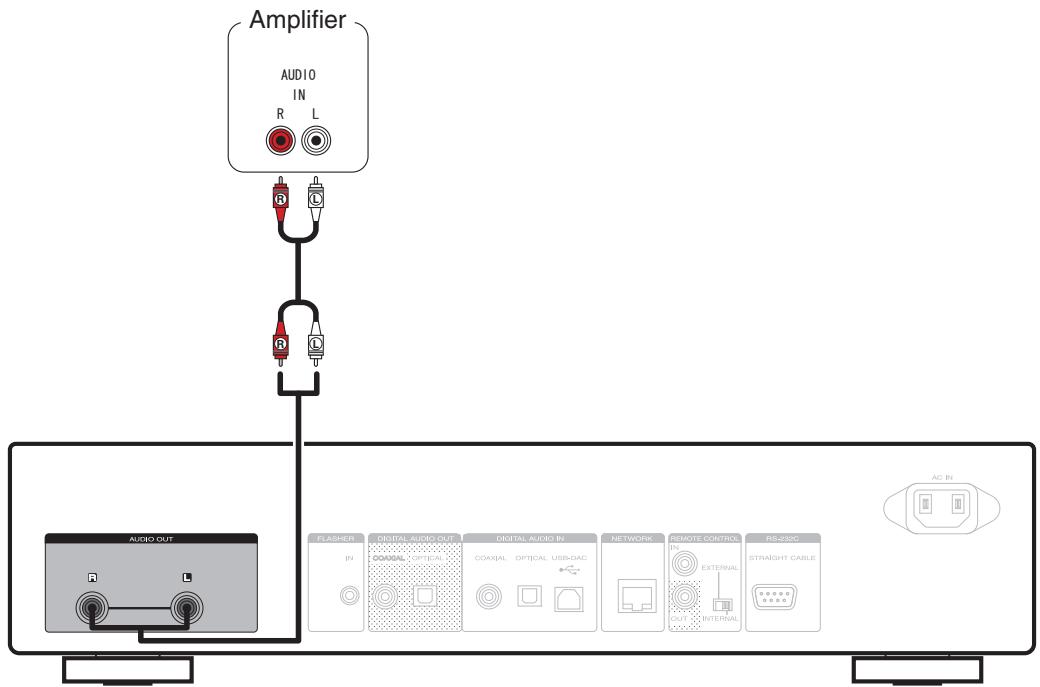
Connecting an amplifier 18
Connecting to a device with digital audio input connectors 19
Connecting to a device with digital audio output connectors 20
Connecting a PC or Mac 21
Connecting an iPod or USB memory device to the USB port 22
Connecting to a home network (LAN) 24
REMOTE CONTROL jack 28
Connecting the power cord 29
NOTE
- Do not plug in the power cord until all connections have been completed.
- Do not bundle power cords with connection cables. Doing so can result in humming or noise.
Cables used for connections
Provide necessary cables according to the devices you want to connect.
| Audio cable (supplied) | ●●●●●●●●●●●●●●●●●●●●●●●●●●●●●●●●●●●●●●●●●●●●●●●●●●●●●●●●●●●●●●●●●●●●●●●●●●●●●●●●●●●●●●●●●●●●●●●●●●●● |
| Remote connector cable (supplied) | ●●●●●●●●●●●●●●●●●●●●●●●●●●●●●●●●●●●●●●●●●●●●●●●●●●●●●●●●●●●●●●●●●●●●●●●●●●●●●●●●●●●●●●●●●●●●● |
| Optical cable (Sold separately) | ●●●●●●●●●●●●●●●●●●●●●●●●●●●●●●●●●●●●●●●●●●●●●●●●●●●●●●●●●●●●●●●●●●●●●●●●●●●●●●●●●●●●●●●●●●●●●●●●● |
| Coaxial digital cable (Sold separately) | ●●●●●●●●●●●●●●●●●●●●●●●●●●●●●●●●●●●●●●●●●●●●●●●●●●●●●●●●●●●●●●●●●●●●●●●●●●●●●●●●●●●●●●●●●●●●● |
| USB cable (Sold separately) | ●●●●●●●●●●●●●●●●●●●●●●●●●●●●●●●●●●●●●●●●●●●●●●●●●●●●●●●●●●●●●●●●●●●●●●●●●●●●●●●●●●●●●●●●●●●●● ● |
| LAN cable (Sold separately) | ●●●●●●●●●●●●●●●●●●●●●●●●●●●●●●●●●●●●●●●●●●●●●●●●●●●●●●●●●●●●●●●●●●●●●●●●●●●●●●●●●●●●●●●●●●●●●± |
| Monaural mini-plug cable (Sold separately) | ○●●●●●●●●●●●●●●●●●●●●●●●●●●●●●●●●●●●●●●●●●●●●●●●●●●●●●●●●●●●●●●●●●●●●●●●●●●●●●●●●●●●●●●●●●●●●●●●●●●●± |
Connecting an amplifier
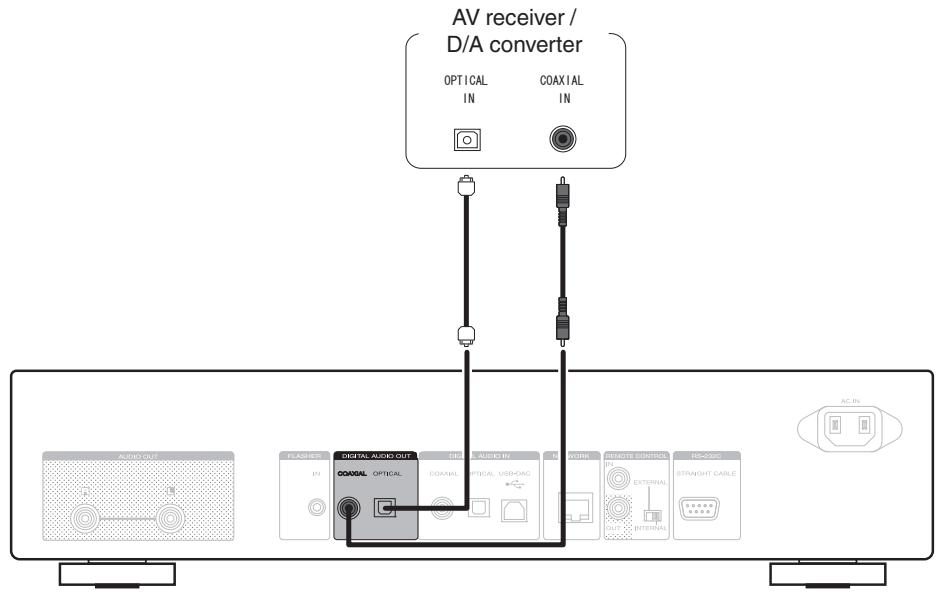
Connecting to a device with digital audio input connectors
Use this connection to output digital audio signals from this unit, and convert the signals for playback using the D/A converter of a connected device.
NOTE
- Digital audio output is stopped during playback of the USB-DAC (DSD signals and linear PCM signals that have a 32 kHz sampling frequency).
- Use the Digital Out button to set the digital audio output on or off. (p. 33)
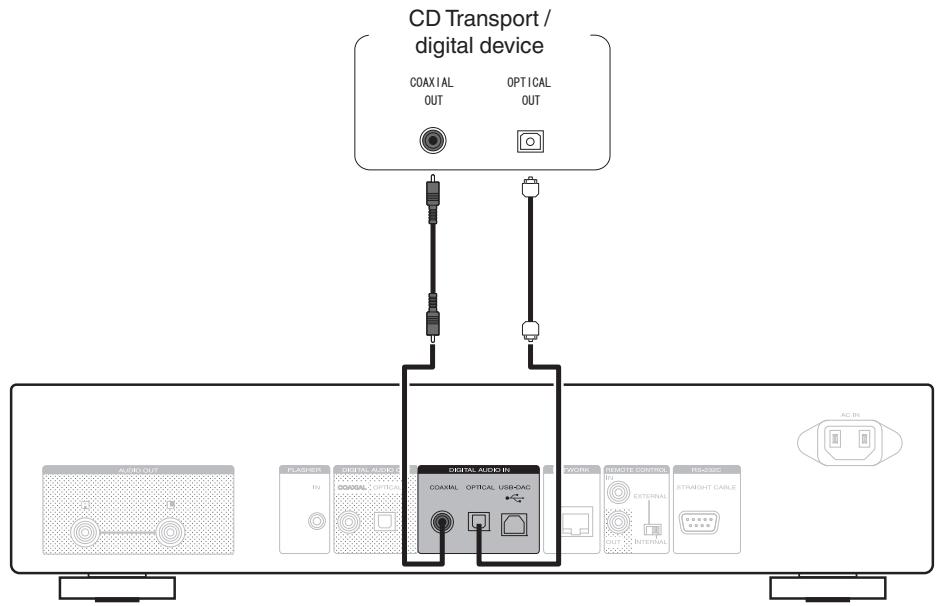
Connecting to a device with digital audio output connectors
Use this connection to input digital audio signals to this unit, and convert the signals for playback using the D/A converter of this unit. (p. 81)
NOTE
- Linear PCM signals with a sampling frequency of 32kHz , 44.1kHz , 48kHz , 64kHz , 88.2kHz , 96kHz , 176.4kHz , or 192kHz can be input into this device.
- Do not input non-PCM signals, such as DTS and AAC. This causes noise and could damage the speakers.
Connecting a PC or Mac
By connecting a computer to the USB-DAC port on the rear panel of this unit using a commercially available USB connecting cable, this unit can be used as a D/A converter. (p. 73)
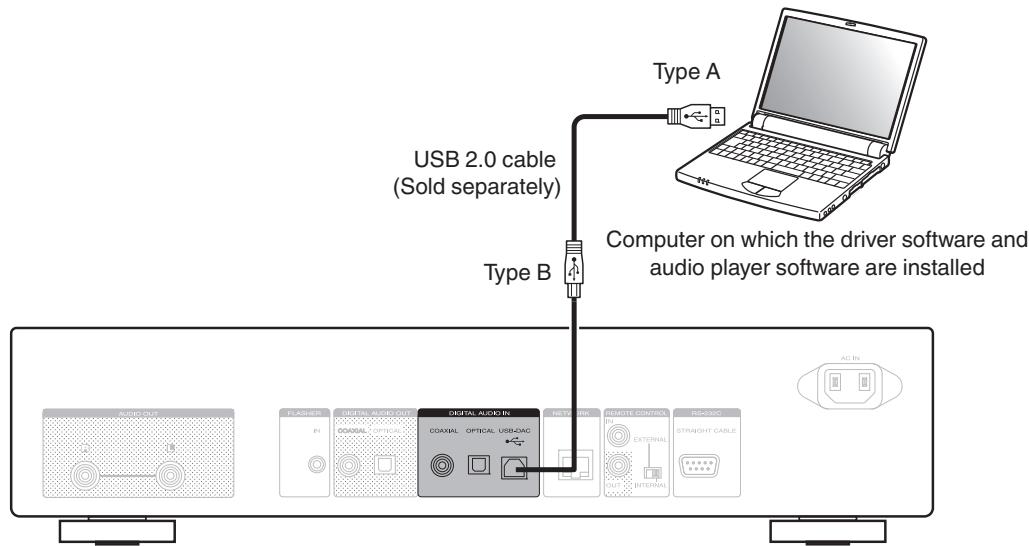

- Install the dedicated driver software on the computer to enable communication between the computer and this unit in order to playback high-resolution sound source (DSD signal or 192 kHz/24 bit PCM signal) audio available on the internet. (Kp.73)
- Download the driver software from the NA8005 page of the Marantz website.
NOTE
Use a cable that is 3m or less to connect to the computer.
Connecting an iPod or USB memory device to the USB port
You can enjoy music stored on an iPod/iPhone or USB memory device.
- To connect an iPod/iPhone to this unit, use the USB adapter cable that was supplied with the iPod/iPhone.
- For operating instructions see "Playing an iPod" (GB p. 56) or "Playing a USB memory device" (GB p. 59).
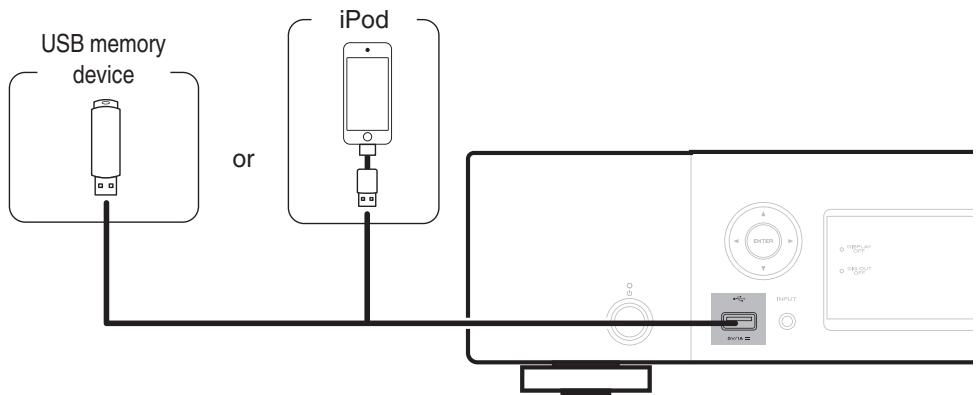

Marantz does not guarantee that all USB memory devices will operate or receive power. When using a portable USB hard disk drive (HDD) which came with an AC adapter, use that device's supplied AC adapter.
NOTE
- USB memory devices will not work via a USB hub.
- Playback is not possible when connected via the front panel's USB port. Connection to a computer is possible via the digital input USB-DAC port (Type B) on the rear panel.
- Do not use an extension cable when connecting a USB memory device. This may cause radio interference with other devices.
Supported iPod/iPhone models
- iPod classic

iPod classic 80GB

iPod classic 160GB (2007)

iPod classic 160GB (2009)
- iPod nano

iPod nano 3rd generation (video) 4GB 8GB

iPod nano 4th generation (video) 8GB 16GB

iPod nano 5th generation (video camera) 8GB 16GB

iPod nano 6th generation 8GB 16GB

iPod nano 7th generation 16GB
- iPod touch

iPod touch 2nd generation 8GB 16GB 32GB

iPod touch 3rd generation 32GB 64GB

iPod touch 4th generation 8GB 16GB 32GB 64GB

iPod touch 5th generation 16GB 32GB 64GB
iPhone

iPhone 3G 8GB 16GB

iPhone 3GS
8GB 16GB 32GB

iPhone 4
8GB 16GB 32GB

iPhone 4S 16GB 32GB 64GB

iPhone 5
iPhone 5c iPhone 5s
16GB 32GB 64GB
Connecting to a home network (LAN)
- This unit lets you play via your home network (LAN) music files stored on a computer and music content such as that from Internet radio. You can also operate this unit from a computer using the Web control function. ("Web control function" (p. 69))
- You can update by downloading the latest firmware from the Marantz website. For more information, see "Firmware" (12 p. 88).
Network settings are required. See "Network" (p. 91).
Wired LAN
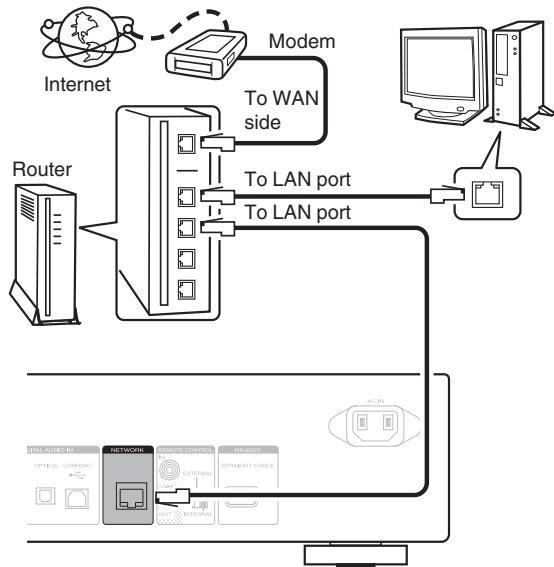
For connections to the Internet, contact an ISP (Internet Service Provider) or a computer shop.
Required system
■ Broadband Internet connection
Modem
Device that connects to your broadband internet provider, and is very often supplied with the service. A type that is integrated with a router is also often available.
Router
When using this unit, we recommend you use a router equipped with the following functions:
Built-in DHCP server
This function automatically assigns IP addresses on the LAN.
Built-in 100BASE-TX switch
When connecting multiple devices, we recommend a switching hub with a speed of 100 Mbps or greater.
LAN cable (CAT-5 or greater recommended)
- Use only a shielded STP or ScTP LAN cable which is easily available at electronics stores.
- The normal shielded-type LAN cable is recommended. If a flat-type cable or unshielded-type cable is used, other devices could be affected by noise.

- When using this unit connected to a network with no DHCP function, make the settings for the IP address, etc., at "Network connection (when "DHCP" settings is "Off")" (R2 p. 92).
- With this unit, it is possible to use the DHCP and Auto IP functions to make the network settings automatically.
- With this unit, it is possible to use the DHCP and Auto IP functions to make the network settings automatically. When this unit is connected to a network that does not have the DHCP function, configure settings such as the IP address, etc. in "Network connection (when "DHCP" setting is "Off")" (ICP p. 92).
- When setting manually, check the setting contents with the network administrator.
NOTE
- A contract with an ISP is required to connect to the Internet.
- No additional contract is needed if you already have a broadband connection to the Internet.
- The types of routers that can be used depend on the ISP. Contact your ISP or a computer shop for details.
- Marantz assumes no responsibility whatsoever for any communication errors or troubles resulting from customer's network environment or connected devices.
- This unit is not compatible with PPPoE. A PPPoE-compatible router is required if you have a contract for a type of line set by PPPoE.
- Do not connect an NETWORK connector directly to the LAN port / Ethernet connector on your computer.
- To listen to audio streaming, use a router that supports audio streaming.
Other connections
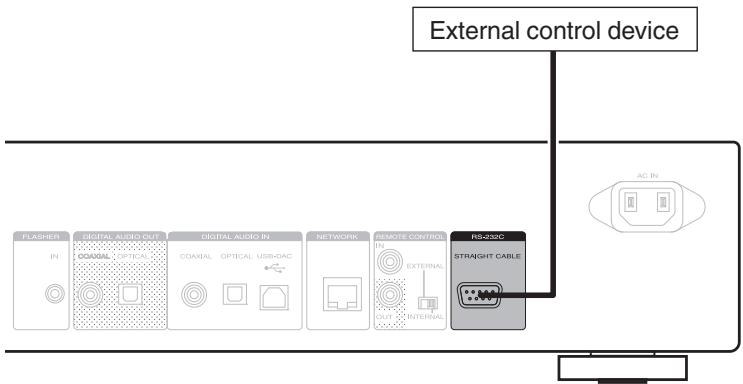
RS-232C connector
Used to connect external control devices.
(Use a straight cable for the connection.)
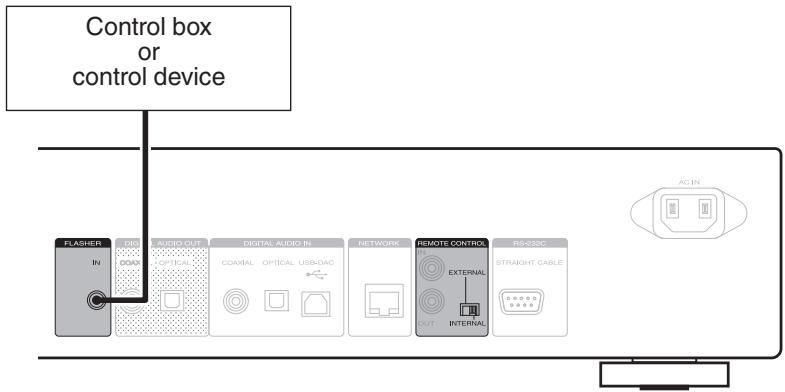
FLASHER IN jack
This unit can be controlled by connecting a control box or other control device to this unit.
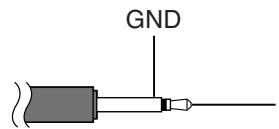
Signal
Monaural mini-plug cable

To use the FLASHER IN jack, set the EXTERNAL/INTERNAL switch to "INTERNAL".
REMOTE CONTROL jack
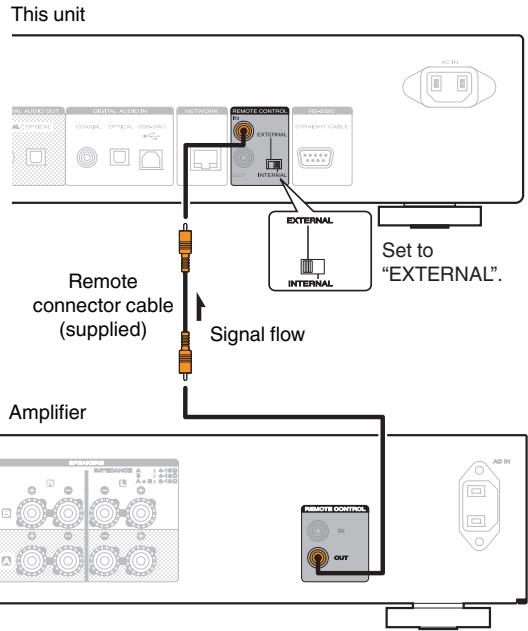
If this unit is connected to a Marantz amp, the amp can be controlled via this unit using the Marantz "Hi-Fi Remote" app. Also, remote control signals received by the amp can be used to control this unit. Next, configure the "Connections" and "Settings".
Connection
Use the supplied remote connector cable to connect the REMOTE CONTROL IN connector of this unit to REMOTE CONTROL OUT connector of the amplifier.
Setting
Turn the EXTERNAL/INTERNAL switch on the unit to "EXTERNAL".
- This setting will disable remote sensor reception of this unit.
- To operate the unit, point the remote control at the remote sensor of the amplifier.

To use this unit by itself without connecting an amplifier, turn the switch to "INTERNAL".
Connecting the power cord
Wait until all connections have been completed before connecting the power cord.
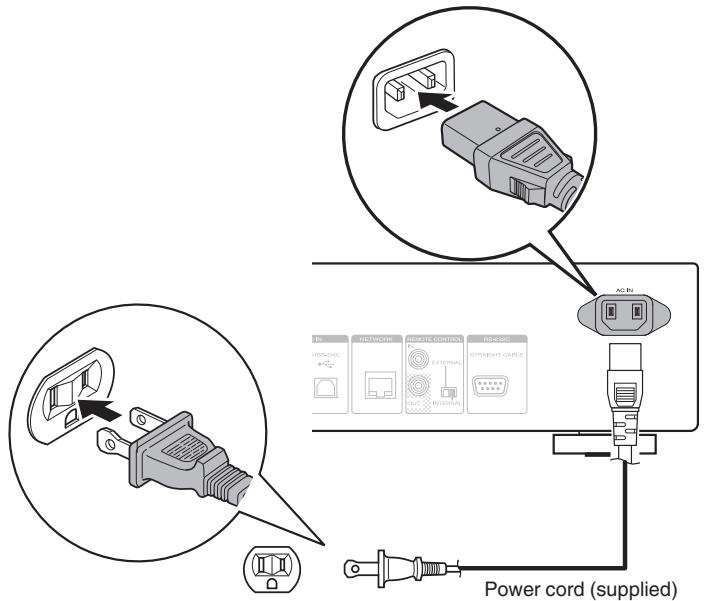
To household power outlet
(AC 120 V, 60 Hz)
Contents
Basic operation 31
Listening to Internet Radio 34
Playing back files stored on PC and NAS 38
Listening to Pandora 43
Listening to SiriusXM Internet Radio 48
Spotify Connect function 51
Favorite function 52
Playing an iPod 56
Playing a USB memory device 59
AirPlay function 63
Remote play function 66
Web control function 69
Using as a D/A converter (USB-DAC) 72
Basic operation
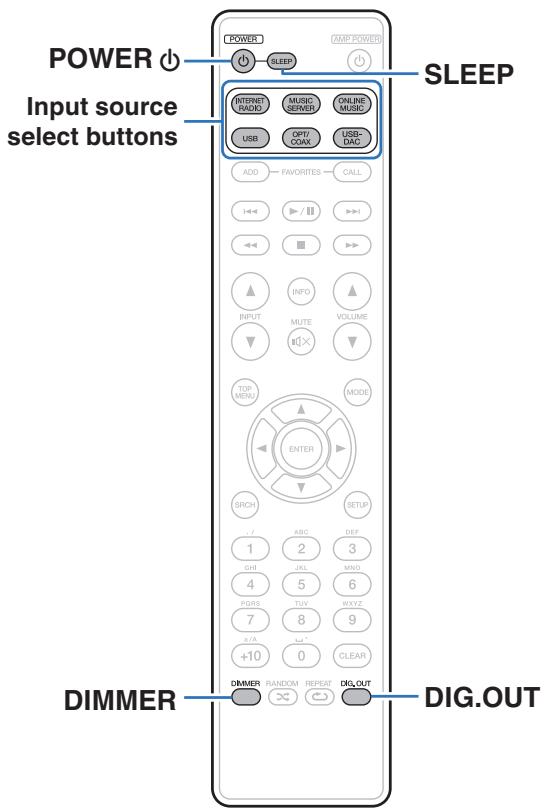
Turning the power on
1 Press POWER to turn on power to the unit. The power indicator turns off.

- You can also switch the power to standby by pressing on the main unit.
- When you turn on the power of this unit for the first time after purchasing it, the "Quick Setup" menu starts up. For details on "Quick Setup" operations, see the separate "Quick Start Guide".
- If you cancelled "Quick Setup" menu or changed the network environment, perform "Setup" - "Quick Setup".
Switching the power to standby
1 Press POWER
The unit switches to standby mode.
Power indicator
Normal standby : Red
When "Network Control" is set to "On": Orange
iPod charge standby : Orange
NOTE
Power continues to be supplied to some of the circuitry even when the power is in the standby mode. When leaving home for long periods of time or when going on vacation, unplug the power cord from the power outlet.
Completely turning off the power
Unplug the power cord from the wall outlet.
Selecting the input source
Selecting the input source using the remote control
1 Press the input source select button to be played back.
- The desired input source can be selected directly.
Selecting the input source using the main unit
1 Press INPUT.
The input source is switched each time the button is pressed.
Switching the display's brightness
The display brightness can be adjusted between four levels. Switching the display off reduces a source of noise that affects sound quality, enabling higher sound quality playback.
1 Press DIMMER.

- When the display is turned off, the "DISPLAY OFF" indicator lights up on the display.
- If you operate the buttons when the display brightness is set to "Off", the display temporarily lights at 100% brightness level.
Stopping digital outputs
Stopping digital audio output reduces a source of noise that affects sound quality, enabling higher sound quality playback.
1 Press DIG. OUT.
The digital audio output is switched on and off each time the button is pressed.
- When digital output is turned off, the "DIG. OUT OFF" indicator lights up on the display.
Using the sleep timer
Use this function to automatically switch the power to the standby mode after a specific amount of time (minutes).
1 Press SLEEP during playback and select the setting time.
- The sleep timer can be set to up to 90 minutes, in steps of 10 minutes.
- After about 3 seconds, the setting is entered and the display returns to as it was before.
Canceling the sleep timer
Either press SLEEP to select "Sleep OFF" or press POWER .
To check the time remaining until the sleep timer is activated
Press SLEEP.
Listening to Internet Radio
- Internet Radio refers to radio broadcasts distributed over the Internet.
Internet Radio stations from around the world can be received. - The broad cast station types and specifications supported by this unit for playback are as follows.
WMA (Windows Media Audio)
- MP3 (MPEG-1 Audio Layer-3)
MPEG-4 AAC
Listening to Internet Radio
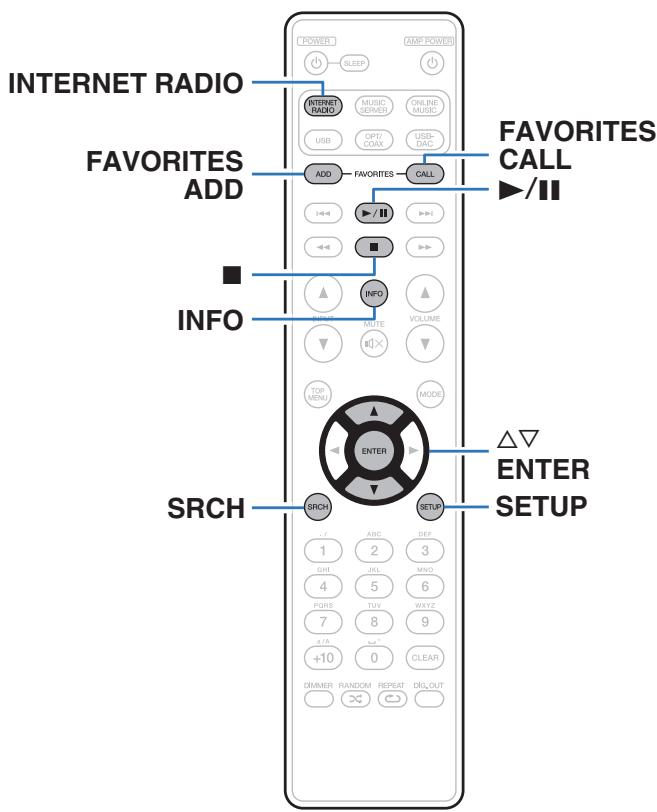
This unit memorizes the last played Internet Radio station. If you press INTERNET RADIO to switch to the Internet Radio function from another input source, the last Internet Radio station you listened to is played.
1 Prepare for playback.
- Check the network environment, then turn on this unit's power. (1 p. 24)
2 Press INTERNET RADIO.
3 Use to select the you want to play, then press ENTER.
| ***** (Country name) : | Displays typical Internet Radio stations your country. |
| Search Stations : | Displays all Internet Radio stations that this unit can tune in to. |
| Search Podcasts : | Displays Internet Radio stations in the podcasts that this unit can tune in to. |
| Recommended Stations : | Displays recommended Internet Radio stations. |
| radiomarantz.com : | Displays Internet Radio stations added to favorites in vTuner. For instructions on how to add to favorites in vTuner, see “Using vTuner to add Internet Radio stations to favorites” (p. 37). |
| Recently Played : | Displays recently played Internet Radio stations. Up to 20 stations can be stored in “Recently Played”. |
| Search by Keyword : | Displays Internet Radio stations searched by keyword. For character input, see “Inputting characters” (p. 85). |
4 Use to select the station, then press ENTER.
Playback starts once buffering reaches "100%".
| Operation buttons | Function |
| ►/■ | Playback |
| ■ | Stop |
| FAVORITES CALL | Call from the Favorite list |
| FAVORITES ADD | Add to the Favorite list |
| SRCH | Character search |
| • If the list is not in alphabetical order, you may not be able to perform a character search. | |
| INFO | Switching the file type/ bit rate and radio station name etc. |

Any characters that cannot be displayed are replaced with "." (period).
NOTE
The radio station database service may be suspended or be otherwise unavailable without notice.
Using vTuner to add Internet Radio stations to favorites
There are many Internet Radio stations in the world, and this unit can tune into these stations. But finding the radio station you want to hear may be difficult, because there are too many stations. If this is the case, then please use vTuner, an Internet Radio station search website specifically designed for this unit. You can use your PC to search Internet Radio stations and add them as your favorites. This unit can play radio stations added to vTuner.
1 Check the MAC address of this unit.
-
The MAC address is necessary when you create an account for vTuner.
2 Use your PC to access the vTuner website (http:// www.radiomarantz.com).
3 Enter the MAC address of this unit, then click "Go".
4 Enter your E-mail address and a password of your choice.
5 Select the search criteria (genre, region, language, etc.) of your choice. -
You can also enter a keyword to search for a station you want to hear.
6 Select the radio station of your choice from the list, and then click the Add to Favorites icon.
7 Enter the name of the favorite group, then click "Go".
A new favorite group that includes the selected radio station is created.
- Internet Radio stations added to favorites in vTuner can be played from "radiomarantz.com" (p. 35) with this unit.
Files that can be played back
See "Playing back Internet Radio" (p. 108).
Playing back files stored on a PC and NAS
- This unit can play back music files and playlists (m3u, wpl) stored on a PC and on Network Attached Storage (NAS) that supports DLNA.
-
The network audio playback function of this unit connects to the server using technologies shown below.
-
Windows Media Player Network Sharing Service
-
This unit can play back the following files.
WMA (Windows Media Audio)
- MP3 (MPEG-1 Audio Layer-3)
WAV
MPEG-4 AAC
- FLAC (Free Lossless Audio Codec)
- ALAC (Apple Lossless Audio Codec)
- AIFF
- DSD (2-channel)
Applying media sharing settings
Here, we apply the settings to share music files stored on a PC and NAS on the network.
If you are using a Media Server, be sure to apply this setting first.
Windows Media Player 12 (Windows 7 / Windows 8)
NOTE
Perform this procedure after changing the control panel display to "Category".
1 Start up Windows Media Player 12 on the PC.
2 Select "More streaming options..." in the "Stream".
3 Select "Allowed" in the drop-down list for "Marantz NA8005".
4 Select "Allowed" in the drop-down list for "Media programs on this PC and remote connections...".
5 Follow the screen instructions to end the setting.
When using Windows Media Player 11
1 Start up Windows Media Player 11 on the PC.
2 Select "Media Sharing" in the "Library".
3 Click the "Share my media" check box, select "Marantz NA8005", and then click "Allow".
As you did in step 3, select the icon of the device (other PCs and mobile devices) you want to use as a media controller, and then click "Allow".
5 Click "OK" to finish.
Sharing media stored in NAS
Change settings on the NAS to allow this unit and other devices (PCs and mobile devices) used as media controllers to access the NAS. For details, see the owner's manual that came with the NAS.
Playing back files stored on PC and NAS
Use this procedure to play music files or playlists.
1 Prepare for playback.
① Check the network environment, then turn on this unit's power. (p. 31)
② If settings are required, make the "Network" (p. 92).
③ Prepare the computer. ("Applying media sharing settings" (R B p. 39), "About Music server" (R B p. 42))
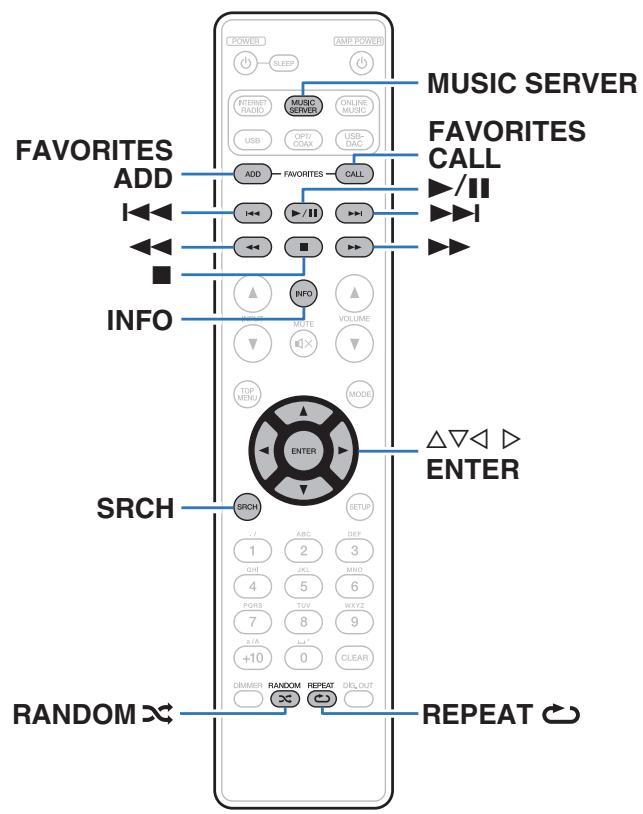
2 Press MUSIC SERVER to switch the input source to "Music Server".
3 Use to select the server including the file to be played, then press ENTER.
4 Use to select the search item or folder, then press ENTER.
5 Repeat step 4 until the file is displayed.
6 Use to select the file, then press ENTER. Playback starts once buffering reaches "100%".

WMA Lossless files can be played when using a server supporting transcoding, such as Windows Media Player (Ver.11 or later).
NOTE
- When playing back music files with your PC or NAS connected through wireless LAN, audio may be interrupted depending on your wireless LAN environment. In this case, play back music files with your PC or NAS connected through wired LAN.
- The order in which the tracks/files are displayed depends on the server specifications. If the tracks/files are not displayed in alphabetical order due to the server specifications, searching by the first letter may not work properly.
Performing repeat playback
1 Press REPEAT
Repeat playback starts.
- The repeat mode is switched each time the button is pressed.

(Single-track repeat):
Only 1 track plays repeatedly.

(All-track repeat):
All tracks within the current playback folder are repeated.
Repeat off (indicator turns off): Normal playback resumes.
Performing random playback
1 Press RANDOM
The × indicator on the display is lighted and all tracks in the current playback folder are randomly played back.
Canceling random playback
Press RANDOM
The × indicator on the display turns off.
Music server operation
| Operation buttons | Function |
| FAVORITES ADD | Add to the Favorite list |
| FAVORITES CALL | Call from the Favorite list |
| Δ∇< ▷ | Cursor operation |
| ENTER | Enter |
| SRCH | Character search*1 |
| ←▶ ▷ | Skip search (cue) |
| ←▶ ▷ | Manual search (fast-reverse/fast-forward) |
| ▷/■ | Playback / Pause |
| ■ | Stop |
| REPEAT ⇌ | Repeat playback (▷ p. 41) |
| RANDOM × | Random playback (▷ p. 41)*2 |
1 Press SRCH, then press ENTER to select the first letter you want to search mode.
2 During random playback of files stored on a computer, each time playback of a track is completed, another track is randomly selected for playback from tracks in the folder.

- If the list is not in alphabetical order, you may not be able to perform a character search.
- Depending on the server being used, some functions may be limited.
Switching the display
During playback, press INFO.
- The display switches between the artist name, album name and file type/bit rate of the track being played back.
Listening to Pandora®
Pandora is free personalized internet radio, powered by the Music Genome Project®.
To listen to Pandora you will need a free Pandora account.
If you do not have a Pandora account, you can create one at
www.pandora.com or from the Pandora smartphone application.
Playback of Pandora in this unit requires the Pandora account to be linked to the unit. Therefore, access http://www.pandora.com/marantz from your personal computer and perform the linkage.
Connecting to Pandora
1 Prepare for playback.
- Check the network environment, then turn on this unit's power. ("Connecting to a home network (LAN)" (p. 24))
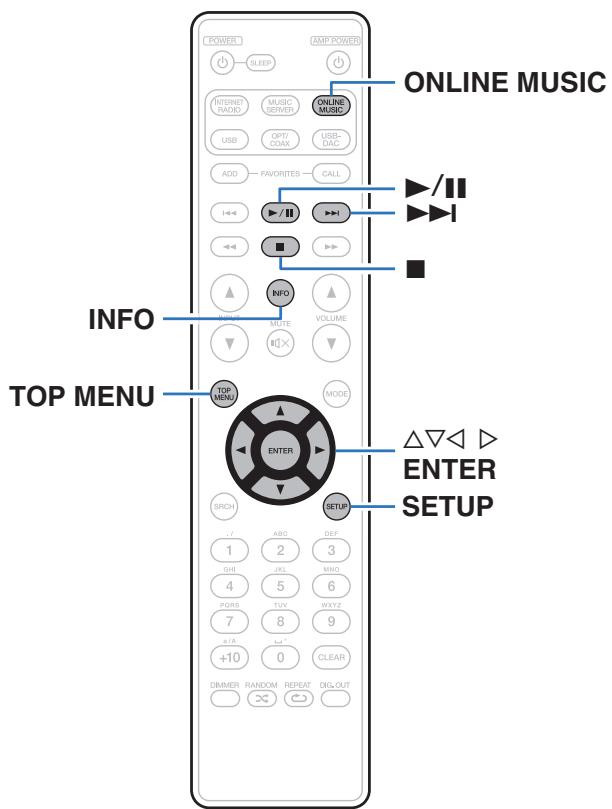
2 Press ONLINE MUSIC to switch the input source to "Pandora".
3 If you have a Pandora account, use to select "I have a Pandora account", then press ENTER.
- If you do not have a Pandora account, press to select "I am to new to Pandora", then press ENTER.
The URL needed to activate Pandora and the activation code will be displayed.
Browse to the Pandora activation URL from your PC and follow the on-screen instructions for creating a new account.
4 Input "Email address" and "Password".
- For character input, see "Inputting characters" (p. 85).
- Press TOP MENU to cancel the input.
After inputting the "Email address" and "Password", select "Login", then press ENTER.
If the "Email address" and "Password" match, the top menu for Pandora is displayed.
Creating a new station
You can create up to 100 radio stations.
1 Use to select "New Station", then press ENTER.
2 Input a track or artist name, then press ENTER.
- For character input, see "Inputting characters" (p. 85).
3 Use to select "Search by Artist" or "Search by Track", then press ENTER.
You can search and display a list by track or artist.
4 Use , select a file from the list, press ENTER.
New station is created.

Your new station will play music with similar qualities to the artist or track you entered.
| Operation buttons | Function |
| Δ∇<▷ | Cursor operation |
| ENTER | Enter |
| SETUP | SETUP |
| ▷/■ | Playback / Pause |
| ▷>I | Auto search (cue) |
| ■ | Stop |
Listening to an existing station
1 Use and select the radio station that you want to listen to, then press ENTER.

You can skip up to 6 tracks that are being played back within 1 hour.
Listening to created radio stations at random
1 Use to select "Shuffle", then press ENTER.
Created radio stations are selected at random, and tracks are streamed.
Giving feedback and managing stations
You can personalize your stations by providing feedback.
1 Press while a track is playing.
The Pandora menu screen is displayed.
| I like this track : | Press when you like the track that is being played. Display the 🅥 (Thumbs up) icon. |
| I don’t like this track : | Press when you don’t like the track that is being played. Delete that track from the radio station. Display the 🅥 (Thumbs down) icon. |
| Create station : | Creates a station for the track or artist being played. |
| Bookmark this track : | Bookmarks the artist currently being played. See your bookmarks on www.pandora.com. |
| Delete this station : | Press when you want to delete the station that is being played. |
Sign Out
Disassociate this unit from your Pandora account.
1 Use to select "Sign Out", then press ENTER.
2 Use to select "Yes", then press ENTER.
Switching the display
During playback, press INFO.
- The station name, artist name and album name are displayed.
Listening to SiriusXM Internet Radio
You can access SiriusXM to enjoy access to a wide range of unique content.
An All Access package lets you listen to SiriusXM on your computer, smartphone, tablet or Lynx Portable.
For details, see the SiriusXM homepage.
http://www.siriusxm.com
Listening to SiriusXM Internet Radio
Over 155 channels commercial-free music, plus play-by-play sports, exclusive talk, comedy and entertainment.
1 Prepare for playback.
① Check the network environment, then turn on this unit's power. ("Connecting to a home network (LAN)" (p. 24))
② Access the following website from your PC and obtain a SiriusXM account. http://www.siriusxm.com
- If you already have SiriusXM Internet Radio credentials, select Sign in in step 4 and enter your SiriusXM username and password. If you need to setup a SiriusXM account or Internet Radio credentials, visit www.siriusxm.com/care
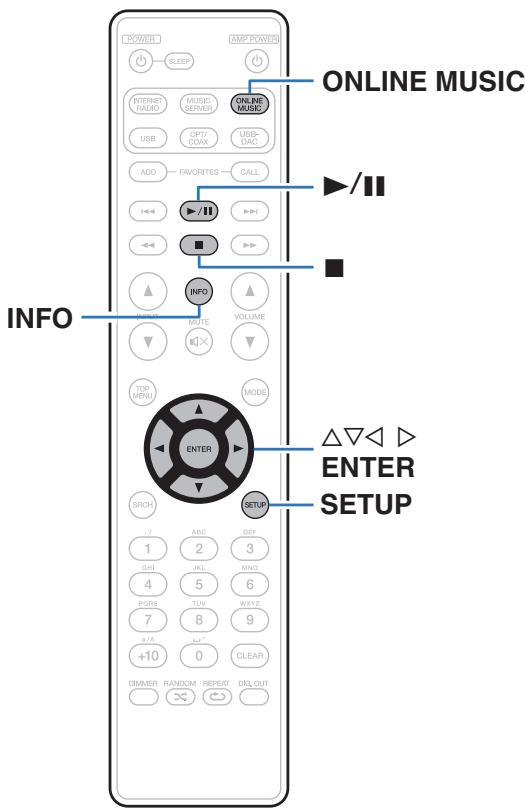
2 Press ONLINE MUSIC to switch the input source to "SiriusXM".
3 Select "Sign in" and then press ENTER.
4 Input "Username" and "Password".
- For character input, see "Inputting characters" (p. 85).
5 Select the "Sign in", then press ENTER.
The top menu of SiriusXM is displayed.
6 Use to select the genre, then press ENTER.
7 Use to select the file, then press ENTER.
The selected file is displayed.
| Operation buttons | Function |
| Δ ∇ <▷ | Cursor operation |
| ENTER | Enter |
| SETUP | SETUP |
| ▷/■ | Playback |
| ■ | Stop |
Sign Out
Disassociate this unit from your SiriusXM account.
1 Use to select "Sign out", then press ENTER.
2 Use to select "OK", then press ENTER.
Switching the display
1 During playback, press INFO.
- The artist name, station name and file type are displayed.
Spotify Connect function
Spotify is the world's most popular streaming service. If you subscribe to Spotify Premium, you can control your new speaker with your phone or tablet. Because Spotify is built-in to your speaker, you can still take calls or use other apps - the music never stops.
To try Spotify Premium free for 30 days, or learn more about Connect, please go to www.spotify.com/connect
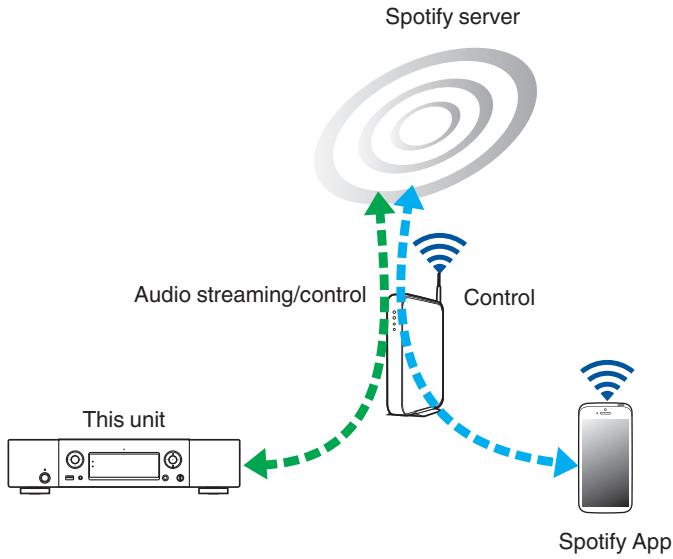
Playing Spotify music with this unit
Download the "Spotify App" onto your Android or iOS device beforehand. To play a Spotify track in this unit, you need to register in the Spotify premium account first.
1 Connect the Wi-Fi settings of the iOS or Android device in the same network as this unit.
2 Launch the Spotify App.
3 Play back the Spotify track.
4 Tap the 念 icon to select the unit.
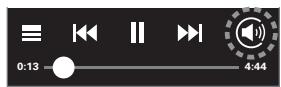
The music will stream to this unit.
Favorite function
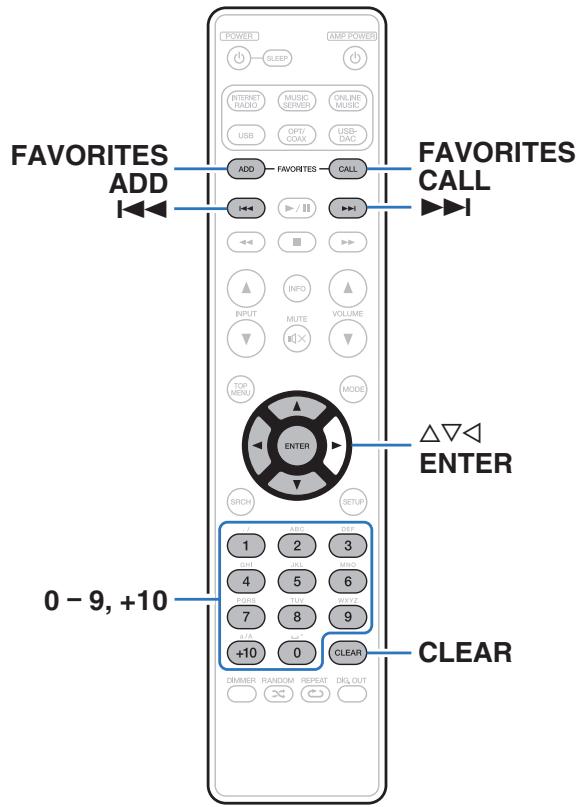
This section provides information on the Favorite function.
- The Favorite function allows you to register your favorite broadcast stations and files in the Favorite List in advance so that you can call and listen to the stations or files right away, whenever you want.
- The contents that you can register and call are Internet radio station and music server.
- You can register up to 50 items in the Favorite List.
Registering stations or files to the favorites list
1 Press FAVORITES ADD while the Internet radio station or file to register is played back.
The Favorite list appears.
2 Use to select a number to register the station or file, and press ENTER.
"Added To Favorites" is displayed and the registration is competed.
Calling stations or files from the favorites list
1 Press FAVORITES CALL.
The Favorite list appears.
2 Press , or to select the station or file that you want to call, and press ENTER.
The respective function starts up and playback starts.
- Press 0 - 9, +10 to call files registered to the Favorite list by number.
To switch between registered stations and files during playback
Press I △, ▷or △V.
Deleting stations or files from the favorite list
Press FAVORITES CALL.
The Favorite list appears.
2 Use to select the station or file that you want to delete, and press CLEAR.
When the prompt "Delete?" appears, press ENTER.
3 "Deleted" is displayed and the deletion is completed.
To cancel the operation
Press
Playing back an iPod
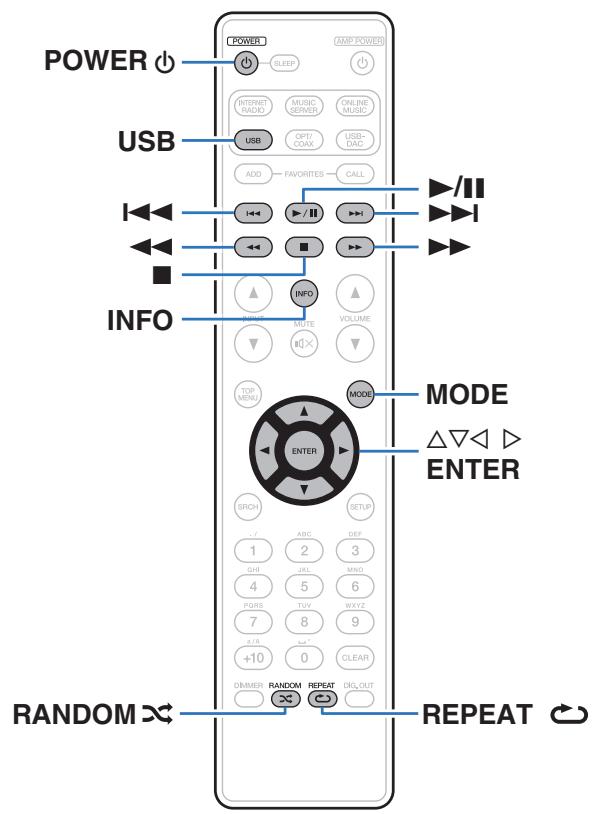
- You can use the USB cable provided with the iPod to connect the iPod with the unit's USB port and enjoy music stored on the iPod.
- For information on the iPod models that can be played back with this unit, see "Supported iPod/iPhone models" (p. 23).
Playing an iPod
1 Press USB to switch the input source to "USB".
2 Connect the iPod to the USB port. (p. 22)
3 Operate iPod itself directly while seeing the iPod screen to play back music.
4 Press MODE to select the display mode.
The display mode switches each time MODE is pressed.
- There are two modes for displaying the contents recorded on the iPod.
| Remote mode: | Display iPod information on the display of this unit. |
| Direct mode (Default): | Display iPod information on the iPod screen. |
| Display mode | Remote mode | Direct mode | |
| Display location | Main unit Display | iPod Display | |
| Playable files | Music file | ✓ | ✓ |
| Video file | ✓* | ||
| Active buttons | Remote control unit (This unit) | ✓ | ✓ |
| iPod | ✓ | ||
- Only the sound is played.
5 Use to select the item, then press ENTER to select the music file to be played.
6 Press /II.
Playback starts.
NOTE
- Marantz will accept no responsibility whatsoever for any loss of iPod data.
- Depending on the type of iPod and the software version, some functions may not operate.
Performing repeat playback
1 Press REPEAT
Repeat playback starts.
- The repeat mode is switched each time the button is pressed.
(Single-track repeat): Only 1 track plays repeatedly.
All-track repeat: All tracks within the current playback folder are repeated.
Repeat off (indicator turns off): Normal playback resumes.
Performing random playback
1 Press RANDOM.
The indicator on the display is lighted and all tracks in the current playback folder are randomly played back.
Canceling random playback
Press RANDOM
The × indicator on the display turns off.
iPod operation
| Operation buttons | Function |
| MODE | Switch between the Remote mode and the Direct mode |
| △▽ | Cursor operation (Up/Down) |
| < | Display the menu / Return to the previous menu |
| ENTER or > | Enter settings/playback |
| I←, ➔I | Skip search (cue) |
| <, ➔ | Manual search (fast-reverse/fast-forward) |
| ▷/■ | Playback / Pause |
| ■ | Stop |
| REPEAT ⇌ | Repeat playback ( ⇌p. 57) |
| RANDOM × | Shuffle playback ( ⇌p. 57) |
Switching the display
During playback, press INFO.
- Switching between the title name, artist name and album name.
Disconnecting the iPod
1 Press POWER to set the standby mode.
2 Disconnect the iPod from the USB port.
Charging the iPod
You can charge your iPhone/iPod by connecting it to the USB port.
Standby charging
If the unit enters power standby mode while the iPod/iPhone is charging, the unit will switch to standby charging mode, and the iPod/ iPhone will continue to be charged. When in standby charging mode, the power display light turns orange.
When the iPhone/iPod is fully charged, the unit automatically stops supplying power for charging and enters normal power standby mode, and the power display light turns red.
- When the "Network Control" setting is "On", the power indicator lights orange when charging is complete.
Playing a USB memory device
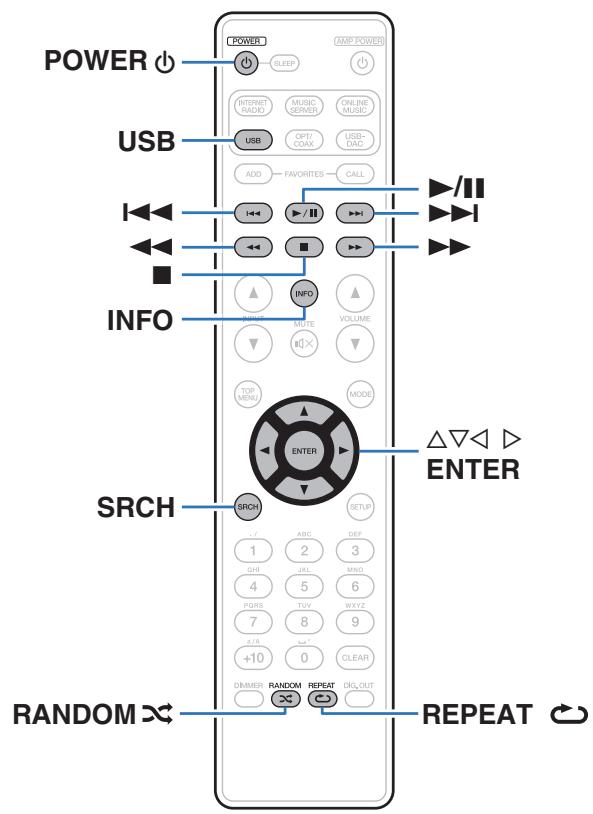
- Playing back music stored on a USB memory device.
- Only USB memory devices conforming to mass storage class and MTP (Media Transfer Protocol) standards can be played on this unit.
- This unit is compatible with USB memory devices in "FAT16" or "FAT32" format.
- This unit can play back the following files.
WMA (Windows Media Audio)
- MP3 (MPEG-1 Audio Layer-3)
WAV
- AAC (Advanced Audio Codec)
- FLAC (Free Lossless Audio Codec)
- ALAC (Apple Lossless Audio Codec)
AIFF
DSD
Playing files stored on USB memory devices
1 Press USB to switch the input source to "USB".
2 Use to select the file or folder, then press ENTER.
3 Use to select the file, then press ENTER. Playback starts.

- If the USB memory device is divided into multiple partitions, only the top partition can be selected.
- Marantz does not guarantee that all USB memory devices will operate or receive power. When using a portable USB hard disk drive (HDD) which came with an AC adapter, use that device's supplied AC adapter.
NOTE
- USB memory devices will not work via a USB hub.
- Playback is not possible when connected via the front panel's USB port.
- To play another file while playing from a USB memory device, press to display the folder tree, to select the file to be played, and then press ENTER.
- Do not use an extension cable when connecting a USB memory device. This may cause radio interference with other devices.
- Files can be read from a USB memory device by connecting the device to this unit. The file reading time varies according to the amount of data saved on the USB memory device. Several minutes may be required to read the maximum permissible number of files and folders.
- Note that Marantz will accept no responsibility whatsoever for any problems arising with the data on a USB memory device when using this unit in conjunction with the USB memory device.
Performing repeat playback
1 Press REPEAT
Repeat playback starts.
- The repeat mode is switched each time the button is pressed.

(Single-track repeat):
Only 1 track plays repeatedly.

(All-track repeat):
All tracks within the current playback folder are repeated.
Repeat off (indicator turns off): Normal playback resumes.
Performing random playback
1 Press RANDOM
The indicator on the display is lighted and all tracks in the current playback folder are randomly played back.
Canceling random playback
Press RANDOM
The × indicator on the display turns off.
Removing the USB memory device
1 Press POWER to set the standby mode.
2 Check that the communication indicator on the USB memory device is not flashing, then pull out the USB memory device.
NOTE
Do not remove the USB memory device from the unit when the USB memory communication indicator is flashing. Doing so may damage the USB memory device, or may corrupt the files recorded on the USB memory device.
USB operation
| Operation buttons | Function |
| Δ ∇ | Select the item |
| ENTER | Enter the selected item / Playback |
| ← | Moving up a level in the folder tree |
| SRCH | Character search*1 |
| ↓↓ → ↑ | Skip search (cue) |
| ←↓, → ↑ | Manual search (fast-reverse/fast-forward) |
| →/■ | Playback / Pause |
| ■ | Stop |
| REPEAT ⇌ | Repeat playback ( ⇌ p. 61) |
| RANDOM × | Random playback ( ⇌ p. 61)*2 |
1 Press SRCH, then press ENTER to select the first letter you want to search mode.
2 During random playback of files stored on a USB memory device, each time playback of a track is completed, another track is randomly selected for playback from tracks in the folder.

If the list is not in alphabetical order, you may not be able to perform a character search.
Switching the display
During playback, press INFO.
- The display switches between the track name, artist name, album name and file type/bit rate.
AirPlay function
Music files stored on your iPhone, iPod touch, iPad or iTunes can be played on this unit via the network.

- Source input will be switched to "AirPlay" when AirPlay playback is started.
- You can stop AirPlay playback by pressing or choosing other input source.
- To see artist name or album name together, press INFO.
- For information about how to use iTunes, also see the Help for iTunes.
- The screen may differ depending on the OS and software versions.
- When you connect iPod to the USB connector during AirPlay playback, AirPlay playback stops.
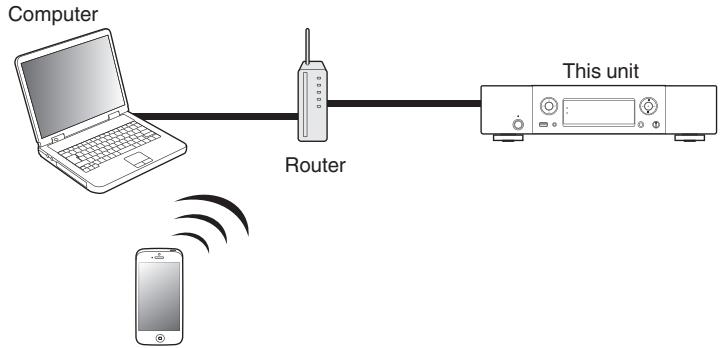
Playing iPhone, iPod touch music with this unit
If you update your "iPhone/iPod touch/iPad" to iOS 4.2.1 or later, you can stream music stored in your "iPhone/iPod touch/iPad" directly to this unit.
1 Connect your iPhone, iPod touch or iPad Wi-Fi to the same network as this unit.
- For details, see your device's manual.
2 Turn this unit ON.
Set "Network Control" to "On" for this unit. (p. 91)
NOTE
When "Network Control" is set to "On", the unit consumes more standby power.
3 Play the song on your iPhone, iPod touch or iPad.
is displayed on the iPhone, iPod touch or iPad screen.
4 Tap the AirPlay icon.
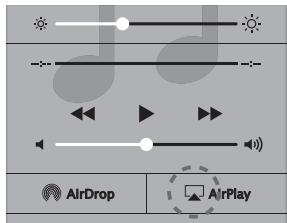
5 Check the speakers you want to use.
Playing iTunes music with this unit
1 Install iTunes 10, or later, on a Mac or Windows PC that is connected to the same network as this unit.
2 Turn this unit ON.
Set "Network Control" to "On" for this unit. (p. 91)
NOTE
When "Network Control" is set to "On", the unit consumes more standby power.
3 Start iTunes and click the AirPlay icon to select the main unit.

4 Choose a song and click play in iTunes.
The music will stream to this unit.
Selecting multiple speakers (devices)
It is possible to play iTunes songs on your home's AirPlay compatible speakers (devices) other than those of this unit.
1 Click the AirPlay icon and select "Multiple".
2 Check the speakers you want to use.
NOTE
In playback using the AirPlay function, the sound is output at the iPhone, iPod touch, iPad or iTunes volume setting level.
You should turn down the iPhone, iPod touch, iPad or iTunes volume prior to playback and then adjust it to a suitable level.
Remote play function
The relevant devices should comply with the DLNA (Digital Living Network Alliance) Ver. 1.5 standard. You can use your home network to play back with this unit music files stored on PC, NAS, smartphones and portable audio players. In this case, you use PC, smartphones and portable audio players for operations.
At this time, the operations are performed using the computer, smartphone or portable audio player.

- The relevant devices should comply with the DLNA (Digital Living Network Alliance) Ver. 1.5 standard.
- A wireless LAN environment is required for playing back music files on smartphones or portable audio players.
- For some smartphones, you must install an application for DLNA music playback.
■ Roles each device plays
The following devices are used for Remote Play. As specified in the DLNA standard, these devices are called DMC, DMS or DMR according to their role.
| Name | Device example | Role |
| DMC(Digital Media Controller) | • Computer • Smartphone • Portable audio player | Performs Remote Play operations. DMC can also play back music files stored on these devices. |
| DMS(Digital Media Server) | • Computer • NAS (Network Attached Storage) | Stores music files. Music files stored on these devices are played back with DMC. |
| DMR(Digital Media Processor) | • This unit | Outputs audio of music files played back through Remote Play from speakers. DMR cannot perform playback operations. |
Files that can be played back
See "Playing back files stored on a PC and NAS" (p. 109).
Settings required for each device
You must make settings on DMC and DMS for Remote Play. Make the following settings. Also see the owner's manual of each device for settings.
Settings on computer and NAS
Make settings on computer and NAS to exchange data with DMR devices.
For details on the settings, see "Applying media sharing settings" (p. 39).
Settings on smartphones
You must install an application for DLNA music playback on your smartphone to perform operations on DMS and this unit (DMR) with your smartphone. The applicable application differs according to your smartphone.

Some smartphones support DLNA music playback with the factory settings. See the owner's manual of your smartphone.
Settings on portable audio players
Make settings so that this unit (DMR) can play back music files stored on your portable audio player. For settings, see the owner's manual of your portable player.
Settings on this unit
Connect this unit to the DLNA network. You do not need to make other settings.
For the network connection, see the provided Quick Start Guide, "Connecting to a home network (LAN)" (p. 24) and "Network" (p. 91).
Remote Play operations
Operations are different for each device, but the procedures for preparing for Remote Play are the same. The preparation procedures are shown below.
1 Turn on this unit.
- Make sure that this unit is connected to the network.
2 Display the music file playback screen on DMC.
- For PC, open Windows Media Player 12, etc.
- For smartphones, switch to the music file playback mode.
3 Select the friendly name of this unit for the item that sets the playback device on the playback screen.
- The default Friendly Name of this unit is "Marantz NA8005".
4 Start playing back a music file on DMC.
- The function on this unit automatically switches to Music Server and the Remote Play mark appears on the display. Remote Play starts.
NOTE
During Remote Play, you cannot perform playback operations with this unit. Use the DMC device for these operations.
To exit Remote Play
1 Press
- The Remote Play mode ends.
Web control function
You can control this unit from a web control screen on a web browser.

- This unit and the PC need to be connected to the network properly in order to use the web control function. (p. 24)
- Depending on the settings of your security-related software, you may not be able to access this unit from your PC. If this is the case, then change the settings of the security-related software.
1 Switch the "Network Control" setting to "On". (p. 91)
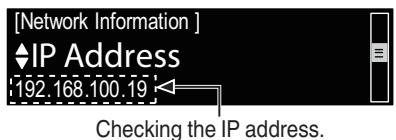
2 Check the IP address of this unit with "Network Information".
3 Start up the web browser.
4 Enter the IP address of this unit in browser's address box.
For example, if the IP address of this unit is "192.168.100.19", enter "http://192.168.100.19".
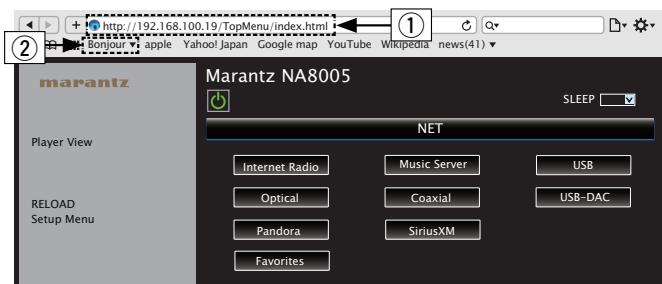
① Entering the IP address.
- By adding this unit's IP address to the browser's bookmark, you can display the web control screen using the bookmark function the next time you use the browser. If you are using a DHCP server and "Network Control" (p.91) is set to "Off", turning the power on/off changes the IP address.
② If you are using the Safari web browser, you can select "Bonjour" and directly access the unit's web control screen from the overview section.
5 When the top menu is displayed, click on the menu item you want to operate.
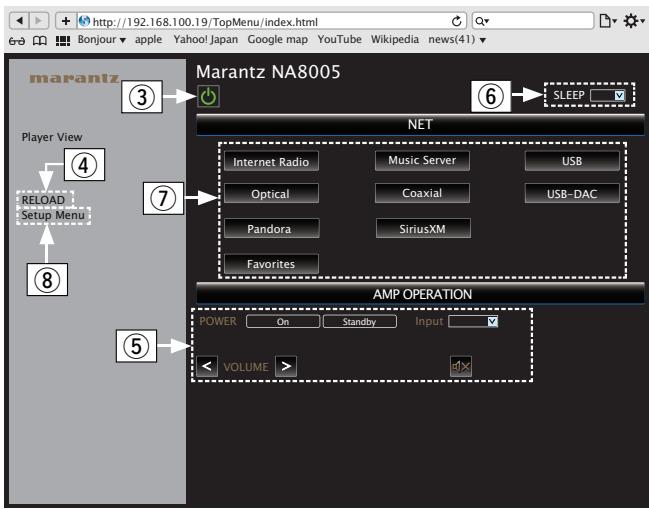
③ Click when you perform a power operation of the unit.
④ Click when you update to the latest information. Normally, there is a change to the latest information each time you operate. When operating from the main unit, click this or else the screen will not be updated.
⑤ Click to operate the Marantz amp connected by Remote connector cable. (p. 28)
(6) Click "v" to set the sleep timer function.
① Click a button to change the input source.
⑧ Click when you operate the setup menu.
6 Operate.
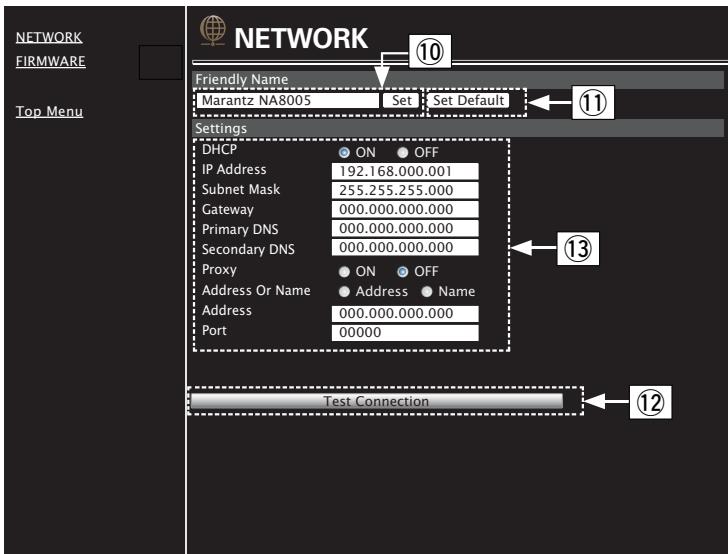
【Network Setting】
Friendly Name setting
To change the Friendly Name, enter the new name in the text box and click "Set".
⑪ To reset the Friendly Name, click "Set Default".
Network connection settings
12 Click to connect using the newly applied settings.
⑬ When changing DHCP/proxy settings, input or select for each item.
NOTE
- Items displayed may vary depending on selected items and connection status.
- After selecting each item, wait a moment for the display to be updated.
- To apply network connection settings, click "Test Connection" after making changes.
Using as a D/A converter (USB-DAC)
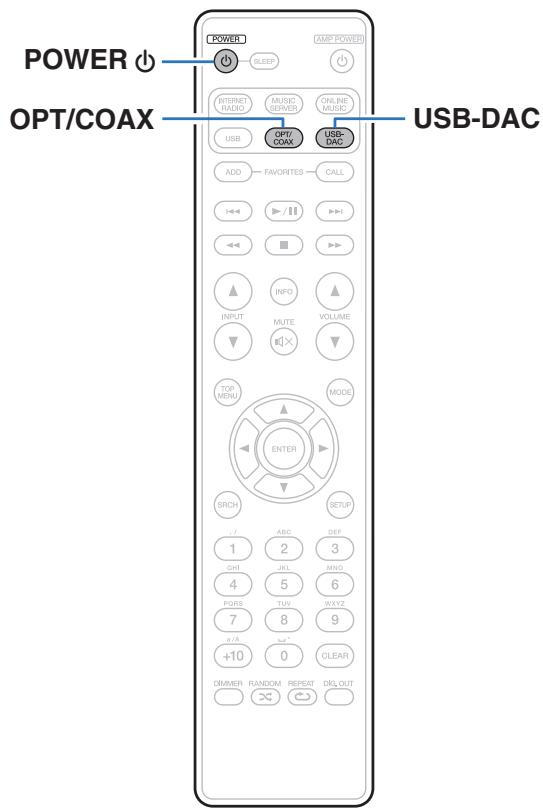
Digital audio signals input from an external device or computer into this unit can be converted and output as analog signals using this unit's D/A converter. (D/A converter function)
- DSD is a registered trademark.
- Microsoft, Windows Vista, Windows 7 and Windows 8 are either registered trademarks or trademarks of Microsoft Corporation in the United States and/or other countries.
- Apple, Macintosh and Mac OS are trademarks of Apple Inc., registered in the U.S. and other countries.
Connecting and playing back from a computer (USB-DAC)
You can enjoy high-quality audio playback from the D/A converter built in to this unit by inputting music files into this unit from a computer via USB connection.
- Before USB connecting this unit to your computer, install the driver software in your computer.
- Drivers do not need to be installed for Mac OS.
- Also, you can use whichever commercially available or downloadable player software you like to playback files on your computer.
Computer (recommended system)
os
- Windows® Vista, Windows 7 or Windows 8
Mac OS X 10.6.3 or later
USB
- USB 2.0: USB High speed/USB Audio Class Ver.2.0
Windows OS
Installing the dedicated driver (p.73)
Mac OS
Audio Device Settings (p. 79)
■ Installing the dedicated driver (Windows OS only)
□ Installing the driver software
1 Disconnect the USB cable between your PC and the unit.
- The driver software cannot be installed correctly if your PC is connected to the unit by a USB cable.
- If the unit and your computer are connected by a USB cable and the computer is switched on before installation, disconnect the USB and restart the computer.
2 Download the dedicated driver from the "Download" section of the NA8005 page of the Marantz website onto your PC.
3 Unzip the downloaded file, select the 32-bit or 64-bit exe file that matches your Windows operating system, and double-click the file.
4 Install the driver.
① Select the language to use for the installation.
② Click "OK".
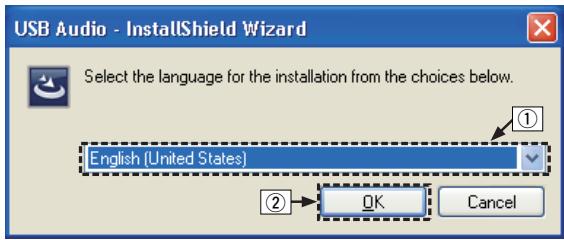
③ The wizard menu is displayed. Click "Next".
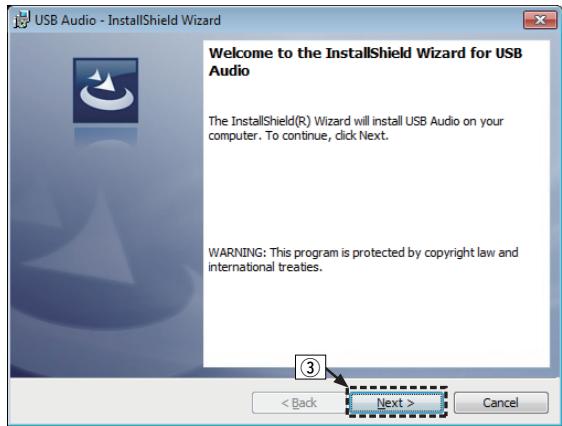
④ Read the Software Licensing Agreement, and click "I accept the terms in the license agreement".
⑤ Click "Next".
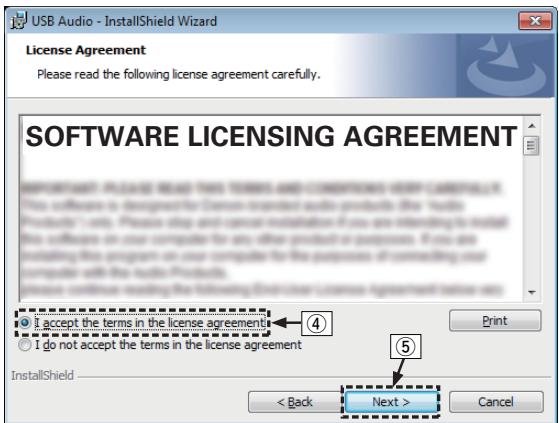
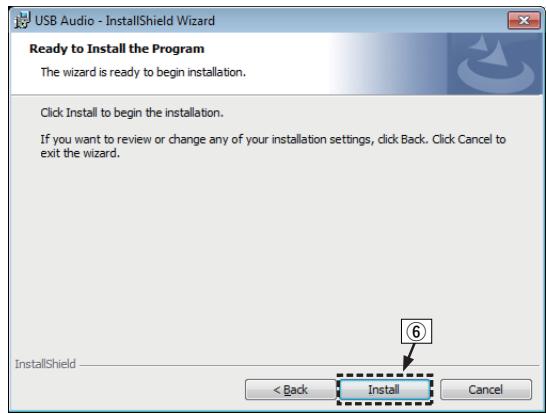
(6) Click "Install" on the installation start dialog.
- The installation starts. Do not perform any operation on the PC until the installation is completed.
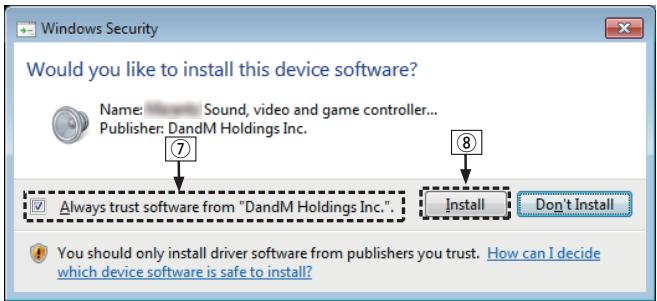
⑦ In the Windows security dialog, select "Always trust software from "DandM Holdings Inc."
⑧ Click "Install".
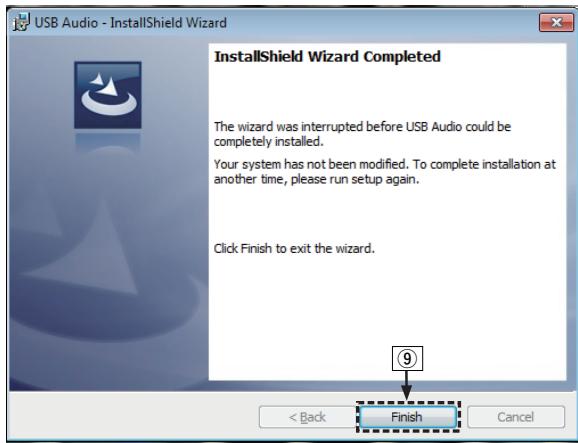
⑨ When the installation is completed, click "Finish".
5 With the unit power off, connect the unit and PC using a USB cable (sold separately).
- For the connection procedure, refer to the "Connecting a PC or Mac" (p. 21) section.
6 Press POWER
- When the unit power is turned on, the PC automatically finds and connects to the unit.
7 Press the input source select button (USB-DAC) to switch the input source to "USB-DAC".
8 Checking the installed driver.
① Click the "Start" button and click "Control Panel" on the PC.
- The control panel setting list is displayed.
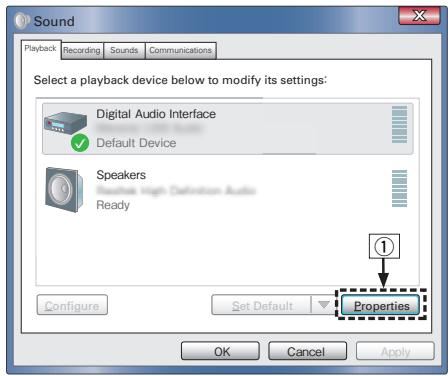
② Click the "Sound" icon.
- The sound menu window is displayed.
③ Check that there is a checkmark next to "Default Device" under in "Digital Audio Interface" of the "Playback" tab.
- When there is a checkmark for a different device, click "Marantz USB Audio" and "Set Default".
9 Checking audio output.
Outputs a TEST signal from the PC and checks the audio output from the USB-DAC function.
① Select "Digital Audio Interface" and click "Properties".
- The Digital Audio Interface Properties window is displayed.
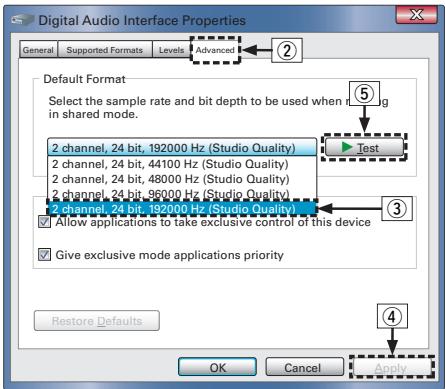
(2) Click the "Advanced" tab.
③ Select the sampling rate and bit rate to be applied to the D/A converter.
- It is recommended that "2 channel, 24 bit, 192000 Hz (Studio Quality)" is selected.
④ Click "Apply".
⑤ Click "Test".
- Check that audio from this unit is output from the PC.
NOTE
- The dedicated driver must be installed in the PC before this unit is connected to a PC. Operation will not occur correctly if connected to the PC before the dedicated driver has been installed.
Operation may fail in some PC hardware and software configurations.
Audio Device Settings (Mac OS X only)
① Move the cursor to “Go” on the computer screen, and then click “Utilities”.
- The utility list is displayed.
② Double-click "Audio MIDI Setup".
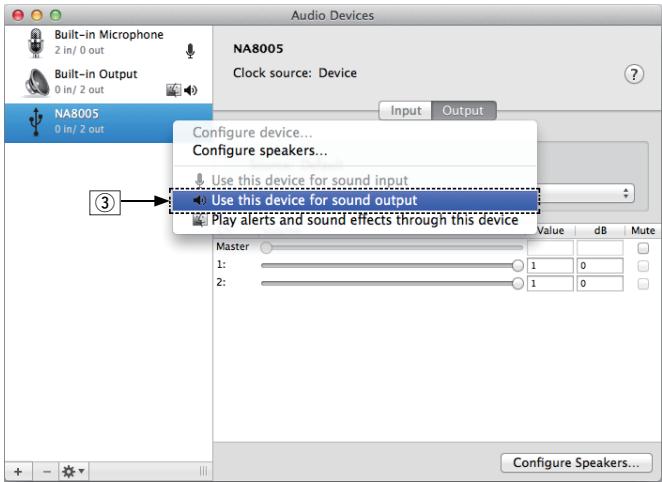
- The "Audio Devices" window is displayed.
③ Check that "Use this device for sound output" is checked in "NA8005".
- If a different device is checked, select and "Secondary click" on "NA8005", and then select "Use this device for sound output".
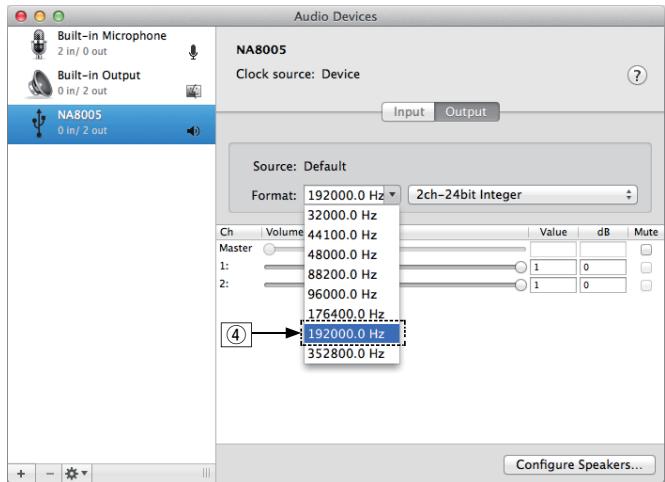
④ Select the "NA8005" format.
- It is normally recommended to set the format to "192000.0 Hz" and "2ch-24 bit Interger".
⑤ Quit Audio MIDI Setup.
Playback
Install the desired player software on your computer beforehand.
Use the rear panel USB-DAC port to connect this unit to a computer.
p.21
1 Press USB-DAC to switch the input source to "USB-DAC".
Start playback on the computer's player software.
The digital audio signal that is being input is shown as follows in the display.
"USB-DAC:
"USB-DAC:
PCM xxx kHz"
or
DSD xxxx MHz"
(xxxx is the sampling frequency.)
- If the sampling frequency cannot be detected, "Signal Unlock" will be displayed.
- "Unsupported" is displayed when audio signals that are not supported by this unit are input.
Files that can be played back
See "D/A converter" (p. 107).
NOTE
- Perform operations such as playback and pause on the computer. At this time, you cannot perform operations with buttons on this unit or the remote control.
- You can also control the volume and equalizer on the computer. Enjoy playing music at the desired volume.
- When this unit is functioning as a D/A converter, sound is not output from the computer's speakers.
- If the computer is disconnected from this unit while the computer music playback software is running, the playback software may freeze. Always exit the playback software before disconnecting the computer.
- When an error occurs on the computer, disconnect the USB cable and restart the computer.
- The sampling frequency of the music playback software and sampling frequency displayed on this unit may differ.
- Use a cable that is 3m or less to connect to the computer.
Connect and playback from a digital device (Coaxial/Optical)
1 Press OPT/COAX to select the input source to "Coaxial" or "Optical".
The digital audio signal that is being input is shown as follows in the display.
"Coaxial
PCM xxxk kHz"
"Optical
PCMxxxx kHz"
(xxxx is the sampling frequency.)
- If the sampling frequency cannot be detected, "Signal Unlock" will be displayed.
- "Unsupported" is displayed when audio signals that are not supported by this unit are input.
Files that can be played back
See "D/A converter" (p. 107).
NOTE
- Do not input non-PCM signals, such as Dolby Digital, and DTS. This causes noise and could damage the speakers.
- If the sampling frequency switches, such as from A mode to B mode in a CS broadcast, muting may operate for 1 - 2 seconds, cutting the sound.
Menu map
For menu operations, see the following page.
By default, this unit has recommended settings defined. You can customize this unit based on your existing system and your preferences.
| Setting items | Detailed items | Description | Page | |
| Quick Setup | - | Performs the network settings using a Wizard style window. For details on the operations, see the separate “Quick Start Guide”. | - | |
| [Setup] ↔Quick Setup ○:enter ▲back | ||||
| General | Audio Out | You can set whether to “Fixed” or “Variable” the analog audio output level. | 87 | |
| Volume Limit | This sets the maximum analog audio output level that can be used when the analog audio output setting is set to variable. | 87 | ||
| Language | Sets the language for display the menu. | 87 | ||
| Auto-Standby | Sets the unit power to standby when the unit is not in use. | 88 | ||
| Firmware | Set whether or not to check for firmware update, update the firmware, and display update and upgrade notifications. | 88 | ||
| Update | Update the firmware of this unit. | 88 | ||
| Notifications | Set the Update, Upgrade and Alerts notification on/off. | 89 | ||
| Add New Feature | Display new features that can be downloaded to this unit and perform an upgrade. | 89 | ||
| Network | Network Information | Displays various information about the network. | 91 | |
| Network Control | Performs the on/off settings for the network function when in standby mode. | 91 | ||
| Friendly Name | Edits a name displayed on the Internet. | 91 | ||
| Settings | Make settings for wired LAN connection. | 92 | ||
| DHCP (On) or DHCP (Off) | Performs the DHCP setting. | 92 | ||
| IP Address * | Performs the IP address setting. | 92 | ||
| Subnet Mask * | Performs the subnet mask setting. | 92 | ||
| Gateway * | Performs the gateway setting. | 92 | ||
| Primary DNS * | Performs the primary DNS setting. | 92 | ||
| Secondary DNS * | Performs the secondary DNS setting. | 92 | ||
| Proxy | Performs the proxy setting. | 93 | ||
| Test Connection | Used to check the network connection. | 93 | ||
- Displayed when the "DHCP" setting is "Off".
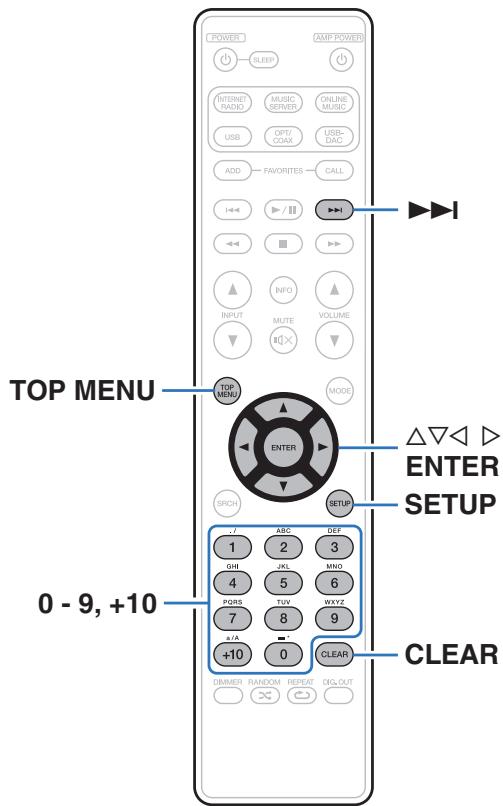
■ Menu operation
1 Press SETUP while playback is stopped.
The menu is displayed on the display.
2 Use to select the menu to be set or operated, then press ENTER.
3 Use to change to desired setting.
4 Press ENTER to enter the setting.
To return to the previous item, press
- Exiting the Menu, press SETUP while the menu is displayed. The display returns to the standard display.
- To back to the top of the menu, during menu operation, press TOP MENU.
Inputting characters
On this unit, the names displayed for Friendly Name and search, screens can be changed as desired. You can also enter characters to search Internet radio stations and music files.
For inputting characters, there are two methods, as shown below.
| Method | Operations |
| Using the number buttons | • Operating with the remote control. • Multiple characters are assigned to a button, and each time the button is pressed, a character is switched. |
| Using the cursor buttons | • Operating with the remote control or the main unit. • Use △∇◁▷ and ENTER to input characters. |
Display of an input screen
【Friendly name input】
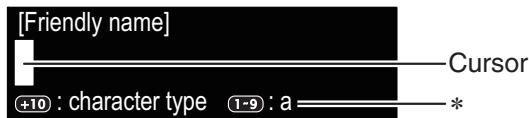
*The current input character type is displayed.
(Use +10 to switch the character type.)
a:Lower case
A:Upper case
1:Numerics
Using the number buttons
1 Display the screen for inputting characters.
2 Use to move the cursor to the character that you wish to change.
3 Press +10 to select the character type (upper case, lower case, or numeric characters), and press 0 - 9 to select the desired character.
- The types of characters that can be input are as shown below.
1. @-_/:
2 ABC abcABC2
3 DEF defDEF3
4 GH iGH I4
5 JKL jklJKL5
4 Repeat step 2 and 3 to change the name then press ENTER to register it.
Using the cursor buttons
1 Display the screen for inputting characters.
2 Use to move the cursor to the character that you wish to change.
3 Use to change the character.
- The types of characters that can be input are as shown below.
【Lower case】
```c abcdefghijklmnopqrstuvwxyz
[Upper case]
ABCDEFGHIJKLMNOPQRSTUVWXYZ
【Symbols】 !“# $ % & ‘() * +, -. /:;<=>? @ [\^] ^_ ` {1} ~
【Numbers】0123456789 (Space)
- Press CLEAR to delete the character.
Press to insert a space.
4 Repeat step 2 and 3 to change the name then press ENTER to register it.
General
Make various other settings.
Audio Out
You can set whether to "Fixed" or "Variable" the analog audio output level.
Fixed
(Default):
Fixes the analog audio output level (0 dB).
Variable:
You can adjust the analog audio output level using the VOLUME buttons on the remote control.

- The remote control needs to be set in order to adjust the analog audio output level. (p. 94)
- When the analog output level is adjusted, the headphone volume also changes. When using the headphones, adjust the volume to a suitable level by also using the headphone volume control knob.
- When "Variable" is selected, the analog audio output level can be adjusted to --- dB (minimum) and between the range from -99dB - 0 dB (Default: -40dB ).
NOTE
- Note that the analog audio output level changes to the maximum (0 dB) when the analog audio output setting is changed from "Variable" to "Fixed".
- Before changing the settings, turn the volume of the amp connected to the analog audio output terminals (AUDIO OUT) and headphones connected to the unit to the minimum volume.
Volume Limit
This sets the maximum analog audio output level that can be used when the analog audio output setting is set to variable.
| 0 dB: | Set the maximum analog audio output level to 0 dB. |
| -10 dB (Default): | Set the maximum analog audio output level to -10 dB. |
| -20 dB: | Set the maximum analog audio output level to -20 dB. |

This can be set when the "Audio Out" setting is set to "Variable".
Language
Sets the language for display the menu.
English / Français / Espanol (Default : English)
Auto-Standby
When this unit is in the stop state and there is no input signal and operation for 15 minutes, it automatically enters the standby mode.
| On: | The unit goes into standby after 15 minutes. |
| Off(Default): | The unit does not go into standby automatically. |

- The auto standby function does not operate when the input source is "iPod" (direct mode).
- When iPod is being charged, this unit enters the power standby mode after charging.
Firmware
Set whether or not to check for firmware update, update the firmware, and display update, upgrade and alert notifications.
Update
- In order to update the firmware, the environment and settings required for connecting to broadband internet are needed. (p. 25)
- Perform the firmware update operation after at least 2 minutes has elapsed since turning this unit's power on.
| Check For Update: | Check for firmware updates. |
| Update Start: | Execute the update process. When the update starts, the menu screen is shut down. During the update, the progress is shown on the display. |

This unit automatically retries updating if updating fails.
Notifications
Notification messages are displayed in the screen when the power is switched on when new firmware can be used, or when there are other notification messages.
Connect to broadband Internet when using this function. (p. 24)
Update
| On(Default): | Display update message. |
| Off: | Do not display update message. |
Upgrade
| On(Default): | Display upgrade message. |
| Off: | Do not display upgrade message. |
Notification Alerts
| On(Default): | Displays notification messages from Marantz in the popup menu. |
| Off: | Does not display notification messages from Marantz in the popup menu. |
Add New Feature
In order to add new functions, the environment and settings required for connecting to broadband internet are needed. (p. 25)
Perform the add new feature operation after at least 2 minutes has elapsed since turning this unit's power on.
| Upgrade Status: | Display a list of the additional functions provided by the upgrade. |
| Upgrade Start: | Execute the upgrade process. • If the upgrade is not successful, an error message identical to those in “Update” (☑ p. 89) will appear on the display. Check the settings and network environment and then perform the upgrade again. |
| Upgrade ID: | The ID number shown on this screen is needed when carrying out the procedure. |

- See the Marantz website for details about upgrades.
- When the procedure is complete, "Registered" is displayed in this menu and upgrades can be carried out. If the procedure has not been carried out, "Not Registered" is displayed.
Notes concerning use of "Update" and "Add New Feature"
- In order to add new functions, the environment and settings required for connecting to broadband internet are needed. (p. 24)
- Perform the add new feature operation after at least 2 minutes has elapsed since turning this unit's power on.
- Do not turn off the power until updating or upgrading is completed.
- Even with a broadband connection to the Internet, approximately 20 minutes is required for the updating/upgrading procedure to be completed.
- Once updating/upgrade starts, normal operations on this unit cannot be performed until updating/upgrading is completed.
- Furthermore, updating/upgrading the firmware may reset the backup data for the parameters, etc. set for this unit.
- When the update or upgrade failed with a message such as "Update failed" and "Download failed". Remove and re-insert the power cord. "Update Retry" appears on the display and update restarts from the point at which update failed. If the error continues despite this, check the network environment.

- Information regarding the "Update" function and "Add New Feature" will be announced on the Marantz web site each time related plans are defined.
- When usable new firmware is released with "Update" or "Add New Feature", a notification message is displayed on the menu screen. When you do not want to be notified, set "Update" (p.89) and "Upgrade" (p.89) to "Off".
Network
To use this unit by connecting it to a home network (LAN), you must configure network settings.
If you set up your home network via DHCP, set "DHCP" to "On" (use the default setting). This allows this unit to use your home network.
If you assign an IP address for each device, you must use the "IP Address" setting to assign an IP address to this unit and enter the information about your home network such as the gateway address and subnet mask.
Network Information
Displays network information.
Friendly Name / DHCPOn or Off / IP Address / MAC Address
Network Control
Enables network communication in standby power mode.
| On (Default): | Network is on during standby. Main unit operable with a network compatible controller. |
| Off: | Suspend network function during standby. |

Set to "On" when using the web control function or a network compatible controller.
NOTE
When "Network Control" is set to "On", it consumes more standby power.
Friendly Name
The Friendly Name is the name of this unit displayed on the network.
■ Friendly Name
When you press ENTER, you can change the Friendly Name according to your preferences.

- Up to 63 characters can be input.
- For character input, see "Inputting characters" (p. 85).
- The default Friendly Name on first use is "NA8005".
Default
Restores Friendly Name, which you had changed, to the default setting.
Settings
Configure the proxy settings and IP address.
- If you are using a broadband router (DHCP function), the information required for network connection such as the IP address will be automatically configured since the DHCP function is set to "On" in the default settings of this unit.
- Set up the IP Address, Subnet Mask, Default Gateway and DNS server information only when assigning a fixed IP address or when connecting to a network without DHCP function.
- Configure the proxy settings when using a proxy server to connect to the Internet.
DHCP
Selects how to connect to the network.
| On (Default): | Configure the network settings automatically from your router. |
| Off: | Configure the network settings manually. |
IP Address
Set the IP address within the ranges shown below.
- The Network Audio function cannot be used if other IP addresses are set.
CLASS A:10.0.0.1 - 10.255.255.254
CLASS B:172.16.0.1 - 172.31.255.254
CLASS C:192.168.0.1 - 192.168.255.254
Subnet Mask
When connecting an xDSL modem or connector adapter directly to this unit, input the subnet mask indicated in the documentation supplied by your provider. Normally input 255.255.255.0.
Gateway
When connected to a gateway (router), input its IP address.
Primary DNS, Secondary DNS
If there is only one DNS address indicated in the documentation supplied by your provider, input it at "Primary DNS". If two or more DNS are provided by your provider, enter both "Primary DNS" and "Secondary DNS".
Proxy
Make this setting when connecting to the Internet via a proxy server.
Make the proxy settings only when you connect to the Internet via a proxy server that is on your internal network or provided by your provider, etc.
| Proxy (Off) or Proxy (On): | Set the proxy server. |
| Proxy (Address) or Proxy (Name): | Select when inputting by address or domain name. |
| Address or Name: | Inputting address or domain name. Up to 38 characters can be input. |
| Port: | Enter port number. |

- If you cannot connect to the Internet, recheck the connections and settings. (p. 24)
- If you do not understand about Internet connection, contact your ISP (Internet Service Provider) or the store from which you purchased your computer.
Test Connection
Test the connection.
Switching the function of the volume buttons on the remote control
When the function of the VOLUME buttons on the remote control is set to "Variable", the analog audio output level can be adjusted. Be sure to check the operation of each unit after setting the remote control codes.
| AMP (Default): | Adjusts the volume of Marantz amplifiers. |
| Variable: | Adjusts the analog audio output level of the analog audio signal output from this unit. |
Set the function of the volume buttons on the remote control to “Variable”
1 Press and hold the ENTER and number 1 button down together for more than 5 seconds.
NOTE
To adjust the analog audio signal output from this unit using the remote control, also set "Audio Out" to "Variable". (p. 87)
Set the function of the volume buttons on the remote control to “AMP”
1 Press and hold the ENTER and number 2 button down together for more than 5 seconds.
NOTE
The remote control codes return to the default settings when the batteries are removed. Set the remote control codes again after replacing the batteries.
Contents
Tips
I want to enjoy analog output audio at higher quality 96
I want to display the title, etc. of the file currently playing back on the iPod on this unit's display 95
I want to playback WAV files 96
Simple operations in the power off state 96
Troubleshooting
Power does not turn on / Power is turned off 97
Operations cannot be performed through the remote control unit 98
Display on this unit shows nothing 98
No sound comes out 99
Sound is interrupted or noise occurs 99
iPod cannot be played back 100
USB memory devices cannot be played back 101
File names on the iPod/USB memory device are not displayed properly 102
The Internet radio cannot be played back 102
Music files on PC or NAS cannot be played back 103
PC or Mac files cannot be played back 104
Audio from digital devices cannot be played back (Coaxial/Optical) 104
Tips
I want to enjoy analog output audio at higher quality
- Press DIG. OUT on the remote control unit to turn digital audio output off. (p. 33)
Press the DIMMER button to turn the display off. (p. 33)
I want to display the title, etc. of the file currently playing back on the iPod on this unit's display
- Press the MODE button to set Remote iPod mode. (15 p. 56)
I want to playback WAV files
- This unit can playback WAV files that are stored on a USB memory device. (p. 59)
Simple operations in the power off state
- Press the or / button to automatically turn the unit's power supply on and start playback of the last selected input source.
- When the "Network Control" function is set to "On", you can perform playback, or other operations through AirPlay, App or the web control function.
Troubleshooting
- Are the connections correct?
- Is the set being operated as described in the owner's manual?
- Are the other devices operating properly?
If this unit does not operate properly, check the items listed in the table below.
Should the problem persist, there may be a malfunction. In this case, disconnect the power immediately and contact your store of purchase.
■ Power does not turn on / Power is turned off
| Symptom | Cause / Solution | Page |
| Power is not turned on. | Check whether the power plug is correctly inserted into the power outlet. | 29 |
| This unit is in standby mode. Press ⋅ on the unit or POWER ⋅ on the remote control. | 31 | |
| Power automatically turns off. | The sleep timer is set. Turn on the power again. | 33 |
| The Auto Standby mode is on. The Auto Standby mode switches the unit to standby mode when the unit is not operated for approximately 15 minutes. To disable Auto Standby mode, set “Auto-Standby” on the menu to “Off”. | 88 |
Operations cannot be performed through the remote control unit
| Symptom | Cause / Solution | Page |
| Operations cannot be performed through the remote control unit. | ·Batteries are worn out. Replace with new batteries. | 6 |
| ·Operate the remote control unit within a distance of about 23 ft/7 m from this unit and at an angle of within 30°. | 7 | |
| ·Remove any obstacle between this unit and the remote control unit. | — | |
| ·Insert the batteries in the proper direction, checking the ⊕ and Θ marks. | 6 | |
| ·The set's remote control sensor is exposed to strong light (direct sunlight, inverter type fluorescent bulb light, etc.). Move the set to a place in which the remote control sensor will not be exposed to strong light. | — | |
| ·When using a 3D video device, the remote control unit of this unit may not function due to effects of infrared communications between units (such as TV and glasses for 3D viewing). In this case, adjust the direction of units with the 3D communications function and their distance to ensure they do not affect operations from the remote control unit of this unit. | — | |
| ·When using this unit independently, set the switch to “INTERNAL”. | 28 |
Display on this unit shows nothing
| Symptom | Cause / Solution | Page |
| Display is off. | • Press DIMMER, and change the setting to anything other than off. | 33 |
No sound comes out
| Symptom | Cause / Solution | Page |
| No sound is produced. Or sound is distorted. | • Check the connections for all devices. | 17 |
| • Insert connection cables all the way in. | — | |
| • Check that input connectors and output connectors are not reversely connected. | — | |
| • Check cables for damage. | — | |
| • Check the amplifier's functions and controls and adjust as necessary. | — |
Sound is interrupted or noise occurs
| Symptom | Cause / Solution | Page |
| During playback from the Internet radio or USB memory device, sound is occasionally interrupted. | ·When the transfer speed of the USB memory device is slow, sound may occasionally be interrupted. | — |
| ·The network communication speed is slow or the radio station is busy. | — | |
| Sound is interrupted during playback of tracks saved on a computer. | ·Do not start applications other than the player software while playing music on your computer. | — |
iPod cannot be played back
| Symptom | Cause / Solution | Page |
| iPod cannot be connected. | ·When using iPod by connecting it to the USB port, some iPod variations are not supported. | 23 |
| ·When iPod is connected by using a USB cable other than the genuine cable, iPod may not be recognized. Use a genuine USB cable. | — | |
| The AirPlay icon ☐ is not displayed on iPhone / iPod touch / iPad. | ·This unit and PC / iPhone / iPod touch / iPad are not connected to the same network (LAN). Connect it to the same LAN as this unit. | 24 |
| ·The firmware on iTunes / iPhone / iPod touch / iPad is not compatible with AirPlay. Update the firmware to the latest version. | — | |
| No sound is produced. | ·The AirPlay playback is not performed, or this unit is not selected. Click the AirPlay icon ☐ on the iTunes / iPhone / iPod touch / iPad screen and select this unit. | 64 |
| Audio is interrupted during the AirPlay playback on iPhone / iPod touch / iPad. | ·Quit the application running in the background of the iPhone/iPod touch/iPad, and then play using AirPlay. | — |
USB memory devices cannot be played back
| Symptom | Cause / Solution | Page |
| “No Connection” is displayed. | ·This unit may not recognize the USB memory device due to poor connection, etc. Make sure that the connection is made properly by taking actions such as disconnecting and reconnecting the USB memory device. | 22 |
| ·USB memory devices of a mass storage class or those compatible with MTP are supported. | — | |
| ·This unit does not support a connection through a USB hub. Connect the USB memory device directly to the USB port. | — | |
| ·The USB memory device must be formatted to FAT16 or FAT32. | — | |
| ·Not all USB memory devices are guaranteed to work. Some USB memory devices are not recognized. When using a type of portable hard disc drive compatible with the USB connection that requires power from an AC adapter, use the AC adapter that came with the drive. | — | |
| Files on the USB memory device are not displayed. | ·Files of a type not supported by this unit are not displayed. | 59 |
| ·This unit can display a file structure with up to 8 levels and up to 5000 sub folders and files in total. Modify the folder structure of the USB memory device. | — | |
| ·When multiple partitions exist on the USB memory device, only files on the first partition are displayed. | — | |
| Files on a USB memory device cannot be played. | ·Files are created in a format that is not supported by this unit. Check the formats supported by this unit. | 59 |
| ·Files that are copyright protected cannot be played on this unit. | — |
File names on the iPod/USB memory device are not displayed properly
| Symptom | Cause / Solution | Page |
| The file names are not displayed properly ("...", etc.). | Characters that cannot be displayed have been used. On this unit, characters that cannot be displayed are replaced with a ".” (period). | — |
The Internet radio cannot be played back
| Symptom | Cause / Solution | Page |
| A list of broadcasting stations is not displayed. | ·The LAN cable is not properly connected, or the network is disconnected. Check the connection status. | 24 |
| Internet Radio cannot be played. | ·The selected radio station is broadcasting in a format that is not supported by this unit. Formats that can be played back in this unit are MP3, WMA and AAC. | 35 |
| ·The firewall function is enabled on the router. Check the firewall setting. | - | |
| ·Check the power of the router is on. | - | |
| ·The IP address is not properly set. To obtain the IP address automatically, enable the DHCP server function on the router. Also, set the DHCP setting to “On” on this unit. | 92 | |
| ·To obtain the IP address manually, set the IP address and proxy on this unit. | 92 | |
| ·Some radio stations broadcast silently during some time period. In this case, no audio is output. Wait for a while and select the same radio station, or select another radio station. | 35 | |
| Cannot connect to favorite radio stations. | ·Radio station is not currently in service. Register radio stations in service. | - |
| For some radio stations, “Connection Down” is displayed and station cannot be connected to. | ·The selected radio station is not in service. Select a radio station in service. | - |
■ Music files on PC or NAS cannot be played back
| Symptom | Cause / Solution | Page |
| This unit is not recognized by my computer. | Check the OS of your computer. | 21 |
| When your computer is running on Windows, a dedicated driver software should be installed. | 21 | |
| Files stored on a computer cannot be played. | Files are stored in a non-compatible format. Record in a compatible format. | 109 |
| Files that are copyright protected cannot be played on this unit. | - | |
| Media sharing settings are not correct. Change media sharing settings so that the unit can access the folders on your computer. | 39 | |
| Server is not found, or it is not possible to connect to the server. | The computer's or router's firewall is activated. Check the computer's or router's firewall settings. | - |
| Computer's power is not turned on. Turn on the power. | - | |
| Server is not running. Launch the server. | - | |
| Set's IP address is wrong. Check the set's IP address. | 69 | |
| Files on PC or NAS are not displayed. | Files of a type not supported by this unit are not displayed. | 109 |
| Music stored on a NAS cannot be played. | If you use a NAS in conformity with the DLNA standard, enable the DLNA server function in the NAS setting. | - |
| If you use a NAS that does not conform with the DLNA standard, play the music via a PC. Set Windows Media Player's media sharing function and add NAS to the selected play folder. | 73 | |
| If connection is restricted, set audio equipment as the connection target. | - | |
| When a music server file registered to the Favorite list is called up, the next track in the same folder may not be played back. | When a file that is played back by Remote play is registered in the Favorite list, only that file is played back. | - |
PC or Mac files cannot be played back
| Symptom | Cause / Solution | Page |
| “Signal Unlock” is displayed. | ·When digital audio signals cannot be detected properly, “Signal Unlock” is displayed. | 80 |
| “Unsupported” is displayed. | ·“Unsupported” is displayed when audio signals that are not supported by this unit are input. Check the settings on your computer or player software. | 80 |
| ·If the computer you use is “Mac OS”, please check if the “NA8005” format is set below “192000.0 Hz” using the “Audio MIDI Setup”. | — |
Audio from digital devices cannot be played back (Coaxial/Optical)
| Symptom | Cause / Solution | Page |
| “Signal Unlock” is displayed. | ·When digital audio signals cannot be detected properly, “Signal Unlock” is displayed. | 81 |
| “Unsupported” is displayed. | ·“Unsupported” is displayed when audio signals that are not supported by this unit are input. Check the audio output signal format from your digital device. | 81 |
Resetting factory settings
Perform this procedure if the display is abnormal or if operations cannot be performed.
Various settings are reset to the factory default values. Make settings again.
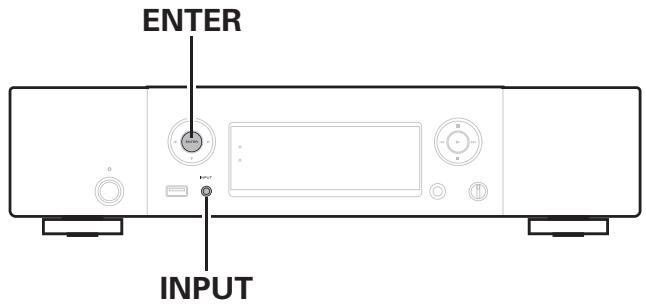
Pull the power cord out of the power outlet.
2 Plug the power cord into a power outlet while pressing ENTER and INPUT on the main unit.
3 When the power indicator lights, release the buttons. "initialized" appears in the display.

- If "initialized" does not display in step 3, start over from step 1.
NOTE
- It takes approximately 90 seconds for all of the settings to be returned to the default settings. When turning the power off, do not remove the power plug for approximately 90 seconds after "initialized" is displayed.
Playing back a USB memory devices
- This unit is compatible with MP3 ID3-Tag (Ver. 2) standard.
- This unit is compatible with WMA META tags.
If the image size (pixels) of an album artwork exceeds 500 × 500 (WMA/MP3/WAV/FLAC) or 349 × 349 (MPEG-4 AAC), then music may not be played back properly.
■ Specifications of supported files
| Sampling frequency | Bit length | Extension | |
| WMA (Windows Media Audio)*1 | 32/44.1/48 kHz | 48 – 192 kbps | .wma |
| MP3 (MPEG-1 Audio Layer-3) | 32/44.1/48 kHz | 32 – 320 kbps | .mp3 |
| WAV | 32/44.1/48/88.2/96/176.4/192 kHz | - | .wav |
| MPEG-4 AAC*1 | 32/44.1/48 kHz | 16 – 320 kbps | .aac/.m4a/.mp4 |
| FLAC (Free Lossless Audio Codec) | 32/44.1/48/88.2/96/176.4/192 kHz | - | .flac |
| ALAC (Apple Lossless Audio Codec)*2 *3 | 32/44.1/48/88.2/96 kHz | - | .m4a |
| AIFF | 32/44.1/48/88.2/96/176.4/192 kHz | - | .aif/.aiff |
| DSD (2-channel) | 2.8/5.6 MHz | - | .dsf/.diff |
1 Only files that are not protected by copyright can be played on this unit. Content downloaded from pay sites on the Internet are copyright protected. Also, files encoded in WMA format when ripped from a CD, etc., on a computer may be copyright protected, depending on the computer's settings.
2 Copyright [2012] [D&M Holdings. Inc.] Licensed under the Apache License, Version 2.0 (the "License"); you may not use this file except in compliance with the License. You may obtain a copy of the License at http://www.apache.org/licenses/License-2.0
*3 Only files recorded in stereo can be played back.
NOTE
Variable Bit rate (VBR) is not supported (when playback is possible, the time display in the display window will speed up and slow down).
Maximum number of playable files and folders
The limits on the number of folders and files that can be displayed by this unit are as follows.
| Item\Media | USB memory device |
| Memory capacity | FAT16 : 2 GB, FAT32 : 2 TB |
| Number of folder directory levels *1 | 8 levels |
| Number of folders | 500 |
| Number of files*2 | 5000 |
1 The limited number includes the root folder.
2 The allowable number of files may differ according to the USB memory device capacity and the file size.
D/A converter
■ Specifications of supported files
USB-DAC
| Sampling frequency | Bit length | |
| DSD (2-channel) | 2.8/5.6 MHz | 1 bit |
| Linear PCM (2-channel) | 32/44.1/48/88.2/96/176.4/192 kHz | 16/24 bits |
NOTE
Digital audio output is stopped during playback of the DSD signals and linear PCM signals that have a 32kHz sampling frequency.
Coaxial/Optical
| Sampling frequency | Bit length | |
| Linear PCM (2-channel) | 32/44.1/48/64/88.2/96/176.4/192 kHz | 16/24 bits |
Playing back Internet Radio
Internet Radio refers to radio broadcasts distributed over the Internet.
Internet Radio stations from around the world can be received.
This unit is equipped with the following Internet radio functions:
- Stations can be selected by genre and region.
- Internet radio stations in MP3 and WMA (Windows Media Audio) format can be listened to.
- Your favorite radio stations can be registered by accessing an exclusive Marantz Internet radio URL from a Web browser on a computer. The function is managed for individual users, so you must provide your MAC or e-mail address.
Exclusive URL: http://www.radiomarantz.com
- The radio station database service may be suspended or be otherwise unavailable without notice.
- This unit's Internet radio station list is created using a radio station database service (vTuner). This database service provides a list edited and created for this unit.
Playable broadcast station specifications
| Sampling frequency | Bit length | Extension | |
| WMA (Windows Media Audio) | 32/44.1/48 kHz | 48 – 192 kbps | .wma |
| MP3 (MPEG-1 Audio Layer-3) | 32/44.1/48 kHz | 32 – 320 kbps | .mp3 |
| MPEG-4 AAC | 32/44.1/48 kHz | 16 – 320 kbps | .aac/.m4a/.mp4 |
Playing back files stored on a PC and NAS
- This unit is compatible with MP3 ID3-Tag (Ver. 2) standard.
- This unit is compatible with WMA META tags.
- If the image size (pixels) of an album artwork exceeds 500 × 500 (WMA/MP3/WAV/FLAC) or 349 × 349 (MPEG-4 AAC), then music may not be played back properly.
- A server or server software compatible with distribution in the corresponding formats is required to play music files via a network.
■ Specifications of supported files
| Sampling frequency | Bit length | Extension | |
| WMA (Windows Media Audio)*1 | 32/44.1/48 kHz | 48 – 192 kbps | .wma |
| MP3 (MPEG-1 Audio Layer-3) | 32/44.1/48 kHz | 32 – 320 kbps | .mp3 |
| WAV | 32/44.1/48/88.2/96/176.4/192 kHz | - | .wav |
| MPEG-4 AAC*1 | 32/44.1/48 kHz | 16 – 320 kbps | .aac/.m4a/.mp4 |
| FLAC (Free Lossless Audio Codec) | 32/44.1/48/88.2/96/176.4/192 kHz | - | .flac |
| ALAC (Apple Lossless Audio Codec)*2 *3 | 32/44.1/48/88.2/96 kHz | - | .m4a |
| AIFF | 32/44.1/48/88.2/96/176.4/192 kHz | - | .aif/.aiff |
| DSD (2-channel) | 2.8/5.6 MHz | - | .dsf/.dff |
Contents
Connections
Playback
Settings
Tips
Appendix
*1 Only files that are not protected by copyright can be played on this unit.
Content downloaded from pay sites on the Internet are copyright protected. Also, files encoded in WMA format when ripped from a CD, etc., on a computer may be copyright protected, depending on the computer's settings.
*2 Copyright [2012] [D&M Holdings. Inc.] Licensed under the Apache License, Version 2.0 (the "License"); you may not use this file except in compliance with the License.
You may obtain a copy of the License at
http://www.apache.org/licenses/License-2.0
*3 Only files recorded in stereo can be played back.
NOTE
Variable Bit rate (VBR) is not supported (when playback is possible, the time display in the display window will speed up and slow down).
Explanation of terms
AirPlay
AirPlay sends (plays) contents recorded in iTunes or on an iPhone/iPod touch to a compatible device via the network.
ALAC(Apple Lossless Audio Codec)
This is a codec for lossless audio compression method developed by Apple Inc. This codec can be played back on iTunes, iPod or iPhone. Data compressed to approximately 60 - 70% can be decompressed to exactly the same original data.
App Store
App Store is a site that sells application software for such devices as the iPhone or iPod Touch, and is operated by Apple Inc.
DLNA
DLNA and DLNA CERTIFIED are trademarks and/or service marks of Digital Living Network Alliance. Some contents may not be compatible with other DLNA CERTIFIED™ products.
DSD (Direct-Stream Digital)
One of the audio data recording methods, it is the signal aspect used to store audio signals on a super audio CD, and is - modulated digital audio. It is configured of an array of single bit values at a 2.8MHz sampling rate.
FLAC
FLAC stands for Free lossless Audio Codec, and is a lossless free audio file format. Lossless means that the audio is compressed without any loss in quality.
The FLAC license is as shown below.
Copyright (C) 2000,2001,2002,2003,2004,2005,2006,2007,2008,2009
Josh Coalson
Redistribution and use in source and binary forms, with or without modification, are permitted provided that the following conditions are met:
- Redistributions of source code must retain the above copyright notice, this list of conditions and the following disclaimer.
- Redistributions in binary form must reproduce the above copyright notice, this list of conditions and the following disclaimer in the documentation and/or other materials provided with the distribution.
- Neither the name of the Xiph.org Foundation nor the names of its contributors may be used to endorse or promote products derived from this software without specific prior written permission.
THIS SOFTWARE IS PROVIDED BY THE COPYRIGHT HOLDERS AND CONTRIBUTORS "AS IS" AND ANY EXPRESS OR IMPLIED WARRANTIES, INCLUDING, BUT NOT LIMITED TO, THE IMPLIED WARRANTIES OF MERCHANTABILITY AND FITNESS FOR A PARTICULAR PURPOSE ARE DISCLAIMED. IN NO EVENT SHALL THE FOUNDATION OR CONTRIBUTORS BE LIABLE FOR ANY DIRECT, INDIRECT, INCIDENTAL, SPECIAL, EXEMPLARY, OR CONSEQUENTIAL DAMAGES (INCLUDING, BUT NOT LIMITED TO, PROCUREMENT OF SUBSTITUTE GOODS OR SERVICES; LOSS OF USE, DATA, OR PROFITS; OR BUSINESS INTERRUPTION) HOWEVER CAUSED AND ON ANY THEORY OF LIABILITY, WHETHER IN CONTRACT, STRICT LIABILITY, OR TORT (INCLUDING NEGLIGENCE OR OTHERWISE) ARISING IN ANY WAY OUT OF THE USE OF THIS SOFTWARE, EVEN IF ADVISED OF THE POSSIBILITY OF SUCH DAMAGE.
iTunes
iTunes is the name of the multimedia player provided by Apple Inc.
iTunes is the name of the multimedia player provided by Apple Inc. It enables management and playback of multimedia contents including music and movies. iTunes supports many main file formats including AAC, WAV, and MP3.
MP3 (MPEG Audio Layer-3)
This is an internationally standardized audio data compression scheme, using the "MPEG-1" video compression standard. It compresses the data volume to about one eleventh its original size while maintaining sound quality equivalent to a music CD.
MPEG (Moving Picture Experts Group), MPEG-2, MPEG-4
These are the names for digital compression format standards used for the encoding of video and audio. Video standards include "MPEG-1 Video", "MPEG-2 Video", "MPEG-4 Visual", "MPEG-4 AVC". Audio standards include "MPEG-1 Audio", "MPEG-2 Audio", "MPEG-4 AAC".
vTuner
This is a free online content server for Internet Radio. For inquiries about this service, visit the vTuner site below.
vTuner website:
http://www.radiomarantz.com
This product is protected by certain intellectual property rights of Nothing Else Matters Software and BridgeCo. Use or distribution of such technology outside of this product is prohibited without a license from Nothing Else Matters Software and BridgeCo or an authorized subsidiary.
Windows Media Player Ver. 11
This is a media player distributed free of charge by Microsoft Corporation. It can play playlists created with Ver.11 or later of Windows Media Player, as well as WMA, MP3, WAV and other files.
WMA (Windows Media Audio)
This is the audio compression technology developed by Microsoft
Corporation.
WMA data can be encoded using Windows Media® Player.
To encode WMA files, only use applications authorized by Microsoft
Corporation. If you use an unauthorized application, the file may not work properly.
Sampling frequency
Sampling involves taking a reading of a sound wave (analog signal) at regular intervals and expressing the height of the wave at each reading in digitized format (producing a digital signal).
The number of readings taken in one second is called the "sampling frequency". The larger the value, the closer the reproduced sound is to the original.
Bit rate
This expresses the read amount per 1 second of video/audio data recorded in a disc. A larger number means higher sound quality, but also means a larger file size.
Trademark information
Made for

iPod

iPhone

AirPlay
"Made for iPod" and "Made for iPhone" mean that an electronic accessory has been designed to connect specifically to iPod, or iPhone, respectively, and has been certified by the developer to meet Apple performance standards.
Apple is not responsible for the operation of this device or its compliance with safety and regulatory standards. Please note that the use of this accessory with iPod, or iPhone, may affect wireless performance. AirPlay, the AirPlay logo, iPad, iPhone, iPod classic, iPod nano, iPod shuffle and iPod touch are trademarks of Apple Inc., registered in the U.S. and other countries.
- Individual users are permitted to use iPhone, iPod, iPod classic, iPod nano, iPod shuffle, and iPod touch for private copy and playback of non-copyrighted contents and contents whose copy and playback is permitted by law. Copyright infringement is prohibited by law.
Specifications
Audio performance
- Analog output
Channels:
2-channels
Playable frequency range:
2 Hz - 96 kHz
Playable frequency response:
2 Hz - 50 kHz (-3 dB)
(DSD mode, PCM sampling frequency: 192 kHz)
2 Hz - 20 kHz
(PCM sampling frequency: 44.1 kHz)
S/N:
110 dB (Audible range)
Dynamic range:
106 dB (DSD/192 kHz) (Audible range)
101 dB (44.1 kHz)
Harmonic distortion:
0.0012% (1 kHz, Audible range)
Output level
2.3 V RMS (PCM)
1.7 VRMS (DSD)
Headphone output:
30 mW/32 Ω/ohms (variable maximum)
Digital output
0.5 Vp-p / 75 Ω/ohms
Coaxial:
-15--21dBm
Optical :
Digital input
0.5 Vp-p / 75 Ω/ohms
Coaxial:
-27 dBm or lator
Optical :
USB Type A (USB 2.0 High speed)
USB (Front):
USB Type B (USB 2.0 High speed)
General
Power supply voltage/frequency: AC120 V, 60 Hz
Power consumption (EN60065) : 30 W
Power consumption in standby mode: 0.4 W
Power consumption in "Network Control" 4 W
- "On" mode:
For the purpose of improvement, the specifications and design are subject to change without notice.
Dimensions (Unit: in. (mm))
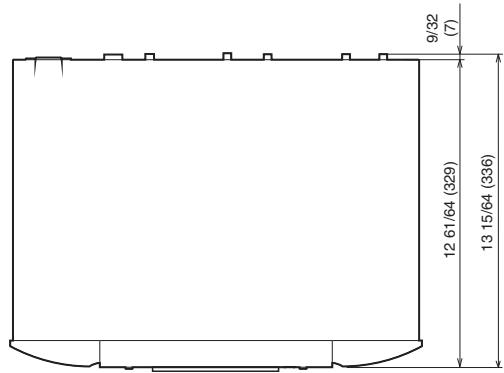
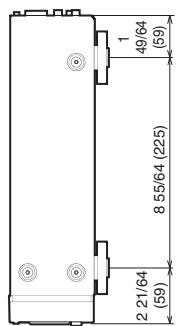
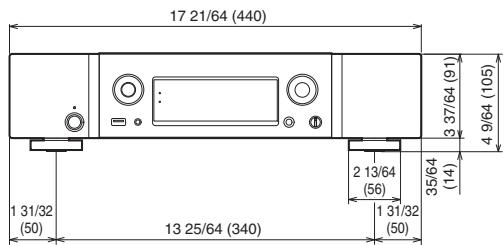
Weight : 15 lbs 14 oz (7.2 kg)
Index
A
Accessories 5
AIFF 60,106,109
AirPlay 63
ALAC 38,59,106,109,111
AppStore 7,111
Audio cable 17, 18
Audio Device Settings (Mac OS X only) 79
B
Bit rate 106, 108, 109, 113
C
Charging the iPod 58
Coaxial digital cable 17, 19, 20
Connecting a computer 21
Connecting an amplifier 18
Connecting an iPod 22
Connecting a USB memory device 22
Connecting a power cord 29
Connecting to a home network (LAN) 24
D
D/A converter function 72, 107
DHCP 92
Digital audio input 19
Display's brightness 33
DLNA 111
DSD 59,107,109,111
F
Favorite list 52
Firmware update 88
FLAC 59,107,109,111
FLASHER IN jack 27
Friendly Name 91
Front panel 10
G
Gateway 92
#
Inputting characters 85
Inserting the batteries 6
Installing the dedicated driver (Windows OS only) 73
Internet Radio 34
IP Address 92
iTunes 65,112
L
LAN cable 17,24
M
Menu map 82
Monaural mini- plug cable 17,27
MP3 34,38,59,106,108,109,112
MPEG 112
MPEG-4 AAC 34, 38, 106, 108, 109, 112
Music server 42


NAS 38,109
Network Control 91
Network Information 91
Notifications 89

Optical cable 17, 19, 20

Playing back an iPod 55
Playing back files stored on PC 109
Playing back Pandora® 43
Playing back SiriusXM 48
Playing a USB memory device 59
Primary DNS 92
Proxy 93


Random playback 41, 57, 61
Rear panel 12
Remote connector cable 17, 28
Remote control connection 28
Remote control unit 14
Remote play function 66
Repeat playback 41, 61
Resetting factory settings 105
RS-232C connector 26

Sampling frequency .... 106, 107, 108, 109, 113
Selecting the input source 32
Sleep timer 33
Spotify 51
Stopping digital outputs 33
Supported iPod/iPhone models 23


Turning the power on 31


USB cable 17,21,22
USB-DAC 21,72,107


vTuner 37


WAV 38,59,106,109
Web control function 69
Windows Media DRM 38
Windows Media Player 38, 113
WMA 34,38,59,106,108,109,113
License
This section describes software license used for this unit. To maintain the correct content, the original (English) is used.
Boost
http://wwwBOOST.org/
Boost Software License - Version 1.0 - August 17th, 2003
Permission is hereby granted, free of charge, to any person or organization obtaining a copy of the software and accompanying documentation covered by this license (the "Software") to use, reproduce, display, distribute, execute, and transmit the Software, and to prepare derivative works of the Software, and to permit third-parties to whom the Software is furnished to do so, all subject to the following:
The copyright notices in the Software and this entire statement, including the above license grant, this restriction and the following disclaimer, must be included in all copies of the Software, in whole or in part, and all derivative works of the Software, unless such copies or derivative works are solely in the form of machine-executable object code generated by a source language processor.
THE SOFTWARE IS PROVIDED "AS IS", WITHOUT WARRANTY OF ANY KIND, EXPRESS OR IMPLIED, INCLUDING BUT NOT LIMITED TO THE WARRANTY OF MERCHANTABILITY, FITNESS FOR A PARTICULAR PURPOSE, TITLE AND NON-INFRINGEMENT. IN NO EVENT SHALL THE COPYRIGHT HOLDERS OR ANYONE DISTRIBUTING THE SOFTWARE BE LIABLE FOR ANY DAMAGES OR OTHER LIABILITY, WHETHER IN CONTRACT, TORT OR OTHERWISE, ARISING FROM, OUT OF OR IN CONNECTION WITH THE SOFTWARE OR THE USE OR OTHER DEALINGS IN THE SOFTWARE.
Expat
http://www.jclark.com/XML/expat.html
Expat License. Copyright (c) 1998, 1999, 2000 Thai Open Source Software Center Ltd
Permission is hereby granted, free of charge, to any person obtaining a copy of this software and associated documentation files (the "Software"), to deal in the Software without restriction, including without limitation the rights to use, copy, modify, merge, publish, distribute, sublicense, and/or sell copies of the Software, and to permit persons to whom the Software is furnished to do so, subject to the following conditions:
The above copyright notice and this permission notice shall be included in all copies or substantial portions of the Software.
THE SOFTWARE IS PROVIDED "AS IS", WITHOUT WARRANTY OF ANY KIND, EXPRESS OR IMPLIED, INCLUDING BUT NOT LIMITED TO THE WARRANTY OF MERCHANTABILITY, FITNESS FOR A PARTICULAR PURPOSE AND NONINFRINGEMENT. IN NO EVENT SHALL THE AUTHORS OR COPYRIGHT HOLDERS BE LIABLE FOR ANY CLAIM, DAMAGES OR OTHER LIABILITY, WHETHER IN AN ACTION OF CONTRACT, TORT OR OTHERWISE, ARISING FROM, OUT OF OR IN CONNECTION WITH THE SOFTWARE OR THE USE OR OTHER DEALINGS IN THE SOFTWARE.
FastDelegate
http://www.codeproject.com/KBcpp/FastDelegate.aspx
THE WORK (AS DEFINED BELOW) IS PROVIDED UNDER THE TERMS OF THIS CODE PROJECT OPEN LICENSE ("LICENSE"). THE WORK IS PROTECTED BY COPYRIGHT AND/OR OTHER APPLICABLE LAW. ANY USE OF THE WORK OTHER THAN AS AUTHORIZED UNDER THIS LICENSE OR COPYRIGHT LAW IS PROHIBITED.
BY EXERCISING ANY RIGHTS TO THE WORK PROVIDED HEREIN, YOU ACCEPT AND AGREE TO BE BOUND BY THE TERMS OF THIS LICENSE. THE AUTHOR GRANTS YOU THE RIGHTS CONTAINED HEREIN IN CONSIDERATION OF YOUR ACCEPTANCE OF SUCH TERMS AND CONDITIONS. IF YOU DO NOT AGREE TO ACCEPT AND BE BOUND BY THE TERMS OF THIS LICENSE, YOU CANNOT MAKE ANY USE OF THE WORK.
Definitions. "Articles" means, collectively, all articles written by Author which describes how the Source Code and Executable Files for the Work may be used by a user.
"Author" means the individual or entity that offers the Work under the terms of this License.
"Derivative Work" means a work based upon the Work or upon the Work and other pre-existing works.
"Executable Files" refer to the executables, binary files, configuration and any required data files included in the Work.
"Publisher" means the provider of the website, magazine, CD-ROM, DVD or other medium from or by which the Work is obtained by You.
"Source Code" refers to the collection of source code and configuration files used to create the Executable Files.
"Standard Version" refers to such a Work if it has not been modified, or has been modified in accordance with the consent of the Author, such consent being in the full discretion of the Author.
"Work" refers to the collection of files distributed by the Publisher, including the Source Code, Executable Files, binaries, data files, documentation, whitepapers and the Articles.
"You" is you, an individual or entity wishing to use the Work and exercise your rights under this License.
Fair Use/Fair Use Rights. Nothing in this License is intended to reduce, limit, or restrict any rights arising from fair use, fair dealing, first sale or other limitations on the exclusive rights of the copyright owner under copyright law or other applicable laws. License Grant. Subject to the terms and conditions of this License, the Author hereby grants You a worldwide, royalty-free, non-exclusive, perpetual (for the duration of the applicable copyright) license to exercise the rights in the Work as stated below: You may use the standard version of the Source Code or Executable Files in Your own applications.
You may apply bug fixes, portability fixes and other modifications obtained from the Public Domain or from the Author. A Work modified in such a way shall still be considered the standard version and will be subject to this License.
You may otherwise modify Your copy of this Work (excluding the Articles) in any way to create a Derivative Work, provided that You insert a prominent notice in each changed file stating how, when and where You changed that file.
You may distribute the standard version of the Executable Files and Source Code or Derivative Work in aggregate with other (possibly commercial) programs as part of a larger (possibly commercial) software distribution.
The Articles discussing the Work published in any form by the author may not be distributed or republished without the Author's consent. The author retains copyright to any such Articles. You may use the Executable Files and Source Code pursuant to this License but you may not repost or republish or otherwise distribute or make available the Articles, without the prior written consent of the Author.
Any subroutines or modules supplied by You and linked into the Source Code or Executable Files this Work shall not be considered part of this Work and will not be subject to the terms of this License.
Patent License. Subject to the terms and conditions of this License, each Author hereby grants to You a perpetual, worldwide, non-exclusive, no-charge, royalty-free, irrevocable (except as stated in this section) patent license to make, have made, use, import, and otherwise transfer the Work.
Restrictions. The license granted in Section 3 above is expressly made subject to and limited by the following restrictions: You agree not to remove any of the original copyright, patent, trademark, and attribution notices and associated disclaimers that may appear in the Source Code or Executable Files.
You agree not to advertise or in any way imply that this Work is a product of Your own.
The name of the Author may not be used to endorse or promote products derived from the Work without the prior written consent of the Author.
You agree not to sell, lease, or rent any part of the Work. This does not restrict you from including the Work or any part of the Work inside a larger software distribution that itself is being sold. The Work by itself, though, cannot be sold, leased or rented.
You may distribute the Executable Files and Source Code only under the terms of this License, and You must include a copy of, or the Uniform Resource Identifier for, this License with every copy of the Executable Files or Source Code You distribute and ensure that anyone receiving such Executable Files and Source Code agrees that the terms of this License apply to such Executable Files and/or Source Code. You may not offer or impose any terms on the Work that alter or restrict the terms of this License or the recipients' exercise of the rights granted hereunder. You may not sub license the Work. You must keep intact all notices that refer to this License and to the disclaimer of warranties. You may not distribute the Executable Files or Source Code with any technological measures that control access or use of the Work in a manner inconsistent with the terms of this License.
You agree not to use the Work for illegal, immoral or improper purposes, or on pages containing illegal, immoral or improper material. The Work is subject to applicable export laws. You agree to comply with all such laws and regulations that may apply to the Work after Your receipt of the Work.
Representations, Warranties and Disclaimer. THIS WORK IS PROVIDED "AS IS", "WHERE IS" AND "AS AVAILABLE", WITHOUT ANY EXPRESS OR IMPLIED WARRANTY OR CONDITIONS OR GUARANTEES. YOU, THE USER, ASSUME ALL RISK IN ITS USE, INCLUDING COPYRIGHT INFRINGEMENT, PATENT INFRINGEMENT, SUITABILITY, ETC. AUTHOR EXPRESSLY DISCLAIMS ALL EXPRESS, IMPLIED OR STATUTORY WARRANTYES OR CONDITIONS, INCLUDING WITHOUT LIMITATION, WARRANTYES OR CONDITIONS OF MERCHANTABILITY, MERCHANTABLE QUALITY OR FITNESS FOR A PARTICULAR PURPOSE, OR ANY WARRANTY OF TITLE OR NONINFRINGEMENT, OR THAT THE WORK (OR ANY PORTION THEREOF) IS CORRECT, USEFUL, BUG-FREE OR FREE OF VIRUSES. YOU MUST PASS THIS DISCLAIMER ON WHENEVER YOU DISTRIBUTE THE WORK OR DERIVATIVE WORKS.
Indemnity. You agree to defend, indemnify and hold harmless the Author and the Publisher from and against any claims, suits, losses, damages, liabilities, costs, and expenses (including reasonable legal or attorneys' fees) resulting from or relating to any use of the Work by You.
Limitation on Liability. EXCEPT TO THE EXTENT REQUIRED BY APPLICABLE LAW, IN NO EVENT WILL THE AUTHOR OR THE PUBLISHER BE LIABLE TO YOU ON ANY LEGAL THEORY FOR ANY SPECIAL, INCIDENTAL, CONSEQUENTIAL, PUNITIVE OR EXEMPLARY DAMAGES ARISING OUT OF THIS LICENSE OR THE USE OF THE WORK OR OTHERWISE, EVEN IF THE AUTHOR OR THE PUBLISHER HAS BEEN ADVISED OF THE POSSIBILITY OF SUCH DAMAGES. Termination.
This License and the rights granted hereunder will terminate automatically upon any breach by You of any term of this License. Individuals or entities who have received Derivative Works from You under this License, however, will not have their licenses terminated provided such individuals or entities remain in full compliance with those licenses. Sections 1, 2, 6, 7, 8, 9, 10 and 11 will survive any termination of this License.
If You bring a copyright, trademark, patent or any other infringement claim against any contributor over infringements. You claim are made by the Work, your License from such contributor to the Work ends automatically.
Subject to the above terms and conditions, this License is perpetual (for the duration of the applicable copyright in the Work). Notwithstanding the above, the Author reserves the right to release the Work under different license terms or to stop distributing the Work at any time; provided, however that any such election will not serve to withdraw this License (or any other license that has been, or is required to be, granted under the terms of this License), and this License will continue in full force and effect unless terminated as stated above.
Publisher. The parties hereby confirm that the Publisher shall not, under any circumstances, be responsible for and shall not have any liability in respect of the subject matter of this License. The Publisher makes no warranty whatsoever in connection with the Work and shall not be liable to You or any party on any legal theory for any damages whatsoever, including without limitation any general, special, incidental or consequential damages arising in connection to this license. The Publisher reserves the right to cease making the Work available to You at any time without notice
Miscellaneous
This License shall be governed by the laws of the location of the head office of the Author or if the Author is an individual, the laws of location of the principal place of residence of the Author.
If any provision of this License is invalid or unenforceable under applicable law, it shall not affect the validity or enforceability of the remainder of the terms of this License, and without further action by the parties to this License, such provision shall be reformed to the minimum extent necessary to make such provision valid and enforceable.
No term or provision of this License shall be deemed waived and no breach consented to unless such waiver or consent shall be in writing and signed by the party to be charged with such waiver or consent.
This License constitutes the entire agreement between the parties with respect to the Work licensed herein. There are no understandings, agreements or representations with respect to the Work not specified herein. The Author shall not be bound by any additional provisions that may appear in any communication from You. This License may not be modified without the mutual written agreement of the Author and You
■ libogg
http://www.xiph.org/ogg/
Copyright (c) 2002, Xiph.org Foundation
Redistribution and use in source and binary forms, with or without modification, are permitted provided that the following conditions are met:
- Redistributions of source code must retain the above copyright notice, this list of conditions and the following disclaimer.
- Redistributions in binary form must reproduce the above copyright notice, this list of conditions and the following disclaimer in the documentation and/or other materials provided with the distribution.
- Neither the name of the Xiph.org Foundation nor the names of its contributors may be used to endorse or promote products derived from this software without specific prior written permission.
THIS SOFTWARE IS PROVIDED BY THE COPYRIGHT HOLDERS AND CONTRIBUTORS "AS IS" AND ANY EXPRESS OR IMPLIED WARRANTYES, INCLUDING, BUT NOT LIMITED TO, THE IMPLIED WARRANTYES OF MERCHANTABILITY AND FITNESS FOR A PARTICULAR PURPOSE ARE DISCLAIMED. IN NO EVENT SHALL THE FOUNDATION OR CONTRIBUTORS BE LIABLE FOR ANY DIRECT, INDIRECT, INCIDENTAL, SPECIAL, EXEMPLARY, OR CONSEQUENTIAL DAMAGES (INCLUDING, BUT NOT LIMITED TO, PROCUREMENT OF SUBSTITUTE GOODS OR SERVICES; LOSS OF USE, DATA, OR PROFITS; OR BUSINESS INTERRUPTION) HOWEVER CAUSED AND ON ANY THEORY OF LIABILITY, WHETHER IN CONTRACT, STRICT LIABILITY, OR TORT (INCLUDING NEGLIGENCE OR OTHERWISE) ARISING IN ANY WAY OUT OF THE USE OF THIS SOFTWARE, EVEN IF ADVISED OF THE POSSIBILITY OF SUCH DAMAGE.
libvorbis
http://www.xiph.org/vorbis/
Copyright (c) 2002-2004 Xiph.org Foundation
Redistribution and use in source and binary forms, with or without modification, are permitted provided that the following conditions are met:
- Redistributions of source code must retain the above copyright notice, this list of conditions and the following disclaimer.
- Redistributions in binary form must reproduce the above copyright notice, this list of conditions and the following disclaimer in the documentation and/or other materials provided with the distribution.
- Neither the name of the Xiph.org Foundation nor the names of its contributors may be used to endorse or promote products derived from this software without specific prior written permission.
THIS SOFTWARE IS PROVIDED BY THE COPYRIGHT HOLDERS AND CONTRIBUTORS "AS IS" AND ANY EXPRESS OR IMPLIED WARRANTYES, INCLUDING, BUT NOT LIMITED TO, THE IMPLIED WARRANTYES OF MERCHANTABILITY AND FITNESS FOR A PARTICULAR PURPOSE ARE DISCLAIMED. IN NO EVENT SHALL THE FOUNDATION OR CONTRIBUTORS BE LIABLE FOR ANY DIRECT, INDIRECT, INCIDENTAL, SPECIAL, EXEMPLARY, OR CONSEQUENTIAL DAMAGES (INCLUDING, BUT NOT LIMITED TO, PROCUREMENT OF SUBSTITUTE GOODS OR SERVICES; LOSS OF USE, DATA, OR PROFITS; OR BUSINESS INTERRUPTION) HOWEVER CAUSED AND ON ANY THEORY OF LIABILITY, WHETHER IN CONTRACT, STRICT LIABILITY, OR TORT (INCLUDING NEGLIGENCE OR OTHERWISE) ARISING IN ANY WAY OUT OF THE USE OF THIS SOFTWARE, EVEN IF ADVISED OF THE POSSIBILITY OF SUCH DAMAGE.
Tremolo
http://wss.co.uk/pinknoise/tremolo
Copyright (C) 2002 - 2009 Xiph.org Foundation Changes Copyright (C) 2009 - 2010 Robin Watts for Pinknoise Productions Ltd
Redistribution and use in source and binary forms, with or without modification, are permitted provided that the following conditions are met:
- Redistributions of source code must retain the above copyright notice, this list of conditions and the following disclaimer.
- Redistributions in binary form must reproduce the above copyright notice, this list of conditions and the following disclaimer in the documentation and/or other materials provided with the distribution.
- Neither the name of the Xiph.org Foundation nor the names of its contributors may be used to endorse or promote products derived from this software without specific prior written permission.
THIS SOFTWARE IS PROVIDED BY THE COPYRIGHT HOLDERS AND CONTRIBUTORS "AS IS" AND ANY EXPRESS OR IMPLIED WARRANTYES, INCLUDING, BUT NOT LIMITED TO, THE IMPLIED WARRANTYES OF MERCHANTABILITY AND FITNESS FOR A PARTICULAR PURPOSE ARE DISCLAIMED. IN NO EVENT SHALL THE FOUNDATION OR CONTRIBUTORS BE LIABLE FOR ANY DIRECT, INDIRECT, INCIDENTAL, SPECIAL, EXEMPLARY, OR CONSEQUENTIAL DAMAGES (INCLUDING, BUT NOT LIMITED TO, PROCUREMENT OF SUBSTITUTE GOODS OR SERVICES; LOSS OF USE, DATA, OR PROFITS; OR BUSINESS INTERRUPTION) HOWEVER CAUSED AND ON ANY THEORY OF LIABILITY, WHETHER IN CONTRACT, STRICT LIABILITY, OR TORT (INCLUDING NEGLIGENCE OR OTHERWISE) ARISING IN ANY WAY OUT OF THE USE OF THIS SOFTWARE, EVEN IF ADVISED OF THE POSSIBILITY OF SUCH DAMAGE.
■Tremor
http://wiki.xiph.org/index.php/Tremor
Copyright (c) 2002, Xiph.org Foundation
Redistribution and use in source and binary forms, with or without modification, are permitted provided that the following conditions are met:
- Redistributions of source code must retain the above copyright notice, this list of conditions and the following disclaimer.
- Redistributions in binary form must reproduce the above copyright notice, this list of conditions and the following disclaimer in the documentation and/or other materials provided with the distribution.
- Neither the name of the Xiph.org Foundation nor the names of its contributors may be used to endorse or promote products derived from this software without specific prior written permission.
THIS SOFTWARE IS PROVIDED BY THE COPYRIGHT HOLDERS AND CONTRIBUTORS "AS IS" AND ANY EXPRESS OR IMPLIED WARRANTY, INCLUDING, BUT NOT LIMITED TO, THE IMPLIED WARRANTYES OF MERCHANTABILITY AND FITNESS FOR A PARTICULAR PURPOSE ARE DISCLAIMED. IN NO EVENT SHALL THE FOUNDATION OR CONTRIBUTORS BE LIABLE FOR ANY DIRECT, INDIRECT, INCIDENTAL, SPECIAL, EXEMPLARY, OR CONSEQUENTIAL DAMAGES (INCLUDING, BUT NOT LIMITED TO, PROCUREMENT OF SUBSTITUTE GOODS OR SERVICES; LOSS OF USE, DATA, OR PROFITS; OR BUSINESS INTERRUPTION) HOWEVER CAUSED AND ON ANY THEORY OF LIABILITY, WHETHER IN CONTRACT, STRICT LIABILITY, OR TORT (INCLUDING NEGLIGENCE OR OTHERWISE) ARISING IN ANY WAY OUT OF THE USE OF THIS SOFTWARE, EVEN IF ADVISED OF THE POSSIBILITY OF SUCH DAMAGE.
■ Mersenne Twister
http://www.math.sci.hiroshima-u.ac.jp/~m-mat/MT/MT2002/CODES/mt19937ar.c
Copyright (C) 1997 - 2002, Makoto Matsumoto and Takuji Nishimura,
All rights reserved.
Redistribution and use in source and binary forms, with or without modification, are permitted provided that the following conditions are met:
Redistributions of source code must retain the above copyright notice, this list of conditions and the following disclaimer.
Redistributions in binary form must reproduce the above copyright notice, this list of conditions and the following disclaimer in the documentation and/or other materials provided with the distribution.
The names of its contributors may not be used to endorse or promote products derived from this software without specific prior written permission.
THIS SOFTWARE IS PROVIDED BY THE COPYRIGHT HOLDERS AND CONTRIBUTORS "AS IS" AND ANY EXPRESS OR IMPLIED WARRANTYES, INCLUDING, BUT NOT LIMITED TO, THE IMPLIED WARRANTYES OF MERCHANTABILITY AND FITNESS FOR A PARTICULAR PURPOSE ARE DISCLAIMED. IN NO EVENT SHALL THE COPYRIGHT OWNER OR CONTRIBUTORS BE LIABLE FOR ANY DIRECT, INDIRECT, INCIDENTAL, SPECIAL, EXEMPLARY, OR CONSEQUENTIAL DAMAGES (INCLUDING, BUT NOT LIMITED TO, PROCEDURE OF SUBSTITUTE GOODS OR SERVICES; LOSS OF USE, DATA, OR PROFITS; OR BUSINESS INTERRUPTION) HOWEVER CAUSED AND ON ANY THEORY OF LIABILITY, WHETHER IN CONTRACT, STRICT LIABILITY, OR TORT (INCLUDING NEGLIGENCE OR OTHERWISE) ARISING IN ANY WAY OUT OF THE USE OF THIS SOFTWARE, EVEN IF ADVISED OF THE POSSIBILITY OF SUCH DAMAGE.
■ zlib
http://www.zlib.net/
zlib.h -- interface of the " zlib" general purpose compression library version 1.2.3, July 18th, 2005
Copyright (C) 1995 - 2004 Jean-Ioup Gailly and Mark Adler
This software is provided "as-is", without any express or implied warranty. In no event will the authors be held liable for any damages arising from the use of this software.
Permission is granted to anyone to use this software for any purpose, including commercial applications, and to alter it and redistribute it freely, subject to the following restrictions:
The origin of this software must not be misrepresented; you must not claim that you wrote the original software. If you use this software in a product, an acknowledgment in the product documentation would be appreciated but is not required.
Altered source versions must be plainly marked as such, and must not be misrepresented as being the original software.
This notice may not be removed or altered from any source distribution.
Jean-loup Gailly jloup@gzip.org, Mark Adler madler@alumni.caltech.edu
cURL
http://curl.haxx.se
COPYRIGHT AND PERMISSION NOTICE
Copyright (c) 1996 - 2011, Daniel Stenberg, daniel@haxx.se.
All rights reserved.
Permission to use, copy, modify, and distribute this software for any purpose with or without fee is hereby granted, provided that the above copyright notice and this permission notice appear in all copies.
THE SOFTWARE IS PROVIDED "AS IS", WITHOUT WARRANTY OF ANY KIND, EXPRESS OR IMPLIED, INCLUDING BUT NOT LIMITED TO THE WARRANTY OF MERCHANTABILITY, FITNESS FOR A PARTICULAR PURPOSE AND NONINFRINGEMENT OF THIRD PARTY RIGHTS. IN NO EVENT SHALL THE AUTHORS OR COPYRIGHT HOLDERS BE LIABLE FOR ANY CLAIM, DAMAGES OR OTHER LIABILITY, WHETHER IN AN ACTION OF CONTRACT, TORT OR OTHERWISE, ARISING FROM, OUT OF OR IN CONNECTION WITH THE SOFTWARE OR THE USE OR OTHER DEALINGS IN THE SOFTWARE.
Except as contained in this notice, the name of a copyright holder shall not be used in advertising or otherwise to promote the sale, use or other dealings in this Software without prior written authorization of the copyright holder.
c-ares
http://c-ares.haxx.se
Copyright 1998 by the Massachusetts Institute of Technology.
Permission to use, copy, modify, and distribute this software and its documentation for any purpose and without fee is hereby granted, provided that the above copyright notice appear in all copies and that both that copyright notice and this permission notice appear in supporting documentation, and that the name of M.I.T. not be used in advertising or publicity pertaining to distribution of the software without specific, written prior permission. M.I.T. makes no representations about the suitability of this software for any purpose. It is provided "as is" without express or implied warranty.
License information for the software used in the unit
About GPL (GNU-General Public License), LGPL (GNU Lesser General Public License) License
This product uses GPL/LGPL software and software made by other companies.
After you purchase this product, you may procure, modify or distribute the source code of the GPL/LGPL software that is used in the product.
Marantz provides the source code based on the GPL and LPGL
licenses at the actual cost upon your request to our customer service center.
However, note that we make no guarantees concerning the source code.
Please also understand that we do not offer support for the contents of the source code.

www.marantz.com
You can find your nearest authorized distributor or dealer on our website.
marantz* is a registered trademark.
D&M Holdings Inc.
3520 10293 10AM
- marantz
- Network Audio Player NA8005
- Connections
- Playback
- Settings
- Tips
- Accessories
- About the remote control
- Inserting the batteries
- Operating range of the remote control unit
- Marantz "Hi-Fi Remote" app
- Main features
- High quality sound
- High performance
- Part names and functions
- NOTE
- Rear panel
- AUDIO OUT connectors
- FLASHER IN jack
- DIGITAL AUDIO OUT connectors
- DIGITAL AUDIO IN connectors
- NETWORK connector
- Remote control unit
- POWER button (b)
- SLEEP button
- Input source select buttons
- FAVORITES ADD /CALL buttons
- System buttons
- Contents
- Cables used for connections
- Connecting an amplifier
- Connecting to a device with digital audio input connectors
- Connecting to a device with digital audio output connectors
- Connecting a PC or Mac
- Connecting an iPod or USB memory device to the USB port
- Supported iPod/iPhone models
- Connecting to a home network (LAN)
- Wired LAN
- Required system
- ■ Broadband Internet connection
- Modem
- Router
- LAN cable (CAT-5 or greater recommended)
- Other connections
- RS-232C connector
- FLASHER IN jack
- REMOTE CONTROL jack
- Connection
- Setting
- Connecting the power cord
- Basic operation
- Turning the power on
- Switching the power to standby
- Press POWER
- Completely turning off the power
- Selecting the input source
- Selecting the input source using the remote control
- Selecting the input source using the main unit
- Switching the display's brightness
- Press DIMMER.
- Stopping digital outputs
- Press DIG. OUT.
- Using the sleep timer
- Press SLEEP during playback and select the setting time.
- Canceling the sleep timer
- To check the time remaining until the sleep timer is activated
- Listening to Internet Radio
- Prepare for playback.
- Press INTERNET RADIO.
- Use to select the you want to play, then press ENTER.
- Use to select the station, then press ENTER.
- Using vTuner to add Internet Radio stations to favorites
- Playing back files stored on a PC and NAS
- Applying media sharing settings
- Windows Media Player 12 (Windows 7 / Windows 8)
- When using Windows Media Player 11
- Sharing media stored in NAS
- Playing back files stored on PC and NAS
- Press MUSIC SERVER to switch the input source to "Music Server".
- Use to select the server including the file to be played, then press ENTER.
- Performing repeat playback
- Press REPEAT
- Performing random playback
- Press RANDOM
- Canceling random playback
- Music server operation
- Switching the display
- Listening to Pandora®
- Connecting to Pandora
- Creating a new station
- Listening to an existing station
- Listening to created radio stations at random
- Giving feedback and managing stations
- Sign Out
- Listening to SiriusXM Internet Radio
- Press ONLINE MUSIC to switch the input source to "SiriusXM".
- Spotify Connect function
- Playing Spotify music with this unit
- Favorite function
- Registering stations or files to the favorites list
- Calling stations or files from the favorites list
- Deleting stations or files from the favorite list
- Playing back an iPod
- Playing an iPod
- Press MODE to select the display mode.
- iPod operation
- Disconnecting the iPod
- Charging the iPod
- Standby charging
- Playing a USB memory device
- Playing files stored on USB memory devices
- Removing the USB memory device
- USB operation
- AirPlay function
- Playing iPhone, iPod touch music with this unit
- Playing iTunes music with this unit
- Selecting multiple speakers (devices)
- Remote play function
- ■ Roles each device plays
- Files that can be played back
- Settings required for each device
- Settings on computer and NAS
- Settings on smartphones
- Settings on portable audio players
- Settings on this unit
- Remote Play operations
- Turn on this unit.
- Display the music file playback screen on DMC.
- Select the friendly name of this unit for the item that sets the playback device on the playback screen.
- Start playing back a music file on DMC.
- To exit Remote Play
- Press
- Web control function
- Enter the IP address of this unit in browser's address box.
- When the top menu is displayed, click on the menu item you want to operate.
- Operate.
- Friendly Name setting
- Network connection settings
- Using as a D/A converter (USB-DAC)
- Connecting and playing back from a computer (USB-DAC)
- Computer (recommended system)
- os
- USB
- ■ Installing the dedicated driver (Windows OS only)
- □ Installing the driver software
- Install the driver.
- With the unit power off, connect the unit and PC using a USB cable (sold separately).
- Press POWER
- Press the input source select button (USB-DAC) to switch the input source to "USB-DAC".
- Checking the installed driver.
- Checking audio output.
- Audio Device Settings (Mac OS X only)
- Press USB-DAC to switch the input source to "USB-DAC".
- Connect and playback from a digital device (Coaxial/Optical)
- Press OPT/COAX to select the input source to "Coaxial" or "Optical".
- Menu map
- ■ Menu operation
- Inputting characters
- Display of an input screen
- Using the number buttons
- Using the cursor buttons
- General
- Audio Out
- Volume Limit
- Language
- Auto-Standby
- Firmware
- Update
- Notifications
- Add New Feature
- Notes concerning use of "Update" and "Add New Feature"
- Network
- Network Information
- Network Control
- Friendly Name
- ■ Friendly Name
- Default
- DHCP
- IP Address
- Subnet Mask
- Gateway
- Primary DNS, Secondary DNS
- Proxy
- Test Connection
- Switching the function of the volume buttons on the remote control
- Set the function of the volume buttons on the remote control to “Variable”
- Set the function of the volume buttons on the remote control to “AMP”
- Troubleshooting
- Resetting factory settings
- Playing back a USB memory devices
- ■ Specifications of supported files
- Maximum number of playable files and folders
- D/A converter
- USB-DAC
- Coaxial/Optical
- Playing back Internet Radio
- Appendix
- Explanation of terms
- AirPlay
- ALAC(Apple Lossless Audio Codec)
- App Store
- DLNA
- DSD (Direct-Stream Digital)
- FLAC
- iTunes
- MP3 (MPEG Audio Layer-3)
- MPEG (Moving Picture Experts Group), MPEG-2, MPEG-4
- vTuner
- Windows Media Player Ver. 11
- WMA (Windows Media Audio)
- Sampling frequency
- Bit rate
- Trademark information
- Specifications
- Audio performance
- Dimensions (Unit: in. (mm))
- Weight : 15 lbs 14 oz (7.2 kg)
- Index
- A
- B
- C
- D
- F
- G
- #
- L
- M
- License
- Boost
- Expat
- FastDelegate
- Miscellaneous
- ■ libogg
- libvorbis
- Tremolo
- ■Tremor
- ■ Mersenne Twister
- ■ zlib
- cURL
- c-ares
- License information for the software used in the unit
- www.marantz.com
Marque : MARANTZ
Modèle : NA8005
Catégorie : Lecteur réseau audio