FALCON 180 - Drone EACHINE - Notice d'utilisation et mode d'emploi gratuit
Retrouvez gratuitement la notice de l'appareil FALCON 180 EACHINE au format PDF.
| Type de produit | Drone de course FPV |
| Marque | Eachine |
| Modèle | FALCON 180 |
| Matériau principal | Composite fibre de carbone |
| Dimensions (châssis) | 200 x 180 x 94 mm |
| Poids (sans batterie) | 397 g |
| Contrôleur de vol | F3 6DOF |
| Récepteur | Intégré 6 canaux 2,4 GHz |
| Moteurs | 2205-2300KV (sans balais) |
| ESC | 20A |
| Hélices | 4 pouces tripales (noir/bleu) |
| Batterie | Li-Po 14,8 V 1100 mAh 30C 4S |
| Autonomie de vol | 10 à 14 minutes |
| Caméra | 1000TVL, PAL/NTSC |
| Transmission vidéo | 5,8 GHz temps réel |
| Température de fonctionnement | -10 °C à +40 °C |
| Âge minimum recommandé | 14 ans et plus |
| Entretien et nettoyage | Nettoyer avec un chiffon doux et sec. Stocker dans un endroit sec et tempéré. |
| Pièces détachées disponibles | Hélices, batterie, moteurs, ESC, contrôleur de vol, caméra, antenne, récepteur (optionnel) |
| Réparabilité | Conception modulaire facilitant le remplacement des pièces |
FOIRE AUX QUESTIONS - FALCON 180 EACHINE
Questions des utilisateurs sur FALCON 180 EACHINE
0 question sur cet appareil. Repondez a celles que vous connaissez ou posez la votre.
Poser une nouvelle question sur cet appareil
Téléchargez la notice de votre Drone au format PDF gratuitement ! Retrouvez votre notice FALCON 180 - EACHINE et reprennez votre appareil électronique en main. Sur cette page sont publiés tous les documents nécessaires à l'utilisation de votre appareil FALCON 180 de la marque EACHINE.
MODE D'EMPLOI FALCON 180 EACHINE
Eachine 80
14+
AGES

INSTRUCTION MANUAL
Machine/80
ENJOY THE FPV RACING
Experience the passion of flinght Faster, more stable picture,smaller,more powerful

Table of Contents
1.0 Know your drone 2
2.0 Specification 3
2.1 Specification of the camera 4
2.2 Imaging parameters 5
3.0 Notice in Flight 6
4.0 Charging 6
5.0Assembling of the drone 7
5.1 Install of the blade propellers 7
5.2 Installing battery 7
6.0 Ready to fly 8
6.1 Charging of the drone 8
6.2 Motor unlocking/locking 8
7.0 End of flying 9
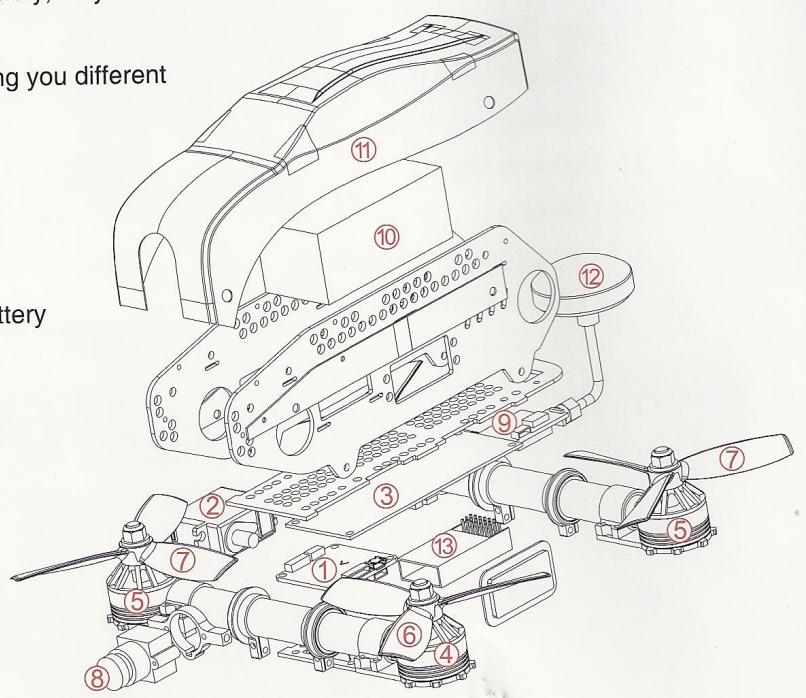
1.0 Know your drone
- The main structure is made of Carbon Fiber Composite materials, with the advantages of super toughness and resistance of impact force and so on.
- New industrial and modular design,improved the product variety,easy to install,maintain,replace and update.
-
Equiped with 5.8G real-time image transmission system,bring you different visual effects.
-
F3 6DOF flight control
- KF 180 steering engine
3.20A ESC - Forward Motor
- Motor reverse
- Positive blade (black cap)
-
Anti-blade (blue cap)
-
Camera
- image transmission
- 4S 30C 1100mAh battery
- PVC Case
- Mushroom attenna
- Receiver(optional)
2.0 Specification
Specification of the drone
main wing : 55mm
airframe ( length×width×height ) : 200×180×94mm
weight : 397g ( not including battery )
Controller: 2.4G 6 channels
Receiver : integration 6 channels
Flight Control : F3 flight control appliance
Motor:2205-2300KV
ESC:20A
Li-Battery : 14.8V 1100mAh 30C 4S Li-Po
Fly time : 10~14 mins
Working temperature : - 10°C to +40°C


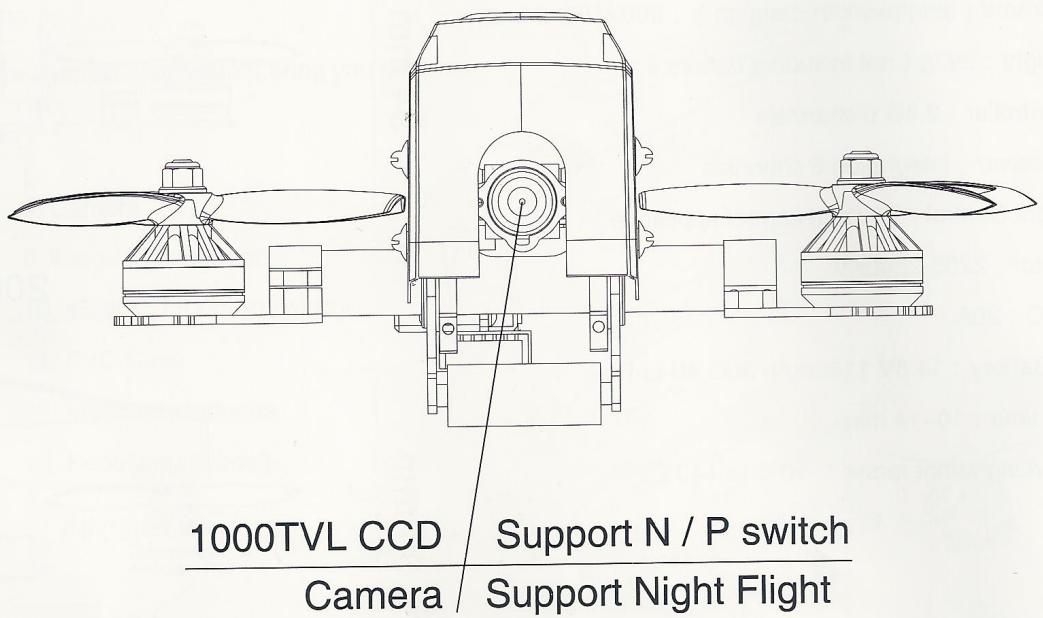
2.1 Specification of the camera
- Resolution: 1000TVL
PAL: 976H X 582V - NTSC: 976H X 494V
Power output: 5V
2.2 Imaging parameters
- 4-inch three-blade propeller
Motor 2205-2350KV
Double locknut

3.0 Notice in Flight
(1) The plane is applicable to the people with operating experience, not younger than 14.
(2) Do not fly in wicked weather condition, such as gale, raining, snowing, fog and so on.
(3)Chose open and legal flying field.
(4) PIs stay away from the high speed rotating parts (such as propellers, brushless motor)
(5) PIs do not fly in the field with high tension line,base station or launch tower,in case of interference on RC controller.
(6) PIs do not fly in the no-fly zone limited by law and rules.
4.0 Charging
(1) Plug the adapter into the charger, connect the output with the charger, and the indicator light of the charger is always.
(2) Plug the port of the battery into the charger.
(3) When charging, the red indicator light will keep flashing. When charging to saturation, the red indicator light will change to green light always.

5.0 Assembling of the drone
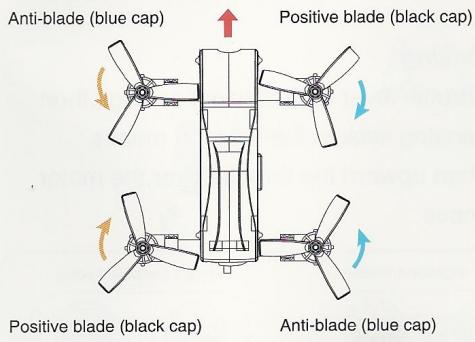
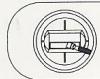
Install of the blade propellers
Install the forward propeller(with black nut) on the forward motor as the arrow direction show,install the reversed propeller(with blue nut) on the reversed motor as the arrow direction show,screw the propellers to tighten by hand,make sure the propellers installing correctly and solidly.
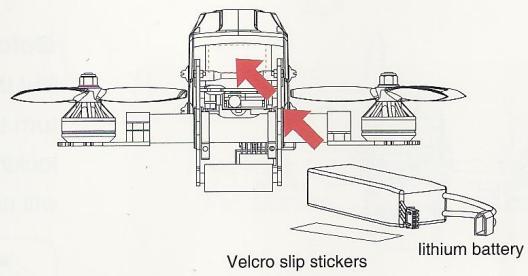
Installing battery
Put the battery, anti-skidding cushion into the drone, adjust the center of gravity of the drone, make the head and tail Horizontal, then use the closure to fix the battery.
Gravity center modification method of the drone
Hang the drone in the air based on the fulcrum of the gravity center,if the head drop down,means the center is in front,please backward the battery;if the tail drop down,means the center is in back,please forward the battery,till to the make the head and tail horizontal.
Head direction
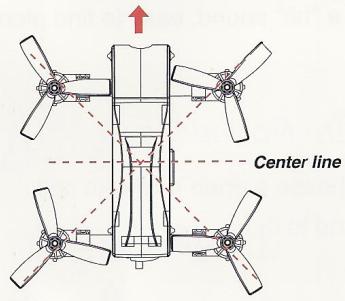
Head direction
6.0 Ready to fly
6.1 Charging of the drone
Make the drone stayed horizontal, connect the power of the drone.

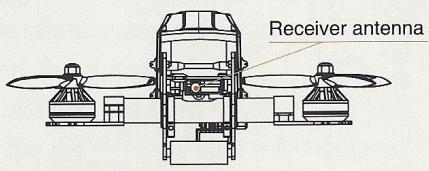
Notice
Erect the receiving attennas before flying,to increase the distance of communication.

When the plane crashed, turn off the remote control aircraft, the aircraft will issue a "bit" sound, easy to find plane

Notice
Choose a open field with soft land to fly.
6.2 Motor unlocking/locking
Motor unlocking
Upward all the switches of the RC controller, put the throttle lever to the lowest setting, open the power of the controller, make the SWC to the middle, turn the analog stick to the rightmost, if the plane makes dripping sounds means motor unlocking, then upward the throttle lever, the motor will move
Mode 1 (Righthand throttle)

direction of the joystick

Throttle Stick
Mode 2 (Lefthand throttle)
Throttle Stick

Lift rocker
Motor locking
Put the throttle lever to the lowest settings, then turn the analog stick to the leftmost means locking, then upward the throttle lever, the motor will not move.
Mode 1 (Righthand throttle)

direction of the joystick

Throttle Stick
Mode 2 (Lefthand throttle)

Throttle Stick

Lift rocker
Notice
① Crossing fly is more applicable for the operator with experience
(2) When crossing flying, please flying in the sight of 50 ~m or in the range of 300 ~m with video receiving (the actual range is depended on the weather condition and flying environment).
③ When crossing, please avoid the obstacle such as crowd, animals and high tension line and so on.
7.0 End of flying
① Landing by hand
② Close the power of the plane, then close the power of the rc controller
③ Take out the battery from the plane.

Crossing fly

When the plane make dripping sounds, means the voltage of the battery is low, please land the the plane as soon as possible, in case of crashing and so on.


www.eachine.com
FCC∈
- Eachine 80
- ENJOY THE FPV RACING
- Table of Contents
- Know your drone
- Specification
- Specification of the camera
- Imaging parameters
- Notice in Flight
- Charging
- Assembling of the drone
- Install of the blade propellers
- Installing battery
- Gravity center modification method of the drone
- Ready to fly
- Charging of the drone
- Notice
- Motor unlocking/locking
- Motor unlocking
- Motor locking
- End of flying
Marque : EACHINE
Modèle : FALCON 180
Catégorie : Drone