
LIL - Trottinette enfant RAZOR - Notice d'utilisation et mode d'emploi gratuit
Retrouvez gratuitement la notice de l'appareil LIL RAZOR au format PDF.

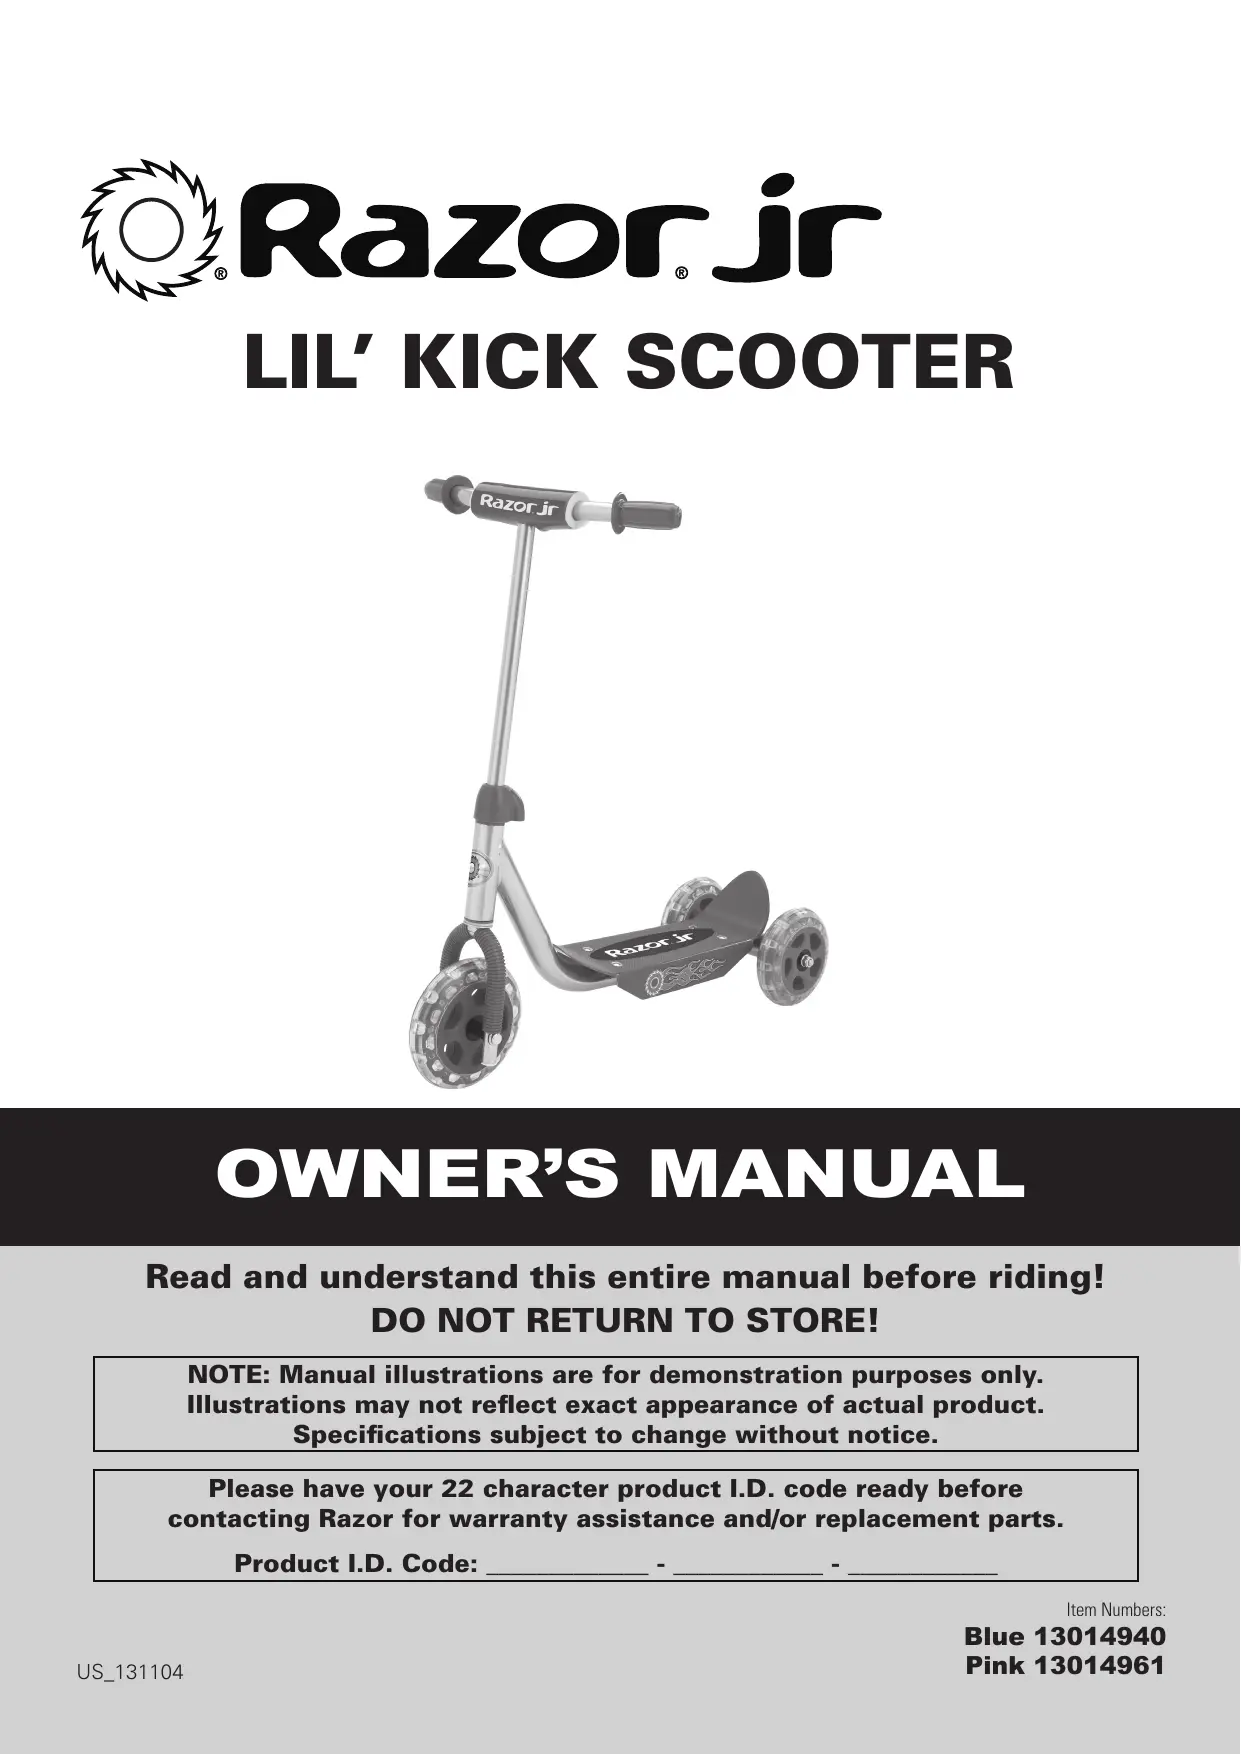

| Type de produit | Trottinette enfant |
| Marque | Razor |
| Modèle | Lil' Kick (LIL) |
| Poids maximal de l'utilisateur | 20 kg (45 lb) |
| Âge recommandé | À partir de 3 ans, sous surveillance adulte |
| Temps d'assemblage | 10 à 15 minutes |
| Outils nécessaires | Clés de 10 mm et 13 mm (fournies) |
| Nombre de roues | 3 (une avant, deux arrière) |
| Type de frein | Aucun frein (modèle pour jeunes enfants) |
| Matériaux principaux | Acier, plastique |
| Garantie | 6 mois contre les défauts de fabrication |
| Pièces détachées | Disponibles sur le site Razor (www.razor.com) |
| Entretien recommandé | Vérifier les fixations avant chaque utilisation, nettoyer avec un chiffon humide |
| Équipement de sécurité requis | Casque, genouillères, coudières, chaussures fermées |
| Utilisation autorisée | Sur surfaces planes, sèches et propres, loin de la circulation |
| Code produit | 22 caractères, situé sous le plateau |
FOIRE AUX QUESTIONS - LIL RAZOR
Questions des utilisateurs sur LIL RAZOR
0 question sur cet appareil. Repondez a celles que vous connaissez ou posez la votre.
Poser une nouvelle question sur cet appareil
Téléchargez la notice de votre Trottinette enfant au format PDF gratuitement ! Retrouvez votre notice LIL - RAZOR et reprennez votre appareil électronique en main. Sur cette page sont publiés tous les documents nécessaires à l'utilisation de votre appareil LIL de la marque RAZOR.
MODE D'EMPLOI LIL RAZOR
LIL' KICK SCOOTER
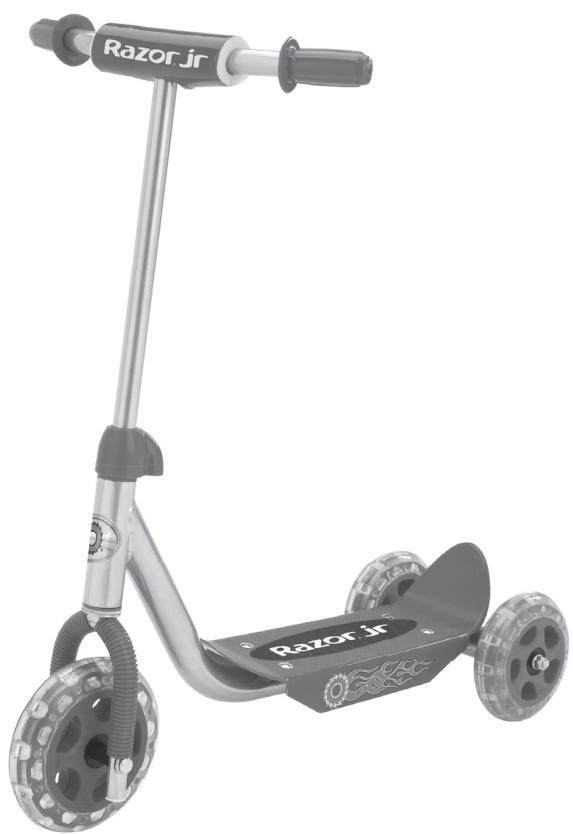
OWNER'S MANUAL
Read and understand this entire manual before riding! DO NOT RETURN TO STORE!
NOTE: Manual illustrations are for demonstration purposes only. Illustrations may not reflect exact appearance of actual product. Specifications subject to change without notice.
Please have your 22 character product I.D. code ready before contacting Razor for warranty assistance and/or replacement parts.
Product I.D. Code:
CONTENTS
SafetyWarnings 1
Before You Begin 2
Set-Up and Usage 3-4
Lil' Kick Parts 5
Warranty 7
SAFETYWARNINGS
AN IMPORTANTMESSAGE TO PARENTS: This manual contains important information. For your child's safety, it is your responsibility to review this information with your child and make sure that your child understands all warnings, cautions, instructions and safety topics. Razor USA recommends that you periodically review and reinforce the information in this manual with younger riders and that you are required to inspect and maintain your child's scooter to insure their safety.
GENERAL WARNING: Scooter riding can be a hazardous activity. Certain conditions may cause the equipment to fail without fault of the manufacturer. Scooters can and are intended to move and it is therefore possible to get into dangerous situations and/or lose control and/or fall. If such things occur you can be seriously injured or die. LIKE ANY OTHER MOVING PRODUCT, USING A SCOOTER CAN BE A DANGEROUS ACTIVITY AND MAY RESULT IN INJURY OR DEATH EVEN WHEN USED WITH PROPER SAFETY PRECAUTIONS. USE AT YOUR OWN RISK AND USE COMMON SENSE.
This manual contains many warnings and cautions concerning the consequences of failing to maintain, inspect or properly use your Lil' Kick scooter. Because any incident can result in serious injury or even death, we do not repeat the warning of potential serious injury or death each time such a possibility is mentioned.
- Always wear safety equipment, such as helmet, knee pads and elbow pads. Always wear a helmet when riding your scooter and keep the chin-strap securely buckled.
Always wear closed toe shoes.
- Ride on smooth, paved surfaces away from motor vehicles.
- Avoid sharp bumps, drainage grates, and sudden surface changes. Scooter may suddenly stop.
- Avoid streets and surfaces with water, sand, gravel, dirt, leaves and other debris. Wet weather impairs traction, stopping, and visibility.
- Do not ride at night.
- Avoid excessive speed associated with downhill rides.
- Obey all local traffic and scootering laws and regulations.
- Watch out for pedestrians.
- Do not exceed 45 lb (20 kg) total weight on the Lil' Kick scooter.
- Do not allow children under age three (3) to use the scooter. Close adult supervision recommended.
- Rider weight does not necessarily mean a child's size is appropriate to fit or maintain control of the scooter.
- A parent's decision to allow his or her child to ride this product should be based on the child's maturity, skill and ability to follow rules.
ACCEPTABLE RIDING PRACTICES AND CONDITIONS
Direct parental supervision is required at all times. Scooters are meant to be used only in controlled environments, free of potential traffic hazards, and not on public streets. Do not allow your child to ride a scooter in any areas where vehicle traffic is present. Child must maintain a hold on the handlebars at all times. Never allow more than one child at a time to ride a scooter. Never use near steps, sloped driveways, hills, roadways, alleys or swimming pool areas.
Do not ride a scooter in wet weather. Scooters are intended for use on solid, flat, clean and dry surfaces such as pavement or level ground without loose debris such as rocks or gravel. Wet, slick or uneven and rough surfaces may impair traction and contribute to possible accidents. Do not ride scooter in mud, ice, puddles or water. Avoid excessive speeds that can be associated with downhill rides. Never risk damaging surfaces, such as carpet or flooring, by use of a scooter indoors. Do not ride at night or when visibility is impaired.
PROPER RIDING ATTIRE
Always ensure child is wearing proper protective equipment, such as an approved safety helmet. A helmet may be legally required by local law or regulation in your area. A child should always wear closed toe shoes, never ride barefooted or in sandals and keep shoelaces tied and out of the way of the wheels.
FAILURE TO USE COMMON SENSE AND HEED THE ABOVE WARNINGS FURTHER INCREASES RISK OF SERIOUS INJURY. USE AT YOUR OWN RISK AND WITH APPROPRIATE AND SERIOUS ATTENTION TO SAFE OPERATION. USE CAUTION.
WARNING: ALWAYS INSPECT SCOOTER PRIOR TO RIDING. Properly inspecting and maintaining your scooter can reduce the risk of injury. Always inspect your scooter before riding and regularly maintain it.
WARNING: CHECK LOCAL LAWS REGARDING SCOOTER USE. Check local laws and regulations to see where and how you may use your Razor scooter legally. In many states and local areas scooter riders are required BY LAW to wear a helmet. Check local laws and regulations regarding laws governing helmet use and scooter operation in your area.
Remove contents from box. Inspect the contents of the box for scratches in the paint and/or dents that may have occurred during shipping. Because your scooter was partially assembled and packed at the factory, there should not be any problems, even if the box has a few scars or dents.
□ Estimated Assembly and Set-Up Time
Adult assembly required.
Allow up to 10-15 minutes for assembly.
WARNING: DO NOT USE NON-RAZOR PARTS WITH YOUR SCOOTER. Razor scooters have been built to certain Razor design specifications. The original equipment supplied at the time of sale was selected on the basis of its compatibility with the frame, fork and all other parts. Certain aftermarket products may not be compatible. Use of any nonRazor product parts will void your warranty.
PRODUCT I.D.CODE
- Underneath the deck
- UPC Side of Box (not shown)
Required Tools
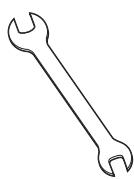
Two (2)10 mm and 13 mm
wrenches
(Included)
Need Help? Visit our web site for replacement parts, product support and a list of authorized service centers at www.razor.com or call toll free 866-467-2967 Monday - Friday 8AM - 5PM Pacific Time. Please have the product I.D. code available for better assistance.
□ Assembling the Handlebars
Tools Needed: 10 mm wrench
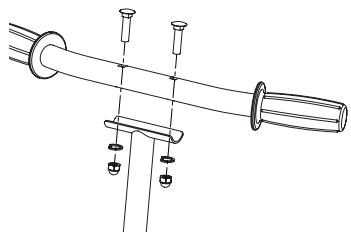
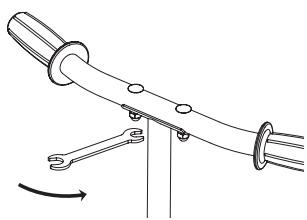
1 Align the holes on the handlebars and the T-bar. Insert handlebar bolts into the top of the handlebar and through the T-bar. Install the washers and nuts onto the bottom of the handlebar bolts. Tighten securely into place using a 10mm wrench.
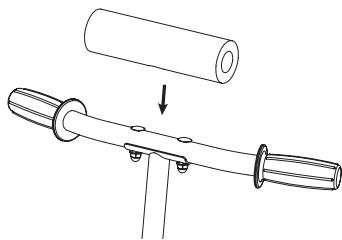
2 Place the handlebar pad over the handlebars and secure tightly with the velcro cover.
□ Assembling the Rear Wheels
Tools Needed: Two (2) 10 mm wrenches
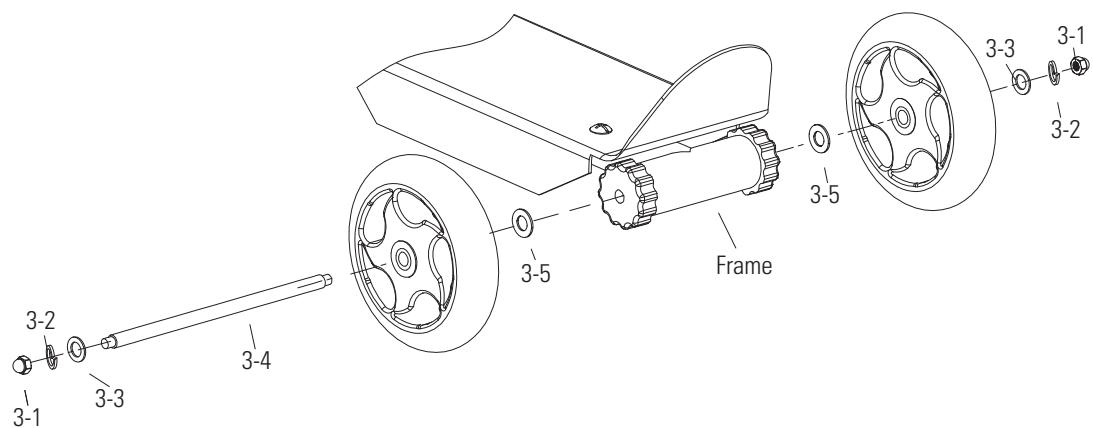
1 Remove the locknut, spring washer and washers (x3) from one side of the axle bolt. Insert the axle bolt through the rear wheel. Insert the large washer (3-5) onto the axle bolt between the frame and rear wheel and slide the axle bolt through the frame. Slide the other large washer and wheel onto the axle bolt. Note: Wheels are interchangeable.
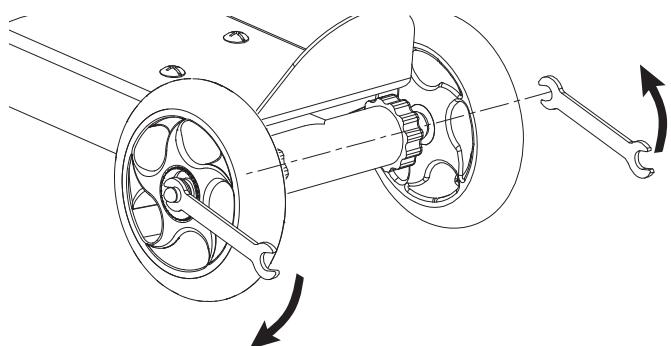
2 Insert the small washer (3-3), spring washer (3-2) and locknut (3-1) onto the axle bolt and tighten securely using two (2) 10mm wrenches.
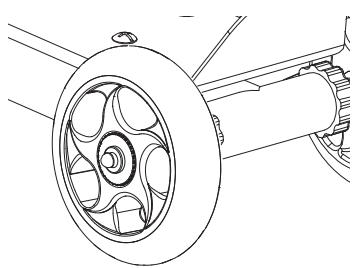
3 Make sure the locknut, spring washer and small washer are securely tightened against the wheel.
Note: For further assistance, please refer to page 5 for parts breakdown.
Rear wheel hardware sequence
3-1 - Locknut
3-2 - Spring washer
3-3-Washer (small)
3-4 - Axle bolt
Wheel
3-5 - Washer (large)
□ Assembling the Front Fork
Tools Needed: 13 mm wrench
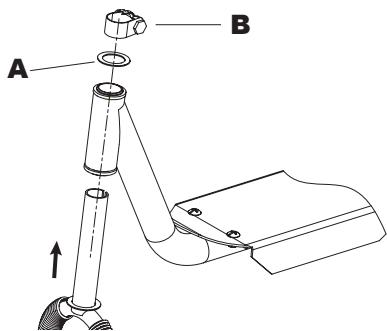
1 Remove the black protective cover from the top of the fork. Using a 13mm wrench, loosen collar clamp bolt and slide collar clamp (B) up the fork and remove. Remove washer (A) from fork. Insert the front fork into the steering tube. Slide washer (A) back onto the front fork. Slide collar clamp (B) back down onto the fork until it is sitting directly on top of washer (A).
□ Attaching the T-bar
Tools Needed: 13 mm wrench
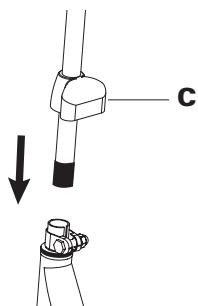
1 Slide collar clamp cover (C) up to the middle of the T-bar. Insert the T-bar all the way down into the front fork.
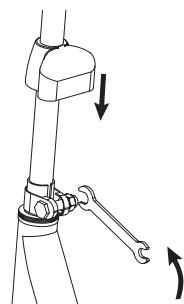
2 Align the handlebars with the front wheel and using a 13 mm wrench, tighten the collar clamp bolt until the handlebars are locked securely into place. Slide the collar clamp cover down over the collar clamp.
| A | |
| B | |
| C |
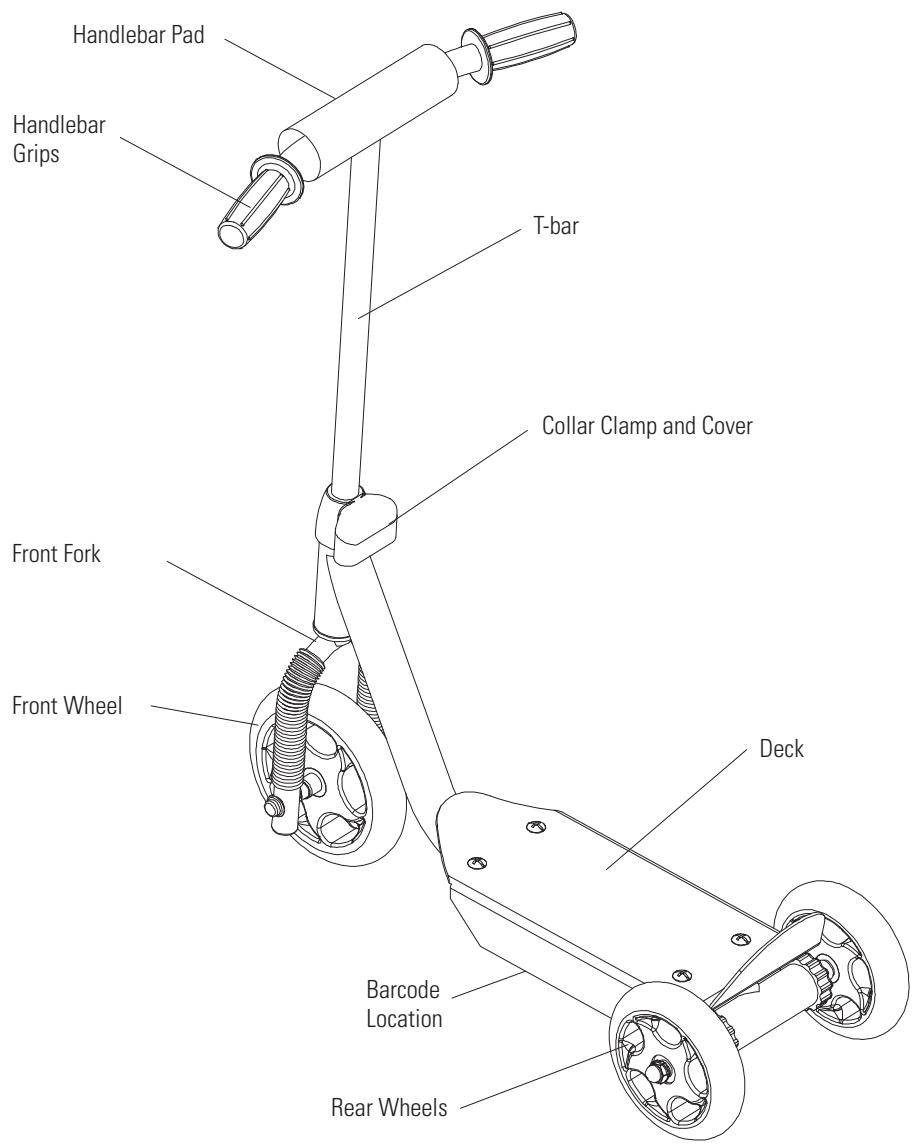
LIL' KICK PARTS
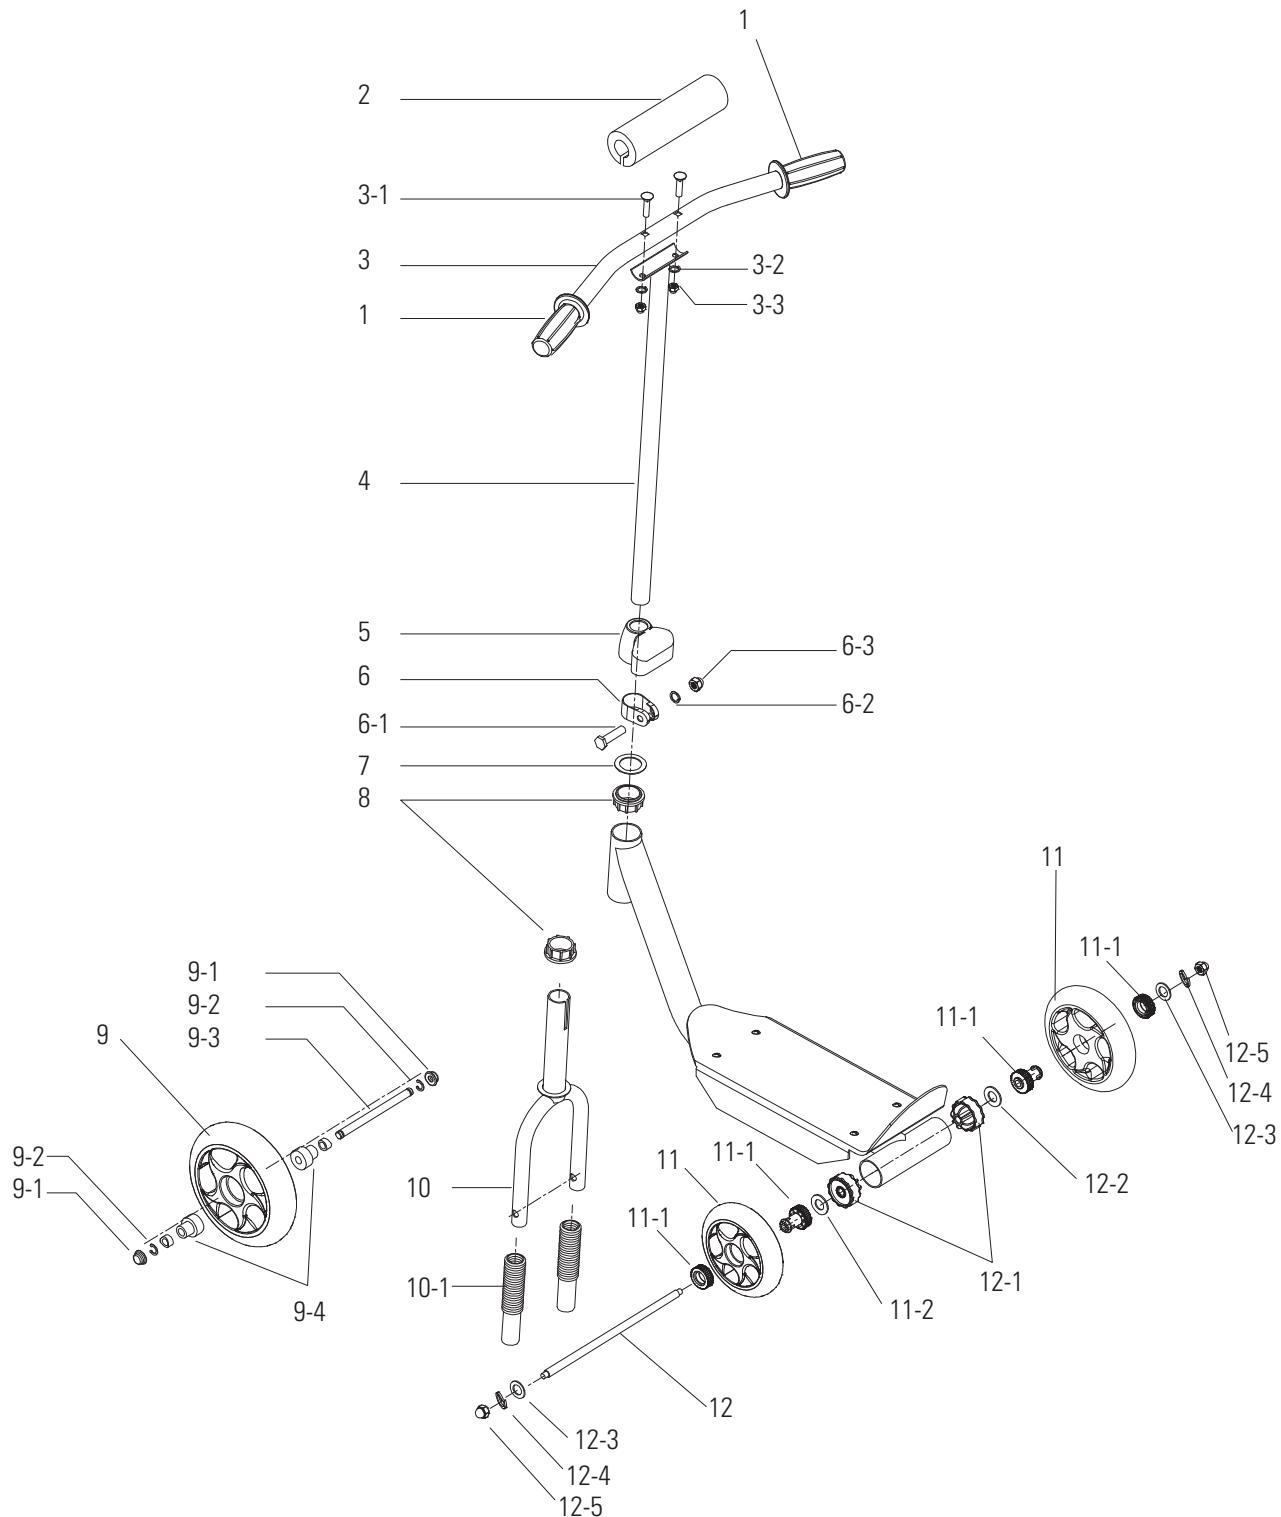
Keep your Lil' Kick scooter working for years with genuine Razor parts. Visit our web site to purchase replacement parts.
(Specifications subject to change without notice.)
1 Handlebar Grips
2 Handlebar Pad
3 Handlebar
3-1 Bolt (x2)
3-2 Spring Washer (x2)
3-3 Nut (x2)
4 T-bar
5 Collar Clamp Cover
6 Collar Clamp
6-1 Bolt
6-2 Spring Washer
6-3 Lock Nut
7 Washer
8 Plastic Headset (upper/lower)
9 Front Wheel
9-1 Fixed Cap (x2)
9-2 CClip (x2)
9-3 Front Axle
9-4 Front Wheel Bushing / Spacer (x2)
10 Front Fork
10-1 Fork Cover (x2)
11 Rear Wheel (x2)
11-1 Short Bushing / Spacer (x4)
12 Rear Axle Bolt
12-1 Rear Tube Cover (x2)
12-2 Washer (Large) (x2)
12-3 Washer (x2)
12-4 Spring Washer (x2)
12-5 Locknut (x2)
PRE-RIDE CHECKLIST

Loose Parts
Check and secure all fasteners before every ride. Make sure the T-bar and wheels are tight. There should not be any unusual rattles or sounds from loose parts or broken components.

Frame, Fork and Handlebars
Check for cracks or broken connections. Although broken frames are rare, it is possible for an aggressive rider to run into a curb or a wall and wreck, bend or break a frame. Get in the habit of inspecting yours regularly.

Safety Gear
Always wear proper protective equipment, such as an approved safety helmet, elbow pads and kneepads. Always wear close toe shoes (lace-up shoes with rubber soles), never ride barefooted or in sandals and keep shoelaces tied and out of the way of the wheels.
WARRANTY
Razor Limited Warranty
The manufacturer warranties this product to be free of manufacturing defects for a period of 6 months from date of purchase. This Limited Warranty does not cover normal wear and tear or any damage, failure or loss caused by improper assembly, maintenance, or storage or use of the Lil' Kick scooter.
This Limited Warranty will be void if the product is ever:
- used in a manner other than for recreation;
- modified in any way;
rented.
The manufacturer is not liable for incidental or consequential loss or damage due directly or indirectly to the use of this product.
Razor does not offer an extended warranty. If you have purchased an extended warranty, it must be honored by the store at which it was purchased.
For your records, save your original sales receipt with this manual and write the barcode number below.
Item Number: Blue 130149 Pink 130149
Need Help? Visit our web site for replacement parts, product support and a list of authorized service centers at www.razor.com or call toll free 866-467-2967 Monday - Friday 8AM - 5PM Pacific Time. Please have the product I.D. code available for better assistance.
Printed in China for:
Razor USA LLC
DC, PA 2610
PO Box 3610 Cerritos, CA 90703
Copyright © 2003 - 2013 Razor USA, LLC. All rights reserved. RAZOR and the Razor Logo Design are among the registered trademarks of Razor USA LLC in the United States and/or select foreign countries.

- LIL' KICK SCOOTER
- OWNER'S MANUAL
- Read and understand this entire manual before riding! DO NOT RETURN TO STORE!
- CONTENTS
- SAFETYWARNINGS
- ACCEPTABLE RIDING PRACTICES AND CONDITIONS
- PROPER RIDING ATTIRE
- □ Estimated Assembly and Set-Up Time
- PRODUCT I.D.CODE
- Required Tools
- □ Assembling the Handlebars
- □ Assembling the Rear Wheels
- Wheel
- □ Assembling the Front Fork
- □ Attaching the T-bar
- LIL' KICK PARTS
- PRE-RIDE CHECKLIST
- Loose Parts
- Frame, Fork and Handlebars
- Safety Gear
- WARRANTY
- Razor Limited Warranty
Marque : RAZOR
Modèle : LIL
Catégorie : Trottinette enfant