
BLACK & DECKER GK1635 - Outils de jardinage BLACK & DECKER - Notice d'utilisation et mode d'emploi gratuit
Retrouvez gratuitement la notice de l'appareil BLACK & DECKER GK1635 BLACK & DECKER au format PDF.

| Type de produit | Tronçonneuse électrique |
| Marque | BLACK & DECKER |
| Modèle | GK1635 |
| Catégorie | Outils de jardinage |
| Longueur du guide-chaîne | 35 cm |
| Tension d'alimentation | 230 V AC |
| Puissance absorbée | 1600 W |
| Vitesse de chaîne à vide | 8 m/s |
| Capacité du réservoir d'huile | 180 ml |
| Poids | 3,8 kg |
| Classe de protection | II (double isolation) |
| Niveau de pression acoustique | 92 dB(A) |
| Niveau de puissance acoustique garanti | 103 dB(A) |
| Vibration (valeur totale) | 5 m/s² |
| Fonctions principales | Élagage, abattage, tronçonnage |
| Sécurité | Frein de chaîne antirebond, interrupteur à verrouillage, protection avant |
| Entretien | Nettoyage régulier du guide et de la chaîne, affûtage ou remplacement de la chaîne |
| Réparabilité | Pièces de rechange disponibles auprès des centres de service agréés Black & Decker |
| Garantie | 24 mois pour défauts de matériau ou de fabrication |
FOIRE AUX QUESTIONS - BLACK & DECKER GK1635 BLACK & DECKER
Questions des utilisateurs sur BLACK & DECKER GK1635 BLACK & DECKER
0 question sur cet appareil. Repondez a celles que vous connaissez ou posez la votre.
Poser une nouvelle question sur cet appareil
Téléchargez la notice de votre Outils de jardinage au format PDF gratuitement ! Retrouvez votre notice BLACK & DECKER GK1635 - BLACK & DECKER et reprennez votre appareil électronique en main. Sur cette page sont publiés tous les documents nécessaires à l'utilisation de votre appareil BLACK & DECKER GK1635 de la marque BLACK & DECKER.
MODE D'EMPLOI BLACK & DECKER GK1635 BLACK & DECKER
Powerful Solutions ™
English
(Original instructions)
A


Intended use
Your Black & Decker chainsaw has been designed for pruning and felling trees and cutting logs. This tool is intended for consumer use only.
Safety instructions
General power tool safety warnings

Warning! Read all safety warnings and all instructions. Failure to follow the warnings and instructions listed below may result in electric shock, fire and/or serious injury.
Save all warnings and instructions for future reference.
The term "power tool" in all of the warnings listed below refers to your mains operated (cored) power tool or battery operated (cordless) power tool.
-
Work area safety
a. Keep work area clean and well lit. Cluttered or dark areas invite accidents.
b. Do not operate power tools in explosive atmospheres, such as in the presence of flammable liquids, gases or dust. Power tools create sparks which may ignite the dust or fumes.
c. Keep children and bystanders away while operating a power tool. Distractions can cause you to lose control. -
Electrical safety
a. Power tool plugs must match the outlet. Never modify the plug in any way. Do not use any adapter plugs with earthed (grounded) power tools. Unmodified plugs and matching outlets will reduce risk of electric shock.
b. Avoid body contact with earthed or grounded surfaces such as pipes, radiators, ranges and refrigerators. There is an increased risk of electric shock if your body is earthed or grounded.
c. Do not expose power tools to rain or wet conditions. Water entering a power tool will increase the risk of electric shock.
d. Do not abuse the cord. Never use the cord for carrying, pulling or unplugging the power tool. Keep cord away from heat, oil, sharp edges or moving parts. Damaged or entangled cords increase the risk of electric shock.
e. When operating a power tool outdoors, use an extension cord suitable for outdoor use. Use of a cord suitable for outdoor use reduces the risk of electric shock.
f. If operating a power tool in a damp location is unavoidable, use a residual current device (RCD) protected supply. Use of an RCD reduces the risk of electric shock.
- Personal safety
a. Stay alert, watch what you are doing and use common sense when operating a power tool. Do not use a power tool while you are tired or under the influence of drugs, alcohol or medication. A moment of inattention while operating power tools may result in serious personal injury.
b. Use personal protective equipment. Always wear eye protection. Protective equipment such as dust mask, non-skid safety shoes, hard hat, or hearing protection used for appropriate conditions will reduce personal injuries.
c. Prevent unintentional starting. Ensure the switch is in the off-position before connecting to power source and/or battery pack, picking up or carrying the tool. Carrying power tools with your finger on the switch or energising power tools that have the switch on invites accidents.
d. Remove any adjusting key or wrench before turning the power tool on. A wrench or a key left attached to a rotating part of the power tool may result in personal injury.
e. Do not overreach. Keep proper footing and balance at all times. This enables better control of the power tool in unexpected situations.
f. Dress properly. Do not wear loose clothing or jewellery. Keep your hair, clothing and gloves away from moving parts. Loose clothes, jewellery or long hair can be caught in moving parts.
g. If devices are provided for the connection of dust extraction and collection facilities, ensure these are connected and properly used. Use of dust collection can reduce dust-related hazards.
- Power tool use and care
a. Do not force the power tool. Use the correct power tool for your application. The correct power tool will do the job better and safer at the rate for which it was designed.
b. Do not use the power tool if the switch does not turn it on and off. Any power tool that cannot be controlled with the switch is dangerous and must be repaired.
c. Disconnect the plug from the power source and/or the battery pack from the power tool before making any adjustments, changing accessories, or storing power tools. Such preventive safety measures reduce the risk of starting the power tool accidentally.
d. Store idle power tools out of the reach of children and do not allow persons unfamiliar with the power tool or these instructions to operate the power tool. Power tools are dangerous in the hands of untrained users.
e. Maintain power tools. Check for misalignment or binding of moving parts, breakage of parts and any other condition that may affect the power tools operation. If damaged, have the power tool repaired before use. Many accidents are caused by poorly maintained power tools.
f. Keep cutting tools sharp and clean. Properly maintained cutting tools with sharp cutting edges are less likely to bind and are easier to control.
g. Use the power tool, accessories and tool bits etc. in accordance with these instructions, taking into account the working conditions and the work to be performed. Use of the power tool for operations different from those intended could result in a hazardous situation.
5. Service
a. Have your power tool serviced by a qualified repair person using only identical replacement parts. This will ensure that the safety of the power tool is maintained.
Additional power tool safety warnings

Warning! Additional safety warnings for chainsaws
- Keep all parts of the body away from the saw chain when the chainsaw is operating. Before you start the chainsaw, make sure the saw chain is not contacting anything. A moment of inattention while operating the chainsaw may cause entanglement of your clothing or body with the chainsaw.
Always hold the chainsaw with your right hand on the rear handle and your left hand on the front handle. Holding the chainsaw with the reversed hand configuration increases the risk of personal injury and should never be done.
Wear safety glasses and hearing protection. Further protective equipment for head, hands, legs and feet is recommended. Adequate protective clothing will reduce personal injury by flying debris or accidental contact with the saw chain.
Do not operate a chainsaw in a tree. Operation of a chainsaw while up in a tree may result in personal injury.
Always keep proper footing and operate the chainsaw only when standing on fixed, secure and level surface. Slippery or unstable surfaces such as ladders may cause a loss of balance or control of the chainsaw. - When cutting a limb that is under tension be alert for spring back. When the tension in the wood fibres is released the spring loaded limb may strike the operator and/or throw the chainsaw out of control.
-
Use extreme caution when cutting brush and saplings. The slender material may catch the saw chain and be whipped toward you or pull you off balance.
-
Carry the chainsaw by the front handle with the chainsaw switched off and away from your body. When transporting or storing the chainsaw always fit the guide bar cover. Proper handling of the chainsaw will reduce the likelihood of accidental contact with the moving saw chain.
Follow instructions for lubricating, chain tensioning and changing accessories. Improperly tensioned or lubricated chain may either break or increase the chance for kickback - Keep handles dry, clean, and free from oil and grease. Greasy, oily handles are slippery causing loss of control.
Cut wood only. Do not use chainsaw for purposes not intended. For example: do not use the chainsaw for cutting plastic, masonry or non-wood building materials. Use of the chainsaw for operations different than intended could result in a hazardous situation.
Position the cord so that it will not get caught on branches or similar when cutting. - The spiked bumber (16) may become sharp during the life of the product. handle with care.
- When handling the product the chain bar may become hot, handle with care.
Causes and operator prevention of kickback
Kickback may occur when the nose or tip of the guide bar touches an object, or when the wood closes in and pinches the saw chain in the cut.
Tip contact in some cases may cause a sudden reverse reaction, kicking the guide bar up and back towards the operator.
Pinching the saw chain along the top of the guide bar may push the guide bar rapidly back towards the operator. Either of these reactions may cause you to lose control of the chainsaw which could result in serious personal injury. Do not rely exclusively upon the safety devices built into your chainsaw. As a chainsaw user, you should take several steps to keep your cutting jobs free from accident or injury. Kickback is the result of tool misuse and / or incorrect operating procedures or conditions and can be avoided by taking proper precautions as given below:
Maintain a firm grip, with thumbs and fingers encircling the chainsaw handles. With both hands on the chainsaw, position your body and arm to allow you to resist kickback forces. Kickback forces can be controlled by the operator, if proper precautions are taken. Do not let go of the chainsaw.
- Do not overreach and do not cut above shoulder height. This helps prevent unintended tip contact and enables better control of the chainsaw in unexpected situations.
- Only use replacement guide bars and chains specified by the manufacturer. Incorrect replacement guide bars and chains may cause chain breakage and/or kickback.
Follow the manufacturer's sharpening and maintenance instructions for the saw chain. Decreasing the depth gauge height can lead to increased kickback.
Striking metal, cement or any other hard material near the wood, or buried in the wood can cause kickback.
A dull or loose chain can cause kickback. - Do not try to insert into a previous cut. As this could cause kickback. Make a fresh cut every time.
Safety recommendations for the chainsaw
We strongly recommend that first time users obtain practical instruction in the use of the chainsaw and protective equipment from an experienced user. Initial practice should be completed sawing logs on a saw horse or cradle.
Always check that the kickback brake operates correctly before use.
We recommend that when carrying the chainsaw that you make sure that the brake is engaged and the saw chain is facing backwards.
Maintain your chainsaw when not in use. Do not store your chainsaw for any length of time without first removing the saw chain and guide bar which should be kept immersed in oil. Store all parts of your chainsaw in a dry, secure place out of reach of children.
We recommend you drain the oil reservoir prior to storage.
Be sure of your footing and pre-plan a safe exit from a falling tree or branches.
- Use wedges to help control felling and prevent binding the guide bar and saw chain in the cut.
Saw chain care. Keep the saw chain sharp and snug on the guide bar. Ensure the saw chain and guide bar are clean and well oiled. Keep handles dry, clean and free from oil and grease.
Avoid cutting
Prepared timber.
Into the ground.
Into wire fences, nails. etc.
Vibration
The declared vibration emission values stated in the technical data and the declaration of conformity have been measured in accordance with a standard test method provided by EN 60745 and may be used for comparing one tool with another. The declared vibration emission value may also be used in a preliminary assessment of exposure.
Warning! The vibration emission value during actual use of the power tool can differ from the declared value depending on the ways in which the tool is used. The vibration level may increase above the level stated.
When assessing vibration exposure to determine safety measures required by 2002/44/EC to protect persons regularly using power tools in employment, an estimation of vibration exposure should consider, the actual conditions of use and the way the tool is used, including taking account of all parts of the operating cycle such as the times when the tool is switched off and when it is running idle in addition to the trigger time.
Electrical safety

This tool is double insulated; therefore no earth wire is required. Always check that the power supply corresponds to the voltage on the rating plate.
- If the supply cord is damaged, it must be replaced by the manufacturer or an authorised Black & Decker Service Centre in order to avoid a hazard.
Using an extension cable
Always use an approved extension cable suitable for the power input of this tool (see technical data). The extension cable must be suitable for outdoor use and marked accordingly. Up to 30m of HO7RN-F 2 X 1.5 mm² extension cable can be used without loss of product performance. Before use, inspect the extension cable for signs of damage, wear and ageing. Replace the extension cable if damaged or defective. When using a cable reel, always unwind the cable completely.
Guard against electric shock
Prevent body contact with earthed or grounded surfaces (e.g. metal railings, lamp-posts etc.). Electric safety can be further improved by using a high-sensitivity (30mA/30mS) Residual Current Device (RCD).

Warning! The use of an RCD or other circuit breaker unit does not release the operator of your chainsaw from the safety instructions and safe working practices given in this user manual.
Additional safety instructions
This appliance is not intended for use by persons (including children) with reduced physical, sensory or mental capabilities, or lack of experience and knowledge, unless they have been given supervision or instruction concerning use of the appliance by a person responsible for their safety.
Children should be supervised to ensure that they do not play with the appliance.
Ensure someone is nearby (but at a safe distance) in case of an accident.
If for any reason you have to touch the saw chain, make sure your chainsaw is disconnected from the mains.
- The noise from this product can exceed 85 dB(A). We therefore recommend you take appropriate measures for the protection of hearing.
Residual risks.
Additional residual risks may arise when using the tool which may not be included in the enclosed safety warnings. These risks can arise from misuse, prolonged use etc.
Even with the application of the relevant safety regulations and the implementation of safety devices, certain residual risks can not be avoided. These include:
Injuries caused by touching any rotating/moving parts.
Injuries caused when changing any parts, blades or accessories.
Injuries caused by prolonged use of a tool. When using any tool for prolonged periods ensure you take regular breaks.
Impairment of hearing.
Health hazards caused by breathing dust developed when using your tool (example:- working with wood, especially oak, beech and MDF.)
Labels on tool
The following pictograms are shown on the tool:


Warning! To reduce the risk of injury, the user must read the instruction manual.

Always wear ear and eye protection

Do not expose the tool to rain or high humidity.

Always remove the plug from the socket before inspecting a damaged cable. Be careful not to use your chainsaw if the cable is damaged.

Directive 2000/14/EC guaranteed sound power.
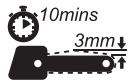
To ensure continued safe operation, check the chain tension as described in this manual after every 10 minutes of use, and adjust back to a clearance of 3mm as required.
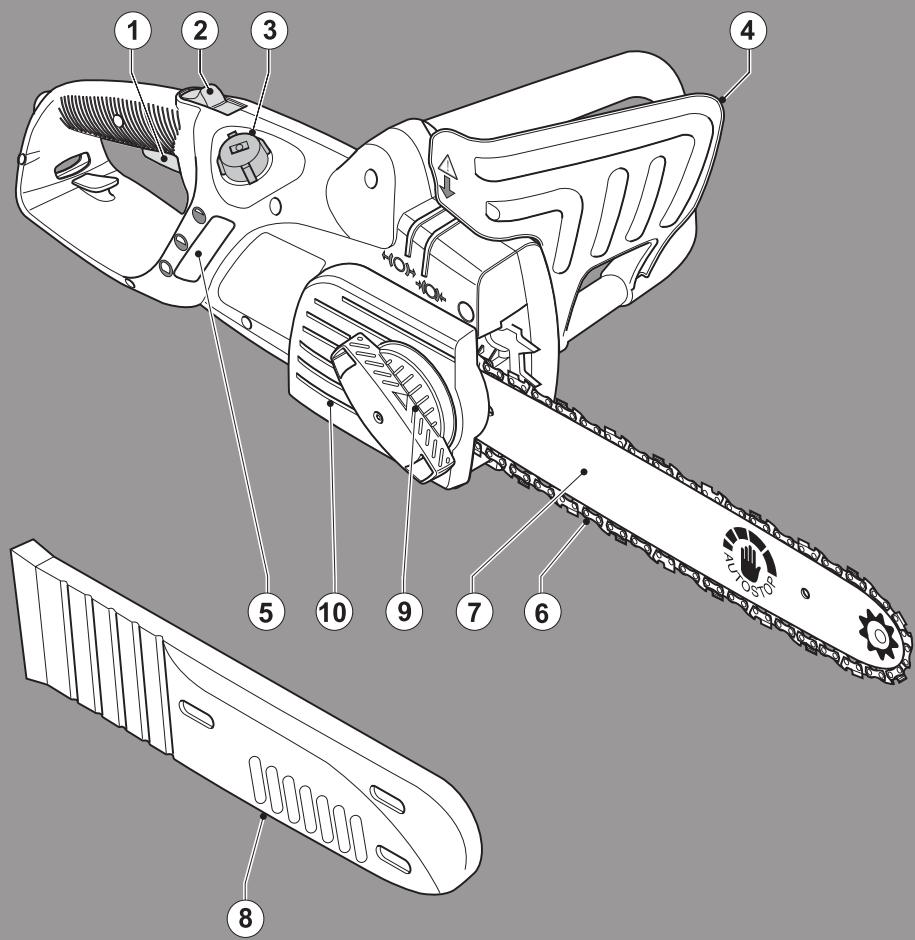
Features
- On/off switch
- Lock-off button
- Oil cap
- Front guard/chain brake
- Oil level indicator
- Chain
- Guide bar
- Chain sheath
- Control knob
- Chain cover assembly
Assembly

Warning! Always wear protective gloves when working on your chainsaw.

Warning! Before performing any maintenance on power tools, switch off and unplug the appliance.
Oiling the chain
You must do this whenever you use a new chain (6) for the first time. Take the new chain (6) and soak it in chain oil for at least an hour before using it. Use Black & Decker chain oil. We recommend that you use only Black & Decker oil during the lifetime of your chainsaw because mixtures of different oils could lead to the oil becoming degraded, which can drastically shorten the lifetime of the saw chain and create additional risks.
Never use waste oil, thick oil or very thin sewing machine oil. These may damage your chainsaw.
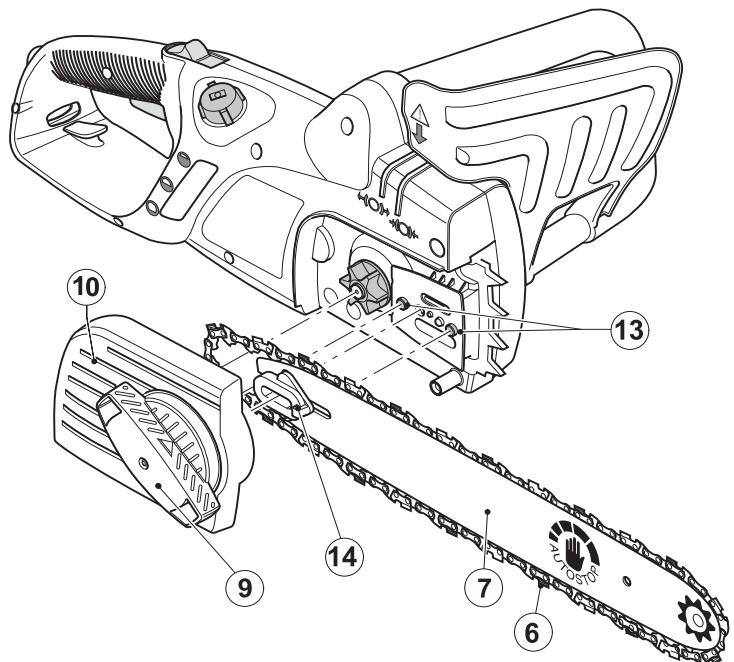
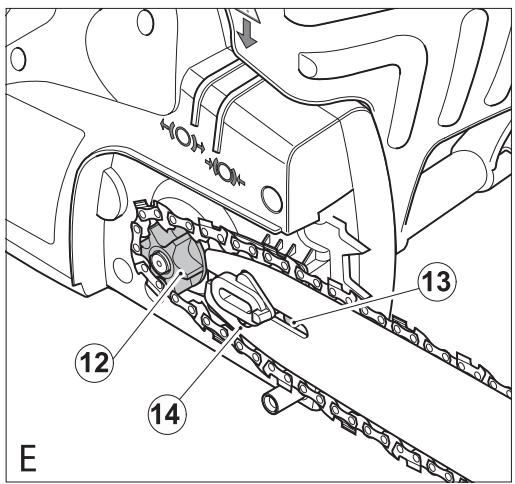
Fitting the guide bar and chain. (fig. A - E)
Place the chainsaw onto a stable surface.
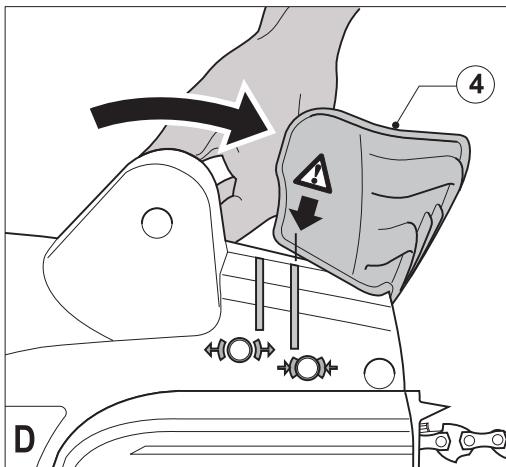
Set the front guard/chain brake assembly to the forward position (fig. D).
Fully loosen the control knob (9) (fig. A).
Remove the chain cover assembly (10).
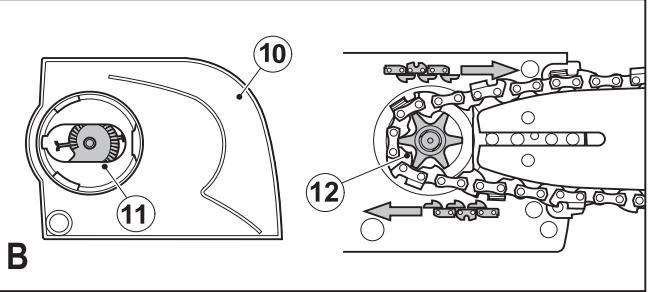
Place the chain (6) over the guide bar (7) making sure that the saw chain cutters on the upper part of the guide bar (7) face towards the front (fig. B).
Guide the chain (6) around the guide bar (7) and pull it to create a loop to one side at the rear end of the guide bar (7).
Guide the chain (6) around the drive sprocket (12). Place the guide bar (7) onto the bar location studs (13) (fig. E).
Warning! Make sure that the front guard/chain brake assembly (4) is in the set (forward) position before refitting (fig. C).
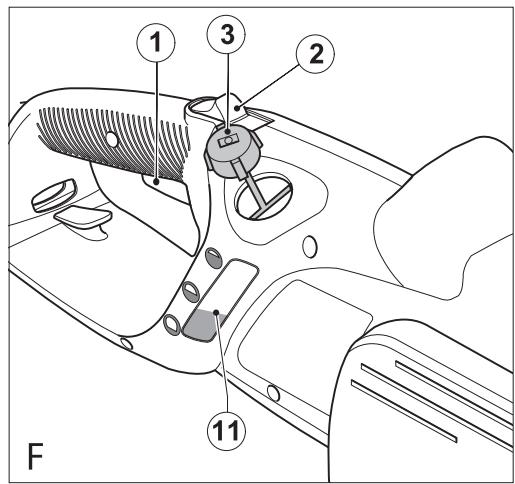
Before fitting the chain cover assembly check that the cam (11) (fig. B) is in the correct position. If necessary, press in and turn the control knob (9) clockwise to rotate the cam into the correct position.
Fit the chain cover by locating the bolt and using the control knob (9) to tighten the chain cover finger tight.
To tension the chain, loosen the control knob one full turn, press in firmly and rotate clockwise. As the bar moves forward make sure that the chain links feed into the guide bar.
Allow the control knob to spring back to the "out" position and rotate further clockwise to tighten the guide bar. Do not overtighten.
Check the tension as described below.
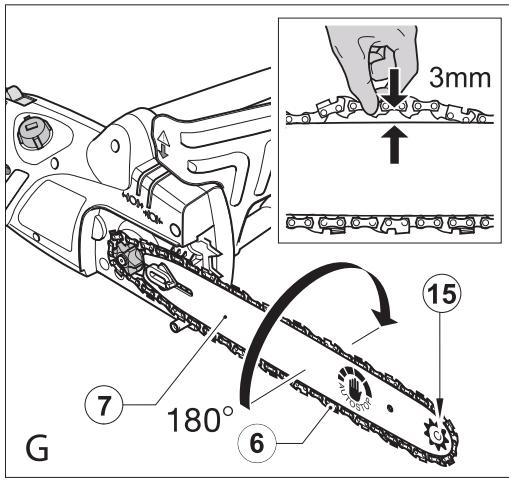
Checking and adjusting the chain tension (fig. G)
Before use and after every 10 minutes of use you must check the chain tension.
Disconnect the tool from the mains supply.
Lightly pull on the chain (6) as shown (inset fig. G). The tension is correct when the chain (6) snaps back after being pulled 3mm away from the guide bar (7). There should be no "sag" between the guide bar (7) and the chain (6) on the underside.
Note: Do not over-tension the chain as this will lead to excessive wear and will reduce the life of the guide bar and the chain.
Note: When the chain is new, check the tension frequently (after disconnecting from the mains) during the first 2 hours of use because a new chain stretches slightly.
To increase the tension
Loosen the control knob one full turn, press in firmly and rotate clockwise until the required tension is reached. As the bar moves forward make sure that the chain links feed into the guide bar.
Allow the control knob to spring back to the out position and rotate further clockwise to tighten the guide bar. Do not overtighten.
Use
Warning! Let the tool work at its own pace. Do not overload.
Filling the oil reservoir (fig. F)
Remove the oil cap (3) and fill the reservoir with the recommended chain oil. You can see the oil level in the oil level indicator (5). Refit the oil cap (3).
Periodically switch off and check the oil level indicator (5); if it is less than a quarter full, disconnect your chainsaw from the mains supply and refill with the correct oil.
Switching on
Note: It will not be possible to switch the tool on if the front guard/chain brake assembly is not in the "set" position.
Grip your chainsaw firmly with both hands. Push the lock-off button (2) and then push the on/off switch (1) to start.
- When the motor starts, remove your thumb from the lock button (2) and grip the handle firmly.
Do not force the tool, allow the tool to do the work.
It will do a better and safer job at the speed for which it is designed. Excessive force will stretch the saw chain (6).
How to set the chain brake (fig. C)
Make sure that the tool is disconnected from the mains supply.
Pull the front guard/chain brake assembly (4) back into the "set" (fig. C) position.
The tool is now ready to use.
How the anti-kickback chain brake works
In the event of kickback, your left hand comes in contact with the front guard, pushing it forwards, toward the workpiece, and stops the tool within a few fractions of a second.
How to test the anti-kickback chain brake (fig. C)
Always check that the kickback brake operates correctly before use.
Grip the tool firmly in both hands on a firm surface makesure the saw chain (6) is clear of the ground and switch on(see" How to switch the chainsaw on").
Rotate your left hand forward around the front handle so that the back of your hand comes in contact with the front guard/chain brake assembly (4) and push it forwards, toward the workpiece (fig. C). The saw chain (6) should stop within a few fractions of a second.
To reset after the operation of the front guard/chain brake assembly (4) follow the instructions for "How to set the chain brake".
Note: Avoid re-starting the tool until you hear the motor come to a complete rest.
Note: If chain brake in malfunctioning take the product to an approved Black & Decker service centre.
If the saw chain (6) or guide bar (7) becomes jammed
Switch the tool off.
Disconnect the tool from the mains supply.
Open the cut with wedges to relieve the strain on the guide bar (7). Do not try to wrench the chainsaw free.
Start a fresh cut.
Felling (fig. H-J)
Inexperienced users should not attempt to fell trees. The user may suffer injury or cause damage to property as a result of failure to control the direction of fall, the tree may splinter or damaged/dead branches may fall during cutting. The safe distance between a tree to be felled and bystanders, buildings and other objects is at least 2 1/2 times the height of the tree. Any bystander, building or object within this distance is at risk from being struck by the tree when felled.
Before attempting to fell a tree:
Make sure that there are no local by-laws or regulations that would prohibit or control the felling of the tree.
Consider all conditions that may affect the direction of fall, including:
The intended direction of fall.
The natural lean of the tree.
Any unusual heavy limb structure or decay.
- Surrounding trees and obstacles including overhead lines and underground drains.
The wind speed and direction.
Pre-plan a safe exit from falling trees or branches. Make sure that the exit route is clear of obstacles that would prevent or hinder movement. Remember that wet grass and freshly cut bark is slippery.
Do not attempt to fell trees where the tree diameter is greater than the cutting length of the chainsaw.
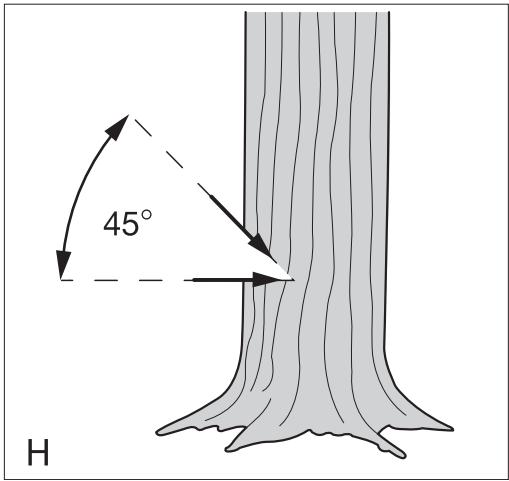
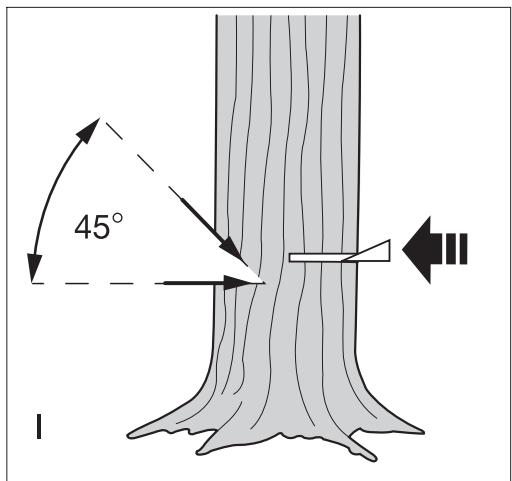
Cut a direction notch to determine the direction of fall.
Make a horizontal cut to a depth of between 1/5th and 1/3rd of the diameter of the tree, perpendicular to the line of fall at the base of the tree (fig. H).
Make a second cut from above to intersect with the first and make a notch of about 45^
Make a single horizontal felling cut from the other side 25 mm to 50~mm above the centre of the direction notch. (fig. 1). Do not cut through to the direction notch, you could lose control of the direction of fall.
Drive a wedge or wedges into the felling cut to open it and drop the tree (fig. J).
Pruning trees
Make sure that there are no local by-laws or regulations that would prohibit or control the pruning of the tree limbs.
Pruning should only be undertaken by experienced users there is an increased risk of the saw chain pinching and kick back.
Before pruning consideration should be given to conditions affecting the direction of fall including:
The length and weight of the branch to be cut.
Any unusual heavy limb structure or decay.
Surrounding trees and obstacles including overhead.
The wind speed and direction.
The branch being intertwined with other branches.
The operator should consider access to the tree limb and the direction of fall. The tree branch is liable to swing towards the tree trunk. In addition to the user bystanders, objects and property below the branch will be at risk.
- To avoid splintering, make the first cut in an upward direction to a maximum depth of one third the diameter of the branch.
Make the second cut downwards to meet the first.
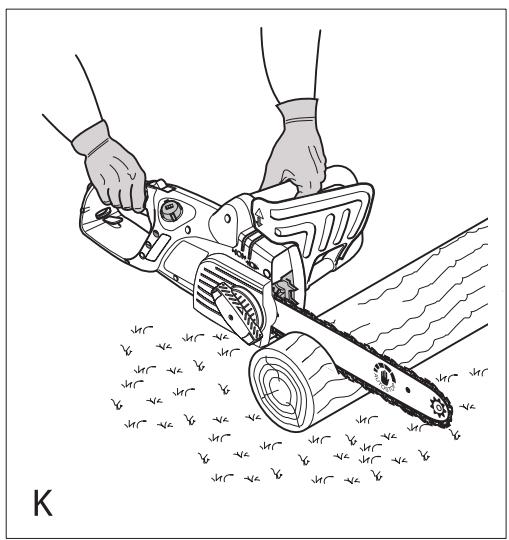
Logging (fig. K - M)
How you should cut depends on how the log is supported. Use a saw horse whenever possible. Always start a cut with the saw chain running and the spiked bumper (16) in contact with the wood (fig. K). To complete the cut use a pivoting action of the spiked bumper against the wood.
When supported along its whole length:
Make a downward cut, but avoid cutting the earth as this will blunt your saw chain quickly.
When supported at both ends:
First, cut one third down to avoid splintering and second, cut again to meet the first cut.
When supported at one end:
First cut one third up to avoid splintering and second, cut down to prevent splintering.
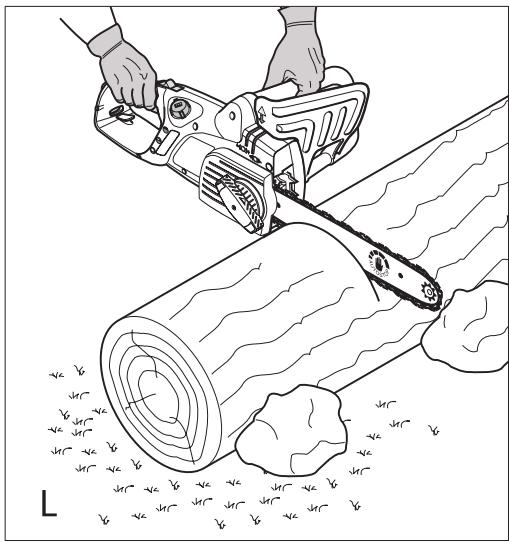
When on a slope (fig. L):
Always stand on the uphill side.
When attempting to cut a log on the ground (fig. L):
Secure the workpiece using chocks or wedges. The user or a bystander should not steady the log by sitting or standing on it. Make sure that the saw chain does not contact the ground.
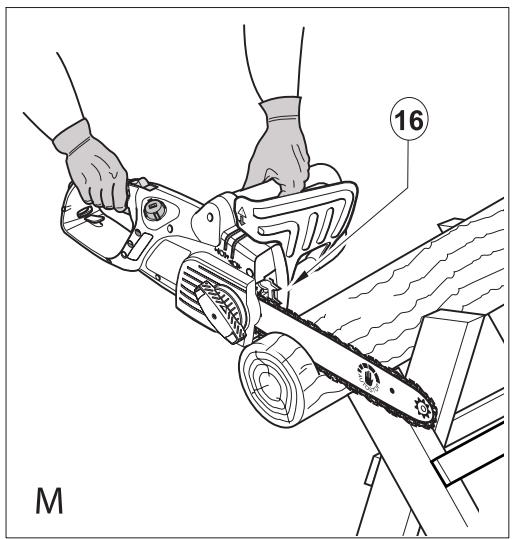
When using a saw horse (fig. M):
This is strongly recommended whenever possible.
Position the log in a stable position. Always cut on the outside of the saw horse arms. Use clamps or straps to secure the workpiece.
Troubleshooting
| Problem | Possible cause | Possible solution |
| Tool will not start | Lock button not pressed. | Press the lock button. |
| Front guard in the brake position | Reset front guard | |
| Blown fuse | Replace fuse | |
| Tripped RCD | Check RCD | |
| Mains lead not connected | Check mains supply | |
| Chain does not stop instantly when the tool is switched off | Chain tension is too slack | Check chain tension |
| Bar/chain appear hot/smoking | Oil tank empty | Check oil tank level |
| Oil hole blocked on chain bar | Clean oil hole | |
| Chain tension is too tight | Check chain tension | |
| Guide bar sprocket nose needs greasing | Oil the guide bar sprocket nose | |
| Chainsaw does not cut well | Chain on backwards | Check/modify chain direction |
| Sharpen | ||
| Chainsaw not using oil | Debris in tank | Empty oil from tank and replace |
| Oil hole in cap blocked | Remove debris from hole | |
| Debris in chain bar | Remove debris and clean the chain bar | |
| Debris in oil outlet | remove debris |
Maintenance
Regular maintenance ensures a long effective life for the tool. We recommend you make the following checks on a regular basis.
Warning! Before performing any maintenance on power tools:
Switch off and disconnect you tool from the mains supply.
Oil level
The level in the reservoir should not be allowed to fall below a quarter full.
Saw chain and guide bar (fig. G)
After every few hours of use and before storage, remove the guide bar (7) and the saw chain (6) and clean them thoroughly.
Make sure that the guard is clean and free from debris.
On reassembling, turn the guide bar (7) through 180^ and oil sprocket nose via the sprocket lubrication hole (15). This ensures an even distribution of wear around the guide bar rails.
Saw chain sharpening
If you are to get the best possible performance from the tool it is important to keep the teeth of the saw chain sharp. Guidance for this procedure is found on the sharpener package. For this purpose we recommend the purchase of the Black & Decker saw chain sharpening kit (available from Black & Decker service agents and selected dealers).
Replacing worn out saw chains
Replacement saw chains are available through retailers or Black & Decker service agents. Always use genuine spare parts.
Saw chain sharpness
The saw chain cutters will blunt immediately if they touch the ground or a nail while cutting.
Saw chain tension
Regularly check the saw chain tension.
What to do if your chainsaw needs repair.
Your chainsaw is manufactured in accordance with the relevant safety requirements. Repairs should only be carried out by a qualified person using original spare parts otherwise this may result in considerable danger to the user. We recommend you keep this user manual in a safe place.
Mains plug replacement (U.K. & Ireland only)
If a new mains plug needs to be fitted:
Safely dispose of the old plug.
Connect the brown lead to the live terminal in the new plug.
Connect the blue lead to the neutral terminal.
Warning! No connection is to be made to the earth terminal.
Follow the fitting instructions supplied with good quality plugs. Recommended fuse: 10 A.
Protecting the environment

Separate collection. This product must not be disposed of with normal household waste.
Should you find one day that your Black & Decker product needs replacement, or if it is of no further use to you, do not dispose of it with household waste. Make this product available for separate collection.

Separate collection of used products and packaging allows materials to be recycled and used again. Re-use of recycled materials helps prevent environmental pollution and reduces the demand for raw materials.
Local regulations may provide for separate collection of electrical products from the household, at municipal waste sites or by the retailer when you purchase a new product.
Black & Decker provides a facility for the collection and recycling of Black & Decker products once they have reached the end of their working life. To take advantage of this service please return your product to any authorised repair agent who will collect them on our behalf.
You can check the location of your nearest authorised repair agent by contacting your local Black & Decker office at the address indicated in this manual. Alternatively, a list of authorised Black & Decker repair agents and full details of our after-sales service and contacts are available on the Internet at: www.2helpU.com
Technical data
| GK1630T | GK1635T | ||
| Typ. 5 | Typ. 5 | ||
| Bar length | cm | 30 | 35 |
| Voltage | VAC | 230 | 230 |
| Power input | W | 1600 | 1600 |
| Chain speed (no load) | m/s | 8 | 8 |
| Max cutting length | cm | 30 | 35 |
| Oil capacity | ml | 180 | 180 |
| Weight | kg | 3.7 | 3.8 |
| Safety class | II | II |
| GK1640T | ||
| Typ. 5 | ||
| Bar length | cm | 40 |
| Voltage | VAC | 230 |
| Power input | W | 1600 |
| Chain speed (no load) | m/s | 8 |
| Max cutting length | cm | 40 |
| Oil capacity | ml | 180 |
| Weight | kg | 3.9 |
| Safety class | II | |
Level of sound pressure according to EN 60745:
Sound pressure (L_dB) 92 dB(A), uncertainty (K) 3 dB(A)
Sound power (L_WA)103dB(A) uncertainty (K) 3 dB(A)
Vibration total values (triax vector sum) according to EN 60745:
Vibration emission value (a_b) 5m / s^2 uncertainty (K) 1.5m / s^2
EC declaration of conformity
MACHINERY DIRECTIVE OUTDOOR NOISE DIRECTIVE

GK1630T, GK1635T, GK1640T
Black & Decker declares that these products described under
"technical data" are in compliance with:
98/37/EC (until Dec. 28, 2009), 2006/42/EC
(from Dec. 29, 2009), EN 60745-1, EN 60745-2-13
2000/14/EC, Chain Saw, Annex V
KEMA Quality B.V., Utrechtseweg 310, 6802 ED Arnhem,
The Netherlands
Notified Body ID No.: 0344
Level of acoustic power according to 2000/14/EC
(Article 13, Annex III):
L_WA (measure sound power) 103 dB(A)
Uncertainty = 3 dB(A)
L_WA (guaranteed sound power) 103 dB(A)
Uncertainty = 3 dB(A)
These products also comply with directive 2004/108/EC.
For more information, please contact Black & Decker at the
following address or refer to the back of the manual.
The undersigned is responsible for compilation of the technical file and makes this declaration on behalf of Black & Decker.

Kevin Hewitt
Vice-President Global Engineering
Black & Decker Europe, 210 Bath Road, Slough
Berkshire, SL1 3YD
United Kingdom
01-12-2009
Guarantee
Black & Decker is confident of the quality of its products and offers an outstanding guarantee. This guarantee statement is in addition to and in no way prejudices your statutory rights.
The guarantee is valid within the territories of the Member
States of the European Union and the European Free Trade
Area.
If a Black & Decker product becomes defective due to faulty materials, workmanship or lack of conformity, within 24 months from the date of purchase, Black & Decker guarantees to replace defective parts, repair products subjected to fair wear and tear or replace such products to ensure minimum inconvenience to the customer unless:
- The product has been used for trade, professional or hire purposes;
The product has been subjected to misuse or neglect; - The product has sustained damage through foreign objects, substances or accidents;
Repairs have been attempted by persons other than authorised repair agents or Black & Decker service staff.
To claim on the guarantee, you will need to submit proof of purchase to the seller or an authorised repair agent. You can check the location of your nearest authorised repair agent by contacting your local Black & Decker office at the address indicated in this manual. Alternatively, a list of authorised Black & Decker repair agents and full details of our after-sales service and contacts are available on the Internet at:
www.2helpU.com
Please visit our website www.blackanddecker.co.uk to register your new Black & Decker product and to be kept up to date on new products and special offers. Further information on the Black & Decker brand and our range of products is available at www.blackanddecker.co.uk
| BLACK& DECKER. | GK1630 GK1635 GK1640 GK1630T GK1635T GK1640T | TYP. 5 | |
| 152 153 154 155 156 157 158 160 161 162 163 | 111 112 113 114 115 116 117 118 119 120 121 122 123 124 125 126 127 128 129 130 131 132 133 | ||
| 165 166 167 168 169 170 171 172 173 174 175 176 177 178 179 180 181 182 183 184 185 186 187 188 189 190 191 192 193 194 195 196 197 198 199 200 201 202 203 204 205 206 207 208 209 210 211 212 213 214 215 216 217 218 219 220 221 222 223 224 225 226 227 228 229 230 231 232 233 234 235 236 237 238 239 240 241 242 243 244 245 246 247 248 249 250 251 252 253 254 255 256 257 258 259 260 261 262 263 264 265 266 267 268 269 270 271 272 273 274 275 276 277 278 279 280 281 282 283 284 285 286 287 288 289 290 291 292 293 294 295 296 297 298 299 300 301 302 303 304 305 306 307 308 309 310 311 312 313 314 315 316 317 318 319 320 321 322 323 324 325 326 327 328 329 330 331 332 333 334 335 336 337 338 339 340 341 342 343 344 345 346 347 348 349 350 351 352 353 354 355 356 357 358 359 360 361 362 363 364 365 366 367 368 369 370 371 372 373 374 375 376 377 378 379 380 381 382 383 384 385 386 387 388 389 390 391 392 393 394 395 396 397 398 399 400 401 402 403 404 405 406 407 408 409 410 411 412 413 414 415 416 417 418 419 420 421 422 423 424 425 426 427 428 429 430 431 432 433 434 435 436 437 438 439 440 441 442 443 444 445 446 447 448 449 450 451 452 453 454 455 456 457 458 459 460 461 462 463 464 465 466 467 468 469 470 471 472 473 474 475 476 477 478 479 480 481 482 483 484 485 486 487 488 489 490 491 492 493 494 495 496 497 498 499 500 501 502 503 504 505 506 507 508 509 510 511 512 513 514 515 516 517 518 519 520 521 522 523 524 525 526 527 528 529 530 531 532 533 534 535 536 537 538 539 540 541 542 543 544 545 546 547 548 549 550 551 552 553 554 555 556 557 558 559 560 561 562 563 564 565 566 567 568 569 570 571 572 573 574 575 576 577 578 579 580 581 582 583 584 585 586 587 588 589 590 591 592 593 594 595 596 597 598 599 600 601 602 603 604 605 606 607 608 609 610 611 612 613 614 615 616 617 618 619 620 621 622 623 624 625 626 627 628 629 630 631 632 633 634 635 636 637 638 639 640 641 642 643 644 645 646 647 648 649 650 651 652 653 654 655 656 657 658 659 660 661 662 663 664 665 666 667 668 669 670 671 672 673 674 675 676 677 678 679 680 681 682 683 684 685 686 687 688 689 690 691 692 693 694 695 696 697 698 699 700 701 702 703 704 705 706 707 708 709 710 711 712 713 714 715 716 717 718 719 720 721 722 723 724 725 726 727 728 729 730 731 732 733 734 735 736 737 738 739 740 741 742 743 744 745 746 747 748 749 750 751 752 753 754 755 756 757 758 759 760 761 762 763 764 765 766 767 768 769 770 771 772 773 774 775 776 777 778 779 780 781 782 783 784 785 786 787 788 789 790 791 792 793 794 795 796 797 798 799 800 801 802 803 804 805 806 807 808 809 810 811 812 813 814 815 816 817 818 819 820 821 822 823 824 825 826 827 828 829 830 831 832 833 834 835 836 837 838 839 840 841 842 843 844 845 846 847 848 849 850 851 852 853 854 855 856 857 858 859 860 861 862 863 864 865 866 867 868 869 870 871 872 873 874 875 876 877 878 879 880 881 882 883 884 885 886 887 888 889 890 891 892 893 894 895 896 897 898 899 900 901 902 903 904 905 906 907 908 909 910 911 912 913 914 915 916 917 918 919 920 921 922 923 924 925 926 927 928 929 930 931 932 933 934 935 936 937 938 939 940 941 942 943 944 945 946 947 948 949 950 951 952 953 954 955 956 957 958 959 960 961 962 963 964 965 966 967 968 969 970 971 972 973 974 975 976 977 978 979 980 981 982 983 984 985 986 987 988 989 990 | |||
Australia
Black & Decker (Australia) Pty. Ltd. Tel. 03-8720 5100
20 Fletcher Road, Mooroolbark, Fax 03-9727 5940
Victoria, 3138
New Zealand
Black & Decker Tel. +64 9 259 1133
5 Te Apunga Place Fax +64 9 259 1122
Mt Wellington
Auckland 1060
United Kingdom
Black & Decker Tel. 01753 511234
210 Bath Road Fax 01753 551155
Slough, Berkshire SL1 3YD Helpline 01753 574277
ENGLISH
Do not forget to register your product!
www.blackanddecker.co.uk/productregistration
Register your product online at www.blackanddecker.co.uk/productregistration or send your name, surname and product
code to Black & Decker in your country.
- Powerful Solutions ™
- Intended use
- Safety instructions
- General power tool safety warnings
- Service
- Additional power tool safety warnings
- Warning! Additional safety warnings for chainsaws
- Causes and operator prevention of kickback
- Safety recommendations for the chainsaw
- Avoid cutting
- Vibration
- Electrical safety
- Using an extension cable
- Guard against electric shock
- Additional safety instructions
- Residual risks.
- Labels on tool
- Features
- Assembly
- Oiling the chain
- Fitting the guide bar and chain. (fig. A - E)
- Checking and adjusting the chain tension (fig. G)
- To increase the tension
- Use
- Filling the oil reservoir (fig. F)
- Switching on
- How to set the chain brake (fig. C)
- How the anti-kickback chain brake works
- How to test the anti-kickback chain brake (fig. C)
- Felling (fig. H-J)
- Before attempting to fell a tree:
- Pruning trees
- Logging (fig. K - M)
- When supported along its whole length:
- When supported at both ends:
- When supported at one end:
- When on a slope (fig. L):
- When attempting to cut a log on the ground (fig. L):
- When using a saw horse (fig. M):
- Maintenance
- Oil level
- Saw chain and guide bar (fig. G)
- Saw chain sharpening
- Replacing worn out saw chains
- Saw chain sharpness
- Saw chain tension
- What to do if your chainsaw needs repair.
- Mains plug replacement (U.K. & Ireland only)
- Protecting the environment
- Level of sound pressure according to EN 60745:
- Vibration total values (triax vector sum) according to EN 60745:
- EC declaration of conformity
- Guarantee
- Australia
- New Zealand
- United Kingdom
- ENGLISH
Marque : BLACK & DECKER
Modèle : BLACK & DECKER GK1635
Catégorie : Outils de jardinage