DP 940 - Lecteur CD KENWOOD - Notice d'utilisation et mode d'emploi gratuit
Retrouvez gratuitement la notice de l'appareil DP 940 KENWOOD au format PDF.
| Type de produit | Lecteur CD |
| Marque | KENWOOD |
| Modèle | DP 940 |
| Dimensions (L × H × P) | 360 × 117 × 351 mm |
| Poids | 3,6 kg |
| Alimentation | 120 V AC (USA/Canada) ou 240 V AC (Royaume-Uni) |
| Consommation électrique | 10 W |
| Réponse en fréquence | 10 Hz – 20 kHz, ±1,0 dB |
| Rapport signal/bruit | Plus de 95 dB |
| Distorsion harmonique totale | 0,07 % à 1 kHz |
| Séparation des canaux | Plus de 80 dB |
| Pleurage et scintillement | En dessous de la limite mesurable |
| Niveau de sortie / impédance | 1,2 V rms / 3,3 kΩ |
| Fonctions de lecture | Lecture normale, programmée (PGM), répétition (REPEAT), édition (EDIT, AI EDIT, MULTI EDIT), recherche, espace (SPACE) |
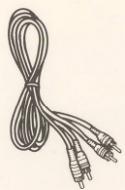
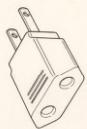
| Accessoires fournis | Cordon de commande système (1), cordon audio (1), adaptateur secteur (1, sauf certaines régions) |
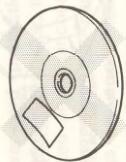
| Entretien et nettoyage | Essuyer avec un chiffon sec ; ne pas utiliser de solvants (alcool, diluant, essence). Nettoyer les disques du centre vers l'extérieur. |
| Sécurité | Ne pas exposer à l'humidité ou à la pluie ; ne pas ouvrir le boîtier ; débrancher en cas d'odeur anormale ; éloigner des sources de chaleur et de champs magnétiques. |
| Remarque importante | L'appareil n'est pas complètement déconnecté du secteur tant que le cordon d'alimentation est branché. |
FOIRE AUX QUESTIONS - DP 940 KENWOOD
Questions des utilisateurs sur DP 940 KENWOOD
0 question sur cet appareil. Repondez a celles que vous connaissez ou posez la votre.
Poser une nouvelle question sur cet appareil
Téléchargez la notice de votre Lecteur CD au format PDF gratuitement ! Retrouvez votre notice DP 940 - KENWOOD et reprennez votre appareil électronique en main. Sur cette page sont publiés tous les documents nécessaires à l'utilisation de votre appareil DP 940 de la marque KENWOOD.
MODE D'EMPLOI DP 940 KENWOOD
KENWOOD
Introduction
Your choice of this product indicates that you are a devotee to excellence in sound reproduction.
We appreciate your patronage and take pride in the long tradition of quality components that our company represents. So that you can get the most out of your unit, we suggest that
you take the time to read through this manual before you hook up and operate your system. This will acquaint you with operation of your system, which is also that
ating features and system-connection considerations so that your listening pleasure will be enhanced right from the start. You will notice that in all aspects of planning, engineering
You will notice that in all aspects of planning, engineering, styling, operating convenience and adaptability we have sought to anticipate your needs and desires.
Keep this manual handy for future reference.
For your records
Record the serial number, found on the back of the unit, in the spaces designated on the warranty card, and in the space
provided below. Refer to the model and serial numbers whenever you call upon your dealer for information or service
on this product. Model ____ Serial Number ____
Unpacking
Unpack the unit carefully and make sure that all accessories are put aside so they will not be lost.
Examine the unit for any possibility of shipping damage. If your unit is damaged or fails to operate, notify your dealer immedi-
ately. If your unit was shipped to you directly, notify the shipping company without delay. Only the consignee (the person
or company receiving the unit) can file a claim against the carrier for shipping damage.
We recommend that you retain the original carton and packing materials for use should you transport or ship the unit in
ing materials for use should you transport of ship the unit in the future.
Accessories
- System control cord ..... 1
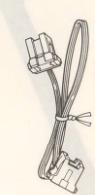
● Audio cord 1
- AC plug adaptor .... 1 (Except for some areas)
For the unit with a European AC plug in areas other than Europe.
Caution: Read the pages marked ⚠️ carefully to ensure safe operation.
| Introduction | 2 | Manual play (TRACK mode) | 9 |
| Before applying power | 3 | Programmed play (PGM mode) | 11 |
| Safety precautions | 3 | Repeated play | 13 |
| IMPORTANT SAFEGUARDS | 4 | Editing | 14 |
| Before operation | 6 | In case of difficulty | 17 |
| System connections | 7 | Specifications | 18 |
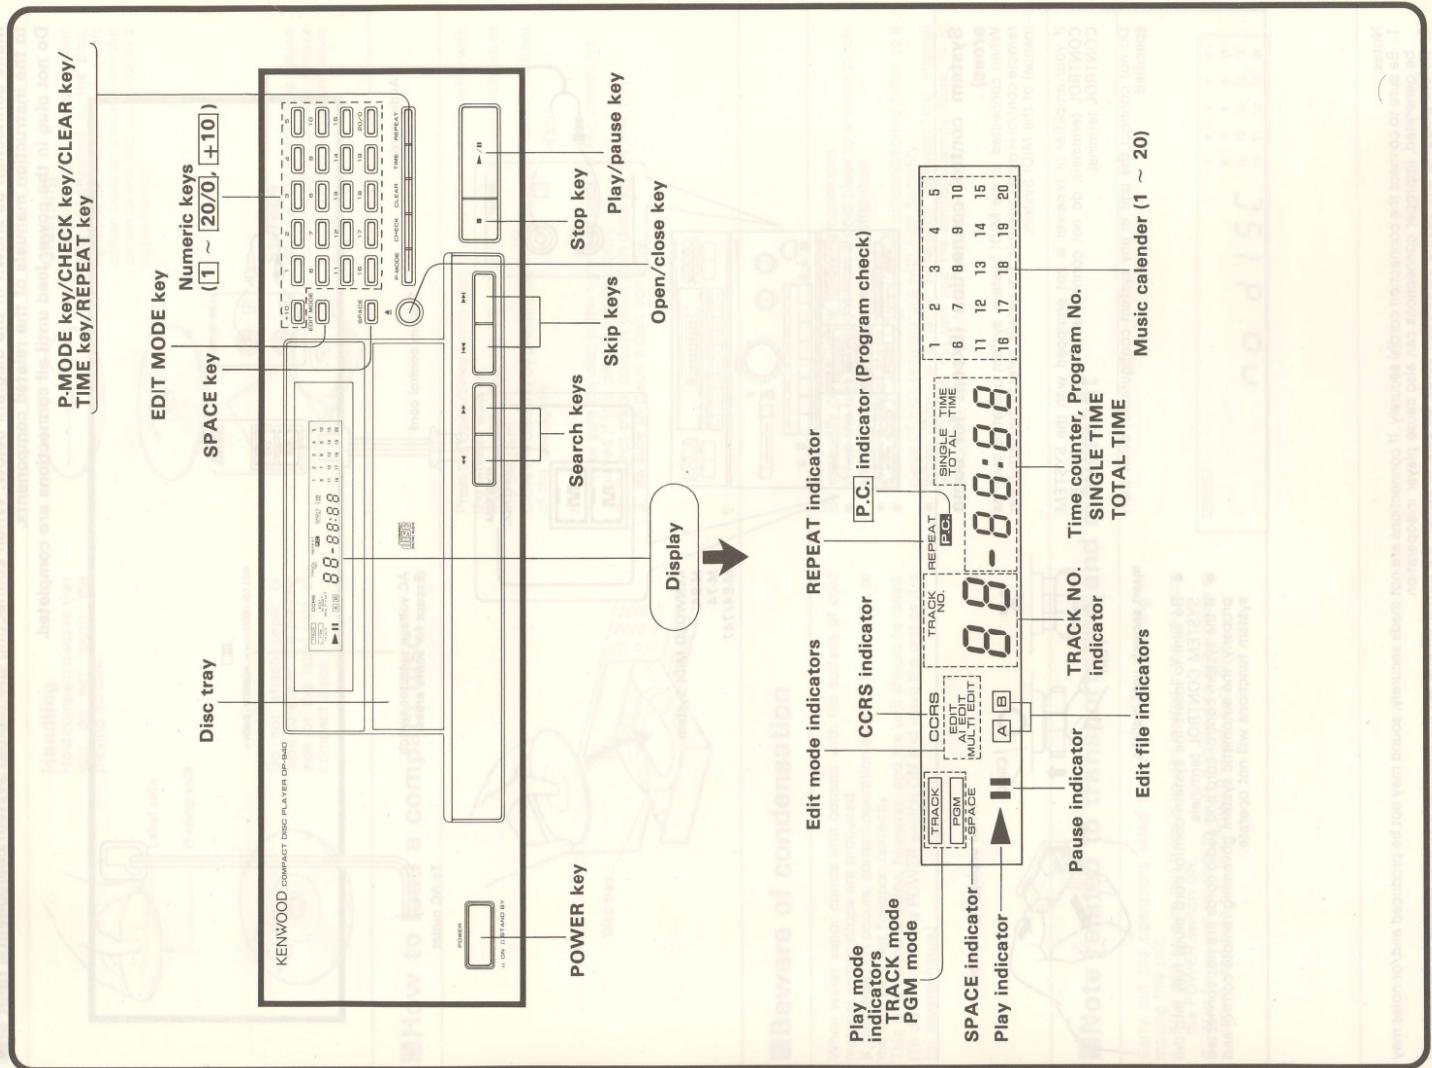
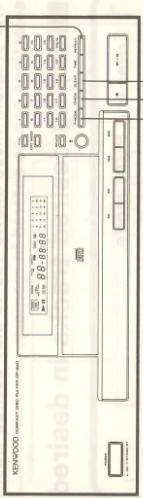
| Controls and indicators | 8 |
For the U.S.A. and Canada
Important!
Units shipped to the U.S.A. and Canada are designed for operation on 120 volts AC only.
Safety precaution for a Polarized AC plug However, some products may be supplied with
plug.
CAUTION: TO PREVENT ELECTRIC SHOCK DO NOT USE
THIS (POLARIZED) PLUG WITH AN EXTENSION CORD,
RECEPTACLE OR OTHER OUTLET UNLESS THE BLADES CAN BE FULLY INSERTED TO PREVENT BLADE EXPOSURE
For the United Kingdom
Important!
Units shipped to the U.K. are designed for operation on
240 volts AC only.
The mains plug must be removed from the wall socket prior
to any internal examination.
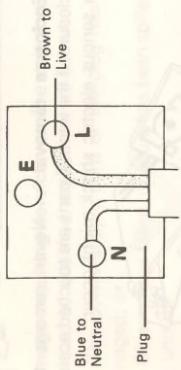
The wires in this mains lead are coloured in accordance with
the following code: Blue Neutral
Blue ....../Neutral Brown ....../Live
The wires in this mains lead must be connected to the termi-
nals in the plug as follows: Wire colour Plug terminal marking
Blue N or Black
Brown L or Red
Notes:
-
If a 13-amp plug is used, this must be fitted with a 5-amp fuse.
-
If a 3-pin plug with earthing contact is used, no wire must
be connected to the E terminal.
(三) 本次股东大会的召集和召开程序
Safety precautions
WARNING: TO PREVENT FIRE OR SHOCK HAZARD, DO NOT EXPOSE THIS APPLIANCE TO RAIN OR MOISTURE.
| CAUTION: TO REDUCE THE RISK OF ELECTRIC SHOCK, DO NOT REMOVE COVER (OR BACK). NO USER-SERVICEABLE PARTS INSIDE, REFER SER-VICING TO QUALIFIED SERVICE PERSONNEL. | ||
| THE LIGHTNING FLASH WITH ARROWHEAD SYMBOL, WITHIN AN EQUILATERAL TRIANGLE, IS INTENDED TO ALERT THE USER TO THE PRESENCE OF UNINSULATED “DANGEROUS VOLTAGE” WITHIN THE PRODUCT’S ENCLOSURE THAT MAY BE OF SUFFICIENT MAGNITUDE TO CONSTITUTE A RISK OF ELECTRIC SHOCK TO PERSONS. | ||
| THE EXCLAMATION POINT WITHIN AN EQUILATERAL TRIANGLE IS INTENDED TO ALERT THE USER TO THE PRESENCE OF IMPORTANT OPERATING AND MAINTENANCE (SERVICING) IN-STRUCTIONS IN THE LITERATURE ACCOMPANYING THE APPLIANCE. | ||
- Heat — The unit should be situated away from heat sources such as radiators, heat registers, stoves, or other units (including amplifiers) that produce heat.
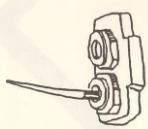
- Electric shock — Care should be taken so that objects do not fall and liquid is not spilled into the enclosure through openings. If a metal object, such as a hair pin or a needle, comes into contact with the
inside of this unit, a dangerous electric shock may result. For families with children, never permit children to put anything, especially metal, inside this unit.
- Enclosure removal — Never remove the enclosure. If the internal parts are touched accidentally, a serious electric shock might occur.
- Magnetic fields — Keep the unit away from sources of magnetic fields such as TV sets, speaker systems, radios, motorized toys or magnetized objects.

natural_image
Illustration of a person operating a computer with a refrigerator and washing machine (no text or symbols)- Cleaning — Do not use volatile solvents such as alcohol, paint thinner, gasoline, or benzine, etc. to clean the cabinet. Use a clean dry cloth.
Please read all of the safety and operating instructions before operating this unit. For best results, follow all warnings placed on the unit and adhere to the operating and use instructions. These safety and operating instructions should be retained for future reference.
-
Power sources — The unit should be connected to a power supply only of the type described in the operating instructions or as marked on the appliance.
-
Power-cord protection — Power-supply cords should be routed so that they are not likely to be walked on or pinched by items placed upon or against them, pay particular attention to cords at plugs, convenience receptacles, and the point where they exit from the unit.
-
Grounding or polarization — The precautions should be taken so that the grounding or polarization means of this unit is not defeated.
-
Ventilation — The unit should be situated so that its location or position does not interfere with its proper ventilation. To maintain good ventilation, do not put records or a table-cloth on the unit. Place the unit at least 10 cm away from the walls. Do not use the unit on a bed, sofa, rug or similar surface that may block the ventilation openings.
natural_image
Illustration of a person climbing a rope while standing beside stacked books (no text or symbols visible)- Water and moisture — The unit should not be used near water — for example, near a bathtub, washbowl, kitchen sink, laundry tub, in a wet basement, or near a swimming pool, etc.
natural_image
Cartoon illustration of a Kenvood appliance with people reacting to water, no text or symbols present- Temperature — The unit may not function properly if used at extremely low, or freezing temperatures. The ideal ambient temperature is above +5°C (41°F).
ductors, location of antenna-discharge unit, connection to grounding electrodes, and requirements for the grounding electrode. See Figure.
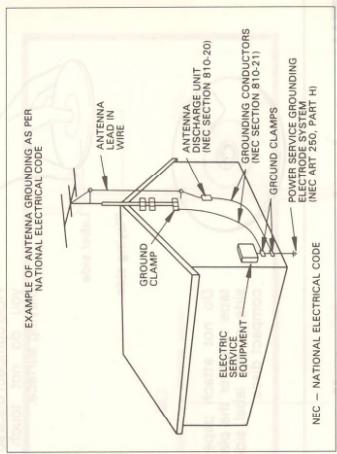
- Power lines — An outdoor antenna should be located away from power lines.
POWER OFF!

- Damage requiring service — The unit should be serviced by qualified service personnel when: A. The power-supply cord or the plug has been damaged; or
B. Objects have fallen, or liquid has been spilled into the unit; or
C. The unit has been exposed to rain; or
D. The unit does not appear to operate normally or exhibits a marked change in performance; or
E. The unit has been dropped, or the enclosure damaged.
Servicing — The user should not attempt to service the unit beyond that described in the operating instructions. All other servicing should be referred to qualified service personnel.
Outdoor antenna grounding — If an outside antenna is connected to the receiver, be sure the antenna system is grounded so as to provide some protection against voltage surges and built up static charges. Section 810 of the National Electrical Code, ANSI/ NFPA No. 70—1984, provides information with respect to proper grounding of the mast and supporting structure, grounding of the lead-in wire to an antenna discharge unit, size of grounding con-
- Carts and stands — An appliance and cart combination should be moved with care. Quick stops, excessive force, and uneven surfaces may cause the appliance and cart combination to overturn.

-
Nonuse periods — The power cord of the unit should be unplugged from the outlet when left unused for a long period of time.
-
Abnormal smell — If an abnormal smell or smoke is detected, immediately turn the power OFF and pull out the power cord. Contact your dealer or nearest service center.
POWER OFF!
■Disc handling precautions
Cleaning
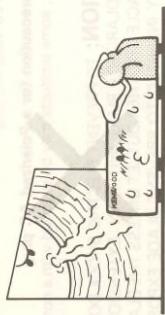
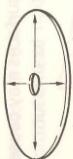
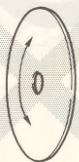
If fingerprints or foreign matter become attached to the disc, lightly wipe the disc with a soft cotton cloth (or similar) from the center of the disc outwards in a radial manner.
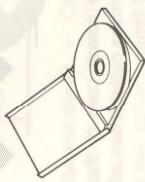
Storage
When a disc is not to be played for a long period of time, remove it from the CD player and store it in its case.
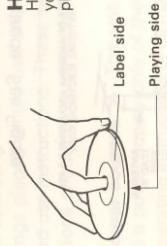
Do not attach paper or tape to either the playing side or the label side of compact discs.
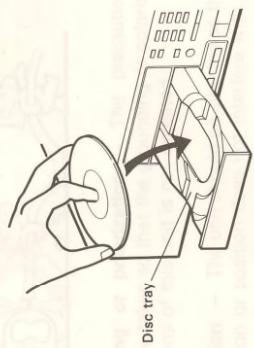
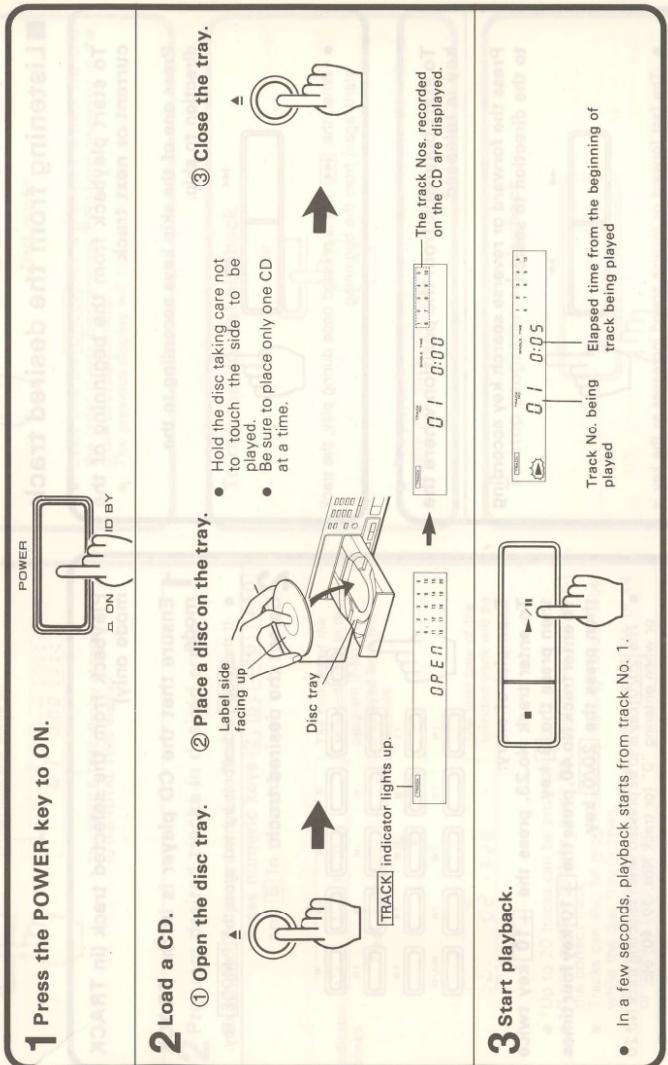
How to load a compact disc
Press the Open/close key to open the tray. The disc is inserted with the labeled side up. Make sure to center the CD correctly in the disc tray as shown in the diagram. Close the disc tray by pressing Open/close key or pushing the front of the tray lighty.
Notes:
1. Make sure the disc is the right way up. The disc cannot be played if it is placed upside down.
2. Do not place objects other than discs on the disc tray.
3. Be sure to place a disc correctly.
■Beware of condensation
- Be especially careful in the following conditions. - When the unit is brought from a cold place to a warm place, and there is a large temperature difference. - When a heater starts operating. - When the unit is brought from an air-conditioned place to a place of high temperature with high humidity. - When there is a large difference between the internal temperature of the unit and the ambient temperature, or in conditions where condensation occurs easily.
When water vapor comes into contact with the surface of cold material, water drops are produced. If condensation occurs, correct operation may not be possible, or the unit may not function correctly. This is not a malfunction, however, and the unit should be dried. (To do this, turn the POWER switch ON and leave the unit as it is for several hours.)
■Note related to transportation and movement
Carry out the operations listed below before transporting or moving this unit.
1. After making sure that there is no disc loaded in the unit, turn the POWER switch ON.
2. Wait for several seconds to verify that the display becomes as shown, and then turn the POWER switch back OFF.

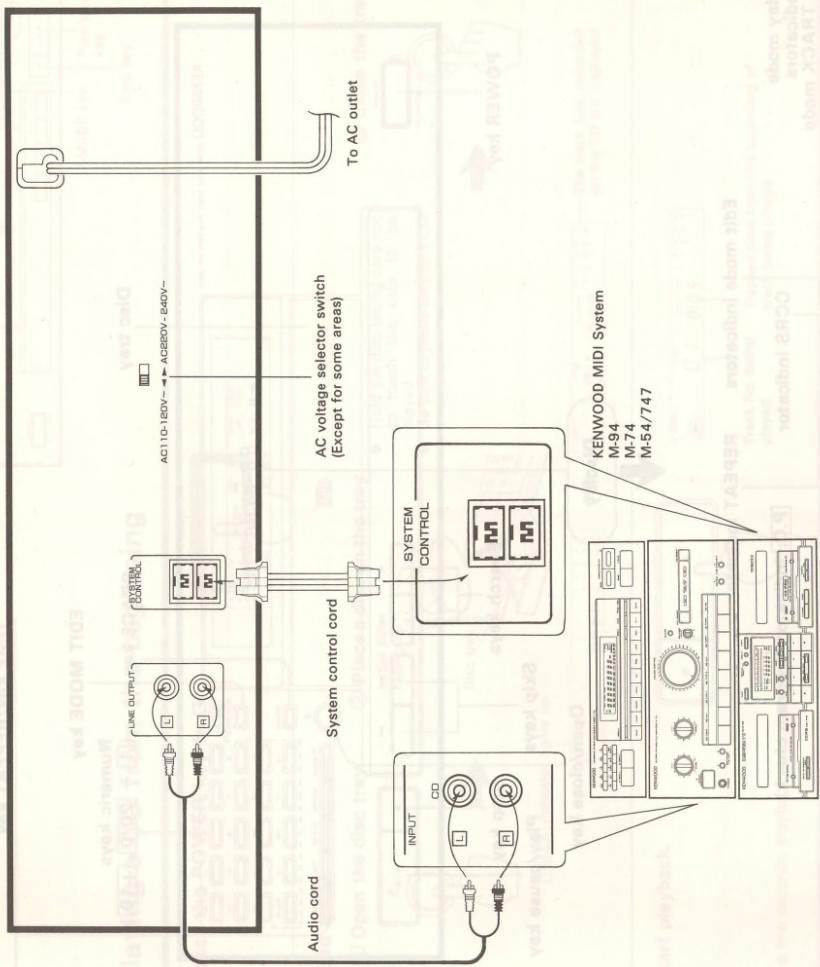
Make connection as shown in the diagram below. When connecting the related system components, refer also to the instruction manuals of the related components. Do not plug in the power lead until all connections are completed.
flowchart
graph TD
    A["Audio cord"] --> B["LINE OUTPUT"]
    B --> C["SYSTEM CONTROL"]
    C --> D["AC110-120V~ AC220V-840V~"]
    D --> E["To AC outlet"]
    F["INPUT"] --> G["CD"]
    G --> H["System control cord"]
    H --> I["SYSTEM CONTROL"]
    I --> J["KENWOOD MIDI System M-94 M-74 M-54/747"]
System control connection (Except for some
When connected to the MIDI System, system operation such as remote control is made possible. For details, refer to the instruction manual of the MIDI System.
If your amplifier or receiver is not equipped with the SYSTEM CONTROL terminals, do not connect anything to any SYSTEM CONTROL terminal.
Do not connect the unit in any system configuration other than specified.
When unplugging the cord
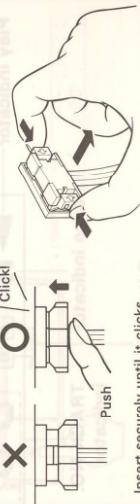
Insert securely until it clicks.
- Be sure to insert the system control cord plugs fully into the SYSTEM CONTROL terminals.
- If the system control cord and audio cords are not connected
properly, the automatic system governing remote control and system functions will not operate.
(3) 用 H_2O 气体的气体, H_2O 气体的气体, H_2O 气体的气体
system functions will not operate.
e d d
3
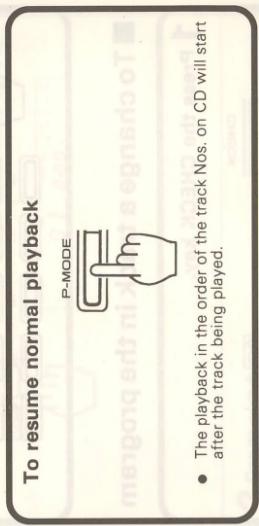
■Playing a CD from the beginning
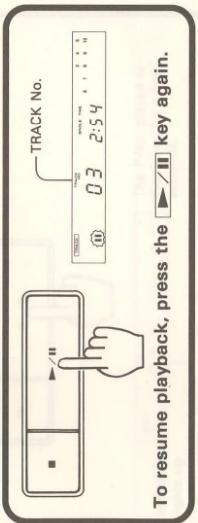
■ To pause CD play
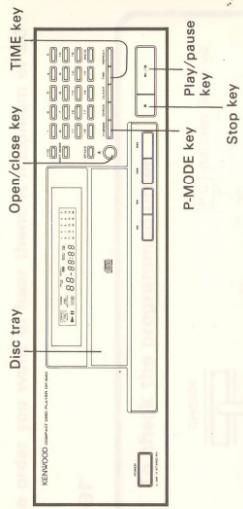
TIME key
Press the TIME key when you want to check the elapsed time and remaining time of the track being played. Every time the TIME key is pressed, the displayed time changes as shown below. The time information display may not appear when playing a CD containing 44 or more tracks or if a track No. over 43 has been programmed in PGM mode. In such a case, the display will show “--:--”.

flowchart
graph LR
    A["SINGLE/TOTAL TIME display"] --> B["23:45"]
    B --> C["SINGLE TIME"]
    C --> D["Elapsed time of the track being played"]
    D --> E["Remaining time of the track being played"]
    E --> F["Total TIME"]
    F --> G["Elapsed time of the whole CD"]
    G --> H["Remaining time of the whole CD"]
    H --> I["-2:37"]
    I --> J["-36:15"]
    style A fill:#f9f,stroke:#333
    style B fill:#ccf,stroke:#333
    style C fill:#cfc,stroke:#333
    style D fill:#fcc,stroke:#333
    style E fill:#cff,stroke:#333
    style F fill:#ffc,stroke:#333
    style G fill:#cfc,stroke:#333
    style H fill:#fcc,stroke:#333
    style I fill:#fff,stroke:#333
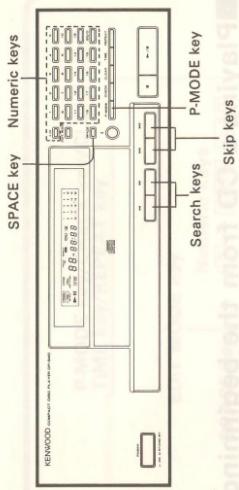
■Listening from the desired track
To start playback from the beginning of the current or next track
Press one of the skip keys according to the direction to skip.
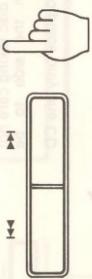
- When the ◀◀◀ key is pressed once during play, the track starts again from the beginning.
To start playback from the position where the key is released
Press the forward or reverse search key according to the direction to search.
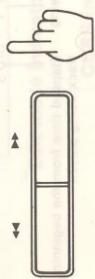
- The fast forward or reverse speed increases as the key is held depressed.
Playback from the selected track (in TRACK mode only)
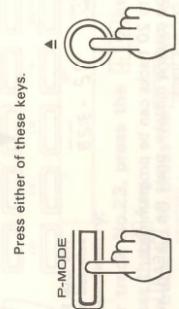
1 Ensure that the CD player is in the TRACK mode.
- If the PGM indicator is lighted, press the P-MODE key.
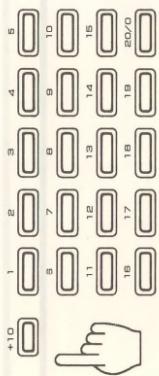
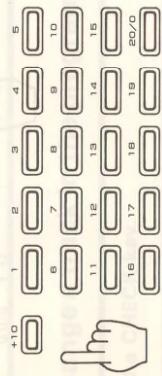
2 Select the desired track.
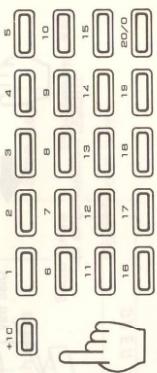
Examples of entry:
To enter track No.23, press the +10 key twice
then press the 3 key.
To enter track No.40, press the +10 key four times then press the 20/0 key.
- The 20/0 key is to be pressed when selecting track No.20 or when entering "0" for track Nos. 30, 40, etc.
Note: If a track No. which is not present on the CD is selected while the tray is open, the last track on the CD will be played. Such a selection is not accepted after the tray has been closed or playback has started.
REPEAT key
P-MODE key | CLEAR key
CHECK key
■ To clear tracks from the program
Press the key(s) for the track No. to be added.

(1) 2017年1月1日
[Non-Text]
■ To change a track in the program
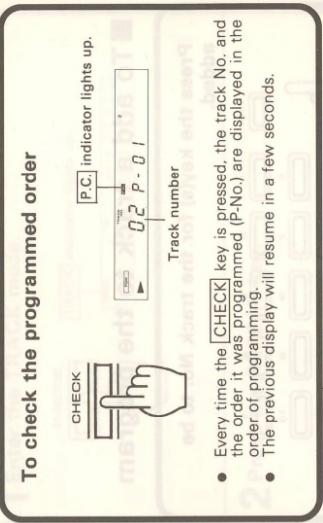
1 Press the CHECK key.
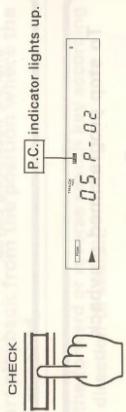
Press until the P-No: to be changed is displayed.
2 Press the key(s) to input the track No. to replace the previous one.
Press while the P.C. indicator is lighted.
The track being played cannot be changed.
During playback in the program mode, when the SPACE key is pressed, a space of about 4 seconds is reserved automatically between the programmed tracks. This function is provided to facilitate the DPSS function of the cassette deck. However, such a space could also be reserved in case the sound of two tracks are continued, for example with some classic music and live recordings.

- The total time is displayed including the time of the space.
- To cancel Auto-Space function, press the SPACE key again.
Clearing the whole of program
Auto-Space function
Repeated play
■ Repeated playback
| Repeated playback of the whole CD |
| 1 Enter the TRACK mode. |
| 2 Press the REPEAT key. |
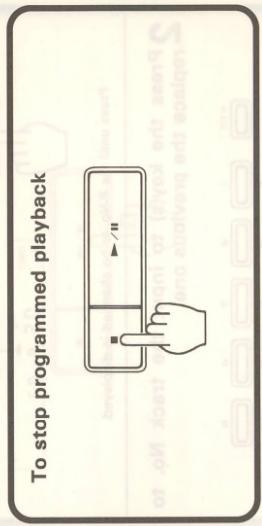
| 3 Start playback. |
| Repeated playback of programmed tracks |
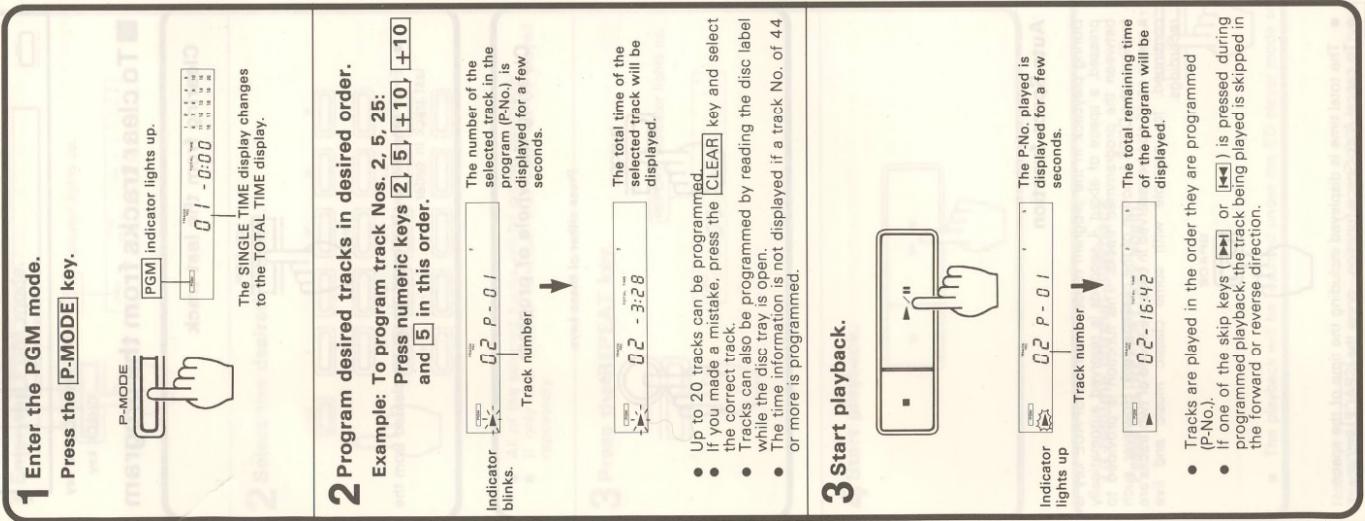
| 1 Enter the PGM mode. |
| 2 Select the desired track(s). |
| 3 Press the REPEAT key. |
| 4 Start playback. |
| To resume normal playbackPress theREPEATkey again. | |
| REPEATindicator goes off. | |
| 05 - 3:28 | |
Note: The REPEAT key does not function after the EDIT mode has been selected.
Editing
This function is for editing when you are recording the contents of a CD onto a tape. The following three types of convenient editing can be performed by pressing the EDIT MODE key.
EDIT: When the recording time is selected, the editing is performed automatically so that the track to be recorded onto the end of the tape will not be cut. Up to 20 tracks can be edited.
AI EDIT: Even when the total time of a CD exceeds the recording time of a tape, all the tracks can be recorded with each track faded out.
MULTI EDIT: Tracks of various CDs can be edited for a tape.
■ EDIT (Normal edit mode)
1 Select the EDIT mode.
EDIT MODE

● The mode changes every time the EDIT MODE key is pressed.
2 While the EDIT indicator is lighted, input the two-way recording time of the tape.
The time display changes as shown below every time the TIME key is pressed.

The CD contents are edited as follows.
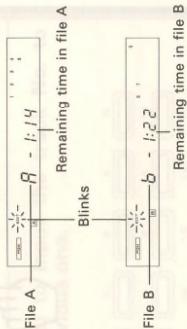
flowchart
graph TD
    A["File A"] -->|Blink| B["File B"]
    B -->|Remaining time in file A| C["8 - 1:14"]
    B -->|Remaining time in file B| D["b - 1:22"]
Completion of editing
Stops blinking

- When the EDIT MODE key is pressed again after the editing has been completed, "SHUFFLE EDIT" will appear on the display, and the change of track Nos. is done only once so that the remaining time of A and B files is minimized.
When the EDIT MODE key is pressed again

EDIT MODE

EDIT MODE key
| KENWOOD CONNECT (MAX 100% OFF) | |
| 80-9000 | |
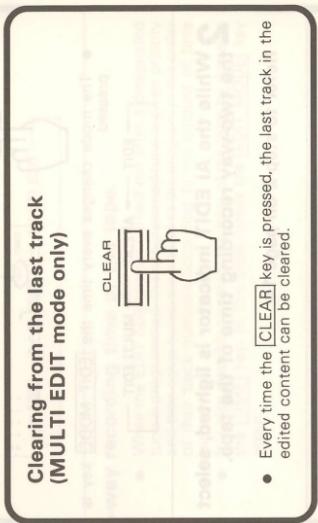
MULTI EDIT
| 1 Select the MULTI EDIT mode.EDIT MODEMULTI EDIT indicator lights up.The mode changes every time theEDIT MODEkey ispressed.→ EDIT → AI EDIT → MULTI EDIT |
| 2 While the MULTI EDIT indicator is lighted,select the two-way recording time of the tape.Refer to step 2 on page 14. |
| 3 Insert the first CD and program the desiredtracks to be edited. |
| 4 Start recording.Refer to the instruction manuals of the MIDISystem. |
| As the disc tray opens automatically, afterrecording is finished for the first CD, perform thesame procedure as the first CD to program thetracks of the second CD and the following ones.When the remaining time of tape side B becomes less, thetracks being recorded may be faded out and cut.When “FULL” appears on the display, no more program canbe input. |
AI EDIT
| 1 Select the AI EDIT mode.EDIT MODEAI EDIT indicator lights up.CBD C--- The mode changes every time the EDIT MODE key is pressed.→ EDIT → AI EDIT → MULTI EDIT |
| 2 While the AI EDIT indicator is lighted, select the two-way recording time of the tape.Refer to step 2 on page 14. |
| 3 Start recording.Refer to the instruction manuals of the MIDI System. |
| When the total playback time of the CD is longer than the selected time of the tape, the ending part of each track is faded out and cut. To record the whole of a track, program beforehand. The programmed tracks are recorded prior to other tracks.Example: Programming the tracks Nos. 2, 4, 6, and 8 when the total playback time of the CD is longer than the selected time of the tape. |
Notes:
1. When the tracks of more than 44 are programmed, the editing operation cannot be carried out.
2. When the selected time of the tape is extremely short, even the programmed tracks may be cut.
■ To record an edited program
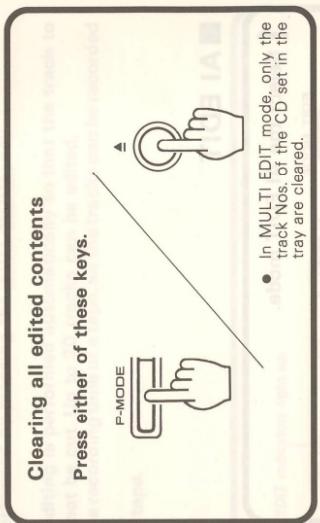
■ To clear the edited contents
Using the KENWOOD MIDI System's CCRS function is the best way to get the most out of the editing function. For details please see "Recording CD play back" in the manual for the KENWOOD MIDI System.
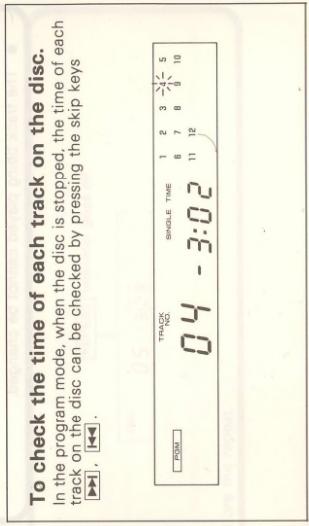
■ To check the edited contents
Press the CHECK key.
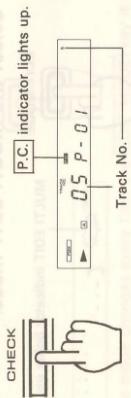
- Every time the CHECK key is pressed, the track Nos. are displayed in the edited order. - In MULTI EDIT mode, only the track Nos. of the CD set in the tray are displayed.
Notes:
- While you can edit with a different time setting to that of the tape you are using, part of the tape may be left with nothing recorded
on it, or the last track on side A or side B may be cut short. 2. Up to a maximum of 30 tracks can be edited using this function
- Up to a maximum of 20 tracks can be edited using this function.
- The EDIT function may not operate properly for discs having only one track or having tracks of long duration such as classical music.
- When AI EDIT or MULTI EDIT mode is selected, the SPACE function and the REPEAT function do not operate.
In case of difficulty
What appears to be a malfunction may not always be serious. If your unit should not perform as expected, consult the table below to see if the problem can be corrected before seeking help from your dealer or service representative.
| Symptom | Cause | Remedy |
| No power is applied with the POWER switch ON. | Power plug is loosely connected.With the power plug connected to the switched AC outlet of an amplifier, the power of the amplifier is turned off. | Insert the power plug firmly to the AC outlet.Turn the amplifier's power ON. |
| Disc is loaded, player does not play. | Disc is loaded upside down.Disc is dirty.Disc is cracked.Condensation occurred on the optical lens unit. | Load the disc again with its label side up.Wipe off the dust on the surface of the disc referring to "Disc handling precautions".Replace the disc with a new one.Leave the player for about 1 hour so that the condensation is removed. |
| No sound. | Disc is not loaded.Play mode is not entered (The play/pause indicator is not lit.)Disc is too dirty.Disc is cracked.The connection cords are inserted loosely. | Load a disc and press the PLAY/PAUSE key ▶/□.Press the PLAY/PAUSE key ▶/□.Wipe off the dust on the disc surface referring to "Disc handling precautions".Replace the disc with a new one.Connect all connection cords firmly. |
| Music is interrupted. (Sound is skipped.) | Disc is too dirty.Disc is cracked.Oscillation is applied to this unit. | Wipe off the dust on the disc surface referring to "Disc handling precautions".Replace the disc with a new one.Try selecting a place where no strong vibrations occur by changing the installation place, etc. |
Notes:
1. As this system uses microcomputers, it is open to interference from external noise, and may sometimes not function properly. In such a case, unplug the power cord once, and then plug it in again.
2. Do not use contact cleaner because it could cause a malfunction. Be specially careful against contact cleaners containing oil, for they may deform the plastic components.
Specifications
| Format | |
| Type | Compact disc player |
| Read system | Non-contact optical pickup |
| Rotational speed | About 200 to 500 rpm |
| Audio | |
| Frequency response | 10 Hz ~ 20kHz, ±1.0 dB |
| Signal to noise ratio | More than 95 dB |
| Total harmonic distortion | 0.07% at 1 kHz |
| Channel separation | More than 80 dB |
| Wow flutter | Below measurable limit |
| Output level/Impedance | 1.2 V rms/3.3kΩ |
| General | |
| Power consumption | 10W |
| Dimensions | W: 360mm (14-3/16")H: 117mm (4-5/8")D: 351mm (13-13/16") |
| Weight | 3.6 kg (7.9 lb) |
| Note:The unit’s power supply is secondarily connected. Note following.The unit is not completely disconnected from the mains as long as the power cord is connected to a wall outlet. | |
| Observera:Apparatens strömförsörjning kopplas från sekundärt.V.g. ge akt på följande.Apparaten fränkopplas inte helt och hålllet från strömnätet medan apparatens nätsladd är ansluten till växelströmsuttaget.Huom:Virta yksikköön on kytketty pois sekundaaripuolelta.Huomioi seuraava.Tämä yksikkö ei ole kokonaan kypketty pois pää virranjakajasta kun pää katkaisin on liitettynä virtatiirin. | Bemærk:Strømmen til apparatet afbrydes på den sekundære side.Vear opmærksom på følgende.Denne enhed er ikke fullstendig koblet fra lysnettet så lenge stikket er tilsluttet stikkontakten.Anmerkning:Strømmen til apparatet er slått av på sekundærsiden.Vær oppmerksom på det følgende.Dette apparatet koples ikke fullstendig fra nettet så lenge støpselet står i en stikkontakt, selv om strømbryteren settes i av-stilling. |
Note: KENWOOD follows a policy of continuous advancements in development. For this reason specifications may be changed without notice.
19
DP-940 (En)