
T1028 - Ordinateur portable 2-en-1 GIGABYTE - Notice d'utilisation et mode d'emploi gratuit
Retrouvez gratuitement la notice de l'appareil T1028 GIGABYTE au format PDF.


| Type de produit | Ordinateur portable 2-en-1 convertible / Tablet PC |
| Processeur | Intel Atom N270 1,6 GHz (ou N280 1,66 GHz en option) |
| Mémoire vive (RAM) | 1 Go DDR2-533 (extensible jusqu'à 2 Go, un slot SO-DIMM) |
| Disque dur | 2,5" SATA, 160 Go / 250 Go / 320 Go |
| Écran | 10,1" LED tactile, résolution WSVGA 1024×600 (option WXGA 1366×768), rotation 180° |
| Graphiques | Intel 945GSE (option GN40) |
| Connectivité sans fil | Wi-Fi 802.11b/g/n, Bluetooth 2.1, 3.5G (option) |
| Ports | 3 × USB 2.0, 1 × VGA, 1 × RJ45, 1 × prise casque/micro, 1 × lecteur SD/MMC/MS, 1 × ExpressCard |
| Webcam | 1,3 mégapixels CMOS |
| Audio | Haut-parleurs stéréo 1,5 W × 2 |
| Batterie | Li-ion 4 cellules 4500 mAh ou 6 cellules 7650 mAh |
| Alimentation | Adaptateur secteur 100-240 V, sortie 12 V / 3 A |
| Dimensions (avec batterie 4 cellules) | 265 × 195 × 38,5 mm |
| Dimensions (avec batterie 6 cellules) | 265 × 214 × 41,4 mm |
| Poids (avec batterie 4 cellules) | 1,3 kg |
| Poids (avec batterie 6 cellules) | 1,48 kg |
| Système d'exploitation | Windows XP / Linux / Vista (selon configuration) |
| Sécurité | Ventilation adéquate, utilisation du chargeur d'origine, éviter les liquides et chocs |
| Entretien | Nettoyer avec un chiffon doux et sec ; ne pas démonter ; éteindre avant nettoyage |
| Pièces remplaçables | Batterie, mémoire SO-DIMM, disque dur 2,5" SATA |
| Garantie | 1 an mondiale (batterie 1 an) |
FOIRE AUX QUESTIONS - T1028 GIGABYTE
Questions des utilisateurs sur T1028 GIGABYTE
0 question sur cet appareil. Repondez a celles que vous connaissez ou posez la votre.
Poser une nouvelle question sur cet appareil
Téléchargez la notice de votre Ordinateur portable 2-en-1 au format PDF gratuitement ! Retrouvez votre notice T1028 - GIGABYTE et reprennez votre appareil électronique en main. Sur cette page sont publiés tous les documents nécessaires à l'utilisation de votre appareil T1028 de la marque GIGABYTE.
MODE D'EMPLOI T1028 GIGABYTE
Copyright © 2009
All Right Reserved - Printed in China
T1028 TouchNote User's Manual
Original Issue: 2009/07
This manual guides you in setting up and using your new Netbook PC. Information in the manual has been carefully checked for accuracy and is subject to change without notice.
No part of this manual may be reproduced, stored in a retrieval system, or transmitted, in any form or by any means, electronic, mechanical, photocopy, recording, or otherwise, without prior written consent.
Trademarks
Product names used herein are for identification purposes only and may be the trademarks of their respective companies. Microsoft®, MS-DOS, Windows®, and Windows® Sound System are trademarks of Microsoft Corporation.
Intel®, Atom™ is registered trademarks of Intel Corporation.
Sound Blaster, Sound Blaster Pro are trademarks of Creative Technology.
All other brands or product names mentioned in this manual are trademarks or registered trademarks of their respective companies.
Safety Instructions
Use the following safety guidelines to help protect yourself and your TouchNote.
When Using Your T1028 TouchNote Computer

CAUTION: Do not operate your portable computer for an extended period of time with the base resting directly on your body. With extended operation, heat can build up in the base. Allowing sustained contact with the skin can cause discomfort or a burn.
- Do not attempt to service the TouchNote yourself. Always follow installation instructions closely.
- Do not carry a battery in your pocket, purse, or other container where metal objects (such as car keys) could short-circuit the battery terminals. The resulting excessive current flow can generate extremely high temperature and may cause burns to your skin.
- Be sure that nothing rests on your AC adapter's power cable and that the cable is not located where it can be tripped over or stepped on.
- While you are using the computer or charging the battery, place the AC adapter in a ventilated area, like on a desktop or on the floor. Do not cover the AC adapter with papers or other items that may prevent ventilation. Also, do not use the AC adapter while it is inside a carrying case.
- Do not insert objects into the air vent of your TouchNote computer. Doing so can cause short-circuiting and may result in fire or electrical shock.
- Use only the AC adapter and batteries that are supplied by your
TouchNote manufacturer. Using other types of battery or AC adapter may heighten the risk of fire or explosion.
- Incorrectly placed batteries may result in an explosion.
- Replace only with the same or compatible battery recommended by the manufacturer.
- Please discard used batteries according to the manufacturer's instructions.
-
Before you connect your TouchNote to a power source, ensure that the voltage rating of the AC adapter matches that of the available power source.
-
115 V/60 Hz in most of North and South America and some Far Eastern countries such as South Korea.
- 100 V/50 Hz in eastern Japan and 100 V/60Hz in western Japan.
- 230 V/50 Hz in most of Europe, the Middle East, and the Far East.
-
If you use an extension cord with your AC adapter, ensure that the total ampere rating of all devices plugged into the extension cord does not exceed its total capacity.
-
When removing battery from your TouchNote, first turn off the system, disconnect the AC adapter from the electrical outlet, and then remove the battery.
- To avoid risk of an electrical shock, do not connect or disconnect any cables, or perform maintenance or reconfiguration of this product during a thunderstorm.
- Do not throw batteries into fire, doing so may cause explosion. Check with local authorities first for battery disposal instructions.
-
When setting up your TouchNote for work, place it on a level surface.
-
When traveling, do not check your TouchNote as baggage. You can put your TouchNote through an X-ray security machine, but never put your TouchNote through a metal detector. If you have your TouchNote checked by hand, be sure to have a charged battery ready in case you are asked to turn on your TouchNote.
- When traveling with the hard drive removed from your TouchNote, wrap the drive in an insulated material, such as cloth or paper. If you have the drive checked by hand, you may be asked to install the drive into your TouchNote. Your can have the hard drive checked through an X-ray machine, but never put the drive through a metal detector.
- When traveling, do not place your TouchNote in the overhead storage compartment where it could shift around. Do not drop your TouchNote or subject it to other mechanical shocks.
- Protect your TouchNote, battery, and hard drive from environmental hazards such as dirt, dust, food, liquids, extreme temperature, and direct exposure to sunlight.
- When you move your TouchNote in environments where there is a substantial difference of temperature or humidity level, condensation may form on or within your TouchNote. To avoid damaging your TouchNote, please allow sufficient time for the moisture to evaporate before continue using.
NOTICE: When taking your TouchNote from a colder to a warmer environment or vice versa, allow your TouchNote enough time to adapt to the new environment before turning on power.
- When unplugging the power cord, please make sure that you pull on its connector or on its strain relief loop, and not on the power cord itself. As you pull out the connector, please ensure that it is
pulled out evenly in order not to bend its connecting pins. Also, before you connect the power cord, make sure that both connectors are correctly oriented and aligned.
- Before you clean your TouchNote, turn it off first, unplug it from its power source, and remove the battery.
- Handle interior components with care. When removing a component, please hold it by the edge and not on the connecting pins (such as the memory module).

When using your telephone equipments, safety instructions should always be followed in order to prevent fire, electrical shock or injuries, these instructions include:
- Do not use this product near water, for example, near a bathtub, washing basins, kitchen/laundry sinks, wet basements or swimming pools.
- Avoid using cordless phones during an electrical storm as lightening may cause electrical shocks.
- Do not use the telephone to report a gas leak within the leakage area.
WARNING: Void of Warranty
- If the battery is not properly handled, there may be a risk of explosion; make sure you are using the same or compatible battery.
- Please discard used batteries according to the instructions given by the manufacturer.
- Please be aware that use of cracked, severely scratched or poor quality discs may damage the optical drive and corrupt data in the disc. Such discs may break while drive operates in high-speed, in this case, your product warranty may be voided.
Regulatory Notices
Federal Communications Commission Notice
This equipment has been tested and found to comply with the limits for a Class B digital service, pursuant to Part 15 of the FCC rules. These limits are designed to provide reasonable protection against harmful interference in a residential installation.
Any changes or modifications made to this equipment may void the user's authority to operate this equipment. This equipment generates, uses, and can radiate radio frequency energy. If not installed and used in accordance with the instructions, may cause harmful interference to radio communications. However, there is no guarantee that interference will not occur in a particular installation. If this equipment does cause harmful interference to radio or television reception, which can be determined by turning the equipment off and on, the user is encouraged to try to correct the interference by one or more of the following measures:
- Reorient or relocate the receiving antenna.
- Increase the separation between the equipment and receiver.
- Connect the equipment into an outlet on a circuit different from that to which the receiver is connected.
- Consult the dealer or an experienced radio/TV technician for help.
- All external cables connecting to this basic unit must be shielded.
For cables connecting to PCMCIA cards, see the option manual or installation instructions.
RF exposure
This equipment must be installed and operated in accordance with provided instructions and must not be co-located or operating in conjunction with any other antenna or transmitter. End-users and installers must be provide with antenna installation instructions and transmitter operating conditions for satisfying RF exposure compliance.
SAR Value:0.323 W/Kg
CE Notice (European Union)
This symbol CE indicates this T1028 TouchNote computer complies with the EMC Directive and the European Union's Low Voltage Directive. This symbol also indicates that T1028 meets the following technical standards:
- EN 55022 — "Limitations and Methods of Measurement for the Radio Interferences of Information Technology Equipment."
- EN 55024 — "Information technology equipment - Immunity characteristics - Limits and methods of measurement."
- EN 61000-3-2 — "Electromagnetic compatibility (EMC) - Chapter 3: Limits - Section 2: Limits on the harmonic current emissions (Equipment input current up to and including 16 A per phase)."
- EN 61000-3-3 — "Electromagnetic compatibility (EMC) - Chapter 3: Limits - Section 3: Limits on the voltage fluctuations and flicker in low-voltage power supply systems for equipment with rate current up to and including 16 A."
EN 60950 — "Safety of Information Technology Equipment."

NOTE: EN 55022 emissions requirements provide for two classifications
Class A governs commercial use
Class B is governs residential use
For CB:
- Only use batteries designed for this computer. The wrong battery type may explode, leak or damage the computer
- Do not remove any batteries from the computer while it is pow-
ered on
- Don not continue to use a battery that has been dropped, or that appears damaged (e.g. bent or twisted) in any way. Even if the computer continues to work with a damaged battery in place, it may cause circuit damage, which may possibly result in fire.
- Recharge the batteries using the notebook's system. Incorrect recharging may make the battery explode.
- Do not try to repair a battery pack. Refer any battery pack repair or replacement to your service representative or qualified service personnel.
- Keep children away from, and promptly dispose of a damaged battery. Always dispose of batteries carefully. Batteries may explode or leak if exposed to fire, or improperly handled or discarded.
- Keep the battery away from metal appliances.
- Affix tape to the battery contacts before disposing of the battery.
- Do not touch the battery contacts with your hands or metal objects.
Battery Disposal & Caution
The product that you have purchased contains a rechargeable battery. The battery is recyclable. At the end of its useful life, under various state and local laws. It may be illegal to dispose of this battery into the municipal waste stream. Check with your local solid waste officials for details in your area for recycling options or proper disposal.
Danger of explosion if battery is incorrectly replaced. Replace only with the same or equivalent type recommended by the manufacturer. Discard used battery according to the manufacturer's instructions.
BSMI Notice (Taiwan Only)
Most TouchNote computers are classified by the Bureau of Standards, Meteorology and Inspection (BSMI) as Class B information technology equipment (ITE).

R32323
The symbol above must be attached to the product indicating compliance with the BSMI standard.

Preface
Congratulations on your purchase of a TouchNote computer! Your new TouchNote features the most innovative features in portable computing technology. It combines state-of-the-art ergonomics with sophisticated architecture, providing you with a personal computer that is compact, powerful, and easy to use. Designed for a wide range of general, business, and personal productivity applications, this TouchNote is an ideal choice for use in the office, at home, and on the road.
This Manual contains all the information you need to set up and use your TouchNote computer. It describes all of its features in a thorough yet easy-to-read manner.
Content
Safety Instructions
Regulatory Notices. 1
Preface VII
Chapter 1 Introducing Your T1028 TouchNote
1.1 Panoramic View 2
1.2 Left Side 3
1.3 Right Side 3
1.4 Cover Side 4
1.5 Bottom Side 4
1.6 Status Indicators 5
1.7 Turning Your T1028 TouchNote On and Off 6
1.8 Keyboard Functions.. 6
1.9 Using the Touchpad 8
1.10 Using the built-in camera 8
1.11 Using the Audio 8
1.12 Using the Wireless LAN (WLAN) 9
1.13 Using the Battery Pack 9
1.14 Connecting the AC Adapter 10
1.15 Installing T1028 Device Drivers 11
1.16 Touch Screen Calibration 11
1.17 Use your T1028 as a Tablet PC 12
1.18 Operating Temperature 12
Chapter 2 Battery
2.1 Battery Pack 14
2.2 Recharging The Battery Pack 14
2.3 Questions And Answers 14
2.4 Battery Maintenance 15
2.5 Power Consumption 15
2.6 Reducing Power Consumption 15
2.7 Removing The Battery Pack 16
2.8 Connecting System To AC Adapter 16
2.9 Battery Capacity Inspection 16
Chapter 3 The BIOS Setup program
3.1 Activate the BIOS Setup Utility 18
3.2 The Main Menu 19
3.3 Advanced Menu 20
3.4 Security Menu 20
3.5 Boot menu 21
3.6 Exit Menu 22
3.7 How to Upgrade the BIOS 23
Chapter 4 Introduction to Smart Manager
Chapter 5 Troubleshooting / Q&A
5.1 Troubleshooting 30
5.2 Q&A 33
Appendix I Specification
Appendix II Recovery Update Notices
Appendix III Service Centers

Chapter 1 Introducing Your T1028 TouchNote
This chapter will show you how to operate your T1028 SERIES TouchNote computer, including connecting the AC adaptor, turning the computer on/off, using touch-pad, keyboard, hot keys, battery, and so on. If you are new to computers and to the operating system, this chapter will guide you through some of the new exciting features.
1.1 Panoramic View
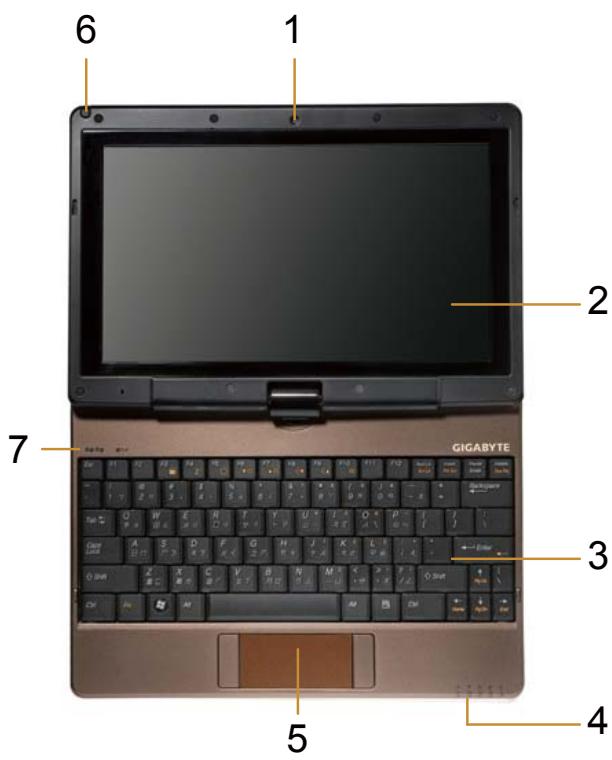
| No. | Item | Function |
| 1 | Web camera | Built-in 1.3M camera. |
| 2 | LCD | To display the content output form the system. |
| 3 | Keyboard | To input characters and numbers. |
| 4 | Five system LEDs | Five LED lights of system signal From left to right Bluetooth signal WLAN signal HDD signal Battery signal Power on signal |
| 5 | Touchpad | To function as mouse. |
| 6 | Stylus Pen Slot | To place the stylus pen. |
| 7 | Num. Lock, Caps Lock & 3.5G LEDs | Num. Lock, Caps Lock & 3.5G LED lights.(Please refer to the detailed descriptions of the LED indicators on Page 5 of the User's Manual.) |
1.2 Left Side
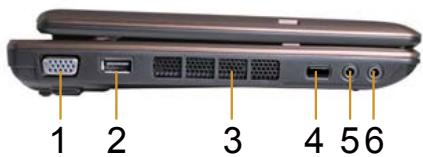
| No. | Item | Function |
| 1 | VGA Port | To connect VGA monitor. |
| 2 | USB port | To connect peripheral equipment with USB interface. |
| 3 | Air Vent | To vent heat from Netbook. |
| 4 | Function key | Function button a). In shutdown/standby/hibernate mode, battery capacity can be displayed when the battery is loaded and the "function button" is pressed. b). Under normal boot conditions: press the "function button" in the DOS operating system: inactive. Press the "function button" in the Windows operating system: turn on/off the Smart Manager program. |
| 5 | Line out | To connect equipment to output sound. |
| 6 | MIC jack | To connect MIC to input audio signal. |
1.3 Right Side
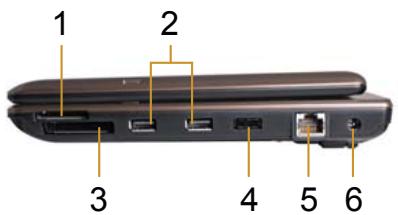
| No. | Item | Function |
| 1 | Media Card Slot (SD/MMC/MS Pro) | To connect SD/MMC/MS Card. |
| 2 | USB port | To connect peripheral equipment with USB interface. |
| 3 | Express Card slot | To connect an Express Card. |
| 4 | Power switch | Power on switch. |
| 5 | LAN RJ45 Jack | To connect LAN. |
| 6 | DC-in hole | To connect AC adapter to power on T1028 TouchNote. |
1.4 Cover Side
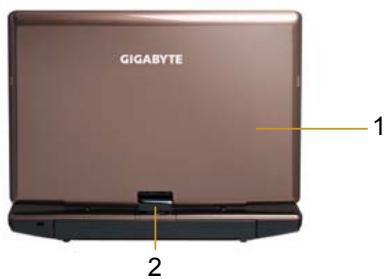
| No. | Item | Function |
| 1 | Cover | To Protect the T1028 TouchNote |
| 2 | Axle | To turn |
1.5 Bottom Side
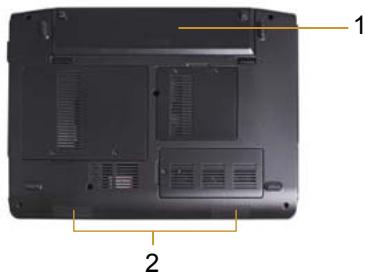
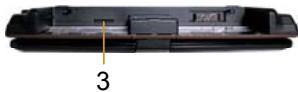
| No. | Item | Function |
| 1 | Battery Pack | Installed in the battery compartment, to supply power to T1028 TouchNote when AC power is disconnected. |
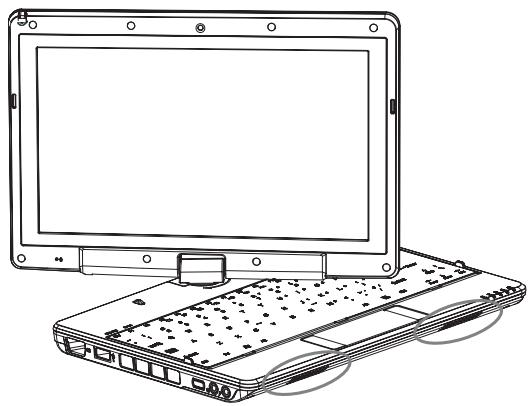
| 2 | Speaker | To output the audio sound from the system. |
| 3 | SIM Card Slot | To insert of a mobile SIM card for 3.5G function (Optional) |
1.6 Status Indicators
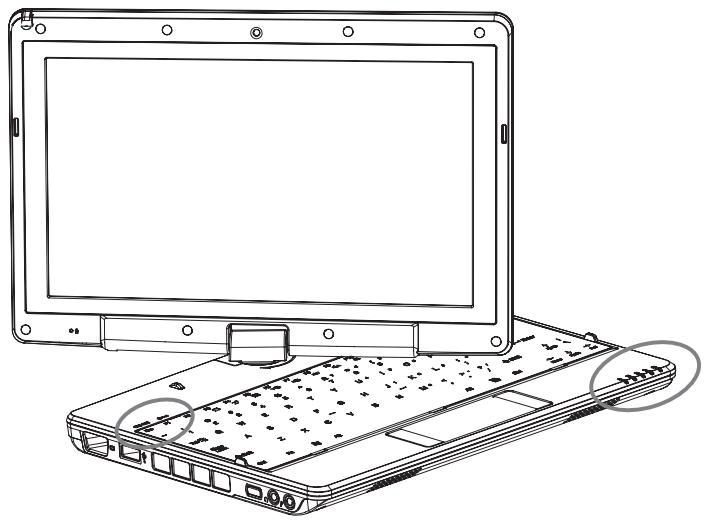
| Icon | Item | Function | |
| Bluetooth | This LED would be lit when the Blue-tooth is enabled. | ||
| WLAN Status | Wireless on/off status. | ||
| HDD | T1028 TouchNote is reading from, or writing to hard disk. | ||
| Battery status | Blue off | Recharging is finished or T1028 TouchNote is not powered by AC adapter. | |
| Blue on | Battery is in recharging. | ||
| Power status | Blue off | System is turned off or in hibernation mode. | |
| Blue flashing | System is in Standby mode. | ||
| Blue on | System is in operating. | ||
| Number-locked | The keyboard is in Number-lock mode. | ||
| Caps-locked | The keyboard is in Caps-lock mode. | ||
| 3.5G | WWAN on/off status. | ||
1.7 Turning Your T1028 TouchNote On and Off
Turning on the power
Open the T1028 TouchNote lid, press and hold the power switch for one or two seconds. The power indicator will glow blue once the computer is powered on.
Turning off the power
If you are not going to use your T1028 TouchNote computer for a while, it is best to turn off its power. Before turning off power, close all program first and shut down the operating system.
After turning off your T1028 TouchNote computer, make it a habit to leave the LCD panel open for a while after it has been used for an extended period of time. This allows the interior of your T1028 TouchNote computer to cool off. Closing the panel will force the heat up against the LCD screen, and doing so after a while may damage the screen. More importantly, never close the LCD panel for a long period of time when the computer is on or when the power saving function is disabled.
Suspend mode
You can adjust default power management settings in the Power Option/ Advanced dialog box. The Power Options dialog box provides several operating functions after your computer has been idle for a while.
Power "Hold" function
Turn the switch to the left (Hold) to suspend inputs from the keyboard, touch control panel, and system function buttons. Turn the switch to the middle manually to resume the functions of the above input devices. This switch is designed to prevent accidental touch of these input devices when the system is idle while the power is on. For correct position of these input devices, refer to the top view in Chapter 1.3.
1.8 Keyboard Functions
T1028 TouchNote computer is equipped with a standard typewriter-. layout keyboard and has extra features.
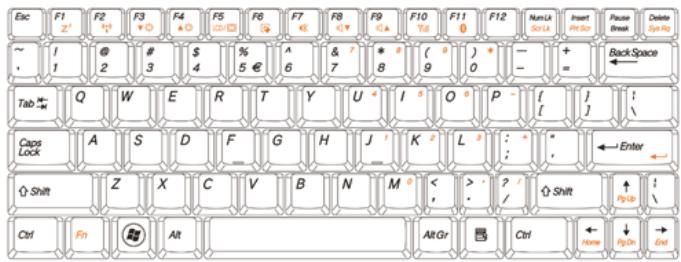
| Icon | Description |
| Caps Lock | Press Caps Lock to set all the characters input are capital letters. |
| Num Lk | To turn on the numeric keypad overlay, press Num Lk. |
| Fn+Scroll Lk | Press this key to scroll the screen under some programs. |
| Press this key to activate Windows® START menu. | |
| Press this key to function as the right key of mouse. |
Fn Combination Keys (Hot Keys)
Use Fn key combined with other keys to activate, close or set special functions. These combinations are also called Hot Keys. To use the Hot Keys, press and hold down
| Icon | Description |
| Fn+F1 | Hibernation |
| Z² | Press this key combination to make system enter hibernation mode. In this mode, the back light of the LCD panel would be turned off and a host of internal devices would enter into a stage of lower power consumption. |
| Fn+F2 | Wireless LAN To activate Wireless LAN. |
| Fn+F3 | Brightness decreasing Press this key combination to decrease the brightness of the LCD. |
| Fn+F4 | Brightness increasing Press this key combination to increase the brightness of the LCD. |
| Fn+F5 | LCD / Video-out Switch Press this key combination to switch between : LCD mode only; Video-out mode only; LCD and Video-out simultaneously mode Notice : This function works under certain setting of OS, please refer to your instruction of OS. |
| LCD/□ |
| Fn+F6 | Touch Pad Enable/Disable |
| Press this key combination to enable/disable Touch Pad function. | |
| Fn+F7 | Mute |
| Press this combination to open/close output of audio signal. | |
| Fn+F8 | Voice weakening |
| Press this key combination to weaken the voice output. | |
| Notice: This function works under certain setting of OS, please refer to your instruction of OS. | |
| Fn+F9 | Voice strengthening |
| Press this key combination to strengthen the voice output. | |
| Notice: This function works under certain setting of OS, please refer to your instruction of OS. | |
| Fn+F10 | 3.5G |
| To activate 3.5G (Optional function) | |
| Fn+F11 | Bluetooth |
| To activate Bluetooth. |
1.9 Using the Touchpad
The built-in touch pad is a PS/2-compatible pointing devise that senses movement on its surface. This means that cursor responds as you move your finger on the surface of the touchpad. The central location on the palm rest provides optimum comfort and support. The following teaches you how to use the touch pad:
Move your finger across the touch pad to move the cursor.
Press the left and right buttons located on the edge of the touch pad to do selection and execution functions. These two buttons are similar to the left and right buttons on a mouse.
Tapping on the touch pad produces similar results.
1.10 Using the built-in camera
The availability of the function depend on the configuration of T1028 TouchNote you bought. The model you bought may be equipped with a built-in camera, and the built-in camera adds video functionality to instant messaging software and video editing software.

··
Tips: For using the built-in camera, see the help file on the utility software.

Tips: The built-in camera cannot be shared by more than on software application. If another application is using the camera, exit the application before using the built-in camera.
1.11 Using the Audio
You can Control volume under your Windows operation system: Click the volume icon on task bar and use the button to adjust volume.
Or you can double click the volume icon to activate Volume Control to adjust control items of volume.

Tips: You can use Fn combination keys to adjust volume. Please refer to "FN combination keys".
Please adjust the voice down before your connect an external audio equipment, such as earphone or MIC.
1.12 Using the Wireless LAN (WLAN)
You can use Wireless LAN to connect to the network and use the Internet in your home and office, so there is no need anymore to pull cables or wires.
Connecting and using the wireless network
You can use the Function key (1.8 Using the Launch Keys) or Fn combination keys (1.8 Keyboard Function) to turn on wireless Lan. Right-click the Wireless network icon on the Taskbar and select View available wireless network.
Select AP (Access Point) you want to connect to and type necessary information. Click Connect. And If you place the mouse pointer on the Wireless network icon on the Taskbar, you can see the status of the wireless network.

··
Tips: You can learn details by referring to instruction document of wireless network.

…
The availability of the functions depend on the configuration of T1028 TouchNote you bought, see the Spec to see whether your model supports the function.

…
Notice: Creating security settings for the wireless LAN is important, we assume no responsibility for any security problems that may arise from the use of the wireless LAN.
1.13 Using the Battery Pack
T1028 TouchNote computer is designed to operate with one of the following power sources:
AC power (using the AC adapter connected to an electrical outlet)
Lithium-Ion (Li-Ion) battery pack
You should use the AC adapter whenever possible; use the battery pack only when AC power is unavailable. The rechargeable Li-Ion battery pack allows you to operate your T1028 TouchNote computer without an external power source. When you use the AC adapter to connect your T1028 TouchNote to a power outlet, the internal battery will begin to recharge. While the battery is charging, the Battery Charge icon on the indicator panel will be on. Once the battery is fully charged, the Battery Charge icon will turn off. The normal battery charging time is 3 hours.
- Operating video, or audio equipment can increase the use of your computer's power.
Decreasing monitor brightness can also save power. - When the battery is not fully charged, allow your battery to be charged completely before using it (i.e., before disconnecting AC power).
■ Li-Ion Battery is vulnerable; do not charge it with other power adapter, otherwise fire or explosion may occur.
Replacing the Battery
The battery will gradually weaken over time. We recommend that you replace your battery when you notice a significant decrease of battery capacity.
To change the battery pack, follow the steps below:
- Turn off the computer.
- Close the lid and flip the computer over.
- Slide the battery latch. Continue to hold it until the battery is removed.
- Make sure the replacement battery is properly oriented before inserting it into the battery compartment.
Note: The battery can not be charged to 100% when remaining battery is no less than 95% . It is based on the supplier's advice, and to extend charging frequency and battery life.
Maintenance of the AC Adapter
- Do not connect the adapter to any other device.
- Do not step on the power cord or place heavy objects on top of it. Carefully route the power cord and keep cables away from all traffic.
- When unplugging the power cord, do not pull on the cord itself but on the plug instead.
If you are using an extension cord, make sure that the devices plugged onto the cord do not exceed its total capacity. Furthermore, the devices plugged into the electrical outlet shall not exceed the fuse's total ampere rating.
Please verify power voltage before connecting the electrical cord to the power outlet. If you are uncertain of its power specification, please consult with your local vendors or power company for more details.
1.14 Connecting the AC Adapter
The AC adapter converts AC power to DC power and reduces the voltage supplied to the computer. It can automatically adjust to any voltage from 100 to 240 volts and outputs power at 12V, (12V, 3.0A for T1028), allowing you to use your T1028 TouchNote computer in almost any region.
CAUTION: Use only the AC adapter and the power cord we recommend. Using the wrong adapter may damage your computer. We assume no responsibilities for damages arising from misuse of AC adapters.
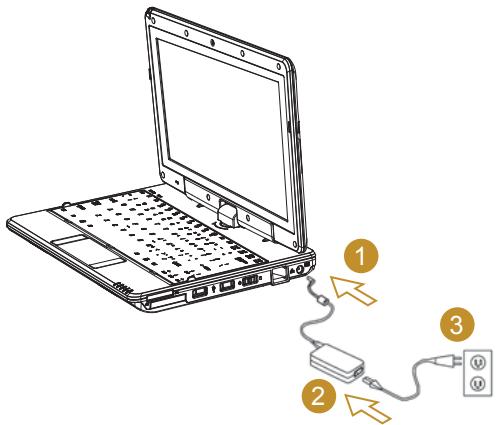
To properly connect the adapter, follow the steps as below:
- Connect the power cord to the AC adapter.
- Connect the AC adapter to the DC power port of your computer.
- Connect the AC adapter power cord to an AC outlet.
1.15 Installing T1028 Device Drivers
If your T1028 TouchNote Computer already has an operating system installed, it is best to install all necessary device drivers in order for he hardware to properly function.
Before installing drivers, check with your vendors to see if they have already installed all the drivers with the operating system, if not, please follow the steps below:
- You can find the Utility Driver CD like the one shown below:
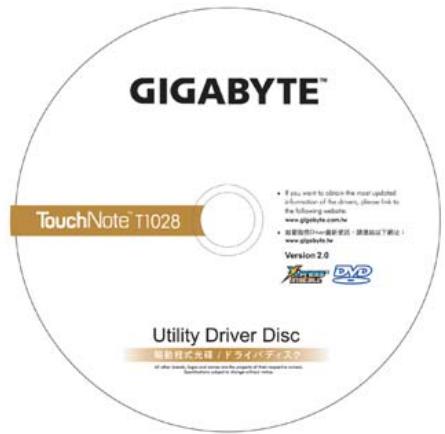
- Put the CD into the CD R-W or DVD-RW (optional) Drive. An Auto Run installation screen will appear.
1.16 Touch Screen Calibration
If your T1028 TouchNote Computer already has an operating system installed, it is best to install all necessary device drivers in order for he hardware to properly function.
The stylus pen together with the system touch-screen LCD display provides you a touch-screen operation by emulating the industry standard mouse left click. Below are the two conditions that you need to calibrate your touch-screen.
- The first time Windows is installed and boot up. The active cursor is shifted; not exactly the same position where the stylus pen tip is tapped.
- Periodically when you find the active cursor is shifted away from the screen position where the stylus pen tip is tapped.
To calibrate the touch-screen, go into Desktop Manu => eGalax Touch => Configure Utility => Tool => 4 points Calibrate. In the Setting screen, select Calibrate. Then follow instruction to complete calibration.
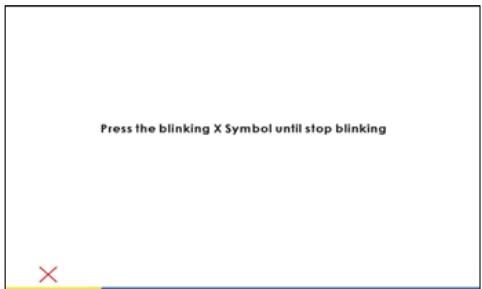

Note: You need to set screen display resolution to right resolution 1366x768 or 1024x600 (depends on your hardware specification) before proceeding with the calibration.
1.17 Use your T1028 as a Tablet PC
The screen of T1028 is convertible to simulate a Tablet PC. Follow the steps to use this function.
- Open the lid (the screen display) of T1028.
- On the top center above the keyboard is the pivot connecting the display panel to the bottom case. There is a sign "E"
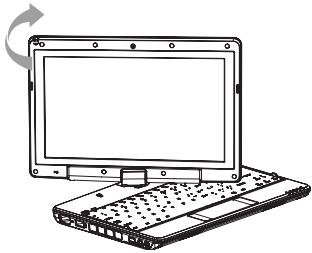
- Follow the sign to turn the screen clockwise up to 180 degree so that the screen is facing out.
- Lay the turned screen down into
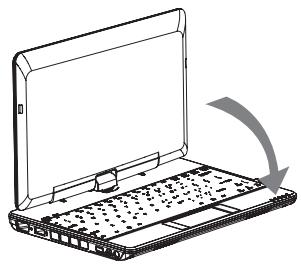
the flat position. The keyboard will be covered by the display. Use the stylus or simply touch the screen to operate T1028 as a Tablet PC.
- When done with Tablet PC, reverse the above instruction (erect the screen to 90 degree, turn counterclockwise to 180 degree) to set T1028 back to original position.
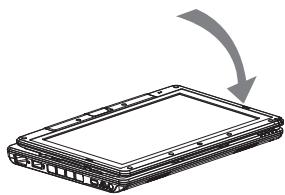
- Attention: Please note that the screen can only rotate at 180 degree clockwise. Be sure to turn the screen according to the sign. Forcing the screen to turn at the wrong angle will cause serious damage to T1028.
1.18 Operating Temperature
Operating Temperature : 10^ to 40^
Chapter 2 Battery
2.1 Battery Pack
Your T1028 TouchNote is equipped with a high-energy rechargeable Lithium Ion (Li-ON) battery pack. Battery life will vary depending on the product configuration, product model, applications loaded on the product, power management settings of the product, and the product features used by the customer. As with all batteries, the maximum capacity of this battery will decrease with time and usage.
2.2 Recharging The Battery Pack
Your T1028 TouchNote supports both on-line and off-line recharge. Follow the procedure below to recharge battery:
Make sure the battery pack is installed in the T1028 TouchNote.
- Connect the AC adapter to the T1028 TouchNote and to an electrical outlet.
When a battery pack is being recharged, its battery LED (located at the upper left corner of LCD display) would be lit. For details on the LEDs, please refer to Chapter 1.3. When the T1028 TouchNote is OFF, a depleted Li-Ion battery will take three hours to recharge.
2.3 Questions And Answers
Q: I can feel a mild heat next to the battery pack. Is it normal?
A: The battery will generate heat during recharging and discharging. There is a protection circuit inside the T1028 TouchNote to prevent overheating. User needs not to worry.
Q: My battery operation time is not as long as it should be. Why?
A: The battery is heat sensitive and can only be charged to its maximum if the battery and its environmental temperature remain within 15 - 25^ C (59-77°F). The more the temperature deviates from this range during recharging, the less chance there is for the battery to be fully charged. In order to recharge the pack to its full capacity, users are requested to cool down the unit by unplugging the AC Adapter. Wait until it is cooled down. Then plug in the AC Adapter to start recharging again.
Q: I did not use my spare battery for a few days. Even though it was fully recharged, there wasn't as much power left as a newly charged one. Why?
A: The batteries will self-discharge when they are not being recharged. To make sure a battery pack is fully charged, recharge before use. Always keep the battery inside the T1028 TouchNote and have the AC adapter connected whenever possible.
Q: I did not use my spare battery for months. I have problem in recharging it.
A: If you happen to leave your battery pack to go through an extended period of self-discharge, say more than three months, the battery voltage level will become too low and needs to be Pre-Charged (to bring the battery voltage level high enough) before it automatically (for Li-Ion only) resumes its normal Fast Charge. Pre-Charge may take 30 minutes. Fast Charge usually takes 2 3 hours.
2.4 Battery Maintenance
To maintain the battery pack's maximum capacity, you should occasionally let the T1028 TouchNote deplete its battery power completely before recharging.
To carry out a complete depletion of the battery, disconnect the AC adapter and let your T1028 TouchNote consume the remaining battery power. To speed up the depletion, use the HDD as much as possible. When the battery is empty, wait for the T1028 TouchNote to cool down (especially the battery). The temperature should be within 15 - 25^ (59 - 77^) . Then insert the AC adapter to recharge the battery.
2.5 Power Consumption
The Windows™ operating system has incorporated the latest state-of-the-art ACPI (Advanced Configuration Power Interface) power management methodology. In order to fully utilize the power of your battery packs, it would be a good idea for you to spend sometime to acquire a basic understanding of the power management concept from your operating system.
In Windows™ Operating Systems, you can go through Power Options of the Control Panel according to the version of Windows™ Operating System the T1028 TouchNote applies. We shall not describe them in details.
2.6 Reducing Power Consumption
Although your T1028 TouchNote (together with the operating system) is capable of power conservation, there are measures you can take to reduce the power consumption:
■Use the AC power whenever possible.
Try to use the HDD drive to read and write files, instead of using the external USB FDD.
■Disable unused devices, such as Web Cam, WLAN, Bluetooth® and etc.
Decrease LCD panel brightness through Windows.
Note: Whenever system is powered on or powered off, make sure the battery pack is installed in the battery pack compartment.
2.7 Removing The Battery Pack
This battery pack can easily be removed and replaced. Make sure that the computer is properly shutdown before changing the battery pack. If you would like to change the battery pack while power is on, make sure this battery pack is not the only electrical source to the system unit. Follow the steps below to remove the battery pack.
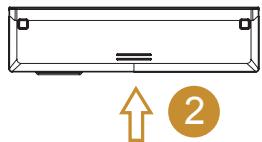
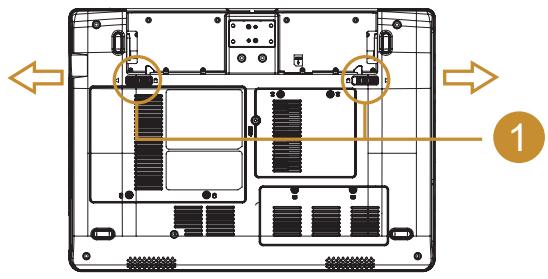
Make sure the system is properly shutdown.
Flip the system upside down as shown.
Push the battery lock to the unlock position as shown by #1.
Remove the battery pack as shown by #2.
To insert the battery pack, reverse the steps above.
2.8 Connecting System To AC Adapter
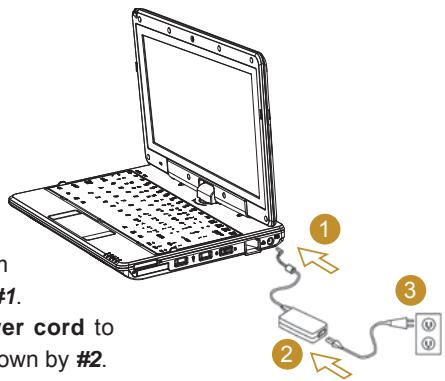
Connect AC adapter to system unit as shown by #1.
Connect AC power cord to AC adapter as shown by #2.
Connect other end of power cord to an electrical outlet as shown by #3.
2.9 Battery Capacity Inspection
When system is turn off, press the function key (Please refer to 1.2) to inspect the battery capacity. The LED indicators will show the battery capacity status.

Chapter 3 The BIOS Setup program
The BIOS Setup Utility is a hardware configuration program built into your T1028 TouchNote's BIOS (basic input/output system). Your T1028 TouchNote is already properly configured and optimized, and you do not need to run this utility. However, if you encounter configuration problems, you may need to run it
3.1 Activate the BIOS Setup Utility
Your T1028 TouchNote has a BIOS setup utility which allows you to configure important system settings, including settings for various optional functions of the computer. This chapter explains how to use the BIOS setup utility.
BIOS Setup Menu
The BIOS setup Utility allows you to configure your computer's basic settings. When you turn your computer on, the system reads this information to initialize the hardware so that it can operate correctly. Use the BIOS setup utility to change your computer's start-up configuration. For example, you can change the security and power management routines of your system.
Starting the BIOS Setup Utility
You can only enter the BIOS setup utility as the computer is booting, that is between the time you turn on the computer and before the Windows interface appears. If your computer is already on, shut down your computer completely (power off) and restart it and then press the F2 key to enter the setup utility.
Navigating and Entering Information in BIOS
Use the following keys to move between fields and to enter information:
| ← → | Select Menu |
| ↑ ↓ | Push the up and down arrow keys to move among selections |
| Enter | Select or enter to the Sub-Menu |
| F1 | Help |
| F7/F8 | Change Values |
| F9 | Setup Default |
| F10 | Save and Exit |
| ESC | Press Esc to exit any section. If you wish to exit the BIOS utility without saving changes, go to the main menu, then press Yes. |
Users are allowed to enter new values to replace the default settings in certain fields, and the rest fields are specified by system default parameters and cannot be modified by users. Reverse the attribute of the main options and press the Enter key to enter into the submenu. Press the Esc key to return to the previous configuration page.
| Menu | Description |
| Main | The Main screen displays a summary of your T1028 TouchNote hardware information, and also includes basic setup parameters. |
| Advanced | This screen contains parameters involving your hardware devices. |
| Security | The Security screen contains parameters that help safeguard and protect your T1028 TouchNote from unauthorized use. |
| Boot | To set the order of booting equipments, enabling or disabling equipments. |
| Exit | To exit the interface of setting system. |

Tips: For more information about Menu and Keys, please refer to the help information of respective selection. There may be difference of BIOS setting between different versions of BIOS of different batch of T1028 TouchNote produced.

Notice: The BIOS of your T1028 TouchNote has been initialized to best settings. It's advised you not to change it if not so necessary.

Tips: The pictures showed at this chapter may be different from those showed by your T1028 TouchNote due to different versions of BIOS. Please set pictures of your T1028 TouchNote as standard.
3.2 The Main Menu
InsydeH20 Setup Utility
| Main Advanced Security Boot Exit | |
| System BIOS Version T1028 F02Processor Type Intel @ Atom ® CPU N270@ 1.60GHzSystem Bus Speed 533MHzSystem Memory Speed 533MHzCache RAM 0512 KBTotal Memory 1024 MBSystem Time [19:14:50]System Date [Thu 01/01/2009] | Item Specific HelpF7: Reduce Number; F8:Increase Number; Noaction for Number Keys |
| F1Help ↑↓ Select Item F7/F8 Change Values F9 Setup DefaultESC Exit ←→ Select Menu Enter Select▶Menu F10 Save and Exit | |
System Time
Allows you to change the system time using the hour:minute:second format of your T1028 TouchNote computer.
Enter the current time for reach field and use the <F7> , <F8> key to move from one field or back to another.
You can also change the system time from your operating system.
System Date
Allows you to set the system date using the month/date/year format. Enter the current time for reach field and use the <F7> , <F8> key to move from one field or back to another.
You can also change the system time from your operating system.
3.3 Advanced Menu
InsydeH20 Setup Utility
| Main Advanced Security Boot Exit | |
| ■Boot Configuration ■IDE Configuration Advanced S3: [Enable] Keyboard Language [US, Chinese] | Item Specific Help Configures Boot Settings. |
| F1 Help ↑↓ Select Item F7/F8 Change Values F9 Setup Default ESC Exit ←→ Select Menu Enter Select>Menu F10 Save and Exit | |
BOOT CONFIGURATION
numlock on/off
Choose whether to set the Numlock On when booting.
ADVANCED S3
Advanced setup of the standby mode ENABLE/DISABLE
Keyboard Language
[disable]/[German]/[Korean]/[Japanese]/[User interface (American keyboard, Chinese)]
3.4 Security Menu
InsydeH20 Setup Utility
| Main Advanced Security Boot Exit | |
| Supervisor Password: Not InstalledUser Password: Not InstalledSet Supervisor PasswordSet User Password | Item Specific HelpInstall or Change the password and the lengthOf password must beGreater than one word. |
| F1 Help ↑ ↓ Select Item F7/F8 Change Values F9 Setup DefaultESC Exit ←→ Select Menu Enter Select▶ Menu F10 Save and Exit | |
Set Supervisor Password
A supervisor password must be set before a lower-level user password can be set. After selecting Change Supervisor Password, press Enter. You will be prompted for the new password, and then again to verify it. Type in 6 or fewer keystrokes. If you make an error, press Esc to start over.
SetUserPassword
With a User password, you can enter the Setup Utility and change or remove the User password, but you cannot enter the Setup Utility and change or remove the Supervisor password, nor enable diskette access if it has been disabled.
3.5 Boot menu
InsydeH20 Setup Utility
| Main Advanced Security Boot Exit | |
| Quiet Boot [Enable]USB boot [Enable]ACPI Selection [ACPI 3.0]Boot Type OrderHard Disk Drive | Item Specific HelpDisables or enablesBooting in Text Mode. |
| F1Help ↑ ↓ Select Item F7/F8 Change Values F9 Setup DefaultESC Exit ←→ Select Menu Enter Select▶ Menu F10 Save and Exit | |
Boot Type menu
This menu allows the user to decide the sequence of the boot devices loaded into the operating system.
Boot Type Order Sub-menu
InsydeH20 Setup Utility
| Boot | |
| Boot Type Order | Item Specific Help |
| Hard Disk Drive | Keys used to view or configure devices; Up and Down arrows select a device. <F7> and <F8> moves the device up or down. |
| USB CD/DVD ROM Driver | |
| USB Memory | |
| Others | |
| F1 Help ↑ ↓ Select Item F7/F8 Change Values F9 Setup Default ESC Exit ←→ Select Menu Enter Select▶Menu F10 Save and Exit | |
3.6 Exit Menu
InsydeH20 Setup Utility
| Main Advanced Security Boot Exit | |
| Exit Saving Changes | Item Specific Help |
| Exit Discarding changes | Exit system setup and save your changes. |
| Load Optimal Defaults | |
| Discard Changes | |
| F1 Help ↑ ↓ Select Item F7/F8 Change Values F9 Setup Default ESC Exit ←→ Select Menu Enter Select▶Menu F10 Save and Exit | |
Exit Saving Changes
Allows the user to save the changes to CMOS and boot again. When the user presses "Enter" on this item, the following messages will appear.
Yes: Save the changes, exit Setup and boot again.
No: Return to the previous screen
Exit Discarding Changes
Allows the user to exit Setup without saving any changes. When the user presses "Enter" on this item, the following messages will appear: Yes: discard the changes, exit Setup and boot again.
No: return to the previous screen
Load Setup Defaults
Allows the user to load the CMOS Setup defaults. When the user press "Enter" on this item, the following messages will appear:
Yes: confirm loading the defaults
No: give up loading the defaults
Discard Changes
Allows the user not to save any change. When the user presses "Enter" on this item, the following messages will appear:
Yes: discard the changes
No: return to the previous screen
3.7 How to Upgrade the BIOS
Your netbook computer T1028 uses EPROM Flash BIOS chip that allows you to easily upgrade the BIOS program.
When you update the BIOS, any customized settings you made are lost. Please go to Gigabyte website at http://www.gigabyte.com.tw for the latest BIOS upgrade utility.
To upgrade the BIOS on DOS
- Insert the disk with BIOS updated into the diskette drive. (USB FDD, USB Flash Disc, or Floppy Disc)
- Power on the system with the diskette in the diskette drive.
- On the DOS prompt, type the following command.
A:>FLASHIT.EXEXXXX.X.BIN /mc /all or
A:>XXXX.X.BAT (Batch file for BIOS file) - The system is now automatically running the BIOS upgrade.
- The system will shut down automatically when the upgrade is completed.
To upgrade the BIOS on Windows
- Please go to Gigabyte website at http://www.gigabyte.com.tw (Home > Support > Notebook > BIOS > BIOS of T1028) to download ① BIOS upgrade tool (InsydeFlash) and ② the latest BIOS upgrade utility.
- Unzip the file you have downloaded.
- Run the InsydeFlash.exe in your unzipped folder.
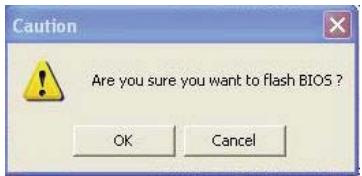
- InsydeFlash Utility tool as below picture
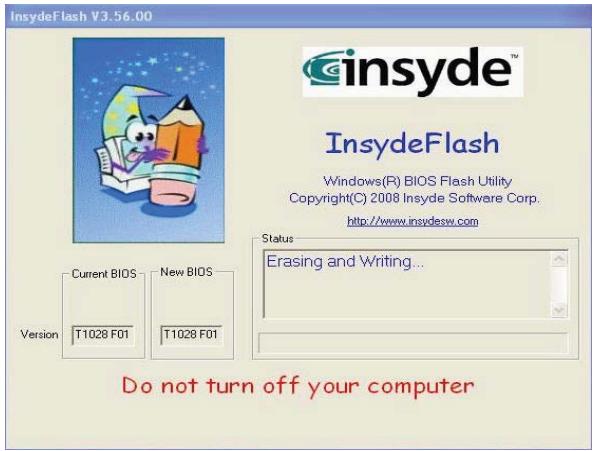
- Click OK to start running the flash program.
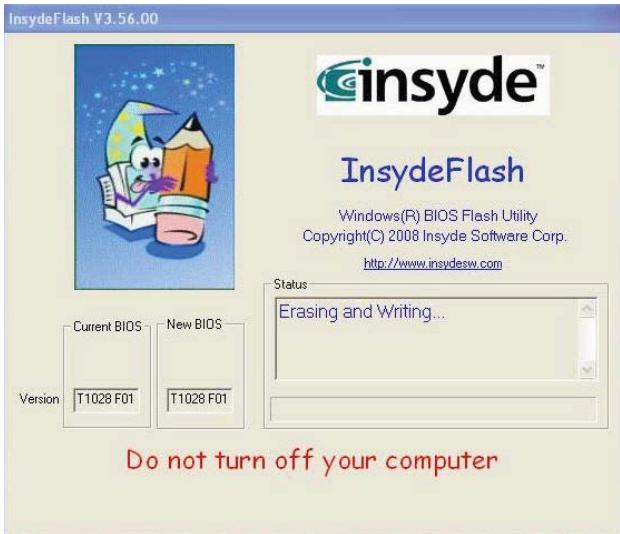
- The status of the execution will be shown in the pop-up window. Please do not interrupt the process of the execution for the program to be properly executed.
- The system now will be shut down for the program to be successfully completed. You may press the power button to restart your notebook computer GIGABYTE T1028.
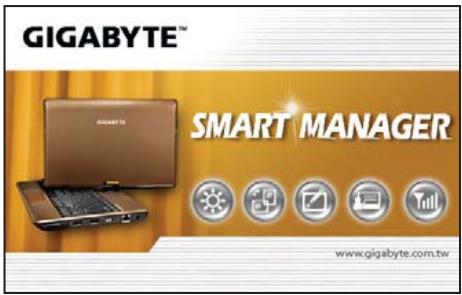
Chapter 4 Introduction to Smart Manager
GIGABYTE
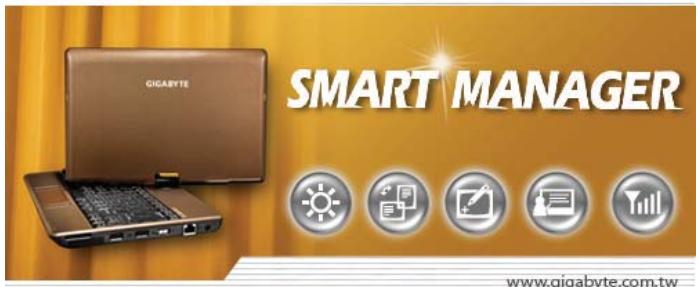
www.gigabyte.com.tw
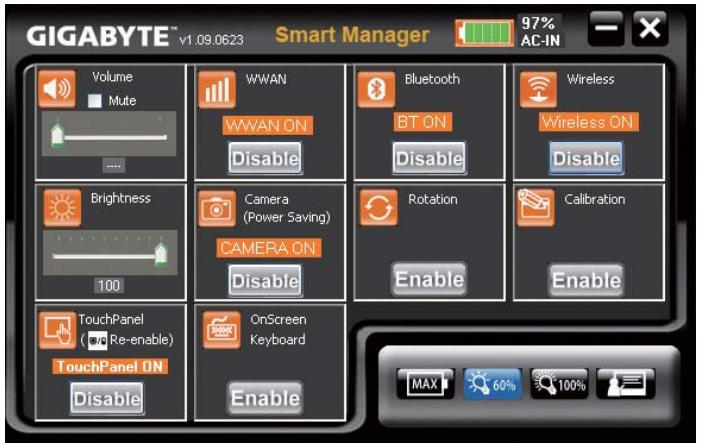

Brightness:
Move the slider to temporarily adjust the brightness of your display. To adjust the display brightness settings for your power plan, click the icon on the title to open Power Option in Control Panel.

Volume:
Move the slider to adjust the speaker volume of your TouchNote or select the Mute check box.

Camera
Press this key combination to enable/disable Webcam function.

Rotation:
This function only supports 2 rotation styles.
- Normal mode: 0 degree
- Vertical mode: 90 degree
Click on the Active icon to rotate your display.

On-Screen Keyboard:
To Active the keyboard.
Click on the Active button will detect the On-Screen Keyboard status.

Calibration:
Click on this button to active the eGalax Touch Device utility (4 ways calibration)

Bluetooth:
Click on the icon to active the Bluetooth sync-center.

Battery Status:
AC-IN / Battery Life time:
a) If the AC power adapter plug-in, the icon will show 'AC-IN', and if unplug the AC power adapter, the icon will show the battery life and counting the battery life time.

Wireless LAN:
To activate Wireless LAN.

3.5G(WWAN) Enable/Disable:
Press this key combination to enable/disable 3.5G Function.

Touch Panel Enable/Disable:
Press this key combination to enable/disable Touch Panel function.

Always-on Mode:
Press this icon to active the Always-on power plan and set the brightness to high level "100%".

Normal Mode:
Press this icon to active the TouchNote power plan and set the brightness to middle high level "60%"

Presentation Mode:
Press this icon to active the Presentation power plan and set the brightness to middle level "44%".

Max-Battery Mode:
Press this icon to active the Max-battery power plan and set the brightness to low level "20%".

Chapter 5 Troubleshooting / Q&A
This chapter contains advice and solutions to a few basic troubles you might encounter when you use T1028 TouchNote. Please refer to this chapter and follow the instructions to solve troubles.
5.1 Troubleshooting

··
Warning: Under the condition that you can't handle trouble, please refer to your dealer to get professional service.
AC Adapter
| Trouble | Solution |
| No power supplies to T1028 TouchNote | Make sure the AC adapter is well connected to the power source and T1028 TouchNote. |
| Check the cable and plug to make sure they are OK. If they are broken, please contact your local dealer ASAP. |
Battery pack
| Trouble | Solution |
| No power supplies to T1028 Touch- Note | The remaining power in battery pack may be not enough to power on the machine. Connect AC Adapter to recharge it. |
| Can't be recharged after connecting AC Adapter | Check temperature of battery pack's surface. Battery pack can't be recharged if its tempera-ture is too high or too low. Recharged it after its temperature is the same with the normal environment one. |
| If battery pack is fully discharged, it won't be recharged at once. Please wait for some min-utes. | |
| If the power indicators of battery pack are always not lit up, its life may be over. Please contact your dealer to buy another one. | |
| Battery life is not as long as it should be | Battery life depends on using condition of T1028 TouchNote. You can change the set-tings in Power Manager of OS to save power. |
| Battery pack can't exert its full capacity if it works when not fully recharged frequently. Power T1028 TouchNote by battery pack until its power drops to a critically low level and the machine emits a high-pitched beep or displays a warning message; after that, recharge battery pack to make battery pack work longer. |

WARNING: Please pay attention to the following information regarding the battery pack:
1.Be sure to recycle the waste batteries.
2.Do not place the batteries near high-temperature locations, fire source or in burning fire as this may cause the batteries to explode
3. Do not assemble/disassemble /modify the batteries without authorization.
4.Use the battery pack provided by the original manufacturer only. Batteries other than those supplied by the original manufacturer may damage the device.
Keyboard
| Trouble | Solution |
| Press character keys but number displayed instead of character | Check if Num Lock is activated. |
| Confusing display | Make sure there is no software to configure the keyboard. |
WARNING: Please pay attention to the following information about keyboard maintenance.
- Dust build-up may occur to the keyboard after long-term use. It is recommended to clean the keyboard with a small brush. Please shut down the machine before cleaning the surface of the keyboard and wipe it with a soft cloth dipped in cleaner or water gently.
- In case any liquid enters the keyboard, shut off the power supply immediately, remove the batteries and contact the original manufacturer directly for repair. Do not disassemble the keyboard yourself for repair.
Hard disc drive (HDD)
| Trouble | Solution |
| HDD can’t be booted | The operating system is corrupted by incorrect operation or virus. Try to clean virus and then configure your operating system correctly. |
| Maybe the documents of your OS run in error; please refer to the manual of your OS. | |
| HDD performs very slowly | There is too much file fragment. Use disk defrag tools to rearrange the programs on the hard disk. |
WARNING: Please pay attention to the following information about Hard Drive maintenance.
- The hard disk is a high-speed data storage device. Avoid using the TouchNote in unstable locations as far as possible to prevent hard disk damage and data loss.
- Please use the computer in accordance with normal startup/shutdown procedures; improper startup/shutdown may shorten the service life of the hard disk.
LCD
| Trouble | Solution |
| The screen is blank | Press hot key Fn + F5 to change the display mode if certain external monitor is connected. |
| Make sure the system isn't in the mode of Hibernation or Standby. |

WARNING: Please pay attention for below matters at mounting design of touch panel of LCD module.
1.Do not put a heavy force along the edge of active area
2.Do not put a heavy shock or stress on the touch panel and film surface.
3.Do not put heavy goods on the touch panel.

- The touch control LCD screen is the most fragile component of the TouchNote and is prone to rupture under external forces. Do not place any object on the keyboard or between the keyboard and the screen to prevent damage to the LCD screen.
- When traveling with Gigabyte T1028 TouchNote, place it in a special case in a tidy manner as far as possible. Excess objects may squeeze the machine and therefore damage the LCD screen.
6.Do not touch the screen with sharp objects or fingers directly. - It is recommended that the LCD screen be wiped with a special screen cleaning cloth. Wipe the screen gently to avoid breakage of the screen.
- Prevent any liquid from entering the LCD screen as this may damage the elements of the LCD screen.
Printer
| Trouble | Solution |
| The data can't be output from T1028 TouchNote to printer | Make sure printer is powered on. Make sure its cable is OK and its USB interface is well connected to T1028 TouchNote. |
| Make sure your printer is compatible to your T1028 TouchNote. | |
| Error printing | Please refer to the user's manual of your printer for help. |
Audio
| Trouble | Solution |
| No sound emitted | Adjust sound controller. |
| Check the setting of sound volume of software. | |
| Check if the ear phone is firmly connected. | |
| Check the Devices Manager of Windows. Be sure the Sound function has been activated and isn't interfered with other hardware. |
USB
| Trouble | Solution |
| Equipments connected can’t work | Check and be sure USB port of T1028 TouchNote is firmly connected with the USB cord of the equipment. |
| Be sure the driver of the equipment is installed correctly. |
Stand by / Hibernation
| Trouble | Solution |
| Can’t enter into Standby/ Hibernation | Please check if the Windows Media Player is running. If Yes, the T1028 TouchNote can’t enter into Standby or Hibernation mode. Please close Windows Media Player. |
LAN
| Trouble | Solution |
| Can't be connected | Be sure the RJ45 connector is firmly connected to the Network Hub or Switch. |
5.2 Q&A
My computer switches to hibernation mode much too quickly, and I have to constantly hit a key or move the mouse to bring back the screen. What can I do?
This is part of Windows Power Management. Access Power Management by clicking on Start / Control Panel / Performance and Maintenance / Power Options, and change the time next to the "Turn off monitor" option to the time you want. You have the choice of either adjusting time for the power supply or for the battery.
I've heard that cleaning and rearranging files on the hard drive will improve program's launch speed, how do I do that?
Good disk maintenances can improve program launch speed. This normally includes deleting unnecessary files, and defragmenting hard disk so that files can be more efficiently grouped. Windows contains maintenance utilities for these tasks; run Disk Cleanup to remove unnecessary files, and Disk Defragmenter to defragment file blocks. For more information about these utilities, please refer to your Windows documentation.
What kind of external microphone can I use with my notebook computer?
You will need to use a self-amplifying microphone.
There are echoes coming from my speakers. What can I do?
Double click on the Speaker icon on the task bar. Then, under Microphone Balance, check the Mute box.
Because of a software problem, I was unable to shut the computer down from Windows, I pressed the power button to power off the computer, but it didn't work. How can I force a power off?
Make sure you press the power button for at least 4 seconds. Normally, this will force the computer to shut off.
Why can't I charge the battery of my portable computer after it was out of use for some time?
After your portable computer has not been used for a long time (say, more than a month), the battery will enter into low voltage protection mode. Under this circumstance, restoring to normal voltage will require the battery to be slowly charged for several hours. Once the battery has been fully charged, your computer will resume to normal operation.
My computer says: "CMOS Battery Low", what should I do?
If your computer is without power (i.e. unplug the computer power source from the power outlet and remove the battery pack from it) for over 45 days, you would lose the information stored in CMOS.
Please follow the steps below to reconfigure your CMOS settings:
- Press F2 to enter into the BIOS setup utility.
- Select "Load Optional Defaults?" When you see the following prompt, choose
and then press . - Select "Save Changes and Exit", select
and press to restart your computer.
How to unplug or eject devices
- In the notification area next to your task bar, double-click the Safe Removal icon. Safe Removal displays a list of Plug and Play devices that support safe removal and that are currently attached to the system.
If you do not see the Safe Removal icon, your device does not support safe removal, and you cannot unplug or eject your device using Safe Removal. - In Safely Remove Hardware, in the list of devices, select the device that you want to unplug or eject, and then click Stop. This tells the system that you will be unplugging or ejecting the device.
- In Stop a Hardware device, click OK.
A notification appears stating that it is now safe to unplug or eject the device.
Caution
- Unplugging or ejecting a device that supports safe removal without first using the Safe Removal application to warn the system can cause data to be lost or your system to become unstable. For example, if you use Safe Removal, however, you can warn the system before you unplug or eject a device, preventing possible loss of data.
Note
- For removable storage devices that can safely be removed while the system is on, the system disables write caching by default. It does this so the devices can be removed without loss of data. When write caching is disabled, however, the system will likely experience slower performance, so be sure to enable write caching when you have finished removing the device.
Does T1028 provide a hardware switch or function button to enable/disable the Bluetooth function?
T1028 provides a combined function button to enable/disable the 3G (Fn+F10) and Bluetooth (Fn+F11) functions.
What are the considerations for the use of the touch control screen?
In accordance with the principle of panel structure, the surroundings of the touch control panel are highly sensitive. Hence, drawing lines along the surroundings of the chassis is strictly prohibited as this may damage the Pet/film due to extreme pressure or cause the internal liners/pads on the edges
of the outer shell to displace, therefore squeezing the edges of the touch control screen and causing the screen to fail.
What is the capacity of SDHC card that T1028 can support?
The specification of SDHC that T1028 SD card reader supports shall be in accordance with that of the SD Association. Currently, the maximum capacity announced by SD Association is 32GB http://www.sdcard.org/developers/tech/sdhc/
How can T1028 be upgraded in the DOS and Windows mode?
Please refer to how to upgrade T1028 in the DOS and Windows mode??
Can T1028 change the 2.5-inch SATA interface SSD and install it for use with Windows XP itself?
Currently the T1028 series delivered by Gigabyte does not support SATA SSD. In case of any version update in the future, the specification will be announced on the website of Gigabyte.

Appendix I Specifications
Processor
Intel® Atom 1.6GHz N270
Intel Atom 1.66GHz N280 (optional)
OS
Microsoft Windows XP compliance/Linux/VISTA
Core Logic
Intel® 945GSE
Intel® GN40 (optional)
Memory
DDRII-533 SO-DIMM X 1, Max 2 GB
■ For the compatible HDDs & RAMs by model, please refer to GIGABYTE AVL List
Video Interface
Intel 945GSE
Intel® GN40 (optional)
Display
10.1"LCD panel/WSVGA 1024x600, w/Touch screen, as 180^ rotation angle
10.1"LCD panel/WXGA 1366x768, w/Touch screen, as 180^ rotation angle (optional)
Hard Disk Drive
2.5",9.5mm S-ATA HDD 160G/250G/320GB
Optical Drive
External ODD by USB connection (Not including)
Input Device
83 key keyboard/Touch Pad
I/O Port
USB X 3,Mic in/Earphone out/D-SUB
RJ45 / SD/MMC/MS Card Reader / Express card
Audio
Speaker 1.5 watt x 2
Bluetooth
BlueTooth 2.1 built-in
Web Camera
1.3M pixel CMOS camera
LAN/Wierless LAN
802.11b/g/n by mini-card, 3.5G by mini card (optional)
Keyboard
83 key keyboard
Protection
■ Kensington lock
Battery
Li-ion 4500mAh, Battery (4 cell)
Li-ion 7650mAh, Battery (6 cell)
Dimension & Weight
265(W) x 195(D) x 38.5(H)mm (Including 4 cell battery)
265(W) x 214(D) x 41.4(H)mm (Including 6 cell battery)
1.3kg (Including 4 cell battery)
1.48kg (Including 6 cell battery)
Service
1 year global warranty
1 year battery warranty
■ More service information, please refer to http://www.gigabyte.com.tw

The above specification is for users' reference. The final configuration depends on the T1028 TouchNote users bought.

Appendix II Recovery Update Notices
How to restore your Netbook to factory defaults
Time to restore: When your computer is infected by virus or there is any other reason that you want to restore your operation system to the factory defaults.
Execute Xpress Recovery3 Lite (XR3 Lite) Professional Recovery Utility.Please take the following procedures:
- Start up your computer first. Restart your computer if it has already booted into system.
- Right after you see the startup screen (such as trademark, logo or text), the DOS screen will appear. Press F9.
-
F9 is a typical hotkey to restore professional settings. Please consult with your computer manufacture if your hotkey doesn't function.
-
There are four options on the menu: "RESTORE" (to restore data), "ABOUT" (to display XR3 software related information) and "REBOOT" (to cancel the recovery and restart the computer). We recommend you to select "RESTORE" to restore factory defaults
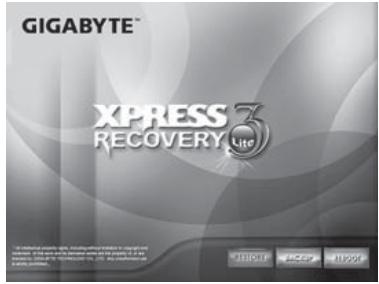
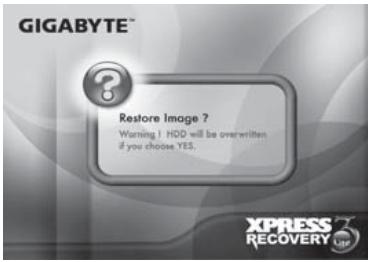
- Then the prompt "Restore Image?" will appear on the menu. We recommend you to select "YES" to restore an image file.* "Image file" is a compressed file that compresses all the Windows operation system data. Recovery an image file allows you to restore your operation system to factory defaults.
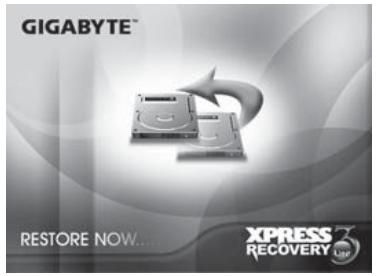
- After all the selections have been made, the screen shows "RESTORE NOW...", indicating your computer is now recovering the operation system data. When the recovery is complete, the computer will automatically restart and restore to factory defaults.

Appendix III Service Centers
This appendix will list our service centers for your T1028 Netbook computer.
Taiwan GIGABYTE Service Center
6F, No.136, Jien-Yi Rd., Chung-Ho, Taipei Hsien, Taiwan.
TEL: +886-2-8227-6136
FAX: +886-2-8227-6163
WEB Address (English): http://www.gigabyte.com.tw/
WEB Address (Chinese): http://www.gigabyte.tw/
U.S.A. G.B.T.INC
TEL: +1 (626) 854-9338
FAX: +1 (626) 854-9339
WEB Address: http://www.gigabyte.us
China G.B.T. TECH. TRADING CO., LTD.
WEB Address: http://www.gigabyte.com.cn/
Shenzhen
TEL: +86-755-8240-8099
FAX: +86-755-8240-8066
Ninbo
TEL: +86-574-86869292
FAX: +86-574-86860781
Beijing
TEL: +86-10-62978099
FAX: +86-10-62980499
Guangzhou
TEL: +86-20-38491240
FAX: +86-20-38491140
Shanghai
TEL: +86-21-57638748
FAX: +86-21-57638320
Xian
TEL: +86-29-85531943
FAX: +86-29-85519336
Germany
TEL: +49 40 25330433
Address: BULLENKOPPEL 16 22047 HAMBURG
Warranty Clause
- The warranty of the products of Gigabyte shall commence from the date specified on the invoice issued by the dealer. Consumers shall keep the purchase invoice properly to safeguard the legal rights and interests.
- To identify the warranty period of various products, please visit related webpages of Gigabyte at http://service.gigabyte.tw/ for query. The dealer shall be responsible for the warranty provided or sold by the dealer itself.
- The commencing date of warranty of products distributed or redistributed by business partners shall be determined in accordance with Article 2.
- This warranty does not cover the pre-installed software products, operating system, consumables and other accessories (e.g. gifts/rucksack/disk/mouse/packaging material, etc).
- In the absence of the sales invoice of the special dealer of Gigabyte, the warranty period will be determined based on the Gigabyte label and serial number on the product.
- In case there is no Gigabyte label or serial number on the product, the serial number does not match the product or is illegible, no warranty or aftersales service will be extended. In case of any need for repair, contact the original dealer for assistance.
- In case of any defect or malfunction in the product within 7 days from the purchase date (except for the circumstance listed in Article 12), the consumer may request the original dealer to replace the product with all accessories in the original packaging as well as the sales proof with a new one; otherwise, the defect or malfunction will be treated by means of repair.
In case that the dealer has no stock for immediate replacement, it shall contact the agent as soon as possible for replacement.
- In case of any defect in the appearance of a new product attributed to human negligence, no request shall be made to Gigabyte for replacement with a new one.
- Any product sent for repair shall be packed using the original packing material of the manufacturer or appropriate materials (e.g. paper carton, air bag or poly foam). In case of damage during transit due to improper packaging, Gigabyte will not provide warranty services.
- In case that a product sent for repair during the warranty period cannot be repaired, Gigabyte will replace the product with a comparable new product or an equivalent one.
- This warranty will become invalid if the product fails or is damaged for the following reasons:
(1) Natural disaster, accident or human negligence
(2) Violation of the operating instructions in the user manual of the product
(3) Improper assembly or request for installation service
(4) Use of unauthorized accessories
(5) Use of the product not in the permitted environment
(6) Unauthorized disassembly
(7) Abnormal use
(8) Line or part oxidation
(9) Use of the product as testing device (e.g. RAM, VGA and USB test)
(10)Problems and malfunction resulting from computer virus
- Considerate reminder !!! Be sure to backup important data before sending the product for repair. Gigabyte is responsible for the
repair and test of the product only and will not provide services such as data backup, etc. Gigabyte will not assume responsibility for any data loss during the repair process.
- Safety Instructions
- WARNING: Void of Warranty
- Regulatory Notices
- Federal Communications Commission Notice
- RF exposure
- CE Notice (European Union)
- For CB:
- ered on
- Battery Disposal & Caution
- BSMI Notice (Taiwan Only)
- Preface
- Content
- Chapter 1 Introducing Your T1028 TouchNote
- Panoramic View
- Left Side
- Right Side
- Cover Side
- Bottom Side
- Status Indicators
- Turning Your T1028 TouchNote On and Off
- Turning on the power
- Turning off the power
- Suspend mode
- Power "Hold" function
- Keyboard Functions
- Fn Combination Keys (Hot Keys)
- Using the Touchpad
- Using the built-in camera
- Using the Audio
- Using the Wireless LAN (WLAN)
- Connecting and using the wireless network
- Using the Battery Pack
- Replacing the Battery
- Maintenance of the AC Adapter
- Connecting the AC Adapter
- Installing T1028 Device Drivers
- Touch Screen Calibration
- Use your T1028 as a Tablet PC
- Operating Temperature
- Chapter 2 Battery
- Battery Pack
- Recharging The Battery Pack
- Questions And Answers
- Battery Maintenance
- Power Consumption
- Reducing Power Consumption
- Removing The Battery Pack
- Connecting System To AC Adapter
- Battery Capacity Inspection
- Chapter 3 The BIOS Setup program
- Activate the BIOS Setup Utility
- BIOS Setup Menu
- Starting the BIOS Setup Utility
- Navigating and Entering Information in BIOS
- The Main Menu
- System Time
- System Date
- Advanced Menu
- BOOT CONFIGURATION
- numlock on/off
- ADVANCED S3
- Keyboard Language
- Security Menu
- Set Supervisor Password
- SetUserPassword
- Boot menu
- Boot Type menu
- Boot Type Order Sub-menu
- Exit Menu
- Exit Saving Changes
- Exit Discarding Changes
- Load Setup Defaults
- Discard Changes
- How to Upgrade the BIOS
- To upgrade the BIOS on DOS
- To upgrade the BIOS on Windows
- Chapter 4 Introduction to Smart Manager
- GIGABYTE
- Brightness:
- Volume:
- Camera
- Rotation:
- On-Screen Keyboard:
- Calibration:
- Bluetooth:
- Battery Status:
- Wireless LAN:
- 3.5G(WWAN) Enable/Disable:
- Touch Panel Enable/Disable:
- Always-on Mode:
- Normal Mode:
- Presentation Mode:
- Max-Battery Mode:
- Chapter 5 Troubleshooting / Q&A
- Troubleshooting
- ··
- Q&A
- Caution
- Note
- Processor
- OS
- Core Logic
- Memory
- Video Interface
- Display
- Hard Disk Drive
- Optical Drive
- Input Device
- I/O Port
- Audio
- Bluetooth
- Web Camera
- LAN/Wierless LAN
- Keyboard
- Protection
- Battery
- Dimension & Weight
- Service
- Appendix II Recovery Update Notices
- Appendix III Service Centers
- Taiwan GIGABYTE Service Center
- U.S.A. G.B.T.INC
- China G.B.T. TECH. TRADING CO., LTD.
- Germany
- Warranty Clause
Marque : GIGABYTE
Modèle : T1028
Catégorie : Ordinateur portable 2-en-1