
MINI WI-FI 2 - Caméra de surveillance NILOX - Notice d'utilisation et mode d'emploi gratuit
Retrouvez gratuitement la notice de l'appareil MINI WI-FI 2 NILOX au format PDF.


| Type de produit | Caméra de surveillance |
| Marque | Nilox |
| Modèle | Mini Wi-Fi 2 |
| Résolution vidéo maximale | 4K à 30 images/s (EIS) |
| Résolution photo maximale | 20 mégapixels |
| Alimentation | Batterie lithium-ion rechargeable 3,7 V, 900 mAh (2 fournies) |
| Charge | USB 5 V / 1 A, durée 3,5 heures |
| Connectivité | Wi-Fi 2,4 GHz, application Nilox LIVE |
| Stockage | Carte microSD/microSDHC/microSDXC jusqu'à 64 Go, classe 10 ou supérieure |
| Dimensions (approx.) | 6 x 4 x 3 cm |
| Poids (approx.) | 80 g (avec batterie) |
| Fonctions principales | Enregistrement vidéo en boucle, time-lapse, ralenti, détection de mouvement, photo en rafale, self-timer |
| Entretien et nettoyage | Nettoyer avec un chiffon sec et doux. Éviter l'eau (sauf si le boîtier étanche est utilisé). |
| Sécurité | Ne pas exposer à des températures supérieures à 55°C. Ne pas ouvrir le boîtier. Utiliser uniquement un chargeur 5V/1A. |
| Pièces détachées et réparabilité | Batterie amovible, câble USB, supports. Réparation non recommandée par l'utilisateur. |
| Informations générales | Fabriqué en Chine. Distribué par Nilox. Garantie 2 ans pour les consommateurs. |
FOIRE AUX QUESTIONS - MINI WI-FI 2 NILOX
Questions des utilisateurs sur MINI WI-FI 2 NILOX
0 question sur cet appareil. Repondez a celles que vous connaissez ou posez la votre.
Poser une nouvelle question sur cet appareil
Téléchargez la notice de votre Caméra de surveillance au format PDF gratuitement ! Retrouvez votre notice MINI WI-FI 2 - NILOX et reprennez votre appareil électronique en main. Sur cette page sont publiés tous les documents nécessaires à l'utilisation de votre appareil MINI WI-FI 2 de la marque NILOX.
MODE D'EMPLOI MINI WI-FI 2 NILOX
niox
MINI Wi-Fi 2
CAUTIONS
- Keep the camera safe from falling and dropping.
- Do not place heavy objects on the camera.
- Keep it at away from any strong magnetic interference objects like electrical machines to avoid strong radio waves from damaging the product and affecting the sound or image quality.
- Keep the camera away from water and liquids (unless equipped with a waterproof case). This may cause the camera to malfunction.
- Do not directly expose the product to high temperatures over 55^ .
- We recommend using a high quality Micro SD Card for best results. Please format the micro SD micro SDHC and micro SDXC memory card in the camera before using and restart the camera after formatting.
- Do not place your Micro SD card near strong magnetic objects to avoid data error or loss.
- Remove the battery before using as a dash camera.
- Lithium battery. Danger of explosion if replaced with an incorrect battery type.
- In case of overheating, unwanted smoke or an unpleasant smell from the device, unplug it immediately from the power outlet to prevent hazardous fire.
- Keep it away from children while charging.
- Do not use the camera when it is low on power.
- Do not use the camera while it is charging.
- Store the device in a cool, dry and dust free place.
- Do not attempt to open the case of the camera or modify it in any way. If the camera has been dismantled, the warranty will be void.
INTRODUCTION
Action Camera "Nilox Mini Wi-Fi 2" is a high-definition digital motion video recording device, created to meet market demand. It has a wide variety of the leading features for digital video recording, photo shooting, audio recording, with screen display and detachable battery. Best suited for vehicle recording, outdoor sports, home security, diving and other related activities. Allowing you to enjoy the moments while capturing every scene anytime, anywhere.
THE BASICS
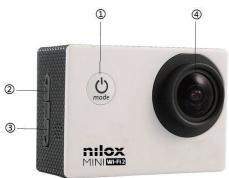
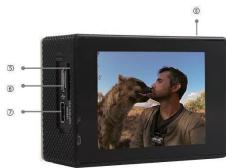
1.Power/Mode
5.TF card slot
- UP/WI-FI
6.USB slot
3.DOWN
7.HDMI
4.LENS
8.OK/SHUTTER
Tips:
- In order to take a clear video or photo, please tear off the lens protection film of the waterproof shell before use.
- In order to ensure the waterproof performance, please make sure that the waterproof shell is sealed well before use. If the white silicone ring of the waterproof shell cannot seal well, please stop using this waterproof shell.
- Please dry it immediately after use, otherwise the waterproof shell metal button will gather dust and reduce the waterproof performance
- The waterproof shell is a vulnerable product. We strongly recommend replacing the waterproof shell in time, depending on the environment and frequency of use.
- When using the camera with the waterproof shell in low temperatures, such as winter, rain, underwater and so on, please use the anti-fogging treatment to avoid blurred video.
GETTING STARTED
HELLO
Congratulations on your new camera! This user manual will help you learn the basics of capturing life's most incredible moments!
To power ON:
Press and hold the Power/Mode Button for a few seconds to switch the screen on.
To power OFF:
Press and hold the Power/Mode Button for a few seconds to switch off the screen.
OVERVIEW
Turn camera ON and repeatedly press the Power/Mode Button to move through the camera modes and settings. The modes will appear in following order:
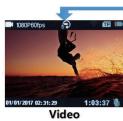
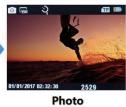
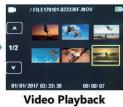
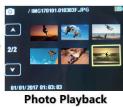
SETTINGS
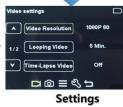
Repeatedly press the Power/Mode Button for the Setting Menu, use the UP or Down Button to move through the various options and press the Ok/Shutter Button to select the desired option.
Video Setting:
Video Resolution: EIS 4K30, EIS 2.7K30, EIS 1080P60, EIS720P120
Looping Video: Off/1 Min/3 Mins/5 Mins
Time-Lapse Video: Off/1Sec/5Secs/10Secs/30Secs/60Secs
Slow Motion: Off/1080P 60/720p 120
Motion Detection: Off/On
Audio Record: Off/On
Photo Setting:
Photo Resolution: 20M/16M/12M/8M/5M
Self-Timer Photo: Off/2Secs/10Secs
Burst Photo: Off/3photos/5photos
General Setting:
Volume: 0~10
Beep: Off/On
Exposure: +-2.0~0
White Balance: Auto/daylight/cloudy/fluoresc./fluoresc. 1/fluoresc. 2
ISO: Auto/ISO100/ISO200/ISO400/ISO800/ISO1600
Effect: Normal/Sepia/B&W/Negative
Contrast: -100~100
Saturation: -100~100
Sharpness: -100~100
System Setting:
Language: English/Italian/Espanol//Portugues/France/Deutsch/Greek
Car Mode: Off/On
Power Off: Never/1Min/5Mins
Date & Time: _Y_M_D 00:00:00
Date Format: None / YYYY MM DD / MM DD YYYY / DD MM YYYY
Stamp: Off/On
Frequency: 50Hz/60Hz
Upside Down: Off/On
Screen Saver: Off/30secs/1min/3mins
Format: YES/NO
Reset: YES/NO
FW Version:LX15PD79-1.5A
Exit:
Press the shutter button to exit
Tips: To ensure the correct setting succeed, please restart your camera after setting.
VIDEO MODE
Video
To record a video, verify that the camera is in a different Video Mode and set the desired video resolution. If the Video icon is not showing in the LCD display of your camera, press the Power/Mode Button repeatedly to then set the menu and select the desired option in the Video Setting menu (such as Looping Video/Time-lapse Video/Slow Motion/Motion Detection etc)
To Start Recording:
Press the Ok/Shutter Button. The camera Status Light and a Red Dot on the screen will flash while recording.
To Stop Recording:
Press the Ok/Shutter Button. The camera Status Light and a Red Dot on the screen will stop flashing to indicate recording has stopped
To Turn On/Off the audio record:
Press the Down Button. The MIC icon will show the status in the right corner of the screen.
Tips:
The camera automatically stops recording when the battery is out of power. Your video will be saved before the camera powers off.
The camera automatically stops recording when the SD card is full, if the looping record function is turned off.
PHOTO MODE
Photo
To take the photo in different Photo Modes and set the desired photo resolution, if the photo icon is not showing in the LCD display of your camera, press the Power/Mode Button repeatedly for the menu setting and select the desired option in the Photo Setting menu (such as Time-lapse Photo/Burst Photo).
Taking a photo:
Press the Ok/Shutter Button. The camera will emit the camera shutter sound.
Self-timer photo
Verify if the camera is in Self-timer photo mode. If the Self-timer photo icon on your camera's LCD screen doesn't appear, press the Power/ Mode Button repeatedly to the Photo Setting Menu, then select the desired option of the Self-timer photo in the Setting Menu.
To take a self-timer photo:
Press the Shutter Button, the camera will emit shutter sound each time a photo is taken.
Burst Photos
To take a Burst Photo series, verify the camera is in Burst Photo mode. If the Burst Photo icon on the LCD screen of the camera does not appear, press the Power/Mode Button repeatedly to the Photo Setting Menu, then select the desired option of the Burst Photo in the Setting Menu.
To capture a Burst Photo series:
Press the Ok/Shutter Button, the camera will emit a shutter sound each time a photo is taken.
PLAYBACK
Playing back Videos and Photos
Verify if the camera is in the Video or Photo Playback menu. Press the UP/DOWN Button to go through the videos or photos and then press the Ok/Shutter Button to playback the desired options.
To exit playback mode, press the Power/Mode Button to the main preview menu, press the Power/Mode Button again to switch setting modes.
Tips:
The camera might not be compatible with the files from a different solution camera.
STORAGE/MICRO CARDS
This camera is compatible with 8GB, 16GB, 32GB, 64GB (selected) capacity micro SD, micro SDHC and micro SDXC memory card. You must use a micro SD card with at least a CLASS 10 (80M/S) speed rating. We recommend using brand-name memory cards for maximum reliability in high vibration activities
Tips:
Please format the micro SD, micro SDHC and micro SDXC memory card on the camera before use. Please restart the camera after formatting.
BATTERY
Charging the battery
To charge the battery
- Connect the camera to a computer or USB power supply with the USB cable included.
- The charging status light remains ON while the battery is charging.
-
The charging status light will turn OFF when the battery is fully charged.
-
2 Batteries included 3.7V 900 mAh
Charging time: 3.5 hours
Please make sure the camera is shut down while charging.
Charge only with 5V 1A output charger.
Remove the battery before using as a dash camera.
Do not store at a temperature above 140^ F/60^ C .
Do not disassemble, crush, damage or dispose of in fire.
Do not use swelling battery.
Stop using the battery after immersion in water.
*Do not dispose of the camera or its battery in the rubbish. Please find a specific recycling point for it.
Wi-Fi APP
Connect to the Wi-Fi App
The Wi-Fi App lets you control your camera remotely using a smart phone or tablet. Features include full camera control, live preview, playback and sharing of selected content and more.
Download the Nilox LIVE App to your smart phone or tablet from the Google Play or Apple App Store.
Press the Power/Mode Button to power the camera ON.
Make sure the Wi-Fi is turned on in the camera setting menu.
Press the Up/Wi-Fi Button to turn on Wi-Fi.
In your smart phone or tablet Wi-Fi setting, connect to the network called "Nilox LIVE" followed by a series of numbers.
Enter the password"12345678"
WiFi Frequency Range: 2,4 Ghz
Open the Nilox LIVE App on your smart phone or tablet.
*press and hold the Up/Wi-Fi Button to turn off the Wi-Fi.
The Nilox LIVE App is compatible with the smart phone and tablet listed below: For Apple IOS
^* iPhone5, 5s, 6 (plus), 6s (plus), 7 (above IOS9)
*iPhone Air & Mini (above IOS9)
For Android
*Android 4x Quad-Core devices
App available on:

INSTRUCTIONS FOR THE ENVIRONMENT
This product may contain substances that can be harmful to the environment and human health, if not disposed of properly. We therefore provide you with the following information in order to prevent the release of such substances and to optimize the use of natural resources. The electrical and electronic products should not be disposed of in the normal household waste, but should be properly collected in order to be correctly treated.
The symbol of the crossed bin shown on the product and on this page indicates the need to properly dispose of the product at the end of its life. In this way you can avoid a non-specific treatment of the substances contained in these products, or an improper use of parts of these which can have harmful consequences for the environment and human health. Moreover, you can contribute to the recovery, recycling and reuse of many of the materials which make up these products.
This is why the manufacturers and distributors of Electrical and Electronic Equipment (EEE) organize proper collection and disposal of the equipment themselves. At the end of the product's lifespan, please contact your dealer for instructions regarding disposal. When purchasing this product your distributor will inform you of the possibility to replace your old device with a new one, on condition that the type of product and its functions are the same. If the dimensions are not over 25cm , the EEE (Electrical and Electronic Equipment) can be returned without any equivalent product purchase obligation. Disposal of the product in any other way will be liable to the penalties provided by the laws in force of the country where the product is disposed of. Moreover, we suggest adoption of the following measures to protect the environment: recycling the inner and outer packaging supplied with the product and disposing of used batteries (if contained in the product) correctly. With your help, we can reduce the amount of natural resources used in the manufacture of EEE (Electrical and Electronic Equipment), minimize use of landfills for product disposal and improve quality of life by preventing the release of potentially dangerous substances into the environment.
INSTALLING AND REPLACING BATTERIES
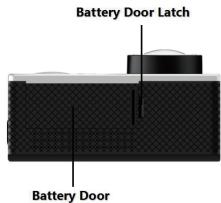
The product contains a battery that could be replaced during the lifetime of the product itself. Dispase of the battery contained in the product correctly at the end of its useful lifespan (for instance when it can no longer be charged) by placing it in an appropriate battery disposal container separate from the generic unsorted waste. Collection and recycling of batteries helps protect the environment and preserve natural resources, allowing recovery of valuable material
Warranty (Validity and Limitations)
- The warranty validity period for consumers, i.e. those that purchase items for purposes unrelated to their professional or business activity is 2 years from delivery . For those that purchase items using a VAT Code for purposes related to their professional activity, the legal assurances provided is 1 year from delivery .
- The warranty on batteries is for 6 months regardless of the type of consumer that buys the product.
- The warranty is valid in the event the product has a material or manufacturing defect.
Consumers are not entitled to the warranty in the following cases:
- lack of proof of purchase (invoice or receipt).
- unauthorised attempts to repair hardware and display parts and/or changing or using software which is different to the one installed;
-
using accessories or items that are not supplied with the product;
-
normal wear and tear of the product;
- accidental damage and falls.

The manufacturer, Exhibito S.p.A declares that the Action Cam Mini Wi-Fi 2 complies with the 2014/53 / EU directive. The complete text of the EU declaration of conformity can be downloaded via www.nilox.com
Specifications may be subject to change without notice. Exhibit S.p.A. reserves the right to modify the product without notice. Exhibit S.p.A. is not responsible for editorial, technical or operational errors / omissions.
Distributed by Nilox
Produced and Imported by
Exhibo S.p.A. via Leonardo da Vinci 6
20854-Vedano al Lambro (MB)
ITALY
Made in China