
RV921 - Cuisinière CDA - Notice d'utilisation et mode d'emploi gratuit
Retrouvez gratuitement la notice de l'appareil RV921 CDA au format PDF.

| Type de produit | Cuisinière à gaz avec fours |
| Marque | CDA |
| Modèle | RV921 |
| Alimentation électrique | 230-240 V~, 50 Hz |
| Puissance électrique totale | 4,35 kW |
| Type de gaz | Gaz naturel (G20, 20 mbar) ou GPL (butane/propane avec kit de conversion) |
| Puissance totale gaz | 13,2 kW |
| Brûleurs de la table de cuisson | 5 brûleurs : 1 rapide 3,0 kW, 2 semi-rapides 1,75 kW, 1 triple couronne/wok 3,7 kW, 1 rapide 3,0 kW |
| Fonctions du four principal | Convection naturelle, chaleur tournante, gril, gril ventilé, décongélation, four à chaleur tournante, maintien au chaud |
| Fonctions du deuxième four | Convection naturelle, maintien au chaud (pizza), gril, brunissage |
| Minuterie | Minuteur programmable, cuisson semi-automatique et automatique (jusqu'à 10 h) |
| Éclairage du four | Ampoules remplaçables (E14, 300 °C max.) |
| Matériau de la surface | Acier inoxydable et émail |
| Dispositifs de sécurité | Thermocouple de sécurité sur brûleurs, thermostat de sécurité four, ventilateur de refroidissement, chaîne antivolve |
| Nettoyage | Nettoyage à la main, pas de nettoyeur vapeur, détergents non abrasifs |
| Pièces détachées | Ampoules, injecteurs pour conversion GPL, adaptateur wok |
| Informations environnementales | Conforme DEEE, ne pas jeter avec les ordures ménagères |
FOIRE AUX QUESTIONS - RV921 CDA
Questions des utilisateurs sur RV921 CDA
0 question sur cet appareil. Repondez a celles que vous connaissez ou posez la votre.
Poser une nouvelle question sur cet appareil
Téléchargez la notice de votre Cuisinière au format PDF gratuitement ! Retrouvez votre notice RV921 - CDA et reprennez votre appareil électronique en main. Sur cette page sont publiés tous les documents nécessaires à l'utilisation de votre appareil RV921 de la marque CDA.
MODE D'EMPLOI RV921 CDA
RV921 Range Cooker
Installation, Use and Maintenance
Important
This appliance must only be used for the purpose for which it is intended, i.e. domestic cooking. Any other use could be dangerous and may lead to premature failure of the appliance.
The CDA Group Ltd cannot be held responsible for injuries or losses caused by incorrect use or installation of this product. Please note that CDA reserve the right to invalidate the guarantee supplied with this product following incorrect installation or misuse of the appliance.
This appliance is not designed to be used by people (including children) with reduced physical, sensorial or mental capacity, or who lack experience or knowledge about it, unless they have had supervision or instructions on how to use the appliance by someone who is responsible for their safety.
Under no circumstances should any external covers be removed for servicing or maintenance except by suitably qualified personnel.
Appliance information:
Please enter the details on the appliance rating plate below for reference, to assist CDA Customer Care in the event of a fault with your appliance and to register your appliance for guarantee purposes.
| Appliance Model | |
| Serial Number |
CE Declarations of Conformity:
This appliance has been designed, constructed and marketed in compliance with safety requirements of EEC Directive 2006/95/ EEC (Low voltage) and requirements of EMC Directive 2004/108/EEC.
This appliance has been manufactured to the strictest standards and complies with all applicable legislation, including Electrical safety (LVD) and Electromagnetic interference compatibility (EMC). Parts intended to come into contact with food conform to EEC/89/109.4
IMPORTANT INFORMATION FOR CORRECT DISPOSAL OF THE PRODUCT IN ACCORDANCE WITH EC DIRECTIVE 2002/96/EC.
At the end of its working life, the product must not be disposed of as urban waste. It must be taken to a special local authority differentiated waste collection centre or to a dealer providing this service.
Disposing of a household appliance separately avoids possible negative consequences for the environment and health deriving from inappropriate disposal and enables the constituent materials to be recovered to obtain significant savings in energy and resources. As a reminder of the need to dispose of household appliances separately, the product is marked with a crossed-out wheeled dustbin.
User Information
-
Read the instructions carefully before using the cooker.
-
Keep the instructions in a safe place for future reference.
-
Follow the instructions for first use (page 6).
-
Always use oven gloves when removing shelves and trays from the cooker.
Always grill with the door closed.
-
Do not grill food containing fat without using the grill pan grid.
-
Do not use the grill pan for roasting.
-
Do not place cooking utensils or plates directly on the oven base.
-
Do not cover the grill pan grid or the oven walls with aluminium foil.
-
Do not store inflammable substances or items that cannot withstand heat (such as wood, paper, cloths, spray cans, etc.) in the storage drawer.
-
Do not attempt to repair the internal workings of your oven.
-
Cookers become hot during and immediately after use. Do not touch the pan stands, burners, hob spill tray or oven internal parts until the appliance has been allowed to cool.
-
After use, ensure that all the control knobs are switched off.
-
Keep children away from the cooker when in use and immediately after use.
-
Ensure that the appliance is correctly adjusted for the type of gas available before installation.
-
The use of a gas appliance produces heat and humidity in the room in which it is installed. Ensure that the room is well ventilated, either by the use of natural ventilation outlets (e.g. windows) or a ducted extractor.
-
This cooker has been designed for use only as a cooking appliance. Any other use (e.g. heating rooms) should be considered incorrect and therefore dangerous.
- This cooker must not be installed in a bed-sit room of less than 20 ~m^3 .
- These instructions are valid only for the intended countries of destination, the symbols of which appear on the cover, the packaging and on the appliance. Use outside of these countries may or may not be possible. You should consult the manufacturer for appropriate advice.
- Do not spray aerosols in the vicinity of this appliance when in use.
- Do not store or use flammable substances in the vicinity of this appliance when in use.
When correctly installed, your product meets all safety requirements laid down for this type of product.
However, special care should be taken around the rear or the underneath of the appliance as these areas are not designed or intended to be touched and may contain sharp or rough edges that could cause injury
Before First Use
Before using the ovens for the first time we recommend that you clean the ovens with soapy water, rinse carefully and then heat on each of the below programmes at maximum temperature for the specified time. A slightly unpleasant smell may be produced, caused by grease remaining on the oven elements from the production process.
15 minutes grill
60 minutes fan oven

60 minutes conventional oven
Please note:
- This range cooker has been fitted with a cooling fan to achieve maximum efficiency and to maintain low surface temperatures. The cooling fan will switch on automatically when the ovens reach a preset temperature and switch off automatically when the ovens have cooled sufficiently, even after the ovens are switched off.
- The range cooker is equipped with a safety thermostat which will switch off the ovens to prevent overheating. Overheating can be caused by incorrect use of an oven or defective components. If an oven switches off due to overheating, wait for the oven to cool down before using it again. If the error continues, contact CDA Customer Care.
Before Using The Hob
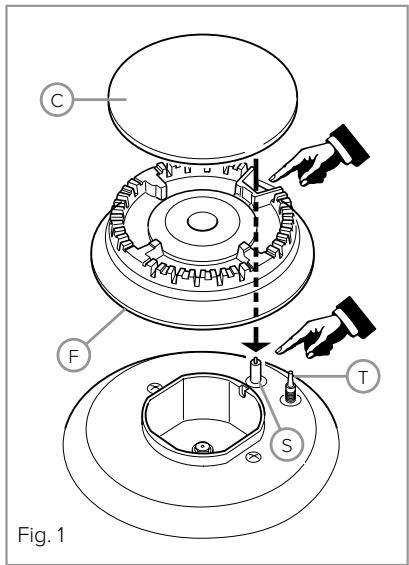
- Before lighting the hob burners, check that the flame-spreaders (F) are in position with their respective burner caps (C), ensuring that the holes in the flame-spreaders are aligned with the ignition electrodes (S) and thermocouples (T) as shown in fig. 1.
- Once the contents come to the boil, turn down the flame far enough to prevent the liquid from boiling over. To prevent burns or damage to the hob
during cooking, all pans or griddle plates must be placed inside the perimeter of the hob.
- Place the pan on the pan supports with the handles facing away from the edge of the work top. This will reduce the risk of the pan being knocked or pulled over.
Deep Fat Frying
- Only fill the pan one third full of oil.
- Do not put a lid on the pan and never leave the pan unattended.
- In the event of a fire, turn off all control knobs and do not move the pan.
- Then put a damp cloth over the pan, or a correctly fitting lid to smother the flames.
- Do not put water on the fire.
- Leave the pan to cool for at least 30 minutes before attempting to move it.
Using Your Hob
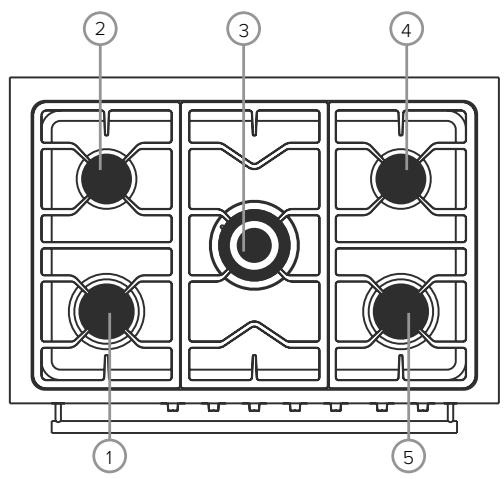
Gas burners:
1.Left Rapid 3.0kW
2. Left Semi-rapid 1.75kW
3. Triple-ring/Wok 3.7kW
4. Right Semi-rapid 1.75kW
5. Right Rapid 3.0kW
Control panel:
- Timer control
- Left cavity function control
- Oven temperature control
- Right cavity function control
- Front left rapid burner control
- Rear left semi-rapid burner control
- Centre Triple ring/Wok burner control
- Rear right semi-rapid burner control
- Front right rapid burner control
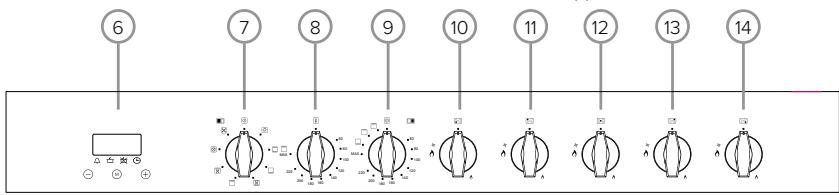
This appliance is class 2/1
Fig. 2
Gas burners
Gas flow to the burners is controlled by the control knobs (10 - 14 on the diagram above). There are 3 positions shown on the control panel. Turning the control knob to the positions shown below achieves the following:

Closed (OFF position)


Maximum position: Provides fast boiling function

Minimum position: Provides simmer function
The hob can be set to the desired position by turning the control knob through the adjustment range in an anti-clockwise direction.
Igniting The Burners
The hob is fitted with a flame failure device. Flame failure devices operate by shutting off the supply of gas to the burner in the event that the flame is extinguished accidentally.
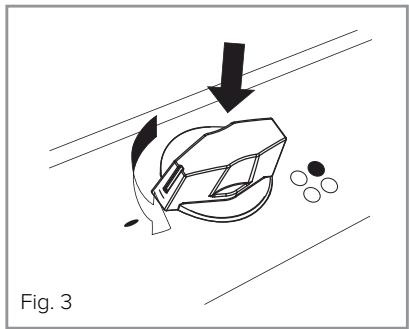
To ignite the burners, follow these instructions:
- Lightly press the control knob down and turn the knob anticlockwise to the maximum position. Firmly press and hold down the control knob to begin the ignition process (a clicking sound will be heard). Hold down the control knob for a few seconds after ignition to allow the safety device to detect that the burner is lit.
- Once the burner is lit, adjust the burner power to the required position.
Please note:
- The ignition device should not be operated for more than 15 seconds.
- If a burner does not ignite, or turns off accidentally, turn the control knob to the 'off' position, and wait for one minute before attempting to reignite the burner.
- If the burner does not ignite, repeat the ignition process with the burner at the minimum position.
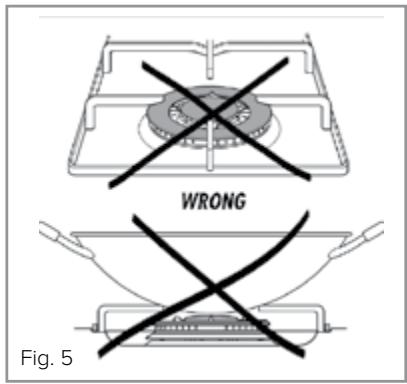
Efficient Use Of Your Hob
The hob is equipped with burners of different sizes, designed to accommodate most shapes and sizes of pan. For best results, only use pans with flat bottoms and choose an appropriate burner depending on the size of the pan. The most efficient use of the hob is shown below, where the pan and burner are correctly chosen.
Ensure that the pans do not overlap the edge of the pan stand, or cover the control panel. Position the pan centrally above the burner.
The table below shows the sizes of pan that should be used with each burner:
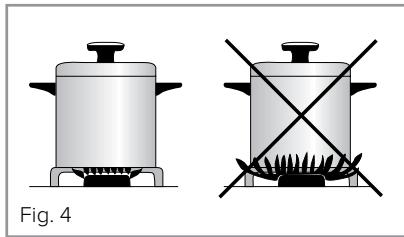
| Burner Size | Minimum Pan Diameter (cm) | Maximum Pan Diameter (cm) |
| Semi-Rapid | 12 | 20 |
| Rapid | 20 | 26 |
| Triple ring | 24 | 28 |
| Wok | - | 36 |
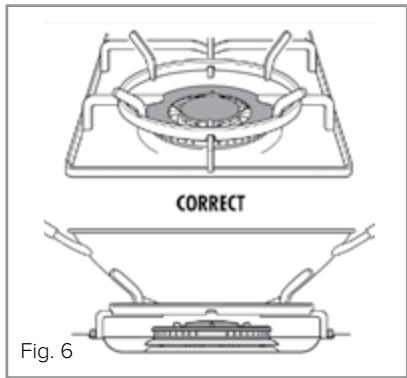
Correct Use Of The Wok Pan Adaptor
The wok pan adaptor is a special stand that is designed to be fitted over the triple ring burner to give support to round bottomed woks.
When using a wok, always place the wok pan adaptor in position over the pan support on the triple ring burner as shown in Fig.6.
IMPORTANT:
- The wok pan adaptor (Fig. 6) must be placed over the pan support on the triple ring burner.
- Do not use the wok pan adaptor for standard flat bottomed pans.
Using Your Main Oven
Important
Cooking function knob
To set the function, turn the cooking function knob clockwise to the required function.
Each of the oven functions uses different elements within the oven to offer you the best choice of cooking every time.
These are explained below:

Oven Light
This function switches on the oven light without using any heating elements, to illuminate the oven cavity.
The oven light remains on with every cooking function.
Fanned Grill
This function uses the fan to circulate the heat from the grill element around the food.
The temperature must be set between 60^ and Max
Grill
This function radiates the heat from the grill element.
The temperature must be set between 60^ and Max
For both grill functions please note:
Always grill with the oven door closed.
- Put the grill pan as close to the grill as possible.
- Do not grill for more than 30 minutes at a time.
- Preheat the grill for approximately five minutes with the oven door closed.
Conventional Oven
This function uses the upper and lower heating elements with a temperature between 60^ and Max.
Natural convection creates a perfect cooking zone in the centre of the oven, ideal for dark fruit cakes and pastries.
Warming Oven
Using heat produced only by the bottom element, this natural heat is perfect for dough proving and blindbaking.
Fan Assisted Oven
Using the circular element and the fan with a temperature between 60^ and Max, this cooking function blows the air into and around the oven cavity. Temperatures are achieved quicker, reducing or even removing the need for preheating. Both cooking temperatures and cooking times can be reduced for a more energy efficient cooking programme.

Defrost
Using the fan only this oven function circulates the air around the oven cavity, speeding up the natural defrost process (1kg takes approximately one hour, depending on the type of food).
Fan Oven
Using the circular element and the fan with a temperature between 60^ and Max, this cooking function blows the air into and around the oven cavity. Temperatures are achieved quicker, reducing or even removing the need for preheating. Both cooking temperatures and cooking times can be reduced for a more energy efficient cooking programme.
Perfect for cooking various food types simultaneously as foods are sealed quickly to prevent flavour transfer.

Temperature knob
- To set the temperature, turn the temperature knob clockwise to the required temperature.
- Once the oven has reached the required temperature, the temperature indicator lamp on the control panel will switch off.
- The temperature indicator lamp will light up when the oven elements are working.
Please note: Always ensure that you turn all the control knobs back to their off positions after cooking.
Programming The Main Oven
Please note:
- The semi-automatic and automatic cooking programmes will only work with the main oven.
- The alert beep will cut off after two minutes if it is not switched off manually.
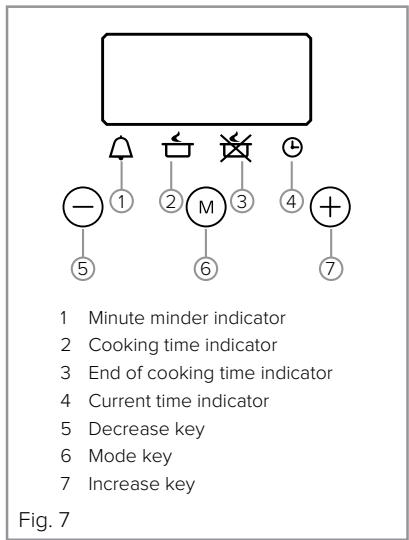
Setting the clock
The clock is preset to 12:00, and will revert to this after a power failure.
When the current time indicator is flashing, touch or . When the correct time is shown on the display, the clock will set after approximately five seconds' delay.
To change the clock once it has been set, touch ⑤ repeatedly until the current time indicator flashes, then touch ^+ or . When the correct time is shown on the display, the clock will set after approximately five seconds’ delay.
The minute minder
The minute minder can be used when the oven is switched on or off. It can be set for up to 23 hours and 59 minutes.
To set the minute minder:
-
Touch repeatedly until the minute minder indicator flashes.
-
Then touch ① or to select the required duration for the minute minder. When the correct duration shows on the display, either touch ⑤ or wait for approximately five seconds. The minute minder indicator will remain lit to confirm the minute minder is on.
- When the countdown is complete, there will be an alert beep which will continue for two minutes and the minute minder indicator will flash. To switch off the alert beep, touch any key.
Please note:
At the end of the countdown, the minute minder will not switch off the oven. Remember to turn off the oven manually.
Semi-automatic cooking
The main oven can be set to switch off automatically at a preset time up to a maximum of 10 hours.
To set a semi-automatic cooking programme:
- Select the oven function and temperature (the oven will switch on)
- Touch until the cooking time indicator flashes.
- Then touch or to select the required duration for the semi-automatic cooking programme. When the correct duration shows on the display, wait for approximately five seconds. The cooking time indicator will remain lit to confirm the semi-automatic programme is on.
- When the cooking time is complete, there will be an alert beep which will continue for two minutes and the cooking time indicator will flash. To switch off the alert beep, touch any key.
Please note:
At the end of the cooking programme, remember to turn off the oven manually.
Automatic cooking
The main oven can be set to switch on and off automatically at preset times up to a maximum of 10 hours.
To set an automatic cooking programme, follow the steps for setting a semi-automatic programme above, and then:
- Touch until the end of cooking time indicator flashes.
- Then touch or to select the required end of cooking time. When the correct time shows on the display, wait for approximately five seconds. The cooking time and end of cooking time indicators will remain lit to confirm the automatic programme is on.
- The oven will switch off until the automatic programme starts. When the programme starts, the cooking time indicator will switch off
- When the cooking time is complete, there will be an alert beep which will continue for two minutes and the end of cooking time indicator will flash. To switch off the alert beep, touch any key.
Please note:
At the end of the cooking programme, remember to turn off the oven manually.
Using Your Second Oven
Control Knob
Important: The control knob does not rotate through a full 360^ .
Rotate it clockwise from the “Off” position to turn the oven on, then rotate it anticlockwise back to the “Off” position to turn the oven off. Do not try to force the knob past the “Max” position.
To set the temperature of the second oven (conventional cooking only), or to select the other functions, turn the control knob to the required function.
Each of the oven functions uses different elements within the oven to offer you the best choice of cooking every time.
These are explained below:
Conventional Oven
Turning the control knob clockwise to any of the temperature settings around the dial switches on the conventional oven.
This function uses the upper and lower heating elements with a temperature between 60^ and Max.
Natural convection creates a perfect cooking zone in the centre of the oven, ideal for dark fruit cakes and pastries.
Warming Oven
This setting uses heat produced only by the bottom element and is pre-set to 250^ .
This gives an ideal setting for cooking pizza.
Browning Oven
Using only the top oven element pre-set at 250^ C , this uses convection heat for browning and crisping.
Ideal for cauliflower or macaroni cheese.
Grill
This function radiates the heat from the grill element. The temperature is pre-set to maximum, for efficient grilling.
Temperature Control
Once the oven has reached the required temperature, the temperature indicator lamp on the control panel will switch off.
The temperature indicator lamp will light up when the elements are working.
Please note: Always ensure that you turn the control knob to its off position after you finish cooking.
Cleaning The Cooker
IMPORTANT:
Always disconnect the appliance from the power supply before undertaking any cleaning or maintenance.
You should always allow the cooker to cool fully after use before undertaking any cleaning or maintenance.
- Steam cleaners must not be used when cleaning this appliance
- Clean the cooker regularly and remove spills as soon as they occur.
- Do not allow fat or oils to build up on the hob or in the oven.
- Do not place hot enamel parts (e.g. burner caps, grill pan) in water. Leave them to cool first.
- Do not allow vinegar, coffee, milk, saltwater, lemon or tomato juice to remain in contact with enamel parts
- Do not use abrasive or corrosive cleaners (including scouring pads or Cif) as these could scratch the appliance, remove control panel markings or damage the cooker.
- Do not clean the removable parts of the cooker in a dishwasher, these must be washed by hand.
For the glass and stainless steel surfaces, you should use a nonabrasive cleaner. Any abrasive cleaner (including Cif) will scratch the surface and could erase the control panel markings. Stainless steel can be effectively cleaned by simply using a dilute solution of water and mild detergent and drying to a shine with a clean cloth.
Over time with use, the stainless steel surface may discolour; this is normal and does not constitute a fault with this appliance. Proprietary stainless steel cleaners are available.
Cleaning The Oven Interiors
To clean the oven interior, suitable proprietary chemical cleaners may be used after first consulting with the manufacturer's recommendations and testing a small sample on the oven cavity.
Do not use metal scrapers or harsh cleaners on the oven door glass.
These could cause scratches, which may result in the glass shattering.
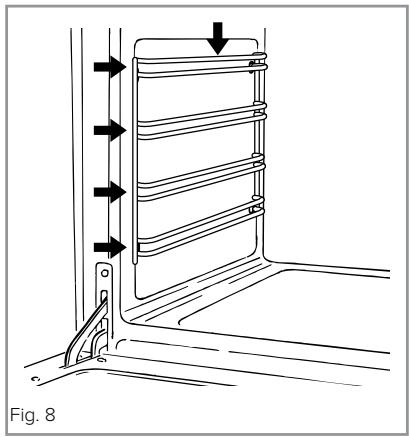
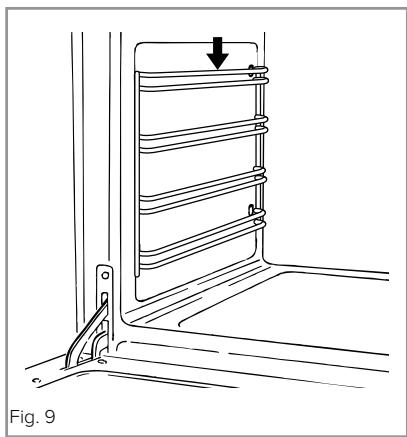
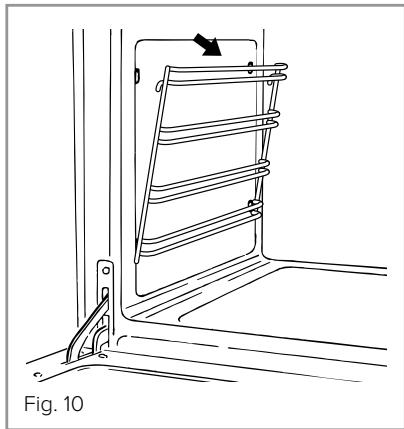
To remove the side racks, press down on the top bar of the side rack to free the rack from the top securing pin, then remove the side rack by lowering it out so that the hooks on the lower edge are freed from the oven cavity (as shown in fig. 9 and 10).
To replace the side racks, locate the lower hooks in the oven cavity, then
pivot the side rack back into position, pressing the top bar down to relocate it against the securing pin.
Ensure that all parts are correctly replaced after cleaning before attempting to use the cooker, and that the rubber pads are in place on the base of the pan stands before repositioning the pan stands on the hob top. To replace the hob burner parts correctly, refer to fig. 1 on page 7.
Removing The Oven
Doors
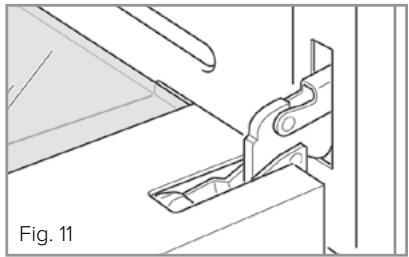
The oven door can easily be removed as follows:
- Open the door to the full extent (fig. 11)
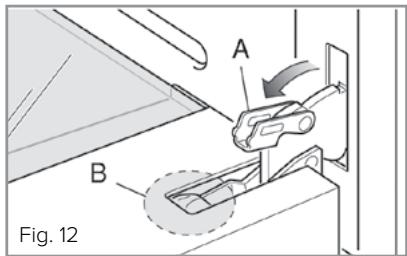
- Open the lever A completely on the left and right hinge (fig. 12)
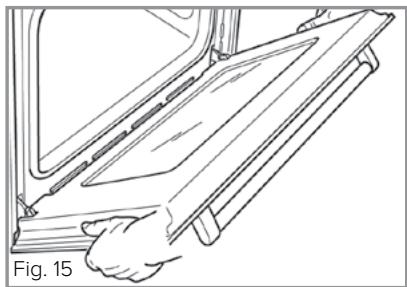
- Hold the door as shown in fig. 15
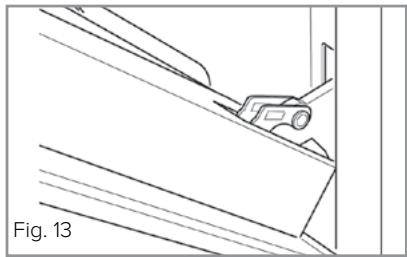
- Gently close the door (fig. 14) until left and right hinge levers A are hooked to part B of the door (fig. 13)
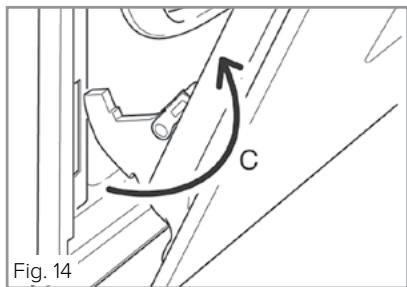
- Withdraw the hinge hooks from their location following arrow C (fig. 14)
- Rest the door on a surface.
To replace the door, repeat the above steps in reverse order.
Flexible Gas Pipe
Check the flexible gas pipe connecting the gas supply to the cooker regularly.
It must be always in perfect condition; in case of damage contact Customer Care for advice.
Control Knobs
Should any of the control knobs become stiff, do not use force. Contact Customer Care for advice.
Changing The Oven Lights
- Disconnect the electrical power supply (for example, by switching off the main isolator switch).
- Unscrew the light cover.
- Fit a new bulb.
- Refit the cover.
Note:
Use only bulbs designed to resist up to 300^ C with the following characteristics: 230 ~V, type E14 and same power of the replaced bulb (check watt power as stamped on the bulb itself).
What to do if you smell gas:
- Open doors and windows
- Turn the gas supply off
- Call TRANSCO on 0800 111 999
| Burner size | Nominal Rating (kW) | Simmer Rating (kW) | LPG flow rates (l/h) | |
| G30 (Butane) | G31 (Propane) | |||
| Semi-Rapid | 1.75 | 0.6 | 127 | 125 |
| Rapid | 3.0 | 1.0 | 218 | 214 |
| Triple ring / Wok | 3.7 | 1.25 | 269 | 264 |
Total rated gas input:
13.2 kW
Mains electrical voltage:
230-240Vac, 50Hz
Total rated electrical consumption:
4.35 kW
If your cooker is not working
- Check that the mains supply has not been switched off.
- Check that the fuse in the spur has not blown.
- Ensure that the burner components are not excessively soiled as this can lead to ignition problems.
Installation
The manufacturer will not be held responsible for any damage to property or injury to persons/animals resulting from incorrect installation of this appliance.
We recommend you seek the help of another individual when installing this appliance to prevent damage or injury.
Installation requirements
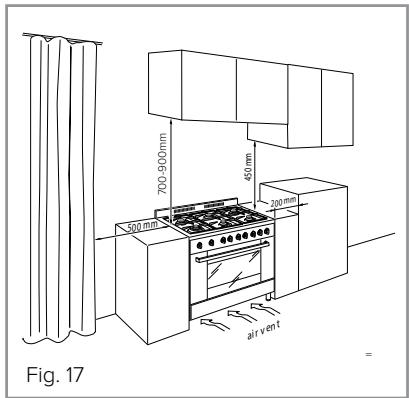
This range cooker is designed to be installed flush with adjacent worktops however in situations where the hob top will be lower than the worktop then a distance of 200mm should be observed.
A distance of 500mm between the range cooker and any adjacent combustible materials (e.g. curtains) should be observed.
A distance of 200mm between the range cooker and adjacent vertical surfaces should be observed.
This appliance is class 2/1 and is suitable for installation adjacent to furniture cabinets.
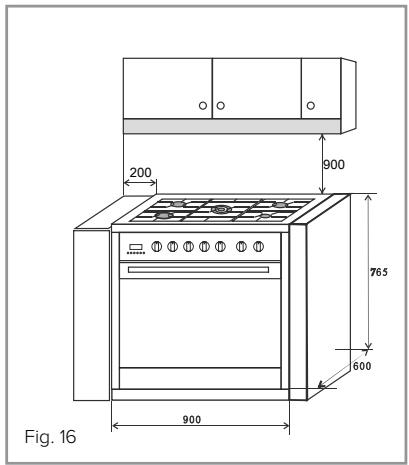
If Fitting A Cooker Hood Above The Range Cooker:
If a cooker hood is to be installed above the range cooker, the height of the hood above the burners must be at least 700mm (750mm is recommended). If the instructions supplied with the hood dictate that the hood must be installed at a height greater than 700mm, then that height is the minimum required.
Wall furniture requirements:
The minimum height of any cabinet immediately above the hob is 900mm. The minimum height of any adjacent units (including light pelmets) is 450mm, unless they are manufactured from a material resistant to fire (steel, for example)
Notes:
- Do not position this appliance adjacent to a refrigeration unit. The heat generated may cause the refrigeration unit to fail.
- This appliance is designed to be installed adjacent to cabinet units capable of withstanding temperatures of 65^ C or greater above ambient temperature.
Flexible Gas Pipe
The flexible gas pipe must be fitted to ensure that it does not come into contact with a moving part of the housing unit (e.g. a drawer) and that there is no obstruction to the pipe. This should be installed in accordance with fig 18.
Correct & incorrect method of installing a flexible cooker connection
| Incorrect method | Correct method |
| Couplings and hose should be installed in the same plane as shown on the right. Do not offset couplings – this causes twisting and undue strain causing premature failure. | |
| The method on the right shows the correct way to install cooker hoses for vertical traverse. Note the single natural loop. Allowing a sharp bend as shown on the left strains and twists the hose to a point of early failure at the coupling. | |
| Try to maintain the minimum or larger bending diameter between the coupling for the longest life as shown on the right. Closing in the diameter as shown on the left creates double bends causing work fatigue failure of the fittings. | |
| Cooker hoses should not be fitted horizontally as shown on the left as this will strain the connections. Where horizontal gas supplies are encountered, the hose should be connected as shown on the right. | Fig. 18 |
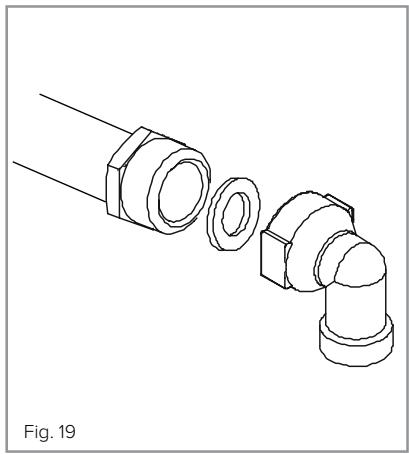
Gas connection
This appliance is supplied with 1 / 2 ” BSP tapered male elbow connection (fig 19).
Anti-tilt bracket/chain
This appliance is supplied fitted with safety chains and wall mounted brackets to prevent it tilting forwards. These should be fitted as part of the installation.
You must ensure that the fixings are suitable for the wall type. Those included may not be suitable in all situations.
Height adjustable feet
The adjustable feet must be fitted to the base of the range cooker before use.
Rest the rear of the appliance on the packaging exposing the base to fit the feet.
Fit the four legs by screwing them hand tight into the support base. To prevent damage, lift the range cooker into position. Do not push it across the floor unnecessarily.
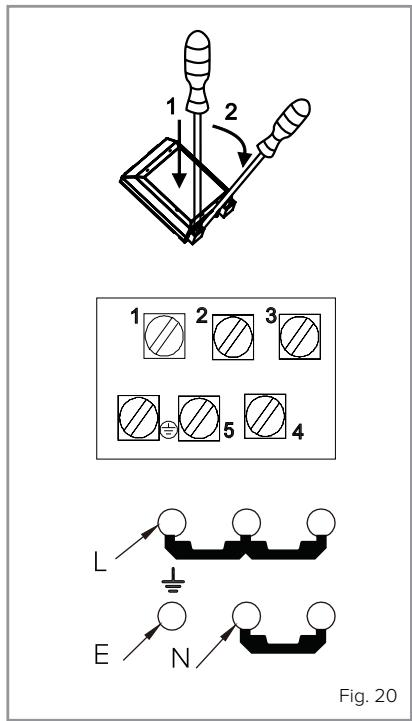
Mains Electricity Connection
Warning! This appliance must be earthed
To connect this appliance to a UK standard mains supply, connect the bridging links between 1-2-3 for the live feed and 4-5 for the neutral feed
We recommend that the appliance is connected by a qualified electrician, who is a member of the N.I.C.E.I.C. and who will comply with the I.E.T. and local regulations.
This appliance is intended to be connected to fixed wiring and is not suitable for connection to a 13A plug or 13A supply.
This appliance is intended to be connected to fixed wiring by a double pole switch, having a contact separation of at least 3mm in all poles. The switch must be positioned no further than 2m from the appliance.
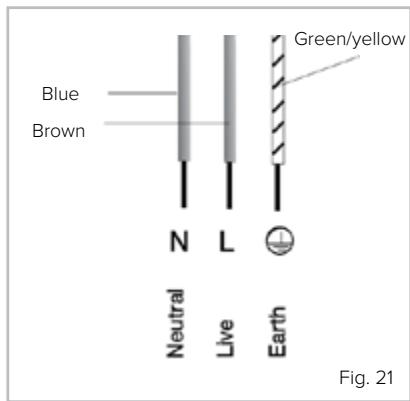
Green and Yellow = Earth (PE)
Blue = Neutral
Brown = Live
Release the two locks located at either side of the connector cover at the rear of the appliance.
Feed the mains lead through the cable clamp to prevent accidental disconnection.
Tighten the cable clamp securely and close the connector cover.
Please note:
- The mains cable must only be replaced by a qualified electrician or service engineer and must be of equivalent or better rating (i.e. 2.5 ~mm^2 , HO5RR-F).
- This appliance is intended to be connected to the mains supply with a cable of cross section area 2.5 ~mm^2 . A larger cable will not fit the terminal connections.
- The marking of the current rating of the fuse or circuit breaker protecting this appliance should be marked on the socket outlet.
Assembly and electrical connection should be carried out by specialised personnel. - When installing this product we recommend you seek the help of another individual.
- The wire which is coloured green and yellow must be connected to the terminal marked E (Earth) or coloured Green.
- The wire which is coloured blue must be connected to the terminal marked N (Neutral), or coloured Black.
- The wire which is coloured brown must be connected to the terminal marked L (Live), or coloured Red.
Gas Supply Requirements
IMPORTANT: THIS APPLIANCE SHOULD BE FITTED BY A GAS SAFE REGISTERED FITTER OR OTHER SUITABLY QUALIFIED PERSON.
- This installation must comply with the Gas Safety (installation and use) Regulations 1984.
- This appliance is category II2H3+ and is designed for use in the UK and Ireland. The installation must comply with the Gas Safety (installation and use) Regulations 1984.
- The CDA Group Ltd is not legally able to provide any assistance in the installation of gas appliances except to Gas Safe registered installers. Any Gas Safe registered fitter requiring help must provide their name, address and registration number. Information supplied will be validated before help is provided.
- This appliance is suitable for conversion to Liquid Petroleum Gas (G30 Butane at a pressure of 28-30mbar or G31 Propane at a pressure of 37mbar). A kit is provided. Do not attempt to fit the conversion kit yourself.
- This appliance is adjusted for natural gas (G20) at 20mbar only.
- In the event that this appliance is not installed in accordance with the above requirements, the appliance may be disconnected from the mains gas supply until any faults are rectified; this is a legal requirement.
- This appliance must not be connected to a combustion gas recovery scavenging system.
- The connection to the gas supply must comply with all current regulations in force.
-
We are not legally able to offer advice on the installation of gas appliances to non Gas Safe registered personnel.
-
An isolation tap should be provided which must be accessible after installation.
Ventilation
All rooms require a window or equivalent (e.g. a door) which can be opened. Some rooms require a permanent vent in addition to a window (see below).
This unit must not be used in a room which is less than 5 ~m^3 . The following table details the requirements based on the kitchen volume (L × W × H) in m^3 .
The above requirements also allow use of a gas oven and grill but if there are any other fuel burning appliances in the same room, consult the relevant British Standard (BS5440-2:2000) or appropriate Gas Safe document.
Flexible gas hoses complying with BS669-1 may be used in situations where the ambient temperature of the hose will not exceed 70^ . Please note that gas hoses designed for natural gas use only must not be used for supplying LPG.
LPG hoses can be identified by either a red band or stripe on the outer coating of the hose. The hose should be positioned in accordance with current gas regulations.
| Room Volume (m3) | Air Vent Req |
| 5 | 100 |
| 6 to 10 | 50 |
| 6 to 11 | No permanent vent if a door opens to the outside |
| 11 or more | None required |
Natural Gas To LPG Conversion
This appliance can be converted from natural gas to propane operation at a nominal inlet pressure of 37mbar, or butane operation at a nominal inlet pressure of 28/30mbar. This conversion must only be carried out by a competent person (i.e. a Gas Safe registered fitter).
Instructions to fit replacement hob injectors:
- Disconnect the appliance from the gas and electrical supplies.
2.Remove burner components and pan supports. - Remove the injectors with a 7mm socket spanner and replace with the corresponding injectors as shown in the table below.
- Refit the burner components and pan supports.
5.Regulate the burner minimum flow rates (see page 19).
When converting from Natural Gas to LPG, it is important that the LPG identity sticker is placed on or adjacent to the rating plate on the appliance.
| Burner | LPG Injector | Natural Gas Injector |
| Semi-Rapid | 65 | 97 |
| Rapid | 85 | 118 |
| Wok | 95 | 140 |
Setting Up The Range Cooker For Use
Regulation of the hob burner minimum flow rates
1. Natural gas
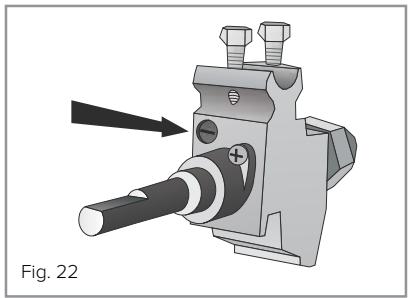
Light the burner and turn it to the minimum position. Remove the gas control knob and turn the adjustment screw at the side of the valve shaft until the required minimum flame is achieved.
2.LPG
Remove the gas control knob and turn the adjustment screw at the side of the valve shaft fully clockwise.
Once the above is complete, refit the knob and verify that the burner flame is stable (the flame must not extinguish
when turning the control knob rapidly between maximum and minimum position). Leave the control knob at the minimum position for one minute to check the flame failure device function. The flame should not extinguish. Repeat this process for all hob burner controls.
Final installation checks
- Check that all connections are gas tight using appropriate methods and that the flexible gas hose is positioned correctly, hanging freely, is not kinked or trapped and is not in contact with any sharp edges including unfinished cabinet materials.
- Check that the supply pressure is correct for the type of gas being used (Natural Gas 20mbar, Butane 28-30mbar, Propane 37mbar).
- Check the correct functioning of all burners at nominal and reduced rates.
Please contact our Customer Care Department for Service on the details below