
MDS7208X - Four encastrable CATA - Notice d'utilisation et mode d'emploi gratuit
Retrouvez gratuitement la notice de l'appareil MDS7208X CATA au format PDF.



| Type de produit | Four encastrable |
| Marque | CATA |
| Modèle | MDS7208X (également MDS7208WH, MDS7208BK) |
| Dimensions du produit (L x P x H) | 595 x 547 x 595 mm |
| Dimensions du meuble d'encastrement (L x P x H) | 560 x 550 x 600 mm |
| Capacité | 72 litres |
| Alimentation électrique | 220-240 V, 50-60 Hz, monophasé |
| Puissance maximale | 2650 W |
| Ampoule four | 15 W, culot E14, 2A/250 V AC |
| Fonctions de cuisson | Chaleur tournante, convection naturelle, gril, gril ventilé, sole, décongélation, AquaSmart (nettoyage vapeur) |
| Commandes | Bouton de sélection des fonctions, thermostat, minuterie tactile, verrouillage enfant |
| Accessoires inclus | Grille métallique, lèchefrite profonde, plateau peu profond (optionnel), rails télescopiques |
| Sécurité | Verrouillage enfant, arrêt automatique, porte à double vitrage, système de refroidissement |
| Nettoyage | AquaSmart (nettoyage vapeur), nettoyage manuel, démontage de la porte et des vitres |
| Classe énergétique | Non spécifiée (préchauffage rapide recommandé) |
| Réparabilité | Ampoule remplaçable par l'utilisateur (E14), autres réparations par service agréé |
| Poids | Non spécifié (environ 30-40 kg estimé) |
FOIRE AUX QUESTIONS - MDS7208X CATA
Questions des utilisateurs sur MDS7208X CATA
0 question sur cet appareil. Repondez a celles que vous connaissez ou posez la votre.
Poser une nouvelle question sur cet appareil
Téléchargez la notice de votre Four encastrable au format PDF gratuitement ! Retrouvez votre notice MDS7208X - CATA et reprennez votre appareil électronique en main. Sur cette page sont publiés tous les documents nécessaires à l'utilisation de votre appareil MDS7208X de la marque CATA.
MODE D'EMPLOI MDS7208X CATA
MDS 7208 X - MDS 7208 WH - MDS 7208 BK
HU Telepitési, hasznalati és karbantartásiutasitások
1, hu_HU
Tartalomjegyzék
1 ELoszó 4
2 FONTOS BIZTONSAGI INFORMÁCIÖK 5
3 A SUTO SPECIFIKACIOI 10
4 A KESZULK BESZERELESE 13
5 A SUTO BESZERELESE A SZEKRENYBE 15
6 ARAMELLATAS. 18
6.1 A sutō energiahatékonysága 21
7 A KESZULK BEMUTATASA. 23
7.1 A sut tortozekai 24
8 AZ ELSO HASNZALAT ELOTT 25
9 A KESZULEK SPECIFIKACIOI ES MUKODSE 26
9.1 A sutó specifikaciói 26
10 AZ ESZKÖZ HASZNÁLATA 32
10.1 A keszülk hómréskletének beállítasa 32
11 A TELESZKÓPOS SÍNEK HASZNÁLATA 33
12 A KESZULEK TISZTITASA ES KARBANTARTASA 36
13 A LÁMPA CSERÉJE 42
14 A fó funkciok magyarázata 44
15 SUTESI TÁBLAZAT 46
1 ELÓSZó
KEDVES VÁSÁRLO!
Köszönjuk, hogy megvásárolta termékunket!
Ezt a terméket korszeru, a környezetet tiszteletben tartó letesítményekben gyártottuk, a természet károsítasa nélkül. Kérjuk, olvassa el figyelmesen az ebben a felhasznalói kézikönybven talalhato utasításokat és figyelmeztét séket. A kézikönyt tartalmazza a termék biztonságos telepítéséhez, hasznalatához és karbantartásához szükséges fontos informaciókat és figyelmeztét séket, hogy maximálisan kihasznáhlassa berendezését. A kézikönyvet tartsa biztonságos, konnyen elerhető helyen, arra az esetre, ha a jovöben szükség lenne rá. A gyartó nem vonható felelosségre az olyan személyi sérulésekér vagy a környezetben vagy egyeb anyagokban bekövetkező károkér, amelyek a kézikönyv fordításából vagy nyomtatási hibaiból, vagy a készülák nem megfelelo mūködtétéséból erednek.
2 FONTOS BIZTONSÁGINFORMÁCIÖK
A sutő üzemi feszúltsege 220-240 V.
Csatlakoztassa a sutot egy 16 amperesbiztositekhoz.Ha a hazban abiztositek jelenlegi erteke 10 ampernel kisebb,akkor szereltessen fel egy szakkepzett villanyszerelov elgy 16 amperesbiztositekot.
A sütôt mindig foldelt
csatlakozóaljzattal használja. A
födelöberendeźeseket szakképzett
villanyszerelonek kell beallitania.
Vállalatunk nem vállal felelosséget
azokér t a károkér, amelyeket a
termék födelés nélkuli aljzattal
tortenő használata eredményez.
Ez a rész a személyi sérulések vagy az anyagi károk elkeruléséhez szükségesBiztonsági utasításokat tartalmazza. Az utasítások figyelmen kivül hagyasa érvénytelenitheti a jóttást, és az esetlegesen keletkező károkert vällalatunk nem vonható felelosségre.
Ha a keszülék belsejében talalhato elektromos csatlakozásokat kiveszik, hogy hozzáférhetöek legyenek, akkor kapcsolja ki a keszülék áramellátását, és forduljon a hivatalos szervizhez.
Ne erjen a sutō besejében talalható fûtoelemekhez, mert muködés kozben tulmelegednek. Legyen ovatos, mert a grillezô funkció használata során a sutō felszíne felforrosodhat.
A sūtōtērén tartott gyūlékony tārgyak meggyulladhatnak. Net tartson gyūlékony tārgyakat a sūtōtérben.
Hasznaljon sutokesztyut, amikor forro etelt vagy edenyeket, peldául tepsiket stb. vesz ki a sutobol vagy a grillbol. A suto alkatreszei és a hasznalt edenyek (tepsi stb.) felforrosodnak a hasznalat során.
A készülk és tartozékai muködes**
kozen felforrosodnak. Ne érjen a
forró részekhez.
Ne nyissa ki a készülék ajtajat, ha fust távozik belöle. Kapcsoljaki a készüléket, húzza ki, vagy kapcsolja ki a megszakító.
A sütöpapir érintkezésbe kerülhet a fūtōelemekkel és meggyulladhat. Elömelegítés során ne helyezzen sütöpapir t a tartozékra. Mindig helyezzen egy edenyt vagy egy tortasutó formát a sütöpapirra. Csak a szükséges területre tegyen papir. A sütöpapir nem lehet a tartozékon.

VIGYAZAT!
Ezt a keszüléket 8 évnel idösebb
gyermekek és korlátozott
fizikai, észlési vagy szellemi
képességekkel rendelkező
személyek, vagy nem megfelelo
tapasztalatkkal és ismeretekkel
rendelkező személyek csak
akkor hasznalhatják, ha
felnött felügelete alatt állnak,
vagy ha betartják a keszülék
muködésével kapcsolatban
kapott utasításokat, és tisztaban
vannak az esetlegesen felmerülő
kockázatakkal.
Gyermekeknek tilos a keszülékkel jatszaniuk.
A keszülék tiszítíasat és karbantartásat felügyelet nélküli gyermekek nem végezhetik.
Az eszkocz mukodés kozben felmelegedhet. Legyen ovatos, amikor a sutobelsejuben levofuttoelemekhez er. Gyermekektol tartsa tavol.
Ne hasznaljon durva es suroló hatásu szereket vagy éles fém kaparokat a sutő üvegajtajnak tiszítíasára, mert eltörhet az üveg vagy megkarcolódhat a felszíne.
A sütőket gyúlékony környezettöl távol kell beszerelni.
Csak az ehhez a sutohoz ajanylott homersekletmert hasznalja.
A sutō tisztítáhsoz ne használjön goztisztító.

VIGYAZAT!
Mielott kicserelne a lampat, az aramutés elkerulése érdekben húzza ki a készüléket, vagy kapcsolja le a fokapcsolót.
Ha megsérul a pátkábel, akkor adott típusú vagy olyan kabellel kell kicserélni, amelyet a gyartó vagy egy hivatalos szerviz jóváhagyott.
A termikus áramkör-megszakító
nem megfelelo elhelyezéséból
adódo károk elkerulése érdekében
az eszközt nem szabad külso
áramkörökhöz, pédául idózǐtokhöz
vagy mindig be- vagy kikapcsolt
áramkörökhöz csatlakoztatni.n
A hozzaféhéto alkatrészek
felforósodhatnak. Grillezes
kożben a gyermekeket tartsa
távol.
A kiömlätt ételeket tiszítías elött el kell távolítani.
A TELEPITÉS SORÁN ÉS A TELEPITÉS UTÁN KÖVETENDÜ UTASITÁSOK
A keszülk beszerelését kizárólag a Silverline egyik hivatalos szervize végezheti.
A keszülék a sutés és a tiszítás megkonnyítesé érdekében nagy teljesítányú légkeringető rendszerrel van felszerelve. Ennek biztosítása érdekében kövesse az utasításokat.
A keszüléket úgy kell a beszereléshez használt szekrényen elhelyezni, hogy a hátulja a fal felénézzen.
A keszülk muködtetese elott ellenörizze, hogy eltávolított-e\
minden csomagolóanyagot.
A keszüléket kizárólag a használati utmutatóban ismertetett rendeltetésszerú használatnak megfeleloen használja.
Ezt a keszüléket kizárolag otthoni konyhában való sütésre tervezték. Iparvagy laboróriuni használatranem alkalmas.
A keszüléket ne használja vagy hagyja kultéren.
A keszüléket ne használá j
viztestekhez köl, nedves talajon
vagy medence kölében.
A keszülék kulso idöztóvel vagy távirányító rendszerrel történő használatra nem alkalias.
A készüléket gyermekek, értelmi fogyatékos vagy tapasztalatlan személyek kizárólagCsak cselekvoképes felnott felügelete alatt használhatják, abi felelosséget vállal.
Ha a készülék ajtaja vagy az ajto tōmtīse megsérūl, akkor csak azután használja, hogy egy hivatalos szervizben megjavitották.
Ne lógassa le a lápkábelt az asztal vagy a pult széleröl.
A karbantartási és a javítasi munkálatokat kizárólag hivatalos szerviz végezheti, és kizárólageredeti pótalkrészeket lehet használni.
MUKÖDÉSRE VONATKOZÖ FIGYELMEZTETÉSEK
A keszülék használá tă elött Ellenőrizze, hogy eltávolított-e-mindeden csomagolóanyagot.
A keszüléket kizárólag sütésre lehet hasznalni. Barmilyen egyéb célu hasznalat (pl. a helyiség fûtése, amelyben található) veszélyes és helytelen. Vállalatunk nem vonhato felelosségre személyeket vagy allatokat ért oylan serulésekert vagy tárgyakat ért oyan károkér, amelyeket a készülék nem megfelelo, helytelen vagy nem rendeltetesszerú hasznalata eredményezett.
A sutő elso használata során a szigetelóanyagok és a fûtőelemek okozta szag jelentkezhet. Ilyen esetakben működtesse a sutő étel behelyezése nélkül kb. 30 percig maximum hörmséklen, az also és felső (és ha elérhető, 3D) sütési funkció hasznalatával.
Soha ne sussön a sutó aljan.
Ne takarja le a sutot aluminium foliaval.
A sutő MOZgatása, tiszítása és szervizelése alatt húzza ki a készüléket.
Soha ne的概率 big.
csatlakozódupot tápkabelból.
Soha ne érjen a készülékhez, ha keze vagy lába vizes vagy nedves.
Ne engedje, hogy gyermekek vagy kiskoru szemelyek felugyelet nélkül hasznalják a készüléket.
Gondatlansag eseten a suto ajtaja levalhat a zsanerról és megsértheti a kezet.
Ha a sutō meghibásodik vagy nem megfeleloen muködik, akkor kapcsolja ki és húzza ki.
Amikor nem használja a sutôt,
akkorBizonyosodjon meg arról,
hogy az összes funkció “OFF” (ki)
állásban van.
Mindig viseljen sutokesztyut, amikor kiveszi a tepsit a sutobol.
Az OnBiztonsaga esasutot tisztasaga erdekében mindig tartsa tisztan a sutot.Amukodtetes utan a sutoben maradt olajmaradvanyok idovel kacosifhatjakasutofeluletet.
A karbantartási és a javítasi
munkálatokat kizárólag hivatalos
szerviz vegezheti, kizárólageredeti
pótalkárészek felhasználásával.
Vállalatunk nem vállal felelosséget a sutó veszelyes vagy nem megfelelo mukodése miatt keletkezett károkét.
A sutō károsodhat, ha a fenti figyelmeztét sék barmelyikét figyelmen kivül hagyja.

VIGYAZAT!
A sutôt ne mozgassa és ne vegye ki a csomagolásból az ajtó fogantúyújánál fogva.
Áramkimaradas esétén a készülék működése megszakad. Termékmodellől fuggöen az áramellás helyreallása után a sütés úrajindul, vagy ismet be kelli altani a sütési idöt.
Az oralapon lecsapódo pára elkerulése érdekében nyissa ki legalabb 3 percig a sutó ajtajat a sutes befejezése utan.
MEGFELELOSEGI NYILATKOZAT
A készülék azon elemei, amelyek éelmiszerekkel érintkezhetnek, megfelelnek 89/109/EGK irányelvnek.
CEA CE jeloléssel kijelentjuk, hogy felelosségunk biztositani, hogy a keszülek megfelelen az europai irányelveknek, valamint abiztonsággal, az egészséggel, valamint a környezetvedelemmel kapcsolatos jogszabályi kovetelményeknek.
Ellenorizze, hogy a sutó jo allapotban van-e, és nem sérult-e, amikor kiveszi csomagolásból. Kétseg esétén ne használja a keszüléket: forduljon szakemberhez.
A csomagolóanyagokat, például a nejlon csomagolást, a poliszirol habot és a szegeket tartsa gyermekektól távol, mivel ezek veszélyt jelenthetnek a gyermekekre.
Tartsa meg a keszülk eredeticsomagolását.
Hasznalja az eredeti csomagolast a keszülék szallitásához, és kõvesse a csomagoláson talalható kezelésre vonatkozo jelölseket. Ha nincs meg az eredeti csomagolás;
Ne erje utes a keszulek kulso feluletet.
Ne helyezzen nehéz terheket a készülékre.
Szállítás során a talajjal párhuzamos pozícioban helyezze el a készüléket (a felső oldal nézzen felfelé).
Csomagolas
A csomagolóanyagok
mindegyike Újrahasznosíthato.
A csomagolóanyagok
maradványait a környezet védelme
érdekében dobja Újrahasznosító
konténereke.
A régi készülékek artalmatlanitasa
A tuli regi vagy mukodsképtelen keszülékeket ne dobja kozvetlenul a szemétbe. A regi elektramos és elektronikus eszközok tartalmazhatnak ürafelhasznalhato és hasznositható alkatrészeket. Ellenkező esetben a muködtető alkatrészeket tartalmazó és a hulladéklerakóra keruló kszülékek tartalmazhatnak oyan anyagokat, amelyek károsak lehetnek a környezetre.
Az elektramos es az elektronikus alkatrészek uyrahasznalatánakBiztosítasa érdekében szallitsa a készüléket a gyartóval egyeztetett adott gyújtoközkpointokba. A jelen felhasznalói kézikönyvet javasolt megtartani, mert informaciókat tartalmaz a készülékmuködtétésel kapcsolatban, ha a készüléket masik felhasznalónak adják át. A készülék leselejtezés és artilmatlanítása elött meg kell akadályoznia az embari egészségre és a környezetre gyakorolt esetleges negativ hatásokat. Ellenkező esetben a készülék alkalmatlan hulladékká valik.
Ez a szimbólum azt jelöli, hogy a készülék a háztartásihulladéktól elkulönítve kezelendő, azt elektrmos éselektronikus hulladékgyüjtö közpointokba kell szállitani. Akészülék ártalmatlanításat a helyi környezetvedelmi elóirásoknak megfeleloen kell elvégezni. Akészülék ártalmatlanítására, ujrahasznalatáre és ujrahasznosítására vonatkozó részletes informaciókat a hatóságoktól lehet beszerezni.
3 A SÜTÖ SPECIFIKÁCIÖI
Ezeket a keszülékeket úgy tervezték, hogy egyfázisú 220-240 V-os tápfeszült séggel, 50-60 Hz-en muködjenek.
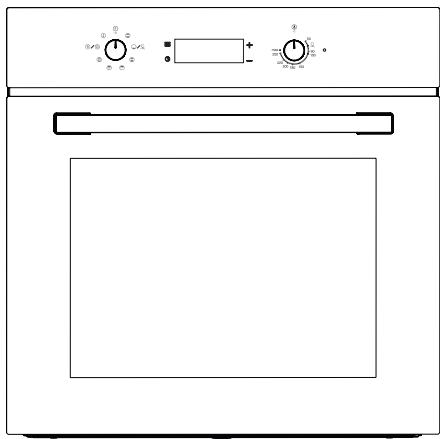
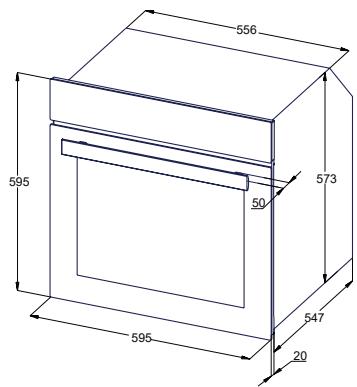
- ábra
| MDS 7208 X - MDS 7208 WH - MDS 7208 BK | |
| Sütőlámpa | 15 W |
| A termék méretei (Szélesség) | 595 mm |
| A termék méretei (Mélység) | 547 mm |
| A termék méretei (Magasság) | 595 mm |
| A termék beszereléséhez használt szekrény méretei (Szélesség) | 560 mm |
| A termék beszereléséhez használt szekrény méretei (Mélység) | 550 mm |
| A termék beszereléséhez használt szekrény méretei (Magasság) | 600 mm |
| Teherbírás | 72 lt |
| Feszültseg | 220–240 V |
| Maximális teljesítmény | 2650 W |
| Maximális teljesítmény | 2650 W |

A hely méreit, ahova a terméket elhelyezik, a sutó specifikaciónak megfeleloen kell lemérni.
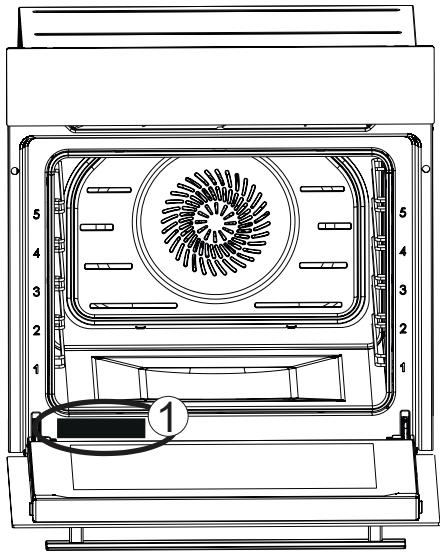
2. ábra
Az adattábla, amelyen a sutó múszaki specifications talalhatok, a sutó konyhába történő beszerelése után is hozzaférhétő. Az adattábla megtekintéséhez nyissa ki a sutó ajtajat. Pótalkárész rendelésekor használja az adattablán talalható informaciókat a sutó modelljének meghatározásához (2/1 ábra).
4 A KÉSZÜLÉK BESZERELESE
A készülék beszerelését kizárolag a Silverline hivatalos szervize végezheti. Vállalatunk nem vonhato felelosségre a személyeket, környezetet vagy egyéb anyagokat ért olyn károkét, amelyekat a készülék nem megfelelo beszerelése okozott.
A csomag felbontása után ellenőrizable a készüléket. Ne csatlakoztassa a készüléket, ha az a szallítás长沙市ben megserült.
Olvassa el alaposan a tartozék
telepitésère vonatkozó oldalakat.
A készülék hasznalata el'tt
vegye le és távolítsa el az összes
csomagolóanyagot és ragasztószalagot
a sütóterból és az ajtoról.
A készüléket kétfélekeppen lehet beszerelni: pult alá és faliszekrénye. Az egyes opciókra vonatkozo beszerelési méretek alább találhatók.
A készüléket ne telepítse dekorácio vagy butorburkolat möge. Ez kockázatot jelentene a tulmelegédés miatt. A bʊtort a készülék beszerelését megelózōen el kell evágni. Az esetlege sorját el kell távolíti. Negativanbefolyásolhatják az elektromos berendezesek mūködését.
A sérulése elkerulése érdekében hasznaljon védokesztyut.
A szekrény balsejenek szelózésé és hútese, valamint a készülék megfelelo muködésé érdekében a rajzokon felTÜntetét hetzagokat be kell tartani.
A butor falainak, amelybe a keszüléket beszerelik, hóallónak kell lenniuk. Különösen, ha az oldalfalak bevont forgácslemezból keszültek, akkor a
bevonatnak 120 °C-ig kell védelmetbiztositania. A meghatározotthómér sékletnek nem ellenálo muanyagvagy ragasztóbevonat deformálódhatés megsérulhet.
A sutot a beszerelés során olyan támaszra kell helyezni, amely elbirja annak sulyát.
A beszerelés befejezésekorBiztonsági okokból meg kell akadályozni, hogy a készülk kózvetlenül erintkezzen az elektromos alkatrészekel.
A szigetelést és védelmet biztosító alkatrészeket úgy kell felszerelni, hogy azokat semmilyen eszközzel ne lehessen eltávolítani.
A hatékonyabb légáramlásBiztosítása érdekében javasoljuk, hogy fali szekrénybe szerelje be a készüléket.
A hatékonyabb légáramlásBiztosítasa érdekében el kell távolítani a konyhai szekrény hátulját.
Javasoljuk, hogyBiztositson legalabbb 70 mm-es hezagot a konyhaszekrny hatuljatol merve, amelybe a keszüléket beszerelik.
A készüléket nem javasoljuk
hútószekrény vagy mélyhú tő kézelében
beszerelni. Ellenkező esetben az
eloszló hó negativenbefolyásolhatja
ezeknek a készülékeknek a
teljesítményét.
Annak érdekében, hogy a sutő készen alljon a muködtétésre, gondoskodjon a beszerelés helyének elektramos ellatásáról. Majd hívja a Silverline hivatalos szervizét.

A rajzokon szerepló méretek mmben vannak megadva.
5 A SÜTÖ BESZERELESE A SZEKKÉNYBE
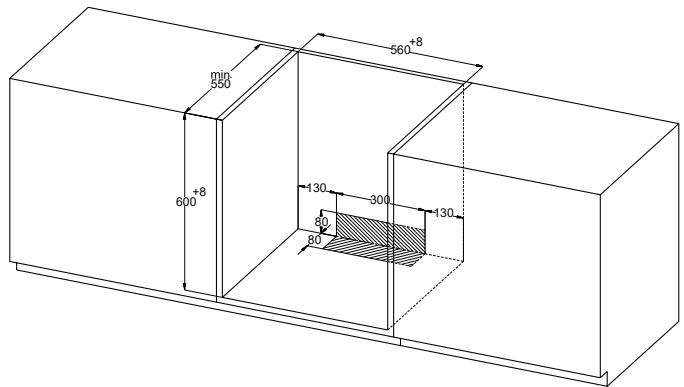
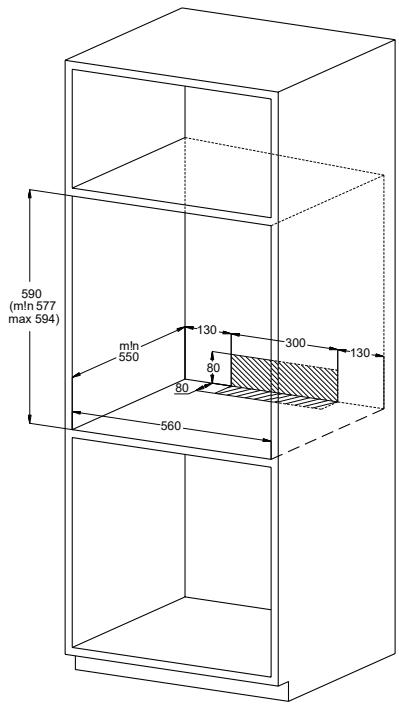
3. ábra

A kézikonyvben szerepló ábrák referencingiaként szolgálnak
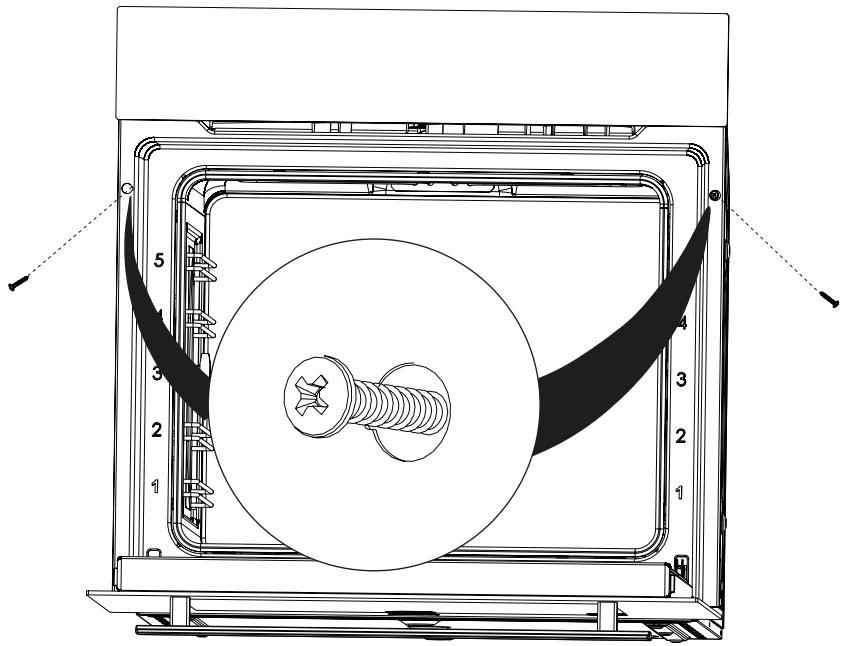
4. ábra
Helyezze a keszüléket a beepítéshez hasznalt szekrény közepébe.
Nyissa ki a keszülek ajtajat, és fürjon furatokat a sutön talalható furatoknak megfeleloen egy 3,9 x 22 atmérojú fúroval, majd Hajtsa be a csavart.

Ha anélkül hajtja be a csavart, hogy elötte a csavar átméröjének megfelelo Méretü furatot furna, az kárt okozhat a butorban.
Ügyeljen arra, ne sertse fel a beszereléshez használt furatokat azzal, hogy tól nagy nyomást gyakorol a csavarokra.
A keszülk tetszés szerint beszerelheto egy magasan elhelyezett szekrénybe vagy a pult alá.
Javasoljuk, hogyBiztosifson legalab70 mm-es hezagot a konyhaszekrery hátuljátol, amelybe a sutot beszerelik
A szigetelést és védelmetBiztosfó alkatrészeketúgykell felszerelni, hogy azokat semmilyen eszközzel ne lehessen eltávolítani.
Ha a sutō fölotti pultba beepitett fozolapot szerelnek, akkor a sutō és a fozolap tapkábeleit külön kell valasztaniBiztonsagi okokból, valamint hogy a sutō késöbb szükség eseten konnyebben eltávolithato legyen.
6 ARAMELLÁTÁS
A keszüléket kizárolag engedéllyel rendelkező szerviz csatlakoztathatja a fő elektromos berendezéshez, az aktuális szabályoknak és jogszabályoknak megfeleloen.
Győzödjön meg arról, hogy a halózat árameròssege megegyezik a készülék also részények elején talalhato adattáblán felTÜntetét fertékkel.
Ha a hazban a kapcsoló jelenlegi éréke 16 amperné kisebb, akkor szereltessen fel egy szakképzett villanyszerelövel egy 16 amperesBiztositékkapcsolét.
A keszüléket mindig le kell födelni. A födelöberendezéseket szakképzett villanyszerelónek kell beallitania.
A sutó tapkábele foldelt csatlakozódugóval van felszerelve. A csatlakozódugó foldelt gezetékkel kell használni.
A keszüléket úgy kell elhelyezni, hogy az aramellátashoz használt kimenet vagy kettós pálusú kapcsoló konnyen elérhető legyen.
A tapkábelt uyg helyezze el, hogy ne erintkezzen forro felületekkel, és necsiptesse a termek burkolatába.
A tapkabel homséklete nem érheti el a környezeti homsékletet 50^ -kal meghaladó homsékletet.
Ha a tapkábel megserül, akkor kérjuk, forduljon a legkozelebbi hivatalos szervizhez. A hivatalos szervizben cseréttesse ki a kábelt egy azonos méretü, muanyag szigetelesse ellatott kabelre, amely Ellenall a készülék által igenyelt elektromos aramerösségnek.
Ha a keszüléket kózvetlenül a halózathoz csatlakoztatják, akkor a készülék és a halózat kóze egy dupla polusú kapcsolót kell felszerelni, amely alkalmas a kívant terhelés elviselésére az aktuális jegszabályok szerint, és amely érirtkezési pontjai között 3 mm-es hézag talalható. A kettős polusú kapcsólónem szakithatja meg a foldelövezetéket.
Nem javasoljuk adapterek, többcsatlakozós aljatok vagy hosszabbítok használatát. Ha feltétlenül szükséges, akkor a vonatkoź biztonsági jogszabályok betartásával alkalmazható adapter vagy hosszabbíto kabel. Az adapter maximális áramterhelését és maximális teljesítényét azonban soha nem szabad tullépní.
Acsatlakoztatas befejezéskor tesztelje a fütoelemeket 3 percig.

A készülék elektromos biztonsága kizárólag akkor garantál't, ha megfelelo'en, megfelelo áramforráshoz van csatlakoztatva, a vonatkozo szabályoknak megfelelo födeléssel. Vállalatunk nem vonható felelosségre személyeket vagy allatokat ért olyan sérulësekért vagy tárgyakat ért olyan károkét, amelyeket a készülék nem megfelelo födelése okozott.
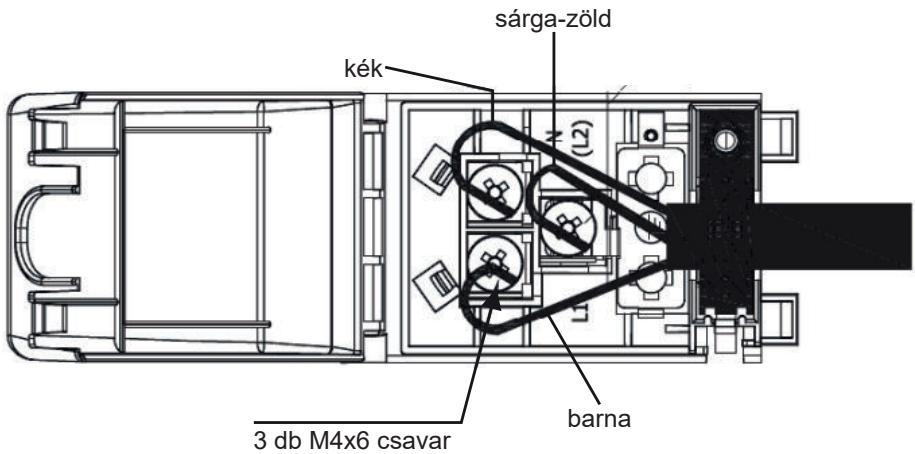
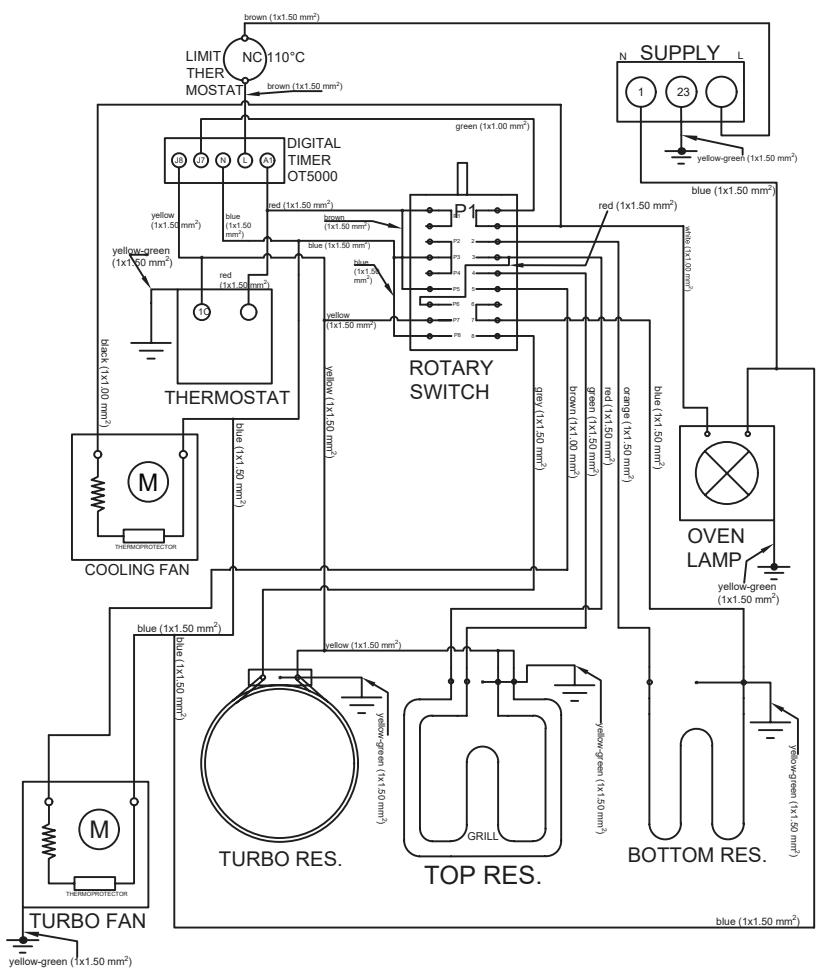
5. ábra
TEENDÖK A KÉSZÜLEK ELSÖ MÜKÖDTÉSEKOR
Aliltsa a homerseklet et maximalis szintre.
Állítsa a funkciógombot also-felso grillezés poziúóba (vagy 3D poziúóba, ha van).
Mukodtesse igy a sutot uresen 30 percig.
Nyissa ki az ablakokat a szoba szellöztétésére.
Ekkor a szigeteloanyagok és a fütoelemek okozta szag és füst jelentkezhet. Ilyen esetakben varjon, amig eltünik a szag és a füst, mielott barmilyen etelt helyezne a sütő belsejébe.
Tisztfsa meg a sutobesejét szappanos vizzel benedesvifett puha ruhaval.
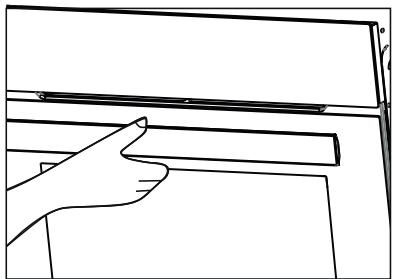
6. ábra
Az ajtó kinyitásához mindig a kozepénéf fogja meg a fogantyút.

VIGYAZAT!
A sutő elő üzembe helyezése előtt mossa le a komponenseket, pédául a tepsit vagy a rácsot lúgos (nem suroló hatású) tiszítószerekkel.
6.1 A sutō energiahatékonysága
A nagy energiahatékonyságú, hószigeteléssellatott sütoket kell elonyben részesitésen.
Ha sutés kozben gyakran kinyitják a sutó ajtaját, azzal minded alkalommal hideg levegőt engednek be a sutóbe, am energiaveszteséghez vezet. EzérCsak akkor nyissa ki a sutó ajtaját, amikor szükséges.
Próbaljon meg egyszerre tobb fogast elkészǐteni a sutōben. Elǒször vegye ki az alacsonyabb hòmér sékleton elkészītét tételt,
és hasznaljon kevessebb energiaat anélkül, hogy megvaltoztatna a sutó homersekletét.
Hasznalja fel a sutés utan megmaradt felesleges hót a kōvetkező etel elkészítéséhez. Ezzel energiát takarít meg.
A sūtō elǒmelegítǒ funkcióját rōvid ideig (maximum 10 percig) használja.
A sutō energihatékonysága
A fagyasztott etelt a sutoben sutés elott fel kell engedni.
A sutō az aktuális hómér sékten folytatja a sutést, és igy kevesebb energiát használ fel, mint amikor a sutési idő elött néhény percelk kikapcsolják.
7 A KÉSZÜLEK BEMUTATÁSA
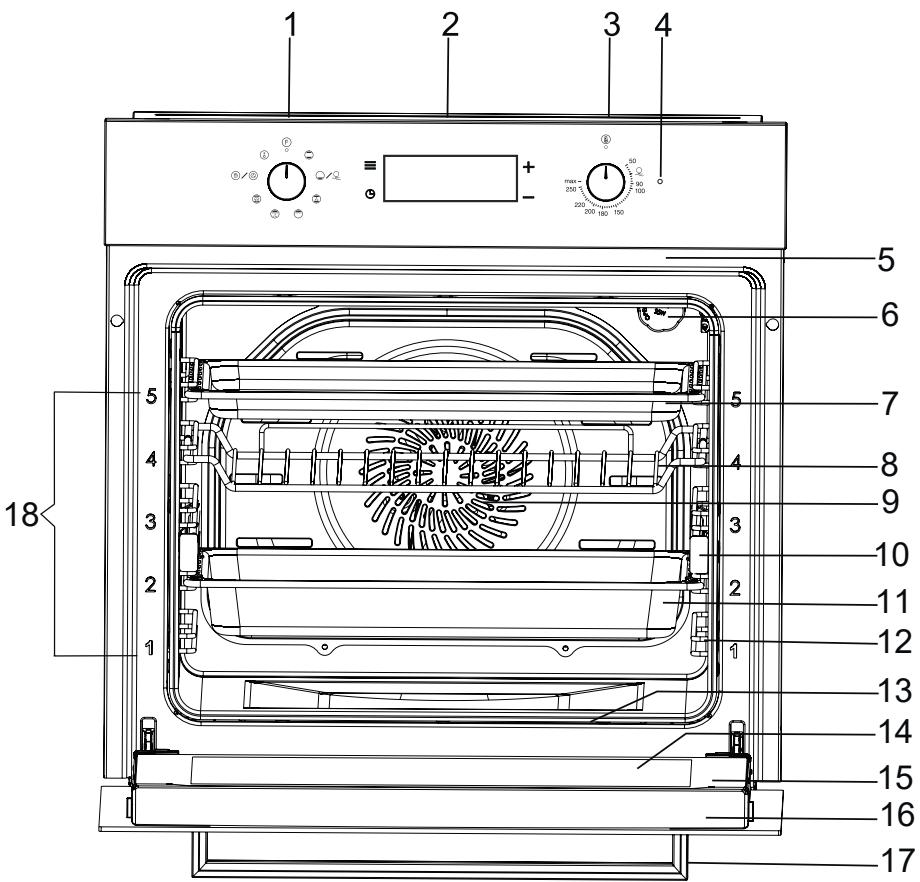
7. ábra
1-Funkcióvalaszto gomb
10- Teleszkópos sínek
2- Érintoképernyos idozitó
11-Mely tepsi
3-Suto homsersekletet beallito gomb
12 Dróttálvány
4- Figyelmezteto lampa
13- Also ellenállas
5-Felso ellenallas
14-Belso uveg
6- Lampa
15-Sutəjto
7-Alacsonyfalutepsi(Opció)
16-Ajto felso muanyag része
8-Sutoracs
17-A sutofogantyuya
9- Ventilator
18- Állványszintek
7.1 A sutō tartozékai
Az elso mukodtetes elott tiszittsa meg a suto tartozekait. Miutan megtisztitotta es szivaccsal lemosta a tartozekokat, torolje oket szarazra.
Távolítson el a sutóterból minded olyan tartozékot, amelyre nincs szüksége.
Sutórács
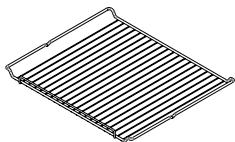
8. ábra
Lap torta-és szufléformákhoz Sutéshez és fagyasztottétel sütéséhz. A dróttlány szintjei különleges felépítésuknek köszönhetöen akkor is vizszintes pozićoban maradnak, amikor kihúzzák öket a sutobol. Fennall a veszelye annak, hogy a lap kicsuszik, és kiömlik azétel.
Mély tpsi
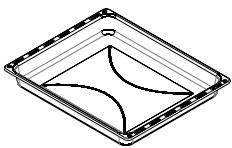
9. ábra
Univerzalis tepsi sutemenyekhez,
krèmes sutemenyekhez, fagyasztott
etelekhez, valamint nagy húsdarabokat
tartalmazó húsetelekhez.
Hasznalhatja zsirgyujtó talként, ha kozvetlenul a sutoracson grille.
Teleszkópos sinek


10. ábra
Állványokhoz és tepsikehze.
A teleszkópos sinek segít ségevel
meghosszabbithatja a sutóállvány
szintjét. A teleszkópos sin
hasznalatakor nem áll fenn az etel
kiontésének a veszélye.
8 AZ ELSÖ HASZNÁLAT ELOTT
A keszülék elso hasznalata elott el kell
vegezni néhány beallítást.
A sütóter és a tartozék tisztlítasa
Mielott elször ételt keszüt a
készülékben, tiszütsa meg a sutőteret
és a tartozékokat.
A sūtōtér tiszṭitása
Az uy keszülék szaganak
eltávolításához melegítse az üres
sütőteret zár'tó mellett.
Ellenorizze, hogy nem maradtak-e
csomagolásmaradványok, pl.
hungarocell a sutōterben, és távolítsa
el a ragasztószalagot a készülék
belsejéöl. A melegítés elött törólje
át a sutōtér sík felületeit egy puha,
nedves ruhával. A folyamat alatt vegig
szelloztesse a konyhát.
Miután kihult a sutóter, tiszíttsa meg
a sik felületeket mosószerrel és
konyharuhával.
A tartozék tiszítísa
Tisztítsa meg alaposan a tartozékokat
egy puha kefével vagy mosószeres
vizzzel és konyharuhával.
9 A KÉSZÜLEK SPECIFIKÁCIÖI és MÜKÖDESE
9.1 A sutó specifikación

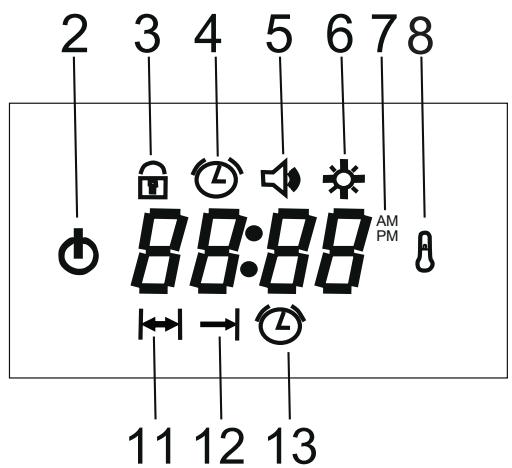

11. ábra
- Menu gomb
- Funkcióvalto
- Gyermekzár
- Idó
- Riasztási hangjelzés hangereje
- A kijelzó fényerejének beallitása
-
Delelotti/delutani ido kijelzese
-
Termosztatikon
- Plusz gomb
- Program gomb
- Fózési idǒ
- Sutési idô végé
- Riasztás
- Minusz gomb
A Menu gomb hasznalata:
A gomb egyes lenyomásaival egymás után aktivalhato a gyermekzár, az idó (ha nincs beallitva a suteí idó), a riasztás hangerejének és a képernyó fényerejének a beallitásmodja, és a beallitás során megjelenik a megfelelo szimbólum.
Program gomb:
A gomb egyes lenyomasaival egymás után aktivalhato a sutési idó végének (ha be van állitva a sutési idó) és a riasztás hangerejének a beallitasi modja, és a beallitás során megjelenik a megfelelo szimbólum.
Gyermekzár
Ez a funkció megakadályozza, hogy a felhasznález věletlenů módosítsa a sutő orajának a beálítását.
Ha a gyermekzárat akkor aktivalják, amikor nincs muködésben egyik sütési program sem, és a sutő ki van kapcsolva, akkor aktivalódk a billentyúzár, és a sutő inaktivá allapotba lép. A Menu gomb kivételével az összes gomb inaktívvá valik. Az orán villoggı kezd a szimbólum.
A sutôc Sak a gyermekzár inaktiválása után lehet muködtetni.
Ha a billentyúzárat aktivált sütóprogram alatt aktivalják, akkorCsak a billentyuket zárolja a rendszer. A Menu gomb kivételével az összes gomb inaktívvá válik
Az sūtō oráján világitani kezd a lakat szimbólum. Ha aktivalva van a glymerkzár, akkor a sūtési program befejezesével a funkcióvezérlo lezár, a glymerkzár funkció aktivalódk, és a sūtöt nem lehet ismét muködtetni.
A sutórórát billentyúzár kikapcsolása után lehet muködtetni.
A billentyúzár aktivalásához, amikor nem tartózkodik egyik menüben sem:
A "Menu" gomb egyszeri megérintésekor villogni kezd a billentyúzár ikon. A kijelzón megjelenik az "OFF" (Ki) felirat.
A gyermekzárat a "+" gomb megérintésével lehet kikapcsolni. Ekkor megjelenik az "ON" (Be) felirat a kijelzón, és a 10 ikon folyamatosan világít.
Szeretném inaktivalni a gyermekzárat
A "Menu" gomb megérintékor villogni kezd a icon a kijelzón. Megjelenik az "ON" (Be) felirat a kijelzón.
A gyermekzárat a “-” gomb megérintésével lehet kikapcsolni. Ekkor megjelenik az "ON" (Be) felirat a kijelzón, a icon pedig eltünik.
Az ora beallitasa:
Amikor a termek csatlakozik az áramforráshoz, akkor a kijelzón megjelenik az idō ikon, és vilogni kezd az "OFF" (Ki) felirat.
A sutő használatához nyomja meg egyszer a “Menu” gombot, ekkor beállithatja az orát a “+” / “-” gombok segítsegével. Az orá beállítása után a beállitási módból való kilépeshez nyomja meg a “Menu” gombot, vagy varjon 5 másodpercet; ekkor az orá jelenik meg a kijelzón.
A sutón korábban beallitott ora átallitásához végezze el az alábbiakat, miután kilépett denen menúból:
Ha kétzs er lenyomja a "Menu" gombot, akkor villogni kezd a szimbólum a kijelzón.
az ora beallitásához nyomja meg a "+"/“-gombokat.
Az ora beallitasa utan a beallitasi modból való kilépéshez nyomja meg a "Menu" gombot, vagy varjon 5 masodpercet.

Az orat nem lehet beallitani, ha barmilyen sutesi beallitas aktiv.
Orabeállitas modja 24 orás/12 orás opció
Az alapértelmezzett beallitás a 24 orás. A 12 orás (délelott/délután) üzemmodra valtashoz nyomja le a "Plusz" (+) gombot 5 masodpercig, miután kiléppt az összes beallitási módból, és az orá láthato a kijelzön, az üzemmod valtásat sípolás jalzi. A 12 orás üzemmodban megjelenik az "AM" (délelott) vagy a "PM" (délután) ikon a kijelzön. Ugyanezekkel a lépésekkel lehet a.masik üzemmodra is valtani.
A riasztási hangjelzés beallitása
A riasztás hangjelzésének módosításához vegezze el az alábbiakat, miután kilépett minded menúból:
Ha haromszor megérinti a "Menü" gombat, akkor villogni kezd a szimbólum a kijelzón
a kívant hangerö kivalasztáhsaz nyomja meg a "+" és a "-" gombot.
A hangerő beállítása után érintse meg a “Menu” gombot, vagy varjon 5 masodpercig a beállítási modból való kilépéshez.
A gyári alapbeállítas szerinti hangeró a legnagyobb, "b-03" hangeró.

VIGYAZAT!
A beállított hangeró “b-01”, “b-02” vagy “b-03” feliratként jelenik meg a kijelzón, és a kapcsolódó ikon eltúnik, amikor kilépnek a beállításí módól.
A kijelzó fényerejének beallitasa:
A kijelző fényerejének modosításához végezze el az alábbiak egyikét, miután kilépett minded menúból:
Ha négyszer megérinti a "Menu" gombat, akkor villogni kezd a szimbólum a kijelzón.
a kívant fényero kivalasztásához nyomja meg a "+" és a "- gombot.
A fenyerő beallitása után érintse meg a "Menu" gombot, vagy varjon 5 masodpercig a beallitásí modból való kilépeshez.
Az alapértelmezett beállitas a legmagasabb, "d-03" fenyeró.
3. AZ IDÖZİTO FUNKCIÖI
Az automatikus sutes azt jelenti, hogy a sutesi funkcio kivalasztasa es a homerseklet beallitasa utan beallithatja, hogy mikor erjen vget automatikusan a sutes.

Ha idozitó nélkül szeretné muködtetni a sutôt, akkor a funkcióvezérlő és a termosztát beallitása utan elindithatja a sutét.

Amikor nem használja a sutôt, akkor a funkciógomboknak és termosztát kapcsolínak OFF (ki) pozicióban kell lenniúk. Ellenkező esetben a sutés nem fog leállni.
Félautomatikus sùtés:
Ez a modszer azokra az esetakre szolgál, amikor azonnal el kivánja indítani a sütét, és megadja a sütési időt.
A Program gomb megerintese utan villogni kezd az ickon
a suteşi ido beallitasahoz nyomja meg a "+" és a "- gombokat. A suteşi ido beallitasa utan aikon folyamatosan vilagft a kijelzón.

Az egy oranál kevessebb időre beállitott sütési programok percben, és nem masodpercen jelennek meg a kijelzón.
FélautomATUSUÉS
Ez a modszer azokra az esetekre szolgal, amikor egyBizonyos idore kivanja elkeszifeni az etelt a jovoben. Ezert kesleltetett sutesnek is hivjak.
A Program gomb megérintése után villogni kezd ikon
nyomja meg a "+" és a "- gombat a sutési idő beállításához, majd lépjen ki a sutési módból.
Ha kétzs er lenyomja a "Program" gombot, akkor villogni kezd a szimbólum a kijelzón.
Nyomja meg a "+" és a "- gombat a kívant sūtési idō beállitásához. Ekkor folyamatosan világítani kezd a (sūtési idō) és a →(sūtési idō vége) ikon.
A sütési idö kezdetének elérésekor eltünik a →ikon a kijelzöröl, a← szimbólum pedig a sütési idö lejártäig a kijelzón marad.
A sutes befejezese utan:
Az ikon villogni kezd a kijelzón, megjelenik az "End" (Vége) felirat, és 7 percre bekapcsol a riasztási hangjelzés.
A riasztás kikapcsoláshoz nyomja meg a Program gombot. Ekkor eltünik az "End" (Vége) felirat a kijelzöról, és az ort jerzi ki a készülék.
1
Amikor megszólal a riasztás, akkor az "End" felirat nem tünik el, ha a Program gombétól eltérő gombbal némítják el a hangjelzést. Csak a hangjelzés szünik meg.
Az automatikus suteşi ido trolsehez:
A sūtési programot es az emlékeztetó idōzítôt a Program gomb 3 masodpercre történǒ lenyomásával lehet kikapcsolni. A kijelźón ekkor megjelenik az “End” (Vége) felirat es a (Sūtési idō) ikon.
Másik opció:
A Program gomb megérintéskor villogni kezd a (Sutési idó) ikon a kijelzón. Nyomja meg a “-” gombat,(amig a sutési idó 00: 00. értekre nem csökken. A kijelzón ekkor megjelenik az “End” (Vége) felirat és a (Sutési idó) ikon.
Emlekezteto idzitó
A sutō orajat alkalmazhatja riasztásként vagy emlékeztetō idözítoként. A riasztás beallitásáho:
A ②ikon villogni kezd, ha 2-szer (beallitott sutesi ido eseten 3-szor) megérinti a Program gombot.
Állítsa be a kívánt riasztásti idót a "+" és a "- gombok segítségevel. A riasztás beállítása után folyamatosan világítani kezd a megfelelo ikon a kijelzón, és csak a riasztás visszaállításakor tünik el. Maximum 23 ora 59 perces idótartamot lehet beállítani.
A riasztasi ido lejartakor
A ⑥ikon villogni kezd a kijelzón, és 7 percre bekapcsol a riasztási hangjelzés.
A riasztás kikapcsoláshoz nyomja meg barmelyik gombat; ekkor a kijelzón ismét az ora fog megjelenni.
A beallitott ido törleséhez:
Nyomja le a Program gombot kb. 3 masodpercig az emlekeztet o idozitó, es ha aktivalva van, a sutei program kikapcsolasahoz, vagy erintse meg a Program gombot, amig 念 ikon vilogni nem kezd. Erintesre a riasztasi ido "00:00"ertekre all, es az emlekeztet o idozitó kikapcsol.

Ha a beallitott riasztasi ido és a sütési ido nem egyezik meg, akkor a rovidebb ido jelenik meg a kijelzón.
VÁLTÓ BEMENETI FUNKCIÖI
1 Funkcióvátó
Amikor a funkcióvátó barmilyen "ON" (Be) pozíctora van állitva, akkor megjelenik a ①ikon a kijelzón.
A oikona funkcióváltó kikapcsolásakor eltünik.
2. Termosztat
Ha a sutō hòmér séklete alacsonyabb, mint a beallitott hòmér séklet, akkor megjelenik az izon a kijelzón.
Amikor a sutō hòmér séklete eléri a beallftott hòmér sékletet, az ikon eltünik a kijelzóról.

A termosztát szimbóluma a sutó aktuális hörmsékletét jerzi. Önmagában nem aktivalja a sutést. A sutés aktivalásahoz állitsa a funkcióvezéról't a kivistfunkcióra.

A sütési idő beállításakor a funkcióvalto és a termosztát ikonja eltünik a kijelzöról a késleltetétt sutes beállítasa után, a sutes megkezdéséig, és az ora beállításat igénylo áramkimaradások után.
10 AZ ESZKÖZ HASZNÁLATA
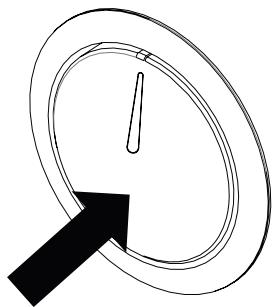
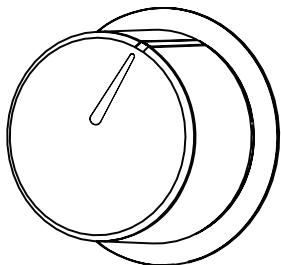
12. ábra: Inaktív kiugró gomb
13. ábra: Aktív kiugró gomb
A sutó kiugró gombokkal van felszerelve, amelyek lenyomásra kiugranak.
Nyomja be a gombot, hogy az kiugarjon, majd állítsa be (12. ábra).
Amikor befezejte a sutest, akkor forditsa a kapcsolot "ki (felso) pozióba, majd nyomja be (13. ábra).
10.1 A készülék hómérsekletények beállításá

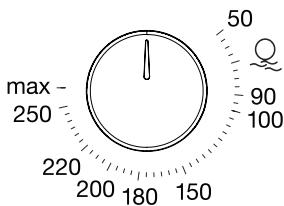
14. ábra
A készülék a hòmér séklet beallitasa után pár masodpercel elkezd melegedni.
Amikor elkészült az étel, akkor kapcsolja ki a keszüléket a funkcióvalaszto kapcsoló nulla poziúoba állíva.
11 A TELESZKÓPOS SÍNEK HASZNÁLATA
A TELESZKÓPOS SÍN HASZNÁLATA
A teleszkópos sínek eltávolítása
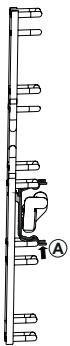
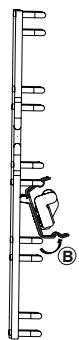
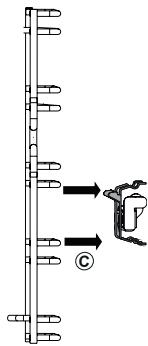

Eltavolitaskor egyik kezevel
tarta teleszkópos sint, hogyne essen a sutábe, és neokozzon sérüléseket.

A teleszkópos sinek
eltávolításához várja meg,
amig lehül a sutő.
15. ábra
A teleszkópos sin polcról való
eltávolításához fogja meg a
teleszkópos sint a 15/A ábrán látható
módon, majd emelje meg a 15/B ábrán
látottak szerint. (15/C ábra).

Ismételje meg a folyamatot mindegyik teleszkópos sin esetében, a sutő mindkét oldalán.
A teleszkópos sinek felhelysezese
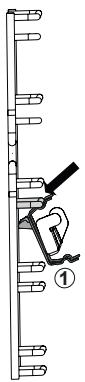
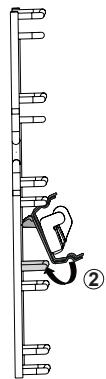
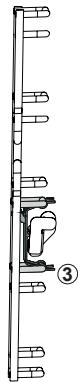
16. ábra
A teleszkópos sinek rácspolcra való illesztéséhez fogja meg a sinen lévo fulet, és illesszte fel a 16./1 ábrán látottak szerint. Majd helyezze a sinen lévo fulet a rácspolcra a 16/2 ábrán látottak szerint, a 16/3 ábrán lévo pozífio eléréséhez.
A teleszkópos sinek használata
A teleszkópos sinek megkonnyítik a tepisk és a rácsok hasznalatát.

Ne mossa a teleszkóposineket mosogatógépn.
A sutórács használata
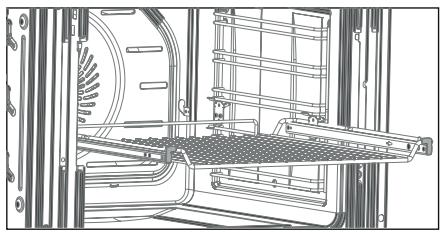
17. ábra
Helyezze a sutórácsot a teleszkóposinekreúgy,hogyalabaklefelénézzenek (17.ábra).
Az edeny használata
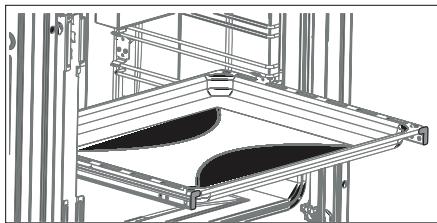
18. ábra
Helyezze az edenyt a teleszkópos rácsokra (18. ábra).

A teleszkópos sin magas
szélekkel rendelkező különleges
kialakítása megakadályozza,
hogy elcsüsszon az edeny.
12 A KÉSZÜLÉK TISZTÍTÁSA ÉSKARBANTARTÁSA
Általános tiszítías
Muködtétés után mindig várja meg, amig lehül a készülék. Ügyeljenarra, hogy ekkor ne maradjanakmaradványok az ajtón. Hosszú tavon hatással lehet a készülékkorulötti konyhabútororra, akkor is, ha az ajtónyitva hagyják.
A keszülk rendszeres karbantartásanak és tisztaságanak elmulasztása a felület károsodásahoz és a keszülk élettartamának csökkenéséhz verzethet, és ezáltal kockázatokat okozhat.
Tisztlatas elott mindig huzza ki a keszuléket, vagy kapcsolja ki az On/Off (Be/Ki) gombat Off (Ki) pozióba allitva..
A tisztítías megkezdésé elótt varja meg, amíg lehú a készülék.
Ugyeljen arra, hogy a termek tiszításakor használt tiszítószerekben ne legyenek oyan részecsék, amelyek megkarcolhatják a zománcozott vagy festett felületeket.
A szimbólumok eltávolításanak megelőzese érdekében a kezelőpanel és a gombok tiszításakor ne használjon csiszóló hatású szemcséket tartalmazó folyékony tiszítószereket vagy drótszivacsot.
A sutō tiszṭitásáre ne használjon fehérītǒket, salétromsvat vagy sósavat.
A sutō tisztítára ne használjon goztisztítókat.
Ne probálja meg eltávolítani a
kezelöpanel gombjait, mert egyes modelleknél nem eltávolithatok.
Ne használjon csiszoló hatású anyagokat (drótszivacs, surolópor, sütótisz tíó spray, suroló hatású kemeny szivacsok), savakat (fehérítǒk) vagy klórt tartalmazó tisz tíószereket.
A hivatalos szervizeinkben kaphato Silverline sutotisztityszert alkalmazhatja a kiomlott, felszáradt hulladekolaj okozta foltok eltavolitásahoz és a tókeletes tiszításhoz. Permetezze a sutotisztíto sprayt a szennyezett felületre, zárja le a fedelet, majd varjon 10 percet.
Zománcozott, festett és rozs+dementes acél felületeken ne hagyjon suroló hatású és savas szennyeződéseket (pl. citromlét, ecet stb.).
AquaSmart
A goztisztítas funkció használá tól'tt vegye ki az összes tartozékot a sütőból;
Helyezzen 100 ml vizet a sutō aljára, majd további 400 ml vizet a 2. szintre helyezett alacsony falú sutōtálába (lágyvizhasználatát javasoljuk),és csukja be a sutō ajtaját.
Allitsa a funkcióválasztó gombot melegító ① pozíóba.
AlItsa a suto homersekletet értékre,és mukodtesse a sutot 30 percig.
A goztisztítási folyamat befejezéséhez álltsa Off (Ki) helyzetbe a kapcsolót.
Tiszítsa meg a sutő belső felületét benedvesítét puha ruhával, amikor a sutő eléri azt a hórmár sékletet, amelyen nem égeti meg a kezét, ti. mielott teljesen lehülne.
Tisztlas utan hagyja nyitva az ajtot 15^ -os szogben, hogy teljesen megszáradjanak a zománcozott belso felületek.

VESZÉLY!
Csak azután érjen a keszülkehz, hogy az teljesen lehult.
Egésveszély.
A sūtō besejének tiszṭitása
Tisztítsa meg a sutôt minded használat után.
A sutō besejének zománcozott felületét akkor a legcelszerübb tisztitani, amikor a sutō meg meleg.
Vegye ki a tepsiket es a raccot. Törölje le a belsö teret meleg, szappanos vizzel benedvesifett ruhával. Majd törölje le meg egyszer egy nedves, majd egy száraz ruhával.
Ne hasznaljon suroló hatásu anyagokat, pédául csiszolopapírt, drótsizvacsot vagy fehérítót. Ellenkező esetben a sutō zománcozzott része megsérülhet.
A sutot rendszeresen tiszittsa meg alaposan megfelelo sutotisztítoszerrel.
Makacs szennyezódések esétén használt rozsdamentes acélhoz használt tiszítószereket vagy ecetet.
Az ilyen folyadekok altal hagyott foltok csokkenthetik a sutofenyessegét, de semmilyen modyon nem befolyasoljak a sutoteljesitmenyet.
A keszüléket ne használá je ételek, pl.kenyér,torták,sütemenyek stb. tárolására.
A sūtō oldalfalainak tisztítása
- ábra
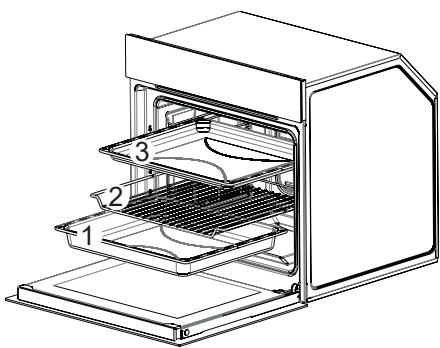
Vegye ki a tepsiket és a grillt (1-2-3 / 19. ábra).
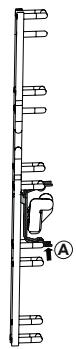
A teleszkópos sínek eltávolítása
20. ábra
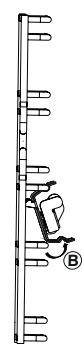
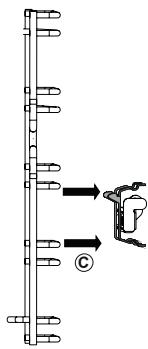
A teleszkópos sin polcról való
eltávolításához fogja meg a
teleszkópos sint a 20/A ábrán latható
módon, majd emelje meg a 20/B ábrán
látottak szerint. (20/C ábra).

Ismételje meg a folyamatot mindegyik teleszkópos sin esetében, a sutő mindkét oldalán.

Eltávolítaskor egyik kezevel tarta s teleszkópos sint, hogy ne essen a sutőbe, és ne okozzon sérülseket.

A teleszkópos sinek
eltávolításához varja meg,
amig lehú a sutó.
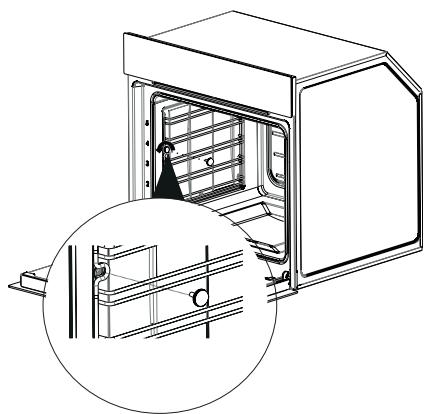
21. ábra
A sūtōben levō dróttálvány
tiszításához távolítsa el a sūtō
belsejében levō recés csavart az
óramutó jarásával ellentétés irányba
csavarva azt (21. ábra).
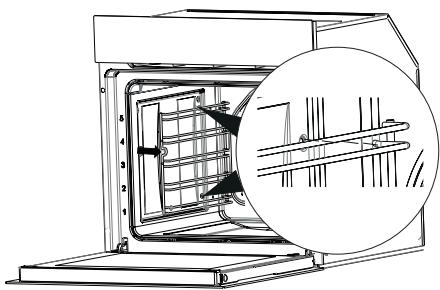
22. ábra
Húzza a dróttálványt a sutō belseje felé és távolítsa el a dróttálvány lábait a helyükról (22. ábra).
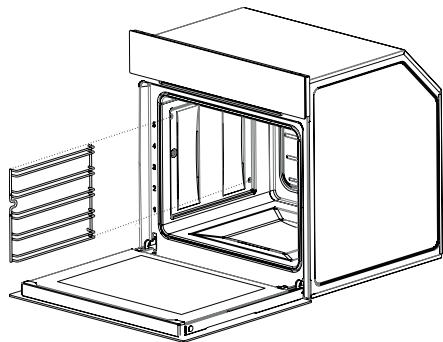
23. ábra
Vegye ki a dróttalványt a sutőból, miután kioldotta a dróttalványt a lábakból (23. ábra).
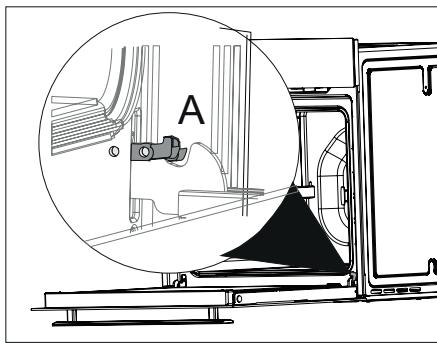
A sutojtajanakeltavolitasa
24. ábra
Nyissa ki teljesen az ajtó maga felé húzva azt (24. ábra).
Majd állītsa a zsanérzárat a
legszelesebb szögbe a (24/A ábrán)
látottak szerint. Állītsa ugyanebbe
a helyzetbe a sutó ajtajat a sutohöz
rögzító mindét zstanért.
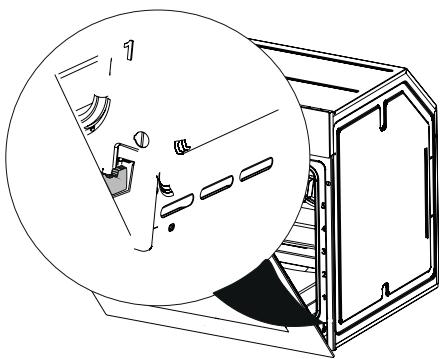
25. ábra
Zárba be a sutōajtó uyg, hogy érintkezzen a zsanérzárral, a (25. abrán) latottak szerint.

26. ábra
1 Zsanér
2 Zsanéhaz
A sutojtó eltavolitásához vegye le a zsanérokat a zsanéhrázrol az ajtó két kézzel fogva (26. ábra).

Az ajto felhelyezeséhez
kövesse forditott sorrendben
az eltavolitas lépeseit. Az ajto
visszahelyezesekor ne felejtse
el bezárnì a zsanér kapcsait.
A sutő üvegnek tiszítítása
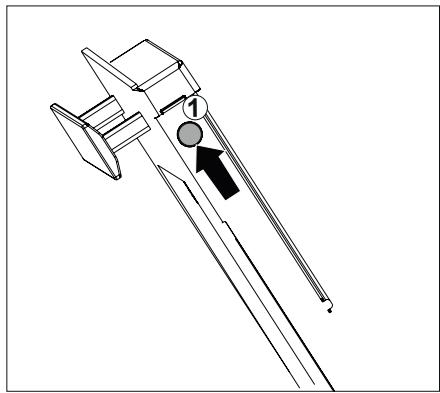
27. ábra
Nyissa ki kisse a keszülk ajtajat.
Nyomja be az ajto felso muanyag részének jobb es bal oldalat (27. ábra).
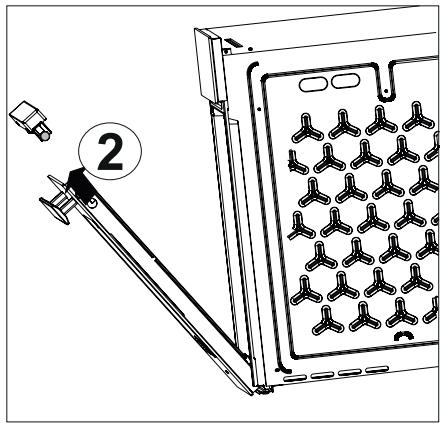
28. ábra
Távolítsa el a felső muányag részt (28. ábra).
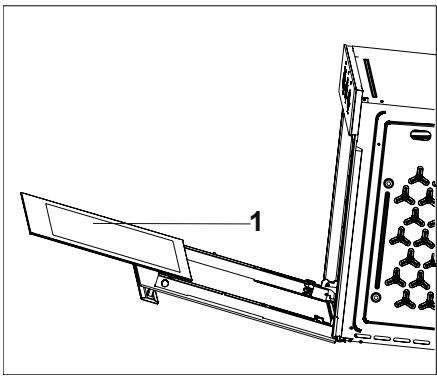
29. ábra
1-A sutobelso uvege
A keszülk belso üvegét távolítsa el a tiszításhoz (29. ábra).
Tisztítsa meg az üvegfeedelet egy szivaccsal, majd törölje szárazra egy ruhával.
A sutō üvegenek tiszṭitásához ne használjon erós surolószert és éles fémkaparót. Ha igy tiszṭījta, azzal megkarcolhatja az üveg felületét, ami az üveg eltoréséhez gezethet.
Ne tamaszkodjon a sutō ajtajára, és ne helyezzen súlyt rá.

VIGYAZAT!
Amikor az ajto az üveg
eltávolításakor hirtelen
könnyebbé valik, akkor hirtelen
becsukódhat, és sérülseket okozhat.

A sutó üvegenek
visszahelyezéshez kovesse a
folyamatot forditott sorrendben.
A sūtōajtó tōmītēse
Ha a sutot hosszú ideig
muködtetik, akkor az ajtó belso
felületén és az ajtó tòmtésen
páralecsapódás jelentkezhet.
Távolítsa el az esetleges
páralecsapódást egy száraz ruha
vagy szivacs segítségével.
A tomités állapotát rendszeresen ellenörizze. Szükség esétén tiszítsa meg surolószerek hasznalata nélkül.
Ha a tomitésen szennyezódés halmozódk fel, akkor egy idó után elófordulhat, hogy nem lehet megfeleloen becsukni a sutō ajtajat.
Ha a tomités megsérül, akkor kérjuk, forduljon a legkozelebbi hivatalos Silverline szervizhez. Ne használa a sütôt, amíg meg nem javítják.
13 A LÁMPA CSERÉJE

Az elektramos áramütés
kockázatának elkerülèse érdekében
a sutó lampájának cseréje elott
valassza le a tapellátást, és varja
meg, amíg lehül a sutó.
A forro felületek égési sérüléseket okozhatnak.
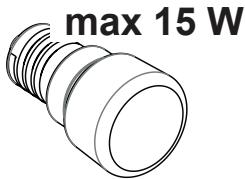
- abra 2 A/250 V AC
Csavarméret: E14
A lampa maximalis
energiafogyasztásat jelzi. A lampa
cseréjekor azonos névleges
teljesitményu lampát kell használni.

A termek altal hasznalt nevleges teljesitményt lasd a termek cimkejen.
A termékben hasznalt izzó nem alkalmas háztartások megvilágítására. A lámpa celja, hogy segítsegével konnyebben lássa a felhasznález az etelt.
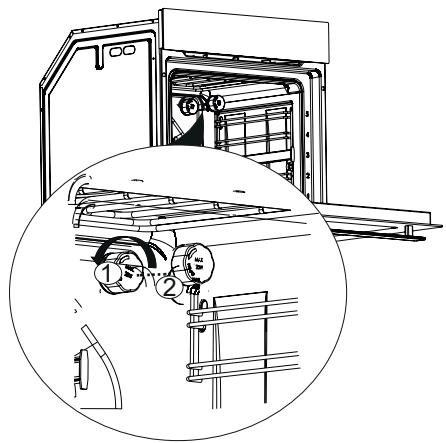
31. ábra
Húzza ki a készüléket.
Távolítsa el a lámpa burkolatát (31/1 ábra) az oramutató jarásával ellentétés irányba forgatva azt (31/2 ábra).
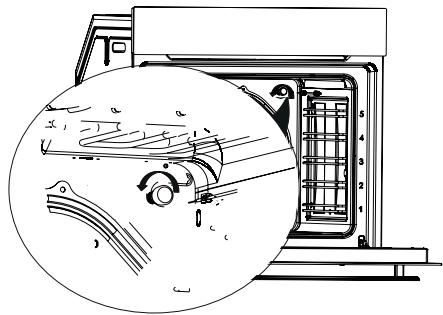
32. ábra
Távolítsa el és cserélje ki a sutólámpat az oramutató jarásával ellentétés irányba forgatva azt (32. ábra).
A lampaburkolat visszahelyezesehzvegeze el a (31. abran) leirtfolyamatot forditott sorrendben.
14 A fő funkciók magyarázata
A fó funkciók leirása alabb talalható.
| Funkció | A funkció magyarázata |
| F | Egy program tincs kiválasztva a készüléken. |
| Be van kapcsolva a felső és az also sütés. A hő egyszerre éri fentrol és alulról az ételt. Ez sūtemenyek, fasírozottak, vagy serpenyőben sütött sūtemenyek és raguk esétén alkalmazható. Süsseldorf. Süssön egy tepsi felhasználásával. | |
| Csak az also sütés van bekapcsolva. Ez a funkció pl. pizzák vagy olyan ételek sütésère alkalmas, amelyek algat kell megpirítani. Aquasmart tiszítási funkció | |
| Be van kapcsolva az also és a felső sütés, valamint a ventilátor (a hátsó falon). A ventilatórnak kösünhetően a forró levegő egyenletesen és gyorsan oszlik el a sütő besejében. Használjön egy tepsi a sütéshez. | |
| * | Be van kapcsolva a sütőt tetején található nagyobb grill. Nagyobb mennyiségő hús grillezésére alkalmas. Grillezéshez helyezze a nagy vagy kõzepes méretü adagokat a megfelelő pozićiban lévő rácsra, a grill fütőszál alá. Àllítsa a hősmersékletet maximál szintre. A sütési idő felénél fordítsa meg az ételt. |
| * | A nagyobb grille felfütött forró levegő a ventilatórnak kõszönhetően gyorsan eloszlik a sütő besejében. Ez nagyobb mennyiségű hús grillezésére alkalmas. Grillezéshez helyezze a nagy vagy böpezes méretű adagokat a megfelelő poziúban lévő rácsra, a grill fütőszál alá. Állítsa a hórmár sékletet maximális szintre. A sütési idő felénél fordítsa meg az éttelt. |
| Aktivalva van a felső sütés, az also sütés és a ventilatór. Az elkésztendő étel minded oldala egyformán és gyorsan elkészül. Használjon egy tepsit a sütéshez. Ezzel a funkcióval gyorsan elő is melegīthetni a sütôt. | |
| Az elkésztendő étel minded oldala egyformán és gyorsan elkészül. Egy vagy tòbb szinten történő sütéshez és pároláshoz. A ventilatór egyenletesen eloszlatja a sütôtérben a hátsó panelen található kerek fütőelemből érkező hét. Használjon egy tepsit a sütéshez. Ezzel a funkcióval gyorsan elő is melegīthetni a sütôt. | |
| * | A sütő nem melegít,Csak a ventilatór működik. A szemcsés fagyasztott étel lassan enged fel szobahörmsékleten, a fättét étel felenged. |

- Max. beallitáson alkalmazando. 230 °C'
15 SUTÉSI TÁBLAZAT
Helyezze az etelt a sutobe.
Válassza ki az uzemmodot és a hómersékletet.
A sutō az elore beallitott hòmér sékletre melegszik, és a kivalasztott sütési idö végéig megörzi ez't a hòmér sékletet.
A sutō kikapcsolása a beallitott idǒ elòtt
Kapcsolja ki a sutot a funkció-és/vagy a hòmér séklet-beállító gombok segítségével.
Sutési idok tablázata

A megadott ertekeket laboratoriumi körulmények kozott határozták meg. Az Ön ertekei ezektől eltérhetnek.

A suto 1. allvanya az also allvany.

VIGYAZAT!
Sütés kölben ne helyezzen alufoliat a sutō aljára. Ezzel tuzet okozhat, és károkat okozhat a készülékben vagy a butorban.
| Étel | Mūködési Funkció | Alkal- mazandó Tepsi | Áll- vány- pozició | Hömér séklet (°C) | Sütési idő (perc) kb. |
| Tepsiben süt ott sūtemény | Egyszintes | 3 | 175 | 25...30 | |
| Serpenyőben süt ott sūtemény | Egyszintes | 2 | 180 | 40...50 | |
| Lemezen süt ott sūtemény | Egyszintes | 3 | 175 | 25...30 | |
| Piskóta | Egyszintes | 3 | 200 | 5...10 | |
| Aprósütemény | Egyszintes | 3 | 175 | 25...30 | |
| Levelestészta | Egyszintes | 2 | 200 | 30...40 | |
| Bucik | Egyszintes | 2 | 200 | 25...35 | |
| Kelt tészta | Egyszintes | 2 | 200 | 35...45 | |
| Lasagna | Egyszintes | 2 | 200 | 30...40 | |
| Pizza | Egyszintes | 2 | 200...220 | 15...20 | |
| Marhahús (egész) / Ssalt | Egyszintes | 3 | 25 percig 250, majd 180...190 | 100, 120 | |
| Báránylám (ragu) | Egyszintes | 3 | 25 percig 250, majd 190 | 70...90 | |
| Ssaltcsirke | Egyszintes | 2 | 15 percig 250, majd 180...190 | 55...65 | |
| Pulyka (5,5 kg) | Egyszintes | 1 | 25 percig 250, majd 180...190 | 150...210 | |
| Hal | Egyszintes | 3 | 200 | 20...30 |
Az elomelegités minded típusú étel esétén javasolt.

Elomelegitest igenlyo sutes eseten melegitse ela sutot a sutes megkezdese elott, amig el nem eri a kivant homersekletet.
Tippek sūteményekhez
Ha a sūtemeny tūl száraz, akkor emelje meg a hómér sékketet 10 °C-kal és csökkentse a sütési idǒt.
Ha a sūtemény túl nedves, akkor használjon keveseabb folyadékot, vagy csökkentse a hòmér sékletet körülbelül 10 °C-kal.
Ha a sūtemény teteje megég, akkor helyezze az also rácsra, csökkentse a homérsekletet és növelje a sūtesi időt.
Ha a sūtemeny beseje megfeleloen átsül, de a külseje ragacsos, akkor használjon kevesebb folyadékot, csökkentese a hómér sékletet és növelje a sütési időt.
Tippek cukrászsuményekhez
Ha a cukrászsütemény tól száraz, akkor emelje meg a hómér sékletet 10 °C-kal és csökkentse a sütési időt. Nedvesítse meg a tésztalapokat tejból, vajból, tojárból és joghurtból készült öntettel.
Ha a sūtemeny sūtesi ideje tú lhoszú, akkor gyōzǒdjön meg arról, hogy a sūtemeny vastagsága nem haladja meg a tepsi magasságát.
Ha a sūtemeny teteje átsül, de az alja nem, akkor a sūtemeny aljára kenjen kevesebb öntetet. Próbalja meg egyenletesen eloszlatni az öntetet a tésztalapok kozott és a sūtemeny tetején.

Suisse meg a cukrászsütemenyt a sütési tablázatban megadott pozión és hórmésklen. Ha a sütemény alja igy sem sul meg megfeleloen, legközelebb helyezze az also rácsra.
Tippek zöld séges fogásokhoz
Ha a zöld séges fogás leve eltünik, és kiszárad, akkor tepsi helyett sùsse lezárt edényben. A lezárt edények megőrzik az étel levét.
Ha a zöld séges fogás nem sül meg megfeleloen, akkor elóször fözze meg a zöld ségeket, vagy készítsen belöluk beföttet, mielott a sutő be helyezné öket.
Importor:
MULTIKOMPLEX BUDAPEST KFT.
A páraelszívók szakértője... 1995 Óta
H-1211 Budapest Mansfeld Péter utca 27.
(Volt Bajáki Ferenc utca)
tel.: +(36-1) 427 0325, +(36-1) 427-0326;
fax: +(36-1) 427 0327
www.multikomplex.hu

CNA
group
CATA ELECTRODOMÉSTICOS, S.L.
Oficinas c/ Anabel Segura, 11, Edif. A, 3a pl. 28108. Alcobendas. Madrid. España
Fábrica: c/ del Ter 2, Apdo. 9.08570. Torello.Barcelona. España
T. +34 938 594 100 - Fax +34 938 594 101
www.cnagroup.es - cna@cnagroup.es
Atencion al Cliente: 902 410 450 / +34 938 521 818 - info@cnagroup.es
SAT Central Portugal: +351 214 349 771 - service@junis.pt
MDS 7208 X - MDS 7208 WH - MDS 7208 BK
EN Installation, use and maintenance instructions
1, en_US
Table of contents
1 PREFACE 4
2 IMPORTANT INFORMATION REGARDING SAFETY 5
3 SPECIFICATIONS OF THE OVEN. 10
4 INSTALLATION OF APPLIANCE 13
5 INSTALLATION OF THE OVEN TO THE CABINET 15
6 POWER CONNECTION 18
6.1 Energy Efficiency of the Oven 21
7 INTRODUCTION OF APPLIANCE 23
7.1 Accessories of the Oven 24
8 BEFORE FIRST USE 25
9 SPECIFICATIONS AND OPERATION OF THE APPLIANCE 26
9.1 Specifications of the Oven 26
10 THE USE OF THE DEVICE 32
10.1 Temperature Setting of the Appliance 32
11 USING TELESCOPIC RAILS 33
12 CLEANING AND MAINTENANCE OF THE APPLIANCE 36
13 REPLACEMENT OF THE LAMP 42
14 MAIN FUNCTION DESCRIPTION 44
15 COOKING CHART 46
1 PREFACE
DEAR COSTUMER
We sincerely thank you for purchasing our product.
This product has been manufactured at modern facilities respectful to the environment without harming nature.
Please read all instructions and warnings in this user manual carefully. This manual includes important information for safe installation, use and maintenance of your product and necessary warnings to get the most out of your appliance. Keep this manual in a safe place where it can easily be reached to use it when required in the future. The manufacturer shall not be held responsible for damages to persons, environment or other materials that may occur due to the translation or printing errors of this manual, or improper operation of the appliance.
2 IMPORTANT INFORMATION REGARDING SAFETY
Operating voltage of your oven is 220 to 240 Volts.
Connect your oven to a fuse with a rating of 16A. If the current value of the fuse in your house is less than 10A, have a qualified electrician install a 16A fuse.
Always use your oven with a grounded power outlet. Have an authorized electrician set grounding equipment. Our company shall not be held responsible for damages that might occur as a result of using the product with an ungrounded outlet.
This section includes the safety instructions necessary to prevent the risk of personal injury or material damage. Not observing these instructions may void any warranty and our company shall not be responsible for any damage that may occur.
If the electrical connections inside the appliance are taken out so that they may be accessible, cut off the power of the appliance against an electric shock and contact the authorized service.
Avoid contacting the heating elements inside the oven as it shall overheat during operation. Be careful as the oven surface may get very hot during the grilling function.
- Flammable objects that are kept on the cooking compartment may get ignited. Do not keep the flammable flammable objects on the cooking compartment.
Use oven gloves when you are taking hot food or utensils such as trays, etc. from the oven or the grill. Components of the oven the utensils (tray, etc.) used shall be very hot during operation.
The appliance and its accessories becomes hot during operation. Avoid touching heated parts.
- Do not open the door of the appliance if smoke is coming out of it. Turn off the appliance, unplug it or switch off the circuit breaker.
Cooking paper may come in contact with heating elements and catch fire. Do not randomly place cooking paper during pre-heating on the accessory. Always place a container or a cake tin on the cooking paper. Place the paper only on the required area. The cooking paper shall not be on the accessory.

CAUTION!
This appliance may be used by children above age of 8 and persons with limited physical, perceptual or mental abilities or persons with a inadequate of experience and knowledge only if they are supervised by an adult or when they comply with the instructions given on the operation of the appliance and understand the risks that may be encountered.
Children shall not play with the appliance.
Cleaning and maintenance of the appliance shall not be carried out by children without supervision.
The device may heat up during operation. Be careful while touching the heating elements inside the oven. Keep away from children.
- Do not use harsh and abrasive cleaning agents or sharp metal scrapers to clean the door glass of the oven as this may cause breaking of the glass or scratching of the surface.
Ovens shall be installed away from flammable environments.
Use the temperature probe recommended for this oven only.
- Do not use steam cleaners to clean the oven.

CAUTION!
Unplug the appliance or cut off power from the main switch to prevent electrocution before replacing the lamp.
In case of a damaged power cord, it shall be replaced with a specific cord or a cord that is approved by the manufacturer or the authorized service.
To prevent damages that may be caused by improper placement of the thermal circuit breaker, this device shall not be connected to external circuit devices such as timers or always-on or always-off circuits.
Accessible parts may be hot. Keep away from children while grilling.
Spilt food stains shall be removed before cleaning.
WARNING'S BEFORE INSTALLATION AND DURING INSTALLATION
The appliance shall always be installed by a Silverline Authorized Service.
- Your appliance features a high performance air circulation system for better cooking and cleaning. Follow the instructions on installation to ensure this.
- Appliance shall be placed on the installation cabinet so that its rear faces the wall.
Ensure you remove all packaging material before starting to operate the appliance.
Use your appliance according to the intended use explained in the operation manual only.
This appliance has been designed for cooking at home kitchens only. It is not suitable for industrial or laboratory operation.
Do not use or leave the appliance outdoors.
- Do not use the appliance near water bodies, on a wet ground or in the vicinity of a pool.
This appliance is not designed to be operated with an external timer or with a remote control system.
This appliance is not suitable to be operated by children, persons with mental disabilities or by inexperienced persons without a competent adult who shall take responsibility.
- Do not operate the appliance until it is repaired by an authorized service if the door or the gaskets on the door of the appliance are damaged.
- Do not hang down the power cord from the edge of the table or the countertop.
All maintenance and repair shall be performed only by authorized service and only original spare parts shall be used.
WARNINGSON OPERATION
Ensure you remove all packaging material before you use your product.
This appliance shall not be used for a purpose other than cooking. It is dangerous and inappropriate to use it for any other purpose (e.g. to heat the room it is in). Our company shall not be held responsible for damages that may occur on people, animals or objects due to improper, incorrect or impractical operations of the oven.
When you operate the oven for the first time, a smell caused by the insulation materials and heating elements may occur for once. In such a case, operate the oven without putting any food inside it for 30 minutes at maximum temperature with the upper and lower heater (and 3D, if applicable) function turned on.
Never cook or fry on the bottom of the oven.
- Do not cover the bottom of the oven with aluminium foil.
Unplug the appliance while moving, cleaning, or servicing the oven.
- Never attempt to remove the plug by pulling it from the cord.
- Never touch the appliance if your hands or feet are wet or damp.
- Do not allow children or minors to use the appliance without supervision.
In case of negligence, the oven door may hurt your hands if it is removed from its hinge.
In case of failure or improper operation of the oven, turn it off and unplug the oven.
When the oven is not used, ensure that all functions are switched to the "OFF" position.
Always wear oven gloves while removing the tray from the oven.
Always keep the oven clean for your safety and to ensure the cleanliness of the oven. Oil residues left inside the oven after operation may damage the surface of the even in the course of time.
All maintenance and repair operations shall be performed by authorized service and original spare parts shall be used only.
Our company shall be held responsible for any damages caused by hazardous or improper operation of the oven.
Damage to your oven may occur if you do not follow any warning given above.

CAUTION!
Do not use the oven handle on the front door to carry the oven or to remove it from its packaging.
If a power failure occurs, the product stops cooking. Depending on model of the product, you may continue to cook when power is restored or you may need to adjust the cooking time again.
- Open the oven door at least 3 minutes after the end of cooking to avoid steam condensation in front of the watch.
DECLARATION OF CONFORMITY
The components of this appliance that may contact with food comply with the requirements of the EEC Directive no. 89/109.
CWith the CEE marking, we declare that it is responsibility to ensure the compliance of this appliance to the European directives and meeting the legal requirements in terms of safety, health and environment.
Ensure that the oven is good condition and not damaged when you take it out of its package. Do not use the appliance in case of any doubt: contact a specialized professional.
Put packaging materials such as nylon packaging, polystyrene foam and nails away from the reach of children as these may pose a danger for children.
-
Keep the original package of the appliance.
Use the original packaging to transport the appliance, follow the handling signs on the package. If the original packaging is missing;
Avoid impacts to the outer surface of the appliance. -
Do not place heavy loads on the appliance.
During transporting, place your appliance parallel to the ground (with the upper side facing up).
Packaging
All packaging materials are recyclable. Dispose of remains of packaging material in recycling containers to help protection of the environment.
Disposing of Old Appliances
Appliances that are too old or not in operable condition shall not be disposed of directly in the trash. Old electrical and electronic devices may contain components that may be reused and utilized.
Otherwise, the appliances that include components that operate the appliance and the ones sent to the landfill may include materials that may be harmful to the environment.
Therefore, deliver your appliance to the certain collection centers by consulting your manufacturer to ensure that the electrical and electronic parts are re-used.
Keeping this user manual is recommended since this provides information regarding the operation of the appliance, if the appliance is provided to another user. You have to prevent the potential negative outcomes against human health and environment before scrapping and disposing of this appliance. Otherwise, the appliance will be an unsuitable waste.
This symbol on the product aims the appliance to be considered as domestic waste, and to warn for delivery to electrical and electronic waste collection centres. Appli
ance disposal must be conducted in accordance with local environment regulations. You can obtain detailed information on disposing of the appliance, reusing and recycling it from authorities.
3 SPECIFICATIONS OF THE OVEN
These appliances are designed to operate with a single phase supply voltage of 220-240V at 50-60Hz.
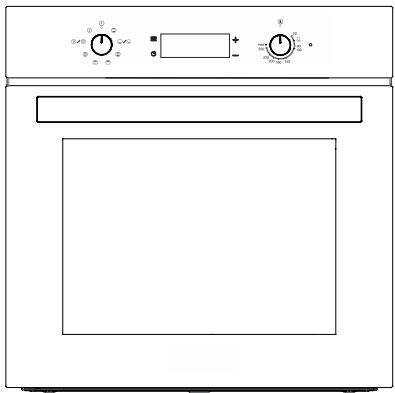
Fig. 1
| MDS 7208 X - MDS 7208 WH - MDS 7208 BK | |
| Function | 8 |
| Oven Lamp | 15 W |
| Product Dimensions (Width) | 595 mm |
| Product Dimensions (Depth) | 547 mm |
| Product Dimensions (Height) | 595 mm |
| Product Installation Cabinet Dimen-sions (Width) | 560 mm |
| Product Installation Cabinet Dimen-sions (Depth) | 550 mm |
| Product Installation Cabinet Dimen-sions (Height) | 600 mm |
| Capacity | 72 lt |
| Voltage | 220-240 V |
| Maximum Power | 2650 W |

The place measurement where the product will enter is taken according to
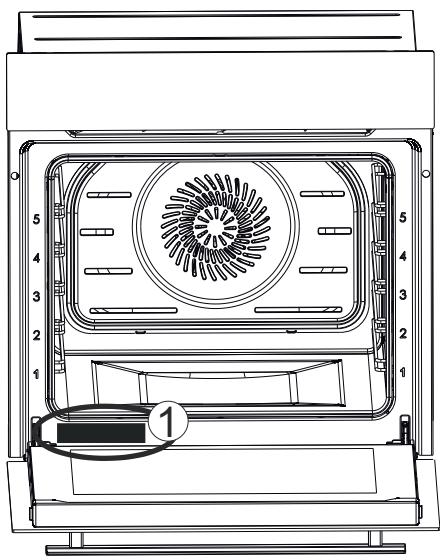
Fig. 2
You may access the nameplate of the oven indicating technical specifications of the oven even after installing the oven in the kitchen. You may see this nameplate when you open the door the oven. Use the information provided in this nameplate to specify the model of your oven while ordering a spare part (Fig. 2/1).
4 INSTALLATION OF APPLIANCE
Installation of the appliance shall be performed by Silverline Authorized Service. Our company shall not be held responsible for damages that may occur on people, surroundings or other materials due to incorrect installation of the appliance.
Inspect the appliance after opening the packaging. Do not perform the connection of the appliance in case of a transport damage.
Carefully read the installation pages for the installation of the accessories.
Take off and remove all packaging materials and adhesive tapes from the cooking compartment and the door before operating the appliance.
The appliance may be installed in two different ways: under the counter or inside a wall cabinet. Installation dimensions to be used for these options are provided below.
Do not install the appliance behind a decoration or a furniture cover. This would pose a risk due to overheating.
Cutting operations on the furniture shall be performed before the installation of the appliance. Remove any burrs. They may have an adverse effect on the functioning of electrical units.
Use protective gloves to prevent injuries.
You shall provide the clearances shown in the drawings for ventilation and cooling inside the cabinet or cupboard to ensure correct operation of the appliance.
Walls of furniture where the appliance is installed shall be resistant to heat. Particularly if the side walls are made of coated particleboard, the coating shall resist up to 120^ . Plastic or adhesive coating that are not resistant to the specified heat may get deformed and damaged.
A support that may handle the weight of the oven shall be put under it while placing the oven.
For safety reasons, direct contact of the appliance with electrical parts shall be prevented when the installation is complete.
Parts that provide insulation and protection shall be installed so that they cannot be removed by using any tool.
We recommended you to install the appliance in a wall cabinet to ensure a more efficient air circulation.
Rear compartment of the cabinet in the kitchen unit shall be removed to ensure a more efficient air circulation.
We recommended you to provide a minimum clearance of 70~mm from the rear of the kitchen unit where the appliance is installed.
We do not recommend installation of the appliance near a refrigerator or deep freezer. Otherwise, the performance of such appliances shall be affected adversely due to the dissipated heat.
To make your oven ready for operation, have the location it shall be placed in built with the electrical installation. Then, call the Silverline Authorized Service.

Dimensional information provided in the drawings are given in mm.
5 INSTALLATION OF THE OVEN TO THE CACINET
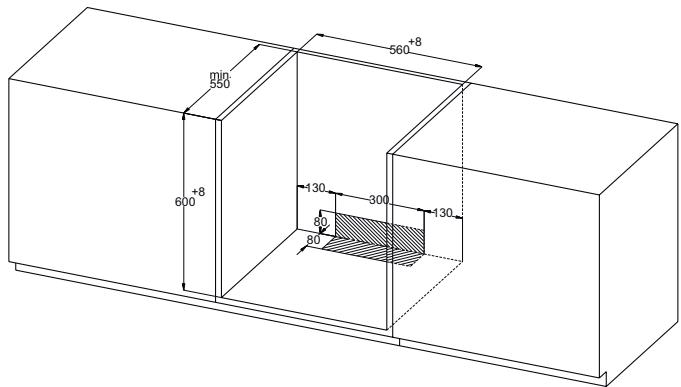
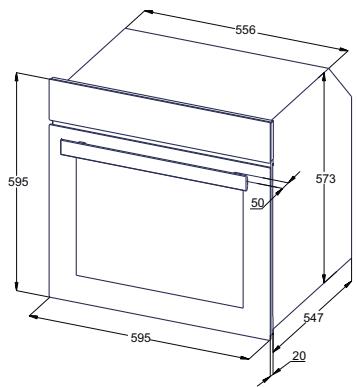
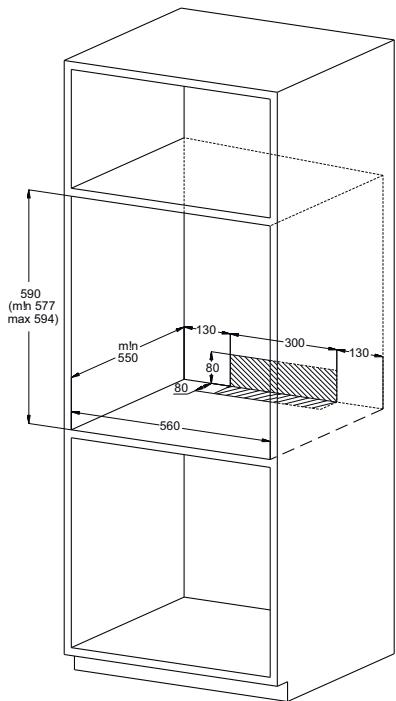
Fig. 3

Visuals in the manual are for reference
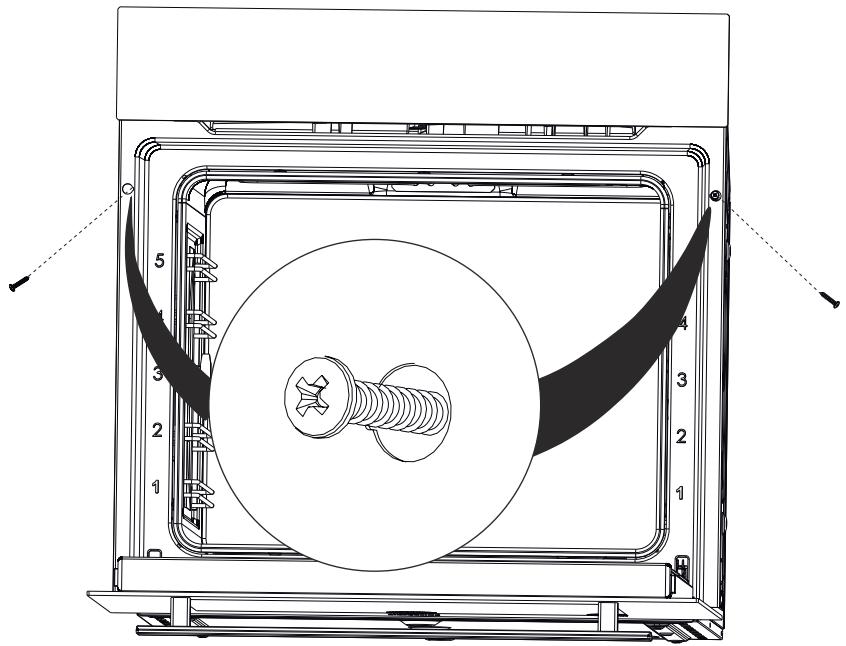
Fig. 4
Place the appliance by centering it inside the built-in appliance cabinet.
- Open the door of the appliance and drill holes by aligning with the holes on the body of the oven using a drill with a screw diameter of 3.9 × 22 , and install the screw.

Installing the screw without drilling a hole suitable for the screw diameter in the furniture may cause damage to your furniture.
- Be careful not to damage the installation holes by applying too much pressure on the screws during installation.
The appliance may be installed on a high-placed cabinet or under the counter as desired.
We recommended you to provide a minimum clearance of 70~mm from the rear of the kitchen unit where the oven is installed
Parts that provide insulation and protection shall be installed so that they cannot be removed by using any tool. - When a built-in stove is installed on the counter on top of the oven, power cords of the oven and the stove shall be separated for safety purposes and to ease the removal of the oven from this stove when required.
6 POWER CONNECTION
The appliance shall be connected to the main electrical installation as per the current rules and legislation and by an authorized service only.
Ensure that the power received from the mains meet the power specified in the nameplate placed on the bottom front of the appliance.
If the current value of the switch in your house is less than 16A, have a qualified electrician install an 16A fuse switch.
The appliance shall always be grounded. Have an authorized electrician set grounding equipment.
Power cable of your oven is fitted with a grounded plug. This plug must be used with a grounded line.
- Place the appliance so that the outlet or double pole switch used for power connection may be reached easily.
- Do not place the power cord in contact with hot surfaces and do not pinch it to the product cover.
The temperature of the power cord shall not reach a temperature that is 50^ above the ambient temperature.
Please contact the nearest Authorized Service when the power cord gets damaged. Have the authorized service replace the cord with a new one with the same dimensions and plastic insulation and that may withstand the electrical current required by the appliance.
If the appliance shall be connected directly to the mains, a double pole switch suitable for carrying the desired load as per the current legislation and with a clearance of 3mm between its contact points shall be installed between the appliance and the mains. Grounding wire shall not be cut off by the double pole switch.
We do not recommend usage of adapters, multi sockets or extension cords. If it is absolutely required, you may use adaptors or extension cords by complying with the applicable safety legislation. However, you shall never exceed the maximum current capacity and the maximum power specified for the adaptor.
Test the heating elements for 3 minutes when the connection is complete.

Electrical safety of the appliance is guaranteed when it is correctly connected to a suitable source with proper grounding as per the applicable rules only. Our company shall not be held responsible for damages that may occur on people, animals or objects due to improper grounding of the appliance.
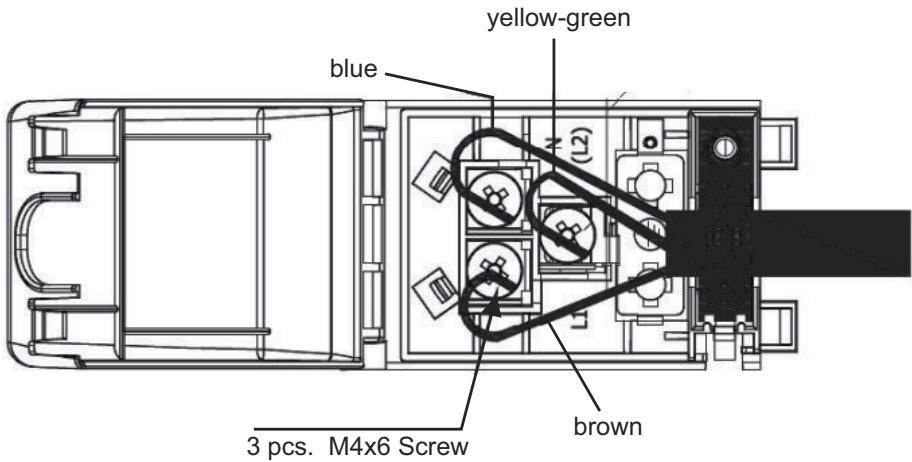
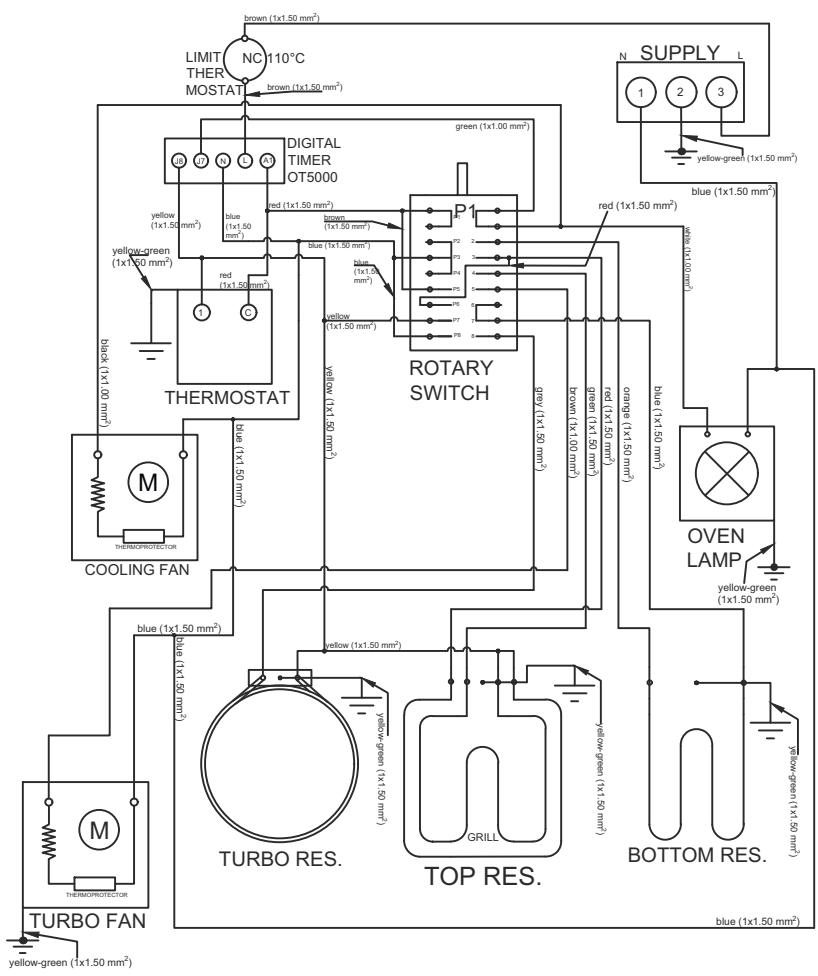
Fig. 5
THINGS TO DO FOR THE FIRST OPERATION OF THE APPLIANCE
Set the temperature to maximum level.
Set the function button to lower and upper grill position (or 3D position, if applicable).
Operate the oven in empty condition for 30 minutes in this way.
Open the windows to ventilate your room.
At this time, a smell and smoke caused by the insulation materials and heating elements may occur for once. In such a case, wait until the smell and smoke wears off before putting any food inside the oven.
Clean the inside of the oven using a soft cloth slightly dampened with soapy water.

Fig. 6
Always grab the handle from its center to open the oven door.

CAUTION!
Wash the components such as tray or grill with alkaline (non-abrasive) cleaning agents before operating the oven for the first time.
6.1 Energy Efficiency of the Oven
Ovens with high efficiency of power and with heat insulation shall be preferred.
- Opening the oven door frequently during cooking allows the cold air enter inside the oven each time, thus it causes loss of energy. Therefore, do not open the oven door more than required.
Try to cook multiple dishes simultaneously in the oven. Take the meal cooked with a lower temperature out first, and use less energy without changing the oven temperature.
Excess heat remaining after cooking a meal shall be used for the next meal, too. This shall save power.
Use the pre-heating function of the oven for a short time (10 minutes at maximum).
Energy Efficiency of the Oven
- Frozen food shall be thawed before cooking in the oven.
The oven would continue cooking with the current temperature using less energy when it is turned off a few minutes before the cooking time.
7 INTRODUCTION OF APPLIANCE
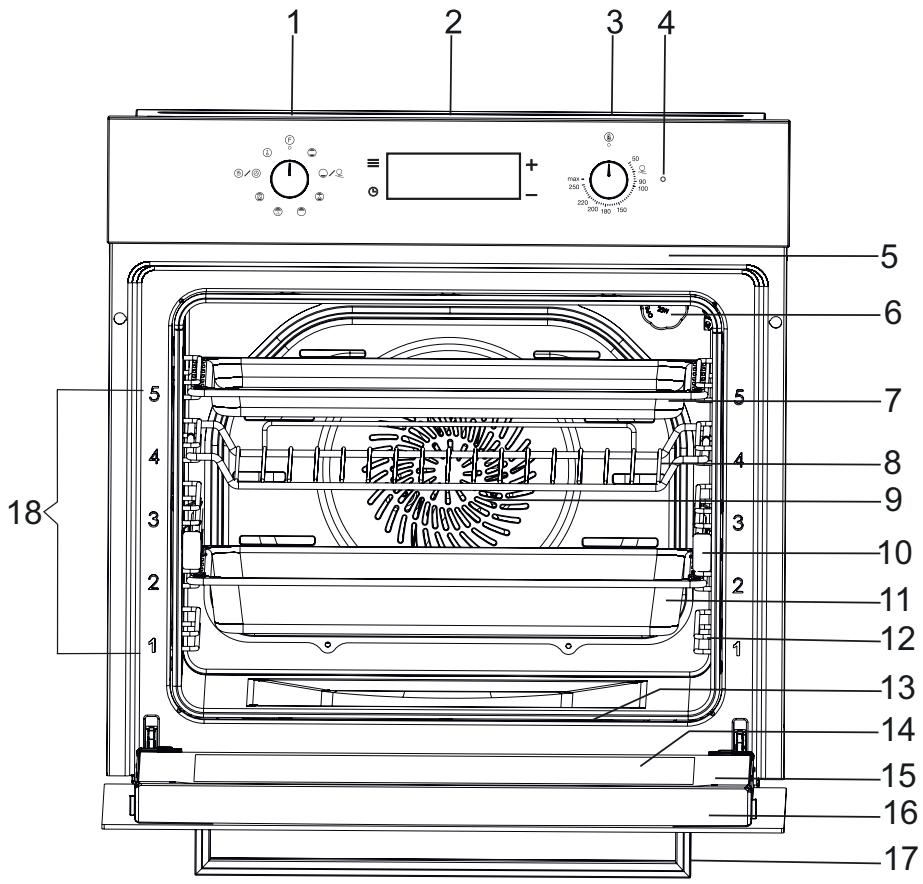
Fig. 7
1- Function Selection Button
2- Touchscreen Timer
3- Oven Temperature Setting Knob
4- Warning Lamp
5- Upper Resistance
6-Lamp
7- Shallow Tray (Option)
8-Oven Grill
9-Fan
10- Telescopic Rails
11- Deep Tray
12 Wire Rack
13- Lower Resistance
14- Internal Glass
15-Oven Door
16- Door Top Plastic
17-Oven Handle
18-Rack Level
7.1 Accessories of the Oven
Clean the accessories of the oven before first operation. After cleaning and washing with a sponge, wipe them dry.
Remove any accessories you do not need from the cooking compartment.
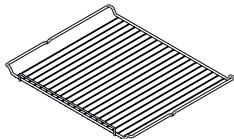
Oven Grill
Fig. 8
Plate, for cake pans and ramekins For frying, frying pieces and frozen food.
Wire racks remain in horizontal position even when they are pulled out of the oven thanks to their special structure. There is risk of sliding the plate and spilling the food.
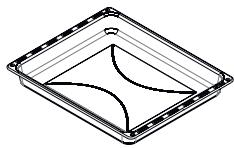
Deep Tray
Fig. 9
Universal pan For cakes, soft cakes, frozen food and meat dishes with big pieces of meat.
It may be used as grease collecting plate when you grill directly on the wire grill.
Telescopic Rail


Fig. 10
For racks and trays.
Telescopic rails increase the oven rack level. When telescopic rail is used, there is no risk of slipping and spilling the food.
8 BEFORE FIRST USE
You shall make some settings first before using your new appliance.
Cleaning of the cooking compartment and the accessories
Clean the cooking compartment and the accessories first before cooking a meal for the first time.
Cleaning of the cooking compartment
Heat the cooking compartment while it is empty and closed to remove the smell of a new appliance.
Ensure that no packaging residues such as styrofoam are left inside the cooking compartment and remove adhesive tapes on or inside the appliance. Wipe the straight surfaces of the cooking compartment with a soft, damp cloth before heating. Ventilate the kitchen as long as the heating operation continues.
Clean the straight surfaces with detergent water and a dish cloth after cooling of the cooking compartment.
Cleaning of the accessories
Clean the accessories thoroughly with a soft brush or detergent water and a dish cloth.
9 SPECIFICATIONS AND OPERATION OF THE APPLIANCE
9.1 Specifications of the Oven
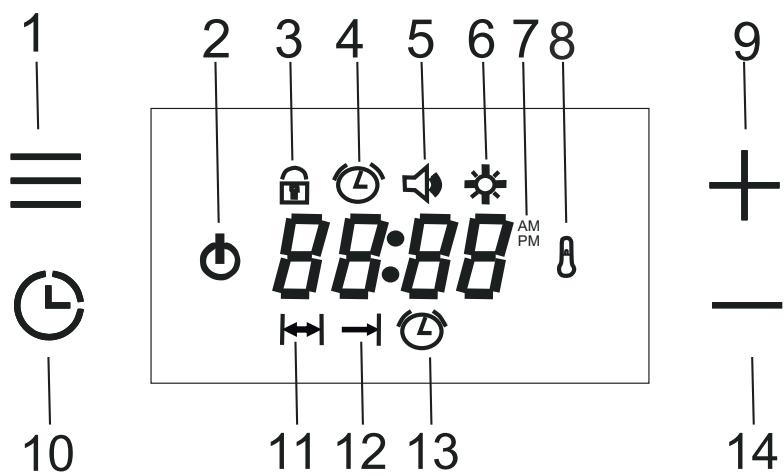
Fig. 11
1- Menu Button
2- Function Commutator
3- Child Lock
4-Day Time
5- Alarm Sound Volume
6- Screen Brightness Setting
7- AM/PM Time Display
8- Thermostat Icon
9- Plus Button
10- Program Button
11-Brewing Time
12- Cooking End Time
13- Alarm
14-MinusButton
Menu Key Usage:
Each time pressed on this button, the child lock, time setting (if cooking time is not set), alarm sound volume setting and screen brightness setting modes are activated in order and the relevant symbol is displayed during the setting.
Program Button:
Each time pressed on this button, cooking end time (if cooking time is set) and alarm sound volume setting modes are activated in order and the relevant symbol is displayed during the setting.
Child Lock
This function serves to prevent unintended changes of the settings made by the user on the oven clock.
If the child lock is activated when a cooking program is not running and the oven is turned off, the keys will be locked and the oven will be deactivated. All buttons except menu button will be deactivated. The on the oven clock will flash.
The oven will not be operated until the child lock is deactivated.
If the key lock is activated while there is an active cooking program, only the keys are locked. All buttons except menu button will be deactivated
The lock symbol on the oven clock will illuminate. When the child lock is active, when the cookin gprocess is completed and the function controller is set as closed, the child lock function will be activated and the oven cannot be operated again.
The oven clock shall be available for operation when the key lock is cancelled.
To activate the key lock, when you are not in any menu, respectively;
When "Menu" button is touched once Key Lock) icon flashes. 'OFF' text appears on the screen.
'+' by tapping this key, deactivate child lock. 'ON' appears on the screen, and the icon remains fixed on the screen.
I want to deactivate the child lock
When the 'Menu' key is tapped, the icon flashes on the screen. 'ON' text appears on the screen.
'-'by tapping this key, deactivate child lock. "OFF" appears on the screen and the icon disappears from the screen.
Clock Setting;
When the product is connected to the supply source, the time of day icon pops up on the display and the OFF text flashes.
To use the oven, press the menu button once, then clock is set by using "+" / "-" buttons. After the time has been set, you can end the setting mode by tapping the Menu key or waiting 5 seconds and the time of day disappears from the display.
To set the day time being previously set for your oven, when you are not in any menu, respectively:
When you tap the "Menu" key twice, 已 symbol flashes.
press ^ +^ / keys to set the time of day.
After setting the time, end the setting mode by touching the "Menu" button or by waiting 5 seconds.

The day time cannot be set if any cooking setting is done.
Clock Setting Mode 24h/12h Option
The default setting is 24 hours. To switch to the 12-hour (AM/PM) mode, touch the "Plus (+) key for 5 seconds when you are not in any setting mode and there is time on the screen, a beep sound is heard when the mode changes. In 12-Hour Mode, The "AM" or "PM" icon is displayed on the screen. The same process is made to pass to the other mode.
Alarm Tone Setting
To change the alarm tone, when you are not in any menu, respectively:
When you tap the "Menu" key three times, 品 symbol flashes on the screen
press' + 'and' - 'to select the desired volume.
After adjusting the volume, touch the Menu key or wait 5 seconds to end the setting mode.
The factory default setting is "b-03", which is the highest volume.

NOTICE!
The adjusted sound volume is displayed as "b-01, b-02 or b-03" and the related icon disappears at the end of setting mode.
Screen Brightness Setting:
To change the screen brightness, when you are not in any menu, respectively:
When you tap the "Menu" key four times, symbol flashes on the screen.
press ^+ and - to select the desired brightness level.
After setting the brightness level, touch the Menu key or wait 5 seconds to end the setting mode.
The default setting is "d-03" and it is the brightest level.
3. TIMER FUNCTIONS
Auto-cooking means that in an oven where the cooking function is selected and the temperature is set, the timer will be set to end automatically.

If you want to operate the oven without a timer, you can set the function controller and the thermostat and start cooking.

When the oven is not in use, the function and thermostat switches must be in off position. If not, the cooking will continue for an indefinite time.
Semi-Automatic Cooking:
This method is used when it is desired that the cooking is started immediately, and the desired cooking time is entered.
The icon flashes when the Program key is touched once
adjust the cooking time by tapping the +' and - keys. After setting the cooking time, the icon remains fixed on the display.

NOTICE!
In cooking programs set up in under an hour, the time appears on the screen in minutes and seconds.
Full Automatic Cooking
This method is used when the food is desired to be ready at a certain time in the future. Therefore, it is also called as the delayed cooking.
The icon flashes when the Program key is touched once
press ' + ' and ' - ' to adjust the cooking time and exit the cooking mode.
When you tap the Program key twice, symbol flashes.
tap ' + ' and ' - ' to adjust the cooking time you want. the light on the (cooking time) and (cooking end time) icons remains lit.
When the cooking start time is reached, the icon disappears on the display and the symbol remains on the display with the remaining cooking time.
When the cooking is completed;
The icon flashes in the display, End appears and the alarm signal starts to run for 7 minutes.
Press the Program key to cancel the Alarm. The End text disappears from the screen, and the time of day appears on the screen.

When the alarm sounds, End will not disappear when the alarm is silenced by touching any key other than the Program key. Only the alarm is silenced.
To Cancel the Automatic Cooking Time;
- Cancel the cooking program and reminder timer if installed by pressing the Program key for about 3 seconds. The End caption and (Cooking Time) icon appear on the display.
Another option is;
When the Program key is touched, (Cooking Time) icon flashes. touch ' - ' the set cooking time is reduced to 00: 00. The "End" caption and (Cooking Time) icon appears on the display.
Reminder Timer
You can use the oven clock as an alarm or reminder timer. To set the alarm, respectively:
The icon flashes when the Program key is touched 2 times (3 times if cooking time is set).
- Set the desired alarm time by tapping the "+" and "-" buttons. Once the alarm is set, the corresponding icon remains lit on the display and is displayed until the alarm time is reset. The maximum time that may be set is 23 hours and 59 minutes.
When the alarm time is completed
The ⑤ icon flashes on the display and the 7-minute alarm signal starts to sound.
Pressed to any button to cancel the alarm and then turns back to show the day time on the screen.
To cancel the set time;
Press the Program key for approximately 3 seconds to cancel the reminder timer and, if installed, the cooking program, or touch the Program key until the 念 icon flashes. by tapping '-', the alarm time is set to "00:00" and the reminder timer is cancelled.

If the alarm time and cooking time are set same, then the shorter one is displayed.
COMMUTATOR INPUT FUNCTIONS
1 Function Commutator
When the function commutator is turned to any ON position, the O icon appears on the display.
The icon disappears when the function commutator is switched off.
2. Thermostat
If the oven temperature is lower than the set temperature, the icon appears on the screen.
When the oven temperature reaches the set temperature, the icon disappears from the screen.

Thermostat symbol indicates the current temperature of the oven. It cannot utilize cooking in the oven alone. However when a function is selected with function controller, the cooking process can be utilized.

When the cooking time is set, the function commutator and thermostat icon disappears from the screen after delayed cooking is set, until cooking starts, and after power outages that require clock setting.
10 THE USE OF THE DEVICE
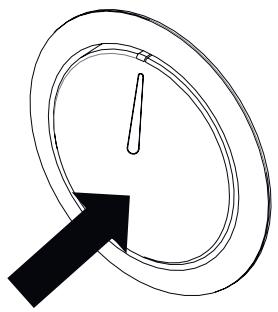
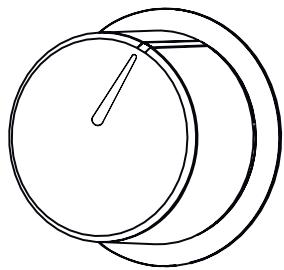
Fig. 12: Pop out off
Fig. 13: Pop out on
The buttons of your oven are the type of pop-out buttons that pop out when pressed in.
Press inward to pop out the button and then adjust (Fig. 12).
When cooking is finished, turn the switch to the off (top) position and press it inwards (Fig. 13).
10.1 Temperature Setting of the Appliance
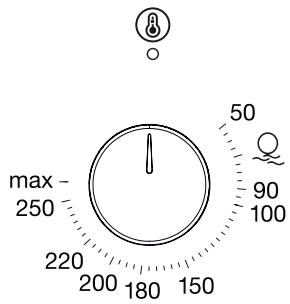
Fig. 14
Your appliance starts heating just a few seconds later when you set the temperature.
Turn off the appliance by bringing the function selection switch to zero position when your food is ready.
11 USING TELESCOPIC RAILS
HOW TO USE TELESCOPIC RAIL
Removing Telescopic Rails
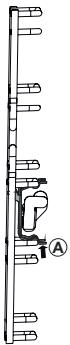
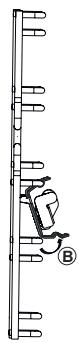
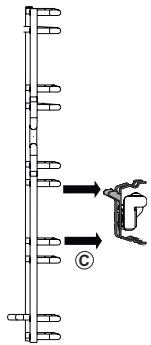

When you remove Telescopic rails, hold it with one hand in order to prevent it falling in the oven and causing damage.

To remove the telescopic rails, wait for the oven to cool down.
To remove telescopic rail from the shelf, hold the telescopic rail handle as seen in Fig. 15/A and then lift it up as seen in Fig. 15/B. (Fig. 15/C).

Fig. 15
Repeat this process for all telescopic rails on both sides of the oven.
Inserting Telescopic Rails
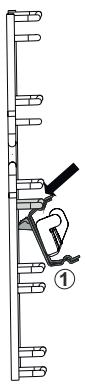
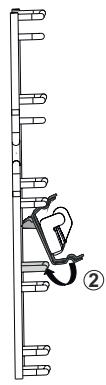
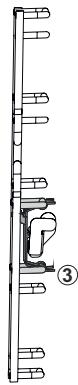
Fig. 16
To insert the telescopic rails to the grill shelf, hold the handle on the rail and insert as seen in Fig. 16/1. Then place the handle on the rail to the grill shelf seen in Fig. 16/2 to achieve the image seen in Fig. 16/3.
Using Telescopic Rails
By using telescopic rails, you can use the trays and grills with ease.

Do not wash telescopic rails in the dishwasher.
Do not oil telescopic rails


Prior to closing the oven door, ensure the telescopic rails are fully inserted in the device.
Using the Wire Grill
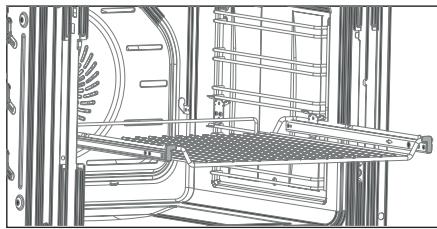
Fig. 17
Place the wire grill to the telescopic rails with their legs looking down (Fig. 17).
Using Cooker

Fig. 18
Place the cooker on the telescopic rails (Fig. 18).

The high edges around the telescopic rail is a special design to prevent the cooker to slip.
12 CLEANING AND MAINTENANCE OF THE APPLIANCE
General Cleaning
Always allow the appliance to cool after operating it. Ensure that no residues are left on the door at this time. The kitchen furniture around the appliance may be affected in the long term even if the door is left ajar.
Failure to maintain the appliance regularly and to keep it clean may cause deterioration of the surface and reduce the service life of the appliance, and thus cause risks as a result of these.
Unplug the appliance or switch off the power of the appliance by bringing the On/off button on the appliance to off position before any cleaning operation.
Wait for the appliance to cool down before starting cleaning.
Ensure that the cleaning agents you use when cleaning your product does not have particles that can scratch enamelled or painted surfaces.
When cleaning the control panel and the knobs, avoid using liquid cleaners with abrasive particles and wire wool to prevent erasing of the symbols.
- Do not clean the oven with materials such as bleachers, nitric acid or hydrochloric acid.
- Do not clean your oven using steam cleaners.
- Do not try to remove the buttons from the control panel as these are not removable in some models.
- Do not use cleaning agents that contain abrasives (wire wool, cleaning powder, oven sprays, abrasive hard sponges), acids (bleachers) or chlorine.
You can obtain Silverline's oven cleaner from our authorised services and use it to remove spilled, dried waste oil stains and for perfect cleaning. Spray the oven cleaning spray on stained surface, close the lid and wait for 10 minutes. - Do not leave abrasive and acidic stains (lemon juice, vinegar etc.) on enamelled, painted and stainless steel surfaces.
AquaSmart
Before using the steam cleaning function, remove all accessories from the oven;
Put 100ml of water to the base of your oven and another 400ml of water inside the shallow tray placed on the 2nd level (we recommend you to use soft water) and close the door of the oven.
Bring the function selection switch to bottom heater position.
Set the oven temperature to and operate the oven for 30 minutes.
To end steam cleaning process, switch the button to Off.
Clean the interior surface of the oven with a soft and damp cloth when the oven reaches a temperature that shall not burn your hands, i.e. before it is completely cooled down.
After cleaning, keep the door ajar at 15^ to completely dry the enamel interiors.

DANGER!
Ensure that the appliance cooled down prior to coming to contact with it.
Risk of burns.
Cleaning of the Interior of the Oven
- Be sure to clean your oven after each operation.
The best time to clean the enamelled surface inside the oven is when the oven is warm.
Remove the trays and the grill. Clean the interior by wiping with a cloth dampened with warm, soapy water. Then, wipe once more with a damp cloth and dry.
- Do not use abrasive materials such as sandpaper, steel wool or bleachers. Otherwise, the enamelled part of the oven may get damaged.
Clean the oven thoroughly using a proper oven cleaning agent in regular intervals.
You may use cleaning agents used for stainless steel or some vinegar in case of harsh stains.
The stains left by such fluids may harm the brightness of the oven, but does not affect its performance in any way.
- Do not use the appliance for storage purposes by putting food such as bread, cakes, cookies, etc. inside the oven.
Cleaning the side walls of the oven
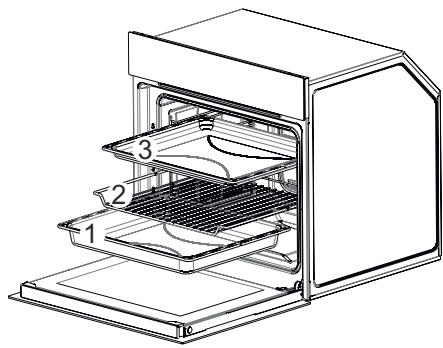
Fig. 19
Remove the trays and the grill respectively (1-2-3 / Fig. 19).
Removing Telescopic Rails
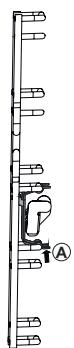
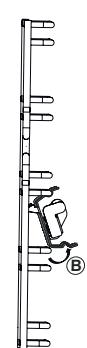
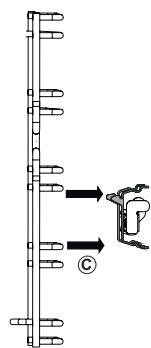
Fig. 20
To remove telescopic rail from the shelf, hold the telescopic rail handle as seen in Fig. 20/A and then lift it up as seen in Fig. 20/B. (Fig. 20/C).

Repeat this process for all telescopic rails on both sides of the oven.

When you remove Telescopic rails, hold it with one hand in order to prevent it falling in the oven and causing damage.

To remove the telescopic rails, wait for the oven to cool down.

Fig. 21
Remove the serrated screw inside the oven by rotating it counter-clockwise to clean the wire rack inside the oven (Fig. 21).
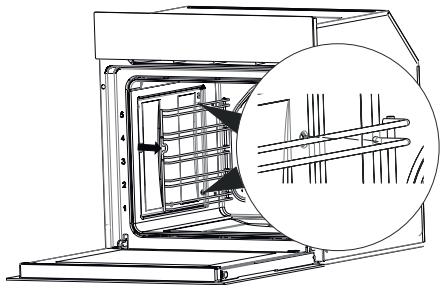
Fig. 22
Pull the wire rack towards the inside of the oven and remove the legs of the wire rack from their seats (Fig. 22).
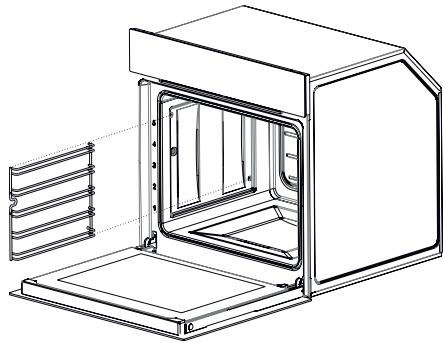
Fig. 23
Remove the wire rack from the oven after releasing the wire rack from its legs (Fig. 23).
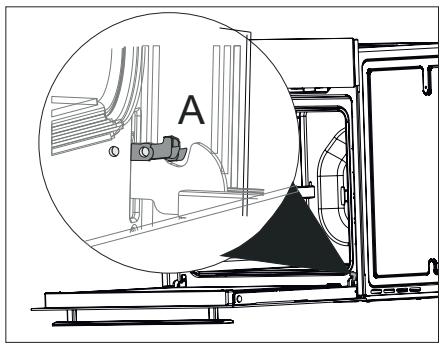
Removal of the Oven Door
Fig. 24
Open the door completely by pulling the oven door toward you (Fig. 24).
Then, bring the hinge lock to the widest angle as shown in (Fig. 24/A). Bring both hinges that connect the oven door to the oven to the same position.
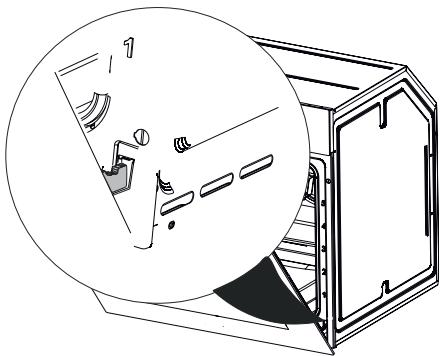
Fig. 25
Close the oven door so that it contacts the hinge lock as shown in (Fig. 25).
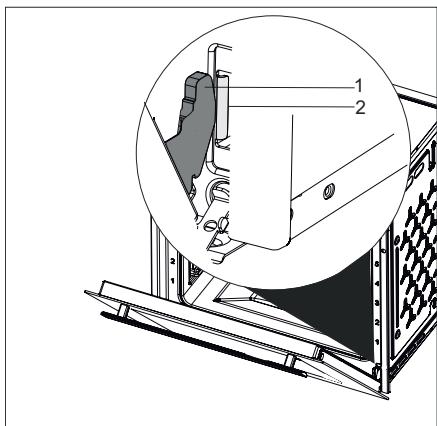
Fig. 26
1 Hinge
2 Hinge Housing
Remove the hinges from the hinge housing by holding the door with both hands to remove the oven door (Fig. 26).

Reverse the removal procedure for installation procedure of the door. Remember to the close the clips on the hinge housing while installing the door.
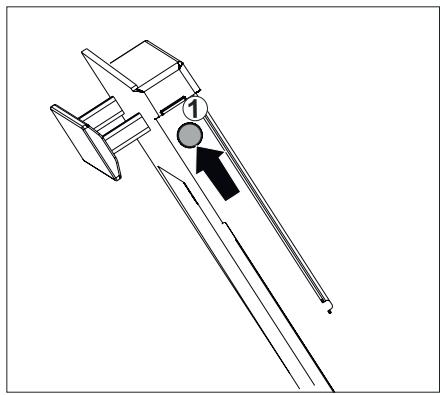
Cleaning of the Oven Glass
Fig. 27
Open the door of the appliance slightly.
Push on the left and right-hand sides of the door top plastic (Fig. 27).
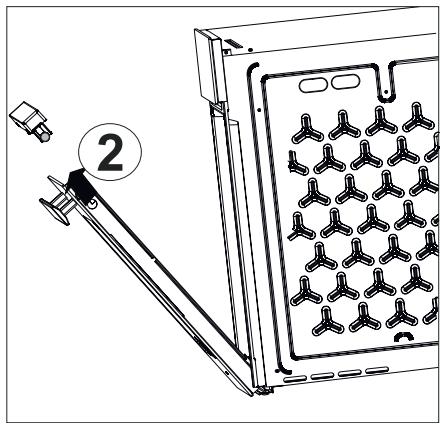
Fig. 28
Remove the door top plastic (Fig. 28).
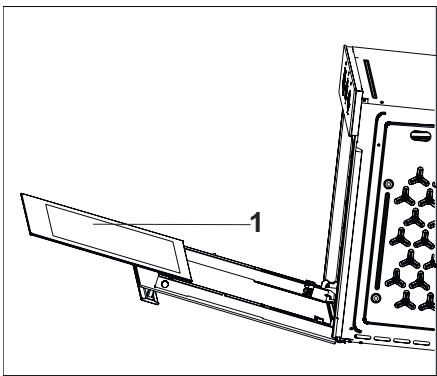
Fig. 29
1 - Internal Glass of the Oven
Remove the internal glass of the appliance to clean it (Fig. 29).
Wipe the glass cover with soft sponges and clothes cleaning and drying.
- Do not use harsh abrasive cleaning agents and sharp metal scrapers to clean the oven glass. Cleaning in such a way may scratch the surface of the glass and may cause the glass to break.
- Do not lean over and apply weight on the oven door.

CAUTION!
As the door loses weight when the glasses are removed, it may close abruptly and cause injuries.

Reverse the same procedure to install the oven glass.
Oven Door Gasket
Condensation may occur inside the front door and on the door gasket when the oven is operated for a long period. Remove the possible condensation using a dry cloth or sponge.
Inspect the condition of this gasket in regular intervals. Clean without using abrasive cleaning agents when required.
Door may not be closed properly when dirt is collected on the door gasket after some time.
Please contact the nearest Silverline Authorized Service when the gasket gets damaged. Do not use the oven until it is repaired.
13 REPLACEMENT OF THE LAMP

Disconnect power supply and wait for the oven to cool down to eliminate the risk of electrocution before replacing the oven lamp.
Hot surfaces may cause burns.
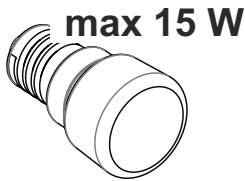
Fig. 30
2A/250V AC
Screw size E14
It indicates the maximum power consumption of the lamp. A lamp with same power rating should be used when replacing the lamp.

To find out the power rating used in the product, see the declaration label in the product.
The bulb used in this product is not suitable for illumination of households. The purpose of this lamp is to help the user to see the food.
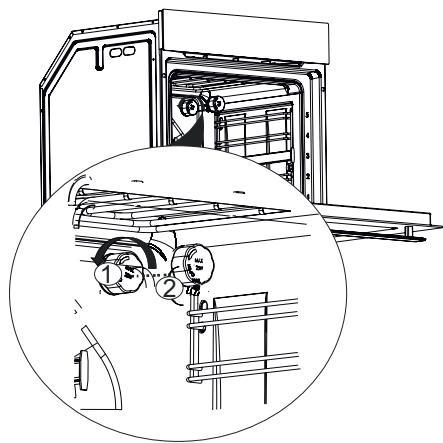
Fig. 31
Unplug the appliance.
Remove the lamp cover (Fig. 31/1) by rotating it counter-clockwise (Fig. 31/2).
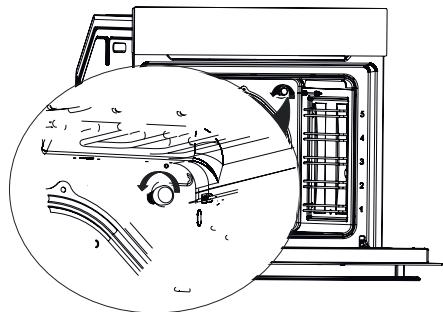
Fig. 32
Remove and replace the oven lamp by rotating it counter-clockwise (Fig. 32).
Reverse the procedure provided in
(Fig. 31) for the installation of the lamp cover.
14 MAIN FUNCTION DESCRIPTION
The main function descriptions are below.
| Function | Explanation of function |
| F | No program is selected in your appli- ance. |
| Upper and lower heaters are on. Food is heated from the bottom and top simultaneously. This is suitable for cakes, patties or cakes and stews cooked in pans. Cook using a single tray. | |
| Ony the lower heater is on. This is applicable for instance to bake pizza or food that requires to be browned on the lower section. Aquasmart Cleaning function | |
| Lower and upper heaters and the fan (on the rear wall) are on Hot air is dis- tributed equally and rapidly inside the oven thanks to the fan. Use a single tray for cooking. | |
| * | Larger grill on the oven roof is on. This is suitable for grilling more meat. Place the large or medium sized portions on the correct rack position under the grill heater to grill. Set the temperature to maximum level. Turn the food upside down halfway through the cooking process. |
| Hot air heated with the bigger grill is distributed rapidly inside the oven thanks to the fan. This is suitable grilling more meat. Place the large or medium sized portions on the correct rack position under the grill heater to grill. Set the temperature to maximum level. Turn the food upside down halfway through the cooking process. | |
| Upper heating, lower heating and fan heating are open. Each side of the product to be cooked is cooked equally and quickly. Use a single tray for cooking. With this function, you can also preheat quickly. | |
| Each side of the product to be cooked is cooked equally and quickly. For cooking and frying at one or more levels. The fan distributes the heat of the round heater on the rear panel evenly in the cooking zone. Cook using a single tray. With this function, you can also preheat quickly. | |
| The oven is not heated, only the fan works. Grained frozen food dissolves slowly at room temperature, cooked food dissolves. | |

- Shall be used at Max. 230°C'
15 COOKING CHART
Place your food in the oven.
Select the operation mode and the temperature.
The oven is heated up to the pre-set temperature and preserves this temperature until the end of selected cooking time.
Turning off the oven before the expected time
Turn the oven off with the function and/or temperature buttons.
Cooking Times Chart

Values specified are determined under laboratory conditions. Your values may differ from these values.

1st rack of the oven is the bottom rack.

CAUTION!
Do not place an aluminium foil on the bottom of the oven while cooking. This may cause fire and damage to your appliance and furniture.
| Food | Operating Function | Tray to be Used | Rack Posi- tion | Tempera- ture (℃) | Cooking time (min.)appr ox. |
| Cake in tray | ◎ | Single level | 3 | 175 | 25...30 |
| Cake in pan | ◎ | Single level | 2 | 180 | 40...50 |
| Cake in sheet | Single level | 3 | 175 | 25...30 | |
| Sponge cake | Single level | 3 | 200 | 5...10 | |
| Cookie | Single level | 3 | 175 | 25...30 | |
| Filo pastry | Single level | 2 | 200 | 30...40 | |
| Buns | Single level | 2 | 200 | 25...35 | |
| Leaven dough | Single level | 2 | 200 | 35...45 | |
| Lasagne | Single level | 2 | 200 | 30...40 | |
| Pizza | Single level | 2 | 200...220 | 15...20 | |
| Beef (full) / Roast | Single level | 3 | 25 minutes 250, then 180...190 | 100,120 | |
| Leg of lamb (stew) | Single level | 3 | 25 minutes 250after 190 | 70...90 | |
| Roasted chicken | Single level | 2 | 15 minutes 250, then 180...190 | 55...65 | |
| Turkey (5.5 kg) | Single level | 1 | 25 minutes 250, then 180...190 | 150...210 | |
| Fish | Single level | 3 | 200 | 20...30 |
Pre-heating is recommended for all kinds of food.

For cooking operations which require pre-heating, perform the pre-heating until the oven reaches the desired temperature at the start of the cooking.
Hints for cakes
If the cake is too dry, increase the temperature about 10^ and decrease the cooking time.
If the cake is wet, use less liquid or decrease the temperature about 10^ .
If the top of the cake is burnt, place it on a lower rack, decrease the temperature and increase the cooking time.
If the inside of the cake is cooked well, but outside is sticky, use less liquid, decrease the temperature and increase the cooking time.
Hints for pastry
If the pastry is too dry, increase the temperature about 10^ and decrease the cooking time. Dampen the sheets of dough with a sauce made of milk, butter, egg and yoghurt.
If the cooking time of your pastry is too long, ensure that the thickness of the pastry does not exceed the tray.
If the top of the pastry is cooked, but the bottom is not cooked, ensure that the amount of the sauce you use for the pastry is less on the bottom side of the pastry. Try to spread a frying sauce evenly between the sheets of dough and on the pastry.

Cook your pastry with the position and temperature specified in the cooking chart. If the bottom part is fried less again, place it at a lower rack on the next time.
Hints for vegetable dishes
If the vegetable dish loses its juice and gets dry, cook inside a closed pot instead of the tray. Closed pots contain the juice of the dish.
If the vegetable dish is undercooked, boil the vegetables or prepare them as preserved food first, and then put them inside the oven.
cata
CNA
group
CATA ELECTRODOMÉSTICOS, S.L.
Oficinas c/ Anabel Segura, 11, Edif. A, 3a pl. 28108. Alcobendas. Madrid. España
Fábrica: c/ del Ter 2, Apdo. 9.08570. Torello. Barcelona. España
T.+34 938 594 100 - Fax +34 938 594 101
www.cnagroup.es - cna@cnagroup.es
Atencion al Cliente: 902 410 450 / +34 938 521 818 - info@cnagroup.es
SAT Central Portugal: +351 214 349 771 - service@junis.pt
- Tartalomjegyzék
- ELÓSZó
- KEDVES VÁSÁRLO!
- FONTOS BIZTONSÁGINFORMÁCIÖK
- VIGYAZAT!
- A TELEPITÉS SORÁN ÉS A TELEPITÉS UTÁN KÖVETENDÜ UTASITÁSOK
- MUKÖDÉSRE VONATKOZÖ FIGYELMEZTETÉSEK
- MEGFELELOSEGI NYILATKOZAT
- Csomagolas
- A régi készülékek artalmatlanitasa
- A SÜTÖ SPECIFIKÁCIÖI
- ábra
- A KÉSZÜLÉK BESZERELESE
- A SÜTÖ BESZERELESE A SZEKKÉNYBE
- ábra
- ábra
- ARAMELLÁTÁS
- ábra
- TEENDÖK A KÉSZÜLEK ELSÖ MÜKÖDTÉSEKOR
- ábra
- A sutō energiahatékonysága
- A KÉSZÜLEK BEMUTATÁSA
- ábra
- A sutō tartozékai
- Sutórács
- ábra
- Mély tpsi
- ábra
- Teleszkópos sinek
- ábra
- AZ ELSÖ HASZNÁLAT ELOTT
- A sütóter és a tartozék tisztlítasa
- A sūtōtér tiszṭitása
- A tartozék tiszítísa
- A KÉSZÜLEK SPECIFIKÁCIÖI és MÜKÖDESE
- A sutó specifikación
- ábra
- A Menu gomb hasznalata:
- Program gomb:
- Gyermekzár
- Az ora beallitasa:
- Orabeállitas modja 24 orás/12 orás opció
- A riasztási hangjelzés beallitása
- A kijelzó fényerejének beallitasa:
- AZ IDÖZİTO FUNKCIÖI
- Félautomatikus sùtés:
- FélautomATUSUÉS
- Az automatikus suteşi ido trolsehez:
- Emlekezteto idzitó
- A riasztasi ido lejartakor
- VÁLTÓ BEMENETI FUNKCIÖI
- Funkcióvátó
- Termosztat
- AZ ESZKÖZ HASZNÁLATA
- A készülék hómérsekletények beállításá
- ábra
- A TELESZKÓPOS SÍNEK HASZNÁLATA
- A teleszkópos sínek eltávolítása
- ábra
- A teleszkópos sinek felhelysezese
- ábra
- A teleszkópos sinek használata
- A sutórács használata
- ábra
- Az edeny használata
- ábra
- A KÉSZÜLÉK TISZTÍTÁSA ÉSKARBANTARTÁSA
- Általános tiszítías
- AquaSmart
- VESZÉLY!
- ábra
- ábra
- ábra
- ábra
- ábra
- A sutő üvegnek tiszítítása
- ábra
- ábra
- ábra
- A sūtōajtó tōmītēse
- A LÁMPA CSERÉJE
- ábra
- ábra
- A fő funkciók magyarázata
- SUTÉSI TÁBLAZAT
- A sutō kikapcsolása a beallitott idǒ elòtt
- Sutési idok tablázata
- Tippek sūteményekhez
- Tippek cukrászsuményekhez
- Tippek zöld séges fogásokhoz
- Importor:
- MULTIKOMPLEX BUDAPEST KFT.
- H-1211 Budapest Mansfeld Péter utca 27.
- (Volt Bajáki Ferenc utca)
- Table of contents
- PREFACE
- DEAR COSTUMER
- IMPORTANT INFORMATION REGARDING SAFETY
- CAUTION!
- WARNING'S BEFORE INSTALLATION AND DURING INSTALLATION
- WARNINGSON OPERATION
- DECLARATION OF CONFORMITY
- Packaging
- Disposing of Old Appliances
- SPECIFICATIONS OF THE OVEN
- INSTALLATION OF APPLIANCE
- INSTALLATION OF THE OVEN TO THE CACINET
- POWER CONNECTION
- THINGS TO DO FOR THE FIRST OPERATION OF THE APPLIANCE
- Energy Efficiency of the Oven
- INTRODUCTION OF APPLIANCE
- Accessories of the Oven
- Telescopic Rail
- BEFORE FIRST USE
- SPECIFICATIONS AND OPERATION OF THE APPLIANCE
- Specifications of the Oven
- Menu Key Usage:
- Program Button:
- Child Lock
- Clock Setting;
- Clock Setting Mode 24h/12h Option
- Alarm Tone Setting
- NOTICE!
- Screen Brightness Setting:
- TIMER FUNCTIONS
- Semi-Automatic Cooking:
- Full Automatic Cooking
- To Cancel the Automatic Cooking Time;
- Reminder Timer
- When the alarm time is completed
- COMMUTATOR INPUT FUNCTIONS
- Function Commutator
- Thermostat
- THE USE OF THE DEVICE
- Temperature Setting of the Appliance
- USING TELESCOPIC RAILS
- Removing Telescopic Rails
- Inserting Telescopic Rails
- Using Telescopic Rails
- Using the Wire Grill
- Using Cooker
- CLEANING AND MAINTENANCE OF THE APPLIANCE
- General Cleaning
- DANGER!
- Fig. 21
- Oven Door Gasket
- REPLACEMENT OF THE LAMP
- MAIN FUNCTION DESCRIPTION
- COOKING CHART
- Turning off the oven before the expected time
- Cooking Times Chart
- Hints for cakes
- Hints for pastry
- Hints for vegetable dishes
- cata
Marque : CATA
Modèle : MDS7208X
Catégorie : Four encastrable