
KIS82449 - KIS82449 - Plaque de cuisson ELECTROLUX - Notice d'utilisation et mode d'emploi gratuit
Retrouvez gratuitement la notice de l'appareil KIS82449 - KIS82449 ELECTROLUX au format PDF.

| Type de produit | Plaque de cuisson à induction encastrable |
| Marque | Electrolux |
| Modèle | KIS82449 |
| Nombre de zones de cuisson | 4 zones à induction |
| Alimentation électrique | 220-240 V / 400 V 2N, 50-60 Hz, 7.2 kW |
| Dimensions des zones (diamètre) | Avant gauche 21 cm, Arrière gauche 21 cm, Milieu avant 14.5 cm, Arrière droit 24 cm |
| Puissance nominale par zone | Avant gauche 2300 W, Arrière gauche 2300 W, Milieu avant 1400 W, Arrière droit 2300 W |
| Fonction PowerBoost | Oui, jusqu'à 3600 W max (zone arrière droit), durée limitée |
| Fonction Bridge | Relie deux zones gauche pour une grande surface de cuisson |
| Fonction SenseBoil® | Régulation automatique de l'ébullition, détection du point d'ébullition |
| Fonction Hob²Hood | Connexion automatique avec une hotte compatible Electrolux (infrarouge) |
| Minuteur | Compte à rebours, compteur, minuteur |
| Ankochautomatik (Automatic Heat Up) | Oui, monte rapidement en température |
| Indicateur de chaleur résiduelle | OptiHeat Control (3 niveaux : continuer, maintien, chaud) |
| Sécurité enfants | Oui, verrouillage du panneau de commande |
| Arrêt automatique | Oui, après inactivité ou surchauffe |
| Matériau de la surface | Vitrocéramique |
| Nettoyage recommandé | Chiffon humide, détergent doux, racloir spécial pour résidus brûlés |
| Consommation énergétique (hob) | 177.9 Wh/kg (selon EN 60350-2) |
| Poids approximatif | Environ 12 kg |
| Dimensions de la plaque (L x P) | Environ 77 x 52 cm (estimation selon zones) |
FOIRE AUX QUESTIONS - KIS82449 - KIS82449 ELECTROLUX
Questions des utilisateurs sur KIS82449 - KIS82449 ELECTROLUX
0 question sur cet appareil. Repondez a celles que vous connaissez ou posez la votre.
Poser une nouvelle question sur cet appareil
Téléchargez la notice de votre Plaque de cuisson au format PDF gratuitement ! Retrouvez votre notice KIS82449 - KIS82449 - ELECTROLUX et reprennez votre appareil électronique en main. Sur cette page sont publiés tous les documents nécessaires à l'utilisation de votre appareil KIS82449 - KIS82449 de la marque ELECTROLUX.
MODE D'EMPLOI KIS82449 - KIS82449 ELECTROLUX
EN Hob
DE Kochfeld
ES Placa de cocción
User Manual 2
Benutzerinformation 24
Manual de instrucciones 50
Get the most out of your appliance

For quick access to manuals, how-to guides, support and more through our photo registration visit electrolux.com/register
CONTENTS
- SAFETY INFORMATION......2
- SAFETY INSTRUCTIONS....5
- INSTALLATION....7
- PRODUCT DESCRIPTION....9
- DAILY USE....11
- HINTS AND TIPS.... 17
- CARE AND CLEANING....19
- TROUBLESHOOTING....20
- TECHNICAL DATA....22
- ENERGY EFFICIENCY....23
WE'RE THINKING OF YOU
Thank you for purchasing an Electrolux appliance. You've chosen a product that brings with it decades of professional experience and innovation. Ingenious and stylish, it has been designed with you in mind. So whenever you use it, you can be safe in the knowledge that you'll get great results every time.
Welcome to Electrolux.
Visit our website for:

Get usage advice, brochures, trouble shooter, service information:
www.electrolux.com/webselfservice

Register your product for better service:
www.registerelectrolux.com

Buy Accessories, Consumables and Original spare parts for your appliance:
www.electrolux.com/shop
CUSTOMER CARE AND SERVICE
Always use original spare parts.
When contacting our Authorised Service Centre, ensure that you have the following data available: Model, PNC, Serial Number.
The information can be found on the rating plate.
⚠ Warning / Caution-Safety information
i General information and tips
Environmental information
Subject to change without notice.
1. ⚠️ SAFETY INFORMATION
Before the installation and use of the appliance, carefully read the supplied instructions. The manufacturer is not responsible for any injuries or damage that are the result of incorrect installation or usage. Always keep the
instructions in a safe and accessible location for future reference.
1.1 Children and vulnerable people safety
- This appliance can be used by children aged from 8 years and above and persons with reduced physical, sensory or mental capabilities or lack of experience and knowledge if they have been given supervision or instruction concerning the use of the appliance in a safe way and understand the hazards involved.
- Children between 3 and 8 years of age and persons with very extensive and complex disabilities shall be kept away from the appliance unless continuously supervised.
- Children of less than 3 years of age should be kept away from the appliance unless continuously supervised.
- Do not let children play with the appliance.
- Keep all packaging away from children and dispose of it appropriately.
- Keep children and pets away from the appliance when it operates or when it cools down. Accessible parts may become hot during use.
- If the appliance has a child safety device, it should be activated.
- Children shall not carry out cleaning and user maintenance of the appliance without supervision.
1.2 General Safety
- WARNING: The appliance and its accessible parts become hot during use. Care should be taken to avoid touching heating elements.
- WARNING: Unattended cooking on a hob with fat or oil can be dangerous and may result in fire.
- NEVER try to extinguish a fire with water, but switch off the appliance and then cover flame e.g. with a lid or a fire blanket.
- CAUTION: The appliance must not be supplied through an external switching device, such as a timer, or connected to a circuit that is regularly switched on and off by a utility.
- CAUTION: The cooking process has to be supervised. A short term cooking process has to be supervised continuously.
- WARNING: Danger of fire: Do not store items on the cooking surfaces.
- Metallic objects such as knives, forks, spoons and lids should not be placed on the hob surface since they can get hot.
- Do not use the appliance before installing it in the built-in structure.
- Do not use a steam cleaner to clean the appliance.
- After use, switch off the hob element by its control and do not rely on the pan detector.
- If the glass ceramic surface / glass surface is cracked, switch off the appliance and unplug it from the mains. In case the appliance is connected to the mains directly using junction box, remove the fuse to disconnect the appliance from power supply. In either case contact the Authorised Service Centre.
- If the supply cord is damaged, it must be replaced by the manufacturer, an authorized Service or similarly qualified persons in order to avoid a hazard.
- WARNING: Use only hob guards designed by the manufacturer of the cooking appliance or indicated by the manufacturer of the appliance in the instructions for use as suitable or hob guards incorporated in the appliance. The use of inappropriate guards can cause accidents.
2. SAFETY INSTRUCTIONS
2.1 Installation

WARNING!
Only a qualified person must install this appliance.

WARNING!
Risk of injury or damage to the appliance.
- Remove all the packaging.
- Do not install or use a damaged appliance.
- Follow the installation instructions supplied with the appliance.
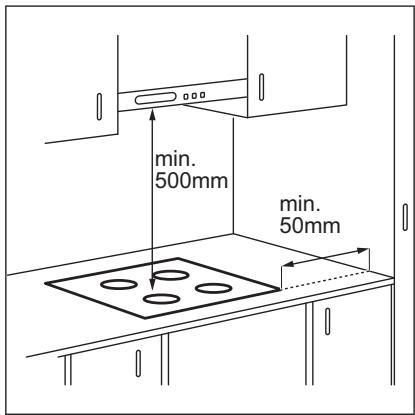
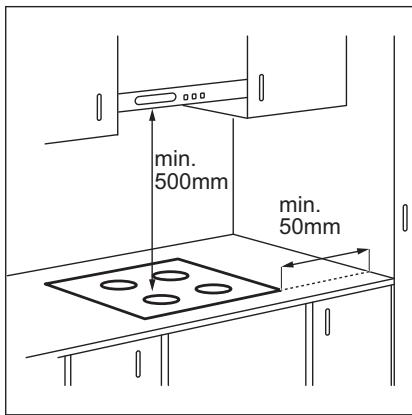
- Keep the minimum distance from other appliances and units.
- Always take care when moving the appliance as it is heavy. Always use safety gloves and enclosed footwear.
- Seal the cut surfaces with a sealant to prevent moisture to cause swelling.
- Protect the bottom of the appliance from steam and moisture.
- Do not install the appliance adjacent to a door or under a window. This prevents hot cookware falling from the appliance when the door or the window is opened.
• Each appliance has cooling fans on the bottom. - If the appliance is installed above a drawer:
- Do not store any small pieces or sheets of paper that could be pulled in, as they can damage the cooling fans or impair the cooling system.
- Keep a distance of minimum 2 cm between the bottom of the appliance and parts stored in the drawer.
- Remove any separator panels installed in the cabinet below the appliance.
2.2 Electrical Connection

WARNING!
Risk of fire and electric shock.
- All electrical connections should be made by a qualified electrician.
• The appliance must be earthed.
- Before carrying out any operation make sure that the appliance is disconnected from the power supply.
- Make sure that the parameters on the rating plate are compatible with the electrical ratings of the mains power supply.
- Make sure the appliance is installed correctly. Loose and incorrect electricity mains cable or plug (if applicable) can make the terminal become too hot.
- Use the correct electricity mains cable.
- Do not let the electricity mains cable tangle.
- Make sure that a shock protection is installed.
- Use the strain relief clamp on the cable.
- Make sure the mains cable or plug (if applicable) does not touch the hot appliance or hot cookware, when you connect the appliance to the near sockets.
- Do not use multi-plug adapters and extension cables.
- Make sure not to cause damage to the mains plug (if applicable) or to the mains cable. Contact our Authorised Service Centre or an electrician to change a damaged mains cable.
- The shock protection of live and insulated parts must be fastened in such a way that it cannot be removed without tools.
- Connect the mains plug to the mains socket only at the end of the installation. Make sure that there is access to the mains plug after the installation.
- If the mains socket is loose, do not connect the mains plug.
- Do not pull the mains cable to disconnect the appliance. Always pull the mains plug.
- Use only correct isolation devices: line protecting cut-outs, fuses (screw type fuses removed from the holder), earth leakage trips and contactors.
- The electrical installation must have an isolation device which lets you
disconnect the appliance from the mains at all poles. The isolation device must have a contact opening width of minimum 3 mm.
2.3 Use

WARNING!
Risk of injury, burns and electric shock.
- Remove all the packaging, labelling and protective film (if applicable) before first use.
- This appliance is for household use only.
- Do not change the specification of this appliance.
• Make sure that the ventilation openings are not blocked. - Do not let the appliance stay unattended during operation.
- Set the cooking zone to "off" after each use.
- Do not rely on the pan detector.
- Do not put cutlery or saucepan lids on the cooking zones. They can become hot.
- Do not operate the appliance with wet hands or when it has contact with water.
- Do not use the appliance as a work surface or as a storage surface.
- If the surface of the appliance is cracked, disconnect immediately the appliance from the power supply. This to prevent an electrical shock.
- Users with a pacemaker must keep a distance of minimum 30 cm from the induction cooking zones when the appliance is in operation.
- When you place food into hot oil, it may splash.

WARNING!
Risk of fire and explosion
- Fats and oil when heated can release flammable vapours. Keep flames or heated objects away from fats and oils when you cook with them.
- The vapours that very hot oil releases can cause spontaneous combustion.
• Used oil, that can contain food remnants, can cause fire at a lower
temperature than oil used for the first time.
- Do not put flammable products or items that are wet with flammable products in, near or on the appliance.

WARNING!
Risk of damage to the appliance.
- Do not keep hot cookware on the control panel.
- Do not put a hot pan cover on the glass surface of the hob.
- Do not let cookware boil dry.
- Be careful not to let objects or cookware fall on the appliance. The surface can be damaged.
- Do not activate the cooking zones with empty cookware or without cookware.
- Do not put aluminium foil on the appliance.
- Cookware made of cast iron, aluminium or with a damaged bottom can cause scratches on the glass / glass ceramic. Always lift these objects up when you have to move them on the cooking surface.
- This appliance is for cooking purposes only. It must not be used for other purposes, for example room heating.
2.4 Care and cleaning
- Clean the appliance regularly to prevent the deterioration of the surface material.
- Deactivate the appliance and let it cool down before you clean it.
- Disconnect the appliance from the electrical supply before maintenance.
- Do not use water spray and steam to clean the appliance.
- Clean the appliance with a moist soft cloth. Only use neutral detergents. Do not use any abrasive products, abrasive cleaning pads, solvents or metal objects.
2.5 Service
• To repair the appliance contact the Authorised Service Centre.
• Use original spare parts only.
2.6 Disposal

WARNING!
Risk of injury or suffocation.
- Contact your municipal authority for information on how to discard the appliance correctly.
3. INSTALLATION

WARNING!
Refer to Safety chapters.
3.1 Before the installation
Before you install the hob, write down the information below from the rating plate. The rating plate is on the bottom of the hob.
Serial number ....
3.2 Built-in hobs
Only use the built-in hobs after you assemble the hob into correct built-in units and work surfaces that align to the standards.
3.3 Connection cable
- The hob is supplied with the connection cable.
-
Replace the damaged mains cable only with the spare parts cable. Speak to your local Authorised Service Center.
-
Disconnect the appliance from the mains supply.
- Cut off the mains electrical cable close to the appliance and dispose of it.

WARNING!
All electrical connections must be made by a qualified electrician.

CAUTION!
Do not drill or solder the wire ends. This is strictly forbidden!

CAUTION!
Do not connect the cable without cable end sleeve.
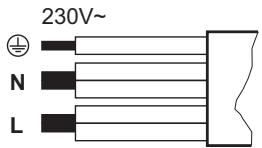
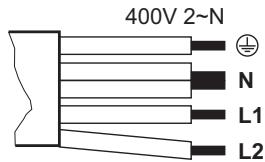
Two-phase connection
- Remove the cable end sleeve from black and brown wires.
- Remove an insulation of the brown and black cable ends.
- Apply a new wire end sleeve of 1.5 mm ^2 on each cable end. (special tool required).
Cable cross section

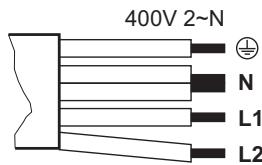
| One-phase connection - 230 V~ | Two-phase connection - 400 V 2 ~ N | ||
| Green - yellow | Green - yellow | ||
| N | Blue and blue | Blue and blue | N |
| L | Black and brown | Black | L1 |
| One-phase connection - 230 V~ | Two-phase connection - 400 V 2 ~ N | |
| Brown | L2 | |
3.4 Assembly
If the appliance is installed above a drawer, the hob ventilation can warm up the items stored in the drawer during the cooking process.

4. PRODUCT DESCRIPTION
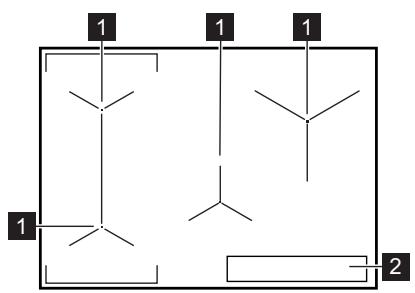
4.1 Cooking surface layout
flowchart
graph TD
    A["1"] --> B["2"]
    C["1"] --> D["3"]
    E["1"] --> F["4"]
1 Induction cooking zone
2 Control panel

For detailed information on the sizes of the cooking zones refer to "Technical data".
4.2 Control panel layout
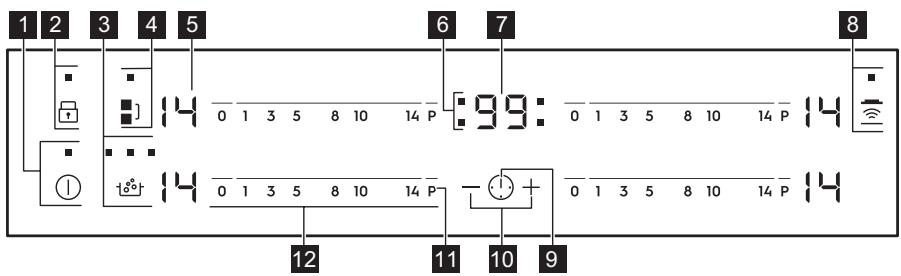
Use the sensor fields to operate the appliance. The displays, indicators and sounds tell which functions operate.
| Sensor field | Function | Comment | |
| 1 | ➊ | ON / OFF | To activate and deactivate the hob. |
| 2 | Lock / Child Safety Device | To lock / unlock the control panel. | |
| 3 | SenseBoil® | To activate and deactivate the function.The indicators above the symbol show the progress of the function. | |
| 4 | Bridge | To activate and deactivate the function. | |
| 5 | - | Heat setting display | To show the heat setting. |
| 6 | - | Timer indicators of cooking zones | To show for which zone you set the time. |
| 7 | - | Timer display | To show the time in minutes. |
| (1000) | (1000) | Hob^2Hood | To activate and deactivate the manual mode of the function. |
| (1000) | (1000) | - | To select the cooking zone. |
| (1000) |  | - | To increase or decrease the time. |
| (1000) | (1000) | PowerBoost | To activate the function. |
| (1000) | - | Control bar | To set a heat setting. |
4.3 Heat setting displays
| Display | Description |
| [ənədəl] | The cooking zone is deactivated. |
| [ənədəl - 14] | The cooking zone operates. |
| [ənədəl] | SenseBoil® operates. |
| [ənədəl] | Automatic Heat Up operates. |
| [ənədəvl] | PowerBoost operates. |
| [ənədəl + digit] | There is a malfunction. |
| [ənədəl / = / ] | OptiHeat Control (3 step Residual heat indicator): continue cooking / keep warm / residual heat. |
| [ənədəl] | Lock / Child Safety Device operates. |
| [ənədəl] | Incorrect or too small cookware or no cookware on the cooking zone. |
| [ənədəl] | Automatic Switch Off operates. |
4.4 OptiHeat Control (3 step Residual heat indicator)

WARNING!
☐ / ☐ / ☐ There is a risk of burns from residual heat. The indicators show the level of the residual heat for the cooking zones you are currently using. The indicators may also come on for the neighbouring cooking zones even if you are not using them.
5. DAILY USE

WARNING!
Refer to Safety chapters.
5.1 Activating and deactivating
Touch Ⓐ for 1 second to activate or deactivate the hob.
5.2 Automatic Switch Off
The function deactivates the hob automatically if:
• all cooking zones are deactivated,
- you do not set the heat setting after you activate the hob,
- you spill something or put something on the control panel for more than 10 seconds (a pan, a cloth, etc.). An acoustic signal sounds and the hob deactivates. Remove the object or clean the control panel.
- the hob gets too hot (e.g. when a saucepan boils dry). Let the cooking zone cool down before you use the hob again.
- you use incorrect cookware. The symbol F comes on and the cooking zone deactivates automatically after 2 minutes.
- you do not deactivate a cooking zone or change the heat setting. After some time - comes on and the hob deactivates.
The relation between the heat setting and the time after which the hob deactivates:
The induction cooking zones produce the heat necessary for the cooking process directly in the bottom of the cookware. The glass ceramic is heated by the heat of the cookware.
| Heat setting | The hob deactivates after |
| 1 - 3 | 6 hours |
| 4 - 7 | 5 hours |
| 8 - 9 | 4 hours |
| 10 - 14 | 1.5 hour |
5.3 The heat setting
To set or change the heat setting:
Touch the control bar at the correct heat setting or move your finger along the control bar until you reach the correct heat setting.
5.4 SenseBoil®
The function automatically adjusts the temperature of water so that it does not boil over once it reaches the boiling point.
If there is any residual heat (☐/☐/☐) on the cooking zone you want to use, an acoustic signal is emitted and the function does not start.
- Touch Ⓘ to activate the hob.
-
Touch 📋 to activate the function.
A blinking ☐ appears for cooking zones on which you can presently use the function. -
Touch the control bar of any available cooking zone for which you want to start the function (between the heat setting 1-14).
The function starts.
If you do not choose any cooking zone within 5 seconds the function does not activate.

Once the function starts the indicators above the ⚫ symbol come on one after another until the water reaches the boiling point.
When the function detects the boiling point the hob emits an acoustic signal and the heat level automatically changes to 8.

If all cooking zones are already in use or there is some residual heat on all of them, the hob emits a beep sound, the indicators above blink and the function does not start.
To deactivate the function touch 18° (the function deactivates and the heat setting goes down to 0) or touch the control bar and adjust the heat setting manually.
5.5 Using the cooking zones
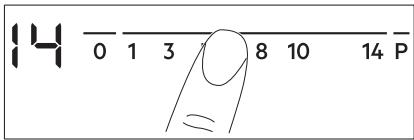
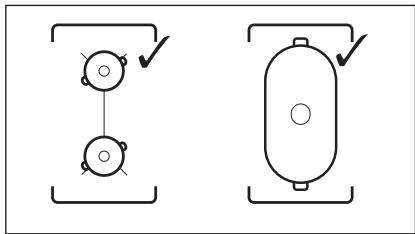
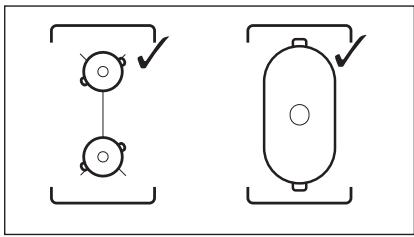
Place the cookware in the centre of the selected zone. Induction cooking zones adapt to the dimension of the bottom of the cookware automatically.
You can cook with large cookware placed on two cooking zones at the same time. The cookware must cover the centres of both zones but not go beyond the area marking. If the cookware is located between the two centres, Bridge function will not be activated.
natural_image
Two schematic diagrams showing mechanical or fluid system components with checkmark indicators (no text or symbols)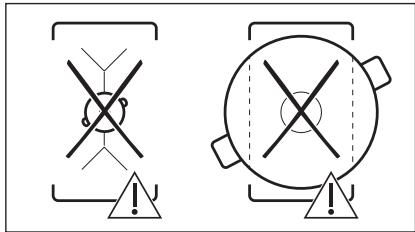
5.6 Bridge

The function operates when the pot covers the centres of the two zones. It does not work with the SenseBoil® function.
This function connects two left side cooking zones and they operate as one.
First set the heat setting for one of the left side cooking zones.
To activate the function: touch ■]. To set or change the heat setting touch one of the control sensors.
To deactivate the function: touch ■]. The cooking zones operate independently.
5.7 Automatic Heat Up
Activate this function to get a desired heat setting in a shorter time. When it is on, the zone operates on the highest setting in the beginning and then continues to cook at the desired heating setting.

To activate the function the cooking zone must be cold.
To activate the function for a cooking zone: touch P (P comes on). Immediately touch a desired heat setting. After 3 seconds R comes on.
To deactivate the function: change the heat setting.
5.8 PowerBoost
This function makes more power available to the induction cooking zones. The function can be activated for the induction cooking zone only for a limited period of time. After this time the induction cooking zone automatically sets back to the highest heat setting.
i
Refer to "Technical data" chapter.
To activate the function for a cooking zone: touch P. comes on.
To deactivate the function: change the heat setting.
5.9 Timer
Count Down Timer
You can use this function to set how long the cooking zone should operate for a single cooking session.
First set the heat setting for the cooking zone then set the function.
To set the cooking zone: touch ① again and again until the indicator of a necessary cooking zone comes on.
To activate the function: touch + of the timer to set the time (00 - 99 minutes). When the indicator of the cooking zone starts to flash slowly the time counts down.
To see the remaining time: set the cooking zone with ⓛ. The indicator of the cooking zone starts to flash quickly. The display shows the remaining time.
To change the time: set the cooking zone with ⚠. Touch + or -.
To deactivate the function: set the cooking zone with ⚙️ and touch —. The remaining time counts back to 00. The indicator of the cooking zone goes out.
i
When the time comes to an end, the sound operates and 00 flashes. The cooking zone deactivates.
To stop the sound: touch ⏻.
CountUp Timer (The count up timer) You can use this function to monitor how long the cooking zone operates.
To set the cooking zone: touch ① again and again until the indicator of a necessary cooking zone comes on.
To activate the function: touch — of the timer. UP comes on. When the indicator of the cooking zone starts to flash slowly the time counts up. The display switches between UP and counted time (minutes).
To see how long the cooking zone
operates: set the cooking zone with Ⓐ. The indicator of the cooking zone starts to flash quickly. The display shows how long the zone operates.
To deactivate the function: set the cooking zone with Ⓛ and touch + or —. The indicator of the cooking zone goes out.
Minute Minder
You can use this function as a Minute Minder when the hob is activated and the cooking zones do not operate. The heat setting display shows ☐.
To activate the function: touch ⚠️.
Touch + or — of the timer to set the time. When the time comes to an end, the sound operates and 00 flashes.
To stop the sound: touch ⚠️.
i
The function has no effect on the operation of the cooking zones.
5.10 Lock
You can lock the control panel while cooking zones operate. It prevents an accidental change of the heat setting.
Set the heat setting first.
To activate the function: touch 🔊. 🔒 comes on for 4 seconds. The Timer stays on.
To deactivate the function: touch 🔒. The previous heat setting comes on.

When you deactivate the hob, you also deactivate this function.
5.11 Child Safety Device
This function prevents an accidental operation of the hob.
To activate the function: activate the hob with Ⓐ. Do not set the heat setting. Touch 🔊 for 4 seconds. L comes on. Deactivate the hob with Ⓐ.
To deactivate the function: activate the hob with ①. Do not set the heat setting. Touch ☐ for 4 seconds. ☐ comes on. Deactivate the hob with ①.
To override the function for only one cooking time: activate the hob with ①. comes on. Touch ☐ for 4 seconds. Set the heat setting in 10 seconds. You can operate the hob. When you deactivate the hob with ① the function operates again.
5.12 OffSound Control (Deactivating and activating the sounds)
Deactivate the hob. Touch ⏻ for 3 seconds. The display comes on and goes out. Touch ⏱ for 3 seconds. Ⓞ or Ⓥ comes on. Touch + of the timer to choose one of the following:
- b1 - the sounds are off
- 60 - the sounds are on
To confirm your selection wait until the hob deactivates automatically.
When the function is set to ☐ you can hear the sounds only when:
- you touch ①
• Minute Minder comes down
• Count Down Timer comes down - you put something on the control panel.
5.13 Power limitation
Originally the hob is at its highest possible power level.
To decrease or increase the power level:
- Deactivate the hob.
- Touch ① for 3 seconds. The display comes on and goes off.
- Touch ☐ for 3 seconds. ☐ or ☐ comes on.
- Touch ⚠️. P 72 comes on.
- Touch — / + of the Timer to set the power level.
Power levels
Refer to "Technical data" chapter.
• P 72 — 7200 W
• P 15 — 1500 W
• P 20 — 2000 W
• P 25 — 2500 W
• P 30 — 3000 W
• P 35 — 3500 W
- P 40 — 4000 W
• P 45 — 4500 W
• P 50 — 5000 W
• P 60 — 6000 W

CAUTION!
Make sure that the selected power fits the house installation fuses.

WARNING!
If you select one of the lowest power levels the SenseBoil® function may not work. Refer to the table below.
√ - the function works, ✗ - the function does not work.
| Power levels | Cooking zone | |||
| Left front | Left rear | Mid-dle front | Right rear | |
| 210 mm | 210 mm | 145 mm | 240 mm | |
| P 72 | √ | √ | √ | √ |
| P 15 | × | × | × | × |
| P 20 | × | × | × | × |
| P 25 | × | × | √ | × |
| P 30 | √ | √ | √ | √ |
| P 35 | √ | √ | √ | √ |
| P 40 | √ | √ | √ | √ |
| P 45 | √ | √ | √ | √ |
| P 50 | √ | √ | √ | √ |
| P 60 | √ | √ | √ | √ |
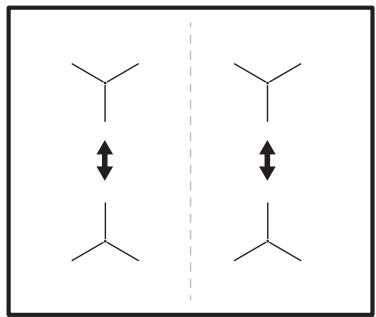
5.14 Power management function
- Cooking zones are grouped according to the location and number of the phases in the hob. See the illustration.
• Each phase has a maximum electricity loading of 3600 W. - The function divides the power between cooking zones connected to the same phase.
- The function activates when the total electricity loading of the cooking zones connected to a single phase exceeds 3600 W.
- The function decreases the power to the other cooking zones connected to the same phase.
- The heat setting display of the reduced zones alternates between the chosen heat setting and the reduced heat setting. After some time the heat setting display of the reduced zones stays on the reduced heat setting.
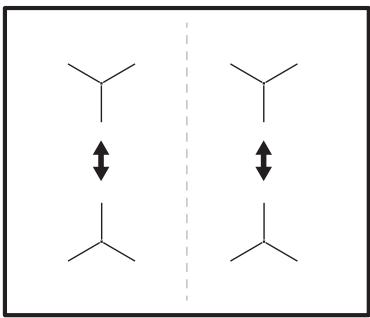
Power management function with Power limitation function
When you set the Power limitation function to 6.0 kW or less, power of the hob is divided between all cooking zones.

flowchart
graph TD
    A["Y"] <--> B["X"]
    C["Y"] <--> D["X"]
    E["Y"] <--> F["X"]
    G["Y"] <--> H["X"]
    I["Y"] <--> J["X"]
    K["Y"] <--> L["X"]
When you set the Power limitation function to more than 6.0 kW, the power of the hob is divided between its left and right side.
chemical
Chemical resonance diagram showing double-headed arrows between two identical Y-shaped molecules5.15 Hob ^2 Hood
It is an advanced automatic function which connects the hob to a special hood. Both the hob and the hood have an infrared signal communicator. Speed of the fan is defined automatically on basis of mode setting and temperature of the hottest cookware on the hob. You can also operate the fan from the hob manually.

For most of the hoods the remote system is originally deactivated. Activate it before you use the function. For more information refer to hood user manual.
Operating the function automatically
To operate the function automatically set the automatic mode to H1 – H6. The hob is originally set to H5. The hood reacts whenever you operate the hob. The hob recognizes temperature of the cookware automatically and adjusts the speed of the fan.
Automatic modes
| Automatic light | Boiling1) | Frying2) | |
| Mode H0 | Off | Off | Off |
| Mode H1 | On | Off | Off |
| Mode H23) | On | Fan speed 1 | Fan speed 1 |
| Mode H3 | On | Off | Fan speed 1 |
| Mode H4 | On | Fan speed 1 | Fan speed 1 |
| Mode H5 | On | Fan speed 1 | Fan speed 2 |
| Mode H6 | On | Fan speed 2 | Fan speed 3 |
1) The hob detects the boiling process and activates fan speed in accordance with automatic mode.
2) The hob detects the frying process and activates fan speed in accordance with automatic mode.
3) This mode activates the fan and the light and does not rely on the temperature.
Changing the automatic mode
-
Deactivate the appliance.
-
Touch ① for 3 seconds. The display comes on and goes off.
-
Touch ☐ for 3 seconds.
-
Touch ⚠️ a few times until Ⓗ comes on.
-
Touch + of the Timer to select an automatic mode.
To operate the hood directly on the hood panel deactivate the automatic mode of the function.
When you finish cooking and deactivate the hob, the hood fan may still operate for a certain period of time. After that time the system deactivates the fan automatically and prevents you from accidental activation of the fan for the next 30 seconds.
Operating the fan speed manually
You can also operate the function manually. To do that touch 📋 when the hob is active. This deactivates automatic operation of the function and allows you to change the fan speed manually. When you press 📋 you raise the fan speed by one. When you reach an intensive level and press 📋 again you will set fan speed to 0 which deactivates the hood fan. To start the fan again with fan speed 1 touch 📋
To activate automatic operation of the function, deactivate the hob and activate it again.
Activating the light
You can set the hob to activate the light automatically whenever you activate the hob. To do so set the automatic mode to H1 – H6.
The light on the hood deactivates 2 minutes after deactivating the hob.
6. HINTS AND TIPS

WARNING!
Refer to Safety chapters.
6.1 Cookware

For induction cooking zones a strong electro-magnetic field creates the heat in the cookware very quickly.

Use the induction cooking zones with suitable cookware.
Cookware material
- correct: cast iron, steel, enamelled steel, stainless steel, multi-layer bottom (with a correct marking from a manufacturer).
• not correct: aluminium, copper, brass, glass, ceramic, porcelain.
Cookware is suitable for an induction hob if:
• water boils very quickly on a zone set to the highest heat setting.
- a magnet pulls on to the bottom of the cookware.

The bottom of the cookware must be as thick and flat as possible.
Ensure pan bases are clean and dry before placing on the hob surface.
Cookware dimensions
Induction cooking zones adapt to the dimension of the bottom of the cookware automatically.
The cooking zone efficiency is related to the diameter of the cookware. The cookware with a diameter smaller than the minimum receives only a part of the power generated by the cooking zone.

Refer to "Technical data".
6.2 The noises during operation
If you can hear:
- crack noise: cookware is made of different materials (a sandwich construction).
- whistle sound: you use a cooking zone with a high power level and the cookware is made of different materials (a sandwich construction).
• humming: you use a high power level. - clicking: electric switching occurs.
• hissing, buzzing: the fan operates.
The noises are normal and do not indicate any malfunction.
6.3 Hints & Tips for SenseBoil®
The function works best for boiling water and preparing potatoes.

It does not work with cast iron and non-stick cookware, e.g. with a ceramic coating. Enamelled steel pots are recommended for achieving the best results while boiling potatoes.
Check if the pot you chose is suitable for SenseBoil® by monitoring the first cooking session.
To use SenseBoil® efficiently follow the advice below:
- Fill between half to three quarters of the pot with cold tap water leaving 4 cm from the rim of the pot empty. Do not use less than 1 or more than 5 litres of water. Make sure the total weight of the water (or the water and potatoes) ranges between 1-5 kg.
- If you want to cook potatoes, make sure they are completely covered with water, but remember to leave at least one quarter of the pot empty.
- To achieve the best results cook only whole, unpeeled, medium-sized potatoes.
• Make sure you do not pack potatoes too tightly. - Avoid producing external vibrations (e.g. from using a blender or placing a mobile phone next to the appliance) when the function is running.
- If you want to use salt, add it after the water reaches the boiling point.
- The function may not work properly for water kettles and espresso pots.
6.4 Öko Timer (Eco Timer)
To save energy, the heater of the cooking zone deactivates before the count down timer sounds. The difference in the operation time depends on the heat setting level and the length of the cooking operation.
6.5 Examples of cooking applications
The correlation between the heat setting of a zone and its consumption of power
is not linear. When you increase the heat setting, it is not proportional to the increase of the consumption of power. It means that a cooking zone with the medium heat setting uses less than a half of its power.

The data in the table is for guidance only.
| Heat setting | Use to: | Time (min) | Hints |
| 1 | Keep cooked food warm. | as necessary | Put a lid on the cookware. |
| 1 - 3 | Hollandaise sauce, melt: butter, chocolate, gelatine. | 5 - 25 | Mix from time to time. |
| 1 - 3 | Solidify: fluffy omelettes, baked eggs. | 10 - 40 | Cook with a lid on. |
| 3 - 5 | Simmer rice and milkbased dishes, heat up ready-cooked meals. | 25 - 50 | Add at least twice as much liquid as rice, mix milk dishes halfway through the procedure. |
| 5 - 7 | Steam vegetables, fish, meat. | 20 - 45 | Add a couple of tablespoons of liquid. |
| 7 - 9 | Steam potatoes. | 20 - 60 | Use max. 14 l of water for 750 g of potatoes. |
| 7 - 9 | Cook larger quantities of food, stews and soups. | 60 - 150 | Up to 3 l of liquid plus ingredients. |
| 9 - 12 | Gentle fry: escalope, veal cordon bleu, cutlets, rissoles, sausages, liver, roux, eggs, pancakes, doughnuts. | as necessary | Turn halfway through. |
| 12 - 13 | Heavy fry, hash browns, loin steaks, steaks. | 5 - 15 | Turn halfway through. |
| 14 | Boil water, cook pasta, sear meat (goulash, pot roast), deep-fry chips. | ||
| P | Boil large quantities of water. PowerBoost is activated. | ||
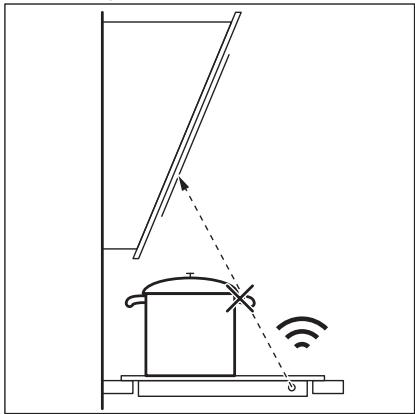
6.6 Hints and Tips for Hob ^2 Hood
When you operate the hob with the function:
- Protect the hood panel from direct sunlight.
- Do not spot halogen light on the hood panel.
- Do not cover the hob control panel.
- Do not interrupt the signal between the hob and the hood (e.g. with the hand, a cookware handle or a tall pot). See the picture.
The hood in the picture is only exemplary.
natural_image
Simple line drawing of a kitchen appliance with a roof, showing a ladder and a hanging dish, with no text or symbols present.7. CARE AND CLEANING

WARNING!
Refer to Safety chapters.
7.1 General information
- Clean the hob after each use.
- Always use cookware with a clean base.
- Scratches or dark stains on the surface have no effect on how the hob operates.
- Use a special cleaner suitable for the surface of the hob.
• Use a special scraper for the glass.
7.2 Cleaning the hob
- Remove immediately: melted plastic, plastic foil, sugar and food with sugar,

Other remotely controlled appliances may block the signal. Do not use any such appliances near to the hob while Hob ^2 Hood is on.
Cooker hoods with the Hob ^2 Hood function
To find the full range of cooker hoods which work with this function refer to our consumer website. The Electrolux cooker hoods that work with this function must have the symbol 📋.
otherwise, the dirt can cause damage to the hob. Take care to avoid burns. Use a special hob scraper on the glass surface at an acute angle and move the blade on the surface.
- Remove when the hob is sufficiently cool: limescale rings, water rings, fat stains, shiny metallic discoloration. Clean the hob with a moist cloth and a non-abrasive detergent. After cleaning, wipe the hob dry with a soft cloth.
- Remove shiny metallic discoloration: use a solution of water with vinegar and clean the glass surface with a cloth.
8. TROUBLESHOOTING

WARNING!
Refer to Safety chapters.
8.1 What to do if...
| Problem | Possible cause | Remedy |
| You cannot activate or operate the hob. | The hob is not connected to an electrical supply or it is connected incorrectly. | Check if the hob is correctly connected to the electrical supply. Refer to the connection diagram. |
| The fuse is blown. | Make sure that the fuse is the cause of the malfunction. If the fuse is blown again and again, contact a qualified electrician. | |
| You do not set the heat setting for 10 seconds. | Activate the hob again and set the heat setting in less than 10 seconds. | |
| You touched 2 or more sensor fields at the same time. | Touch only one sensor field. | |
| There is water or fat stains on the control panel. | Clean the control panel. | |
| An acoustic signal sounds and the hob deactivates. An acoustic signal sounds when the hob is deactivated. | You put something on one or more sensor fields. | Remove the object from the sensor fields. |
| The hob deactivates. | You put something on the sensor field ➀. | Remove the object from the sensor field. |
| Residual heat indicator does not come on. | The zone is not hot because it operated only for a short time or the sensor is damaged. | If the zone operated sufficiently long to be hot, speak to an Authorised Service Centre. |
| Hob ^2 Hood does not work. | You covered the control panel. | Remove the object from the control panel. |
| You use a very tall pot which blocks the signal. | Use a smaller pot, change the cooking zone or operate the hood manually. | |
| Automatic Heat Up does not operate. | The zone is hot.The highest heat setting is set. | Let the zone become sufficiently cool.The highest heat setting has the same power as the function. |
| The heat setting changes between two levels. | Power management operates. | Refer to "Daily use". |
| The sensor fields become hot. | The cookware is too large or you put it too near to the controls. | Put large cookware on the rear zones, if possible. |
| There is no sound when you touch the panel sensor fields. | The sounds are deactivated. | Activate the sounds. Refer to "Daily use". |
| L comes on. | Child Safety Device or Lock operates. | Refer to "Daily use". |
| F comes on. | There is no cookware on the zone. | Put cookware on the zone. |
| The cookware is unsuitable. | Use suitable cookware. Refer to "Hints and tips". | |
| The diameter of the bottom of the cookware is too small for the zone. | Use cookware with correct dimensions. Refer to "Technical data". | |
| F and I appear alternately. | The power is too low due to unsuitable cookware or an empty pot. | Use the appropriate type of cookware. Refer to "Hints and Tips" and "Technical Data". Do not activate any zone with an empty pot on it. |
| F and 2 appear alternately. | The pot is empty or contains some liquid other than water, e.g. oil. | Avoid using the function with liquids other than water. |
| F and 3 appear alternately. | There is too much or too little water in the pot. You boiled some food other than water and potatoes. The boiling point was moved in time and the SenseBoil® function could not work properly. | Refer to "Hints and Tips". Only boil water and potatoes with the use of Sense-Boil®. |
| You hear a beep sound, the indicators above 10°† blink and the SenseBoil® function does not start. | None of the cooking zones is ready to be used with the SenseBoil® function. There is some residual heat on the cooking zones you want to choose or they are still in use. | Finish your previous cooking activities and choose a free cooking zone without any residual heat. |
| and a number come on. | There is an error in the hob. | Deactivate the hob and activate it again after 30 seconds. If comes on again, disconnect the hob from the electrical supply. After 30 seconds, connect the hob again. If the problem continues, speak to an Authorised Service Centre. |
| You can hear a constant beep noise. | The electrical connection is incorrect. | Disconnect the hob from the electrical supply. Ask a qualified electrician to check the installation. |
8.2 If you cannot find a solution...
If you cannot find a solution to the problem yourself, contact your dealer or an Authorised Service Centre. Give the data from the rating plate. Give also three digit letter code for the glass ceramic (it is in the corner of the glass
surface) and an error message that comes on. Make sure, you operated the hob correctly. If not the servicing by a service technician or dealer will not be free of charge, also during the warranty period. The instructions about the Service Centre and conditions of guarantee are in the guarantee booklet.
9. TECHNICAL DATA
9.1 Rating plate
Model KIS82449
Typ 62 D4A 01 AD
Induction 7.2 kW
Ser.Nr. ....
ELECTROLUX
PNC 949 596 974 00
220 - 240 V / 400 V 2N 50 - 60 Hz
Made in Germany
7.2 kW

9.2 Cooking zones specification
| Cooking zone | Nominal power (maximum heat setting) [W] | PowerBoost [W] | PowerBoost maximum duration [min] | Cookware diameter [mm] |
| Left front | 2300 | 3200 | 10 | 125 - 210 |
| Left rear | 2300 | 3200 | 10 | 125 - 210 |
| Middle front | 1400 | 2500 | 4 | 125 - 145 |
| Right rear | 2300 | 3600 | 10 | 205 - 240 |
The power of the cooking zones can be different in some small range from the data in the table. It changes with the material and dimensions of the cookware.
For optimal cooking results use cookware no larger than the diameter in the table.
10. ENERGY EFFICIENCY
10.1 Product information according to EU 66/2014 valid for EU market only
| Model identification | KIS82449 | |
| Type of hob | Built-In Hob | |
| Number of cooking zones | 4 | |
| Heating technology | Induction | |
| Diameter of circular cooking zones (∅) | Left front | 21.0 cm |
| Left rear | 21.0 cm | |
| Middle front | 14.5 cm | |
| Right rear | 24.0 cm | |
| Energy consumption per cooking zone (EC electric cooking) | Left front | 179.6 Wh / kg |
| Left rear | 177.0 Wh / kg | |
| Middle front | 180.2 Wh / kg | |
| Right rear | 174.6 Wh / kg | |
| Energy consumption of the hob (EC electric hob) | 177.9 Wh / kg | |
EN 60350-2 - Household electric cooking appliances - Part 2: Hobs - Methods for measuring performance
The energy measurements referring to the cooking area are identified by the markings of the respective cooking zones.
10.2 Energy saving
You can save energy during everyday cooking if you follow below hints.
- When you heat up water, use only the amount you need.
- If it is possible, always put the lids on the cookware.
- Before you activate the cooking zone put the cookware on it.
- Put the smaller cookware on the smaller cooking zones.
- Put the cookware directly in the centre of the cooking zone.
- Use the residual heat to keep the food warm or to melt it.
11. ENVIRONMENTAL CONCERNS
Recycle materials with the symbol 📊. Put the packaging in relevant containers to recycle it. Help protect the environment and human health by recycling waste of electrical and electronic appliances. Do not dispose of
appliances marked with the symbol 📄 with the household waste. Return the product to your local recycling facility or contact your municipal office.
INHALTSVERZEICHNIS
- SICHERHEITSHINWEISE....24
- SICHERHEITSANWEISUNGEN.... 27
- MONTAGE....30
- GERÄTEBESCHREIBUNG.... 32
- TÄGLICHER GEBRAUCH....34
- TIPPS UND HINWEISE....41
- REINIGUNG UND PFLEGE.... 44
- FEHLERSUCHE....44
- TECHNISCHE DATEN 47
- ENERGIEEFFIZIENZ....48
WIR DENKEN AN SIE
Vielen Dank, dass Sie sich für ein Gerät von Electrolux entschieden haben. Sie haben ein Produkt gewählt, hinter dem jahrzehntelange professionelle Erfahrung und Innovation stehen. Bei der Entwicklung dieses großartigen und eleganten Geräts haben wir an Sie gedacht. So haben Sie bei jedem Gebrauch die Gewissheit, dass Sie stets großartige Ergebnisse erzielen werden. Willkommen bei Electrolux.
Besuchen Sie uns auf unserer Website, um:

Sich Anwendungshinweise, Prospekte, Fehlerbehebungs- und Service-Informationen zu holen:
www.electrolux.com/webselfservice
Ihr Produkt für einen besseren Service zu registrieren:
www.registerelectrolux.com


Zubehör, Verbrauchsmaterial und Original-Ersatzteile für Ihr Gerät zu kaufen: www.electrolux.com/shop
REPARATUR- UND KUNDENDIENST
Bitte verwenden Sie ausschließlich Original-Ersatzteile für Ihre Produkte. Halten Sie folgende Angaben bereit, wenn Sie sich an den Kundendienst wenden: Modell, Produktnummer (PNC), Seriennummer. Diese Informationen finden Sie auf dem Typenschild.
⚠️ Warnungs-/Sicherheitshinweise
i Allgemeine Informationen und Empfehlungen
Informationen zum Umweltschutz
Änderungen vorbehalten.
1. ⚠ SICHERHEITSHINWEISE
Lesen Sie vor der Montage und dem Gebrauch des Geräts zuerst die Bedienungsanleitung. Bei Verletzungen oder Schäden infolge nicht
ordnungsgemäßer Montage oder Verwendung übernimmt der Hersteller keine Haftung. Bewahren Sie die Anleitung zum Nachschlagen an einem sicheren und zugänglichen Ort auf.
1.1 Sicherheit von Kindern und schutzbedürftigen Personen
- Das Gerät kann von Kindern ab 8 Jahren und Personen mit eingeschränkten physischen, sensorischen oder geistigen Fähigkeiten oder mit mangelnder Erfahrung und/oder mangelndem Wissen nur dann verwendet werden, wenn sie durch eine für ihre Sicherheit zuständige Person beaufsichtigt werden oder in die sichere Verwendung des Geräts eingewiesen wurden und die mit dem Gerät verbundenen Gefahren verstanden haben.
- Kinder zwischen 3 und 8 Jahren und Personen mit schweren Behinderungen oder Mehrfachbehinderung müssen vom Gerät ferngehalten werden, wenn sie nicht ständig beaufsichtigt werden.
- Halten Sie Kinder unter 3 Jahren vom Gerät fern, wenn sie nicht ständig beaufsichtigt werden.
- Kinder dürfen nicht mit dem Gerät spielen.
- Halten Sie sämtliches Verpackungsmaterial von Kindern fern und entsorgen Sie es auf angemessene Weise.
- Halten Sie Kinder und Haustiere während des Betriebs oder der Abkühlphase vom Gerät fern. Die zugänglichen Geräteteile werden beim Betrieb sehr heiß.
- Falls Ihr Gerät mit einer Kindersicherung ausgestattet ist, empfehlen wir, diese einzuschalten.
- Kinder dürfen keine Reinigung und Wartung ohne Beaufsichtigung durchführen.
1.2 Allgemeine Sicherheit
- WARNUNG: Das Gerät und die zugänglichen Geräteteile werden während des Betriebs heiß. Seien Sie vorsichtig und berühren Sie niemals die Heizelemente.
- WARNUNG: Kochen mit Fett oder Öl auf einem unbeaufsichtigten Kochfeld ist gefährlich und kann zu einem Brand führen.
- Versuchen Sie NIEMALS, ein Feuer mit Wasser zu löschen, sondern schalten Sie das Gerät aus und decken Sie die Flamme ab, z.B. mit einem Deckel oder einer Feuerlöschdecke.
- VORSICHT: Das Gerät darf nicht durch ein externes Schaltgerät, wie einer Zeitschaltuhr, mit Strom versorgt oder an einen Schaltkreis angeschlossen werden, der vom einem Programm regelmäßig ein- und ausgeschaltet wird.
- VORSICHT: Der Kochvorgang muss überwacht werden. Ein kurzer Kochvorgang muss kontinuierlich überwacht werden.
- WARNUNG: Brandgefahr: Legen Sie keine Gegenstände auf dem Kochfeld ab.
- Legen Sie keine Metallgegenstände wie Messer, Gabeln, Löffel oder Topfdeckel auf die Oberfläche des Kochfelds, da diese heiß werden können.
- Verwenden Sie ds Gerät nicht, bevor es in den Einbauschrank gesetzt wird.
- Reinigen Sie das Gerät nicht mit einem Dampfstrahlreiniger.
- Schalten Sie die Kochzone nach dem Gebrauch ab und verlassen Sie sich nicht auf die Topferkennung.
- Hat die Glaskeramik-/Glasoberfläche einen Sprung, schalten Sie das Gerät aus und nehmen Sie es vom Stromnetz. Falls das Gerät direkt mit dem Stromnetz verbunden ist und nicht getrennt werden kann, nehmen Sie die Sicherung für den Anschluss heraus, um die Stromversorgung zu unterbrechen.
Verständigen Sie in jedem Fall den autorisierten Kundendienst.
- Wenn das Netzkabel beschädigt ist, muss es vom Hersteller, seinem autorisierten Kundenservice oder einer gleichermaßen qualifizierten Person ausgetauscht werden, um Gefahrenquellen zu vermeiden.
- WARNUNG: Verwenden Sie nur Schutzabdeckungen des Herstellers des Kochgeräts, von ihm in der Bedienungsanleitung als geeignete und empfohlene Schutzabdeckungen oder die im Gerät enthaltene Schutzabdeckung. Es besteht Unfallgefahr durch die Verwendung ungeeigneter Schutzabdeckungen.
2. SICHERHEITSANWEISUNGEN
2.1 Montage

WARNUNG!
Die Montage des Geräts darf nur von einer qualifizierten Fachkraft durchgeführt werden.

WARNUNG!
Verletzungsgefahr sowie Risiko von Schäden am Gerät.
- Entfernen Sie das gesamte Verpackungsmaterial.
- Montieren Sie ein beschädigtes Gerät nicht und benutzen Sie es nicht.
- Halten Sie sich an die mitgelieferte Montageanleitung.
• Die Mindestabstände zu anderen Geräten und Küchenmöbeln sind einzuhalten. - Seien Sie beim Umsetzen des Gerätes vorsichtig, da es sehr schwer ist. Tragen Sie stets Sicherheitshandschuhe und festes Schuhwerk.
- Dichten Sie die Ausschnittskanten mit einem Dichtungsmittel ab, um ein Aufquellen durch Feuchtigkeit zu verhindern.
-
Schützen Sie die Geräteunterseite vor Dampf und Feuchtigkeit.
-
Installieren Sie das Gerät nicht direkt neben einer Tür oder unter einem Fenster. So kann heißes Kochgeschirr nicht herunterfallen, wenn die Tür oder das Fenster geöffnet wird.
- Jedes Gerät besitzt Kühlgebläse auf seiner Unterseite.
- Ist das Gerät über einer Schublade installiert:
- Lagern Sie keine kleinen Papierstücke oder -blätter, die eingezogen werden können, in der Schublade, da sie die Kühlgebläse beschädigen oder das Kühlsystem beeinträchtigen können.
- Halten Sie einen Abstand von mindestens 2 cm zwischen dem Geräteboden und den Teilen, die in der Schublade gelagert sind, ein.
- Entfernen Sie Trennplatten, die im Küchenmöbel unter dem Gerät installiert sind.
2.2 Elektrischer Anschluss

WARNUNG!
Brand- und
Stromschlaggefahr.
- Alle elektrischen Anschlüsse sind von einem geprüften Elektriker vorzunehmen.
• Das Gerät muss geerdet sein.
- Vor der Durchführung jeglicher Arbeiten muss das Gerät von der elektrischen Stromversorgung getrennt werden.
- Stellen Sie sicher, dass die Daten auf dem Typenschild mit den elektrischen Nennwerten der Netzspannung übereinstimmen.
- Vergewissern Sie sich, dass das Gerät ordnungsgemäß installiert ist. Lockere und unsachgemäße Kabel oder Stecker (falls vorhanden) können die Klemme überhitzen.
- Stellen Sie sicher, dass Sie das richtige Kabel für den elektrischen Netzanschluss verwenden.
- Achten Sie darauf, dass das Netzkabel nicht lose hängt oder sich verheddert.
- Sorgen Sie dafür, dass ein Berührungsschutz installiert wird.
- Verwenden Sie die Zugentlastung für das Kabel.
- Stellen Sie beim elektrischen Anschluss des Gerätes sicher, dass das Netzkabel oder ggf. der Netzstecker nicht mit dem heißen Gerät oder heißem Kochgeschirr in Berührung kommt.
- Verwenden Sie keine Mehrfachsteckdosen oder Verlängerungskabel.
- Achten Sie darauf, Netzstecker (falls vorhanden) und Netzkabel nicht zu beschädigen. Wenden Sie sich zum Austausch eines beschädigten Netzkabels an unseren autorisierten Kundendienst oder eine Elektrofachkraft.
- Alle Teile, die gegen direktes Berühren schützen, sowie die isolierten Teile müssen so befestigt werden, dass sie nicht ohne Werkzeug entfernt werden können.
- Stecken Sie den Netzstecker erst nach Abschluss der Montage in die Steckdose. Stellen Sie sicher, dass der Netzstecker nach der Montage noch zugänglich ist.
- Falls die Steckdose lose ist, schließen Sie den Netzstecker nicht an.
- Ziehen Sie nicht am Netzkabel, wenn Sie das Gerät von der Stromversorgung trennen möchten. Ziehen Sie stets am Netzstecker.
- Verwenden Sie nur geeignete Trenneinrichtungen: Überlastschalter, Sicherungen (Schraubsicherungen müssen aus dem Halter entfernt werden können), Fehlerstromschutzschalter und Schütze.
- Die elektrische Installation muss eine Trenneinrichtung aufweisen, mit der Sie das Gerät allpolig von der Stromversorgung trennen können. Die Trenneinrichtung muss mit einer Kontaktöffnungsbreite von mindestens 3 mm ausgeführt sein.
2.3 Gebrauch

WARNUNG!
Verletzungs-, Verbrennungs- und Stromschlaggefahr.
- Entfernen Sie vor dem ersten Gebrauch das gesamte Verpackungsmaterial, die Aufkleber und Schutzfolie (falls vorhanden).
- Dieses Gerät ist ausschließlich zur Verwendung im Haushalt bestimmt.
- Nehmen Sie keine technischen Änderungen am Gerät vor.
• Die Lüftungsöffnungen dürfen nicht abgedeckt werden. - Lassen Sie das Gerät bei Betrieb nicht unbeaufsichtigt.
- Schalten Sie die Kochzonen nach jedem Gebrauch aus.
- Verlassen Sie sich nicht auf die Topferkennung.
- Legen Sie kein Besteck und keine Topfdeckel auf die Kochzonen. Anderenfalls werden sie sehr heiß.
- Bedienen Sie das Gerät nicht mit feuchten oder nassen Händen oder wenn es mit Wasser in Kontakt gekommen ist.
- Benutzen Sie das Gerät nicht als Arbeits- oder Abstellfläche.
-
Hat die Geräteoberfläche einen Sprung, trennen Sie das Gerät umgehend von der Spannungsversorgung. Dies dient zur Vermeidung eines Stromschlags.
-
Benutzer mit einem Herzschrittmacher müssen einen Mindestabstand von 30 cm zu den Induktionskochzonen einhalten, wenn das Gerät in Betrieb ist.
- Wenn Sie Nahrungsmittel in heißes Öl geben, kann dieses spritzen.

WARNUNG!
Brand- und
Explosionsgefahr
- Erhitzte Öle und Fette können brennbare Dämpfe freisetzen. Halten Sie Flammen und erhitzte Gegenstände beim Kochen mit Fetten und Ölen von diesen fern.
• Die von sehr heißem Öl freigesetzten Dämpfe können eine Selbstzündung verursachen. - Bereits verwendetes Öl kann Lebensmittelreste enthalten und schon bei niedrigeren Temperaturen eher einen Brand verursachen als frisches Öl.
- Laden Sie keine entflammbaren Produkte oder Gegenstände, die mit entflammbaren Produkten benetzt sind, in das Gerät und stellen Sie solche nicht in die Nähe oder auf das Gerät.

WARNUNG!
Risiko von Schäden am Gerät.
- Stellen Sie kein heißes Kochgeschirr auf das Bedienfeld.
- Legen Sie keine heißen Topfdeckel auf die Glasoberfläche des Kochfeldes.
- Lassen Sie das Kochgeschirr nicht leerkochen.
- Lassen Sie keine Gegenstände oder Kochgeschirr auf das Gerät fallen. Die Oberfläche könnte beschädigt werden.
- Schalten Sie die Kochzonen niemals ein, wenn sich kein Kochgeschirr darauf befindet, oder wenn das Kochgeschirr leer ist.
- Legen Sie keine Alufolie auf das Gerät.
- Kochgeschirr aus Gusseisen, Aluminium oder mit beschädigten Böden kann die Glas- bzw. Glaskeramikoberfläche verkratzen.
Heben Sie das Kochgeschirr stets an, wenn Sie es auf der Kochfläche umsetzen möchten.
- Dieses Gerät ist nur zum Kochen bestimmt. Jeder andere Gebrauch ist als bestimmungsfremd anzusehen, zum Beispiel das Beheizen eines Raums.
2.4 Reinigung und Pflege
- Reinigen Sie das Gerät regelmäßig, um eine Verschlechterung des Oberflächenmaterials zu verhindern.
- Schalten Sie das Gerät vor dem Reinigen aus und lassen Sie es abkühlen.
- Trennen Sie das Gerät vor Wartungsarbeiten von der Spannungsversorgung.
- Reinigen Sie das Gerät nicht mit Wasserspray oder Dampf.
- Reinigen Sie das Gerät mit einem weichen, feuchten Tuch. Verwenden Sie ausschließlich Neutralreiniger. Benutzen Sie keine Scheuermittel, scheuernde Reinigungsschwämmchen, Lösungsmittel oder Metallgegenstände.
2.5 Service
- Wenden Sie sich zur Reparatur des Geräts an den autorisierten Kundendienst.
- Verwenden Sie ausschließlich Originalersatzteile.
2.6 Entsorgung

WARNUNG!
Verletzungs- und Erstickungsgefahr.
- Für Informationen zur ordnungsgemäßen Entsorgung des Geräts wenden Sie sich an die zuständige kommunale Behörde vor Ort.
- Trennen Sie das Gerät von der Stromversorgung.
- Schneiden Sie das Netzkabel in der Nähe des Geräts ab, und entsorgen Sie es.
3. MONTAGE

WARNUNG!
Siehe Kapitel Sicherheitshinweise.
3.1 Vor der Montage
Notieren Sie vor der Montage des Kochfelds folgende Daten, die Sie auf dem Typenschild finden. Das Typenschild ist auf dem Boden des Kochfelds angebracht.
Seriennummer ......
3.2 Einbau-Kochfelder
Einbau-Kochfelder dürfen nur nach dem Einbau in normgerechte, passende Einbaumöbel und Arbeitsplatten betrieben werden.
3.3 Anschlusskabel
• Das Kochfeld wird mit dem Anschlusskabel geliefert.
- Ersetzen Sie das beschädigte Kabel nur durch ein geeignetes Ersatzkabel. Für weitere Informationen wenden Sie
sich bitte an Ihren lokalen autorisierten Kundendienst.

WARNUNG!
Die elektrischen Anschlüsse müssen von einem qualifizierten Elektriker ausgeführt werden.

VORSICHT!
Verdrillen oder verlöten Sie die Kabelenden nicht. Dies ist streng verboten!

VORSICHT!
Schließen Sie das Kabel nicht ohne Aderendhülse an.
Zweiphasiger Anschluss
- Entfernen Sie die Aderendhülsen des schwarzen und braunen Kabels.
- Isolieren Sie die Enden des braunen und schwarzen Kabels ab.
- Bringen Sie eine neue Aderendhülse von 1,5 mm² an jedem Kabelende an. (Es wird ein Spezialwerkzeug benötigt.)
Kabelquerschnitt
| Einphasiger Anschluss - 230 V~ | Zweiphasiger Anschluss - 400 V 2 ~ N | ||
| ⊥ | Grün - gelb | Grün - gelb | ⊥ |
| N | Blau und blau | Blau und blau | N |
| L | Schwarz und braun | Schwarz | L1 |
| Braun | L2 | ||
3.4 Montage
i
Ist das Gerät über einer Schublade installiert, kann die Kochfeldbelüftung die in der Schublade aufbewahrten Gegenstände während des Garvorgangs erwärmen.

4. GERÄTEBESCHREIBUNG
4.1 Kochfeldanordnung

flowchart
graph TD
    A["1"] --> B["Process Block"]
    C["1"] --> D["Processing Block"]
    E["1"] --> F["Processing Block"]
    G["1"] --> H["Processing Block"]
1 Induktionskochzone
2 Bedienfeld

Weitere Einzelheiten zur Größe der Kochzonen finden Sie unter „Technische Daten“.
4.2 Bedienfeldanordnung

Bedienen Sie das Gerät über die Sensorfelder. Die Anzeigen, Kontrolllampen und akustischen Signale informieren Sie über die aktiven Funktionen.
| Sensorfeld | Funktion | Kommentar | |
| 1 | ➊ | EIN/AUS | Ein- und Ausschalten des Kochfeldes. |
| 2 | Verriegeln / Kindersicherung | Verriegeln/Entriegeln des Bedienfelds. | |
| 3 | SenseBoil® | Ein- und Ausschalten der Funktion.Die Kontrolllampen über dem Symbol zeigen den Fortschritt der Funktion an. | |
| 4 | Bridge | Ein- und Ausschalten der Funktion. | |
| 5 | - | Kochstufenanzeige | Zeigt die Kochstufe an. |
| 6 | - | Kochzonen-Anzeigen des Timers | Zeigt an, für welche Kochzone die Zeit eingestellt wurde. |
| 7 | - | Timer-Anzeige | Zeigt die Zeit in Minuten an. |
| [Sezels] | [Sezels] | Hob ^2 Hood | Ein- und Ausschalten des manuellen Modus der Funktion. |
| [Stefel] | [Stefel] | - | Auswählen der Kochzone. |
| [Stefel] |  | - | Erhöhen oder Verringern der Zeit. |
| [CTNA] | [CTNA] | PowerBoost | Einschalten der Funktion. |
| [STEN] | - | Einstellskala | Einstellen der Kochstufe. |
4.3 Anzeige der Kochstufen
| Display | Beschreibung |
| [1V32H] | Die Kochzone ist ausgeschaltet. |
| [6706] | Die Kochzone ist eingeschaltet. |
| [0C86] | SenseBoil®ist eingeschaltet. |
 | Ankochautomatik ist eingeschaltet. |
| [1Y764] | PowerBoost ist eingeschaltet. |
| [1Y3AH] | Eine Störung ist aufgetreten. |
| [1X64D] | OptiHeat Control (Restwärmeanzeige, 3-stufig): Weitergaren/Warmhalten/Restwärme. |
| [0GKD] | Verriegeln/Kindersicherung ist eingeschaltet. |
 | Das Kochgeschirr ist ungeeignet oder zu klein bzw. es befindet sich kein Kochgeschirr auf der Kochzone. |
 | Abschaltautomatik ist eingeschaltet. |
4.4 OptiHeat Control (Restwärmeanzeige, 3-stufig)

WARNUNG!
Es besteht
Verbrennungsgefahr durch Restwärme. Die Anzeigen zeigen den Restwärmegrad der Kochzonen an, die Sie gerade verwenden. Die Anzeigen der benachbarten Kochzonen können auch dann leuchten, wenn Sie sie nicht benutzen.
5. TÄGLICHER GEBRAUCH

WARNUNG!
Siehe Kapitel Sicherheitshinweise.
5.1 Ein- und Ausschalten
Berühren Sie ① 1 Sekunde lang, um das Kochfeld ein- oder auszuschalten.
5.2 Abschaltautomatik
Mit dieser Funktion wird das Kochfeld in folgenden Fällen automatisch ausgeschaltet:
• Alle Kochzonen sind ausgeschaltet.
- Nach dem Einschalten des Kochfelds wird keine Kochstufe gewählt.
- Das Bedienfeld ist mehr als 10 Sekunden mit verschütteten Lebensmitteln oder einem Gegenstand bedeckt (Topf, Tuch usw.). Ein akustisches Signal ertönt und das Kochfeld schaltet ab. Entfernen Sie den Gegenstand oder reinigen Sie das Bedienfeld.
- Das Kochfeld wird zu heiß (wenn beispielsweise ein Topf leerkocht). Lassen Sie die Kochzone abkühlen, bevor Sie das Kochfeld wieder verwenden.
- Sie verwenden ungeeignetes Kochgeschirr. Das Symbol leuchtet auf und die Kochzone wird automatisch nach 2 Minuten ausgeschaltet.
Die Induktionskochzonen erzeugen die erforderliche Hitze zum Kochen direkt im Boden des Kochgeschirrs. Die Glaskeramik wird nur durch die Wärme des Kochgeschirrs erhitzt.
- Eine Kochzone wurde nicht ausgeschaltet bzw. die Kochstufe wurde nicht geändert. Nach einer Weile leuchtet ☐ auf und das Kochfeld schaltet sich aus.
Verhältnis zwischen der Kochstufe und der Zeit, nach der das Kochfeld ausgeschaltet wird:
| Kochstufe | Das Kochfeld wird ausgeschaltet nach |
| 1 - 3 | 6 Stunden |
| 4 - 7 | 5 Stunden |
| 8 - 9 | 4 Stunden |
| 10 - 14 | 1,5 Stunden |
5.3 Kochstufe
Einstellen oder Ändern der Kochstufe:
Berühren Sie die Einstellskala auf der gewünschten Kochstufe oder fahren Sie mit dem Finger entlang der Skala bis zur gewünschten Kochstufe.

5.4 SenseBoil®
Diese Funktion regelt die Wassertemperatur automatisch, so dass es nicht überkocht, wenn es den Siedepunkt erreicht.

Ist in der Kochzone, die Sie benutzen möchten, noch Restwärme (☐/☐/☐) vorhanden, ertönt ein Signal und die Funktion startet nicht.
- Schalten Sie das Gerät durch die Berührung von Ⓘ ein.
- Berühren Sie zum Einschalten der Funktion 🔊.
Bei den Kochzonen, für die Sie die Funktion derzeit verwenden können, blinkt ☐.
- Berühren Sie die Einstellskala der verfügbaren Kochzone, für die Sie die Funktion starten möchten (zwischen Kochstufe 1 - 14).
Die Funktion startet.
Wenn Sie innerhalb von 5 Sekunden keine Kochzone auswählen, schaltet sich die Funktion nicht ein.

Beim Start der Funktion leuchten die Kontrolllampen über dem Symbol t ^10 nacheinander auf, bis das Wasser den Siedepunkt erreicht.
Wenn die Funktion erkennt, dass der Siedepunkt erreicht ist, gibt das Kochfeld ein akustisches Signal aus und die Kochstufe ändert sich automatisch in Stufe 8.

Sind alle Kochzonen in Gebrauch oder ist in ihnen allen noch Restwärme vorhanden, gibt das Kochfeld ein akustisches Signal aus, die Kontrolllampen über 180 ^+ blinken und die Funktion startet nicht.
Berühren Sie zum Ausschalten der Funktion 📁 (die Funktion wird
ausgeschaltet und die Kochstufe auf 0 verringert) oder berühren Sie die Einstellskala und stellen Sie die Kochstufe manuell ein.
5.5 Verwenden der Kochzonen
Stellen Sie das Kochgeschirr mittig auf die ausgewählte Kochzone. Induktionskochzonen passen sich bis zu einem gewissen Grad automatisch an die Größe des Kochgeschirrbodens an.
Mit einem großen Kochgeschirr können Sie auf zwei Kochzonen gleichzeitig kochen. Das Kochgeschirr muss die Mitten beider Zonen bedecken darf aber nicht über den markierten Bereich hinausragen. Befindet sich das Kochgeschirr zwischen den beiden Mitten, wird die Funktion Bridge nicht eingeschaltet.
natural_image
Two schematic diagrams showing circular components connected by lines, with checkmarks indicating alignment or adjustment (no text or symbols)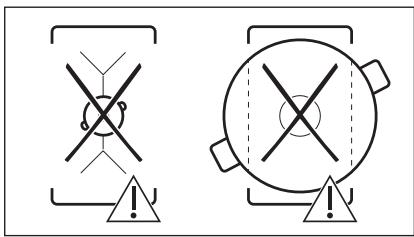
5.6 Bridge

Die Funktion wird eingeschaltet, wenn der Topf die Mitten beider Kochzonen bedeckt. Sie funktioniert nicht mit der Funktion SenseBoil®.
Diese Funktion verbindet zwei linke Kochzonen, sie funktionieren dann wie eine Kochzone.
Stellen Sie zuerst die Kochstufe für eine der beiden linken Kochzonen ein.
Einschalten der Funktion: Berühren
Sie ■]. Zum Einstellen oder Ändern der Kochstufe berühren Sie eine der Einstellsensortasten.
Ausschalten der Funktion: Berühren
Sie ■]. Die Kochzonen arbeiten wieder unabhängig voneinander.
5.7 Ankochautomatik
Schalten Sie diese Funktion ein, damit die gewünschte Kochstufeneinstellung in kürzerer Zeit erreicht wird. Wenn sie aktiviert ist, schaltet sich die Kochzone mit der höchsten Stufe ein und wechselt dann zur gewünschten Einstellung.

Zum Einschalten der Funktion muss die Kochzone abgekühlt sein.
Einschalten der Funktion für eine
Kochzone: Berühren Sie P (P leuchtet auf). Berühren Sie dann gleich danach die gewünschte Kochstufe. Nach 3 Sekunden leuchtet R auf.
Ausschalten der Funktion: Ändern Sie die Kochstufe.
5.8 PowerBoost
Diese Funktion stellt den Induktionskochzonen zusätzliche Leistung zur Verfügung. Für die Induktionskochzone kann diese Funktion nur für einen begrenzten Zeitraum eingeschaltet werden. Danach schaltet die Induktionskochzone automatisch wieder auf die höchste Kochstufe um.

Siehe Kapitel „Technische Daten“.
Einschalten der Funktion für eine
Kochzone: Berühren Sie P. ☐ leuchtet auf.
Ausschalten der Funktion: Ändern Sie die Kochstufe.
5.9 Timer
Kurzzeitmesser
Mit dieser Funktion stellen Sie ein, wie lange eine Kochzone für einen einzelnen Kochvorgang eingeschaltet bleiben soll.
Stellen Sie zuerst die Kochstufe für die Kochzone und erst danach die Funktion ein.
Auswählen der Kochzone: Berühren Sie ① wiederholt, bis die Kontrolllampe der gewünschten Kochzone aufleuchtet.
Einschalten der Funktion: Berühren Sie + des Timers, um die Zeit einzustellen (00 - 99 Minuten). Wenn die Kontrolllampe der Kochzone langsam blinkt, wird die Zeit heruntergezählt.
So wird die Restzeit angezeigt:
Wählen Sie die Kochzone mit ① aus. Die Kontrolllampe der Kochzone blinkt schneller. Das Display zeigt die Restzeit an.
Ändern der Zeit: Wählen Sie die Kochzone mit ⏻ aus. Berühren Sie + oder —.
Ausschalten der Funktion: Wählen Sie die Kochzone mit ⏻ und berühren Sie —. Die Restzeit wird auf 00 heruntergezählt. Die Kontrolllampe der Kochzone erlischt.

Wenn die eingestellte Zeit abgelaufen ist, ertönt ein Signalton und 00 blinkt. Die Kochzone wird ausgeschaltet.
Ausschalten des Signaltons: Berühren Sie ⏻.
CountUp Timer (Garzeitmesser)
Mit dieser Funktion können Sie feststellen, wie lange eine Kochzone bereits in Betrieb ist.
Auswählen der Kochzone: Berühren
Sie ⚠ wiederholt, bis die Kontrolllampe der gewünschten Kochzone aufleuchtet.
Einschalten der Funktion: Berühren
Sie — des Timers. UP leuchtet auf.
Wenn die Kontrolllampe der Kochzone langsamer blinkt, wird die Zeit hochgezählt. Das Display schaltet um zwischen UP und der abgelaufenen Zeit (Minuten).
So können Sie feststellen, wie lange die Kochzone bereits in Betrieb ist:
Wählen Sie die Kochzone mit ① aus. Die Kontrolllampe der Kochzone blinkt schneller. Im Display wird die Einschaltdauer der Zone angezeigt.
Ausschalten der Funktion: Wählen Sie die Kochzone mit ⚠️ und berühren Sie + oder —. Die Kontrolllampe der Kochzonen erlischt.
Kurzzeit-Wecker
Sie können diese Funktion als Kurzzeit-Wecker benutzen, wenn das Kochfeld eingeschaltet ist und die Kochzonen nicht in Betrieb sind. Das Display zeigt an.
Einschalten der Funktion: Berühren Sie ⚠. Berühren Sie + oder — des Timers, um die Zeit einzustellen. Wenn die eingestellte Zeit abgelaufen ist, ertönt ein Signalton und 00 blinkt.
Ausschalten des Signaltons: Berühren Sie ⏻.

Diese Funktion hat keine Auswirkung auf den Kochzonenbetrieb.
5.10 Verriegeln
Sie können das Bedienfeld sperren, wenn Kochzonen eingeschaltet sind. So wird verhindert, dass die Kochstufe versehentlich geändert wird.
Stellen Sie zuerst die Kochstufe ein.
Einschalten der Funktion: Berühren Sie 📋. 📁 leuchtet 4 Sekunden auf. Der Timer bleibt eingeschaltet.
Ausschalten der Funktion: Berühren Sie ☐. Die vorherige Kochstufe wird angezeigt.

Diese Funktion wird auch ausgeschaltet, sobald das Kochfeld ausgeschaltet wird.
5.11 Kindersicherung
Diese Funktion verhindert ein versehentliches Einschalten des Kochfelds.
Einschalten der Funktion: Schalten Sie das Kochfeld mit ① ein. Stellen Sie keine Kochstufe ein. Berühren Sie 4 Sekunden lang. leuchtet auf. Schalten Sie das Kochfeld mit ① aus.
Ausschalten der Funktion: Schalten Sie das Kochfeld mit ① ein. Stellen Sie keine Kochstufe ein. Berühren Sie 4 Sekunden lang. leuchtet auf. Schalten Sie das Kochfeld mit ① aus.
Vorübergehendes Ausschalten der Funktion für einen einzelnen Kochvorgang: Schalten Sie das Kochfeld mit ① ein. L leuchtet auf. Berühren Sie 4 Sekunden lang. Stellen Sie die Kochstufe innerhalb von 10 Sekunden ein. Das Kochfeld kann jetzt bedient werden. Wenn Sie das Kochfeld mit ① ausschalten, wird diese Funktion wieder eingeschaltet.
5.12 OffSound Control (Ein- und Ausschalten der Signaltöne)
Schalten Sie das Kochfeld aus. Berühren Sie ① 3 Sekunden lang. Das Display wird ein- und ausgeschaltet. Berühren Sie ② 3 Sekunden lang. Es wird ③ oder ④ angezeigt. Berühren Sie + des Timers zum Auswählen von:
- – der Signalton ist ausgeschaltet - 0 – der Signalton ist eingeschaltet Ihre Einstellungen werden übernommen, sobald das Kochfeld automatisch ausgeschaltet wird.
Haben Sie die Funktion auf b1 eingestellt, ertönt der Signalton nur in folgenden Fällen:
- Bei der Berührung von ①
- Nach Ablauf der für Kurzzeit-Wecker eingestellten Zeit
- Nach Ablauf der für Kurzzeitmesser eingestellten Zeit
- Wenn das Bedienfeld bedeckt ist.
5.13 Leistungsbegrenzung
Werkseitig ist das Kochfeld auf die höchstmögliche Leistungsstufe eingestellt.
Erhöhen oder Verringern der Leistungsstufe:
- Schalten Sie das Kochfeld aus.
- Berühren Sie ① 3 Sekunden lang. Das Display wird ein- und ausgeschaltet.
- Berühren Sie ☐ 3 Sekunden lang. Es wird ☐ oder ☐ angezeigt.
- Berühren Sie ⚠️. Es wird P 72 angezeigt.
- Berühren Sie 一/十 des Timers, um die Leistungsstufe einzustellen.
Leistungsstufen
Siehe Kapitel „Technische Daten“.
• P 72 — 7200 W
• P 15 — 1500 W
• P 20 — 2000 W
• P 25 — 2500 W
• P 30 — 3000 W
• P 35 — 3500 W
- P 40 — 4000 W
• P 45 — 4500 W
- P 50 — 5000 W
- P 60 — 6000 W

VORSICHT!
Achten Sie darauf, dass die gewählte Leistungsstufe für die Sicherungen in der Hausinstallation geeignet ist.

WARNUNG!
Wenn Sie eine der niedrigsten Leistungsstufen wählen, funktioniert die FunktionSenseBoil® möglicherweise nicht. Siehe die Tabelle unten.
√ - die Funktion funktioniert, ✗ - die Funktion funktioniert nicht.
| Leis-tungs-stufen | Kochzone | |||
| Vorne links | Hin-ten links | Vor-ne Mitte | Hin-ten rechts | |
| 210 mm | 210 mm | 145 mm | 240 mm | |
| P 72 | √ | √ | √ | √ |
| P 15 | ✗ | ✗ | ✗ | ✗ |
| P 20 | ✗ | ✗ | ✗ | ✗ |
| P 25 | ✗ | ✗ | √ | ✗ |
| P 30 | √ | √ | √ | √ |
| P 35 | √ | √ | √ | √ |
| P 40 | √ | √ | √ | √ |
| P 45 | √ | √ | √ | √ |
| P 50 | √ | √ | √ | √ |
| P 60 | √ | √ | √ | √ |
5.14 Strommanagement Funktion
• Die Kochzonen werden je nach Lage auf dem Kochfeld und Anzahl der Phasen im Kochfeld gruppiert. Siehe Abbildung.
- Jede Phase darf mit maximal 3600 W belastet werden.
- Mit dieser Funktion wird die Leistung zwischen den einzelnen, an dieselbe Phase angeschlossenen Kochzonen aufgeteilt.
- Diese Funktion wird eingeschaltet, sobald die Gesamtstromlast aller an dieselbe Phase angeschlossenen Kochzonen 3600 W übersteigt.
- Mit dieser Funktion wird die Leistung aller anderen Kochzonen reduziert, die an dieselbe Phase angeschlossen sind.
• Die Anzeige der Kochzonen mit reduzierter Leistung wechselt zwischen der eingestellten und der reduzierten Kochstufe. Nach einiger Zeit zeigt die Anzeige der Kochzonen mit reduzierter Leistung nur noch die reduzierte Kochstufe an.
Strommanagement Funktion mit der Funktion Leistungsbegrenzung
Bei Einstellung der Funktion Leistungsbegrenzung auf 6,0 kW oder weniger wird die Leistung des Kochfelds unter allen Kochzonen aufgeteilt.

flowchart
graph TD
    A["Y"] <--> B["X"]
    C["Y"] <--> D["X"]
    E["Y"] <--> F["X"]
    G["Y"] <--> H["X"]
    I["Y"] <--> J["X"]
    K["Y"] <--> L["X"]
Bei Einstellung der Funktion Leistungsbegrenzung auf mehr als 6,0 kW wird die Leistung des Kochfelds zwischen dessen linker und rechter Seite aufgeteilt.
chemical
Chemical resonance diagram showing double-headed bonds between two Y-shaped molecules5.15 Hob ^2 Hood
Diese innovative automatische Funktion verbindet das Kochfeld mit einer speziellen Dunstabzugshaube. Das Kochfeld und die Dunstabzugshaube kommunizieren mit Hilfe von Infrarotsignalen. Die Drehzahl des Lüfters wird automatisch eingestellt. Sie richtet sich nach dem eingestellten Modus und der Temperatur des heißesten Kochgeschirrs auf dem Kochfeld. Sie können den Lüfter auch manuell auf dem Bedienfeld des Kochfelds einstellen.

Bei den meisten Dunstabzugshauben ist das Fernsteuerungssystem werkseitig ausgeschaltet. Schalten Sie es ein, bevor Sie die Funktion nutzen. Weitere Informationen finden Sie in der Anleitung der Dunstabzugshaube.
Automatikbetrieb der Funktion
Stellen Sie für den automatischen Betrieb den Modus auf H1 – H6. Das Kochfeld ist standardmäßig auf H5 gestellt. Die Dunstabzugshaube schaltet sich ein, wenn Sie das Kochfeld bedienen. Das Kochfeld misst die Temperatur des Kochgeschirrs automatisch und passt die Geschwindigkeit des Lüfters an.
Automatikmodi
| Automatische Einschaltung der Beleuchtung | Kochen1) | Bra-ten2) | |
| Modus H0 | Aus | Aus | Aus |
| Modus H1 | Ein | Aus | Aus |
| Auto-mati-sche Ein-schal-tung der Be-leuch-tung | Ko-chen1) | Bra-ten2) | |
| Modus H23) | Ein | Lüfter-ge-schwin-digkeit 1 | Lüfter-ge-schwin-digkeit 1 |
| Modus H3 | Ein | Aus | Lüfter-ge-schwin-digkeit 1 |
| Modus H4 | Ein | Lüfter-ge-schwin-digkeit 1 | Lüfter-ge-schwin-digkeit 1 |
| Modus H5 | Ein | Lüfter-ge-schwin-digkeit 1 | Lüfter-ge-schwin-digkeit 2 |
| Modus H6 | Ein | Lüfter-ge-schwin-digkeit 2 | Lüfter-ge-schwin-digkeit 3 |
1) Das Kochfeld erkennt, dass gekocht wird und regelt die Lüftergeschwindigkeit je nach eingestelltem Automatikbetrieb.
2) Das Kochfeld erkennt, dass gebraten wird und regelt die Lüftergeschwindigkeit je nach eingestelltem Automatikbetrieb.
3) In diesem Modus werden der Lüfter und die Beleuchtung unabhängig von der Temperatur eingeschaltet.
Ändern des Automatikbetriebs
- Schalten Sie das Gerät aus.
- Berühren Sie ① 3 Sekunden lang. Das Display wird ein- und ausgeschaltet.
- Berühren Sie 🔒 3 Sekunden lang.
-
Berühren Sie ⚠ wiederholt, bis Ⓗ angezeigt wird.
-
Berühren Sie + des Timers, um einen automatischen Modus auszuwählen.
Schalten Sie den Automatikbetrieb aus, um die Dunstabzugshaube direkt über ihr Bedienfeld einzustellen.
Wenn Sie nach Beendigung des Kochvorgangs das Kochfeld ausschalten, kann die Dunstabzugshaube noch eine gewisse Zeit in Betrieb sein. Nach dieser Zeit schaltet das System den Lüfter automatisch aus. Während der folgenden 30 Sekunden kann der Lüfter nicht wieder eingeschaltet werden.
Manuelles Einstellen der Lüftergeschwindigkeit
Sie können den Lüfter auch manuell einstellen. Berühren Sie hierzu 📄, wenn das Kochfeld eingeschaltet ist. Auf diese Weise wird der Automatikbetrieb ausgeschaltet und Sie können die Lüftergeschwindigkeit manuell ändern. Durch Drücken von 📋 erhöht sich die Lüftergeschwindigkeit um eine Stufe. Wenn Sie die Intensivstufe gewählt haben und 📋 erneut drücken, wird die Geschwindigkeit auf 0 gesetzt und die Dunstabzugshaube ausgeschaltet. Berühren Sie 📋, um die Lüftergeschwindigkeit 1 wieder einzustellen.
Zum erneuten Einschalten des Automatikbetriebs schalten Sie das Kochfeld aus und wieder ein.
Einschalten der Beleuchtung
Sie können das Kochfeld so einstellen, dass sich die Beleuchtung automatisch einschaltet, wenn Sie das Kochfeld bedienen. Stellen Sie hierzu den Automatikmodus auf H1 - H6.
Die Beleuchtung der Dunstabzugshaube schaltet sich 2 Minuten nach Ausschalten des Kochfelds aus.
6. TIPPS UND HINWEISE

WARNUNG!
Siehe Kapitel Sicherheitshinweise.
6.1 Kochgeschirr

Das Kochgeschirr wird bei Induktionskochzonen durch ein starkes Magnetfeld sehr schnell erhitzt.

Benutzen Sie für die Induktions-Kochzonen nur geeignetes Kochgeschirr.
Kochgeschirrmaterial
- Geeignet: Gusseisen, Stahl, Stahlemail, Edelstahl, Boden aus mehreren Schichten verschiedener Materialien (vom Hersteller als geeignet gekennzeichnet).
- Nicht geeignet: Aluminium, Kupfer, Messing, Glas, Keramik, Porzellan.
Kochgeschirr eignet sich für Induktionskochfelder, wenn:
- Wasser sehr schnell auf einer Kochzone kocht, die auf die höchste Stufe geschaltet ist;
- Ein Magnet von Geschirrboden angezogen wird.

Der Boden des Kochgeschirrs sollte so dick und flach wie möglich sein. Stellen Sie sicher, dass die Topfböden sauber sind, bevor Sie sie auf das Kochfeld stellen.
Abmessungen des Kochgeschirrs
Induktionskochzonen passen sich bis zu einem gewissen Grad automatisch an die Größe des Kochgeschirrbodens an.
Die Kochzoneneffizienz hängt vom Durchmesser des Kochgeschirrs ab. An Kochgeschirr mit einem kleineren Durchmesser als der Mindestdurchmesser gelangt nur ein Teil der von der Kochzone erzeugten Hitze.

Siehe hierzu „Technische Daten“.
6.2 Betriebsgeräusche
Es gibt verschiedene Betriebsgeräusche:
- Knacken: Das Kochgeschirr besteht aus unterschiedlichen Materialien (Sandwichkonstruktion).
- Pfeifen: Sie haben die Kochzone auf eine hohe Stufe geschaltet und das Kochgeschirr besteht aus unterschiedlichen Materialien (Sandwichkonstruktion).
- Summen: Sie haben die Kochzone auf eine hohe Stufe geschaltet.
• Klicken: Elektrisches Umschalten. - Rauschen, Surren: Der Lüfter ist in Betrieb.
Die Geräusche sind normal und weisen nicht auf eine Störung hin.
6.3 Tipps und Hinweise für SenseBoil®
Die Funktion eignet sich besonders für das Kochen von Wasser und die Zubereitung von Kartoffeln.

Sie funktioniert nicht mit Kochgeschirr aus Gusseisen oder mit Antihaftbeschichtung, z.B. mit einer Keramikbeschichtung. Für beste Ergebnisse beim Kochen von Kartoffeln empfehlen wir emaillierte Stahlkochtöpfe zu verwenden.
Prüfen Sie, ob der Topf für SenseBoil® geeignet ist, indem Sie den ersten Kochvorgang überwachen.
Für eine effiziente Nutzung von SenseBoil® beachten Sie die nachfolgenden Hinweise:
- Füllen Sie den Topf bis zur Hälfte oder drei Viertel mit kaltem Leitungswasser, so dass 4 cm bis zum Topfrand frei bleiben. Verwenden Sie nicht weniger als 1 und nicht mehr als 5 Liter Wasser. Achten Sie darauf, dass das Gesamtgewicht des Wassers (oder des Wassers mit den Kartoffeln) zwischen 1 - 5 kg beträgt.
- Wenn Sie Kartoffeln kochen möchten, achten Sie darauf, dass sie komplett mit Wasser bedeckt sind, aber das mindestens ein Viertel des Topfs leer sein muss.
• Die besten Ergebnisse erzielen Sie mit ganzen, ungeschälten Kartoffeln mittlerer Größe. -
Achten Sie darauf, die Kartoffeln nicht zu dicht nebeneinander einzufüllen.
-
Vermeiden Sie die Erzeugung von externen Schwingungen (z. B. durch den Gebrauch eines Mixers oder Mobiltelefons in der Nähe des Geräts), wenn die Funktion eingeschaltet ist.
- Möchten Sie Salz verwenden, geben Sie es hinzu, nachdem das Wasser seinen Siedepunkt erreicht hat.
• Die Funktion arbeitet möglicherweise nicht richtig mit Wasserkesseln und Espressokannen.
6.4 Öko Timer (Öko-Timer)
Um Energie zu sparen, schaltet sich die Kochzonenheizung vor dem Signal des Kurzzeitmessers ab. Die Abschaltzeit hängt von der eingestellten Kochstufe und der Gardauer ab.
6.5 Anwendungsbeispiele für das Garen
Das Verhältnis zwischen der Kochstufe und dem Energieverbrauch der Kochzone ist nicht linear. Bei einer höheren Kochstufe steigt der Energieverbrauch nicht proportional an. Das bedeutet, dass eine Kochzone, die auf eine mittlere Kochstufe eingestellt ist, weniger als die Hälfte ihrer maximalen Leistung verbraucht.

Bei den Angaben in der folgenden Tabelle handelt es sich um Richtwerte.
| Kochstufe | Verwendung: | Dauer (Min.) | Hinweise |
| 1 | Warmhalten von gegarten Speisen. | Nach Bedarf | Legen Sie einen Deckel auf das Kochgeschirr. |
| 1 - 3 | Sauce Hollandaise, Schmelzen von: Butter, Schokolade, Gelatine. | 5 - 25 | Gelegentlich umrühren. |
| 1 - 3 | Stocken: Lockere Omeletts, gebackene Eier. | 10 - 40 | Mit Deckel garen. |
| 3 - 5 | Köcheln von Reis und Milchgerichten, Erhitzen von Fertiggerichten. | 25 - 50 | Mindestens doppelte Menge Flüssigkeit zum Reis geben, Milchgerichte nach der Hälfte der Zeit umrühren. |
| 5 - 7 | Dünsten von Gemüse, Fisch, Fleisch. | 20 - 45 | Einige Esslöffel Flüssigkeit zugeben. |
| 7 - 9 | Dampfgaren von Kartoffeln. | 20 - 60 | Max. 1⁄4 l Wasser für 750 g Kartoffeln verwenden. |
| 7 - 9 | Kochen größerer Speise-mengen, Eintopfgerichte und Suppen. | 60 - 150 | Bis zu 3 l Flüssigkeit plus Zutaten. |
| 9 - 12 | Bei geringer Hitze anbraten: Schnitzel, Cordon bleu, Kotelett, Frikadellen, Bratwürste, Leber, Mehlschwitze, Eier, Pfannkuchen, Donuts. | Nach Bedarf | Nach der Hälfte der Gardau-er wenden. |
| 12 - 13 | Braten bei starker Hitze: Rösti, Lendenstücke, Steaks. | 5 - 15 | Nach der Hälfte der Gardau-er wenden. |
| 14 | Aufkochen von Wasser, Nudeln kochen, Anbraten von Fleisch (Gulasch, Schmorbraten), Frittieren von Pommes frites. | ||
| P | Aufkochen großer Mengen Wasser. PowerBoost ist eingeschaltet. | ||
6.6 Tipps und Hinweise für Hob ^2 Hood
Wenn Sie das Kochfeld mit dieser Funktion betreiben:
- Schützen Sie das Bedienfeld der Dunstabzugshaube vor direkter Sonneneinstrahlung.
- Richten Sie keine Halogenstrahler auf das Bedienfeld der Dunstabzugshaube.
- Decken Sie das Bedienfeld des Kochfelds nicht ab.
- Unterbrechen Sie den Signalfluss zwischen dem Kochfeld und der Dunstabzugshaube nicht (z.B. mit der Hand, einem Kochgeschirrgriff oder großen Topf). Siehe Abbildung.
Die abgebildete Dunstabzugshaube ist nur beispielhaft.

natural_image
Diagram of a kitchen appliance with a cooking pot and Wi-Fi signal, no text or symbols present
Andere ferngesteuerte Geräte können das Signal blockieren. Verwenden Sie solche Geräte nicht in der Nähe des Kochfelds, wenn Hob²Hood eingeschaltet ist.
Dunstabzugshauben mit der Funktion Hob ^2 Hood
Die komplette Palette von Dunstabzugshauben, die mit dieser Funktion ausgestattet sind, finden Sie
auf unserer Verbraucher-Website. Die Electrolux Dunstabzugshauben, die mit dieser Funktion ausgestattet sind, sind mit dem Symbol 📋 gekennzeichnet.
7. REINIGUNG UND PFLEGE

WARNUNG!
Siehe Kapitel Sicherheitshinweise.
7.1 Allgemeine Informationen
- Reinigen Sie das Kochfeld nach jedem Gebrauch.
- Verwenden Sie stets Kochgeschirr mit sauberen Böden.
- Kratzer oder dunkle Flecken auf der Oberfläche beeinträchtigen die Funktionsfähigkeit des Kochfelds nicht.
- Verwenden Sie einen Spezialreiniger zur Reinigung der Kochfeldoberfläche.
- Verwenden Sie einen speziellen Reinigungsschaber für Glas.
7.2 Reinigen des Kochfelds
- Folgendes muss sofort entfernt werden: Geschmolzener Kunststoff, Plastikfolie, Zucker und zuckerhaltige
Lebensmittel. Anderenfalls können die Verschmutzungen das Kochfeld beschädigen. Achten Sie darauf, dass sich niemand Verbrennungen zuzieht. Den speziellen Reinigungsschaber schräg zur Glasfläche ansetzen und über die Oberfläche bewegen.
- Folgendes kann nach ausreichender Abkühlung des Kochfelds entfernt werden: Kalk- und Wasserränder, Fettspritzer und metallisch schimmernde Verfärbungen. Reinigen Sie das Kochfeld mit einem feuchten Tuch und nicht scheuernden Reinigungsmittel. Wischen Sie das Kochfeld nach der Reinigung mit einem weichen Tuch trocken.
- Entfernen Sie metallisch schimmernde Verfärbungen: Benutzen Sie für die Reinigung der Glasoberfläche ein mit einer Lösung aus Essig und Wasser angefeuchtetes Tuch.
8. FEHLERSUCHE

WARNUNG!
Siehe Kapitel Sicherheitshinweise.
8.1 Was tun, wenn..
| Störung | Mögliche Ursache | Abhilfe |
| Das Kochfeld kann nicht eingeschaltet oder bedient werden. | Das Kochfeld ist nicht oder nicht ordnungsgemäß an die Spannungsversorgung angeschlossen.Die Sicherung ist durchgebrannt. | Prüfen Sie, ob das Kochfeld ordnungsgemäß an die Spannungsversorgung angeschlossen ist. Nehmen Sie dazu den Anschlussplan zu Hilfe.Vergewissern Sie sich, dass die Sicherung der Grund für die Störung ist. Brennt die Sicherung wiederholt durch, wenden Sie sich an eine zugelassene Elektrofachkraft. |
| Sie haben die Kochstufe nicht innerhalb von 10 Sekunden eingestellt. | Schalten Sie das Kochfeld erneut ein und stellen Sie innerhalb von 10 Sekunden die Kochstufe ein. | |
| Zwei oder mehr Sensorfelder wurden gleichzeitig berührt. | Berühren Sie nur ein Sensorfeld. | |
| Auf dem Bedienfeld befinden sich Wasser- oder Fettspritzer. | Wischen Sie das Bedienfeld ab. | |
| Ein akustisches Signal er-tönt und das Kochfeld schaltet ab.Wenn das Kochfeld ausgeschaltet wird, ertönt ein akustisches Signal. | Mindestens ein Sensorfeld wurde bedeckt. | Entfernen Sie den Gegenstand von den Sensorfeldern. |
| Das Kochfeld wird ausgeschaltet. | Sie haben etwas auf das Sensorfeld 1 gestellt. | Entfernen Sie den Gegenstand vom Sensorfeld. |
| Die Restwärmeanzeige funktioniert nicht. | Die Kochzone ist nicht heiß, da sie nur kurze Zeit in Betrieb war oder der Sensor ist beschädigt. | War die Kochzone lange genug eingeschaltet, um heiß zu sein, wenden Sie sich an den autorisierten Kundendienst. |
| Hob2Hood funktioniert nicht. | Sie haben das Bedienfeld bedeckt. | Entfernen Sie den Gegenstand vom Bedienfeld. |
| Sie benutzen einen sehr großen Topf, der das Signal blockiert. | Verwenden Sie einen kleineren Topf, wechseln Sie die Kochzone oder bedienen Sie die Dunstabzugs-haube manuell. | |
| Ankochautomatik funktioniert nicht. | Die Kochzone ist heiß. | Lassen Sie die Kochzone lange genug abkühlen. |
| Die höchste Kochstufe ist eingestellt. | Die höchste Kochstufe hat die gleiche Leistung wie die Funktion. | |
| Die Kochstufe schaltet zwischen zwei Kochstufen hin und her. | Strommanagement ist eingeschaltet. | Siehe „Täglicher Gebrauch“. |
| Die Sensorfelder werden heiß. | Das Kochgeschirr ist zu groß, oder Sie haben es zu nahe an die Bedienelemente gestellt. | Stellen Sie großes Kochgeschirr nach Möglichkeit auf die hinteren Kochzonen. |
| Es ertönt kein Signalton, wenn Sie die Sensorfelder des Bedienfelds berühren. | Der Ton ist ausgeschaltet. | Schalten Sie den Ton ein. Siehe „Täglicher Gebrauch“. |
| leuchtet auf. | Kindersicherung oder Verriegeln ist eingeschaltet. | Siehe „Täglicher Gebrauch“. |
| leuchtet auf. | Es wurde kein Kochgeschirr auf die Kochzone gestellt. | Stellen Sie Kochgeschirr auf die Kochzone. |
| Sie verwenden ungeeignetes Kochgeschirr. | Verwenden Sie geeignetes Kochgeschirr. Siehe Kapitel „Tipps und Hinweise“. | |
| Der Durchmesser des Kochgeschirrbodens ist zu klein für die Kochzone. | Verwenden Sie Kochgeschirr mit den richtigen Abmessungen. Siehe hierzu "Technische Daten". | |
| und erscheinen abwechselnd. | Die Leistung ist wegen eines ungeeigneten oder leeren Kochgeschirrs zu niedrig. | Verwenden Sie geeignetes Kochgeschirr. Siehe Kapitel „Tipps und Hinweise“ sowie „Technische Daten“. Schalten Sie die Kochzone nicht ein, wenn sich ein leerer Topf auf ihr befindet. |
| und erscheinen abwechselnd. | Der Topf ist leer oder enthält eine andere Flüssigkeit als Wasser, z.B. Öl. | Verwenden Sie die Funktion nicht für andere Flüssigkeiten als Wasser. |
| und erscheinen abwechselnd. | Der Topf enthält zu viel oder zu wenig Wasser. Sie haben etwas anderes als Wasser und Kartoffeln gekocht. Der Siedepunkt hat sich zeitlich verschoben und die SenseBoil® Funktion konnte nicht richtig funktionieren. | Siehe Kapitel „Tipps und Hinweise“. Kochen Sie nur Wasser und Kartoffeln mit SenseBoil®. |
| Es ertönt ein Signalton, die Kontrolllampe über tõõt blinkt und die Funktion SenseBoil® startet nicht. | Keine der Kochzonen kann mit der Funktion SenseBoil® verwendet werden. Es ist noch Restwärme in der Kochzone, die Sie verwenden möchten, vorhanden oder sie wird noch benutzt. | Beenden Sie Ihre Kochaktivitäten und wählen Sie eine freie Kochzone ohne Restwärme. |
| E und eine Zahl werden angezeigt. | Es ist ein Fehler im Kochfeld aufgetreten. | Schalten Sie das Kochfeld aus und nach 30 Sekunden wieder ein. Wenn E erneut erscheint, trennen Sie das Kochfeld von der Spannungsversorgung. Schalten Sie nach 30 Sekunden das Kochfeld wieder ein. Tritt das Problem weiterhin auf, wenden Sie sich an den autorisierten Kundendienst. |
| Es ist ein konstanter Piepton zu hören. | Unsachgemäßer elektrischer Anschluss. | Trennen Sie das Kochfeld von der Stromversorgung. Wenden Sie sich an eine Elektrofachkraft zur Überprüfung der Installation. |
8.2 Wenn Sie das Problem nicht lösen können...
Wenn Sie das Problem nicht selbst lösen können, wenden Sie sich an Ihren Händler oder einen autorisierten Kundendienst. Geben Sie die Daten, die Sie auf dem Typenschild finden, an. Geben Sie dabei den dreistelligen Buchstaben-Code für die Glaskeramik (befindet sich in der Ecke der Glasfläche)
und die angezeigte Fehlermeldung an. Vergewissern Sie sich, dass Sie das Kochfeld korrekt bedient haben. Wenn Sie das Gerät falsch bedient haben, fällt auch während der Garantiezeit für die Reparatur durch einen Techniker oder Händler eine Gebühr an. Die Informationen zum Kundendienst und die Garantiebedingungen finden Sie im Garantieheft.
9. TECHNISCHE DATEN
9.1 Typenschild
Modell KIS82449
Typ 62 D4A 01 AD
Induktion 7.2 kW
Ser. Nr. ....
ELECTROLUX
PNC 949 596 974 00
220 - 240 V/400 V 2N, 50 - 60 Hz
Made in Germany
7.2 kW

9.2 Technische Daten der Kochzonen
| Kochzone | Nennleistung (höchste Kochstufe) [W] | PowerBoost [W] | PowerBoost maximale Ein-schaltdauer [Min.] | Durchmesser des Kochge-schirrs [mm] |
| Vorne links | 2300 | 3200 | 10 | 125 - 210 |
| Hinten links | 2300 | 3200 | 10 | 125 - 210 |
| Vorne Mitte | 1400 | 2500 | 4 | 125 - 145 |
| Hinten rechts | 2300 | 3600 | 10 | 205 - 240 |
Die Leistung der Kochzonen kann geringfügig von den Daten in der Tabelle abweichen. Sie ändert sich je nach Material und Abmessungen des Kochgeschirrs.
Verwenden Sie für optimale Kochergebnisse kein Kochgeschirr, dessen Durchmesser größer als der in der Tabelle angegebene Wert ist.
10. ENERGIEEFFIZIENZ
10.1 Produktinformationen gemäß EU 66/2014, nur gültig für den EU-Markt
| Modellidentifikation | KIS82449 | |
| Kochfeldtyp | Einbau-Kochfeld | |
| Anzahl der Kochzonen | 4 | |
| Heiztechnologie | Induktion | |
| Durchmesser der kreis-förmigen Kochzonen (∅) | Vorne links | 21,0 cm |
| Hinten links | 21,0 cm | |
| Vorne Mitte | 14,5 cm | |
| Hinten rechts | 24,0 cm | |
| Energieverbrauch pro Kochzone (EC electric cooking) | Vorne links | 179,6 Wh/kg |
| Hinten links | 177,0 Wh/kg | |
| Vorne Mitte | 180,2 Wh/kg | |
| Hinten rechts | 174,6 Wh/kg | |
| Energieverbrauch des Kochfelds (EC electric hob) | 177,9 Wh/kg | |
EN 60350-2 - Elektrische Kochgeräte für den Hausgebrauch - Teil 2: Kochfelder - Verfahren zur Messung der Gebrauchseigenschaften
Die Energiemessungen der Kochflächen wurden an den Markierungen der entsprechenden Kochzonen vorgenommen.
10.2 Energie sparen
Beachten Sie folgende Tipps, um beim täglichen Kochen Energie zu sparen.
- Wenn Sie Wasser erwärmen, verwenden Sie nur die benötigte Menge.
-
Decken Sie Kochgeschirr, wenn möglich, mit einem Deckel ab.
-
Stellen Sie Kochgeschirr auf die Kochzone, bevor Sie sie einschalten.
- Stellen Sie kleineres Kochgeschirr auf die kleineren Kochzonen.
- Stellen Sie das Kochgeschirr mittig auf die Kochzone.
- Nutzen Sie die Restwärme, um die Speisen warm zu halten oder zu schmelzen.
11. UMWELTTIPPS
Recyceln Sie Materialien mit dem Symbol 📊. Entsorgen Sie die Verpackung in den entsprechenden Recyclingbehältern. Recyclen Sie zum Umwelt- und Gesundheitsschutz elektrische und elektronische Geräte.
Entsorgen Sie Geräte mit diesem Symbol nicht mit dem Hausmüll. Bringen Sie das Gerät zu Ihrer örtlichen Sammelstelle oder wenden Sie sich an Ihr Gemeindeamt.
CONTENIDO
- INFORMACIÓN SOBRE SEGURIDAD......50
- INSTRUCCIONES DE SEGURIDAD....53
- INSTALACIÓN....55
- DESCRIPCIÓN DEL PRODUCTO....57
- USO DIARIO....59
- CONSEJOS....65
- MANTENIMIENTO Y LIMPIEZA....69
- SOLUCIÓN DE PROBLEMAS....69
- DATOS TÉCNICOS....72
- EFICACIA ENERGÉTICA....73
PENSAMOS EN USTED
Gracias por adquirir un aparato Electrolux. Ha escogido un producto que contiene décadas de experiencia e innovación profesionales. Ingenioso y elegante, se ha diseñado pensando en usted. Así pues, siempre que lo utilice, puede tener la seguridad de que conseguirá excelentes resultados.
Bienvenido a Electrolux.
Consulte en nuestro sitio web:

Obtener consejos, folletos, soluciones a problemas e información de servicio:
www.electrolux.com/webselfservice

Registrar su producto para recibir un mejor servicio:
www.registerelectrolux.com

Adquirir accesorios, artículos de consumo y recambios originales para su aparato:
www.electrolux.com/shop
ATENCIÓN Y SERVICIO AL CLIENTE
Le recomendamos que utilice recambios originales.
Al contactar con nuestro centro autorizado de servicio técnico, cerciórese de tener la siguiente información a mano: Modelo, PNC, Número de serie.
La información se puede encontrar en la placa de características.
⚠️ Advertencia / Precaución-Información sobre seguridad
i Información general y consejos
Información sobre el medio ambiente
Salvo modificaciones.
1. INFORMACIÓN SOBRE SEGURIDAD
Antes de instalar y utilizar el aparato, lea atentamente las instrucciones facilitadas. El fabricante no se hace responsable de lesiones o daños producidos como resultado de una instalación o un uso incorrectos.
Conserve siempre estas instrucciones en lugar seguro y accesible para futuras consultas.
1.1 Seguridad de niños y personas vulnerables
- Este aparato puede ser utilizado por niños de 8 años en adelante y personas cuyas capacidades físicas, sensoriales o mentales estén disminuidas o que carezcan de la experiencia y conocimientos suficientes para manejarlo, siempre que cuenten con las instrucciones o la supervisión sobre el uso del electrodoméstico de forma segura y comprendan los riesgos.
- Es necesario mantener alejados del aparato a los niños entre 3 y 8 años, así como a las personas con minusvalías importantes y complejas, salvo que estén bajo supervisión continua.
- Es necesario mantener alejados del aparato a los niños de menos de 3 años salvo que estén bajo supervisión continua.
- No deje que los niños jueguen con el aparato.
- Mantenga todo el material de embalaje fuera del alcance de los niños y deséchelo de forma adecuada.
- Mantenga a los niños y mascotas alejados del aparato cuando esté funcionando o enfriándose. Las partes accesibles pueden calentarse durante el uso.
- Si este aparato tiene un bloqueo de seguridad para niños, debe activarlo.
- La limpieza y mantenimiento de usuario del aparato no podrán ser realizados por niños sin supervisión.
1.2 Seguridad general
- ADVERTENCIA: El aparato y las piezas accesibles se calientan mucho durante el funcionamiento. Preste mucha atención para no tocar las resistencias.
- ADVERTENCIA: Cocinar con grasa o aceite sin estar presente puede resultar peligroso, ya que podría ocasionarse un incendio.
- NUNCA intente apagar un fuego con agua; apague el aparato y cubra la llama con una tapa o una manta ignífuga.
- ATENCIÓN: El aparato no se debe alimentar a través de un dispositivo de conmutación externo, como un temporizador, ni conectarse a un circuito que se encienda y apague regularmente por un servicio público.
- ATENCIÓN: El proceso de cocción debe ser supervisado. Un proceso de cocción breve debe estar permanentemente supervisado.
- ADVERTENCIA: Peligro de incendio: No utilice las superficies de cocción para almacenar alimentos.
- No deje objetos metálicos, como cuchillos, tenedores, cucharas o tapas sobre la superficie de cocción para evitar que se calienten.
- No utilice el aparato antes de instalarlo en la estructura empotrada.
- No utilice un limpiador a vapor para limpiar el aparato.
- Tras el uso, apague la zona de cocción con el mando y no preste atención al detector de tamaño.
- Si la superficie de vitrocerámica/cristal está agrietada, apague el aparato y desenchúfelo de la red eléctrica. Si el aparato está conectado directamente a la red eléctrica mediante una caja de empalmes, quite el fusible para desconectarlo de la alimentación eléctrica. En cualquier caso, diríjase al servicio técnico autorizado.
- Si el cable eléctrico sufre algún daño, el fabricante, su servicio técnico autorizado o un profesional tendrán que cambiarlo para evitar riesgos.
- ADVERTENCIA: Utilice exclusivamente protecciones para la placa de cocción diseñadas por el fabricante del aparato o indicadas en sus instrucciones de uso como apropiadas, o bien las protecciones incluidas con el aparato. El uso de protectores inadecuados puede provocar accidentes.
2. INSTRUCCIONES DE SEGURIDAD
2.1 Instalación

ADVERTENCIA!
Solo un técnico cualificado puede instalar el aparato.

ADVERTENCIA!
Podría sufrir lesiones o dañar el aparato.
- Retire todo el embalaje.
- No instale ni utilice un aparato dañado.
- Siga las instrucciones de instalación suministradas con el aparato.
- Respete siempre la distancia mínima entre el aparato y los demás electrodomésticos y mobiliario.
- Tenga cuidado al mover el aparato, porque es pesado. Utilice siempre guantes de protección y calzado cerrado.
- Proteja las superficies cortadas con un material sellante para evitar que la humedad las hinche.
- Proteja la parte inferior del aparato del vapor y la humedad.
- No instale el aparato junto a una puerta ni debajo de una ventana. De esta forma se evita que los utensilios de cocina calientes caigan del aparato cuando la puerta o la ventana estén abiertas.
- Cada aparato tiene ventiladores de refrigeración en la base.
-
Si el aparato se instala sobre un cajón:
-
No guarde objetos pequeños u hojas de papel que puedan ser absorbidos, porque podrían dañar los ventiladores o perjudicar el sistema de refrigeración.
- Mantenga una distancia mínima de 2 cm entre la base del aparato y los objetos guardados en el cajón.
- Retire los paneles separadores instalados en el armario por debajo del aparato.
2.2 Conexión eléctrica

ADVERTENCIA!
Riesgo de incendios y descargas eléctricas.
- Todas las conexiones eléctricas deben realizarlas electricistas cualificados.
- El aparato debe conectarse a tierra.
- Antes de efectuar cualquier tipo de operación, compruebe que el aparato esté desenchufado de la corriente eléctrica.
- Asegúrese de que los parámetros de la placa de características son compatibles con los valores eléctricos del suministro eléctrico.
- Asegúrese de que el aparato está instalado correctamente. Un cable de red o enchufe (en su caso) flojo o inadecuado puede provocar que el terminal se caliente en exceso.
- Utilice el cable de red eléctrica adecuado.
- Coloque los cables eléctricos de forma que no se puedan enredar.
- Asegúrese de que hay instalada una protección contra descargas eléctricas.
- Establezca la descarga de tracción del cable.
- Asegúrese de que el cable o el enchufe (en su caso) no toquen el aparato caliente ni utensilios de cocina calientes cuando conecte el aparato a las tomas cercanas.
- No utilice adaptadores de enchufes múltiples ni cables prolongadores.
- Asegúrese de no provocar daños en el enchufe (en su caso) ni en el cable de red. Póngase en contacto con un electricista o con nuestro servicio técnico para cambiar un cable dañado.
- Los mecanismos de protección contra descargas eléctricas de componentes con corriente y aislados deben fijarse de forma que no puedan aflojarse sin utilizar herramientas.
- Conecte el enchufe a la toma de corriente únicamente cuando haya terminado la instalación. Asegúrese
de tener acceso al enchufe del suministro de red una vez finalizada la instalación.
- Si la toma de corriente está floja, no conecte el enchufe.
- No desconecte el aparato tirando del cable de conexión a la red. Tire siempre del enchufe.
- Use únicamente dispositivos de aislamiento apropiados: línea con protección contra los cortocircuitos, fusibles (tipo tornillo que puedan retirarse del soporte), dispositivos de fuga a tierra y contactores.
- La instalación eléctrica debe tener un dispositivo de aislamiento que permita desconectar el aparato de todos los polos de la red. El dispositivo de aislamiento debe tener una apertura de contacto con una anchura mínima de 3 mm.
2.3 Uso del aparato

ADVERTENCIA!
Riesgo de lesiones, quemaduras y descargas eléctricas.
- Retire todo el embalaje, las etiquetas y la película protectora (en su caso) antes del primer uso.
- Este aparato está diseñado exclusivamente para uso doméstico.
- No cambie las especificaciones de este aparato.
- Cerciórese de que los orificios de ventilación no están obstruidos.
- No deje nunca el aparato desatendido mientras está en funcionamiento.
- Apague las zonas de cocción después de cada uso.
- No se confíe por el detector de tamaño.
- No coloque cubiertos ni tapaderas sobre las zonas de cocción. Pueden alcanzar temperaturas elevadas.
- No utilice el aparato con las manos mojadas ni cuando entre en contacto con el agua.
- No utilice el aparato como superficie de trabajo ni de almacenamiento.
- Si la superficie del aparato está agrietada, desconéctelo inmediatamente de la fuente de
alimentación. De esta forma evitará descargas eléctricas.
- Los usuarios que tengan marcapasos implantados deberán mantener una distancia mínima de 30 cm de las zonas de cocción por inducción cuando el aparato esté en funcionamiento.
- Cuando se coloca comida en aceite caliente, éste puede saltar.

ADVERTENCIA!
Riesgo de incendio y explosiones
- Las grasas o aceites calientes pueden generar vapores inflamables. Mantenga las llamas u objetos calientes alejados de grasas y aceites cuando cocine con ellos.
- Los vapores que liberan los aceites muy calientes pueden provocar combustiones imprevistas.
- El aceite usado, que puede contener restos de alimentos, puede provocar incendios a temperaturas más bajas que el aceite que se utiliza por primera vez.
- No coloque productos inflamables ni objetos mojados con productos inflamables dentro, cerca o encima del aparato.

ADVERTENCIA!
Podría dañar el aparato.
- No coloque ningún utensilio de cocina caliente en el panel de control.
- No coloque una tapa caliente sobre la superficie de cristal de la placa de cocción.
- No deje que el contenido de los recipientes hierva hasta evaporarse.
- Evite la caída de objetos o utensilios de cocina en el aparato. La superficie puede dañarse.
- No encienda las zonas de cocción sin utensilios de cocina o con éstos vacíos.
- No coloque papel de aluminio sobre el aparato.
- Los utensilios de cocina de hierro o aluminio fundido, o que tengan la base dañada, pueden arañar el cristal o la vitrocerámica. Levante siempre estos objetos cuando tenga que
moverlos sobre la superficie de cocción.
- Este aparato está diseñado exclusivamente para cocinar. No debe utilizarse para otros fines, por ejemplo, como calefacción.
2.4 Mantenimiento y limpieza
- Limpie periódicamente el aparato para evitar el deterioro del material de la superficie.
- Apague el aparato y déjelo enfriar antes de limpiarlo.
- Desconecte el aparato de la red eléctrica antes de realizar el mantenimiento.
- No utilice pulverizadores ni vapor de agua para limpiar el aparato.
- Limpie el aparato con un paño suave humedecido. Utilice solo detergentes neutros. No utilice productos abrasivos, estropajos duros, disolventes ni objetos de metal.
3. INSTALACIÓN

ADVERTENCIA!
Consulte los capítulos sobre seguridad.
3.1 Antes de la instalación
Antes de instalar la placa de cocción, anote la información siguiente de la placa de características. La placa de características está situada en la parte inferior de la placa de cocción.
Número de
serie ....
3.2 Placas empotradas
Las placas de cocción que han de ir integradas en la cocina solo deben utilizarse una vez encastradas en los muebles adecuados y con las encimeras y superficies de trabajo apropiadas.
3.3 Cable de conexión
- La placa de cocción se suministra con el cable de conexión.
2.5 Asistencia
- Para reparar el aparato, póngase en contacto con el centro de servicio autorizado.
- Utilice solamente piezas de recambio originales.
2.6 Eliminación

ADVERTENCIA!
Existe riesgo de lesiones o asfixia.
- Póngase en contacto con las autoridades locales para saber cómo desechar correctamente el aparato.
- Desconecte el aparato de la red.
- Corte el cable eléctrico cerca del aparato y deséchelo.
- Cambie el cable de red dañado solo por el cable de repuesto. Póngase en contacto con el servicio técnico local autorizado.

ADVERTENCIA!
Todas las conexiones eléctricas deben realizarlas electricistas cualificados.

PRECAUCIÓN!
No taladre ni suelde los extremos de cable. Está terminantemente prohibido.

PRECAUCIÓN!
No conecte el cable sin el manguito del extremo.
Conexión bifásica
- Retire el manguito del extremo del cable de los cables negros y marrones.
- Quite el aislamiento de los extremos del cable negro y marrón.
- Coloque un nuevo manguito de 1,5 mm² en cada extremo de cable. (se necesita una herramienta especial).
Sección transversal del cable
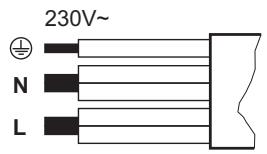
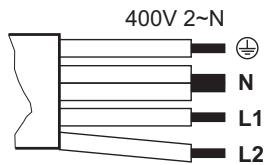
| Conexión monofásica - 230 V~ | Conexión bifásica - 400 V 2 ~ N | ||
| Verde - amarillo | Verde - amarillo | ||
| N | Azul y azul | Azul y azul | N |
| L | Negro y marrón | Negro | L1 |
| Marrón | L2 | ||
3.4 Montaje

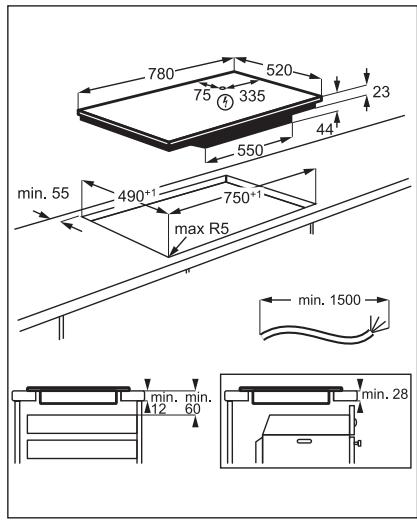
Si el aparato se instala sobre un cajón, la ventilación de la placa puede calentar el contenido del cajón durante el proceso de cocción.
4. DESCRIPCIÓN DEL PRODUCTO
4.1 Disposición de las zonas de cocción
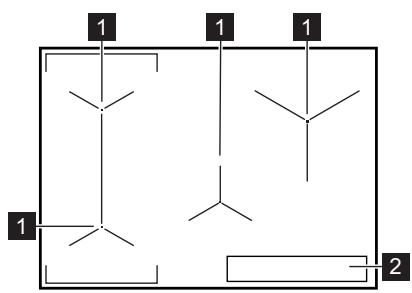
flowchart
graph TD
    A["1"] --> B["1"]
    C["1"] --> D["1"]
    E["1"] --> F["1"]
    G["1"] --> H["1"]
    I["1"] --> J["1"]
    K["1"] --> L["1"]
    M["1"] --> N["1"]
    O["1"] --> P["1"]
    Q["1"] --> R["1"]
    S["1"] --> T["1"]
    U["1"] --> V["1"]
    W["1"] --> X["1"]
    Y["1"] --> Z["1"]
    AA["1"] --> AB["1"]
    AC["1"] --> AD["1"]
    AE["1"] --> AF["1"]
    AG["1"] --> AH["1"]
    AI["1"] --> AJ["1"]
    AK["1"] --> AL["1"]
    AM["1"] --> AN["1"]
    AO["1"] --> AP["1"]
    AQ["1"] --> AR["1"]
    AS["1"] --> AT["1"]
    AU["1"] --> AV["1"]
    AW["1"] --> AX["1"]
    AY["1"] --> AZ["1"]
    BA["1"] --> BB["1"]
    BC["1"] --> BD["1"]
    BE["1"] --> BF["1"]
    BG["1"] --> BH["1"]
    BI["1"] --> BJ["1"]
    BK["1"] --> BL["1"]
    BM["1"] --> BN["1"]
    BO["1"] --> BP["1"]
    BQ["1"] --> BR["1"]
    BS["1"] --> BT["1"]
    BU["1"] --> BV["1"]
    BW["1"] --> BX["1"]
    BY["1"] --> BZ["1"]
    CA["1"] --> CB["1"]
    CC["1"] --> CD["1"]
    CE["1"] --> CF["1"]
    DG["1"] --> DH["1"]
    DI["1"] --> DJ["1"]
    DK["1"] --> DL["1"]
1 Zona de cocción por inducción
2 Panel de mandos

Para información detallada sobre los tamaños de las zonas de cocción, consulte "Datos técnicos".
4.2 Disposición del panel de control
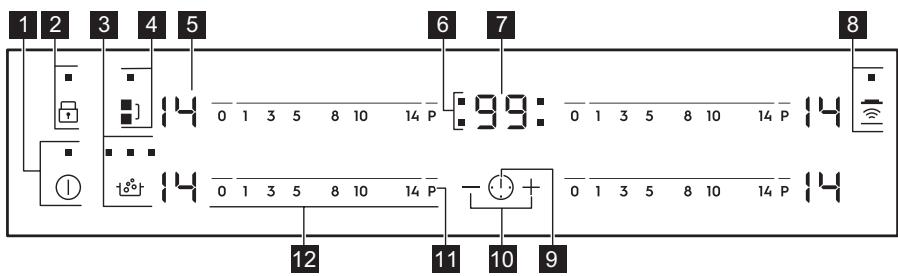
Utilice el aparato con los sensores. Las pantallas, indicadores y señales acústicas indican qué funciones están en funcionamiento.
| Sensor | Función | Comentario | |
| 1 | ➊ | ENCENDIDO/APAGADO | Para activar y desactivar la placa. |
| 2 | Bloqueo / Bloqueo de seguridad para niños | Para bloquear y desbloquear el panel de control. | |
| 3 | SenseBoil® | Para activar y desactivar la función .Los indicadores situados encima del símbolo muestran el progreso de la función. | |
| 4 | Bridge | Para activar y desactivar la función . | |
| 5 | - | Indicador del nivel de calor | Para mostrar el nivel de calor. |
| 6 | - | Indicadores de tiempo de las zonas de cocción | Muestra la zona para la que se ha ajustado la hora. |
| 7 | - | Indicador del temporizador | Para mostrar la hora en minutos. |
| 8 | Hob ^2 Hood | Para activar y desactivar el modo manual de la función. | |
| 9 | ! | - | Para seleccionar una zona de cocción. |
| 10 | +/- | - | Para aumentar o disminuir el tiempo. |
| 11 | P | PowerBoost | Para activar la función. |
| 12 | - | Barra de control | Para ajustar la temperatura. |
4.3 Indicación de la temperatura en pantalla
| Pantalla | Descripción |
| La zona de cocción está apagada. | |
| La zona de cocción está en funcionamiento. | |
| SenseBoil® está en funcionamiento. | |
| Calentamiento automático está en funcionamiento. | |
| PowerBoost está en funcionamiento. | |
| Hay un fallo de funcionamiento. | |
| OptiHeat Control (indicador de calor residual de 3 pasos): seguir cocinando / mantener caliente / calor residual. | |
| Bloqueo /Bloqueo de seguridad para niños está en funcionamiento. | |
| El recipiente es inadecuado o demasiado pequeño, o no se ha colocado ningún recipiente sobre la zona de cocción. | |
| Apagado automático está en funcionamiento. |
4.4 OptiHeat Control (indicador de calor residual de 3 pasos)

ADVERTENCIA!
☐ / ☐ / ☐ Riesgo de quemaduras por calor residual. Los indicadores muestran el nivel de calor residual de las zonas de cocción que está usando. También pueden iluminarse los indicadores de las zonas de cocción vecinas aunque no las esté utilizando.
5. USO DIARIO

ADVERTENCIA!
Consulte los capítulos sobre seguridad.
5.1 Activación y desactivación
Toque ① durante 1 segundo para encender o apagar el la placa de cocción.
5.2 Apagado automático
La función desconecta automáticamente la placa de cocción siempre que:
- todas las zonas de cocción están apagadas,
- no se ajusta un nivel de calor después de encender la placa,
- se vierte algo o se coloca algún objeto sobre el panel de control durante más de 10 segundos (un recipiente, un trapo, etc.). Se emite una señal acústica y la placa de cocción se apaga. Retire el objeto o limpie el panel de control.
- la placa está demasiado caliente (por ejemplo, el contenido de un recipiente ha hervido hasta agotarse el líquido). Deje que la zona de cocción se enfríe antes de utilizar la placa de nuevo.
- está utilizando utensilios de cocina no adecuados. Se ilumina el símbolo F y la zona de cocción se apaga automáticamente después de 2 minutos.
Las zonas de cocción por inducción generan el calor necesario para el proceso de cocción directamente en la base del recipiente, lo que hace que la superficie vitrocerámica se caliente por el calor del mismo.
- no apaga una zona de cocción ni cambia la temperatura. Al cabo de un cierto tiempo, se enciende - y se apaga la placa.
Relación entre el ajuste de temperatura y el tiempo tras el que se apaga la placa de cocción:
| Ajuste del nivel de calor | La placa de coc-ción se apaga. |
| 1 - 3 | 6 horas |
| 4 - 7 | 5 horas |
| 8 - 9 | 4 horas |
| 10 - 14 | 1,5 hora |
5.3 Ajuste de temperatura
Para ajustar o cambiar la temperatura:
Toque la barra de control en el ajuste de temperatura adecuado o desplace el dedo a lo largo de la barra de control hasta llegar al ajuste de temperatura adecuado.
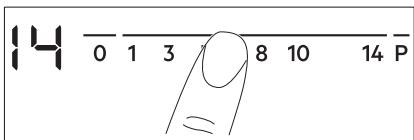
5.4 SenseBoil®
La función ajusta automáticamente la temperatura del agua para que no se derrame cuando alcance el punto de ebullición.

Si hubiera calor residual (☐ / ☐ / ☐) en la zona de cocción que desea utilizar, se emite una señal acústica y la función no se inicia.
- Toque Ⓐ para activar la placa de cocción.
- Toque para activar la función. En las zonas de cocción donde se puede utilizar actualmente la función aparece
parpadeante. - Toque la barra de control de cualquier zona de cocción disponible (entre niveles de calor 1-14) para la que quiera iniciar la función.
La función se inicia.
Si no elige ninguna zona de cocción en 5 segundos, la función no se activa.

Una vez puesta en marcha la función, los indicadores situados encima del símbolo se encienden uno tras otro hasta que el agua alcanza el punto de ebullición.
Cuando la función detecta el punto de ebullición, la placa de cocción emite una señal acústica y el nivel de calor cambia automáticamente a 8.

Si ya están en uso todas las zonas de cocción o queda calor residual en todas ellas, la placa de cocción emite un pitido, los indicadores situados encima de parpadean y la función no se pone en marcha.
Para desactivar la función, toque 📁 (la función se desactiva y el ajuste de calor baja a 0) otro que la barra de control y ajuste el nivel de calor anualmente.
5.5 Uso de las zonas de cocción
Coloque el utensilio de cocina en el centro de la zona seleccionada. Las zonas de cocción por inducción se adaptan automáticamente al tamaño de la base de los utensilios de cocina.
Puede cocinar con utensilios de cocina grandes sobre dos zonas de cocción al mismo tiempo. El utensilio de cocina debe cubrir los centros de ambas zonas pero no superar las marcas de área. Si el utensilio de cocina está entre las dos zonas, la función Bridge no se activará.
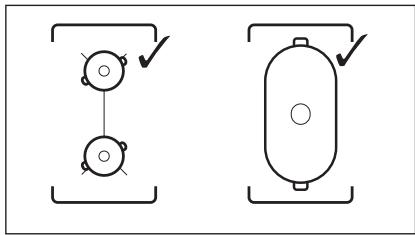
natural_image
Two schematic diagrams of mechanical or electrical components with checkmark indicators (no text or symbols)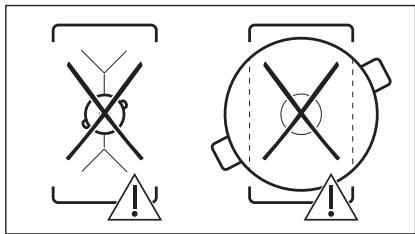
5.6 Bridge

La función se activa cuando el utensilio de cocción cubre los centros de las dos zonas. No es compatible con la función SenseBoil®.
La función conecta dos zonas de cocción izquierdas de forma que funcionen como si fueran una.
Seleccione primero el ajuste de temperatura de una de las zonas de la izquierda.
Para activar la función: toque ■]. Si desea ajustar o cambiar el nivel de calor, pulse uno de los sensores.
Para desactivar la función: toque ■]. Las zonas de cocción funcionan de manera independiente.
5.7 Calentamiento automático
Active esta función para alcanzar el ajuste de calor que desea en menos tiempo. Cuando se activa, la zona opera en el ajuste más alto al inicio y después sigue cocinando con el ajuste de calor deseado.

Para activar la función, la zona de cocción debe estar fría.
Para activar la función de una zona de cocción: toque P (P se enciende). Toque inmediatamente el ajuste de calor que desee. Transcurridos 3 segundos, R se enciende.
Para desactivar la función: cambie el ajuste de calor.
5.8 PowerBoost
Esta función suministra potencia adicional a las zonas de cocción por inducción. La función se puede activar para la zona de cocción por inducción durante un periodo de tiempo limitado. Transcurrido ese tiempo, la zona de cocción adopta automáticamente el nivel de temperatura más alto.

Consulte el capítulo "Datos técnicos".
Para activar la función de una zona de cocción: toque P. Se enciende P.
Para desactivar la función: cambie el ajuste de calor.
5.9 Temporizador
Temporizador
Puede utilizar esta función para ajustar el tiempo que desee que funcione la zona de cocción para un único proceso de cocción.
Ajuste primero temperatura para la zona de cocción y después la función.
Para seleccionar la zona de cocción: toque Ⓐ varias veces hasta que se encienda el indicador de la zona de cocción que desea.
Para activar la función: toque la parte + del temporizador para programar el tiempo (00 - 99 minutos). La cuenta atrás comenzará cuando el indicador de la zona de cocción parpadee más lentamente.
Para comprobar el tiempo restante: seleccione la zona de cocción con ⚠. El indicador de la zona de cocción comienza a parpadear rápidamente. La pantalla muestra el tiempo restante.
Para modificar el tiempo: seleccione la zona de cocción con ⚠. Toque + o —.
Para desactivar la función: seleccione la zona de cocción con ⏻ y toque —. El tiempo restante cuenta atrás hasta 00. El indicador de la zona de cocción se apaga.

Cuando ha transcurrido el tiempo, se activa la señal acústica y 00 parpadea. Se apaga la zona de cocción.
Para detener la señal acústica: toque ①.
CountUp Timer (Tiempo de cocción) Puede utilizar esta función para supervisar la duración de funcionamiento de la zona de cocción.
Para seleccionar la zona de cocción: toque Ⓐ varias veces hasta que se encienda el indicador de la zona de cocción que desea.
Para activar la función:toque — del temporizador; UP se enciende. La cuenta de cronómetro comienza cuando el indicador de la zona de cocción parpadea más lentamente. La pantalla alterna entre UP y el tiempo transcurrido (minutos).
Para ver el tiempo de funcionamiento de la zona de cocción: seleccione la zona de cocción con ⚠. El indicador de
la zona de cocción comienza a parpadear rápidamente. La pantalla muestra cuánto tiempo ha estado funcionado la zona.
Para desactivar la función: seleccione la zona de cocción con Ⓐ y toque + o —. El indicador de la zona de cocción se apaga.
Avisador
Puede utilizar esta función como Avisador mientras la placa está activada y las zonas de cocción no funcionan. La pantalla de temperatura muestra ☐.
Para activar la función: toque ⚠️.
Toque + o — del temporizador para ajustar el tiempo. Cuando ha transcurrido el tiempo, se activa la señal acústica y 00 parpadea.
Para detener la señal acústica: toque ⓣ.

La función no afecta al funcionamiento de las zonas de cocción.
5.10 Bloqueo
Se puede bloquear el panel de control mientras funcionan las zonas de cocción. Evita el cambio accidental del nivel de calor.
Ajuste en primer lugar el nivel de calor que desee.
Para activar la función: toque 📋. 📁 se enciende durante 4 segundos. El temporizador se mantiene activo.
Para desactivar la función: toque 🔒. Se enciende el ajuste de calor anterior.

La función también se desactiva cuando se apaga la placa.
5.11 Bloqueo de seguridad para niños
Esta función impide el uso accidental o indebido de la placa.
Para activar la función: encienda la placa de cocción con ①. No ajuste los niveles de calor. Pulse durante 4 segundos. se enciende. Apague la placa de cocción con ①.
Para desactivar la función: encienda la placa de cocción con Ⓘ. No ajuste los niveles de calor. Toque ☐ durante 4 segundos. ☑ se enciende. Apague la placa de cocción con Ⓘ.
Para anular la función solo durante el tiempo de cocción: encienda la placa de cocción con Ⓐ. L se enciende. Toque ☑ durante 4 segundos. Ajuste la temperatura antes de que transcurran 10 segundos. Ya puede utilizar la placa de cocción. Cuando apague la placa de cocción con Ⓐ, la función vuelve a activarse.
5.12 OffSound Control (Activación y desactivación de los sonidos)
Apague la placa de cocción. Toque ① durante 3 segundos. La pantalla se enciende y se apaga. Toque □ durante 3 segundos. □ o □ se encienden.
Toque + en el temporizador para seleccionar una de las siguientes opciones:
- b1 - el sonido se desactiva
- 60 - el sonido se activa
Para confirmar su selección, espere hasta que la placa de cocción se desactive automáticamente.
Cuando esta función se ajusta en 📋, solo se oye el sonido cuando:
- se toca ①
- El Avisador baja
- El Temporizador baja
• se coloca algo en el panel de control.
5.13 Limitación de potencia
Inicialmente, la placa de cocción tiene ajustado el nivel de potencia más alto posible.
Para aumentar o disminuir el nivel de potencia:
- Apague la placa de cocción.
- Toque ① durante 3 segundos. La pantalla se enciende y se apaga.
- Toque ☐ durante 3 segundos. ☐ o ☐ se encienden.
- Toque ⚠️. Se enciende P 72.
- Toque — / + del temporizador para ajustar el nivel de potencia.
Niveles de potencia
Consulte el capítulo "Datos técnicos".
• P 72 — 7200 W
• P 15 — 1500 W
• P 20 — 2000 W
• P 25 — 2500 W
• P 30 — 3000 W
• P 35 — 3500 W
• P 40 — 4000 W
• P 45 — 4500 W
• P 50 — 5000 W
- P 60 — 6000 W

PRECAUCIÓN!
Asegúrese de que la potencia seleccionada se adapta a los fusibles de la instalación doméstica.

ADVERTENCIA!
Si selecciona uno de los niveles de potencia más bajos, es posible que la función SenseBoil® no funcione. Consulte la tabla siguiente.
√ - la función actúa, ✗ - la función no actúa.
| Niveles de potencia | Zona de cocción | |||
| Anterior iz-quier-da | Posterior iz-quier-da | Mitad anterior | Posterior dere-cha | |
| 210 mm | 210 mm | 145 mm | 240 mm | |
| P 72 | √ | √ | √ | √ |
| P 15 | × | × | × | × |
| P 20 | × | × | × | × |
| P 25 | × | × | √ | × |
| P 30 | √ | √ | √ | √ |
| P 35 | √ | √ | √ | √ |
| P 40 | √ | √ | √ | √ |
| P 45 | √ | √ | √ | √ |
| P 50 | √ | √ | √ | √ |
| P 60 | √ | √ | √ | √ |
5.14 Función Gestión de energía
- Las zonas de cocción se agrupan según la ubicación y el número de fases de la placa. Consulte la ilustración.
- Cada fase tiene una carga eléctrica máxima de 3600 W.
- La función divide la potencia entre las zonas de cocción conectadas a la misma fase.
- La función se activa cuando la carga eléctrica total de las zonas de cocción conectadas a la misma fase supera los 3600 W.
- La función reduce la potencia de las otras zonas de cocción conectadas a la misma fase.
- La pantalla de ajuste de temperatura de las zonas reducidas alterna entre el ajuste de calor elegido y el reducido. Después de algún tiempo,
la pantalla de las zonas reducidas permanece en el ajuste de calor reducido.
Función Gestión de energía con función Limitación de potencia
Cuando la función Limitación de potencia se ajusta en 6,0 kW o menos, la potencia de la placa se divide entre todas las zonas de cocción.
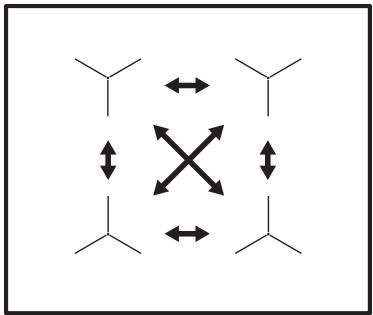
flowchart
graph TD
    A["Y"] <--> B["X"]
    C["Y"] <--> D["X"]
    E["Y"] <--> F["X"]
    G["Y"] <--> H["X"]
    I["Y"] <--> J["X"]
    K["Y"] <--> L["X"]
Cuando la función Limitación de potencia se ajusta en más de 6,0 kW, la potencia de la placa se divide entre el lado izquierdo y el derecho.
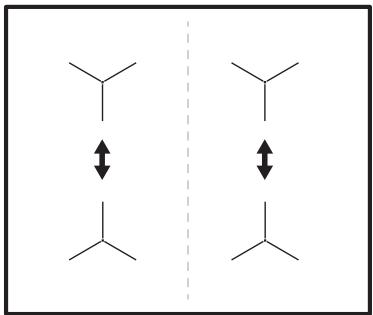
chemical
Chemical resonance diagram showing double-headed arrows between two identical Y-shaped molecules5.15 Hob ^2 Hood
Es una función automática avanzada que conecta la placa de cocción a una campana especial. La placa de cocción y la campana tienen un comunicador de señales infrarrojas. La velocidad del ventilador se define automáticamente según el ajuste de modo y temperatura del utensilio de cocina más caliente en la placa de cocción. También puede operar manualmente el ventilador desde la placa de cocción.

Para la mayoría de las campanas, el sistema remoto esta desactivado de origen. Actívelo antes de usar la función. Para más información, consulte el manual de instrucciones de la campana.
Uso automático de la función
Para utilizar la función automáticamente, ajuste el modo automático en H1 – H6. La placa está ajustada de origen en H5. La campana reacciona siempre que funciona la placa. La placa de cocción reconoce automáticamente la temperatura del utensilio de cocina y ajusta la velocidad del ventilador.
Modos automáticos
| Luz automática | Hervir1) | Freír2) | |
| Modo H0 | Apaga-do | Apaga-do | Apaga-do |
| Modo H1 | Encen-dido | Apaga-do | Apaga-do |
| Modo H2 3) | Encen-dido | Veloci-dad delventilador 1 | Veloci-dad delventilador 1 |
| Modo H3 | Encen-dido | Apaga-do | Veloci-dad delventilador 1 |
| Modo H4 | Encen-dido | Veloci-dad delventilador 1 | Veloci-dad delventilador 1 |
| Modo H5 | Encen-dido | Veloci-dad delventilador 1 | Veloci-dad delventilador 2 |
| Modo H6 | Encendido | Velocidad del ventilador 2 | Velocidad del ventilador 3 |
1) La placa detecta el proceso de ebullición y activa la velocidad del ventilador según el modo automático.
2) La placa detecta el proceso de fritura y activa la velocidad del ventilador según el modo automático.
3) Este modo activa el ventilador y la luz, y no depende de la temperatura.
Cambio del modo automático
- Desactive el aparato.
- Toque ① durante 3 segundos. La pantalla se enciende y se apaga.
- Toque ☐ durante 3 segundos.
- Toque Ⓐ varias veces hasta que se encienda H.
- Toque + del temporizador para seleccionar un modo automático.

Para operar la campana directamente con el panel de la campana, desactive el modo automático de la función.

Cuando termine de cocinar y apague la placa de cocción, la campana puede seguir funcionando un breve período de tiempo. Tras ese tiempo, el sistema desactiva el ventilador automáticamente y evita la activación accidental del ventilador durante los siguientes 30 segundos.
6. CONSEJOS

ADVERTENCIA!
Consulte los capítulos sobre seguridad.
Ajuste manual de la velocidad del ventilador
También puede utilizar la función manualmente. Para ello, toque mientras la placa está encendida. Así se desactiva el funcionamiento automático de la función y es posible modificar manualmente la velocidad del ventilador.
Al pulsar se incrementa en un nivel la velocidad del ventilador. Cuando alcance un nivel intensivo y pulse de nuevo, ajustará la velocidad del ventilador en 0 y lo apagará. Para volver a poner en marcha el ventilador con la velocidad 1, toque.

Para activar el funcionamiento automático, apague la placa de cocción y vuelva a encenderla.
Activación de la luz
Puede hacer que la placa de cocción active automáticamente la luz al encender la placa. Para ello, ajuste el modo automático en H1 – H6.

La luz de la campana se apaga 2 minutos después de apagar la placa de cocción.
6.1 Utensilios de cocina

En las zonas de cocción por inducción, la presencia de un fuerte campo magnético calienta los utensilios de cocina muy rápidamente.

Utilice las zonas de cocción con los utensilios de cocina adecuados.
Material de los utensilios de cocina
- correcto: hierro fundido, acero, acero esmaltado y acero inoxidable con bases formadas por varias capas (indicados por el fabricante como aptos para inducción).
- incorrecto: aluminio, cobre, latón, cristal, cerámica, porcelana.
El utensilio de cocina es adecuado para cocinar con inducción si:
- el agua hierve muy rápido en una zona con el ajuste de calor máximo.
- el imán se adhiere a la base del utensilio de cocina.

La base del utensilio de cocina debe ser lo más gruesa y plana posible. Asegúrese de que las bases de los utensilios están limpias y secas antes de colocarlas sobre la placa de cocción.
Medidas de los utensilios de cocina
Las zonas de cocción por inducción se adaptan automáticamente al tamaño de la base de los utensilios de cocina.
La eficacia de la zona de cocción está relacionada con el diámetro del utensilio de cocina. Un utensilio de cocina con un diámetro inferior al mínimo solo recibe una parte de la potencia generada por la zona de cocción.

Consulte "Datos técnicos".
6.2 Ruidos durante la utilización
Es posible que escuche los ruidos siguientes:
- chasquido: el utensilio de cocina está fabricado con distintos tipos de materiales (construcción por capas).
- silbido: está utilizando una zona de cocción con muy elevado nivel de potencia y con utensilios de cocina cuya base está hecha de distintos materiales (construcción por capas).
- zumbido: el nivel de potencia utilizado es elevado.
- clic: se produce una conmutación eléctrica.
- silbido; zumbido: el ventilador está en funcionamiento.
Estos ruidos son normales y no indican fallo alguno.
6.3 Consejos para SenseBoil®
Los mejores resultados de la función se logran con agua hirviendo y para preparar patatas.

No funciona con utensilios de cocina de hierro fundido y antiadherentes, p.ej., con revestimiento cerámico. Para conseguir los mejores resultados de hervido de patatas se recomienda utilizar utensilios de acero esmaltado.
Compruebe si el utensilio de cocina es adecuado para SenseBoil® supervisando la primera sesión de cocción.
Para utilizar SenseBoil® de manera eficiente, siga el consejo siguiente:
- Llene entre la mitad y tres cuartas partes del recipiente con agua de grifo filtrada dejando 4 cm vacíos hasta el borde. No utilice menos de 1 ni más de 5 litros de agua. Asegúrese de que el peso total del agua (o del agua y las patatas) oscile entre 1 y 5 kg.
- Si quiere cocinar patatas, asegúrese de que estén totalmente cubiertas de
agua, pero recuerde dejar como mínimo un cuarto del recipiente vacío.
- Para obtener los mejores resultados, cocine solo patatas enteras de tamaño medio sin pelar.
- Asegúrese de no colocar las patatas demasiado apretadas.
- Evite producir vibraciones externas (p.ej., por utilizar una batidora o colocar un teléfono móvil junto al aparato) cuando esté activada la función.
- Si desea utilizar sal, añádala después de que el agua alcance el punto de ebullición.
- Es posible que la función no actúe correctamente con hervidores de agua y utensilios para preparar expresos.
6.4 Öko Timer (temporizador Eco)
Con el fin de ahorrar energía, la resistencia de la zona de cocción se apaga antes de que suene la señal del temporizador de cuenta atrás. La diferencia en el tiempo de utilización depende de la temperatura de calentamiento y de la duración de la cocción.
6.5 Ejemplos de aplicaciones de cocción
La relación entre el ajuste de temperatura y el consumo de potencia de la zona de cocción no es lineal. Cuando se aumenta el ajuste de temperatura, no es proporcional al aumento del consumo de potencia. Significa que una zona de cocción con el ajuste de temperatura medio usa menos de la mitad de su potencia.

Los datos de la tabla son solo orientativos.
| Ajuste del nivel de calor | Utilícelo para: | Tiempo (min) | Sugerencias |
| 1 | Mantener calientes los alimentos. | como estime necesario | Tape los utensilios de cocina. |
| 1 - 3 | Salsa holandesa, derretir: mantequilla, chocolate, gelatina. | 5 - 25 | Remover de vez en cuando. |
| 1 - 3 | Cuajar: tortilla, huevos revueltos. | 10 - 40 | Cocinar con tapa. |
| 3 - 5 | Arroces y platos cocinados con leche, calentar comidas preparadas. | 25 - 50 | Añadir al menos el doble de líquido que de arroz; los platos lácteos deben remover-se a media cocción. |
| 5 - 7 | Cocinar al vapor verduras, pescados o carnes. | 20 - 45 | Añada un par de cucharadas de líquido |
| 7 - 9 | Cocinar patatas al vapor. | 20 - 60 | Utilice como máximo 14 l de agua para 750 g de patatas. |
| 7 - 9 | Grandes cantidades de alimentos, estofados y sopas. | 60 - 150 | Hasta 3 litros de líquido además de los ingredientes. |
| 9 - 12 | Freír ligeramente: escalopes, ternera “cordon bleu”, chule-tas, hamburguesas, salchi-chas, hígado, filetes rusos, huevos, tortitas, rosquillas. | como estime necesario | Dele la vuelta a media coc-ción. |
| 12 - 13 | Asado fuerte, bolas de pata-ta, filetes de lomo, filetes. | 5 - 15 | Dele la vuelta a media coc-ción. |
| 14 | Hervir agua, cocer pasta, dorar carne (gulash, asado), freír patatas. | ||
| P | Hervir grandes cantidades de agua. PowerBoost está activado. | ||
6.6 Consejos para Hob ^2 Hood
Cuando utilice la placa de cocción con la función:
- Proteja el panel de la campana de la luz solar directa.
- No dirija focos halógenos hacia el panel de la campana.
- No cubra el panel de control de la placa de cocción.
- No interrumpa la señal entre la placa de cocción y la campana (por ejemplo, con la mano, algún mango o un utensilio alto). Consulte la figura.
La campana de la figura es solo a título ilustrativo.
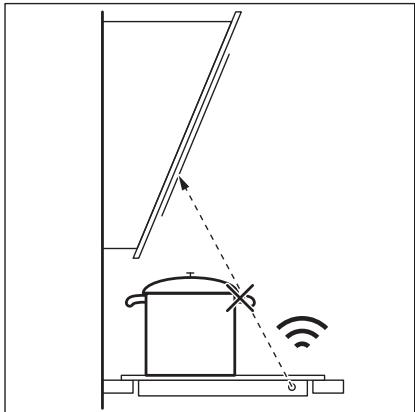
natural_image
Diagram of a smart room setup with a pot, antenna, and wireless signal icons (no text or labels)
Otros aparatos controlados a distancia pueden bloquear la señal. No utilice ningún otro aparato cerca de la placa mientras esté Hob²Hood activado.
Campanas extractoras con la función Hob ^2 Hood
Para conocer la gama completa de campanas extractoras que usan esta función, consulte nuestro sitio web para consumidores. Las campanas extractoras Electrolux que usan esta función deben tener el símbolo 📄.
7. MANTENIMIENTO Y LIMPIEZA

ADVERTENCIA!
Consulte los capítulos sobre seguridad.
7.1 Información general
- Limpie la placa después de cada uso.
- Utilice siempre recipientes cuya base esté limpia.
- Los arañazos o las marcas oscuras en la superficie no afectan al funcionamiento normal de la placa.
- Utilice un limpiador especial para la superficie de la placa.
- Utilice un rascador especial para el cristal.
7.2 Limpieza de la placa
- Elimine de inmediato: restos fundidos de plástico, recubrimientos de plástico, azúcar y alimentos que
contengan azúcar, la suciedad puede dañar la placa. Tenga cuidado para evitar quemaduras. Utilice un rascador especial sobre la superficie del cristal formando un ángulo agudo y arrastre la hoja para eliminar la suciedad.
- Elimine cuando el aparato se haya enfriado: restos de cal, marcas de agua, manchas de grasa y decoloraciones metálicas. Limpie la placa de cocción con un paño suave humedecido con agua y detergente no abrasivo. Después de limpiar, seque la placa de cocción con un paño suave.
- Elimine cualquier decoloración metálica brillante: utilice una solución de agua y vinagre para limpiar la superficie de cristal con un paño.
8. SOLUCIÓN DE PROBLEMAS

ADVERTENCIA!
Consulte los capítulos sobre seguridad.
8.1 Qué hacer si...
| Problema | Posible causa | Solución |
| La placa no se enciende o no funciona. | La placa no está conectada a un suministro eléctrico o está mal conectada. | Compruebe si la placa se ha conectado correctamente a la red eléctrica. Consulte el diagrama de conexiones. |
| Ha saltado el fusible. | Compruebe si el fusible es la causa del fallo de funcionamiento. Si el fusible se funde repetidamente, consulte a un electricista cualificado. | |
| No ha ajustado la temperatura antes de que transcurran 10 segundos. | Vuelva a encender la placa y ajuste el nivel de calor en menos de 10 segundos. | |
| Ha pulsado 2 o más sensores al mismo tiempo. | Toque solo un sensor. | |
| Hay agua o salpicaduras de grasa en el panel de control. | Limpie el panel de control. | |
| Se emite una señal acústica y la placa de cocción se apaga.Se emite una señal acústica cuando la placa se apaga. | Hay uno o más sensores cubiertos. | Quite el objeto que cubre los sensores. |
| La placa de cocción se apaga. | Ha puesto algún objeto sobre el campo del sensor ➊. | Retire el objeto del sensor. |
| El indicador de calor residual no se enciende. | La zona no está caliente porque ha funcionado poco tiempo o el sensor está dañado. | Si la zona ha funcionado el tiempo suficiente como para estar caliente, consulte con el centro de servicio autorizado. |
| Hob ^2 Hood no funciona. | Ha tapado el panel de control. | Retire el objeto del panel de control. |
| Puede estar utilizando un utensilio muy alto que bloquea la señal. | Utilice un utensilio más pequeño, cambie la zona de cocción o manipule manualmente la campana de cocción. | |
| Calentamiento automático no funciona. | La zona está caliente. | Deje que la zona se enfríe suficientemente. |
| Se ha ajustado el nivel de calor más alto. | El nivel de cocción máximo tiene la misma potencia que la función. | |
| El valor de la temperatura varía entre dos ajustes. | Gestión de energía está en funcionamiento. | Consulte "Uso diario". |
| Los sensores se calientan. | El utensilio de cocina es demasiado grande o está colocado demasiado cerca de los mandos. | Coloque los utensilios de cocina grandes en las zonas traseras si es posible. |
| No hay ningún sonido al pulsar los sensores del panel. | Los sonidos están desactivados. | Active los sonidos. Consulte "Uso diario". |
| L se enciende. | Bloqueo de seguridad para niños o Bloqueo está en funcionamiento. | Consulte "Uso diario". |
| F se enciende. | No hay ningún utensilio de cocina sobre la zona.El utensilio de cocina no es adecuado. | Ponga un utensilio de cocina sobre la zona.Utilice un utensilio de cocina adecuado. Consulte "Consejos". |
| El diámetro de la base del utensilio de cocina es demasiado pequeño para la zona. | Utilice un utensilio de cocina del tamaño adecuado. Consulte "Datos técnicos". | |
| y aparecen alternativamente. | La potencia es demasiado baja por un utensilio inadecuado o vacío. | Utilice el tipo de utensilio adecuado Consulte "Consejos" y "Datos técnicos". No active ninguna zona con utensilios vacíos. |
| y 2 aparecen alternativamente. | El utensilio está vacío o contiene un líquido distinto del agua, por ejemplo, aceite. | Evite usar esta función con líquidos distintos del agua. |
| y 3 aparecen alternativamente. | Hay demasiada o demasiado poca agua en el utensilio.Ha hervido un alimento distinto de agua y patatas.El punto de hervido ha variado en el tiempo y la función SenseBoil® no ha actuado correctamente. | Consulte "Consejos". Utilice SenseBoil® solo para hervir agua y patatas. |
| Se oye un pitido, los indicadores encima de ^ parpadean y la función SenseBoil® no se pone en marcha. | Ninguna de las zonas de cocción está preparada para usarse con la función SenseBoil®. Sigue habiendo algo de calor residual en las zonas de cocción que quiere elegir o siguen estando en uso. | Termine la cocción que esté realizando y elija una zona de cocción libre y sin calor residual. |
| y un número se encienden. | Se ha producido un error en la placa. | Apague la placa y vuelva a encenderla después de 30 segundos. Si vuelve a aparecer , desconecte la placa de cocción de la red eléctrica. Espere 30 segundos antes de volver a conectar la placa. Si el problema continúa, póngase en contacto con el Centro de servicio técnico. |
| Se oye un pitido constante. | La conexión eléctrica no es adecuada. | Desconecte la placa de cocción de la red eléctrica. Pida a un electricista cualificado que compruebe la instalación. |
8.2 Si no encuentra una solución...
Si no logra subsanar el problema, póngase en contacto con su distribuidor o el centro de servicio técnico. Facilite la información de la placa de características. Indique también el código de tres dígitos de la placa vitrocerámica (se encuentra en la esquina de la superficie vitrocerámica) y el mensaje de error que aparezca.
Asegúrese de que maneja la placa de cocción adecuadamente. De lo contrario, el personal del servicio técnico o del distribuidor facturará la reparación efectuada, incluso en el caso de que el aparato se encuentre en periodo de garantía. Las instrucciones sobre servicio técnico y condiciones de garantía se encuentran en el folleto de garantía que se suministra con el aparato.
9. DATOS TÉCNICOS
9.1 Placa de características
Modelo KIS82449
Tipo 62 D4A 01 AD
Inducción 7.2 kW
N° ser. ....
ELECTROLUX
Número de producto (PNC) 949 596 974 00
220 - 240 V / 400 V 2N 50 - 60 Hz
Hecho en Alemania
7.2 kW

9.2 Especificaciones de las zonas de cocción
| Zona de coc-ción | Potencia no-minal (ajuste de temperatu-ra máx.) [W] | PowerBoost [W] | PowerBoost duración má-xima [min] | Diámetro de los utensilios de cocina [mm] |
| Anterior iz-quierda | 2300 | 3200 | 10 | 125 - 210 |
| Posterior iz-quierda | 2300 | 3200 | 10 | 125 - 210 |
| Mitad anterior | 1400 | 2500 | 4 | 125 - 145 |
| Posterior dere-cha | 2300 | 3600 | 10 | 205 - 240 |
La potencia de las zonas de cocción puede variar ligeramente de los datos de la tabla. Cambia con el material y las dimensiones del utensilio de cocina.
Para obtener unos resultados de cocción óptimos, utilice recipientes de diámetro inferior al indicado en la tabla.
10. EFICACIA ENERGÉTICA
10.1 Información de producto de acuerdo con EU 66/2014 válida solo para el mercado de la UE
| Identificación del modelo | KIS82449 | |
| Tipo de placa de cocción | Placa empotrada | |
| Número de zonas de cocción | 4 | |
| Tecnología de calenta-miento | Inducción | |
| Diámetro de las zonas de cocción circulares (∅) | Anterior izquierda | 21,0 cm |
| Posterior izquierda | 21,0 cm | |
| Mitad anterior | 14,5 cm | |
| Posterior derecha | 24,0 cm | |
| Consumo de energía por zona de cocción (EC electric cooking) | Anterior izquierda | 179,6 Wh / kg |
| Posterior izquierda | 177,0 Wh / kg | |
| Mitad anterior | 180,2 Wh / kg | |
| Posterior derecha | 174,6 Wh / kg | |
| Consumo de energía de la placa de cocción (EC electric hob) | 177,9 Wh / kg | |
EN 60350-2 - Aparatos electrodomésticos - Parte 2: Placas de cocción - Métodos de medición del rendimiento
Las mediciones de energía referidas al área de cocción se identifican mediante las marcas de las zonas de cocción respectivas.
10.2 Ahorro de energía
Estos consejos la ayudarán a ahorrar energía al cocinar cada día.
- Cuando caliente agua, utilice solo la cantidad que necesite.
- En la medida de lo posible, cocine siempre con los utensilios de cocina tapados.
- Coloque el utensilio de cocina sobre la zona de cocción antes de encenderla.
- Coloque los utensilios de cocina pequeños en zonas de cocción pequeñas.
- Coloque el utensilio de cocina directamente en el centro de la zona de cocción.
- Utilice el calor residual para mantener calientes los alimentos o derretirlos.
11. ASPECTOS MEDIOAMBIENTALES
Recicle los materiales con el símbolo 📊. Coloque el material de embalaje en los contenedores adecuados para su reciclaje. Ayude a proteger el medio ambiente y la salud pública, así como a reciclar residuos de aparatos eléctricos y
electrónicos. No deseche los aparatos marcados con el símbolo junto con los residuos domésticos. Lleve el producto a su centro de reciclaje local o póngase en contacto con su oficina municipal.
- Get the most out of your appliance
- CONTENTS
- WE'RE THINKING OF YOU
- CUSTOMER CARE AND SERVICE
- ⚠️ SAFETY INFORMATION
- Children and vulnerable people safety
- General Safety
- SAFETY INSTRUCTIONS
- Installation
- WARNING!
- Electrical Connection
- Use
- Care and cleaning
- Service
- Disposal
- INSTALLATION
- Before the installation
- Built-in hobs
- Connection cable
- CAUTION!
- Two-phase connection
- PRODUCT DESCRIPTION
- Cooking surface layout
- Control panel layout
- Heat setting displays
- OptiHeat Control (3 step Residual heat indicator)
- DAILY USE
- Activating and deactivating
- Automatic Switch Off
- The function deactivates the hob automatically if:
- The heat setting
- SenseBoil®
- Using the cooking zones
- Bridge
- Automatic Heat Up
- PowerBoost
- Timer
- Count Down Timer
- To see how long the cooking zone
- Minute Minder
- Lock
- Set the heat setting first.
- Child Safety Device
- OffSound Control (Deactivating and activating the sounds)
- Power limitation
- To decrease or increase the power level:
- Power levels
- Power management function
- Power management function with Power limitation function
- Hob 2 Hood
- Operating the function automatically
- Changing the automatic mode
- Operating the fan speed manually
- Activating the light
- HINTS AND TIPS
- Cookware
- Cookware material
- Cookware is suitable for an induction hob if:
- Cookware dimensions
- The noises during operation
- Hints & Tips for SenseBoil®
- Öko Timer (Eco Timer)
- Examples of cooking applications
- Hints and Tips for Hob 2 Hood
- CARE AND CLEANING
- General information
- Cleaning the hob
- Cooker hoods with the Hob 2 Hood function
- TROUBLESHOOTING
- If you cannot find a solution...
- TECHNICAL DATA
- Rating plate
- Cooking zones specification
- ENERGY EFFICIENCY
- Product information according to EU 66/2014 valid for EU market only
- Energy saving
- ENVIRONMENTAL CONCERNS
- INHALTSVERZEICHNIS
- WIR DENKEN AN SIE
- REPARATUR- UND KUNDENDIENST
- ⚠ SICHERHEITSHINWEISE
- Sicherheit von Kindern und schutzbedürftigen Personen
- Allgemeine Sicherheit
- SICHERHEITSANWEISUNGEN
- Montage
- WARNUNG!
- Elektrischer Anschluss
- Gebrauch
- Reinigung und Pflege
- Entsorgung
- MONTAGE
- Vor der Montage
- Einbau-Kochfelder
- Anschlusskabel
- VORSICHT!
- Zweiphasiger Anschluss
- Kabelquerschnitt
- Montage
- GERÄTEBESCHREIBUNG
- Kochfeldanordnung
- Bedienfeldanordnung
- Anzeige der Kochstufen
- OptiHeat Control (Restwärmeanzeige, 3-stufig)
- TÄGLICHER GEBRAUCH
- Ein- und Ausschalten
- Abschaltautomatik
- Mit dieser Funktion wird das Kochfeld in folgenden Fällen automatisch ausgeschaltet:
- Kochstufe
- Verwenden der Kochzonen
- Ankochautomatik
- Kurzzeitmesser
- So können Sie feststellen, wie lange die Kochzone bereits in Betrieb ist:
- Kurzzeit-Wecker
- Verriegeln
- Stellen Sie zuerst die Kochstufe ein.
- Kindersicherung
- OffSound Control (Ein- und Ausschalten der Signaltöne)
- Leistungsbegrenzung
- Erhöhen oder Verringern der Leistungsstufe:
- Leistungsstufen
- Strommanagement Funktion
- Strommanagement Funktion mit der Funktion Leistungsbegrenzung
- Automatikbetrieb der Funktion
- Ändern des Automatikbetriebs
- Manuelles Einstellen der Lüftergeschwindigkeit
- Einschalten der Beleuchtung
- TIPPS UND HINWEISE
- Kochgeschirr
- Kochgeschirrmaterial
- Kochgeschirr eignet sich für Induktionskochfelder, wenn:
- Abmessungen des Kochgeschirrs
- Betriebsgeräusche
- Es gibt verschiedene Betriebsgeräusche:
- Tipps und Hinweise für SenseBoil®
- Öko Timer (Öko-Timer)
- Anwendungsbeispiele für das Garen
- Tipps und Hinweise für Hob 2 Hood
- Dunstabzugshauben mit der Funktion Hob 2 Hood
- REINIGUNG UND PFLEGE
- Allgemeine Informationen
- Reinigen des Kochfelds
- FEHLERSUCHE
- Was tun, wenn..
- Wenn Sie das Problem nicht lösen können...
- TECHNISCHE DATEN
- Typenschild
- Technische Daten der Kochzonen
- ENERGIEEFFIZIENZ
- Produktinformationen gemäß EU 66/2014, nur gültig für den EU-Markt
- Energie sparen
- UMWELTTIPPS
- CONTENIDO
- PENSAMOS EN USTED
- ATENCIÓN Y SERVICIO AL CLIENTE
- INFORMACIÓN SOBRE SEGURIDAD
- Seguridad de niños y personas vulnerables
- Seguridad general
- INSTRUCCIONES DE SEGURIDAD
- Instalación
- ADVERTENCIA!
- Conexión eléctrica
- Uso del aparato
- Mantenimiento y limpieza
- INSTALACIÓN
- Antes de la instalación
- Placas empotradas
- Cable de conexión
- Asistencia
- Eliminación
- PRECAUCIÓN!
- Conexión bifásica
- Sección transversal del cable
- Montaje
- DESCRIPCIÓN DEL PRODUCTO
- Disposición de las zonas de cocción
- Disposición del panel de control
- Indicación de la temperatura en pantalla
- OptiHeat Control (indicador de calor residual de 3 pasos)
- USO DIARIO
- Activación y desactivación
- Apagado automático
- La función desconecta automáticamente la placa de cocción siempre que:
- Ajuste de temperatura
- Uso de las zonas de cocción
- Calentamiento automático
- Temporizador
- Temporizador
- Avisador
- Bloqueo
- Ajuste en primer lugar el nivel de calor que desee.
- Bloqueo de seguridad para niños
- OffSound Control (Activación y desactivación de los sonidos)
- Limitación de potencia
- Para aumentar o disminuir el nivel de potencia:
- Niveles de potencia
- Función Gestión de energía
- Función Gestión de energía con función Limitación de potencia
- Uso automático de la función
- Cambio del modo automático
- CONSEJOS
- Ajuste manual de la velocidad del ventilador
- Activación de la luz
- Utensilios de cocina
- Material de los utensilios de cocina
- El utensilio de cocina es adecuado para cocinar con inducción si:
- Medidas de los utensilios de cocina
- Ruidos durante la utilización
- Es posible que escuche los ruidos siguientes:
- Estos ruidos son normales y no indican fallo alguno.
- Consejos para SenseBoil®
- Öko Timer (temporizador Eco)
- Ejemplos de aplicaciones de cocción
- Consejos para Hob 2 Hood
- Campanas extractoras con la función Hob 2 Hood
- MANTENIMIENTO Y LIMPIEZA
- Información general
- Limpieza de la placa
- SOLUCIÓN DE PROBLEMAS
- Qué hacer si...
- Si no encuentra una solución...
- DATOS TÉCNICOS
- Placa de características
- Especificaciones de las zonas de cocción
- EFICACIA ENERGÉTICA
- Información de producto de acuerdo con EU 66/2014 válida solo para el mercado de la UE
- Ahorro de energía
- ASPECTOS MEDIOAMBIENTALES
Marque : ELECTROLUX
Modèle : KIS82449 - KIS82449
Catégorie : Plaque de cuisson