
KD-500 - Platine vinyle KENWOOD - Notice d'utilisation et mode d'emploi gratuit
Retrouvez gratuitement la notice de l'appareil KD-500 KENWOOD au format PDF.

| Type de produit | Platine vinyle à courroie |
| Marque | Kenwood |
| Modèle | KD-500 |
| Dimensions (L x P x H) | 456 x 347 x 145 mm |
| Poids | 6 kg |
| Alimentation | 240 V ~ 50 Hz |
| Consommation électrique | 7 W |
| Vitesses de lecture | 33 ⅓ et 45 tours/min |
| Entraînement | Courroie |
| Bras de lecture | Bras droit avec contrepoids et antiskating |
| Force d'appui | Réglable, recommandé 2 g (cartouche fournie) |
| Anti-skating | Par poids, réglable selon force d'appui |
| Cartouche incluse | TRIO V-41 ou V-47 selon marché |
| Pointe de lecture | Diamant, durée de vie ~500 heures |
| Sortie audio | RCA (L/R) + fil de masse |
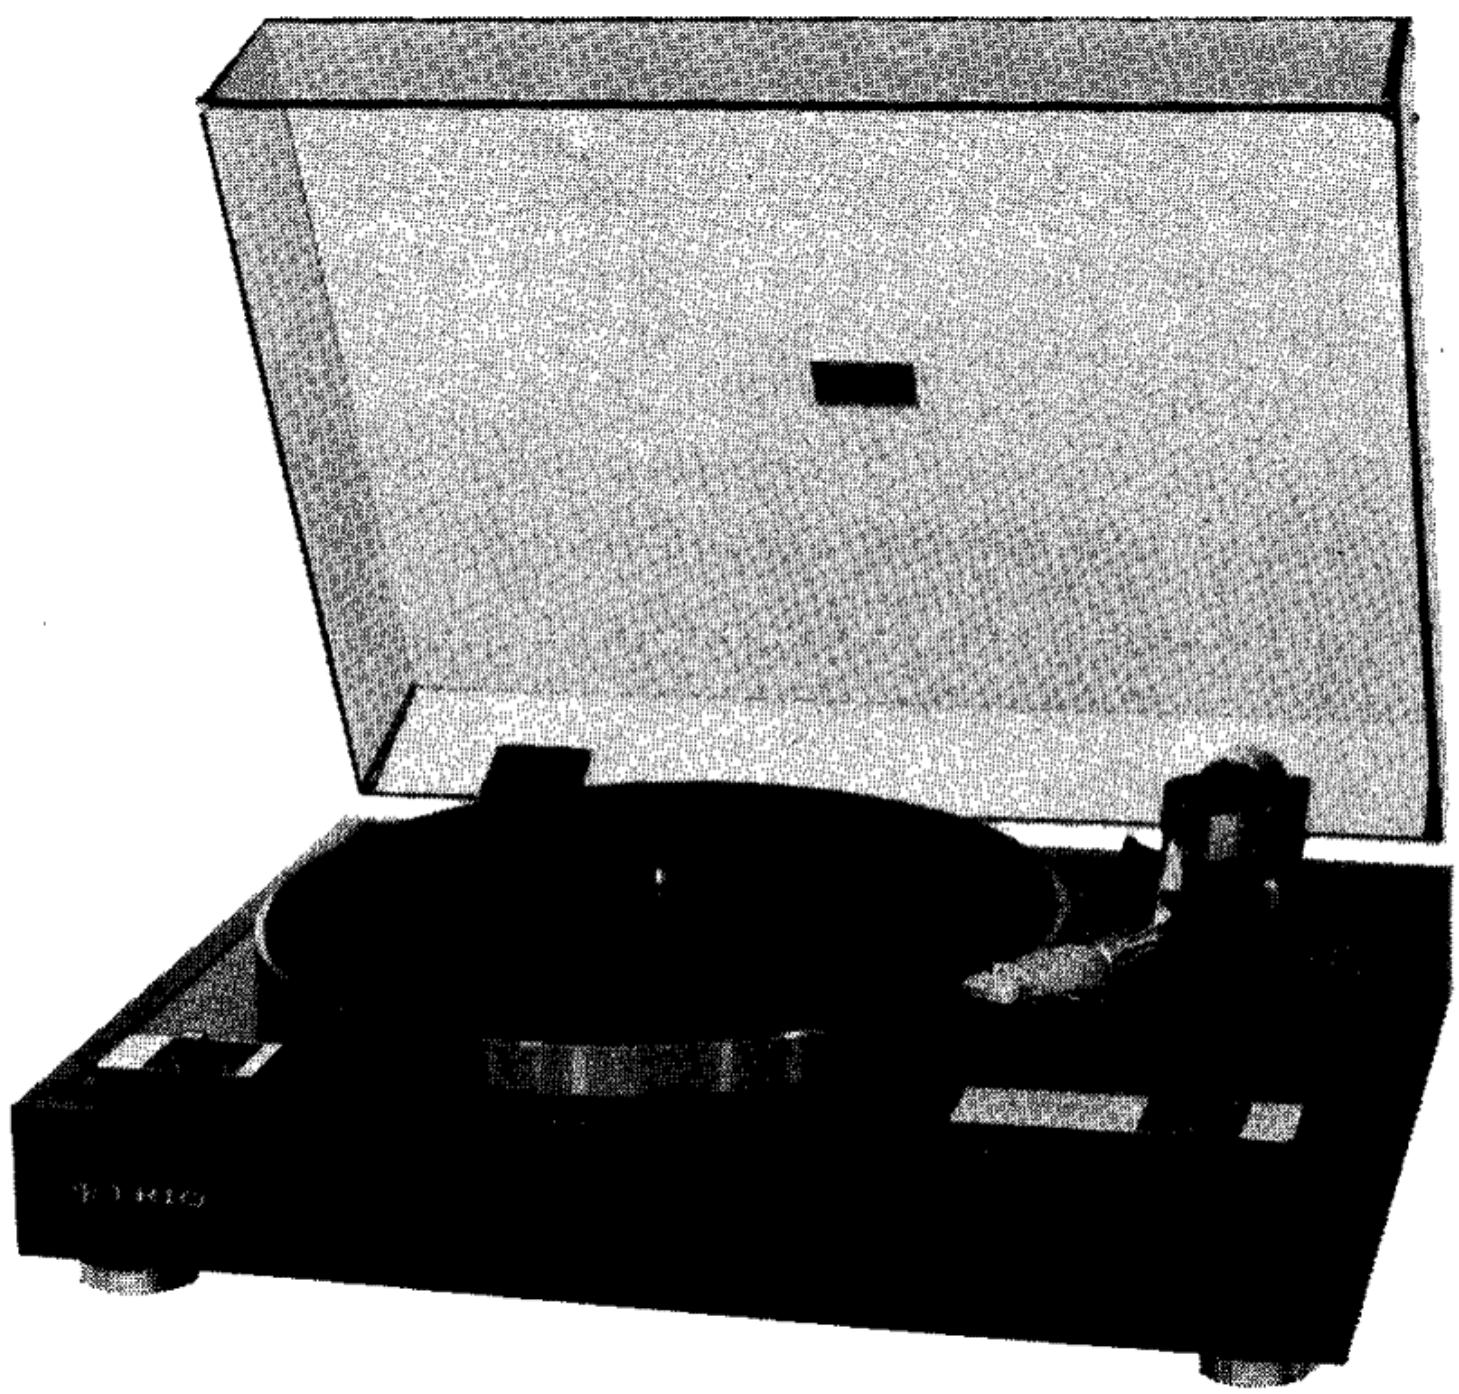
| Capot | Amovible (one-touch) |
| Fonction Cue | Oui, levier Cue |
| Adaptateur EP | Fourni |
| Lubrification | Huile moteur légère fournie, trou de lubrification |
| Entretien de la courroie | Nettoyage à l'alcool si nécessaire |
FOIRE AUX QUESTIONS - KD-500 KENWOOD
Questions des utilisateurs sur KD-500 KENWOOD
0 question sur cet appareil. Repondez a celles que vous connaissez ou posez la votre.
Poser une nouvelle question sur cet appareil
Téléchargez la notice de votre Platine vinyle au format PDF gratuitement ! Retrouvez votre notice KD-500 - KENWOOD et reprennez votre appareil électronique en main. Sur cette page sont publiés tous les documents nécessaires à l'utilisation de votre appareil KD-500 de la marque KENWOOD.
MODE D'EMPLOI KD-500 KENWOOD
The home of the turntable
THE UNIVYL ENGINE
Belt Drive Turntable
KD-1033B
INSTRUCTION MANUAL
WARNING: THIS APPARATUS MUST BE EARTHED.
INTRODUCTION
Thank you for purchasing our turntable.
The purpose of this manual is to acquaint you with the operating features of your new turntable.
We suggest that you read this manual carefully. Knowing how to set up your turntable, to the best advantage, will enhance your listening pleasure right from the start.
CONCERNING LINE VOLTAGE AND FREQUENCY
- Units shipped to U. K. are designed to be operated with 240V-50Hz AC only.
IMPORTANT
THE WIRES IN THIS MAINS LEAD ARE COLOURED IN ACCORDANCE WITH THE FOLLOWING CODE:
GREEN-AND-YELLOW : EARTH
BLUE : NEUTRAL
BROWN : LIVE
As the colours of the wires in the mains lead of this apparatus may not correspond with the coloured markings identifying the terminals in your plug proceed as follows.
The wire which is coloured GREEN-AND-YELLOW must be connected to the terminal in the plug which is marked by the letter E or by the safety earth symbol 12 or coloured GREEN or GREEN-AND-YELLOW.
The wire which is coloured BLUE must be connected to the terminal which is marked with the letter N or coloured BLACK.
The wire which is coloured BROWN must be connected to the terminal which is marked with the letter L or coloured RED.
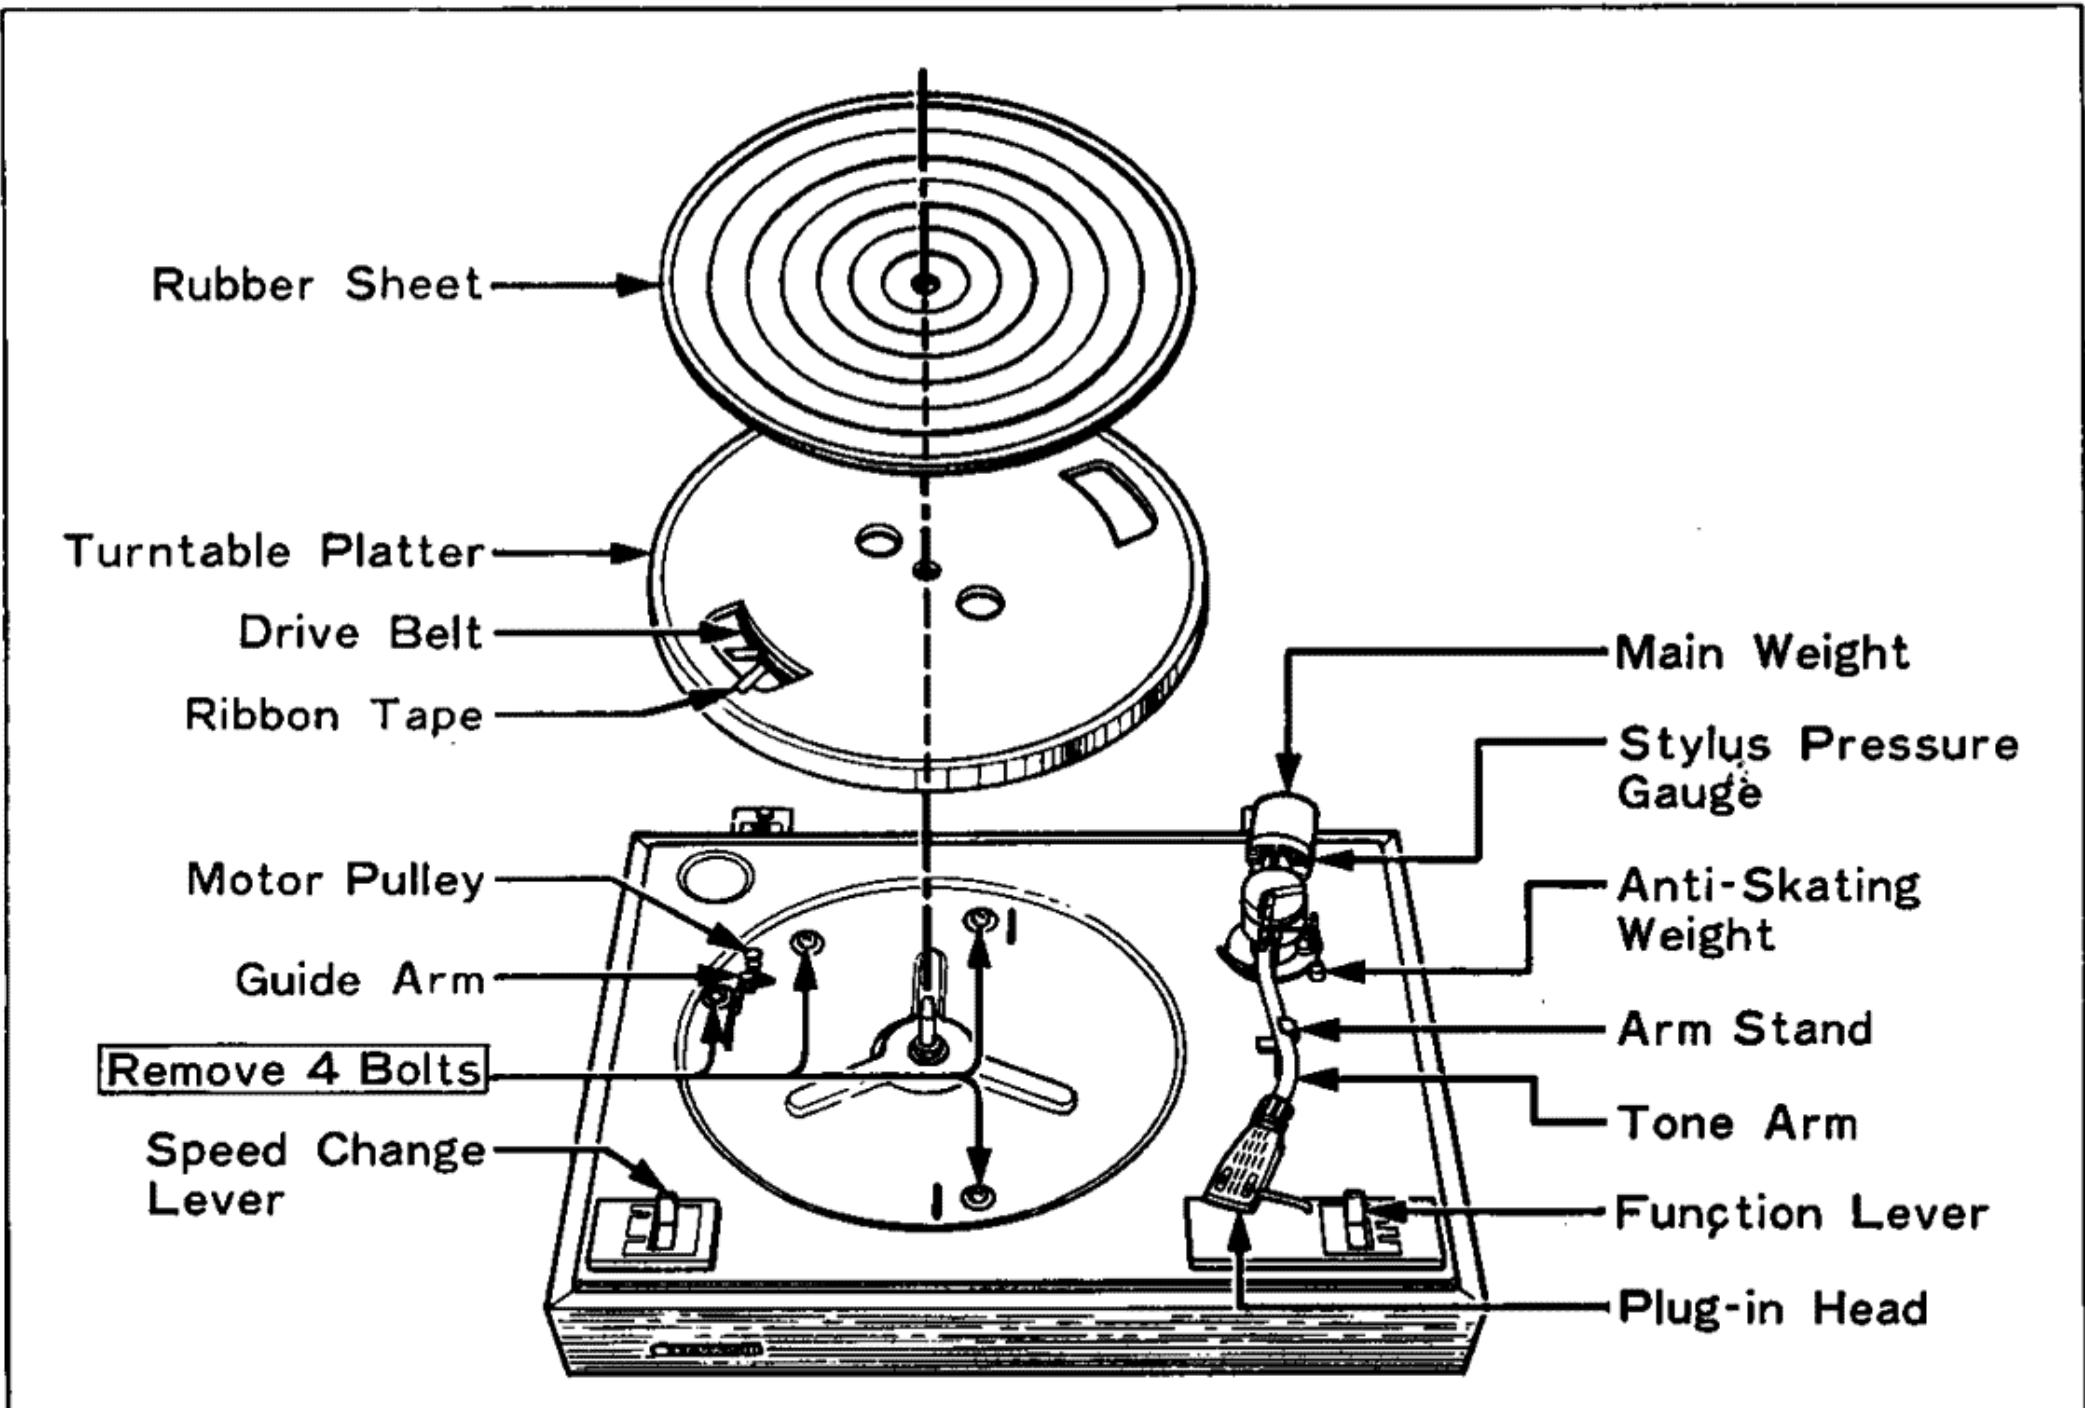
Fig. 3 Turntable Parts Nomenclature
ASSEMBLY PROCEDURE
- Be sure to remove the four bolts, located beneath the turntable platter position, that are used to protect the motor and other instruments during shipment. They are no longer required after installation.
- Place the turntable platter on the center shaft, and attach the drive belt to the motor pulley and guide arm. This can be done easily by using the ribbon tape as shown in Fig. 4. Place the rubber sheet on the turntable platter.
- Attach the plug-in head with the cartridge of your choice to the tonearm after lining up the head pin with the tonearm groove as shown in Fig. 5. Be sure the connecting points have been cleaned thoroughly beforehand. Now turn the ring on the tonearm clockwise to lock the head securely in place.
- Attach the main weight to the rear end of the tonearm.
- Connect the output cord (White Pin-Plug "L", Red Pin-Plug "R") extending from the rear of the turntable to the PHONO input terminals that are available usually on the rear panel of most amplifiers. The Ground lead from the turntable should also be connected to the GND terminal of your amplifier.
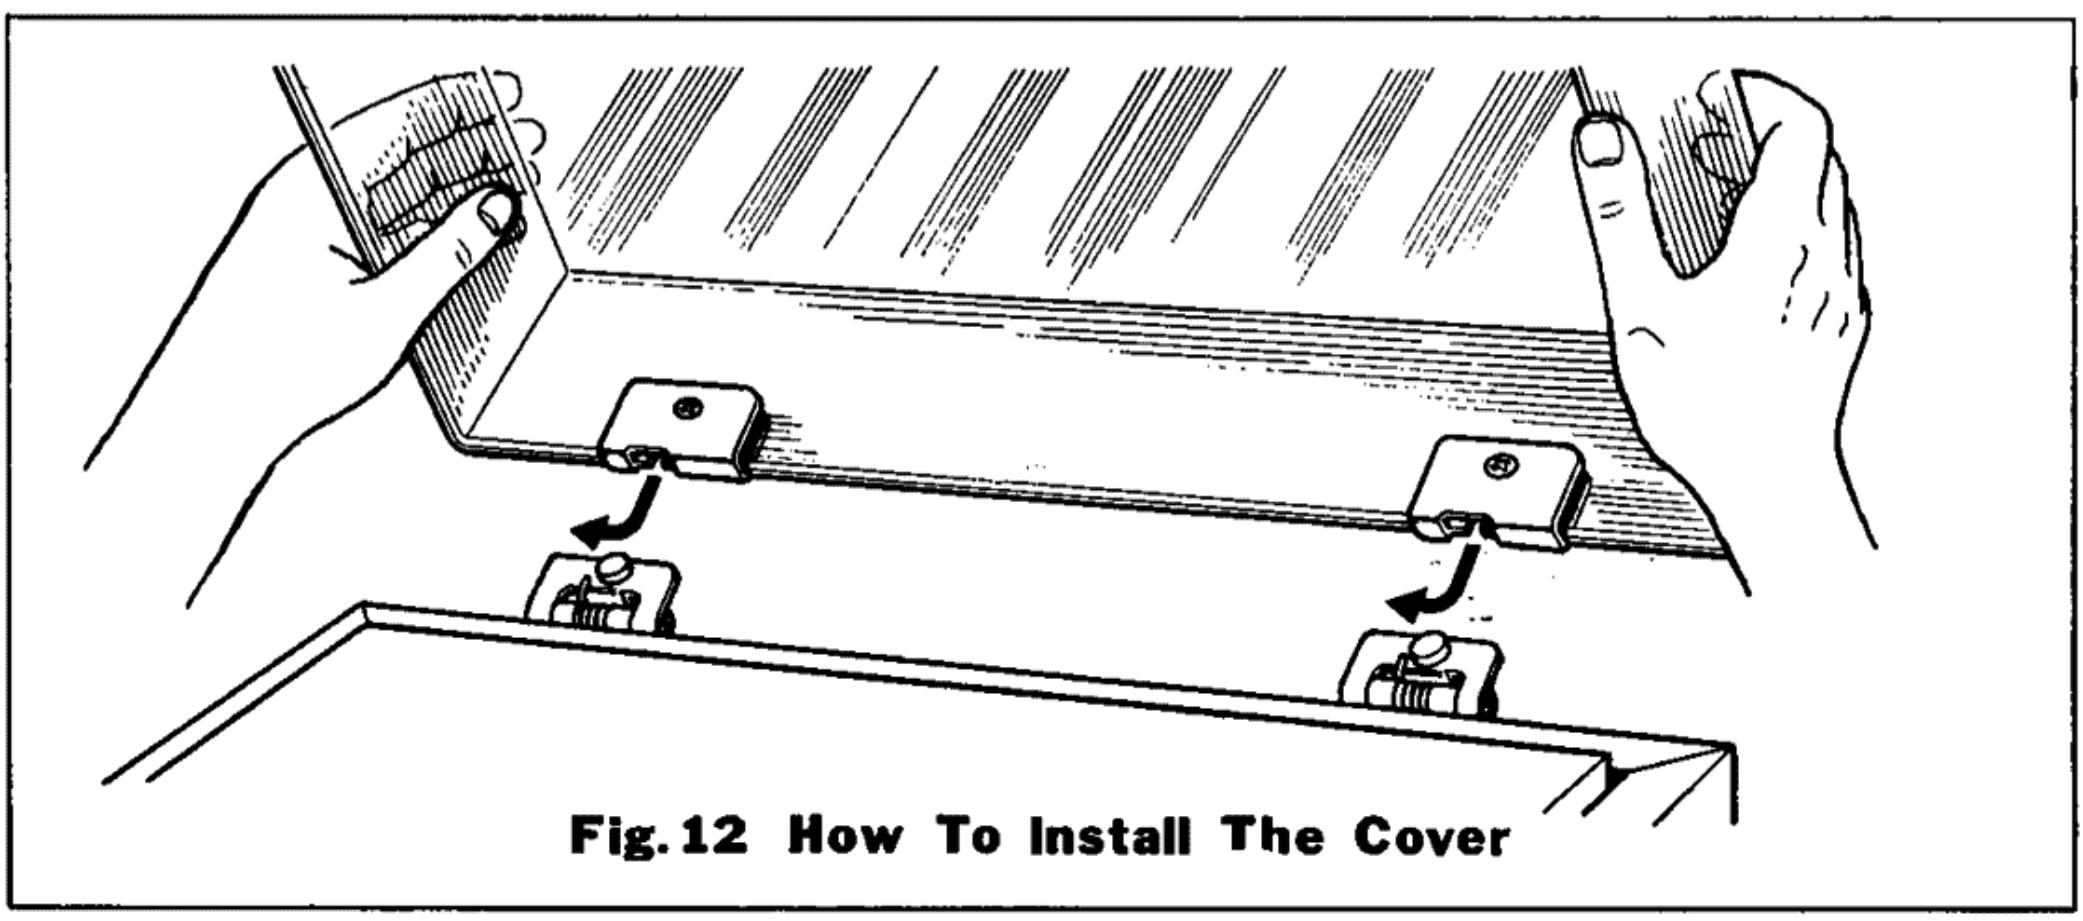
- Finally attach the cover to the turntable as shown in Fig. 12. It has been especially designed to be attached or removed easily with a "one-touch" operation.
STYLUS PRESSUREADJUSTMENT
- Remove the stylus cover and release the tonearm from the arm rest lock of the Arm stand.
- Set the function lever to DOWN position.
- Turn the main weight and move it forward or backward until the tonearm becomes perfectly balanced horizontally.
- Holding the main weight fixed in that position, turn only the stylus pressure indicator dial and set the "0" mark to the Reference Line. See Fig. 6. It is important to keep the main weight stationary during this step.
- Next turn the main weight counterclockwise as shown in Fig. 6. The indicator dial will also turn simultaneously. The main weight should be turned to the setting which corresponds to the recommended stylus pressure of the cartridge you have chosen to use. (Fig. 6 shows an example of stylus pressure setting set for 2 grams.)
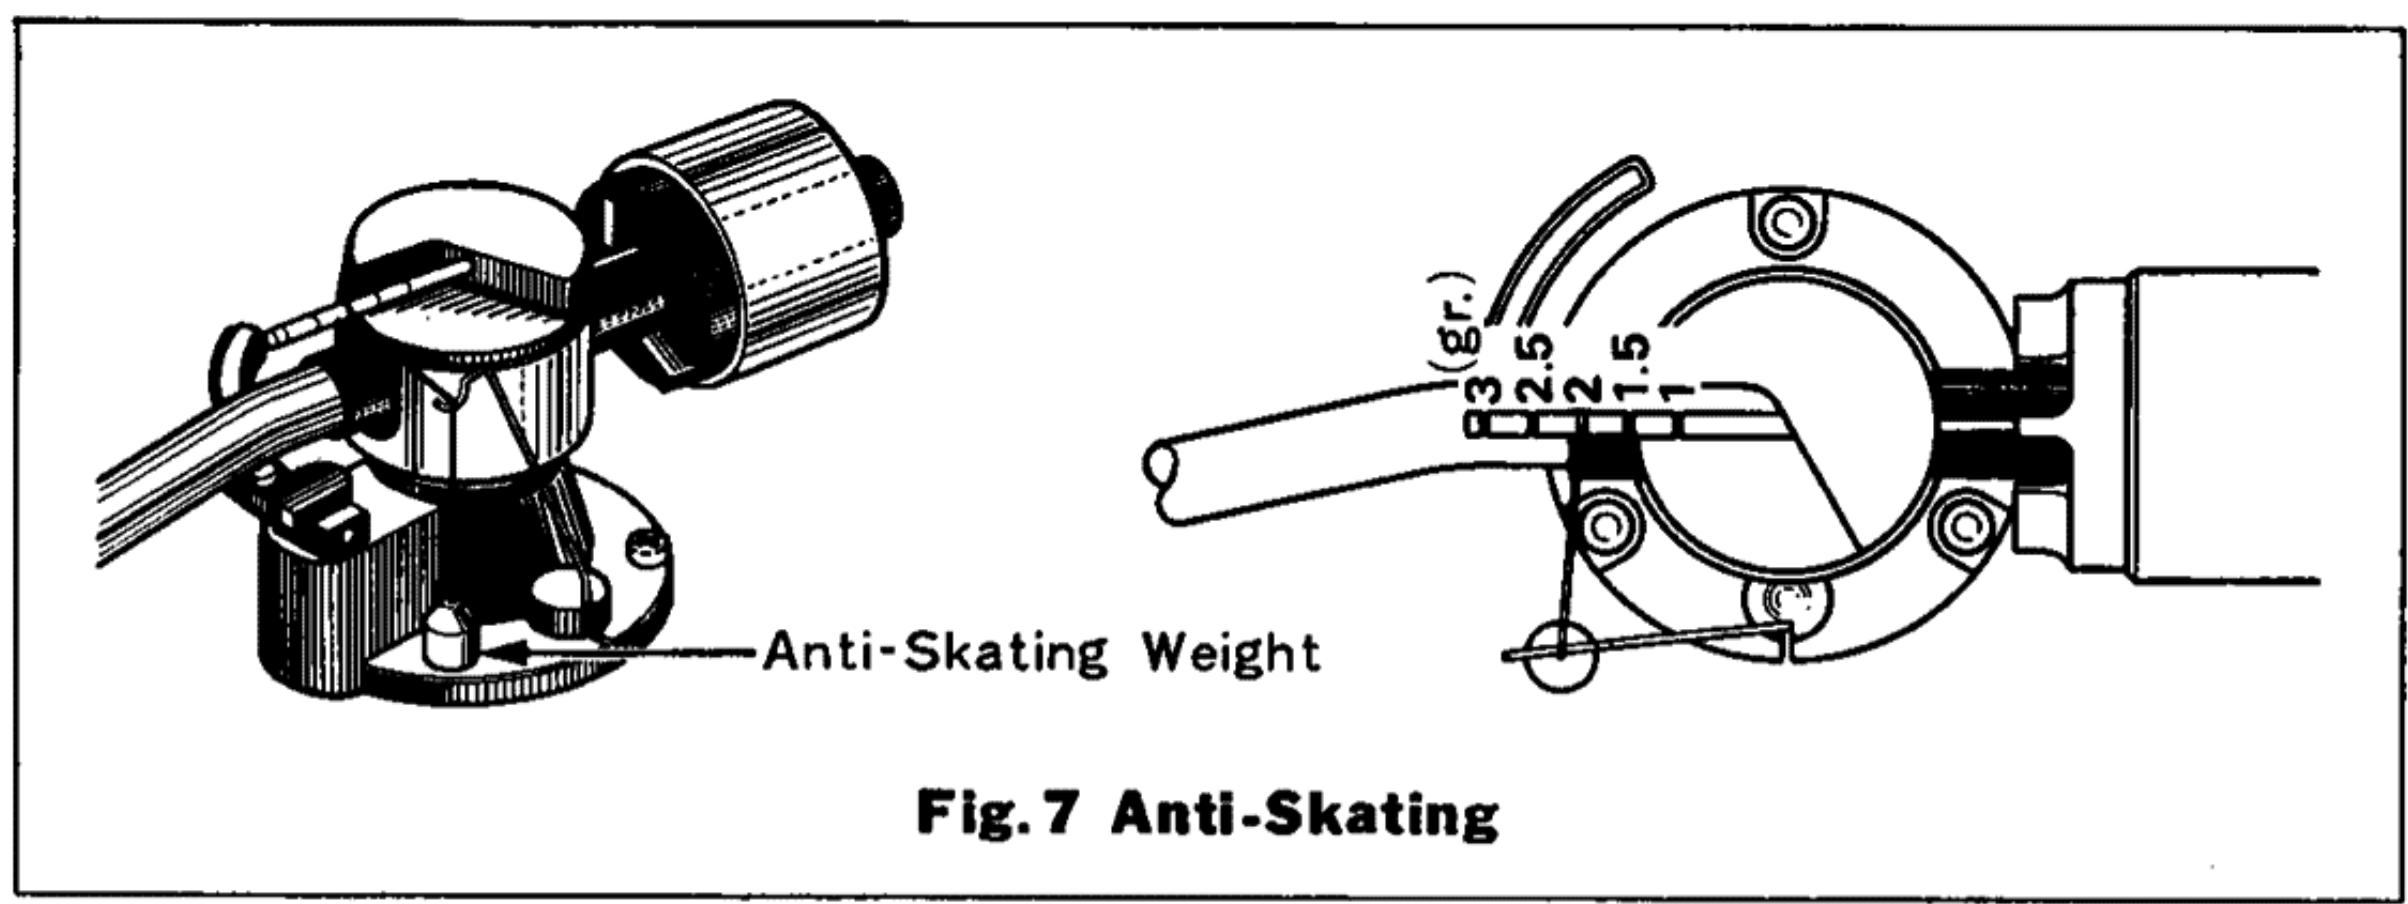
- Finally be sure to attach correctly the anti-skating weight that is supplied with this turntable. As shown in Fig. 7, the anti-skating string must be hooked through the groove on the shaft extending from the tonearm fulcrum that corresponds to the most suitable stylus pressure. For example, the string should be hooked on the second groove from the rear for 1.5 gram stylus pressure. (Fig. 7 is an example of correct setting for 2 grams).
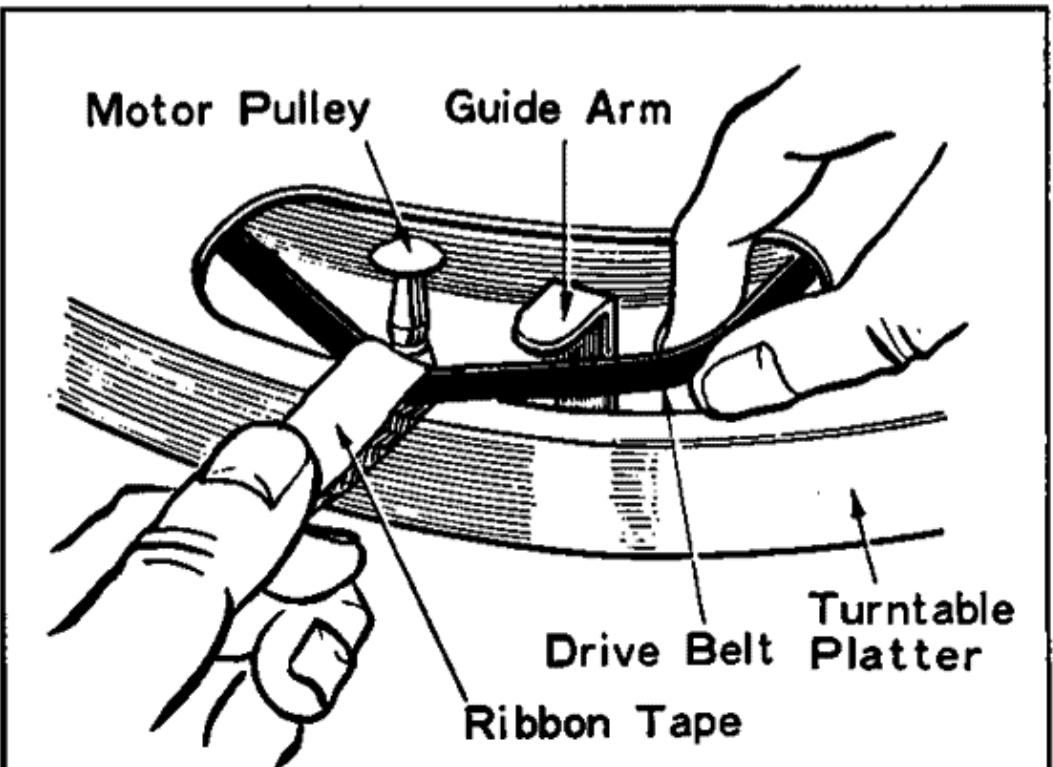
Fig.4 How To Attach The Belt
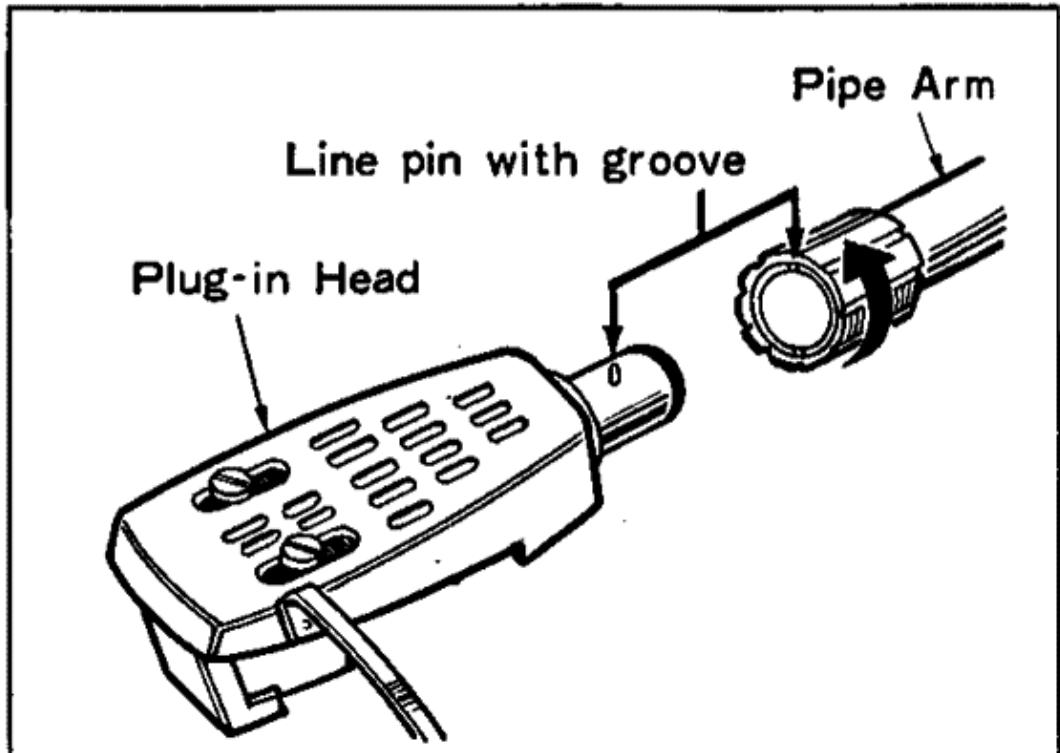
Fig.5 Attaching The Plug-in Head
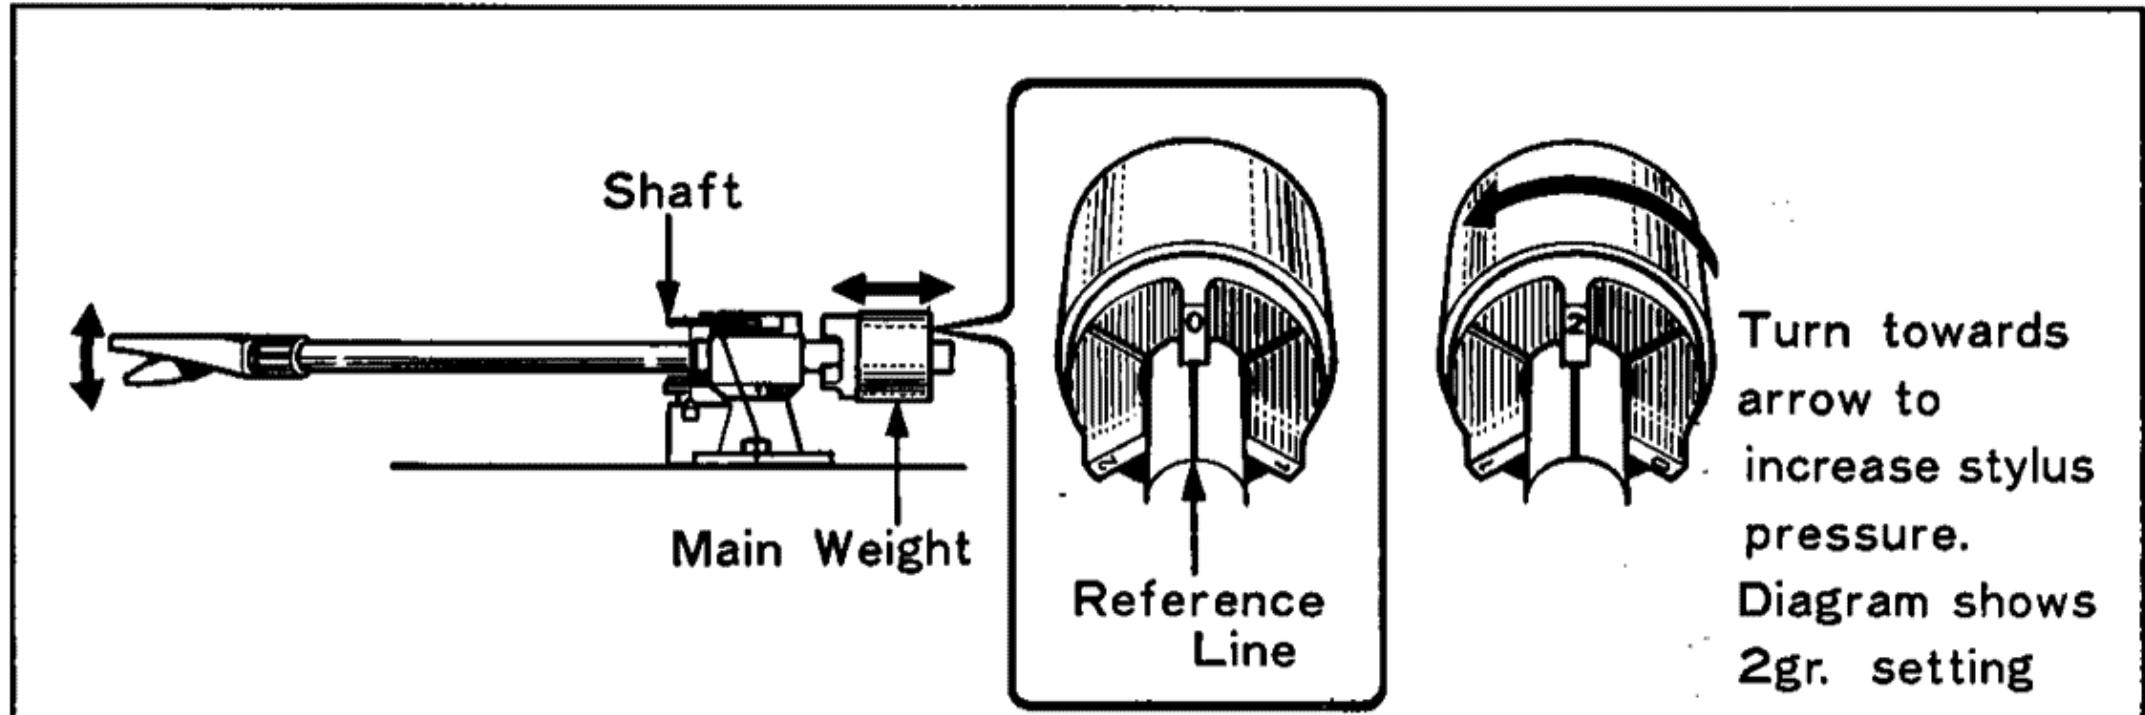
Fig.6 Stylus Pressure Adjustment
OPERATING INSTRUCTIONS
- Before operating the turntable, recheck the connections to the amplifier and the amplifier control settings to confirm that they have been correctly made.
- Place a record on the turntable platter. If an EP record is used, the EP adapter that is supplied with this turntable must be inserted first into the center shaft.
- Set the function lever to ON. This causes the turntable platter to revolve.
- Set the SPEED selector lever to the correct speed of the record.
- Use the finger hook on the plug-in head to swing the stylus over the starting position, and then set the function lever to DOWN.
- When it is desired to interrupt record play, set the function lever to CUE. The tonearm will then ascend, forcing the stylus to leave the record surface, and come to stop above the record which will continue to turn. Switching the function lever to DOWN position will cause record play to resume at approximately the same place where it was cut off.
- At the end of record play, return the tonearm to the arm rest and switch the function lever to OFF.
- Always lock the tonearm to the arm rest when finished with the turntable.
ABOUT ANTI-SKATING
This turntable is provided with an anti-skating mechanism to further ensure its top-class performance. Set the anti-skating weight in accordance with the stylus pressure, as shown in Fig. 7.
HOW TO ATTACH THE CARTRIDGE
Cartridge can be attached easily as follows. The tone arm uses EIA standard connectors that can accept any head shell on the market that conforms to this standard.
- Connect four leads to the cartridge, as shown in Fig. 8.
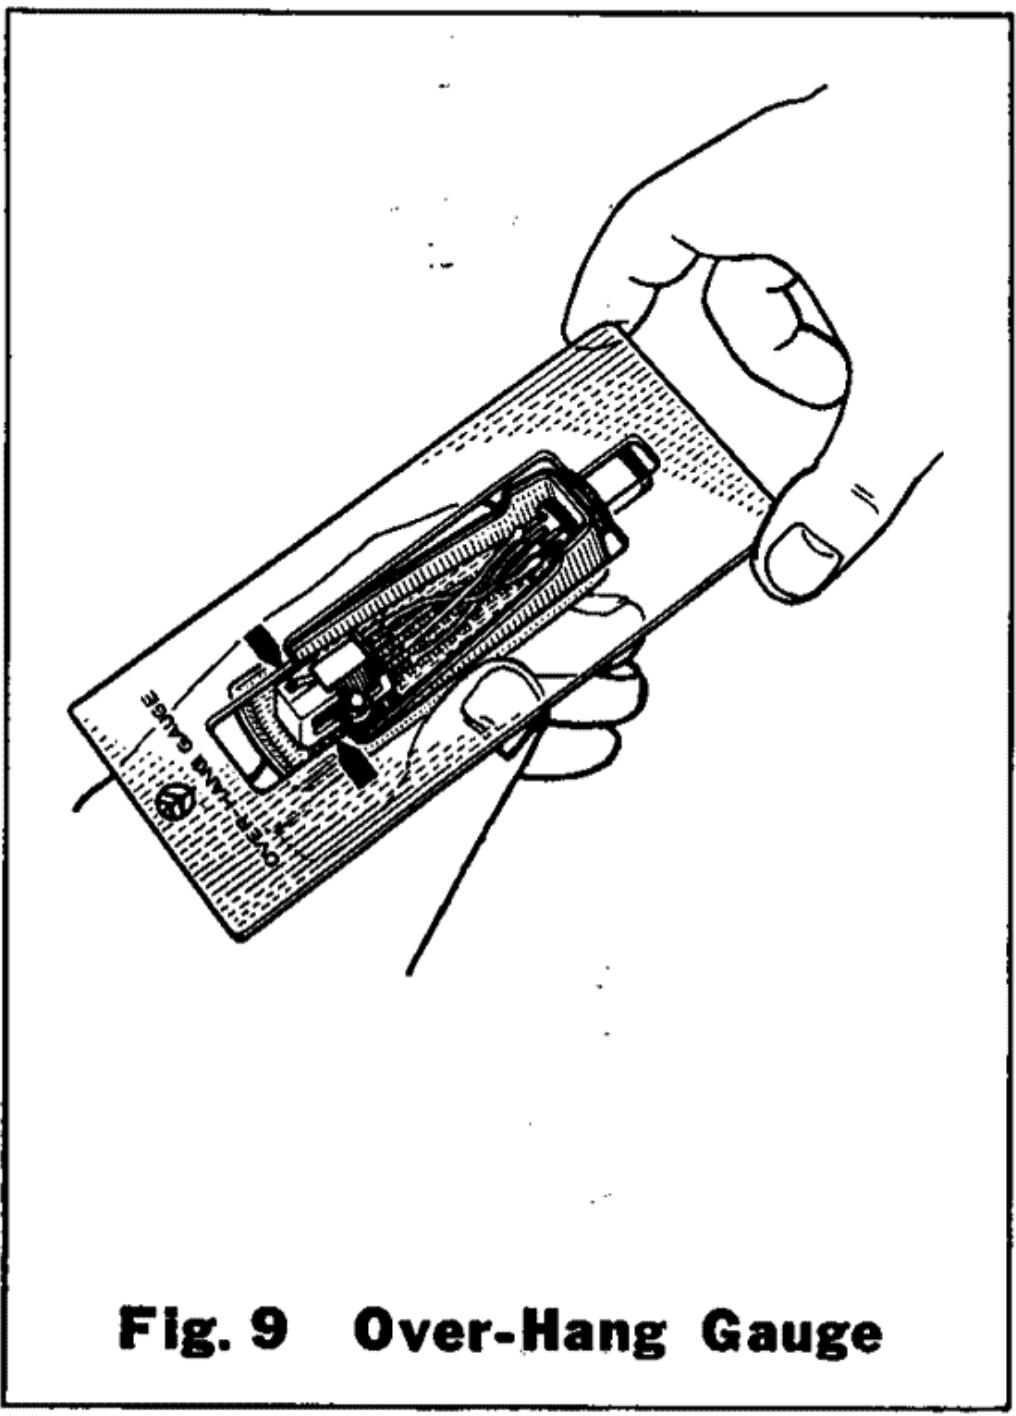
- Attach the cartridge to the head shell but keep the two screws slightly loose so that the cartridge can be shifted forward or backward as desired. Use appropriate length screws. Slip the overhang gauge over the head shell as shown in Fig. 9, and move the cartridge so that the stylus point lines up with the gauge arrowmarks. Now tighten the cartridge locking screws. This completes correct stylus over-hang adjustment for this turntable.
- Plug the head with the cartridge into the tone arm, and readjust stylus pressure, as explained on page 2 so that it conforms to the cartridge manufacturer's recommendation.
Cartridge can be replaced easily by removing the old one and attaching the replacement in the above manner.
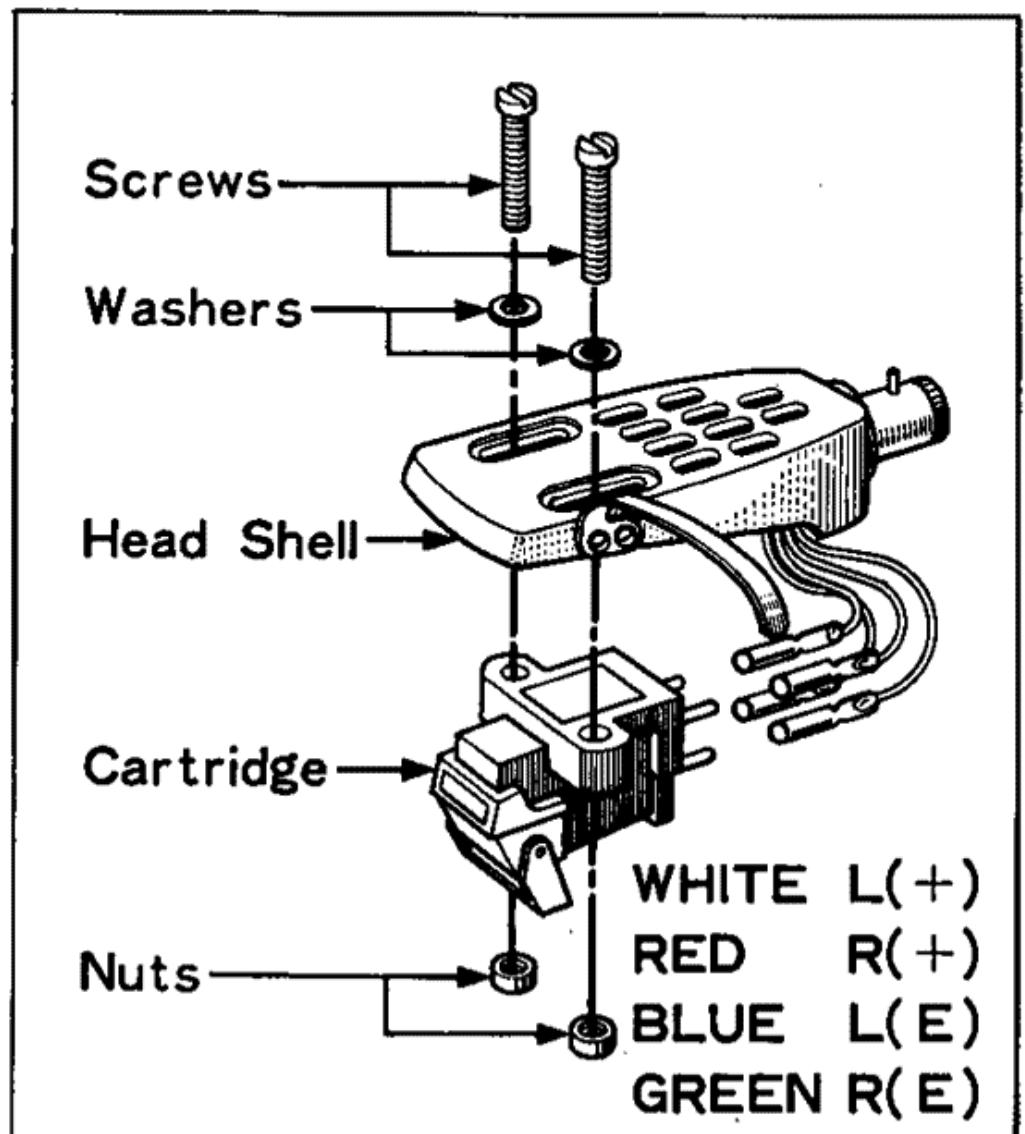
Fig. 8 Attaching The Cartridge
ABOUT THE TRIO CARTRIDGE
The TRIO Cartridge V-41 or V-47 is supplied with the turntables that are shipped to certain areas of the world.
STYLUS PRESSUREADJUSTMENT
Two grams is the recommended stylus pressure for these cartridges and anti-skating adjustments should be made accordingly as explained above.
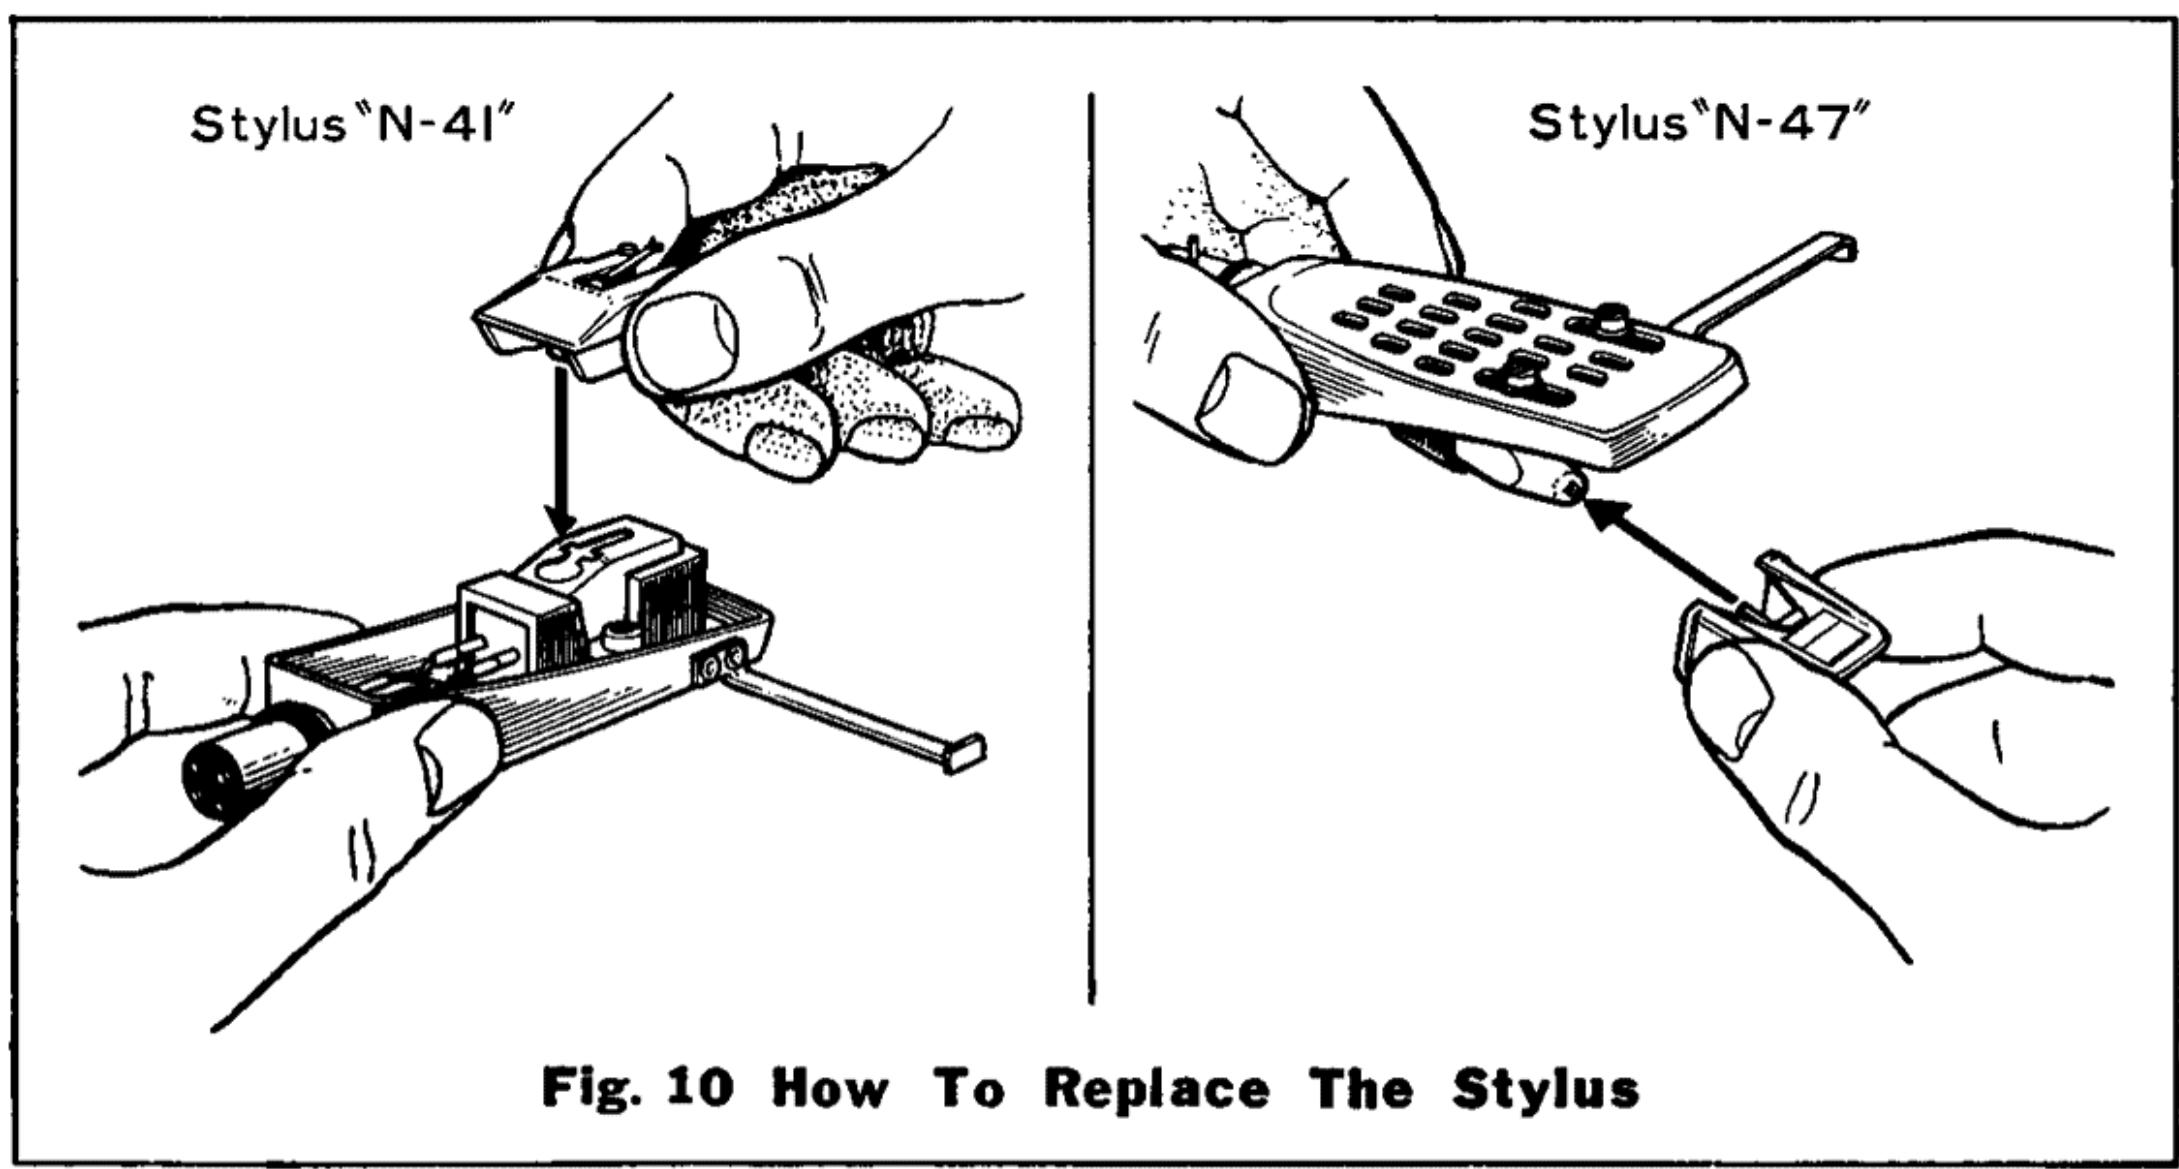
HOW TO REPLACE THE STYLUS
A N-41 or N-47 type stylus is used in this turntable. Replacement may be obtained from the dealer from whom you purchased this turntable. To replace the stylus, first remove the plug-in head. Refer to Fig. 5. Now pull and remove the old stylus, and then insert the new one as shown in Fig. 10.
LIFE OF A STYLUS
Diamond or sapphire styli are usually used in turntables. A diamond stylus is used in this turntable. It is normally good for 500 hours for 12 inch (30 cm) records played on one side, but this varies greatly depending on how it is used.
A worn stylus will cause treble tones to increase in harshness. A stylus should be replaced as soon as this becomes noticeable to prevent record wear.
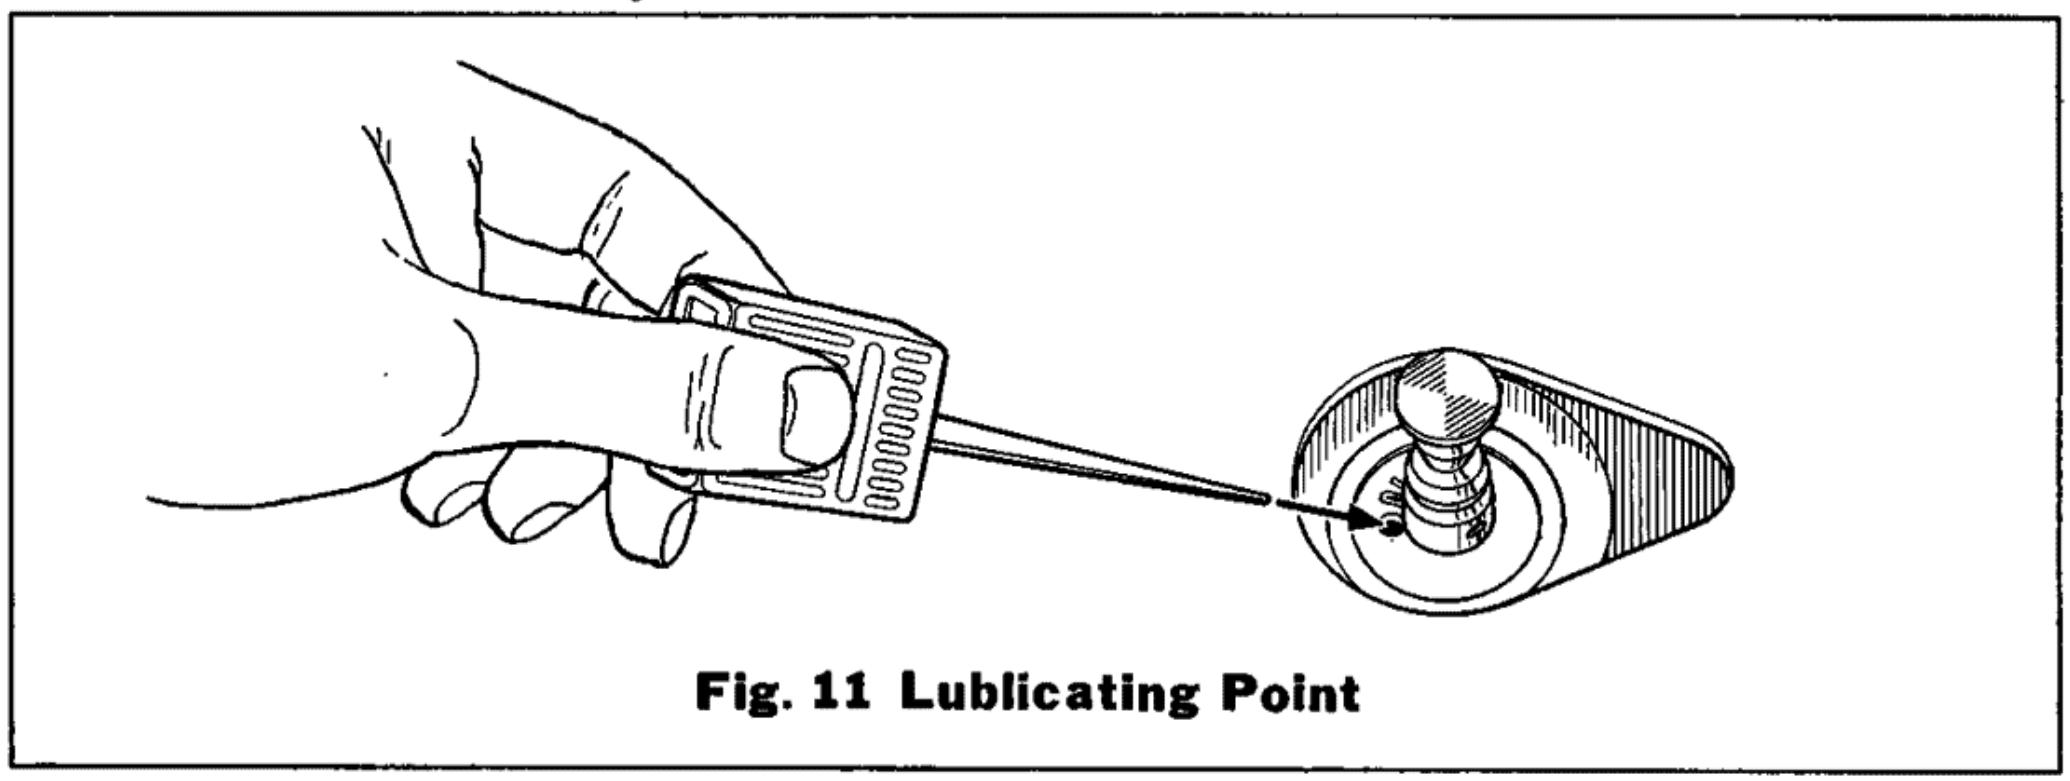
LUBRICATION
When the turntable platter is removed, you will notice a lubricating hole as shown in Fig. 11. The light motor oil supplied with this turntable should be used for application here — Special care should be taken not to drop oil on rubber components or parts which come into contact with them.
If oil is accidentally dropped on the belt, it should be wiped clean with a soft cloth moistened with alcohol.
RATING
POWER CONSUMPTION
DIMENSIONS
WEIGHT
: 7 watts.
W 456 mm (17 15/16")
D 347 mm (13 11/16")
H 145 mm (5 11/16")
: 6 kg (13.2 1bs)