
KD 2070 - Platine vinyle KENWOOD - Notice d'utilisation et mode d'emploi gratuit
Retrouvez gratuitement la notice de l'appareil KD 2070 KENWOOD au format PDF.

| Type de produit | Platine vinyle à entraînement direct |
| Marque | Kenwood |
| Modèle | KD 2070 |
| Dimensions (L x H x P) | 468 x 147 x 365 mm |
| Poids | 7,0 kg |
| Alimentation | 120 V CA, 60 Hz (modèle USA/Canada) ; 240 V CA, 50 Hz (modèle UK) ; 120/220 V CA, 50/60 Hz (autres pays) |
| Consommation électrique | 7,0 watts |
| Moteur | Moteur servocommandé CC à 20 pôles et 30 encoches |
| Plateau | Diamètre 31 cm (12-3/16 pouces), alliage d'aluminium moulé sous pression, poids 1,1 kg |
| Vitesses | 33-1/3 et 45 tr/min |
| Plage de réglage de vitesse | ±3% |
| Pleurage et scintillement | Moins de 0,04% (WRMS) |
| Ronflement (pondéré DIN) | Meilleur que -65 dB |
| Ronflement (non pondéré DIN) | Meilleur que -45 dB |
| Bras de lecture | Type équilibré statique, bras tubulaire en S |
| Longueur effective du bras | 225 mm (8-7/8 pouces) |
| Débord (overhang) | 15 mm (9/16 pouce) |
| Erreur de suivi | ±1,5 degré |
| Plage de force d'appui | 0 à 3 grammes |
| Poids de cellule compatible | 4 à 10 grammes |
| Cellule fournie | V-47 (selon destination) |
| Style de saphir | N-47, diamant 0,5 mil |
| Réponse en fréquence | 20 Hz à 20 000 Hz |
| Tension de sortie | 2,0 mV (1 000 Hz, 5 cm/s) |
| Force d'appui optimale | 2,0 ±0,5 grammes |
| Impédance de charge | 50 kΩ |
| Fonctions supplémentaires | Dispositif d'élévation amorti (cueing), dispositif antiskating, stroboscope avec lampe, réglages fins de vitesse, support de coquille |
| Accessoires fournis | Adaptateur EP, coquille avec cellule, contrepoids, poids antiskating, vis pour couvercle |
| Entretien et nettoyage | Nettoyer le boîtier et le couvercle avec un chiffon doux ou silicone ; ne pas utiliser de diluant, alcool, benzène |
| Sécurité | Ne pas exposer à la pluie ou à l'humidité ; vérifier la tension avant utilisation |
| Réparabilité - Pièces détachées | Cellule de remplacement N-47 disponible chez le revendeur |
FOIRE AUX QUESTIONS - KD 2070 KENWOOD
Questions des utilisateurs sur KD 2070 KENWOOD
0 question sur cet appareil. Repondez a celles que vous connaissez ou posez la votre.
Poser une nouvelle question sur cet appareil
Téléchargez la notice de votre Platine vinyle au format PDF gratuitement ! Retrouvez votre notice KD 2070 - KENWOOD et reprennez votre appareil électronique en main. Sur cette page sont publiés tous les documents nécessaires à l'utilisation de votre appareil KD 2070 de la marque KENWOOD.
MODE D'EMPLOI KD 2070 KENWOOD
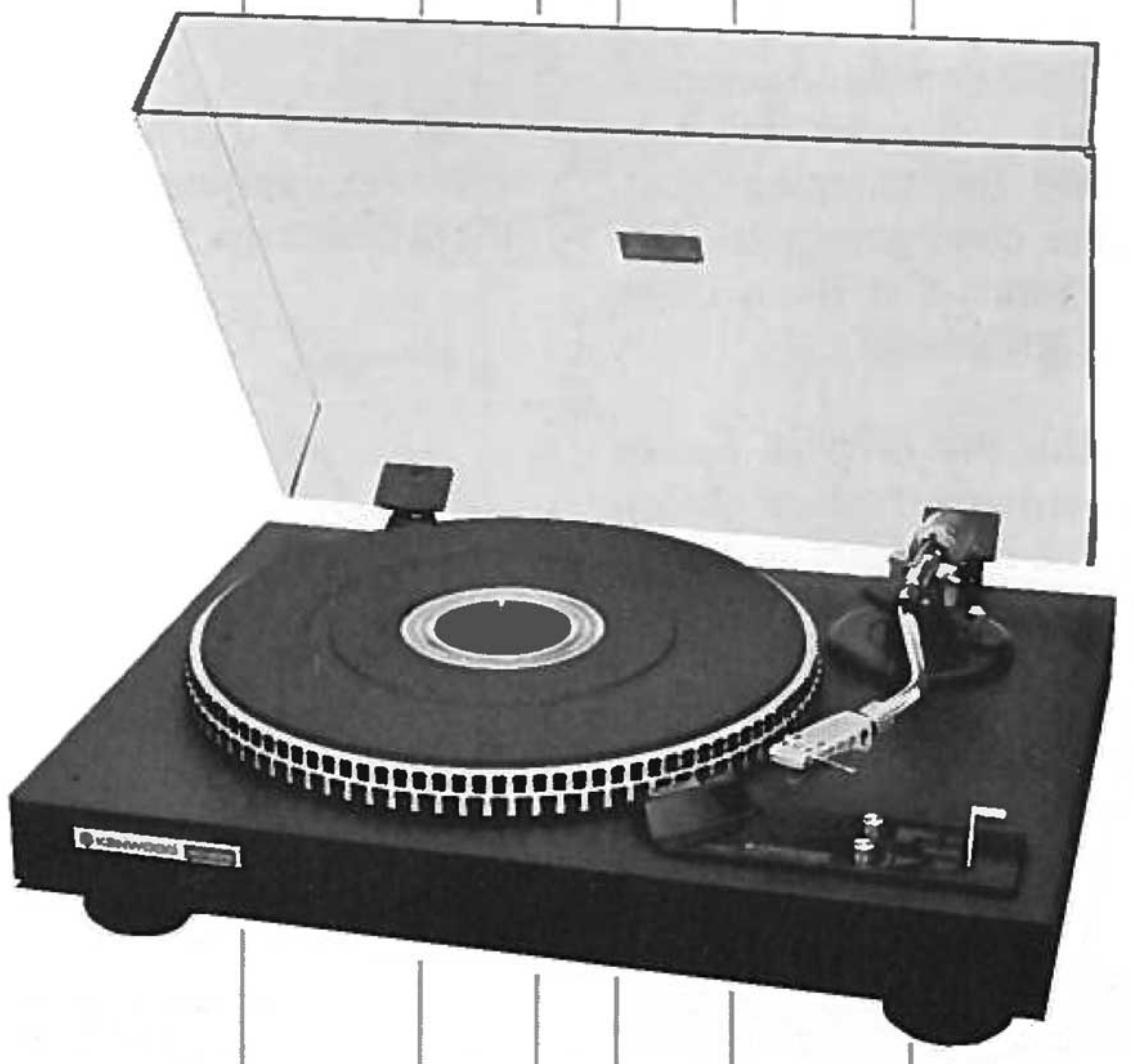
DIRECT-DRIVE TURNTABLE
KD-2070
INSTRUCTION MANUAL
INTRODUCTION
Thank you for purchasing our turntable. Because we take great pride in the long tradition of quality components the name KENWOOD represents, your choice of our product places you in a distinguished family of connoisseurs of superb high-fidelity sound reproduction.
The purpose of this manual is to acquaint you with the operating features of your new turntable. You will notice that in every detail of planning, engineering, styling, operating convenience, and adaptability, we have sought to anticipate your needs and desires.
We suggest that you read this manual carefully. Knowing how to set up your turntable, to the best advantage, will enhance your listening pleasure right from the start. You will also become aware of the ease with which you can adjust your turntable to meet your special requirements.
SERIAL NUMBER
Record your SERIAL NUMBER on the spaces designated on the warranty card. You will find the serial number on the back of the unit.
AFTER UNPACKING
After unpacking, we recommend you inspect and examine the unit for any possible shipping damage. If your unit is damaged or fails to operate, notify your dealer immediately. If your unit was shipped to you directly, notify the shipping company without delay. Only the consignee (the person or company receiving the unit) can file a claim against the carrier for shipping damage.
We recommend you retain the original carton and packing materials to prevent any damage should you transport or ship your unit in the future.
WARNING: TO PREVENT FIRE OR SHOCK HAZARD, DO NOT EXPOSE THIS APPLIANCE TO RAIN OR MOISTURE.
NOTES
CONCERNING LINE VOLTAGE
- Units shipped to the countries listed in the table below are designed to be operated with the AC line voltages that are shown, which are standard in those countries.
| Destination | AC Voltage |
| U.S.A. | 120V |
| CANADA | 120V |
| U.K. | 240V |
These units are therefore not equipped with an AC Voltage Selector. The owners of such units should disregard all reference to these items in this Instruction Manual.
AC VOLTAGE SELECTOR
- Units shipped to countries not listed in the above table are equipped with an AC Voltage Selector beneath the Turntable Platter that is preset at the factory to the voltage generally available in the destination area. Before operating this turntable, make sure that the position of the AC Voltage Selector matches your line voltage.
If not, it must be changed to the proper setting.
- Be sure to remove the AC Plug when setting the AC Voltage Selector.
Our warranty does not cover damage caused by excessive line voltage due to improper setting of the AC Voltage Selector.
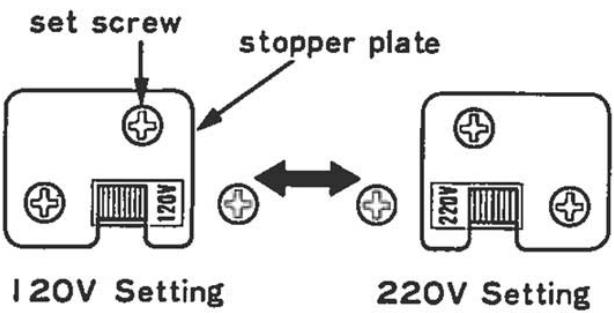
- Remove the set screw and stopper plate.
- Switch the lever to opposite side.
- Lock the lever by attaching stopper plate with the set screw.
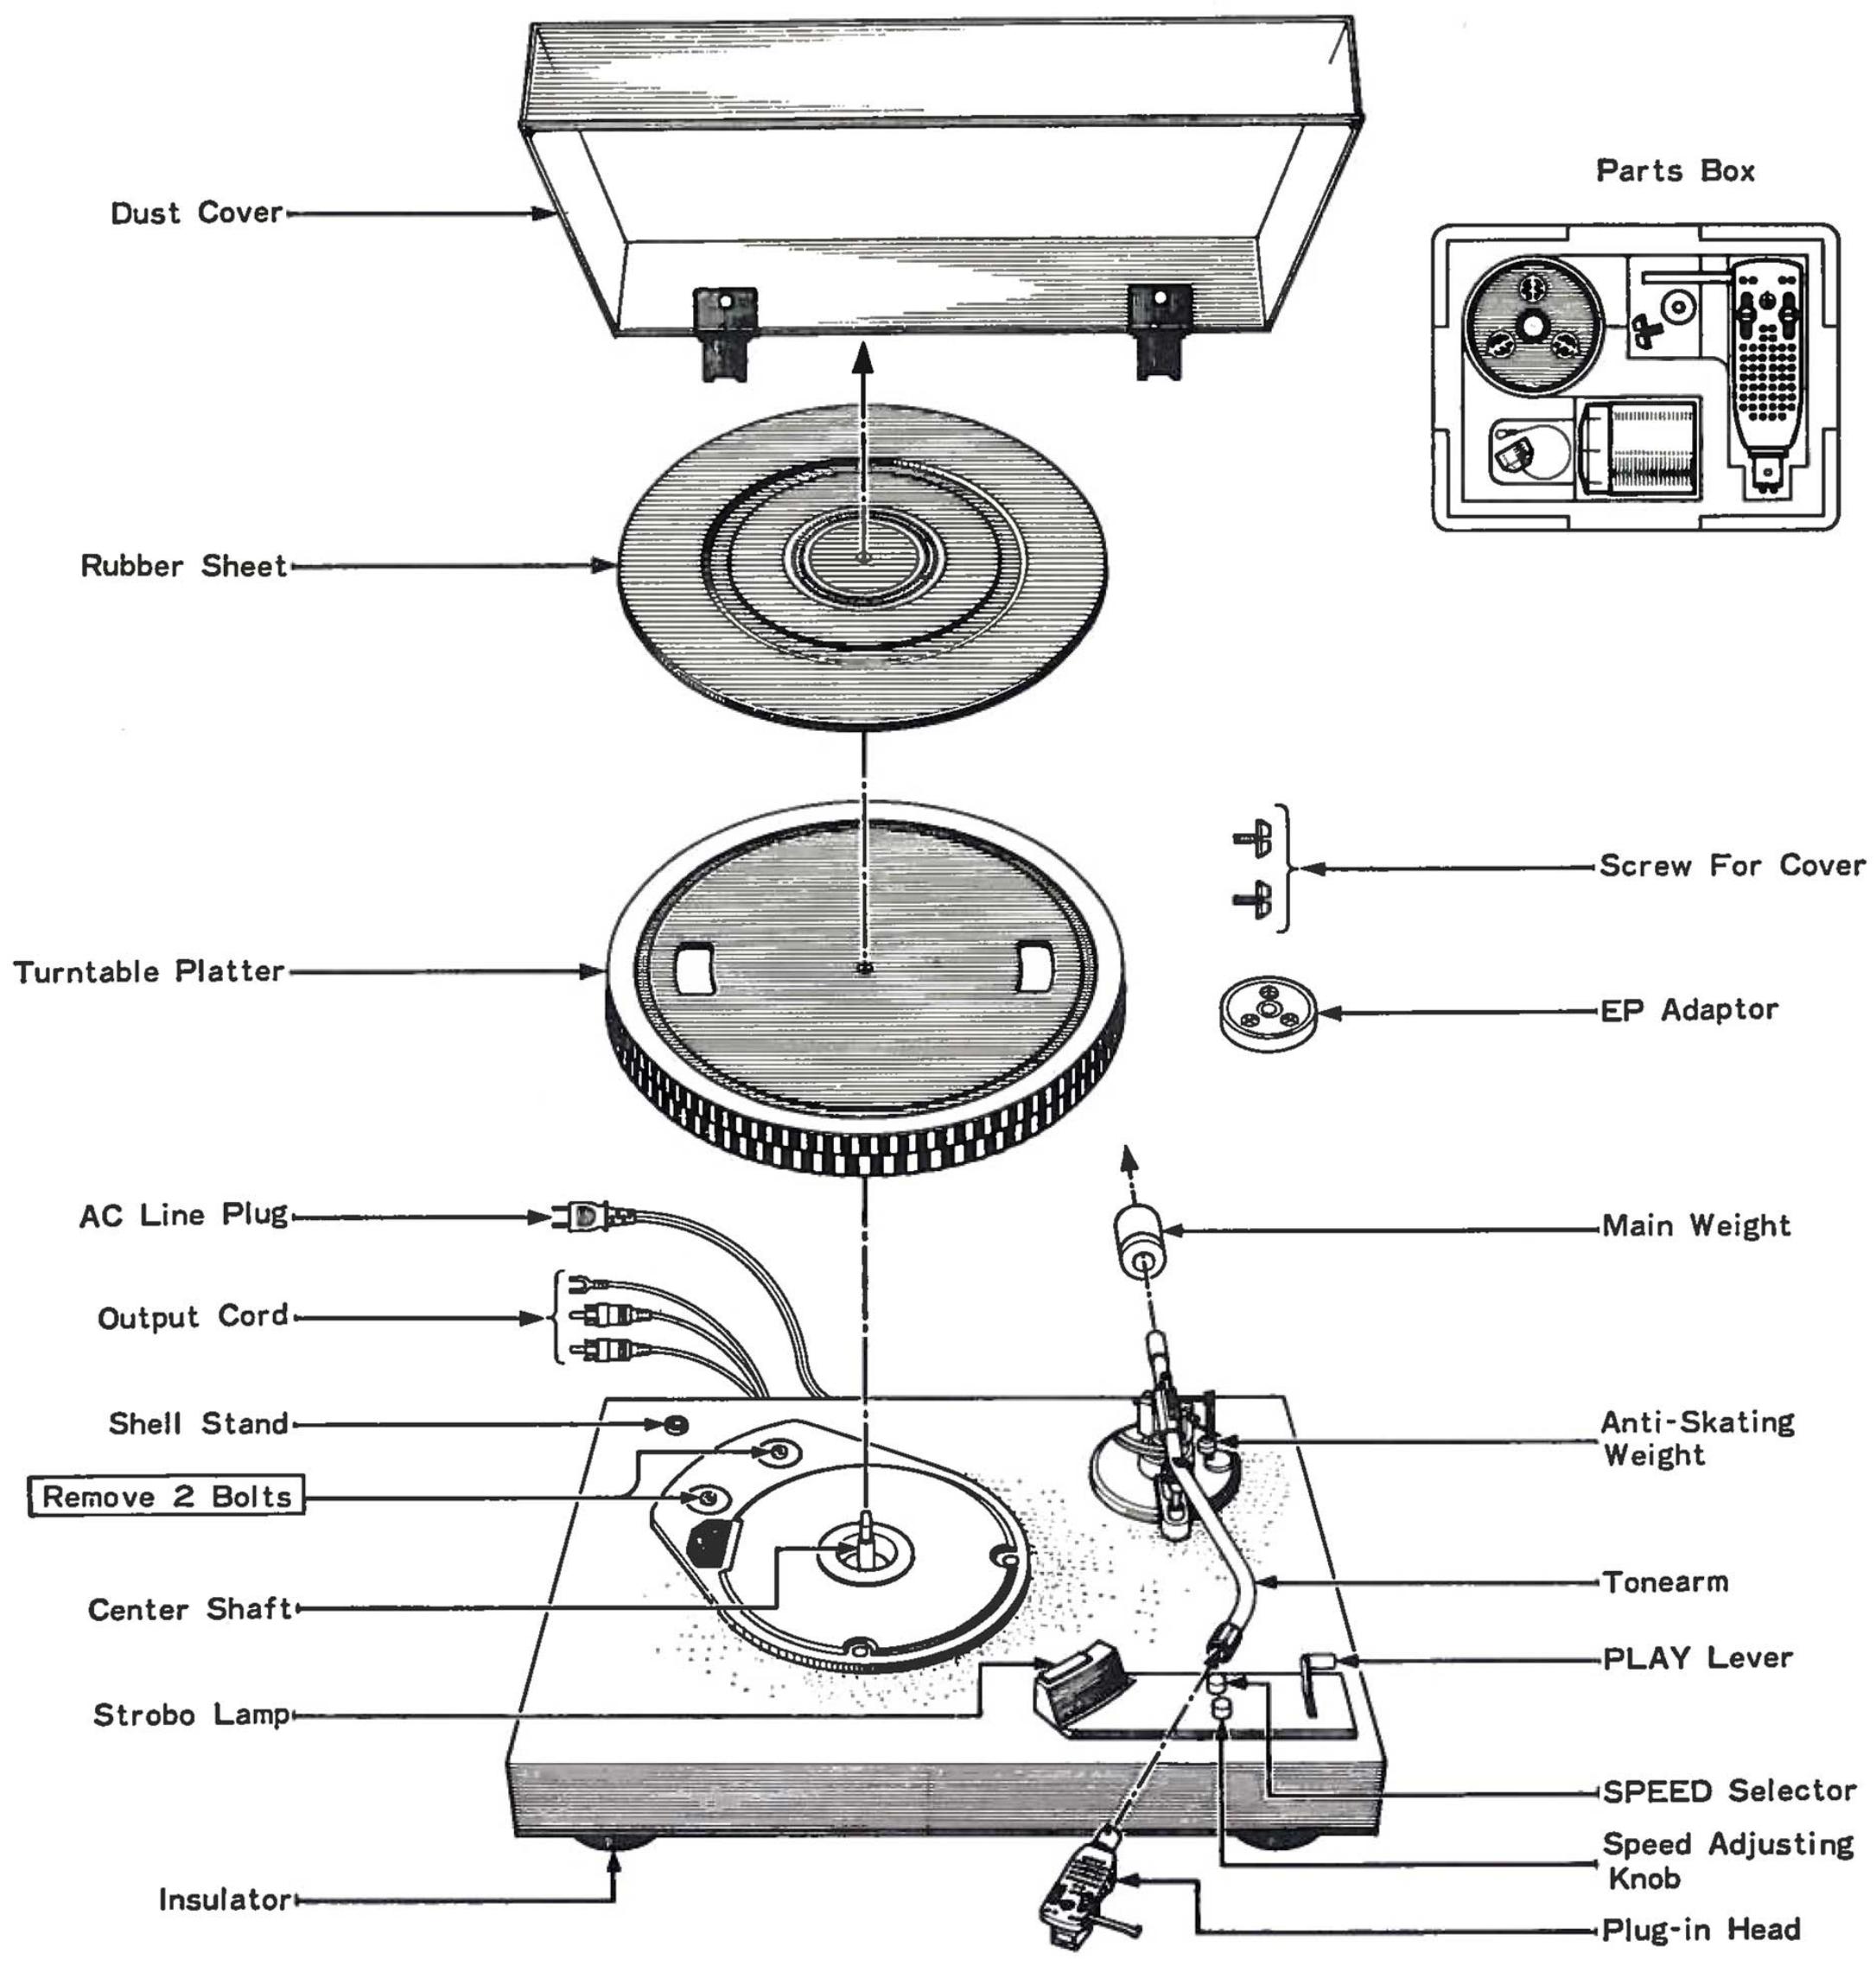
PARTS NOMENCLATURE
-
Check to see that the packing carton contains all the component parts shown in the Figure below, before you begin to assemble the turntable.
See page 4 for assembly procedure. -
You will find the smaller parts in the small parts box, also included in the carton.
Plug-in Head
EP Adaptor
Main Weight
Anti-Skating Weight
Screw For Cover
ASSEMBLY PROCEDURE
-
Be sure to follow steps 1 to 6 in that order.
-
Remove the two bolts shown in the diagram. (Painted red for easy identification) These bolts were used to lock the turntable assembly to protect it during shipment.
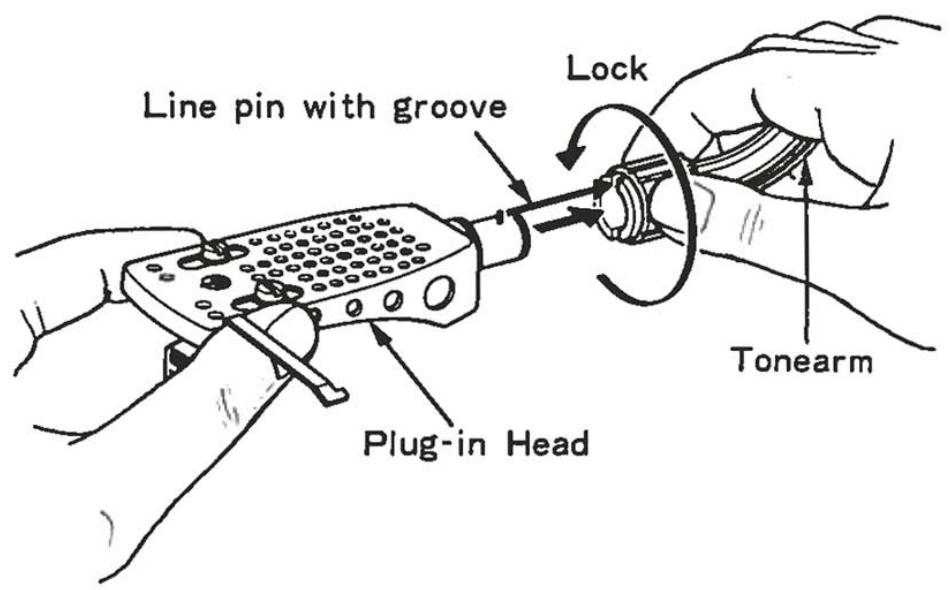
- Insert the plug-in head into the tonearm.
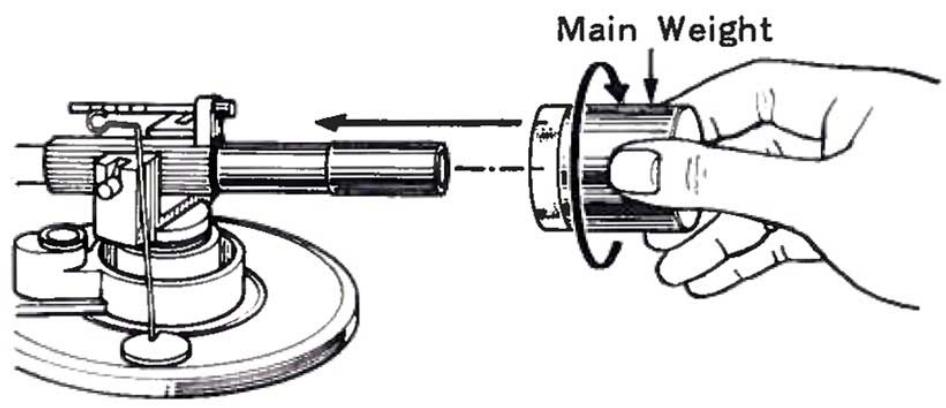
- Attach the main weight to the rear of the tonearm.
- Place the turntable platter and rubber sheet on the center shaft.

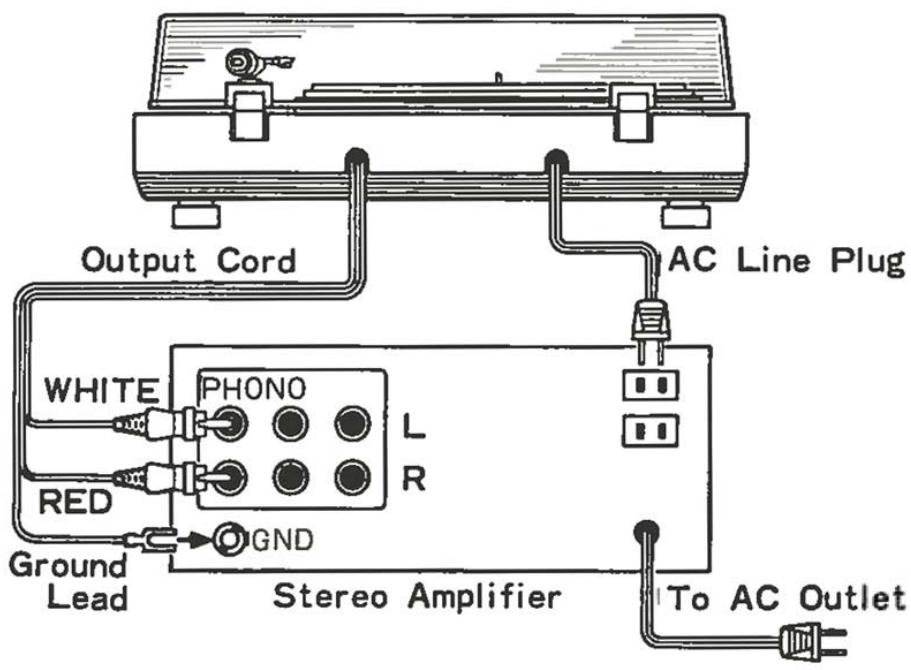
- Connect the audio cord, then the AC cord.
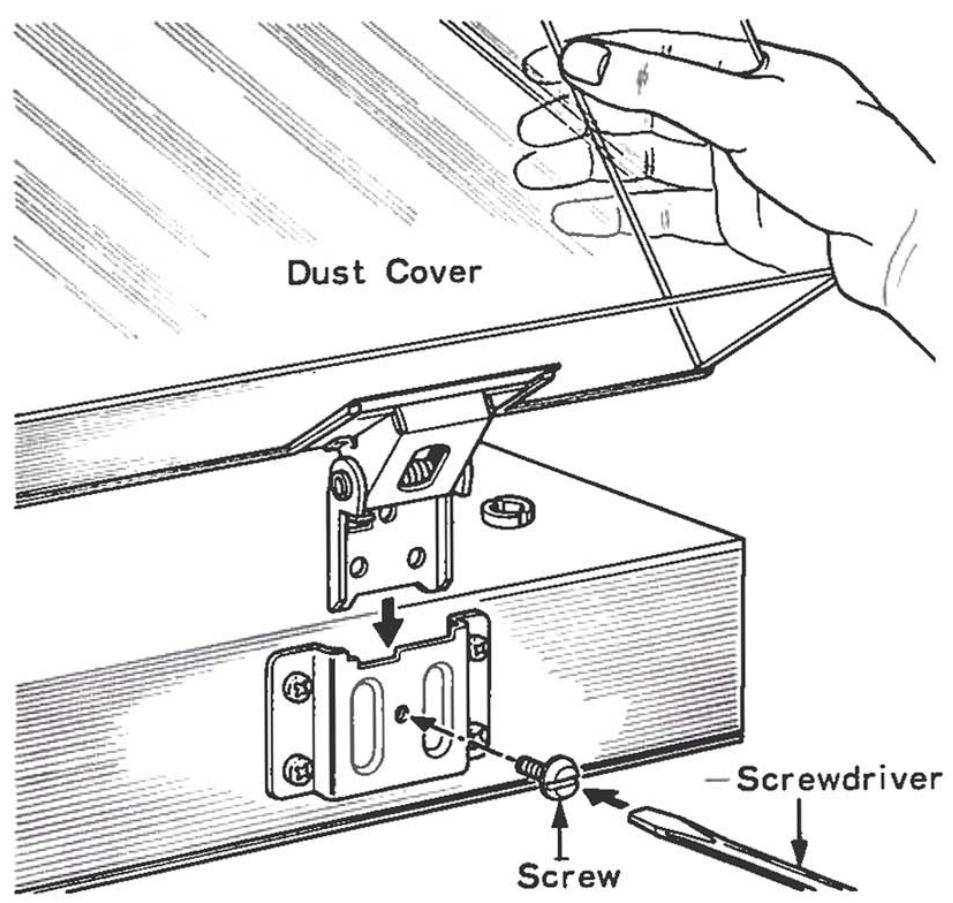
- Install the dust cover. Use the screws that are supplied. They will ensure a closer fit.
TRACKING FORCE ADJUSTMENT
- Remove the stylus cover and also the AC plug. Set the play lever to "PLAY."
- Release the tonearm from the arm rest.
- Turn the main weight either to the right or left so that the tonearm balances perfectly in a horizontal position.

- Return the tonearm to the arm rest. Now hold the main weight in place and turn only the counter ring so that it points to "0" position.
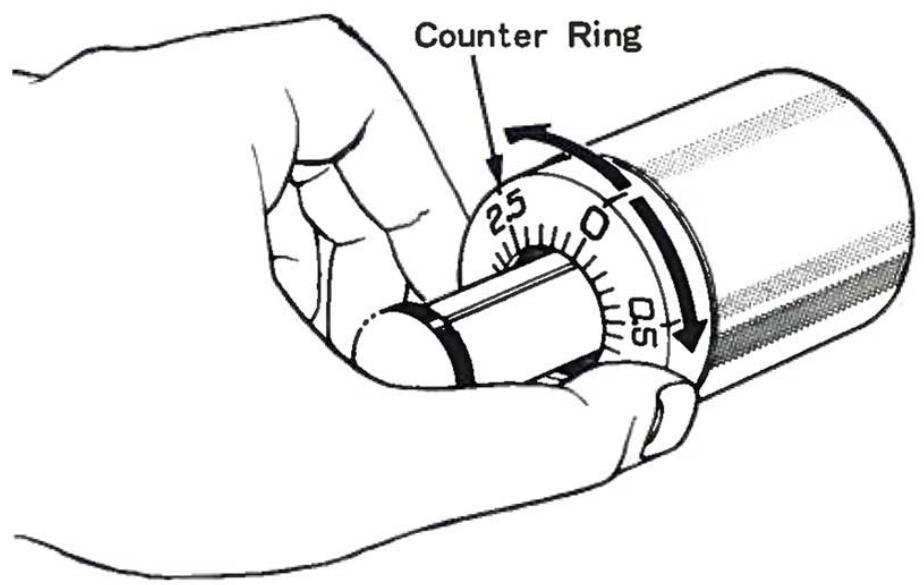
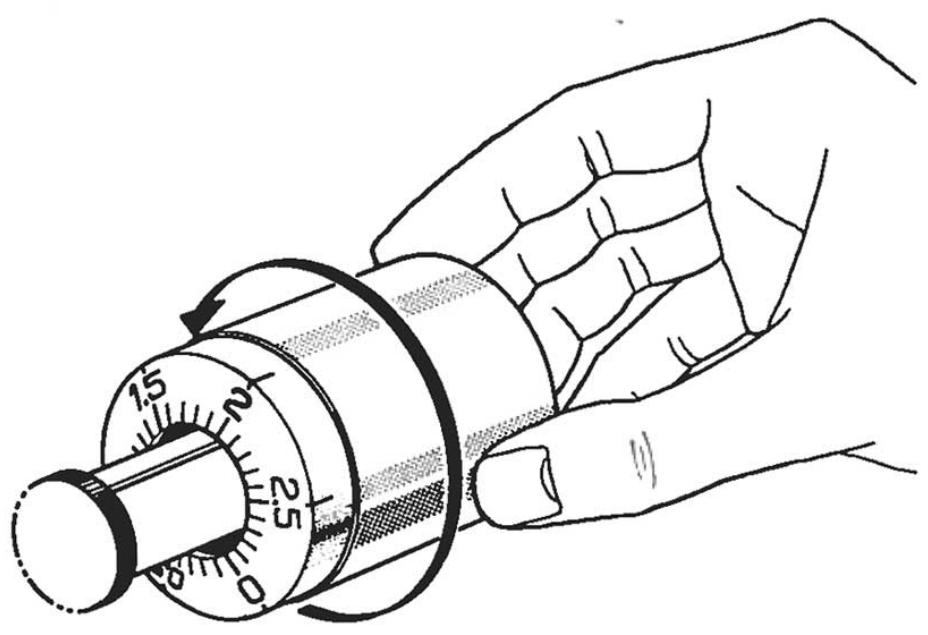
- Turn the main weight to the right until the counter ring points to the tracking force recommended for the cartridge that is used.
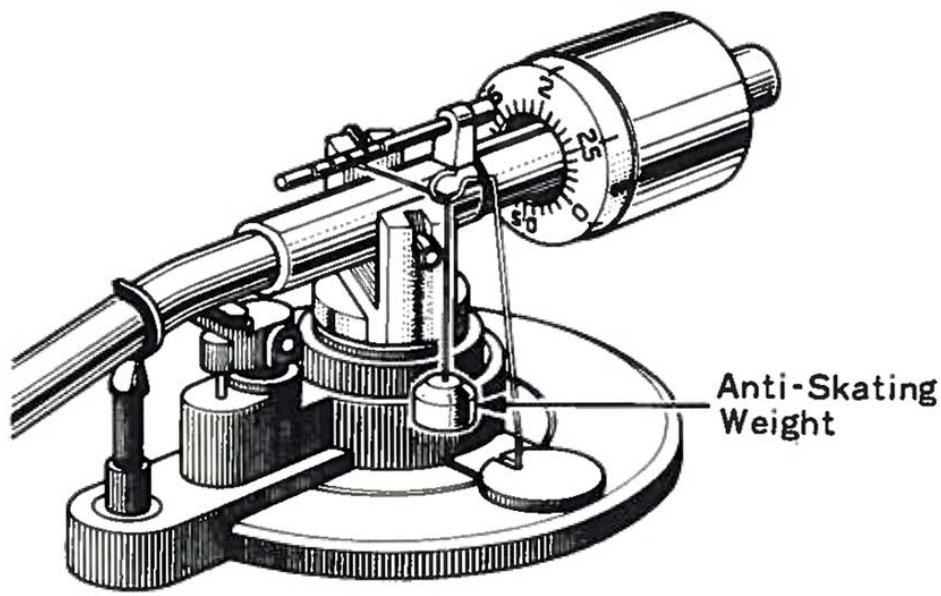
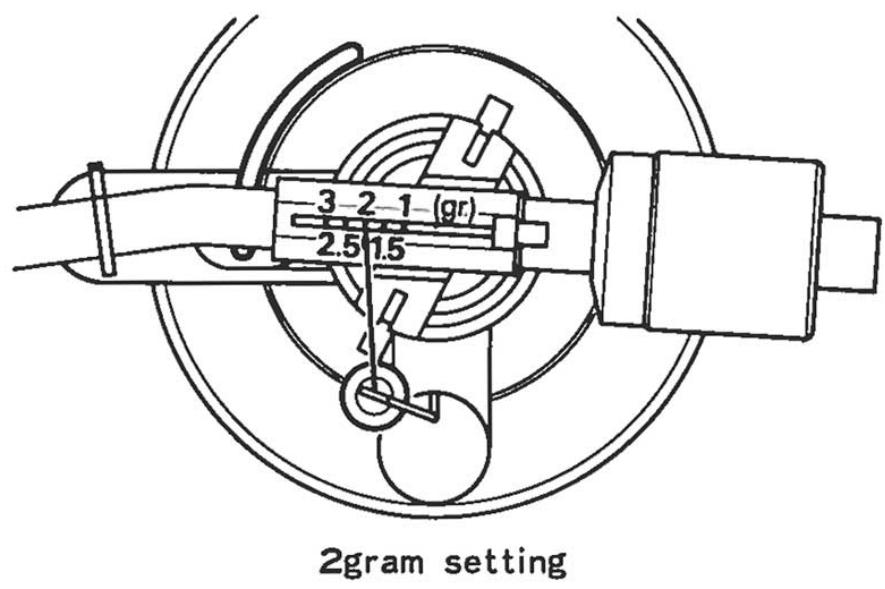
- Next install the anti-skating weight by hooking its string over the groove that corresponds to the tracking force of the cartridge.
This will place appropriate counteracting force on the tonearm to offset its natural tendency to swing to the center and exert increased pressure against the inside groove wall.
- Switch the play lever to "OFF" and then connect the AC cord.
Note: The V-47 cartridge is supplied with turntables that are shipped to certain areas of the world. Two grams is the recommended optimum tracking force for this V-47 cartridge.
OPERATING INSTRUCTIONS
- Check the turntable connections to the amplifier. Also see that the amplifier's function knobs are set in correct positions.
- Make adjustment for correct speed. See section under "How To Adjust Speed" on the next item.
- Place the desired record on the turntable platter. If a 45 rpm "donut" style record is selected, use the EP adaptor that is supplied with this turntable.
- Set the speed selector to the correct speed of the record that is chosen.
- Remove the stylus cover and swing the tonearm over the starting position.
- Switch the play lever to "PLAY." The tonearm will descend gently until the stylus engages the groove and record play will begin.
- If you wish to interrupt record play temporarily, you may switch the play lever to "CUE." The tonearm will then rise to disengage the stylus from the record groove, but the platter will continue to turn. The stylus will remain stationary in this position so that record play can be resumed at this point at any time.
- Switch the play lever to "OFF" at the end of record play and return the tonearm to the arm rest.
TROUBLE SHOOTING
Check the following if . . .
...hum (boom, zzz noise) is encountered.
- Check whether the audio cord and the ground wire are respectively connected between the turntable and amplifier.
- Check whether the plug-in head is perfectly mounted.
- Rearrange the audio cord and try changing the turntable position.
- Reverse the AC line plug insertion.
...howling occurs.
- Howling occurs when vibrating air pressures of speaker cone movements cause resonant vibrations in the turntable. This can be transmitted directly to the turntable, or it can happen through resonant vibrations of loose floorboards. Place the turntable away from the speaker system, preferably in a room with solid flooring to avoid this disturbance.
HOW TO ADJUST THE SPEED
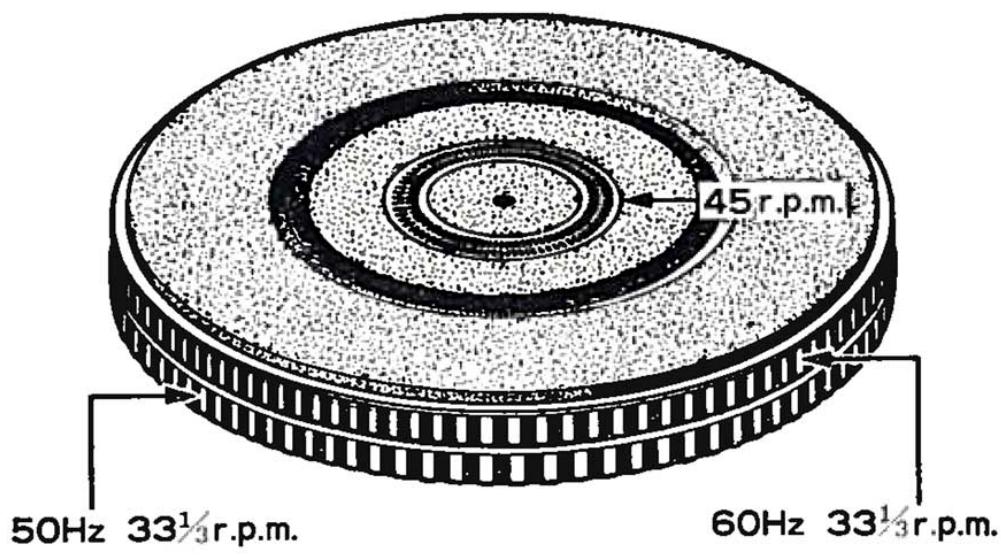
The stroboscope pattern on the turntable platter permits easy accurate adjustment of turntable speed.
Two 33-1/3 rpm stroboscope patterns are etched on the rim of the turntable platter. The upper pattern should be used in 60Hz power line areas, and the lower pattern in 50Hz areas. This unit is designed so that when speed is adjusted correctly for 33 - 1 / 3 rpm, it will also be correct for 45 rpm when the speed lever is switched to "45." A double check of speed accuracy can be made by using the stroboscope pattern on the rubber sheet.
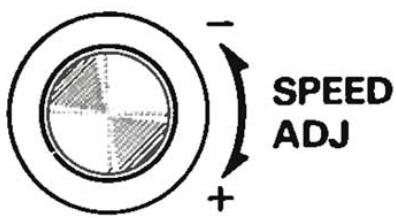
- Set speed selector to "33."
- Switch the play lever to "ON"
- Adjust the speed adjustment knob until the stripes of the stroboscope appear to become stationary.
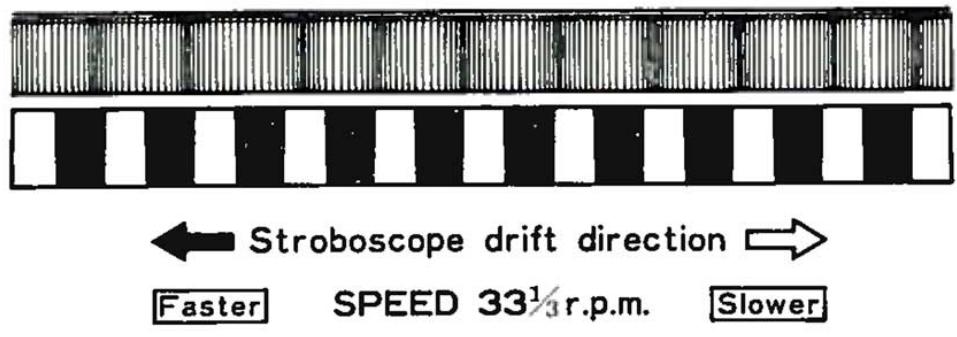
Note: The driving motor is DC type which is never influenced by modification of the source frequency (50-60 Hz).
HOW TO ATTACH THE CARTRIDGE
Cartridge can be attached easily as follows. The tone arm uses EIA standard connectors that can accept any head shell on the market that conforms to this standard.
- Connect four leads to the cartridge, as shown in below.
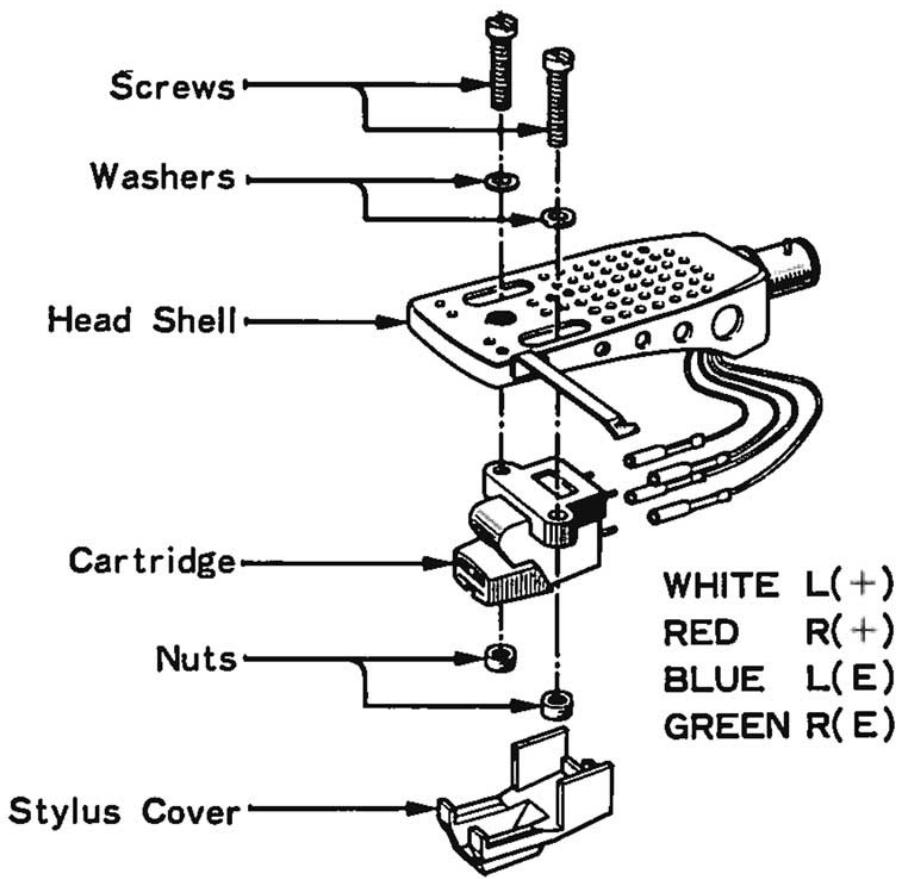
- Attach the cartridge lightly to the head shell with the bolts and nuts that are supplied. Next you must make the overhang adjustment as follows. The figure below shows the head shell and cartridge in about the actual size and correct position. Adjust your cartridge to the head shell accordingly, and lock it in place by tightening the bolt nuts securely.
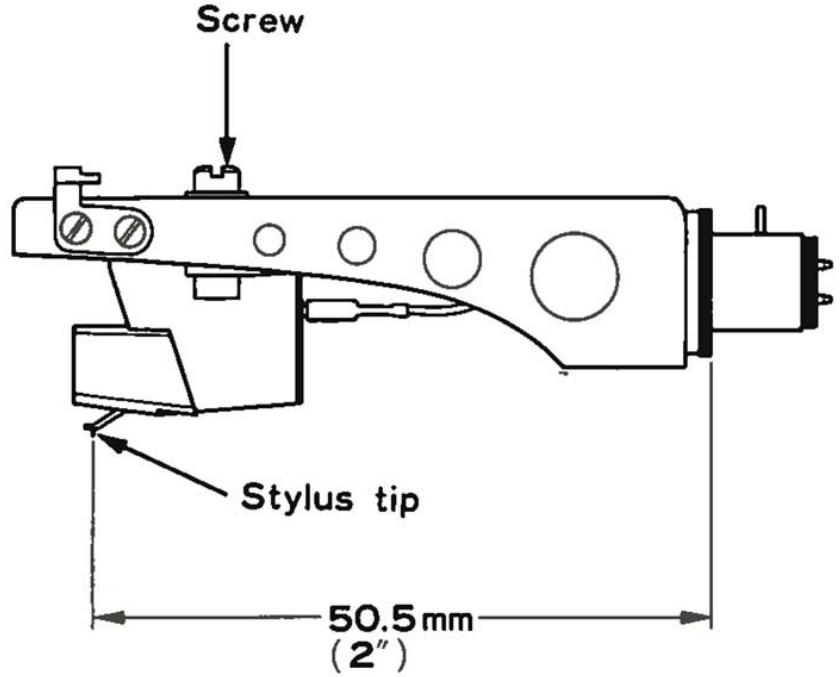
- Plug the head with the cartridge into the tone arm, and readjust tracking force as explained on page 5 so that it conforms to the cartridge manufacturer's recommendation.
Cartridge can be replaced easily by removing the old one and attaching the replacement in the above manner.
MAINTENANCE
LIFE OF A STYLUS
A diamond stylus is used in most cartridges. It is normally good for 500 hours for LP records on one side, but this varies greatly depending on how it is used.
A worn stylus will cause treble tones to increase in harshness. To prevent excessive record wear, a stylus should be replaced as soon as this becomes noticeable.
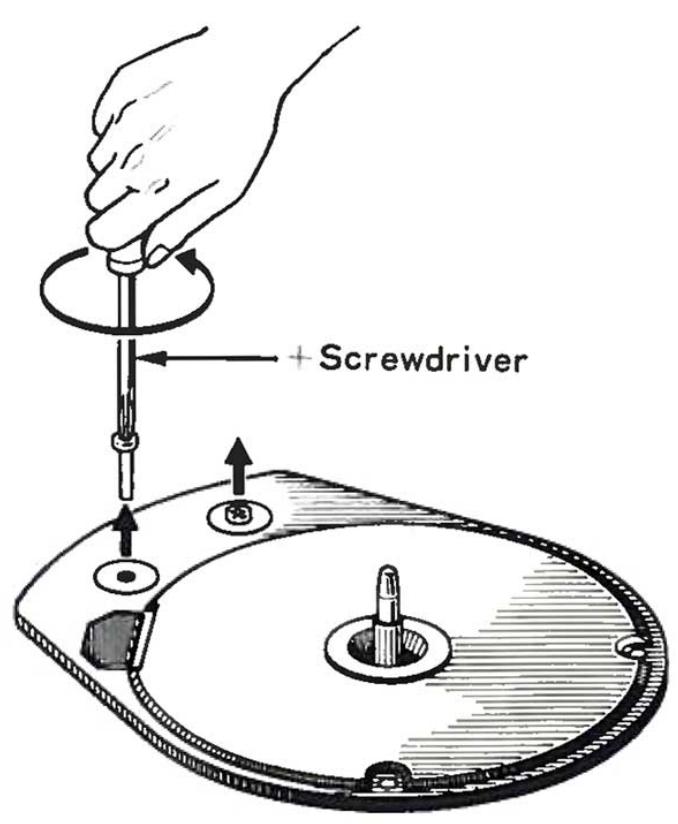
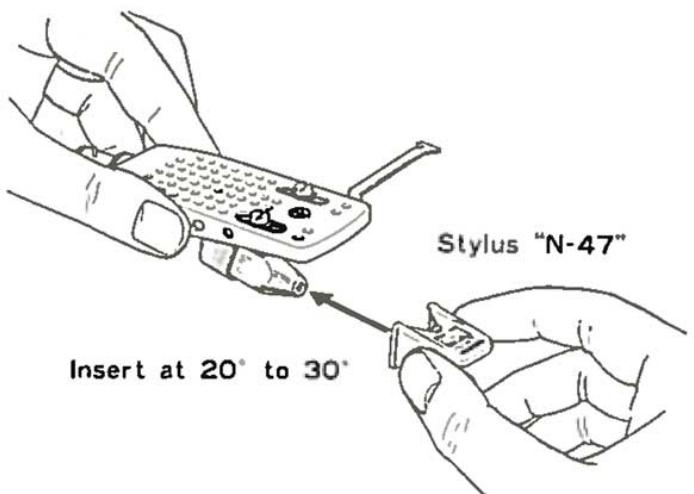
HOW TO REPLACE THE STYLUS
N-47 is the designation of the replacement stylus for that used in the V-47 cartridge.
Replacement stylus may be obtained from the dealer from whom you purchased this turntable.
You can replace the stylus easily as shown below.
CLEANING THE CASE AND THE DUST COVER
Clean the case and dust cover gently with dry cloth or silicone cloth. In case they are badly dirtied, wipe them with a well wrung cloth that has been wetted in soapsuds.
Never use thinner, alcohol, benzine or other volatile liquids.
PERIODICAL CHECK-UP
Generally, machines operated over long periods without proper care and maintenance may develop trouble due to poor lubrication, wear, deterioration or the like. To ensure a long service life and stable operation, periodical check-up at an interval of two years or so, if possible, is recommended even if the equipment appears to be working normally.
Please have such a periodical check-up made through the dealer.
SPECIFICATIONS
MOTOR & TURNTABLE:
Drive System: Direct drive system
Motor: 20-pole 30-slot D.C. servo motor
Turntable Platter: 31 cm (12-3/16 inch) Diameter
Aluminum Alloy Die-Cast
Weight 1.1 kg (2.4 lbs)
Speeds: 2 speeds, 33-1/3 and 45 rpm.
Speeds Control Range: . . . . . . . Within ±3%
Wow & Flutter: .Less than 0.04% (WRMS)
Rumble: (DIN weighted) Better than -65 dB
(DIN unweighted) . . . . . Better than -45 dB
TONEARM:
Type: Static-balance type, S-shaped pipe arm
Effective Tonearm Length: 225 mm (8-7/8 inch)
Overhang: 15 mm (9/16 inch)
Tracking Error: ±1.5 degree
Stylus Pressure Variable Range: . . . 0 to 3 grams
Usable Cartridge Weight: 4 to 10 grams
CARTRIDGE:
Furnished Cartridge: V-47
(Certain destination models are not equipped with the V-47 cartridge.)
Stylus: N-47 with 0.5 mil Diamond
Frequency Response: 20 Hz to 20,000 Hz
Output Voltage: 2.0 mV (1,000 Hz, 5 cm/sec.)
Optimum Tracking Force: 2.0 ±0.5 grams
Load Impedance: 50 k ohms
Replacement Stylus: N-47
ADDITIONAL FEATURES: Viscous-damped cueing device,
Anti-skating device,
Stroboscope with lamp,
Fine speed adjusting controls,
Head shell stand,
MISCELLANEOUS:
Power Requirement: AC 120V, 60 Hz — USA and Canada Model
AC 240V, 50 Hz — U.K. Model
AC 120/220V, 50/60 Hz (Switchable) — other countries.
Power Consumption: 7.0 watts
Dimensions: W 468 mm (18-7/16")
H 147 mm (5-3/4")
D 365 ~mm (14-3/8")
Weight: 7.0 kg (15.4 lbs)
SUPPLIED ACCESSORIES: . . . . . . EP adapter,
Note: Kenwood follows a policy of continuous advancements in development. For this reason specifications may be changed without notice.