
WA14642W - WA14655W - WA14656W - WA14657W - WA14662W - WTA14305W - Lave-linge AMICA - Notice d'utilisation et mode d'emploi gratuit
Retrouvez gratuitement la notice de l'appareil WA14642W - WA14655W - WA14656W - WA14657W - WA14662W - WTA14305W AMICA au format PDF.
| Type de produit | Lave-linge frontal |
| Marque | Amica |
| Modèles compatibles | WA14642W, WA14655W, WA14656W, WA14657W, WA14662W, WTA14305W |
| Capacité nominale | 7 kg |
| Dimensions (H x L x P) | 845 x 597 x 527 mm |
| Poids net | 71 kg |
| Alimentation électrique | 220-240 V ~ 50 Hz |
| Puissance nominale | 2200 W |
| Protection courant | 10 A |
| Pression d'eau | 0,1 MPa (1 bar) - 1 MPa (10 bar) |
| Vitesse d'essorage maximale | 1400 tr/min |
| Classe énergétique | A++ |
| Consommation énergétique annuelle pondérée | 195 kWh/an |
| Consommation d'eau annuelle pondérée | 10337 L/an |
| Niveau sonore (lavage / essorage) | 58 dB(A) / 79 dB(A) |
| Programmes de lavage | Coton, Eco, Daily 60', Shirts, Quick Wash 15', Allergy Safe, Laine, Lavage à la main, etc. |
| Fonctions spéciales | Départ différé (1-23 h), Lavage rapide, Sécurité enfants, Contrôle de répartition de charge |
| Sécurité | Verrouillage de porte, protection contre la surchauffe, arrêt en cas de porte ouverte |
| Entretien | Nettoyage du filtre de pompe (tous les 20 lavages), nettoyage du bac à lessive (1 fois/mois), nettoyage du joint de porte |
| Réparabilité | Pièces détachées disponibles via service après-vente Amica |
| Pays de fabrication | Pologne |
FOIRE AUX QUESTIONS - WA14642W - WA14655W - WA14656W - WA14657W - WA14662W - WTA14305W AMICA
Questions des utilisateurs sur WA14642W - WA14655W - WA14656W - WA14657W - WA14662W - WTA14305W AMICA
0 question sur cet appareil. Repondez a celles que vous connaissez ou posez la votre.
Poser une nouvelle question sur cet appareil
Téléchargez la notice de votre Lave-linge au format PDF gratuitement ! Retrouvez votre notice WA14642W - WA14655W - WA14656W - WA14657W - WA14662W - WTA14305W - AMICA et reprennez votre appareil électronique en main. Sur cette page sont publiés tous les documents nécessaires à l'utilisation de votre appareil WA14642W - WA14655W - WA14656W - WA14657W - WA14662W - WTA14305W de la marque AMICA.
MODE D'EMPLOI WA14642W - WA14655W - WA14656W - WA14657W - WA14662W - WTA14305W AMICA
AWI714S
INSTRUCTION MANUAL
WASHING MACHINE
Please read this User Manual carefully before using the appliance!
IO 01252/1
(03.2015)
Basic Information. 3
Notes on Safety. 4
Installing the Washing Machine 7
Understanding the symbols on clothes labels. 9
Description of control panel. 10
Using the appliance. 14
Table of programmes. 15
Troubleshooting 16
Maintenance and Cleaning. 18
Practical tips on washing. 19
Specification 22
Service and Warranty. 22
Product Fiche. 23
In accordance with European Directive 2012/19/UE and Polish legislation regarding used electrical and electronic goods, this appliance is marked with the symbol of the crossed-out waste container.
This marking means that the appliance must not be disposed of together with other household waste after it has been used. The user is obliged to hand it over to a waste collection centre collecting used electrical and electronic goods. The collectors, including local collection points, shops and local authority departments provide recycling schemes. Proper handling of used electrical and electronic goods helps to avoid
environmental and health hazards resulting from the presence of dangerous components and the inappropriate storage and processing of such goods.
From today, washing will be easier than ever before. The Amica washing machine combines exceptional ease of use with excellent effectiveness. Once you have read the instructions, operating the washing machine will not be a problem.
Before being packed and leaving the factory, the safety and functions of this washing machine were carefully tested. These tests may have resulted in some damp or traces of water being left inside the machine.
We ask you to read the User Manual carefully before switching on the appliance. Following the directions in this manual will protect you from any misuse.
Keep this User Manual and store it near at hand. The instructions should be followed carefully to avoid any unfortunate accidents.

Important!
This washing machine is intended for purely domestic use to wash textiles and clothes which are designed to be machine washed in a detergent bath.
Before plugging the washing machine into the mains, remove the safety packaging and ensure the machine is level.
The manufacturer reserves the right to introduce changes which do not affect the operation of the appliance.
Use
- The machine should only be used after the instructions below have been read carefully.
- Never use the machine outdoors or anywhere the temperature may fall below freezing.
- The machine should not be operated by children or anyone who has not read the instructions.
Important! Temperatures below 0^ can damage the washing machine! In the event of the machine being stored or transported in sub-zero temperatures, it should be left to acclimatise in a temperature above zero for 8 hours before being used.
Manufacturer's Declaration
The manufacturer hereby declares that this product meets the requirements of the following European directives:
Low Voltage Directive 2014/35/EC,
Electromagnetic Compatibility (EMC) Directive 2014/30/EC
ErP Directive 2009/125/EC
and has thus been marked with the C symbol and been issued with a declaration of compliance made available to market regulators.
Detergents Use only those detergents and additives which are designed for automatic washing machines, especially when using the TOWELS
programme. Do not use any agents containing solvents, as these may damage certain parts of the machine, or cause them to emit poisonous gases. There may also be a risk of ignition and explosion.
- Loading the Machine Ensure no unwanted objects are put inside the appliance. Completely empty all pockets in the clothing to be washed and fasten buttons and zips. Place small, loose objects in a washing bag, or inside a pillow case, as they may be destroyed or else damage the drum or internal tank. Do not exceed the recommended maximum load of washing.
Control Panel
Protect the control panel from water spillage.
Do not put washed clothes on top of the machine!

- Transport
Unplug the machine before preparing the machine for transport. Do not transport the washing machine if drum locking bolts are not in place. See the chapter INSTALLING THE MACHINE. Keep the appliance in upright position when transported.
- Data Plate
Data plate indicating basic information about the washing machine is located at the top part of the rear casing.
- Burns
The door glass of your washing machine is hot during operation. Do not allow children in the vicinity of the appliance.
Checking stability
Once the washing machine is in position and levelled, it must be checked to ensure it rests firmly on all four legs.
In order to check this, press down each corner of the appliance in turn to see if it moves. Safe, long-term and reliable operation of the washing machine depends on it being correctly positioned and level.

Important! Level the appliance, remove the drum locking bolts and wait 3 hours before using the appliance for the first time.

Important! Incorrect levelling, especially instability, may cause the washing machine to move around during operation.
This appliance can be used by children aged from 8 years and above and persons with reduced physical, sensory or mental capabilities or lack of experience and knowledge if they have been given supervision or instruction concerning use of the appliance in a safe way and understand the hazards involved. Children shall not play with the appliance. Cleaning and user maintenance shall not be made by children without supervision.
Children of less than 3 years should be kept away unless continuously supervised.
DISPOSAL OF THE APPLIANCE
To ensure safety, the washing machine must be rendered unsuitable for use once its useful life comes to an end. First unplug it and then cut off the power lead. Scrap the appliance in line with local waste disposal legislation.
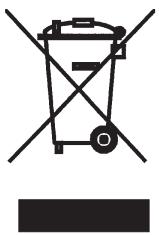
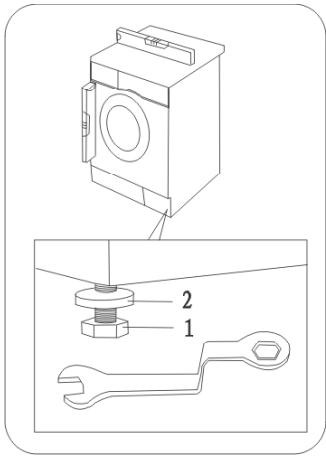
I. Remove the protection used for transporting the appliance (keep the locking bolts for future use, e.g. when moving house).
- Unscrew the 4 locking bolts with a spanner.
-
Remove the rubber and plastic transport brackets from the sockets along with the washers and bolts.
-
Stop up the holes with the stoppers enclosed in the accessories bag.

The locking bolts MUST be removed before the washing machine is used!
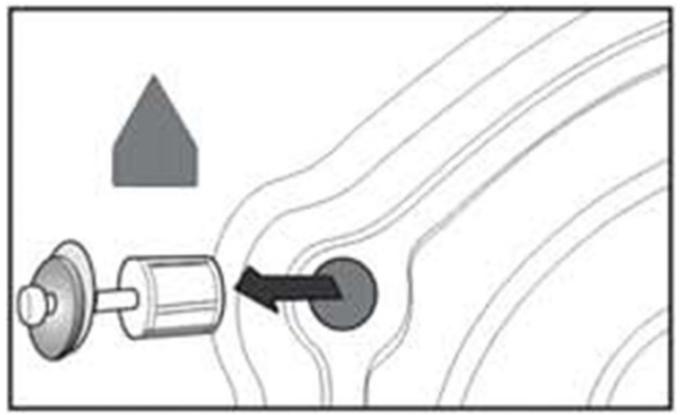
II. Positioning and levelling the machine

- Do not place the washing machine on a carpet!
- The floor surface should not be either concave or sloping!
- Attention should be paid to the shape of the surface of the floor, so that the entire weight of the appliance rests on its legs (not its body)!
- Place the washing machine on a solid, even surface.
- Loosen the plastic washer (2)
- Level the machine by adjusting the legs (1)
- Lock with washers (2)

After positioning and levelling the machine, check that it is stable by pressing down each corner and ensuring it does not move!
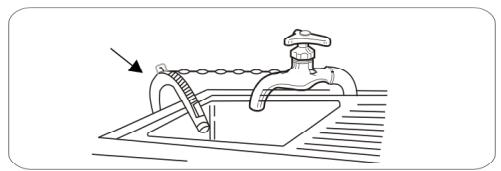
III. Connecting the water supply
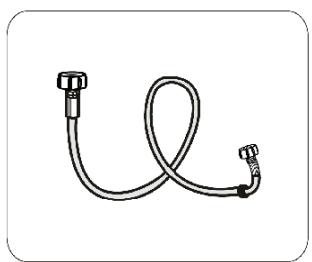
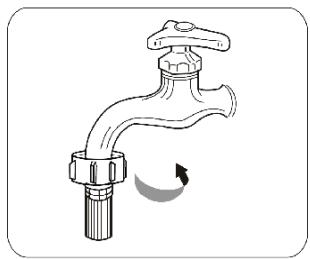
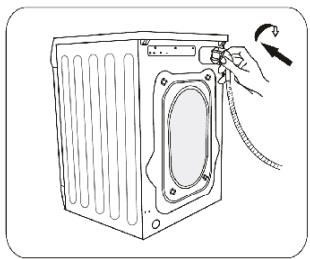
Use the new hoses supplied with the machine. Do not re-use old hoses.
A water supply hose with seals is inside the drum of the machine.

Water pressure min. 0,1 MPa (1 bar), max.1 MPa (10 bar). Supply the machine with cold water
- after connecting, make sure the hose is not twisted
- after connecting the hose and the valve, check they are sealed tight
- regularly check the condition of the supply hose.
IV. Water drain
The drain hose is at the back of the machine. Fix the drain hose so that it does not move while the machine is in operation (use the elbow as shown below). Do not place the hose too deep into the outlet pipe!
V. Connecting the electric power supply
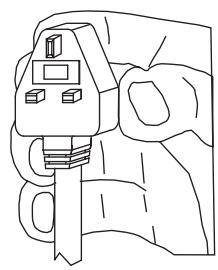

- The appliance's mains connection (electrical wall socket) should be in a visible and accessible place!
- Only plug the machine into a properly installed socket with an earth pin!
- Do not connect to an adaptor or an extension cord!
- In the event of the power lead being damaged, it must be replaced by an authorised technician.
- The electrical system to which the appliance is to be connected must be protected with a 10 A fuse.
| I. Washing | 90 boiling temp. 90° | 60 normal temp 60°C | 40 normal temp 40°C | DO NOT wash! |
| 30 delicate | 40 handwash | |||
| II. Chemical cleaning | A all solvents | P all except TRI | F petrol only | DO NOT dry clean! |
| III. Spin dryer | normal | low | high | DO NOT dry! |
| IV. Ironing | 110°C | 150°C | 200°C | DO NOT |

Always pay attention to the symbols on garments' labels when choosing a washing setting.
DESCRIPTION OF THE APPLIANCE
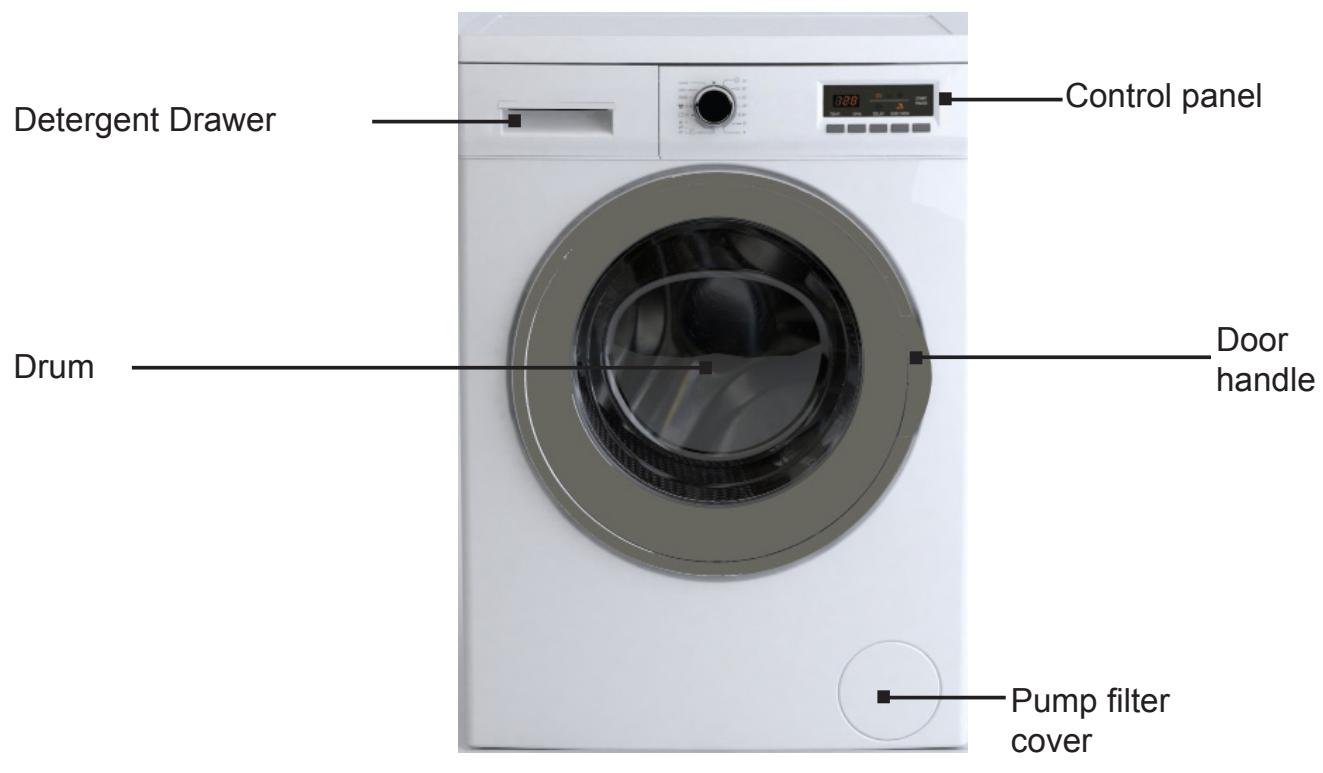
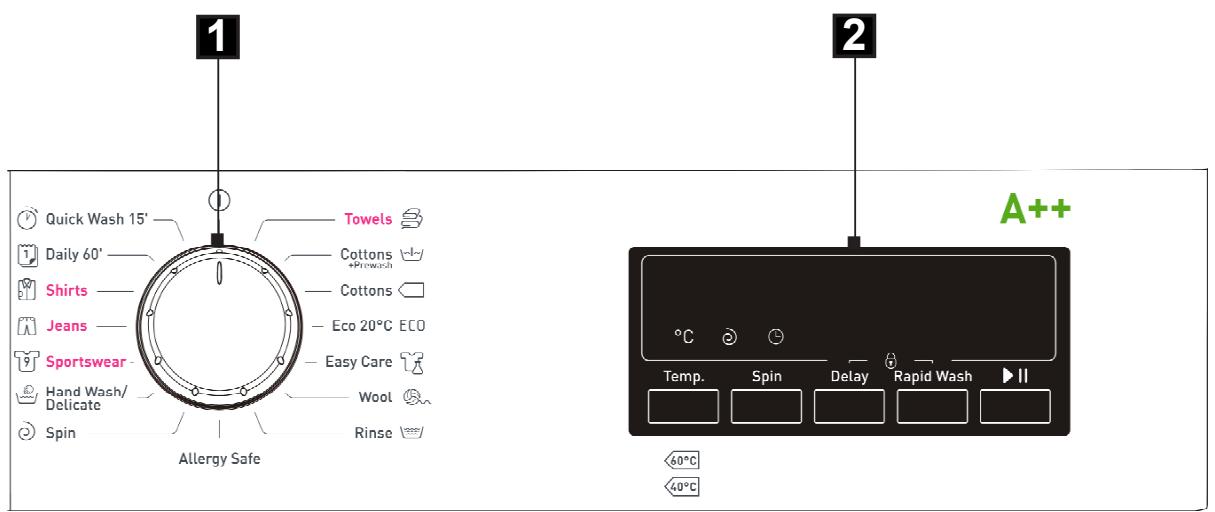
- Programme selector knob
- Display
- Temperature selector button
- Spin speed button
- Delay button
- Rapid wash button
- START/PAUZA button
5+6. Child Lock
1. Programme selector knob
Choose the appropriate wash programme as required, depending on the degree of soil, and type and amount of laundry loaded, which ensures better results and more effective washing. Once the wash programme is started, turning the programme selector knob to another position (except 1) does not change the previously selected programme.
2. Display
- Time, temperature, spin speed, delay start 1-23 h are available on display. In addition, additional function indicators are displayed (delay start and rapid wash), and START/PAUSE. Message End is displayed at the end of programme.
- The remaining time is displayed during wash cycle. The displayed time is an estimate and may differ from actual wash cycle time, depending on temperature, water pressure, load size, quantity of washing powder used etc. The time is automatically updated during wash cycle. Displaying the same time for an extended period or abrupt changes are normal.
Child Lock
When Child Lock is active if you attempt to change the wash cycle or settings the CL symbol will flash on the display.
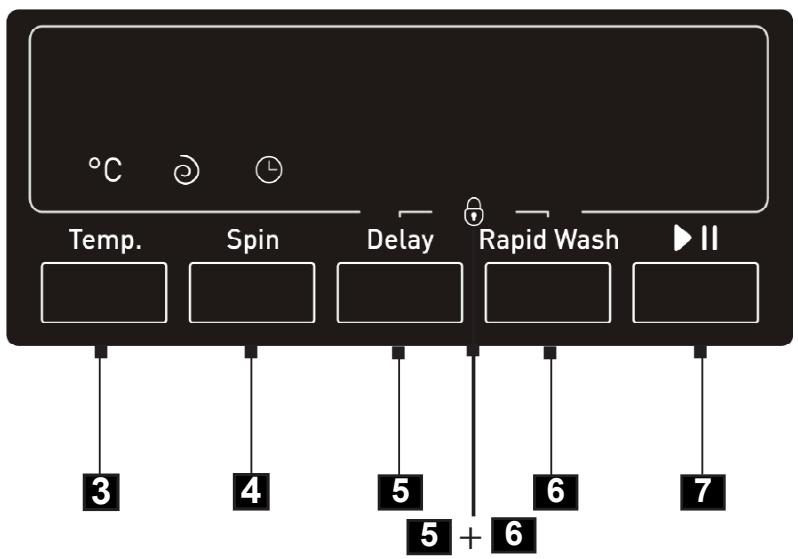
3. Temperature selector button
This button allows the washing temperature to be set. Press this button to display water temperature settings available for a given programme or an option for washing in cold water (no heating). Depending on the programme selected, the display shows the following temperatures -- ^ C (cold water) - 30^ C - 40^ C - 50^ C - 60^ C - 70^ C - 80^ C - 90^ C . For the Eco programme you can select the cold water option or 20^ C on the display.
4. Spin speed button
Press this button to set the spin speed when water is being pumped out of the washing machine. Press the button to change the setting. Depending on the programme selected, the display shows the following options -- (spin off) - 400 - 600 - 800 - 1000 - 1200 - 1400.
5. Delay Start button L
Press this button to set the delay time for starting washing. The setting range available is from 1-23 hours. Press the button to set the time after which washing is to commence.
NOTE: If there is a power outage during Delay Time, countdown will resume immediately after the power is restored.
6. Rapid Wash button
The Rapid Wash function reduces the total wash time saving money while reducing energy consumption and water consumption.
Pre-wash is recommended when washing lightly soiled laundry.
NOTE 1: The Rapid function is not available for all programmes (see Table of wash programmes).
NOTE 2: The Rapid function can be activated automatically when partial load for a given programme is detected.
7. START/PAUSE button
Press START/PAUSE to start or pause a programme. When the washing machine operates, START/PAUSE indicator light is on. When you PAUSE a programme, START/PAUSE indicator flashes.
The PAUSE mode can be used to soak the laundry.
Once the selected programme started wait for about 10 minutes and then press the START/PAUSE button. When the laundry is soaked as required, press the START/PAUSE button again to resume the program. Soaking will improve washing results for heavily soiled laundry.
5+6. Child Lock
This function locks the function buttons to prevent settings being changed or the operation being interrupted by children. To set Child Lock, simultaneously press and hold
5 (Delay) and 6 (Rapid Wash) buttons for approximately 3 seconds. To release the Child Lock, hold the same buttons down once more for around 3 seconds. Child Lock will be automatically released after the wash cycle is completed.
Note: When the child lock is activated Delay and no spin indicators will flash a few times. When the child lock is release Rapid Wash indicator will flash a few times.
1. Allergy Safe programme:
This programme is designed for washing clothes of children and people with sensitive skin. Main wash is carried out at a temperature of 60^ (temperature setting: 60/50/40/30/---, cold water), followed by four rinses.
Additionally, during all stages of rinsing water is heated to 30^ .
2. Daily 60':
A daily wash programme with a duration of 60 minutes, the temperature setting of 60^ and a single rinse cycle and a maximum spin speed. Use this programme to wash coloured fabrics, cotton and linen.
3. Shirts programme:
The temperature of 60^ and spinning between the rinse phases. There is a three-step spin sequence at speeds of 400, 500 and 600~rpm at the end of the wash programme. This program can be used for simultaneous washing of cotton shirts and blouses together with synthetic and mixed fabrics.
4. Quick Wash 15':
Use this programme to refresh clothes. Includes all three wash stages:
- Main wash
-Rinse - Spin
5. Eco 20^ C :
Use this programme to wash clothes at 20^ .
I. Select Programme
- Set the programme selector knob to the desired programme (see the table further on).
- Change temperature, spin speed or activate available additional functions to modify the programme to your individual needs.
- Press the [Start/ Pause] button.
II. Start delay setting
The delayed start function may be used when, for example, taking advantage of discounted energy tariffs.
Procedure:
- Close the door.
- Set the programme selector knob to the desired programme (see the table further on).
- Select additional functions or wash cycle parameters as required.
- Press the Delay button.
- Select time ranging from 1 to 23 hours. The display will show the setting from 1h to 23h.
- Press the [Start/ Pause] button. The appliance will be set in delay mode. Washing will commence immediately after the delay time has elapsed.
III. End of the wash cycle
- When the wash programme has ended End will flash on the display.
- Turn off the water valve
- Set the programme selection knob to
- Unplug the appliance from the mains.
- Open the door and remove laundry.
IV. Cancelling and changing programme
Set the programme selector knob to position for several seconds to terminate a programme. Then select the desired wash programme.
NOTE: When you cancel a programme when there is water in the drum and turn the programme selector knob to a different position, the appliance will drain the water. Then select the desired wash programme.
e e e e e e e e e e e e e e e e e e e e e e e e e e e e e e e e e e e e e e e e e e e e
| 'puere' puee' puee' puee' puee' puee' puee' puee' puee' puee' puee' puee' puee' puee' puee' puee' puee' puee' puee' puee' puee' puee' puee' puee' puee' puee' pueae' puee' puee' puee' puee' puee' puee' puee' puee' puee' puee' puee' puee' puee' puee' puee' puee' puee' puee' puee' puee' puee' puee' puee' puee' pueee' puee' puee' puee' puee' puee' puee' puee' puee' puee' puee' puee' puee' puee' puee' puee' puee' puee' puee' puee' puee' puee' puee' puee' puee' pueei' puee' puee' puee' puee' puee' puee' puee' puee' puee' puee' puee' puee' puee' puee' puee' puee' puee' puee' puee' puee' puee' puee' puee' puee' pueo' puee' puee' puee' puee' puee' puee' puee' puee' puee' puee' puee' puee' puee' puee' puee' puee' puee' puee' puee' puee' puee' puee' puee' puee' puea' puee' puee' puee' puee' puee' puee' puee' puee' puee' puee' puee' puee' puee' puee' puee' puee' puee' puee' puee' puee' puee' puee' puee' puee' puec' puee' puee' puee' puee' puee' puee' puee' puee' puee' puee' puee' puee' puee' puee' puee' puee' puee' puee' puee' puee' puee' puee' puee' puee' pue e' pue' pue' pue' pue' pue' pue' pue' pue' pue' pue' pue' pue' pue' pue' pue' pue' pue' pue' pue' pue' pue' pue' pue' pue' pue' pue' pue' pue' pue' pue' pue' pue' pue' puee' pue' pue' pue' pue' pue' pue' pue' pue' pue' pue' pue' pue' pue' pue' pue' pue' pue' pue' pue' pue' pue' pue' pue' pue' pue' pue' pue' pue' pue' pue' pue' pue' pue'e' pue' pue' pue' pue' pue' pue' pue' pue' pue' pue' pue' pue' pue' pue' pue' pue' pue' pue' pue' pue' pue' pue' pue' pue' pue' pue' pue' pue' pue' pue' pue' pue' pue 'pue' pue' pue' pue' pue' pue' pue' pue' pue' pue' pue' pue' pue' pue' pue' pue' pue' pue' pue' pue' pue' pue' pue' pue' pue' pue' pue' pue' pue' pue' pue' pue' pue' pUE' pUE' pUE' pUE' pUE' pUE' pUE' pUE' pUE' pUE' pUE' pUE' pUE' pUE' pUE' pUE' pUE' pUE' pUE' pUE' pUE' pUE' pUE' pUE' pUE' pUE' pUE' pUE' pUE' pUE' pUE' pUE' pUE' pUE" pUE" pUE" pUE" pUE" pUE" pUE" pUE" pUE" pUE" pUE" pUE" pUE" pUE" pUE" pUE" pUE" pUE" pUE" pUE" pUE" pUE" pUE" pUE" pUE" pUE" pUE" pUE" pUE" pUE" pUE" pUE" pUE" pUE"pUE" pUE" pUE" pUE" pUE" pUE" pUE" pUE" pUE" pUE" pUE" pUE" pUE" pUE" pUE" pUE" pUE" pUE" pUE" pUE" pUE" pUE" pUE" pUE" pUE" pUE" pUE" pUE" pUE" pUE" pUE" pUE" pUE" pU" pUE" pUE" pUE" pUE" pUE" pUE" pUE" pUE" pUE" pUE" pUE" pUE" pUE" pUE" pUE" pUE" pUE" pUE" pUE" pUE" pUE" pUE" pUE" pUE" pUE" pUE" pUE" pUE" pUE" pUE" pUE" pUE" pUE "pUE" pUE" pUE" pUE" pUE" pUE" pUE" pUE" pUE" pUE" pUE" pUE" pUE" pUE" pUE" pUE" pUE" pUE" pUE" pUE" pUE" pUE" pUE" pUE" pUE" pUE" pUE" pUE" pUE" pUE" pUE" pUE" pUE"pU" pUE" pUE" pUE" pUE" pUE" pUE" pUE" pUE" pUE" pUE" pUE" pUE" pUE" pUE" pUE" pUE" pUE" pUE" pUE" pUE" pUE" pUE" pUE" pUE" pUE" pUE" pUE" pUE" pUE" pUE" pUE" pUE" pU "pUE" pUE" pUE" pUE" pUE" pUE" pUE" pUE" pUE" pUE" pUE" pUE" pUE" pUE" pUE" pUE" pUE" pUE" pUE" pUE" pUE" pUE" pUE" pUE" pUE" pUE" pUE" pUE" pUE" pUE" pUE" pUE" pUE”pUE" pUE" pUE" pUE" pUE" pUE" pUE" pUE" pUE" pUE" pUE" pUE" pUE" pUE" pUE" pUE" pUE" pUE" pUE" pUE" pUE" pUE" pUE" pUE" pUE" pUE" pUE" pUE" pUE" pUE" pUE" pUE" pUE" ppE" ppE" ppE" ppE" ppE" ppE" ppE" ppE" ppE" ppE" ppE" ppE" ppE" ppE" ppE" ppE" ppE" ppE" ppE" ppE" ppE" ppE" ppE" ppE" ppE" ppE" ppE" ppE" ppE" ppE" ppE" ppE" ppE" ppE "pUE" ppE" ppE" ppE" ppE" ppE" ppE" ppE" ppE" ppE" ppE" ppE" ppE" ppE" ppE" ppE" ppE" ppE" ppE" ppE" ppE" ppE" ppE" ppE" ppE" ppE" ppE" ppE" ppE" ppE" ppE" ppE" ppE" ppF" ppF" ppF" ppF" ppF" ppF" ppF" ppF" ppF" ppF" ppF" ppF" ppF" ppF" ppF" ppF" ppF" ppF" ppF" ppF" ppF" ppF" ppF" ppF" ppF" ppF" ppF" ppF" ppF" ppF" ppF" ppF" ppF" ppF” ppF" ppF" ppF" ppF" ppF" ppF" ppF" ppF" ppF" ppF" ppF" ppF" ppF" ppF" ppF" ppF" ppF" ppF" ppF" ppF" ppF" ppF" ppF" ppF" ppF" ppF" ppF" ppF" ppF" ppF" ppF" ppF" ppF"ppF" ppF" ppF" ppF" ppF" ppF" ppF" ppF" ppF" ppF" ppF" ppF" ppF" ppF" ppF" ppF" ppF" ppF" ppF" ppF" ppF" ppF" ppF" ppF" ppF" ppF" ppF" ppF" ppF" ppF" ppF" ppF" ppF" pp F" ppF" ppF" ppF" ppF" ppF" ppF" ppF" ppF" ppF" ppF" ppF" ppF" ppF" ppF" ppF" ppF" ppF" ppF" ppF" ppF" ppF" ppF" ppF" ppF" ppF" ppF" ppF" ppF" ppF" ppF" ppF" ppF" ppF "ppF" ppF" ppF" ppF" ppF" ppF" ppF" ppF" ppF" ppF" ppF" ppF" ppF" ppF" ppF" ppF" ppF" ppF" ppF" ppF" ppF" ppF" ppF" ppF" ppF" ppF" ppF" ppF" ppF" ppF" ppF" ppF" ppF"pp F" ppF" ppF" ppF" ppF" ppF" ppF" ppF" ppF" ppF" ppF" ppF" ppF" ppF" ppF" ppF" ppF" ppF" ppF" ppF" ppF" ppF" ppF" ppF" ppF" ppF" ppF" ppF" ppF" ppF" ppF" ppF" ppF" pp F " ppF" ppF" ppF" ppF" ppF" ppF" ppF" ppF" ppF" ppF" ppF" ppF" ppF" ppF" ppF" ppF" ppF" ppF" ppF" ppF" ppF" ppF" ppF" ppF" ppF" ppF" ppF" ppF" ppF" ppF" ppF" ppF" ppF" PP F" ppF" ppF" ppF" ppF" ppF" ppF" ppF" ppF" ppF" ppF" ppF" ppF" ppF" ppF" ppF" ppF" ppF" ppF" ppF" ppF" ppF" ppF" ppF" ppF" ppF" ppF" ppF" ppF" ppF" ppF" ppF" ppF" ppf F" ppF" ppF" ppF" ppF" ppF" ppF" ppF" ppF" ppF" ppF" ppF" ppF" ppF" ppF" ppF" ppF" ppF" ppF" ppF" ppF" ppF" ppF" ppF" ppF" ppF" ppF" ppF" ppF" ppF" ppF" ppF" ppF" ppFA" ppF" ppF" ppF" ppF" ppF" ppF" ppF" ppF" ppF" ppF" ppF" ppF" ppF" ppF" ppF" ppF" ppF" ppF" ppF" ppF" ppF" ppF" ppF" ppF" ppF" ppF" ppF" ppF" ppF" ppF" ppF" ppF" ppF' ppF" ppF" ppF" ppF" ppF" ppF" ppF" ppF" ppF" ppF" ppF" ppF" ppF" ppF" ppF" ppF" ppF" ppF" ppF" ppF" ppF" ppF" ppF" ppF" ppF" ppF" ppF" ppF" ppF" ppF" ppF" ppF" ppF" ppm F" ppm F" ppm F" ppm F" ppm F" ppm F" ppm F" ppm F" ppm F" ppm F" ppm F" ppm F" ppm F" ppm F" ppm F" ppm F" ppm F" ppm F" ppm F" ppm F" ppm F" ppm F" ppm F" ppm F" ppm F" ppm F" ppm F" ppm F" ppm F" ppm F" ppm F" ppm F" ppm F" ppm F' ppm F" ppm F" ppm F" ppm F" ppm F" ppm F" ppm F" ppm F" ppm F" ppm F" ppm F" ppm F" ppm F" ppm F" ppm F" ppm F" ppm F" ppm F" ppm F" ppm F" ppm F" ppm F" ppm F" ppm F" ppm F" ppm F" ppm F" ppm F" ppm F" ppm F" ppm F" ppm F" ppm F"pp F"pp F"pp F"pp F"pp F"pp F"pp F"pp F"pp F"pp F"pp F"pp F"pp F"pp F"pp F"pp F"pp F"pp F"pp F"pp F"pp F"pp F"pp F"pp F"pp F"pp F"pp F"pp F"pp F"pp F"pp F"pp F"pp F"ppF"pp F"pp F"pp F"pp F"pp F"pp F"pp F"pp F"pp F"pp F"pp F"pp F"pp F"pp F"pp F"pp F"pp F"pp F"pp F"pp F"pp F"pp F"pp F"pp F"pp F"pp F"pp F"pp F"pp F"pp F"pp F"pp F"pp F'pp F"pp F"pp F"pp F"pp F"pp F"pp F"pp F"pp F"pp F"pp F"pp F"pp F"pp F"pp F"pp F"pp F"pp F"pp F"pp F"pp F"pp F"pp F"pp F"pp F"pp F"pp F"pp F"pp F"pp F"pp F"pp F"pp F" pp F"pp F"pp F"pp F"pp F"pp F"pp F"pp F"pp F"pp F"pp F"pp F"pp F"pp F"pp F"pp F"pp F"pp F"pp F"pp F"pp F"pp F"pp F"pp F"pp F"pp F"pp F"pp F"pp F"pp F"pp F"pp F"pp F"pp E PP F" PP F" PP F" PP F" PP F" PP F" PP F" PP F" PP F" PP F" PP F" PP F" PP F" PP F" PP F" PP F" PP F" PP F" PP F" PP F" PP F" PP F" PP F" PP F" PP F" PP F" PP F" PP F" PP F" PP F" PP F" PP F" PP F" PP F" pp F" pp F" pp F" pp F" pp F" pp F" pp F" pp F" pp F" pp F" pp F" pp F" pp F" pp F" pp F" pp F" pp F" pp F" pp F" pp F" pp F" pp F" pp F" pp F" pp F" pp F" pp F" pp F" pp F" pp F" pp F" pp F" pp F" pp E" pp F" pp F" pp F" pp F" pp F" pp F" pp F" pp F" pp F" pp F" pp F" pp F" pp F" pp F" pp F" pp F" pp F" pp F" pp F" pp F" pp F" pp F" pp F" pp F" pp F" pp F" pp F" pp F" pp F" pp F" pp F" pp F" pp F pp F" pp F" pp F" pp F" pp F" pp F" pp F" pp F" pp F" pp F" pp F" pp F" pp F" pp F" pp F" pp F" pp F" pp F" pp F" pp F" pp F" pp F" pp F" pp F" pp F" pp F" pp F" pp F" pp F" pp F" pp F" pp F" pp F" PP F" PP F" PP F" PP F" PP F" PP F" PP F" PP F" PP F" PP F" PP F" PP F" PP F" PP F" PP F" PP F" PP F" PP F" PP F" PP F" PP F" PP F" PP F" PP F" PP F" PP F" PP F" PP F" PP F" PP F" PP F" PP F" PP E" PP E" PP E" PP E" PP E" PP E" PP E" PP E" PP E" PP E" PP E" PP E" PP E" PP E" PP E" PP E" PP E" PP E" PP E" PP E" PP E" PP E" PP E" PP E" PP E" PP E" PP E" PP E" PP E" PP E" PP E" PP E" PP E" PP E PP E" PP E" PP E" PP E" PP E" PP E" PP E" PP E" PP E" PP E" PP E" PP E" PP E" PP E" PP E" PP E" PP E" PP E" PP E" PP E" PP E" PP E" PP E" PP E" PP E" PP E" PP E" PP E" PP E" PP E" PP E" PP E" PP E" pp E" pp E" pp E" pp E" pp E" pp E" pp E" pp E" pp E" pp E" pp E" pp E" pp E" pp E" pp E" pp E" pp E" pp E" pp E" pp E" pp E" pp E" pp E" pp E" pp E" pp E" pp E" pp E" pp E" pp E" pp E" pp E" pp E" pp F" pp F" pp F" pp F" pp F" pp F" pp F" pp F" pp F" pp F" pp F" pp F" pp F" pp F" pp F" pp F" pp F" pp F" pp F" pp F" pp F" pp F" pp F" pp F" pp F" pp F" pp F" pp F" pp F" pp F" pp F" pp F pp F pp F pp F pp F pp F pp F pp F pp F pp F pp F pp F pp F pp F pp F pp F pp F pp F pp F pp F pp F pp F pp F pp F pp F pp F pp F pp F pp F pp F pp F pp F pp F pp F PP F" PP F" PP F" PP F" PP F" PP F" PP F" PP F" PP F" PP F" PP F" PP F" PP F" PP F" PP F" PP F" PP F" PP F" PP F" PP F" PP F" PP F" PP F" PP F" PP F" PP F" PP F" PP F" PP F" PP F" PP F" PP F" PP F PP F" PP F" PP F" PP F" PP F" PP F" PP F" PP F" PP F" PP F" PP F" PP F" PP F" PP F" PP F" PP F" PP F" PP F" PP F" PP F" PP F" PP F" PP F" PP F" PP F" PP F" PP F" PP F" PP F" PP F" PP F" PP F" PP E" pp E" pp E" pp E" pp E" pp E" pp E" pp E" pp E" pp E" pp E" pp E" pp E" pp E" pp E" pp E" pp E" pp E" pp E" pp E" pp E" pp E" pp E" pp E" pp E" pp E" pp E" pp E" pp E" pp E" pp E" pp E" pp E pp E" pp E" pp E" pp E" pp E" pp E" pp E" pp E" pp E" pp E" pp E" pp E" pp E" pp E" pp E" pp E" pp E" pp E" pp E" pp E" pp E" pp E" pp E" pp E" pp E" pp E" pp E" pp E" pp E" pp E" pp E" pp E" pp E" PP E" PP E" PP E" PP E" PP E" PP E" PP E" PP E" PP E" PP E" PP E" PP E" PP E" PP E" PP E" PP E" PP E" PP E" PP E" PP E" PP E" PP E" PP E" PP E" PP E" PP E" PP E" PP E" PP E" PP E" PP E" PP E" PP F" PP F" PP F" PP F" PP F" PP F" PP F" PP F" PP F" PP F" PP F" PP F" PP F" PP F" PP F" PP F" PP F" PP F" PP F" PP F" PP F" PP F" PP F" PP F" PP F" PP F" PP F" PP F" PP F" PP F" PP F" PP F" PP F pp F pp F pp F pp F pp F pp F pp F pp F pp F pp F pp F pp F pp F pp F pp F pp F pp F pp F pp F pp F pp F pp F pp F pp F pp F pp F pp F pp F pp F pp F pp F pp F pp E pp E pp E pp E pp E pp E pp E pp E pp E pp E pp E pp E pp E pp E pp E pp E pp E pp E pp E pp E pp E pp E pp E pp E pp E pp E pp E pp E pp E pp E pp E pp E pp E pp E' pp E pp E pp E pp E pp E pp E pp E pp E pp E pp E pp E pp E pp E pp E pp E pp E pp E pp E pp E pp E pp E pp E pp E pp E pp E pp E pp E pp E pp E pp E pp E pp E pp E PP PP PP PP PP PP PP PP PP PP PP PP PP PP PP PP PP PP PP PP PP PP PP PP PP PP PP PP PP PP PP PP PP PP PP PP PP PP PP PP PP PP PP PP PP PP PP PP PP PP P PP PP PP PP PP PP PP PP PP PP PP PP PP PP PP PP PP PP PP PP PP PP PP PP PP PP PP PP PP PP PP PP PP PP PP PP PP PP PP PP PP PP PP PP PP PP PP PP PP pp E pp E pp E pp E pp E pp E pp E pp E pp E pp E pp E pp E pp E pp E pp E pp E pp E pp E pp E pp E pp E pp E pp E pp E pp E pp E pp E pp E pp E pp E pp E pp E pp E" pp E pp E pp E pp E pp E pp E pp E pp E pp E pp E pp E pp E pp E pp E pp E pp E pp E pp E pp E pp E pp E pp E pp E pp E pp E pp E pp E pp E pp E pp E pp E pp E pp E ppe ppe ppe ppe ppe ppe ppe ppe ppe ppe ppe ppe ppe ppe ppe ppe ppe ppe ppe ppe ppe ppe ppe ppe ppe ppe ppe ppe ppe ppe ppe ppe ppe ppe |
-
- standard programmes for washing cotton fabrics at 60^ and 40^ .
These programmes are suitable for washing normally soiled cotton fabrics. These are the most effective programmes for washing these type of fabrics, taking into account the total energy and water consumption.
Note: Real water temperature may differ from the declared wash cycle temperature.
- standard programmes for washing cotton fabrics at 60^ and 40^ .
NOTE: Above mentioned time is an estimate and may differ from actual wash cycle time, depending on temperature, water pressure, load size, etc. The time is automatically updated during wash cycle. Displaying the same time for an extended period or abrupt changes are normal.
| Problem | Probable cause/Solution |
| The washing machine is not working | - Turn the tap on Clean the mesh filter on the supply hose. - Close the door of the appliance. Press the [Start/ Pause] button. |
| Water leaks | - Connect the water intake properly. |
| The load in the appliance has not been spun | - Replace the load evenly in the drum, clean the pump filter. |
| Unpleasant smell in the drum | - Activate the Autoclean cycle without a load (see the washing programme table). |
| No water in the drum | - Turn on the tap with the water supply. |
| There is water left in the fabric softener container. | - Firmly press the button in the middle container |
| Washing not properly rinsed | - Use the correct amount of cleaning agent, depending on how dirty the washing is and the hardness of the water (see the instructions on the cleaning agent's packaging). - Clean the pump filter |
| The appliance does not fill with water | - Turn on the water valve - Check the programme setting - Check the water pressure - Reconnect the water supply hose. - Close the door of the appliance. - Check the water intake is not bent or blocked. |
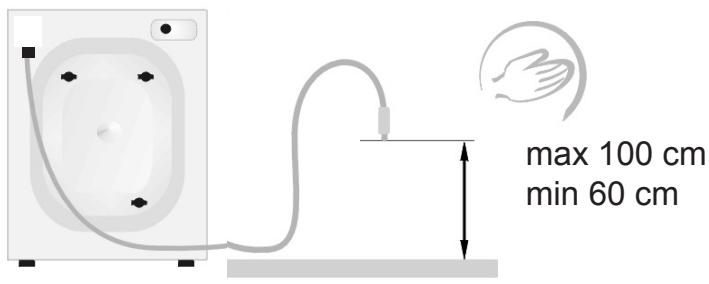
| Simultaneous intake and draining of water | - Check that the end of the outlet hose is higher than the level of the water in the appliance (the hose should be at a height of 0.6m to 1m). |
| Water outflow problems | - Check the pump filter - Check the outlet lead - Check the height of the outlet hose, which should be 0.6m to 1m from the bottom of the washing machine. |
| Appliance is vibrating | - Check that the transport safety devices have been removed. - Level the appliance - Secure the legs (tighten the nuts). |
| Foam from the detergent drawer | - Reduce the amount of detergent used. - Check the water hardness and amount of detergent used, as well as the type of detergent used in the drum. |
| The operation of the appliance is interrupted before the programme has finished | - Check power supply, water supply and water outlet. |
| Noise caused by operation of the outlet pump after water is removed | - The water has been removed from the drum, but small amounts remain in the pump and outlet lead. Constant operation of the outlet pump causes air to be sucked in leading to the characteristic noise, which does not mean that anything is wrong. |
| Short breaks during the wash cycle | - The water in the appliance is being automatically refilled. - Pause caused by removal of excess foam. |
The fault indicator lights
The washing machine has a system of CODES shown on the display, which helps to locate minor operating faults and identify their cause.
Fault is indicated by the symbols:
| Display indication | Reason | Solution |
| E02 | Low pressure, no water in the machine | Unscrew the water valve, check the water inlet hose and filter, check the water pressure. |
| E03 | Improper water outflow | Make sure that drain hose is not clogged, check the pump and water filter. |
| E01 | Door ajar | Check that the door is locked; check that laundry is not jammed in the door. |
| E04 | Others | Try to restart or contact the SERVICE CENTRE tel. 0844815 8880 / 0818 45 46 46 |

Never clean the product's casing or plastic parts using solvents or strong, abrasive cleaning agents (e.g. washing powders or creams)! Only use delicate liquid cleaning agents and soft
cloths. Do not use sponges.
Clean the pump filter every 20 washes or so.
Neglecting to clean the filter causes difficulties in emptying the machine of water!
I. Cleaning the pump filter
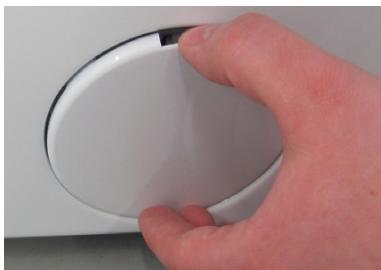
- Unplug the appliance from the mains,
- Turn off the water valve,
- Open the filter cover by hand or using a flat-head screwdriver.
- Unscrew the filter.
- Remove and clean the filter.
To replace the filter following the procedure in reverse order.
II. Cleaning the water supply valve
- Turn on the water supply hose,
- Use forceps to grasp the filter mesh plunger,
- Remove and clean the filter (using a brush).
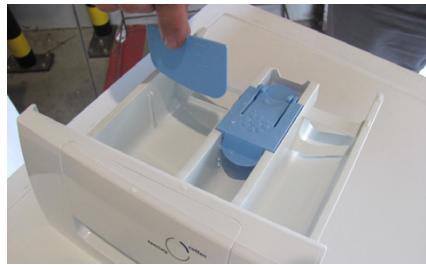
III. Cleaning the detergent drawer (at least once a month).
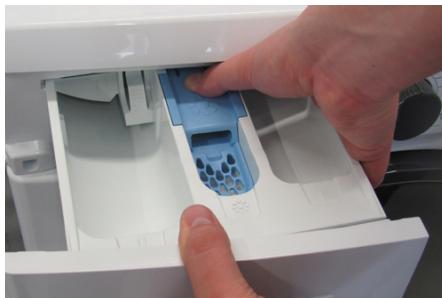
- Remove the drawer (while pressing the stop).
- Clean in running water (or using a Replace the drawer. brush or piece of cloth).
I. Cleaning and purifying agents

It is recommended to use powder or liquid general purpose detergents for all temperatures in a range as per the detergent Producer's recommendations indicated on the product packaging.
Detergents
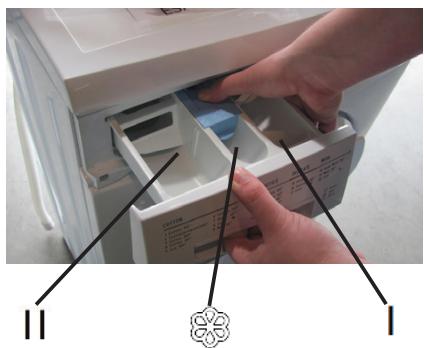
- Pour the detergent into the drawer compartment marked
- Pour the pre-wash detergent into the drawer compartment marked I
Liquid detergents
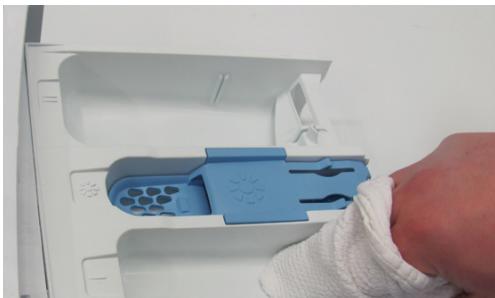
- Install the supplied partition in the compartment figure below).
- Pour liquid detergent into the drawer compartment marked
Fabric softeners added to the rinse
- Pour the fabric softener into the drawer compartment marked
- Do not exceed the maximum level marked on the drawer compartment. This detergent will be used for the final rinse.
II. First wash

Before washing for the first time, put it through one high temperature cycle without a load, according to the following procedure:
- Connect the washing machine to the electricity mains
- Turn on the water valve
- Set the programme selector knob to high temperature wash.
- Add the appropriate detergent and press the [Start/ Pause] button.
III. Soil

Stubborn stains
Before washing garments, apply an additional stain remover according to the instructions for use
Heavily soiled:
One-off washing of smaller amounts of clothes
- Add more detergent
- After washing heavily soiled clothes (e.g. working clothes) or garments which are shedding fibres, it is recommended that the washing machine is rinsed out by running a programme cycle at a temperature of 60^ , e.g. COTTON, without a load. Lightly soiled:
- See pt. "Conservation".
IV. Conservation

Reducing energy and water consumption
Garments which are only lightly soiled should be washed using the appropriate wash programme, i.e. ULTRA SHORT The washing machine detects partial load. For partial load, when using the Towels and Cotton programmes, washing machine will reduce water and energy consumption and shorten the wash cycle.
V. Water hardness

Hard water causes sediment to form.
Information about water hardness is available from your nearest water works.
It is advised that water softeners are used for every wash.
VI. Power cut
(programme memory)

Power cuts or unplugging the machine does not cancel the setting. This has been memorised and the cycle will continue once the power is restored. Do not open the doors of the washing machine during a power cut.
VII. Loading

Maximum drum capacity 7 kg:
Load the washing into the drum according to the following instructions:
- cotton, denim, children's clothes – max full drum (do not force clothes into the drum as this will reduce the quality of the wash!).
- synthetics - max 1/2 drum
- wool, silk, delicate fabrics - max. approx. 1/3 of the drum.
Important! Do not overload the machine! Overloading the machine may cause damage to the clothes being washed!
The maximum load amounts depending on the program are given in table of programs.
VIII. Even load distribution cont

The electronic control device includes a load distribution control system. In the event that the system detects uneven distribution of load in the drum, the washing machine will try to relocate it. Sometimes the trials will not be sufficient for the proper location of the clothes (in the case of frote dressing gowns washed with other types of clothes, ball-shaped sheets which closes several objects inside it). The system may react in the following way:
- it may accept the uneven distribution of clothes but will decrease the spin speed
- it may not allow spinning as the clothes are distributed unevenly.)
In both cases, after the wash is over, open the door of the washing machine, place the laundry manually, close the door and select the spin programme again.
IX. Door interlock

The washing machine is equipped with an interlock which prevents the door from being opened during washing. Once a washing cycle is complete, the door interlock is automatically released. In order to open the door during the wash program, press PAUSE button and wait to unlock the door.
IMPORTANT! If the temperature inside the drum is high, the door may remain blocked until the water temperature has dropped below 60^ .
IMPORTANT! Before opening the door of the washing machine check whether there is water in the drum.
X. Delicate fabrics

Programme:
- Select the appropriate wash programme (WOOL, HAND WASH)
Loading:
Do not overload the machine, max 1/3 of the drum, see Loading.
XI. Dosing

According to the cleaning agent manufacturer's instructions. Too little cleaning agent
The washing turns grey.
- Lumps of grease form, sediment builds up.
Too much cleaning agent
Strong foaming.
- Ineffective washing, detergent incompletely rinsed from fabrics.
| -Type | AWI714S |
| -Rated voltage | 220-240V / ~50Hz. |
| -Rated power | 2200 W |
| -Current protection | 10 A |
| -Drum capacity | max 7 kg |
| -Water pressure | min 0,1 MPa (1 bar) |
| max 1 MPa (10 bar) | |
| -Dimensions/Height/Breadth/Depth | 845 / 597 / 527 [mm] |
| -Weight | 71 kg |
| -Meets the requirements of EU legislation, | EN 60456 |
| standard. |
Testing for label information in accordance with EN 60456 using the standard cotton wash programmes:
- Cotton 60^ at full load
- Cotton 60^ at partial load
-
Cotton 40^ C at partial load
-
average annual water consumption is 10337 litres,
- weighted average electricity consumption is 195 kWh/year
Amica

Service Help Line
For the UK: please call
0844 815 8880
For Ireland: please call
0818 46 46 46
Pursuant to a Delegated Regulation of the Commission (EU) No. 1061/2010 of 28 September 2010 supplementing the Directive of the European Parliament and of the Council 2010/30/EU on the energy labelling of household washing machines and Regulation of the Commission (EU) No. 1015/2010 of 10 November 2010 on the implementation of the Directive of the European Parliament and of the Council No. 2009/125/EC on the Eco design requirements for the household washing machines).
| Supplier's name or trade mark | Amica Wronki S.A. |
| Type | AWI714S |
| Rated capacity | 7,0 kg |
| Energy efficiency class\(^{1)2)}\) | A++ |
| Weighted annual energy consumptio AE\(_{\text{c}}^{3)}\) | 195 kWh/year |
| Energy consumption of the standard cotton programme: | |
| - 60°C at full load Et,60 | 1,06 kWh |
| - 60°C at partial load Et,601/2 | 0,69 kWh |
| - 40°C at full load Et,401/2 | 0,63 kWh |
| Power consumption of the off-mode Po | 0,5 W |
| Power consumption of the left-on mode Pi | 1,0 W |
| Weighted annual water consumption AW\(_{\text{C}}^{4)}\) | 10337 I |
| Water consumption of the standard cotton programme: | |
| - at 60°C, full load Wt,60 | 50 I |
| - at 60°C, half load Wt,601/2 | 45 I |
| - at 40°C, half load Wt,401/2 | 45 I |
| Spin-drying efficiency class\(^{2)}\) | B |
| Residual humidity D | 53 % |
| Maximum spin speed attained\(^{2)}\) | 1400 rev / min |
| Duration of the standard 60°C cotton programme at full and partial load | 205 min |
| Duration of the standard 60°C cotton programme at partial load | 165 min |
| Duration of the standard 40°C cotton programme at partial load | 160 min |
| Noise Level: | |
| - during the wash cycle | 58 dB(A) re 1 pW |
| - during the spin cycle | 79 dB(A) re 1 pW |
| Equipment designed for fitting | No |
1) Energy efficiency class on a scale from A+++ (more efficient) to D (less efficient).
2) For a standard Cottons 60^ and 40^ intensive wash programme at full and partial load.
3) Estimated weighted annual energy consumption based on 220 standard wash cycles for Cottons 60^ and 40^ intensive wash programmes at full and partial load and energy consumption in power saving modes. Actual energy consumption depends on how the appliance is used.
4) Estimated weighted annual water consumption based on 220 standard wash cycles for Cottons 60^ and 40^ intensive wash programmes at full and partial load. Actual water consumption depends on how the appliance is used.
Amica

Service Help Line
For the UK: please call 0844 815 8880
For Ireland: please call 0818 46 46 46
- INSTRUCTION MANUAL
- WASHING MACHINE
- Important!
- Use
- Manufacturer's Declaration
- Checking stability
- DISPOSAL OF THE APPLIANCE
- Positioning and levelling the machine
- Connecting the water supply
- Water drain
- Connecting the electric power supply
- DESCRIPTION OF THE APPLIANCE
- Programme selector knob
- Display
- Child Lock
- Temperature selector button
- Spin speed button
- Delay Start button L
- Rapid Wash button
- START/PAUSE button
- 5+6. Child Lock
- Allergy Safe programme:
- Daily 60':
- Shirts programme:
- Quick Wash 15':
- Eco 20° C :
- Select Programme
- Start delay setting
- End of the wash cycle
- Cancelling and changing programme
- The fault indicator lights
- Cleaning the pump filter
- Cleaning the water supply valve
- Cleaning the detergent drawer (at least once a month).
- Cleaning and purifying agents
- Detergents
- Liquid detergents
- Fabric softeners added to the rinse
- First wash
- Soil
- Stubborn stains
- Conservation
- Reducing energy and water consumption
- Water hardness
- Power cut
- Loading
- Even load distribution cont
- Amica
- Service Help Line
Marque : AMICA
Modèle : WA14642W - WA14655W - WA14656W - WA14657W - WA14662W - WTA14305W
Catégorie : Lave-linge