
HAPPY II - Téléphone mobile OLYMPIA - Notice d'utilisation et mode d'emploi gratuit
Retrouvez gratuitement la notice de l'appareil HAPPY II OLYMPIA au format PDF.
| Type d'appareil | Téléphone mobile à clapet |
| Écran | Écran couleur, taille moyenne |
| Clavier | Clavier physique avec touches numériques |
| Connectivité | 2G/3G (non précisé) |
| Appareil photo | Non précisé |
| Autonomie | Autonomie standard pour téléphone à clapet |
| Radio FM | Non précisé |
| Bluetooth | Non précisé |
| Dimensions | Compact, facile à transporter |
| Poids | Léger |
| Langues supportées | Multilingue |
| Carte mémoire | Non précisé |
| Fonctions supplémentaires | Non précisé |
| Type de batterie | Rechargeable, amovible |
| Interface utilisateur | Menu simple et intuitif |
FOIRE AUX QUESTIONS - HAPPY II OLYMPIA
Questions des utilisateurs sur HAPPY II OLYMPIA
0 question sur cet appareil. Repondez a celles que vous connaissez ou posez la votre.
Poser une nouvelle question sur cet appareil
Téléchargez la notice de votre Téléphone mobile au format PDF gratuitement ! Retrouvez votre notice HAPPY II - OLYMPIA et reprennez votre appareil électronique en main. Sur cette page sont publiés tous les documents nécessaires à l'utilisation de votre appareil HAPPY II de la marque OLYMPIA.
MODE D'EMPLOI HAPPY II OLYMPIA
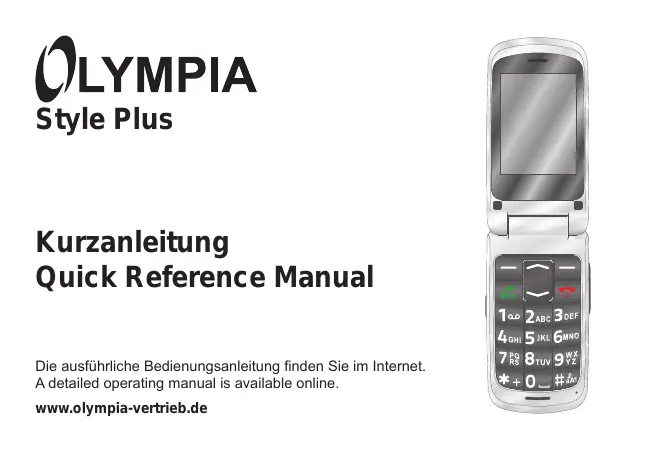
Kurzanleitung Quick Reference Manual
Die ausfuhrliche Bedienungsanleitung finds Sie im Internet. A detailed operating manual is available online.
www.olympia-vertrieb.de

Inhalt
Sicherheitshinweise 3
Erste Schritte 7
Ubersicht 8
Verpackungsinhalt. 10
Mobiltelefon bedienen. 17
SOS-Taste (Notruf-Funktion) 24
Technische Eigenschaften 27
Entsorgung 28
Garantie 29
Konformitätserklarung 30
Pflegehinweise. 30
Sicherheitshinweise
Bewahren Sie sich vor körperlichen Schäden und beachten Sie die Hinweise!

WARNING! Es besteht die Gefahr eines elektrischen Schlags!
Niemals selbst das Mobiltelefon oder Komponenten öffnen oder reparieren. Niemals blanke Kontakte mit metallischen Gegenständen berühren. Niemals mit nassen Händen den Ladeadapter stecken oder losen.

WARNING! Es besteht Erstickungsgefahr! Von Kindern fernhalten! Halten Sie Verpackungs- und Schutzfolien sowie Akkus von Kindern fern. Bewahren Sie das Mobiletelefon und Zubehör außerhalb der Reichweite von Kindern auf. Kleinkinder können Kleinteile oder Akkus verschlucken. Falls ein Akku verschluckt wird, ist umgehend ein Arzt aufzusuchen.

VORSICHT! Explosionsgefahr durch unsachgemäßes Austauschen oder Entnahmen des Akkus! Ersetzen Sie den Akku nur durch einen vom Hersteller freiigegebenen Typ und entsorgen Sie den Akku fachgerecht.

VORSICHT! Entfernen Sie den Akku nicht, während das Mobiltelefon geladen wird. Das Mobiltelefon kann dadurch beschadigt werden. Entfernen Sie das Ladekabel von ihrem Mobiltelefon, bevor Sie den Akku austauschen oder enthalten.

VORSICHT! Verletzungsgefahr für die Netzhaut. Die LED der Taschenlampe ist sehr hell und kann ihre Augen schädigen. Blichen Sie nicht direkt in die LED der Taschenlampe, wenn die Taschenlampe eingeschaltet ist.

VORSICHT! Reduzieren Sie die Belastung durch Funkwellen. Verwenden Sie bei längeren Telefonaten ein passendes Headset. Bewahren Sie das Mobiletelefon nicht in Kopfnähe auf.

VORSICHT! Der Rufton wird über den Laufsprecher wiedergegeben. Nehmen Sie zuerst den Anruf an und halten Sie dann das Mobiletelefon an Ihr Ohr. So vermeiden Sie eine eventuelle Schädigung des Gehörs.

WICHTIG! Verwenden Sie das Mobiletelefon nicht in verbotenen Bereichen! Verbotene Bereiche können z. B. Krankenhäuser, Tankstellen, Flugzeuge u. ä. sein. Befolgen Sie die örtlichen Vorschriften!

WICHTIG! Bei der Absicherung für Notfälle nicht allein auf das Mobiltelefon verlassen! Aus technischen Gründen ist es nicht möglich, in jeder Situation sichere Verbindungen zu garantieren.

WICHTIG! Schützen Sie Ihr Gerät gegen Nässe, Staub, Flüssigkeiten, Chemikalien, Dämpfe, Hitze und direkte Sonneninstrahlung. Ihr Mobiltelefon ist nicht wasserdicht, halten Sie es trocken.

WICHTIG! Verwenden Sie ausschließlich das Originalzubehör. Schließen Sie nur vom Hersteller freiigegebenes Zubehör an. Telefonieren während einer Autofahr ist nur unter Beachtung landesspezifischer Regelungen erlaubt.
Erste Schritte

Lesen Sie die Bedienungsanleitung aufmerksam und gehen Sie wie beschreibenben vor. So können Sie alle Funktionen zu ihrer Zufriedenheit nutzen.
Bestimmungsgemäß Verwendung
Dieses Mobiltelefon ist geeignet für die Verwendung innerhalb eines Mobilfunknetzes. Jede andere Verwendung gilt als nicht bestimmungsgemäß. Eigenmächtige Veränderungen oder Umbauten sind nicht zulässig. Öffnen Sie das Gerät in keinem Fall selbst und führen Sie keine eigenen Reparaturversuche durch.
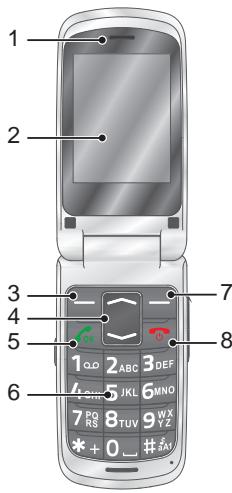
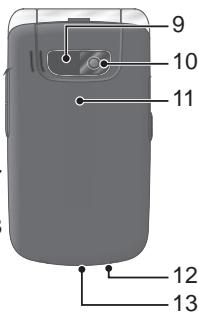
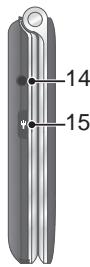
Übersicht
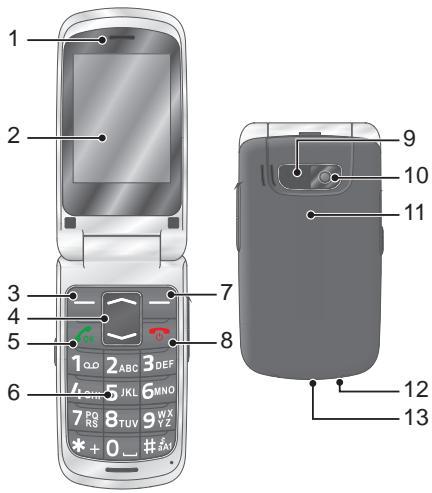
Die nebenstehende Abbildung zeigt Ohnen Ihr Mobilitelefon im Detail. Machen Sie sich mit allen Bedienelementen vertraut, bevor Sie Ihr Mobilitelefon in Betriebnehmen.
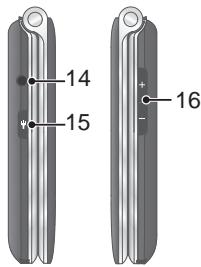
| 1 | Lautsprecher | 9 | SOS-Taste (Notruf-Funktion) |
| 2 | Display | 10 | Kamera |
| 3 | Softkey links | 11 | Akkufachabdeckung |
| 4 | Navigations-Taste | 12 | Taschenlampe (LED) |
| 5 | Taste Annehmen | 13 | microUSB-Anschlussbuchse |
| 6 | Tastatur | 14 | Kopfhörer-Anschlussbuchse |
| 7 | Softkey rechts | 15 | Schalter Taschenlampe |
| 8 | Taste Auflegen | 16 | Lautstärke-Tasten |

Verpackungsinhalt
Prüfen Sie den Verpackungsinhalt Ihres Mobiltelefons, bevor Sie Ihr Mobiltelefon in Betriebnehmen. Sollte etwas fehlen oder beschädigt sein, wenden Sie sich an unseren Service.
| Mobiletelefon Style Plus | Ladeschale |
| Akku | USB-Anschlusskabel |
| Ladeadapter | Kurzanleitung |
SIM-Karte einlagen
Bevor Sie Ihr Mobiltelefon verwenden können, müssen Sie ihre SIM-Karte (nicht im Lieferumfang enthalten) in Ihr Mobiltelefon einlagen. Verwenden Sie nur SIM-Karten im abgebildeten Format (Mini-SIM). Bereits ausgebrochene micro- oder nano-SIM-Karten können zu Kontaktproblemen oder Funktionsausfallen führen. Wenn Sie eine micro- oder nano-SIM-Karte verwenden möchten, bestehtigen Sie einen entsprechenden Adapter.
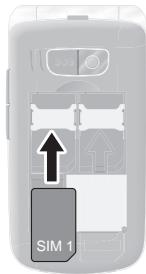
1 Nehmen Sie die Akkufachabdeckung ab. Nutzen Sie damit die Aussparung an der unteren Seite der Akkufachabdeckung.
2 Setzen Sie ihre SIM-Karte in den Steckplatz SIM 1 ein. Achten Sie darüber auf die Ausrichtung der SIM-Karte.
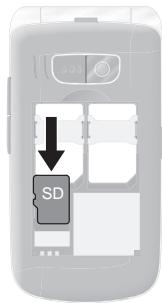
microSD-Speicherkarte einlagen
Wenn Sie den Speicher Ihres Mobiltelefons erweitern möchten, können Sie eine microSD-Speicherkarte (nicht im Lieferumfang enthalten) mit bis zu 8 GB Speicher in Ihr Mobiltelefon einlagen. Eine microSD-Speicherkarte benötigen Sie bspw., wenn Sie die Kamera verwenden möchten.
1 Legen Sie die microSD-Speicherkarte wie abgebildet mit den Kontakten nach unter in das Fach ein. Achten Sie darauf auf die Ausrichtung der microSD-Speicherkarte.
Akku einlagen
Bevor Sie Ihr Mobilitelefon verwenden können,
legen Sie den mitgelieferten Akku in Ihr Mobilitelefon ein.
1 Legen Sie den Akku wie abgebildet ein. Achten Sie darauf auf die Ausrichtung des Akkus.
2 Setzen Sie die Akkufachabdeckung auf. Die Akkufachabdeckung rastet hörbar ein.


VORSICHT! Entfern den Akku nicht, während das Mobilitefon geladen wird. Entfern den das Ladekabel von ihrem Mobilitefon, bevor Sie den Akku austauschen oder entnahmen.
Akku auflagen
1 Schließen Sie das Netzeil des Ladeadapters an eine ordnungsgemäß installierte Steckdose an.
2 Schließen Sie den microUSB-Stecker an die microUSB-Anschlussbuchse Ihres Mobiltelefons an. Der microUSB-Stecker ist verpolungssicher.

VORSICHT! Entfernen Sie den Akku nicht, während das Mobiltelefon geladen wird. Entfernen Sie das Ladekabel von Ihrrem Mobiltelefon, bevor Sie den Akku austauschen oder entnahmen.
3 Wenn der Akku Ihres Telefons vollständig geladen ist, trennen Sie die Verbindung zur Stromversorgung. So konnen Sie ihren Stromverbrauch reduzieren.

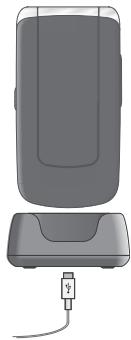
Akku aufladen mit Ladeschale
1 Schließen Sie das Netzteil des Ladeadapters an eine ordnungsgemäß installierte Steckdose an.
2 Schließen Sie den microUSB-Stecker an die microUSB-Anschlussbuchse der Ladeschale an. Der microUSB-Stecker ist verpolungssicher.
3 Stellen Sie das Mobiltelefon in die Ladeschale.

VORSICHT! Entfernen Sie den Akku nicht, während das Mobiltelefon geladen wird. Entfernen Sie das Ladekabel von Ihr dem Mobiltelefon, bevor Sie den Akku austauschen oder entnahmen.
4 Wenn der Akku Ihres Telefons vollständig geladen ist, trennen Sie die Verbindung zur Stromversorgung. So können Sie ihren Stromverbrauch reduzieren.
Mobiletelefon einschalten
Drücken Sie die Taste Auflegen für 3 Sekunden. Ihr Mobiletelefon wird eingeschaltet. Nach kurzer Zeit zeigt das Display den Startbildschirm.

Mobiltelefon ausschalten
Drücken Sie die Taste Auflegen für 3 Sekunden. Ihr Mobiletelefon wird ausgeschaltet. Das Display erlischt.

Wenn Ihr Mobittelefon ausgeschaltet ist, können Sie die Notruf-Funktion (über die SOS-Taste Ihres Mobittelefons) nicht nutzen.
Mobilefon bedieren
Navigieren Sie mit den folgenden Tasten durch das Menu Ihr's Mobiltelefons. Einige Tasten haben je nach Menu eine doppelte Belegung. Detaillierte Informationen erhalten Sie in der ausfuhrlichen Bedienungsanleitung unter www.olympia-vertrieb.de

Navigieren Sie im Menu nach oben oder unter. Auf dem Startbildschirm: Telefonbuch öffnen bzw. Kamera starten.

Verwerfen Sie Einstellungen oder navigieren Sie eine Menüebene zurück. Auf dem Startbildschirm: Bildwahl öffnen.

Öffnen Sie ein Untermenü oder bestätigten Sie ihre Eingaben.
Wenn Sie Anrufe annehmen, beenden oder abweisen möchten, verwenden Sie dazu die folgenden Tasten:

Nehmen Sie einen eingehenden Anruf an oder beginnene Sie ein Geschäft.

Beenden Sie ein laufendes Geschrech.

Weisen Sie einen eingehenden Anruf ab.
Wenn Sie Rufnummern bzw. Ziffern eingeben oder Eingabenlöschen möchten, verwenden Sie dazu die folgenden Tasten:

Löschen Sie
Eingaben.

Geben Sie Ziffern bzw. Buchstaben ein.
Die Bedienelemente an der Seite bzw. an der Unterseite Ihres Telefons haben die folgenden Funktionen:

Lösen Sie einen Notruf an gespeicherte Rufnummern aus.

Schalten Sie die Taschenlampe Ihr's Mobiletelefons ein bzw. aus.
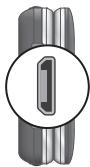
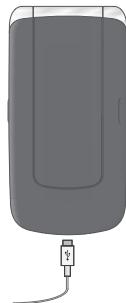
Laden Sie den Akku Ihres Mobiltelefons bzw. stellen Sie eine Verbindung zu einem Computer her.

Verbinden Sie Kopfhörer, bspw. für das Radiohoren oder das Telefonieren, während einer Autofahrt.
Die wichtigen Funktionen im Überblick
In den folgenden Bedienschritten sehen Sie eingerahmte Texte. Diese Rahmen symbolisieren Texte, die Sie im Display Ihres Mobittelefons sehen.
Sprache einstellen
1 Drucken Sie den linken Softkey, um das Hauptmenu zu öffnen.
2 Navigieren Sie zum Menüpunkt [Einstellungen] [Telefon] [Sprache].
3 Wahlen Sie Ihr Speache aus.
Uhrzeit und Datum einstellen
1 Drucken Sie den linken Softkey, um das Hauptmenu zu öffnen.
2 Navigieren Sie zum Menüpunkt [Einstellungen] [Telefon]
Uhrzeit und Datum Uhrzeit und Datum einstellen.
3 Geben Sie die aktuelle Uhrzeit und das aktuelle Datum ein.
4 Wahlen Sie [Speichern], um die Einstellung zu übernehmen.
Kontakte zum Telefonbuch hinzufugen
Speichern Sie bis zu 300 Kontakte in Ihr Telefonbuch.
1 Drucken Sie den linken Softkey, um das Hauptmenu zu öffnen.
2 Navigieren Sie zum Menüpunkt Telefonbuch Neuer Kontakt OK.
3 Wahlen Sie einen Speicherort (Zu SIM) bzw. Zum Telefon).
4 Geben Sie den Namen und die Rufnummer ein.
5 Drucken Sie den linken Softkey und wahlen Sie Speichern.
Kontakte aus dem Telefonbuch anrufen
1 Drucken Sie den linken Softkey, um das Hauptmenu zu öffnen.
2 Navigieren Sie zum Menüpunkt [Telefonbuch].
3 Wahlen Sie den gewünschten Kontakt.
4 Drucken Sie die Taste Annehmen. Die Rufnummer wird gewählt.
Bildwahl
Weisen Sie bis zu acht ihrer favorisierten Kontakte Bilder zu. Diese Bilder werden im Bildwahl-MENU angezeigt. Durch Auswahlen dieser Bilder wird die dem Kontakt zugeordnete Rufnummer angerufen. Detallierte Informationen erhalten Sie in der ausfuhrlichen Bedienungsanleitung unter www.olympia-vertrieb.de.
Kontakte zur Bildwahl hinzufugen
1 Drücken Sie den rechten Softkey, um das Menu der Bildwahl zu öffnen.
2 Wahlen Sie einen beliebigen Eintrag und bestätigten Sie die Abfrage mit [Ja].
3 Wahlen Sie einen Eintrag aus Ihr Telefonbuch und bestätigten Sie ihre Einstellungen mit OK.
Uber Bildwahl anrufen
1 Drücken Sie den rechten Softkey, um das Menu der Bildwahl zu öffnen.
2 Wahlen Sie den gewünschten Bildwahl-Kontakt.
3 Drucken Sie den linken Softkey und wahlen Sie Anrufen.
Bild zu Bildwahl-Kontakt hinzufugen
Wenn Sie einem Bildwahl-Kontakt ein Bild hinzufugen möchten, können Sie entweder die Kamera Ihres Mobiltelefons verwenden oder ein Bild von Ihr dem Computer auf Ihr Mobiltelefon übertragen. Dafür benötigen Sie eine microSD-Speicherkarte.
1 Drücken Sie den rechten Softkey, um das Menu der Bildwahl zu öffnen.
2 Wahlen Sie den gewünschten Bildwahl-Kontakt.
3 Drucken Sie den linken Softkey und wahren Sie Bild hinzufugen.
4 Weisen Sie mit dem Datei-Manager ein Bild zu odernehmen Sie ein Foto mit der Kamera Ihrches Mobilitelfons auf.
5 Drücken Sie den linken Softkey und bestätigten Sie ihre Einstellungen mit OK.
SOS-Taste (Notruf-Funktion)
Sie können mit der SOS-Taste auf der Rückseite Ihres Mobittelefons einen Notruf auslösen. Zuerst ertönt ein Alarmsignal. Dann werden Notruf-Kurzmitteilungen an die für diesen Zweck gespeicherten Rufnummern gesendet. Anschließlich werden die gespeicherten Rufnummern im Freisprechmodus nacheinander angerufen.
Speichern Sie bis zu 5 Rufnummern, die Sie der Notruf-Funktion zuweisen möchten. Detaillerte Informationen zur Notruf-Funktion erhalten Sie in der ausfuhrlichen Bedienungsanleitung unter www.olympia-vertrieb.de.
Notruf-Funktion einschalten
1 Drucken Sie den linken Softkey, um das Hauptmenu zu öffnen.
2 Navigieren Sie zum Menüpunkt Einstellungen Notruf-Einstellungen Status.
3 Drucken Sie den linken Softkey und wahlen Sie [Einschalten].
Rufnummer zur Notruf-Funktion hinzufügen
1 Drucken Sie den linken Softkey, um das Hauptmenu zu öffnen.
2 Navigieren Sie zum Menüpunkt Einstellungen Notruf-Einstellungen Notruf-Nummern.

Weisen Sie keine officiellen Notrufnummern zu. Ein Fehlalarm verursacht erhebliche Kosten, die zu ihren Lasten gehen konnen.
3 Wahlen Sie einen freien Speicherplatz und geben Sie die Rufnummer ein bzw. wahlen Sie einen Kontakt aus Ihrtem Telefonbuch.
4 Drücken Sie den linken Softkey und bestätigten Sie ihre Einstellungen mit OK.
Bluetooth
Mit der Bluetooth-Funktion, einem Standard zur Datenübertragung über Funk, konnen Sie beispelseweise einen kompatiblen Kopfhörer kabellos mit Ihr Mobiltelefon verbinden.
Bluetooth einschalten
Schalten Sie die Funktion Bluetooth ein, wenn SieCompatible Geräte mit Ihrer Mobiletelefon mit verbinden möchten.
1 Drucken Sie den linken Softkey, um das Hauptmenu zu öffnen.
2 Navigieren Sie zum Menüpunkt Einstellungen Bluetooth Status.
3 Drücken Sie den linken Softkey und schalten Sie die Funktion Bluetooth Ein.
Detailed Informationen zu Bluetooth erhalten Sie in der ausfuhrlichen Bedienungsanleitung unter www.olympia-vertrieb.de
Technische Eigenschaften
| Frequenzband | GSM 850 / 900 / 1800 / 1900 MHz Quadband |
| Stromversorgung | Eingang: 100 - 240 V, 50 - 60 Hz, 0,3 A, Ausgang: 5 V, 500 mA |
| Akku | 3,7 V, 800 mAh, bis zu 120 h Stand-by, bis zu 4 h Geschäftsdauer, max. 2 h Ladedauer |
| Display | 2,4" LCD mit Hintergrundbeleuchtung |
| Abmessungen | ca. 97 x 50 x 17 mm |
| Gewicht | ca. 90 g inkl. Akku |
| Umgebungs-bedingungen | -10 °C bis 40 °C bei 30 % bis 75 % Luftfeuchte |
| Anschlüsse | microUSB, 3,5-mm-Klinkenbuchse |
| Dual-SIM | ja, 2 SIM-Karten maximal |
| Extras | Radio, Kamera, Bluetooth |
Entsorgung

Wollen Sie Ihr Gerät entsorgen, bringen Sie Ihr Gerät zur Sammelstelle IhresCOMMUNALEN Entsorgungsträgers (z. B. Wertstoffhof). Nach dem Elektro- und Elektronikgerätegesetz sind Besitzer von Altgeräten gesetzlich verpflichtet, alte
Elektro- und Elektronikgeräte einer getrennten Abfallerfassung zuzuführen. Das Symbol bedeutet, dass Sie das Gerät auf keinen Fall in den Hausmüll werfen dürfen! Gefährung von Gesundheit und Umwelt durch Akkus! Akkus nie öffnen, beschädigen, verschlucken oder in die Umwelt gelangen{lassen. Akkus konnen giftige und umweltschädliche Schwermetalle enthalten. Sie sind gesetzlich verpflichtet, Akkus beim batterievertreibenden Handel bzw. über die vom zuständigen Entsorgungssträger bereitgestelltten Sammelstellen zu entsorgen. Die Entsorgung ist unentgeltlich.

Verpackungsmaterialien entsorgen Sie entsprechend den lokalen Vorschriften.
Garantie
Die Garantiezeit beträgt 24 Monate. Die Garantiezeit beginnt ab Kaufdatum.itte bewahren Sie den Kaufbeleg und die Originalverpackung auf.Sollte ein Problem auftreten, besuchen Sie unser Retouren-Portal (RMA) im Bereich Support auf unserer Internetseite www.olympia-vertrieb.de
Bei weiteren Fragen steht Ihnen unsere Hotline unter der Nummer 01805007514 (Kosten aus dem dt. Festnetz bei Drucklegung: 14 ct/Min., mobil maximal 42 ct/Min.) zur Verfügung.
Ohre Olympia Business Systems Vertriebs GmbH
Zum Kraftwerk 1
45527 Hattingen
Konformitätserklarung
Hiermit erklart die Olympia Business Systems Vertriebs GmbH, Zum Kraftwerk 1, 45527 Hattingen, dass sich theses Gerät in Übereinstimmung mit den grundlegenden Anforderungen und den anderen relevanten Vorschriften der Richtlinie 1999/5/EG befindet.
CE Das CE-Kennzeichen auf den Geräten bestätigt die Konformität. Die Konformitätserklärung zu diesersem Produkt finden Sie unter www.olympia-vertrieb.de
Pflegehinweise
Reinigen Sie die Gehäuseoberflächen mit einem weichen und fusselfreien Tuch. Verwenden Sie keine Reinigungs- oder Lösungsmittel.
Safety Instructions 32
General View 36
First Steps 38
Package Contents 38
Operating the Mobile Phone. 45
SOS Key (Emergency Call Function). 52
Technical Properties 55
Disposal 56
Guarantee. 57
Care Instructions. 57
Declaration of Conformity 58
Safety Instructions
Avoid any personal injury by paying attention to the following information!

WARNING! Risk of electric shock! Never attempt to open and repair the mobile phone or accessories yourself. Never touch bare contacts with metallic objects. Never plug-in or unplug the charging adapter when your hands are wet.

WARNING! Risk of suffocation! Keep out of reach of children! Keep packaging materials and protective foils as well as batteries out of reach of children. Keep the mobile phone and any accessories out of reach of children. Small children can swallow small parts or batteries. If a battery is swallowed, contact medical assistance immediately.

CAUTION! Risk of explosion through improper replacement or removal of the battery! Only replace the battery by a type approved by the manufacturer and dispose of the battery according to the applicable laws.

CAUTION! Do not remove the battery while the mobile phone is being charged. This could damage the phone. Disconnect the charging cable from the mobile phone before changing or removing the battery.

CAUTION! Risk of injury to the retina. The LED for the torch is very bright and could cause damage to eyes. Never look directly into the LED torch beam when the torch is switched on.

CAUTION! Reduce exposure to radio waves! Use an appropriate headset in the case of longer calls. Do not keep the mobile phone near your head.

CAUTION! The ringing tone is issued via the loudspeaker.
Take an incoming call first and then hold the mobile phone to your ear. This prevents any possible hearing damage.

IMPORTANT! Do not use the phone in prohibited areas! Prohibited areas could include hospitals, petrol stations, aeroplanes, etc. Please observe local regulations!

IMPORTANT! With regard to emergencies, do not rely on the mobile phone alone! For technical reasons, it is not possible to guarantee a reliable connection in every situation.

IMPORTANT! Protect the device from moisture, dust, liquids, chemicals, vapours, heat and direct sunlight. The phone is not waterproof; therefore, keep it dry.

IMPORTANT! Only use original accessories. Only connect accessories approved by the manufacturer. Telephoning while driving is only permitted when the applicable legal regulations are observed.
Intended Use
This mobile phone is designed for use within a mobile phone network. Any other use is considered unintended use. Unauthorized modification or reconstruction is not permitted. Under no circumstances open the device or complete any repair work yourself.
General View
The following illustration shows details of the mobile phone. Familiarise yourself with all the operating elements before starting to use the mobile phone.
| 1 | Loudspeaker | 9 | SOS key (emergency call function) |
| 2 | Display | 10 | Camera |
| 3 | Softkey, left | 11 | Battery compartment cover |
| 4 | Navigation key | 12 | Torch lamp (LED) |
| 5 | Call key | 13 | MicroUSB connection port |
| 6 | Keypad | 14 | Headphone connection port |
| 7 | Softkey, right | 15 | Torch switch |
| 8 | On-hook key | 16 | Volume buttons |
| 36 |
First Steps

Read the instruction manual carefully and proceed as described. This will enable you to use all the functions to your full satisfaction.
Package Contents
Before starting up the mobile phone, check the package contents. If anything is missing or damaged, please contact our Service department.
Style Plus mobile phone
Battery
Charging adapter
Charging cradle
USB connection cable
Quick reference manual
Inserting the SIM Card
Before you can start to use the mobile phone, you must insert your SIM card (not included in the equipment supplied) in the phone. Only use SIM cards of the size illustrated (mini SIM). Micro or nano cards which have already been broken out can cause contact problems or malfunctions. If you want to use a micro or nano SIM card, you will need an appropriate adapter.

1 Remove the battery compartment cover. Use the recess at the bottom of the battery compartment cover.
2 Insert the SIM card in the slot labelled SIM 1.
Ensure the SIM card is aligned correctly.
Inserting the MicroSD Memory Card
If you want to increase the memory capacity of the mobile phone, you can insert a microSD memory card (not included in the equipment supplied) with a memory of up to 8 GB in the mobile phone.
A microSD memory card is necessary, for instance, when you want to use the camera.
1 Lay the microSD memory card with the contacts facing down in the compartment, as illustrated. Ensure the microSD memory card is aligned correctly.

Inserting the Battery
Before you can use the mobile phone, you must insert the battery supplied in the mobile phone.
1 Insert the battery as illustrated. Pay attention the battery is aligned correctly.
2 Replace the battery compartment cover. The battery compartment cover latches audibly into place.


CAUTION! Do not remove the battery
while the mobile phone is being charged. Disconnect the charging cable from the mobile phone before changing or removing the battery.
Charging the Battery
1 Connect the power adapter plug on the charging adapter to a properly installed power socket.
2 Connect the microUSB plug to the microUSB connection port on the mobile phone. The microUSB plug is protected against reverse polarity.

CAUTION! Do not remove the battery while the mobile phone is being charged. Disconnect the charging cable from the mobile phone before changing or removing the battery.
3 When the phone battery is fully charged, disconnect the connection to the power supply. This reduces power consumption.
Charging the Battery, Charging Cradle
1 Connect the power adapter plug on the charging adapter to a properly installed power socket.
2 Connect the microUSB plug to the microUSB connection port on the charging cradle. The microUSB plug is protected against reverse polarity.
3 Place the mobile phone in the charging cradle.

CAUTION! Do not remove the battery while the mobile phone is being charged. Disconnect the charging cable from the mobile phone before changing or removing the battery.
4 When the phone battery is fully charged, disconnect the connection to the power supply. This reduces power consumption. 43

Switching On the Mobile Phone
Press the On-hook key for 3 seconds. The mobile phone is switched on. The start screen appears in the display after a short time.

Switching Off the Mobile Phone
Press the On-hook key for 3 seconds. The mobile phone is switched off. The display goes out.

When the mobile phone is switched off, you cannot use the emergency call function (via the SOS key on the mobile phone).
Operating the Mobile Phone
Use the following keys to navigate through the menus provided by the mobile phone. Some keys are assigned two functions depending on the menu. Further information is available online in the detailed operating manual at www.olympia-vertrieb.de

Navigate up or down in the menu. When the start screen is displayed: Open the phone book or start the camera.

Discard the settings or navigate one menu level back.
On the start screen: Open the Caller Picture menu.

Open a submenu or confirm your entries.
When you want to take, end or reject calls, use the following keys:

Take an incoming call or begin a conversation.

End a call in progress.

Reject an incoming call.
When you want to enter phone numbers and digits or delete entries, use the following keys:

Delete entries.

Enter digits and letters.
The operating elements on the sides or rear of the phone are assigned the following functions:

Trigger an emergency call to the stored phone numbers.

Switch the torch integrated in the phone on and off.

Charge the mobile phone battery or establish a connection to a computer.

Connect the headphones, e.g. to listen to the radio or use the phone while driving a car.
Overview of the Most Important Functions
Framed texts are provided in the following operating steps. These frames indicate texts which can appear in the display of the mobile phone.
Setting the Language
1 Press the left-hand softkey to open the main menu.
2 Navigate to the Settings Phone settings Language menu option.
3 Select the required language.
Setting the Time and Date
1 Press the left-hand softmax to open the main menu.
2 Navigate to the Settings Phone settings Time and date Set time/date menu option.
3 Enter the current time and date.
4 Select Save to activate the setting.
Adding a Contact to the Phone Book
You can store up to 300 contacts in the phone book.
1 Press the left-hand softkey to open the main menu.
2 Navigate to the Phonebook Add new contact Select menu option.
3 Select a storage location (To SIM or To phone).
4 Enter the name and phone number.
5 Press the left-hand softkey and select Save.
Dialling Contacts from the Phone Book
1 Press the left-hand softkey to open the main menu.
2 Navigate to the Phonebook menu option.
3 Select the required contact.
4 Press the Call key. The number is dialled.
Dialling Caller Picture Contacts
You can assign a picture to each of your eight favourite contacts.
These pictures are displayed in the Caller Picture menu. On selecting a picture, the phone number of the contact assigned to the picture is dialled. Further information is available online in the detailed operating manual at www.olympia-vertrieb.de.
Adding Contacts to the Caller Picture Menu
1 Press the right-hand softmax to open the Caller Picture menu.
2 Select the entry you require and confirm it by answering the prompt with Yes.
3 Select a contact from the phone book and confirm your settings by selecting OK.
Dialling Via the Caller Picture Menu
1 Press the right-hand softmax to open the Caller Picture menu.
2 Select the required picture contact.
3 Press the left-hand softkey and select Call.
Adding a Picture to the Caller Picture Contacts
When you want to assign a picture to a contact, you can either use the camera integrated in the mobile phone or transfer a picture stored on your computer to the mobile phone. In this case, you need a microSD memory card.
1 Press the right-hand softmax to open the Caller Picture menu.
2 Select the required picture contact.
3 Press the left-hand softkey and select Set picture.
4 Use the File Manager to assign a picture or take a photo with the camera integrated in the mobile phone.
5 Press the left-hand softkey and confirm your settings by selecting OK.
SOS Key (Emergency Call Function)
You can initiate an emergency call by using the SOS key on the rear of the mobile phone. An alarm signal is issued first of all. Then the SOS text message is sent to the phone numbers saved for this purpose. After that, the respective phone numbers stored are dialled in succession in Handsfree mode. You can store up to 5 phone numbers which can be assigned to the emergency call function. Further information on the SOS function is available online in the detailed operating manual at www.olympia-vertrieb.de.
Activating the Emergency Call Function
1 Press the left-hand softkey to open the main menu.
2 Navigate to the Settings SOS settings Switch menu option.
3 Press the left-hand softmax and select Activate.
Adding a Phone Number to the SOS Function
1 Press the left-hand softmax to open the main menu.
2 Navigate to the Settings SOS settings Switch menu option.

Do not assign any official emergency call service numbers. A false alarm can lead to considerable costs which could be charged to you.
3 Select a free storage location and enter the required phone number or select a contact from the phone book.
4 Press the left-hand softkey and confirm your settings by selecting OK.
Bluetooth
The Bluetooth function, a standard for data transfer via wireless communication systems, can be used to connect a compatible headphone to the mobile phone without the need for any cables.
Activating Bluetooth
Switch the Bluetooth function on when you want to connect compatible devices to your mobile phone.
1 Press the left-hand softkey to open the main menu.
2 Navigate to the Settings Bluetooth Power menu option.
3 Press the left-hand softkey and switch the Bluetooth function on.
Further information on the Bluetooth function is available online in the detailed operating manual at www.olympia-vertrieb.de
Technical Properties
| Frequency band | GSM 850 / 900 / 1800 / 1900 MHz quad band |
| Power supply | Input: 100 - 240 V, 50 - 60 Hz, 0.3 A, Output: 5 V, 500 mA |
| Battery | 3.7 V, 800 mAh, up to 120 h standby, up to 4 h talk time, max. charging time approx. 2 h |
| Display | 2.4" LCD with back-lighting |
| Dimensions | Approx. 97 x 50 x 17 mm |
| Weight | Approx. 90 g incl. battery |
| Ambient conditions | -10 °C to 40 °C at 30% to 75% humidity |
| Connections | MicroUSB, 3.5 mm jack socket |
| Dual SIM | Yes, max. 2 SIM cards |
| Extras | Radio, camera, Bluetooth |
Disposal

In order to dispose of your device, take it to a collection point provided by your local public waste authorities (e.g. recycling centre). According to laws on the disposal of electronic and electrical devices, owners are obliged to dispose of old
electronic and electrical devices in a separate waste container. The symbol indicates that the device must not be disposed of in normal domestic waste! Risk to health and the environment through batteries! Never open, damage or swallow batteries or allow them to pollute the environment. Batteries may contain toxic, ecologically hazardous heavy metals. You are legally obliged to dispose of batteries and power packs at a battery retailer or in the corresponding containers provided at collection points by local public waste authorities. Disposal is free of charge.

Packaging materials must be disposed of according to local regulations.
Guarantee
Dear Customer,
we are pleased that you have chosen this equipment.
In the case of a defect, please return the device together with the receipt and original packing material to the point-of-sale.
Care Instructions
Clean the housing surfaces with a soft, fluff-free cloth. Do not use any solvents or cleaning agents.
Declaration of Conformity
Olympia Business Systems Vertriebs GmbH, Zum Kraftwerk 1, 45527 Hattingen hereby declares that this device in fulfils the basic requirements and other relevant provisions stipulated in the Directive 1999/5/EC.
The CE mark on the devices confirm their conformity. The Declaration of Conformity for this product is available at www.olympia-vertrieb.de
Wir halten uns inhaltliche und technische Änderungen vor.
Subject to change without prior notice.
Art. Nr. 2276 (schwarz), 2277 (rot), 2278 (silber) / Version 2016.10
Art. No. 2276 (black), 2277 (red), 2278 (silver) / Version 2016.10
Detaillierte Informationen zu Ihr dem Mobiltelefon erhalten Sie in der ausfuhrlichen Bedienungsanleitung unter Further information on the mobile phone is availa ble in the detailed operating manual provided online at
www.olympia-vertrieb.de