
WT5019 - Sèche-linge BOMANN - Notice d'utilisation et mode d'emploi gratuit
Retrouvez gratuitement la notice de l'appareil WT5019 BOMANN au format PDF.

| Type de produit | Sèche-linge à évacuation |
| Marque | BOMANN |
| Modèle | WT5019 |
| Capacité de séchage (poids sec max) | 6 kg |
| Dimensions (H x L x P) | 84,0 x 59,5 x 55,5 cm |
| Poids net | 33,0 kg |
| Alimentation électrique | 220-240 V~ / 50 Hz |
| Puissance de raccordement | 2000 W |
| Classe énergétique | C |
| Consommation énergétique annuelle | 452 kWh/an |
| Programme standard | Coton Standard |
| Durée du programme standard (pleine charge) | 120 min |
| Durée du programme standard (charge partielle) | 68 min |
| Niveau sonore | 69 dB(A) |
| Type de séchage | Automatique avec détection d'humidité |
| Fonctions | Programmes automatiques, niveaux de séchage (Extra, Standard, Léger), anti-froissage, sécurité enfants |
| Nettoyage du filtre | Avant ou après chaque cycle |
| Protection contre la surchauffe | Oui (interrupteur de réarmement) |
| Température ambiante de fonctionnement | 5 °C à 35 °C |
| Installation | Libre, avec tuyau d'évacuation fourni |
FOIRE AUX QUESTIONS - WT5019 BOMANN
Questions des utilisateurs sur WT5019 BOMANN
0 question sur cet appareil. Repondez a celles que vous connaissez ou posez la votre.
Poser une nouvelle question sur cet appareil
Téléchargez la notice de votre Sèche-linge au format PDF gratuitement ! Retrouvez votre notice WT5019 - BOMANN et reprennez votre appareil électronique en main. Sur cette page sont publiés tous les documents nécessaires à l'utilisation de votre appareil WT5019 de la marque BOMANN.
MODE D'EMPLOI WT5019 BOMANN
HOUSEHOLD VENTED TUMBLE DRYER WT 5019
Instruction Manual
Contents
Introduction
General Notes
Special safety Information for this Unit
Unpacking the Appliance
Appliance Equipment
Installation
Startup / Operation
Starting a Program
Cleaning and Maintenance
Troubleshooting
Technical Data
Disposal
EU Product Data Sheet
Introduction
Thank you for choosing our product. We hope you will enjoy using the appliance.
Symbols in these Instructions for Use
Important information for your safety is specially marked. It is essential to comply with these instructions to avoid accidents and prevent damage:

WARNING:
This warns you of dangers to your health and indicates possible injury risks.

CAUTION:
This refers to possible hazards to the machine or other objects.

NOTE: This highlights tips and information.
General Notes
Read the operating instructions carefully before putting the appliance into operation and keep the instructions including the warranty and the receipt. If you give this device to other people, also pass on the operating instructions.
I NOTE:
The illustrations can deviate from the original appliance.
- The appliance is designed exclusively for private use and for the envisaged purpose. This appliance is not fit for commercial use.
- The appliance is only to be used as described in the user manual. Do not use the appliance for any other purpose. Any other use is not intended and can result in damages or personal injuries.
- Do not use it outdoors. Keep it away from sources of heat, direct sunlight and humidity.
- Do not operate the appliance without supervision.
- When not in use, for cleaning, user maintenance works or with disruption, switch off the appliance
and disconnect the plug (pull the plug itself, not the lead) or turn off the fuse.
- The appliance and if possible the mains lead have to be checked regularly for signs of damage. If damage is found the appliance must not be used.
- For safety reasons, alterations or modifications of the appliance are prohibited.
- In order to ensure your children's safety, please keep all packaging (plastic bags, boxes, polystyrene etc.) out of their reach.
WARNING:
Do not allow small children to play with the foil. There is a danger of suffocation!
Special safety information for this Unit

WARNING: Hot surface! Danger of burns!
The touchable surfaces may become very hot during operation.

WARNING:
Never switch the appliance off before the end of the drying cycle, unless all washing is taken out quickly and spread out so that the heat can be dissipated.
- The dry weight of laundry must not exceed the max. capacity of 6kg .
- There must be adequate ventilation in order to prevent the recirculation of gases, which are generated by appliances which burns other fuels, including open fires, into the room.
- The extracted air may not be vented into a flue which is used for the waste gas from appliances which burns gas or other fuels.
- The ventilation openings in the appliance base (if existing) may not be clogged / blocked e.g. by carpet.
- Do not place the appliance behind a lockable door, a sliding door, or a door with a hinge that lies opposite the door hinge of the appliance in such a way that it prevents the appliance door from opening fully.
- Observe the "Drying advice" that we give you in the chapter "Startup / Operation".
- The appliance must not be used if industrial chemicals have been used for cleaning.
-
Do not use the appliance without installed filter. Clean the lint filter before or after each use.
-
This appliance can be used by children aged from 8 years and above and persons with reduced physical, sensory or mental capabilities or lack of experience and knowledge if they have been given supervision or instruction concerning use of the appliance in a safe way and understand the hazards involved.
- Children under 3 years should be kept away, unless they are constantly supervised.
- Children shall not play with the appliance.
- Cleaning and user maintenance shall not be made by children, unless they are older than 8 years and are supervised.
- Do not try to repair the appliance on your own. Always contact an authorized technician. If the supply cord is damaged, it must be replaced by the manufacturer, its service agent or similarly qualified persons in order to avoid a hazard.
Unpacking the Appliance
- Remove the appliance from its packaging.
- Remove all packaging material, such as foils, fillers and cardboard packaging.
- To prevent hazards, check the appliance for any transport damage.
- In case of damage, do not put the appliance into operation. Contact your distributor.
NOTE:
Production residue or dust may have collected on the appliance. We recommend cleaning the appliance according to chapter "Cleaning and Maintenance".
Appliance Equipment
Appliance Overview
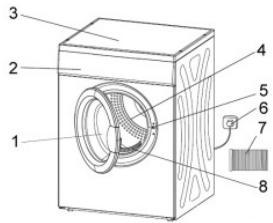
1 Unit door/Bull's-eye
6 Mains plug
2 Control panel
7 Vent hose
3 Appliance top
8 Lint filter
4 Drum
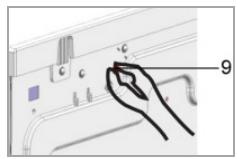
9 Reset switch
5 Door lock
Overheating protection: Reset switch
The appliance has a protection switch at the appliance back which is triggered in the cause of overheating.
The most common cause of overheating is a clogged lint filter and blocked vents.
Once the circuit breaker tripped, the appliance is not heating. Proceed as follows:
- Switch off the appliance,
- wait about 10 minutes before you restart the operation, and after correcting the cause.
- Press the reset switch to turn on the heating power again. You hear a clicking sound.
Delivery scope
Vent hose
Installation

WARNING:
The appliance must not be connected to the mains during installing. Otherwise there is danger to life or electric shock hazard!
Appliance location
- The site should be located near the water inlet and outlet, as well as near a properly grounded power socket.
- Good ventilation around the appliance is required, in order to dissipate the heat properly. Sufficient clearance must be created for this purpose.
- The clearance to the front must be created so, that the appliance door can open without being impeded.
- Make sure that the floor on which the appliance is installed, is even, heat-resistant and clean.
-
Take care of a solid and horizontal position of the appliance. If the appliance is not horizontally leveled, adjust the feet accordingly (see "Adjust the feet").
-
Avoid the installation:
-
near heaters, next to a stove, direct sunlight or any other heat sources;
-
at locations with high humidity (e.g. outdoors), as metal parts would be susceptible to corrosion under such circumstances;
- in rooms where the temperature drops below 5^ C or above 35^ C . Do not expose the appliance any weather.
- near volatile or flammable materials (e.g. gas, fuel, alcohol, paint, etc.).
Adjusting the feet
CAUTION:
The feet must never be removed. Do not restrict the floor clearance through carpets, strips of wood or similar. Danger of heat accumulation!
- Turn the feet to the right to let down the appliance; turn to the left to lift it up. The feet must have solid ground contact.
- Check with a spirit level if the appliance is leveled horizontally. If the appliance is not in balance, the feet must be adjusted again.
Installation of the vent hose
The dryer has an air outlet on the back of the appliance to vent the moist air.
OTE:
The distance between the dryer and the exhaust air opening should be not too large in order to avoid an accumulation of condensate in the tube.
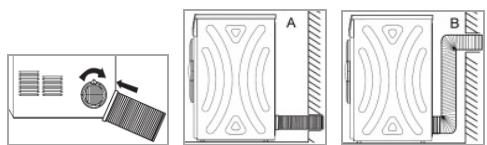
- Attach the accompanying vent hose at the air outlet. Tighten the hose clockwise.
- Lay the vent hose in the manner A or B.
- Connect the vent hose to the exhaust opening (air duct or window).
Electrical connection

WARNING:
- The installation to the mains supply must conform to the local standards and regulations.
- Improper connection may cause an electric shock!
- Do not use multiple sockets or extension cords.
- It is not allowed to modify the plug provided with the appliance! If the plug does not fit properly to the outlet, let install a proper outlet by an authorized specialist.
- The accessibility of the power plug must always be ensured in order to disconnect the device from the power supply in case of an emergency.
-
Make sure that the voltage supply matches the specifications on the rating label before connecting.
-
Connect the mains cable to a properly installed and earthed wall outlet.
- If the plug after installation is not accessible, a corresponding disconnect device must be available to meet the relevant safety regulations.
Startup / Operation
Prior using for the first time
- Remove accessories and other materials from the appliance drum.
- Clean the appliance drum. Follow the instructions which we provide in the chapter "Cleaning and Maintenance".
- Allow the appliance to dry the first time for about 30 minutes with old, damp clothes (see "Starting the program").
Drying advice
CAUTION: Do NOT dry in the appliance!
- Fabrics which are not tumble-dryer safe. Always follow the instructions on the care labels of your fabrics.
- Washing that has not been washed.
- Washing stained with cooking oil, acetone, alcohol, fuel, petrol, kerosene, stain remover, turpentine, wax, or wax remover. This must be washed first in the washing machine with hot water and detergent before drying.
-
Objects such as foam rubber (latex), shower caps, waterproof fabrics, rubberised items, and items of clothing or pillows with foam rubber flakes.
-
Softeners or similar products should be used as specified in the softener instructions.
- Remove all objects from pockets, such as matches and lighters.
- Close zips, buttons, or hooks before drying. Tie loose straps or loops together.
Adding laundry
- Shake out the washed fabrics and sort them according to the required drying setting, fibre, and fabric type, size, as well as remaining moisture after spinning. This will make the drying very consistent.
- Do not overload the appliance. Each load should correspond to the rated capacity of the appliance.
- Ensure that no items of washing are trapped in the door.
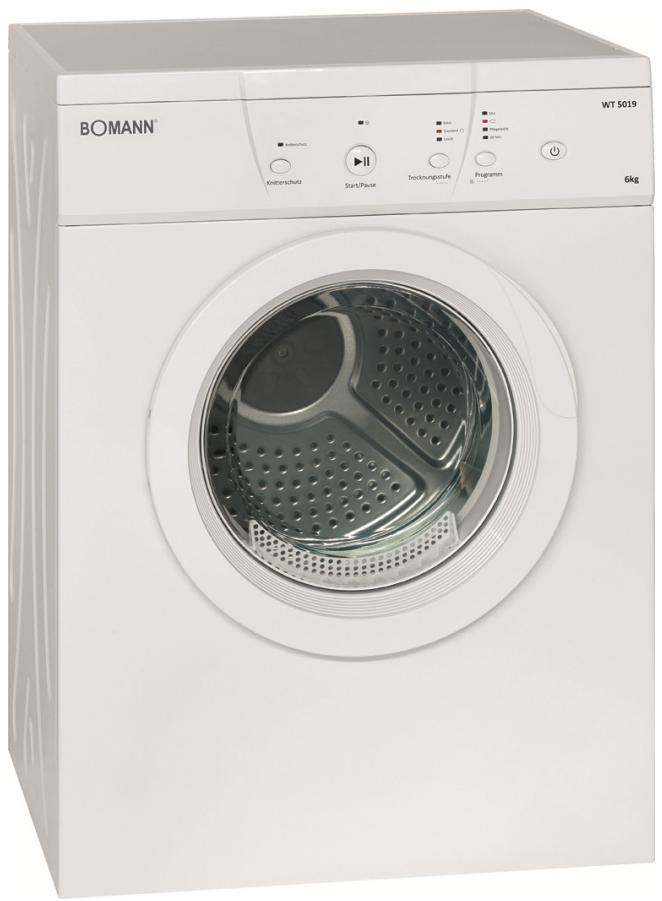
Control panel
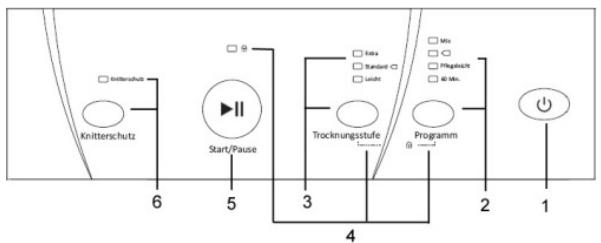
1 Power
Press the button to switch the unit on and/or off.
2 PROGRAMM (program)
By repeatedly button press you select the program. The control lamps indicate the selection. Consider the program details in the "Program table".
3 TROCKNUNGSSTUFES (drying level)
By repeatedly button press you select the drying level. The control lamps indicate the selection.
4 Child-safety lock
To activate / deactivate keep pressing the button combination PROGRAMM and TROCKNUNGSSTUFE for a few seconds.
The control lamp indicates the activation.
When activated, all controls, except the power button, are disabled for operation.
5 START/PAUSE
Press the button to start / stop the selected or running program.
6 KNITTERSCHUTZ (anti-crease)
Extended the automatic anti-crease phase (30 minutes) at the end of the drying cycle to about 120 minutes; prevents wrinkling. Note that the option depends on the program.
Starting a Program
Program table
NOTE:
The figures listed below are approximate figures and recommendations under normal operating conditions and are therefore for information only. The program running times and the consumption data may deviate from the specified figures according to load, remaining moisture, and temperature.
| Program | Drying level | Program selection information | Loading (dry weight) | Remaining moisture | Time Min | Energy kWh |
| Mix | Extra | For simultaneous drying not colored synthetic / cotton fabrics. | 6 kg | 70 % | 160 | 5.23 |
| 3 kg | 100 | 3.23 | ||||
| 1 kg | 70 | 2.23 | ||||
| Standard | 6 kg | 60 % | 130 | 4.23 | ||
| 3 kg | 90 | 2.90 | ||||
| 1 kg | 60 | 1.90 | ||||
| Leicht (Light) | Combination not possible | |||||
| Cotton | Extra | For drying normal wet cotton textiles, e.g. sheets, linen, underwear etc. | 6 kg | 70 % | 150 | 4.90 |
| 3 kg | 110 | 3.57 | ||||
| 1 kg | 60 | 1.90 | ||||
| Standard* | 6 kg | 60 % | 130 | 4.23 | ||
| 3 kg | 100 | 3.23 | ||||
| 1 kg | 60 | 1.90 | ||||
| Leicht (Light) | 6 kg | 60 % | 90 | 2.90 | ||
| 1 kg | 60 | 1.90 | ||||
| Pflegeleicht (Easy care) | Extra | For drying small loads of hardwearing fabrics; e.g. synthetic fabrics. | 3 kg | 40 % | 58 | 1.83 |
| 1 kg | 50 | 1.57 | ||||
| Standard | 3 kg | 50 % | 45 | 1.40 | ||
| 1 kg | 40 | 1.23 | ||||
| Leicht (Light) | Combination not possible | |||||
| 60 Min | ----- | For drying small loads of textiles. E.g. for after-drying of multi-layer fabrics. | ----- | ----- | 60 | 1.90 |
* Standard drying program: Cotton standard
In the case of a full load or partial load, this drying program is used to determine the figures on the energy label. The program is suitable for drying normal wet cotton fabrics and is the most efficient program with regard to energy consumption for cotton.
Automatic drying programs
The appliance detects the moisture in the load and automatically adjusts the optimum drying time. The
electronic control ensures the best drying results even at less loading of the dryer. It is activated in all
programs, except in the time controlled program [60 MIN].
Capacity
Do not overload the appliance, otherwise the fabrics will become stretched and drying will be impaired.
Refer to the information in the "Program table".
Starting the program
- Connect the appliance to the power supply.
- Put the washing into the drum.
- Switch the appliance on.
- Select the required operating conditions.
- Start the drying operation.
Program change
A change is not possible after a successful startup. To select a new program, you must switch the appliance off and on again.
End of program
At the end of the drying cycle will sound a series of signals; the control panel goes into standby mode and the appliance starts an automatic anti-crease cycle.
Automatic anti-crease cycle
If you do not remove the clothes from the appliance after the drying process has finished, the appliance will start the automatic anti-crease cycle of approx. 30 minutes (the anti-crease control lamp is flashing). The appliance continues rotating the drum in intervals in order to prevent textiles from creasing. At the end of that cycle the appliance will stop operating completely. During the process you can remove the washing at any time.
Switch off
- Switch the appliance off.
-
Clean the lint filter as described under "Cleaning and Maintenance".
-
Leave the appliance door slightly open until the next dry cycle to avoid odors.
- If the appliance is not in use for an extended time: - disconnect it from the power supply!
Energy saving tips
- Take advantage of the maximum capacity of each dry program.
- Select the dry program depending on the type of laundry and the required degree of dryness.
- Dry the laundry not excessively. This protects your laundry, prevents wrinkling and save energy.
- Clean the filter regularly to avoid excessive drying and high energy consumption.
- Ventilate the room well. The room temperature should not rise above 35^ C .
Cleaning and Maintenance
WARNING:
- Always switch off the appliance and disconnect it from the power supply before cleaning and user maintenance.
- Allow the appliance to cool down sufficient before cleaning.
- Do not use steam cleaners for cleaning the appliance; moisture could enter electrical components. Risk of electric shock! Hot steam could damage the plastic parts. The appliance must be dry before restarting operation.
CAUTION:
- Do not use a wire brush or other sharp, abrasive items.
- Do not use any acidic or abrasive detergents.
Maintenance of the appliance
-
Clean the appliance outer surfaces and the door sealing thoroughly with a soft, damp cloth. Use only mild cleaning agent.
-
Check the drum regularly on dirt or fiber residues; clean the drum and the inside of the door also with a soft, damp cloth.
- Dry the appliances thoroughly before taking in operation again.
Cleaning the lint filter

CAUTION:
- Dirty filter affect the drying result. Check and clean the filter regularly.
- The appliance must never be operated without installed filter. Improper insertion of filter may affect the performance and damage the appliance.
The lint filter catches all fibres which accumulate during drying. Clean the filter before or after each drying cycle.
- Remove the filter upwards.
- Open on the lint filter.
- Wipe off the lint by hand, if necessary use a damp cloth or clean the filter under running water.
- Dry the filter thoroughly and replace if correctly.
Troubleshooting
Before you contact an authorized specialist
| Problem | Cause / Action |
| Appliance does not work. | • Check the power supply. • Is the appliance switched on? •Is a program selected? • Consider the maximum loading. |
| The housing is hot or there is a smell of burning. | • Lint filter is blocked and must be cleaned. • Vent hose or ventilation openings are blocked. |
| Unusual odours and powerful vibrations. | • The appliance must stand on a solid base. • Are the feet aligned? |
| Fabrics are misshapen. | • Always follow the instructions on the care label of your fabrics. |
Error messages
With some malfunctions the appliance indicates the following error codes to warn you:
| Error code | Description | Reason | Action | Control lamps flashing |
| E1 | Over-heating | NTC or PCB fault | See “Over-heating protection: Reset switch” | [Leicht] |
| E3 | Problem Temperature sensor | Temperature Sensor is short or PCB fault | [Leicht] & [Standard] | |
| E4 | [Extra] |
NOTE:
If a problem still persists after following the steps above, contact your distributor or an authorized technician.
Technical Data
Electrical connection.
Connection voltage: 220-240 V~ / 50 Hz
Connection power: 2000 W
Dimension H x W x D / Weight.
Unit size: 84.0 x 59.5 x 55.5 cm
Net weight: approx. 33.0 kg
The right to make technical and design modifications in the course of continuous product development remains reserved.
This appliance has been tested according to all relevant current CE guidelines, such as electromagnetic compatibility and low voltage directives, and has been constructed in accordance with the latest safety regulations.
Disposal
Meaning of the "Dustbin" Symbol
Protect our environment; do not dispose of electrical equipment in the domestic waste.
Please return any electrical equipment that you will no longer use to the collection points provided for their disposal.
This helps avoid the potential effects of incorrect disposal on the environment and human health.
This will contribute to the recycling and other forms of reutilization of electrical and electronic equipment.
Information concerning where these can be disposed of can be obtained from your local authority.

WARNING:
Remove or disable any existing snap and bolt locks, if you take the unit out of operation or dispose it.
EU Product Data Sheet
Product information for household tumble dryer according to regulation (EU) No. 392/2012
| Brand | BOMANN | |
| Model | WT 5019 | |
| Rated capacity | kg | 6 |
| Dryer type | Air vented | |
| Energy efficiency class1) | C | |
| Annual energy consumption2) | kWh/a | 452 |
| Automatic tumble dryer | • | |
| Energy consumption standard program | ||
| - with full load | kWh | 3.81 |
| - with partial load | kWh | 2.05 |
| Power consumption: off mode | W | 0.46 |
| Power consumption: left-on mode | W | 0.46 |
| Duration of the left-on mode | Min | 10 |
| Standard programm3) | Cotton Standard | |
| Program time of standard cotton program | ||
| - weighted at full and partial load | Min | 90 |
| - average at full load | Min | 120 |
| - average at partial load | Min | 68 |
| Condensation efficiency class4) | - | |
| Condensation efficiency class standard program | ||
| - average at full load | % | - |
| - average as partial load | % | - |
| - weighted at full and partial load | % | - |
| Noise level | dB(A) | 69 |
| Built-in appliance | - |
1) A+++ (highest efficiency) to D (lowest efficiency).
2) Weighted annual energy consumption based on 160 drying cycles for the standard program with a full load and partial load, as well as the consumption of operating modes with lower power consumption. The energy consumption per cycle depends on the type of use of the appliance.
3) The "Cotton standard" program with a full load and a partial load is the standard drying program on which the information on the label and in the datasheet is based. This program is suitable for drying normal wet cotton fabrics and is the most efficient with regard to the energy consumption for cotton.
4) A (highest efficiency) to G (lowest efficiency).
BOMANN®
C. Bomann GmbH
www.bomann.de
Made in P.R.C.
- HOUSEHOLD VENTED TUMBLE DRYER WT 5019
- Contents
- Introduction
- Symbols in these Instructions for Use
- WARNING:
- CAUTION:
- General Notes
- I NOTE:
- Special safety information for this Unit
- WARNING: Hot surface! Danger of burns!
- Unpacking the Appliance
- NOTE:
- Appliance Equipment
- Appliance Overview
- Overheating protection: Reset switch
- Delivery scope
- Installation
- Appliance location
- Adjusting the feet
- Installation of the vent hose
- OTE:
- Electrical connection
- Startup / Operation
- Prior using for the first time
- Drying advice
- CAUTION: Do NOT dry in the appliance!
- Adding laundry
- Control panel
- Power
- PROGRAMM (program)
- TROCKNUNGSSTUFES (drying level)
- Child-safety lock
- START/PAUSE
- KNITTERSCHUTZ (anti-crease)
- Starting a Program
- Program table
- * Standard drying program: Cotton standard
- Automatic drying programs
- Capacity
- Starting the program
- Program change
- End of program
- Automatic anti-crease cycle
- Switch off
- Energy saving tips
- Cleaning and Maintenance
- Maintenance of the appliance
- Cleaning the lint filter
- Troubleshooting
- Error messages
- Technical Data
- Disposal
- Meaning of the "Dustbin" Symbol
- EU Product Data Sheet
Marque : BOMANN
Modèle : WT5019
Catégorie : Sèche-linge