MODE D'EMPLOI SD-470EKE TOSHIBA


DVD PLAYER
SD5010KB
OWNER'S MANUAL




Introduction
2
Connections
15
Basic playback
20
Function setup
24
Others
27

natural_image
Exterior view of a gray electronic device with ports and buttons (no visible text or symbols)
SAFETY PRECAUTIONS
text_image
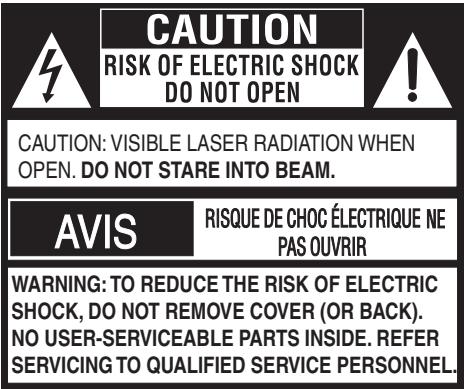
CAUTION
RISK OF ELECTRIC SHOCK
DO NOT OPEN
!
CAUTION: VISIBLE LASER RADIATION WHEN
OPEN. DO NOT STARE INTO BEAM.
AVIS
RISQUE DE CHOC ÉLECTRIQUE NE
PAS OUVRIR
WARNING: TO REDUCE THE RISK OF ELECTRIC
SHOCK, DO NOT REMOVE COVER (OR BACK).
NO USER-SERVICEABLE PARTS INSIDE. REFER
SERVICING TO QUALIFIED SERVICE PERSONNEL.
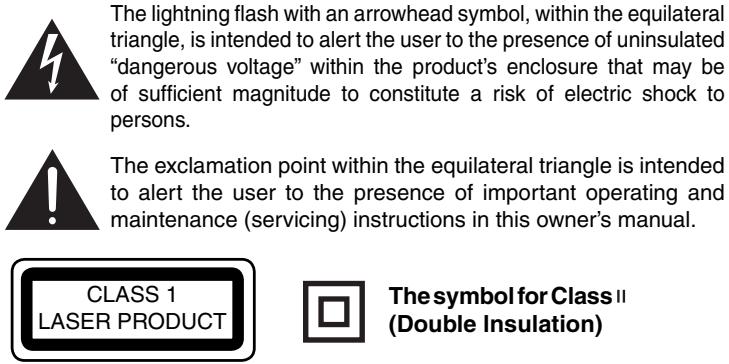
The lightning flash with an arrowhead symbol, within the equilateral triangle, is intended to alert the user to the presence of uninsulated “dangerous voltage” within the product’s enclosure that may be of sufficient magnitude to constitute a risk of electric shock to persons.
The exclamation point within the equilateral triangle is intended to alert the user to the presence of important operating and maintenance (servicing) instructions in this owner's manual.
The symbol for Class II (Double Insulation)
WARNING: To reduce the risk of fire or electric shock, do not expose this appliance to rain or moisture. Dangerous high voltages are present inside the enclosure. Do not open the cabinet. Refer servicing to qualified personnel only.
CAUTION: This Digital Video Disc Player employs a Laser System. To ensure proper use of this product, please read this owner's manual carefully and retain for future reference. Should the unit require maintenance, contact an authorized service location.
Use of controls or adjustments or performance of procedures other than those specified herein may result in hazardous radiation exposure.
To prevent direct exposure to laser beam, do not try to open the enclosure.
Visible and invisible laser radiation when open and interlocks defeated.
DO NOT STARE INTO BEAM.
WARNINGS
- The main plug is used as disconnect device and it should remain readily operable during intended used. In order to disconnect the apparatus from the mains completely, the main plug should be disconnected from the mains socket outlet completely.
- The mains plug of apparatus should not be obstructed OR should be easily accessed during intended use.
- The apparatus shall not be exposed to dripping or splashing and that no objects filled with liquid, such as vases, shall be placed on the apparatus.
- Minimum 10 cm (4 inches) distances around the apparatus for sufficient ventilations.
- The ventilation should not be impeded by covering the ventilation openings with items such as newspaper, table-cloths, curtains, etc.
- No naked flame sources such as lighted candles should be placed on the apparatus.
- The use of apparatus in moderate climates.
CE
"This product is marked with “CE” and complies therefore with the applicable harmonized European standards listed under the Low Voltage Directive 2006/95/EC and the EMC Directive 2004/108/EC."
Responsible for CE-marking is TOSHIBA INFORMATION SYSTEMS (U.K.) LTD,
Toshiba Court, Weybridge Business Park, Addlestone Road, Weybridge,
Surrey, KT15 2UL, United Kingdom
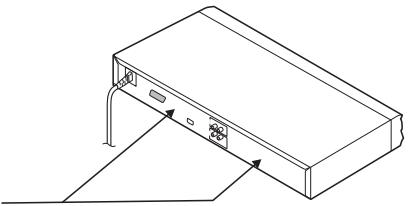
Location of the required label
The rating plate and the safety caution are on the rear of the unit.
natural_image
Line drawing of a device rear panel with connectors and ventilation slots (no text or symbols)
IMPORTANT SAFETY INSTRUCTIONS
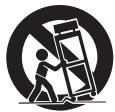
Portable Cart Warning
- Read these instructions.
- Keep these instructions.
- Read all warnings.
- Follow all instructions.
- Do not use this appliance near water.
- Clean only with a dry cloth.
- Do not block any of the ventilation openings. Install in accordance with the manufacturer's instructions.
- Do not install near any heat sources such as radiators, heat registers, stoves, or other apparatus (including amplifiers) that produce heat.
- Protect the power cord from being walked on or pinched particularly at plugs, convenience receptacles, and the point where they exit from the apparatus.
- Only use attachments/accessories specified by the manufacturer.
- Use only with the cart, stand, tripod, bracket, or table specified by the manufacturer, or sold with the apparatus. When a cart is used, use caution when moving the cart/apparatus combination to avoid injury from tip-over.
- Unplug this apparatus during lightning storms or when unused for long periods of time.
-
Refer all servicing to qualified service personnel. Servicing is required when the apparatus has been damaged in any way, such as the power-supply cord or plug is damaged, liquid has been spilled or objects have fallen into the apparatus, the apparatus has been exposed to rain or moisture, does not operate normally, or has been dropped.
-
Do not overload wall outlets; extension cords, or integral convenience receptacles as this can result in a risk of fire or electric shock.
- Never expose the apparatus to dripping or splashing or place items such as vases, aquariums, any other item filled with liquid, or candles on top of the unit.
- Keep your fingers well clear of the disc tray as it is closing. Neglecting to do so may cause serious personal injury.
- Do not place anything on top of this unit.
- Do not place the apparatus on amplifiers or equipment that may produce heat.
- Never block or cover the slots or openings in the unit.
- Do not overload wall outlets; extension cords, or integral convenience receptacles as this can result in a risk of fire or electric shock.
- Never expose the apparatus to dripping or splashing or place items such as vases, aquariums, any other item filled with liquid, or candles on top of the unit.
- Keep your fingers well clear of the disc tray as it is closing. Neglecting to do so may cause serious personal injury.
- Do not place anything on top of this unit.
- Never block or cover the slots or openings in the unit.
Never place the unit:
- on a bed, sofa, rug or similar surface;
- too close to drapes, curtains, or walls; or
- in a confined space such as a bookcase, built-in cabinet, or any other place with poor ventilation.
- on a bed, sofa, rug or similar surface;
- too close to drapes, curtains, or walls; or
- in a confined space such as a bookcase, built-in cabinet, or any other place with poor ventilation.
The slots and openings are provided to protect the unit from overheating and to help maintain reliable operation.
- Do not use a cracked, deformed, or repaired disc. These discs are easily broken and may cause serious personal injury and apparatus malfunction.
- If the apparatus should emit smoke or an unusual odor, immediately disconnect the power cord from the wall outlet. Wait until the smoke or smell stops, then ask your dealer for a check and repair. Neglecting to do so may cause fire.
- During thunderstorms, do not touch the connecting cables or the apparatus.
- Warning: To prevent spread of fire, keep candles or other open flames away from this product at all times.
- Do not use a cracked, deformed, or repaired disc. These discs are easily broken and may cause serious personal injury and apparatus malfunction.
- If the apparatus should emit smoke or an unusual odor, immediately disconnect the power cord from the wall outlet. Wait until the smoke or smell stops, then ask your dealer for a check and repair. Neglecting to do so may cause fire.
- During thunderstorms, do not touch the connecting cables or the apparatus.
- Warning: To prevent spread of fire, keep candles or other open flames away from this product at all times.
ADDITIONAL SAFETY INSTRUCTIONS
Never place the unit:
The slots and openings are provided to protect the unit from overheating and to help maintain reliable operation.
IMPORTANT SAFETY INSTRUCTIONS
SOME DOS AND DON'TS ON THE SAFE USE OF EQUIPMENT
This equipment has been designed and manufactured to meet international safety standards but, like any electrical equipment, care must be taken if you are to obtain the best results and safety is to be assured. So, please read the points below for your own safety. They are of a general nature, intended to help you with all your electronic consumer products and some points may not apply to the goods you have just purchased.
**************************
DO read the operating instructions before you attempt to use the equipment.
DO ensure that all electrical connections (including the mains plug, extension leads and inter-connections between the pieces of equipment) are properly made and in accordance with the manufacturer's instructions. Switch off and withdraw the mains plug before making or changing connections.
DO consult your dealer if you are ever in doubt about the installation, operation or safety of your equipment.
DO be careful with glass panels or doors on equipment
**************************
DON'T remove any fixed cover as this may expose dangerous voltages.
DON'T obstruct the ventilation openings of the equipment with items such as newspapers, tablecloths, curtains, etc. Overheating will cause damage and shorten the life of the equipment.
DON'T allow electrical equipment to be exposed to dripping or splashing, or objects filled with liquids, such as vases, to be placed on the equipment.
DON'T place hot objects or naked flame sources such as lighted candles or nightlights on, or close to equipment. High temperatures can melt plastic and lead to fires.
DON'T use makeshift stands and NEVER fix legs with wood screws - to ensure complete safety always fit the manufacturer's approved stand or legs with the fixings provided according to the instructions.
DON'T use equipment such as personal stereos or radios so that you are distracted from the requirements of traffic safety. It is illegal to watch television whilst driving.
DON'T listen to headphones at high volume, as such use can permanently damage your hearing.
DON'T leave equipment switched on when it is unattended unless it is specifically stated that it is designed for unattended operation or has a stand-by mode. Switch off using the switch on the equipment and make sure that your family know how to do this. Special arrangements may need to be made for infirm or handicapped people.
DON'T continue to operate the equipment if you are in any doubt about it working normally, or if it is damaged in any way -switch off, withdraw the mains plug and consult your dealer.
ABOVE ALL
—NEVER let anyone especially children push anything into holes, slots or any other opening in the case - this could result in a fatal electrical shock;
—NEVER guess or take chances with electrical equipment of any kind
—It is better to be safe than sorry!
***************************
This appliance may be fitted with a non-rewireable plug. If it is necessary to change the fuse in a non-rewireable plug the fuse cover must be refitted. If the fuse cover is lost or damaged, the plug must not be used until a replacement available from the appliance manufacturer is obtained. If the plug has to be changed because it is not suitable for your socket, or becomes damaged, it should be cut off and an appropriate plug fitted following the wiring instructions below. The plug removed must be disposed of safely as it is hazardous if inserted into a live socket.
IMPORTANT
The wires in this mains lead are coloured in accordance with the following code:
BLUE: NEUTRAL
BROWN: LIVE
As the colours of the wires in the mains lead of this unit may not correspond with the coloured markings identifying the terminals in your plug, proceed as follows:
The wire that is coloured blue must be connected to the terminal in the plug which is marked with the letter N or coloured black.
The wire that is coloured brown must be connected to the terminal which is marked with the letter L or coloured red.
Do not connect either wire to the earth terminal which is marked by the letter E or by the safety earth symbol 12 or coloured green or green-and-yellow.
Use a 3A BS1362 fuse which is approved by ASTA or BSI. Always replace the fuse cover after changing the fuse.
PRECAUTIONS
Notes on handling
■ When shipping the DVD player, the original shipping carton and packing materials come in handy. For maximum protection, repack the unit as it was originally packed at the factory. Take care not to give it a shock or shake when carrying.
■ Do not use volatile liquids, such as insect spray, near the DVD player. Do not leave rubber or plastic products in contact with the DVD player for a long time. They will leave marks on the finish.
■ The top and rear panels of the DVD player may become warm after a long period of use. This is not a malfunction.
■ When the DVD player is not in use, be sure to remove the disc and turn off the power.
If you do not use the DVD player for a long period, the unit may not function properly in the future. Turn on and use the DVD player occasionally.
Notes on locating
Place the DVD player on a level surface. Do not use it on a shaky or unstable surface such as a wobbling table or inclined stand. The loaded disc may come off the proper position and cause damage to the DVD player.
■ When you place this DVD player near a TV, radio, or VCR, the playback picture may become poor and the sound may be distorted. In this case, place the DVD player away from the TV, radio, or VCR.
Notes on cleaning
Use a soft, dry cloth for cleaning.
- For stubborn dirt, soak the cloth in a weak detergent solution, wring well and wipe. Use a dry cloth to wipe it dry.
Do not use any type of solvent, such as thinners and benzene, as they may damage the surface of the DVD player.
- If you use a chemical saturated cloth to clean the unit, follow that product's instructions.
Inspection and Maintenance
This DVD player is a high technology, precision device. If the optical pick-up lens and disc drive parts become dirty or worn down, the picture quality may be reduced. To avoid reduction in picture quality, it is recommended that regular inspection and maintenance (cleaning or parts replacement) be performed every 1,000 hours of use. For further details, contact your nearest consumer electronics dealer.
PRECAUTIONS
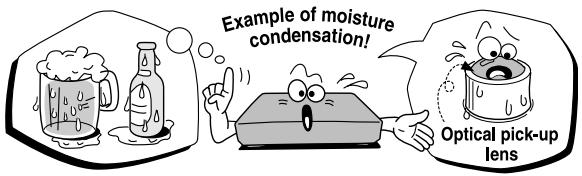
Notes on moisture condensation
Moisture condensation damages the DVD player. Please read the following carefully.
Moisture condensation occurs, for example, when you pour a cold drink into a glass on a warm day. Drops of water form on the outside of the glass. In the same way, moisture may condense on the optical pick-up lens inside this unit, one of the most crucial internal parts of the DVD player.
text_image
Example of moisture
condensation!
Optical pick-up
lens
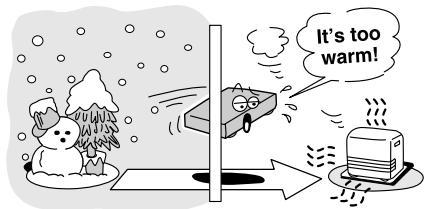
■ Moisture condensation occurs during the following cases.
- When you bring the DVD player directly from a cold place to a warm place.
- When you use the DVD player in a room where you just turned on the heater, or a place where the cold wind from the air conditioner directly hits the unit.
- In summer, when you use the DVD player in a hot and humid place just after you move the unit from an air conditioned room.
- When you use the DVD player in a humid place.
text_image
It's too
warm!
■ Do not use the DVD player when moisture condensation may occur.
If you use the DVD player in such a situation, it may damage discs and internal parts. Remove the disc, connect the power cord of the DVD player to the wall outlet, turn on the DVD player, and leave it for two or three hours. After two or three hours, the DVD player will have warmed up and evaporated any moisture. Keep the DVD player connected to the wall outlet and moisture condensation will seldom occur.
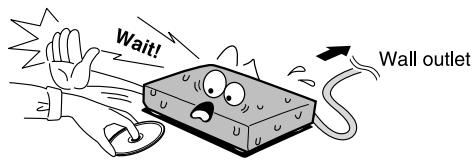
text_image
Wait!
Wall outlet
NOTES ON DISCS
On handling discs
- Do not touch the playback side of the disc.
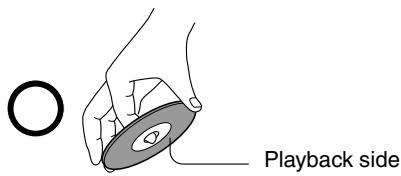
text_image
Playback side
- Do not attach paper or tape to discs.
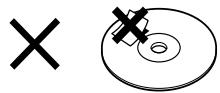
On cleaning discs
● Fingerprints and dust on the disc cause picture and sound deterioration. Wipe the disc from the center outwards with a soft cloth. Always keep the disc clean.
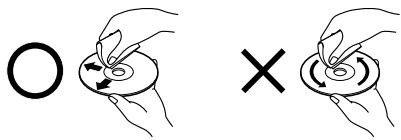
text_image
O
×
- If you cannot wipe off the dust with a soft cloth, wipe the disc lightly with a slightly moistened soft cloth and finish with a dry cloth.
- Do not use any type of solvent such as thinner, benzine, commercially available cleaners or antistatic spray for vinyl LPs. It may damage the disc.
On storing discs
- Do not store discs in a place subject to direct sunlight or near heat sources.
- Do not store discs in places subject to moisture and dust such as a bathroom or near a humidifier.
- Store discs vertically in a case. Stacking or placing objects on discs outside of their case may cause warping.
On VIDEO CDs
This DVD player supports VIDEO CDs equipped with the PBC (Version 2.0) function. (PBC is the abbreviation of Playback Control.) You can enjoy two playback variations depending on types of discs.
• VIDEO CD not equipped with PBC function (Version 1.1)
Sound and movie can be played on this DVD player in the same way as an audio CD.
• VIDEO CD equipped with PBC function (Version 2.0)
In addition to operation of a VIDEO CD not equipped with the PBC function, you can enjoy playback of interactive software with search function by using the menu displayed on the TV screen (Menu Playback). Some of the functions described in this owner's manual may not work with some discs.
About this owner's manual
This owner's manual explains the basic instructions of this DVD player. Some DVDs are produced in a manner that allows specific or limited operation during playback. As such, the DVD player may not respond to all operating commands. This is not a defect in the DVD player. Refer to instruction notes of discs.
“ ⊗ ” may appear on the TV screen during operation. A “ ⊗ ” means that the operation is not permitted by the DVD player or the disc.
About DVD VCD CD
The DVD VCD CD icons on the heading bar show the playable discs for the function described under that heading.
DVD : You can use this function with DVD discs.
VCD : You can use this function with Video CDs.
CD : You can use this function with Audio CDs/CD-R/RW CDs.
Notes on region numbers
The region number of this DVD player is 2. If region numbers, which stand for their playable area, are printed on your DVD and you do not find 📄 or 🌐, disc playback will not be allowed by the player. (In this case, the DVD player will display a message on-screen).
Notes on copyright
The unauthorized recording, use, distribution, or revision of copyrighted materials including, without limitation, television programs, videotapes, and DVDs, is prohibited under the Copyright Laws of the United States and other countries, and may subject you to civil and criminal liability.
This product incorporates copyright protection technology that is protected by method claims of certain U.S. patents and other intellectual property rights owned by Macrovision Corporation and other rights owners. Use of this copyright protection technology must be authorized by Macrovision Corporation, and is intended for home and other limited viewing uses only unless otherwise authorized by Macrovision Corporation. Reverse engineering or disassembly is prohibited.
playable discs
This DVD player can play the following discs.
| Disc Mark | Contents | Disc Size | Maximum playback time |
| DVDs |  VIDEO VIDEO | Audio+video(moving pictures) | 12 cm | Approx. 4 hours(single sided disc) |
| Approx. 8 hours(double sided disc) |
| 8 cm | Approx. 80 minutes(single sided disc) |
| Approx. 160 minutes(double sided disc) |
| VIDEO CDs |  DIGITAL VIDEO DIGITAL VIDEO | Audio+video(moving pictures) | 12 cm | Approx. 74 minutes |
| 8 cm | Approx. 20 minutes |
| Audio CDs |  DIGITAL AUDIO DIGITAL AUDIO | Audio | 12 cm | Approx. 74 minutes |
| 8 cm(CD single) | Approx. 20 minutes |
| SUPERVIDEO CDs |  SUPER VIDEO SUPER VIDEO | Audio+video(moving pictures) | 12 cm | 35 min. |
| 8 cm | 10 min. |
| DivX® |  | Audio+video(moving pictures) | 12 cm | It depends on DivX®quality |
| 8 cm |
| The following discs are also available.DVD±R/±RW and DVD-ROM discs of DVD formatCD-R/CD-RW discs of CD-DA, Video CD, MP3 or JPEG formatDivX Certified to play DivX video, including premium contentSome of these discs may be incompatible. |
You cannot play discs other than those listed above.
- You cannot play DVD-RAM discs or non-standardized discs, etc., even if they may be labeled as above.
- This DVD player uses the NTSC/PAL colour system, and cannot play DVDs recorded in any other colour system (SECAM, etc.).
Because of problems and errors that can occur during the creation of DVD and CD software and/or the manufacture of DVD and CD discs, Toshiba cannot assure that this DVD player will successfully play every disc bearing the DVD and CD logos. If you happen to experience any difficulty playing a DVD and/or CD disc on this DVD player, please contact Toshiba Customer Service.
DVD is a trademark of DVD Format/Logo Licensing Corporation.

Table of Contents
Introduction
● SAFETY PRECAUTIONS ...... 2
●IMPORTANT SAFETY INSTRUCTIONS .... 3
●PRECAUTIONS 5
● NOTES ON DISCS 6
Notes on region numbers 7
●Table of Contents 8
●Identification of Controls 9
Front panel....9
Rear panel 9
DVD display 9
● Using the Remote Control 10
Loading batteries ....10
Operating with the remote control....10
Remote control 11
Names and functions....12
Connections
●Connecting to a TV 15
Connecting to a TV (Using the SCART socket) .15
Connecting to a TV (Using the phono type jacks) . 15
Connecting to a display (Using a HDMI™ cable)......16
●Connecting to Optional Equipment ...... 17
Connecting to an amplifier equipped with a Dolby® Digital decoder .... 18
Connecting to an amplifier equipped with Dolby Surround Pro Logic.... 18
Connecting to an amplifier equipped with a DTS ^® decoder....19
Connecting to an amplifier equipped with an MPEG2 audio decoder .... 19
Connecting to an amplifier equipped with a digital audio input.... 19
Basic playback
●Playing a Disc.... 20
Basic playback.... 20
●Playing MP3/DivX®/JPEG Files...... 21
Playing MP3/DivX®/JPEG Files.... 21
● Using USB Device....23
Connecting to USB flash drive 23
MP3 Converter (converting CD to USB device .... 23
Function setup
● Customizing the Function Settings......24
Using the Language setup menu....24
Using the Video setup menu....24
Using the Audio setup menu....25
Using the Parental Lock setup menu .....25
Using the TV System setup menu....26
Others
● Before Calling Service Personnel......27
● Specifications......28
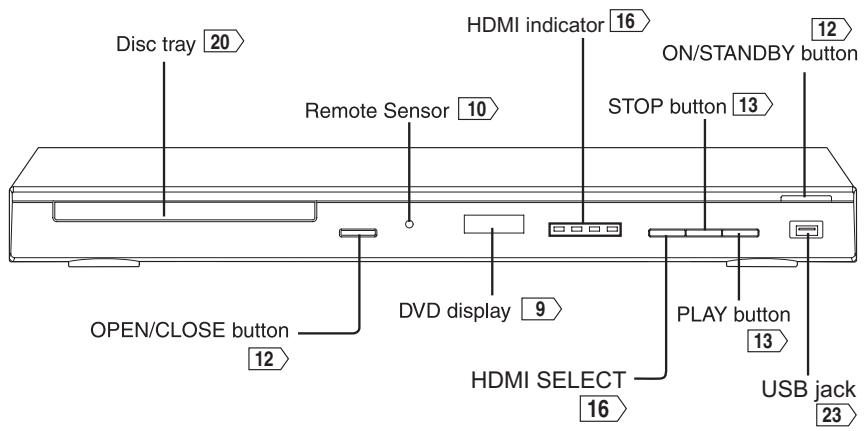
Front panel
text_image
Disc tray 20
HDMI indicator 16
ON/STANDBY button 12
Remote Sensor 10
STOP button 13
OPEN/CLOSE button 12
DVD display 9
PLAY button 13
HDMI SELECT 16
USB jack 23
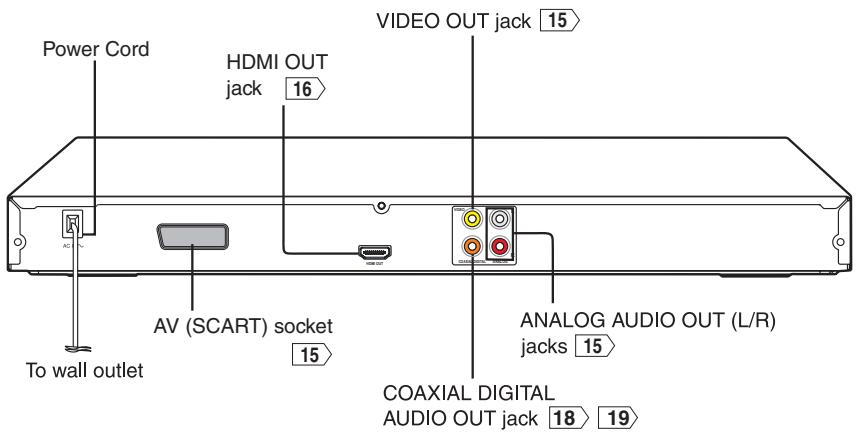
Rear panel
text_image
Power Cord
HDMI OUT
jack 16
VIDEO OUT jack 15
AV (SCART) socket 15
TO wall outlet
ANALOG AUDIO OUT (L/R)
jacks 15
COAXIAL DIGITAL
AUDIO OUT jack 18 19
DVD display
The indicators vary depending on the kinds of discs you play.
No disc

Bad disc

OPEN
LOAD/CLOSE
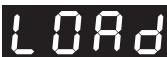
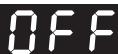
Power off
DVD VIDEO
- During playback: Example

Some discs may only display chapter numbers.
VIDEO CD
- During playback: Example

Some discs may only display track numbers.
Audio CD
• During playback: Example

Some discs may only display track numbers.
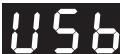
USB
• In USB mode with no USB device connected:
Title/Chapter/Track number Indicator
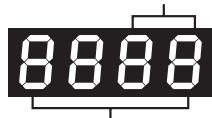
Multifunctional indicator (indicates operating status or messages, etc.)

Using the Remote control
Loading batteries
1 Open the cover.
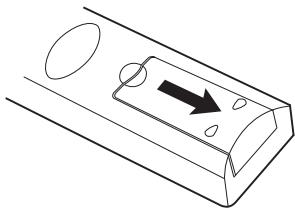
natural_image
Pure technical line drawing of a mechanical component with an arrow indicating direction (no text or symbols)
2 Insert batteries (R03/AAA size).
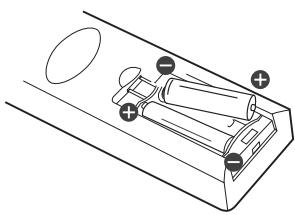
natural_image
Diagram of a battery pack with two batteries and one bulb, no text or symbols present
Make sure to match the + and – on the batteries to the marks inside the battery compartment.
Caution
- Never throw batteries into a fire.
Notes
- Be sure to use R03/AAA size batteries.
- Dispose of batteries in a designated disposal area.
- Batteries should always be disposed of with the environment in mind. Always dispose of batteries in accordance with applicable laws and regulations.
- If the remote control does not operate correctly, or if the operating range becomes reduced, replace both batteries with new ones.
- When necessary to replace batteries in the remote control, always replace both batteries with new ones. Never mix battery types or use new and used batteries in combination.
- Always remove batteries from remote control if they are dead or if the remote control is not to be used for an extended period of time. This will prevent battery acid from leaking into the battery compartment.
- Battery shall not be exposed to excessive heat such as sunshine, fire or the like.
Operating with the remote control
Point the remote control at the remote sensor and press the buttons.
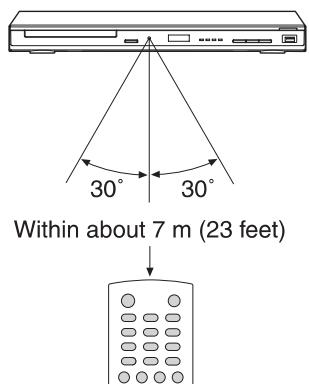
text_image
30°
30°
Within about 7 m (23 feet)
Distance: About 7 m (23 feet) from the front of the remote sensor
Angle: About 30^ in each direction of the front of the remote sensor
* Do not expose the remote sensor of the DVD player to a strong light source such as direct sunlight or other illumination. If you do so, you may not be able to operate the DVD player via the remote control.
Notes on the remote control
- Direct the remote control at the remote sensor of the DVD player.
- When using the remote control, press the buttons at intervals of about 1 second to ensure the correct mode of operation.
- Do not drop or give the remote control a shock.
- Do not leave the remote control near an extremely hot or humid place.
- Do not spill water or put anything wet on the remote control.
- Do not open the remote control.
Remote control
The instructions in this manual describe the functions on the remote control. See the page in □ for details.
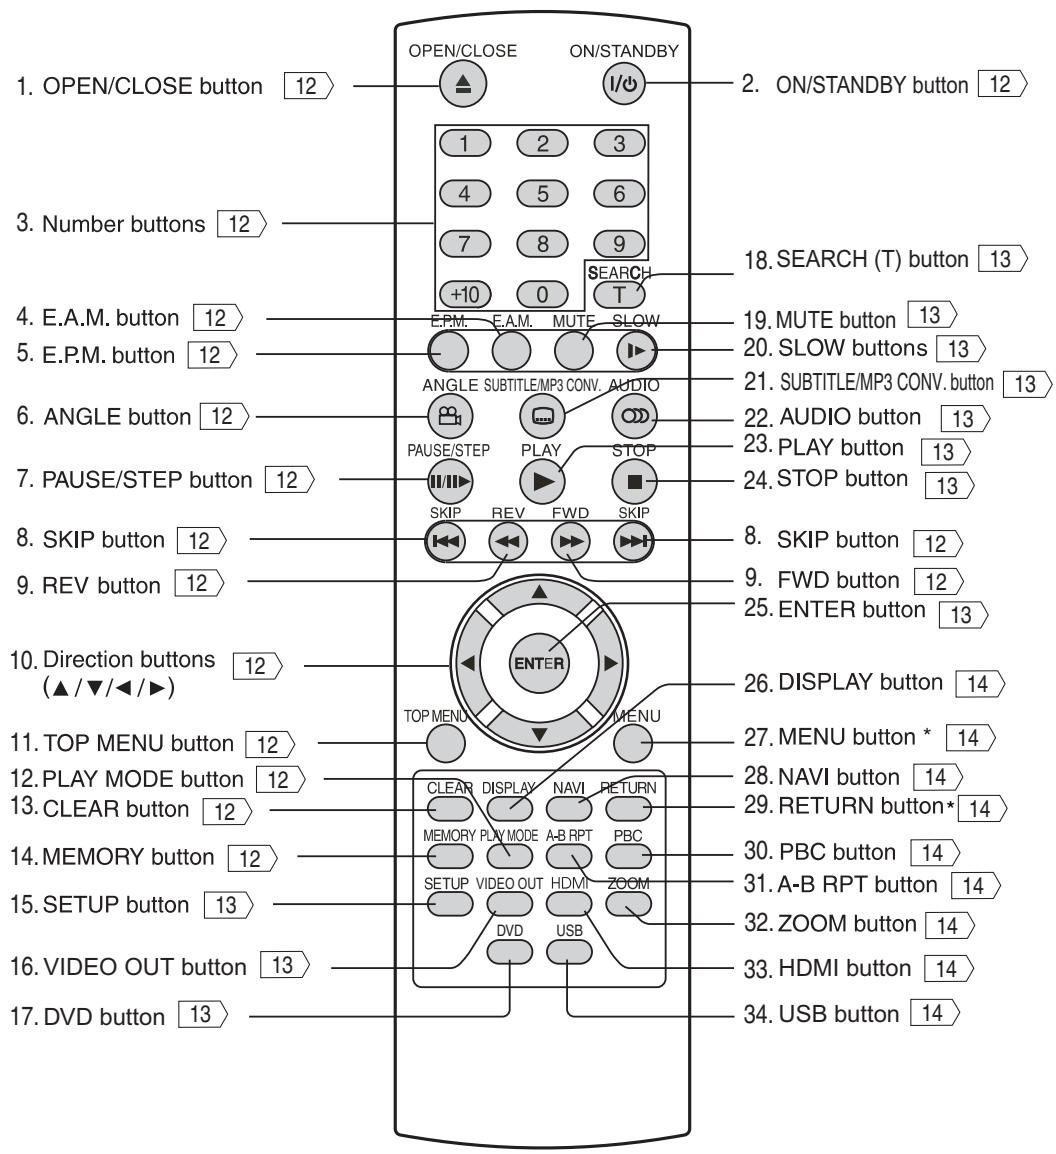
text_image
1. OPEN/CLOSE button 12
2. ON/STANDBY button 12
3. Number buttons 12
4. E.A.M. button 12
5. E.P.M. button 12
6. ANGLE button 12
7. PAUSE/STEP button 12
8. SKIP button 12
9. REV button 12
10. Direction buttons (▲/▼/◄/►)
11. TOP MENU button 12
12. PLAY MODE button 12
13. CLEAR button 12
14. MEMORY button 12
15. SETUP button 13
16. VIDEO OUT button 13
17. DVD button 13
OPEN/CLOSE ON/STANDBY
I/O
1 2 3
4 5 6
7 8 9
+10 0 SEARCH T
E.P.M. E.A.M. MUTE SLOW
ANGLE SUBTITLE/MP3 CONV. AUDIO
PAUSE/STEP PLAY STOP
SKIP REV FWD SKIP
ENTER
TOP MENU MENU
CLEAR DISPLAY NAVI RETURN
MEMORY PLAY MODE A-B RPT PBC
SETUP VIDEO OUT HDMI ZOOM
DVD USB
26. DISPLAY button 14
27. MENU button * 14
28. NAVI button 14
29. RETURN button* 14
30. PBC button 14
31. A-B RPT button 14
32. ZOOM button 14
33. HDMI button 14
34. USB button 14
* RETURN button
Return to menu display for VCD (2.0) discs with menu (PBC should be ON).
* MENU button
Use the MENU button to display the menu included on many DVDs.
Names and functions
- Press the button to open/close the disc tray.
- The function is the same as the OPEN/CLOSE button on the front panel.
Turn the unit on or set the unit to standby mode.
Press number buttons to play relevant chapter/track.
Use to select the sound enhancement on or off.
3D*:
To obtain expansive virtual surround sound effects from two speakers. To use this enhancement on sounds output from the ANALOG AUDIO OUT jacks, be sure to set "Digital out" to "PCM".
* Effective in playback of a DVD.
Notes
- Actual effects to sounds may vary depending on the speaker system. Make selection according to your preference.
- Actual effects to sounds may vary depending on the disc.
- When the DVD player is connected to an amplifier equipped with Dolby Surround Pro Logic, select "3D effect". Otherwise, Dolby Surround Pro Logic may function differently than usual.
- The sound effect might not be heard easily on small TVs.
- The sound effect can be heard more easily at higher volume.
- The sound effect might take a few seconds to be heard after turning on the E.A.M.
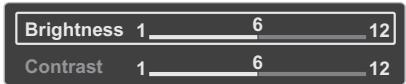
Use to select the picture enhancement.
text_image
Brightness 1 6 12
Contrast 1 6 12
Select the picture enhancement by pressing ▲ / ▼, then press ◀/▶ to make your selections.
To exit the picture enhancement selection, press E.P.M again.
Note
Actual effect to picture may vary depending on the TV. Make selection according to your preference.
- While playing a scene recorded with multiple angles, press the ANGLE button.
Number changes to show the number of the current angle. (The maximum number of possible angles is 9)

ANGLE button is also used to rotate the picture in clockwise direction during JPEG playback.
Note
This function can only be used for discs on which scenes shot from multiple angles have been recorded. If only one angle is recorded, “⊗” will be displayed.
- Press PAUSE/STEP to freeze playback.
- During still playback, press PAUSE/STEP advance the picture frame by frame.

To locate succeeding chapters or tracks.

To locate preceding chapters or tracks.
REV: Fast reverse playback
FWD: Fast forward playback
Each time you press the REV or FWD button, the playback speed changes.
Use ▲/▼/◄/► to select a selection in setup menu.
Display the title menu on DVD.
While playing a disc, press the PLAY MODE button repeatedly to select a repeat mode.
For DVD:
- Repeat Chapter (currently playing chapter)
- Repeat Title (currently playing title)
- Repeat All (entire disc)
- Off (cancel)
For Video CD, Audio CD:
- Repeat Single (currently playing track)
- Repeat All (entire disc)
- Off (cancel)
For MP3, JPEG, DivX®:
- Repeat Single (currently playing file)
- Repeat Folder (current folder)
- Repeat All (all files)
- Off (cancel)
Note
For VCD with PBC on, you cannot select a repeat mode.
Use CLEAR to delete the scheduled program or to cancel input data in setting mode.
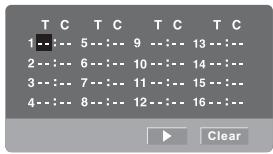
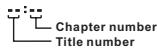
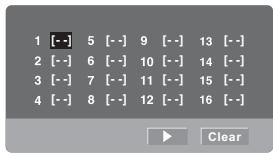
- Press this button, the program screen is displayed as below:
e.g. DVD
e.g. VCD/Audio CD
text_image
T C T C T C T C
1 --:-- 5 --:-- 9 --:-- 13 --:--
2 --:-- 6 --:-- 10 --:-- 14 --:--
3 --:-- 7 --:-- 11 --:-- 15 --:--
4 --:-- 8 --:-- 12 --:-- 16 --:--
▶ Clear
text_image
1 [--] 5 [--] 9 [--] 13 [--]
2 [--] 6 [--] 10 [--] 14 [--]
3 [--] 7 [--] 11 [--] 15 [--]
4 [--] 8 [--] 12 [--] 16 [--]
- Select the items in the order you want by pressing the number buttons.
Each time you press the ▲/▼/◄/► button, the space is highlighted in turn. Highlight where you want to enter, then press the corresponding number buttons.
To change the programmed selections, use ▲/▼/◄/► to move the highlighted bar to the item you want to change and press CLEAR, then input the new number.
- Press ▲ / ▼ / ◀/ ▶ to move the highlighted bar to ▶, then press PLAY or ENTER to start playback.
- To resume normal playback from memory playback, use ▲/▼/◄/► to move the highlighted bar to "Clear", then press ENTER. All the input programs will be cleared.
Press PLAY button to resume normal playback.
Notes
- Some discs may not permit memory playback operation.
- If you select repeat during memory playback, the DVD player repeats the current memory playback.
- The programmed selections will be cleared when you open the disc tray or turn off the DVD player.
Access the on-screen Setup menu for settings adjustment.
Press to select the video output signal (RGB or HDMI) 25.
Sometimes it can take awhile before the correct mode is displayed.
Press to select the DVD mode if it is in the USB mode.
- Press SEARCH (T) and use ◀/▶ to move the cursor to the title (TT) / chapter (CH) / track (TRK) / time. eg.
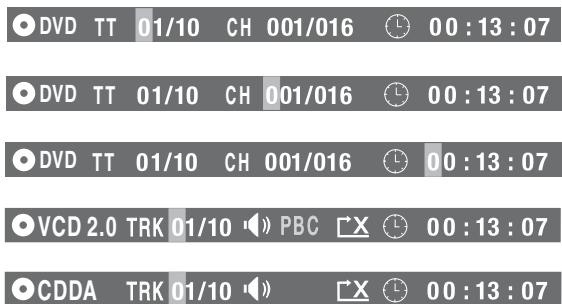
text_image
DVD TT 01/10 CH 001/016 00:13:07
DVD TT 01/10 CH 001/016 00:13:07
DVD TT 01/10 CH 001/016 00:13:07
VCD 2.0 TRK 01/10 PBC 00:13:07
CDDA TRK 01/10 00:13:07
- Press the corresponding number button(s) for the title (TT) / chapter (CH) / track (TRK) / time, then press ENTER. Playback starts from the selected section.
Notes
- Pressing the CLEAR button resets the numbers. To clear the display, press the SEARCH (T) button several times.
- For VCD with PBC on, accessing tracks using number buttons does not work.
Press to mute and restore the sound.
Forward slow playback.
Each time you press the SLOW button, the slow-motion speed changes in the following sequence:
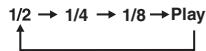
Note
The sound is muted during slow-motion playback.
For DVDs, press this button to change the language of the subtitle.
To turn off the subtitle, press the SUBTITLE button repeatedly until the : [off] is displayed.
For CDs, access or quit the MP3 converting menu.
Notes
- Some DVDs are set to display subtitles automatically, and you cannot turn them off even if you set the subtitle function to off.
- During some scenes, the subtitles may not appear immediately after you select your desired.
- Some DVDs will allow you to make subtitle selections and turn subtitles on or off only via the disc menu.
For DVDs, press the AUDIO button to toggle between different audio modes. The selected audio mode will be displayed on the screen.
For VIDEO CDs, press the AUDIO button repeatedly during playback to hear a different audio channel (Stereo, Left, Right or MIX).
Notes
- When you turn on the DVD player or replace a disc, player returns to the initial default setting.
- If you select a sound track which is not included on the disc, the DVD player plays a prior soundtrack programmed on the disc.
- Some discs allow you to change audio selections only via the disc menu. If this is the case, press the MENU button and choose the appropriate language from the selections on the disc menu.
- Press to start playback.
- The function is the same as the PLAY button on the front panel.
- Press once to stop playback and the DVD player memorizes the location where playback is stopped.
- Press twice to clear the last playback position.
- The function is the same as the STOP button on the front panel.
Press to confirm selections on a menu screen.
Press to view the operational status.
e.g.
1) Press DISPLAY while a disc is playing, the first banner shows the title, chapter information and the elapsed time display of the current chapter.
2) Press DISPLAY again for Audio language, Subtitles and Camera angle information.
3) Press DISPLAY a third time for the remaining time display of the current chapter.
4) Press DISPLAY a fourth time for the elapsed time display of the current chapter.
5) Press DISPLAY a fifth time for the remaining time display of the current title.
6) To turn off the display, press DISPLAY again.
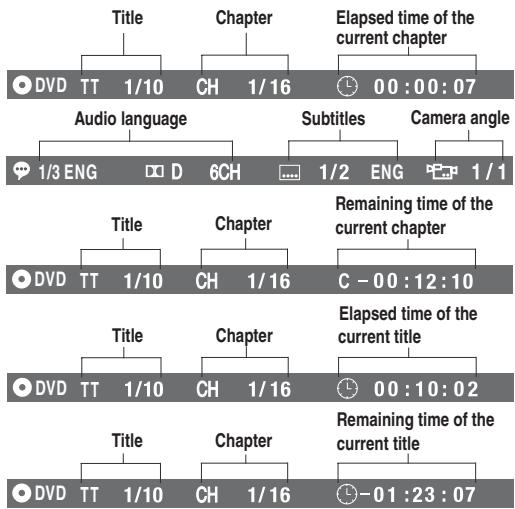
flowchart
graph TD
    A["Title"] --> B["Chapter"]
    B --> C["Elapsed Time of the Current Chapter"]
    D["DVD TT 1/10 CH 1/16 00:00:07"] --> E["Audio language"]
    F["1/3 ENG D 6CH 1/2 ENG 1/1"] --> G["Subtitles"]
    H["DVD TT 1/10 CH 1/16 C -00:12:10"] --> I["Remaining Time of the Current Chapter"]
    J["DVD TT 1/10 CH 1/16 00:10:02"] --> K["Elapsed Time of the Current Title"]
    L["DVD TT 1/10 CH 1/16 -01:23:07"] --> M["Remaining Time of the Current Title"]
e.g.
1) Press DISPLAY while a disc is playing, the first banner shows the track, play mode information and the elapsed time display of the current track.
2) Press DISPLAY again for the remaining time display of the current track.
3) Press DISPLAY a third time for the elapsed time display of the played tracks.
4) Press DISPLAY a fourth time for the remaining time display of the disc.
5) To turn off the display, press DISPLAY again.
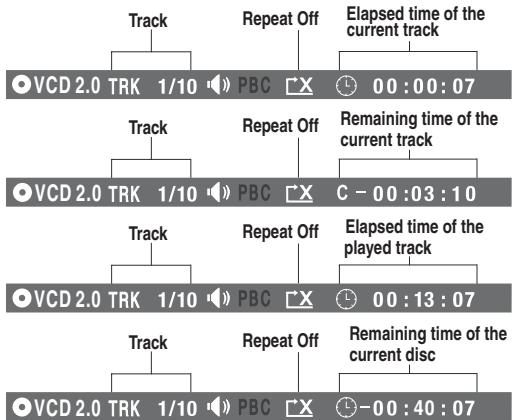
flowchart
graph TD
    A["Track"] --> B["PBC"]
    C["Repeat Off"] --> D["Elapsed time of the current track"]
    E["VCD 2.0 TRK 1/10"] --> F["PBC"]
    G["Track"] --> H["PBC"]
    I["Repeat Off"] --> J["Remaining time of the current track"]
    K["Track"] --> L["PBC"]
    M["Repeat Off"] --> N["C - 00:03:10"]
    O["Track"] --> P["PBC"]
    Q["Repeat Off"] --> R["Elapsed time of the played track"]
    S["Track"] --> T["PBC"]
    U["Repeat Off"] --> V["00:13:07"]
    W["Track"] --> X["PBC"]
    Y["Repeat Off"] --> Z["-00:40:07"]
Note
"PBC" display will change from light green to black when PBC is set to Off.
e.g.
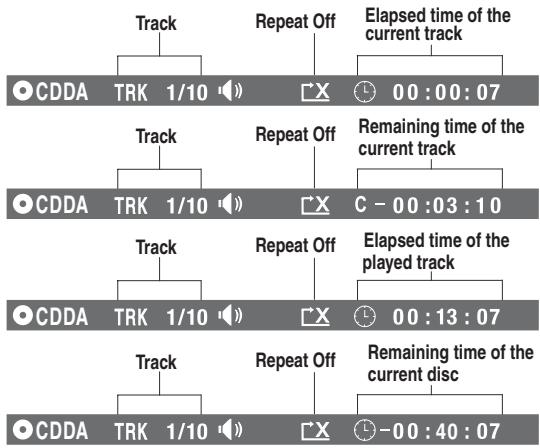
flowchart
graph TD
    A["Track"] --> B["Repeat Off"]
    B --> C["Elapsed time of the current track"]
    D["CDDA TRK 1/10"] --> E["X 00:00:07"]
    F["Track"] --> G["Repeat Off"]
    G --> H["Remaining time of the current track"]
    I["CDDA TRK 1/10"] --> J["X C - 00:03:10"]
    K["Track"] --> L["Repeat Off"]
    L --> M["Elapsed time of the played track"]
    N["CDDA TRK 1/10"] --> O["X 00:13:07"]
    P["Track"] --> Q["Repeat Off"]
    Q --> R["Remaining time of the current disc"]
    S["CDDA TRK 1/10"] --> T["X - 00:40:07"]
Display the menu of DVD.
Press this button to display and access features and settings.
Press to return to previous menu or exit the menu.
For VCD 2.0, PBC must be On in order to return to the menu when RETURN is pressed.
Press to toggle between PBC On and PBC Off.
Set the beginning and end points of a section to repeat.
Notes
- Some discs may not permit A-B repeat operation.
- You cannot set the A-B repeat function for a segment that includes multiple camera angles.
- You can specify a segment only within the current title or track (VIDEO CD).
- There may be a slight difference between point A and the location where playback actually resumes depending on the disc.
Press to zoom in the current picture.
Notes
- During some scenes, the buttons may not work as described.
- Zooming does not work on subtitles or menus included on DVDs.
Press HDMI to receive a suitable video quality 16.
The function is the same as the HDMI SELECT on the front panel.
Select the USB mode during DVD stop.
Connecting to a TV (Using the SCART socket)
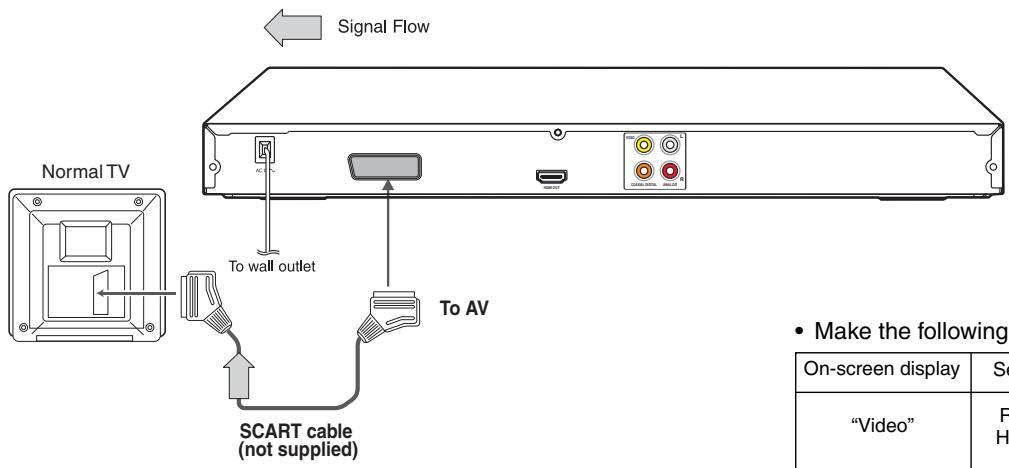
text_image
Signal Flow
Normal TV
To wall outlet
To AV
SCART cable
(not supplied)
• Make the following:
On-screen display
"Video"
F
H
- Make the following setting.
| On-screen display | Select: | Page |
| “Video” | RGB HDMI | 25 |
Connecting to a TV (Using the phono type jacks)
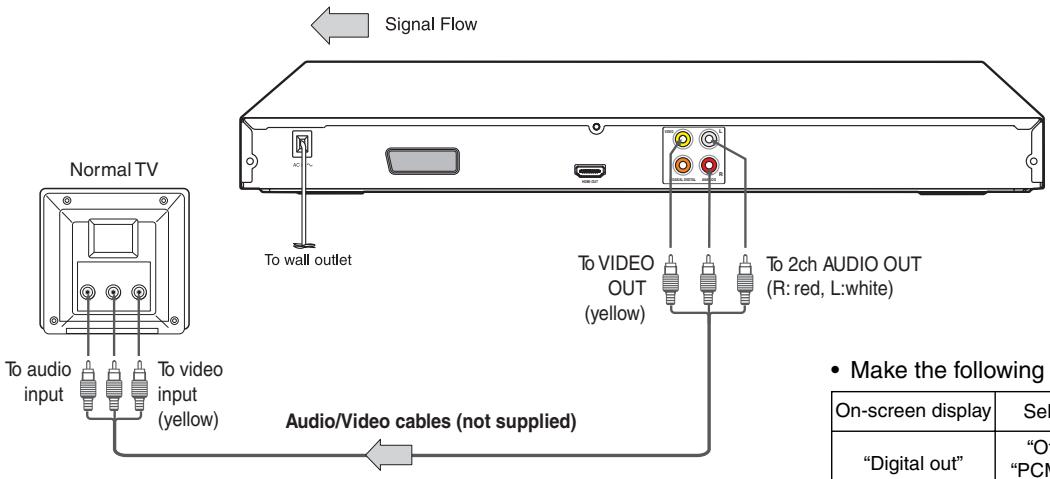
text_image
Signal Flow
Normal TV
To wall outlet
To video OUT (yellow)
To 2ch AUDIO OUT (R: red, L:white)
To audio input
To video input (yellow)
Audio/Video cables (not supplied)
• Make the following
On-screen display
Sel
"Digital out"
"Of
"PCM
- Make the following setting.
| On-screen display | Select: | Page |
| “Digital out” | “Off”, “PCM” or “Bitstream” | 25 |
| “Video” | RGB HDMI | 25 |
Notes
- Refer to the owner's manual of the connected TV as well.
- When you connect the DVD player to your TV, be sure to turn off the power and unplug both units from the wall outlet before making any connections.
- If your television set has one audio input, connect the left and right audio outputs of the DVD player to a Y cable adapter (not supplied) and then connect to your TV.
- Connect the DVD player directly to your TV. If you connect the DVD player to a VCR, TV/VCR combination or video selector, the playback picture may be distorted as DVDs are copy protected.
- Analogue audio out will not have sound if DTS playback is selected.
About HDMI
HDMI (High Definition Multimedia Interface) supports both video and audio on a single digital connection for use with DVD players, DTV, set-top boxes, and other AV devices. HDMI was developed to provide the technologies of High Bandwidth Digital Content Protection (HDCP) as well as Digital Visual Interface (DVI) in one specification. HDCP is used to protect digital content transmitted and received by DVI-compliant or HDMI-compliant displays.
HDMI has the capability to support standard, enhanced, or high-definition video plus standard to multi-channel surround-sound audio. HDMI features included uncompressed digital video, a bandwidth of up to 2.2 gigabytes per second (with HDTV signals), one connector (instead of several cables and connectors), and communication between the AV source and AV devices such as DTVs.
HDMI, the HDMI logo and High-Definition Multimedia Interface are trademarks or registered trademarks of HDMI licensing LLC.
Connecting to a display (Using a HDMI™ cable)
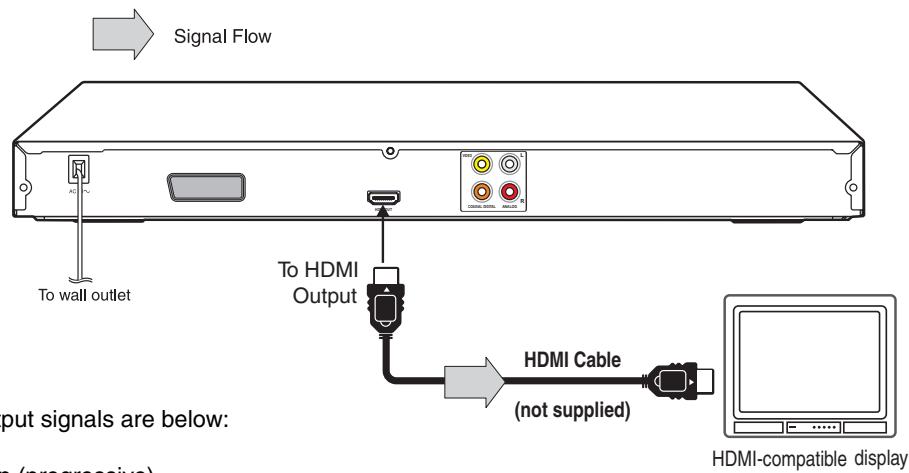
text_image
Signal Flow
To wall outlet
To HDMI Output
HDMI Cable
(not supplied)
Output signals are below:
( progressive )
HDMI-compatible display
Available output signals are below:
- Auto
• 576p/480p (progressive)
- 720p (progressive)
• 1080i (interlaced)
• 1080p (progressive)
Press HDMI button on the remote control or HDMI SELECT button on the front panel to receive a suitable video quality. The video quality is required to match your TV having HDMI feature and suitable quality. Please also check your TV owner's manual. Press this button to change the output signals as below. See the HDMI indicator and select the appropriate output signal.

flowchart
graph TD
    A["HDMI indicator"] --> B["illuminates “• 1080p”"]
    B --> C["Press"]
    C --> D["1080p (progressive)"]
    A --> E["illuminates “• 1080i”"]
    E --> F["Press"]
    F --> G["1080i (interlaced)"]
    A --> H["illuminates “• 720p”"]
    H --> I["Press"]
    I --> J["720p (progressive)"]
    A --> K["illuminates “• 576p/480p”"]
    K --> L["Press"]
    L --> M["576p/480p (progressive)"]
    A --> N["illuminates “• 576p/480p, • 720p, • 1080i, • 1080p”"]
    N --> O["Auto"]
    O --> P["Press"]
576p/480p, 720p, 1080i and 1080p are signals created with this DVD Player from original 576i/480i signal. The resolution of the picture may not be increased even if they are selected.
- Make the following setting.
| On-screen display | Select: | Page |
| “Digital out” | “PCM” | 25 |
| “Video” | HDMI | 25 |
Notes
- Refer to the owner's manual of the connected TV as well.
- When you connect the DVD player to your TV, be sure to turn off the power and unplug both units from the wall outlet before making any connections.
- If you have a HDMI (with HDCP) equipped monitor or display, you can connect it to this player using a HDMI cable.
- The HDMI connector outputs uncompressed digital video, as well as almost every kind of digital audio that the player is compatible with, including DVD-Video, Video CD/Super VCD, CD, MP3 and DivX®.
- This unit has been designed to be compliant with HDMI (High Definition Multimedia Interface) depending on the component you have connected. Using a HDMI connection may result in unreliable signal transfers.
- Because HDMI is an evolving technology, it is possible that some devices with an HDMI input may not operate properly with this DVD player.
- When using HDMI cable, do not connect to other analog video outputs.
- HDMI output is only available when the Video out is set to "HDMI". Otherwise the HDMI button is invalid.
Content of the output for each output jack is shown in the following table and differ depending on the On-Screen Display Setting:
| On-Screen Display Setting | Content of output for each output jack |
| “Video” Setting | HDMI Output Setting | HDMI Output | Video Output | AV Output |
| RGB | Invalid | - | Composite | RGB |
| HDMI | 576p/480p | 576p/480p | Composite | Composite |
| 720p | 720p | Composite | Composite |
| 1080i | 1080i | Composite | Composite |
| 1080p | 1080p | Composite | Composite |
* Settings for HDMI output format are performed using the HDMI button on the remote control or HDMI SELECT button on the front panel.
Note
- If Auto is selected, it follows preference HDMI aspect ratio of TV.

Connecting to Optional Equipment
You can enjoy high quality dynamic sounds by connecting the DVD player to optional audio equipment.
- For connection to your TV, see “Connecting to a TV”.
- This section uses the following reference marks.


: Front speaker
: Rear speaker
: Sub woofer
: Center speaker
: Signal flow
Warning
- When you are connecting (via the COAXIAL DIGITAL AUDIO OUT jack) an AV decoder that does not have Dolby Digital, DTS® or MPEG2 decoding function, be sure to set “Digital out” to “PCM” from the on-screen displays. Otherwise, high volume sound may damage your hearing as well as the speakers.
- When playing DTS-encoded discs (DVDs and audio CDs), excessive noise may be output from the analog audio output jacks. To avoid possible damage to the audio system, you should take proper precautions when the analog audio output jacks of the DVD player are connected to an amplification system. To enjoy DTS Digital Surround™ playback, an external 5.1 channel DTS Digital Surround™ decoder system must be connected to the COAXIAL DIGITAL AUDIO OUT jack of the DVD player.
Notes
- DO NOT connect the COAXIAL DIGITAL AUDIO OUT jack of the DVD player to the AC-3 RF input of a Dolby Digital Receiver. This input on your A/V Receiver is reserved for Laserdisc use only and is incompatible with the COAXIAL DIGITAL AUDIO OUT jack of the DVD player.
- Connect the COAXIAL DIGITAL AUDIO OUT jack of the DVD player to the “DIGITAL (COAXIAL)” input of a Receiver or Processor.
- Refer to the owner's manual of the connected equipment as well.
- When you connect the DVD player to other equipment, be sure to turn off the power and unplug all of the equipment from the wall outlet before making any connections.
- The output sound of the DVD player has a wide dynamic range. Be sure to adjust the receiver's volume to a moderate listening level. Otherwise, the speakers may be damaged by a sudden high volume sound.
- Turn off the amplifier before you connect or disconnect the DVD player's power cord. If you leave the amplifier power on, the speakers may be damaged.

Connecting to Optional Equipment (continued)
Connecting to an amplifier equipped with a Dolby® Digital decoder
Dolby Digital
Dolby Digital is the surround sound technology used in theaters showing the latest movies, and is now available to reproduce this realistic effect in the home. You can enjoy motion picture and live concert DVDs with this dynamic realistic sound by connecting the DVD player to a 6 channel amplifier equipped with a Dolby Digital decoder or Dolby Digital processor. If you have a Dolby Surround Pro Logic decoder, you will obtain the full benefit of Pro Logic from the same DVD movies that provide full 5.1-channel Dolby Digital soundtracks, as well as from titles with the Dolby Surround mark.
Manufactured under license from Dolby Laboratories. Dolby and the double-D symbol are trademarks of Dolby Laboratories.
- Use DVDs encoded via the Dolby Digital recording system.
- Make the following setting.
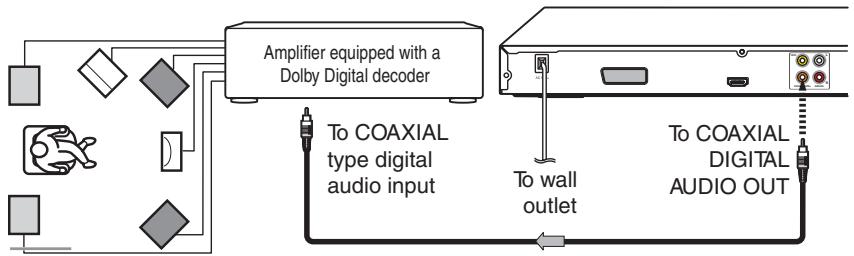
flowchart
graph TD
    A["Input"] --> B["Amplifier equipped with a Dolby Digital decoder"]
    B --> C["To COAXIAL type digital audio input"]
    B --> D["To wall outlet"]
    B --> E["To COAXIAL DIGITAL AUDIO OUT"]
75 Ω coaxial cable (not supplied)
| On-screen display | Select: | Page |
| “Digital out” | “PCM” or “Bitstream” | 25 |
Connecting to an amplifier equipped with Dolby Surround Pro Logic
Dolby Surround Pro Logic
You can enjoy the dynamic realistic sound of Dolby Surround Pro Logic by connecting an amplifier and speaker system (right and left front speakers, a center speaker, and one or two rear speakers).
■ With an amplifier equipped with Dolby Digital
Connect the equipment the same way as described in “Connecting to an amplifier equipped with a Dolby® Digital decoder.” Refer to that amplifier’s owner’s manual and set the amplifier so you can enjoy Dolby Surround Pro Logic sound.
■ With an amplifier not equipped with Dolby Digital
Connect the equipment as follows.
- Make the following setting.
| On-screen display | Select: | Page |
| “Digital out” | “PCM” or “Bitstream” | 25 |
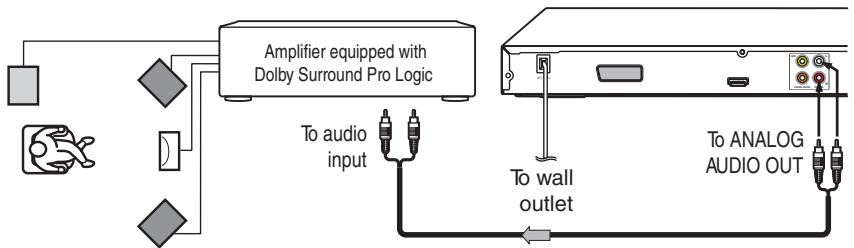
flowchart
graph TD
    A["Input"] --> B["Amplifier equipped with Dolby Surround Pro Logic"]
    B --> C["To audio input"]
    B --> D["To wall outlet"]
    B --> E["To ANALOG AUDIO OUT"]
Audio cable (not supplied)
* Connect one or two rear speakers.
The output sound from the rear speakers will be monaural even if you connect two rear speakers.
Connecting to an amplifier equipped with a DTS® decoder
DTS®
DTS is a high quality surround technology used in theaters and now available for home use, on DVDs or audio CDs. If you have a DTS decoder or processor, you can obtain the full benefit of 5.1 channel DTS encoded sound tracks on DVDs or audio CDs.
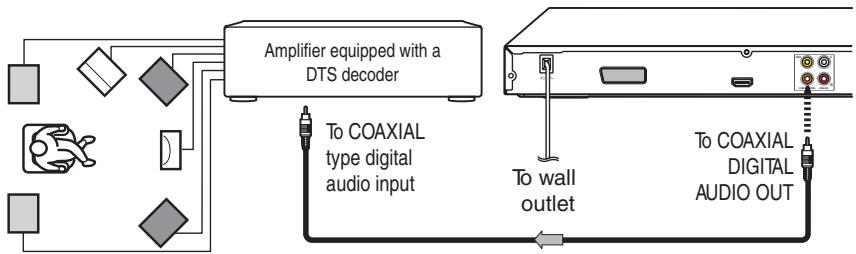
flowchart
graph TD
    A["Amplifier equipped with a DTS decoder"] --> B["To COAXIAL type digital audio input"]
    A --> C["To wall outlet"]
    A --> D["To COAXIAL DIGITAL AUDIO OUT"]
75 Ω coaxial cable (not supplied)
Manufactured under license under U.S. Patent #: 5,451,942 & other U.S. and worldwide patents issued & pending. DTS and the Symbol are registered trademarks and DTS Digital Out and the DTS logos are trademarks of DTS, Inc. Product includes software. © DTS, Inc. All Rights Reserved.
- Use DVDs or audio CDs encoded via the DTS recording system.
- Make the following setting.
| On-screen display | Select: | Page |
| “Digital out” | “Bitstream” | 25 |
Connecting to an amplifier equipped with an MPEG2 audio decoder
MPEG2 sound
You can enjoy motion picture and live concert DVDs with dynamic realistic sound by connecting an amplifier equipped with an MPEG2 audio decoder or MPEG2 audio processor.
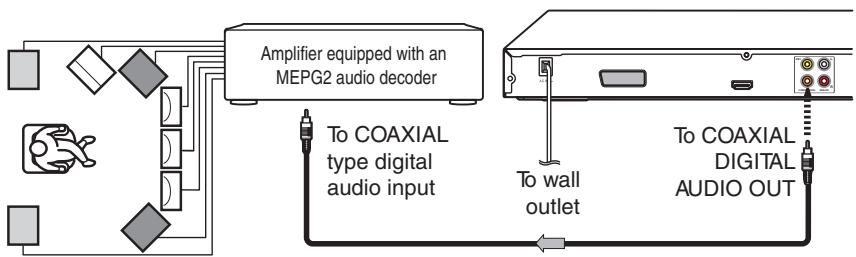
flowchart
graph TD
    A["Amplifier equipped with an MEPG2 audio decoder"] --> B["To COAXIAL type digital audio input"]
    A --> C["To wall outlet"]
    A --> D["To COAXIAL DIGITAL AUDIO OUT"]
75 Ω coaxial cable (not supplied)
- Use DVDs encoded via the MPEG2 recording system.
- Make the following setting.
| On-screen display | Select: | Page |
| “Digital out” | “PCM” or “Bitstream” | 25 |
2 channel digital stereo
You can enjoy the dynamic sound of 2 channel digital stereo by connecting an amplifier equipped with a digital audio input and speaker system (right and left front speakers).
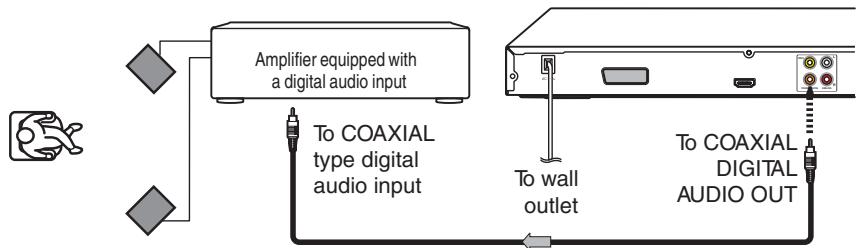
flowchart
graph TD
    A["Amplifier equipped with a digital audio input"] --> B["To COAXIAL type digital audio input"]
    B --> C["To wall outlet"]
    C --> D["To COAXIAL DIGITAL AUDIO OUT"]
75 Ω coaxial cable (not supplied)
- Make the following setting.
| On-screen display | Select: | Page |
| “Digital out” | “PCM” | 25 |
Playing a Disc
This section shows you the basics on how to play a disc.
CAUTION
Keep your fingers well clear of the disc tray as it is closing. Neglecting to do so may cause serious personal injury.
DVD
VCD
CD
Basic playback
Preparations
- When you want to view a disc, turn on the TV and select the video input connected to the DVD player.
- When you want to enjoy the sound of discs from the audio system, turn on the audio system and select the input connected to the DVD player.
1
ON/STANDBY

The DVD player turns on.
2
Press OPEN/CLOSE.
OPEN/CLOSE

The disc tray opens.
3
Place the disc on the disc tray.
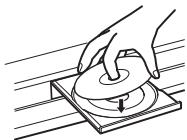
With the playback side down
- There are two different disc sizes. Place the disc in the correct guide on the disc tray. If the disc is out of the guide, it may damage the disc and cause the DVD player to malfunction.
- Do not place a disc which is unplayable in this DVD player.
4
Press OPEN/CLOSE to close the disc tray.
OPEN/CLOSE
Playback starts.

If you insert a DVD that contains a top menu, a menu may appear. Use ▲/▼/◀/▶ to select the title you want to view, then press ENTER to start playback.
- You may need to press the TOP MENU or MENU button to display disc menu (depending on the actual DVD.)
Notes
- If the disc tray is holding a disc you have already played, playback will begin from the location where you last stopped.
- Some video CD are recorded with PBC (Playback Control), a menu with recorded contents may appear on the TV if you have turned the PBC on. You can make your selection according to its PBC menu. Press the PBC button on the remote control to turn PBC on or off anytime during Video CD playback. When switching from PBC off to PBC on mode, playback will start from the beginning of the disc. To turn on the menu display again, press the RETURN button.
■ To start playback in the stop mode Press PLAY.
PLAY

■ To pause playback (still mode)
Press PAUSE/STEP during playback.
PAUSE/STEP

To resume normal playback, press the PLAY button.
- The sound is muted during still mode.
■ To stop playback Press STOP.
STOP

■ To remove the disc Press OPEN/CLOSE.
OPEN/CLOSE

Remove the disc after the disc tray opens completely.
Be sure to press the OPEN/CLOSE button to close the disc tray after you remove the disc.
■ To turn the power off
Press ON/STANDBY button to turn the unit off.
■ Automatic Power Off function
If the DVD player is stopped, or the screen saver is engaged for approximately 20 minutes, the DVD player will automatically turn itself off.
Notes
- Do not move the DVD player during playback. Doing so may damage the disc.
- Use the OPEN/CLOSE button to open and close the disc tray. Do not push the disc tray while it is moving. Doing so may cause the DVD player to malfunction.
- Do not push up on the disc tray or put any objects other than discs on the disc tray. Doing so may cause the DVD player to malfunction.
- In many instances, a menu screen will appear after playback of a movie is completed. Prolonged display of an on-screen menu may damage your television set, permanently etching that image onto its screen. To avoid this, be sure to press the STOP button on your remote control once the movie is completed.
Playing MP3/DivX®/JPEG Files
You can play MP3, DivX ^® or JPEG files that have been recorded on a CD-R or CD-RW on the DVD player.
Playing MP3/DivX®/JPEG Files
1 Press OPEN/CLOSE to open the disc tray, place a disc that contains MP3/DivX®/JPEG Files.
OPEN/CLOSE

A selection menu will appear on the screen.
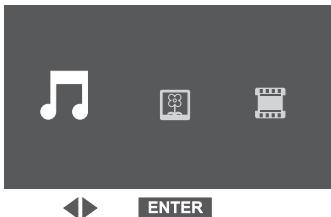
natural_image
Three icons: a musical note, a play button, and a music player icon, all without any text or symbols.
music icon
: picture icon
: video icon
2 Press ◀/▶ to select the Music, Picture or Video icon, and then press ENTER. (For example: selecting the Picture icon)
Make sure the disc you are playing contains the music, picture or video files.
A list of folders in the disc appears, press
▲ / ▼ button to select a folder and then press ENTER.
e.g.
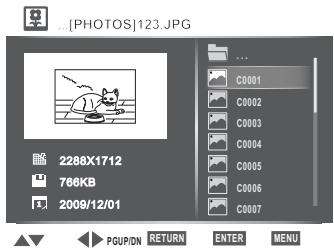
text_image
[PHOTOS]123.JPG
2288X1712
766KB
2009/12/01
C0001
C0002
C0003
C0004
C0005
C0006
C0007
PGUP/DN RETURN ENTER MENU
▲ ▼ : selects a file.
◀ ▶ : Page up or Page down
MENU : views a thumbnail view.
RETURN : returns to previous menu.
ENTER : plays your selected file.
Notes
- Make sure that a disc you want to play is compatible with this DVD player.
- Some discs may not permit this operation.
- When the MP3 file is out of the above specifications, the song may be skipped or muted with counter moving.
- If your DivX ^ files include the subtitle file supported by this unit (see 24), press SUBTITLE to toggle the available subtitles or off.
- Some DivX® Video-On-Demand files may require registration code of your DVD player, you may get the code in TV System settings 26.
- It is recommended to record the same kind of files in a CD-R or CD-RW.
■ MP3 Playable files
MP3 disc compatibility with this player is limited as follows:
- Playable discs:
CD-R (650MB / 74 min. only)
CD-RW may not be compatible.
44.1 kHz only
- Sampling Frequency:
32 kbps - 320 kbps (CBR*)
- Bit rate:
Mode 1, Mode 2 XA Form 1
- CD physical format:
ISO9660 Level 1, 2 or Joliet
- File system:
A file name should be in alphabet and numerals only, and must incorporate "MP3" extension. e.g. "*******.MP3".
- File name:
• Total number of folders: Less than 100
• Total number of files: Less than 1000
* CBR = Constant Bit Rate
MPEG Layer-3 audio coding technology licensed from Fraunhofer IIS and Thomson.
This DVD player requires discs/recordings to meet certain technical standards in order to achieve optimal playback quality. Pre-recorded DVDs are automatically set to these standards. There are many different types of recordable disc formats (including CD-R containing MP3 files). Because this area of technology is still evolving, Toshiba cannot guarantee that all recordable discs will produce optimal playback quality. The technical criteria set forth in this owner's manual are meant only as a guide.
Please be advised that you must obtain permission from the applicable copyright owners to download copyrighted content, including music files, in any format, including the MP3 formats, prior to the downloading thereof. Toshiba has no right to grant and does not grant permission to download any copyrighted content.
DivX® Playable files
DivX ^® disc compatibility with this player is limited as follows:
- Playable discs:
CD-R (650MB / 74 min. only)
CD-RW may not be compatible.
- DivX® versions:
DivX ^® 3.11, 4.12, 5.0, 5.1
- Audio format:
CBR MP3, VBR MP3, Mono MP3, DivX® AC3
- Enhance video:
GMC, Qpel, Progressive B-frames
- Frame rate:
8 to 25 fps
- CD physical format:
Mode 1, Mode 2 X A Form 1
- File system:
ISO9660 Level 1, 2 or Joliet
- File name:
A file name should be in alphabet and numerals only, and must incorporate "DIVX" or "AVI" extension.
e.g. “********.DIVX”, “********.AVI”
• Total number of folders:
Less than 100
• Total number of files:
Less than 1000
Playing MP3/DivX®/JPEG Files (continued)
Playing MP3/DivX®/JPEG Files (continued)
ABOUT DIVX VIDEO : DivX® is a digital video format created by DivX, Inc. This is an official DivX Certified device that plays DivX video. Visit www.divx.com for more information and software tools to convert your files into DivX video.
ABOUT DIVX VIDEO-ON-DEMAND: This DivX Certified® device must be registered in order to play DivX Video-on-Demand (VOD) content. To generate the registration code, locate the DivX VOD section in the device setup menu. Go to vod.divx.com with this code to complete the registration process and learn more about DivX VOD.
DivX Certified to play DivX video, including premium content.
DivX ^® is a registered trademark of DivX, Inc., and is used under license.
JPEG files compatibility
JPEG disc compatibility with this DVD player is limited as follows:
- Playable discs:
CD-R (650MB / 74 min. only)
CD-RW may not be compatible.
- CD physical format:
Mode 1, Mode 2 XA Form 1
- File system:
ISO9660 Level 1, 2 or Joliet
- File name:
A file name should be in alphabet and numerals only, and must incorporate "JPG" extension. e.g. "*******.JPG" (Do not name the file with "JPE" or "JPEG" extension.)
• Total number of folders: Less than 100
• Total number of files: Less than 1000
Depending on the file size, some files may not display the entire image.
Some discs may not permit this operation. Especially, the following conditions of included files will increase the disc's disability.
-
Pixels over 4000 x 4000 in height and/or width
-
File size over 16M bytes
-
File format except Exif
■ Zooming in an image
Press ZOOM repeatedly to toggle through Q1, Q2 and Q3.
To return to normal playback, press ZOOM until the Q:Off appears.
Press the ▲/▼/◄/► buttons to view a different part of the image. You may move the image from the centre position to up, down, left and right direction. When you reach the edge of the image, the display will not shift anymore in that direction.
■ Rotating an image
Press the ANGLE button repeatedly. The image will rotate in the clockwise direction as follows:
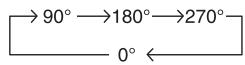
■ Viewing a thumbnail view
Press MENU in the photo list screen 21). e.g.
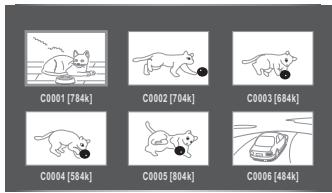
text_image
C0001 [784k]
C0002 [704k]
C0003 [684k]
C0004 [584k]
C0005 [804k]
C0006 [484k]
- Press the ▲ / ▼ / ◀ / ▶ to select an image, press the ENTER button to view one image in full-screen.
- Press SKIP ◀◀◀ / ▶▶▶ I to view other thumbnail screen.
■ Slide Show playback
The Slide Show enables you to view picture (files) one after another automatically.
- Set “JPEG Interval” setting to “5 seconds”, “10 seconds” or “15 seconds” 25.
Playing USB Device
You can connect the USB flash drives (not included) to the USB jack on the front of DVD player.
You can play the files in MP3, DivX ^® or JPEG format stored on a USB flash drive by connecting it to this player.
Connecting to USB flash drive
1 Plug the USB flash drive to the USB jack on the front of DVD player.
A selection menu will appear on the screen if it contains music, picture or video files in the USB device.

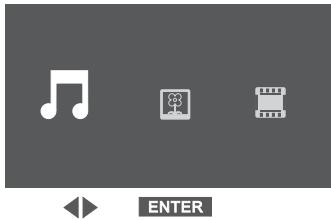
natural_image
Three icons: a musical note, a film strip, and a film reel on a gray background (no text or symbols)
3 Press ◀/▶ to select the Music, Picture or Video icon, and then press ENTER. (please see 21 for details.)
■ To return to DVD mode

- Pressing the DVD button on the remote control to resume DVD playback during USB device stop.
Notes
- It is recommended to plug the USB flash drive when the DVD player is off.
- It does not support USB harddisk mass storage device, multi-card reader and other USB computer peripheral.
- It only supports FAT format (e.g. It does not support NTFS).
- It only supports USB flash drive (max. 4G bytes).
- The unit can recognise up to 127 folders and 999 files only.
- It is not possible to play back files whose file size exceeds 1G bytes.
- The connection may not be available depending on the type of your USB flash drive.
- Do not disconnect the USB flash drive when you are playing it, it may corrupt the data. You may remove it in stop mode or DVD mode.
MP3 Converter (converting CD to USB device)
MP3 Converter allows you to convert tracks on CD to USB device. Connect the USB device first before converting.
SUBTITLE/MP3 CONV.

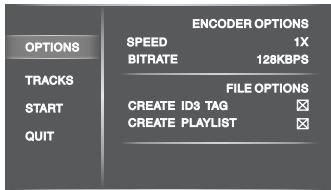
MP3 CONVERTER 1'S
text_image
ENCODER OPTIONS
SPEED 1X
BITRATE 128KBPS
TRACKS FILE OPTIONS
CREATE ID3 TAG
CREATE PLAYLIST
OPTIONS
Press the ▶ button and use the ▲ / ▼ buttons to select the setting option (SPEED, BITRATE, CREATE ID3 TAG or CREATE PLAYLIST), then press the ENTER button to change the setting.
Speed
High speed converting mode can save time when converting from CDs. Select 1x(normal speed) or 2x(double speed) by pressing the ENTER button.
Bitrate
Select 128kbps, 160kbps, 192kbps, 256kbps or 320kbps by pressing the ENTER button.
Create ID3 TAG/Create Playlist
It allows you to create ID3 TAG and playlist for your converted files. The default (☒) is for creating them and press the ENTER button to shift the setting.
- Only CDDA with CD Text supports creating ID3 TAG.
- All converted files will be saved to the folder named as the album of the CD TEXT of the CD (e.g. “#1’S”) with file name as the track number (e.g. if it is track02, it will generate a track02.mp3).
- After creating ID3 TAG, the artist name and the song name also will be converted to the MP3 file, and they will appear during playback.
- After creating Playlist, you can play all tracks in playlist folder you converted if your MP3 player has the playlist function.
TRACKS
Press the ▶ button and use the ▲/▼ buttons to select the tracks you want to convert, then press the ENTER button.
START
Press the ENTER button to start converting.
QUIT
Press the ENTER button to quit the converting menu.
Notes
- MP3 Converter function only supports CDDA discs.
- During 2x converting, the audio output is muted.
- If your discs have the copyright protection, it cannot convert to USB device.

Customizing the Function Settings
You can change the default settings to customize performance to your preference.
- Press SETUP during stop, the system setup menu appears.
- Press ▲ / ▼ button to select the setting item: Language, Subtitle, Audio, DVD Menu or DivX Subtitle.
- Press▶ button, then use ▲/▼ button to select the setting choice on the right.
- Press ENTER button.
- Press SETUP button to exit the menu.
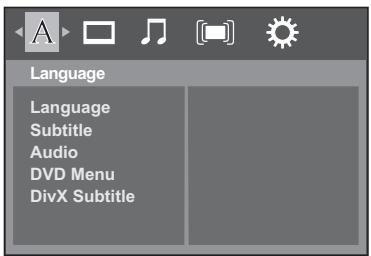
text_image
Language
Language
Subtitle
Audio
DVD Menu
DivX Subtitle
Language DVD VCD CD
To select a preferred language for on-screen displays.
English: To view on-screen displays in English.
Deutsch: To view on-screen displays in German.
Polski: To view on-screen displays in Polish.
Magyar: To view on-screen displays in Hungarian.
Português: To view on-screen displays in Portuguese.
Čeština: To view on-screen displays in Czech.
Italiano: To view on-screen displays in Italian.
Español: To view on-screen displays in Spanish.
Français: To view on-screen displays in French.
Nederlands: To view on-screen displays in Dutch.
Suomi: To view on-screen displays in Finnish.
Ελληνικά: To view on-screen displays in Greek.
Türkçe: To view on-screen displays in Turkish.
Svenska: To view on-screen displays in Swedish.
These menus contain various language options for Subtitle, Audio and DVD Menu which may be recorded on the DVD.
Notes
- Some DVDs may be set to display subtitles in a different language other than your selection. A prior subtitle language may be programmed on the disc.
- Some DVDs allow you to change subtitle selections only via the disc menu. If this is the case, press the MENU button and choose the appropriate subtitle language from the selection on the disc menu.
- Some DVDs may not be played in a different language that you selected. A prior language may be programmed on the disc.
- Some DVDs may not include your pre-selected language. In this case, the DVD player automatically displays disc menus consistent with the disc's initial language setting.
DivX® Subtitle
If your DivX ^® files include a subtitle file, then you may select a supported DivX ^® subtitle language:
Standard (English)
Russian
Czech
Hebrew
Modern Greek
Turkish
Notes
- If your DivX® files do not include the subtitle file, you cannot use this selection.
- Supported subtitle file formats: .srt, .sub, .txt, .smi, .ssa.
- Press SETUP during stop.
- Press ▶ button to select Video.
- Press ENTER button.
-
Press SETUP button to exit the menu.
-
Press ▲ / ▼ button to select the setting item: Aspect Ratio, Video, HDMI Res. or JPEG Interval.
-
Press ▶ button, then use ▲ / ▼ button to select the setting choice on the right.
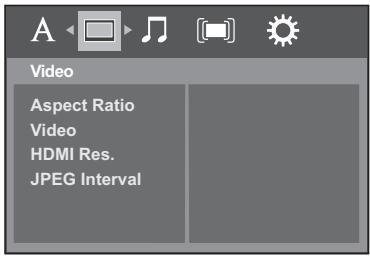
text_image
Video
Aspect Ratio
Video
HDMI Res.
JPEG Interval
TV Shape DVD
Depending on the format of the DVD disc, you can choose the picture format (aspect ratio) best suited to the format of your TV screen.
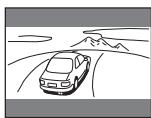
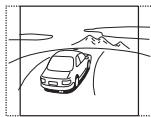
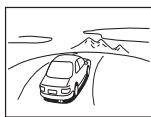
4:3 LB : Select when a standard 4:3 TV is connected.
When wide-screen video is played in this mode on a conventional screen, black bands appear at the top and bottom of the screen.
4:3 PS : Select when a standard 4:3 TV is connected.
Displays pictures cropped to fill your TV screen. Either or both sides of the picture are cut off.
16 : 9 : Select when a 16:9 TV is connected. For playing wide-screen videos on a wide-screen TV.
Notes
- The displayable picture size is preset on the DVD. Therefore, the playback picture of some DVDs may not conform to the picture size you select.
- When you play DVDs recorded in the 4:3 picture size only, and you own a 16:9 TV set, Video output picture will be 16:9 only when you select the TV picture setting on the TV.
- If you select "16:9" and you own a 4:3 TV set, the DVD playback picture will be horizontally distorted during playback. Images will appear to be horizontally compressed. Always be sure that your TV shape conforms to the actual TV in use.
Video DVD VCD CD
The video output of the DVD player can be selected as RGB or HDMI.
RGB: Select if you connect the DVD player to your TV which has RGB inputs by scart cable.
HDMI: High Definition Multimedia Interface. Select if you connect the DVD player to TV via HDMI input.
Note
For the HDMI output, please connect the unit to your TV via HDMI cable 16.
HDMI Res. (Resolution)
You can set the HDMI Res. (resolution) to be Auto, 480p/576p, 720p, 1080i or 1080p, according to the connected TV.
Notes
- Select the HDMI resolution according to the performance of the connected TV.
- If the Video out is not set to "HDMI", you cannot select the "HDMI Res.".
JPEG Interval
To set the JPEG Interval for slide show playback. Select "Off" to disable the slide show feature.
5 seconds: Plays back images in the form of a slide show at 5 seconds interval.
10 seconds: Plays back images in the form of a slide show at 10 seconds interval.
15 seconds: Plays back images in the form of a slide show at 15 seconds interval.
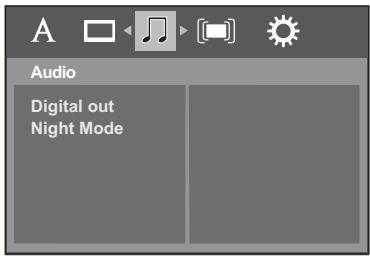
- Press SETUP during stop.
- Press ▶ button to select Audio.
- Press ▲ / ▼ button to select the setting item: Digital out or Night Mode.
- Press ▶ button, then use ▲ / ▼ button to select the setting choice on the right.
- Press ENTER button.
- Press SETUP button to exit the menu.
text_image
Audio
Digital out
Night Mode
Digital out DVD VCD CD
Selects the output sound format corresponding to your system connection.
Off: To disable Digital out.
Bitstream: Disc audio raw data will be output. Select "Bitstream" if your amplifier supports "DTS".
PCM: Select when connected to a Multi-channel digital stereo amplifier. The DVD player outputs sound in the PCM stereo format when you play a DVD recorded on the Dolby Digital, MPEG1 or MPEG2 recording system.
Night Mode DVD
Night mode is equivalent to Dynamic Range Compress. When it is On, it reduces the variations between loud and soft sounds in audio output. You can still hear softer sounds and dialogue even in very low volume.
Note
Night mode is Dynamic Range Control (DRC) option for analogue audio output.
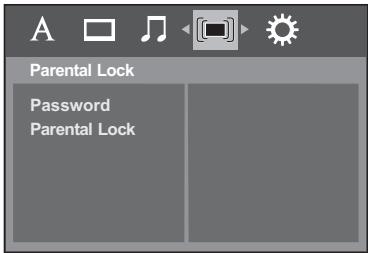
- Press SETUP during stop.
- Press ▶ button to select Parental Lock.
- Press ▲ / ▼ button to select the setting option: Password or Parental Lock.
text_image
Parental Lock
Password
Parental Lock
Password DVD
Press ▲ / ▼ button to select the Password option, then press ▶ button. Enter your 4-digit security code and then press the ENTER button.
If you forget the password, you can erase your current password by pressing number button 8 on the remote control four times, then press ENTER button to confirm the setting. (PASSWORD: 8888)

The Parental lock is active.

The Parental lock is NOT active.
Parental Lock DVD
DVDs equipped with the password function are rated according to their content. The contents allowed by a parental lock level and the way a DVD can be controlled may vary from disc to disc.
For example, if the disc allowed, you could edit out violent scenes unsuitable for children and replace them with more suitable scenes, or you could lock out playback of the disc altogether.
1) Press ▲ / ▼ button to select the Parental Lock option, then press ▶ button.
2) Press ▲/▼ button to select parental lock level and then press the ENTER button.
3) Press ▲ / ▼ button to select the Password option, then press ▶ button. Enter your 4-digit security code and then press the ENTER button.
Customizing the Function Settings (continued)
You cannot play DVD discs rated higher than the level you selected unless you cancel the parental lock function and enter the 4-digit security code. Then press ENTER to confirm the password.
If you forget your password at this moment, you cannot use the super password (8888). You need to go to the Parental Lock setup menu to reset and input a new password.
The parental lock levels are equivalent to the following ratings.
Level 1 : Kid Safe Level 5 : PG-R
Level 2 : G Level 6 : R
Level 3 : PG Level 7 : NC-17
Level 4 : PG-13 Level 8 : Adult
- DVDs may or may not respond to the parental lock settings. This is not a defect in the DVD player. Make sure this function works with your DVDs.
- Parental lock level cannot be changed when the Parental lock is active.
- Press SETUP during stop.
- Press ▶ button to select TV System.
- Press ▲ / ▼ button to select the setting item: Initialization, View DivX(R) VOD, Screen Saver, HDMI CEC or TV System.
- Press ▶ button, then use ▲ / ▼ button to select the setting choice on the right.
- Press ENTER button.
- Press SETUP button to exit the menu.
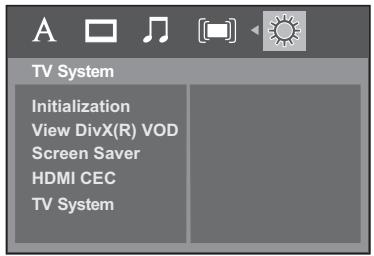
text_image
TV System
Initialization
View DivX(R) VOD
Screen Saver
HDMI CEC
TV System
Initialization DVD VCD CD
This option allows you to return the unit's setting to the factory default. Any changes you have made to the unit's settings will be reverted back to the original setting except your password and parental lock level.
Note
When you reset the DVD player to the factory default, the DVD player will take 3-5 seconds to reset.
View DivX(R) VOD
DivX® Deregistration
DivX ^® deregistration code allows you to deregister your DVD player using the DivX ^® VOD service from the internet, please get the deregistration code as follow:
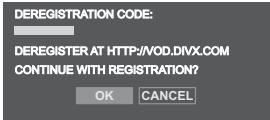
text_image
DEREGISTRATION CODE:
DEREGISTER AT HTTP://VOD.DIVX.COM
CONTINUE WITH REGISTRATION?
OK CANCEL
For more information, please visit http://vod.divx.com
If you want to continue with registration, please select "OK" then press "ENTER" on the remote control.
DivX® Registration
DivX ^® registration code allows you to rent and purchase movies using the DivX ^® VOD service from the internet, please get the registration code of your DVD player as follow:
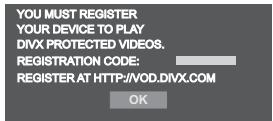
text_image
YOU MUST REGISTER
YOUR DEVICE TO PLAY
DIVX PROTECTED VIDEOS.
REGISTRATION CODE:
REGISTER AT HTTP://VOD.DIVX.COM
OK
Registration service at http://vod.divx.com
Follow the instructions and download the movie from your computer onto a CD-R/RW or DVD±R/RW for playback on this DVD player.
Note
This registration code is for DivX® Video-On-Demand only. Do not apply this code for other applications or websites.
Screen Saver
To turn on or off the screen saver (screen protection to prevent image burn).
Note
When you leave the unit in DVD stop mode for approximately 2 minutes, the screen saver of the DVD player automatically appears if you set the Screen Saver to On mode. To turn off the screen saver, press the PLAY button.
HDMI CEC
You can control this DVD unit from TV's remote which is connected via HDMI cable.
Functions available for the HDMI-CEC
- One touch play
When the operations with following buttons of this unit's remote control are performed, the TV will automatically switch to appropriate input channel.
Button for one touch play: [PLAY] (make sure a disc is inserted.)
This unit recognizes the OSD languages set for the TV and automatically set the same language as the player menu language (OSD menu language) for this unit.
Power off:
When you turn the TV off, this unit will automatically turn off.
Receiving operational signal from TV's Remote:
You can operate this unit with TV's remote control. Check your TV owner's manual for details.
Notes
- This function may not work properly depending on the TV you are connecting.
- If the Video out is not set to "HDMI", HDMI-CEC will not work.
- Other components must be compatible with HDMI-CEC in order to use this function.
TV System
NTSC: Select if your TV system is NTSC.
PAL: Select if your TV system is PAL.
Auto: The DVD player automatically identifies PAL or NTSC video system of a disc. Connect a multisystem TV (PAL / NTSC compatible) to view a picture. A playback picture may be distorted when detected a signal change between PAL and NTSC on the disc. For the case of Progressive mode, your multisystem TV must be able to support 525p and 625p.
Symptoms and correction
| Symptom | Cause | Correction | Page |
| No power. | The power plug is disconnected. | Connect the power plug securely into the wall outlet. | 15-16 |
| The DVD player turned off by itself. | The automatic power off function turned the unit off. | Press the PLAY button. | 20 |
| No picture. | The TV is not set to receive DVD signal output. | Select the appropriate video input mode on the TV so the picture from the DVD player appears on the TV screen. | 20 |
| The video/HDMI cable is not connected securely. | Connect the video/HDMI cable securely into the appropriate jacks. | 15-16 |
| Mismatch setting between TV and this unit. | Select the correct Video out setting. | 25 |
| Wrong connection. | Check the connection. | 15-16 |
| No sound. | The equipment connected with the audio cable is not set to receive DVD signal output. | Select the correct input mode of the audio receiver so you can listen to the sound from the DVD player. | 20 |
| The audio cable is not connected securely. | Connect the audio cable securely into the appropriate jacks. | 15-19 |
| The audio receiver or TV is turned off. | Turn on the equipment connected with the audio cable. | 20 |
| The setting of output sound format is incorrect. | Select the proper audio setting. | 25 |
| The playback picture has occasional distortion. | The disc is dirty. | Remove the disc and clean it. | 6 |
| It is in fast forward or fast reverse playback. | Sometimes a small amount of picture distortion may appear. This is not a malfunction. | - |
| Brightness is unstable or noises are present in the playback pictures. | The effect of copy protection. | Connect the DVD player directly to the TV. Avoid connecting the DVD player to a VCR or TV/VCR combination. | 15 |
| The DVD player does not start playback. | No disc is inserted. | Insert a disc. | 20 |
| An unplayable disc is inserted. | Insert a playable disc. (Check the disc type and colour system.) | 7 |
| The disc is placed upside down. | Place the disc with the playback side down. | 20 |
| The disc is not placed within the guide. | Place the disc correctly inside the guide on the disc tray. | 20 |
| The disc is dirty. | Clean the disc. | 6 |
| The parental lock function is set. | Cancel the parental lock function or change the parental lock level. | 25 |
| Playback does not follow the course of the disc's program. | It is in the mode of repeat playback, memory playback, etc. | These operations may prevent a proper progress of the contents. | - |
| Buttons do not work. | Power supply fluctuations or other abnormalities such as static electricity may interrupt correct operations. | Press and hold the ON/STANDBY button on the front panel for more than about 3 seconds. The DVD player turns off. Press the button again to turn it on. If the buttons still do not work, disconnect the power plug and insert it into the wall outlet again. | - |
| The remote control does not work properly. | The remote control is not pointed at the remote sensor of the DVD player. | Point the remote control at the remote sensor of the DVD player. | 10 |
| The remote control is too far from the DVD player. | Operate the remote control within about 7 m. | 10 |
| The batteries in the remote control are exhausted. | Replace the batteries with new ones. | 10 |
DVD player / outputs / supplied accessories
DVD Player
| Power supply | 100V - 240 V AC, 50/60 Hz |
| Power consumption | 9 W (standby: less than 1.0W) |
| Mass | 1.30 kg |
| External dimensions | 430 x 42 x 209 mm (W/H/D) |
| Signal system | PAL/3.58 NTSC |
| Laser | Semiconductor laser, wavelength 650/780 nm |
| Frequency range | DVD linear sound : 48 kHz sampling 4 Hz to 22 kHz96 kHz sampling 4 Hz to 44 kHz |
| Signal-to-noise ratio | More than 93 dB |
| Audio dynamic range | More than 80 dB |
| Harmonic distortion | Less than 0.05 % |
| Wow and flutter | Below measurable level (less than ±0.001 % (W.PEAK)) |
| Operating conditions | Temperature: 5 °C to 35 °C, Operation status: Horizontal |
Outputs
| Video output (SCART with RGB) | 1.0 V (p-p), 75 Ω, SCART socket x 1 |
| Video output | 1.0 V (p-p), 75 Ω, pin jack x 1 |
| Audio output (SCART) | 2.0 V (rms), 680 Ω, SCART socket x 1 |
| Audio output (COAXIAL DIGITAL) | 0.5V (p-p), 75 Ω, pin jack x 1 |
| Audio output (ANALOG) | 2.0 V (rms), 680 Ω, pin jacks (L, R) x 1 |
| HDMI output | 19 pin |
Supplied Accessories
| Remote control (SE-R0374)......1 |
| Batteries (R03/AAA)......2 |
- This model complies with the above specifications.
- Designs and specifications are subject to change without notice.
- This model may not be compatible with features and/or specifications that may be added in the future.
The use of the symbol indicates that this product may not be treated as household waste. By ensuring this product is disposed of correctly, you will help prevent potential negative consequences for the environment and human health, which could otherwise be caused by inappropriate waste handling of this product. For more information about recycling of this product, please contact your local city office, your household waste disposal service or the shop where you purchased the product.
Disposal of batteries and/or accumulators
The crossed out wheeled dust bin symbol indicates that batteries and/or accumulators must be collected and disposed of separately from household waste.
If the battery or accumulator contains more than the specified values of lead (Pb), mercury (Hg), and/or cadmium (Cd) defined in the Battery Directive (2006/66/EC), then the chemical symbols for lead (Pb), mercury (Hg) and/or cadmium (Cd) will appear below the crossed out wheeled dust bin symbol.
By participating in separate collection of batteries, you will help to assure the proper disposal of products and batteries and thus help to prevent potential negative consequences for the environment and human health.
For more detailed information about the collection and recycling programmes available in your country, please contact your local city office or the shop where you purchased the product.
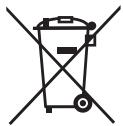
Pb, Hg, Cd