
AC1040 - Accessoires pour outils électriques RIDGID - Notice d'utilisation et mode d'emploi gratuit
Retrouvez gratuitement la notice de l'appareil AC1040 RIDGID au format PDF.

| Type de produit | Insert pour scie à table (dado/molding head insert) |
| Marque | RIDGID |
| Modèle | AC1040 |
| Compatibilité | Scies RIDGID TS3650 et TS2400LS 10" |
| Diamètre de jeu de couteaux | 6 à 8 pouces |
| Diamètre de tête de moulure | Jusqu'à 8 pouces |
| Matériau | Métal |
| Fonctions principales | Permet l'utilisation de jeux de couteaux à rainurer et de têtes de moulure |
| Installation | Remplace l'insert standard, se fixe avec une vis à tête fraisée et quatre vis de réglage |
| Réglage | Alignement de l'insert avec la surface de la table à l'aide des vis de réglage |
| Sécurité | Débrancher la scie avant de manipuler l'insert ; ne jamais incliner l'arbre en marche |
| Entretien et nettoyage | Garder l'insert propre et exempt de résidus ; vérifier périodiquement le serrage des vis |
| Poids | Environ 0,2 kg |
| Dimensions (L x l x h) | Environ 25 x 15 x 0,6 cm |
| Pièces détachées | Vis de réglage et vis à tête fraisée disponibles auprès du fabricant |
| Réparabilité | Réglages simples par l'utilisateur ; contacter le service client pour toute pièce endommagée |
FOIRE AUX QUESTIONS - AC1040 RIDGID
Questions des utilisateurs sur AC1040 RIDGID
0 question sur cet appareil. Repondez a celles que vous connaissez ou posez la votre.
Poser une nouvelle question sur cet appareil
Téléchargez la notice de votre Accessoires pour outils électriques au format PDF gratuitement ! Retrouvez votre notice AC1040 - RIDGID et reprennez votre appareil électronique en main. Sur cette page sont publiés tous les documents nécessaires à l'utilisation de votre appareil AC1040 de la marque RIDGID.
MODE D'EMPLOI AC1040 RIDGID
DUBIR®
AC1040
OPERATOR'S MANUAL

natural_image
Technical drawing of a hollow cylindrical mechanical part with a rectangular slot (no text or symbols)■ Use AC1040 With 6 to 8-Inch Diameter Dado Sets or up to 8-Inch Cutting Diameter Molding Head
■ Fits RIDGID Model TS3650 and TS2400LS 10" Table Saws
DADO/MOLDING HEAD INSERT
- Operation
QUESTIONS OR COMMENTS?
CALL 1-866-539-1710
www.ridgidwoodworking.com
For Your Safety:
Read all instructions carefully
General Safety Instructions for Power Tools
1. Know Your Power Tool
Read and understand the operator's manual and labels affixed to the tool. Learn the tool's application and limitations as well as the specific potential hazards peculiar to this tool.
2. Ground Your Tool
If your tool is equipped with an approved 3-conductor cord and a 3-prong grounding type plug to fit the proper grounding type receptacle. The green conductor in the cord is the grounding wire. Never connect the green wire to a live terminal.
3. Keep Guards In Place
In working order, and in proper adjustment and alignment.
4. Remove Adjusting Keys And Wrenches
Form habit of checking to see that keys and adjusting wrenches are removed from tool before turning it on.
5. Keep Work Area Clean
Cluttered areas and benches invite accidents. Floor must not be slippery due to wax or sawdust.
6. To Reduce The Risk Of Dangerous Environment
Don't use power tools in damp or wet locations or expose them to rain. Keep work area well lit. Provide adequate surrounding work space.
7. Keep Children Away
All visitors should be kept a safe distance from work area.
8. Make Workshop Child-proof
With padlocks, master switches, or by removing starter keys.
9. Don't Force Tool
It will do the job better and safer at the rate for which it was designed.
10. Use Right Tool
Don't force tool or attachment to do a job it was not designed for.
11. Wear Proper Apparel
No loose clothing, gloves, neckties or jewelry (rings, wristwatches), to get caught in moving parts. NON-SLIP footwear is recommended. Wear protective hair covering to contain long hair. Roll long sleeves above the elbow.
12. Use Safety Goggles (Head Protections)
WARNING: The operation of any power tool can result in foreign objects being thrown into your eyes, which can result in severe eye damage. Before beginning tool operation, always wear safety goggles or safety glasses with side shields and a full face shield when needed. We recommend Wide Vision Safety Mask for use over eyeglasses or standard safety glasses with side shields. Always wear eye protection which is marked to comply with ANSI Z87.1.

natural_image
Silhouette of a person wearing a smart glasses, enclosed in a circular frame (no text or symbols)Also, use face or dust mask if cutting operation is dusty, and ear protectors (plugs or muffs) during extended periods of operation.
13. Secure Work
Use clamps or a vise to hold work when practical. It's safer than using your hand, frees both hands to operate tool.
14. Don't Overreach
Keep proper footing and balance at all times.
15. Maintain Tools With Care
Keep tools sharp and clean for best and safest performance. Follow instructions for lubricating and changing accessories.
16. Disconnect Tools
Before servicing; when changing accessories such as blades, bits, cutters, etc.
17. To Reduce The Risk Of Accidental Starting
Make sure switch is in "OFF" position before plugging in. Turn switch "OFF" in the event of a power failure.
18. Use Recommended Accessories
Consult the operator's manual for recommended accessories. Follow the instructions that accompany the accessories. The use of improper accessories may cause hazards.
19. Never Stand On Tool
Serious injury could occur if the tool is tipped or if the cutting tool is accidentally contacted.
Do not store material above or near the tool such that it is necessary to stand on the tool to reach them.
20. Check Damaged Parts
Before further use of the tool, a guard or other part that is damaged should be carefully checked to ensure that it will operate properly and perform its intended function. Check for alignment of moving parts, binding of moving parts, breakage of parts, mounting, and any other conditions that may affect its operation. A guard or other part that is damaged should be properly repaired or replaced. If power cord is worn or cut, or damaged in any way, have it replaced immediately.
21. Direction Of Feed
Feed work into a blade or cutter against the direction of rotation of the blade or cutter only.
22. Never Leave Tool Running Unattended.
Turn power off. Don't leave tool until it comes to a complete stop.

WARNING: For your own safety, turn
switch “OFF” and remove plug from power source outlet before removing insert.
- Unplug the saw.
- Remove the blade guard, the saw blade insert, and the saw blade.
- To remove insert:
a. Make sure saw is off and unplugged.
b. Loosen flathead screw.
c. Lift insert from front end, and pull toward front of saw.
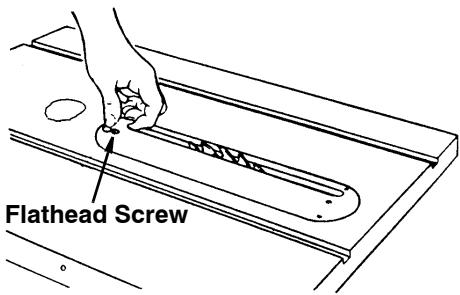
text_image
Flathead Screw
WARNING: To reduce the risk of
injury from accidental start, make sure switch is “OFF” and plug is not connected to power source outlet.
- Insert should be flush with table top.
Check as shown. Loosen flathead screw that holds insert and adjust the four set screws as necessary. Tighten flathead screw. Do not tighten screw to the point where it bends the insert.

CAUTION: Insert must be even with
the table surface. Inserts too high or low can let the workpiece “snag” or catch on uneven edges. Workpiece could twist and kick back.

natural_image
Line drawing of hands using a tool to cut or mark a component on a flat surface (no text or symbols)Use Set Screw Wrench
Furnished with Saw
- Remove the dado/molding insert and install the dado set or molding head... replace the insert.
Using the Dado and Molding Insert
NOTE: Do not install the outer loose collar (the one next to the arbor nut) when installing the dado set or molding head.
- Before using the dado set or the molding head...or the insert, read and understand the Safety and Operating instructions contained in the Operator's Manual furnished with your table saw
and the instructions furnished with your dado set or molding head.
-
The dado set or molding head can be used with the saw arbor tilted BUT NOT IN ALL POSITIONS... NEVER TILT THE ARBOR WHILE THE SAW IS RUNNING.
-
Rotate the dado set or molding head manually, (don't touch it with your fingers, but use a stick of wood) to be sure it clears the insert before connecting the power cord to the electrical outlet in your shop.

WARNING: Always rotate the cutter annually with the saw unplugged to as- be there is no contact with the saw or in it. Failure to heed this warning can result in serious personal injury.
-
Never operate the saw without the proper insert installed.
-
When replacing the saw blade and saw blade insert, always replace the blade guard.
DURBIR®
One World Technologies, Inc.
Hwy. 8
Pickens, SC 29671
QUESTIONS OR COMMENTS?
CALL 1-866-539-1710
www.ridgidwoodworking.com