
ANTI-VIRUS 6.0 SOS MP4 - Logiciel de sécurité KASPERSKY LAB - Notice d'utilisation et mode d'emploi gratuit
Retrouvez gratuitement la notice de l'appareil ANTI-VIRUS 6.0 SOS MP4 KASPERSKY LAB au format PDF.


| Type de produit | Logiciel antivirus |
| Version | 6.0 |
| Compatibilité | Windows, Mac OS, Android |
| Fonctions principales | Protection en temps réel, analyse des fichiers, protection contre les logiciels malveillants |
| Interface utilisateur | Interface graphique conviviale |
| Mises à jour | Mises à jour automatiques des définitions de virus |
| Support technique | Assistance en ligne et par téléphone |
| Langues disponibles | Multilingue |
| Conditions système requises | Processeur 1 GHz, 1 Go de RAM, 1 Go d'espace disque |
| Installation | Installation facile via un assistant d'installation |
| Entretien et nettoyage | Vérification régulière des mises à jour et des analyses programmées |
| Durée de la licence | 1 an |
| Politique de remboursement | Remboursement sous 30 jours si insatisfaction |
FOIRE AUX QUESTIONS - ANTI-VIRUS 6.0 SOS MP4 KASPERSKY LAB
Questions des utilisateurs sur ANTI-VIRUS 6.0 SOS MP4 KASPERSKY LAB
0 question sur cet appareil. Repondez a celles que vous connaissez ou posez la votre.
Poser une nouvelle question sur cet appareil
Téléchargez la notice de votre Logiciel de sécurité au format PDF gratuitement ! Retrouvez votre notice ANTI-VIRUS 6.0 SOS MP4 - KASPERSKY LAB et reprennez votre appareil électronique en main. Sur cette page sont publiés tous les documents nécessaires à l'utilisation de votre appareil ANTI-VIRUS 6.0 SOS MP4 de la marque KASPERSKY LAB.
MODE D'EMPLOI ANTI-VIRUS 6.0 SOS MP4 KASPERSKY LAB
Kaspersky Anti-Virus 6.0 SOS MP4
USERGUIDE
APPLICATION VERSION: 6.0 MAINTENANCE PACK 4, CRITICAL FIX 1

Dear User of Kaspersky Anti-Virus!
Thank you for choosing our product. We hope that this documentation helps you in your work and provides answers you may need.
Any type of reproduction or distribution of any materials, including in translated form, is allowed only with the written permission of Kaspersky Lab.
This document and the graphic images it contains may be used exclusively for information, non-commercial or personal purposes.
This document is subject to change without prior notification. For the latest version of this document please refer to Kaspersky Lab's website at http://www.kaspersky.com/docs.
Kaspersky Lab assumes no liability for the content, quality, relevance or accuracy of any materials used in this document for which the rights are held by third parties, or for the potential damages associated with using such documents.
This document involves the registered trademarks and service marks which are the property of their respective owners.
Revision date: 25.02.2010
© 1997-2010 Kaspersky Lab ZAO. All Rights Reserved.
http://www.kaspersky.com
http://support.kaspersky.com
TABLE OF CONTENTS
INTRODUCTION 7
Distribution Kit. 7
End user license agreement (EULA) 7
Services provided for registered users. 7
Hardware and software system requirements. 8
KASPERSKY ANTI-VIRUS 6.0 SOS MP4. 9
Obtaining information about the application 9
Sources of information to research on your own 9
Contacting the Sales Department 10
Contacting the Technical Support service 10
Discussing Kaspersky Lab's applications on the web forum 11
What's new in Kaspersky Anti-Virus 6.0 SOS MP4. 11
Kaspersky Anti-Virus 6.0 SOS MP4 13
Virus scan tasks 13
Update. 13
Support features of the application 13
INSTALLING KASPERSKY ANTI-VIRUS 15
Installation using the Installation Wizard 15
Step 1. Verifying that the system meets the installation requirements 16
Step 2. Installation start window 16
Step 3. Viewing the License Agreement 16
Step 4. Selecting installation folder 16
Step 5. Using application settings saved after previous installation 17
Step 6. Selecting the type of the installation. 17
Step 7. Selecting application components for the installation 17
Step 8. Searching for other anti-virus applications 18
Step 9. Completing the installation 18
Application installation from the command line 18
Installation from Group Policy Object editor 18
Installing the application 18
Description of setup.ini file settings 19
Updating application version 19
Removing the application 20
GETTING STARTED 21
Initial Configuration Wizard 21
Activating the application 22
Update settings configuration 23
Configuring virus scan schedule 24
Restricting access to the application 24
Finishing the Configuration Wizard 24
Scanning computer for viruses 25
Updating the application 25
Managing licenses 25
Security management 26
Eliminating problems. User technical support 27
Creating a trace file 28
Configuring application settings 28
Application operation reports. Data files 29
APPLICATION INTERFACE 30
Taskbar notification area icon 30
Context menu 31
Main application window 31
Notifications 33
Application settings window 33
SCANNING COMPUTER FOR VIRUSES 34
Starting the virus scan 35
Creating a list of objects to scan 36
Changing security level 37
Changing actions to be performed on detected objects 37
Changing the type of objects to scan 38
Scan optimization 39
Scan of compound files. 40
Changing the scan method 40
Scan technology 41
Computer performance during task execution 41
Run mode: specifying an account 42
Run mode: creating a schedule 42
Features of scheduled task launch 43
Virus scan statistics 43
Assigning common scan settings for all tasks 43
Restoring default scan settings 44
KASPERSKY ANTI-VIRUS UPDATE 45
Starting the update 46
Rolling back the last update 47
Selecting an update source 47
Regional settings 48
Using a proxy server 48
Run mode: specifying an account 48
Run mode: creating a schedule 49
Changing the update task's run mode 49
Selecting objects to update 50
Updating from a local folder 50
Update statistics 51
Possible problems during the update 51
CONFIGURING APPLICATION SETTINGS 56
Protection. 57
Launching the application at the operating system startup 57
Selecting detectable threat categories 58
Creating a trusted zone 58
Exporting / importing Kaspersky Anti-Virus settings 61
Restoring the default settings 62
Scan 62
Update 63
Options 63
Application self-defense 64
Restricting access to the application 64
Notifications about Kaspersky Anti-Virus events 64
Active interface elements 66
Reports and Storages 67
Principles of handling reports 67
Configuring reports 68
Quarantine for potentially infected objects 68
Actions on quarantined objects 69
Backup copies of dangerous objects 69
Working with backup copies 70
Configuring quarantine and backup 70
VALIDATING KASPERSKY ANTI-VIRUS SETTINGS 71
Test "virus" EICAR and its modifications 71
72
TYPES OF NOTIFICATIONS 73
Malicious object detected 73
Object cannot be disinfected. 74
Suspicious object detected 74
WORKING WITH THE APPLICATION FROM THE COMMAND LINE 76
Viewing Help 77
Virus scan 77
Updating the application 79
Rolling back the last update 80
Starting / stopping tasks run 80
Statistics on a component's operation or a task 81
Exporting protection settings 81
Importing protection settings 82
Activating the application 82
Restoring a file from quarantine 82
Closing the application 83
Obtaining a trace file 83
Return codes of the command line 83
MODIFYING, REPAIRING, OR REMOVING THE APPLICATION 85
Modifying, repairing, and removing the application using the Installation Wizard 85
Step 1. Installation Welcome window 85
Step 2. Selecting an operation 85
Step 3. Completing application modification, repair, or removal 86
Removing the application from the command prompt. 86
MANAGING THE APPLICATION VIA KASPERSKY ADMINISTRATION KIT 88
Managing the application 90
Starting and stopping the application 91
Configuring application settings 92
Configuring specific settings 94
Managing tasks 95
Starting and stopping tasks 96
Creating tasks 97
Local Task Wizard 98
Configuring tasks 99
Managing policies 100
Creating policies. 100
Policy Creation Wizard 101
Configuring the policy 103
USING THIRD-PARTY CODE 105
Boost-1.30.0 library 106
LZMA SDK 4.40, 4.43 library 106
Windows Template Library 7.5 106
Windows Installer XML (WiX) toolset 2.0 library 107
ZIP-2.31 library 110
ZLIB-1.0.4, ZLIB-1.0.8, ZLIB-1.1.3, ZLIB-1.2.3 library 111
UNZIP-5.51 library 111
LIBPNG-1.0.1, LIBPNG-1.2.8, LIBPNG-1.2.12 library 112
LIBJPEG-6B library 114
LIBUNGIF-4.1.4 library 116
MD5MESSAGE-DIGEST ALGORITHM-REV.2 library. 116
MD5MESSAGE-DIGEST ALGORITHM-V.18.11.2004 library 116
INDEPENDENT IMPLEMENTATION OF MD5 (RFC 1321)-V.04.11.1999 library 116
CONVERSION ROUTINES BETWEEN UTF32, UTF-16, AND UTF-8-V. 02.11.2004 library 117
COOL OWNER DRAWN MENUS-V. 2.4, 2.63 By Brent Corkum library 117
PLATFORM INDEPENDENT IMAGE CLASS library. 117
FLEXPARSER(FLEXLER)-V.1993library 118
ENSURECLEANUP, SWMRG, LAYOUT-V. 2000 library 118
STDSTRING-V.1999 library 119
T-REX (TINY REGULAR EXPRESSION LIBRARY)- V. 2003-2006 library 119
NTSERVICE-V.1997 library 120
SHA-1-1.2 library 120
COCOA SAMPLE CODE- V. 18.07.2007 library. 121
Other information 121
GLOSSARY 122
KASPERSKY LAB. 128
LICENSE AGREEMENT 129
INDEX 134
INTRODUCTION
IN THIS SECTION
Distribution Kit 7
Services provided for registered users 7
Hardware and software system requirements 8
DISTRIBUTION KIT
You can purchase the boxed version of Kaspersky Anti-Virus from our resellers, or purchase it from online stores, such as the eStore section at http://www.kaspersky.com.
If you purchase the boxed version of the product, the package will include:
Sealed envelope with the installation CD containing the program files and documentation in PDF format.
- User Guide in printed form (if this item has been included in the order), or Product Guide.
- Application key file attached to the installation CD envelope.
- Registration card (with serial number of the product).
End user license agreement (EULA).
Before unsealing the installation CD envelope, carefully read through the EULA.
If you buy Kaspersky Anti-Virus from eStore, you will download the product from the Kaspersky Lab website; the present User Guide is included with the installation package. You will be sent a key file by email after your payment has been received.
END USER LICENSE AGREEMENT (EULA)
The End User License Agreement is a legal agreement between you and Kaspersky Lab that specifies the terms under which you may use the software you have purchased.
Read the EULA through carefully!
If you do not agree with the terms of the EULA, you can return your boxed product to the reseller from whom you purchased it, and be reimbursed the amount you paid for the application, provided that the envelope containing the installation disk is still sealed.
By opening the sealed envelope with the installation CD, you accept all the terms of the EULA.
SERVICES PROVIDED FOR REGISTERED USERS
Kaspersky Lab offers an extensive service package to all legally registered users, thus enabling them to boost the application's performance.
After purchasing a license, you become a registered user and, during the period of your license, you will be provided with the following services:
hourly updates to the application databases and updates to the software package;
- support on issues related to the installation, configuration and use of the purchased software product. Services will be provided by phone or by email;
- notifications about new Kaspersky Lab products and new viruses appearing worldwide. This service is available to users who have subscribed to Kaspersky Lab news mailing at the Technical Support Service website (http://support.kaspersky.com/subscribers/).
Support on issues related to the performance and the use of operating systems, third-party software, or other technologies, is not provided.
HARDWARE AND SOFTWARE SYSTEM REQUIREMENTS
For a proper functioning of Kaspersky Anti-Virus 6.0, the computer should meet these minimum requirements:
General requirements:
300 MB free hard drive space.
Microsoft Internet Explorer 6.0, or higher (for updating application databases and program modules via the Internet).
- Microsoft Windows Installer 2.0, or higher.
Microsoft Windows 2000 Professional (Service Pack 4 Rollup1), Microsoft Windows XP Professional (Service Pack 2, or higher), Microsoft Windows XP Professional x64 (Service Pack 2, or higher):
Intel Pentium 300 MHz 32-bit (x86) / 64-bit (x64) processor, or higher (or a compatible equivalent).
256 MB free RAM.
Microsoft Windows Vista Business / Enterprise / Ultimate (Service Pack 1, or higher), Microsoft Windows Vista Business / Enterprise / Ultimate x64 (Service Pack 1, or higher), Microsoft Windows 7 Professional / Enterprise / Ultimate, Microsoft Windows 7 Professional / Enterprise / Ultimate x64:
Intel Pentium 800 MHz 32-bit (x86) / 64-bit (x64) processor, or higher (or a compatible equivalent).
512 MB free RAM.
KASPERSKY ANTI-VIRUS 6.0 SOS MP4
Kaspersky Anti-Virus 6.0 SOS MP4 is a new generation of data security products.
The primary difference between Kaspersky Anti-Virus 6.0 SOS MP4 and existing products is that this application is a supplemental anti-virus protection tool designed for virus scan. At the same time, Kaspersky Anti-Virus 6.0 SOS MP4 is able to cooperate with other anti-virus applications without any conflicts.
IN THIS SECTION
Obtaining information about the application 9
What's new in Kaspersky Anti-Virus 6.0 SOS MP4 11
Kaspersky Anti-Virus 6.0 SOS MP4 13
OBTAINING INFORMATION ABOUT THE APPLICATION
If you have any questions regarding purchasing, installing, or using Kaspersky Anti-Virus, answers are readily available.
Kaspersky Lab provides various sources of information about the application. You can choose the most suitable of them, with regard to your question's importance and urgency.
IN THIS SECTION
Sources of information to research on your own 9
Contacting the Sales Department. 10
Contacting the Technical Support service 10
Discussing Kaspersky Lab's applications on the web forum 11
SOURCES OF INFORMATION TO RESEARCH ON YOUR OWN
You may refer to the following sources of information about the application:
- application page at the Kaspersky Lab website;
- application page at the Technical Support Service website (in the Knowledge Base);
help system;
documentation.
Application page at the Kaspersky Lab website
http://www.kaspersky.com/kaspersky anti-virus sos
This page will provide you with general information on the application, its features and options.
Application page at the Technical Support Service website (Knowledge Base)
http://support.kaspersky.com/sos6
On this page, you will find the articles created by Technical Support Service specialists.
These articles contain useful information, recommendations and FAQ on purchasing, installation and use of the application. They are assorted by their subject, such as Managing key files, Setting database updates, or Eliminating operation failures. The articles may provide answers to the questions that concern not only this application but the other Kaspersky Lab products as well; they may also contain the news from Technical Support service.
Help system
The application installation package includes the full and context help file that contains the information about how to manage the computer protection (view protection status, scan various computer areas for viruses, execute other tasks), and the information on each application window such as the list of its proper settings and their description, and the list of tasks to execute.
To open the help file, click the Help button in the required window, or press the
Documentation
Kaspersky Anti-Virus installation package includes the User Guide document (in .pdf format). This document contains descriptions of the application's features and options as well as main operation algorithms.
CONTACTING THE SALES DEPARTMENT
If you have questions about selecting or purchasing the application or extending your license, please phone the Sales Department in our Moscow Central Office, at:
+7 (495) 797-87-00, +7 (495) 645-79-39, +7 (495) 956-70-00
The service languages are Russian and English.
You can also send your questions to the Sales Department by email: sales@kaspersky.com.
CONTACTING THE TECHNICAL SUPPORT SERVICE
If you have already purchased Kaspersky Anti-Virus, you can obtain information about it from the Technical Support service, either over the phone or via the Internet.
Technical Support service specialists will answer any of your questions about installing and using the application. They will also help you eliminate the consequences of malware activities if your computer has been infected.
Before contacting the Technical Support Service, please read the Technical Support Terms and Conditions (http://support.kaspersky.com/support/rules).
An email request to the Technical Support Service
You can send your question to the Technical Support Service specialists by filling out the Helpdesk web form (http://support.kaspersky.com/helpdesk.html).
You can ask your question in Russian, English, German, French or Spanish.
In order to send an email request, you must indicate the customer ID obtained during the registration at the Technical Support Service website along with the password.
If you are not a registered user of Kaspersky Lab's applications yet, you can fill out a registration form at https://support.kaspersky.com/en/personalcabinet/registration/form/. When registering, you will have to enter the activation code or the name of your license key file.
The Technical Support Service will respond to your request in your Kaspersky Account (https://support.kaspersky.com/en/PersonalCabinet) and by the email you have specified in your request.
Describe the problem you have encountered in the request web form providing as much detail as possible. Specify the following in the mandatory fields:
- Request type. Select the subject that corresponds to the problem the most strictly, for example: Problem with product installation/uninstallation, or Problem with searching/eliminating viruses. If you have not found an appropriate topic, select "General Question".
Application name and version number. - Request text. Describe the problem you have encountered providing as much details as possible.
- Customer ID and password. Enter the client number and the password you have received during the registration at the Technical Support service website.
- Email address. The Technical Support service will send an answer to your question to this email address.
Technical support by phone
If you have an urgent problem you can call your local Technical Support service. Before contacting Russian-speaking (http://support.kaspersky.ru/support/support_local) or international (http://support.kaspersky.com/support/international) Technical Support specialists, please gather the information (http://support.kaspersky.com/support/details) about your computer and the anti-virus application installed on it. This will let our specialists help you more quickly.
DISCUSSING KASPERSKY LAB'S APPLICATIONS ON THE WEB FORUM
If your question does not require an urgent answer, you can discuss it with Kaspersky Lab's specialists and other users in our forum at http://forum.kaspersky.com.
In this forum you can view existing topics, leave your comments, create new topics and use the search engine.
WHAT'S NEW IN KASPERSKY ANTI-VIRUS 6.0 SOS MP4
Kaspersky Anti-Virus 6.0 is a comprehensive data protection tool. The application allows to perform centralized scan of workstations in a corporate LAN without any compatibility problems with other anti-virus software.
Let us take a closer look at the innovations in Kaspersky Anti-Virus 6.0.
New in protection:
- The new antivirus kernel that Kaspersky Anti-Virus uses detects malicious programs more effectively. The new antivirus kernel is also significantly faster in scanning the system for viruses. This is the result of improved object processing and optimized use of computer resources (particularly for dual or quad core processors).
- A new heuristic analyzer has been implemented, providing more accurate detection and blocking of previously unknown malicious programs. If a program's signature has not been found in anti-virus databases, the heuristic analyzer simulates the launch of the program in an isolated virtual environment. This method is secure and allows for analyzing all of the effects of a program before it runs in a real environment.
- The update procedure for the application has been improved. The computer now rarely needs to be restarted.
New interface features:
- The interface makes the features of the program simple and easy to access.
- The interface has been redesigned with regard to the needs of administrators of small to midsized networks as well as administrators of large corporate networks.
New features in Kaspersky Administration Kit:
- A feature has been added that enables remote installation of the application with the latest version of the application databases.
- Management of the application when installed on a remote computer has been improved (policy structure has been redesigned).
- A feature has been added that allows to use an existing application configuration file when creating a policy.
- Another important feature is realized in option of creating specific configurations for mobile users when configuring group update tasks.
KASPERSKY ANTI-VIRUS 6.0 SOS MP4
Kaspersky Anti-Virus includes:
Virus scan tasks with which the computer or separate files, folders, disks, or areas are scanned for viruses.
- Update, ensuring the up-to-date status of the internal application modules, and the databases used to scan for malicious programs.
Support Features that provide information support for working with the program and expanding its capabilities.
IN THIS SECTION
Virus scan tasks 13
Update 13
Support features of the application 13
VIRUS SCAN TASKS
It is extremely important to scan your computer for viruses periodically. For this purpose the following virus scan tasks are included in Kaspersky Anti-Virus:
Scan
Scan of objects selected by the user. You can scan any object in the computer's file system.
Full Scan
A thorough scan of the entire system. The following objects are scanned by default: system memory, programs loaded at startup, system backup, email databases, hard drives, removable storage media, and network drives.
Quick Scan
Virus scan of operating system startup objects.
UPDATE
To block any network attack, delete a virus or other malicious program, Kaspersky Anti-Virus should be regularly updated. The Update component is designed for that purpose. It handles the update of databases and modules used by the application.
The update distribution service allows saving database updates and program modules downloaded from Kaspersky Lab servers to a local folder and then granting access to them to other computers on the network to save network traffic.
SUPPORT FEATURES OF THE APPLICATION
Kaspersky Anti-Virus includes a number of support features. They are designed to keep the application up-to-date, to expand its capabilities, and to assist you in using the application.
Data files
When using the application, each scan task and application update creates a report. It contains the information about performed activities and the results; with them, you will be able to learn the details of how any task works. Should problems arise, you can send the reports to Kaspersky Lab so that our specialists can study the situation in greater depth and help you as quickly as possible.
Kaspersky Anti-Virus moves all files suspected of being dangerous, to the special storage area called Quarantine. They are stored there in an encrypted form as to avoid infecting the computer. You can scan these objects for viruses, restore them to their previous locations, delete them, or place files to quarantine on your own. All files that turn out to be not infected upon completion of the virus scan, are automatically restored to their former locations.
The Backup holds copies of files disinfected and deleted by Kaspersky Anti-Virus. These copies are created so that you can restore the files or a picture of their infection, if necessary. The backup copies of the files are also stored in an encrypted form to avoid further infections.
You can restore a file from the backup copy to the original location and delete the copy.
License
When you purchase Kaspersky Anti-Virus, you enter into a license agreement with Kaspersky Lab which governs the use of the application, and your access to application database updates and Technical Support for a specified period of time. The term of use and other information required for the application's full functionality are provided in the license.
Using the License function, you can obtain detailed information about your current license, purchase a new license, or renew the existing one.
Support
All registered Kaspersky Anti-Virus users can take advantage of our Technical Support Service. To see the information about where to receive technical support, use the Support function.
Using the links provided, you can go to the Kaspersky Lab product user forum and browse a list of frequency asked questions that might provide a solution to your problem. Additionally, you can fill out the special form on the site and send Technical Support a message regarding an error or a comment on program operation.
You also have access to the online Technical Support, and, of course, our personnel are always ready to provide you with telephone support about Kaspersky Anti-Virus.
INSTALLING KASPERSKY ANTI-VIRUS
Kaspersky Anti-Virus 6.0 SOS MP4 may be installed together with other anti-virus applications by third-party vendors or Kaspersky Lab, except for:
Kaspersky Anti-Virus 2009;
Kaspersky Internet Security 2009;
- Kaspersky Anti-Virus 6.0 for Windows Workstations;
- Kaspersky Anti-Virus 6.0 for Windows Servers.
Kaspersky Anti-Virus 6.0 SOS MP4 cannot ensure real-time computer protection, it is a supplemental anti-virus program!
Kaspersky Anti-Virus 6.0 SOS MP4 can be installed on a computer in several ways:
-
local installation - application installation on a single computer. Direct access to that computer is required for the installation to run and complete. Local installation can be carried out in one of the following modes:
-
interactive mode, using the application installation wizard, this mode requires the participation from the user when installing;
-
non-interactive mode in which the application installation is launched from the command line and does not require the participation from the user when installing.
-
remote installation - application installation on networked computers managed remotely from an administrator's workstation using the following:
Kaspersky Administration Kit software set (see Kaspersky Administration Kit Deployment Guide);
Microsoft Windows Server 2000/2003 group domain policies.
Before Kaspersky Anti-Virus installation begins (including remote one), it is recommended to close all active applications.
IN THIS SECTION
Installation using the Installation Wizard. 15
Application installation from the command line 18
Installation from Group Policy Object editor 18
INSTALLATION USING THE INSTALLATION WIZARD
To install Kaspersky Anti-Virus on your computer, run the installation file on the product CD.
Installing the application from the installation file downloaded via the Internet, is identical to installing the application from the CD.
The setup program is implemented as a standard Windows wizard. Each window contains a set of buttons to control the installation process. Provided below is the brief description of their purpose:
- Next - accept the action and go to the next step in the installation procedure.
- Back - return to the previous step in the installation procedure.
- Cancel - cancel the installation.
Finish - complete the application installation procedure.
A detailed discussion of each step of the package installation is provided below.
STEP 1. VERIFYING THAT THE SYSTEM MEETS THE INSTALLATION REQUIREMENTS
Before installing Kaspersky Anti-Virus on the computer, the wizard will verify that the computer meets the minimum requirements. It will also verify that you have the rights required to install software.
If any of the requirements is not met, the corresponding notice will be displayed on the screen. We recommend that you install any required updates using the Windows Update service, and the required programs, before attempting to install Kaspersky Anti-Virus again.
STEP 2. INSTALLATION START WINDOW
If your system meets the implied requirements completely, immediately after the installation file is launched, the start window will open on the screen displaying the information on the start of Kaspersky Anti-Virus installation.
To proceed with the installation, click the Next button. To cancel the installation, click the Cancel button.
STEP 3. VIEWING THE LICENSE AGREEMENT
The application's next dialog box contains the license agreement between you and Kaspersky Lab. Read it carefully, and if you agree with all terms and conditions of the agreement, select the I accept the terms of the License Agreement option and click the Next button. The installation will continue.
To cancel the installation, click the Cancel button.
STEP 4. SELECTING INSTALLATION FOLDER
Next step of Kaspersky Anti-Virus installation defines the folder to install the application in. The default path is as follows:
Program Files Kaspersky Lab Kaspersky Anti-Virus 6.0 SOS MP4 - for 32-bit systems. → Program Files (x86) → Kaspersky Lab → Kaspersky Anti-Virus 6.0 SOS MP4 – for 64-bit systems.
You can specify a different folder by clicking the Browse button and selecting a folder in the standard folder selection window, or by entering the folder's path in the entry field provided.
Please note that if you manually enter the full path to the installation folder, its length should not exceed 200 characters, and the path should not contain special characters.
To proceed with the installation, click the Next button.
STEP 5. USING APPLICATION SETTINGS SAVED AFTER PREVIOUS INSTALLATION
At this step, you will be offered to specify if you wish to use protection settings and application databases in application's operation if those objects have been saved on your computer after the previous version of Kaspersky Anti-Virus 6.0 had been removed (if, for example, you are installing the commercial version, having removed the beta version).
Let us take a closer look at how to enable the features described above.
If a previous version (build) of Kaspersky Anti-Virus had been installed on your computer, and you have saved the application databases after it had been removed, then you can integrate them into the version you are installing. To do so, check the Application databases box. Application databases included in the installation package will not be copied on the computer.
To use the protection settings that you have modified in a previous version and saved on your computer, check the Application settings box.
Click the Next button to continue.
STEP 6. SELECTING THE TYPE OF THE INSTALLATION
At this step, you should define the completeness of application installation. There are two installation options:
Complete. In this case, all components of Kaspersky Anti-Virus will be installed on your computer. To get acquainted with further steps of the installation, please refer to Step 8.
Custom. In this case, you will be offered to select which of the application components you wish to install. For more details see Step 7.
To select the installation mode, click the corresponding button.
STEP 7. SELECTING APPLICATION COMPONENTS FOR THE INSTALLATION
This step will be performed only if you selected the Custom installation option.
Before starting the custom installation, you should select which of Kaspersky Anti-Virus components you wish to install. By default, the virus scan component and Network Agent connector to manage the application remotely via Kaspersky Administration Kit, are selected for the installation.
To select a component for further installation, you should open the menu by left-clicking on the icon next to the component name and select the This feature will be installed on the local hard drive item. For more details on functionality of the component you have selected and on disk space required for installation, please see the bottom part of this installation program window.
For detailed information about available disk space on your computer, click the Volume button. The information will be displayed in the window that will open.
To cancel the component installation, select the This feature will become unavailable option from the context menu. Note that if you cancel installation of any component, you will not be protected against a number of hazardous programs.
When you have finished selecting components to be installed, click the Next button. To return to the default list of components to be installed, click the Reset button.
STEP 8. SEARCHING FOR OTHER ANTI-VIRUS APPLICATIONS
At this step, the wizard searches for other anti-virus programs installed on your computer.
If any third-party anti-virus software is detected, Kaspersky Anti-Virus 6.0 SOS MP4 will go on installing. A notification will be displayed to warn you that the application being installed cannot ensure a comprehensive computer protection.
To proceed with the installation, click the Next button.
STEP 9. COMPLETING THE INSTALLATION
The Installation complete window contains information on completing the installation of Kaspersky Anti-Virus on your computer.
To run the Initial Configuration Wizard, click the Next button.
If a reboot is required for the installation to complete successfully, the special notification will be displayed on the screen.
APPLICATION INSTALLATION FROM THE COMMAND LINE
To install Kaspersky Anti-Virus 6.0 SOS MP4, enter the following in the command prompt:
msiexec /i <package_name>
The installation wizard will run (see section "Installation using the Installation Wizard" on page 15).
To install the application in non-interactive mode (without launching the installation wizard), type the following:
msiexec /i <package_name> /qn
To install the application with a password, which confirms the right to remove the application, type the following:
msiexec /i
msiexec /i <package_name> KLUNINSTPACCESS=**** /qn - when installing the application in noninteractive mode without rebooting the computer;
When installing Kaspersky Anti-Virus in non-interactive mode, the setup.ini file reading is supported; the file contains general settings for the installation of the application, install.cfg configuration file (see section Import of protection settings on page 82), and license key file. Note that those files should be located in the same folder as Kaspersky Anti-Virus installation package.
INSTALLATION FROM GROUP POLICY OBJECT EDITOR
Using Group Policy Object editor you can install, update and remove Kaspersky Anti-Virus on enterprise workstations making part of the domain, without using Kaspersky Administration Kit.
INSTALLING THE APPLICATION
To install Kaspersky Anti-Virus, please do the following:
- Create a shared network folder on the computer functioning as domain controller, and place Kaspersky Anti-Virus installation package in the .msi format in it.
Additionally, in this directory you can place the setup.ini file, which contains the list of settings for Kaspersky Anti-Virus installation, the install.cfg configuration file (see section Import of protection settings on page 82), and a license key file.
- Open Group Policy Object editor from the standard MMC console (for detailed information on how to work with this editor please refer to Microsoft Windows Server help system).
- Create a new package. To do so, select Group Policy Object / Computer configuration/ Program configuration / Software installation from the console tree, and use the Create / Package command from the context menu.
In the window that will open, specify the path to the shared network folder that stores Kaspersky Anti-Virus installation package. In the Program deployment dialog box, select the Assigned setting, and click the OK button.
The group policy will be applied to each workstation at the next registration of computers in the domain. As a result, Kaspersky Anti-Virus will be installed on all computers.
DESCRIPTION OF SETUP.INI FILE SETTINGS
The setup.ini file located in the directory of Kaspersky Anti-Virus installation package, is used when installing the application in non-interactive mode from the command line or Group Policy Object editor. This file includes the following settings:
[Setup] - general settings for application installation.
InstallDir=
- Reboot=yes|no - defines whether the computer should reboot when the application installation is complete, or not (reboot does not run by default).
[Tasks] - enabling Kaspersky Anti-Virus tasks. If no task is specified, all tasks will be enabled after the installation. If at least one task is specified, the tasks that have not been listed will be disabled.
- ScanMyComputer=yes|no - full scan task.
- ScanStartup=yes|no - quick scan task.
- Scan=yes|no - scan task.
- Updater=yes|no - update task for application databases and program modules.
The 1, on, enable, enabled values may be used instead of the yes value; the 0, off, disable, disabled values may be used instead of the no value.
UPDATING APPLICATION VERSION
To update Kaspersky Anti-Virus version, please do the following:
- Place the installation package that contains Kaspersky Anti-Virus updates in .msi format, in a shared network folder.
- Open Group Policy Object editor and create a new package using the procedure described above.
- Select the new package from the list and use the Properties command in the context menu. Select the Updates tab in the window of package properties, and specify the package, which contains the installation package of previous Kaspersky Anti-Virus version. To install an updated version of Kaspersky Anti-Virus saving protection settings, select the option of installation over the existing package.
The group policy will be applied to each workstation at the next registration of computers in the domain.
REMOVING THE APPLICATION
To remove Kaspersky Anti-Virus, please do the following:
- Open Group Policy Object Editor.
- Select Group_Policy_Object / Computer configuration/ Program configuration/ Software installation in the console tree.
Select Kaspersky Anti-Virus package from the list of packages, open the context menu, and execute the All tasks/ Remove command.
In the Removing applications dialog box, select Immediately remove this application from computers of all users for Kaspersky Anti-Virus to be removed at the next reboot.
GETTING STARTED
One of the main goals of Kaspersky Lab in creating Kaspersky Anti-Virus was to provide the optimum configuration of the application. This allows users with any level of computer literacy to ensure his or her computer's protection immediately after the installation without wasting his or her precious time upon the settings.
However, configuration details for your computer or for the tasks you execute with it can have their own specifics. That is why we recommend performing a preliminary configuration to achieve the most flexible, personalized approach to protecting your computer.
For the user's convenience, we have brought the preliminary configuration stages together in the unified interface of the Initial Configuration Wizard which starts upon the completion of the application installation procedure. By following the Wizard's instructions, you can activate the application, configure settings for updates and virus scan tasks launch, password-protect access to the application, etc.
After completing installation and starting the program, we recommend taking the following steps:
- Update the application (unless it has been done using the setup wizard, or automatically immediately after the application had been installed).
- Scan the computer for viruses.
IN THIS SECTION
Initial Configuration Wizard 21
Scanning computer for viruses 25
Updating the application 25
Managing licenses 25
Security management. 26
Eliminating problems. User technical support 27
Creating a trace file 28
Configuring application settings 28
Application operation reports. Data files 29
INITIAL CONFIGURATION WIZARD
Kaspersky Anti-Virus Configuration Wizard starts at the end of application installation. It is designed to help you configure the initial application settings, based on the features and tasks of your computer.
The Configuration Wizard interface is designed like a standard Microsoft Windows Wizard and consists of a series of steps that you can browse using the Back and Next buttons, or complete using the Finish button. To stop the wizard at any step, use the Cancel button.
To make complete installation of the application on the computer, all steps of the wizard's procedure should be taken. If the wizard's operation has been interrupted for some reasons, the values for the settings that had been already specified, will not be saved. At the next attempt of running the application, the Initial Configuration Wizard runs again thus requiring to edit the settings again.
ACTIVATING THE APPLICATION
The application activation procedure consists in registering a license by installing a key file. Based on the license, the application will determine the existing privileges and calculate its term of use.
The key file contains service information required for Kaspersky Anti-Virus to be fully functional as well as additional data:
- support information (who provides the support and where it can be obtained);
- key name and number as well as the license expiration date.
Depending on whether you already have a key file, or will receive one from Kaspersky Lab's server, you will have the following options for activating Kaspersky Anti-Virus:
- Online activation (see page 22). Select this activation option if you have purchased a commercial version of the application, and you have been provided an activation code. You can use this code to obtain a key file providing access to the application's full functionality throughout the effective term of the license.
- Activating trial version (see page 23). Use this activation option if you want to install the trial version of the application before making the decision to purchase a commercial version. You will be provided a free key file valid for a term specified in the trial version license agreement.
- Activation with a license key file obtained earlier (see section "Activating using a key file" on page 23). Activate the application using Kaspersky Anti-Virus 6.0 key file obtained earlier.
- Activate later. If you select this option, you will skip the activation stage. The application will be installed on your computer, and you will have access to all the application's features, except for updates (only one application update will be available, immediately after the installation). The Activate later option will only be available at the first startup of the Activation Wizard. At further wizard launches, if the application is already activated, the Delete key file option is available to perform the deletion.
If either of the first two application activation options is selected, the application will be activated via Kaspersky Lab's web server, which requires the Internet connection to link to. Before starting the activation, please verify and edit network connection settings as required in the window that will open by clicking the LAN Settings button. For more details on network settings, please contact your network administrator or Internet provider.
If at the time of installation no Internet connection is available, you can perform the activation later, using the application interface or connecting to the Internet from a different computer and obtaining a key, using an activation code received by registering on the Kaspersky Lab's Technical Support Service website.
You can also activate the application using Kaspersky Administration Kit. To do so, you should create a key file installation task (see page 97) (for more details please refer to the Kaspersky Administration Kit help guide).
SEE ALSO
Online activation 22
Obtaining a key file 23
Activation using a key file 23
Completing the activation 23
ONLINE ACTIVATION
Online activation is performed by entering an activation code that you receive by email when you purchase Kaspersky Anti-Virus via the Internet. If you purchase the boxed application (retail version), the activation code will be printed on the envelope containing the installation disk.
ENTERING THE ACTIVATION CODE
At this step, the activation code should be entered. The activation code is a sequence of numbers and letters divided by hyphens into four groups of five symbols without spaces. For example, 11111-11111-11111-11111. Note that the code should only be entered in Latin characters.
Enter your personal information in the bottom part of the window: full name, email address, and country and city of residence. This information may be necessary to identify a registered user if, for example, his or her license data have been lost or stolen. In this case, you can obtain another activation code using your personal information.
OBTAINING A KEY FILE
The Configuration Wizard connects to Kaspersky Lab's internet servers and sends your registration data, including the activation code and your contact information. Once the connection is established, the activation code and contact information will be checked. If the activation code has passed the verification successfully, the Wizard receives a key file which then will be installed automatically. By the end of the activation, the window with detailed information on the obtained license will open.
If the activation code has not passed the verification, a relevant notification will pop up on the screen. If this happens, contact the software vendor from whom you purchased the application for information.
If the number of activations with the activation code has been exceeded, a relevant notification will pop up on the screen. Activation process will be interrupted, and the application will offer you to contact Kaspersky Lab's Technical Support service.
ACTIVATING THE TRIAL VERSION
Use this activation option if you want to install a trail version of Kaspersky Anti-Virus before making the decision to purchase a commercial version. You will be provided with a free license, which will be valid for the term specified in the trial version license agreement. Once the license expires, you will not be able to activate the trial version again.
ACTIVATION USING A KEY FILE
If you have a key file, you can use it to activate Kaspersky Anti-Virus. To do so, use the Browse button and select the file path for the file with the .key extension.
After you have successfully installed the key, you will see the information about the license in the bottom part of the window: license number, license type (commercial, beta, trial, etc.), license expiration date, and number of hosts.
COMPLETING THE ACTIVATION
The Configuration Wizard will inform you that Kaspersky Anti-Virus has been successfully activated. Additionally, information about the license is provided: license number, type (commercial, beta, trial, etc.), expiration date, and number of hosts.
UPDATE SETTINGS CONFIGURATION
The quality of the virus scans on your computer is directly dependent on timely receipt of threat signature and application module updates. In this window, the Configuration Wizard asks you to select the application update mode and to edit schedule settings:
- Automatically. Kaspersky Anti-Virus checks the update source for update packages at specified intervals. Scanning frequency may increase during anti-virus outbreaks and decrease when they are over. If new updates are found, Kaspersky Anti-Virus downloads and installs them on the computer. This is the default mode.
-
Every 2 hour(s) (frequency may vary depending on the schedule settings). Updates will run automatically according to the schedule created. You can modify the schedule settings in another window by clicking the Change button.
-
Manually. If you select this option, you will run application updates on your own.
Note that the application databases and modules included with the installation package may be outdated by the time you are installing the application. That is why we recommend you obtaining the latest updates of the application. To do so, click the Update now button. Then Kaspersky Anti-Virus will download the necessary updates from update sites and will install them on your computer.
If you wish to switch to configuring updates (specify network settings, select an update source, run an update from a specific user account, or enable update download to a local source), click the Settings button.
CONFIGURING VIRUS SCAN SCHEDULE
Scanning selected areas for malicious objects is one of the key tasks in protecting the computer.
When you install Kaspersky Anti-Virus, three default virus scan tasks are created. In this window, the Configuration Wizard asks you to select a scan task run mode:
Full Scan
A thorough scan of the entire system. The following objects are scanned by default: system memory, programs loaded at startup, system backup, email databases, hard drives, removable storage media, and network drives. You can change the schedule settings in the window that will open by clicking the Change button.
Quick Scan
Virus scan of operating system startup objects. You can change the schedule settings in the window that will open by clicking the Change button.
RESTRICTING ACCESS TO THE APPLICATION
Since a personal computer may be used by several people with different levels of computer literacy, and since malicious programs can disable its protection, you have the option of password-protecting access to Kaspersky Anti-Virus. Using a password can protect the application from unauthorized attempts to disable protection or change the settings of the application.
To enable password protection, check the Enable password protection box and fill in the Password and Confirm password fields.
Below, specify the area that you want to protect with a password:
-
All operations (except notifications of dangerous events). The password will be requested if the user attempts to take any action on the application, apart from responding to notifications about the detection of dangerous objects.
Selected operations: -
Configuring application settings - request password if a user attempts to modify application settings.
Closing application - the password will be requested when the user attempts to exit the application. - Stopping scan tasks - request password if a user attempts to stop a virus scan task.
Upon application uninstall - request the password if the user attempts to remove the application from the computer.
FINISHING THE CONFIGURATION WIZARD
If necessary, check the Start application box in the last window and press the Finish button to complete the Initial Configuration Wizard.
SCANNING COMPUTER FOR VIRUSES
Malware developers make every effort to conceal its actions, and therefore you may not notice the presence of malware on your computer.
Once Kaspersky Anti-Virus is installed on your computer, it automatically performs the Quick Scan task on your computer. This task searches for and neutralizes harmful programs in objects loaded during operating system startup.
Kaspersky Lab's specialists also recommend that you perform the Full Scan task.
To start / stop a virus scan task, please do the following:
- Open the main application window.
- In the left part of the window, select the Scan (Full Scan, Quick Scan) section.
- Click the Start scan button to start the scan. If you need to stop the task execution, click the Stop scan button while the task is in progress.
UPDATING THE APPLICATION
You will need an Internet connection to update Kaspersky Anti-Virus.
Kaspersky Anti-Virus installation package includes the databases, which contain threat signatures. At the moment the application is installed, these databases may turn out to be obsolete, since Kaspersky Lab updates both the application databases and the application modules on a regular basis.
When Initial Configuration Wizard is active, you can select the update run mode. By default, Kaspersky Anti-Virus automatically checks for updates on Kaspersky Lab's servers. If the server contains a fresh set of updates, Kaspersky Anti-Virus will download and install them in the silent mode.
To keep your computer's protection up-to-date, you are advised to update Kaspersky Anti-Virus immediately after the installation.
To update Kaspersky Anti-Virus by yourself, please do the following:
- Open the main application window.
- In the left part of the window, select the Update section.
- Click the Start update button.
MANAGING LICENSES
Kaspersky Anti-Virus requires a license to operate. You are provided with a license when you purchase the product. It gives you the right to use the product as soon as you activate it.
Without a license, if the trial version of the application has not been activated, Kaspersky Anti-Virus will run in one-update mode. The application will not download any new updates.
If a trial version of the application has been activated, Kaspersky Anti-Virus will not run after the free license expires.
When the commercial license expires, the application will continue working, except that you will not be able to update application databases. As before, you will be able to scan your computer for viruses and use the protection components,
but only using the databases that you had when the license expired. We cannot guarantee that you will be protected from viruses that surface after your program license expires.
To avoid infecting your computer with new viruses, we recommend renewing your license for Kaspersky Anti-Virus. Two weeks before the license expiration, the application notifies you about it. During some period, a corresponding message will be displayed each time the application is launched.
General information on the license currently in use (active and additional licenses if the latter has been installed) is shown in the License section of the main window of Kaspersky Anti-Virus: license type (full, trial, beta), maximum number of hosts, license expiration date, and number of days to the expiration date. For more details about the license please click the link with the license type currently in use.
To view the provision of the application license agreement, click the View End User License Agreement button.
To remove the license, click the Add / Delete button and follow the instructions of the wizard that will open.
Kaspersky Lab has special pricing offers on license renewal for our products. Check for special offers on the Kaspersky Lab's website.
To purchase or renew a license, please do the following:
- Purchase a new key file or an activation code. To do so, use the Purchase license (if the application has not been activated) or License renewal buttons. On the web page that will open you will be provided with detailed information on the terms of purchasing the key from Kaspersky Lab eStore or from authorized distributors. If you purchase online, a key file or an activation code will be mailed to you at the address specified in the order form once payment has been made.
- Activate the application. Use the Add / Delete button in the License section of the main application window, or use the Activate command from the application context menu. This will start the Activation Wizard.
SECURITY MANAGEMENT
Problems in computer protection are indicated by the computer protection status, by changes in the color of the protection status icon, and of the panel on which this icon is located. Once problems appear in the protection, you are advised to solve them.

Figure 1. Current status of the computer protection
Your computer security is at risk
Fix!
You can view the list of problems occurred, their description and possible ways of solving them, via Security Wizard (see figure below) which can be activated by clicking the Fix link (see figure above).
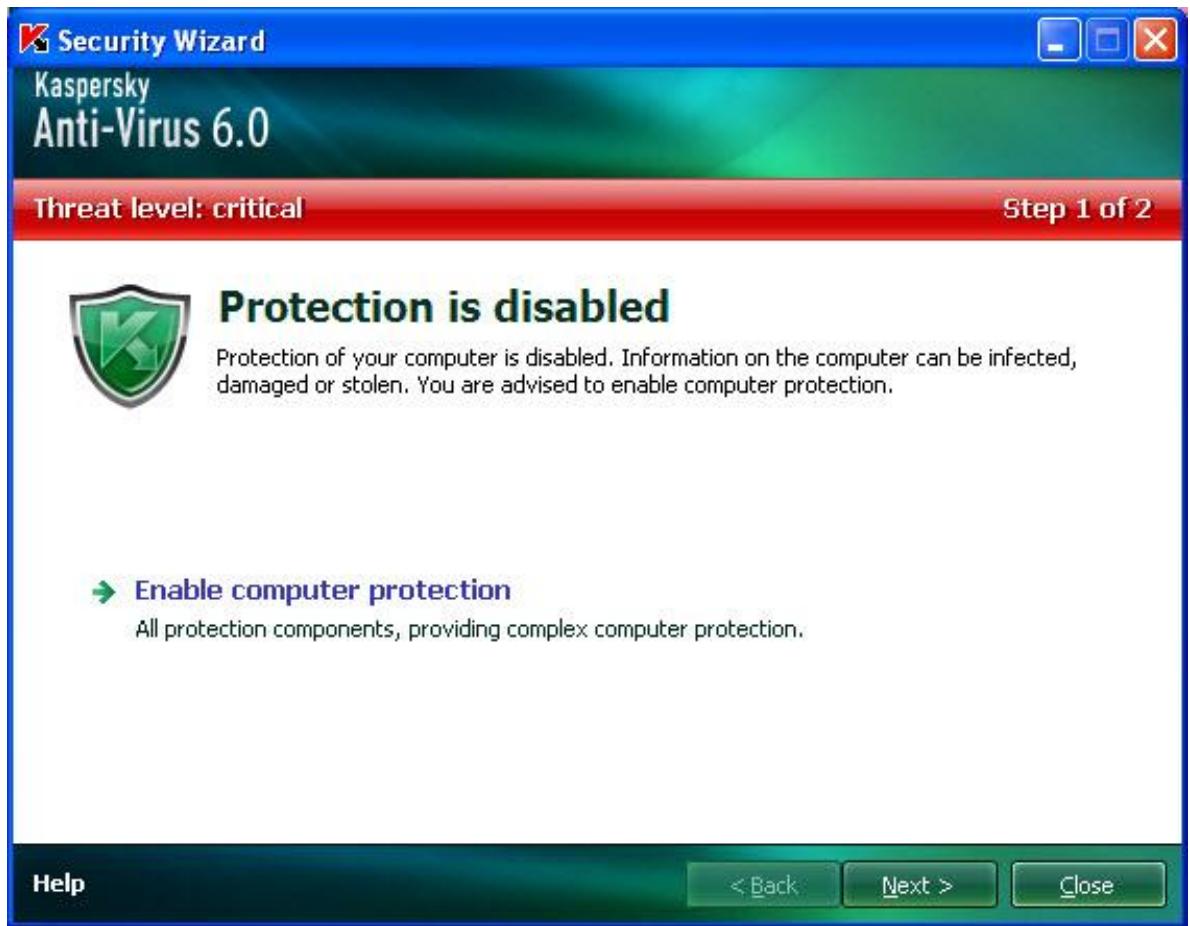
Figure 2. Solving security problems
You can view the list of current problems. The problems are sorted with regard to their criticality: first, the most critical ones (i.e., with red status icon), then less critical ones – with yellow status icon, and the last – information messages. A detailed description is provided for each problem, and the following actions are available:
- Eliminate immediately. Using the appropriate links, you can switch to fixing the problem, which is the recommended action.
- Postpone elimination. If, for any reason, immediate elimination of the problem is not possible, you can put off this action and return to it later. Check the Ignore this threat when determining security status box for the threat not to impact the current protection status.
Note that this option is not available for serious problems. Such problems include, for example, malicious objects that were not disinfected, crashes of one or several components, or corruption of the application files. Problems like these should be eliminated as quickly as possible.
ELIMINATING PROBLEMS. USER TECHNICAL SUPPORT
If problems occur with the operation of Kaspersky Anti-Virus, the first place to check for help in for solving the problem is the Help system. The second place is the Kaspersky Lab Knowledge Base (http://support.kaspersky.com). The Knowledge Base is a separate section of the Technical Support web site, and comprises recommendations for Kaspersky Lab products as well as answers to frequently asked questions. Try to find an answer to your question or a solution to your problem with this resource.
To use the Knowledge Base, please do the following:
- Open the main application window.
- In the bottom part of the window, click the Support link.
- In the Support window that will open, click the Technical Support Service link.
Another resource you can use to obtain information about working with the application is Kaspersky Lab users forum. It is another separate section of the Technical Support web site and it contains user questions, feedback and requests. You can view the main topics of the forum, leave feedback or find an answer to a question.
To open the users' forum, please do the following:
- Open the main application window.
- In the bottom part of the window, click the Support link.
- In the Support window that will open, click the User Forum link.
If you do not find a solution to your problem in Help, in the Knowledge Base, or at the User Forum, we recommend that you contact Kaspersky Lab's Technical Support.
CREATING A TRACE FILE
After installing Kaspersky Anti-Virus, some failures in the operating system or in the operation of individual applications may occur. The most likely cause is a conflict between the application and the software installed on your computer, or with the drivers of your computer's components. You may be asked to create a tracing file for Kaspersky Lab's specialists to successfully solve your problem.
To create the trace file:
- Open the main application window.
- In the bottom part of the window, click the Support link.
- In the Support window that will open, click the Traces link.
- In the Information for Technical Support Service window that will open, use the dropdown list in the Traces section to select the tracing level. The tracing level should be set on the advice of the Technical Support specialist. If no instructions from the Technical Support are available, you are advised to set tracing level on 500.
- To start the tracing process, click the Enable button.
- Reproduce the situation which caused the problem to occur.
- To stop the tracing process, click the Disable button.
CONFIGURING APPLICATION SETTINGS
The application settings window (see page 56) that can be accessed from the main window by clicking the Settings button, is designed for the quick access to Kaspersky Anti-Virus 6.0 settings.
APPLICATION OPERATION REPORTS. DATA FILES
Every scan or update task is logged in a report (see page 67). To view reports, use the Reports button in the lower right corner of the main window.
The objects that have been quarantined (see page 68) or placed to the backup (see page 69) by Kaspersky Anti-Virus, are called application data files. By pressing the Detected button, you can open the Storage window, where you can process these objects as necessary.
APPLICATION INTERFACE
Kaspersky Anti-Virus has a fairly simple and easy-to-use interface. This chapter highlights its basic features:
system tray icon;
- context menu;
main window;
- notifications;
Kaspersky Anti-Virus settings window.
In addition to the primary interface, the application has a plug-in for Microsoft Windows Explorer. The plug-in extends Microsoft Windows Explorer's functionality providing the opportunity to use its interface to manage Kaspersky Anti-Virus 6.0 SOS MP4.
IN THIS SECTION
Taskbar notification area icon 30
Context menu 31
Main application window 31
Notifications 33
Application settings window 33
TASKBAR NOTIFICATION AREA ICON
Right after installing Kaspersky Anti-Virus, its icon will appear in the system tray.
The icon is a sort of indicator for Kaspersky Anti-Virus operations. It also reflects the protection status and shows a number of basic functions performed by the application.
If the icon is present in the system tray, Kaspersky Anti-Virus is enabled.
Kaspersky Anti-Virus icon changes depending on the operation being performed:
file scan is in progress.
Kaspersky Anti-Virus database and module update is in progress.
An error occurred in the operation of some Kaspersky Anti-Virus component.
The icon also provides access to the basic components of the application interface: context menu and main window.
To open the context menu, right-click on the application icon.
To open the Kaspersky Anti-Virus main window, click on the application icon.
CONTEXT MENU
You can run basic protection tasks from the context menu, which contains the following items:
Full Scan - start a complete scan of your computer for malware objects. Objects residing on all drives, including removable storage media, will be scanned.
- Scan - select objects and start a virus scan. By default, the list contains a number of files, such as the My Documents folder, Startup objects, email databases, all disk drives on your computer, etc. You can enlarge the list, select other objects for scan and start virus scan.
- Update - start module updates and Kaspersky Anti-Virus threat signatures and install them on your computer.
- Activate - activate the application. To become a registered user with access to the application's full functionality and Technical Support, you have to activate your version of Kaspersky Anti-Virus. This menu item is only available if the application has not been activated.
- Settings - view and configure settings of Kaspersky Anti-Virus application.
Kaspersky Anti-Virus - open the main application window.
- About - display the window with information about the application.
- Exit - close Kaspersky Anti-Virus (when this option is selected, the application will be discarded from the computer's RAM).
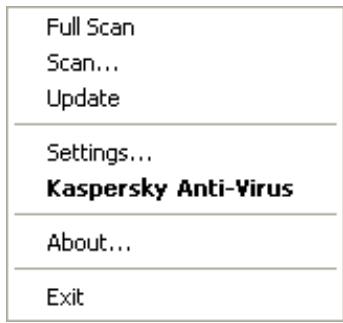
Figure 3. Context menu
If a virus scan task is running, its name will be displayed in the context menu with a percentage progress indication. After selecting a task, you can go to the report window to view current performance results.
MAIN APPLICATION WINDOW
The main application window can be divided into three parts:
- The top part of the window indicates your computer's current protection status.

Figure 4. Current status of the computer protection
Your computer security is at risk
Fix!
There are three possible values of protection status: each of them is indicated with a certain color, similar to traffic lights. Green indicates that your computer's protection is at the correct level, while yellow and red colors
indicate that there are security threats in the system configuration or in Kaspersky Anti-Virus operation. In addition to malicious programs, threats include, for example, obsolete application databases.
Security threats should be eliminated as they appear. To obtain detailed information about them and to eliminate them quickly, use the Fix link (see figure above).
The left part of the window provides quick access to virus scan tasks, updates, etc.
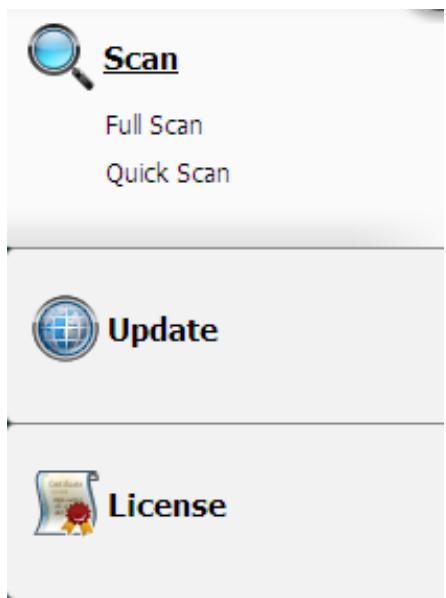
Figure 5. Left part of the main window
The right part of the window provide tools for performing virus scan tasks, downloading updates, etc.
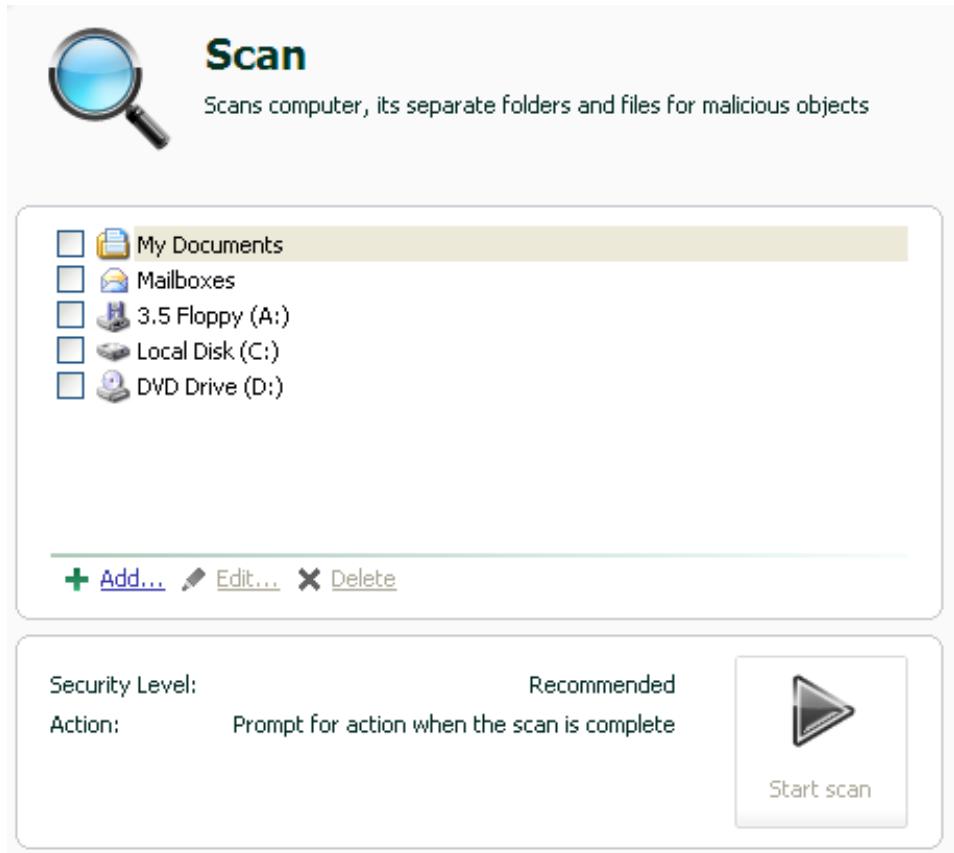
Figure 6. Right part of the main window
You can also use:
The Settings button - to open the application settings window (see page 56).
The Help link - to open Kaspersky Anti-Virus Help.
The Detected button - to work with application datafiles (see page 67).
The Reports button – to open the reports on the application components' operation (see page 67).
- The Support link – to open the window containing the information about the system and the links to Kaspersky Lab's information resources (see page 27) (Technical Support service site, forum).
NOTIFICATIONS
If events occur during the operation of Kaspersky Anti-Virus, special notifications will be displayed on the screen as pop-up messages above the application icon in the Microsoft Windows task bar.
Depending on how critical the event is for computer security, you might receive the following types of notifications:
- Alarm. An event of critical importance has occurred, such as a virus has been detected. You should immediately decide how to deal with this threat. This type of notification is color-coded in red.
- Warning. A potentially dangerous event has occurred, such as a potentially dangerous object has been detected. You should decide how dangerous you think this event is. This type of notification is color-coded in yellow.
- Info. This notification gives information about non-critical events. Minor notifications are color-coded in green.
SEE ALSO
Types of notifications 73
APPLICATION SETTINGS WINDOW
Kaspersky Anti-Virus settings window may be opened via the main window or the context menu. To do so, click the Settings button in the top part of the main window, or select the appropriate option in the application's context menu.
The application settings window consists of two parts:
- the left part of the window provides access to Kaspersky Anti-Virus components, virus scan tasks, update tasks, etc.;
- the right part of the window contains a list of settings for the component, task, etc., selected in the left part of the window.
SEE ALSO
Configuring application settings 56
SCANNING COMPUTER FOR VIRUSES
Kaspersky Anti-Virus 6.0 SOS MP4 allows scanning separate items (files, folders, disks, removable media) or the entire computer for viruses.
Kaspersky Anti-Virus 6.0 SOS MP4 comprises the following default virus scan tasks:
Scan
Scan of objects selected by the user. You can scan any object in the computer's file system.
Full Scan
A thorough scan of the entire system. The following objects are scanned by default: system memory, programs loaded at startup, system backup, email databases, hard drives, removable storage media, and network drives.
Quick Scan
Virus scan of operating system startup objects.
By default, those tasks run with recommended settings. These settings may be modified, and tasks may be scheduled to run.
In addition, any object may be scanned (such as a hard drive storing software and games, email databases brought home from office, a compressed file received by email, etc.) without creating a dedicated scan task. An object to scan may be selected using the Kaspersky Anti-Virus interface or standard Microsoft Windows tools (for example, Windows Explorer or Desktop, etc.). Place the cursor on the desired object's name, right-click to open the Microsoft Windows context menu, and select the Scan for viruses option.
Place the cursor on the desired object's name, right-click to open the Microsoft Windows context menu, and select the Scan for viruses option.
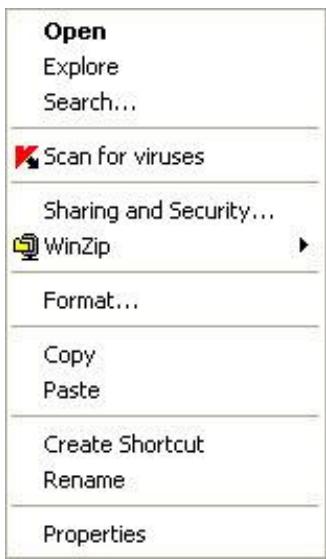
Figure 7. Microsoft Windows context menu
Additionally, following a scan you can view the scan report, which contains full information about events which occurred during the execution of the tasks.
To change the settings of any virus scan task, please do the following:
-
Open the main application window.
-
In the left part of the window, select the Scan (Full Scan, Quick Scan) section.
- For the selected section, click the link with the preset security level.
- In the window that will open, make the required changes in the settings for the task you have selected.
To switch to the virus scan report, please do the following:
- Open the main application window.
- In the left part of the window, select the Scan (Full Scan, Quick Scan) section.
- Click the Reports button.
IN THIS SECTION
Starting the virus scan 35
Creating a list of objects to scan 36
Changing security level 37
Changing actions to be performed on detected objects 37
Changing the type of objects to scan 38
Scan optimization 39
Scan of compound files 40
Changing the scan method 40
Scan technology 41
Computer performance during task execution 41
Run mode: specifying an account 42
Run mode: creating a schedule 42
Features of scheduled task launch 43
Virus scan statistics 43
Assigning common scan settings for all tasks 43
Restoring default scan settings 44
STARTING THE VIRUS SCAN
You can start a virus scan task in one of the two following ways:
from Kaspersky Anti-Virus context menu;
from the main window of Kaspersky Anti-Virus.
Task execution information will be displayed in the main window of Kaspersky Anti-Virus.
In addition, you can select an object to be scanned with the help of standard tools of the Microsoft Windows operating system (for example, in the Explorer program window or on your Desktop, etc.).
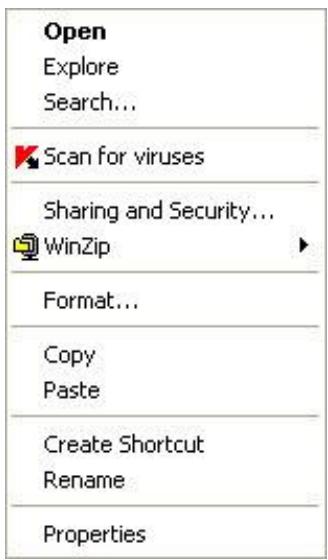
Figure 8. Microsoft Windows context menu
To start a virus scan task from the context menu, please do the following:
- Right-click the application icon in the taskbar notification area.
- Select the Scan item from the dropdown menu. In the main application window that will open, select the required Scan (Full Scan, Quick Scan) task. If required, configure the selected task and click the Start scan button.
- Alternatively, you can select the Full Scan item from the context menu. This will start a full computer scan. The task progress will be displayed in the main window of Kaspersky Anti-Virus.
To start the virus scan task from the main application window:
- Open the main application window.
- In the left part of the window, select the Scan (Full Scan, Quick Scan) section.
- Click the Start scan button for selected section. The task progress will be displayed in the main application window.
To start a virus scan task for a selected object from the Microsoft Windows context menu:
- Right-click the name of the selected object.
- Select the Scan for viruses item in the context menu that will open. The progress and the results of task execution will be displayed in the statistics window.
CREATING A LIST OF OBJECTS TO SCAN
Each virus scan task has its own default list of objects. To view a list of objects, select the task name (such as Full Scan) in the Scan section of the main application window. The list of objects will be displayed in the right part of the window.
Lists of objects to scan are already generated for default tasks created at the application installation.
For the user's convenience, you can add categories to the scan scope, such as user's mailboxes, RAM, startup objects, operating system backup, and files in the Kaspersky Anti-Virus Quarantine folder.
Besides, when you add a folder that contains embedded objects to the scan scope, you can edit the recursion. To do so, select the required object from the list of objects to scan, open the context menu, and use the Include sub folders option.
To create a list of objects to scan, please do the following:
- Open the main application window.
- In the left part of the window, select the Scan (Full Scan, Quick Scan) section.
- Click the Add link for the selected section.
- In the Select object to scan window that will open, select an object and click the Add button. Click the OK button after you have added all the objects you need. To exclude any objects from the list of objects to scan, uncheck the boxes next to them. To remove an object from the list, select it and click the Delete link.
CHANGING SECURITY LEVEL
The security level is a preset collection of scan settings. Kaspersky Lab specialists distinguish three security levels. You should make the decision on which level to select based on your own preferences:
If you suspect that your computer has a high chance of becoming infected, select the High security level.
The recommended level is suitable in most cases, and is advised for using by Kaspersky Lab specialists.
If you are using applications requiring considerable RAM resources, select the Low security level because the application puts least demand on system resources in this mode.
If none of the preset levels meet your needs, you can configure the scan settings yourself. As a result, the security level's name will change to Custom. To restore the default scan settings, select one of the preset security levels. By default, scan is set at the Recommended level.
To change the defined security level, perform the following actions:
- Open the main application window.
- In the left part of the window, select the Scan (Full Scan, Quick Scan) section.
- For the selected section, click the link with the preset security level.
- In the window that will open, in the Security Level section, adjust the slider on the scale. By adjusting the security level, you define the ratio of scan speed and the total number of files scanned: the fewer files are subject to analysis for viruses, the higher the scan speed is. You can also click the Customize button and modify the required settings in the window that will open. The security level will change to Custom.
CHANGING ACTIONS TO BE PERFORMED ON DETECTED OBJECTS
If a virus scan identifies an object as infected or suspected to be so, subsequent processing by the application depends on the status of the object and the action selected.
Based on the scan results, an object may be assigned one of the following statuses:
- the malicious program status (such as virus, Trojan);
- the potentially infected status when the scan cannot determine if the object is infected. This is caused when the application detects a sequence of code in the file from an unknown virus, or modified code from a known virus.
By default, all infected files are subject to disinfection, and all potentially infected ones are subject to quarantine.
| IF THE ACTION SELECTED WAS | WHEN A MALICIOUS / POTENTIALLY INFECTED OBJECT IS DETECTED |
| Prompt for action when the scan is complete | The application will postpone processing of objects until the scan is complete. When the scan is complete, the statistics window will pop up with a list of objects detected, and you will be asked if you want to process the objects. |
| Prompt for action during scan | The application will display a warning message with information about which malicious code has infected or potentially infected the object, and will offer several options of further actions. |
| Do not prompt for action | The application creates a report with information about objects detected without processing them or notifying the user. This application mode is not recommended, because it leaves infected or potentially infected objects on your computer making infection virtually inevitable. |
| Do not prompt for action Disinfect | The application attempts to disinfect the object without requesting any confirmation from the user. If the attempt of disinfecting the object fails, it will be either blocked (if the object cannot be disinfected), or assigned the potentially infected status (if the object is considered suspicious), and it will be moved to Quarantine. Relevant information is logged in the report. Later you can attempt to disinfect this object. |
| Do not prompt for action Disinfect Delete if disinfection fails | The application attempts to disinfect the object without requesting any confirmation from the user. If the object cannot be disinfected, it will be deleted. |
| Do not prompt for action Disinfect Delete | The application deletes the object automatically. |
Before attempting to disinfect or delete an infected object, Kaspersky Anti-Virus creates a backup copy of it, which is placed into Backup to allow later restoration or disinfection.
To change the specified action to be performed on detected objects, please do the following:
- Open the main application window.
- In the left part of the window, select the Scan (Full Scan, Quick Scan) section.
- For the selected section, click the link with the preset security level.
- In the Action section, enter the required changes in the window that will open.
CHANGING THE TYPE OF OBJECTS TO SCAN
When specifying the type of objects to scan, you establish which file formats and sizes will be scanned for viruses when the selected virus scan runs.
When selecting file types you should remember the following:
- Certain file formats (such as .txt) have a fairly low risk of having malicious code infiltrated into them and subsequently activated. At the same time, there are formats that contain or may contain an executable code (such as .exe, .dll, .doc). The risk of penetration and activation of malicious code in such files is fairly high.
- Remember that an intruder can send a virus to your computer in a file with the .txt extension, whereas it is in fact an executable file renamed as .txt file. If you have selected the ⑤ Files scanned by extension option, such a file will be skipped by the scan. If the ⑨ Files scanned by format option has been selected, regardless the
extension, the file protection will analyze the file header and may determine that the file is an .exe file. Such a file would be thoroughly scanned for viruses.
To change the type of scanned objects:
- Open the main application window.
- In the left part of the window, select the Scan (Full Scan, Quick Scan) section.
- For the selected section, click the link with the preset security level.
- In the window that will open, in the Security Level section, click the Customize button.
- In the window that will open, on the Scope tab, in the File types section, select the required settings.
SCAN OPTIMIZATION
You can shorten the scan time and speed up Kaspersky Anti-Virus. This can be achieved by scanning only new files and those files that have altered since the last time they were scanned. This mode applies both to simple and compound files.
Additionally, you can impose a restriction on the scan length. Once the specified time period is elapsed, the file scan will be stopped. You can also limit the size of the file being scanned. The file will be skipped if its size exceeds the value you have set.
To scan only new and changed files, please do the following:
- Open the main application window.
- In the left part of the window, select the Scan (Full Scan, Quick Scan) section.
- For the selected section, click the link with the preset security level.
- In the window that will open, in the Security Level section, click the Customize button.
- In the window that will open, on the Scope tab, in the Scan optimization section, check the Scan only new and changed files box.
To impose a time restriction on the scan duration:
- Open the main application window.
- In the left part of the window, select the Scan (Full Scan, Quick Scan) section.
- For the selected section, click the link with the preset security level.
- In the window that will open, in the Security Level section, click the Customize button.
- In the window that will open, on the Scope tab, in the Scan optimization section, check the Stop scan if it takes longer than box and specify the scan duration in the field next to it.
To limit the size of the file to scan, please do the following:
- Open the main application window.
- In the left part of the window, select the Scan (Full Scan, Quick Scan) section.
- For the selected section, click the link with the preset security level.
-
In the window that will open, in the Security Level section, click the Customize button.
-
In the window that will open, on the Scope tab, click the Additional button.
- In the Compound files window that will open, check the Do not unpack large compound files box and specify the file size in the field next to it.
SCAN OF COMPOUND FILES
A common method of concealing viruses is to embed them into compound files: archives, databases, etc. To detect viruses that are hidden this way a compound file should be unpacked, which can significantly lower the scan speed.
For each type of compound file, you can select to scan either all files or only new ones. To do so, use the link next to the name of the object. It changes its value when you left-click on it. If you select the scan new and changed files only scan mode, you will not be able to select which types of compound files are to be scanned.
To modify the list of scanned compound files:
- Open the main application window.
- In the left part of the window, select the Scan (Full Scan, Quick Scan) section.
- For the selected section, click the link with the preset security level.
- In the window that will open, in the Security Level section, click the Customize button.
- In the window that will open, on the Scope tab, in the Scan of compound files section, select the required type of compound files to be scanned.
CHANGING THE SCAN METHOD
You can use heuristic analysis as the scan method. It analyzes the actions an object performs on the system. If its actions are typical of malicious objects, the object is likely to be classed as malicious or suspicious.
Additionally, you can set the detail level for heuristic analysis by moving the slider bar to one of the following positions: light, medium, or deep.
In addition to this scan method, you can use the Rootkit Scan. Rootkit is a set of tools that can hide malicious applications in your operating system. These utilities are injected into the system, hiding their presence and the presence of processes, folders and the registry keys of other malicious programs installed with the rootkit. If the scan is enabled, you can specify detailed level (advanced analysis) to detect rootkits. It will scan carefully for such programs by analyzing a large number of various objects.
To specify which scan method to use:
- Open the main application window.
- In the left part of the window, select the Scan (Full Scan, Quick Scan) section.
- For the selected section, click the link with the preset security level.
- In the window that will open, in the Security Level section, click the Customize button.
- In the window that will open, on the Additional tab, in the Scan methods section, select the required scan technologies.
SCAN TECHNOLOGY
Additionally, you can set the iChecker technology which will be used during the scan.
iChecker technology can increase scan speed by excluding certain objects from the scan. An object is excluded from the scan using a special algorithm that takes into account the release date of the application databases, the date the object was last scanned, and any modifications to the scan settings.
For example, you have an archived file that was scanned by Kaspersky Anti-Virus and assigned the not infected status. The next time the application will skip this archive, unless it has been altered or the scan settings have been changed. If the archive's structure has changed by adding a new object to it, or if the scan settings have changed, or if the application databases have been updated, the archive will be re-scanned.
There are limitations to iChecker technology: it does not work with large files and applies only to the objects with a structure that the application recognizes (for example, .exe, .dll, .lnk, .tff, .inf, .sys, .com, .chm, .zip, .rar).
To scan objects using the iChecker technology, please do the following:
- Open the main application window.
- In the left part of the window, select the Scan (Full Scan, Quick Scan) section.
- For the selected section, click the link with the preset security level.
- In the window that will open, in the Security Level section, click the Customize button.
- In the window that will open, on the Additional tab, in the Additional settings section, check the iChecker technology box.
COMPUTER PERFORMANCE DURING TASK EXECUTION
Virus scan tasks may be postponed to limit the load on the central processing unit (CPU) and disk storage subsystems.
Executing scan tasks increases the load on the CPU and disk subsystems, thus slowing down other applications. By default, if such a situation arises, Kaspersky Anti-Virus will pause virus scan tasks and release system resources for the user's applications.
However, there is a number of applications which will start immediately when CPU resources become available, and will run in the background. For the scan not to depend on the performance of those applications, system resources should not be conceded to them.
Note that this setting can be configured individually for every virus scan task. In this case, the configuration for a specific task has a higher priority.
To postpone the execution of scan tasks if it slows down other applications, please do the following:
- Open the main application window.
- In the left part of the window, select the Scan (Full Scan, Quick Scan) section.
- For the selected section, click the link with the preset security level.
- In the window that will open, in the Security Level section, click the Customize button.
- In the window that will open, on the Additional tab, in the Scan methods section, check the Concede resources to other applications box.
RUN MODE: SPECIFYING AN ACCOUNT
You can specify an account used by the application when performing a virus scan.
To start the task with the privileges of a different user account:
- Open the main application window.
- In the left part of the window, select the Scan (Full Scan, Quick Scan) section.
- For the selected section, click the link with the preset security level.
- In the window that will open, in the Security Level section, click the Customize button.
- In the window that will open, on the Run mode tab, in the User section, check the Run task as box. Specify the user name and password.
RUN MODE:CREATING A SCHEDULE
All virus scan tasks can be started manually, or by a schedule.
The default schedule setting for the tasks created when the program is installed is off. The exception is the quick scan task, which runs every time you start your computer.
When creating a schedule on tasks launch it is necessary to set the interval of the scans.
If it is not possible to start the task for any reason (for example, the computer was not on at specified time), you can configure the task to start automatically as soon as it becomes possible.
To edit a schedule for scan tasks:
- Open the main application window.
- In the left part of the window, select the Scan (Full Scan, Quick Scan) section.
- For the selected section, click the link with the preset security level.
- In the window that will open, press the Change button in the Run mode section.
- Make the required changes in the Schedule window that will open.
To configure automatic launches of skipped tasks:
- Open the main application window.
- In the left part of the window, select the Scan (Full Scan, Quick Scan) section.
- For the selected section, click the link with the preset security level.
- In the window that will open, press the Change button in the Run mode section.
- In the Schedule window that will open, in the Schedule settings section, check the Run task if skipped box.
FEATURES OF SCHEDULED TASK LAUNCH
All virus scan tasks can be started manually, or by a schedule.
Scheduled tasks feature an additional functionality, for example, you can check the Pause scheduled scan when screenshot is inactive or computer is unlocked box. This functionality postpones the task launch until the user has finished working on the computer. So, the scan task will not take up system resources during the work.
To launch scan tasks only when the computer isn't in use any more, please do the following:
- Open the main application window.
- In the left part of the window, select the Full Scan, Quick Scan section.
- For the selected section, click the link with the preset security level.
- In the window that will open, in the Run mode section, check the Pause scheduled scan when screenshot is inactive or computer is unlocked box.
VIRUS SCAN STATISTICS
General information on each virus scan task is shown in the statistics window. Here you can check how many objects have been scanned and how many hazardous and suspicious objects subject to processing have been detected. Additionally, here you can find information about the starting and completing time of the last task run and about the scan length.
General information on scan results is grouped on the following tabs:
The Detected tab lists all dangerous objects detected when executing a task.
- The Events tab lists all events occurred when executing a task.
The Statistics tab provides statistical data of scanned objects.
- The Settings tab provides the settings, which determine the way of executing a task.
If any errors have occurred during the scan, try running it again. If the next attempt returns an error, we recommend that you save the report on task results in a file using the Save as button. Then contact the Technical Support Service, and send the report file. Kaspersky Lab's specialists will certainly help you.
To view statistics of a virus scan task, please do the following:
- Open the main application window.
- In the left part of the window, select the Scan (Full Scan, Quick Scan) section, create a scan task, and launch it. The task progress will be displayed in the main window. Click the Details link to switch to the statistics window.
ASSIGNING COMMON SCAN SETTINGS FOR ALL TASKS
Each scan task is run according to its own settings. By default, the tasks created at the application installation are run with the settings recommended by Kaspersky Lab experts.
You can configure universal scan settings for all tasks. You will use a set of properties used to scan an individual object for viruses as a starting point.
To assign universal scan settings to all tasks, please do the following:
- Open the application settings window.
- In the left part of the window, select the Scan section.
- In the right part of the window, in the Other task settings section, click the Apply button. Confirm the universal settings that you have selected in the pop-up dialog box.
RESTORING DEFAULT SCAN SETTINGS
When editing task settings, you can always restore the recommended ones. They are considered optimal, recommended by Kaspersky Lab, and grouped in the Recommended security level.
To restore the default file scan settings, please do the following:
- Open the main application window.
- In the left part of the window, select the Scan (Full Scan, Quick Scan) section.
- For the selected section, click the link with the preset security level.
- In the window that will open, click the Default level button in the Security Level section.
KASPERSKY ANTI-VIRUS UPDATE
New viruses, Trojans, and other malware are created every day all over the world; therefore, it is extremely important to make certain that you are using the latest version of the application databases.
Application update downloads and installs on your computer:
- Application databases
The protection of information is based on databases which contain signatures of threats. The databases are added to every hour with records of new threats and methods used to fight them. Therefore, you are advised to update them on a regular basis.
- Application modules
In addition to the application databases, you can also update the application modules. The update packages fix the application's vulnerabilities and add new or improve the existing functionality.
Kaspersky Lab update servers are the primary sources of Kaspersky Anti-Virus updates.
To successfully download updates from servers, your computer must be connected to the Internet. By default, the Internet connection settings are determined automatically. If the proxy server settings are not properly configured automatically, the connection settings can be set manually.
During an update, application modules and databases on your computer are compared to those in the update source. If your computer has the latest version of the databases and application modules, you will see a notification window confirming that your computer's protection is up to date. If the databases and modules on your computer differ from those on the update server, the application downloads only the incremental part of the updates. The fact that not all the databases and modules are downloaded significantly increases the speed of copying files and saves Internet traffic.
Before updating the databases, Kaspersky Anti-Virus creates backup copies of them, so that you can use it again in the future.
You might need the rollback option if, for example, the databases have become corrupted during the update process. You can easily roll back to the previous version and try to update the databases again.
You can copy the retrieved updates to a local source while updating the application. This service allows updating the databases and modules of the application on networked computers to save Internet traffic.
You can also configure automatic update startup.
The Update section displays the current status of the application databases.
You can view the updating report, which contains full information about events that have occurred during updating. You can also see the virus activity overview at www.kaspersky.com by clicking the Virus activity review link.
In order to edit the settings of any update task, please do the following:
- Open the main application window.
- In the left part of the window, select the Update section.
- For the selected section, click the link with the preset run mode.
- In the window that will open, make the required changes in the settings for the task you have selected.
To switch to update report, please do the following:
-
Open the main application window.
-
In the left part of the window, select the Update section.
- Click the Reports button.
IN THIS SECTION
Starting the update 46
Rolling back the last update 47
Selecting an update source 47
Regional settings 48
Using a proxy server. 48
Run mode: specifying an account 48
Run mode: creating a schedule 49
Changing the update task's run mode 49
Selecting objects to update 50
Updating from a local folder 50
Update statistics 51
Possible problems during the update 51
STARTING THE UPDATE
You can start the application update at any time. Updates are downloaded from the selected update source.
You can update Kaspersky Anti-Virus using one of the two supported methods:
From the context menu.
From the main application window.
Update information will be displayed in the main application window.
Note that the updates are distributed to a local source during the updating process, provided that this service is enabled.
To start Kaspersky Anti-Virus update from the context menu:
- Right-click the application icon in the taskbar notification area.
- Select the Update item from the dropdown menu.
To start Kaspersky Anti-Virus update from the main application window:
- Open the main application window.
- In the left part of the window, select the Update section.
- Click the Start update button. The task progress will be displayed in the main application window.
ROLLING BACK THE LAST UPDATE
At the start of the update process Kaspersky Anti-Virus creates a backup copy of the current databases and application modules. This allows the application to continue working, using the previous databases, if the update fails.
The rollback option is useful if, for example, part of the databases has been corrupted. Local databases can be corrupted by the user or by a malicious program, which is possible only if the application's self-defense is disabled. You can easily roll back to the previous databases and try to update the databases later.
To roll back to the previous database version:
- Open the main application window.
- In the left part of the window, select the Update section.
- Click the Roll back to the previous databases link.
SELECTING AN UPDATE SOURCE
Update source is a resource containing updates for databases and application modules of Kaspersky Anti-Virus.
You can use the following as update sources:
- Administration Server is a centralized update repository located on the Kaspersky Administration Kit Administration Server (for more details see the Administrator's Guide for Kaspersky Administration Kit).
- Kaspersky Lab's update servers are special websites containing updates for the databases and application modules for all Kaspersky Lab's products.
- FTP or HTTP servers, local or network folders are local servers or folders that contain the latest updates.
If you do not have access to Kaspersky Lab's update servers (for example, your computer is not connected to the Internet), you can call the Kaspersky Lab main office at +7 (495) 797-87-00 or +7 (495) 645-79-39 to request contact information of Kaspersky Lab partners who can provide you with updates on floppy disks or ZIP disks.
You can copy the updates from a removable disk and upload them to an FTP or HTTP website, or save them in a local or network folder.
When requesting updates on removable media, please specify if you want to have the updates for application modules as well.
If you select a resource outside the LAN as an update source, you must have an Internet connection to update.
If several resources are selected as update sources, the application will try to connect to them in turn, starting at the top of the list and retrieving the updates from the first available source.
To choose an update source:
- Open the main application window.
- In the left part of the window, select the Update section.
- For the selected section, click the link with the preset run mode.
-
In the window that will open, in the Update settings section, click the Configure button.
-
In the window that will open, on the Update source tab, click the Add button.
- Select an FTP or HTTP site, or enter its IP address, symbolic name or URL in the Select update source window that will open.
REGIONAL SETTINGS
If you use Kaspersky Lab update servers as update source, you can select the optimal server location when downloading updates. Kaspersky Lab servers are located in several countries. Choosing the Kaspersky Lab update server closest to you will let you save time and download updates faster.
To choose the closest server:
- Open the main application window.
- In the left part of the window, select the Update section.
- For the selected section, click the link with the preset run mode.
- In the window that will open, in the Update settings section, click the Configure button.
- In the window that will open, on the Update Source tab, in the Regional settings section, select the Select from list option and then select the country nearest to your current location from the dropdown list.
If you select the Autodetect option, the information on your location will be copied from your operating system's registry when updating.
USING A PROXY SERVER
If you are using a proxy server to connect to the Internet, you must configure its settings.
To configure the proxy server, please do the following:
- Open the main application window.
- In the left part of the window, select the Update section.
- For the selected section, click the link with the preset run mode.
- In the window that will open, in the Update settings section, click the Configure button.
- In the window that will open, edit the proxy server settings on the Proxy settings tab.
RUN MODE: SPECIFYING AN ACCOUNT
Kaspersky Anti-Virus has a feature that can start program updates from another profile. By default, this service is disabled, and tasks are started using the account under which you are registered in the system.
Since the application can be updated from a source that you do not have access to (such as the network updates directory) or authorized user rights to the proxy server, you can use this feature to run application updates using the login of a user that has such privileges.
Note that if you do not run the task with privileges, the scheduled update will be run with the privileges of the current user account. If no users are currently registered on the computer, running updates under another user account has not been configured, and updates run automatically, they will run with the SYSTEM privileges.
To start the task with the privileges of a different user account:
- Open the main application window.
- In the left part of the window, select the Update section.
- For the selected section, click the link with the preset run mode.
- In the window that will open, in the Update settings section, click the Configure button.
- In the window that will open, on the Additional tab, in the Run mode section, check the Run task as box. Enter the data for the login that you want to start the task as below: user name and password.
RUN MODE:CREATING A SCHEDULE
All virus scan tasks can be started manually, or by a schedule.
When creating a schedule on tasks launch it is necessary to set the interval of the update tasks.
If it is not possible to start the task for any reason (for example, the computer was not on at specified time), you can configure the task to start automatically as soon as it becomes possible.
To edit a schedule for scan tasks:
- Open the main application window.
- In the left part of the window, select the Update section.
- For the selected section, click the link with the preset run mode.
- In the window that will open, press the Change button in the Run mode section.
- Make the required changes in the Schedule window that will open.
To configure automatic launches of skipped tasks:
- Open the main application window.
- In the left part of the window, select the Update section.
- For the selected section, click the link with the preset run mode.
- In the window that will open, press the Change button in the Run mode section.
- In the Schedule window that will open, in the Schedule settings section, check the Run task if skipped box.
CHANGING THE UPDATE TASK'S RUN MODE
The startup mode of Kaspersky Anti-Virus update task is selected in the Initial Configuration Wizard. You can change the run mode you have selected.
The update task can be launched using one of the following modes:
- Automatically. Kaspersky Anti-Virus checks the update source for update packages at specified intervals. If new updates are found, Kaspersky Anti-Virus downloads and installs them on the computer. This is the default mode.
Kaspersky Anti-Virus will attempt to perform updates at intervals specified in the previous update package. This option allows Kaspersky Lab to regulate the updating frequency in case of virus outbreaks and other potentially dangerous situations. Your application will receive the latest updates for the databases, network attacks, and software modules in a timely manner, thus excluding the possibility for malware to penetrate your computer.
- On schedule (time interval changes depending on settings). Updates will run automatically according to the schedule created.
- Manually. If you select this option, you will run application updates on your own. Kaspersky Anti-Virus will notify you when updates are required without fail.
To configure the update task launch schedule:
- Open the main application window.
- In the left part of the window, select the Update section.
- For the selected section, click the link with the preset run mode.
- In the window that will open, select the update task launch mode in the Run mode section. If the scheduled update option is selected, create the schedule.
SELECTING OBJECTS TO UPDATE
Update objects are the components that will be updated:
- application databases;
- application modules.
Application databases are always updated while application modules are only updated if an appropriate mode is selected.
If there is a set of application modules in the update source when updating, Kaspersky Anti-Virus will download and install it when the computer is restarted. Downloaded module updates will not be installed until the computer is restarted.
If the next application update occurs before the computer is restarted and hence before the previously downloaded application module updates are installed, only the threat signatures will be updated.
If you want to download and install updates for application modules, please do the following:
- Open the main application window.
- In the left part of the window, select the Update section.
- For the selected section, click the link with the preset run mode.
- In the window that will open, in the Update settings section, check the Update application modules box.
UPDATING FROM A LOCAL FOLDER
The procedure of retrieving updates from a local folder is arranged as follows:
- One of the computers on the network retrieves the Kaspersky Anti-Virus update package from a Kaspersky Lab's server, or from a mirror server hosting the current set of updates. The updates retrieved are placed in a shared folder.
- Other computers on the network access the shared folder to retrieve updates.
Kaspersky Anti-Virus 6.0 only retrieves its update packages from Kaspersky Lab's servers. We recommend distributing updates for other Kaspersky Lab's applications through Kaspersky Administration Kit.
To enable update distribution mode, please do the following:
- Open the main application window.
- In the left part of the window, select the Update section.
- For the selected section, click the link with the preset run mode.
- In the window that will open, click the Customize button.
- In the window that will open, on the Additional tab, in the Update distribution section, check the Copy updates to folder box and in the field below specify the path to a public folder into which downloaded updates will be copied. Also, you can select the path in the window that will open by clicking the Browse button.
If you wish application updates to be performed from the shared folder selected, please do the following on all computers on the network:
- Open the main window.
- In the left part of the window, select the Update section.
- For the selected section, click the link with the preset run mode.
- In the window that will open, click the Customize button.
- In the window that will open, on the Update source tab, click the Add button.
- In the Select update source window that will open, select a folder or enter the full path to it in the Source field.
- Uncheck the Kaspersky Lab's update servers box on the Update source tab.
UPDATE STATISTICS
You will find general information on update tasks in the statistics window. In this window, you can also view the events occurred when executing a task (the Events tab) and view the list of settings that determine the task execution (the Settings tab).
If any errors have occurred during the scan, try running it again. If the next attempt returns an error, we recommend that you save the report on task results in a file using the Save as button. Then contact the Technical Support Service, and send the report file. Kaspersky Lab's specialists will certainly help you.
Brief update statistics are displayed in the top part of the statistics window. It includes the size of downloaded and installed updates, update speed and duration, and other information.
To view statistics of a virus scan task, please do the following:
- Open the main application window.
- In the left part of the window, select the Update section, create an update task, and launch it. The task progress will be displayed in the main window. You can switch the statistics window by clicking the Details link.
POSSIBLE PROBLEMS DURING THE UPDATE
When you update Kaspersky Anti-Virus application modules or threat signatures, errors may occur, which is associated with incorrect update configuration, connection problems, etc. This Help section covers the major part of errors and gives
tips for eliminating them. If you encounter errors not covered in Help or want detailed recommendations for eliminating them, try finding information in the Knowledge Base in the Technical Support web portal in the "If a program generated an error..." section. If recommendations given in this section are not helpful in solving the problem or if there is no information about the error in the Knowledge Base, send a request to the Technical Support Team.
| CONFIGURATION ERRORS Errors of this group occur largely due to an incorrect installation of the application, or due to modifications of the application configuration, which resulted in a loss of functionality. General recommendations: If errors in this group are generated, we recommend restarting updates. If the error persists, contact Technical Support. If the problem is connected to the application being installed incorrectly, we recommend reinstalling it. |
| No update source specified None of the source contains update files. It is possible that no update source is specified in the update settings. Please make sure that the update settings are configured correctly and try again. |
| Error verifying license This error is generated if the license key used by the application is blocked and placed in the license black list. |
| Error retrieving update settings Internal error retrieving update task settings. Please make sure that update settings are configured correctly and try again. |
| Insufficient privileges to update This error usually occurs when the user account used to start the update does not have access privileges to the update source. We recommend making sure that user account has the necessary privileges. This error could also be generated when attempt to copy update files to a folder that cannot be created. |
| Internal error Internal logical error in update task. Please make sure that the update settings are configured correctly and try again. |
| Error verifying updates This error is generated if the files downloaded from the update source do not pass internal verification. Please try updating later. |
| ERRORS THAT OCCUR WHEN WORKING WITH FILES AND FOLDERS This type of error occurs when the user account being used to run updates has restricted rights or no rights to access the update source or the folder where the updates are located. General recommendations: If errors of this type occur, we recommend verifying that the user account has sufficient access rights to those files and folders. |
| Cannot create folder This error is generated if a folder cannot be created during the update procedure. |
| Insufficient privileges to execute file operation This error occurs if the user account used to run the update does not have sufficient privileges to execute operations with the files. |
| File or folder not found This error occurs if a file or folder needed in updates is missing. We recommend verifying that the specified file or folder exists and is available. |
| File operation error This error is an internal logical error of the update module when executing operations with files. |
| NETWORK ERRORS Errors of this group occur when there are connection problems or when network connection is not configured correctly. General recommendations: If errors in this group occur, we recommend making sure your computer is connected to the Internet, the connection settings are correctly configured, and the update source is available. Then try updating again. If the problem persists, contact Technical Support. |
| Network error An error was generated while retrieving update files. If you encounter this error, check your computer's network connection. |
| Connection interrupted This error occurs when the connection with the update source is terminated by the update server for any reason. |
| Network operation timeout Update source connection timeout. When configuring the program's update settings, you may have set a low time-out value for the connection with the update source. If your computer cannot connect to the server or the update folder within that time, the program returns this error. In such a case, we recommend checking that the settings for Updater are correct and that the update source is available. |
| Authorization error on FTP server This error occurs if authorization settings for the FTP server used as the update source are entered incorrectly. Please make sure that the actual FTP server settings allow this user account to download files. |
| Authorization error on proxy server This error is generated if the settings for updating via a proxy server incorrectly indicate the name and password, or if the user account under which the updates are run does not have access privileges to the update source. Please, edit the authorization settings and retry the update. |
| Error resolving DNS name This error is generated if no update source is detected. It is possible that the update source address is indicated incorrectly, the network settings are incorrect, or the DNS server is unavailable. We recommend checking your update settings and availability of update sources, then try again. |
| Connection to the update source could not be established This error occurs is there is no connection with the update source. Please make sure that the update source settings are configured correctly and try again. |
| Connection to the proxy server could not be established This error is generated if the proxy server connections settings are indicated incorrectly. To solve the problem, we recommend making sure that settings are configured correctly, the proxy server is available, and the Internet is available, and trying to update again. |
| Error resolving proxy server DNS name This error is generated if the proxy server is not detected. We recommend making sure that the proxy server settings are correct and that the DNS server is available. |
| ERRORS RELATED TO CORRUPTED DATABASES These errors are linked to corrupted files in the update source. General recommendations: If you are updating from Kaspersky Lab web servers, try updating again. If the problem persists, contact Technical Support. If you are updating from a different source, such as a local folder, we recommend updating it from Kaspersky Lab's web servers. If the error occurs again, contact Kaspersky Lab Technical Support. |
| File not in update source All files downloaded and installed on your computer during the update process are listed in a special file included in the update. This error occurs if there are any files on the update list that are not on the update source. |
| Error verifying signature This error might be returned by the application if the electronic digital signature of the update pack being downloaded is corrupted or does not match the Kaspersky Lab signature. |
| Index file corrupted or missing This error is generated if the .xml format index file used for updating is missing from the update source or corrupted. |
| ERRORS RELATED TO UPDATING USING KAPERSKY ADMINISTRATION KIT ADMINISTRATION SERVER These errors are generated in connection with problems updating the application through Kaspersky Administration Kit Administration Server. General recommendations: First, make sure that Kaspersky Administration Kit and its components (Administration Server and Network Agent) are installed and running. Try updating again. If this fails, restart Network Agent and Administration Server, then try updating again. If this does not resolve the issue, contact Technical Support. |
| Error connecting to Administration Server This error is generated if the Kaspersky Administration Kit Administration Server cannot be connected to. We recommend making sure that NAgent is installed and running. |
| Registration error in NAgent If this error occurs, follow the general recommendations for resolving this type of error. If the error reoccurs, send the detailed report file for the update and Network Agent on that computer to Technical Support Service using the online form. Describe the situation in detail. |
| Cannot establish connection. The Administration Server is busy and cannot process the request In this case, the update should be attempted later. |
| Cannot establish connection with Administration Server / Main Administration Server / NAgent, physical error / unknown error If you encounter such errors, we recommend trying to update again later. If the problem persists, contact Technical Support. |
| Error retrieving file from Administration Server, invalid transport argument If the error persists, contact Technical Support. |
| Error retrieving file from Administration Server If you encounter such errors, we recommend trying to update again later. If the problem persists, contact Technical Support. |
| VARIOUS CODES This group includes errors that cannot be included in any of the groups listed above. |
| Files for rollback operation missing This error is generated if another rollback attempt has been made after completing rollback of updates, but no updates had been made between them. The rollback procedure cannot be repeated until a successful update which restores a backup set of files has been performed. |
CONFIGURING APPLICATION SETTINGS
The application settings window is used for quick access to the main settings of Kaspersky Anti-Virus 6.0.
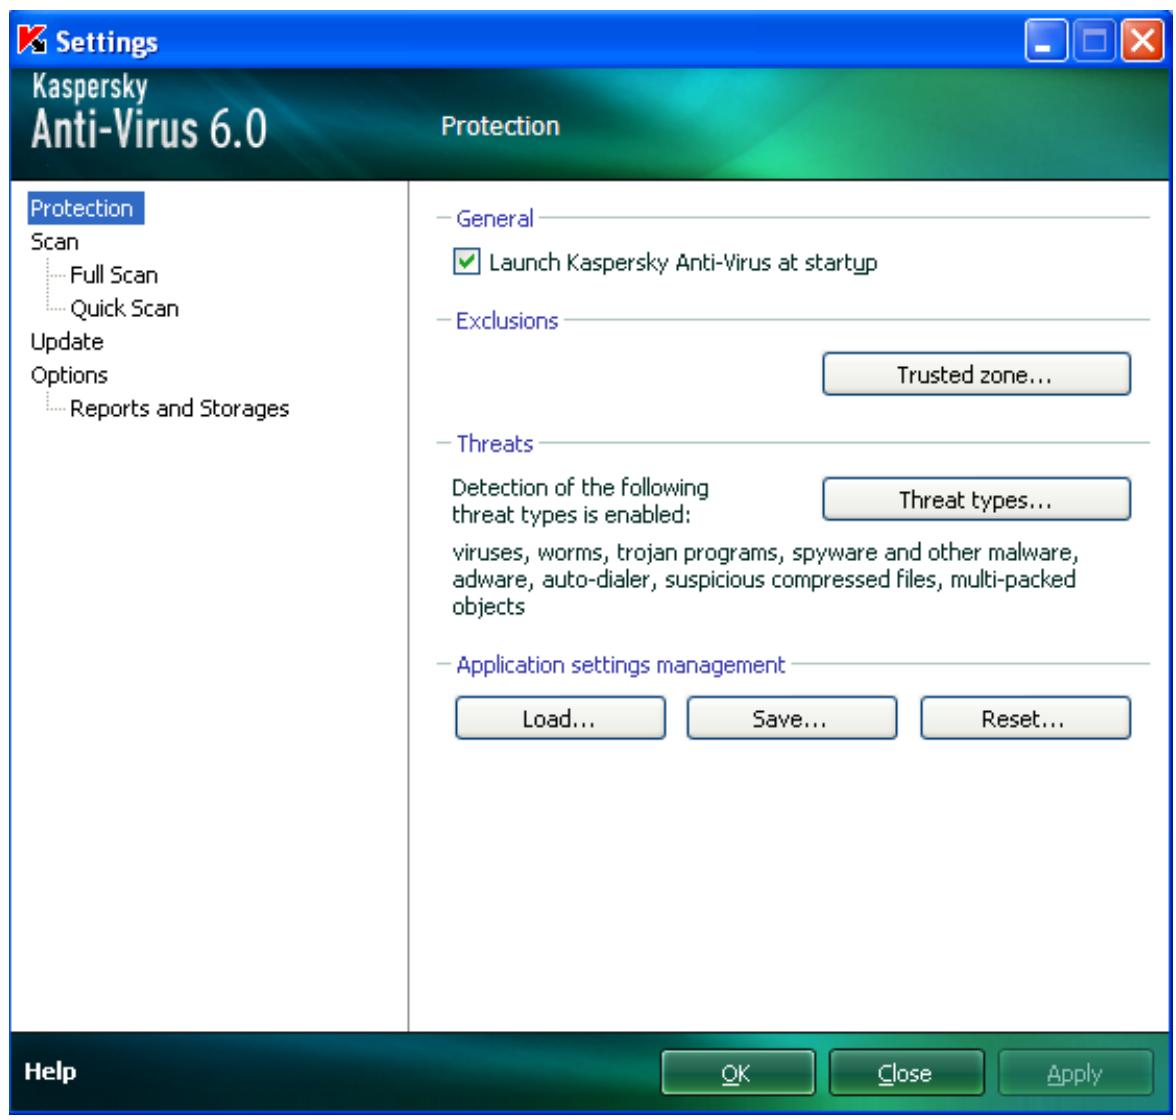
Figure 9. Application settings configuration window
The window consists of two parts:
- the left part of the window provides access to Kaspersky Anti-Virus components, virus scan tasks, update tasks, etc.;
the right part of the window contains a list of settings for the task, etc., selected in the left part of the window.
You can open this window:
From the main application window. To do so, click the Settings button in the top part of the main window.
From the context menu. To do so, select the Settings item from the application context menu.
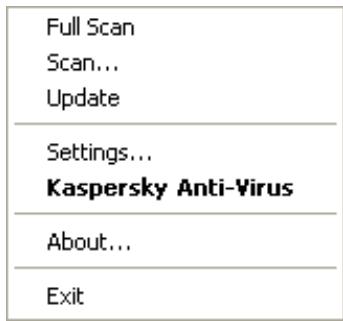
Figure 10. Context menu
IN THIS SECTION
Protection 57
Scan 62
Update 63
Settings 63
Reports and Storages 67
PROTECTION
In the Protection window you can use the following additional functions of Kaspersky Anti-Virus:
- Launching the application at the operation system startup (see page 57).
- Selecting the detectable threat categories (see page 58).
-
Creating a trusted zone (see page 58):
-
creating an exclusion rule (see page 59);
-
exporting / importing exclusion rule components (see page 61).
-
Exporting / importing the application settings (see page 61).
- Restoring the default application settings (see page 62).
LAUNCHING THE APPLICATION AT THE OPERATING SYSTEM STARTUP
If you have to shut down Kaspersky Anti-Virus completely for any reason, select the Exit item from the application's context menu. Then the application will be discarded from RAM. That means that the computer will be running unprotected.
You can enable the computer's protection by starting the application from the Start Programs Kaspersky AntiVirus 6.0 Kaspersky Anti-Virus 6.0 menu.
Protection can also be resumed automatically after restarting your operating system.
To enable the mode of launching the application at the operating system startup, please do the following:
- Open the application settings window.
- In the left part of the window, select the Protection section.
- Check the Launch Kaspersky Anti-Virus at startup box.
SELECTING DETECTABLE THREAT CATEGORIES
Kaspersky Anti-Virus protects you against various types of malicious programs. Regardless of the settings selected, the application will always scan and disinfect viruses and Trojans. These programs can do significant harm to your computer. To provide more security to your computer, you can enlarge the list of threats to be detected, by enabling the control of various potentially dangerous programs.
To select the detectable threat categories, please do the following:
- Open the application settings window.
- In the left part of the window, select the Protection section.
- In the Threats section, click the Threat types button.
- In the Threat types window that will open, check the boxes for the categories of threats you want to protect your computer from.
CREATING A TRUSTED ZONE
Trusted zone is a list of objects created by the user that Kaspersky Anti-Virus does not monitor. In other words, it is a set of exclusions from the application's protection scope.
The user creates a trusted zone based on the features of the objects he or she works with, and on the applications installed on the user's computer. You might need to create such an exclusion list if, for example, Kaspersky Anti-Virus blocks access to an object or an application which you are sure is absolutely safe.
You can exclude files of certain formats from the scan, use a file mask, or exclude a certain area (for example, a folder or an application), programs' processes, or objects according to the Virus Encyclopedia classification (status assigned to objects by Kaspersky Anti-Virus during a scan).
An exclusion object is excluded from scan when the disk or the folder where it is located is scanned. However, if you select that object specifically, the exclusion rule will not be applied to it.
To create the list of exclusions from scan, please do the following:
- Open the application settings window.
- In the left part of the window, select the Protection section.
- In the Exclusions section, click the Trusted zone button.
- In the window that will open, configure the exclusion rules for objects (see page 59).
SEE ALSO:
Creating an exclusion rule 59
Allowed file exclusion masks 60
Allowed exclusion masks according to the Virus Encyclopedia 61
Exporting /importing exclusion rules 61
CREATING AN EXCLUSION RULE
Exclusion rules are sets of conditions that Kaspersky Anti-Virus uses to verify if it can skip the scan of an object.
You can exclude files of certain formats from the scan, use a file mask, or exclude a certain area (for example, a folder or an application), program processes, or objects according to the Virus Encyclopedia's classification.
Threat type is the status Kaspersky Anti-Virus assigns to an object while scanning it. This status is assigned based on the classification of malware and riskware found in the Kaspersky Lab's Virus Encyclopedia.
Potentially dangerous software does not have malicious functions but it can be used as an auxiliary component for a malicious code, since it contains holes and errors. This category includes, for example, remote administration applications, IRC clients, FTP servers, all-purpose utilities for halting or hiding processes, keyloggers, password macros, autodialers, etc. Such software is classified as not-a-virus, but it can be divided into several types, e.g. Adware, Joke, Riskware, etc. (for more information on potentially dangerous software detected by Kaspersky Anti-Virus, see the Virus Encyclopedia at www.viruslist.com (http://www.viruslist.com/en/viruses/encyclopedia)). After the scan, such programs may be blocked. Since many of them are widely exploited by users, they may be excluded from the scan. To do so, you should add the name of the threat or a threat name mask (according to the Virus Encyclopedia's classification) to the trusted zone.
For example, you may frequently use the Remote Administrator program. This is a remote access system that allows you to operate your resources from a remote computer. Kaspersky Anti-Virus views this sort of application activity as potentially dangerous and may block it. To avoid blocking the application, you should create an exclusion rule that would specify Remote Admin as the verdict.
When an exclusion is being added, it results in a rule, which further can be used at the execution of virus scan tasks.
To create an exclusion rule, please do the following:
- Open the application settings window.
- In the left part of the window, select the Protection section.
- In the Exclusions section, click the Trusted zone button.
- In the window that will open, on the Exclusion rules tab, click the Add button.
- In the Exclusion mask window that will open, in the Properties section, select an exclusion type. Then, in the Rule description section, assign values to the selected exclusion types and select which Kaspersky Anti-Virus components should be covered by the rule.
To create an exclusion rule from the report window, please do the following:
- Select the object from the report to add to the exclusions.
- Select the Add to Trusted zone item from the context menu for this object.
- The Exclusion mask window will open. Make sure that you are satisfied with the exclusion rule settings. Object name and relevant threat type fields are filled in automatically based on report data. To create the rule, click the OK button.
ALLOWED FILE EXCLUSION MASKS
Let us take a closer look at some examples of allowed masks that you can use when creating the list of files to exclude from scan:
- Masks without file paths:
*.exe - all files with the .exe extension;
^*.ex? - all files with the ex? extension, where ? may represent any single character;
- test - all files with the name test.
- Masks with absolute file paths:
C:\dir*.* or C:\dir* or C:\dir\ - all files in the C:\dir\ folder;
C:\dir*.exe - all files with the .exe extension in the C:\dir\ folder;
C:\dir*.ex? - all files with the ex? extension in the C:\dir\ folder where ? may represent any character;
C:\dir\test -only the C:\dir\test file.
If you do not want the application to scan files in all nested sub folders of the specified folder, check the Include sub folders box when creating the mask.
-
File path masks:
-
dir*, or dir*, or dir\ - all files in all dir\ folders;
- dir\test - all test files in dir\ folders;
- dir*.exe - all files with the .exe extension in all dir\ folders;
- dir*.ex? - all files with the ex? extension in all dir\ folders, where ? may represent any character.
If you do not want the application to scan files in all nested sub folders of the specified folder, check the
Include sub folders box when creating the mask.
The *. and * exclusion masks can only be used if you specify the classification type of the threat according to the Virus Encyclopedia. In this case, the specified threat will not be detected in any object. Using those masks without specifying the classification type essentially disables monitoring. Also, when setting an exclusion, it is not recommended selecting a path related to a network disk created based on a file system folder using the subst command, as well as to a disk which mirrors a network folder. The case is that different resources may be given the same disk name for different users, which will inevitably lead to an incorrect triggering of exclusion rules.
SEE ALSO
Allowed exclusion masks according to the Virus Encyclopedia 61
ALLOWED EXCLUSION MASKS ACCORDING TO THE VIRUS ENCYCLOPEDIA
When adding masks to exclude certain threats based on their Virus Encyclopedia classification, you can specify the following:
- the full name of the threat as given in the Virus Encyclopedia at www.viruslist.com (http://www.viruslist.com), e.g. not-a-virus:RiskWare.RemoteAdmin.RA.311 or Flooder.Win32.Fuxx;
the threat name by mask, e.g.:
not-a-virus - exclude legal but potentially dangerous programs from scan, as well as joke programs;
Riskware. - exclude riskware from scan;
- RemoteAdmin.* - exclude all remote administration programs from scan.
SEE ALSO
Allowed file exclusion masks 60
EXPORTING / IMPORTING EXCLUSION RULES
Export and import are designed to carry over the created rules to other computers.
To copy the exclusion rules, please do the following:
- Open the application settings window.
- In the left part of the window, select the Protection section.
- In the Exclusions section, click the Trusted zone button.
- In the window that will open, on the Exclusion rules tab, use the Export and Import buttons to perform the required actions to copy the rules.
EXPORTING / IMPORTING KASPERSKY ANTI-VIRUS SETTINGS
Kaspersky Anti-Virus provides the option of importing and exporting its settings.
This is a helpful feature when, for example, the application is installed on your home computer and in your office. You can configure the application the way you want it at home, export those settings as a file on a disk, and load them on your computer at work using the import feature. The settings are stored in a special configuration file.
To export the application's current settings, please do the following:
- Open the application settings window.
- In the left part of the window, select the Protection section.
- In the Application settings management section, click the Save button.
- In the window that will open enter the name of the configuration file and the path where it should be saved.
To import the application's settings from a saved configuration file, please do the following:
-
Open the application settings window.
-
In the left part of the window, select the Protection section.
- In the Application settings management section, click the Load button.
- In the window that will open, select a file that you wish to import the Kaspersky Anti-Virus settings from.
RESTORING THE DEFAULT SETTINGS
You can always return to the default or recommended settings of Kaspersky Anti-Virus. They are considered optimum, and are recommended by Kaspersky Lab. Application Configuration Wizard restores default settings.
In the window that will open, you will be asked to determine which settings and for which components should or should not be saved when restoring the recommended security level.
To restore protection settings, please do the following:
- Open the application settings window.
- In the left part of the window, select the Protection section.
- In the Application settings management section, click the Reset button.
- In the window that will open, check the boxes for the settings requiring to be saved. Click the Next button. The Initial Configuration Wizard will be launched; follow its directions.
SCAN
Selection of the method to be used to scan objects on your computer is determined by a set of properties assigned for each task.
Kaspersky Lab specialists distinguish several virus scan tasks. They are as follows:
Scan
Scan of objects selected by the user. You can scan any object in the computer's file system.
Full Scan
A thorough scan of the entire system. The following objects are scanned by default: system memory, programs loaded at startup, system backup, email databases, hard drives, removable storage media, and network drives.
Quick Scan
Virus scan of operating system startup objects.
The settings window of each task allows you to do the following:
- select the security level (see page 37) with the settings that the task will use;
- select an action (see page 37) that the application will apply when it detects an infected / potentially infected object;
- create a schedule (see page 42) to run tasks automatically;
- specify the file types (see page 38) to be scanned for viruses;
specify the scan settings for compound files (see page 40); -
select the scan methods and technologies;
-
assign common scan settings to all tasks (see page 43).
To edit task settings, please do the following:
- Open the application settings window.
- In the left part of the window, select the Scan (Full Scan, Quick Scan) section.
- In the right part of the window, select the required security level, the reaction to the threat and configure the run mode. Click the Customize button in order to switch to the settings of other tasks' settings. To restore the default settings, click the Default level button.
UPDATE
Kaspersky Anti-Virus update is performed using settings that determine the following:
- the source (see page 47) from which updates will be downloaded and installed;
- the application update run mode (see page 49) and the specific components to be updated (see page);
- how often the update will be launched if scheduled launch is configured (see page 49);
which account (see page 48) the update will be launched under; - if the updates are to be copied to a local source (see page 50);
use of a proxy server (see page 48).
To proceed to update configuration, please do the following:
- Open the application settings window.
- In the left part of the window, select the Update section.
- Select the required run mode in the right part of the window. Click the Configure button to switch to configuring other tasks.
OPTIONS
Using the Options window you can use the following additional functions of Kaspersky Anti-Virus:
Application self-defense (see page 64).
Restricting the access to the application (see page 64).
- Notifications about Kaspersky Anti-Virus events (see page 64):
- selecting event type and way of sending notifications (see page 65);
- configuring email notification (see page 66);
- configuring the event log (see page 66).
Active interface elements (see page 66).
APPLICATION SELF-DEFENSE
Kaspersky Anti-Virus ensures your computer's security against malware and, because of that, can be the target of malicious programs which may try to block or even delete it.
To ensure your computer safety system's stability, the application has its own mechanisms of self-defense and protection against remote access.
To enable protection against remote access, please do the following:
- Open the application settings window.
- In the left part of the window, select the Options section.
- In the Self-Defense section, check the Disable external control of system service box to block any attempt to remotely manage the application's services.
If any of the actions listed are attempted, a message will appear over the application icon in the taskbar notification area (unless the notification service has been disabled by the user).
RESTRICTING ACCESS TO THE APPLICATION
You personal computer may be used by several people with varying levels of computer literacy. Leaving open access to Kaspersky Anti-Virus and its settings may dramatically lower the computer's security level as a whole.
To increase the security level of your computer, use a password to access Kaspersky Anti-Virus. This can block all operations, except for notifications of detecting dangerous objects, and prevent the following actions from being performed:
- changing application settings;
closing the application; - stopping scan tasks.
Each of the actions listed above leads to a lower level of protection on your computer, so try to establish which of the users on your computer you trust to take such actions.
To protect access to the application with a password, please do the following:
- Open the application settings window.
- In the left part of the window, select the Options section.
- In the Password protection section, check the Enable password protection box and click the Settings button.
- In the Password protection window that will open, enter the password and specify the area to be covered by the access restriction. Now whenever any user on your computer attempts to perform the actions you have selected, the application will always request the password.
NOTIFICATIONS ABOUT KASPERSKY ANTI-VIRUS EVENTS
Different types of events occur during the operation of Kaspersky Anti-Virus. The may be of reference type or contain important information. For example, an event can inform you of a successful completion of an application update, or can record an error in the operation of a certain component that should be immediately eliminated.
To keep up with the most recent events in Kaspersky Anti-Virus operation, use the notification feature.
Notifications can be delivered in one of the following ways:
- pop-up messages appearing over the application icon in the system tray;
sound notification; - email messages;
recording information in the event log.
To use the notification service, please do the following:
- Open the application settings window.
- In the left part of the window, select the Options section.
- In the Appearance section, check the Enable notifications box and click the Settings button.
- In the Notification settings window that will open, specify the types of Kaspersky Anti-Virus events that you want to be notified of, and the types of notification as well.
SEE ALSO
Selecting event type and way of sending notifications 65
Configuring notification by email 66
Configuring event log. 66
SELECTING EVENT TYPE AND WAY OF SENDING NOTIFICATIONS
During Kaspersky Anti-Virus operation, the following kinds of events arise:
- Critical notifications are events of critical importance. It is highly recommended that they are reported of with notifications since they point to problems in the application's operation or gaps in your computer's protection. For example, databases are obsolete or license validity period has expired.
- Error notifications are events that lead to the application's inoperability. For example, databases are missing or corrupted.
- Important notifications are events that should be attended to because they reflect important situations in the application's operation. For example, databases are obsolete or license expires soon.
- Minor notifications are reference-type messages that do not contain important information, as a rule. For example, object quarantined.
To specify which events the application should notify you of and how, please do the following:
- Open the application settings window.
- In the left part of the window, select the Options section.
- In the Appearance section, check the Enable notifications box and click the Settings button.
- In the Notification settings window that will open, check the boxes for the events and the ways of sending notifications for them, which you want to be notified of.
CONFIGURING NOTIFICATION BY EMAIL
After you have selected the events (see section "Selecting event type and way of sending notifications" on page 65) about which you wish to receive a notification by email, you should set up notifications.
To configure the email notifications, please do the following:
- Open the application settings window.
- In the left part of the window, select the Options section.
- In the Appearance section, check the Enable notifications box and click the Settings button.
- In the Notification Settings window that will open, check the boxes for the required events in the Email field and click the Email Settings button.
- In the Email notification settings window that will open, specify the required values for the settings. If you want notifications about events to be sent at scheduled times, create a schedule for sending the information message by clicking the Change button. Make the required changes in the Schedule window that will open.
CONFIGURING EVENT LOG
Kaspersky Anti-Virus provides the option of recording information about events that occur while the application is running either in the Microsoft Windows general event log (Application) or in a dedicated Kaspersky Anti-Virus event log (Kaspersky Event Log).
- Logs can be viewed in the Microsoft Windows Event Viewer which you can open by using the Start/Settings/Control Panel/Administration/View Events option.
To configure the event log, please do the following:
- Open the application settings window.
- In the left part of the window, select the Options section.
- In the Appearance section, check the Enable notifications box and click the Settings button.
- In the Notification settings window that will open, check the boxes for the required events in the Log field and click the Log Settings button.
- In the Event Log settings window that will open, select the log into which the information on events will be recorded.
ACTIVE INTERFACE ELEMENTS
Active interface elements include the following options of Kaspersky Anti-Virus:
Animate taskbar notification area icon.
Depending on the operation being performed by the application, the application icon in the system tray will change. By default, the application icon is animated.
To configure active interface elements, please do the following:
- Open the application settings window.
- In the left part of the window, select the Options section.
- Check the Animate taskbar notification area icon box in the Appearance section
REPORTS AND STORAGE
The section contains the settings that control the operations with application data files.
Application data files are objects that have been quarantined by Kaspersky Anti-Virus, or moved to backup, and files with reports about application components' operation.
In this section, you can:
- configure the report creation and storage (see page 68);
- configure quarantine and backup (see page 70);
- clear the report archive, Quarantine and Backup.
To clear the storage areas, please do the following:
- Open the application settings window.
- In the left part of the window, select the Reports and Storages section.
- In the window that will open, click the Clear button.
- In the Data files window that will open, specify the storage areas from which all objects should be removed.
SEE ALSO
Principles of handling reports 67
Configuring reports 68
Quarantine for potentially infected objects 68
Actions on quarantined objects 69
Backup copies of dangerous objects 69
Working with backup copies 70
Configuring quarantine and backup 70
PRINCIPLES OF HANDLING REPORTS
Every scan or update task is logged in a report.
To view reports, please do the following:
- Open the main application window.
- Click the Reports button.
To review all the events about component performance or task performance recorded in the report, please do the following:
-
Open the main application window and click the Reports button.
-
In the window that will open, on the Reports tab, select the name of the task and click the Details button. As a result a window will pop up, containing detailed information on the performance of the selected task. The resulting statistics on performance are displayed in the upper part of the window, and detailed information is given on the various tabs in the central part. Depending on the task, the composition of the tabs can vary.
To import the report into a text file, please do the following:
- Open the main application window and click the Reports button.
- In the window that will open, on the Reports tab, select the name of a component or a task and click the Details link.
- In the window that will open, the information about the performance of selected task will be displayed. Click the Save As button and specify where you want to save the report file.
CONFIGURING REPORTS
You can modify the following settings for creating and saving the reports:
- Allow or block logging informative events. As a rule, those events are not critical for the protection (the Log non-critical events box).
- Allow the saving in the report only for the events that have occurred since the last startup of the task. This saves disk space by reducing the report size (the Keep only recent events box). If the box is checked, the information will be updated every time the task is restarted. However, only non-critical information will be overwritten.
- Set the storage term for reports (the Store reports no longer than box). By default, the objects storage time is 14 days; once it expires, the objects will be deleted. You can change the maximum storage time, or even cancel any restrictions imposed on it.
- Specify the maximum report size (the Maximum size box). By default, the maximum size is 100 MB. You can cancel any restrictions imposed on the report's size, or enter another value.
To edit the settings for report creation and storage, please do the following:
- Open the application settings window.
- In the left part of the window, select the Reports and Storages section.
- In the Reports section, check all required boxes, and set the storage term and the maximum size of the report, if necessary.
QUARANTINE FOR POTENTIALLY INFECTED OBJECTS
Quarantine is a special repository that stores the objects possibly infected with viruses.
Potentially infected objects are objects suspected of being infected with viruses or their modifications.
Why potentially infected? It is not always possible to exactly determine where an object is infected. This could be for the following reasons:
The code of the object being analyzed resembles a known threat but is partially modified.
Application databases contain information on the threats investigated to date by Kaspersky Lab's specialists. If a malicious program has been modified and these changes have not been entered into databases yet, Kaspersky Anti-Virus classifies the object infected with the modified malicious program as a potentially infected object, and indicates without fail which threat this infection resembles.
- The code of the object detected is reminiscent in structure of a malicious program; however, nothing similar is recorded in the application databases.
It is quite possible that this is a new type of threat, so Kaspersky Anti-Virus classifies that object as a potentially infected object.
Files are identified as potentially infected with a virus by the heuristic code analyzer. This mechanism is fairly effective and very rarely leads to false positives.
Potentially infected object may be detected and quarantined in the course of the scan for viruses.
When you place an object to the Quarantine, it is moved, not copied: the object is deleted from the disk or email message, and saved in the Quarantine folder. Files in Quarantine are saved in a special format and are not dangerous.
SEE ALSO
Configuring quarantine and backup 70
Actions on quarantined objects 69
ACTIONS ON QUARANTINED OBJECTS
You can do the following operations with quarantined objects:
- quarantine the files that you suspect of being infected;
- scan and disinfect all potentially infected objects in Quarantine, using the current application databases;
- restore files to the folders from which they were moved to Quarantine, or to the folders selected by the user;
- delete any quarantined object or a group of selected objects.
To take some actions on quarantined objects, please do the following:
- Open the main application window and click the Detected button.
- In the window that will open, on the Quarantine tab, take the required actions.
BACKUP COPIES OF DANGEROUS OBJECTS
Sometimes the integrity of objects cannot be maintained during disinfection. If the disinfected file contained important information, and after disinfection it became partly or fully inaccessible, you can attempt to restore the original object from its backup copy.
Backup copy is a copy of an original dangerous object that is created when first disinfecting or deleting the object, and it is saved in backup.
Backup is a special repository that contains backup copies of dangerous objects after processing or deletion. The main function of backup is the ability to restore the original object at any time. Files in backup are saved in a special format and are not dangerous.
SEE ALSO
Working with backup copies 70
Configuring quarantine and backup 70
WORKING WITH BACKUP COPIES
You can apply the following operations to the objects stored in backup:
- restore selected copies;
- delete objects.
To take some actions on backup objects, please do the following:
- Open the main application window and click the Detected button.
- In the window that will open, on the Backup tab, take the required actions.
CONFIGURING QUARANTINE AND BACKUP
You can edit the following settings for the quarantine and backup:
- Enable the autoscan mode for quarantined objects after each update of the application databases (the Scan quarantined files after update box).
Kaspersky Anti-Virus will not be able to scan quarantined objects immediately after updating the application databases if you are working with quarantine.
- Determine the maximum storage time for quarantined objects and for copies of objects in the backup (the Store objects no longer than box). By default, the objects storage time is 30 days; once it expires, the objects will be deleted. You can change the maximum storage time, or even cancel any restrictions imposed on it.
- Specify the maximum size of data storage area (the Maximum size box). By default, the maximum size is 250 MB. You can cancel any restrictions imposed on the report's size, or enter another value.
To configure the quarantine and backup settings:
- Open the application settings window.
- In the left part of the window, select the Reports and Storages section.
- In the Quarantine and Backup section, check the required boxes and specify the maximum size of data storage area, if necessary.
VALIDATING KASPERSKY ANTI-VIRUS SETTINGS
After Kaspersky Anti-Virus has been installed and configured, you can verify whether the application is configured correctly, using a test "virus" and its modifications. A separate test is required for each protection component / protocol.
IN THIS SECTION
Test "virus" EICAR and its modifications 71
72
TEST "VIRUS" EICAR AND ITS MODIFICATIONS
This test "virus" was specially developed by eicar (The European Institute for Computer Antivirus Research) for the testing of anti-virus products.
The test "virus" IS NOT A VIRUS, because it does not contain code that can harm your computer. However, most anti-virus products identify this file as a virus.
Never use real viruses for testing the operation of an anti-virus product!
You can download this test "virus" from the EICAR's official website at http://www.eicar.org/anti_virus_test_file.htm.
Before you download the file, you must disable the computer's anti-virus protection, because otherwise the application would identify and process the file anti_virus_test_file.htm as an infected object transferred via the HTTP protocol. Do not forget to enable the anti-virus protection immediately after you download the test "virus".
The application identifies the file downloaded from the EICAR site as an infected object containing a virus that cannot be disinfected and performs the actions specified for this type of object.
You can also modify the standard test "virus" to verify the operation of the application. To modify the "virus", change the content of the standard "virus" by adding one of the prefixes to it (see table below). To modify test "virus", you can use any text or hypertext editor, such as Microsoft Notepad, UltraEdit32, etc.
You can test the correctness of the operation of the anti-virus application using the modified EICAR "virus" only if your anti-virus bases were last updated on or after October 24, 2003 (October, 2003 cumulative updates).
In the table below, the first column contains the prefixes that must be added at the start of the standard test "virus" string. The second column lists all possible statuses that the Anti-Virus application can assign to the object, based on the results of the scan. The third column indicates how the application processes objects with the specified status. Please note that that actual actions performed on the objects are determined by the application's settings.
After you have added a prefix to the test "virus", save the new file under a different name, for example: eicar_dele.com. Assign similar names to all modified "viruses".
Table 1. Modifications of the test "virus"
| Prefix | Object status | Object processing information |
| No prefix, standard test "virus". | Infected Object contains code | The application identifies the object as a non-disinfectable virus. |
| of a known virus. You cannot disinfect the object. | An error occurs while attempting to disinfect the object; the action performed will be that specified for non-disinfectable objects. | |
| CORR- | Corrupted. | The application could access the object but could not scan it because it is corrupted (for example, the file structure is corrupted, or the file format is invalid). You can find the information that the object has been processed in the report on application operation. |
| WARN- | Suspicious Object contains code of an unknown virus. You cannot disinfect the object. | The object has been found suspicious by the heuristic code analyzer. At the time of detection, the Anti-Virus threat signature databases contain no description of the procedure for treating this object. You will be notified when an object of this type is detected. |
| SUSP- | Suspicious Object contains modified code of a known virus. You cannot disinfect the object. | The application detected a partial correspondence of a section of object code with a section of code of a known virus. At the time of detection, the Anti-Virus threat signature databases contain no description of the procedure for treating this object. You will be notified when an object of this type is detected. |
| ERRO- | Scanning error. | An error occurred during a scan of an object. The application could not access the object, since the integrity of the object has been breached (for example, no end to a multivolume archive) or there is no connection to it (if the object is scanned on a network resource). You can find the information that the object has been processed in the report on application operation. |
| CURE- | Infected Object contains code of a known virus. Disinfectable. | Object contains a virus that can be disinfected. The application will disinfect the object; the text of the "virus" body will be replaced with the word CURE. You will be notified when an object of this type is detected. |
| DELE- | Infected Object contains code of a known virus. You cannot disinfect the object. | The application identifies the object as a non-disinfectable virus. An error occurs while attempting to disinfect the object; the action performed will be that specified for non-disinfectable objects. You will be notified when an object of this type is detected. |
VALIDATING VIRUS SCAN TASK SETTINGS
In order to verify that the virus scan task is correctly configured:
- Create a folder on the disk. Copy into this folder the test "virus" downloaded from the official EICAR's website (http://www.eicar.org/anti_virus_test_file.htm), as well as all the test "virus" modifications you have created.
- Create a new virus scan task and select the folder, containing the set of test "viruses", as the object to scan.
- Allow all events to be logged so the report file retains data on corrupted objects and objects not scanned because of errors.
- Run the virus scan task.
When the scan task is running, the actions specified in the task settings will be performed as suspicious or infected objects are detected. By selecting different actions to be performed with the detected object, you can perform a full check of the component's operation.
You can view all information about the virus scan task actions in the report on the component's operation.
TYPES OF NOTIFICATIONS
When Kaspersky Anti-Virus events occur, special notification messages are displayed. Depending on how critical the event is for computer security, you might receive the following types of notifications:
- Alarm. A critical event has occurred, for instance, a malicious object or dangerous activity has been detected on your system. You should immediately decide how to deal with this threat. This type of notification is color-coded in red.
- Warning. A potentially dangerous event has occurred. For instance, potentially infected files or suspicious activity have been detected on your system. You should decide how dangerous you think this event is. This type of notification is color-coded in yellow.
- Info. This notification gives information about non-critical events. This type includes notifications displayed in the course of an update, for instance. Informational notifications are color coded in blue.
IN THIS SECTION
Malicious object detected 73
Object cannot be disinfected 74
Suspicious object detected 74
MALICIOUS OBJECT DETECTED
In the event that a virus scan task detects a malicious object, a special notification is displayed.
The notification contains:
- Threat type (for instance, virus, Trojan) and the name of the malicious object as listed in the Kaspersky Lab Virus Encyclopedia. The name of the dangerous object is given as a link to www.viruslist.com, where you can find more detailed information on the type of threat detected on your computer.
Full name of the malicious object and a path to it.
You are asked to select one of the following responses to the object:
- Disinfect - attempt to disinfect the malicious object. Before treatment, a backup copy is made of the object in case the necessity arises to restore it or a portrait of its infection.
- Delete - delete malicious object. Before deleting, a backup copy of the object is created in case the necessity arises to restore it or a portrait of its infection.
- Skip - block access to the object but perform no actions on it; simply record information about it in the report.
You can later come back to skipped malicious objects in the report window. However, you cannot postpone processing objects detected in emails.
To apply the selected action to all objects of the same status detected in the current session of protection component or a task operation, check the Apply to all box. The current session is the time from when the component is started until it is disabled or the application is restarted or the time from beginning a virus scan task until it is complete.
OBJECT CANNOT BE DISINFECTED
There are some cases when it is impossible to disinfect a malicious object. This could happen if a file is so damaged that it is impossible to delete malicious code from it and restore integrity. The treatment procedure cannot be applied to several types of dangerous objects, such as Trojans.
In such cases, a special notification will pop up containing:
- Threat type (for instance, virus, Trojan) and the name of the malicious object as listed in the Kaspersky Lab Virus Encyclopedia. The name of the dangerous object is given as a link to www.viruslist.com, where you can find more detailed information on the type of threat detected on your computer.
Full name of the malicious object and a path to it.
You are asked to select one of the following responses to the object:
- Delete - delete malicious object. Before deleting, a backup copy of the object is created in case the necessity arises to restore it or a portrait of its infection.
- Skip - block access to the object but take no actions on it; simply record information about it in a report.
You can later come back to skipped malicious objects in the report window. However, you cannot postpone processing objects detected in emails.
To apply the selected action to all objects with the same status detected in the current session of the protection component or the task, check the Apply to all box. The current session is the time from when the component is started until it is disabled or the application is restarted or the time from beginning a virus scan task until it is complete.
SUSPICIOUS OBJECT DETECTED
If virus scan detects an object containing code from an unknown virus or modified code of a known virus, a special notification will pop up.
The notification contains:
- The threat type (for instance, virus, Trojan) and the name of the object as listed in the Kaspersky Lab Virus Encyclopedia. The name of the dangerous object is given as a link to www.viruslist.com, where you can find more detailed information on the type of threat detected on your computer.
Full name of the object and a path to it.
You are asked to select one of the following responses to the object:
- Quarantine - move the object to the Quarantine. When you place an object to the Quarantine, it is moved, not copied: the object is deleted from the disk or email message, and saved in the Quarantine folder. Files in Quarantine are saved in a special format and are not dangerous.
When you scan Quarantine later with updated threat signatures, the status of the object could change. For example, the object may be identified as infected and can be processed using an updated database. Otherwise, the object could be assigned the not infected status, and then restored.
If a file is quarantined manually and after a subsequent scan turns out to be uninfected, its status will not change to OK immediately after the scan. This will only occur if the scan took place after a certain amount of time (at least three days) after file quarantine.
- Delete - delete the object. Before deleting, a backup copy of the object is created in case the necessity arises to restore it or a portrait of its infection.
- Skip - block access to the object but perform no actions on it; simply record information about it in the report.
You can later come back to skipped objects in the report window. However, you cannot postpone processing objects detected in emails.
To apply the selected action to all objects of the same status detected in the current session of protection component or a task operation, check the Apply to all box. The current session is the time from when the component is started until it is disabled or the application is restarted or the time from beginning a virus scan task until it is complete.
If you are sure that the object detected is not malicious, we recommend adding it to the trusted zone to avoid the application making repeat false positives when you use the object.
WORKING WITH THE APPLICATION FROM THE COMMAND LINE
You can work with Kaspersky Anti-Virus from the command line.
Command line syntax:
avp.com <command> [options]
You must access the application from the command line from the Kaspersky Anti-Virus installation folder, or by specifying the full path to avp.com.
The following commands can be used as a
- HELP - help with command syntax and list of commands.
- SCAN - scanning of objects for malware.
- UPDATE - starts the application update.
- ROLLBACK - rolls back to the last Kaspersky Anti-Virus update made (the command can only be executed if the password assigned via the application interface is entered).
- START - starts a component or a task.
- STOP - stops a component or a task (the command can only be executed if the password assigned via the Kaspersky Anti-Virus interface is entered).
STATUS - displays the current component or task status on screen. - STATISTICS - displays statistics for the component or task on screen.
- EXPORT - exports application protection settings.
- IMPORT - imports application protection settings (the command can only be executed if the password assigned via the Kaspersky Anti-Virus interface is entered).
- ACTIVATE - activates Kaspersky Anti-Virus via Internet using an activation code.
- ADDKEY - activates the application using a key file (the command can only be executed if the password assigned via the application interface is entered).
RESTORE - restores a file from quarantine. - EXIT - closes the application (the command can only be executed if the password assigned via the application interface is entered).
- TRACE - obtains a trace file.
Each command requires its own specific set of parameters.
IN THIS SECTION
Viewing Help 77
Virus scan. 77
Updating the application 79
Rolling back the last update 80
Starting / stopping tasks run 80
Statistics on a component's operation or a task 81
Exporting protection settings 81
Importing protection settings 82
Activating the application 82
Restoring a file from quarantine 82
Closing the application 83
Obtaining a trace file. 83
Return codes of the command line 83
VIEWING HELP
Use this command to view the application command line syntax:
avp.com [ /? | HELP ]
To get help on the syntax of a specific command, you can use one of the following commands:
avp.com
avp.com HELP
VIRUS SCAN
Starting a scan of a certain area for viruses and processing malicious objects from the command prompt generally looks as follows:
avp.com SCAN [
To scan objects, you can also use the tasks created in the application by starting the one you need from the command line. The task will be run with the settings specified in Kaspersky Anti-Virus interface.