
DESIGNER ELECTROL - Écran de projection DA-LITE - Notice d'utilisation et mode d'emploi gratuit
Retrouvez gratuitement la notice de l'appareil DESIGNER ELECTROL DA-LITE au format PDF.



| Type de produit | Écran de projection motorisé |
| Marque | DA-LITE |
| Modèle | DESIGNER ELECTROL |
| Alimentation électrique | 120 V ou 220/240 V selon modèle |
| Montage | Mural ou plafond |
| Dimensions du caisson | Longueur = largeur de l'écran + 11 pouces (28 cm) |
| Réglage fin de course | Oui, vis blanche pour réglage manuel |
| Cycle de service | 1 min marche / 3 min arrêt |
| Fonctions principales | Montée/descente motorisée, arrêt automatique en fin de course, commande par interrupteur mural |
| Entretien et nettoyage | Nettoyer avec un chiffon doux et sec. Ne pas utiliser de solvants ou produits abrasifs. |
| Sécurité | Ne pas démonter l'appareil, utiliser des rallonges adaptées, débrancher avant entretien |
| Pièces détachées et réparabilité | Assemblage moteur remplaçable par un technicien agréé. Contacter le SAV Da-Lite. |
| Garantie | 1 an contre les défauts de matériaux et de fabrication |
| Informations générales | Fabricant : Da-Lite Screen Company, Warsaw, Indiana, USA |
| Contact | Tél. : 800-622-3737 ou 574-267-8101, email : info@da-lite.com |
FOIRE AUX QUESTIONS - DESIGNER ELECTROL DA-LITE
Questions des utilisateurs sur DESIGNER ELECTROL DA-LITE
0 question sur cet appareil. Repondez a celles que vous connaissez ou posez la votre.
Poser une nouvelle question sur cet appareil
Téléchargez la notice de votre Écran de projection au format PDF gratuitement ! Retrouvez votre notice DESIGNER ELECTROL - DA-LITE et reprennez votre appareil électronique en main. Sur cette page sont publiés tous les documents nécessaires à l'utilisation de votre appareil DESIGNER ELECTROL de la marque DA-LITE.
MODE D'EMPLOI DESIGNER ELECTROL DA-LITE
The Da-Lite Difference.

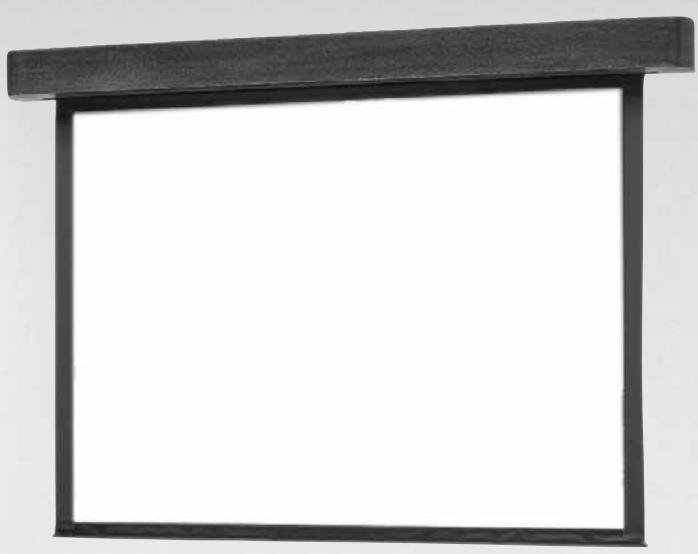
Instruction Book for DESIGNER ELECTROL®

3100 North Detroit Street
Post Office Box 137
Warsaw, Indiana 46581-0137
Phone: 574-267-8101
800-622-3737
Fax: 574-267-7804
Toll Free Fax: 877-325-4832
www.da-lite.com
e-mail: info@da-lite.com
IMPORTANT SAFETY INSTRUCTIONS
When using your video equipment, basic safety precautions should always be followed, including the following:
- Read and understand all instructions before using.
- Position the cord so that it will not be tripped over, pulled, or contact hot surfaces.
- If an extension cord is necessary, a cord with a current rating at least equal to that of the appliance should be used. Cords rated for less amperage than the appliance may overheat.
- To reduce the risk of electric shock, do not disassemble this appliance. Contact an authorized service dealer when repair work is required. Incorrect reassembly can cause electric shock when the appliance is used subsequently.
- The use of an accessory attachment not recommended by the manufacturer may cause a risk of fire, electric shock, or injury to persons.
SAVE THESE INSTRUCTIONS
PRE-INSTALLATION
Before proceeding with the installation of the screen, please read the installation and operations instructions thoroughly!

CAUTION! Do not cut wrapping paper or tape with knife or any sharp tool. Pull orange string.
- Carefully unpack the screen and remove the outer wrapping.
- Always handle screen in upright position.
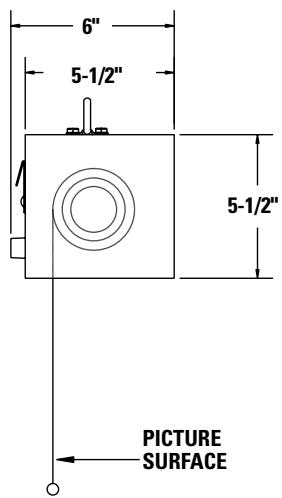
- Remove the front cover of the screen from the back of the screen. Lift front cover up approximately 1/2 and pull away from back of screen. See Figure 1.
- There are two methods of mounting the screen: suspended from ceiling and wall mounted. See Figure 2.
NOTE: Allow 1/2 above screen (when mounted) for front cover of screen installation and removal.
- Picture surface is centered in case. Case extends 5 - 1 / 2 beyond surface on either end. Do not attach anything to screen slat on the bottom of the screen.
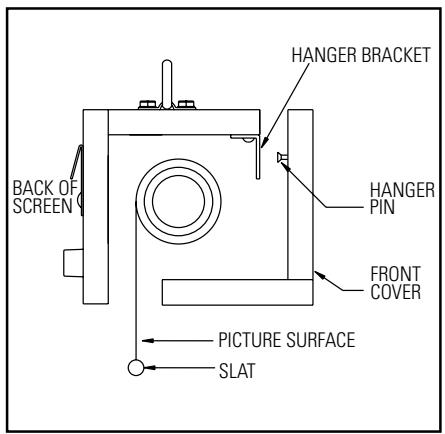
FIGURE 1
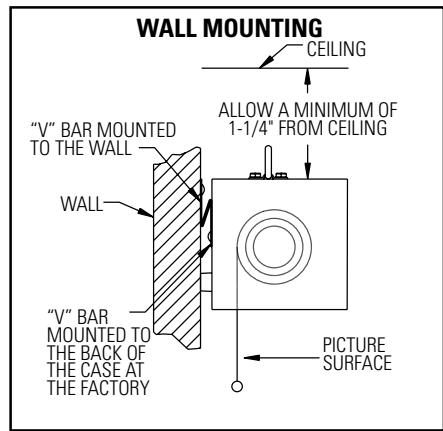
FIGURE 2
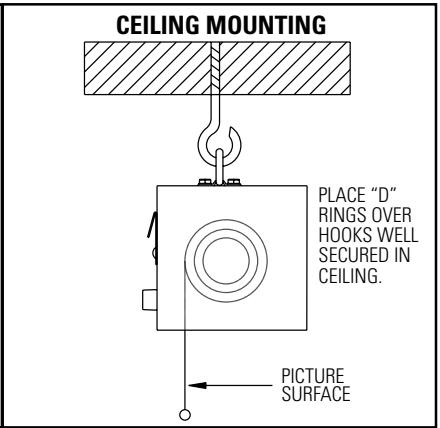
DESIGNER ELECTROL® INSTALLATION
1. Hang screen from wall or ceiling.
FOR WALL MOUNTING
HARDWARE PROVIDED
2 - "V" Bars ( one is factory mounted to the back of the case; one will be mounted to the wall)
6-Toggle Bolts,4"
6-Lead Shields,#10-14 × 1%
6 - Phillips Flat Head Wood Screws, #10 x 2"
TOOLS REQUIRED
Electric Drill
Masonry Bit 5 116 (if mounting in solid masonry or concrete)
Screw Driver, #2 Flat Tip (if using toggle bolts) or #2 Phillips (if mounting in solid masonry or concrete)
Determine the height of the top of the case from the floor. This will be the height of the wall mounted "V" bar.
Hold the loose "V" bar to the wall at the height determined above (MAKE SURE IT IS LEVEL), and mark the location for the screw holes. To mount the "V" bar on solid concrete or masonry wall, drill 5/16 holes and insert the lead shields. Fasten the "V" bar to the wall using the # 10 × 2 wood screws. If you are mounting to a hollow wall, drill 1/2 holes and insert the toggle bolts. Then fasten the "V" bar to the wall with the toggle bolts. Now set the case in place on the wall with the "V" bar of the case nestled into the "V" bar on the wall.
FOR CEILING MOUNTING
Position and properly anchor screw hooks into ceiling, beam or other solid surface. Then proceed to use the two "D" rings that are factory mounted to the top of the case to hang the case securely.
- Remove black tape from slat.
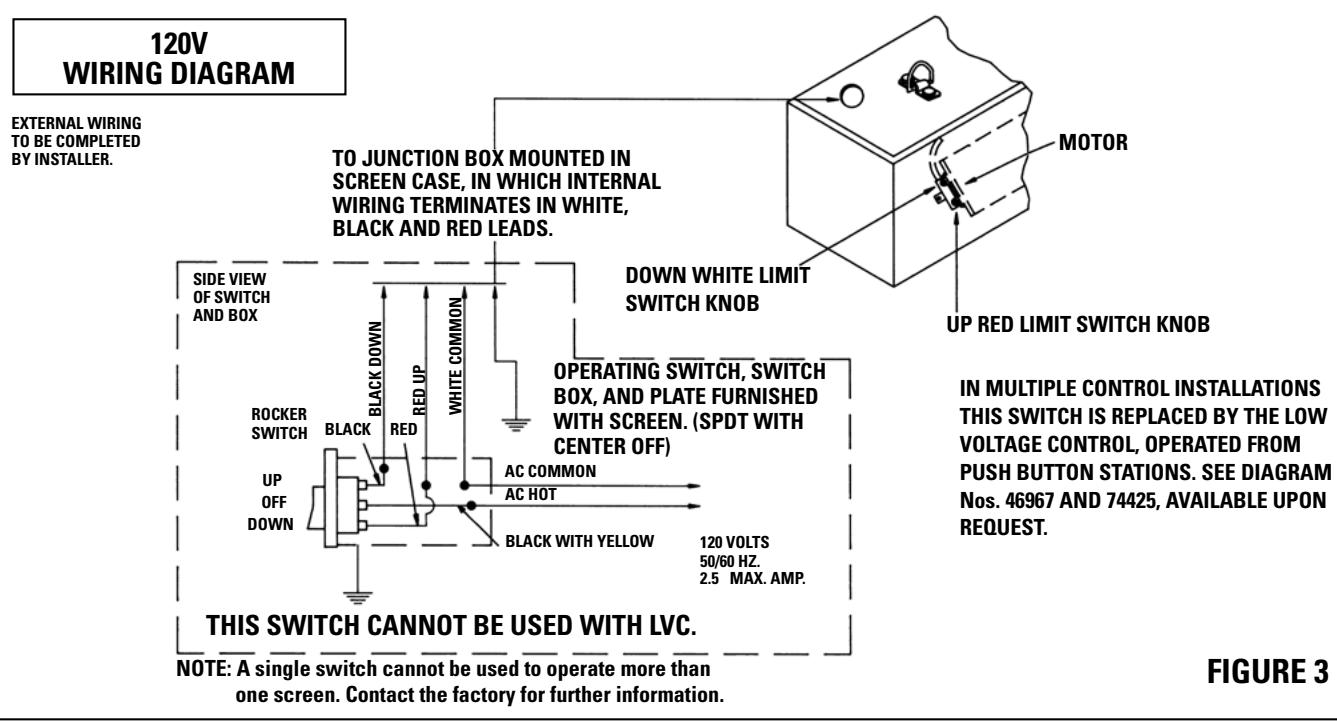
- Install electrical hook-up that applies to your unit. Make sure to review your electrical installation checklist and wiring diagrams (included) for either 120 volt switch, 220/240 volt switch or low voltage control. See Figure 3.
- Test installation by running screen up and down a few times. Be prepared to stop screen. Standard Duty Cycle: 1 MIN. ON / 3 MIN. OFF.
NOTE: Must be installed in accordance with the requirements of the Local Building Codes, the Canadian Electrical Code (CED), CAN/ CSA C22.1 and the National Electric Code (NEC), NFPA 70.
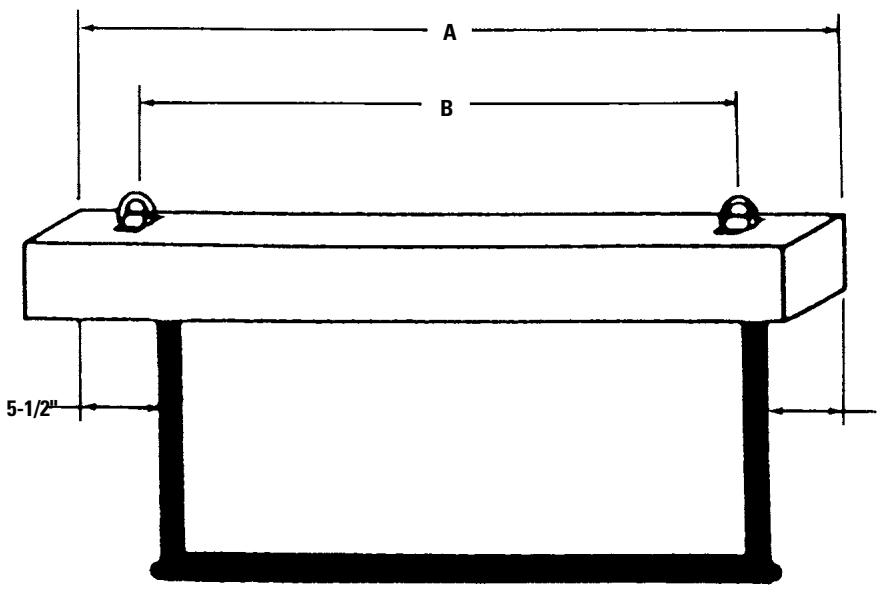
A = FABRICWIDTH + 11"
B = FABRICWIDTH
240 VOLT WIRING DIAGRAM FOR STANDARD WALL SWITCH:
Da-Lite offers two styles of 240 volt wall switches for standard operation. Please see wiring diagram included in wall switch box included with screen.
SCREEN ADJUSTMENT FOR 120V AND 220/240V SCREENS
Screen travel is stopped automatically in the down and up positions by the limit switches that are preset at the factory. If it's necessary to adjust for more or less drop follow the steps below. The case cover must be removed to access the motor limit switches.
Remove the front cover of the screen from the back of the screen. Lift front cover up approximately 1/2 and pull away from back of screen. See Figure 1.
SETTING THE DOWN LIMIT POSITION
TO REDUCE SCREEN DROP:
Turn the white limit switch screw clockwise to decrease the amount of screen drop. Run the screen down to test the stop position. If the screen drops too far, raise the screen about one foot and adjust the limit switch again. Repeat until the desired position is set.
TO INCREASE SCREEN DROP:
Turn the white limit switch screw counterclockwise to increase the amount of screen drop. Run the screen down to test the stop position. If the screen does not drop enough, raise the screen about one foot and adjust the limit switch again. Repeat until the desired position is set. Do not adjust for more drop than what was ordered. At least 1-1/2 wraps of fabric must remain on the roller.
TROUBLESHOOTING
| SYMPTOM | CAUSE | SOLUTION |
| 1. Screen will not operate.Motor does not hum. | (a) Incorrect line voltage.(b) Blown fuse.(c) Tripped circuit breaker.(d) No power to operating switch or junction. | (a) Verify 115-125V (or 220-240V). If insufficient voltage, rewire incom-ing electric line.(b) Replace fuse.(c) Reset circuit breaker.(d) Check above. Tighten all loose wire connections. Correct any improper connections.“Down” PositionCheck for power across black and white leads.“Up” PositionCheck for power across red and white leads. |
| Motor hums. | Power at junction box(e) Thermal overload tripped.(f) Broken wire in the "up" or "down" position.(g) Defective motor, limit switch or capacitor.(h) Temporary binding.(i) Capacitor burned out. | (e) Let motor cool down for 15 minutes. Try again.(f) Check for continuity. Cut off old splice and reconnect.(g) Replace motor assembly. NOTE: Motor is a sealed assembly.(h) With power "off", turn roller by hand to free binding.(i) Replace motor assembly. |
| 2. Incorrect stopping position in downward direction. | (a) Lost roller wrap.(b) “Down” limit switch out of adjustment | (a) See instructions below.(b) See installation instructions. |
| 3. Incorrect stopping position in upward direction. | (a) Lost roller wrap.(b) “Up” limit switch out of adjustment | (a) See instructions below.(b) Adjust "up" limit switch. Turn clockwise to expose more fabric. See installation instructions |
| 4. Noise.NOTE: Screen will operate with a low pitched hum. | (a) Squeaking rubber end plug rubbing on motor.(b) Grinding due to foreign object in screen rubbing on roller or fabric.(c) Gear noise. | (a) Adjust roller to center of case.(b) Remove foreign object.(c) Replace motor assembly. |
| 5. Coasting. | (a) Defective brake. | (a) Replace motor assembly. |
| 6. Roller displaced from mounting bracket. | (a) Pin end slipped out of nylon bearing. | (a) Remove pin end mounting. Re-align motor in tube. Re-attach pin end. |
RESTORING LOST ROLLER WRAP
- Push strap over back of roller.
- Tape end of strap to pocket.
- Feed fabric as you pull strap to draw fabric over top.
- Remove tape and strap.
LIMITED ONE YEAR WARRANTY ON DA-LITE PRESENTATION PRODUCTS
Da-Lite Screen Company, Inc. warrants its products to the original purchaser only, to be free from defects in materials and workmanship for a period of one (1) year from the date of purchase by the original purchaser provided they are properly operated according to Da-Lite's instructions and are not damaged due to improper handling or treatment after shipment from the factory.
This warranty does not apply to equipment showing evidence of misuse, abuse or accidental damage, or which has been tampered with or repaired by a person other than authorized Da-Lite personnel.
Da-Lite's sole obligation under this warranty shall be to repair or to replace (at Da-Lite's option) the defective part of the merchandise. Returns for service should be made to your Da-Lite dealer. If it is necessary for the dealer to return the screen or part to Da-Lite, transportation expenses to and from Da-Lite are payable by the purchaser and Da-Lite is not responsible for damage in shipment. To protect yourself against damage or loss in transit, insure the product and prepay all transportation expenses.
THIS WARRANTY IS IN LIEU OF ALL OTHER WARRANTYES, EXPRESS OR IMPLIED, INCLUDING WARRANTY AS TO FITNESS FOR USE AND MERCHANT ABILITY. Any implied warranties of fitness for use, or merchantability, that may be mandated by statute or rule of law are limited to the one (1) year warranty period. This warranty gives you specific legal rights, and you may also have other rights, which vary from state-to-state. NO LIABILITY IS ASSUMED FOR EXPENSES OR DAMAGES RESULTING FROM INTERRUPTION IN OPERATION OF EQUIPMENT, OR FOR INCIDENTAL, DIRECT, OR CONSEQUENTIAL DAMAGES OF ANY NATURE.
In the event that there is a defect in materials or workmanship of a Da-Lite product, you may contact our Sales Partners at PO Box 137, Warsaw, IN 46581-0137, (574) 267-8101, (800) 622-3737.
IMPORTANT: THIS WARRANTY SHALL NOT BE VALID AND DA-LITE SHALL NOT BE BOUND BY THIS WARRANTY IF THE PRODUCT IS NOT OPERATED IN ACCORDANCE WITH DA-LITE'S WRITTEN INSTRUCTIONS.
Keep your sales receipt to prove the date of purchase and your original ownership.
- The Da-Lite Difference.
- IMPORTANT SAFETY INSTRUCTIONS
- SAVE THESE INSTRUCTIONS
- PRE-INSTALLATION
- DESIGNER ELECTROL® INSTALLATION
- Hang screen from wall or ceiling.
- FOR WALL MOUNTING
- HARDWARE PROVIDED
- TOOLS REQUIRED
- FOR CEILING MOUNTING
- VOLT WIRING DIAGRAM FOR STANDARD WALL SWITCH:
- SCREEN ADJUSTMENT FOR 120V AND 220/240V SCREENS
- SETTING THE DOWN LIMIT POSITION
- TROUBLESHOOTING
- RESTORING LOST ROLLER WRAP
- LIMITED ONE YEAR WARRANTY ON DA-LITE PRESENTATION PRODUCTS
Marque : DA-LITE
Modèle : DESIGNER ELECTROL
Catégorie : Écran de projection