POMW301 - Four encastrable THERMADOR - Notice d'utilisation et mode d'emploi gratuit
Retrouvez gratuitement la notice de l'appareil POMW301 THERMADOR au format PDF.

| Type d'appareil | Four encastrable |
| Modes de cuisson | Rôtir, Cuisson, Convection, Déshydratation, Nettoyage |
| Réglage de la température | De 100 à 550 °F (environ 38 à 288 °C) |
| Fonction auto-nettoyage | Oui, mode Self-Clean |
| Durée auto-nettoyage | Environ 2 heures |
| Positions des grilles | 6 positions |
| Réglage de l'horloge | Manuel avec cadran |
| Indicateurs lumineux | Préchauffage, Nettoyage, Four allumé |
| Mode convection | Vitesse convection, Rôtissage convection |
| Conseils cuisson convection | Réduire température de 25 °F, utiliser plats bas et découverts |
| Préchauffage max convection | 3-4 minutes |
| Consignes de sécurité | Utiliser des gants, positionner les grilles avant allumage |
| Nettoyage après auto-nettoyage | Essuyer cendres avec chiffon humide |
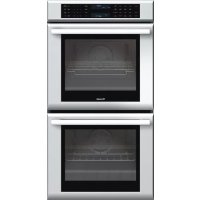
| Fonction double four | Non simultané en mode convection rapide ou auto-nettoyage |
| Température max cuisson | Environ 550 °F (288 °C) |
FOIRE AUX QUESTIONS - POMW301 THERMADOR
Questions des utilisateurs sur POMW301 THERMADOR
0 question sur cet appareil. Repondez a celles que vous connaissez ou posez la votre.
Poser une nouvelle question sur cet appareil
Téléchargez la notice de votre Four encastrable au format PDF gratuitement ! Retrouvez votre notice POMW301 - THERMADOR et reprennez votre appareil électronique en main. Sur cette page sont publiés tous les documents nécessaires à l'utilisation de votre appareil POMW301 de la marque THERMADOR.
MODE D'EMPLOI POMW301 THERMADOR
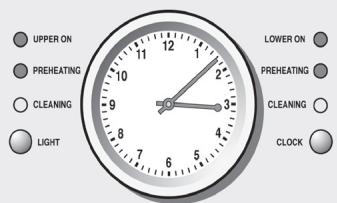
Setting the Clock:
Use CLOCK to set the clock. Pressing and holding CLOCK adjusts the minute hand at a faster rate. Pressing CLOCK briefly sets the clock one minute ahead.
Self-Clean
During Self-Clean, the oven is heated to a very high temperature. Soil is burned off at this temperature.
Note: Self-Clean time is 2:00 hours.
ATTENTION: Wipe out excessive spillage before Self-Cleaning the oven.
ATTENTION: Do not clean parts or accessories in the Self-Clean oven.
Setting the Self-Clean Mode:
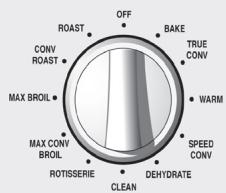
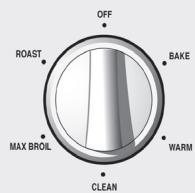
- Turn the heating mode dial to "CLEAN".
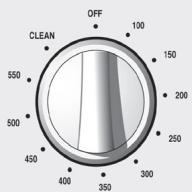
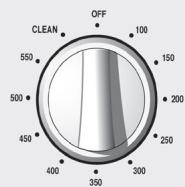
- Turn the temperature dial to "CLEAN".
- Self-Clean starts after a few seconds and the oven is locked. The oven can be opened again only after the oven has cooled.
- To cancel Self-Clean, turn the heating mode dial to "OFF" position.
- A moist cloth is the best way to wipe remaining ash from the oven.
Note: For double oven models—while Self-Clean is in progress in one oven, the other oven must be off.
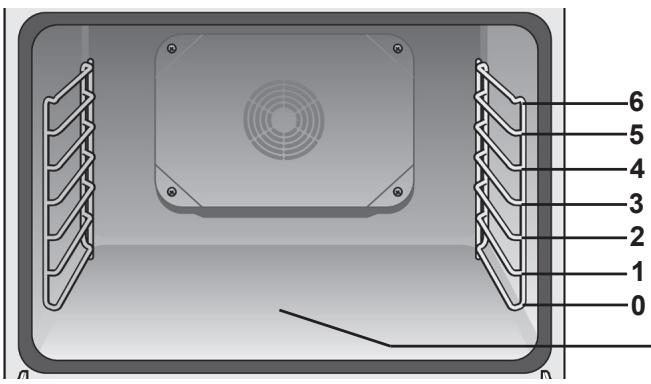
Oven Rack Positions:
Setting the Cooking Mode and Temperature:
- Turn the heating mode dial to the preferred cooking mode.
- Turn the temperature dial to the desired temperature.
- The light next to "OVEN ON" ("UPPER ON"/"LOWER ON" for double ovens) illuminates as soon as a valid cooking mode and temperature has been selected.
Note: For double oven models—if Speed Convection is set for one oven, the other oven cannot run at the same time.
Using Convection Cooking Tips:
True Convection
- Reduce recipe temperature by 25^ F .
- Place food in low-sided, uncovered pans such as cookie sheets without sides.
Convection Roast
- Do not cover meat or use cooking bags.
Use the same temperature as indicated in the recipe. - Check doneness early since roasting time may decrease.
Max Convection Broil
- Preheat oven 3-4 minutes. Do not preheat for more than 5 minutes.
Use broil pan and grid included with your oven.
Speed Convection
- Begin cooking all frozen convenience products in a cold, non-preheated oven. The food will still be done in package time.
- This mode is well suited for frozen convenience foods such as fish sticks and chicken nuggets.

Caution:
To avoid burns, place oven racks in desired positions before turning oven on. Always use oven mitts when the oven is warm. If a rack must be moved while the oven is hot, do not let oven mitts contact hot heating elements.
Assembling the Rotisserie:

- Insert rotisserie rack half way into the oven on rack position 4.
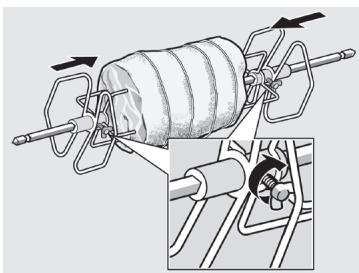
- Slide the left fork onto the skewer and tighten the screw.
- Slide meat or poultry for roasting onto the skewer.
- Slide the right fork onto the skewer and tighten the screw.
- Check the balance of the food on the skewer by rolling the skewer in the palms of your hands. Food not evenly balanced will not cook evenly.
- Place the rotisserie skewer onto the rack.
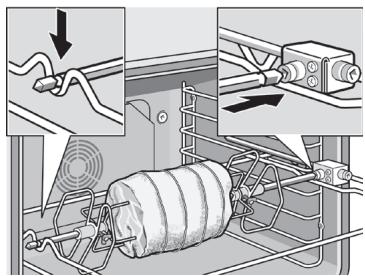
- Place the skewer rack into the oven and insert the drive shaft into the opening on the back oven wall.
- If necessary, turn the rotisserie skewer slightly so that the drive shaft fits properly into the opening.
- Insert a flat rack on position 0 and insert broil pan to catch drippings.
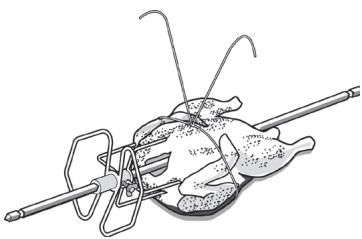
Trussing Poultry for the Rotisserie:
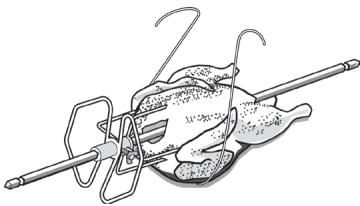
- Slip one of the forks on the skewer with the tines pointing to the tip of the skewer. Loosely tighten the screw to keep it from slipping.
- Insert the skewer through the bird securing with the fork.
- Cut 24" of kitchen string and lay it under the bird, breast side up, with equal lengths of string on each side.
- Wrap each end of the string around each of the wings; catch each wing tip as the string is brought tightly together at the top and knotted. Do not cut off the extra string.
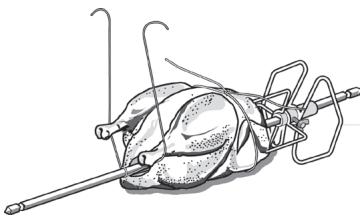
- Cut another 20" of string and lay it under the back. Wrap it around the tail then around the skewer. Cinch tightly.
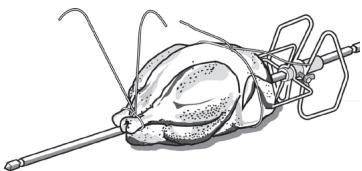
- Pull legs forward; cross them on top of the skewer; bring string around and tie a tight knot.
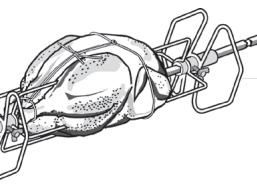
- Connect the string holding the legs to the string holding the wings; then knot. Add the other fork and push tines into the drumsticks to secure.
- Check the balance by rolling the skewer in your palms. The bird should not rotate or be loose in any way. If so, redo the trussing. The bird will not cook evenly if it moves on the skewer.
Thermador®
An American _con^TM