
EX67N - Hotte aspirante CORBERO - Notice d'utilisation et mode d'emploi gratuit
Retrouvez gratuitement la notice de l'appareil EX67N CORBERO au format PDF.

| Marque | CORBERO |
| Modèle | EX67N |
| Type de produit | Hotte aspirante |
| Alimentation électrique | 220-240 V, 50 Hz |
| Modes de fonctionnement | Évacuation extérieure (conduit) ou recyclage (filtre à charbon) |
| Vitesses du moteur | 3 vitesses |
| Éclairage | Ampoule(s) remplaçable(s) |
| Type de commandes | Interrupteurs poussoirs ou curseur (selon version) |
| Filtre anti-graisse | Panneau métallique lavable au lave-vaisselle |
| Filtre à charbon | Nécessaire en mode recyclage, à remplacer tous les 6 mois |
| Installation | Fixation murale ou sous meuble |
| Entretien | Nettoyage régulier du filtre anti-graisse, remplacement du filtre à charbon |
| Sécurité | Installation électrique conforme, utilisation des trous prévus |
| Pièces détachées disponibles | Filtre à charbon, filtre anti-graisse, ampoule |
FOIRE AUX QUESTIONS - EX67N CORBERO
Questions des utilisateurs sur EX67N CORBERO
0 question sur cet appareil. Repondez a celles que vous connaissez ou posez la votre.
Poser une nouvelle question sur cet appareil
Téléchargez la notice de votre Hotte aspirante au format PDF gratuitement ! Retrouvez votre notice EX67N - CORBERO et reprennez votre appareil électronique en main. Sur cette page sont publiés tous les documents nécessaires à l'utilisation de votre appareil EX67N de la marque CORBERO.
MODE D'EMPLOI EX67N CORBERO
INSTRUCTIONS FOR INSTALLATION AND USE
MONTAGE- UND GEBRAUCHSANWEISUNG
INSTRUCTIONS POUR L'INSTALLATION ET L'UTILISATION
ISTRUZIONI PER L'INSTALLAZIONE E L'USO
INSTRUCCIONES PARA INSTALLACION Y USO
INSTRUÇOES DE INSTALLação Y UTILIZAGHO
AANWIJZING VOOR GEBRUIK EN INSTALLATIE
DESCRIPTION
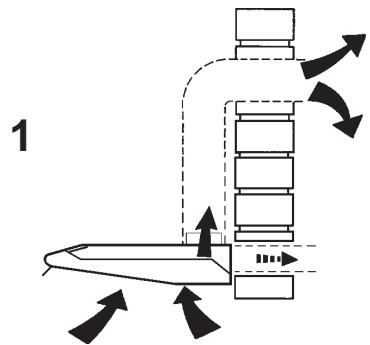
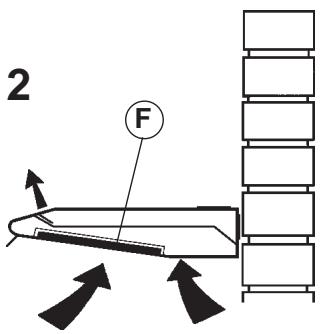
The appliance can be used both in Ducting version and Filtering version. In the Ducting version (Fig. 1), cooking vapours and/or odours are conveyed straight outside (ceiling and/or wall) by a disposal duct, using the holes that are predisposed on the top and/or at the back of the apparatus. In the Filtering version (Fig. 2) cooking vapours and/or odours are depurated by a special charcoal filter and recirculated around the room by the front fissures. ATTENTION: For the filtering version it is absolutely necessary to use the special charcoal filter whereas for the ducting version it is not.
INSTALLATION
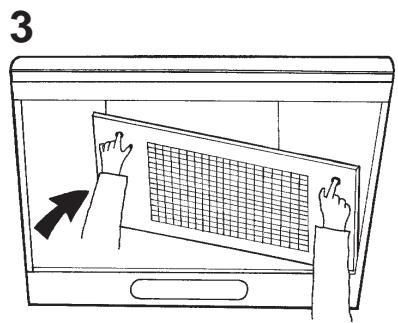
Before assembling the appliance it is necessary to take off the anti-grease grille. To take off the grill it is necessary to push this one towards the rear of the apparatus, by means of the proper knobs, so that it gets released, and to pull it downwards; to take it off completely, make it rotate on one side keeping the other one steady (Fig. 3).
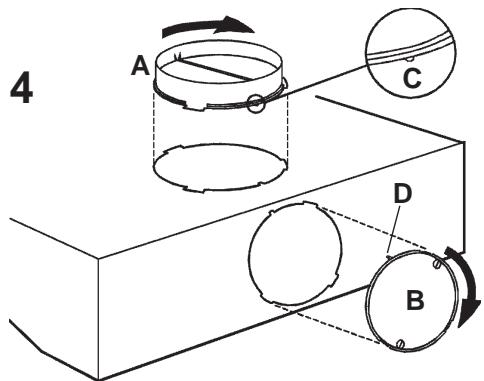
Installation in extraction version: depending on your requirements, choose which opening to use for the air outlet (rear or upper) and fit the flange (A) provided, proceeding as follows: make the 3 flange tabs and stop (C) coincide with the slots on the hood; turn the flange slightly clockwise until it locks into position (Fig. 4). On the other opening, fit the cap (B) provided and make the 3 cap tabs and stop (D) coincide with the slots on the hood; turn the cap slightly clockwise until it locks into position.
Installation in filter version: on both the openings (rear and upper), fit the caps (B) provided, making the 3 cap tabs and the stop (D) coincide with the slots on the hood; turn the cap slightly clockwise until it locks into position.
The following operations are essential for assembly: - Install a proper wiring system. - If your apparatus is to be assembled as a Ducting appliance, you must first make the air venting hole and get a proper pipe to connect the hole to the flange of the hood.
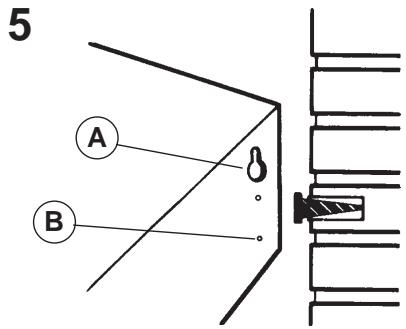
Wall fitting: Making use of the appropriate drilling jig, apply the supplied blocks into the wall. Insert two of the supplied screws so that the apparatus can be hooked onto these ones by means of the holes provided on the appliance (Fig. 5A). Once the apparatus is hooked, fix it definitively to the wall using the two other screws and the holes made at its bottom (Fig.5B). To avoid damage make exclusive use of the holes already prepared on the hood. Make the electrical connections.
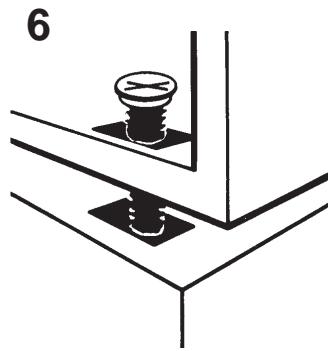
Wall cupboard fitting: Using the appropriate drilling jig make the four fixing holes into the bottom of the wall cupboard and cut the air venting hole if the hood is a ducting version one (for the filtering version this hole is not necessary). Holding the hood against the bottom of the cupboard fix it to it by means of the supplied four screws (Fig. 6). Make the electrical connections.
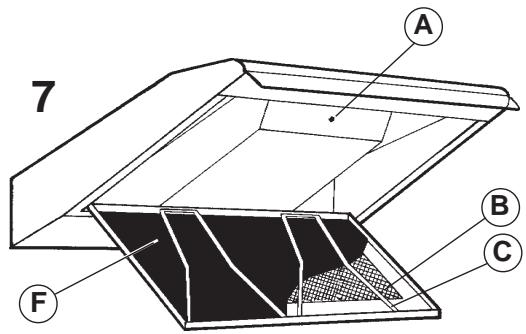
IMPORTANT: Check the position of screw A (Fig. 7). For the ducting version screw A must be completely screwed; for the filtering version the screw must be completely unscrewed to let the sucked air to get out through the top fissures.
OPERATION
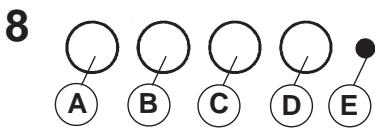
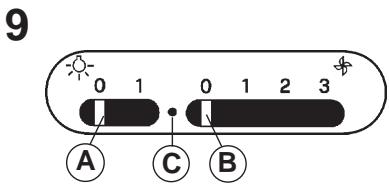
The hoods are provided with the following type of controls:
Controls of Fig. 8: A = light switch. B = first speed motor ON/OFF switch. C = second speed switch. D = third speed switch. E = warning light: indicates motor operation.
Controls of Fig. 9: A = light switch; position 0: light off; position 1: light on. B = motor switch; position 0: motor off; position 1-2-3: motor first, second and third speed motor on. C = warning light: indicates motor operation.
Filtering/ducting conversion: the conversion can be done in the inside of the appliance. Access is possible by opening the grille as described beforehand. Verify that screw A (Fig. 7) is completely unscrewed, so that the inside valve let the air to be conveyed again into the room through the slots. Insert the charcoal filter (Fig. 2F and 7F): lift the two stops made of metallic wire (Fig. 7C); insert the charcoal filter and set back the two stops.
In case the hood is a filtering version one, it is necessary to change the charcoal filter (Fig. 2F and 7F) according to utilization about every six month. To remove the charcoal filter: - take off the anti-grease grill: by means of the proper knobs make the grill move towards the rear of the apparatus and drop the front part of it; now, keeping the right (or left) side of the grill steady, make the opposite side rotate so that it gets off the hood (Fig. 3). - lift the two metallic stops (Fig. 7C). - remove the charcoal filter.
The anti-grease filtering panel is easily removed from the grille by opening it as described above and lifting the two stops made of metallic wire (Fig. 7C). In the filtering version, to get access to the anti-grease panel the charcoal filter must be removed too. Change the anti-grease panel according to use. If the panel is a metallic one it can be washed with some neutral detergent by hand or in a dish-washer.
To gain access to the light bulb(s), remove the anti-grease grill as described above and remove the bulb(s). Replace with lamps of the same type.

Marque : CORBERO
Modèle : EX67N
Catégorie : Hotte aspirante