VCENTER CONVERTER STANDALONE 4.3 - Virtualisation VMWARE - Notice d'utilisation et mode d'emploi gratuit
Retrouvez gratuitement la notice de l'appareil VCENTER CONVERTER STANDALONE 4.3 VMWARE au format PDF.


| Type de produit | Logiciel de virtualisation |
|---|---|
| Version | 4.3 |
| Compatibilité des systèmes d'exploitation | Windows XP, Windows Vista, Windows 7, Windows 8, Windows Server 2003, Windows Server 2008 |
| Fonctions principales | Conversion de machines physiques en machines virtuelles, migration de VM entre hôtes, clonage de VM |
| Interface utilisateur | Interface graphique conviviale |
| Exigences système minimales | Processeur 1 GHz, 1 Go de RAM, 1 Go d'espace disque disponible |
| Installation | Installation par téléchargement ou via un support physique |
| Maintenance et mises à jour | Mises à jour disponibles via le site officiel de VMware |
| Support technique | Documentation en ligne, forums communautaires, support payant disponible |
| Sécurité | Fonctionnalités de sécurité intégrées, recommandations pour la protection des données |
| Licences | Licence gratuite pour usage personnel, options de licence commerciale disponibles |
| Langues disponibles | Multilingue, y compris le français |
FOIRE AUX QUESTIONS - VCENTER CONVERTER STANDALONE 4.3 VMWARE
Questions des utilisateurs sur VCENTER CONVERTER STANDALONE 4.3 VMWARE
0 question sur cet appareil. Repondez a celles que vous connaissez ou posez la votre.
Poser une nouvelle question sur cet appareil
Téléchargez la notice de votre Virtualisation au format PDF gratuitement ! Retrouvez votre notice VCENTER CONVERTER STANDALONE 4.3 - VMWARE et reprennez votre appareil électronique en main. Sur cette page sont publiés tous les documents nécessaires à l'utilisation de votre appareil VCENTER CONVERTER STANDALONE 4.3 de la marque VMWARE.
MODE D'EMPLOI VCENTER CONVERTER STANDALONE 4.3 VMWARE
VMware vCenter Converter Standalone User's Guide
vCenter Converter Standalone 4.3
This document supports the version of each product listed and supports all subsequent versions until the document is replaced by a new edition. To check for more recent editions of this document, see http://www.vmware.com/support/pubs.
EN-000369-01
You can find the most up-to-date technical documentation on the VMware Web site at:
http://www.vmware.com/support/
The VMware Web site also provides the latest product updates.
If you have comments about this documentation, submit your feedback to:
docfeedback@vmware.com
Copyright © 2008-2010 VMware, Inc. All rights reserved. This product is protected by U.S. and international copyright and intellectual property laws. VMware products are covered by one or more patents listed at http://www.vmware.com/go/patents.
VMware is a registered trademark or trademark of VMware, Inc. in the United States and/or other jurisdictions. All other marks and names mentioned herein may be trademarks of their respective companies.
VMware, Inc.
3401 Hillview Ave.
Palo Alto, CA 94304
www.vmware.com
Contents
Updated Information 5
About This Book 7
1 Introduction to VMware vCenter Converter Standalone 9
Migration with Converter Standalone 10
Converter Standalone Components 10
Cloning and System Configuration of Physical Machines 11
Types of Data Cloning Operations 16
Using Converter Standalone with Virtual Machine Sources and System Images 18
System Settings Affected by Conversion 19
Changes to Virtual Hardware 19
2 System Requirements 21
Supported Operating Systems 21
Installation Space Requirements 22
Supported Source Types 23
Supported Destination Types 25
Configuring Permissions for VirtualCenter Users 26
Support for IPv6 in Converter Standalone 26
TCP/IP and UDP Port Requirements for Conversion 27
Requirements for Remote Hot Cloning of Windows Operating Systems 28
3 Installing and Uninstalling Converter Standalone 33
Perform a Local Installation on Windows 33
Perform a Client-Server Installation in Windows 34
Perform a Command-Line Installation in Windows 35
Command-Line Options for Windows Installation 36
Modify Converter Standalone in Windows 37
Repair Converter Standalone in Windows 38
Uninstall Converter Standalone in Windows 38
Connect to a Remote Converter Standalone Server 39
4 Convert a Physical or Virtual Machine 41
Start the Wizard for a Conversion 42
Select a Source Machine to Convert 42
Select a Destination for the New Virtual Machine 48
Configure the Hardware of the Destination Virtual Machine 51
Configure the Software on the Destination Virtual Machine 62
Configure the Conversion Task 67
Review the Summary and Submit the Conversion Task 73
5 Configure Virtual Machines 75
Save Sysprep Files 75
Start the Configuration Wizard 76
Select a Source Machine to Configure 76
Select the Options to Configure 79
Review and Submit the Configuration Task 83
6 Managing Conversion and Configuration Tasks 85
Manage Tasks in the Task List 85
Index 91
Updated Information
This VMware vCenter Converter Standalone User's Guide is updated with each release of the product or when necessary.
This table provides the update history of the VMware vCenter Converter Standalone User's Guide.
| Revision | Description |
| EN-000369-01 | In Table 2-3, the formatting for Microsoft VHD sources is corrected for clarity. |
| EN-000369-00 | Initial release. |
The VMware vCenter Converter Standalone User's Guide provides information about installing and using VMware vCenter Converter Standalone 4.3.
Intended Audience
This book is intended for users who want to do the following:
Install, upgrade, or use Converter Standalone
Nonintrusively copy and transform physical machines into VMware virtual machines that VMware vCenter manages
The material in this book is written for information systems engineers, software developers, QA engineers, trainers, salespeople who run demonstrations, and anyone who wants to create virtual machines.
VMware Technical Publications Glossary
VMware Technical Publications provides a glossary of terms that might be unfamiliar to you. For definitions of terms as they are used in VMware technical documentation, go to http://www.vmware.com/support/pubs.
Document Feedback
VMware welcomes your suggestions for improving our documentation. If you have comments, send your feedback to docfeedback@vmware.com.
Technical Support and Education Resources
The following technical support resources are available to you. To access the current version of this book and other books, go to http://www.vmware.com/support/pubs.
Online and Telephone Support
To use online support to submit technical support requests, view your product and contract information, and register your products, go to http://www.vmware.com/support.
Customers with appropriate support contracts should use telephone support for the fastest response on priority 1 issues. Go to http://www.vmware.com/support/phone_support.html.
Support Offerings
To find out how VMware support offerings can help meet your business needs, go to http://www.vmware.com/support/services.
VMware Professional Services
VMware Education Services courses offer extensive hands-on labs, case study examples, and course materials designed to be used as on-the-job reference tools. Courses are available onsite, in the classroom, and live online. For onsite pilot programs and implementation best practices, VMware Consulting Services provides offerings to help you assess, plan, build, and manage your virtual environment. To access information about education classes, certification programs, and consulting services, go to http://www.vmware.com/services.
Introduction to VMware vCenter Converter Standalone
VMware® vCenter Converter Standalone is a scalable solution to convert virtual and physical machines to VMware virtual machines. You can also configure existing virtual machines in your vCenter Server environment.
Converter Standalone 4.3 eases the exchange of virtual machines among the following products.
VMware hosted products can be both conversion sources and conversion destinations.
VMware Workstation
VMware FusionTM
VMware Server
VMware Player
- Virtual machines running on an ESX instance that vCenter Server manages can be both conversion sources and conversion destinations.
- Virtual machines running on unmanaged ESX hosts can be both conversion sources and conversion destinations.
This chapter includes the following topics:
"Migration with Converter Standalone," on page 10
"Converter Standalone Components," on page 10
"Cloning and System Configuration of Physical Machines," on page 11
"Types of Data Cloning Operations," on page 16
"Using Converter Standalone with Virtual Machine Sources and System Images," on page 18
"System Settings Affected by Conversion," on page 19
Changes to Virtual Hardware," on page 19
Migration with Converter Standalone
Migration with Converter Standalone involves converting physical machines, virtual machines, and system images for use in VMware hosted and managed products.
You can convert virtual machines that vCenter Server manages for use in other VMware products. You can use Converter Standalone to perform a number of conversion tasks.
- Import running remote physical and virtual machines as virtual machines to standalone ESX/ESXi or ESX/ESXi hosts that vCenter Server manages.
- Import virtual machines hosted by VMware Workstation or Microsoft Hyper-V Server to ESX/ESXi hosts that vCenter Server manages.
- Import third-party backup or disk images to ESX/ESXi hosts that vCenter Server manages.
Export virtual machines managed by vCenter Server hosts to other VMware virtual machine formats. - Configure virtual machines managed by vCenter Server so that they are bootable, and to install VMware Tools or customize their guest operating systems.
- Customize the guest operating systems of virtual machines in the vCenter Server inventory (for example, change the host name or network settings).
- Reduce the time needed to set up new virtual machine environments.
- Migrate legacy servers to new hardware without reinstalling operating systems or application software.
Perform migrations across heterogeneous hardware.
Readjust volume sizes and place volumes on separate virtual disks.
Converter Standalone Components
The Converter Standalone application consists of Converter Standalone server, Converter Standalone worker, Converter Standalone client, and Converter Standalone agent.
Converter Standalone server
Enables and performs the import and export of virtual machines. The Converter Standalone server comprises two services, Converter Standalone server and Converter Standalone worker. The Converter Standalone worker service is always installed with the Converter Standalone server service.
Converter Standalone agent
The Converter Standalone server installs the agent on Windows physical machines to import them as virtual machines. You can choose to remove the Converter Standalone agent from the physical machine automatically or manually after the import is complete.
Converter Standalone client
The Converter Standalone server works with the Converter Standalone client. The client component consists of the Converter Standalone user interface, which provides access to the Conversion and the Configuration wizards, and allows you to manage the conversion and the configuration tasks.
VMware vCenter Converter Boot CD
The VMware vCenter Converter Boot CD is a separate component that you can use to perform cold cloning on a physical machine. Converter Standalone 4.3 does not provide a Boot CD, but you can use previous versions of the Boot CD to perform cold cloning. See "Prepare for Cold Cloning," on page 15.
Cloning and System Configuration of Physical Machines
When you convert a physical machine, Converter Standalone uses cloning and system reconfiguration steps to create and configure the destination virtual machine so that it works successfully in the vCenter Server environment. Because the migration process is nondestructive to the source, you can continue to use the original source machine after the conversion completes.
- Cloning is the process of copying the source physical disks or volumes for the destination virtual machine.
- Cloning involves copying the data on the source machine's hard disk and transferring that data to a destination virtual disk. The destination virtual disk might have a different geometry, size, file layout, and other characteristics, so the destination virtual disk might not be an exact copy of the source disk.
System reconfiguration adjusts the migrated operating system to enable it to function on virtual hardware.
If you plan to run an imported virtual machine on the same network as the source physical machine, you must modify the network name and IP address on one of the machines, so that the physical and virtual machines can coexist. Besides, you must make sure that the Windows source machine and the destination virtual machine have different computer names.
Note You cannot move original equipment manufacturer (OEM) licenses between physical machines. The license is attached to the server when you purchase it from the OEM and cannot be reassigned. You can only reassign retail and volume licenses to new physical servers. If you migrate an OEM Windows image, you must have a Windows Server Enterprise or Datacenter Edition license to run multiple virtual machines.
Hot and Cold Cloning of Physical Machines
Although Converter Standalone 4.3 supports only hot cloning, you can still perform cold cloning by using the VMware Converter 4.1.x Boot CD. Depending on your virtual environment, you can choose to use hot or cold cloning.
Hot cloning, also called live cloning or online cloning, entails converting the source machine while it is running its operating system. Hot cloning lets you clone machines without shutting them down.
Because processes continue to run on the source machine during conversion, the resulting virtual machine is not an exact copy of the source machine.
You can set Converter Standalone to synchronize the destination virtual machine with the source machine after hot cloning. Synchronization is performed by transferring from the source to the destination the blocks that were changed during the initial cloning period. To avoid loss of data on the destination virtual machine, Converter Standalone can shut down certain Windows services before the synchronization. Based on your settings, Converter Standalone shuts down the selected Windows services so that no critical changes occur on the source machine while destination is being synchronized.
Converter Standalone can shut down the source machine and power on the destination machine when the conversion process is complete. When combined with synchronization, this action allows seamless migration of a physical machine source to a virtual machine destination. The destination machine takes over the source machine operations with the least possible downtime.
NOTE When you hot clone dual-boot systems, you can clone only the default operating system to which the boot. ini file points. To clone the nondefault operating system, change the boot. ini file to point to the other operating system and reboot. After the other operating system is booted, you can hot clone it. If your second operating system is Linux, you can boot it and clone it using the standard procedure for cloning Linux physical machine sources.
Cold cloning, also called offline cloning, entails cloning the source machine when it is not running its operating system. When you cold clone a machine, you reboot the source machine using a CD that has its own operating system and the vCenter Converter application on it. Cold cloning allows you to create the most consistent copy of the source machine because nothing changes on the source machine during the conversion. Cold cloning leaves no footprint on the source machine, but requires you to have physical access to the source machine that is being cloned.
When you cold clone a Linux source, the resulting virtual machine is an exact replica of the source machine and you cannot configure the destination virtual machine. You must configure the destination virtual machine after the cloning is complete.
Table 1-1 compares the hot and cold cloning modes.
Table 1-1. Hot and Cold Cloning Comparison
| Comparison Criteria | Hot Cloning with Converter Standalone 4.3 | Cold Cloning with Converter Enterprise 4.1.x |
| Licensing | No license required with VMware vCenter Converter Standalone 4.3. | License file required for Enterprise features of VMware Converter Enterprise. |
| Required installation | Full Converter Standalone installation is required. As part of the cloning process, Converter Standalone agent is installed on the source machine remotely. | No installation is required. All components required for the conversion are on the CD. |
| Supported sources | Local and remote powered-on physical or virtual machines. | Local powered-off physical or virtual machines. |
| Advantages | ■ Does not require direct access to the source machine.■ You can clone the source machine while it is running. | ■ Creates the most consistent copy of the source machine.■ Leaves no footprint on the source machine. |
| Disadvantages | ■ Applications that constantly modify files need to be VSS aware to allow Converter Standalone to create a consistent snapshot for cloning.■ Dynamic source disks are read but not preserved during volume-based conversions. Dynamic disks are converted into basic volumes on the target virtual machine. | ■ You must power off the source machine to clone it.■ Requires physical access to the source machine.■ Hardware detection and configuration of Boot CD.■ Converter Standalone 4.x features are not supported. |
| Use | ■ To clone running source machines without shutting them down.■ To clone unique hardware that the Boot CD does not recognize. | ■ To clone a system that Converter Standalone does not support.■ To preserve the exact disk layout in the target.■ To preserve logical volumes in dynamic disks (Windows) or LVM (Linux). |
| When to not use | When you do not want anything to be installed on the source system. | ■ When you want Linux P2V with automatic reconfiguration.■ When you do not have physical access to the source machine.■ When you cannot afford a long downtime of the source system.■ To perform synchronization after cloning. |
Remote Hot Cloning of Physical Machine Sources That Are Running Windows
You can use the Conversion wizard to set up conversion tasks and Converter Standalone components perform all of the cloning tasks.
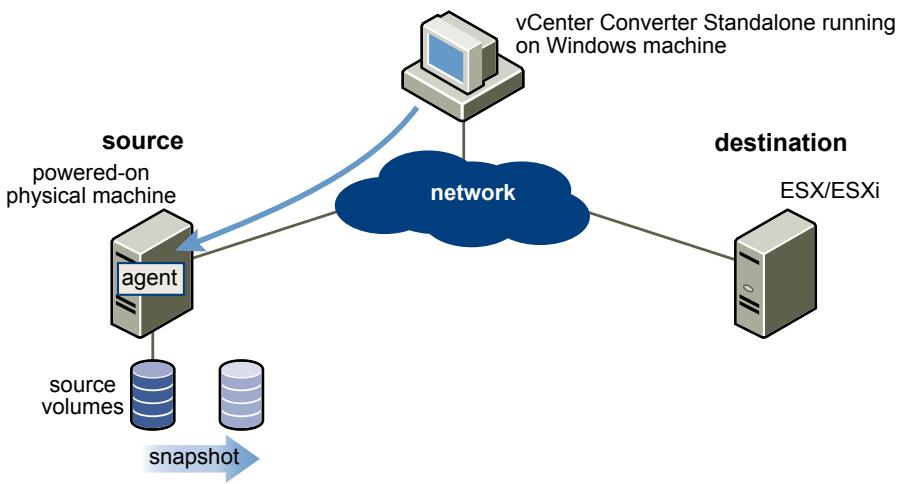
The following workflow is an example of remote hot cloning in which the physical machine being cloned experiences no downtime.
1 Converter Standalone prepares the source machine for the conversion.
Converter Standalone installs the agent on the source machine and the agent takes a snapshot of the source volumes.
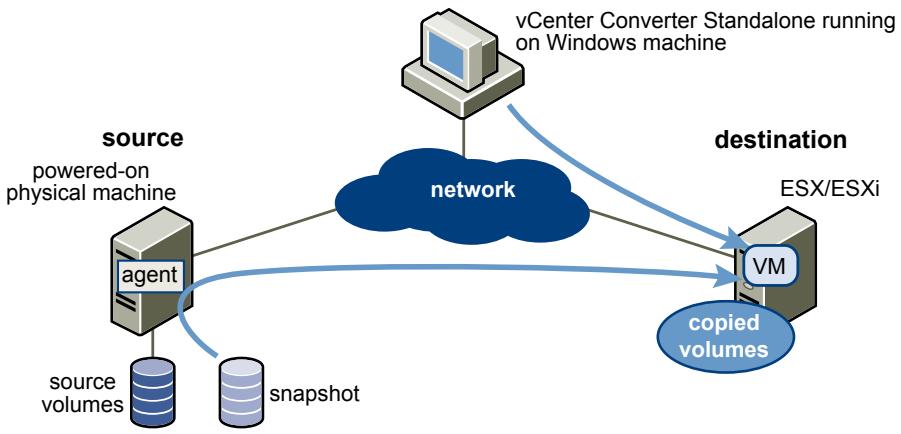
2 Converter Standalone prepares the virtual machine on the destination machine.
Converter Standalone creates a virtual machine on the destination machine and the agent copies volumes from the source machine to the destination machine.
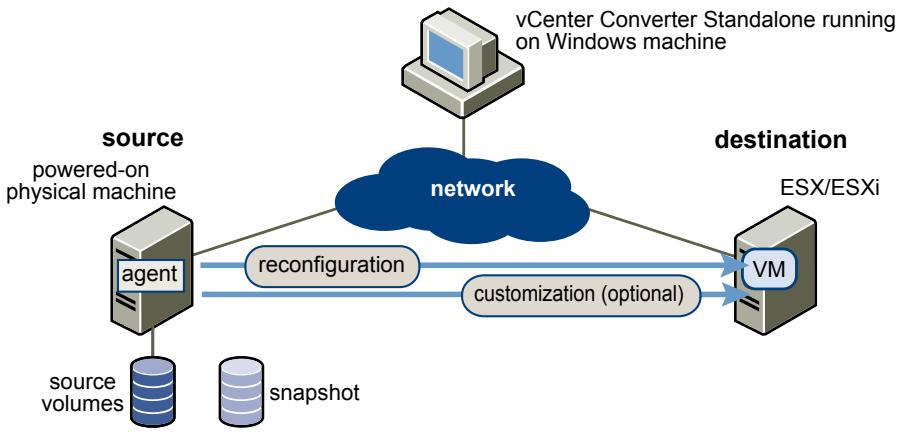
3 Converter Standalone completes the conversion process.
The agent installs the required drivers to allow the operating system to boot in a virtual machine and personalizes the virtual machine (changes the IP information, for example).
4 Optionally, Converter Standalone uninstalls the agent from the source machine.
The virtual machine is ready to run on the destination server.
Remote Hot Cloning of Physical Machine Sources That Are Running Linux
The conversion process of physical machines that are running Linux operating systems differs from that of Windows machines.
In Windows conversions, the Converter Standalone agent is installed on the source machine and the source information is pushed to the destination.
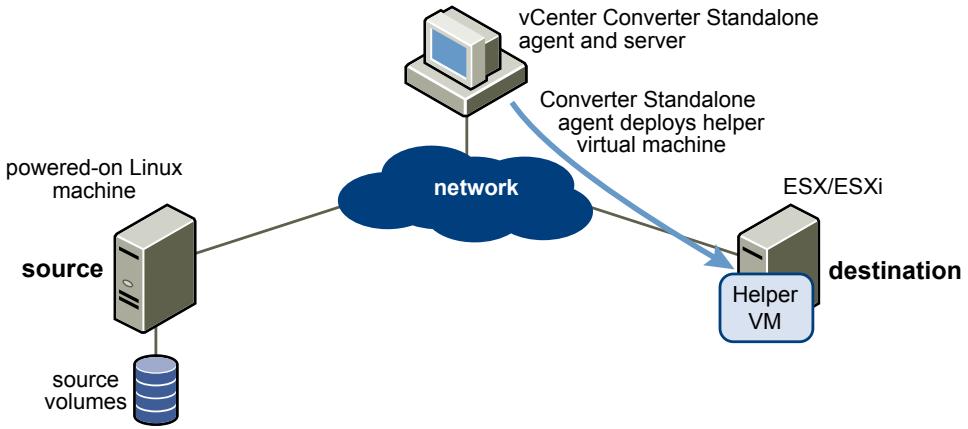
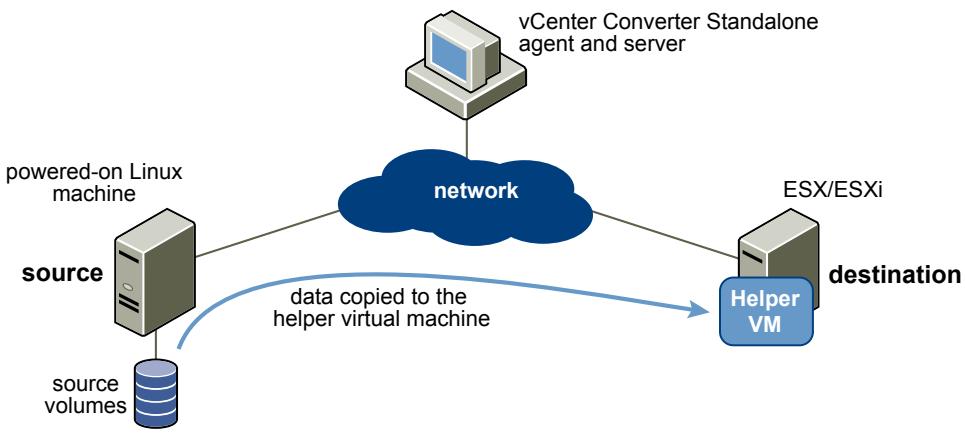
In Linux conversions, no agent is deployed on the source machine. Instead, a helper virtual machine is created and deployed on the destination ESX/ESXi host. The source data is then copied from the source Linux machine to the helper virtual machine. After the conversion is complete, the helper virtual machine shuts down to become the destination virtual machine the next time you power it on.
Converter Standalone supports conversion of Linux sources only to managed destinations.
The following workflow demonstrates the principles of hot cloning physical machine sources that run Linux to managed destinations.
1 Converter Standalone uses SSH to connect to the source machine and retrieves source information. Converter Standalone creates an empty helper virtual machine based on your conversion task settings. The helper virtual machine serves as a container for the new virtual machine during conversion. Converter Standalone deploys the helper virtual machine on the managed destination, an ESX/ESXi host. The helper virtual machine boots from a *. iso file that is located on the Converter Standalone server machine.
2 The helper virtual machine powers on, boots from the Linux image, connects to the source machine through SSH, and starts retrieving the selected data from the source. While you set up the conversion task, you can select which source volumes to be copied to the destination machine.
- Optionally, after data is copied, the destination virtual machine is reconfigured to allow the operating system to boot in a virtual machine.
4 Converter Standalone shuts down the helper virtual machine. The conversion process is complete.
You can configure Converter Standalone to power on the newly created virtual machine after the conversion is complete.
Prepare for Cold Cloning
Because Converter Standalone 4.3 does not support cold cloning, you must use the Boot CD of an earlier vCenter Converter edition. The features supported on the Boot CD depend on the product version you choose.
When you cold clone a machine, you reboot the source machine from a CD that has its own operating system and also includes the vCenter Converter application. You can find a detailed description of the cold cloning process in the documentation of the Boot CD you select to use.
VMware vCenter Converter 4.1.x is not a free software product.
Procedure
1 To obtain a Boot CD, go to the VMware Download Web site and download the vCenter Converter 4.1.x installation package.
2 Extract the Boot CD .iso file from the installation package.
3 Write the Boot CD . iso file on a CD.
What to do next
Follow the onscreen instructions to proceed with cold cloning.
Types of Data Cloning Operations
Converter Standalone supports disk-based cloning, volume-based cloning, and linked-cloning modes.
IMPORTANT Converter Standalone cannot detect any source volumes and file systems that are located on physical disks larger than 2TB.
Table 1-2. Cloning Modes
| Data Copy Types | Application | Description |
| Volume based | Copy volumes from the source machine to the destination machine. | Volume-based cloning is relatively slow. File-level cloning is slower than block-level cloning. Dynamic disks are converted into basic volumes on the target virtual machine. |
| Disk based | Create copies of the source machines, for all types of basic and dynamic disks. | You cannot select which data to copy. Disk-based cloning is faster than volume-based cloning. |
| Linked clone | Use to quickly check compatibility of non-VMware images | For certain third-party sources, the linked clone is corrupted if you power on the source machine after the conversion. Linked cloning is the fastest (but incomplete) cloning mode that Converter Standalone supports. |
Volume-Based Cloning
During volume-based cloning, volumes from the source machine are copied to the destination machine. Converter Standalone supports volume-based cloning for hot and cold cloning, and during the import of existing virtual machines.
During volume-based cloning, all volumes in the destination virtual machine are converted to basic volumes, regardless of their type in the corresponding source volume.
Volume-based cloning is performed at the file level or block level, depending on the destination volume size that you select.
Volume-based cloning at the file level
Performed when you select a size smaller than the original volume for NTFS volumes or you choose to resize a FAT volume.
Volume-based cloning at the file level is supported only for FAT, FAT32, NTFS, ext2, ext3, and ReiserFS file systems.
Dynamic source disks are read but not preserved during volume-based conversions. Dynamic disks are converted into basic volumes on the target virtual machine.
Volume-based cloning at the block level
Performed when you choose to preserve the size of the source volume or when you specify a larger volume size for NTFS source volumes.
For certain cloning modes, Converter Standalone might not support some types of source volumes. Table 1-3 shows the supported and nonsupported source volume types.
Table 1-3. Supported and Nonsupported Source Volumes
| Cloning Mode | Supported Source Volumes | Nonsupported Source Volumes |
| Virtual machine conversion | ■ Basic volumes | ■ RAID |
| ■ All types of dynamic volumes | ■ GUID partition table (GPT) disks | |
| ■ Master boot record (MBR) disks | ||
| Powered-on machine conversion | All types of source volumes that Windows recognizes |
Disk-Based Cloning
Converter Standalone supports disk-based cloning to import existing virtual machines.
Disk-based cloning transfers all sectors from all disks and preserves all volume metadata. The destination virtual machine receives partitions of the same type, size, and structure, as the partitions of the source virtual machine. All volumes on the source machine's partitions are copied as they are.
Disk-based cloning supports all types of basic and dynamic disks.
Full and Linked Clones
Clones can be full or linked depending on the amount of data copied from the source to the destination machine.
A full clone is an independent copy of a virtual machine that shares nothing with the parent virtual machine after the cloning operation. Ongoing operation of a full clone is separate from the parent virtual machine.
Because a full clone does not share virtual disks with the parent virtual machine, full clones generally perform better than linked clones. Full clones take longer to create than linked clones. Creating a full clone can take several minutes if the files involved are large.
You can create a full clone by using any disk clone type other than the linked clone type.
A linked clone is a copy of a virtual machine that shares virtual disks with the parent virtual machine in an ongoing manner. A linked clone is a fast way to convert and run a new virtual machine. You can create a linked clone from the current state, or snapshot, of a powered-off virtual machine. This practice conserves disk space and allows multiple virtual machines to use the same software installation.
All files available on the source machine at the moment of the snapshot continue to remain available to the linked clone. Ongoing changes to the virtual disk of the parent do not affect the linked clone, and changes to the disk of the linked clone do not affect the source machine. If you make changes to a source Virtual PC and Virtual Server machines, or to LiveState images, the linked clone is corrupted and you cannot use it anymore.
A linked clone must have access to the source. Without access to the source, you cannot use a linked clone at all.
For more information on how to create a linked clone, see "Create a Linked Clone," on page 59.
Destination Disk Types
Depending on the destination you select, several destination disk types are available.
For detailed information on destination virtual disks types, see Table 1-4.
Table 1-4. Destination Disk Types
| Destination | Available Disk Types | |
| VMware Infrastructure virtual machine | Flat | Copies the entire source disk size to the destination, regardless of its used and free space. |
| Thin | For managed destinations that support thin provisioning through GUI, creates an expanding disk on the destination. For example, if the source disk size is 10GB, but only 3GB is used, the created destination disk is 3GB but can expand to 10GB. | |
| VMware Workstation or other VMware virtual machine | Pre-allocated | Copies the entire source disk size to the destination, regardless of its used and free space. |
| Not pre-allocated | Creates an expanding disk on the destination. For example, if the source disk size is 20GB, but only 5GB is used, the created destination disk is 5GB but can expand to 20GB. Take this expansion into account when you calculate the free disk space on the destination datastore. | |
| 2GB Split pre-allocated | Splits the source disk into 2GB sections on the destination. | |
| 2GB Split not pre-allocated | Creates 2GB sections on the destination that include only the real used space on the source disk. As the destination disk grows, new 2GB sections are created to accommodate the new data until the size reaches that of the original source disk. | |
To support destination virtual disks on FAT file systems, divide the source data into 2GB files.
Using Converter Standalone with Virtual Machine Sources and System Images
With Converter Standalone, you can convert virtual machines and system images, and configure VMware virtual machines.
Converting virtual machines
You can convert VMware virtual machines from and to Workstation, VMware Player, VMware ACE, VMware Fusion, ESX, ESXi Embedded, ESXi Installable, and VMware Server. You can also import virtual machines from Microsoft Virtual Server and Virtual PC.
To be able to run an imported VMware virtual machine and its source virtual machine on the same network, you must modify the network name and IP address on one of the virtual machines. Modifying the network name and IP address allows the original and new virtual machines to coexist on the same network.
Configuring virtual machines
If the VMware virtual machines have disks that are populated by using a backup of a physical host or by cold cloning, Converter Standalone prepares the image to run on VMware virtual hardware. If you have used a third-party virtualization software to create a virtual machine on an ESX host, you can use Converter Standalone to reconfigure it. You can also reconfigure any operating system installed on a multiboot machine if you have imported the virtual machine to an ESX host. Before you reconfigure a multiboot machine, you must change the boot.ini file.
System Settings Affected by Conversion
A VMware virtual machine that Converter Standalone creates contains a copy of the disk state of the source physical machine, virtual machine, or system image. Some hardware-dependent drivers and sometimes the mapped drive letters might not be preserved.
The following source computer settings remain unchanged:
- Operating system configuration (computer name, security ID, user accounts, profiles, preferences, and so on)
Applications and data files
Volume serial number for each disk partition
Because the target and the source virtual machines or system images have the same identities (name, SID, and so on), running them on the same network might result in conflicts. To redeploy the source virtual machine or system image, make sure that you do not run the source and target images or virtual machines on the same network at the same time.
For example, if you use Converter Standalone to test whether you can run a Virtual PC virtual machine as a VMware virtual machine without first decommissioning the original Virtual PC machine, you must first resolve the duplicate ID problem. You can resolve this problem by customizing the virtual machines in the Conversion or the Configuration wizard.
Changes to Virtual Hardware
After conversion, most applications function correctly on the VMware virtual machine because their configuration and data files have the same location as on the source virtual machine. However, applications might not work if they depend on specific characteristics of the underlying hardware, such as the serial number or the device manufacturer.
Table 1-5 contains hardware changes that might occur after virtual machine migration.
Table 1-5. Hardware Changes After Virtual Machine Migration
| Hardware | Behavior |
| CPU model and serial numbers | Might change after migration if they are activated. They correspond to the physical computer hosting the VMware virtual machine. |
| Ethernet adapters | Might change (AMD PCNet or VMXnet) and have a different MAC address. The IP address of each interface must be individually reconfigured. |
| Graphics cards | Might change after migration (VMware SVGA card). |
| Disks and partitions | The number of disks and partitions might change if you rearrange volumes during the cloning process. Each disk device might have a different model and different manufacturer strings. |
| Primary disk controllers | Might differ from the source machine. |
Applications might not work if they depend on devices that are not available within a virtual machine.
You must consider the compatibilities and the interoperabilities among the systems on which and with which the Converter Standalone components work.
This chapter includes the following topics:
"Supported Operating Systems," on page 21
"Installation Space Requirements," on page 22
"Supported Source Types," on page 23
"Supported Destination Types," on page 25
"Configuring Permissions for VirtualCenter Users," on page 26
"Support for IPv6 in Converter Standalone," on page 26
"TCP/IP and UDP Port Requirements for Conversion," on page 27
"Requirements for Remote Hot Cloning of Windows Operating Systems," on page 28
Supported Operating Systems
You can install Converter Standalone components only on Windows operating systems. Converter Standalone supports Windows and Linux operating systems as sources for powered-on-machine conversions and virtual-machine conversions. You cannot reconfigure Linux distributions.
For a list of operating systems on which you can install Converter Standalone components, see Table 2-1.
Table 2-1. Supported Operating Systems
| Supported Operating Systems | Converter Standalone Server Support | Converter Standalone Client Support | Converter Standalone Agent Support | Source for Powered-On Machine Conversions | Source for Virtual Machine Conversions | Configuration Source |
| Windows XP Professional (32-bit and 64-bit) SP3 | Yes | Yes | Yes | Yes | Yes | Yes |
| Windows 2003 (32-bit and 64-bit) SP2, Revision 2 | Yes | Yes | Yes | Yes | Yes | Yes |
| Windows Vista (32-bit and 64-bit) SP2 | Yes | Yes | Yes | Yes | Yes | Yes |
| Windows Server 2008 (32-bit and 64-bit) SP2 | Yes | Yes | Yes | Yes | Yes | Yes |
| Windows Server 2008 R2 (64-bit) | Yes | Yes | Yes | Yes | Yes | Yes |
| Windows 7 (32-bit and 64-bit) | Yes | Yes | Yes | Yes | Yes | Yes |
| Red Hat Enterprise Linux 2.x (32-bit and 64-bit) | No | No | No | Yes | Yes | No |
| Red Hat Enterprise Linux 3.x (32-bit and 64-bit) | No | No | No | Yes | Yes | No |
| Red Hat Enterprise Linux 4.x (32-bit and 64-bit) | No | No | No | Yes | Yes | No |
| Red Hat Enterprise Linux 5.x (32-bit and 64-bit) | No | No | No | Yes | Yes | No |
| SUSE Linux Enterprise Server 8.x (32-bit and 64-bit) | No | No | No | Yes | Yes | No |
| SUSE Linux Enterprise Server 9.x (32-bit and 64-bit) | No | No | No | Yes | Yes | No |
| SUSE Linux Enterprise Server 10.x (32-bit and 64-bit) | No | No | No | Yes | Yes | No |
| SUSE Linux Enterprise Server 11.x (32-bit and 64-bit) | No | No | No | Yes | Yes | No |
| Ubuntu 5.x (32-bit and 64-bit) | No | No | No | Yes | Yes | No |
| Ubuntu 6.x (32-bit and 64-bit) | No | No | No | Yes | Yes | No |
| Ubuntu 7.x (32-bit and 64-bit) | No | No | No | Yes | Yes | No |
| Ubuntu 8.x (32-bit and 64-bit) | No | No | No | Yes | Yes | No |
| Ubuntu 9.x (32-bit and 64-bit) | No | No | No | Yes | Yes | No |
| Ubuntu 10.04 (32-bit and 64-bit) | No | No | No | Yes | Yes | No |
Installation Space Requirements
During installation, you can select the Converter Standalone components that you want to install. All components require different amounts of free disk space to install.
Table 2-2 shows the disk space required to install Converter Standalone and its components.
Table 2-2. Installation Space Requirements
| Installation Component | Disk Space Required | Disk Space Requirement for Decompressed Files |
| Installation file | 100MB | 100MB |
| vCenter Converter client | 25MB | 25MB |
| vCenter Converter server | 120MB | 300MB |
| vCenter Converter agent | 25MB | 100MB |
Supported Source Types
With Converter Standalone, you can convert remote powered-on machines, powered-off VMware virtual machines, Hyper-V virtual machines, and other third-party virtual machines and system images.
Table 2-3 shows the sources that Converter Standalone supports.
Table 2-3. Supported Sources
| Source Type | Sources |
| Powered-on machines | Remote Windows physical machinesRemote Linux physical machinesLocal Windows physical machinesWindows virtual machines running on Hyper-V ServerPowered-on VMware virtual machines |
| VMware Infrastructure virtual machines | Powered-off virtual machines managed by the following servers:VirtualCenter 2.5vCenter Server 4.0 and 4.1ESX Server 2.5.x (if VirtualCenter 2.5 or higher manages ESX)ESX Server 3.0, 3.5, 4.0, and 4.1ESXi 3.5, 4.0, and 4.1 |
| VMware virtual machines | Powered-off hosted virtual machines of the following versions:VMware Workstation 5.x, 6.x, and 7.xVMware Fusion 2.x and 3.xVMware Player 2.x and 3.xVMware Server 2.x |
| Hyper-V Server virtual machines | Powered-off virtual machines with the following guest operating systems:Windows Server 2008 (x86 and x64), SP1, SP2, and R2Windows Server 2008 (x86 and x64) SP2 and R2 SP2Windows 7 (except Home editions)Windows Vista SP1 and SP2 (except Home editions)Windows XP Professional SP2, SP3, and x64 SP2SUSE Linux Enterprise Server 10 SP1 and SP2SUSE Linux Enterprise Server 11Red Hat Enterprise Linux 5.2, 5.3, and 5.4 (x86 and x64) |
| Third-party virtual machines or system images | Acronis True Image Echo 9.1, 9.5, and Acronis True Image 10 and 11 (Home product (.tib).Symantec Backup Exec System Recovery (formerly LiveState Recovery) 6.5, 7.0, 8.0, and 8.5, LiveState Recovery 3.0 and 6.0 (only .sv2i).Norton Ghost version 10.0, 12.0, and 14.0 (.sv2i format only).Parallels Desktop 2.5, 3.0, and 4.0 (.pvs and .hdd). Compressed disks are not supported.Parallels Workstation 2.x (.pvs). Compressed disks are not supported. Parallels Virtuozzo Containers are not supported.StorageCraft ShadowProtect Desktop, ShadowProtect Server, ShadowProtect Small Business Server (SBS), ShadowProtect IT Edition, versions 2.0, 2.5, 3.0, 3.1, and 3.2 (.spf).Microsoft VHD format for the following sources:Microsoft Virtual PC 2004 and Microsoft Virtual PC 2007 (.vmc)Microsoft Virtual Server 2005 and 2005 R2 (.vmc) |
Sources that run Windows 7 and Windows Server 2008 R2 can be converted to ESX 3.5 Update 5, ESX 4.0, or later destinations. ESX 3.5 Update 4 or earlier versions do not support Windows 7.
Conversion Limitations for Powered-On Machines
When you convert a powered-on machine, some conversion features might not be available for certain source operating systems.
For a list of limitations dependent on the source operating system, see Table 2-4.
Table 2-4. Limitations for Powered-On Machine Conversion
| Source Operating System | Limitations |
| Windows XP and later | Synchronization is supported only for volume-based cloning at the block level. |
| Linux | ■ Only volume-based cloning at the file level is supported.■ Only managed destinations are supported.■ You can convert multiboot virtual machines only if GRUB is installed as the boot loader. LILO is not supported.■ LVM logical volumes are converted to basic volumes on the destination virtual machine. |
Conversion Limitations for VMware Virtual Machines
Certain limitations exist when you convert a VMware virtual machine.
You must power off source virtual machines before you convert them. You can convert running virtual machines if you follow the procedure for converting powered-on machines.
Certain limitations are applicable when you convert Linux virtual machine sources.
Only disk-based cloning is supported for Linux guest operating systems.
- Configuration or customization is not supported for Linux guest operating systems.
You cannot install VMware Tools on Linux guest operating systems.
Conversion Limitations for Third-Party Virtual Machines or System Images
Converter Standalone can convert third-party virtual machines, system images, ShadowProtect images, and BackupExec System Recovery images. These conversions have limitations.
Third-Party Virtual Machines and System Images
Third-party virtual machines and system images have the following limitations.
Virtual machines created with Macintosh versions of Virtual PC are not supported.
- The operating system on the source Virtual PC or Virtual Server virtual machine must be a Windows guest operating system supported by the destination VMware platform (for example, Workstation 5 or 6.0.x). For a list of supported operating systems, see the Guest Operating System Installation Guide.
Converter Standalone supports Virtual PC and Virtual Server virtual machines with most Windows operating systems earlier than Windows NT 4.0 and with non-Windows operating systems (for example, Linux and DOS) only for cloning. Converter Standalone does not support configuring for these systems.
- Parallels Virtuozzo containers are not supported.
ShadowProtect and Backup Exec System Recovery
ShadowProtect and Backup Exec System Recovery have the following limitations.
Dynamic disks are not supported.
All images for the backup of a machine must be in a single folder. The source folder must not contain images that are not part of the backup.
- For volume-based cloning, all volumes in the disk up to the active and system volumes must be backed up. For example, if a disk has four partitions, 1 through 4, with partition 2 as the active volume and partition 3 as the system volume, the backup must include partitions 1 through 3.
For incremental images, up to 16 incremental backups are supported.
- ShadowProtect images of systems with logical drives are not supported if the logical drive is also a system or active volume.
Supported Destination Types
With Converter Standalone, you can create virtual machines compatible with VMware hosted and managed products.
Table 2-5 shows the destinations that Converter Standalone supports.
Table 2-5. Supported Destinations
| Destination Type | Supported Versions |
| VMware Infrastructure virtual machines | Managed destinations■ ESX Server 3.5, 4.0, and 4.1■ ESXi 3.5, 4.0, and 4.1■ vCenter Server 2.5, 4.0, and 4.1 |
| VMware Hosted virtual machines | Hosted destinations■ VMware Workstation 5.x, 6.x, and 7.x■ VMware Fusion 1.x, 2.x, and 3.0■ VMware Player 1.x, 2.x, and 3.0■ VMware Server 1.x and 2.x |
NOTE For hosted destinations that reside on SMB or NFS shares, you must use volume-based cloning and create 2GB disks that are not pre-allocated.
Configuring Permissions for VirtualCenter Users
To convert virtual machines to vCenter with Converter Standalone, you must have certain vCenter permissions set at the datacenter level.
- Datastore-Allocate Space
Virtual machine.Inventory.Create new
Virtual machine.Configuration.Add new disk
■ Virtual Machine.Interaction.Power On (needed only if you choose to power on the destination virtual machine after conversion)
Virtual Machine.Provisioning.Allow Disk Access
Resource.Assign Virtual Machine To Resource Pool
Network.Assign network (needed only if you plan to connect the destination virtual machine to a network)
For more information about setting permissions, see the vSphere Datacenter Administration Guide.
Support for IPv6 in Converter Standalone
Converter Standalone supports both IPv4 and IPv6 Internet protocols with several limitations.
Internet Protocol version 6 (IPv6 or IPng) is the successor to Internet Protocol version 4 (IPv4), which is the currently used protocol for assigning IP addresses to computers on the Internet. IPv6 was adopted to overcome the expected exhaustion of IPv4 addresses that might be caused by the constantly increasing number of computers on the Internet.
While IPv4 uses 32bit addresses, IPv6 uses 128bit. IPv6 addresses can have different formats or notations.
1040:0:0:0:0:0:0:1
1040::1
21DA:00D3:0010:2F3B:02AA:00FF:FE28:9C5A
Converter Standalone supports all IPv6 notations for all components of the system.
Converter Standalone installer
Converter Standalone client
Converter Standalone agent
All destinations supported in Converter Standalone
Along with the higher security level and much larger address space, IPv6 brings about some compatibility tasks that have not been resolved yet. For example, IPv4-only nodes cannot communicate directly with IPv6 nodes and need additional routing. This makes the end-to-end support of mixed IPv4 and IPv6 environments precarious.
To reduce this complexity, Converter Standalone supports only pure IPv6 or IPv4 environments, where the protection source, the protection destination, and the Converter Standalone server and agent must run the same version of IP.
Note You cannot use IPv6 to customize the guest operating systems of virtual machines.
TCP/IP and UDP Port Requirements for Conversion
To enable conversion, the Converter Standalone server and client must be able to send data to each other, to remote physical machines, and to vCenter Server. Also, the source and destination hosts must receive data from each other. Designated ports are reserved for this communication.
If any of these ports is blocked, the corresponding conversion task fails.
Ports Used When Converting a Powered-On Physical Machine Running Windows
Table 2-6 contains a list of the ports that must be open during the conversion of physical machine sources running Windows.
Table 2-6. Ports Required During Windows P2V
| Communication Paths | Communication Ports | Notes |
| Converter Standalone server to powered-on source machine | TCP - 445, 139, 9090 UDP - 137, 138 | If the source computer uses NetBIOS, port 445 is not required. If NetBIOS is not being used, ports 137, 138, and 139 are not required. When in doubt, make sure that none of the ports are blocked.Note Unless you have installed Converter Standalone server or agent on the source computer, the account used for authentication to the source computer must have a password, network file sharing must be enabled on the source computer, and Simple File Sharing must not be used. |
| Converter Standalone server to vCenter Server | TCP - 443 | Required only if the conversion destination is a vCenter Server. |
| Converter Standalone client to vCenter Server | TCP - 443 | Required only if the Converter Standalone server and client components are on different machines. |
| Powered-on source machine to ESX/ESXi | TCP - 443, 902 | If the conversion destination is vCenter Server, only port 902 is required. |
Ports Used When Converting a Powered-On Physical Machine Running Linux
Table 2-7 contains a list of the ports that must be open during the conversion of physical machine sources running Linux.
Table 2-7. Ports Required During Linux P2V
| Communication Paths | TCP Ports | Notes |
| Converter Standalone server to powered-on source machine | 22 | Used to establish an SSH connection between the Converter Standalone server and the source machine. |
| Converter Standalone client to Converter Standalone server | 443 | Required only if the Converter Standalone server and client components are on different machines. |
| Converter Standalone server to vCenter Server | 443 | Required only if the conversion destination is a vCenter Server. |
| Converter Standalone server to ESX/ESXi | 443, 902, 903 | If the conversion destination is a vCenter Server, only ports 902 and 903 are required. |
| Converter Standalone server to helper virtual machine | 443 | |
| Helper virtual machine to powered-on source machine | 22 | Used to establish an SSH connection between the helper virtual machine and the source machine. By default, the IP address of the helper virtual machine is assigned by DHCP. If no DHCP server is available on the destination network, you must manually assign the target virtual machine an IP address. |
Ports Used When Converting Virtual Machine Sources
Table 2-8 contains a list of the ports that must be open during the conversion of virtual machines.
Table 2-8. Ports Required During V2V
| Communication Paths | Communication Ports | Notes |
| Converter Standalone server to Fileshare path | TCP - 445, 139 | Required only for standalone virtual machine sources or destinations. If the computer hosting the source or destination path uses NetBIOS, port 445 is not required. If NetBIOS is not being used, ports 137, 138, and 139 are not required. When in doubt, make sure that none of the ports are blocked. |
| UPD - 137, 138 | ||
| Converter Standalone client to Converter Standalone server | TCP - 443 | Required only if the Converter Standalone server and client components are on different machines. |
| Converter Standalone server to vCenter Server | TCP - 443 | Required only if the conversion destination is a vCenter Server. |
| Converter Standalone server to ESX/ESXi | TCP - 443, 902 | If the conversion destination is a vCenter Server, only port 902 is required. |
Requirements for Remote Hot Cloning of Windows Operating Systems
To avoid problems related to permissions and network access, ensure that simple file sharing is turned off and that Windows Firewall does not block file and printer sharing. Also, to access file and printer sharing ports, you might need to change the scope of the IP addresses that the firewall allows.
To ensure successful remote hot cloning of Windows platforms, verify the following items on the source machine before you start the application:
Ensure that simple file sharing is turned off.
Ensure that file and printer sharing is not blocked by Windows Firewall.
You must allow incoming file share connections in the following cases:
When you use the machine to host standalone images
When you use the machine as a standalone destination
When you remotely hot clone the machine
To enable customization of the guest operating system, install Sysprep files on the machine where Converter Standalone server runs.
Ensure that Windows Firewall Does Not Block File and Printer Sharing
If Converter Standalone fails to connect to a remote Windows XP machine and issues a bad username/password error message, ensure that file and printer sharing is not blocked by Windows Firewall.
Procedure
1 Select Start > Settings > Control Panel > Administrative Tools > Local Security Policy.
2 In the Security Settings list on the left, select Local Policies > Security Options.
3 In the policies list on the right, select Network access: Sharing and Security model for local accounts.
4 Verify that Classic - local users authenticate as themselves is selected.
What to do next
For troubleshooting information about file and printer sharing, search the Microsoft TechNet Web site.
For information about setting file and printer sharing on other Windows systems, see the documentation for your system.
Turn Off Simple File Sharing on Windows XP Professional
To control permissions for individual users, you must turn off simple file sharing on the source machine.
Turning simple file sharing off does not turn off the Shared Documents feature. Use the simple file sharing UI, located in the folder's properties, to configure share and file permissions.
For Windows XP Professional operating systems that are part of a workgroup, the simple file sharing UI is turned on by default. Windows XP Professional operating systems that are part of a domain use only the classic file sharing and security interface.
Procedure
1 On the source machine, select Start > Settings > Control Panel > Folder Options.
2 Click the View tab and deselect Use Simple File Sharing (Recommended).
Simple file sharing is turned off.
What to do next
For more information about turning simple file sharing on or off, see the Microsoft TechNet Web site.
Prepare Guest Operating System for Customization
To customize the guest operating system of a virtual machine that runs Windows Server 2003 or Windows XP, you must save the Sysprep files to the specified locations on the machine where Converter Standalone server runs.
If Sysprep files are missing from the server machine, the Customize Guest OS option is not accessible in the Converter Standalone wizards.
Prerequisites
You must download the Sysprep files that correspond to the operating system of the source machine.
Procedure
Save the Sysprep files that correspond to the source operating system to the specified location on the machine where Converter Standalone server runs.
| Option | Description |
| Windows Server 2003 (32bit) | The Sysprep files Location for Windows: %ALLUSERSPROFILE %Application Data\VMware\VMware vCenter Converter Standalone\sysprep\svr2003 |
| Windows Server 2003 (64bit) | The Sysprep files Location for Windows: %ALLUSERSPROFILE %Application Data\VMware\VMware vCenter Converter Standalone\sysprep\svr2003-64 |
| Windows XP (32bit) | The Sysprep files Location for Windows: %ALLUSERSPROFILE %Application Data\VMware\VMware vCenter Converter Standalone\sysprepxp |
| Windows XP (64bit) | The Sysprep files Location for Windows: %ALLUSERSPROFILE %Application Data\VMware\VMware vCenter Converter Standalone\sysprepxp-64 |
What to do next
You can now customize Windows Server 2003 (32bit and 64bit) and Windows XP (32bit and 64bit) guest operating systems by using the Conversion or the Configuration wizard.
Limitations Related to Creating Snapshots of Windows Sources
Converter Standalone uses VSS snapshots to save the state of source volumes during hot cloning of physical and virtual machines that run Windows. VSS snapshots are also used to synchronize the destination virtual machine with the source machine after the initial conversion. Some of the VSS-related issues are inherited in Converter Standalone and can prevent the proper completion of your conversion tasks.
Read the limitations listed in Table 2-9 before you initiate a conversion task.
If your conversion task fails with an VSS-related error message, you can check the table for possible reasons and workarounds.
Table 2-9. VSS Snapshotting Limitations
| VSS Limitations | Error Messages | Workarounds |
| For all operating systems that support volume-based cloning, you need at least one NTFS volume for VSS to work. | There is no workaround for this limitation. | |
| VSS under Windows Server 2008 does not support FAT and FAT32. | Deselect all FAT and FAT32 volumes on the View/Edit Options page of the vCenter Converter wizards. | |
| VSS under Windows Server 2008 does not support unformatted or unrecognized volumes. | Failed to create VSS snapshot of source volume. Error code :2147754764 (0x8004230C) | ■ Format all unformatted or unrecognized volumes and try the conversion again.■ Deselect all unformatted or unrecognized volumes while setting up the conversion task in the Data to copy pane of the View/Edit Options page. |
| If the space in the VSS snapshot storage area is not enough for VSS to create a snapshot, the conversion fails. | Failed to create VSS snapshot of source volume. Error code: 2147754783(0x8004231F) | Clean up the source volumes, especially the system volume and all NTFS volumes, and try to convert the source again. |
| Importing powered-on Hyper-V sources fails if the following two VSS services are not started or are not operating properly on the source machine:■ Microsoft Software Shadow Copy Provider Service■ Volume Shadow Copy Service | Failed to create VSS snapshot of source volume. Error code: 2147754758 (0x80042306) | 1 Set the starting mode for Microsoft Software Shadow Copy Provider Service and Volume Shadow Copy Service to Automatic.2 Restart the source machine and try cloning it again. |
Installing and Uninstalling Converter Standalone
You can install Converter Standalone on a physical or a virtual machine. You can also modify or repair a Converter Standalone installation.
The Local setup installs the Converter Standalone server, Converter Standalone agent, and Converter Standalone client for local use.
During the client-server installation, you can select the Converter Standalone components that you want to install on your system.
When you install the Converter Standalone server and Remote access, the local machine becomes a server for conversions, which you can manage remotely. When you install the Converter Standalone server and the Converter Standalone client, you can use the local machine to access remote Converter Standalone servers or create conversion tasks locally.
If you install only Converter Standalone client, you can connect to a remote Converter Standalone server. You can then use the remote machine to convert hosted virtual machines, managed virtual machines, or remote physical machines.
This chapter includes the following topics:
"Perform a Local Installation on Windows," on page 33
"Perform a Client-Server Installation in Windows," on page 34
"Perform a Command-Line Installation in Windows," on page 35
"Command-Line Options for Windows Installation," on page 36
"Modify Converter Standalone in Windows," on page 37
"Repair Converter Standalone in Windows," on page 38
"Uninstall Converter Standalone in Windows," on page 38
"Connect to a Remote Converter Standalone Server," on page 39
Perform a Local Installation on Windows
You can install Converter Standalone on a physical or a virtual machine. The local setup installs the Converter Standalone server, Converter Standalone agent, and Converter Standalone client for local use.
If you install Converter Standalone in local mode, you can create and manage conversion tasks only from the machine on which you installed the application.
Prerequisites
Make sure your system meets the Converter Standalone system requirements.
Make sure that you have Administrator privileges.
If you have Converter 3.0.x installed and your machine runs Windows Vista, uninstall Converter 3.0.x manually before you install Converter Standalone 4.3.
If you have an earlier version of Converter Standalone agent on the system, uninstall Converter Standalone agent.
Procedure
1 Download the latest version of Converter Standalone from the VMware Web site.
2 Navigate to the folder that contains the installer file you downloaded and double-click the VMware-converter-4.x.x--
3 In the Choose Setup Language dialog box, select the language for the install process and click OK.
4 Follow the prompts till the End-User License Agreement page appears.
5 Select I accept the terms in the License agreement and click Next.
6 On the Destination Folder page, select the location to install Converter Standalone and click Next.
The default location is C:\Program Files\VMware\VMware vCenter Converter Standalone. To install to another location, you can click Change and browse for the new location.
7 On the Setup Type page, select Local installation and click Next.
8 On the Ready to Install page, click Install.
9 (Optional) On the Installation Completed page, deselect Run Converter Standalone Client now to complete the installation without starting the application at this time.
10 On the Installation Completed page, click Finish.
A prompt might ask you to restart your system.
Converter Standalone is installed on the local machine and is ready for use.
What to do next
You can use Converter Standalone to convert physical or virtual machine sources to virtual machine destinations.
Perform a Client-Server Installation in Windows
Perform a client-server installation so that you can create and manage conversion tasks remotely.
During the client-server installation, you can select the Converter Standalone components that you want to install on your system.
Prerequisites
Make sure your system meets the Converter Standalone system requirements.
Make sure that you have Administrator privileges.
If you have Converter 3.0.x installed and your machine runs Windows Vista, uninstall Converter 3.0.x manually before you install Converter Standalone 4.3.
If you have an earlier version of Converter Standalone agent on the system, uninstall Converter Standalone agent.
Procedure
1 Download the latest version of Converter Standalone from the VMware Web site.
2 Navigate to the folder that contains the installer file you downloaded and double-click the VMware-converter-4.x.x--
3 In the Choose Setup Language dialog box, select the language for the install process and click OK.
4 On the Setup Type page, select Client-Server installation (advanced) and click Next.
5 On the Custom Setup page, select the components that you want to install and click Next.
| Option | Description |
| Converter server | Converter Standalone server manages the conversion tasks. It handles the communication between the Converter Standalone clients and Converter Standalone agents. You cannot install Converter server alone. You must install Converter Standalone server together with Remote access or with the Converter Standalone client, or with both. |
| Remote access | If you install Remote access, local and multiple remote Converter Standalone clients can connect to the local Converter Standalone server. With remote access you can create and manage conversion tasks remotely. For remote access, you must perform a client-server installation. |
| Converter agent | Install Converter Standalone agent to allow the local machine to be a source machine for conversions. |
| Converter client | If you install only Converter Standalone client, you can connect to remote Converter Standalone server. You can then use the remote machine to convert hosted virtual machines, managed virtual machines, or remote physical machines. |
When you install the Converter Standalone server and Remote access, the local machine becomes a server for conversions, which you can manage remotely. When you install the Converter Standalone server and the Converter Standalone client, you can use the local machine to access remote Converter Standalone servers or create conversion tasks locally.
(Optional) If you decided to install Remote access or Converter Standalone agent, modify the Web service ports on the Port Settings page.
Type the HTTPS port service number.
Type the HTTP port service number.
Type the Agent port service number.
7 On the Ready to Install page, click Install.
8 (Optional) If you installed the Converter Standalone client, deselect Run Converter Standalone Client now to complete the installation without starting the application at this time.
9 On the Installation Completed page, click Finish.
A prompt might ask you to restart your system.
The selected Converter Standalone components are installed on the local machine and are ready for use.
What to do next
You can use Converter Standalone to convert physical or virtual machine sources to virtual machine destinations.
Perform a Command-Line Installation in Windows
You can install Converter Standalone from the MS-DOS command prompt or by writing a Windows batch file (.bat) to automate the installation process.
Prerequisites
Make sure your system meets the Converter Standalone system requirements.
Make sure that you have Administrator privileges.
If you have Converter 3.0.x installed and your machine runs Windows Vista, uninstall Converter 3.0.x manually before you install Converter Standalone 4.3.
If you have an earlier version of Converter Standalone agent on the system, uninstall Converter Standalone agent.
Procedure
1 Download the latest version of Converter Standalone from the VMware Web site.
2 In the local directory to which you downloaded the installer, check the number of the build, which is a part of the installer filename.
3 At the command line, install Converter Standalone silently with the log file written to the temp directory.
VMware-converted
For more command-line options, see "Command-Line Options for Windows Installation," on page 36.
What to do next
You can use Converter Standalone to convert physical or virtual machine sources to virtual machine destinations.
Command-Line Options for Windows Installation
You can use the command-line installation options when you install Converter Standalone from the MS-DOS command prompt in Windows or by writing a Windows batch file (.bat).
For a list of options to perform command-line installation, see Table 3-1.
Table 3-1. Command-Line Options
| Option | Action |
| /s | Does not display the Windows Installer version check. |
| /v" | |
| /qn | Passes parameters to the msiexec.exe file. |
| /qb | Runs the msi command in silent mode. |
| /qf | Runs the msi command in basic mode. |
| /l*v | |
| /x | Uninstalls VMware vCenter Converter Standalone. |
| ADDLOCAL="ALL" | Installs full package. The parameter is case-sensitive. |
| PROPERTY=<property value> | Sets the value of a property to <property value>. |
| VMCE:http_port | Sets the HTTP port. The default is 80. Remote machines connect to the server through this port to download the Converter Standalone client. |
| VMCE HTTPS_PORT | Set the HTTPS port. The default is 443. Remote Converter Standalone clients connect to this port on the server and submit conversion tasks. |
| VMCE_agent_PORT | Sets an Agent port. The default is 9089. Remote Converter Standalone servers connect to this port to convert this machine. |
Modify Converter Standalone in Windows
To change the installed Converter Standalone agent or the communication ports for the Converter Standalone components, you must modify the Converter Standalone installer.
Prerequisites
Make sure that you have Administrator privileges.
Close the Converter Standalone application before you start the installer wizard.
Procedure
1 To start the Converter Standalone installer, do one of the following:
- Go to the folder that contains the installer file and double-click the VMware-converter-4.x.x-
.exe file, where is the number of the build. Check the number of the build to see if it matches the build you installed. - Select Add or Remove Programs from the Control Panel, select Converter Standalone from the list, and click Change.
2 On the Welcome page of the installer wizard, click Next.
3 On the Program Maintenance page, select Modify and click Next.
4 On the Custom Setup page, select the components that you want to install and click Next.
| Option | Description |
| Converter server | Converter Standalone server manages the conversion tasks. It handles the communication between the Converter Standalone clients and Converter Standalone agents. You cannot install Converter server alone. You must install Converter Standalone server together with Remote access or with the Converter Standalone client, or with both. |
| Remote access | If you install Remote access, local and multiple remote Converter Standalone clients can connect to the local Converter Standalone server. With remote access you can create and manage conversion tasks remotely. For remote access, you must perform a client-server installation. |
| Converter agent | Install Converter Standalone agent to allow the local machine to be a source machine for conversions. |
| Converter client | If you install only Converter Standalone client, you can connect to remote Converter Standalone server. You can then use the remote machine to convert hosted virtual machines, managed virtual machines, or remote physical machines. |
When you install the Converter Standalone server and Remote access, the local machine becomes a server for conversions, which you can manage remotely. When you install the Converter Standalone server and the Converter Standalone client, you can use the local machine to access remote Converter Standalone servers or create conversion tasks locally.
5 (Optional) If you decided to install Remote access or Converter Standalone agent, modify the Web service ports on the Port Settings page.
Type the HTTPS port service number.
Type the HTTP port service number.
Type the Agent port service number.
6 On the Ready to Modify page, click Install.
7 (Optional) If you installed the Converter Standalone client, deselect Run Converter Standalone Client now to complete the installation without starting the application at this time.
8 On the Installation Completed page, click Finish.
A prompt might ask you to restart your system.
The selected Converter Standalone components are installed on the local machine and are ready for use.
What to do next
You can use Converter Standalone to convert physical or virtual machine sources to virtual machine destinations.
Repair Converter Standalone in Windows
You can repair the Converter Standalone installation to check for and reinstall the Converter Standalone client or Converter Standalone agent.
Prerequisites
Make sure that you have Administrator privileges.
Close the Converter Standalone application before you start the installer wizard.
Procedure
1 To start the Converter Standalone installer, do one of the following:
- Go to the folder that contains the installer file and double-click the VMware-converter-4.x.x-
.exe file, where is the number of the build. Check the number of the build to see if it matches the build you installed. - Select Add or Remove Programs from the Control Panel, select Converter Standalone from the list, and click Change.
2 On the Welcome page of the installer wizard, click Next.
3 On the Program Maintenance page, select Repair and click Next.
4 On the Ready to Repair page, click Install.
5 On the Installation Completed page, click Finish.
A prompt might ask you to restart your system.
What to do next
You can use Converter Standalone to convert physical or virtual machine sources to virtual machine destinations.
Uninstall Converter Standalone in Windows
You can uninstall Converter Standalone by using the Microsoft Windows Add or Remove Programs utility from the Control Panel or by using the VMware vCenter Converter Standalone installer wizard.
Prerequisites
Make sure that you have Administrator privileges.
Close the Converter Standalone application before you start the installer wizard.
Procedure
1 To start the Converter Standalone installer, do one of the following:
- Go to the folder that contains the installer file and double-click the VMware-converter-4.x.x-
.exe file, where is the number of the build. Check the number of the build to see if it matches the build you installed. - Select Add or Remove Programs from the Control Panel, select Converter Standalone from the list, and click Change.
2 On the Welcome page of the installer wizard, click Next.
3 On the Program Maintenance page, select Remove and click Next.
4 On the Ready to Remove page, click Remove.
5 On the Installation Completed page, click Finish.
A prompt might ask you to restart your system.
Connect to a Remote Converter Standalone Server
You can use the Converter Standalone client to connect to a Converter Standalone server installed on a remote machine.
Prerequisites
Ensure that the Converter Standalone server and agent are installed on the remote machine.
Procedure
1 Start Converter Standalone.
2 Follow the procedure that is applicable for your installation type.
| Option | Action |
| Local installation | a Select Administration > Connect to another server. |
| b On the Converter Standalone login page, select Enter the IP address or host name of the Converter Standalone server. | |
| c Provide the IP address and Administrator credentials, and click Login. | |
| Client-server installation with remote access | a On the Converter Standalone login page, select Enter the IP address or host name of the Converter Standalone server. |
| b Provide the IP address and Administrator credentials, and click Login. |
What to do next
You can now use the remote Converter Standalone server to set up and manage conversion tasks.
You can create a conversion task to convert a physical or virtual machine to a variety of destinations. You can convert physical machines, VMware virtual machines, third-party backup images and virtual machines, and Hyper-V Server virtual machines into VMware standalone virtual machines or virtual machines that vCenter Server manages.
The approach you take for creating the conversion task is determined by the type of source and the type of destination that you select.
Source type
A powered-on physical or virtual machine, a VMware Infrastructure virtual machine running on an ESX host, or a standalone virtual machine.
Standalone virtual machines include VMware virtual machines, backup images, and third-party virtual machines such as VMware Workstation, VMware Server, Acronis True Image, Microsoft Virtual PC and Virtual Server, Symantec Backup Exec Server Recovery (formerly known as LiveState Recovery), LiveState Recovery, StorageCraft, Parallels Desktop for Microsoft Windows and Mac OS, Parallels Workstation, and Norton Ghost (only .sv2i) images.
"Supported Source Types," on page 23 contains a full list of supported source types and product versions.
Destination type
ESX host, ESX host that vCenter Server manages, or a VMware standalone virtual machine.
"Supported Destination Types," on page 25 contains a full list of supported destination types and product versions.
Procedure
1 Start the Wizard for a Conversion on page 42
The Conversion wizard guides you through the steps of creating a conversion task.
2 Select a Source Machine to Convert on page 42
You can select from several source options for the type of machine to convert.
3 Select a Destination for the New Virtual Machine on page 48
When you set up a conversion task, you must select a destination for the new virtual machine.
4 Configure the Hardware of the Destination Virtual Machine on page 51
You can configure the virtual hardware resources that the destination virtual machine uses.
5 Configure the Software on the Destination Virtual Machine on page 62
You can configure the guest operating system so that it is ready to operate in a virtual environment.
6 Configure the Conversion Task on page 67
You can configure the conversion process and select the behavior of the source and destination machine during and after conversion. You can change the status of the source and destination services only when the source machine is running a Windows operating system.
7 Review the Summary and Submit the Conversion Task on page 73
On the Summary page, you can view a summary of the conversion task before you add it to the task list.
Start the Wizard for a Conversion
The Conversion wizard guides you through the steps of creating a conversion task.
Procedure
1 Start the Converter Standalone application.
2 Click Convert Machine in the application menu.
The Conversion wizard opens on the Source System page.
What to do next
You can now select the source machine type to convert.
Select a Source Machine to Convert
You can select from several source options for the type of machine to convert.
Prerequisites
Before you select a source machine to convert, verify that it is listed in the list of supported source types. See "Supported Source Types," on page 23.
Select a Powered-On Windows Machine to Convert on page 43
You can select a running (powered-on) Windows machine to convert. The source machine can be physical or virtual.
Select a Powered-On Linux Machine to Convert on page 44
You can select a powered-on Linux machine to convert. The source machine can be a physical or virtual machine.
Select an ESX/ESXi or vCenter Server Virtual Machine to Convert on page 44
You can convert a powered-off virtual machine that is located on an ESX/ESXi host, or on an ESX/ESXi host managed by vCenter Server.
Select a VMware Hosted Virtual Machine to Convert on page 46
You can convert a virtual machine created or used in a VMware hosted product, such as VMware Workstation, VMware Player, VMware Fusion, and VMware Server.
Select a Backup Image or a Third-Party Virtual Machine to Convert on page 46
You can select a backup image or a third-party virtual machine as the conversion source.
Select a Hyper-V Server Virtual Machine to Convert on page 47
You can convert virtual machines that Hyper-V Server manages.
Select a Powered-On Windows Machine to Convert
You can select a running (powered-on) Windows machine to convert. The source machine can be physical or virtual.
Prerequisites
Before you continue, you must prepare the source Windows machine for conversion.
Make sure that the Windows version installed on the powered-on machine is supported. For a list of supported operating systems, see "Supported Operating Systems," on page 21.
Make sure that the Converter Standalone server machine has network access to the Windows source machine.
Turn off firewall applications running on the source machine.
- Disable file sharing on the source Windows machine.
Make sure that no other conversion task is using the source you select.
- Manually remove any VMware Converter 3.x installations from the source machine.
If you plan to convert a powered-on machine by using IPv6, ensure that Converter Standalone server is installed on Windows Vista, Windows 2008, or Windows 7 operating system.
Procedure
1 On the Source System page of the Conversion wizard, select Powered-on machine from the Select source type drop-down menu.
2 Select an option that corresponds to your source machine location.
| Source Location | Action |
| Local | Click This local machine. For local machines, the authorization is set to the current user and cannot be changed. If remote access is enabled during Converter Standalone installation, this local machine is treated as a remote physical machine. |
| Remote | a Click A remote machine. b Provide the IP address or name of the machine and administrator credentials. c Select the operating system type from the OS Family drop-down menu. |
3 (Optional) Click View source details to see hardware and software information about the source machine.
4 Click Next.
If Converter Standalone agent is not already installed on the source machine, a dialog box appears. In it, you confirm the installation and select an uninstallation method for Converter Standalone agent.
5 (Optional) Select the uninstallation procedure for Converter Standalone agent and click Yes.
Converter Standalone agent is installed on the source machine.
Converter Standalone agent prepares the source machine for conversion.
What to do next
On the Destination System page you can select the destination type for the new virtual machine.
Select a Powered-On Linux Machine to Convert
You can select a powered-on Linux machine to convert. The source machine can be a physical or virtual machine.
You can convert powered-on machines that run Linux only if GRUB is installed as the boot loader on the source. LILO boot loader is not supported.
Prerequisites
Before you continue, you must prepare the source machine for conversion.
- Enable SSH on the source Linux machine.
Make sure that you use the root account to convert a Linux powered-on machine.
Make sure that vCenter Converter server machine has network access to the Linux source machine.
Make sure that no other conversion task is using the source you select.
To be able to convert multiboot virtual machines, make sure to install GRUB as the boot loader. LILO is not supported.
Procedure
1 On the Source System page of the Conversion wizard, select Powered-on machine from the Select source type drop-down menu.
2 Provide the IP address or DNS name and root credentials for the Linux machine you want to convert.
3 From the OS Family drop-down menu, select Linux.
4 Click Next.
Converter Standalone connects to the powered-on Linux machine and prepares it for conversion.
What to do next
On the Destination System page you can select the destination type for the new virtual machine.
Select an ESX/ESXi or vCenter Server Virtual Machine to Convert
You can convert a powered-off virtual machine that is located on an ESX/ESXi host, or on an ESX/ESXi host managed by vCenter Server.
You cannot convert a running or suspended virtual machine by using this procedure. For powered-on virtual machines, use the procedures for powered-on source machines.
If you connect to a vCenter Server that is part of an environment that contains multiple vCenter Server instances, Converter Standalone displays only ESX hosts managed directly by the currently connected vCenter Server.
Prerequisites
If the source machine that you want to convert resides on a VMware DRS cluster that vCenter Server manages, set VMware DRS Power Management (DPM) to manual so that DPM does not power off the ESX hosts used by Converter Standalone. When the conversion process completes, restore DPM to its original settings. For information about how to change DPM settings, see the Resource Management Guide.
Power off the source machine before the conversion.
Procedure
1 On the Source System page of the Conversion wizard, select VMware Infrastructure virtual machine from the Select source type drop-down menu.
2 Provide the IP address or host name and credentials for authentication with the ESX host or the vCenter Server, and click Next.
The Source Machine page appears, displaying the host name or IP address and the inventory of the ESX host or the vCenter Server.
What to do next
On the Source Machine page of the Conversion wizard, you can browse the virtual infrastructure inventory and select the virtual machine to convert.
Specify the vCenter Server Virtual Machine to Convert
If you choose to convert a virtual machine managed by a vCenter Server or ESX host, you must browse the inventory to locate the source virtual machine.
Prerequisites
On the Source System page of the Conversion wizard, select VMware Infrastructure virtual machine as the conversion source and click Next to proceed to the Source Machine page.
Procedure
1 (Optional) If you are connected to a vCenter Server, select a virtual machine view from the Specify machine with drop-down menu.
| Option | Description |
| Hosts and Clusters | The Incentroy tree pane provides a view of hosts, clusters, resource pools, and vApps. If you select a host managed by a cluster, you see the full list of virtual machines and templates in the VM list view. If you select a standalone host or a cluster, you see only the virtual machines that are not deployed in the resource pools of that host or cluster. |
| VMs and Templates | The Inventory tree pane provides a view of datacenters and VM folders. |
2 (Optional) If you are connected to a vCenter Server, select an object from the Inventory tree pane.
| Option | Description |
| Hosts and Clusters | Select cluster, ESX host, resource pool, or vApp. |
| VMs and Templates | Select datacenter or VM folder. |
3 From the virtual machines list, select the virtual machine you want to convert.
You can search for virtual machines in the VM list by typing one or more letters of their names in the Search for name with text box. You can clear your search by clicking Clear.
NOTE If you connect to a vCenter Server that has a disconnected ESX instance (powered off, connected to another vCenter Server, or in maintenance mode), you cannot select a virtual machine from that ESX host.
4 (Optional) To refresh the Inventory, click Refresh.
5 (Optional) To view more details about a machine, select it and click View source details.
6 Click Next to proceed to the Destination System page.
What to do next
On the Destination System page you can select the destination type for the new virtual machine.
Select a VMware Hosted Virtual Machine to Convert
You can convert a virtual machine created or used in a VMware hosted product, such as VMware Workstation, VMware Player, VMware Fusion, and VMware Server.
Prerequisites
Verify that your source machine is a supported VMware Desktop products virtual machine "Supported Source Types," on page 23.
If you plan to use a network path to locate the source, verify that the machine where Converter Standalone server runs has access to that network path.
Power off the source machine before the conversion.
Procedure
1 On the Source System page of the Conversion wizard, select VMware Workstation or other VMware virtual machine from the Select source type drop-down menu.
2 Locate the virtual machine source.
If you are connected to a remote Converter Standalone server, provide a network path to the source virtual machine file (.vmx) in the Virtual machine file text box. For example, \server\virtual Machines\virtual-machine.vmx.
If you are connected to a local Converter Standalone server, provide a network path or a local path to the .vmx file.
The file type choices are limited to VMware Workstation *.vmx files.
3 If you are connected to a remote Converter Standalone server, enter user credentials for accessing the source virtual machine.
You do not have to provide user credentials if you are connected to a local Converter Standalone server. In such cases, Converter Standalone uses the Windows credentials to connect to the source machine.
4 (Optional) To view more information about the selected source, click View source details
5 Click Next to proceed to the Destination System page.
What to do next
On the Destination System page you can select the destination type for the new virtual machine.
Select a Backup Image or a Third-Party Virtual Machine to Convert
You can select a backup image or a third-party virtual machine as the conversion source.
Prerequisites
Verify that your machine is a supported backup image or third-party virtual machine here "Supported Source Types," on page 23.
If you plan to use a network path to locate the source, verify that the machine where Converter Standalone server runs has access to that network path.
Power off the source machine before the conversion.
Procedure
1 On the Source System page, select Backup image or third-party virtual machine from the Select source type drop-down menu.
2 Locate the source backup image or virtual machine file.
If you are connected to a remote Converter Standalone server, provide a valid network path to the source backup image or virtual machine file in the Virtual machine file text box. For example, \server\backup_images\backup_image.pvs.
If you are connected to a local Converter Standalone server, provide a network path or a local path to the source backup image or virtual machine file.
3 If you are connected to a remote Converter Standalone server, enter user credentials for accessing the source virtual machine.
You do not have to provide user credentials if you are connected to a local Converter Standalone server. In such cases, Converter Standalone uses the Windows credentials to connect to the source machine.
4 (Optional) To view more information about the selected source, click View source details
5 Click Next to proceed to the Destination System page.
What to do next
On the Destination System page you can select the destination type for the new virtual machine.
Select a Hyper-V Server Virtual Machine to Convert
You can convert virtual machines that Hyper-V Server manages.
Prerequisites
Power off the source Hyper-V virtual machine.
Procedure
1 On the Source System page, select Hyper-V Server from the Select source type drop-down menu.
2 Provide the IP address or DNS name and administrative credentials to authenticate with the Hyper-V Server and click Next.
If Converter Standalone agent is not already installed on the Hyper-V Server, a dialog box appears. In it, you confirm the installation of Converter Standalone agent.
3 (Optional) Select an uninstallation procedure for Converter Standalone agent and click Yes.
Converter Standalone agent is installed on the source Hyper-V Server.
What to do next
On the Source Machine page, browse the Hyper-V Server inventory to locate the source virtual machine to convert.
Specify the Hyper-V Server Virtual Machine to Convert
If you choose to convert a virtual machine managed by a Hyper-V Server, you must browse the inventory to locate the source virtual machine.
Prerequisites
On the Source System page, select Hyper-V Server as the source type and navigate to the Source Machine page.
Procedure
1 On the Source Machine page, select the virtual machine you want to convert.
You can search for virtual machines in the inventory by typing one or more letters of their names in the Search for name with text box. You can clear your search by clicking Clear.
NOTE You can select only powered-off virtual machines. To convert a running machine, select a powered-on machine. To convert a suspended machine, either power it off and use the current procedure, or power it on and select a powered-on machine as the source.
2 (Optional) To refresh the inventory, click Refresh.
3 (Optional) To view more details about the virtual machine to convert, click View source details.
4 Click Next to proceed to the Destination System page.
The Converter Standalone agent prepares the Hyper-V source machine for conversion.
What to do next
On the Destination System page you can select the destination type for the new virtual machine.
Select a Destination for the New Virtual Machine
When you set up a conversion task, you must select a destination for the new virtual machine.
When you use a VMware DRS cluster as the destination, set VMware DRS Power Management (DPM) to manual. This setting ensures that DPM does not power off the ESX hosts that Converter Standalone uses. When the conversion process completes, restore DPM to its original settings. For information about how to change DPM settings, see the Resource Management Guide.
NOTE For conversions of powered-on source machines that run Linux, the only supported destination is a VMware Infrastructure destination.
Select a Managed Destination
You can convert a virtual machine to use with ESX/ESXi or with an ESXi host that vCenter Server manages.
Procedure
1 On the Destination System page, select VMware Infrastructure virtual machine from the Select destination type drop-down menu.
2 Provide the IP address or host name and credentials for authentication with the ESX host or the vCenter Server.
3 Click Next to proceed to the Destination Virtual Machine page.
What to do next
On the Destination Virtual Machine page, you can specify the name of the destination virtual machine and select the folder in which it should reside.
Name the Destination Virtual Machine and Select a Folder
For VMware Infrastructure destinations, you can select the destination folder and rename the destination virtual machine.
If you connect to an ESX host directly, you can view only the list of virtual machines. Therefore, you cannot select a destination folder.
Prerequisites
On the Destination System page of the Conversion wizard, select VMware Infrastructure virtual machine as the destination type.
Procedure
1 On the Destination Virtual Machine page, select the datacenter to accommodate the destination virtual machine.
If you use folders in your virtual environment to manage groups of virtual machines, you can select a folder to accommodate the destination virtual machine.
2 In the Name text box, enter a name for the destination virtual machine.
By default, Converter Standalone assigns the source machine name in this text box.
NOTE Search the list of virtual machines in the datacenter or folder you selected to ensure that the name you assign to the destination virtual machine does not exist. Virtual machines are filtered as you type. You can clear your search by clicking Clear.
3 (Optional) To refresh the Inventory, click Refresh.
4 Click Next to proceed to the Destination Location page.
What to do next
On the Destination Location page you can modify the destination environment for the new virtual machine. This includes selecting a host, resource pool, or cluster to accommodate the destination virtual machine, selecting the Datastore to hold the files of the destination virtual machine, and selecting the virtual hardware version to install on the destination virtual machine.
Customize the Location of the Destination Virtual Machine
For VMware Infrastructure destinations, you can select an ESX host, a resource pool, or a cluster. You can also select a datastore and the virtual hardware version to be installed on the destination.
Prerequisites
On the Destination Virtual Machine page, name the destination virtual machine. If you selected a vCenter Server destination, select the destination folder.
Procedure
1 On the Destination Location page of the Conversion wizard, select a datacenter object from the inventory to accommodate the destination virtual machine.
Select an ESX host.
Select a resource pool.
Select a cluster.
If DRS on the selected cluster is not set to automated mode, you can select an ESX host that belongs to the selected cluster from the Host drop-down menu.
2 (Optional) From the Datastore drop-down menu, select the datastore to hold the destination virtual machine files.
3 (Optional) From the Virtual machine version drop-down menu, select the virtual hardware version for the destination virtual machine.
| Option | Description |
| Version 4 | Select when the destination host is ESX 3.x. |
| Version 7 | Select for the latest virtual machine features. This hardware version is not supported for ESX 3.x versions. |
4 Click Next to proceed to the Options page.
What to do next
On the Options page you can set up the parameters of the conversion task. These settings include data layout, network settings, guest operating system customization, and others.
Select a Hosted Destination
You can convert a virtual machine for use with VMware Workstation, VMware Fusion, VMware Server, or VMware Player.
Prerequisites
If you plan to use a network path to locate the destination, verify that you have access to that network path.
For powered-on machines or Hyper-V virtual machine sources, verify that the machine where Converter Standalone agent runs has access to that network path.
- For all other source types, verify that the machine where Converter Standalone server runs has access to that network path.
Procedure
1 On the Destination System page, select VMware Workstation or other VMware virtual machine from the Select destination type drop-down menu.
2 Select the destination VMware hosted product from the Select VMware product drop-down menu.
3 Provide a name for the destination virtual machine in the Name text box.
4 Specify the location to store the destination virtual machine files.
If you are connected to a remote Converter Standalone server, provide a network path to the destination directory. For example, \server\virtual_machines.
If you are connected to a local Converter Standalone server, provide a network path or a local path to the destination directory.
5 (Optional) If the destination directory is password-protected, provide valid user credentials.
You do not have to provide user credentials if the destination location is on the local storage of the machine where Converter Standalone server runs.
6 Click Next to proceed to the Options page.
What to do next
On the Options page you can set up the parameters of the conversion task. These settings include data layout, network settings, guest operating system customization, and others.
Configure the Hardware of the Destination Virtual Machine
You can configure the virtual hardware resources that the destination virtual machine uses.
- Organize the Data to Copy on the Destination Machine on page 51
Depending on the selected source and destination, you can either select between disk-based and volume-based cloning modes, or create linked clones. For the conversion task, you can copy all disks to the destination or select the volumes to be copied or to be excluded. For destinations with multiple datastores, you can select the data location on specific datastores in your virtual environment.
Edit the Number of Processors on page 59
You can change the number of processors that the destination virtual machine uses.
Allocate Memory for the Destination Virtual Machine on page 60
You can change the amount of memory allocated to the destination virtual machine.
- Specify a Disk Controller for the Destination Virtual Machine on page 60
You can select a disk controller type for the destination virtual disks.
- Configure the Network Settings of the Destination Virtual Machine on page 61
You can change the number of network adapters and select the network that the destination virtual machine uses. You can also set network adapters to connect to the network when the destination virtual machine powers on.
- Configure the Network for the Helper Virtual Machine on page 62
When you convert a powered-on Linux machine, Converter Standalone creates a Helper virtual machine on the destination. The Helper virtual machine needs network access to the source machine to clone the source files. Default conversion settings enforce automatic acquisition of an IPv4 address and a DNS server for the Helper virtual machine, but you can set up this network connection manually.
Organize the Data to Copy on the Destination Machine
Depending on the selected source and destination, you can either select between disk-based and volume-based cloning modes, or create linked clones. For the conversion task, you can copy all disks to the destination or select the volumes to be copied or to be excluded. For destinations with multiple datastores, you can select the data location on specific datastores in your virtual environment.
IMPORTANT Converter Standalone cannot detect any source volumes and file systems that are located on physical disks larger than 2TB.
Prerequisites
On the Options page of the Conversion wizard, click Data to copy in the options list.
Procedure
In the Data to copy pane, select a copy mode from the Data copy type drop-down menu.
| Option | Description |
| Copy all disks and maintain layout | Results in disk-based cloning. You can preserve the source disk layout in the destination virtual machine. This option is not available for physical machine sources. |
| Select volumes to copy | Results in volume-based cloning. You can select the volumes to be copied to the destination virtual machine. You can also resize and reorganize the volume layout. This option is available for powered-on source machines that run Windows and Linux, and for all other supported sources that run Windows. |
| Linked clone | A linked clone allows you to create a VMware virtual machine that shares the virtual disk of the source machine or system image. This option is available for hosted sources and hosted destinations. |
Depending on the destination you select, several destination disk types are available. To support destination virtual disks on FAT file systems, divide the source data into 2GB files. For detailed information on destination virtual disks types, see "Destination Disk Types," on page 18.
Resize a Volume
To manage disk space on the destination datastore, you can resize the disk volumes before you begin the conversion.
Prerequisites
On the Options page of the Conversion wizard, click Data to copy in the options list.
Procedure
1 From the Data copy type drop-down menu, select Select volumes to copy.
2 In the Destination size column, select an option to specify the size of a destination volume.
| Option | Description |
| Maintain size | Maintains the original source volume size. |
| Min size | Copies only the used space of the source volume. |
| Type size in GB | Allows you to type a custom size in GB for the destination volume. The value cannot be smaller than the used space on the source volume, but can be larger than the total size of the source volume. The maximum allowed disk size for the destination is 999GB. |
| Type size in MB | Allows you to type a custom size in MB for the destination volume. The value cannot be smaller than the used space on the source volume, but can be larger than the total size of the source volume. The maximum allowed disk size for the destination is 999GB. |
3 Save your settings.
| Option | Description |
| Select another option from the options list | Saves your settings and displays the pane for the selected option. |
| Click Next | Saves your settings and displays the next page of the Conversion wizard. ■ The Customizations page is displayed if you select Customize guest preferences for the virtual machine in the Advanced options pane. ■ The Summary page is displayed if you do not select Customize guest preferences for the virtual machine in the Advanced options pane. |
Exclude a Source Volume from the Conversion Process
You can choose not to copy a volume from the source machine to the destination virtual machine. During the conversion process, Converter Standalone ignores the deselected volumes and copies only the volumes that are selected.
The source virtual machine must have more than one volume to be able to deselect existing volumes.
You cannot delete the system volume from the destination virtual machine. For example, if C: is the volume that contains the Windows operating system installation, you cannot remove it from the destination virtual machine.
Prerequisites
On the Options page of the Conversion wizard, click Data to copy in the options list.
Procedure
1 From the Data copy type drop-down menu, select Select volumes to copy.
2 Deselect the volumes that you do not want to copy to the destination virtual machine.
3 Save your settings.
| Option | Description |
| Select another option from the options list | Saves your settings and displays the pane for the selected option. |
| Click Next | Saves your settings and displays the next page of the Conversion wizard. ■ The Customizations page is displayed if you select Customize guest preferences for the virtual machine in the Advanced options pane. ■ The Summary page is displayed if you do not select Customize guest preferences for the virtual machine in the Advanced options pane. |
The deselected volumes are ignored during the conversion process and do not appear on the destination virtual machine.
Move a Volume to a Different Virtual Disk
You can add virtual disks to the destination virtual machine and move source volumes in the new disks.
The number of virtual disks you can create depends on the number of volumes that exist on the source virtual machine. For example, if you have only one volume on the source virtual machine, you cannot add a virtual disk to the destination virtual machine.
You cannot move the system volume where the guest operating system is installed. For example, if your Windows operating system is installed on C:, you cannot move the C: volume.
Prerequisites
On the Options page of the Conversion wizard, click Data to copy in the options list.
Procedure
1 From the Data copy type drop-down menu, select Select volumes to copy.
2 Click Advanced and select the Destination layout tab.
3 Select a volume from the list and click Add disk.
A new virtual disk appears in the Destination layout column.
4 Select a source volume and use the Move up and Move down buttons to accommodate the volume in the new virtual disk.
If you leave the new virtual disk empty, Converter Standalone does not create the new virtual disk on the destination virtual machine.
The selected source volume is copied to a new virtual disk on the destination virutal machine.
Select the Destination Datastore for a Source Volume
You can store a disk volume in a datastore different from the one that accommodates the virtual machine configuration file (.vmx).
You can select the destination datastore for a volume only for managed destinations with more than one datastore.
Prerequisites
On the Options page of the Conversion wizard, click Data to copy in the options list.
Procedure
1 From the Data copy type drop-down menu, select Select volumes to copy.
2 Click Advanced and select the Destination layout tab.
3 Select a volume from the list and click Add disk.
A new virtual disk appears in the Destination layout column.
4 Select a source volume and use the Move up and Move down buttons to accommodate the volume in the new virtual disk.
If you leave the new virtual disk empty, Converter Standalone does not create the new virtual disk on the destination virtual machine.
5 Highlight the new virtual disk and select a different datastore from the Destination datastore drop-down menu.
6 Save your settings.
| Option | Description |
| Select another option from the options list | Saves your settings and displays the pane for the selected option. |
| Click Next | Saves your settings and displays the next page of the Conversion wizard. ■ The Customizations page is displayed if you select Customize guest preferences for the virtual machine in the Advanced options pane. ■ The Summary page is displayed if you do not select Customize guest preferences for the virtual machine in the Advanced options pane. |
The virtual disk file (.vmdk) that contains the volume is stored in the selected datastore.
Add a Virtual Disk
You can add a virtual disk to the destination virtual machine.
The number of virtual disks depends on the number of volumes that exist on the source virtual machine. For example, if you have only one volume on the source virtual machine, you cannot add a virtual disk to the destination virtual machine.
Prerequisites
You must have more than one volumes on the source machine to be able to add an additional virtual disk.
On the Options page of the Conversion wizard, click Data to copy in the options list.
Procedure
1 From the Data copy type drop-down menu, select Select volumes to copy.
2 Click Advanced and select the Destination layout tab.
3 Select a volume from the list and click Add disk.
A virtual disk is added to the destination disk layout.
4 Select a source volume and use the Move up and Move down buttons to accommodate the volume in the new virtual disk.
If you leave the new virtual disk empty, Converter Standalone does not create the new virtual disk on the destination virtual machine.
5 Save your settings.
| Option | Description |
| Select another option from the options list | Saves your settings and displays the pane for the selected option. |
| Click Next | Saves your settings and displays the next page of the Conversion wizard. ■ The Customizations page is displayed if you select Customize guest preferences for the virtual machine in the Advanced options pane. ■ The Summary page is displayed if you do not select Customize guest preferences for the virtual machine in the Advanced options pane. |
The new virtual disk is created on the destination datastore.
Move a Disk to a Different Datastore
You can use disk-based cloning to select a different datastore for a destination virtual disk.
Prerequisites
On the Options page of the Conversion wizard, click Data to copy in the options list.
You can change the destination datastore for a disk only for managed destinations with more than one datastore.
Procedure
1 From the Data copy type drop-down menu, select Copy all disks and maintain layout.
2 Click the name of the virtual disk to relocate and select a different datastore from the Destination datastore drop-down menu.
3 Save your settings.
| Option | Description |
| Select another option from the options list | Saves your settings and displays the pane for the selected option. |
| Click Next | Saves your settings and displays the next page of the Conversion wizard. ■ The Customizations page is displayed if you select Customize guest preferences for the virtual machine in the Advanced options pane. ■ The Summary page is displayed if you do not select Customize guest preferences for the virtual machine in the Advanced options pane. |
The virtual disk file (.vmdk) is stored in the selected datastore.
Create an Expandable Disk on a Managed Destination
To save space on the destination datastore, you can copy only the existing data from a source virtual disk and create an expandable disk on the destination. Later, as you use the destination virtual machine and write new data, the destination virtual disk grows.
You can create expandable disks on managed destinations that support thin provisioning through their GUI.
You can create an expandable disk by using volume-based or disk-based cloning.
Prerequisites
On the Options page of the Conversion wizard, click Data to copy in the options list.
Procedure
Use disk-based cloning to create an expandable disk.
a From the Data copy type drop-down menu, select Copy all disks and maintain layout.
b Click a virtual disk and select Thin from the Type drop-down menu.
c To apply your settings, select another option from the options list or click Next.
Use volume-based cloning to create an expandable disk.
a From the Data copy type drop-down menu, select Select volumes to copy and click Advanced.
b Select the Destination layout tab, click a virtual disk, and select Thin from the Type drop-down menu.
c To apply your settings, select another option from the options list or click Next.
Converter Standalone copies only the existing data to the destination datastore. The empty disk space from the virtual disk is not copied to the datastore. As you use the destination virtual machine and write new data to the disk, the size of the destination disk grows.
Create an Expandable Disk on a Hosted Destination
To save space on the destination, you can copy only the existing data from a source virtual disk. Later, as you use the destination virtual machine and write new data, the destination virtual disk grows.
You can create an expandable disk by using volume-based or disk-based cloning.
Prerequisites
You must select a hosted destination, such as VMware Workstation, to use the Not pre-allocated disk option. On the Options page of the Conversion wizard, click Data to copy in the options list.
Procedure
Use disk-based cloning to create an expandable disk.
a From the Data copy type drop-down menu, select Copy all disks and maintain layout.
b From the Type drop-down menu, select Not pre-allocated.
c To apply your settings, select another option from the options list or click Next.
Use volume-based cloning to create an expandable disk.
a From the Data copy type drop-down menu, select Select volumes to copy and click Advanced.
b Select the Destination layout tab, select a virtual disk, and select Not pre-allocated from the Type drop-down menu.
c To apply your settings, select another option from the options list or click Next.
Converter Standalone copies only the existing data to the destination datastore. The empty disk space from the virtual disk is not copied to the datastore. As you use the destination virtual machine and write new data to the disk, the size of the destination disk grows.
Exclude a Source Disk from the Conversion Task
You can select a disk from the source machine and delete it from the disk layout of the destination virtual machine.
Prerequisites
The source machine must have more than one hard disk.
On the Options page of the Conversion wizard, click Data to copy in the options list.
Procedure
1 From the Data copy type drop-down menu, select Select volumes to copy.
2 Delete the disk.
| Option | Description |
| Preserve the volumes associated with the disk | a Click Advanced and select the Destination layout tab. |
| b Move the volumes from the disk you want to delete to another virtual disks. | |
| c Highlight the empty disk and click Remove disk. | |
| Delete the volumes associated with the disk | a Click Advanced and select the Source volumes tab. |
| b Deselect the volumes associated with the disk that you want to delete. |
3 Save your settings.
| Option | Description |
| Select another option from the options list | Saves your settings and displays the pane for the selected option. |
| Click Next | Saves your settings and displays the next page of the Conversion wizard. ■ The Customizations page is displayed if you select Customize guest preferences for the virtual machine in the Advanced options pane. ■ The Summary page is displayed if you do not select Customize guest preferences for the virtual machine in the Advanced options pane. |
Converter Standalone creates .vmdk files in the destination datastore only for the virtual disks you selected to preserve.
Copy All Disks to the Destination
To preserve the source disks on the destination virtual machine, you can copy all disks to the destination.
Disk-based cloning is not available for powered-on machine sources.
Prerequisites
On the Options page of the Conversion wizard, click Data to copy in the options list.
Procedure
1 From the Data copy type drop-down menu, select Copy all disks and maintain layout.
2 (Optional) If the destination datastore is low on disk space, click a virtual disk and select a different datastore from the Destination datastore drop-down menu.
NOTE You must have access to more than one datastore to move a disk to a different datastore.
3 Save your settings.
| Option | Description |
| Select another option from the options list | Saves your settings and displays the pane for the selected option. |
| Click Next | Saves your settings and displays the next page of the Conversion wizard. ■ The Customizations page is displayed if you select Customize guest preferences for the virtual machine in the Advanced options pane. ■ The Summary page is displayed if you do not select Customize guest preferences for the virtual machine in the Advanced options pane. |
Converter Standalone copies the disks to the selected datastores and preserves the source disk layout.
Create a Linked Clone
A linked clone is a VMware virtual machine that shares the virtual disk of the source virtual machine or system image. Linked clones are useful for quickly checking the compatibility of non-VMware images, such as .sv2i and .vmc files.
You can create linked clones only when you convert a virtual machine or other image source to a hosted destination.
You cannot create linked clones from Parallels source images.
You cannot create a linked clone if the source image is password-protected.

CAUTION Linked clones converted from Virtual PC and Virtual Server machines, and from LiveState images are corrupted if the source is modified or powered on after the conversion.
Prerequisites
Turn off the source virtual machine.
To verify that your source type is a supported third-party source, see "Supported Source Types," on page 23.
Procedure
1 On the Destination System page, select VMware Workstation or other VMware virtual machine as a destination and click Next.
2 On the Options page, click Data to copy in the left pane.
3 In the Data copy type drop-down menu, select Linked clone.
4 Save your settings.
| Option | Description |
| Select another option from the options list | Saves your settings and displays the pane for the selected option. |
| Click Next | Saves your settings and displays the next page of the Conversion wizard. ■ The Customizations page is displayed if you select Customize guest preferences for the virtual machine in the Advanced options pane. ■ The Summary page is displayed if you do not select Customize guest preferences for the virtual machine in the Advanced options pane. |
You have set up a conversion task to create a linked clone.
Edit the Number of Processors
You can change the number of processors that the destination virtual machine uses.
Prerequisites
Make sure the destination host and the guest operating system support the number of processors you assign to the destination virtual machine.
On the Options page of the Conversion wizard, click Devices in the options list.
Procedure
1 From the Number of processors drop-down menu, select the processor count for the destination virtual machine.
2 Save your settings.
| Option | Description |
| Select another option from the options list | Saves your settings and displays the pane for the selected option. |
| Click Next | Saves your settings and displays the next page of the Conversion wizard. ■ The Customizations page is displayed if you select Customize guest preferences for the virtual machine in the Advanced options pane. ■ The Summary page is displayed if you do not select Customize guest preferences for the virtual machine in the Advanced options pane. |
The destination virtual machine is configured with the number of processors that you selected. If Converter Standalone shows a message that the destination hardware does not support the number of processors you selected, you must select a supported number of processors.
Allocate Memory for the Destination Virtual Machine
You can change the amount of memory allocated to the destination virtual machine.
By default, Converter Standalone recognizes the amount of memory on the source machine and allocates it to the destination virtual machine.
Prerequisites
On the Options page of the Conversion wizard, click Devices in the options list.
Procedure
1 In the Memory panel, use the slider or the spin-box to specify the amount of memory for the destination virtual machine.
2 Save your settings.
| Option | Description |
| Select another option from the options list | Saves your settings and displays the pane for the selected option. |
| Click Next | Saves your settings and displays the next page of the Conversion wizard. ■ The Customizations page is displayed if you select Customize guest preferences for the virtual machine in the Advanced options pane. ■ The Summary page is displayed if you do not select Customize guest preferences for the virtual machine in the Advanced options pane. |
Converter Standalone validates the memory amount. A warning appears if you set the memory amount to more than the maximum supported or to less than the required minimum.
Specify a Disk Controller for the Destination Virtual Machine
You can select a disk controller type for the destination virtual disks.
Prerequisites
On the Options page of the Conversion wizard, click Devices in the options list.
Procedure
1 From the Disk controller drop-down menu, select a disk controller for the destination virtual disk.
| Option | Description |
| SCSI Bus Logic | Use SCSI virtual disks in the destination virtual machine. |
| IDE | Use IDE virtual disks in the destination virtual machine. |
| LSI Logic | Use LSI Logic SCSI virtual disks in the destination virtual machine. |
| LSI Logic SAS | Use LSI Logic SCSI (SAS) virtual disks in the destination virtual machine. |
| Preserve source | Use the same types of disk controllers as those installed on the source machine. |
2 Save your settings.
| Option | Description |
| Select another option from the options list | Saves your settings and displays the pane for the selected option. |
| Click Next | Saves your settings and displays the next page of the Conversion wizard. ■ The Customizations page is displayed if you select Customize guest preferences for the virtual machine in the Advanced options pane. ■ The Summary page is displayed if you do not select Customize guest preferences for the virtual machine in the Advanced options pane. |
Configure the Network Settings of the Destination Virtual Machine
You can change the number of network adapters and select the network that the destination virtual machine uses. You can also set network adapters to connect to the network when the destination virtual machine powers on.
Note You cannot use IPv6 to customize the guest operating systems of virtual machines.
Prerequisites
On the Options page of the Conversion wizard, select Networks from the options list.
Procedure
1 From the Network adapters to connect drop-down menu, select the number of network adapters to be used by the destination virtual machine.
2 Use the Network drop-down menu to select the network that the adapter connects to.
3 To connect an adapter when you power on the destination virtual machine, select the Connect at power-on check box.
4 Save your settings.
| Option | Description |
| Select another option from the options list | Saves your settings and displays the pane for the selected option. |
| Click Next | Saves your settings and displays the next page of the Conversion wizard. ■ The Customizations page is displayed if you select Customize guest preferences for the virtual machine in the Advanced options pane. ■ The Summary page is displayed if you do not select Customize guest preferences for the virtual machine in the Advanced options pane. |
Configure the Network for the Helper Virtual Machine
When you convert a powered-on Linux machine, Converter Standalone creates a Helper virtual machine on the destination. The Helper virtual machine needs network access to the source machine to clone the source files. Default conversion settings enforce automatic acquisition of an IPv4 address and a DNS server for the Helper virtual machine, but you can set up this network connection manually.
Procedure
1 On the Options page of the Conversion wizard, click Helper VM network.
2 (Optional) To assign a static IPv4 address to the Helper virtual machine, select Use the following IP address and specify the IPv4 address, subnet mask, and default gateway.
Be sure that the IP address you specify for the Helper virtual machine is not already in use on the network.
3 (Optional) Select Use the following DNS server address and type the preferred DNS server address to configure the DNS server address manually.
Optionally, you can type an alternative DNS server address as well.
4 Save your settings.
| Option | Description |
| Select another option from the options list | Saves your settings and displays the pane for the selected option. |
| Click Next | Saves your settings and displays the next page of the Conversion wizard. ■ The Customizations page is displayed if you select Customize guest preferences for the virtual machine in the Advanced options pane. ■ The Summary page is displayed if you do not select Customize guest preferences for the virtual machine in the Advanced options pane. |
Converter Standalone uses the IP address and DNS server you specify to copy data from the source Linux machine to the Helper virtual machine during conversion.
Configure the Software on the Destination Virtual Machine
You can configure the guest operating system so that it is ready to operate in a virtual environment.
Software configuration includes a number of settings.
Customize the Windows Guest Operating System on page 63
You can customize guest operating systems running Windows XP or later so that the virtual machine is prepared to work immediately in the destination environment.
Install VMware Tools on the Destination Virtual Machine on page 66
Install VMware Tools to improve graphics performance of the guest operating system. Other enhancements include automatic grab and release of the mouse pointer, copying and pasting between guest and host, improved mouse performance, and so on.
Remove System Restore Checkpoints on page 67
When you convert source machines running Windows XP or later, you can remove all System Restore checkpoints so that the conversion process is faster.
Customize the Windows Guest Operating System
You can customize guest operating systems running Windows XP or later so that the virtual machine is prepared to work immediately in the destination environment.
Prerequisites
Save the Sysprep files to %ALLUSERSPROFILE%\Application Data\Vmware\Vmware vCenter Converter Standalone\sysprep on the machine that runs vCenter Converter server. For more details on the Sysprep files location for different operating systems, see Save Sysprep Files.
On the Options page of the Conversion wizard, click Advanced, select Customize guest preferences for the virtual machine, and click Next to view and adjust the available customization options.
- Customize the Identity of the Destination Virtual Machine on page 63
To configure the identity of the destination virtual machine for the destination network, personalize it by editing its name, owner, and organization name, and by generating a new security ID.
Enter the Windows License Information on page 64
Ensure that you enter licensing information for all destination virtual machines running guest operating systems as necessary.
Set the Time Zone for the Destination Virtual Machine on page 65
You can set the time zone if you are converting a virtual machine to use in a different time zone. - Configure the Network Adapters on page 65
You can configure the network settings of the virtual machine to work with the network configuration of the destination environment.
■ Assign a Workgroup or Domain Details on page 66
You can set up the workgroup and the domain in which the destination virtual machine belongs.
Customize the Identity of the Destination Virtual Machine
To configure the identity of the destination virtual machine for the destination network, personalize it by editing its name, owner, and organization name, and by generating a new security ID.
Prerequisites
On the Options page of the Conversion wizard, click Advanced, select Customize guest preferences for the virtual machine, and click Next to view and adjust the available customization options.
Procedure
1 On the Customizations page, select Computer information from the options list.
2 Customize the guest operating system identity.
a In the Computer Name text box, specify a computer name to identify the virtual machine on the network.
Valid characters include A-Z, a-z, 0-9, and the hyphen (-). The underscore (_ is nonstandard, but Converter Standalone permits it. The recommended length for most languages is 15 characters or less. Computer names cannot consist only of numerals.
b In the Owner Name text box, write the name of the owner of the virtual machine.
Valid characters include A-Z, a-z, 0-9, and the hyphen (-). The underscore (_ is nonstandard, but Converter Standalone permits it. The owner name cannot have more than 63 characters or consist only of numerals.
c In the Organization field, enter an organization name.
Valid characters include all printable characters. The limit is 63 characters.
3 (Optional) To create a new security identifier, select Generate New Security ID (SID).
By default, the security ID is selected for source systems that run Windows Vista or later and cannot be deselected.
The identifiers of the destination virtual machine are assigned according to your settings.
What to do next
You can select another option to set or click Next to view a summary of the conversion task. If the Next button is inactive, check the Current settings list for other settings that need your attention on this page.
Enter the Windows License Information
Ensure that you enter licensing information for all destination virtual machines running guest operating systems as necessary.
Prerequisites
On the Options page of the Conversion wizard, click Advanced, select Customize guest preferences for the virtual machine, and click Next to view and adjust the available customization options.
Procedure
1 On the Customizations page, select Windows license from the options list.
2 Type Product ID information for the destination virtual machine.
3 (Optional) Select Include server license information if the guest operating system is Windows Server 2003 or Windows Server 2008.
4 Select a Server license mode option.
| Option | Description |
| Per seat | For individual user licenses. |
| Per server | For a concurrent user license. Specify the Maximum connections value when you select this option. |
The Windows license information is saved to the destination virtual machine after the conversion.
What to do next
You can select another option to set or click Next to view a summary of the conversion task. If the Next button is inactive, check the Current settings list for other settings that need your attention on this page.
Set the Time Zone for the Destination Virtual Machine
You can set the time zone if you are converting a virtual machine to use in a different time zone.
Prerequisites
On the Options page of the Conversion wizard, click Advanced, select Customize guest preferences for the virtual machine, and click Next to view and adjust the available customization options.
Procedure
1 On the Customizations page, select Time zone from the options list.
2 Select the target time zone from the Time zone drop-down menu.
The time zone is set on the destination virtual machine after the conversion.
What to do next
You can select another option to set or click Next to view a summary of the conversion task. If the Next button is inactive, check the Current settings list for other settings that need your attention on this page.
Configure the Network Adapters
You can configure the network settings of the virtual machine to work with the network configuration of the destination environment.
The option for configuring network adapters is available for all supported destinations.
Note You cannot use IPv6 to customize the guest operating systems of virtual machines.
Prerequisites
On the Options page of the Conversion wizard, click Advanced, select Customize guest preferences for the virtual machine, and click Next to view and adjust the available customization options.
Procedure
1 On the Customizations page, select Network interface settings from the options list.
2 Select a network adapter and click Customize to configure its properties.
a On the General tab, type the IPv4 address and DNS server address.
b On the DNS tab, specify the DNS connections by entering DNS suffixes.
c Enter a DNS suffix and click Add.
You can add more than one DNS suffix.
d If you are specifying multiple DNS suffixes, use Move up and Move down to specify the order in which the guest operating system uses the connections.
e On the WINS tab, type the primary and secondary WINS IP address in the text box.
When powered on, the destination virtual machine uses the network settings that you configured.
What to do next
You can select another option to set or click Next to view a summary of the conversion task. If the Next button is inactive, check the Current settings list for other settings that need your attention on this page.
Assign a Workgroup or Domain Details
You can set up the workgroup and the domain in which the destination virtual machine belongs.
Prerequisites
On the Options page of the Conversion wizard, click Advanced, select Customize guest preferences for the virtual machine, and click Next to view and adjust the available customization options.
Procedure
1 On the Customizations page, select Workgroup/Domain from the options list.
2 Select how the virtual machine participates in the destination network.
| Option | Description |
| Workgroup | Valid characters include A-Z, a-z, 0-9, space, and the hyphen (-). Maximum length is 15 characters. |
| Windows server domain | The text box must have a value. Valid characters include A-Z, a-z, 0-9, space, period, and hyphen (-). The entire text string can be up to 64 characters. User credentials are required. |
The destination virtual machine connects to the specified workgroup and domain server.
What to do next
You can select another option to set or click Next to view a summary of the conversion task. If the Next button is inactive, check the Current settings list for other settings that need your attention on this page.
Install VMware Tools on the Destination Virtual Machine
Install VMware Tools to improve graphics performance of the guest operating system. Other enhancements include automatic grab and release of the mouse pointer, copying and pasting between guest and host, improved mouse performance, and so on.
Prerequisites
On the Options page of the Conversion wizard, click Advanced options.
Procedure
1 Select the Install VMware Tools on the destination virtual machine check box.
2 Save your settings.
| Option | Description |
| Select another option from the options list | Saves your settings and displays the pane for the selected option. |
| Click Next | Saves your settings and displays the next page of the Conversion wizard. ■ The Customizations page is displayed if you select Customize guest preferences for the virtual machine in the Advanced options pane. ■ The Summary page is displayed if you do not select Customize guest preferences for the virtual machine in the Advanced options pane. |
Converter Standalone installs VMware Tools on the destination machine when the destination machine is powered on for the first time after the conversion.
Remove System Restore Checkpoints
When you convert source machines running Windows XP or later, you can remove all System Restore checkpoints so that the conversion process is faster.
System Restore is enabled on Windows Vista and Windows XP systems by default. For Windows Vista, if you are performing volume-based file-level cloning, System Restore checkpoints are automatically removed from the destination virtual machine, regardless of whether the Remove System Restore checkpoints on destination check box is selected or deselected. If you are performing disk-based cloning or volume-based block-level cloning, deselecting the check box instructs Converter Standalone to keep the System Restore check points in the destination virtual machine.
Removing all System Restore checkpoints prevents the target machine from reverting to a preconversion state. Restoring a checkpoint in the target virtual machine that was created before you cloned the source machine can damage the system and prevent the destination virtual machine from starting up.
Prerequisites
On the Options page of the Conversion wizard, click Advanced options.
Procedure
1 Select the Remove System Restore checkpoints on destination check box.
2 Save your settings.
| Option | Description |
| Select another option from the options list | Saves your settings and displays the pane for the selected option. |
| Click Next | Saves your settings and displays the next page of the Conversion wizard. ■ The Customizations page is displayed if you select Customize guest preferences for the virtual machine in the Advanced options pane. ■ The Summary page is displayed if you do not select Customize guest preferences for the virtual machine in the Advanced options pane. |
Configure the Conversion Task
You can configure the conversion process and select the behavior of the source and destination machine during and after conversion. You can change the status of the source and destination services only when the source machine is running a Windows operating system.
Set the Startup Mode for Destination Services on page 68
To minimize downtime for a Windows service, you can select the service and have it start automatically on the destination virtual machine. You can also prevent Windows services from automatically starting on the destination machine.
- Stop Services Running on the Source Machine on page 69
You can make sure that you do not lose data from services running on the source machine. You can select the services that you want to stop before Converter Standalone synchronizes the data between the source and destination machine. As a result, the services do not generate data while source and destination machines are synchronized.
Synchronize the Destination Machine with Changes Made to the Source Machine on page 70
When you convert a powered-on Windows machine, Converter Standalone copies data from the source machine to the destination machine while the source machine is still running and generating changes. This process is the first transfer of data. You can transfer data for the second time by copying only the changes made during the first transfer of data. This process is called synchronization.
Power Off the Source Machine After Conversion on page 71
If your source machine is running services that you want to start on the destination virtual machine after conversion, you can power off the source machine to avoid interference between source and destination services.
Power On the Destination Virtual Machine After Conversion on page 71
You can minimize the downtime of important services by powering on the destination virtual machine immediately after the conversion is complete.
- Limit the Amount of Resources Used by the Conversion Task on page 72
A conversion task competes for computing resources with other processes. To limit the impact of the conversion task on other workloads, you can throttle the task. If you do not throttle conversion tasks, they are carried out with normal priority and depending on the available computing resources during conversion.
Uninstall Converter Standalone Agent from the Source Machine on page 72
When setting up a conversion task for a powered-on Windows source or a Hyper-V Server virtual machine, you can choose how you want to remove the Converter Standalone agent from the source after the conversion. By default, the Converter Standalone agent is uninstalled automatically, but you can choose to uninstall it manually.
Set the Startup Mode for Destination Services
To minimize downtime for a Windows service, you can select the service and have it start automatically on the destination virtual machine. You can also prevent Windows services from automatically starting on the destination machine.
You can change the settings for the destination services only when you convert source machines that run Windows.
Prerequisites
On the Options page of the Conversion wizard, click Services in the options list.
Procedure
1 If you are converting a powered-on source machine, click the Destination services tab.
If the source machine is poweredoff, the Services pane displays no tabs. You can modify only the starting mode of destination services.
2 On the services list, select the startup mode for each service.
| Option | Description |
| Automatic | The service starts automatically after the destination machine is powered on. |
| Manual | The service does not start after the destination machine is powered on, but you can start it manually. |
| Disabled | The service is disabled and does not start after the destination machine is powered on. |
3 Save your settings.
| Option | Description |
| Select another option from the options list | Saves your settings and displays the pane for the selected option. |
| Click Next | Saves your settings and displays the next page of the Conversion wizard. ■ The Customizations page is displayed if you select Customize guest preferences for the virtual machine in the Advanced options pane. ■ The Summary page is displayed if you do not select Customize guest preferences for the virtual machine in the Advanced options pane. |
Stop Services Running on the Source Machine
You can make sure that you do not lose data from services running on the source machine. You can select the services that you want to stop before Converter Standalone synchronizes the data between the source and destination machine. As a result, the services do not generate data while source and destination machines are synchronized.
You can stop services on the source only when you convert a powered-on Windows machine.
Prerequisites
On the Options page of the Conversion wizard, click Services in the options list.
Procedure
1 Click the Source services tab.
2 To stop a service on the source machine before synchronization, highlight a service and select the Stop check box to the right.
3 Save your settings.
| Option | Description |
| Select another option from the options list | Saves your settings and displays the pane for the selected option. |
| Click Next | Saves your settings and displays the next page of the Conversion wizard. ■ The Customizations page is displayed if you select Customize guest preferences for the virtual machine in the Advanced options pane. ■ The Summary page is displayed if you do not select Customize guest preferences for the virtual machine in the Advanced options pane. |
Converter Standalone stops the selected source services before it synchronizes the destination machine with the source machine.
Synchronize the Destination Machine with Changes Made to the Source Machine
When you convert a powered-on Windows machine, Converter Standalone copies data from the source machine to the destination machine while the source machine is still running and generating changes. This process is the first transfer of data. You can transfer data for the second time by copying only the changes made during the first transfer of data. This process is called synchronization.
Synchronization is available only for Windows XP or later source operating systems.
If you resize FAT volumes or shrink NTFS volumes, you cannot use the synchronization option.
Prerequisites
Stop various source services to make sure they do not generate additional changes during the synchronization, as that might lead to data loss.
On the Options page of the Conversion wizard, click Advanced options.
Procedure
1 Select Synchronize changes that occur to the source during cloning.
2 Save your settings.
| Option | Description |
| Select another option from the options list | Saves your settings and displays the pane for the selected option. |
| Click Next | Saves your settings and displays the next page of the Conversion wizard. ■ The Customizations page is displayed if you select Customize guest preferences for the virtual machine in the Advanced options pane. ■ The Summary page is displayed if you do not select Customize guest preferences for the virtual machine in the Advanced options pane. |
Converter Standalone synchronizes the destination machine with the source machine after the conversion is complete.
Power Off the Source Machine After Conversion
If your source machine is running services that you want to start on the destination virtual machine after conversion, you can power off the source machine to avoid interference between source and destination services.
Prerequisites
On the Options page of the Conversion wizard, click Advanced options.
Procedure
1 In the Post-conversion power state panel, select Power off source machine.
2 Save your settings.
| Option | Description |
| Select another option from the options list | Saves your settings and displays the pane for the selected option. |
| Click Next | Saves your settings and displays the next page of the Conversion wizard. ■ The Customizations page is displayed if you select Customize guest preferences for the virtual machine in the Advanced options pane. ■ The Summary page is displayed if you do not select Customize guest preferences for the virtual machine in the Advanced options pane. |
Converter Standalone powers off the source machine after the conversion is complete.
Power On the Destination Virtual Machine After Conversion
You can minimize the downtime of important services by powering on the destination virtual machine immediately after the conversion is complete.
Prerequisites
On the Options page of the Conversion wizard, click Advanced options.
Procedure
1 In the Post-conversion power state panel, select Power on destination machine.
2 Save your settings.
| Option | Description |
| Select another option from the options list | Saves your settings and displays the pane for the selected option. |
| Click Next | Saves your settings and displays the next page of the Conversion wizard. ■ The Customizations page is displayed if you select Customize guest preferences for the virtual machine in the Advanced options pane. ■ The Summary page is displayed if you do not select Customize guest preferences for the virtual machine in the Advanced options pane. |
After the conversion, Converter Standalone powers on the destination machine.
Limit the Amount of Resources Used by the Conversion Task
A conversion task competes for computing resources with other processes. To limit the impact of the conversion task on other workloads, you can throttle the task. If you do not throttle conversion tasks, they are carried out with normal priority and depending on the available computing resources during conversion.
A powered-on source machine runs its own conversion task. You can limit the impact of the conversion task on other workloads running on the powered-on machine.
For source machines that are not powered-on, you can limit the resources used on the machine where Converter Standalone server is installed.
Throttling controls the CPU and network resources that the conversion process uses. You cannot throttle disk I/O from the Converter Standalone interface, but can throttle it indirectly by throttling the network bandwidth.
Note You cannot throttle conversion tasks for powered-on source machines that run Linux.
Procedure
1 On the Options page, select Throttling from the options list.
2 From the CPU throttling drop-down menu, select the priority of the conversion task.
| Option | Description |
| None | The priority of the current conversion task is set to normal. |
| Light | The priority of the current conversion task is reduced slightly below normal. |
| Medium | The priority of the current conversion task is set to lowest. |
NOTE Converter Standalone reduces the thread priorities of conversion tasks to control the CPU resources they consume.
3 (Optional) Select Network bandwidth throttling and specify the maximum network bandwidth at which Converter Standalone performs the conversion task.
4 Save your settings.
| Option | Description |
| Select another option from the options list | Saves your settings and displays the pane for the selected option. |
| Click Next | Saves your settings and displays the next page of the Conversion wizard. ■ The Customizations page is displayed if you select Customize guest preferences for the virtual machine in the Advanced options pane. ■ The Summary page is displayed if you do not select Customize guest preferences for the virtual machine in the Advanced options pane. |
Uninstall Converter Standalone Agent from the Source Machine
When setting up a conversion task for a powered-on Windows source or a Hyper-V Server virtual machine, you can choose how you want to remove the Converter Standalone agent from the source after the conversion. By default, the Converter Standalone agent is uninstalled automatically, but you can choose to uninstall it manually.
Use Add or Remove Programs on the source machine to uninstall the Converter Standalone agent.
Procedure
1 In Windows, run the Add or Remove Programs utility.
2 In the list of installed programs, locate and click VMware vCenter Converter Standalone Agent.
3 Click Remove.
4 In the confirmation dialog box, click Yes.
Windows installer uninstalls the Converter Standalone agent from the source machine.
Review the Summary and Submit the Conversion Task
On the Summary page, you can view a summary of the conversion task before you add it to the task list.
The summary includes information about the source machine, the destination virtual machine, and destination customization settings (if any). Converter Standalone performs task validation at this stage.
Prerequisites
You must complete all steps in the Conversion wizard to access the Summary page.
Procedure
1 Review the summary of the task.
2 Click Finish to submit the task.
Converter Standalone validates the task parameters. This might take several minutes. If the validation succeeds, the conversion task appears in the Tasks list in the main application window. If the validation fails, click Back and correct the invalid parameters as prompted.
You might need to configure a virtual machine after you convert it so that it is ready to start in the destination virtual environment. You might also need to configure virtual machines if their virtual environment changes or if you need to improve their performance.
Note Only virtual machines that are running Windows XP or later can be configured. You cannot configure virtual machines that run operating systems other than Windows.
Unlike the conversion process, which is nondestructive to the source machine, the configuration process affects the source. When you create a configuration task, your settings are applied to the configuration source machine and you cannot revert them.
Procedure
1 Save Sysprep Files on page 75
To customize the guest operating system of a virtual machine that runs Windows Server 2003 or Windows XP, you must save the Sysprep files to the specified locations on the machine where Converter Standalone server runs.
2 Start the Configuration Wizard on page 76
You can configure VMware desktop virtual machines or virtual machines managed by ESX hosts or vCenter Server.
3 Select a Source Machine to Configure on page 76
You can select a powered-off VMware virtual machine as the source for a configuration task.
4 Select the Options to Configure on page 79
When you create a configuration task, you can select which steps of the configuration process to run.
5 Review and Submit the Configuration Task on page 83
After you review your settings on the Summary page of the Configuration wizard, you can go back and change a setting or submit the task.
Save Sysprep Files
To customize the guest operating system of a virtual machine that runs Windows Server 2003 or Windows XP, you must save the Sysprep files to the specified locations on the machine where Converter Standalone server runs.
Prerequisites
You must download the Sysprep files that correspond to the operating system of the source machine.
Procedure
Save the Sysprep files that correspond to the source operating system to the specified location on the machine where Converter Standalone server runs.
| Option | Description |
| Windows Server 2003 (32bit) | The Sysprep files Location for Windows: %ALLUSERSPROFILE %\Application Data\VMware\VMware vCenter Converter Standalone\sysprep\svr2003 |
| Windows Server 2003 (64bit) | The Sysprep files Location for Windows: %ALLUSERSPROFILE %\Application Data\VMware\VMware vCenter Converter Standalone\sysprep\svr2003-64 |
| Windows XP (32bit) | The Sysprep files Location for Windows: %ALLUSERSPROFILE %\Application Data\VMware\VMware vCenter Converter Standalone\sysprep\xp |
| Windows XP (64bit) | The Sysprep files Location for Windows: %ALLUSERSPROFILE %\Application Data\VMware\VMware vCenter Converter Standalone\sysprep\xp-64 |
You can now customize Windows Server 2003 (32bit and 64bit) and Windows XP (32bit and 64bit) guest operating systems by using the Conversion or the Configuration wizard.
What to do next
You can now use the Configuration wizard to customize Windows guest operating systems.
Start the Configuration Wizard
You can configure VMware desktop virtual machines or virtual machines managed by ESX hosts or vCenter Server.
A physical machine cannot be a configuration source.
You can configure only powered-off virtual machines.
Procedure
1 Start the VMware vCenter Converter Standalone application.
2 Click Configure Machine in the application menu.
The Configuration wizard opens.
What to do next
Select the source machine to configure.
Select a Source Machine to Configure
You can select a powered-off VMware virtual machine as the source for a configuration task.
Prerequisites
On the Source System page of the Configuration wizard, select a source type from the drop-down menu.
What to do next
On the Options page of the Configuration wizard, you can select the required configuration options.
Select a VMware Infrastructure Virtual Machine to Configure
If the system you want to configure is a virtual machine that runs on an ESX host or on an ESX host managed by vCenter Server, you must select a VMware Infrastructure virtual machine as the source type.
Prerequisites
Power off the source machine before the configuration.
In the main application window of Converter Standalone, click Configure Machine to open the Configuration wizard.
Procedure
1 On the Source System page of the Configuration wizard, select VMware Infrastructure virtual machine from the Select source type drop-down menu.
2 Provide the IP address or host name and credentials for authentication with the ESX host or the vCenter Server, and click Next.
The Source Machine page appears, displaying the host name or IP address and the inventory of the ESX host or the vCenter Server.
What to do next
On the Source Machine page of the Configuration wizard you can browse the virtual infrastructure inventory and select the virtual machine to configure.
Specify the vCenter Server Virtual Machine to Configure
If you choose to configure a virtual machine managed by a vCenter Server or ESX host, you must browse the inventory to locate the source virtual machine.
Prerequisites
On the Source System page of the Configuration wizard, select VMware Infrastructure virtual machine as the configuration source and click Next to proceed to the Source Machine page.
Procedure
1 (Optional) If you are connected to a vCenter Server, select a virtual machine view from the Specify machine with drop-down menu.
| Option | Description |
| Hosts and Clusters | The Incentroy tree pane provides a view of hosts, clusters, resource pools, and vApps. If you select a host managed by a cluster, you see the full list of virtual machines and templates in the VM list view. If you select a standalone host or a cluster, you see only the virtual machines that are not deployed in the resource pools of that host or cluster. |
| VMs and Templates | The Inventory tree pane provides a view of datacenters and VM folders. |
2 (Optional) If you are connected to a vCenter Server, select an object from the Inventory tree pane.
| Option | Description |
| Hosts and Clusters | Select cluster, ESX host, resource pool, or vApp. |
| VMs and Templates | Select datacenter or VM folder. |
3 From the virtual machines list, select the virtual machine you want to configure.
You can search for virtual machines in the VM list by typing one or more letters of their names in the Search for name with text box. You can clear your search by clicking Clear.
NOTE If you connect to a vCenter Server that has a disconnected ESX instance (powered off, connected to another vCenter Server, or in maintenance mode), you cannot select a virtual machine from that ESX host.
4 (Optional) To refresh the Inventory, click Refresh.
5 (Optional) To view more details about a machine, select it and click View source details.
6 Click Next to proceed to the Options page.
What to do next
On the Options page of the Configuration wizard, you can select the required configuration options.
Select a VMware Desktop Virtual Machine to Configure
If the system you want to configure is a standalone VMware virtual machine created with VMware Workstation, VMware Fusion, VMware Player, VMware Server, or VMware ACE, you must select VMware Workstation or other VMware virtual machine as the configuration source type.
Prerequisites
If you plan to use a network path to locate the source, verify that the machine where Converter Standalone server runs has access to that network path.
In the main application window of Converter Standalone, click Configure Machine to open the Configuration wizard.
Procedure
1 On the Source System page of the Configuration wizard, select VMware Workstation or other VMware virtual machine.
2 Locate the virtual machine source.
If you are connected to a remote Converter Standalone server, provide a network path to the source virtual machine file (.vmx) in the Virtual machine file text box. For example, \server\virtual Machines\virtual-machine.vmx.
If you are connected to a local Converter Standalone server, provide a network path or a local path to the .vmx file.
The file type choices are limited to VMware Workstation *.vmx files.
3 If you are connected to a remote Converter Standalone server, enter user credentials for accessing the source virtual machine.
You do not have to provide user credentials if you are connected to a local Converter Standalone server. In such cases, Converter Standalone uses the Windows credentials to connect to the source machine.
4 (Optional) To view more information about the selected source, click View source details
5 Click Next to proceed to the Options page.
What to do next
On the Options page of the Configuration wizard, you can select the required configuration options.
Select the Options to Configure
When you create a configuration task, you can select which steps of the configuration process to run.
Procedure
On the Options page, select one or more configuration steps to perform and click Next.
| Option | Description |
| Install VMware Tools on the destination virtual machine | Installs VMware Tools to enhance the performance of the destination virtual machine. |
| Customize guest preferences for the virtual machine | Allows you to customize Windows XP or later guest operating systems so that the virtual machine is prepared to work in the destination environment. |
| Remove System Restore checkpoints on destination | Removes System Restore checkpoints from the destination virtual machine. |
| Reconfigure destination virtual machine | Updates the drivers on the virtual machine so that it is bootable in a virtual environment. |
What to do next
Depending on the configuration options you selected, you can either customize the guest operating system of the source virtual machine or view the Summary page of the Configuration wizard.
Install VMware Tools on a Virtual Machine
Install VMware Tools to improve graphics performance for the guest operating system of a configured virtual machine. Other enhancements include automatic grab and release of the mouse pointer, copying and pasting between guest and host, improved mouse performance, and so on.
Install VMware Tools on the virtual machine you are configuring.
Procedure
On the Options page of the Configuration wizard, select Install VMware Tools on the destination virtual machine and click Next.
vCenter Converter Standalone installs VMware Tools on the configured virtual machine.
What to do next
Depending on the configuration options you selected, you can either customize the guest operating system or view the Summary page of the Configuration wizard.
Customize the Windows Guest Operating System
As a part of the configuration task, you can customize virtual machines running Windows XP or later.
Prerequisites
Save the Sysprep files to %ALLUSERSPROFILE%\Application Data\VMware\VMware vCenter Converter Standalone\sysprep on the machine that runs vCenter Converter server. For more details on the Sysprep files location for different operating systems, see Save Sysprep Files.
On the Options page of the Configuration wizard, select Customize guest preferences for the virtual machine and click Next to view and adjust the available customization options.
Customize the Identity of a Virtual Machine on page 80
To configure the identity of a virtual machine on a virtual network, personalize the virtual machine by editing its name, owner, and organization name, and by generating a new security ID.
Specify the Windows License Information on page 81
Ensure that you enter licensing information for all destination virtual machines running guest operating systems as necessary.
Set the Time Zone on page 81
You can configure the time zone for a virtual machine.
- Configure the Network Adapters on page 81
You can change the network settings of a virtual machine to work with the network configuration of the virtual environment.
■ Assign a Workgroup or Domain Details on page 82
You can configure the workgroup and the domain for a virtual machine.
Customize the Identity of a Virtual Machine
To configure the identity of a virtual machine on a virtual network, personalize the virtual machine by editing its name, owner, and organization name, and by generating a new security ID.
Prerequisites
On the Options page of the Configuration wizard, select Customize guest preferences for the virtual machine and click Next to view and adjust the available customization options.
Procedure
1 On the Customizations page, select Computer information from the options list.
2 Customize the guest operating system identity.
a In the Computer Name text box, specify a computer name to identify the virtual machine on the network.
Valid characters include A-Z, a-z, 0-9, and the hyphen (-). The underscore (_) is nonstandard, but Converter Standalone permits it. The recommended length for most languages is 15 characters or less. Computer names cannot consist only of numerals.
b In the Owner Name text box, write the name of the owner of the virtual machine.
Valid characters include A-Z, a-z, 0-9, and the hyphen (-). The underscore (_ is nonstandard, but Converter Standalone permits it. The owner name cannot have more than 63 characters or consist only of numerals.
c In the Organization field, enter an organization name.
Valid characters include all printable characters. The limit is 63 characters.
3 (Optional) To create a new security identifier, select Generate New Security ID (SID).
By default, the security ID is selected for source systems that run Windows Vista or later and cannot be deselected.
The identifiers of the configured virtual machine are assigned according to your settings.
What to do next
You can select another option to set or click Next to view a summary of the configuration task. If the Next button is inactive, check the Current settings list for other settings that need your attention on this page.
Specify the Windows License Information
Ensure that you enter licensing information for all destination virtual machines running guest operating systems as necessary.
Prerequisites
On the Options page of the Configuration wizard, select Customize guest preferences for the virtual machine and click Next to view and adjust the available customization options.
Procedure
1 On the Customizations page, select Windows license from the options list.
2 Type Product ID information for the destination virtual machine.
3 (Optional) Select Include server license information if the guest operating system is Windows Server 2003 or Windows Server 2008.
4 Select a Server license mode option.
| Option | Description |
| Per seat | For individual user licenses. |
| Per server | For a concurrent user license. Specify the Maximum connections value when you select this option. |
The Windows license information is saved to the configuration source machine when the configuration task is completed.
What to do next
You can select another option to set or click Next to view a summary of the configuration task. If the Next button is inactive, check the Current settings list for other settings that need your attention on this page.
Set the Time Zone
You can configure the time zone for a virtual machine.
Prerequisites
On the Options page of the Configuration wizard, select Customize guest preferences for the virtual machine and click Next to view and adjust the available customization options.
Procedure
1 On the Customizations page, select Time zone from the options list.
2 Select the target time zone from the Time zone drop-down menu.
The time zone is set on the source machine when the configuration task completes.
What to do next
You can select another option to set or click Next to view a summary of the configuration task. If the Next button is inactive, check the Current settings list for other settings that need your attention on this page.
Configure the Network Adapters
You can change the network settings of a virtual machine to work with the network configuration of the virtual environment.
The options for configuring network adapters are available for all supported customization sources.
Prerequisites
On the Options page of the Configuration wizard, select Customize guest preferences for the virtual machine and click Next to view and adjust the available customization options.
Procedure
1 On the Customizations page, select Network interface settings from the options list.
2 Select a network adapter and click Customize to configure its properties.
a On the General tab, type the IPv4 address and DNS server address.
b On the DNS tab, specify the DNS connections by entering DNS suffixes.
c Enter a DNS suffix and click Add.
You can add more than one DNS suffix.
d If you are specifying multiple DNS suffixes, use Move up and Move down to specify the order in which the guest operating system uses the connections.
e On the WINS tab, type the primary and secondary WINS IP address in the text box.
When powered on, the configured virtual machine uses the network settings that you specified.
What to do next
You can select another option to set or click Next to view a summary of the configuration task. If the Next button is inactive, check the Current settings list for other settings that need your attention on this page.
Assign a Workgroup or Domain Details
You can configure the workgroup and the domain for a virtual machine.
Prerequisites
On the Options page of the Configuration wizard, select Customize guest preferences for the virtual machine and click Next to view and adjust the available customization options.
Procedure
1 On the Customizations page, select Workgroup/Domain from the options list.
2 Select how the virtual machine participates in the destination network.
| Option | Description |
| Workgroup | Valid characters include A-Z, a-z, 0-9, space, and the hyphen (-). Maximum length is 15 characters. |
| Windows server domain | The text box must have a value. Valid characters include A-Z, a-z, 0-9, space, period, and hyphen (-). The entire text string can be up to 64 characters. User credentials are required. |
The configured virtual machine connects to the specified workgroup and domain server.
What to do next
You can select another option to set or click Next to view a summary of the configuration task. If the Next button is inactive, check the Current settings list for other settings that need your attention on this page.
Remove System Restore Checkpoints
Remove the System Restore checkpoints of newly imported source machines to prevent them from reverting to a preconversion state. For other configuration source machines, removing System Restore checkpoints helps you save disk space by deleting unnecessary data.
Procedure
On the Options page of the Configuration wizard, select Remove System Restore checkpoints on the destination and click Next.
The System Restore checkpoints are deleted from the configuration source machine.
What to do next
Depending on the configuration options you selected, you can either customize the guest operating system or view the Summary page of the Configuration wizard.
Update the Device Drivers of a Virtual Machine
If a newly converted virtual machine does not start properly in the destination virtual environment, try configuring it to update its device drivers.
Procedure
On the Options page of the Configuration wizard, select Reconfigure destination virtual machine and click Next.
Converter Standalone updates the device drivers on the source machine so it can work in the virtual environment.
What to do next
Depending on the configuration options you selected, you can either customize the guest operating system or view the Summary page of the Configuration wizard.
Review and Submit the Configuration Task
After you review your settings on the Summary page of the Configuration wizard, you can go back and change a setting or submit the task.
Procedure
1 Review the summary of the settings for the source virtual machine.
2 Click Finish to submit the configuration task.
The task appears in the tasks list of the main application window. You can view the progress on the Task progress tab.
What to do next
To view details about the configuration task, click the Summary tab.
Managing Conversion and Configuration Tasks
Converter Standalone provides a task manager for managing migrations and configurations for a single conversion.
After you create a task using the Converter Standalone wizards to set up how to convert or configure a machine, you can use the Task View of the Converter Standalone manager to manage running tasks, to edit the tasks, to check the progress of a task, and more.
Manage Tasks in the Task List
Converter Standalone provides a list of all tasks that are submitted. You can use the main application menus to control the way tasks appear in the task list.
Prerequisites
You must submit a conversion or configuration task to view it in the task list.
Add a Task to the Task List on page 86
Converter Standalone runs concurrent conversion tasks and configuration tasks as they appear in the task list, depending on the maximum number of tasks that is set in Administration menu > Maximum concurrent tasks.
Control the Number of Tasks Running Concurrently on page 86
You can set the number of tasks that can run concurrently to improve the conversion speed. Limiting the number of concurrent tasks helps you reduce the network resources required for the conversion tasks. Limiting the number of concurrent tasks also helps to limit the CPU load on the machine where the Converter Standalone server runs.
Copy, Cancel, or Delete Tasks on page 86
In the Converter Standalone task list, you can copy, cancel, and delete tasks.
Check the Task Progress and the Log Files on page 88
The Task list and the Task Details pane show the progress of tasks.
Filter the Tasks in the Task List on page 89
The number of archived tasks can grow to be very large. To minimize clutter in the task list, you can lower the number of tasks that appear. You can select the tasks that you want the task list to display by filtering them.
Add a Task to the Task List
Converter Standalone runs concurrent conversion tasks and configuration tasks as they appear in the task list, depending on the maximum number of tasks that is set in Administration menu > Maximum concurrent tasks.
Procedure
On the Summary page of the Conversion or the Configuration wizard, make sure no settings need adjustment, and click Finish to add a conversion or configuration task.
The task appears at the beginning of the task list.
What to do next
In the task list, you can view the progress, expected end time, and other details of the task. You can also stop running tasks and copy running, failed, or complete tasks to create tasks.
Control the Number of Tasks Running Concurrently
You can set the number of tasks that can run concurrently to improve the conversion speed. Limiting the number of concurrent tasks helps you reduce the network resources required for the conversion tasks. Limiting the number of concurrent tasks also helps to limit the CPU load on the machine where the Converter Standalone server runs.
You can set the number of concurrent tasks to any number from 1 to 12. The default number of concurrent tasks is set to Maximum.
Procedure
1 On the main menu, select Administration > Maximum Concurrent Tasks.
2 In the Custom spin-box, specify a number.
3 Click OK.
The setting takes effect immediately for all newly added tasks. See "Example: Limiting the Number of Concurrent Tasks," on page 86.
Example: Limiting the Number of Concurrent Tasks
Assume that Converter Standalone is running 12 tasks. If you change the number of concurrent tasks to 6, these 12 tasks continue running, but all newly added tasks remain pending in the task list.
When the number of running tasks drops to 5, a new task from the wait list starts.
Copy, Cancel, or Delete Tasks
In the Converter Standalone task list, you can copy, cancel, and delete tasks.
While tasks are running, you can continue to add new tasks to the queue by using the Conversion or the Configuration wizards. In the tasks list, you can cancel, delete, or copy tasks.
Create a Task by Copying an Existing Task on page 87
You can edit a task in the task list by creating a copy of the task and modifying its settings in the Conversion or the Configuration wizards. The settings for the original task appear at each step of the wizard so that you can reuse or change them.
Cancel a Task on page 87
You can cancel a task in the queue or a task that is in progress.
Delete a Task on page 87
The Delete option removes a task from the task list.
Create a Task by Copying an Existing Task
You can edit a task in the task list by creating a copy of the task and modifying its settings in the Conversion or the Configuration wizards. The settings for the original task appear at each step of the wizard so that you can reuse or change them.
NOTE You can copy only tasks that were created with the Converter Standalone client.
Note You cannot copy running conversion tasks for powered-on source machines.
Procedure
1 Select a task in the task list.
2 Select Task > Copy As New.
3 Follow the prompts to modify the task settings.
4 Click Finish to add the new task to the task list.
Cancel a Task
You can cancel a task in the queue or a task that is in progress.
When you cancel a conversion task, the task is removed from the queue. Canceling a configuration task removes it from the queue and reverts the source machine to its original state.
Canceling a task in progress does not suspend it. You cannot restart a canceled task. However, you can create a copy of the canceled task and add it to the task list to run it again.
Procedure
1 From the task list of the Task view, select a task.
2 Click Cancel.
The task is now out of the queue and the time of cancellation appears in the End Time column.
Delete a Task
The Delete option removes a task from the task list.
The Delete option does not work for queued tasks or tasks in progress.
Prerequisites
To delete a running task, cancel it and perform the following procedure.
Procedure
1 From the task list of the Task view, select the task that you want to remove.
2 Click Delete.
The task is removed from the task list.
Check the Task Progress and the Log Files
The Task list and the Task Details pane show the progress of tasks.
If problems arise that cause the task to fail, you can also review information in the log files.
View Task Progress on page 88
The Task view and the Details view show the progress of tasks. You can check the estimated time left to the completion of a conversion task in the End Time column.
Export the Log Files for a Task on page 88
If problems arise that cause a task to fail, you can review information about the task in the log files or send a copy of log files to VMware technical support. You can export the log files for a specific task in the task list.
Export All Log Files on page 89
You can export the log files of all tasks that are present to the current server log files.
Back-End and Client Log Files Locations on page 89
Converter Standalone saves log files as it operates.
View Task Progress
The Task view and the Details view show the progress of tasks. You can check the estimated time left to the completion of a conversion task in the End Time column.
You can obtain a general indication of a task's progress by looking at its row in the task list of the Task view. View the Task progress tab in the Details view for more complete information.
Procedure
1 Select the row in the task list for the task to view.
The information for that task appears in the Details pane below the tasks list.
2 Click the Task progress tab to view the conversion status and log highlights.
Export the Log Files for a Task
If problems arise that cause a task to fail, you can review information about the task in the log files or send a copy of log files to VMware technical support. You can export the log files for a specific task in the task list.
Procedure
1 Select the task in the task list.
2 In the Details pane, click the Task Progress tab.
3 Click Export Logs.
4 Select a location to which you want to save the files and click Save.
The log files for this task are saved to the selected location.
NOTE Windows Explorer does not allow you to view the logs if you are logged in with restricted (nonadministrator) user credentials. To avoid this situation, save the log files in a public folder.
Export All Log Files
You can export the log files of all tasks that are present to the current server log files.
Procedure
1 Select File > Export Logs.
2 Select a location to which you want to save the files, and click Save.
All current server log files are saved to the selected directory.
3 Open the log files with a text editor.
Back-End and Client Log Files Locations
Converter Standalone saves log files as it operates.
Table 6-1 lists the default locations where log files are saved. You can view the log files or send them to VMware support, if necessary.
These file locations are also the file locations on the remote machine if you are running a remote hot clone. To send these log files from a remote machine to VMware support, you must manually compress and send them.
Table 6-1. Log Files Locations
| Log Files | File Path |
| Converter Standalone server and agent log files | %ALLUSERSPROFILE%\Application Data\VMware\VMware vCenter Converter Standalone\logs* |
| Converter Standalone client log files | %USERPROFILE%\Local Settings\Application Data\VMware\VMware vCenter Converter Standalone\Logs* |
Filter the Tasks in the Task List
The number of archived tasks can grow to be very large. To minimize clutter in the task list, you can lower the number of tasks that appear. You can select the tasks that you want the task list to display by filtering them.
You can filter tasks by history, status, or multiple criteria.
Filter Tasks by History on page 89
You can use the date on which a task is submitted to filter the task list.
Filter Tasks by Status on page 90
You can change which tasks appear in the task list based on their running status.
Filter Tasks by Multiple Criteria on page 90
You can combine filtering criteria to filter tasks in the task list. Tasks that are currently running are displayed regardless of the filtering criteria you apply.
Filter Tasks by History
You can use the date on which a task is submitted to filter the task list.
This option does not affect tasks in progress. Tasks in progress always appear in the task list.
Procedure
On the main menu, click View > History Filter and select a level of filtering.
Only tasks that correspond to the selected filtering level remain in the task list.
Filter Tasks by Status
You can change which tasks appear in the task list based on their running status.
Procedure
1 On the main menu, select View > Filter by.
2 Select a level of display from the drop-down menu.
If you are connected to a remote Converter Standalone server, you can select My own to view only tasks that you create.
Filter Tasks by Multiple Criteria
You can combine filtering criteria to filter tasks in the task list. Tasks that are currently running are displayed regardless of the filtering criteria you apply.
Procedure
Use the drop-down menus in the toolbar to select the status and history criteria.
The two filtering conditions combine to show only tasks that comply with both conditions.
If you select Failed and Past week filters, the resulting task list contains their combined output:
All tasks with failed status that were active within the last 24 hours
All tasks with failed status that were completed in the past 7 days
Index
A
Acronis True Image, source 23
add a disk 53, 54
adding tasks 86
advanced customization
guest operating system 63
installing VMware Tools 66
removing system restore checkpoints 67
synchronizing source and destination 70
agent 10
allocate memory 60
audience 7
C
changing the number of tasks displayed 89, 90
client 10
cloning
cold, defined 11
disk based 16
disk-based cloning 17
full clones 17
hot, defined 11
linked clones 17
volume based 16
volume-based cloning 16
cloning modes 16
cold cloning
boot CD 15
defined 11
command-line commands 36
components 10
configuration options 79
configuration, submitting task 83
configure the conversion task 67
configure the hardware allocate memory 60
configure the Helper VM network 62
configure the network settings 61
edit the number of processors 59
specify a disk controller 60
configure the hardware of the destination machine 51
configure the network settings 61
configure the software 62
configuring
domain details 82
guest operating system 79
install VMware tools 79
removing system restore checkpoints 83
selecting a source 76
selectingVMwareFusion source 76
selecting VMware Player source 76
selecting VMware Server source 76
selecting Workstation source 76
sysprep files locations 29
Sysprep files locations 75
time zone 81
updating drivers 83
workgroup 82
configuring permissions for vCenter users 26
connect to a remote Converter Standalone server 39
controlling the number of concurrent tasks 86
conversion limitations
configuration limitations 24
Linux guest limitations 24
powered-on machine limitations 24
third-party images limitations 24
third-party virtual machines or system images 25
virtual machines 24
VSS snapshots 30
windows guest limitations 24
conversion tasks
editing 87
managing 85
maximum running 86
starting 42
submitting 73
viewing summary 73
conversion throttling 72
conversion wizard, starting 42
conversion, viewing task summary 73
Converter Standalone
installing client in Windows 33
installing in Windows 33
installing server and agent in Windows 33
modifying installation in Windows 37
repairing in Windows 38
converting
existing system images 18
existing virtual machines 18
converting machines 41
converting, powered-on machines 70
copy all disks 58
copy disks or volumes
copy all disks 58
create an expandable disk on a hosted destination 56
create an expandable disk on a managed destination 56
delete a disk 57
move a disk to a different dataset 55
move a volume to a different datastore 54
move a volume to a different virtual disk 53
resize a volume 52
skip a volume 53
create an expandable disk on a hosted destination 56
create an expandable disk on a managed destination 56
customization 29
customize the location 49
customizing
computing resources 72
tasks throttling 72
customizing the guest operating system 63
D
data to copy 51
delete a disk 57
deleting tasks 87
destination
ESX host 25
vCenter Server 25
VirtualCenter 25
VMware Fusion 25
VMware Player 25
VMware Server 25
Workstation 25
destination machine
folder 48
naming 48
power on 71
destination services, startup mode 68
destination setup
computer information 63
DNS 65
domain details 66
guest operating system 63
network adapters 65
SID 63
time zone 65
Windows license 64
WINS 65
workgroup 66
disk
2GB split 18
flat 18
not pre-allocated 18, 56
thin-provisioned 18, 56
disk cloning modes
disk-based cloning, defined 17
full clones, defined 17
linked clones, defined 17
volume-based cloning, defined 16
disk controller 60
disk-based cloning 16, 17, 55, 56, 58
disks, adding 54
dual boot systems 11
duplicate ID 19
E
edit the number of processors 59
editing tasks 86
errors, viewing in the log files 88, 89
ESX host
destination 25
source 23
support 23
ESX VM, source 44
exporting
to hosted formats 48, 50
to managed formats 48
exporting a single task log file 88
exporting all log files 89
F
feedback 7
full clones, defined 17
G
glossary 7
guest operating system configuration
computer information 80
DNS 81
domain 82
network adapters 81
SID 80
time zone 81
Windows license 81
WINS 81
workgroup 82
guest operating system customization
computer information 63
DNS 65
network adapters 65
SID 63
time zone 65
Windows license 64
WINS 65
workgroup and domain page 66
guest operating system, configuration 79
guest operating system, customization 63
guest operating system, customizing 63
GUID Partition Table (GPT) disks 16
H
Helper VM 62
hosted destinations
converting to 50
Fusion 50
VMware Server 50
Workstation 50
hosted VM, source 46
hot cloning
defined 11
Linux sources 14
Windows sources 13
hot cloning, synchronization 70
Hyper-V Server VM, source 47
Hyper-V, source 23
1
importing machines
configure the hardware 51
customize the location 49
select a source machine 42
installVMwareTools66,79
installation space requirements 22
installing 33
installing Converter Standalone, in Windows 33
installing VMware vCenter Converter Standalone, Windows command-line installation 35
introduction 9
IPng support 26
IPv6 support 26
L
linked clones 16
linked clones, defined 17
live cloning, See hot cloning
log files, exporting and viewing 88, 89
logs, location 89
M
managing tasks
adding to task list 86
canceling 86, 87
changing the number of tasks displayed 89, 90
checking task progress 88
deleting 87
filtering tasks by history 89
filtering tasks by status 90
multiple-criteria filtering 90
task view 85
Master Boot Record (MBR) disks 16
maximum number of tasks 86
Microsoft Virtual PC, source 23
Microsoft Virtual Server, source 23
modes of cloning 16
modifying 37
move a disk to a different datastore 55
move a volume to a different datastore 54
move a volume to a different virtual disk 53
N
network settings 61, 62
not pre-allocated disks 56
0
offline cloning, See cold cloning
online cloning, See hot cloning
operating systems, support 21
P
Parallels Desktop, source 23
permissions, configuring for vCenter users 26
port requirements 27
power off source machine 71
power on destination machine 71
powered-on machine conversion limitations 24
powered-on machine, source 43, 44
progress viewing 88
R
reconfiguring, starting the Wizard 76
remote Converter Standalone server 39
repairing 37
s
selecting configuration sources
VMware Desktop VMs 78
VMware Infrastructure VMs 77
selecting sources
ESX virtual machine 44
hosted virtual machine 46
Hyper-V Server VM 47
Linux powered-on machine 44
powered-on machine 43
third-party VM 46
vCenter Server VM 44
Windows powered-on machine 43
server 10
services
on destination 68
on source 69
setting up destination
computer information 63
DNS 65
domain details 66
guest operating system 63
network adapters 65
SID 63
time zone 65
Windows license 64
WINS 65
workgroup 66
setting up SID 80
Simple File Sharing, turning off 29
skip a volume 53
snapshots, limitations 30
source machine
power off 71
uninstall Converter Standalone agent 72
source services, stop 69
specify a disk controller 60
starting
conversion 42
conversion wizard 42
starting the reconfiguration wizard 76
stop source services 69
StorageCraft ShadowProtect, source 23
support 7
supported destination types
ESX host 25
vCenter Server 25
virtual appliances 25
VirtualCenter 25
VMware Fusion 25
VMware Player 25
VMware Server 25
Workstation 25
supported operating systems 21
supported source types
Acronis True Image 23
ESX support 23
Hyper-V 23
Microsoft Virtual PC support 23
Microsoft Virtual Server support 23
Parallels Desktop 23
powered-on machines 23
StorageCraft ShadowProtect 23
Symantec LiveState Recovery 23
vCenter Server 23
Virtual Iron 23
VirtualCenter support 23
VMware Fusion support 23
VMware Server support 23
VMware virtual machines 23
Workstation support 23
Xen 23
SymantecLiveStateRecovery,source 23
synchronizing source with destination 70
sysprep 29
system images, converting existing 18
system reconfiguration 11
system requirements
installation space requirements 22
supported operating systems 21
TCP/IP and UDP port requirements 27
Windows operating systems 28
T
task manager
adding tasks 86
canceling tasks 86, 87
checking tasks progress 88
combined filtering 90
deleting tasks 87
editing tasks 87
filtering by multiple criteria 90
filtering tasks by history 89
filtering tasks by status 90
number of concurrent tasks 86
viewing task progress 88
tasks, adding to list 86
tasks, editing 86
tasks, filtering 89
tasks,managing 85
tasks, submitting configuration 83
TCP/IP and UDP port requirements 27
thin-provisioned destination disks 10
thin-provisioned disk 56
third-party VM, source 46
throttling conversion tasks 72
time zone configuration 81
U
uninstall Converter Standalone agent 72
uninstalling 33
uninstalling VMware vCenter Converter
Standalone, in Windows 38
updated information 5
V
vCenter Converter
migration with 10
tasks 10
vCenter permissions 26
vCenter Server, destination 25
vCenter Server support 23
vCenter Server virtual machines 45
vCenter Server VM, source 44
version support 23
viewing a task's progress 88
viewing conversion task summary 73
viewing the log files 88, 89
virtual disk 53, 54
virtual disk, adding 54
virtual hardware
CPU issues 19
disk device issues 19
Ethernet adapter issues 19
graphics card issues 19
Virtual Iron, source 23
virtual machines
conversion limitations 24
converting existing 18
destination on same network as source 18
VirtualCenter
destination 25
source 23
support 23
VMware Fusion
destination 25
source 23
support 23
VMware hosted products support 23
VMware managed products support 23
VMware Player
destination 25
source 23
support 23
VMware Server
destination 25
source 23
support 23
VMware Tools 66
VMware vCenter Converter Boot CD 10
VMware vCenter Converter Standalone
command-line installation in Windows 35
installing remote access in Windows 34
uninstalling in Windows 38
volume-based cloning 16, 52-54, 56, 57
volume-based cloning, defined 16
volume, supported types 16
volumes, excluding 53
volumes,moving 54
volumes, resizing 52
VSS snapshots limitations 30
W
Windows, Simple File Sharing 29
Windows virtual machines, configuring 75
Windows XP, turning off Simple File Sharing 29
Windows XP, checking Windows Firewall blocks 29
worker 10
Workstation
destination 25
source 23
support 23
X
Xen, source 23