ELZG 1480 WS ELT EBH - Four encastrable JUNO - Notice d'utilisation et mode d'emploi gratuit
Retrouvez gratuitement la notice de l'appareil ELZG 1480 WS ELT EBH JUNO au format PDF.

| Type de produit | Four encastrable |
| Marque | JUNO |
| Modèle | ELZG 1480 WS ELT EBH |
| Dimensions (environ) | 595 x 595 x 550 mm (L x H x P) |
| Poids (environ) | 35 kg |
| Alimentation | 220-240 V ~ 50 Hz |
| Puissance totale (environ) | 2500 W |
| Types de chauffage | Chaleur tournante, chaleur voûte/sole, gril, gril grande surface, chaleur tournante + gril, chaleur sole, chaleur tournante + sole |
| Plages de température | 50-275 °C selon mode |
| Capacité du four | 70 litres (environ) |
| Éclairage | Ampoule halogène 40 W (E14) |
| Niveaux de cuisson | 4 glissières (1 à 4 du bas) |
| Accessoires fournis | Grille, lèchefrite (FP 143), plaque de cuisson émaillée (EBB 143) |
| Filtre à graisse | Oui, amovible et lavable (lave-vaisselle possible) |
| Nettoyage | Parois catalytiques optionnelles (KAG 143) |
| Sécurité | Voyants de fonctionnement, thermostat, arrêt automatique du ventilateur |
| Pièces détachées principales | Ampoule, filtre à graisse, sonde à viande (BT 74), glissières, joints |
| Indice de réparabilité | 7/10 (pièces courantes disponibles) |
| Informations générales | Four encastrable avec gril et chaleur tournante, adaptable en hauteur et profondeur selon la niche. |
FOIRE AUX QUESTIONS - ELZG 1480 WS ELT EBH JUNO
Questions des utilisateurs sur ELZG 1480 WS ELT EBH JUNO
0 question sur cet appareil. Repondez a celles que vous connaissez ou posez la votre.
Poser une nouvelle question sur cet appareil
Téléchargez la notice de votre Four encastrable au format PDF gratuitement ! Retrouvez votre notice ELZG 1480 WS ELT EBH - JUNO et reprennez votre appareil électronique en main. Sur cette page sont publiés tous les documents nécessaires à l'utilisation de votre appareil ELZG 1480 WS ELT EBH de la marque JUNO.
MODE D'EMPLOI ELZG 1480 WS ELT EBH JUNO
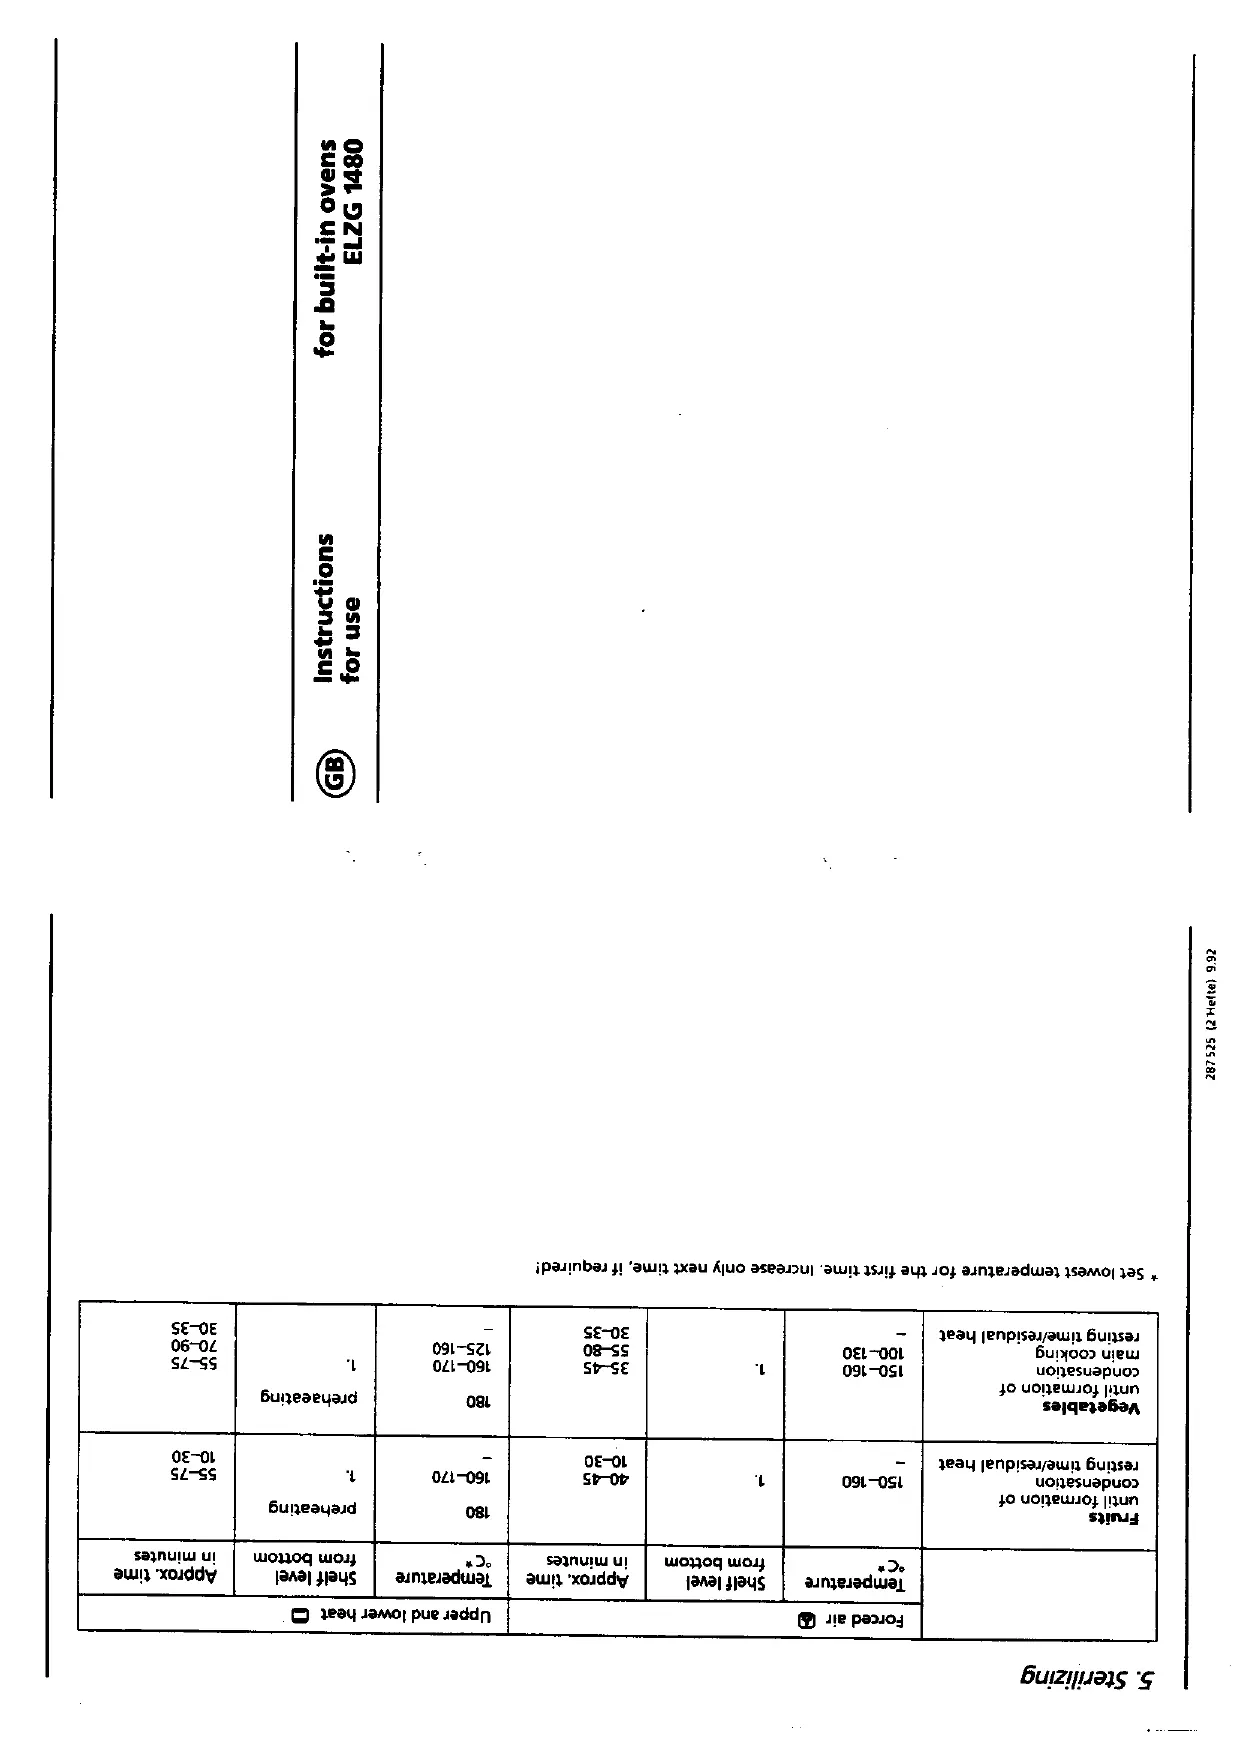
| GB | Instructions for use | for built-in ovens ELZG 1480 |
aannnnae aen anan eaeene nne ennnnne nee
| SE-0E 06-0L SL-SS | 1 68888888888888888888888888888888888888888888888888888888888888888888888888888888888888888888888888888 | -091-5Z1 091-09L 08L | SE-0E 08-SS 5S-5E | 1 | -0E1-001 091-09L | 1 year |
| 0E-0L SL-SS | 1 68888888888888888888888888888888888888888888888888888888888888888888888888888888888888888 | 0E-0L 5S-0P | 1 | -091-09L | 1 year | |
| s### | ### | ### | ### | ### | ### | ### |
| ### | ### | ### | ### | ### | ### | ### |
| ### | ### | ### | ### | ### | ### | ### |
4. Grilling Table
Select grill symbol for Grilling of smaller quantities
and grill symbol for Grilling of bigger quantities
You can grill with the oven door closed as well as with the oven door open. When the oven door is open, the deflector plate, as described under "Grilling", must be used.
| Grill dish | Knob setting °C* | Shelf level from bottom | Approximate time in minutes per side |
| Meat | |||
| Rumpsteak, 200 g | 250–275 | 4. | 5-7 per side |
| Filet steak, approx. 2.5 cm thick | 250–275 | 4. | 5-7 per side |
| Double fillet steak | 250–275 | 4. | 10-15 per side |
| Pork fillet | 225–250 | 3. or 4. | 12-15 per side |
| Meat loaf | 225–250 | 4. | 6-8 per side |
| Sliced liver | 225–250 | 4. | 5-7 per side |
| Legs of poultry | 225–250 | 3. or 4. | 12-15 per side |
| Large cuts of meat | |||
| Roastbeef, 500 g | 210–230 | 3. | 15-20 per side |
| Roastbeef, 1 kg | 210–230 | 3. | 20-30 per side |
| Chicken, half | 200–230 | 3. | 15-20 per side |
| Fish | |||
| Mackerel | 150-170 | 3. | 6-10 per side |
| Herring | 210-250 | 3. | 5-8 per side |
| Fish fillet | 225-250 | 4. | 6-8 per side |
| Au gratin dishes | |||
| Welsh rarebit | 225-250 | 4. | 5-8 |
| French onion soup | 225-250 | 3. | 6-8 |
| Fruit and vegetables | |||
| Bananas, halved | 210-225 | 4. | 5-7 |
| Tomato rings | 225-250 | 4. | 6-8 |
- Set lowest temperature when grilling for the first time. Increase only next time, if required!
We suggest you read these instructions carefully. They will help you in operating your appliance correctly. This high-level quality appliance will give maximum performance results for many years if operated correctly.
Please read the instructions in the recipe book carefully. They are intended to supplement these operating instructions.
Contents
| Page | |
| Description of appliance | 2 |
| Safety tips | 3 |
| Control panel | 4 |
| Hotplates | 4-5 |
| Oven | 6 |
| Baking | 7-8 |
| Roasting | 9 |
| Use of the grill | 9-10 |
| Sterilization | 10 |
| Removing the oven door | 11 |
| Cleaning and care | 12 |
| What to do if... (something doesn't work) | 13 |
| Tables | |
| 1. Fan circulation temperatures and their uses | 14 |
| 2. Baking temperatures and times | 15 |
| 3. Roasting temperatures and times | 16 |
| 4. Grilling temperatures and times | 17 |
| 5. Sterilizing temperatures and times | 18 |
e 666666666666666666666666666666666666666666
aenbnaeauaoaou-deapueaeauo saeaedrae 01 o aneradwaae uue aeaow aeaasse paaes saaa aanrss
| Forced air or forced air and grill element | Roastingtime, hours/minutes** | Upper and bottom heat 0 | |||||
| x | TemperatureoC* | Shelf levelfrom bottom | TemperatureoC* | Shelf levelfrom bottom | |||
| MeatRoast without bone (1 kg) | x or x | 140-160 | 2. | 1:40-2:20 | 175-200 | 2. | |
| Roast with rind | x | 160-170 | 2. | 1:40-2:20 | 190-210 | 2. | |
| Roast beef (1 kg) | x | 150-170 | 2. | 1:00-1:30 | 190-210 | 2. | |
| Meat loaf (500 g mince) | x | 140-160 | 2. | 1:00-1:10 | 190-210 | 2. | |
| Roast with bone (1 kg) | x | 150-160 | 2. | 2:00-2:40 | 175-200 | 2. | |
| Roast chop withbone (1 kg) | x | 150-160 | 2. | 1:20-1:50 | 180-200 | 2. | |
| PoultryChicken (1 kg) | - | 160-180 | 2. | 1:00-1:30 | 190-210 | 2, or 3. | |
| Duck (1 1/2-2 kg) | - | 160-170 | 2. | 1:50-2:10 | 190-210 | 2. | |
| Goose (3-4 kg) | - | 140-160 | 2. | 2:30-3:00 | 180-200 | 2. | |
| FishBake up to 2 kg | x or x | 150-170 | 2 or 3. | 0:45-1:00 | 200-220 | 2, or 3. | |
| Steam up to 2 kg | x | 150-160 | 2. | 0:35-1:00 | 180-190 | 2. | |
| Cooking and roasting inclosed containersaccording to ingredients | x or x | 180-230 | 1 or 2. | 0:50-2:00 | 200-230 | 1, or 2. | |
| Browning | - | x | 230-250 | 3 or 4. | 0:15-0:30 | 250 | 3, or 4. |
| ThawingChickenBakingInstant dishes | x | - | 50 | 2 or 3. | 1:20-1:35 | - | - |
| x | - | 150-170 | 2 or 3. | 0:05-0:20 | - | - | |
| x | - | 150-170 | 2 or 3. | 0:30-0:50 | - | - | |
| Forced air or forced air and bottom heat | Baking time in minutes | Upper and bottom heat ☐ | |||||
| ☐ | ☐ | Temperature °C* | Shelf level from bottom | Temperature °C* | Shelf level from bottom | ||
| Cakes in moulds Deep dish cake Madeira type cakes Sponge fan Short pastry fan Cake with fruit topping Cottage cheese covering | x | - | 150-160 | 2. | 55-75 | 160-190 | 1. or 2. |
| x | - | 150-160 preheating | 2. | 60-80 | 160-170 preheating | 1. or 2. | |
| x | - | 150-160 | 2. | 30-45 | 160-180 | 1. or 2. | |
| x | - | 170-180 | 2. or 3. | 15-30 | 200-220 | 1. or 2. | |
| x | - | 160-170 | 2. or 3. | 45-60 | 180-210 | 1. or 2. | |
| x | - | 140-160 | 2. or 3. | 60-90 | 170-190 | 1. or 2. | |
| Shaped pastries Yeast plait Christmas fruit loaf Bread | x | - | 150-170 | 2. | 25-40 | 180-200 | 2. |
| x | - | 200 preheating | 2. | 45-70 | 250 preheating | 2. | |
| x | - | 150-160 preheating | 2. | 50-70 | 170-190 | 2. | |
| x | - | 180-200 | 2. | 30-45 | 230 preheating | 2. | |
| Cake baked on a tray Cake with try topping 1 tray 2 trays 3 trays Cake with moist topping 1 tray 2 trays Swiss roll | x | - | 160-180 | 3. | 40-55 | 180-200 | 2. or 3. |
| x | - | 150-170 | 2. and 4. | 40-60 | - | - | |
| x | - | 150-170 | 1:3:4. | 30-45 | 180-200 | 2. or 3. | |
| x | - | 150-170 preheating | 3. | 35-50 | - preheating | 2. | |
| x | - | 150-170 preheating | 2. or 4. | 10-20 | 190-210 | 2. | |
| Small cakes and pastries Viennese whirls Short pastry sponge Flaky pastry Choux pastry Meringues | x | - | 140-150 | 3. | 25-35 | preheating | 2. or 3. |
| x | - | 150-170 | 3. | 8-15 | 190-200 | 2. or 3. | |
| x | - | 150-170 | 3. | 10-20 | 190-200 | 2. or 3. | |
| x | - | 170-180 | 3. | 15-25 | 190-200 | 2. or 3. | |
| x | - | 170-180 | 3. | 20-30 | 190-210 | 2. or 3. | |
| x | - | 100-120 | 3. | 25-35 | 190-210 | 2. or 3. | |
aJeBuxeg 2

Description of the appliance
Tables
1. Circulating Air Temperatures
| Temperature range (℃) | Use |
| 0 | Defrosting e. g. poultry, gatteaux |
| 50-100 | Defrosting, keeping foods warm, plate warming |
| 100-120 | To prepare meringues |
| 140-150 | Souffles, casseroles |
| 150-170 | Biscuits, shortbread, sterilizing Defrosting pre-cooked frozen foods which need to be hot |
| 170-190 | Choux, puff, flaky pastry |
| 190-230 | Bread, pizza; high temperature pastries cooking in covered dishes |
| 230-250 | Au gratin dishes |
| 140-170 plus fan filter | Roasting of meat and fish (also deep-frozen) open on the rack or in shallow open dishes |
Users instructions
Important! For reasons of safety and correct function, the oven/switchboxes should only be combined with the hotplates/ cooking surfaces which are marked with the same symbol.
Electronic clock and thermometer
If your appliance is equipped with an electronic clock and a special thermometer to check whether dishes are done, read the additional instructions for clock and thermometer carefully.
Analog-clock
If your appliance is equipped with an analogclock with automatic setting, read the additional information carefully.
Before using the appliance for the first time
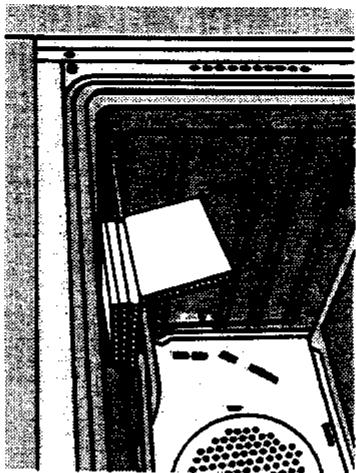
Important Information!
The heating elements for top heat as well as for the grill are secured against damages during transport by a locking device. It is absolutely necessary to remove this part before the oven is heated for the first time.
Hotplates
Before use, heat up the hotplates for approximately 3 to 5 minutes without utensils.
Glass ceramic hob
Information how to use the glass ceramic hob is given in the instructions for use packed with the ceramic hob.
Control panel
Function of the control knobs
#
Automatic Hotplates
Faults - what to do?
booklet. Most probably the fault is caused by an oversight.
If you are unable to find the cause, you can contact our Service Division. In case of Service call, please state the model of your appliance which is indicated in the Service code of the plate framed in red.

Optional accessories
Drip tray: FP 143
Code number: 81
they are not included in the cost of the appliance)
Enemalled baking tray: EBB 143
Code number: 13/5320-00.80.21-30
Drip tray: FP 143
Code number: 81/5320-00.00-21.20
The knobs cannot be tur
For bringing to the correct boiling of frying temperature, select position 12. As soon as the desired temperature has been achieved change to continuous cooking. Please consult the recommendations in the setting chart.
This oven has been manufactured with the most advanced techniques and with a high quality material. In case of faults, check first if you have followed the instructions given in this
Meat probe:BT 74 Code number:13/3
Catalytic panels: KAG 143
Catalytic panels: KAG 143
Oven illumination - Exchange of incadescent bulb
4. Setting knob for right front cooking area
6. Setting knob for oven temperature
Automatic boiling functions from setting 1 to setting 7. The power in the boiling range from 1 to 7 lies between approx. 4% and approx. 25% of total power. To start automatic boiling, select a setting between 1 and 7 depending on the amount and/or type of food to be cooked. Pull the knob outwards to the stop. This raises the power by a factor of 5, i.e. to between approx. 20% and approx. 100% of the total power. When the boiling time (approx. 9 minutes) has elapsed, the regulator switches the power back automatically to continue cooking.
Automatic boiling does not work in the frying range from 8-12, in order to avoid overheating the fat.
as the hot plates or oven are on. The red pilot light is for the oven. (see "red pilot light")
Control Illumination , appliance on
correct position. The automatic boiling device adapts automatically to the new setting.
∴ m : x = 1 或 3x + 4y + 1 = 0
Hotplates with two zones (only with glass ceramic surfaces)
The left-hand hotplates can be increased in size by adding a second zone. This is done by turning the knob to the right until the stop is reached (i.e. beyond position 12).
Then turn the knob to the desired position. For further operation, see hotplate with automatic boiling device.
SERVICE NUMBER DO NOT REMOVE
00/0000 00
The yellow pilot light
The plate is visible on the left front of oven bottom, with the oven door open. If you specify the Service code, you will help Service in preparing the spare parts to repair your appliance during the first visit of the technician. You will save money for further visits.
Hotplates with Two Zones (only with glass ceramic surfaces)
The left-hand hotplates can be increased in size by adding a second zone. This is done by turning the knob to the right until the stop is reached (i.e. beyond position 12).
Then turn the knob to the desired position. For further operation, see hotplate with automatic boiling device.
Meat probe: BT 74 Code number: 13/3
Oven illumination - Exchange of Incandescent bulb To exchange the incandescent bulb the round glass cover in the oven (in the rear, on the right) can be screwed out. The oven is illuminated by a lamp with a heat resistance of 300°C 40 watt/220 volts E 14.
SERVICE NUMBER DO NOT REMOVE
180 °
Pilot light (EMZU 1480)
The yellow pilot light remains lighted as long as the hot plates or oven are on. The red pilot light is for the oven. (see "red pilot light")
Control Illumination , appliance on
Control Illumination - appliance on (ELZG 1480)
As long as a hotplate or the over control illumination remains on.
Oven thermostat indicator
As soon as the oven is switched
oven thermostat indicator light comes on in addition to the yellow pilot light. It extinguishes as soon as the temperature set by you is reached in the oven and will only
come on again when the oven is reheating automatically.
Cleaning and care
Glass ceramic top Please observe the cleaning instructions in the operating instructions supplied with the top.
∴ m - 1 ≠ 0 ;
Hob
Food which has boiled over should always be removed immediately where possible. The enamelled hob is best cleaned with a soft cloth and grease-solvent domestic cleaners not containing any scouring agent. Abrasive cleaning agend and sharp objects
Tray Guide
Stainless steel tops are cleaned in the same To clean the oven thoroughly, remove the
tray guides. Lift the front of the tray guide, unhinge and remove from side walls. Unhinge the back of the tray guide. Pull forward to remove. Insert tray guide in reverse order.
Reinserting tray guide
It is very important to rest the grill element on the top right-angle bends of the tray guide when reinserting.
Oven door window
Clean these parts with warm water and a soft cloth. Remove soiling as soon as possible. Dried soiling should be soaked first. Do not use harsh or abrasive cleaners.
This element is a additional one.
This element is self-cleaning and requires no additional care.
Fan filter
The filter should be washed after use. Normally dirty: wash the filter in warm water with detergent.
concentrated solution of detergent.
Then mine and dry carefully. The fan filter can also be way
dishwasher.
Cooking area setting table
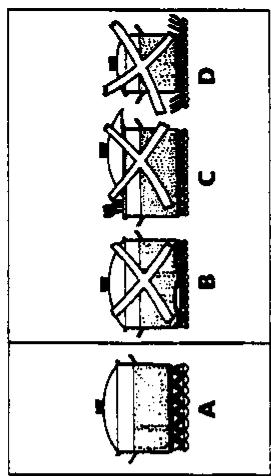
A = Right B,C,D Wrong
Cooking utensils should have a flat, solid bottom.
Particularly suitable for example are utensils with turned bottoms. Utensils and bottoms which are not flat will result in longer heating up and cooking times and thus increased power consumption. The utensils should have the same or slightly larger diameter than the rings. If the utensils are too small, food can boil over on to the rings. In addition, insufficient diameter will lead to increased power consumption, the same applying to uncovered saucepans and pans. It possible, therefore, the lid should be on at all times.
Please ensure that only dry cooking utensils are placed on the hotplate or cooking surface, and that no lids with condensation inside are laid on these. Always place the cooking utensil (pots, frying pans etc.) on the plate or surface before switching on.
Hotplate Covers
The hotplates must be switched off, dry and cold before covers are placed over them. Glass Ceramic Cooking Surface
Please read the instructions concerning cooking utensils in the booklet enclosed with the glass ceramic cooking surface.
| Setting | suitable for: |
| 12 | Boiling up large quantities of water. Boiling noodles |
| 11–12 | Frying chips. Fast frying meat, e.g. goulash |
| 10–11 | Frying, e.g. potato pancakes sirloin, steaks, cordon bleu |
| 9–10 | Frying meat, escalopes, chops, pancakes, rissoles |
| 8–9 | Slow frying, sausages, liver eggs, fritters |
| 5–7 | Boiling large quantities of food hot pots and soups |
| 4–6 | Simmering potatoes. Cooking meat broth |
| 3–5 | Simmering vegetables or stewing meat |
| 3–5 | Cooking rice pudding |
| 2–4 | Simmering rice and milk dishes. Simmering small quantities of potatoes or vegetables. Heating instant dishes |
| 1–2 | Hollandaise sauce, souffle omelette. Keeping dishes warm. Melting butter, chocolate, gelantine |
| 0 | Residual heat, OFF setting |
Energy Saving
In almost all boiling and frying processes, the heat stored in the plate can be used up in the final 5 or 10 minutes. So don't forget to switch off in time!
Oven
Air circulation
The air is sucked from the opening on therear wall, it is then heated and circulated
inside the oven.
The circulation of air allows an even heat and simultaneous cooling of different foods. The
simultaneous cooking of different foods. Temperature required for cooking is lower
than that of traditional ovens with radiant
heat - see "Temperature selection".
open the door
Heat from top and from bottom
The top element is inside the oven and the
bottom element under the oven heat the oven with radiant heat.

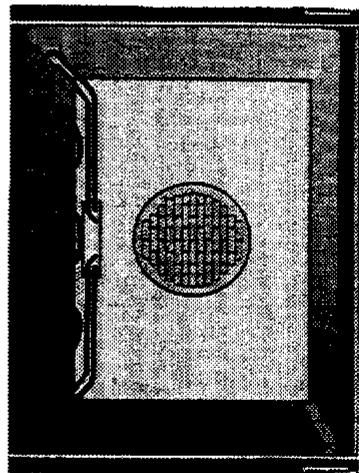
The grill heating element is built-in in
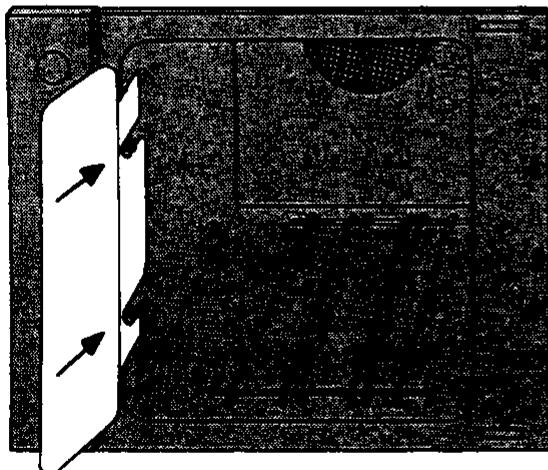
- lift the door until the lower hinge lever is freed

- Pull out door, hinge levers leave slots
To remount the door, reverse the procedure.
Switching on and Pre-heating
Turn the selector knob for heating
to the grill symbol 📄 or 📁 . Set thetemperature knob 📄 to the correct grill 📁
temperature. For grill temperatures, refer to the q
We recommend that you select the lower of
the stated temperatures at first. If the
does not brown sufficiently or if grillin takes too long, the higher of the two temperatures should then be selected.
Table-Types of heating and temperature In the following table we give the types of heating and the temperatures.
| Knob selecting tem- pera- ture | type of heating | |
| Off position | ● | 0 |
| Oven lamp | ● | ● |
| Heat from the top and from the bottom | ●-250 | ● |
| Grill | ●-275 | ● |
| Grill (large area) | ●-275 | ● |
| Forced air and grill | ●-250 | ● |
| Heat from the bottom | ●-250 | ● |
| Forced air and heat from the bottom | ●-250 | ● |
| Forced air | ●-250 | ● |
Grease filter
The grease filter protects the fan from
splashes which can be produced during
roasting or grilling.
We suggest you use this filter during roasting.
or grilling only.
Insert both hooks into the slots in the rear
wall of the oven.


To operate the oven, turn the oven selector knob and the thermostat knob to the
positions required.
If any oven function is switched on, the fan (and so the cooling will)
The oven selector knob may be used as
The oven selector knob may be used as well to switch the oven on and off. It may be
turned in a clockwise or anti-clockwise
direction.
The thermostat knob selects the temperature required for cooling by turning
temperature required for cooking, by turning it in a clockwise direction. To switch the
thermostat off, turn the knob anti-clock.
it in a clock-wise direction. To switch the
thermostat off, turn the knob anti-clockwise
it in a clo
thermostat off, turn
it in a clock-wise direction. To switch the
thermostat off, turn the knob anti-clockwise
The red pilot lamp
The red pilot lamp goes on as soon as the
oven is switched on. It goes out when the
oven reaches the set temperature and lightstove , which is then automatically
up again when the oven reheats automaticall:
Preheating
All food to be reacted and baked should be
All food to be roasted and baked should be placed in the cold oven. Preheating is
placed in the cold oven. Flenching it; however, advisable for delicate items such as
sponge cake or other items with very short
baking time.
Temperature selection in fan circulation
mode
The temperatures required are generally
about 20 - 40°C lower than the temperatures
in radiant heat ovens (top/bottom heat only).
0
Important!
When using the grill with the oven door
open, it is necessary to insert the heat
deflector between cavity ceiling and grill
element.
Do not place very fatty food near the grill
heating element. When grilling many times,
We suggest you clean the drip tray after weuse. When grilling, do not leave the oven.
use. When grinning, do not leave the oven unattended.
Sterilization
To sterilize in the
Bottles and cans should not be sterili
the oven but in a suitable pan.
We suggest you sterilize meat, sauces, jams.
Further details for sterilization see recipe.
guide attached.
Table-Types of heating and
C
To operate the oven, turn the oven selector
knob and the thermostat knob l to the positions required.
positions required: If any oven function is switched on, the fan
In any event, function is continued on, the law of the case colling will run.
The oven selector knob may be used as
well to switch the oven on and off. It may be used in conjunction with a modern device.
turned in a clockwise or anti-clockwise direction.
The thermostat knob selects the
temperature required for cooking, by turning
to the "●" position.
to the "●" position.
Grease filter
The grease filter protects the fan from
splashes which can be produced during
roasting or grilling.
We suggest you use this filter during ro
or drilling only.
Insert both hooks into the slots in the rear
wall of the oven.
Turn the selector knob for heating types
to the grill symbol or . Set thetemperature knob to the correct grill
temperature.
For grill temperatures, refer to the grill
We recommend that you select the lower of
the stated temperatures at first. If the food
does not brown sufficiently or if grilling
takes too long, the higher of the two
temperatures should then be selected.
We recommend pre-heating the grill element for 3-5 minutes before beginning grilling.
Grilling with oven door closed: close the
oven door during preheating.
Grilling with oven door open: during preheating, open the oven door to the first stop
Shelf rails during the use of the grill:
The family collecting juice has to take
The drip pan , connecting juices – has to bepositioned in the 1st runner from the
positioned in the 1st flank from thebottom
Position the shelf according to the dimension and the type of food to be cooked.
Do not place very fatty food near the grill
heating element. When grilling many times,
We suggest you clean the drip tray after each time. When grilling, do not leave the oven.
use. When grinning, do not leave the oven unattended
Sterilization
To sterilize in the oven, only use appropriate
containers.
Bottles and caps should not be sterilized in
the oven but in a suitable pan.
We suggest you sterilize meat, sauscs, jams
and tomatoes in suitable containers.
Further details for sterilization see recipe
Further details for sterilization see recipe guide attached
AD = AC = 1/2AB,AB = AC
With almost all baking and roasting processes it is possible to make use of the residual heat of the oven 5-10 minutes before completion. Thus, you can switch to "●" during this time. Potatoes, rice or vegetables can be inserted in the oven at the same time as the meat.
For the choice of temperature for the individual types of heating, see oven chart.
Roasting
Important!
When roasting, the fan filter must be engaged in the back of the oven.
Roasting is possible in the following heating modes.
Oven rail: Roasting
The drip tray should be pushed onto the bottom rail, and the grid with the meat onto the second rail from the bottom.
Roasts in open or closed dishes should be placed on the centre of the grid. The grid should be pushed onto the bottom rail or the second rail from the bottom.
Please refer to the recipe book for more information on roasting and preparation of sauces.
This roasting thermometer can be ordered as special accessory from your stockist..
Use of the grill
The heating elements is built-in in the oven and cannot be removed. During the use of the grill, it is necessary to position the grease filter on the oven rear wall.
Put the fan filter into place on the back wall of the oven when grilling.
The grill has two use possibilities:
Grill 口 .. for small food quantities..
Large area grill 口 .. for large food quantities (eg.: full grid).
When grilling with large area grill place the food and shelf well under the grilling elements and not too far to the rear of cavity.
The grill or the large radiation grill may be used with the oven door open or closed.
When grilling, open the oven door to the first catch.
Wall rails

Shelf position to cook pastry:
Roast is to be well browned, select not all with grill. At a roasting temperature of 140 - 170°C, the fat or juice dripping out of the meat only splashes slightly. The oven remains practically clean.
The circulation of the hot air means that turning and basting the roast is no longer required. According to taste however, it can be turned after about half the roasting time has elapsed. If desired, roasts remaining in the oven for longer periods can be basted with liquid.
If you wish to roast on the grid using heat from above or below, select a temperature of 180-200°C. Depending on the kind of meat, add 100-300 ml of water to the drip tray before roasting begins. If desired, some water can be added during roasting to keep the juice from the meat from burning. The roast is turned after about half the required time.
When baking with hot air and heat below 4 or heat above and below 5, dark baking tins are used.
With hot air heating , it is possible to bake on several levels at the same time. Observe the trays carefully. Remove the cakes from the oven when they are sufficiently browned. Depending on the kind of cake, the baking times can be increased by 5 to 15 minutes.
The oven is fitted with two guides on each side which can be removed. They allow the use of 4 baking trays and/or shelves and a drip tray. The baking trays, the shelves and the drip tray must be positioned properly in the guides to avoid tilting. To select the correct position, please refer to the table of temperatures and cooking times.
Forced air position: Using only one baking tray, please position into 2nd or 3rd sliding rails from bottom.
To cook on two levels, use the 1st or the 3rd and 2nd or the 4th position from the bottom. Using three trays, please position into 1st, 3rd and 4th sliding rails.
Cake in moulds position shelf at 2nd sliding rails from bottom.
Forced air and heat from the bottom position: To get best results from the heat from the bottom, we suggest you use the 2nd position from the bottom.
Heat from the top and from the bottom position : Place shallow metal contain
on the 2nd or 3rd position. Place deep containers on the 1st or 2nd position.
middle of the grid.
For baking with hot air, light and dark tins as well as glass, ceramic or other heat resistant materials can be used.
When baking with hot air and heat below or heat above and below, dark baking tins are used.
With hot air heating , it is possible to bake on several levels at the same time. Observe the trays carefully. Remove the cakes from the oven when they are sufficiently browned. Depending on the kind of cake, the baking times can be increased by 5 to 15 minutes.
position : Place shallow metal containers on the 2nd or 3rd position. Place deep containers on the 1st or 2nd position.
Fan
Top and bottom heat
Fan with bottom heat
- GRILLING TABLE
- TABLES
- CIRCULATING AIR TEMPERATURES
- USERS INSTRUCTIONS
- ELECTRONIC CLOCK AND THERMOMETER
- ANALOG-CLOCK
- BEFORE USING THE APPLIANCE FOR THE FIRST TIME
- IMPORTANT INFORMATION
- HOTPLATES
- GLASS CERAMIC HOB
- CONTROL PANEL
- FUNCTION OF THE CONTROL KNOBS
- AUTOMATIC HOTPLATES
- FAULTS - WHAT TO DO
- OPTIONAL ACCESSORIES
- CLEANING AND CARE
- ∴ M - 1 ≠ 0
- HOB
- TRAY GUIDE
- REINSERTING TRAY GUIDE
- OVEN DOOR WINDOW
- THIS ELEMENT IS A ADDITIONAL ONE
- FAN FILTER
- COOKING AREA SETTING TABLE
- ENERGY SAVING
- OVEN
- AIR CIRCULATION
- HEAT FROM TOP AND FROM BOTTOM
- SWITCHING ON AND PRE-HEATING
- GREASE FILTER
- THE RED PILOT LAMP
- MODE
- IMPORTANT
- STERILIZATION
- TO STERILIZE IN THE
- TABLE-TYPES OF HEATING AND
- WALL RAILS
- SHELF POSITION TO COOK PASTRY
Marque : JUNO
Modèle : ELZG 1480 WS ELT EBH
Catégorie : Four encastrable