HDC-500 - Matériel audio CORTEX - Notice d'utilisation et mode d'emploi gratuit
Retrouvez gratuitement la notice de l'appareil HDC-500 CORTEX au format PDF.


| Type de produit | Contrôleur audio numérique streaming |
| Marque | CORTEX |
| Modèle | HDC-500 |
| Formats audio compatibles | MP3 (8-320 kbps, CBR/VBR, 44.1 kHz), WAV (44.1 kHz, 16 bits stéréo), CD-Audio |
| Plages de pitch | 4 %, 8 %, 16 %, 24 % |
| Précision du pitch | 0,05 % |
| Alimentation | 6 V DC, 3000 mA (12 W) ; adaptateur secteur AC 100-240 V, 50/60 Hz |
| Dimensions | 482 x 267 x 64 mm (19 x 10,5 x 2,5 pouces) |
| Poids | 4,4 kg (9,68 lb) |
| Affichage | Écran LCD rétroéclairé bleu, 4 lignes de 20 caractères |
| Connectivité USB | 2 ports USB Type A et B ; USB 1.0/1.1/2.0 ; jusqu'à 4 périphériques via hub USB actif |
| Systèmes de fichiers supportés | FAT32, NTFS (lecture seule), HFS+, CDFS, UDFS |
| Fonctions principales | Molette jog, contrôle de pitch, points de repère, boucles, recherche par base de données, navigation par fichiers, lecture aléatoire, modes single/continu |
| Nettoyage | Chiffon doux sec ; pour taches tenaces : solution 2:1 d'eau distillée et d'alcool isopropylique à 30%. Éviter benzène, diluant, eau de Javel, acide chlorhydrique. |
| Température de fonctionnement | +5 °C à +35 °C (+41 °F à +95 °F) |
| Humidité de fonctionnement | 5-85 % |
| Consignes de sécurité | Lire et conserver les instructions, respecter les avertissements, ne pas utiliser près de l'eau, assurer une ventilation adéquate, utiliser uniquement l'adaptateur fourni, débrancher lors d'orages, confier les réparations à un personnel qualifié. |
| Garantie | 1 an limitée (USA) ; contacter GCI Technologies pour service. Ne pas expédier sans numéro RMA. |
| Mise à jour firmware | Télécharger depuis cortex-pro.com, placer à la racine d'une clé USB, suivre la procédure en 8 étapes. |
| Accessoires inclus | Adaptateur secteur, manuel d'instructions |
FOIRE AUX QUESTIONS - HDC-500 CORTEX
Questions des utilisateurs sur HDC-500 CORTEX
0 question sur cet appareil. Repondez a celles que vous connaissez ou posez la votre.
Poser une nouvelle question sur cet appareil
Téléchargez la notice de votre Matériel audio au format PDF gratuitement ! Retrouvez votre notice HDC-500 - CORTEX et reprennez votre appareil électronique en main. Sur cette page sont publiés tous les documents nécessaires à l'utilisation de votre appareil HDC-500 de la marque CORTEX.
MODE D'EMPLOI HDC-500 CORTEX
Important Notice
Before operating this unit, please verify that you have the latest firmware version available from our website - http://www.cortex-pro.com. New versions of the HDC-500 firmware will include additional features, bug fixes, and enhanced compatibility to guarantee optimum performance of your unit. There are even Spanish and French language versions, to make operating the HDC-500 easier than ever!
Additionally, please also download our FREE Cortex Database Creation Software, which allows you to create searchable databases of your entire music collection within minutes, as well as create playlists for use on your unit! This indispensable utility is designed to save you time when preparing large storage devices to use with the HDC-500.
To find out what version of HDC-500 firmware you are running:
- Power on the HDC-500 with NO DEVICES CONNECTED.
- At the prompt that says 'Insert Devices,' press the INFO button.
- The screen will display the version number of the currently installed HDC-500 firmware.
To upgrade your firmware to the newest version:
- Using your PC, download the firmware update to the root directory of your USB storage device (X:\ where X is the letter of the drive). We recommend Internet Explorer.
- Connect the USB storage device to the HDC-500.
- Power on the HDC-500, and select the aforementioned device.
- The unit will display the date/version of the new update, and will ask if you want to update. Select 'YES,' and press enter.
- The unit will go through a 8-step update procedure, after which the power will automatically shut down. When the unit is powered on again, you will be running the latest firmware.
Warning: If the power is interrupted or the USB device is removed during this process, it can damage the operating system of the unit. As well, it is advisable that the unit is not moved during the update process to make sure that the process is uninterrupted.
For more detailed information about Firmware Updates, including screen shots, please see the Firmware Updates section of the manual (page 23).

CORTEX
intelligent. sound.
Table of Contents
Warnings and WEEE....2
Introduction....3
Features....4
Compatibility and Recommended Peripherals....5
Device Requirements....5
Care and Maintenance....6
Operating Conditions......6
Legal Info....6
Setup Guide & Parts Diagram....7
Rear Panel & Connections....7
Front Panel & Functions....8-9
Using the HDC-500....10
Preparing for Use....10
Selecting Devices & Database Creation....11
File Browser & Search Options....12
USB keyboard....13
Search Options (continued)....13-14
Waveform display....14
Info Button & Track Attributes....15
Play Mode & Single Auto Cue....16
Time Display....17
Pitch Control....17
Jog Mode....18
Playback Navigation Controls....18
Cue Points and Cue Memorization....19
Device Menu....20
Shuffle Mode....21
Loops....21
Soft Power....21
Setup Preferences....22
Firmware Updates....23
Setting up your Cortex and iTunes®....24-25
Error Messages....26
Technical Specifications....27
Warranty Information....28
IMPORTANT WARNING & SAFETY INSTRUCTIONS
PLEASE READ PRIOR TO OPERATING THIS DEVICE!
CAUTION: This product satisfies FCC regulations when shielded cables and connectors are used to connect the unit to other equipment. To prevent electromagnetic interference with electric appliances such as radios and televisions, use shielded cables and connectors for connections.
The exclamation point within an equilateral triangle is intended to alert the user to the presence of important operating and maintenance (servicing) instructions in the literature accompanying the appliance.
The lightning flash with arrowhead symbol, within an equilateral triangle, is intended to alert the user to the presence of uninsulated "dangerous voltage" within the product's enclosure that may be of sufficient magnitude to constitute a risk of electric shock to persons.
READ INSTRUCTIONS: All the safety and operating instructions should be read before the product is operated.
RETAIN INSTRUCTIONS: The safety and operating instructions should be retained for future reference.
HEED WARNINGS: All warnings on the product and in the operating instructions should be adhered to.
FOLLOW INSTRUCTIONS: All operating and use instructions should be followed.
CLEANING: The product should be cleaned only with a polishing cloth or a soft dry cloth. Never clean with furniture wax, benzine, insecticides or other volatile liquids since they may corrode the cabinet.
ATTACHMENTS: Do not use attachments not recommended by the product manufacturer as they may cause hazards.
WATER & MOISTURE: Do not use this product near water, for example, near a bathtub, wash bowl, kitchen sink, or laundry tub; in a wet basement; or near a swimming pool; and the like.
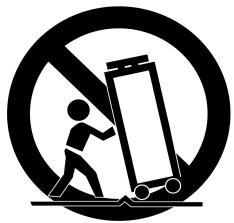
ACCESSORIES: Do not place this product on an unstable cart, stand, tripod, bracket, or table. The product may fall, causing serious injury to a child or adult, and serious damage to the product. Use only with a cart, stand, tripod, bracket, or table recommended by the manufacturer, or sold with the product. Any mounting of the product should follow the manufacturer's instructions, and should use a mounting accessory recommended by the manufacturer.
CART: A product and cart combination should be moved with care. Quick stops, excessive force, and uneven surfaces may cause the product and cart combination to overturn. SEE FIGURE A.
natural_image
Symbolic icon of a person pulling a heavy device through a circle, no text or symbols presentVENTILATION: Slots and openings in the cabinet are provided for ventilation and to ensure reliable operation of the product and to protect it from overheating, and these openings must not be blocked or covered. The openings should never be blocked by placing the product on a bed, sofa, rug, or other similar surface. This product should not be placed in a built-in installation such as a bookcase or rack unless proper ventilation is provided or the manufacturer's instructions have been adhered to.
POWER SOURCES: This product should be operated only from the type of power source indicated on the marking label. If you are not sure of the type of power supply to your home, consult your product dealer or local power company.
LOCATION: The appliance should be installed in a stable location.
NON-USE PERIODS: The power cord of the appliance should be unplugged from the outlet when left unused for a long period of time.
GROUNDING OR POLARIZATION:
- If this product is equipped with a polarized alternating current line plug (a plug having one blade wider than the other), it will fit into the outlet only one way. This is a safety feature. If you are unable to insert the plug fully into the outlet, try reversing the plug. If the plug should still fail to fit, contact your electrician to replace your obsolete outlet. Do not defeat the safety purpose of the polarized plug.
- If this product is equipped with a three-wire grounding type plug, a plug having a third (grounding) pin, it will only fit into a grounding type power outlet. This is a safety feature. If you are unable to insert the plug into the outlet, contact your electrician to replace your obsolete outlet. Do not defeat the safety purpose of the grounding type plug.
POWER-CORD PROTECTION: Power-supply cords should be routed so that they are not likely to be walked on or pinched by items placed upon or against them, paying particular attention to cords at plugs, convenience receptacles, and the point where they exit from the product.
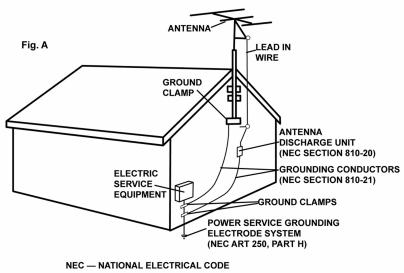
OUTDOOR ANTENNA GROUNDING: If an outside antenna or cable system is connected to the product, be sure the antenna or cable system is grounded so as to provide some protection against voltage surges and built-up static charges. Article 810 of the National Electrical Code, ANSI/NFPA 70, provides information with regard to proper grounding of the mast and supporting structure, grounding of the lead-in wire to an antenna discharge unit, size of grounding conductors, location of antenna-discharge unit, connection to grounding electrodes, and requirements for the grounding electrode. SEE FIGURE B.
LIGHTNING: For added protection for this product during a lightning storm, or when it is left unattended and unused for long periods of time, unplug it from the wall outlet and disconnect the antenna or cable system. This will prevent damage to the product due to lightning and power-line surges.
POWER LINES: An outside antenna system should not be located in the vicinity of overhead power lines or other electric light or power circuits, or where it can fall into such power lines or circuits. When installing an outside antenna system, extreme care should be taken to keep from touching such power lines or circuits as contact with them might be fatal.
OVERLOADING: Do not overload wall outlets, extension cords, or integral convenience receptacles as this can result in a risk of fire or electric shock.
OBJECT & LIQUID ENTRY: Never push objects of any kind into this product through openings as they may touch dangerous voltage points or short-out parts that could result in a fire or electric shock. Never spill liquid of any kind on the product.
SERVICING: Do not attempt to service this product yourself as opening or removing covers may expose you to dangerous voltage or other hazards. Refer all servicing to qualified service personnel.
DAMAGE REQUIRING SERVICE: Unplug this product from the wall outlet and refer servicing to qualified service personnel under the following conditions:
- When the power-supply cord or plug is damaged.
- If liquid has been spilled, or objects have fallen into the product.
- If the product has been exposed to rain or water.
- If the product does not operate normally by following the operating instructions. Adjust only those controls that are covered by the operating instructions as an improper adjustment of other controls may result in damage and will often require extensive work by a qualified technician to restore the product to its normal operation.
- If the product has been dropped or damaged in any way.
- When the product exhibits a distinct change in performance, this indicates a need for service.
REPLACEMENT PARTS: When replacement parts are required, be sure the service technician has used replacement parts specified by the manufacturer or have the same characteristics as the original part. Unauthorized substitutions may result in fire, electric shock, or other hazards.
SAFETY CHECK: Upon completion of any service or repairs to this product, ask the service technician to perform safety checks to determine that the product is in proper operating condition.
WALL OR CEILING MOUNTING: The product should not be mounted to a wall or ceiling.
HEAT: The product should be situated away from heat sources such as radiators, heat registers, stoves, or other products (including amplifiers) that produce heat.
DISPOSAL: This product shall not be treated as household waste. Instead it shall be handed over to the applicable collection point for the recycling of electrical and electronic equipment. By ensuring this product is disposed of correctly, you will help prevent potential negative consequences for the environment and human health, which could otherwise be caused by inappropriate waste handling of this product. The recycling of materials will help to conserve natural resources. For more detailed information about recycling of this product, please contact your local city office, your household waste disposal service or the shop where you purchased the product.

Foreword
Thank you for purchasing our Cortex HDC-500.. We are confident that the Cortex platform of products will not only make your life easier through the use of the latest technological advancements in cross-platform connectivity and sound reproduction but will raise the bar for DJ and pro audio products. With the proper care & maintenance, your unit will likely provide years of reliable, uninterrupted service. All Cortex products are backed by a 1-year limited warranty*.
Preparing for First Use
Please insure that you find these accessories included with the HDC-500:
Power supply....1
Operating instructions....1
We Want You Listening For A Lifetime!




Dear Customer:
Selecting fine audio equipment such as the unit you have just purchased is only the start of your musical enjoyment. Now it's time to consider how you can maximize the fun and excitement your equipment offers. This Manufacturer and the Electronic Industries Association's Consumer Electronics Group want you to get the most out of your equipment by playing it at a safe level. One that lets the sound come through loud and clear without annoying blaring or distortion-and, most importantly, without affecting your sensitive hearing.
Sound can be deceiving. Over time your hearing “comfort level” adapts to higher volumes of sound. So what's sounds “normal” can actually be loud and harmful to your hearing. Guard against this by setting your equipment at a safe level BEFORE your hearing adapts.
To establish a safe level:
- Start your volume control at a low setting.
- Slowly increase the sound until you can hear it comfortably and clearly, and without distortion.
Once you have established a comfortable sound level:
- Set the dial and leave it there.
Taking a minute to do this now will help to prevent hearing damage or loss in the future. After all, we want you listening for a lifetime.
Used wisely, your new sound equipment will provide a lifetime of fun and enjoyment. Since hearing damage from loud noise is often undetectable until it is too late, This Manufacturer and the Electronic Industries Association's Consumer Electronics Group recommend you avoid prolonged exposure to excessive noise. This list of sound levels is included for your protection.
Decibel
Level Example
30 Quiet library, soft whispers
40 Living room, refrigerator, bedroom away from traffic
50 Light traffic, normal conversation, quiet office
60 Air conditioner at 20 feet, sewing machine
70 vacuum cleaner, hair dryer, noisy restaurant
80 Average city traffic, garbage disposals, alarm clock at two feet
THE FOLLOWING NOISES CAN BE DANGEROUS UNDER CONSTANT EXPOSURE
90 Subway, motorcycle, truck traffic, lawn mower
100 Garbage truck, chain saw, pneumatic drill
120 Rock band concert in front of speakers, thunderclap
140 Gunshot blast, jet plane
180 Rocket launching pad
Information courtesy of the Deafness Research Foundation.
The Cortex HDC-500 has been designed & engineered to provide digital music playback and manipulation features demanded by professional users. The HDC-500 is designed to liberate DJs from the issues associated with PC-based solutions, by eliminating the need for a computer during performance. The HDC-500 also offers superior portability and flexibility over that of a typical PC.
Jog Wheel
The Jog Wheel on the HDC-500 provides highly precise control for a variety of functions. With the Jog Wheel, the User can search, pitch bend or even scratch just as if it were a vinyl turntable! As well, this can provide an extremely powerful navigation tool for searching menus, changing parameters and selecting music on your hard drive.
Pitch Control
High precision 60mm slide potentiometer for accurate adjustment of speed.
• 0.05% pitch precision
In order to provide more precise pitch adjustment, the unit is able to advance in increments of 0.05%. This aids in beat-matching between two musical programs, with much finer pitch resolution than can be found on most conventional professional CD players.
- Multiple pitch ranges
With pitch ranges of 4, 8, 12, and 24% , the pitch control's minimum and maximum values can be altered to augment or reduce the amount of pitch adjustment to a musical program.
- Pitch ON/OFF
By pressing the PITCH + and PITCH - buttons simultaneously, this toggles whether or not the unit will respond to changes via the PITCH CONTROL slide. The Pitch ON/OFF feature also functions as a pitch reset, when it is used to turn the pitch OFF.
Backlit LCD Display
The backlit 20 Character LCD screen shows a variety of information, including track titles, times, pitch, setup options, waveforms, loops and search parameters. This display allows more extensive visualization of parameters than a conventional CD player.
Cross-Platform USB Connectivity
The HDC-500 offers an unparalleled level of connectivity with all driver-less USB devices. The Cortex line of products are the first to offer the ability to manipulate music stored on USB devices such as hard drives, flash memory, optical drives, and personal music players, regardless of platform. Through this innovation, DJs are able to consolidate the amount of equipment and music needed during a performance. Even more USB devices can be connected with the use of a compatible USB hub.
CD Audio support
Despite the fact that a vast majority of people have access to USB storage devices or portable music players, the Cortex HDC-500 supports the playback of CD Audio discs through a compatible USB external CD-ROM, CD-RW, DVD-ROM, or DVD-RW drive. This is particularly useful for DJs making a gradual migration, or for playing CDs provided by clients.
Database-Driven Music Management
The entire line of Cortex Digital Music Players allows for the management of music collections via a database-driven system. Using this method, the database can be queried based on a number of different criteria. This allows DJs to search by artist, title, genre, album, or search string. Using this method allows the DJ to find a specific music selection within seconds. The database is saved to the storage device the music is being drawn from, so that it can be used with any Cortex unit, whether it's in your personal rig or at a club! Cue Points that have been memorized using the HDC-500 are also stored along with the database information on the active storage device. Once a Cue Point has been stored, DJs have the ability to recall it each time that track is loaded.
Playlist Support
The HDC-500 supports both iPod ^™ and User created Playlists, which can be created using Apple iTunes ^™ (in the case of an Ipod ^™ ) or our own DB SE software. When there are iPod ^™ Playlists available to be loaded, a menu option will appear in the main Search Options menu. Otherwise, user created playlists are accessible from the Playlist menu.
Compatibility & Recommended Peripherals
A Word About Compatibility
The HDC-500 (and all Cortex products) are designed to interface with all driverless USB devices. This means that if the product does not require proprietary driver software and can be accessed natively by a PC or Macintosh computer, it should be compatible with the Cortex. Note that just because the product works on a computer without using an included driver disk, that does not mean that it is truly driverless.
In theory (but sometimes not in practice), any device that doesn't require a driver should work just fine with the Cortex. However, varying specifications of certain products (primarily USB flash memory) sometimes might present an incompatibility issue. As one might imagine, testing every USB peripheral on the market would be a lifelong quest, and the introduction of new peripherals on the daily basis would make it even more difficult.
If you are having trouble with a specific peripheral, please find the compatibility advisory section of our website, and let us know! In the vast majority of cases, support can be added for sub-standard units that deviate from typical specifications.
- DAE capability for Audio CD playback via CD-ROM/DVD-ROM drive In order to play back audio CDs on a CD-ROM/DVD-ROM drive, the drive itself must support bit-accurate Digital Audio Extraction (DAE for short). If the drive does not support bit-accurate DAE, it is possible that you may notice anomalies such as pops & clicks during playback.
- USB Hubs must be Powered, not Passive (non-powered)
Although the Cortex is able to provide power to the vast majority of USB-powered devices, USB Hubs should be powered. Although a passive hub itself will function, the extraneous current draw of the devices connected to it may cause instability when operating the Cortex.
- Write-protection must be Disabled (where applicable)
When using a writeable device (hard drive, music player, flash memory), any write-protection must be disabled. Otherwise the Cortex will not be able to store the database it has created.
Certified-Compatible Devices
For a list of devices that have been tested and are certified to be compatible with the HDC-500, please visit the support section of our website at http://www.cortex-pro.com
Device Requirements
- USB Compliance
The storage device must comply to USB 1.0, 1.1, or 2.0 specifications. Wireless USB devices are not supported.
• Devices should be dedicated for use with the Cortex, if possible
For optimal performance, the storage devices you use should be dedicated for audio-only use. No other files should be stored on the device, other than the audio and database files used by the Cortex.
- Drives must be unpartitioned
The HDC-500 cannot switch between multiple partitions - it recognizes the first partition on the active device. This is crucial for the efficiency of the database driven search.
- FAT32, NTFS, or HFS+ File System for Flash Memory and Hard Drives
All storage devices must be formatted using FAT32, NTFS, or HFS+ file systems. On Windows PCs, all hard drives will use FAT32 or NTFS file systems, with NTFS common for Windows XP and later. HFS+ is the file system that is used by Macintosh and Linux-based machines.
- NTFS is read-only!
If you are using an external hard drive that is formatted using the NTFS file system, you will not be able to create a database using the HDC-500 unit. Instead, you should use the Cortex Database Creation (DBC) software for PC or Mac. This should not impact the majority of users, as the only devices that will be typically formatted using NTFS are extremely large hard drives over 32 gigs. When there is a large music collection, using the DBC software will be dramatically faster at creating a database.
Maintaining Storage Devices
When using writeable storage devices, such as hard drives, and hard-drive-based music players (iPod, Zen), certain maintenance might be required. Because the Cortex units use streaming technology to manipulate more than one music file from one device simultaneously, hard drives and hard-drive based units need to be defragmented regularly to ensure the integrity of the streamed files.
Fragmentation refers to “the condition of a disk in which files are divided into pieces scattered around the disk. Fragmentation occurs naturally when you use a disk frequently, creating, deleting, and modifying files. At some point, the operating system needs to store parts of a file in non-contiguous clusters. This is entirely invisible to users, but it can slow down the speed at which data is accessed because the disk drive must search through different parts of the disk to put together a single file.”
Maintaining these storage devices must be done via your computer, and should be performed whenever there has been a substancial change to your music library (adding/deleting music). Note that failure to maintain your storage devices might result in delayed access times and glitchy audio playback.
- With Windows™ based machines
First, connect the storage device that you wish to defragment. If you are connecting a hard-drive based music player, such as an Apple iPod or Creative Zen, make sure to exit any applications that may be launched on connection.
To load Disk Defragmenter, go to the Start menu, and find Disk Defragmenter under Accessories/System Tools.
When Disk Defragmenter has been loaded, select the device to be defragmented, and click the 'Defragment' button at the bottom of the window.
For more information on defragmenting, consult the Windows Help guide.
• With Apple Macintosh Machines
According to Apple, provisions within the HFS file allocation system diminish the need for any type of defragmentation. Because of this, there is no software included in OSX to accomplish this. However, this does not guarantee that defragmentation will not be necessary for external storage devices and portable music players.
For more information on Apple's claims, see this article: http://docs.info.apple.com/article.html?artnum=25668
Always Make Backups!
Due to the sometimes fragile state of PC components, we insist that you make backups of the storage devices that you plan on using with the Cortex. All hard drives (and hard-drive-based portable music players), are prone to failure - they have moving parts inside. Instead of taking a chance that your hard drive will last one more performance, one more month, or one more year, it is a far more intelligent choice to back up your data for the worst case scenario.
Neither Cortex nor your retailer will be held responsible for data loss because of the lack of backups.
Cleaning the Unit
To clean the HDC-500, use only a dry soft cloth and/or compressed air. If the unit is soiled with stubborn dirt, we suggest using a 2:1 solution of distilled water and 30% isopropyl alcohol. Avoid using harsh cleaning chemicals such as benzene, paint thinner, bleach, or hydrochloric acid, which will damage the unit.
Operating Conditions
For optimum performance, the temperature of the operating environment should be between +5^ C to +35^ C ( +41^ F - +95^ F). Failure to maintain proper operating temperature may result in difficulty reading the LCD display, thermal overload, or system-wide instability. Avoid exposing the unit to direct sunlight.
When placing the unit in an installation, make sure that it is placed on a stable surface, as far away from vibrations as possible. Even though the Cortex is impervious to vibration, the storage devices (specifically hard drive based ones) that are designed to be used in conjunction with it are typically not. Also be sure not to place or use the player on heat generating sources, such as amplifiers or near spotlights.
Never use any other power supply other than the one provided with the unit, as doing so may damage the unit and void the warranty. The power supply included with the HDC-500 is a custom made supply and is not commercially available.
Lawful Use of HDC-500
Neither Cortex nor its dealers assume responsibility for the use made of the HDC-500. The user must ensure he/she has all relevant licences and consents in place (whether for copyright/public performance, performers rights, moral rights or otherwise) to allow the lawful use of the HDC-500. This is likely to include licences from organizations administering performance rights in audio recordings or consents from any other relevant rights holders.
The Cortex line of units, although designed to streamline the process by which DJs perform, is not designed as a tool to facilitate media piracy. We urge that our users legitimately purchase the music they plan to use, and support the artists who make it possible for them to sustain a career as a professional entertainer.
Parts Diagram and Functions
Rear Panel
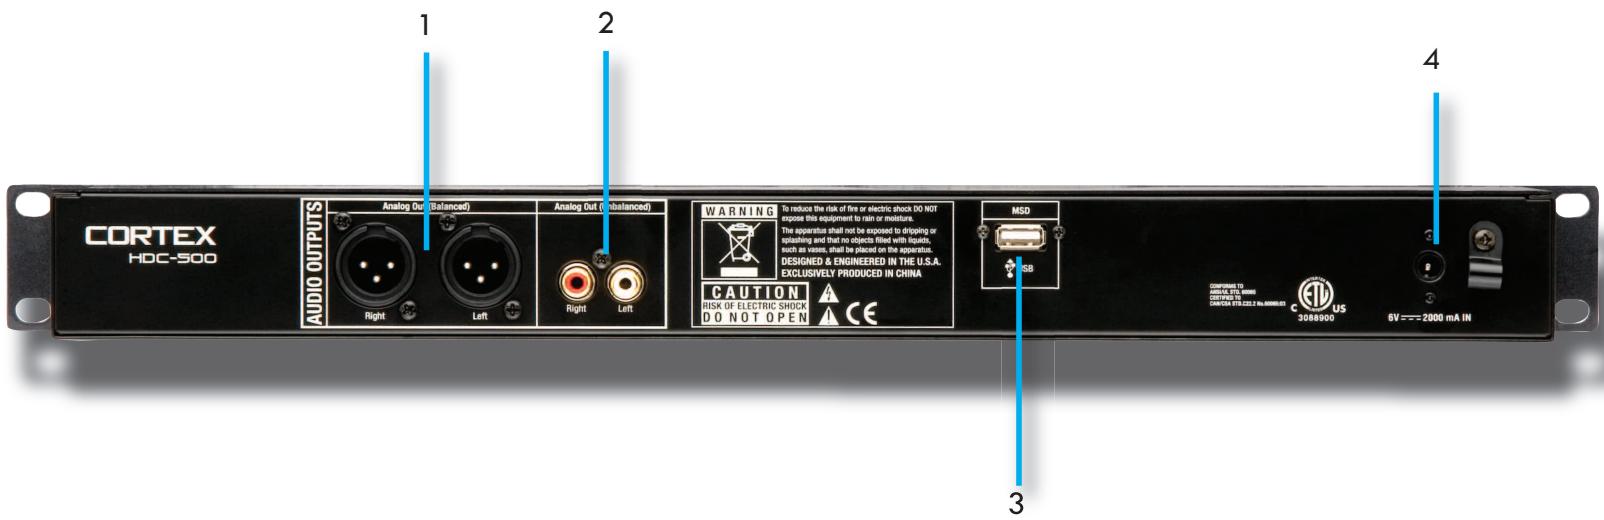
- AUDI O OUT L/R XLR connectors (BALANCED)
XLR type balanced stereo audio output. These connectors output audio signal generated from the HDC-500 unit.
- AUDIO OUT L/R RCA connectors (UNBALANCED)
RCA type unbalanced stereo audio output. These connectors output audio signal also generated from the HDC-500 unit.
NOTE: Both outputs can be used simultaneously for example one output to your mixer the other to a recording device.
- USB connector (type A)
This connector is used to attach the USB mass storage device that contains your music library. Suitable mass storage devices include, but are not limited to: external hard drives, flash memory, portable digital music players, CD/DVD-ROM drives, memory card readers, and active USB hubs.
- DC inlet w/security clamp
This connector is used in conjunction with the AC/DC adaptor to power the unit. Next to the DC inlet connector is a security clamp, which can be fastened over top of the cable to prevent it from being dislodged.
Parts Diagram and Functions
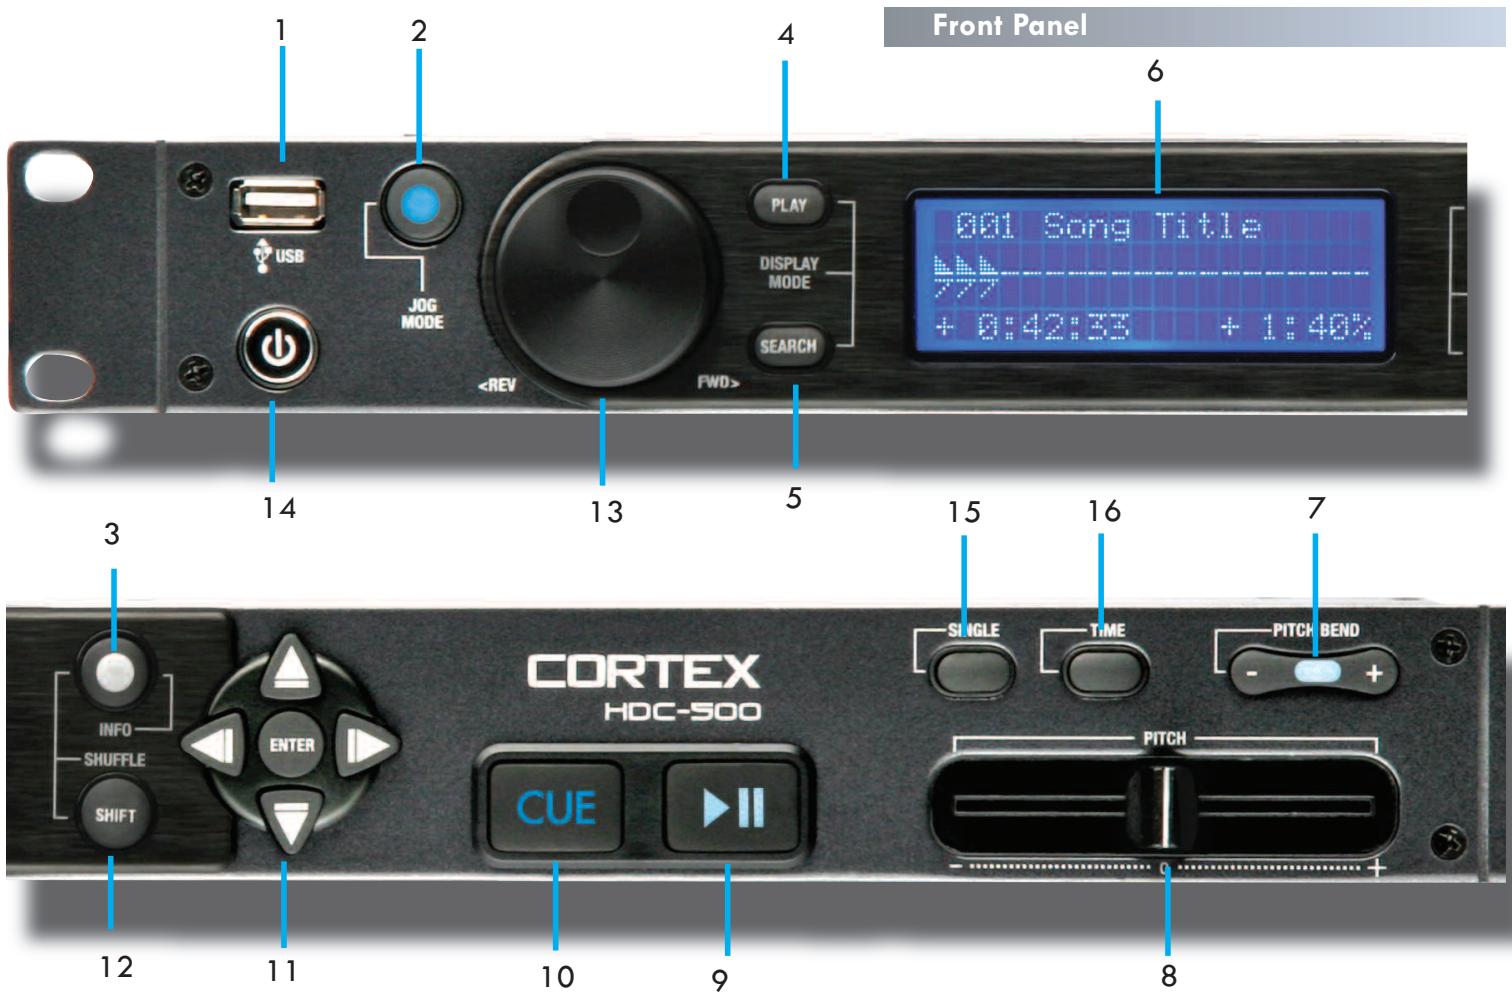
1. USB connector (type A)
This connector is used to attach the USB mass storage device that contains your music library. Suitable mass storage devices include, but are not limited to: external hard drives, flash memory, portable digital music players, CD/DVD-ROM drives, memory card readers, and active USB hubs.
2. JOG MODE button/indicator
Each time this button is pressed, this button controls alternately whether the JOG WHEEL will function as PITCH BEND or FF/REW. When the LED indicator is lit, it indicates that the JOG WHEEL will function as FF/REW.
3. INFO button
When this button is pressed, the LCD DISPLAY will show all of the attributes of the currently playing track. When the unit is in SEARCH MODE, pressing INFO on a highlighted digital music file will also show these attributes. The UP/DOWN arrows and JOG WHEEL can be used to advance through pages of attributes, when necessary.
4. PLAY MODE button
When this button is pressed, the LCD DISPLAY will return to the state that relates to playback. This means that the track name, time remaining (or elapsed), pitch percentage, and visual time indicators will be displayed on the screen. This button can be used at any time, with the exception of when the unit is creating a database.
5. SEARCH MODE button
When this button is pressed, the LCD DISPLAY will return to the state that relates the search function of the unit. This means that track titles, artist names, album names, genre classifications, playlists, file names, or search criteria will be displayed on the screen. This button can be used
at any time, with the exception of when the unit is creating a database.
6. LCD DISPLAY panel
This blue-backlit display consists of 4 lines of 20 characters each, and is used to display visual and textual information relating to the machine state of the HDC-500.
7. PITCH ON/OFF indicator and PITCH BEND buttons
Pressing both PITCH BEND (+) and PITCH BEND (-) simultaneously toggles whether or not the unit will respond to changes made to the pitch via the PITCH BEND buttons, PITCH CONTROL slide, and JOG WHEEL. PITCH is engaged when the LED indicator is lit. Momentary adjustments to PITCH can be made by pressing the PITCH BEND (+) or PITCH BEND (-) button. The range of the PITCH CONTROL can be changed by holding the SHIFT and pressing the PITCH BEND (+) or PITCH BEND (-) button. The pitch range will be displayed in the lower right hand corner of the LCD DISPLAY panel.
8. PITCH CONTROL slide
This slide, when pushed towards the right of the unit (+), increases the tempo of playback. When the slide is pushed towards the left of the unit (-), the tempo of playback is decreased.
9. PLAY/PAUSE button/indicator
When the LED indicator which illuminates this button is lit solidly, it indicates that the unit is in PLAY mode. When the LED indicator is flashing, it indicates that the unit is in PAUSE mode.
10. CUE button/indicator
When the LED indicator which illuminates this button is lit, it indicates that there is a CUE POINT memorized. See page 20 for detailed information about setting, memorizing, and recalling CUE POINTS.
Parts Diagram and Functions
Front Panel (continued)
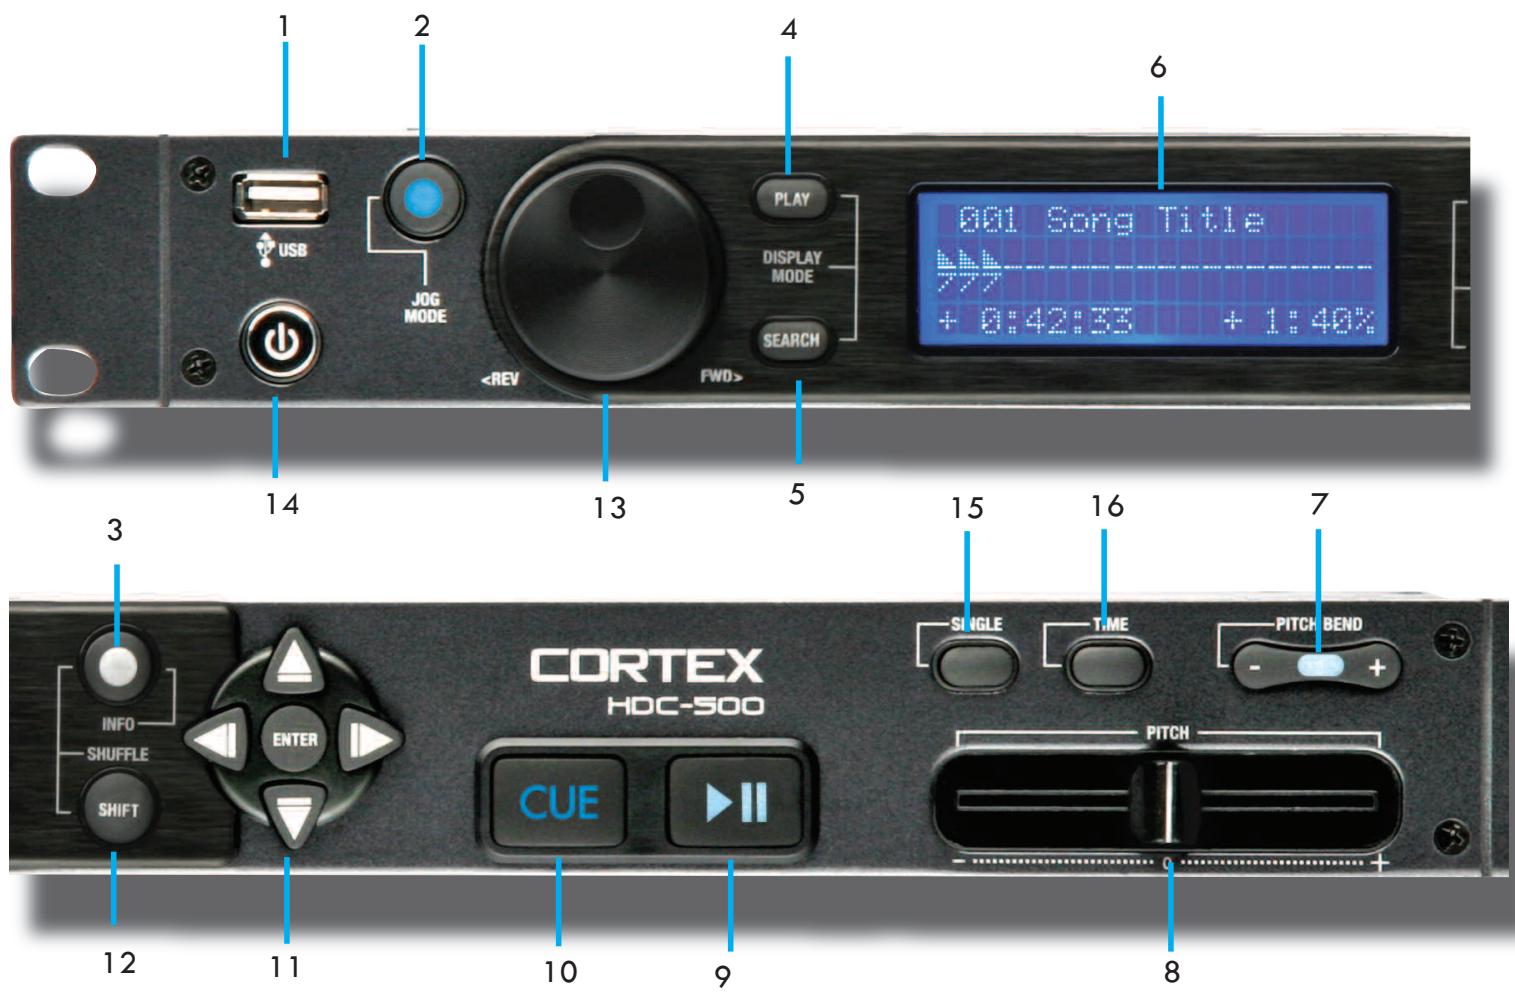
11. NAVIGATOR keypad
These buttons allow the user to navigate through menus and features of the HDC-500. Depending on the mode of the unit, the buttons may serve different purposes. See page 25 for detailed documentation of all of the functions of the NAVIGATOR, in all modes and contexts.
12. SHIFT button
Holding down the SHIFT button extends the use of certain buttons on the unit, by providing alternate functions. For more on all of the features that are augmented by use of the SHIFT button, see page 26.
NOTE: WHEN SHIFT + INFO ARE PRESSED SHUFFLE MODE IS TURNED ON
13. JOG WHEEL
The JOG WHEEL controls many aspects of the unit, and can be used for navigating through menus, searching through music and manipulation of pitch. The behavior of the JOG WHEEL is dependent on the mode of operation, as well as the status of the PITCH ON/OFF indicator and JOG MODE.
14. POWER button
The POWER button can be pressed momentarily to turn ON the unit; to turn off the unit, the POWER button must be held down for 5 seconds. Holding the SHIFT button while pressing POWER will display an additional menu, which allows for the changing and removal of USB devices, as well as setup options relating to the HDC-500.
15. SINGLE button
When this button is pressed momentarily, the state of playback (SINGLE or CONTINUE) will be displayed. To change the state of playback, hold the SHIFT button SINGLE button momentarily. The new state of playback (SINGLE or CONTINUE) will then be displayed on the LCD DISPLAY panel.
16. TIME MODE button
This button dictates whether the unit will display textual and visual time information relating to the TIME REMAINING or TIME ELAPSED. Pressing this button momentarily changes the TIME MODE of both sides of the unit, while holding SHIFT and momentarily pressing TIME will change the TIME MODE of only that respective side.
Preparing for Use
STEP ONE
Connect the AC/DC adaptor to the DC Inlet, found on the rear of the unit. Fasten the Security Clamp (found directly below the DC Inlet jack) on top of the cable, so that it is not possible for the cable to become dislodged.
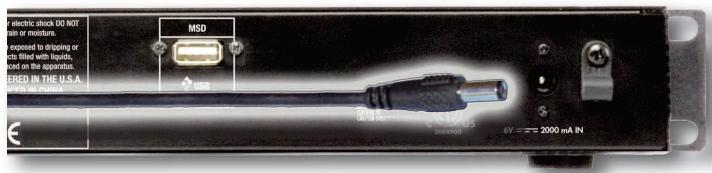
Fig 1.1 - Connect Power
STEP TWO
Connect either the XLR type (Balanced) audio output and/or the RCA type (Unbalanced) Audio Outputs to a suitable audio mixer. When connecting the unit, make sure you note that the either output will have the same music program and both can work at the same time.
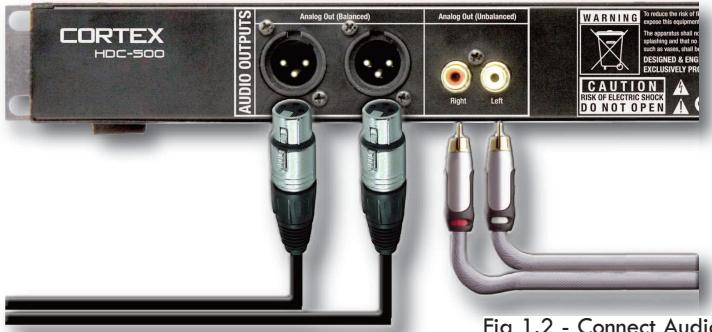
Fig 1.2 - Connect Audio
STEP THREE
Connect your primary USB device to the port found to the right of the rear panel. You may choose any driverless device that follows FAT32, NTFS, or HFS+ file systems. You may also connect a powered (active) USB hub to augment the amount of available ports. If required, you may also connect a device to the front USB port.
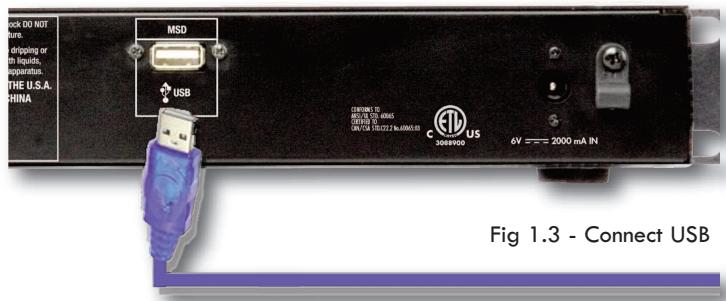
STEP FOUR
Press the Power button located to the left of the front panel. The unit will take about 5 seconds to boot up as well as detect any USB devices that are currently connected.

Selecting Devices & Database Creation
STEP ONE - DEVICE SELECTION
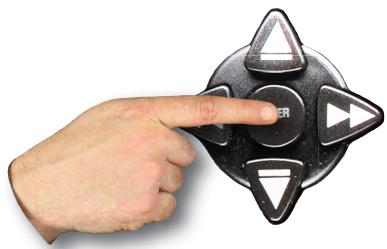
When prompted, select the desired storage device, that you wish to access. Use the Navigator Keypad to advance through the list of devices, and press Enter to select.
If necessary, you can also connect other USB storage devices without powering down the unit.
Note that when you select a storage device, the unit will be required to complete any necessary Database Creation before being able to select another device.
STEP TWO - INDEXING
Once you have selected a device, the unit will search for a database of the music that exists on that device. If it is the first time you are using that particular unit with the HDC-500, the unit will prompt you to perform indexing, so that you can search for any song within seconds. If you already have used the storage device with the HDC-500, skip to STEP TWO - VERIFICATION.
natural_image
Hand pointing at a black circular button with triangular symbols and 'ER' label (no readable text or numbers)If you wish to create the database using the HDC-500, select 'YES' from this prompt.
During the indexing procedure, the unit must create a database based off of the ID3 tags that exist on the storage device. The speed of this procedure directly relates to how many songs are stored on the connected device. If you are using a hard drive over 20 gigs, or an NTFS device, we suggest that you use the Cortex Database Creation PC application to perform the indexing, as it will save time (especially with a fast CPU). The Cortex Database Creation software is available for FREE from http://www.cortex-pro.com.
Once the indexing procedure has begun, it can be cancelled by pressing the Info button.
VERIFICATION
If your storage device has already been indexed, you will be presented with a prompt allowing you to verify the database. For each time that you add files to your storage device, you will either have to use the Verify function to add those files to the index, or use the Cortex Database Creation PC application.
We strongly suggest using the Database Creation application, as it can process files at many times the speed of the HDC-500 itself.
Once the verification procedure has begun, it can be cancelled by pressing the Info button.
Once you are finished with verifying, simply choose the option labeled 'Exit from Verify.'
Congratulations! You are now ready to start searching through your music library quickly and efficiently. Using this method will help you locate any song in your collection quicker than ever before.
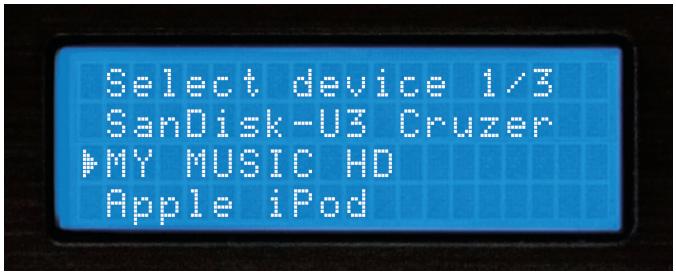
Fig 2.1 - Select USB device
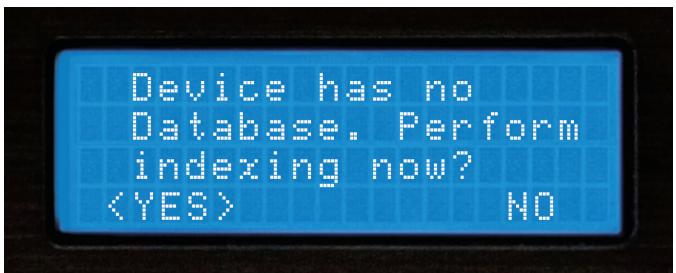
Fig 2.2 - Create Database by selecting 'YES'
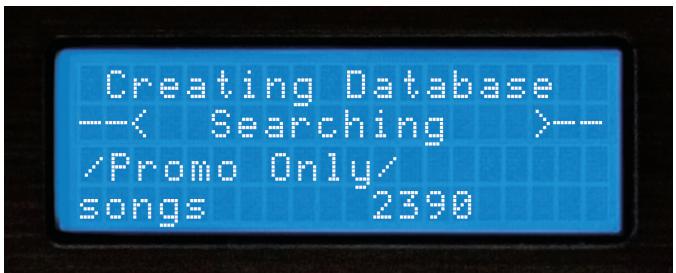
Fig 2.3 - Database Creation Screen
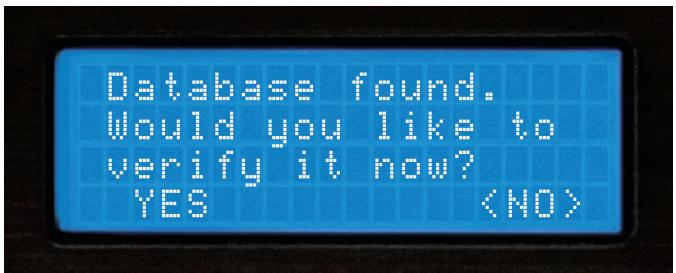
Fig 2.4 - Everytime music is added to your storage device, the database must be verified and updated in order to index the new songs.
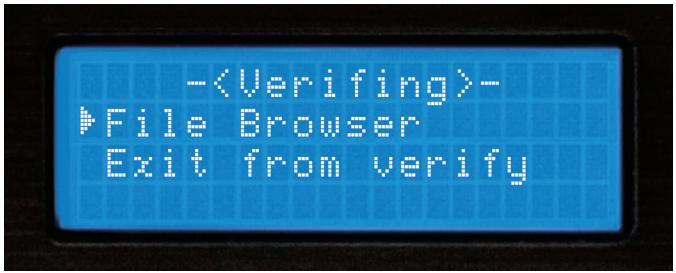
Fig 2.3 -Exit Verify
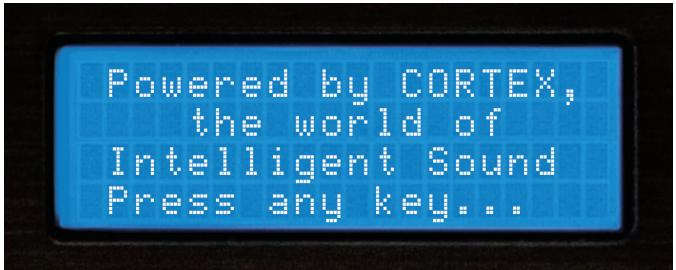
Fig 2.4 - Welcome screen shows unit is ready for use
File Browser and Search Options
USING THE FILE BROWSER
The File Browser is designed to allow you to view the directory structure found on a connected storage device, rather than search by specific criteria. This can be helpful if you keep your music collection in order, but can also help to locate a song that may not have the appropriate ID3 tag information. When a track does not have an ID3 tag, it will not be added to the searchable database of tracks.
Once you enter the File Browser, you will be presented with the file structure exactly as it exists on the storage device. Use the Jog Wheel or the Navigator Keypad to advance through entries. To go back to the Main Menu, press the left Arrow Key.
When you have found the MP3 file that you wish to play, simply press Enter, and the track will load. You may press the Search Mode button, found to the left of the display of the unit, at any time to return to the Search Options menu. Similarly, when you are in Search Mode, you may press the Play Mode button to return to the play screen.
SEARCH OPTIONS
The database-driven searching of the HDC-500 provides DJs with a quick and easy way to find tracks amongst a large library, by allowing the user to search by Song, Artist, Genre, Album, or String. Simply choose one of these Search Options, and that particular criteria will be displayed in alphabetical order.
Search by Songs
When you Search by Songs, you will see presented with all of the track titles in the database that has been created by the HDC-500 or the helper software application.
Search by Artists
When you choose Search by Artists, you can narrow down the amount of results by first selecting the artist you wish to browse, then you can easily select the track you want to play.
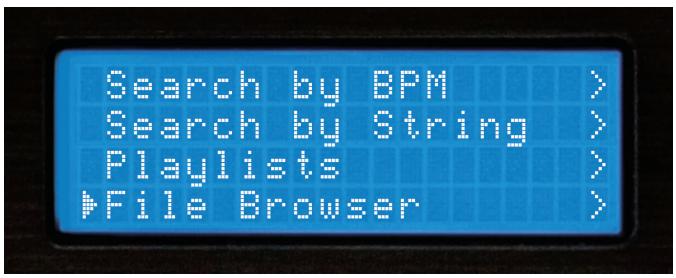
Fig 2.5 - Selecting File Browser from Main Menu
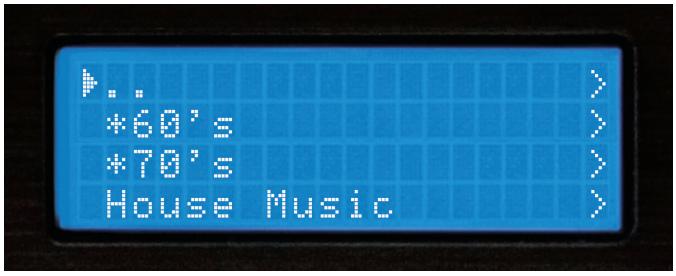
Fig 2.51 - Browsing file/directory structure using File Browser
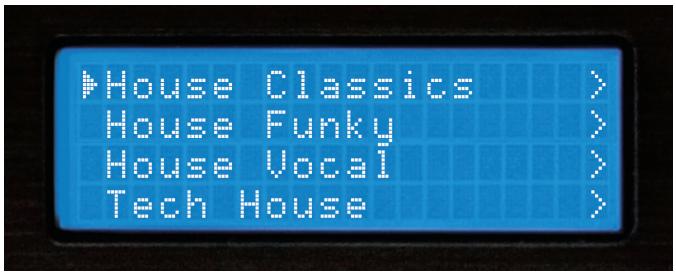
Fig 2.52 - Browsing files in the House Music directory using File Browser

Fig 2.6 - Searching by song title
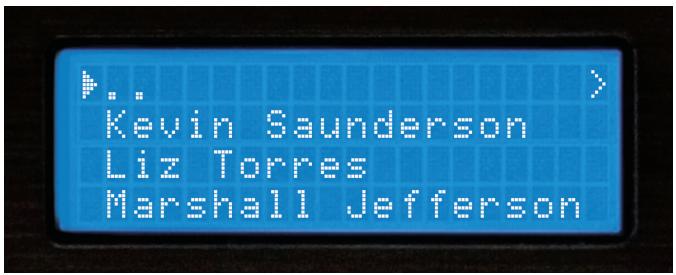
Fig 2.61 - Searching by artist
Search Options (continued)
SEARCH OPTIONS (CONTINUED)
Search by Genres
When Search by Genres is chosen, you will be presented with a list of all of the genres found in the database. Because not every MP3 has ID3 genre tagging, some tracks may not be displayed in this search. Once you select a genre from the list, you will be able to browse all songs within that genre.
Search by Album
Using the Search by Album option will allow you to search by the name of the album that a track is from. Keep in mind that this option also may not allow you to access all tracks, because sometimes singles are sold separately and are not taken from any specific album. Once you select an album, all of the tracks found under that album will be displayed.
Search by String
One of the most convenient features of the HDC-500 is string search, which allows you to find a specified word or string of words within the database. This is exceptionally helpful when you (or your client) has a request, but does not know the exact title or artist.
Once you have selected 'Search by String,' you will be presented with a prompt where you may input a word or series of words that will be used when querying the database.
USB Keyboard
You can control your HDC-500 by from any wireless or corded USB keyboard. Just plug in a USB keyboard into any of the USB jacks and you can string search for songs to input directly into the player you can also control many of the functions of your player from the keyboard, below is a list of key names and thier corresponding functions.
| KEYBOARD | CORRESPONDING FUNCTION / KEY ON PLAYER |
| TAB | Switch active side the keyboard is controlling (no affect on single units) |
| ENTER | Enter |
| Arrows | MF Navigator keypad |
| + | Pitch bend + |
| - | Pitch bend - |
| Shift | Shift |
| CTRL-S | Search Mode |
| CTRL-P | Play Mode |
| CTRL-C | Cue |
| CTRL-Space | Play/Pause |
| CTRL-J | Jog Mode |
| CTRL-I | Info |
| CTRL-T | Time |
| CTRL-1 | Single |
| CTRL-D | Device Menu |
NOTE: No matter what mode you are in, when you start typing, the HDC-500 will jump to the string search screen.
You can also use the Jog Wheel or Up/Down arrows (on the Navigator Keypad), to input the first letter of the Search String. Use the Right arrow or the Enter Key to advance to the next space, and enter the next letter. You may press the Left arrow to go back to the previous letter, or press Shift+Left to backspace (deletes the previous letter).
Finally, when the Search String is entered, you will need to press the Enter key twice, and the unit will execute the search.
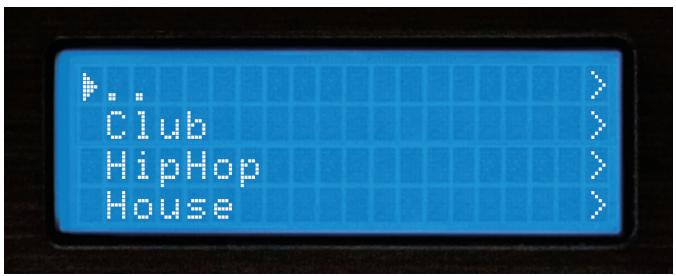
Fig 2.63 - Searching by genre
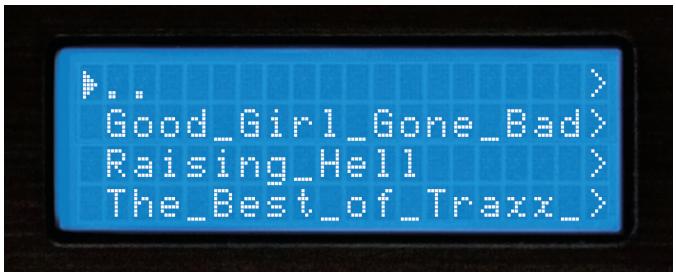
Fig 2.64 - Searching by album
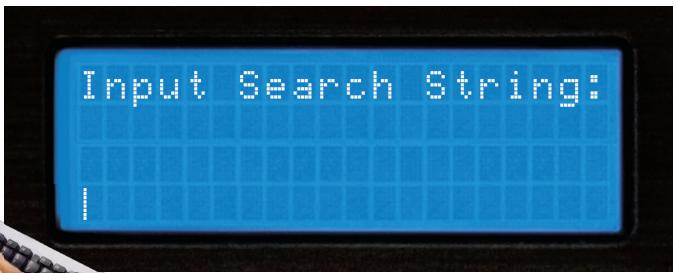
Fig 2.65 - String Search input prompt
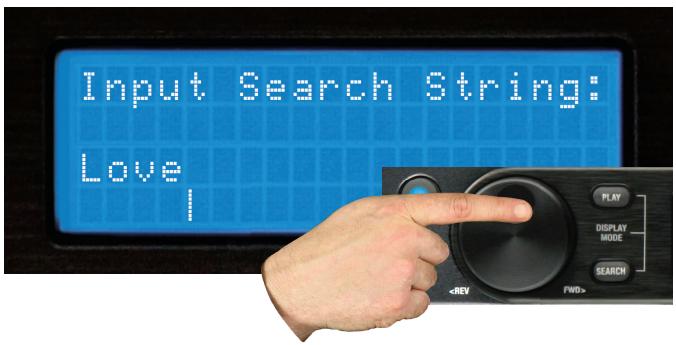
Fig 2.66 - Using Jog Wheel to input a string
Search Options (Continued) and Waveform
SEARCH OPTIONS (CONTINUED)
Once you press Enter twice, the unit will begin processing your search. Depending on the size of your library, this may take awhile.
After the unit is finished executing the search, it will display the results that were found for each category: Titles, Artists, Genres, and Albums - each of which can be accessed by using the Navigation Pad Arrow Keys or the Jog Wheel. Note that the amount of results found under each category will be displayed in parenthesis. In this example, there are 10 titles of songs with the word "LOVE" in them, and 1 artist.
Once you have chosen a category - Titles, Artists, Genres, or Albums, you will browse through the selections as if you were in any of the other search modes. Once again, you may select a track using the Jog Wheel or Navigation Pad, and press Enter to load it.
BPM SEARCH FEATURE
You can also read the BPM off of your songs ID3-tags search by BPM, if your songs do not have a BPM in thier ID3-tag they will be considered 0 BPM and the unit will display songs from lowest to higest BPM.
NOTE: There are many third party programs that will allow you to automatically or manually input the BPM's for all your music.
WAVEFORM FEATURE
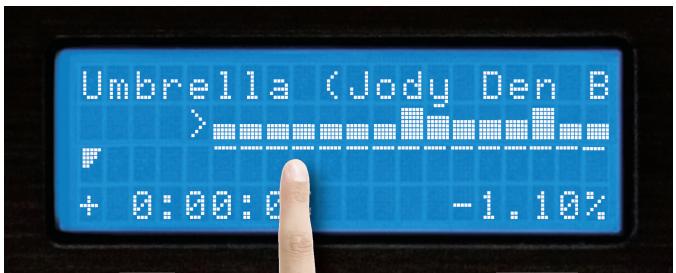
This feature allows you to see a block diagram representation of the high and low volume peaks for the chosen song, which scrolls along while the songs plays, an arrow represents the exact point at which the song is playing.
To disengage the WAVEFORM display feature just hit the PLAY button in the display mode section.
By using the DB SE software (Downloadable off our website) WWW.CORTEX-PRO.COM you can create waveforms for all your music files.
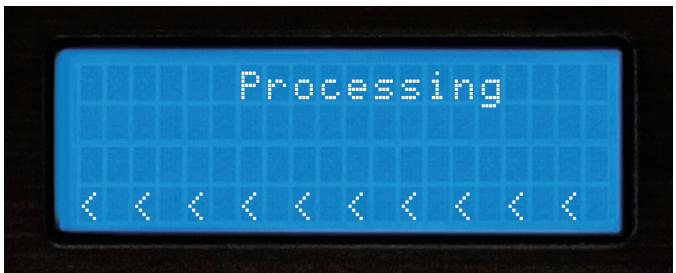
Fig 2.67 - Processing the Search
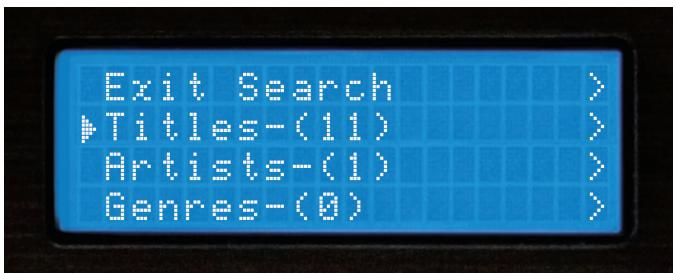
Fig 2.68 - Displaying result categories
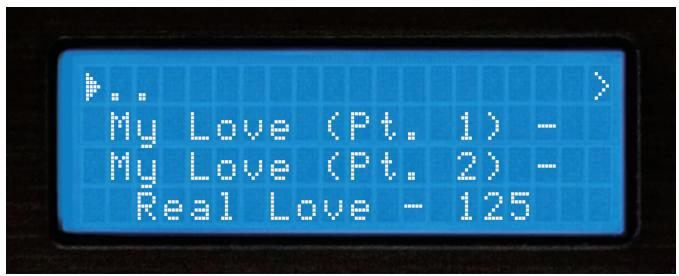
Fig 2..69 - Selecting a matching title from the executed search
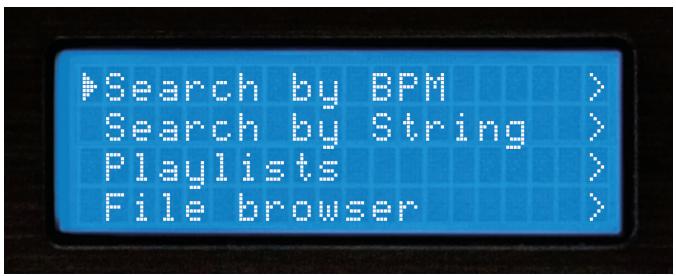
Fig 2..70 - Search by BPM
natural_image
Close-up of a human hand giving a thumbs-up gesture (no text or symbols visible)Fig 2..71 - Waveform
Info Button & Track Attributes
You will find that the Info Button, located to the top middle of the HDC500 and will become an indispensable part of using the HDC-500. Despite the HDC-500 being able to display an adequate amount of information on the LCD, not every attribute of each track can be displayed all at once. Additionally, there will be times when you may run into two tracks with the same title, and the Info Button will help to reveal which track you truly want to select.
While in Play Mode or Search Mode, pressing the Info button will display all attributes relating to the currently playing or currently selected track (depending on whether you are in Play or Search Mode).
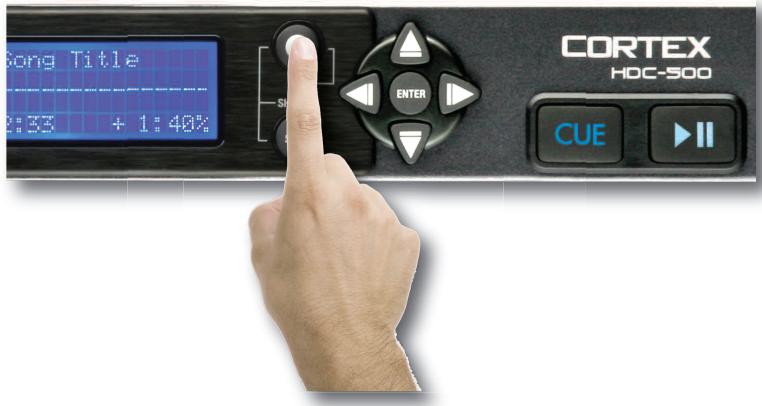
Fig 2.7 - The Info Button is used to display all track attributes
The Info function displays:
Artist - Artist as per what is listed in the ID3 tag
Title - Title as per what is listed in the ID3 tag
Album - Album as per what is listed in the ID3 tag
Type of File - Whether the file is MP3 or WAV
Genre - Genre as per what is listed in the ID3 tag
Path & Filename - Exactly how it exists in the directory structure of the storage device
Note that most of the attributes are taken directly from the ID3 tag found in the MP3 file. If the ID3 tag is missing any of these attributes, they will not be displayed in the Info screens.
Once you have pressed the Info button, you will be presented with all of the attributes relating to the currently playing or selected track. You may use the Navigation Pad Arrow Keys or the Jog Wheel to scroll up and down to view all of the information.
To exit the Info screens, you may press the Info Button again, or you may press either the Search or Play Mode buttons to jump immediately to those modes, when applicable.

Fig 2.71 - Information Screen 1 of 3
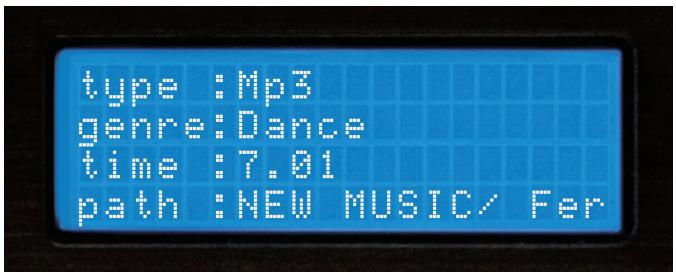
Fig 2.72 - Information Screen 2 of 3
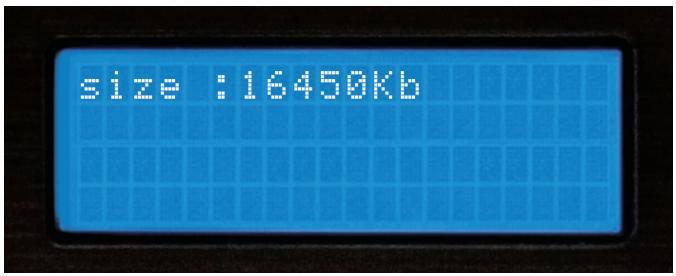
Fig 2.73 - Information Screen 3 of 3
Play Mode and Single Auto Cue
Section Five: Play Mode
The Play Mode is the heart of the Cortex HDC-500. Just like conventional CD players, the HDC-500 allows you to select multiple pitch ranges, memorize cue points, and frame accurate searching. The HDC-500 excels over traditional CD players, as it is much faster at loading and starting playback, it has a more informative LCD display, and it can memorize cue points for future performances.
Entering Play Mode
By default, when you press Enter to select a track from Search Mode, the unit will immediately load the track and enter Play Mode.
If music is already playing and you wish to return to the Play Mode screen, simply press the Play Mode button.
Single Mode (Single Auto Cue)
Single Mode, when a track is loaded, it will automatically cue to the first frame of audio, and then wait for you to press Play. At the end of that track, the unit will pause. To engage this mode, press Shift+Single on each side you wish to engage this mode on.
When Single Mode is off when loading a track, the unit will begin playing immediately. At the end of that track, the unit will continue to play the next file displayed in the Search Results. When Single Mode is off, this gives you the ability to play all of the Search Results in the order that they were displayed. Pressing Shift+Single will also allow you to turn Single Mode off.
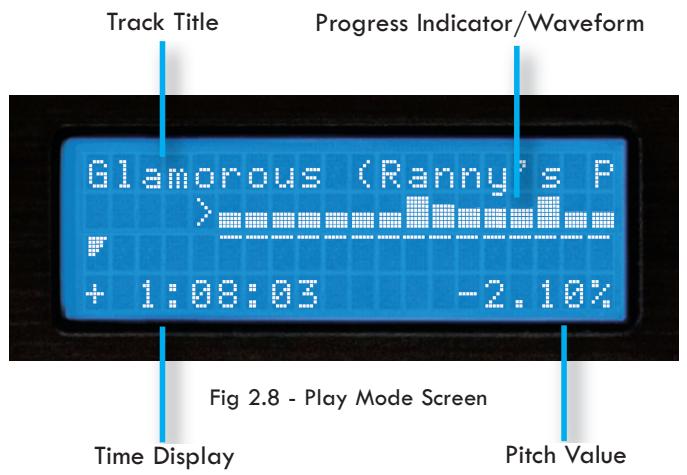
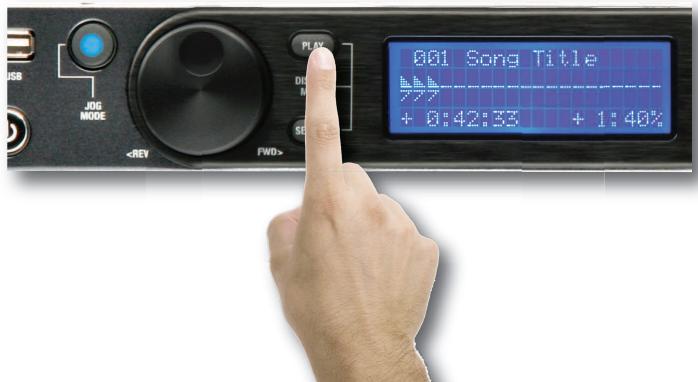
Fig 2.81 - Entering Play Mode
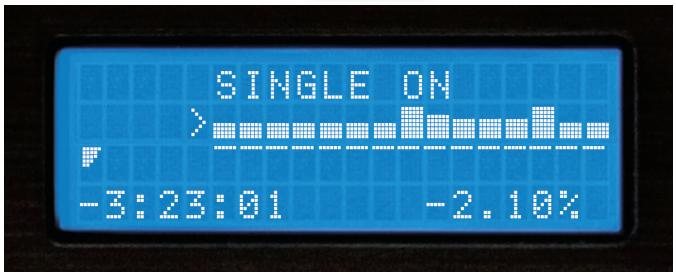
Fig 2.82 - LCD Display shows status of Single Mode
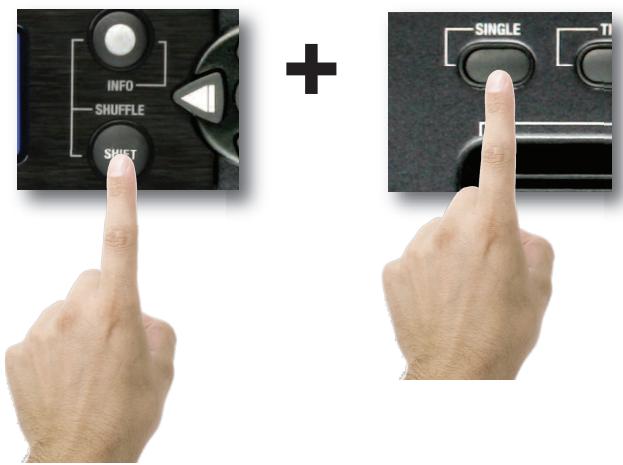
Fig 2.83 - Using Shift+Single to toggle Single or Continuous modes
Time Display and Pitch Control
Time Display Modes
Changing the Time Display Mode is as simple as pressing the Time button to toggle between elapsed and remaining time. Elapsed Time shows how much time has past since the beginning of the track, and Remaining Time shows how much time is left before the track is over.
You may press Shift+Time to change the Time Display Mode.
When the Time Display Mode is changed, you will also notice that the Progress Indicator will also change to reflect either Elapsed Time or Remaining Time.
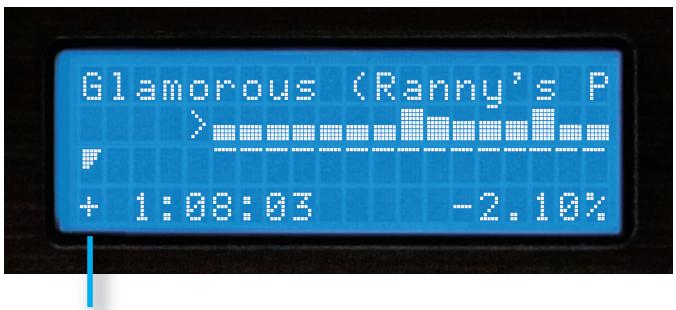
Fig 2.9 - LCD Display and progress indicator in time elapsed
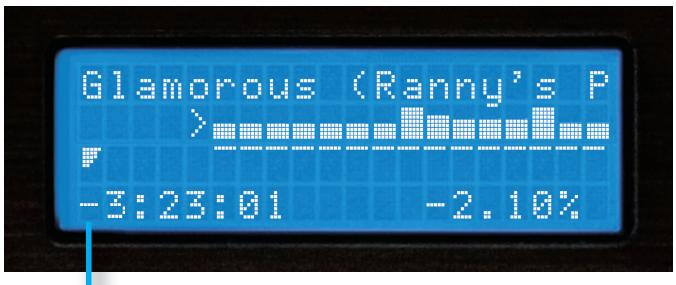
Fig 2.91 - LCD Display and progress indicator in time remaining
Pitch Control, Pitch Bend, and Pitch Ranges
The Pitch Control allows you to speed up (or slow down) the playback of a track by a desired percentage. The HDC-500 offers Pitch Ranges of 4, 8, 16, and 24%, in order to provide a wide level of flexibility when manipulating digital music files. In 4 and 8% mode, 0.05% Pitch Resolution can be achieved, allowing for a more precise level of adjustment.
To toggle Pitch On or Off (the unit will not respond to pitch changes when Pitch is Off), press both the Pitch Bend (+) and Pitch Bend (-) buttons simultaneously. The LED indicator will illuminate when Pitch has been turned On.
To change Pitch Ranges, press Shift+Pitch Bend (+) OR Pitch Bend (-) buttons simultaneously. The Pitch Display on the LCD screen of that respective side will momentarily display the new Pitch Range.
For a momentary change in Pitch, the Pitch Bend (+) and Pitch Bend (-) buttons will temporarily increase or decrease pitch relative to the amount of time either button is held down.
When the Jog Mode is not engaged (LED remains unlit), you may also use the Jog Wheel to perform a Pitch Bend.
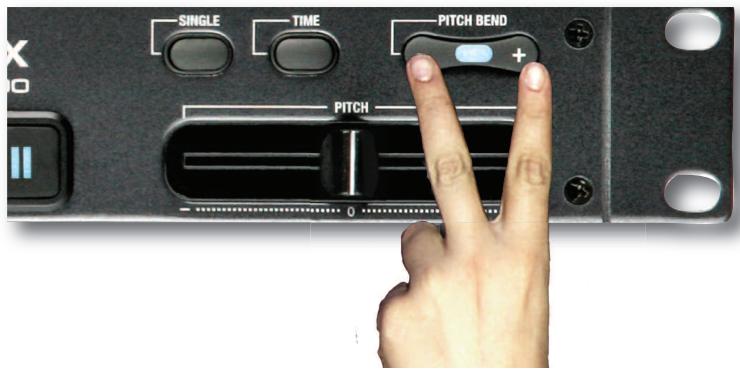
Fig 2.91 - Pitch On/Off by pressing both buttons simultaneously
Jog Mode and Playback Navigation
Jog Mode
When the Jog Mode LED is unlit, the Jog Wheel (when in Play Mode) will perform a Pitch Bend.
When the Jog Mode button is pressed, the LED indicator will illuminate, and the Jog Wheel will then allow you to search (FF/REW) through each track. The faster the Jog Wheel is moved, the faster the unit will search through the playing track. In order to use the Jog Mode, the unit must be in the process of playing, not paused.
Playback Navigation Functions
Using the Navigation keypad left & right buttons, you can search through a track similar to using the Jog Mode function.
Using the Navigation keypad up & down buttons will allow you to skip to the previous or next track that was found in the Search Results. For instance, if you searched by Artist, and your Search Results displayed 10 tracks by that Artist, using the Navigation keypad up & down buttons will allow you to skip between those tracks.
iPodPlaylist Support
Although there is no facility to create playlists on the HDC-500 unit, you can load iPod ^TM playlists that are created using iTunes ^TM .
Once a playlist has been constructed using iTunes ^™ , it can be loaded from the main Search Options screen.
Creating a Simple Playlist
When using the File Browser with Single Mode OFF, you can play all of the files in a specified directory simply by choosing the first file and letting the unit continue playing. If you change the filenames (via your PC) to be preceded by a number, the HDC-500 will play them in numeric order.
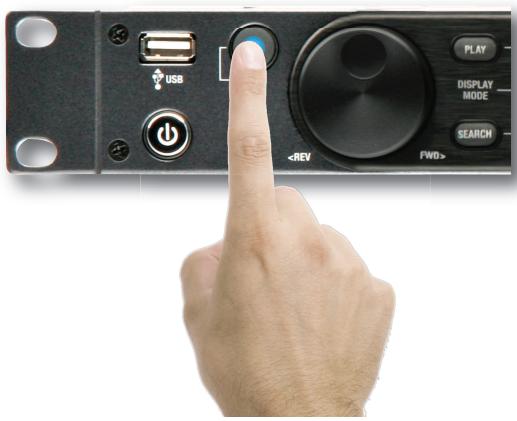
Fig 3 - Engaging Jog Mode for FF/REW using the Jog Mode button
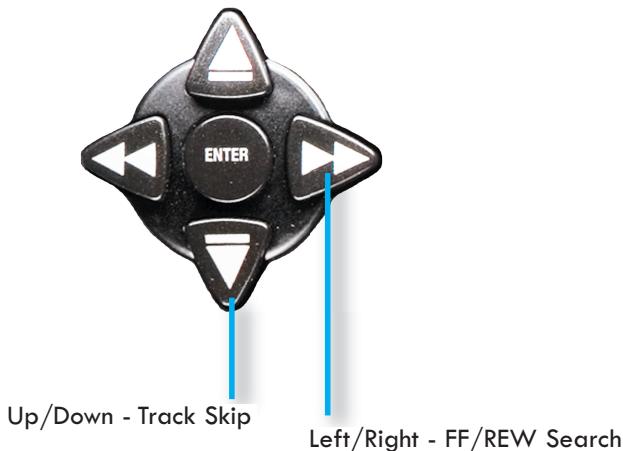
Fig 3.1 - Navigation keypad functions in Play mode
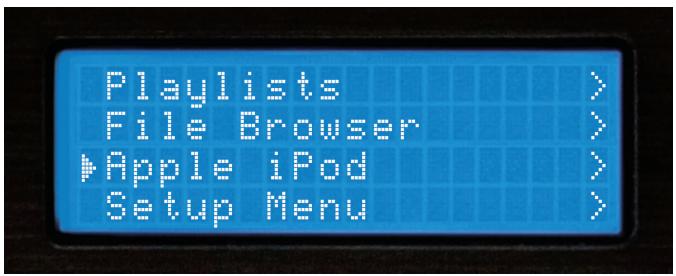
Fig 3.2 - iPod/XML Playlist option from the Search Menu
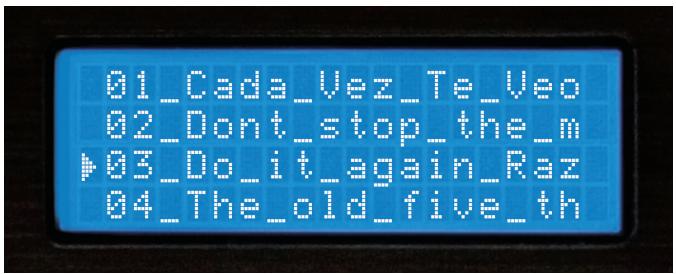
Fig 3.3 - Simple Playlist by using numbered files with File Browser
Cue Points & Memorization
Setting and Memorizing Cue Points
With the HDC-500, creating and memorizing cue points is quick and easy.
By default, when there is no Cue Point set (or memorized), pressing the Cue button returns the unit to the beginning of the track (0:00.00) and pauses.
To set a Cue Point during playback at a time of your choice, simply press Pause, and then use the Navigation keypad left & right buttons or Jog Wheel to make any adjustments by frame. When Play is pressed to resume playback, the Cue Point will be stored.
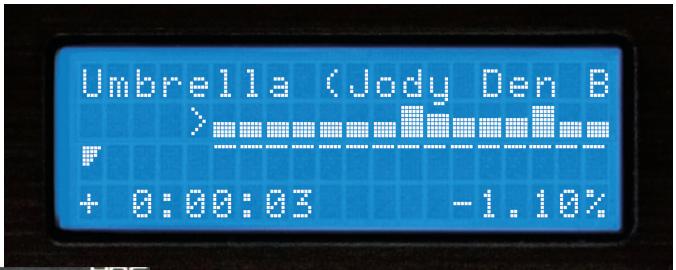
Fig 3.4 - Pressing CUE to return to 0:00:00.
To memorize the Cue Point and save it to the USB storage device (to be recalled each time the track is loaded), find the exact frame that you wish to set as a Cue Point, and press Shift+Cue. This will permanently set & save the Cue Point to the storage device. This process can also be done on the fly, without the unit being paused. The screen will indicate when a Cue Point has been stored.
To advance back to the set Cue Point, simply press the Cue button during playback. Do not press Pause first, as this will instead set a new point. Once advanced to the Cue Point, the unit will remain in Pause mode.
To memorize a new Cue Point, you do not have to erase the previously set one. You can simply press Shift+Cue again, and it will replace the old Cue Point.
Please note that in order for a Cue Point to be saved to the connected USB storage device, it must be a FAT32 file system.
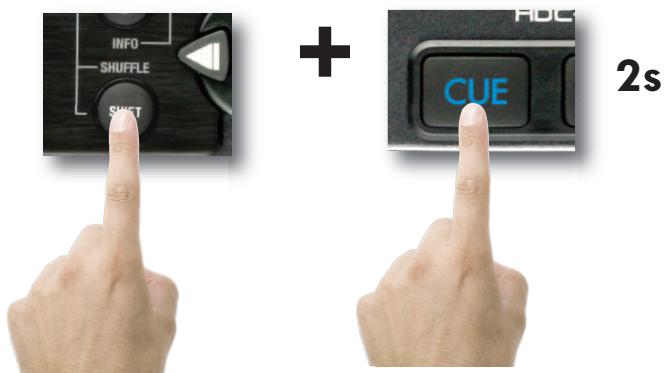
To erase the saved Cue Point completely, hold Shift and press Cue for two seconds, until the screen indicates that the Cue Point has been deleted.
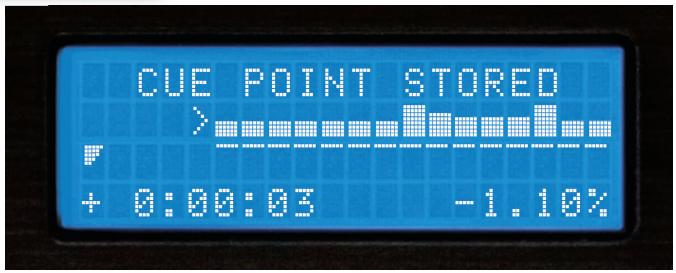
Fig 3.41 - Cue Point Memorization using Shift+Cue
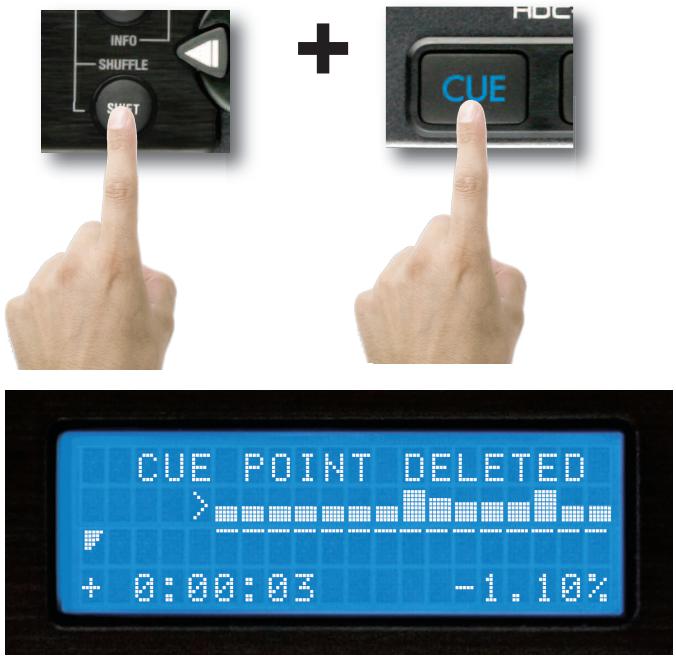
Fig 3.41 - Cue Point Deletion using Shift+Cue
Device Menu
Changing, Adding, and Ejecting USB Storage Devices
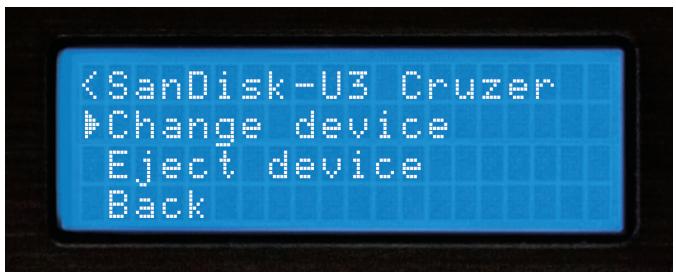
To access the Device Menu from any screen, press Shift+Power. From this menu, you can choose to Change or Eject Devices.
Since USB is hot-pluggable, you can connect (but not disconnect) a USB device at any time, regardless of whether the unit is powered. On or not and regardless of what mode the unit is in.
- To Change devices:
- Select Change device from the Device Menu.
- Select the new device you wish to switch to using the Navigation keypad or Jog Wheel.
- Perform any necessary catalogging or verification (as found in Section Two: Selecting Devices & Database Creation)
- To Eject devices:
- Select Eject device from the Device Menu.
- Select the new device you wish to Eject using the Navigation keypad or Jog Wheel. Press Enter to eject the device.
- When the display reads "The device can be safely removed," you may disconnect the USB device.
- If you are using a USB CD-ROM or DVD-ROM drive, you must use the Eject procedure in order to open the CD/DVD tray.
If the Eject procedure is not followed, there is risk of corrupting any files that are open when the device is disconnected.
Shuffle Mode, Loop & Soft Power
Shuffle Mode
A useful feature for unattended playback is Shuffle Mode. This feature randomly selects tracks based on what is narrowed down using the Search Criteria. For instance, if you select All Songs as your Search Criteria, then the unit will randomly select any song in that list. If you select Search by Artist, the unit will randomly select music from that Artist only. The same applies to Genre, Album, String, or even the File Browser. Shuffle Mode is toggled on and off by pressing Shift+Info, the LCD display will indicate when Shuffle has been engaged or disengaged.LOOP FEATURE
Once you have loaded a song press and Hold the info button down from 1 to 2 seconds and this will engage the LOOP feature (Fig1).SET LOOP
Then to set the start point press ENTER once This will set the IN point of the loop (Fig 2) represented by a lowercase (i) and then press the ENTER button again to set the OUT point of the loop (Fig 3) represented by a lowercase (o) The loop will continue playing until exitedEXIT LOOP
To exit the loop and continue playing the song press the RIGHT cursor button. (Fig 4). Then to RELOOP or to re-engage the same LOOP press the LEFT cursor button (FIG 5) and the loop will start again continuing until The RIGHT cursor (EXIT) loop button is pressed. (FIG 4)DISABLE LOOP FEATURE
To Disable the loop feature just press and hold the INFO button for 1-2 seconds and the player will resume normal operationPowering the Unit Off
Similar to modern computers, the HDC-500 has a soft-power-off feature, as the unit has to close all connections with USB devices and go through a shut down procedure before the power is removed. This also protects against accidentally turning the power off. In order to power down the HDC-500, simply hold the Power Button down for 3 seconds.  Fig 3.7 - LCD Display shows Shuffle Status flowchart
graph TD
    A["Shuffle"] --> B["ENTER"]
    B --> C["SHIFT"]
    D["INFO"] --> E["SHUFFLE"]
    E --> F["ENTER"]
    F --> G["SHIFT"]
    H["INFO"] --> I["SHUFFLE"]
    I --> J["ENTER"]
    J --> K["SHIFT"]
    L["INFO"] --> M["SHUFFLE"]
    M --> N["ENTER"]
    N --> O["SHIFT"]
Setup Menu
The Setup Menu can be accessed as the final option on the Main Menu. Each option is changed by pressing the Enter key repeatedly. To exit the Setup Menu, simply press the left arrow key on the Navigator keypad. Pitch Bend - slow, norm, and fast - slow : bends at a rate of approx. 1% per second - norm : bends at a rate of approx. 2% per second - fast : bends at a rate of approx. 4% per second Enable Pitch - on/off This determines whether or not the pitch function will be enabled on start-up or not. Some entertainers who never use the pitch function will prefer to turn this 'off'. Pitch Range - 4, 8, 16, 24% This determines the default Pitch Range when the unit is first powered on. 4 or 8% Pitch Range will allow much finer adjustment, using 0.05% Pitch Resolution. Indexing - on/off When this is set to 'off,' the unit will never prompt to create a database. This is useful for DJs that already keep a meticulous organization system of directories, or for permanent installations. Time - elapsed/remain This option toggles the default time display to show either time elapsed or time remaining during the playback of each track. Auto Fade - 0-12 sec/ Off When in either continuous mode or playing from a playlist Autofade in the ON position will cut the gap between songs and fade between them, you can set the length of the fade from 0-12 seconds. Shuffle - on/off When this option is enabled, the unit will play at random, based on the search criteria. If you select 'All Songs', it will shuffle all songs. If you select 'The Kinks' as an Artist, it will shuffle all songs by The Kinks. Single - on/off This toggles whether the unit will default to Single Auto-Cue mode or Continuous mode when powered on. Jog Mode On/ Off The same as the JOG button this changes the JOG WHEEL function to either PITCH BEND or SEARCH. Restore DB If your DB gets corrupted in the HDC-500, Restore DB will reload the saved DB from your mass storage device. Waveform Size 5 sec, 10 Sec, 20 Sec, 40 sec Changes the the length of time that the waveform will display. Autoload Waveform Yes/No Will determine if the waveform will be displayed. BPM from ID3 Tag On/Off The HDC-500 will Display the BPM information from the id3 tag of a song file if the songfile has no BPM information the BPM display will remain blank. Language English, Spanish and French Lets you choose which langugae the HDC-500 will display in its MENU.  Fig 3.9 - Setup Menu is the last option from the Search Options  Fig 3.91 - Setup Menu page 1 of 4  Fig 3.92 - Setup Menu page 2 of 4  Fig 3.93 - Setup Menu page 3 of 4  Fig 3.94 - Setup Menu page 4 of 4Firmware Updates
One of the most powerful features of the HDC-500 is the capability to upgrade the internal software. This lends itself to the addition of new features and support, the optimization of current processes, and the capability to fix bugs as they arise. Firmware updates will be issued periodically at http://www.cortex-pro.com. We suggest that you stay as current as possible with all updates in order to insure the highest level of functionality and compatibility that Cortex has to offer. To check the version of firmware installed: 1. Power on the HDC-500 with NO DEVICES CONNECTED. 2. At the prompt that says 'Insert Devices,' press the INFO button. 3. The screen will display the version number of the currently installed HDC-500 firmware. To update the firmware, follow these steps: 1. Using Internet Explorer ONLY, download the latest firmware upgrade from http://www.cortex-pro.com. Other web browsers may rename the file extension, which will result in the unit not recognizing the update file. 2. Place the file in the root directory of your external USB storage device. 3. Connect the USB storage device to the HDC-500, and select it from the Device Menu (during startup). Make sure your HDC-500 is connected to a stable power source, where there is no potential of the unit losing power during update. 4. When the HDC-500 detects the firmware in the root directory of the USB storage device, it will ask you if you want to apply the update. You must answer YES. If the version of firmware on the storage device is the same or older than what you have, it will be ignored. 5. When updating, the unit will go through 8 stages. This will take only a few minutes. If the power is interrupted or the USB device is removed during this process, it can damage the operating system of the unit. 6. When the update is completed, the unit will shut itself down. You must press power to restart the unit. Once the unit has booted up again, the new software will take effect. You may then erase the firmware update from your USB device at your convenience (it will not be detected again).  Fig 4.1 - Automatic detection of new firmware, option to update  Fig 4.2 - Updating the firmware in 8 stages  Fig 4.3 - Power shuts off completely when the update is completeUsing iTunes ^TM to optimize your sound files
Before you dock your iPod ^™ and use it with the HDC-500 there are a few setup tasks you must do first: (A) Enable your iPod™ for disk use (B) Prepare your computer so that when you rip music into your computer it will be of the supported format. (C) Convert any files that you have pre-ripped and or downloaded so they will work with your HDC-500ENABLE YOUR iPOD™ FOR DISK USE
First and most important is setting up your iPod ^™ so your Cortex player can read it. Plug in your iPod ^™ to your computer and wait for iTunes ^™ to identify it. When you see a representation of your iPod ^™ on your main screen, scroll down to options and un-click the “manually manage music” box and make sure that the “Enable for disk use” box is checked. Then you can re-check “the manually manage music box depending on whether you do or do not want iTunes ^™ to manage your music.  iTunes™ SETUP FOR MAC OR PC (PC SHOWN)
The following are the preferred settings you will want, to optimize iTunes and ensure all your music files are supported and will play on your HDC-500. On your Mac or PC open iTunes™, then under the “EDIT” pull down menu (iTunes™ menu for MAC) go to preferences, when the preferences box opens choose the “ADVANCED” pane, and in the “ADVANCED” pane choose the Importing button   First where it says “On CD insert” choose “Ask to import CD” option, which will set iTunes™ to prompt you when a disc is inserted, so iTunes will not automatically start ripping a cd when  inserted. Then, next to the "Import Using" you can choose one of two formats.NO COMPRESSION(WAV)
If you wish to keep your music files Full quality (No compression) you may set the Import Using button to WAV encoder, and set the "Setting" menu to automatic, The rest of the setting should  stay as they were. Settings for importing as WAV. But remember files that were downloaded or ripped to Mp3 will not sound any better by converting them to this format all you will be doing will be increasing thier size 300%!Using iTunes ^TM to optimize your sound files (continued)
COMPRESSION(Mp3)
Cortex chose to use the Mp3 format because it is the most widely used format for digital music compression. So when Mp3 Encoder is chosen set the SETTINGS menu to CUSTOM because although the default setting is Higher Quality (192 kbps) we recommend (320 Kbps) because its a generous increase in sound quality without sacrificing file size. Next to Stereo Bit Rate: Choose (320 kbps) and under it make sure that the "Use Variable Bit Rate Encoding (VBR)" box IS NOT CHECKED! VBR files are not as reliable as Constant Bit Rate (CBR) files which is the default.  The rest of the settings can stay as the default with the exception of the last box (Filter Frequencies Below 10Hz) should be unchecked because although it may be fine to filter those frequencies for your laptop that barely audible low end can go a long way in a big club system.Finally the Mp3 encoder settings box should look like this.
Once that is done hit OK twice and iTunes™ will be ready to rip/convert all your files to the proper form of Wav and or Mp3 used by your HDC-500. AAC and DRM FILES
Most downloaded or ripped music is in the appropriate Mp3 format, however you may have ripped CD's on to your drive with the default settings in iTunes™ or another ripping program which would have created files that may not be currently supported. Or you may have purchased songs from iTunes and those files may be copy protected and are also known as DRM files, which must be sorted out of your iTunes because they cannot be converted. Here are a few easy steps to quickly identify, sort and/or convert all other files including AAC and DRM files which are not currently supported with your HDC-500. First you must identify the different type of files and to do that you must sort them by file type also known as “KIND”, if you do not have a “KIND” column displayed in iTunes™ you can set iTunes™ to display one by right clicking on the top of the NAME column and adding “Kind” as one of the sort column’s,| Name | Time Artist | Album | Genre | My Rating | Play Count | |
| ✓ Ain't nobody ✓ back to life ✓ Back to Life (Acapella) ✓ Back to Life (club mix) ✓ Batterie ✓ Beats & Drums E.P. ✓ Beautiful people ✓ Big Love ✓ Big Love - Dronez Mix ✓ Blow Your Whistle (Radio edit) ✓ Blue Monday ✓ The Bomb! (These Sounds Fall ✓ Born Slippy (Extended) ✓ Brighter Days (Underground G ✓ Buffalo Gals ✓ Cafe Del Mar ✓ Call On Me ✓ Can you Feel It ✓ Can you Feel It ✓ Can you Feel It (original mix) | Auto Size Column Auto Size All Columns | Chalva Khan ful ful ful ful Artist Beats Per Minute Bit Rate Category Comment Composer Date Added Date Modified Description Disc Number Episode ID Equalizer ✓ Genre Grouping Kind ✓ Last Played | Record Collection Record Collection Record Collection Record Collection Xirbir - Incite 49 Record Collection Record Collection Record Collection Record Collection Big Love Record Collection Record Collection Record Collection Record Collection Record Collection Record Collection Record Collection Record Collection Record Collection Record Collection Record Collection Record Collection Record Collection Record Collection | Dance Dance Dance Dance Dance Dance Dance Dance House Dance Dance Dance Dance Dance Dance Dance Dance | ||
Error Messages
If you experience an error message while navigating the unit, here are a few explanations of those errors and how they can be corrected. For a more complete troubleshooting guide, consult our website at http://www.cortex-pro.com. "Can't access device" will be displayed because of one of the following problems with the storage device: \- Device is write protected In the case of a USB flash drive, some units have a switch to enable write-access. \- Device has already been ejected using the eject procedure. Remove the USB device and plug it back in. \- Device is using an unsupported file system The file systems supported are FAT32, NTFS, HFS+, CDFS, and UDFS. \- Device is not able to run without a proprietary hardware driver Some devices require proprietary hardware device drivers. Although with the introduction of USB, this is less common, it still sometimes presents an issue. These devices are not compatible with the HDC-500. \- Device has been removed while before using the eject procedure If the device is removed from the USB port without using the proper ejection procedure, it is possible that the unit will not detect the absence of a USB storage device, and will try to access the port anyway. \- If the device is powered by an external power supply, make sure that the unit is receiving power. \- If the device has just been plugged in, and it was immediately selected, the drive might not be ready to be accessed. Wait 10 seconds and try again. "Error creating DB" may be displayed if there is not a sufficient amount of space left on your storage device to create the necessary database files required to search through your music library. \- If you are out of space, try to delete some files and try the database process again. \- Check the USB cable that is being used to connect the storage device to the HDC-500. \- If the device is powered by an external power supply, make sure that the unit is receiving power.  Fig 4.5 - Error message, drive full or not responding1. General
Type of unit....Streaming Digital Audio Controller Format compatibility....MP3, WAV, CD-Audio MP3 format....8 kbps \~ 320 kbps, CBR/VBR, 44.1 kHz WAV format....44.1 kHz, 16 bit stereo Instant Start....<0.1 second Pitch ranges....4, 8, 16, 24% Pitch increment....0.05% Power....6V DC 3000mA Power consumption....12 watts Operating environment temp....+5°C to +35°C (+41°F - +95°F) Operating environment humidity....5-85% Weight....9.68 lbs .....4.4 kgs Dimensions....19 x 10.5 x 2.5 inches .....482 x 267 x 64mm Adapter....AC 100\~240V, 50/60Hz3. USB interface section
Connector type....USB Types A&B USB protocol support....1.0, 1.1 (Full Speed) and 2.0 (Hi-Speed) Number of ports....2 Maximum number of connected devices (via USB hub, sold separately).... ....4 (Plus Keyboard) File system support....FAT32, NTFS, HFS+, CDFS, UDFS4. Included Accessories
Power supply....1 Operating instructions....15. Replaceable Parts (order from GCI by part number if needed)
Power supply.....USA 110v 059-370-R .....VDE (Europe) 059-371-R .....UK 059-372-R .....JIS (Japan) 059-373 Power cable strain relief clamp.....049-231-R Pitch control knob.....002-603-R Should your Cortex product require warranty or non-warranty service in the USA, or if you wish to purchase replacement parts, operating instructions, or accessories, please contact GCI Technologies at the phone number listed below:732-346-0061
Do not, under any circumstance, ship your product to GCI without first calling the Technical Support Department at the number listed above. Failure to establish an RMA (Return Merchandise Authorization) number prior to shipping your product will delay your repair indefinitely. GCI reserves the right to refuse all packages that arrive without an RMA number. For warranty information, please refer to the warranty page included in this manual. Once an RMA number is established, your unit should be sent to the address specified by your customer service representative, with the RMA clearly written on the outer carton: For support or repair outside of the USA, please visit the Cortex website at http://www.cortex-pro.com. Published by GCI Technologies Corporation Copyright © 2007 GCI Technologies Corp. All rights reserved. Features & specifications subject to change without notice.| GCI Technologies USA: | +1 (732)346-0061 |
| GCI Latin America and Caribbean: | +1 (305)592-4746 |
| GCI United Kingdom LTD: | +44 (0)87 087-00880 |
| GCI France | + 33 1 69 79 97 72 |
| GCI SA (Spain): | +34 93 436 37 00 |
| GCI GmbH (Germany): | +49 8131 39171-0 |
CORTEX intelligent. sound.
Cortex products are designed and manufactured to the highest standards in professional audio. With proper care and maintenance, your product will provide years of reliable service. Please register your product online at http://www.cortex-pro.comLimited Warranty:
In the USA, Cortex guarantees its products against defects in workmanship for the period of One (1) year\* from the original date of purchase. This limited warranty does not cover damage or failure caused by abuse, misuse, abnormal use, faulty installation, improper maintenance or any repairs other than those provided by an authorized service center. There are no obligations of liability on the part of GCI, Cortex, or any of its retailers for consequential damages arising out of or in connection with the use or performance of the product or other indirect damages with respect to loss of property, revenues, profit, or costs of removal, installation, or reinstallation. All implied warranties for GCI, including implied warranties for fitness, are limited in duration to One (1) year from the original date of purchase, unless otherwise mandated by local statutes.Returning Your Product for Service:
In the U.S.A., please call our helpful Customer Service Representatives at (732) 346-0061, and they will be happy to give you a Return Merchandise Authorization (RMA) number and the address of an authorized service center closest to you. After receiving an RMA, include a copy of the original sales receipt, with defective product and a description of the defect. Send by insured freight to GCI Technologies Corporation, and use the address provided by your customer service representative. Your RMA must be written on the outside of the package, or processing will be delayed indefinitely! GCI reserves the right to refuse all packages that arrive without an RMA number. Service covered under warranty will be paid for by GCI and returned to you. For non-warrantees products, GCI will repair your unit after payment is received. Repair charges do not include return freight. Your warranty is valid only in the country where the unit has been purchased. Repairs performed outside of the country of purchase will be treated as out-of-warranty. For warranty service, you pay for shipping to GCI; we pay for return shipping within the Continental United States. Alaska, Hawaii, Puerto Rico, Canada, Bahamas, and the Virgin Islands will be charged for freight. Please allow 2-4 weeks for return of your product. Under normal circumstances your product will spend no more than 10 working days at GCI. We are not responsible for shipping times. For repairs and warranty information outside of the USA, please call the GCI affiliate closest to where you reside, listed on the specifications page of this manual (page 18), or visit the Cortex website at http://www.cortex-pro.com. \* Unless otherwise mandated by local statutes.For Your Records


- Important Notice
- To find out what version of HDC-500 firmware you are running:
- To upgrade your firmware to the newest version:
- CORTEX
- Table of Contents
- IMPORTANT WARNING & SAFETY INSTRUCTIONS
- PLEASE READ PRIOR TO OPERATING THIS DEVICE!
- GROUNDING OR POLARIZATION:
- Foreword
- Preparing for First Use
- We Want You Listening For A Lifetime!
- Dear Customer:
- To establish a safe level:
- Once you have established a comfortable sound level:
- Decibel
- Level Example
- THE FOLLOWING NOISES CAN BE DANGEROUS UNDER CONSTANT EXPOSURE
- Jog Wheel
- Pitch Control
- Backlit LCD Display
- Cross-Platform USB Connectivity
- CD Audio support
- Database-Driven Music Management
- Playlist Support
- Compatibility & Recommended Peripherals
- A Word About Compatibility
- - USB Hubs must be Powered, not Passive (non-powered)
- - Write-protection must be Disabled (where applicable)
- Certified-Compatible Devices
- Device Requirements
- - USB Compliance
- • Devices should be dedicated for use with the Cortex, if possible
- - Drives must be unpartitioned
- - FAT32, NTFS, or HFS+ File System for Flash Memory and Hard Drives
- - NTFS is read-only!
- Maintaining Storage Devices
- - With Windows™ based machines
- • With Apple Macintosh Machines
- Always Make Backups!
- Cleaning the Unit
- Operating Conditions
- Lawful Use of HDC-500
- Parts Diagram and Functions
- Rear Panel
- USB connector (type A)
- JOG MODE button/indicator
- INFO button
- PLAY MODE button
- SEARCH MODE button
- LCD DISPLAY panel
- PITCH ON/OFF indicator and PITCH BEND buttons
- PITCH CONTROL slide
- PLAY/PAUSE button/indicator
- CUE button/indicator
- Front Panel (continued)
- NAVIGATOR keypad
- SHIFT button
- NOTE: WHEN SHIFT + INFO ARE PRESSED SHUFFLE MODE IS TURNED ON
- JOG WHEEL
- POWER button
- SINGLE button
- TIME MODE button
- Preparing for Use
- STEP ONE
- STEP TWO
- STEP THREE
- STEP FOUR
- Selecting Devices & Database Creation
- STEP ONE - DEVICE SELECTION
- STEP TWO - INDEXING
- VERIFICATION
- File Browser and Search Options
- USING THE FILE BROWSER
- SEARCH OPTIONS
- Search by Songs
- Search by Artists
- Search Options (continued)
- Search by Genres
- Search by Album
- Search by String
- USB Keyboard
- Search Options (Continued) and Waveform
- BPM SEARCH FEATURE
- WAVEFORM FEATURE
- Info Button & Track Attributes
- Play Mode and Single Auto Cue
- Section Five: Play Mode
- Entering Play Mode
- Single Mode (Single Auto Cue)
- Time Display and Pitch Control
- Time Display Modes
- Pitch Control, Pitch Bend, and Pitch Ranges
- Jog Mode and Playback Navigation
- Jog Mode
- Playback Navigation Functions
- iPodPlaylist Support
- Creating a Simple Playlist
- Cue Points & Memorization
- Setting and Memorizing Cue Points
- Device Menu
- Changing, Adding, and Ejecting USB Storage Devices
- Shuffle Mode, Loop & Soft Power
- Shuffle Mode
- LOOP FEATURE
- SET LOOP
- EXIT LOOP
- DISABLE LOOP FEATURE
- Powering the Unit Off
- Setup Menu
- Firmware Updates
- # # # # # # # # # # # # # # # # # # # # # # # # # # # # # # # # # # # # # # # # # # # # # # # # # # # # # # # # # # # # # # # # # # # # # # # # # # # # # # # # # # # # # # # # # # # # # # # # # # # # @
- Using iTunes TM to optimize your sound files
- ENABLE YOUR iPOD™ FOR DISK USE
- iTunes™ SETUP FOR MAC OR PC (PC SHOWN)
- NO COMPRESSION(WAV)
- Using iTunes TM to optimize your sound files (continued)
- COMPRESSION(Mp3)
- Finally the Mp3 encoder settings box should look like this.
- AAC and DRM FILES
- Error Messages
- General
- USB interface section
- Included Accessories
- Replaceable Parts (order from GCI by part number if needed)
- 732-346-0061
- CORTEX intelligent. sound.
- Limited Warranty:
- Returning Your Product for Service:
- For Your Records
Marque : CORTEX
Modèle : HDC-500
Catégorie : Matériel audio