KCR2607 - Radio-réveil CURTIS - Notice d'utilisation et mode d'emploi gratuit
Retrouvez gratuitement la notice de l'appareil KCR2607 CURTIS au format PDF.
| Type de produit | Radio-réveil |
| Marque | CURTIS |
| Modèle | KCR2607 |
| Alimentation | 120 V~ 60 Hz, câble secteur polarisé |
| Pile de secours horloge | 2 piles AA 1,5 V (non incluses) |
| Pile télécommande | 2 piles AAA 1,5 V (non incluses) |
| Fonctions principales | Horloge, radio AM/FM, lecteur CD, alarme, minuterie, sommeil, snooze, égaliseur |
| Gammes radio | AM et FM |
| Préréglages radio | 30 stations (15 AM + 15 FM) |
| Lecteur CD | CD audio, programmation jusqu'à 20 pistes, répétition |
| Type d'alarme | Buzzer, CD ou radio |
| Minuterie | De 1 minute à 19 heures 59 minutes |
| Fonction sommeil | De 1 à 90 minutes réglable |
| Snooze | 9 minutes |
| Égaliseur | Flat, Jazz, Rock, Classic, Pop |
| Montage | Sous meuble avec gabarit, vis et entretoises fournies |
| Sécurité | Fiche polarisée, rayon laser classe 1, protections contre l'humidité |
| Entretien | Débrancher avant nettoyage ; chiffon doux et sec ; savon doux pour le panneau avant |
| Accessoires inclus | Télécommande, gabarit de montage, 3 vis (2 3/4 et 1 5/8), 3 entretoises (1/4, 1/2, 1), 3 rondelles |
| Dimensions approximatives | 30,5 x 15,2 x 10,2 cm (L x P x H) estimées |
| Poids approximatif | 0,9 kg |
FOIRE AUX QUESTIONS - KCR2607 CURTIS
Questions des utilisateurs sur KCR2607 CURTIS
0 question sur cet appareil. Repondez a celles que vous connaissez ou posez la votre.
Poser une nouvelle question sur cet appareil
Téléchargez la notice de votre Radio-réveil au format PDF gratuitement ! Retrouvez votre notice KCR2607 - CURTIS et reprennez votre appareil électronique en main. Sur cette page sont publiés tous les documents nécessaires à l'utilisation de votre appareil KCR2607 de la marque CURTIS.
MODE D'EMPLOI KCR2607 CURTIS
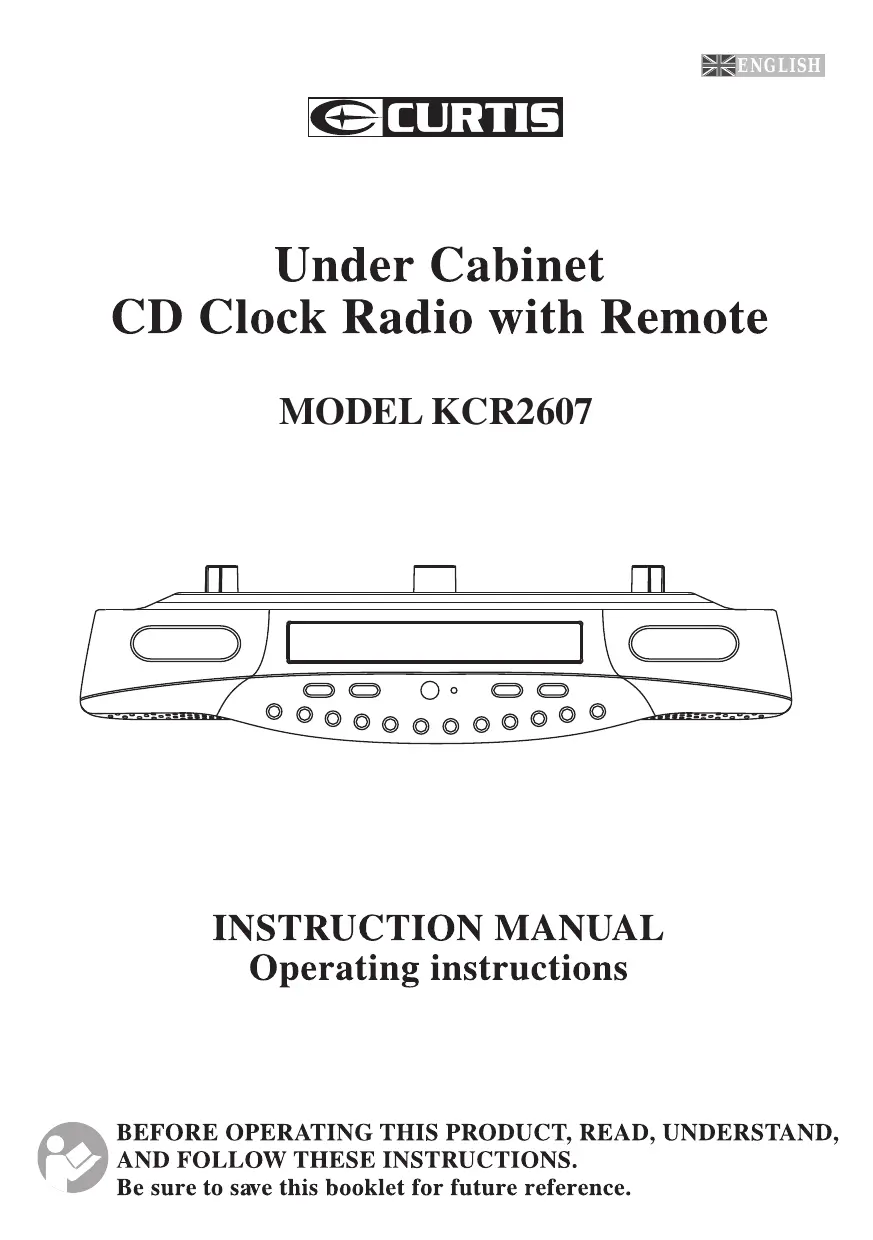
Under Cabinet CD Clock Radio with Remote
MODEL KCR2607
INSTRUCTION MANUAL Operating instructions
IMPORTANT
SAFETY
INSTRUCTIONS

The Lightning flash with arrowhead symbol, with an equilateral triangle is intended to alert the user of the presence of uninsulated dangerous voltage within the product's enclosure that may be of sufficient magnitude to constitute a risk of electric shock to persons.
CAUTION
RISK OF ELECTRIC SHOCK DO NOT OPEN
CAUTION: TO REDUCE THE RISK OF ELECTRIC SHOCK, DO NOT REMOVE COVER (OR BACK). NO USER SERVICEABLE PARTS INSIDE. REFER SERVICING TO QUALIFIED SERVICE PERSONNEL.

The exclamation point within an equilateral triangle is intended to alert the user of the presence of important operating and maintenance (servicing) instructions in the literature accompanying the appliance.
WARNING: TO PREVENT FIRE OR SHOCK HAZARD, DO NOT EXPOSE THIS APPLIANCE TO RAIN OR MOISTURE.
THESE IMPORTANT SAFETY INSTRUCTIONS ARE INCLUDED, AS APPLICABLE TO THE APPLIANCE, CONVEYING TO THE USER THE FOLLOWING INFORMATION :
HeedWarnings-All warnings on the appliance and in the operating instructions should be adhered to.
Follow instructions- All operating and use instructions should be followed.
Water and moisture- The appliance should not be used near water. For example, near a bathtub, washbowl, kitchen sink, or near a swimming pool, and the like
Ventilation- The appliance should be situated so that its location or position does not interfere with its proper ventilation. For example, the appliance should not be situated on a bed, sofa, rug, or similar surface that may block the ventilation openings; or, placed in a built-in installation, such as a bookcase that impedes the flow of air through the ventilation openings.
Heat - The appliance should be situated away from heat sources such as radiators, heat registers, stoves, or other appliances (including amplifiers) that product heat.
Power Sources-The appliance should be connected to a power supply only of the type described in the operating instructions or as marked on the appliance.
Grounding or Polarization - Precautions should be taken so that the grounding or polarization means of the appliance are not defeated.
Power-Cord Protection- Power supply cords should be routed so that they are not likely to be walked on or pinched by items placed upon or against them, paying particular attention to cords at plugs, convenience receptacles, and the point where they exit from the appliance.
Cleaning-The appliance should be cleaned only as recommended by the manufacturer.
Nonuse Periods-The power cords of the appliance should be unplugged from the outlet when unused for an extended period of time
Object and Liquid entry-Care should be taken so that objects do not fall and liquids are not spilled into the housing.
Damage Requiring Service-The appliance should be serviced by qualified service personnel when:
- The Power-supply cord or the plug has been damaged; or
- Object have fallen or liquid has been spilled into the appliance; or
- The appliance has been exposed to rain ; or
- The appliance does not appear to operate normally or exhibits a marked changed in performance ;or
- The appliance has been dropped or the housing damaged.
Servicing-The user should not attempt to service the appliance beyond that described in the operating instructions. All other servicing should be referred to qualified service personnel.
Do not take the unit apart. The laser beam used in the unit could harm your eyes.
- Do not insert pins or other objects inside the unit. This unit is equipped with a safety device which automatically turns the laser beam off when the disc compartment is opened. If a pin or other metal objects get inside the unit, this safety device may be deactivated.
- Do not drop the unit or subject it to strong shocks. Doing so could result in damage.
Do not place the unit in the following :
- Locations where the temperature is high. The unit's housing may warp or the unit may otherwise be damaged if it is placed in direct sunlight, near heaters (where the temperature is 140^0F / 60^0C or greater) or in cars with the windows closed.
- In humid or dusty locations
- In locations exposed to heavy vibrations
- On unstable or tilted surfaces.
CAUTION: *This product is equipped with a polarized plug (one blade is wider than the other blade) as a safety feature to reduce the risk of electrical shock. This plug will fit into a polarized outlet only one way. This is a safety feature. If you are unable to insert the plug into the electrical outlet, try reversing the plug. If the plug still does not fit, contact a qualified electrician. Never use the plug with an extension cord unless the plug can be fully inserted into the extension cord. Do not alter the plug. Do not attempt to defeat the safety purpose of the polarized plug,
*Use of controls or adjustments or performance of procedures other than those specified herein may result in hazardous radiation exposure.
SAFETY CERTIFICATION
This Compact Disc Player is made and tested to meet the safety standards of the Federal Communications Commission(FCC) and to comply with the safety performance requirements of the U.S. Department of Health and Human Services and with the Food & Drug Administration(FDA) Radiation performance Standards 21 CFR Subchapter J.
IMPORTANT INFORMATION REQUIRED BY THE FCC
Since the Compact Disc (CD) circuitry may cause interference to other radios nearby, switch this set off when not in use or move it away from the affected radios.
This device complies with Part 15 of the FCC Rules. Operation is subject to the following two conditions: (1) this device may not cause harmful interference; and (2) this device must accept any interference received, including interference that may cause undesirable operation.
NOTE: This equipment has been tested and found to comply with the limits for a Class B digital device, pursuant to part 15 of the FCC Rules. These limits are designed to provide reasonable protection against harmful interference in a residential installation. This equipment generates, uses, and can radiate radio frequency energy and, if not installed and used in accordance with the instructions, may cause harmful interference to radio elevation reception, which can be determined by turning the equipment off and on. The user is encouraged to try to correct the interference by one or more of the following measures;
Reorient or relocate the receiving antenna.
Increase the separation between the equipment and receiver.
Connect the equipment into an outlet on a circuit different from that to which receiver is connected.
Consult the dealer or an experienced radio/TV technician for help
LASER SAFETY
THIS SET EMPLOYS AN OPTICAL LASER BEAM SYSTEM IN THE CD MECHANISM DESIGNED WITH BUILT-IN SAFEGUARDS. DO NOT ATTEMPT TO DISASSEMBLE. EXPOSURE TO THIS INVISIBLE LASER LIGHT BEAM MAY BE HARMFUL TO THE EYES. THIS COMPACT DISC PLAYER SHOULD NOT BE ADJUSTED OR REPAIRED BY ANYONE EXCEPT QUALIFIED SERVICE PERSONNEL. THE LASER MECHANISM IN THE SET CORRESPONDS TO THE STYLUS (NEEDLE) OF A RECORD PLAYER. ALTHOUGH THIS PRODUCT USES A LASER PICK-UP LENS, IT IS COMPLETELY SAFE WHEN OPERATED ACCORDING TO THE MANUFACTURER'S INSTRUCTIONS CONTAINED HEREIN.
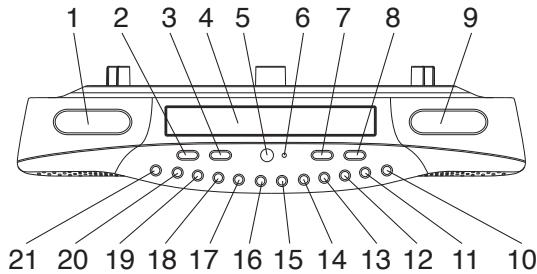
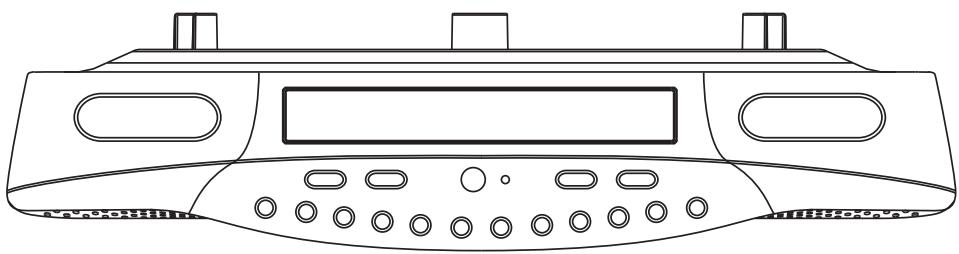
LOCATION OF CONTROLS
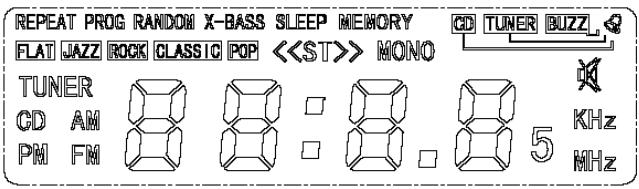
- LCD DISPLAY-A (for CD, CLOCK AND RADIO)
- VOLUME DOWN
- VOLUME UP
- CD DRAWER
- REMOTE SENSOR
- POWER ON INDICATOR
- POWER/ALARM OFF BUTTON
- CD DRAWER OPEN/CLOSE BUTTON
- LCD DISPLAY B (FOR TIMER)
- MINTUE SET BUTTON (FOR TIMER)
- HOUR SET BUTTON (FOR TIMER)
- STEREO/MONO BUTTON (FOR FM RADIO ONLY)
- FAST FORWARD (SKIP >>|) BUTTON
- REWIND (SKIP |<< ) BUTTON
- STOP/ RADIO BAND BUTTON
- PLAY/PAUSE BUTTON
- RADIO BUTTON
- CD BUTTON
- DISPLAY/ALARM SET BUTTON
- MEMORY/CLOCK ADJUST BUTTON
- REPEAT/MEMORY. RECALL BUTTON
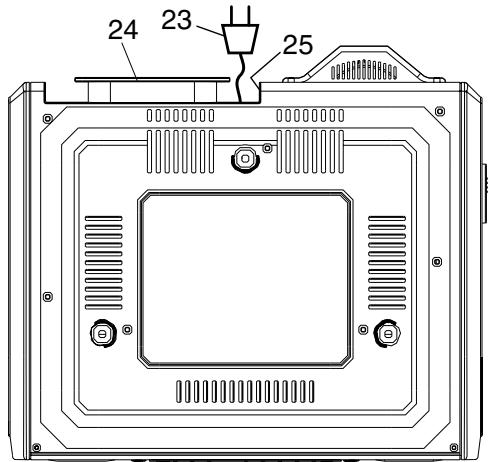
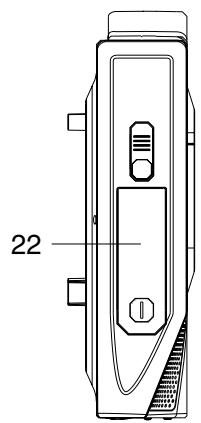
- BATTERY DOOR(FOR CLOCK BACK UP)
- AC POWER CORD
- POWER WIRE HOLDER
- FM ANTENNA
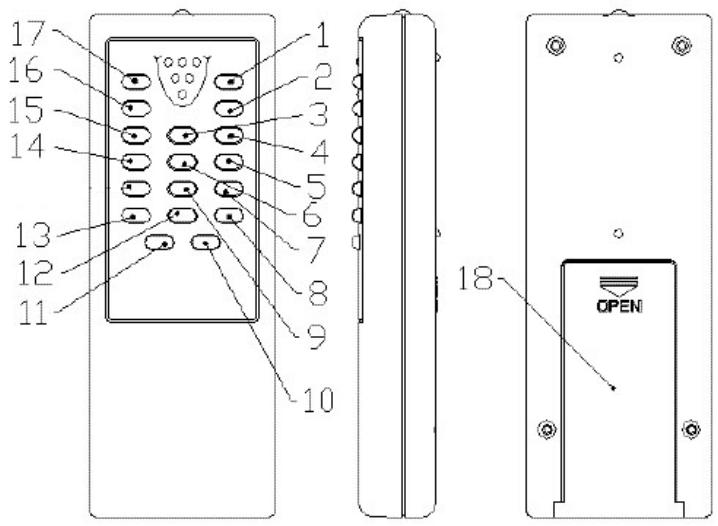
- OPEN/CLOSE KEY
- PLAY/PAUSE KEY
- FAST FORWARD (SKIP >>|) BUTTON
- VOLUME UP KEY
- VOLUME DOWN KEY
- REWIND (SKIP |< < ) BUTTON
- RANDOM KEY
- MUTE KEY
- CD/RADIO MEMORY KEY (MEM)
- SNOOZE KEY
- ALARM SET KEY
- SLEEP KEY
- EQUALIZATION PRESET KEY (EQ)
- REPEAT KEY
- FUNCTION KEY (to select the CD, Radio function)
- STOP/RADIO BAND KEY
- POWER/ ALARM OFF KEY
- Battery compartment (for Remote control)
Insert two(2) "AAA"/1.5V(not included) batteries following the polarity as indicated in the compartment to the right. Alkaline batteries are recommended for long using time.
Note: when planning not to use the remote control for a long time. Remove the batteries in order to avoid the electrolyte leakage.
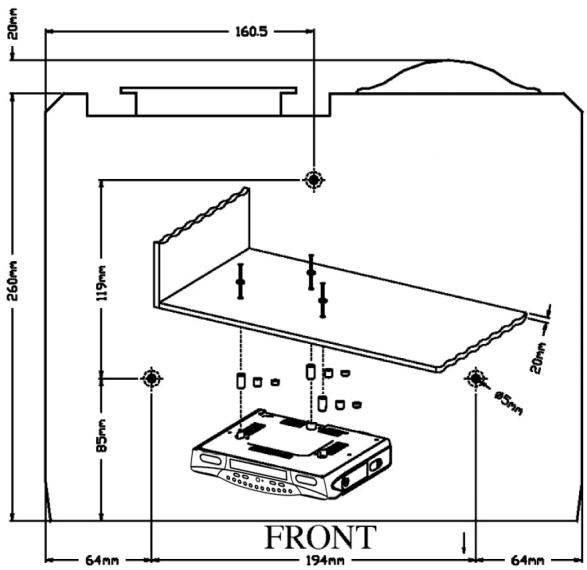
Under Cabinet Mounting Instructions

Fig. 1


Spacers

3-1

3 - Washers
USE:
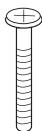
3-2" Phillips head screws
or
3- 1^5 / 8 "Phillips head screws
Tools Required
- Drill and 1/4" Drill Bit
Ruler or Tape Measure
- Nail or Awl
- Scissors
- Screwdriver - Phillips
- Countersink (Optional)
- Masking Tape
Safety Glasses
1 - Mounting template
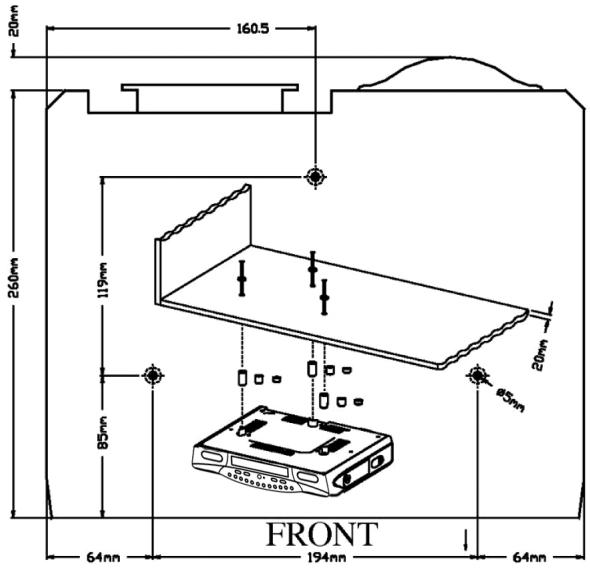
Parts Packed with your unit
- Spacers (3pcs of 1/4", 3pcs of 1/2", 3pcs of 1")
- Washers (3pcs)
- Phillips head screws (3pcs of 2 3/4", 3pcs of 1 5/8")
- Mounting Template
Before Mounting
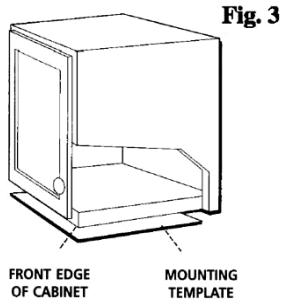
Empty contents of the selected cabinet under which the unit will be mounted and thoroughly clean the underside of the cabinet to remove any grease residue which might be present. We recommend the unit be mounted at the front edge of the cabinet.
Important: For secure mounting, the screws must go into the radio to a depth of at least 3/8 . If the overall length from the bottom of the cabinet shelf to the bottom of the overhang is more than 13/4 , then a wood shim will be necessary. A shim can be made from a sheet of plywood, using the Template to located the central lines for drilling the 1/4 mounting holes; the shim can be located between the cabinet shelf bottom and spacers. Make sure the wood is at least as thick as the excess over 13/4 . If a shim is necessary, longer screws are required.
Longer screws (Type#10-32) are available at most local hardware stores
Cut out the template on the line indicated. The template size and the screw hold positions are identical to the top of the Clock radio.
Mounting Procedure
Step 1.
If your cabinet does not have a overhang :
a) Position template in desired location on underside of cabinet, flush with front edge.
b) Then tape template in place and go to step 2.
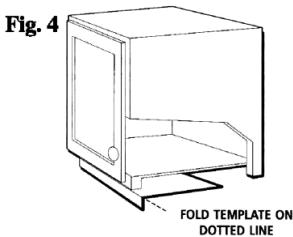
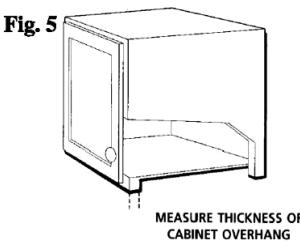
If your cabinet has an overhang:
a) Measure the thickness of the overhang.
b) Fold front of the template downward along the printed guideline that is closet to the thickness of your cabinet.
c) Tape fold-down portion to backside of overhand, tape template to cabinet underside.
Note: If your cabinet has glue blocks or other obstructions, cut out corresponding areas on the template to clear them. Do not cut or cut through the screw holes indicated on the template.
CAUTION: It is recommended that safety glasses be worn while drilling screw holes to prevent the possibility of eye injury.
Step 2
Drill 3/16" inch diameter holes through the underside of the cabinet bottom shelf using the three points marked on the template.
Helpful Hints:
On wooden cabinets you may want to mark and start the drill holes with a nail or an awl. Be sure to hold the drill very firmly against the cabinet to reduce "walking" of the drill bit from the markings.
Use masking tape above the holes locations on inside of wooden cabinet shelf to help reduce splintering.
If installing the unit under a wood cabinet, you may wish to countersink the drilled holes from the INSIDE of the cabinet. If you opt not to countersink the holes, use the supplied washers.
Step 3
Remove template and clean drill shavings from inside and underside of cabinet.
Step 4
If your cabinet does not have an overhang. Go to Step 5.
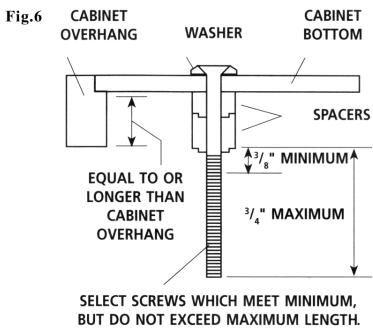
If your cabinet has an overhang. Select the spacer or combination of spacers that is equal to or longer than the cabinet overhang.
Installation with supplied washers (no Countersink)
Step 5.
Insert screws from inside the cabinet. The washers must be used on metal cabinets, and on wood cabinets if you did not countersink the drilled holes. Position washers, flat side down, and place screws into the holes.
If your cabinet does not have an overhang, go to Step 7.
Step 6.
Hold screw heads down while you push the selected spacers onto the screws under the cabinet. Be sure to push up spacers until they are fully nested (if more then one is in used)
Step 7
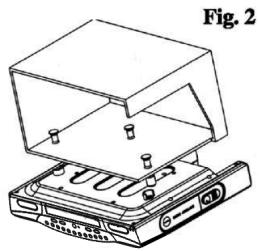
Align radio under the screws. Hold the screw holes in the top of the clock radio against the mounting screws and partially tighten the screws.
Do not fully tighten until all 3 screws have been started. (The top front edge of the clock radio should clear the overhang.)
Power Wire Holder
It is for rounding the extra power wire after user had plugged the power cord to the electrical outlet.
UNIT POWER SUPPLY (Mains 120V/60Hz)
Connect the power cable plug to the (120V) wall outlet.
Warning:
Before using the unit. Check that the local mains supply is compatible with the HI-FI System (120V 60Hz) Do not plug or unplug the power cable when your hands wet.
When planning not to use this unit for long periods of time (i.e. Vacation etc.) disconnect the plug from the wall outlet.
When disconnecting the power cord from the wall outlet, grasp the plug; do not pull the cord in order to avoid shock risks caused by the damaged cable.
Battery Safety Precautions:
- Keep batteries away from children and pets.
- Do not use rechargeable batteries with this product.
- Insert the battery observing the proper polarity (+/-) . Failure to properly align the battery polarity can cause personal injury and/or property damage.
- Remove spent or discharged batteries from the product. Remove the battery when the product will not be used for extended periods of time to prevent damage due to rusted or corroded batteries
- Never throw batteries into a fire, Do not expose batteries to fire or other heat sources
- Battery Disposal: Spent or discharged batteries must be properly disposed of and recycled in compliance with all applicable laws. For detailed information, contact your local country solid waste authority
- Follow the battery manufacturer's safety, usage, and disposal instructions.
Battery Backup:
DC 3V 2 x 1.5V "AA" size batteries (not included) may be installed as a backup option to maintain the time if electrical power fails. In the event of a power outage, the time will not appear on the clock LCD Display, however the clock will continue to operate and the actual time will be maintained. The Clock LCD Display and other functions will resume once electrical power is restored if used the backup battery; Remove the battery if the clock is not used or stored for long periods of time
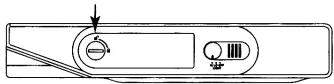
Open the compartment door by rotating the lock in the direction of the arrow.
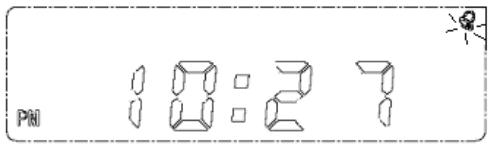
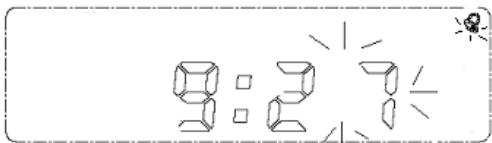
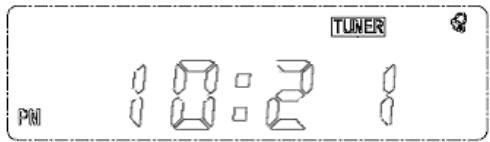
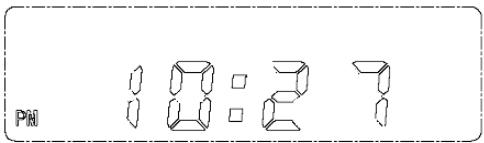
- While in the CD or Radio mode, Press "Display/AL. Set" one time to enter the time mode.
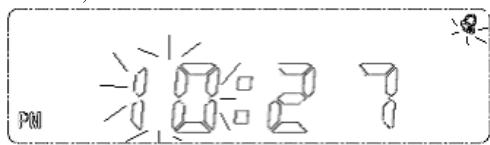
- Press and hold MEMORY/C- ADJ button for 2 seconds, enter to hour adjustment mode( Hour will begin to flash)
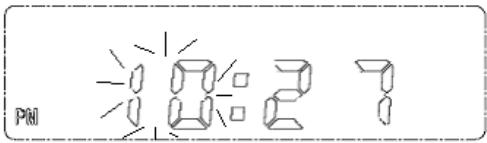
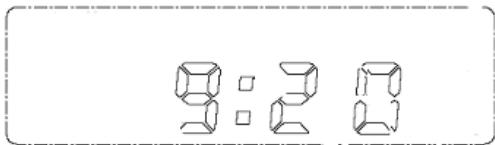
- Press SKIP >>| or SKIP | button to desired time. (e.g. 10:27pm -> 9:27am)
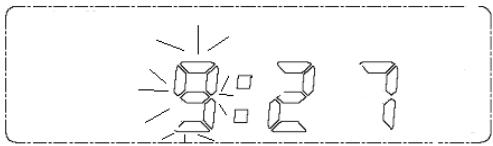
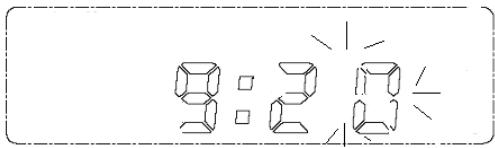
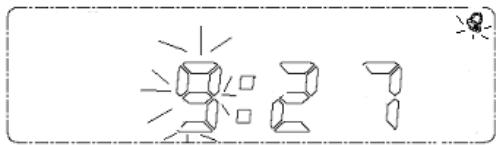
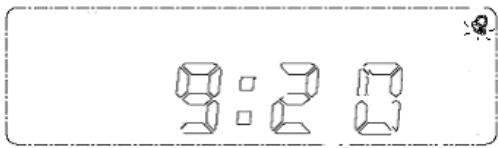
- Press MEMORY/C-ADJ button, enter to minute adjustment mode.(Minute will begin to flash)
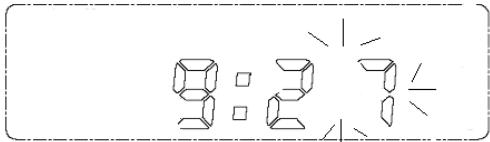
d. Press SKIP >> | or SKIP | << button to desired time. (e.g. 9:27am -> 9:20am) e) and then press MEMORY/C-ADJ button, finish clock adjustment.
NOTE:
For 12 Hour display, If the time is pm, then PM icon will appear.
And "AM" will not indicate on the display
Time setting is invalid if the time always flashes.
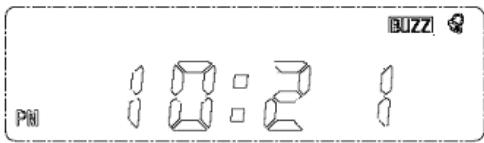
ALARM TIME SETTING
- While in the CD or Radio mode, Press "Display/AL.Set" two time to enter the alarm time set mode. (The bell icon
" ” will appear and begin to flash)
- Press and hold MEMORY/C- ADJ button for 2 seconds, enter to alarm hour adjustment mode (Alarm hour will begin to flash)
- Press SKIP >>| or SKIP << button to desired time. (e.g. 10:27pm -> 9:27am)
Press MEMORY/C-ADJ button, enter to alarm minute adjustment mode. ( Alarm minute will begin to flash)
Press SKIP >> | or SKIP |<< button to desired time. (e.g. 9:27am -> 9:20am) and then press MEMORY/C-ADJ button, finish clock adjustment.
After setting the alarm time.
Note: To disable the alarm function, press AL. SET KEY (on the remote controller) repeatedly to select alarm disable mode. ("@ indicator will disappear)
a. Press AL.Set KEY (on the remote controller) repeatedly to select Buzzer mode. ("BUZZ" indicator will appear)
b. The alarm buzzer will sound for 3 minutes at the set alarm time.
c. Press Power/AL.Off button to turn off the alarm when it sounds.
TO WAKE UP TO CD:
a. Power on the unit by pressing the Power/AL. off button.
b. Open the CD DRAWER and insert a CD (with the label side facing up) into the CD compartment.
c. Close the CD DRAWER.
d. Power off the unit by pressing the Power/AL. off button.
e. Press AL.Set KEY (on the remote controller) repeatedly to select CD mode. ("CD" indicator will appear and cd indicator will begin to flash)
f. You can use SKIP >>| or SKIP|<< to select the track as be auto-played during the flashing of "cd" indicator in the display.
g. The CD will sound at the set alarm time playing the track you have selected on the CD.
h. To deactivate the alarm (CD playing); Press either the STOP Button or Press the Power/AL. off button.
TO WAKE UP TO RADIO:
a. Power on the unit by pressing the Power/ AL. off button.
b. Press the RADIO button to select RADIO.
c. Press the STOP/Band button to Select AM or FM .
d. Tuning your favorite radio station and your desired listening level.
e. Press POWER/ AL. OFF button to turn off the unit again.
f. Press AL.Set KEY (on the remote controller) repeatedly to select tuner mode. ("tuner" indicator will appear)
g. The radio will sound at the set alarm time.
Snoopze Function
If you want to snooze a few more minutes press the SNOOZE BUTTON (on the remote control) will deactivate the sound for 9 minutes.
SLEEP FUNCTION
Sleep time step change for PRESSING AND HOLDING SLEEP KEY (on remote control):
$$ 9 0 - > 8 0 - > 7 0 - > 6 0 - > 5 0 - > 4 0 - > 3 0 - > 2 0 - > 1 0 - > 9 - > 8 - > 7 - > 6 - > 5 - > 4 - > 3 - > 2 - > 1 - > 9 0 $$
Sleep appears in display- >sleep function activate
To cancel sleep function, Press sleep key (on remote controller) one more time
Sleep disappears in display-> cancel sleep function
when the SLEEP time expires, the system will automatically turn OFF.
TIMER FUNCTION (0:01 ----19:59)
- Continue press the HOUR SET button (T/HOUR) adjust the hour of the time. (from 19: --to 0: --)
- Continue press the MINUTE SET button (T/MIN) adjust the minute of the time. (from --:59 to --:00)
- When the count-down time reach to zero, the system will alarm for 3 minutes
- To turn off the timer alarm. Simply PRESS and HOLD the Hour set button (T/HOUR) and Minute set button (T/Minute) for 3-5 seconds the timer will be turn off.
Note: The radio or CD player is muted when alarm turns on
VOLUME
Adjust the VOLUME to the desired level by pressing the VOL. DOWN or VOL. UP button and volume message will hold 2 seconds on screen after level change.
MUTE
To Mute the volume, Just press the Mute KEY (On the remote controller).
Volume Mute On
Volume Mute Off
Notes:
1) The volume range is [01, 40].


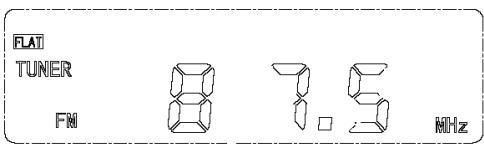
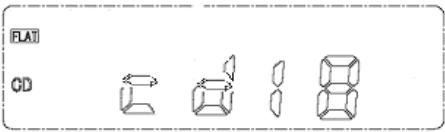
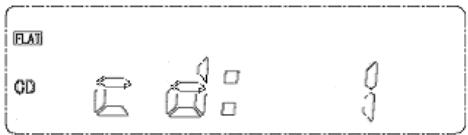
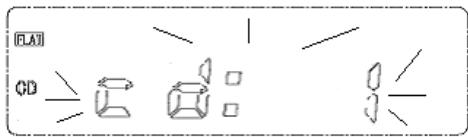
EQUALIZATION PRESETS
While in play mode, pressing the EQ button selects five different types of equalization effects:
Flat, Jazz, Rock, Classic and Popular, Press the EQ button repeatedly to cycle through the presets, the default setting is flat.
There is a power switch (POWER/AL. OFF button) to switch on and off the system.
Power on in tuner mode
Power-off (clock display)
RADIO SECTION
RADIO RECEPTION
NOTE: In Radio operation mode, press Display/AL. Set button to display the clock time.
- Press Power/AL. off button to turn on the unit.
- Press RADIO button to select radio.
- Select AM/FM band by pressing the STOP/BAND button. AM and FM are alternately selected each time when the STOP/BAND button is pressed.
- How to use the buttons for radio
a. Manual Tuning
----Higher frequency can be selected by pressing the "SKIP >>|" button
---Lower frequency can be selected by pressing the "SKIP | · · · button
b. Automatic Tuning
-----Press and hold the "SKIP >>" or "SKIP |<< " button until the display frequency starts run.
----When a station of sufficient strength has been found. Tuning will stop or you can stop the automatic tuning by pressing "SKIP >>|" or "SKIP |<<" button again.
-----Repeat until you have found the desired station.
- Adjust the volume to the desired level. by pressing VOL. UP or VOL. DOWN button.
- Press the STEREO/MONO button to select Stereo and Mono as desired in case FM band is being selected. (If stereo signal is too weak, <<ST>> icon will not appear, press this button to mono mode, the reception will be improved)
Note:
For better reception, FM wire antenna shall be fully untied and adjusted well.
This unit has a built-in antenna for AM, Locate the unit where you can obtain the best reception.
PRESET TUNING
- Select the AM/FM band and tune to your desired station according to the normal tuning procedure.
- Press the MEMORY/C-ADJ button, "P" will appear and flash in the LCD, Then use SKIP >>| or SKIP |<< button to change the number where the station will be stored. (NO.1 to NO.15)
- Store the current frequency by pressing MEMORY/C-ADJ button again when you get the desired number. (The "P" still appears and will not flash.)
- Repeat the same procedure to set other desired frequencies into Memory No.1 to NO.15
Remarks: A stored frequency can only be erased by storing another frequency in its place.
The unit can be preset up to 30 stations. (15 for AM and 15 for FM)
MEMORY RECALL
To recall the stored frequencies, Enter AM or FM band mode first, press REPEAT/MEM/RCL button first then use SKIP >>| or SKIP |< button to select 1 to 15 station as desired.
[NOTE:] As stored frequencies can only be stored for long time with the power supplying, The station you stored will be lost and can not be recalled in case that you cut off the AC power
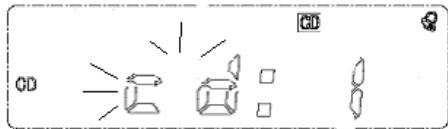
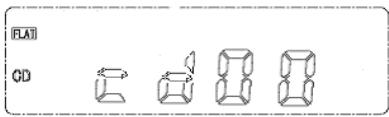
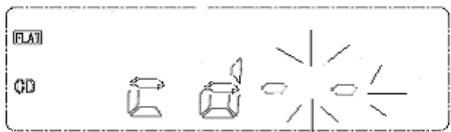
OPERATION OF CD PLAYER
Power ON in CD mode and indicate the total tracks which contain in the disc
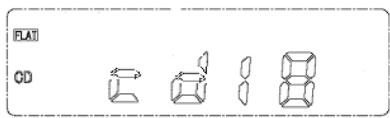
If open the CD DRAWER or there is no disc inside the unit, "00" display will be indicated on the display.
PLAYING A CD
- Turn on the unit by pressing the POWER/ AL. OFF button
- Press CD button to select CD function.
- Press Open/Close button to open the CD drawer.
- Insert a CD with the label facing up.
- Close the CD Door by pressing Open/Close button.
TOC reading ("- - " indicator will begin to flash)
- Press PLAY/PAUSE button to start CD playback from the first track.
- Press once more PLAY/PAUSE button to momentarily pause
Pausing ("cd: 1" indicator will begin to flash)
Notes:
While in the Pause mode. SKIP | scan or SKIP >>| scan can in use to rewind or go to next song.
- To stop the playback, Press STOP/BAND button.
SKIPPING TRACKS
Press during play.
Backward---------SKIP |< < button
Fast Forward---SKIP>>| button
Press SKIP |<< button twice to skip to the beginning of the previous track.
Press SKIP >> button once to skip to the beginning of the next track.
SEARCHING TRACKS
Press and hold during play
Backward---------SKIP | button
Fast Forward---SKIP>>| button
PROGRAMMED PLAYBACK
Up to 20 tracks can be programmed in to play in any desired sequence.
- Turn on the unit by pressing the POWER/ AL. OFF button.
- Press the CD button to select CD function.
- Press Open/Close button to open the CD door.
- Insert a CD with the label facing up
-
Close the CD Door by pressing Open/Close button.
-
In CD stop mode, Press MEMORY/C-ADJ button until "MEMORY" "Cd:01" is displayed in display.
- Press SKIP >> button or SKIP << button to select a desired track to be memorized.
- Press MEMORY/C-ADJ button to program the track.
- Repeat steps 7 and 8 to program tracks.
- Press PLAY/PAUSE button to start playing.
To cancel program play, Press STOP/BAND button two times.
REPEAT PLAY
To Repeat Single Track
Press REPEAT/MEM/RCL button while the track you want to repeat is playing. The "REPEAT" flashing will appear in display.
-----To repeat another track, Press SKIP >>| button or SKIP << button.
-----To cancel repeat play, Press REPEAT/MEM/RCL button two times.
To Repeat all the tracks
Press REPEAT/MEM/RCL button twice during play. The "REPEAT" indicator will appear in display steadily.
-----All tracks will be played through in sequence and then the sequence will be repeated continuously.
-----To cancel repeat play, press REPEAT/MEM/RCL button one time.
TROUBLESHOOTING GUIDE
You experience a problem with this unit check the chart below before calling of service.
SYMPTOM
CAUSE
SOLUTION
| System will Not turn on | ---AC Cord not connected properly | Reinsert the AC cord |
| Disc will not Play | ---Disc inserted incorrectly ---Defective compact disc ---CD compartment not closed ---Moisture condensation on disc | ---Reinsert disc with label side facing up ---Try another compact disc ---Close CD compartment ---Wipe disc with soft cloth |
| Erratic CD playback | ---Dirty or defective disc | ---Clean or replace disc |
| No sound | ---Volume set to minimum ---Defective compact disc | ---Increase the volume ---Try another compact disc |
| Noise or Sound distorted on radio | ---Station not tuned properly for AM or FM ---Unit is not positioned correctly | ---Retune AM or FM broadcast station ---Rotate unit until best reception is obtained |
CARE AND MAINTENANCE
CARING FOR COMPACT DISCS
---To keep the CD clean, handle it by its edge. Do not touch the surface.
---Do not stick paper or tape onto the CD
--Do not expose the CD to direct sunlight or heat sources such as hot air ducts.
Do not leave the CD in a car parked under direct sunlight.
Cleaning the Unit
---To prevent fire or shock hazard, disconnect your unit from the AC power source when cleaning.
--- The finish on your unit may be cleaned with a dust cloth and cared for as other furniture. Use caution when cleaning and wiping the plastic parts.
---Mild soap and a damp cloth may be used on the front panel.