HTG77 - Thermomètre hygromètre IROX - Notice d'utilisation et mode d'emploi gratuit
Retrouvez gratuitement la notice de l'appareil HTG77 IROX au format PDF.
| Type de produit | Thermomètre hygromètre sans fil |
| Marque | IROX |
| Modèle | HTG77 |
| Dimensions de l'unité principale | 95 × 174 × 30 mm |
| Dimensions de l'unité distante | 56 × 107 × 24 mm |
| Poids de l'unité principale | 231 g (sans pile) |
| Alimentation | 2 piles AA 1,5 V pour chaque unité |
| Fréquence de transmission | 433 MHz |
| Nombre max. d'unités distantes | 3 |
| Portée de transmission | 30 m (zone dégagée) |
| Plage de température intérieure | 0 °C à +50 °C |
| Plage de température extérieure | -20 °C à +60 °C |
| Plage d'humidité relative | 10 % à 95 % HR |
| Résolution température | 0,1 °C |
| Résolution humidité | 1 % |
| Indicateur de confort | COM, WET, DRY |
| Mémoire min/max | Oui (température et humidité) |
| Affichage des tendances | Montante, stable, descendante |
| Fonction de recherche | Synchronisation manuelle par bouton [SEARCH] |
| Montage mural | Oui (pour les deux unités) |
| Entretien | Nettoyer avec un chiffon doux et sec. Ne pas immerger. Utiliser des piles neuves. |
| Sécurité | Ne pas démonter l'appareil. Ne pas exposer à des chocs, poussière, températures extrêmes ou humidité excessive. |
FOIRE AUX QUESTIONS - HTG77 IROX
Questions des utilisateurs sur HTG77 IROX
0 question sur cet appareil. Repondez a celles que vous connaissez ou posez la votre.
Poser une nouvelle question sur cet appareil
Téléchargez la notice de votre Thermomètre hygromètre au format PDF gratuitement ! Retrouvez votre notice HTG77 - IROX et reprennez votre appareil électronique en main. Sur cette page sont publiés tous les documents nécessaires à l'utilisation de votre appareil HTG77 de la marque IROX.
MODE D'EMPLOI HTG77 IROX

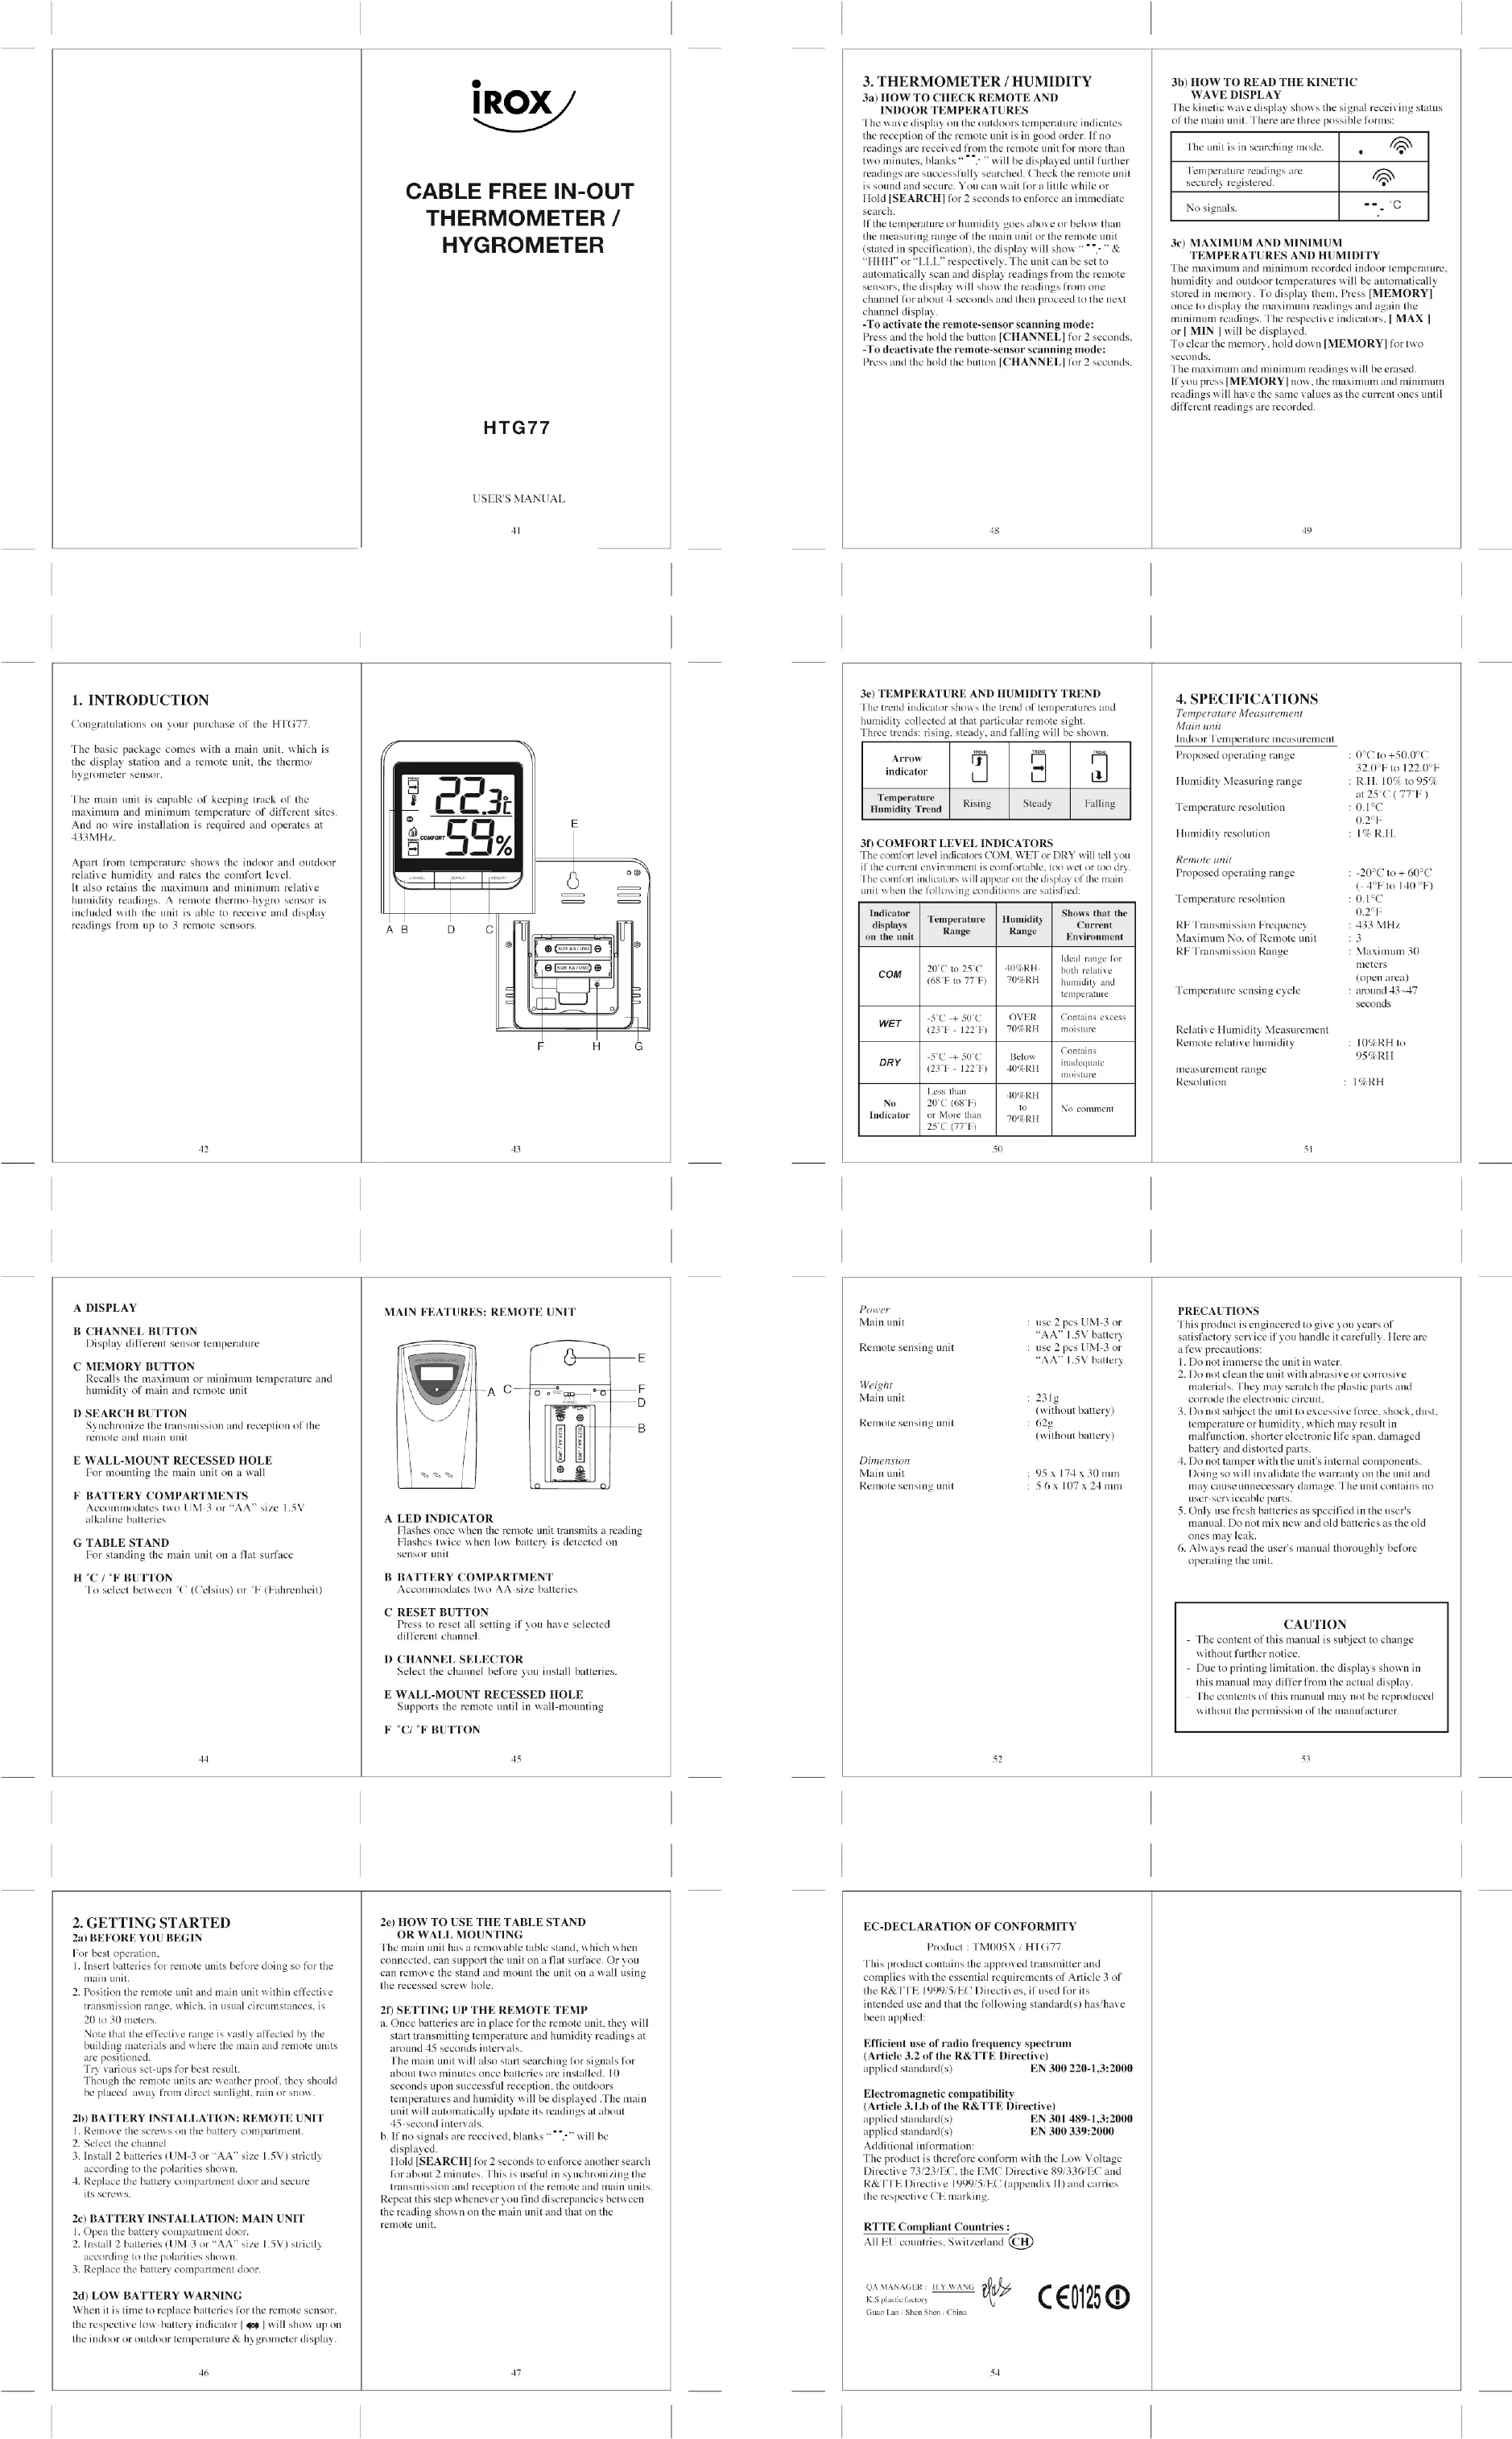
CABLE FREE IN-OUT THERMOMETER / HYGROMETER
HTG77
USER'S MANUAL
41
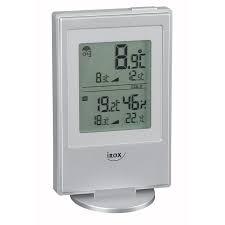
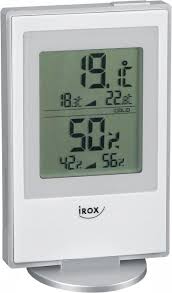
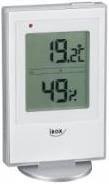
1. INTRODUCTION
Congratulations on your purchase of the HTG77.
The basic package comes with a main unit, which is the display station and a remote unit, the thermo/ hygrometer sensor.
The main unit is capable of keeping track of the maximum and minimum temperature of different sites. And no wire installation is required and operates at 433MHz .
Apart from temperature shows the indoor and outdoor relative humidity and rates the comfort level. It also retains the maximum and minimum relative humidity readings. A remote thermo-hygro sensor is included with the unit is able to receive and display readings from up to 3 remote sensors.
42
43
3. THERMOMETER / HUMIDITY 3a) HOW TO CHECK REMOTE AND INDOOR TEMPERATURES
The wave display on the outdoors temperature indicates the reception of the remote unit is in good order. If no readings are received from the remote unit for more than two minutes, blanks ***." will be displayed until further readings are successfully searched. Check the remote unit is sound and secure. You can wait for a little while or Hold [SEARCH] for 2 seconds to enforce an immediate search. If the temperature or humidity goes above or below than the measuring range of the main unit or the remote unit (stated in specification), the display will show ***-" & "HHH" or "LLL" respectively. The unit can be set to automatically scan and display readings from the remote sensors, the display will show the readings from one channel for about 4-seconds and then proceed to the next channel display.
-To activate the remote-sensor scanning mode: Press and the hold the button [CHANNEL] for 2 seconds.
-To deactivate the remote-sensor scanning mode: Press and the hold the button [CHANNEL] for 2 seconds
3b) HOW TO READ THE KINETIC
WAVE DISPLAY
The kinetic wave display shows the signal receiving status of the main unit. There are three possible forms:
| The unit is in searching mode. | |
| Temperature readings are securely registered. | |
| No signals. | - - - °C |
3c) MAXIMUM AND MINIMUM
TEMPERATURES AND HUMIDITY
The maximum and minimum recorded indoor temperature, humidity and outdoor temperatures will be automatically stored in memory. To display them, Press [MEMORY] once to display the maximum readings and again the minimum readings. The respective indicators, [MAX] or [MIN] will be displayed. To clear the memory, hold down [MEMORY] for two seconds.
The maximum and minimum readings will be erased. If you press [MEMORY] now, the maximum and minimum readings will have the same values as the current ones until different readings are recorded.
48
49
3e) TEMPERATURE AND HUMIDITY TRENDE The trend indicator shows the trend of temperatures and humidity collected at that particular remote sight. Three trends: rising, steady, and falling will be shown.
| Arrow indicator | Hypothesis | Hypothesis | Hypothesis |
| Temperature Humidity Trend | Rising | Steady | Falling |
3f) COMFORT LEVEL INDICATORS
The comfort level indicators COM, WET or DRY will tell you if the current environment is comfortable, too wet or too dry. The comfort indicators will appear on the display of the main unit when the following conditions are satisfied:
| Indicator displays on the unit | Temperature Range | Humidity Range | Shows that the Current Environment |
| COM | 20°C to 25°C (68°F to 77°F) | 40%RH-70%RH | Ideal range for both relative humidity and temperature |
| WET | -5°C + 50°C (25°F - 122°F) | OVER 70%RH | Contains excess moisture |
| DRY | -5°C + 50°C (25°F - 122°F) | Below 40%RH | Contains inadequate moisture |
| No Indicator | Less than 20°C (68°F) or More than 25°C (77°F) | 40% RH to 70% RH | No comment |
50
4. SPECIFICATIONS
Temperature Measurement
Math unit 1
Indoor Temperature measurement
Proposed operating range
32.0°F to 12.0°F H=10% to 9.5%
Humidity Measuring range
Temperature resolution
Humidity resolution
Remote unit
Proposed operating range
Temperature re
RF Transmission Frequency Maximum No. of Remote units
Maximum No. of Remote units RF Transmission Range
Temperature sensing cycle
Relative Humidity Measurement
Remote relative humidity
measurement range
Resolution
0^ to +50.0^
32.0^ to 122.0^
R.H. 10% to 95%
at 25 9:106
0.1℃ 0.2°E
1%
-20°C to +60°C
(-4°F to 140°F)
0.1^
0.2-F 133-1
435 MHz
2.3
Maximum 30
meters
(open area)
around 43-47
second
: 10% RH to
95%RH
1% DII
51
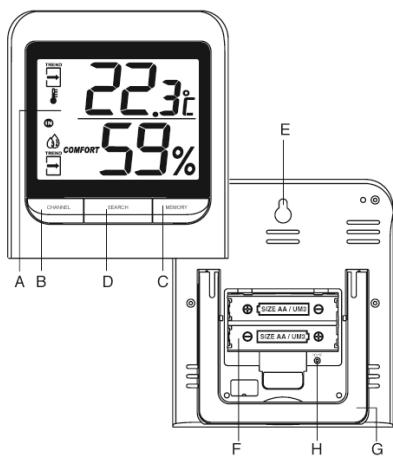
A DISPLAY
B CHANNEL BUTTON
Display different sensor temperature
C. MEMORY BUTTON
Recalls the maximum or minimum temperature and humidity of main and remote unit
D SEARCH BUTTON
Synchronize the transmission and reception of the remote and main unit
E WALL-MOUNT RECESSED HOLE
For mounting the main unit on a wall
E. BATTERY COMPARTMENTS
Accommodates two UM-3 or "AA" size 1.5V alkaline batteries
G TABLE STAND
For standing the main unit on a flat surface
H°C/°FBUTTON
To select between ^ C (Celsius) or ^ F (Fahrenheit)
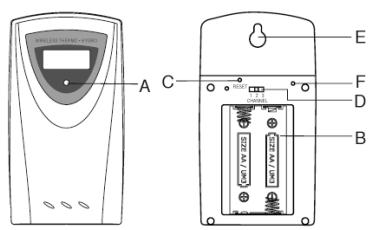
MAIN FEATURES: REMOTE UNIT
A LED INDICATOR
Flashes once when the remote unit transmits a reading Flashes twice when low battery is detected on
sensor unit
B BATTERY COMPARTMENT
Accommodates two AA-size batteries
C. RESET BUTTON
Press to reset all setting if you have selected
difficult
D CHANNEL SELECTOR
Select the channel before you install batteries.
E WALL-MOUNT RECESSED HOLE
Supports the remote until in wall-mounting
F°C/°F BUTTON
45
Power
Main unit
Remote sensing unit
use 2 pcs UM-3 or
"AA" 1.5V battery 2. LiM 3
AAA 1.5V battery
Weight
Main unit
Remote sensing unit
231g
(Without battery)
( without battery).
Dimension
Main unit
Remote sensing unit
95 × 174 × 30 ~mm
56× 10 / x24mm
52
AUTIONS
This product is engineered to give you years of
satisfactory service if you handle it carefully. Here are a few precautions:
-
Do not immerse the unit in water.
-
Do not clean the unit with abrasive or corrosive
materials. They may scratch the plastic parts and corrode the electronic circuit.
- Do not subject the unit to excessive force, shock, dust,
temperature or humidity, which may result in deterioration of the potential life span.
mation, shorter electronic fire span, damaged battery and distorted parts.
- Do not tamper with the unit's internal components.
Doing so will invalidate the warranty on the unit and may cause unnecessary damage. The unit contains no user-serviceable parts.
- Only use fresh batteries as specified in the user's
manual. Do not mix new and old batteries as the old ones may leak.
- Always read the user's manual thoroughly before
operating the unit.
CAUTION
The content of this manual is subject to change
without further notice.
Due to printing limitation, the displays shown in
this manual may differ from the actual display
The contents of this manual may not be reproduced without the permission of the manufacturer.
44
2. GETTING STARTED
2a) BEFORE YOU BEGIN
For best operation,
-
Insert batteries for remote units before doing so for the main unit.
-
Position the remote unit and main unit within effective transmission range, which in usual circumstances is
20 to 30 meters.
Note that the effective range is vastly affected by the
building materials and where the main and remote units are positioned.
Try various set-ups for best result.
Though the remote units are weather proof, they should be used to confirm the light transmission.
be placed away from direct sunlight, rain or snow.
2b) BATTERY INSTALLATION: REMOTE UNIT
Remove the screws on the battery compartment. Select the channel.
-
Select the channel 3. Install 2.100x (KM-3, "A A
-
Install 2 batteries (UM-5 or "AA" size 1.3V) strictly according to the polarities shown.
-
Replace the battery compartment door and secure
its screws.
2c) BATTERY INSTALLATION: MAIN UNIT
- Open the battery compartment door.
- Install 2 batteries (UM-3 or "AA" size 1.5V) strictly
according to the polarities shown
- Replace the battery compartment door.
2d) LOW BATTERY WARNING
When it is time to replace batteries for the remote sensor, the respective low-battery indicator [ ] will show up on the indoor or outdoor temperature & hygrometer display.
46
2e) HOW TO USE THE TABLE STAND
OR WALL MOUNTING
The main unit has a removable table stand, which when connected, can support the unit on a flat surface. Or you can remove the stand and mount the unit on a wall using the recessed screw hole.
2f) SETTING UP THE REMOTE TEMP
a. Once batteries are in place for the remote unit, they will start transmitting temperature and humidity readings at
around 45 seconds intervals
The main unit will also start searching for signals for
about two minutes once batteries are installed. 10
seconds upon successful reception, the outdoorsertemperatures and humidity will be displayed . The main
unit will automatically update its readings at about
45-second intervals.
b. If no signals are received, blanks "---" will be
displayed. Hold [SEAPCHU] for 2 seconds to enforce another search
Note [SEARCH] for 2 seconds to employee another scan for about 2 minutes. This is useful in synchronizing the
transmission and reception of the remote and main units Repeat this step whenever you find discrepancies between the reading shown on the main unit and that on the remote unit.
EC-DECLARATION OF CONFORMITY
Product : TM005X / HTG77
This product contains the approved transmitter
complies with the essential requirements of Article 3 of ILO CODE 10985 (EPC) (see above for further
the R&TE 1999/EC Directives, if used for its intended use and that the following standard(s) has/have
been applied:
Efficient use of radio frequency spectrum
(Article 3.2 of the R&TE Directive) applied standard(s) EN 300 2201.3:2000
1.1.2.1.2.1.3.1.6.4
Electromagnetic compatibility
Article 3.1.b of the R&TTE
EN 301 489-1.3:2000
EN300339:2000
Additional information:
The product is therefore conform with the Low Voltage
Directive 73/23/EC, the EMC Directive 89/336/EC and R&TTE Directive 1999/5/EC (appendix II) and carries the respective CE marking.
RTTE Compliant Countries :
All EU countries, Switzerland

54
materials. They may scratch the plastic parts and
corrode the electronic circuit.
- Do not subject the unit to excessive force, shock, dust,
temperature or humidity, which may result in
malfunction, shorter electronic life span, damaged battery and distorted body.
-
Disassembly with the aim
-
Do not tamper with the unit's internal components. Doing so will invalidate the warranty on the unit end.
may cause unnecessary damage. The unit contains no user-serviceable parts.
- Only use fresh batteries as specified in the user's
manual. Do not mix new and old batteries as the old
ones may leak.
- Always read the user's manual thoroughly before operating the unit.
CAUTION
The content of this manual is subject to change
without further notice.
Due to printing limitation, the displays shown in
this manual may differ from the actual display
The contents of this manual may not be reproduced without the permission of the manufacturer.
53