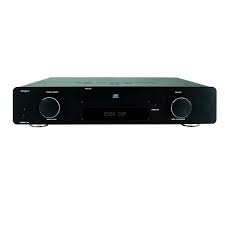
EXEO-CDP - Lecteur CD TANGENT - Notice d'utilisation et mode d'emploi gratuit
Retrouvez gratuitement la notice de l'appareil EXEO-CDP TANGENT au format PDF.


| Type de produit | Lecteur CD |
| Marque | TANGENT |
| Modèle | EXEO-CDP |
| Alimentation | CA secteur (tension selon étiquette arrière) |
| Consommation en veille | 0,73 W |
| Consommation à l'arrêt | 4,75 W |
| Consommation en lecture | 5,6 W |
| Sorties audio analogiques | RCA (Phono) dorée, 2 Vrms |
| Sortie audio numérique coaxiale | RCA (Phono) dorée, 75 Ω |
| Sortie audio numérique optique | Toslink (JIS F05) |
| Réponse en fréquence | 20 Hz - 20 kHz, ±0,1 dB |
| Rapport signal/bruit (SNR) | 111 dBA |
| Plage dynamique | 91 dBA |
| Distorsion (THD+N) | -86 dB (0,0053 %) |
| Diaphonie | -112 dB |
| Fonctions de lecture | Lecture, pause, arrêt, piste suivante/précédente, avance/retour rapide, programmation, répétition, aléatoire |
| Réglage de la luminosité de l'affichage | 4 niveaux : 25 %, 50 %, 75 %, 100 % |
| Télécommande | Infrarouge, portée 7 m, angle 30°, piles AAA (2x) |
| Entretien et nettoyage | Débrancher avant nettoyage, utiliser un chiffon humide, pas de nettoyants liquides |
| Sécurité | Construction classe II (double isolation), ne pas ouvrir, aucun composant réparable par l'utilisateur |
| Réparabilité | Confier toute réparation à un technicien qualifié |
FOIRE AUX QUESTIONS - EXEO-CDP TANGENT
Questions des utilisateurs sur EXEO-CDP TANGENT
0 question sur cet appareil. Repondez a celles que vous connaissez ou posez la votre.
Poser une nouvelle question sur cet appareil
Téléchargez la notice de votre Lecteur CD au format PDF gratuitement ! Retrouvez votre notice EXEO-CDP - TANGENT et reprennez votre appareil électronique en main. Sur cette page sont publiés tous les documents nécessaires à l'utilisation de votre appareil EXEO-CDP de la marque TANGENT.
MODE D'EMPLOI EXEO-CDP TANGENT
EXEO CDP
Instruction manual
CD Player
CONTENTS
SAFETY INFORMATION 1
IMPORTANT SAFETY INSTRUCTIONS 2
ACCESSIONS 4
CONNECTIONS 5
REMOTE CONTROL INFORMATION 6
FRONT PANEL INFORMATION 8
REAR PANEL INFORMATION 9
OPERATION AND FUNCTIONS 10
TROUBLESHOOTING GUIDE 11
SPECIFICATIONS 12
| CAUTION RISK OF ELECTRIC SHOCK DO NOT OPEN | Caution: - To reduce the risk of electric shock, do not remove Cover (or back) - No user-serviceable parts inside. - Refer servicing to qualified service personnel. |
| This lightning flash with arrowhead symbol, within an equilateral triangle is intended to alert the user to the presence of uninstalled “dangerous voltage” within the product’s enclosure that may be of sufficient magnitude to constitute a risk of electric shock to persons. | |
| The exclamation point within an equilateral triangle is intended to alert the user to the presence of important operating and maintenance (servicing) instructions in the literature accompanying the appliance. | |
| The symbol on this product indicates that it is of CLASS II (double insulated) construction. |
CAUTION: READ THIS BEFORE OPERATING YOUR UNIT.
-
READ AND FOLLOW INSTRUCTIONS: All the safety and operation instructions should be read before the product is operated. Follow all operation instructions within this manual.
-
RETAIN INSTRUCTIONS: The safety and operation instructions should be retained for future reference.
-
HEED WARNINGs: Comply with all warnings on the product and in the operation instructions.
-
CLEANING: Unplug this product from the wall outlet before cleaning. Do not use liquid cleaners or aerosol cleaners. Use a damp cloth for cleaning.
-
GROUNDING or POLARIZATION: This product may be equipped with a polarized alternating current line plug (a plug having one pin wider than the other). This plug will fit into the power outlet only one way. This is a safety feature. If you are unable to insert the plug fully into the outlet, try reversing the plug. If the plug should still fail to fit, contact your electricians since it is likely you have an out of safe wall socket. Never force the plug into the socket.
-
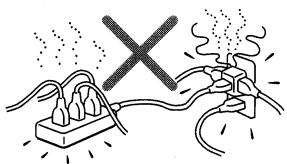
OVERLOADING: Do not overload wall outlets or extension cords as this can result in the risk of fire or electric shock. Overloaded AC outlets, extension cords, frayed power cables, damaged or cracked wire insulation, and broken plugs are dangerous. They may result in electric shock or fire hazard. Periodically examine the power cable - if its appearance indicates damage or deteriorated receptacles have it replaced by your service technician.
-
POWER SOURCES: This product should be operated only from the type of power source indicated on the rear panel label. If you are not sure of the type of power supply to your home, consult your product dealer or local power company. For products intend to be operated from battery power, or other sources, refer to the operation instructions.
-
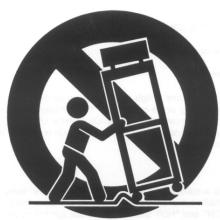
ACCESSORIES: Do not place this product on an unstable surface or support. The product may fall, causing serious injury to a child or adult as well as serious damage to the product. Any mounting of the product should follow the manufacture's instructions and use a mounting accessory recommended by the manufacturer. A product and cart combination should be moved with care.
Quick stops, excessive force, and uneven surfaces may cause the product and cart combination to overturn.
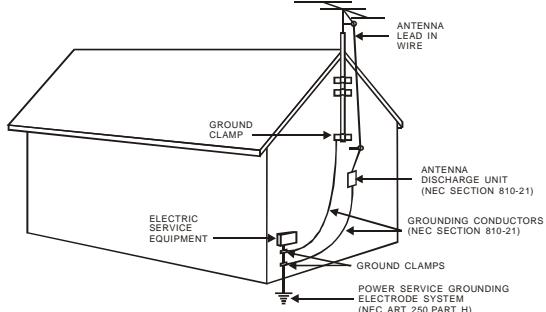
- OUTDOOR ANTENNA GROUNDING: If an outside antenna or cable system is connected to the product, be sure the antenna or cable system is grounded so as to provide some protection against voltage surges and built-up static charges. The example below is for reference only. Correct grounding should always be installed by an electrician.
- POWER-CORD PROTECTION: The power supply cables should be routed so that they are not likely to be walked on or pinched by items placed upon or against them, paying particular attention to cables at plugs and the point where they exit from the product. The mains plug of the power supply cord shall remain readily operable.
- ATTACHMENTS: Do not use unauthorized attachments as they may cause faults with the unit.
- CONDITIONS REQUIREING SERVICE: Unplug this product from the wall outlet and refer servicing to qualified service personnel under the following conditions.
a) If the unit exhibits sudden unusual operation or unusual display characteristics.
b) If liquid has been spilled, or objects have fallen into the product.
c) If the product has been exposed to rain or water.
d) If the product does not operate normally by following the operation instructions, adjusting only those controls that are covered by the operation instructions. (NOTE: improper adjustment of other controls may result in damage and will often require extensive work by a qualified technician to restore the product to its normal operation).
e) If the product has been dropped or damaged in any way.
f) If the product exhibits a distinct change in performance.
- SERVICING: Do not attempt to service this product yourself as opening or removing covers may expose you to dangerous voltage and may damage precision components. Refer all servicing to qualified service personnel.
- LIGHTNING: For added protection during a lightning storm, or when it is left unattended and unused for long period of time, unplug it from the wall outlet and disconnect the antenna or cable system. This will prevent damage to the product due to lightning and power line surges.
- REPLACEMENT PARTS: Should replacement parts be required, has the service technician verify that the replacement parts he uses have the same safety characteristics as the original parts. Use of unauthorized replacements parts can cause fire or electric shock.
- SAFETY CHECK: Upon completion of any service or repairs to this product, ask the service technician to perform safety checks recommended by the manufacturer to determine that the product is in a safe operating condition.
- HEAT DISpersAL: Leave at least 10cm of space between the top, back and sides of the unit and the wall or other electrical components.
- The apparatus shall not be exposed to dripping or splashing and that no objects filled with liquids, such as vases, shall be placed on the apparatus.
19. NOTES ON USE
| ·Avoid high temperatures Allow for sufficient heat dispersion when installed on a rack. | ·Keep the set free from moisture. water, and dust. | ·Do not let foreign objects in the set. |
| ·Unplug the power cord when not using the set for long periods of time | ·Do not let insecticides,benzene,and thinner come in contact with the set. | |
| ·Handle the power cord carefully. Hold the plug when unplugging the cord. | * (For sets with ventilation holes) ·Do not obstruct the ventilation holes | ·Never disassemble or modify the set in any way. |
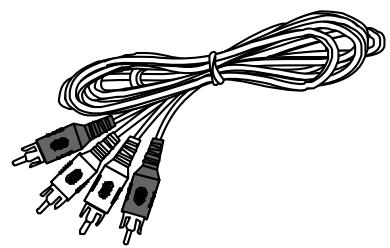
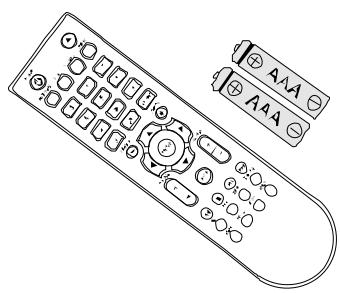
You should find the following accessories included:
- Mains cord
- RCA cord
- Remote control + batteries AAA x 2
- Operator's Manual.

1
2
3
4
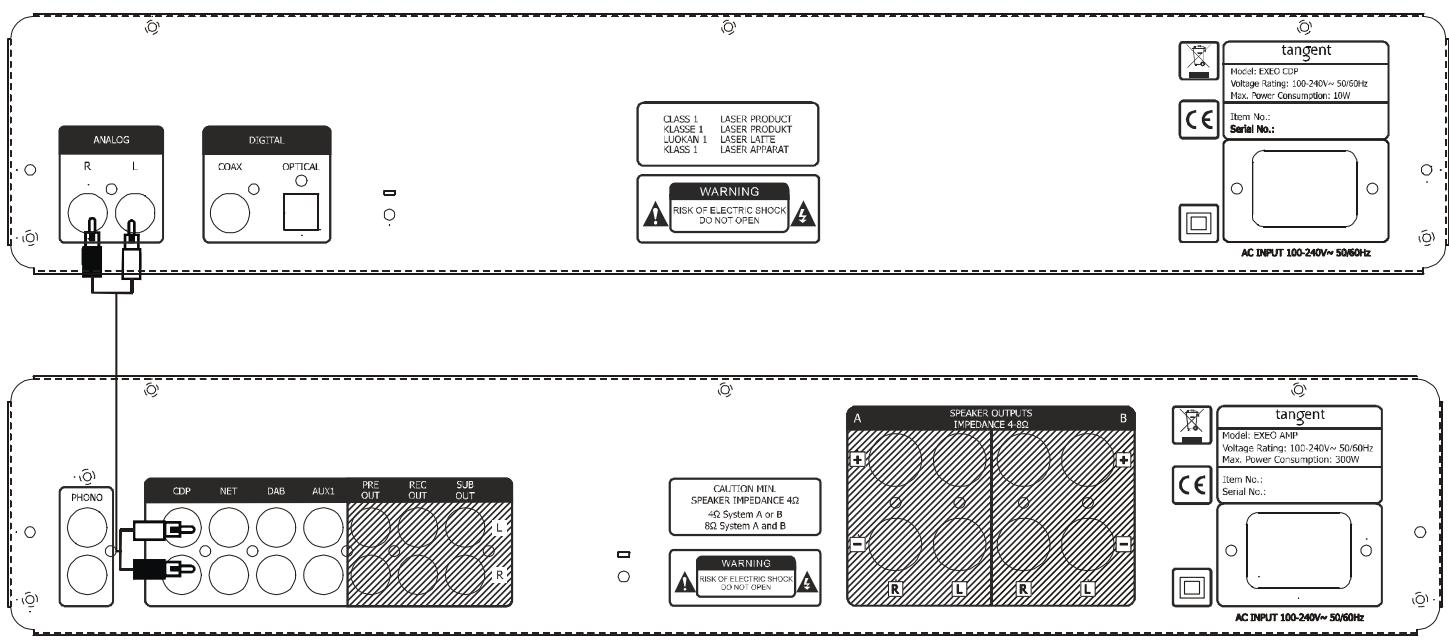
Amplifier systems
How to connect the EXEO CDP to e.g. an EXEO AMP.
By using the provided remote control unit, the receiver can be controlled from your listening position. To use the remote control unit, point it at the REMOTE SENSOR window of the receiver.
Notes:
- Even if the remote control unit is operated within the effective range, remote control operation may be impossible if there are any obstacles between the unit and the remote control.
- If the remote control unit is operated near other appliance which generate infrared rays, or if other remote control devices using infrared rays are used near the unit, it may operate incorrectly.
Precautions concerning batteries
-Be sure to insert the batteries with correct positive+ and negative - polarities.
- Use batteries of the same type. Never use different types of batteries together.
- Rechargeable and non-rechargeable batteries can be used. Refer to the precautions on their labels.
- When the remote control unit is not to be used for a long time (more than a month), remove the batteries from the remote control unit to prevent them from leaking. If they leak, wipe away the liquid inside the battery compartment and replace the batteries with new ones.
- Do not heat or disassemble batteries and never dispose of old batteries by throwing them in a fire.
REMOTE CONTROL OPERATION RANGE
Use the remote control unit within a range of about 7 meters (23 feet) and the angles of up to 30 degrees aiming at the remote sensor.
BATTERY INSTALLATION
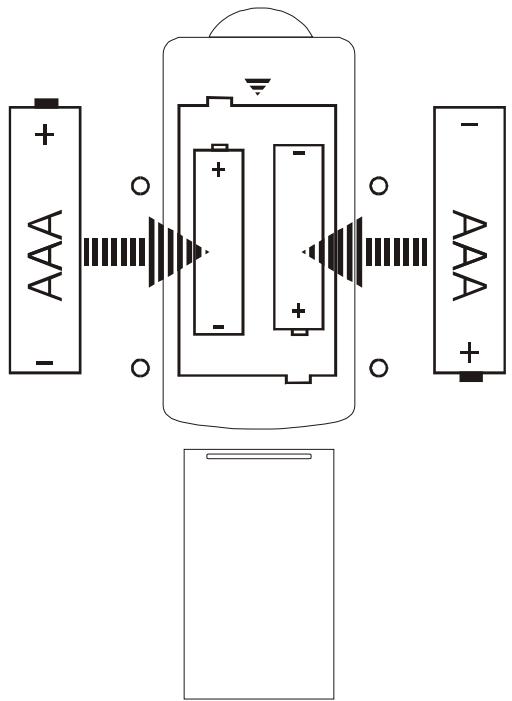
- Remove the battery compartment cover.
- Insert two "AAA" dry batteries.
Make sure that the batteries are inserted with their positive "+" and negative "-" poles positioned correctly. - Close the cover until it clicks. If the distance required between the remote control unit and main unit decreases, the batteries are exhausted. In this case, replace the batteries with new on.
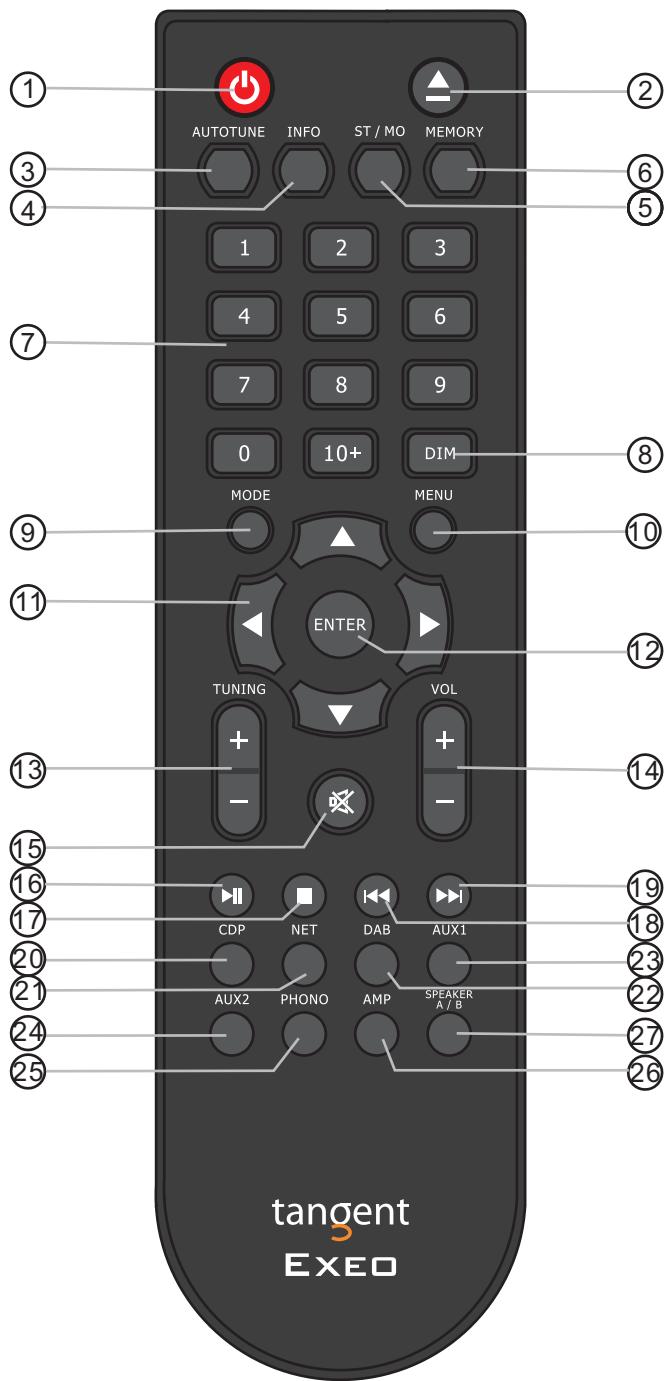
1. System Off
Press this key to turn off the EXEO AMP and any other EXEO product.
- Open and close the disc tray on the EXEO CDP.
3. Autotune
Does not apply.
4. Info
Press CDP and the MENU button to display the current playing time, remaining time of the track or the total remaining of the disc.
5. ST/Mono
Does not apply.
6. Memory
Under stop mode, press memory and "MEM01 = 01" appears on the display, use the numerical keys to select your tracks, e.g. press 2, then "MEM01 = 02" appears on the display, press enter to select. Nextly "MEM02" will be displayed and same procedure applies. Press /II key to start to play your custom list according to your programming.
7. Number Keys
Select numbers by pressing these buttons.
8. DIM
Press this button to toggle the brightness between: 25% , 50% , 75% & 100% .
9. MODE
Does not apply.
10. Menu
Press the CDP button and then press the Menu button to enter the menu.
11. Cursor keys
12. Enter
To confirm selection.
13. Tuning +/-
Does not apply.
14. Volume+/-
Does not apply.
15. Mute
Does not apply.
16. /II Play/Pause
17. Stop
- Press to select the previous track. Press and hold to fast rewind and return to normal playback after release.
- Press to select the next track or chapter (MP3).
Press and hold to fast forward and return to normal playback after release.
20.CDP
Press this button to activate the EXEO CDP from Standby or to select MENU or INFO.
21. NET
Does not apply.
22. DAB
Does not apply.
23.AUX1
Does not apply.
24. AUX2
Does not apply.
25. Phono
Does not apply.
26. AMP
Does not apply.
27. Speaker A/B
Does not apply.
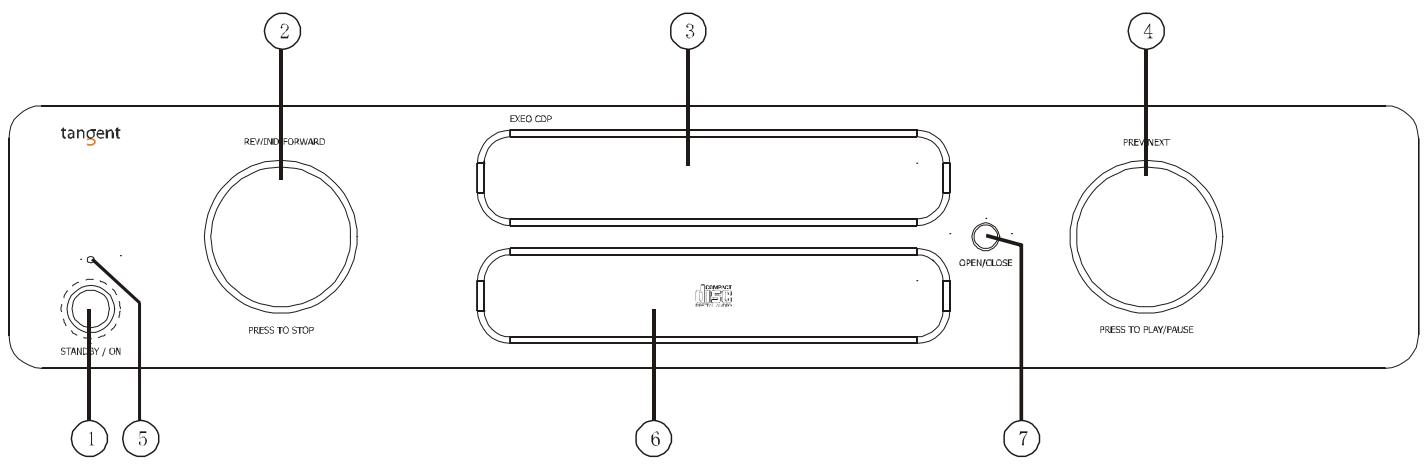
1. Power On
Press it to turn on the unit, press it again to turn off.
2. REWIND-FORWARD
a. Rotate the knob clockwise or counterclockwise to scan the tracks forward or backwards. Press it once to stop the playback.
(Note: when the unit is scanning fast forward, press the PREV-NEXT button once to resume normal playback.
b. Press this button for 2 seconds to enter the MENU. Rotate to select Repeat, Random, Display and Firmware.
3. Disc Tray
The tray for loading a disc
4. PREV-NEXT
Rotate the knob clockwise or counterclockwise to skip to the previous or the next track while playing. Press it to switch between Play/Pause.
5. LED indicator
Is OFF when the unit is turned on. Is red when the unit is in standby mode.
6. Display
7. OPEN/CLOSE
Press this button to open/close the disc tray.
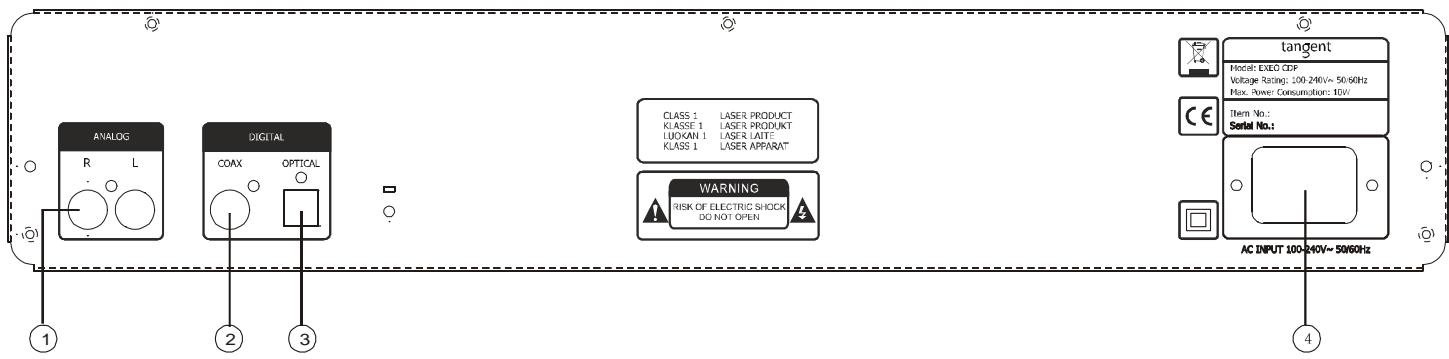
1. ANALOG
For connection to an amplifier e.g. EXEO AMP
2. COAX
Coaxial (75Ω) SPDIF output.
3. OPTICAL
Optical (Toslink) SPDIF output
4. AC MAINS INPUT
For connection of mains voltage. Make sure that the plug is correctly inserted, and that the voltage corresponds to the text printed on the rear panel of the cabinet.
ON, OFF and standby
- Turn on the unit by pressing the Standby/ON button on the front panel or the CDP button on the remote control.
- If you wish to turn off the unit to avoid any power consumption, you must remove the power cord.
Load a disc
To load a disc press the eject button on the remote control or on the front panel. When the disc has been read, the display will show the number of tracks on the disc and the total playback time.
If there is no disc in the tray, the message "NO DISC" will be displayed. If the unit has trouble reading a disc, the message "NO DISC" will be displayed.
Play/Pause
Press the PLAY/PAUSE button on the remote control once to start playback. Press it again to pause. Or press the right hand side knob to play or pause playback.
Stop
To stop playback, press the STOP button on the remote control or press the left hand side knob on the front panel. The display will again display the number of tracks on the disc and the total playback time.
Previous and Next
Previous and next is controlled by the right hand side knob. On the remote you press for next and for previous track.
Forward and Rewind
Fast Forward and Rewind is controlled by the left hand side knob. To resume normal playback press play. On the remote press and hold for forward and for backwards.
Memory
The unit can be programmed to play the tracks of a CD in a certain order. Please look in the section: REMOTE CONTROL INFORMATION on how to program it.
Menu Layout
The menu is accessed by pressing and holding the left hand side knob, or by pressing AMP and then MENU on the remote. Use the arrow keys and ENTER key of the remote or the left hand side knob on the front panel to select.
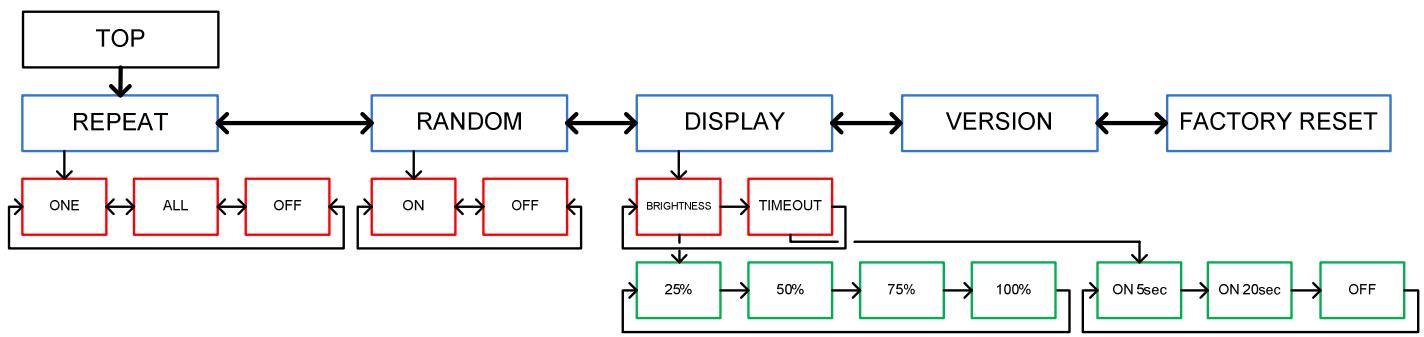
Random
It is possible to have the unit playback the tracks in random order.
Repeat
The unit can be set to repeat one or all tracks of a CD.
NOTE: This function can also be used, when unit has been programmed.
Display - Brightness
Levels of 25-50-75 and 100% can be selected. 75% is default. The DIM button on the remote toggles the levels.
Display - Time Out
Time limits of 5 and 20secs can be selected and of course off. Time Out means the display is switched off.
TROUBLESHOOTING
| PROBLEM | CAUSE/REMDY |
| No power when the unit is turn on | - Switch on the current at the mains outlet socket. - Check that the plug has been correctly inserted into the socket. - The internal fuse has blown and must be replaced by a qualified service technician - The power cord has been damaged and must replaced |
| No Sound | - The unit has not been turned on - Incorrect connection to the amplifier - No CD in the unit |
| The unit will not read the disc | - Check if the disc has been turned upside down - Check if the disc is clean and undamaged |
| The unit skip some parts during playback | - Check if the disc is clean and undamaged. - The unit is positioned on an unstable surface. |
| High buzzing | - The audio input cables have been incorrectly connected or damaged |
Power
| Parameter | Value | Note |
| Standby Consumption | 0.73W | |
| Idle Consumption | 4.75W | |
| Play Consumption | 5.6W |
Audio
| Parameter | Value | Note |
| Line Level Outputs Connectors | RCA (Phono), gold plated | Case = Gnd, Tip = Signal |
| Coaxial Output Connector | RCA (Phono), gold plated | Case = Gnd, Tip = Signal, 75Ω |
| Optical Output Connector | Toslink (JIS F05) | |
| Amplitude | 2Vrms | 0dBFS 1KHz playback |
| Frequency Response L/R | +/- 0.1dB | 20-20KHz |
| Signal-to-Noise Ratio (SNR) | 111dBA | ('infinity zero' track) A-wgt |
| Dynamic Range | 91dBA | (output -60dBFS 1KHz) A-wgt |
| Distortion THD+N | -86dB (0.0053%) | 20-20KHz |
| Crosstalk | -112dB | 125-16KHz |
- EXEO CDP
- CONTENTS
- CAUTION: READ THIS BEFORE OPERATING YOUR UNIT.
- NOTES ON USE
- Amplifier systems
- Notes:
- Precautions concerning batteries
- REMOTE CONTROL OPERATION RANGE
- BATTERY INSTALLATION
- System Off
- Autotune
- Info
- ST/Mono
- Memory
- Number Keys
- DIM
- MODE
- Menu
- Cursor keys
- Enter
- Tuning +/-
- Volume+/-
- Mute
- /II Play/Pause
- Stop
- 20.CDP
- NET
- DAB
- 23.AUX1
- AUX2
- Phono
- AMP
- Speaker A/B
- Power On
- REWIND-FORWARD
- Disc Tray
- PREV-NEXT
- LED indicator
- Display
- OPEN/CLOSE
- ANALOG
- COAX
- OPTICAL
- AC MAINS INPUT
- ON, OFF and standby
- Load a disc
- Play/Pause
- Stop
- Previous and Next
- Forward and Rewind
- Memory
- Menu Layout
- Random
- Repeat
- Display - Brightness
- Display - Time Out
- TROUBLESHOOTING
Marque : TANGENT
Modèle : EXEO-CDP
Catégorie : Lecteur CD