
HKI52W - Hotte aspirante ACEC - Notice d'utilisation et mode d'emploi gratuit
Retrouvez gratuitement la notice de l'appareil HKI52W ACEC au format PDF.


| Type de produit | Hotte aspirante |
| Marque | ACEC |
| Modèle | HKI52W |
| Hauteur minimale au-dessus de la plaque | 65 cm |
| Modes d'évacuation | Extraction (conduit extérieur) ou recyclage (filtre à charbon) |
| Diamètre de conduit | 100 ou 120 mm |
| Nombre de vitesses moteur | 3 (faible, moyenne, élevée) |
| Éclairage | 2 lampes de 40 W |
| Filtres à graisse | Filtres métalliques lavables (tous les 2 mois) |
| Filtre à charbon actif | Pour mode recyclage, remplacement tous les 2 mois (non lavable) |
| Type de filtre supplémentaire | Filtre synthétique (indicateur de saturation par points rouges) |
| Alimentation électrique | 230 V ~ 50 Hz (vérifier plaque signalétique) |
| Installation | Fixation murale ou entre meubles, avec support fourni |
| Usage en extraction | Ne pas raccorder à un conduit d'évacuation d'appareils à combustible non électrique |
| Sécurité | Double isolation (classe II), arrêt bipolaire avec 3 mm d'ouverture |
| Nettoyage extérieur | Chiffon humide et détergent doux, éviter produits abrasifs ou alcool |
| Entretien des filtres | Filtres métalliques au lave-vaisselle ou à la main ; charbon synthétique à remplacer |
| Fonction microswitch | Commutation éclairage et moteur par mouvement du panneau avant |
| Contrôle | Panneau à 2 ou 3 interrupteurs (selon modèle) |
FOIRE AUX QUESTIONS - HKI52W ACEC
Questions des utilisateurs sur HKI52W ACEC
0 question sur cet appareil. Repondez a celles que vous connaissez ou posez la votre.
Poser une nouvelle question sur cet appareil
Téléchargez la notice de votre Hotte aspirante au format PDF gratuitement ! Retrouvez votre notice HKI52W - ACEC et reprennez votre appareil électronique en main. Sur cette page sont publiés tous les documents nécessaires à l'utilisation de votre appareil HKI52W de la marque ACEC.
MODE D'EMPLOI HKI52W ACEC
Operating Instructions Mode d'emploi Bedienungsanleitung Istruzioni per l'uso Manual de instrucciones Gebruiksaanwijzing
Part 1 - INSTALLATION INSTRUCTIONS
1 - GENERAL INFORMATION
This hood is designed to be fixed to any rigid vertical surface, over a gas or electric hotplate and can be used either in the extraction mode (ducted to the outside) or in the recirculation mode (internal recycling).
Before commencing the installation, consideration should be given to the difficulties to be found during installation.
The installation work must be undertaken by a qualified and competent person in conformity to the rules concerning the evacuation of contaminated air.
The manufacturer disclaims all liability for any damage or injury caused as a result of not following the instructions for installation contained in the following text.
2 - SAFETY WARNINGS
2.1 - When used in the extraction mode, the cooker hood ducting must not be connected to a flue which is used for exhausting fumes from appliances supplied with energy other than electric, such as a central heating flue or water heating flue.
2.2 - Before connecting to the mains supply ensure that the mains voltage corresponds with the voltage on the rating plate inside the hood.
2.3 - Connect the cooker hood to the mains via a bipolar switch which has 3mm clearance between the contacts.
2.4 - For cooker hoods featuring an earth cable, make sure the electric plant of your house is correctly earthed.
2.5 - Appliances in class II are provided with a double insulation; therefore do not connect them through earthed plugs but through simple bipolar plugs.
2.6 - When installed, the hood must be positioned at least 65~cm above the hotplate.
2.7 - Never do flambe cooking under this cooker hood.
2.8 - Never leave frying pans unattended during use as overheated fat and oil may catch fire.
2.9 - Before carrying out any kind of maintenance or cleaning, disconnect the hood from the mains supply.
2.10 -If the room where the cooker hood is to be used contains a fuel burning appliance such as a central heating boiler then this must be of the room sealed or balanced flue type.
If other types of flue or appliance are fitted, ensure that there is an adequate supply of air into the room.
When the cooker hood is used in conjunction with appliances supplied with energy other than electric, the negative pressure in the room must not exceed 0.04 mbar to prevent fumes being drawn back into the room by the cooker hood.
3 - INSTALLATION
3.1 - Fixing the front panel to the screen
Extract the metal screen by turning it outwards unlocking, at the same time the stop on the left hand side of the hood (fig. 1), drill the panel, using the cardboard template provided and fix it to the screen using the 3.9 × 13 screws provided. Replace the screen, ensuring that the guides are fitted correctly into position.
Adjust the slide of the screen by turning the two screws V
3.2 - Fixing to the wall
Drill the wall using the cardboard template provided, fit plugs into the holes and fix the two metal brackets using the four screws provided with the accessories.
Hook the hood onto the metal brackets.
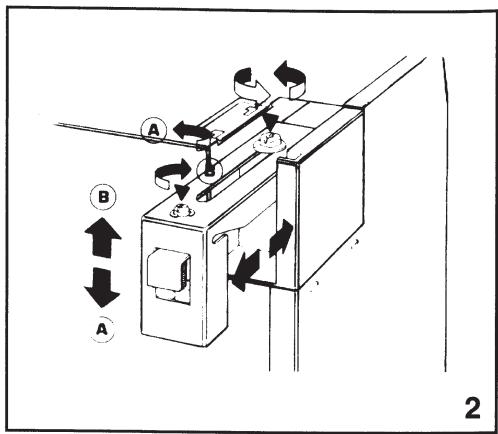
The rear hooks on the hood can be adjusted both in height and depth, allowing the hood to be aligned
with the cupboards on either side (fig. 2).
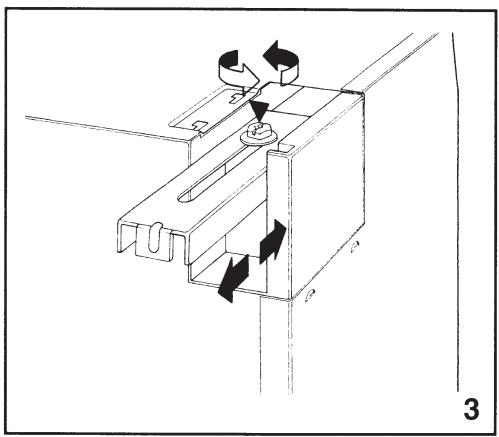
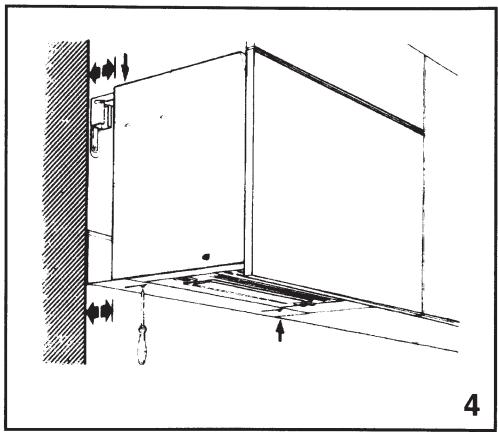
In some models the rear hooks can only be adjusted horizontally (fig. 3), in any case, after hooking the hood to the wall it will always be necessary to adjust the depth of the metal spacer on the lower part of the hood (fig. 4).
3.3 - Fixing to cupboards on either side
Drill the side cupboards using the cardboard template provided, remove the screen (see paragraph 3.1).
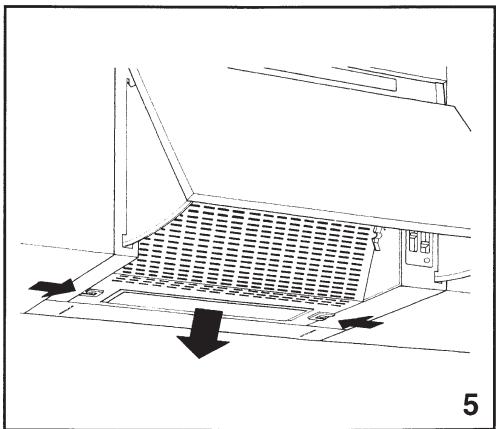
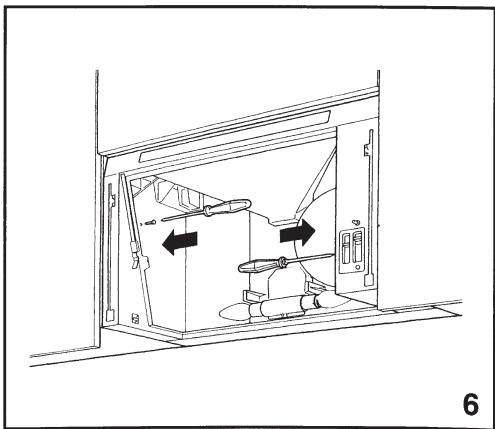
Remove the ventilator grille (fig. 5), fix the hood to the cupboards using the 3.5 × 16 screws provided, screwing them from the inside (fig. 6).
3.4 - Ducting or recycling connection
1 - Ducting connection
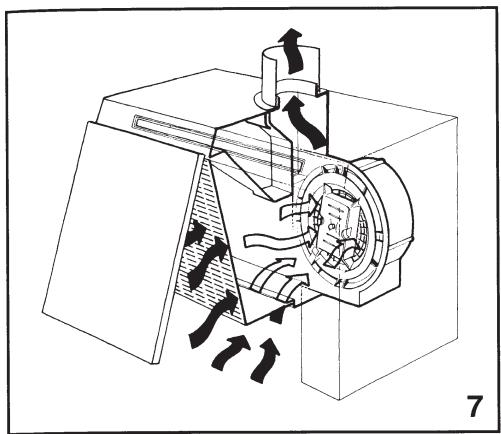
Kitchen fumes are ducted to the outside of the building through an outlet pipe (fig. 7).
The outlet from the hood must be connected to external ducting by means of rigid or flexible pipes 100 or 120mm to be fixed using suitable pipe connectors (not provided). Check whether or not there are active charcoal filters fitted in the hood: in the ducting version they should not be installed (see paragraph 3.3 part 2).
2 - Recycling connection
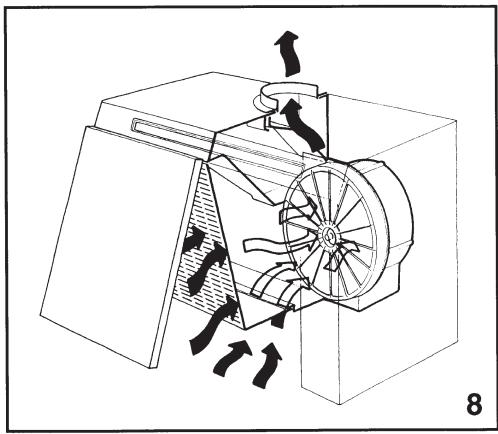
The air is filtered through the active charcoal filter and returned into the room through the hole in the top of the hood (fig. 8).
Check that the active charcoal filters are fitted inside the hood (see paragraph 3.3, part 2).
3.5 - Electrical connection and working test
1 - The safety measures 2.2, 2.3, 2.4 and 2.5 of paragraph 2 are to be strictly observed.
2 - Once the electrical connection has been completed, check that the worktop illumination, motor and speeds work properly.
Part 2 - OPERATION AND
MAINTENANCE INSTRUCTIONS
1 - SAFETY WARNINGS
It is most important that all the warnings shown in paragraph 2 of part 1 are strictly observed. Moreover, special attention must be paid to the following warnings during the use and maintenance of the cooker hood:
1.1 - The grease filters and the charcoal filters should be cleaned or replaced as recommended by the manufacturer or more frequently if the hood is used consistently (more than 4 hours per day).
1.2 - When using a gas hob in connection with the cooker hood never leave the burners of the hob uncovered while the hood is in use or when the pans have been removed. Switch off the gas before removing the pan or for just short periods and never leave the hob unattended.
1.3 - Always ensure that the appliance is kept at the correct intensity to prevent the flame from licking round from the bottom of the pan; this will save energy and will avoid a dangerous concentration of heat.
1.4 - Always ensure that the appliance is used in accordance with the manufacturer's instructions for the removal of contaminated odours during cooking.
2 - USE
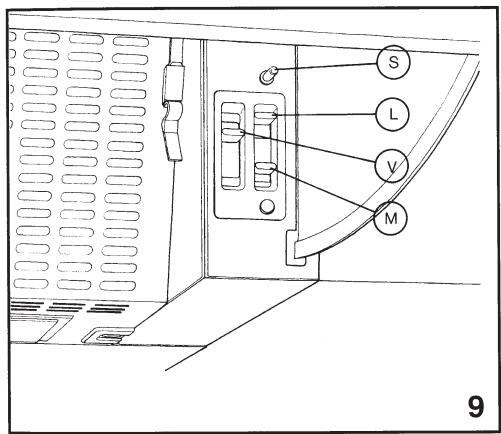
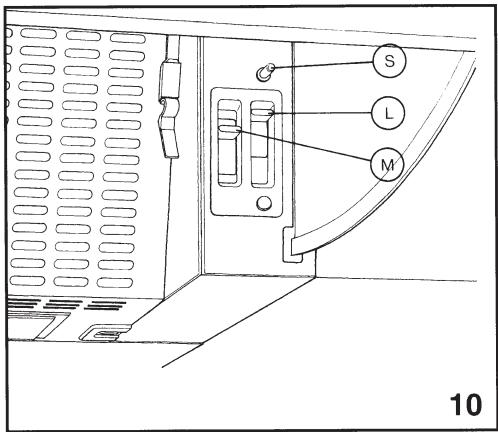
A microswitch S activated by movement of the front panel turns the lighting system on and off and activates switching on and off of the motor at the pre-selected speed.
Control panel (3 switches) (fig. 9)
SWITCH L = controls the worktop illumination
SWITCH M = switches the motor on or off
SWITCH V = controls the fan speed
Control panel (2 switches) (fig. 10)
SWITCH L = ontrols the worktop illumination
SWITCH M = controls the power to the motor and the fan speed
Working speeds:
Position 1 = low speed, should be selected when simmering or using only one pan: the noise level is kept to the minimum.
Position 2 = medium speed, should be selected for normal cooking. This speed offers the best ratio between air capacity and noise level.
Position 3 = top speed, should be selected when frying or cooking food with strong odours, even for a long period.
3 - MAINTENANCE
Regular maintenance and cleaning will ensure good performance and reliability, while extending the working life of the hood.
Special attentions should be paid to the grease filters and to the charcoal filters when the hood is used in the recirculation mode.
3.1 - Metal grease filters
1 - Cleaning
The metal grease filters should be cleaned every two months with normal usage and can be cleaned in a dishwasher or by hand using a mild detergent or liquid soap.
2 - Removal
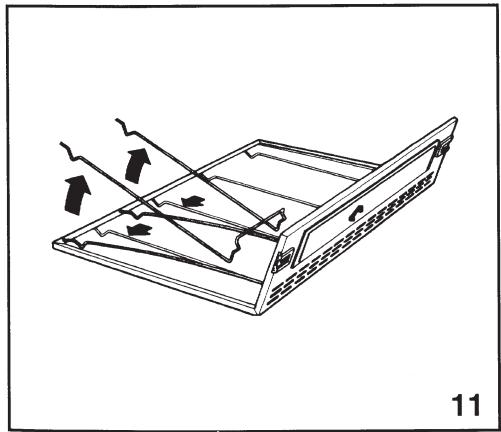
a - Open the metal grille pushing the knobs towards the centre while pulling downwards (fig. 5).
b - Remove the wire clips and remove the filters (fig. 11).
3.2 - Synthetic fibre filter
1 - This type of filter is printed with red dots. When the filter becomes saturated the red colour of the dots will spread over the whole surface of the filter. At this point the filter has to be replaced.
The saturated filter cannot be cleaned or regenerated.
2 - Replacement
a - Open the metal grille pushing the knobs towards the centre while pulling downwards (fig. 5).
b - Remove the wire clips and replace the synthetic fibre filter (fig. 11).
c - Close the metal grille.
3.3 - Charcoal filters
1 - Functioning
In the recycling mode the charcoal filters absorb smells and odours. The charcoal filter cannot be washed or regenerated and should be replaced every 2 months or more frequently if the hood is used consistently.
2 - Replacement
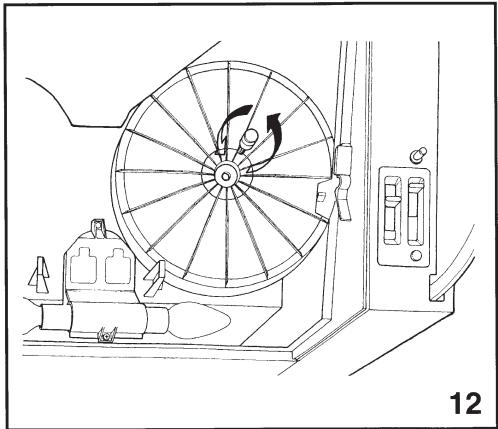
a - Open the metal grille pushing the knobs towards the centre while pulling downwards (fig. 5).
b - Replace the charcoal filters by unscrewing the fixing knobs (fig. 12).
c - Close the metal grille.
ATTENTION - There could be a possible fire hazard if the filters are not replaced according to these instructions.
3.4 - Lighting
a - Two 40W lamps ensure the worktop lighting. These lamps can be reached by removing the metal grille.
b - Should the two lamps fail to work, open the metal grille and ensure they are correctly screwed into the holder.
c - When changing the lamp, an identical replacement must be fitted to ensure the safe working of the cooker hood.
3.5 - Cleaning
When cleaning the hood:
- Never use a wet cloth or sponge, or running water;
- Never use thinners or products containing alcohol, as they might damage the paintwork;
- Never use abrasive cleaning materials, in particular when cleaning stainless steel surfaces.
It is recommended to use a damp cloth and mild liquid household cleaner.

- Part 1 - INSTALLATION INSTRUCTIONS
- - GENERAL INFORMATION
- - SAFETY WARNINGS
- - INSTALLATION
- - Fixing the front panel to the screen
- - Fixing to the wall
- - Fixing to cupboards on either side
- - Ducting or recycling connection
- - Electrical connection and working test
- Part 2 - OPERATION AND
- MAINTENANCE INSTRUCTIONS
- - SAFETY WARNINGS
- - USE
- Control panel (3 switches) (fig. 9)
- Control panel (2 switches) (fig. 10)
- Working speeds:
- - MAINTENANCE
- - Metal grease filters
- - Synthetic fibre filter
- - Charcoal filters
- - Lighting
- - Cleaning
Marque : ACEC
Modèle : HKI52W
Catégorie : Hotte aspirante