
KOMPLEXER - Synthétiseur sonore TERRATEC - Notice d'utilisation et mode d'emploi gratuit
Retrouvez gratuitement la notice de l'appareil KOMPLEXER TERRATEC au format PDF.


| Type de synthèse | Soustractive étendue |
| Nombre d'oscillateurs | 3 |
| Filtres | 2 filtres paramétriques |
| Enveloppes | Enveloppes de filtre et d'amplificateur |
| LFO | 1 LFO avec modulation multiple |
| Effets intégrés | Non précisé |
| Interface utilisateur | Écran et boutons de contrôle |
| Type de contrôle | Logiciel VST |
| Compatibilité | DAW compatibles VST |
| Polyphonie | Non précisé |
| Modulation | Multiples sources de modulation |
| Version du logiciel | 1.00 (juillet 2006) |
| Fabricant | Non précisé |
| Utilisation | Création sonore et production musicale |
FOIRE AUX QUESTIONS - KOMPLEXER TERRATEC
Questions des utilisateurs sur KOMPLEXER TERRATEC
0 question sur cet appareil. Repondez a celles que vous connaissez ou posez la votre.
Poser une nouvelle question sur cet appareil
Téléchargez la notice de votre Synthétiseur sonore au format PDF gratuitement ! Retrouvez votre notice KOMPLEXER - TERRATEC et reprennez votre appareil électronique en main. Sur cette page sont publiés tous les documents nécessaires à l'utilisation de votre appareil KOMPLEXER de la marque TERRATEC.
MODE D'EMPLOI KOMPLEXER TERRATEC
KOMPLEXERvST
Extended Subtractive Synthesizer
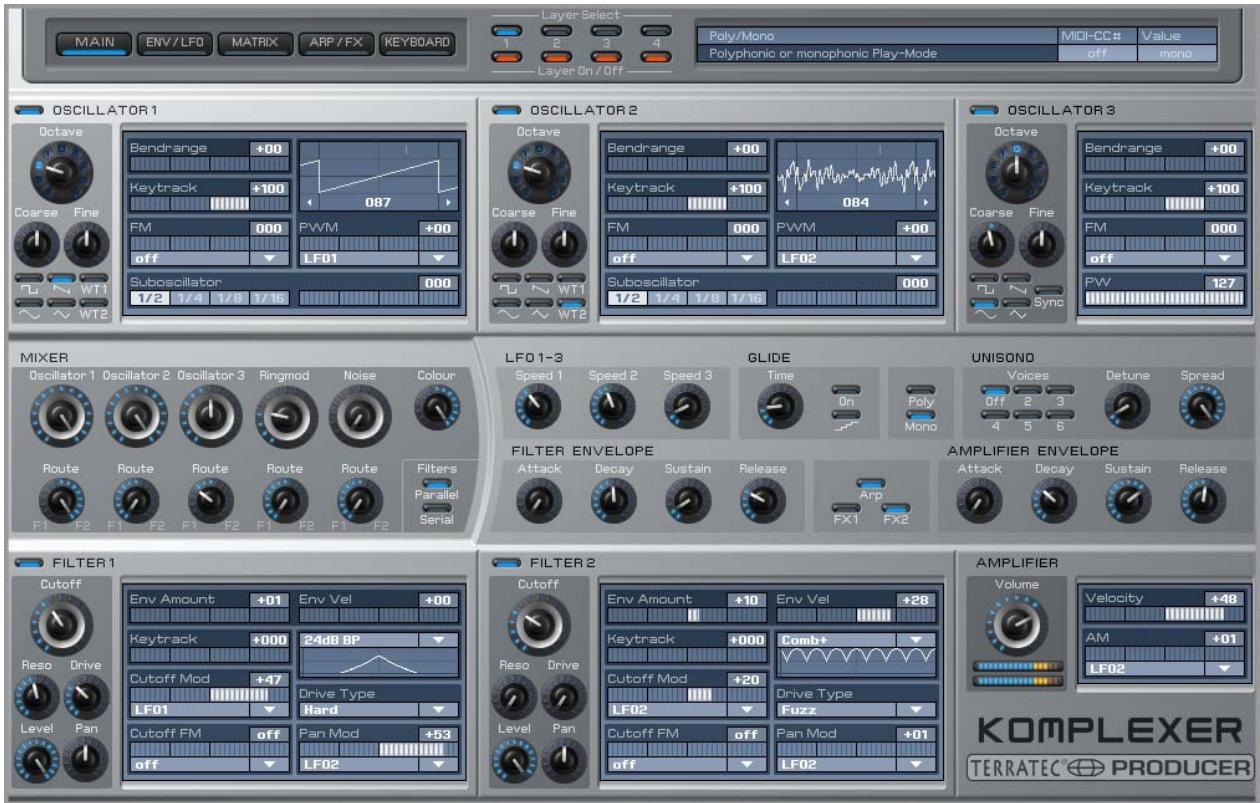
TerraTec Producer KOMPLEXER VST
English manual
Version 1.00, from: July 2006
The software described by this document is subject to a License Agreement and may not be copied, reproduced or otherwise transmitted or recorded for any purpose without prior written permission by TerraTec Electronic GmbH.
The information in this document is subject to change without notice and shall not be deemed as a warranty by the seller. No warranties, express or implied, are given with regard to the quality, suitability or accuracy of this document. The manufacturer reserves the right to change the contents of this document and/or the associated products at any time without the provision of prior notice to specific persons or organizations. The manufacturer shall not be held liable for damages of any kind arising from the use, or the inability to use this product or its documentation, even if the possibility of such damage is known. The information in this document is subject to copyright. All rights are reserved. No part of this manual may be reproduced or transmitted in any form or for any purpose without the express written permission of the copyright holders. Product and brand names contained in this document are used for identification purposes only. All registered trademarks, product designations or brand names used in this document are the registered property of their respective owners.
©TerraTec® Electronic GmbH, 1994 - 2006. All rights reserved (10.07.2006).
Contents:
Welcome! 4
From opening the package to installation. 5
Scope of delivery 5
Windows installation--step by step 6
Which operating system? 6
Installing the KOMPLEXER VST 6
Starting the KOMPLEXER VST 7
Playing sounds 7
Sound architecture 8
General operation 8
The HEADER 9
OPTIONS menu 9
MIDI controller 10
KEYBOARD screen 11
Waldorf microQ import 12
MAIN screen. 13
OSCILLATOR 1+2 13
OSCILLATOR 3+2 15
MIXER 15
FILTER 1+2 16
Other parameters on the main screen 18
ENV/LFO screen 19
LFOs 20
MATRIX screen 21
ARITHMETIC 21
MACRO controller 22
Application example 23
ARP/FX screen 23
Mode 24
Direction 24
FX1 24
FX2 25
Automation 26
Welcome!
We're pleased that you've chosen the TerraTec Producer KOMPLEXER VST for your musical endeavors and would like to congratulate you on your decision. With the KOMPLEXER VST, you've purchased an exceptional synthesizer—and we're convinced this innovative development will prove extremely useful to you in the coming years and, above all, provide you with a great deal of entertainment. We hope that this brochure is helpful to you while using the product. It is designed to illustrate technical aspects of sound programming. This brochure is not only designed to help beginners with this complicated subject—advanced musicians will also find the occasional bit of useful information.
We hope you find this manual both informative and entertaining to read, and hope you find lots of pleasure in the KOMPLEXER VST.
Sincerely,
Your TerraTec Producer Team
Worlds of sound. The KOMPLEXER VST—a high-end synthesizer "made in Germany". With the fantastic possibilities this synthesis engine provides, you are unlikely to need any other synthesizer. In addition to classic virtual analog synthesis, wavetable oscillators and FM synthesis provide you with additional powerful sound sculpting tools. With four envelope curves, three LFOs, two multimode filters and a 16x modulation matrix, the sound possibilities of the KOMPLEXER VST are unlimited.
Perfect integration. The KOMPLEXER VST integrates perfectly into every VST host system. The KOMPLEXER VST processes both important tempo information and external MIDI controllers. The arpeggiator automatically synchronizes with the host, all parameters can be automated and all settings are saved together with your project.
Waldorf microQ import. The KOMPLEXER VST is the only VST plugin in the world to have an import function for Waldorf microQ sounds. Even now, with the first version of the KOMPLEXER VST, you have access to a huge library of sounds.
From opening the package to installation
Before using the KOMPLEXER VST on your computer, take note of any special points pertaining to your computer's configuration. Also refer to the manuals of your computer and other software programs for their settings.
The installation should run without any problems, especially in recent systems. If you are experiencing difficulties all the same, please review carefully the relevant chapter in this manual. If you are still having problems, please call our service hotline. You can find our contact information on the Internet at www.terratec.net.
Scope of delivery
Start by making sure that the contents of the package are complete.
The KOMPLEXER VST package should include at least the following items:
1 KOMPLEXER VST installation CD
1 user manual
1 service request form
1 registration card
Please fill out and return the registration card enclosed in the package to us at your earliest convenience or register online at www.terratec.net/register.htm. This is important for support and hotline services. We can only provide support if you are properly registered.
Windows installation—step by step
Please follow the steps in the exact order they are listed and ensure that Windows is correctly installed on your computer.

Which operating system?
The TerraTec Producer KOMPLEXER VST can be used in Windows only. Macintosh computers are not yet supported.
Installing the KOMPLEXER VST
- Before you start, ensure that your Windows version is up to date. Right-click the "My Computer" icon and choose "Properties" from the context menu. If you're still using the default XP wallpaper, you can access this menu item by clicking: Start -> Settings -> Control Panel -> System. Please contact Microsoft (www.microsoft.com) to obtain an update for your system. The service pack is generally free of charge.
- Insert the KOMPLEXER VST installation CD provided and wait for the autorun application to launch. If you have disabled autorun, start the installation manually by double-clicking the file "Install_KOMPLEXER VST.exe".
- Then, proceed through the windows of the installation routine, clicking "Next" to go to the next window. During the installation, you will be prompted to enter your name and the accompanying serial number. Enter this information very carefully and do not pass on your registration data to third parties. Installation is possible from the original KOMPLEXER VST CD only. Install the KOMPLEXER VST into the directory that also contains your other VST plugins. In addition to the conventional KOMPLEXER VST.dll file, a KOMPLEXER VST.exe file is installed, which you can use to start the standalone version of the KOMPLEXER VST if you do not have any VST-compatible host software (or do not want to use it).
- Now, all important files, including the manual, are in the Windows Start menu. The sound banks provided are located in the KOMPLEXER VST folder.
Starting the KOMPLEXER VST
After connecting a suitable keyboard to your computer via MIDI or USB, check to make sure that your audio hardware is working properly.
The KOMPLEXER VST can either be used as a VST instrument (VSTi) within a host (such as Cubase, Live or Sonar) or called up as a standalone program.
Where applicable, refer to the documentation for the respective host software for additional information about loading VST instruments.
To call up KOMPLEXER VST as a standalone program, in the Windows Start menu, open KOMPLEXER Standalone. Then, under DEVICES MIDI, set the MIDI port to which your keyboard is connected. Under DEVICES WAVE, select the corresponding driver of your audio system. If you have an audio interface with ASIO driver, set the correct audio channels under ASIO CHANNEL SELECTION.
Playing sounds
Go to the KEYBOARD screen of the KOMPLEXER VST. When you start it for the first time, a preset bank consisting of 128 sounds is loaded. Play these sounds via your keyboard's MIDI channel 5. You can also play the sounds via MIDI channel 1, but some sounds consist of multiple layers (refer to the section on "Sound architecture"). All layers are addressed at the same time via MIDI channel 5. The sounds are displayed in groups of 16, between which you can switch using the buttons to the left. The eight large MACRO controllers are always allocated to different parameters of one sound; you can use these to change sounds quickly while playing. The MACRO controllers can be addressed via both MIDI controllers and the host automation.
You can acquire additional high-quality sounds. The About screen (which you can reach by clicking the KOMPLEXER VST logo) includes links to the online stores of providers of these sounds.
Sound architecture
The KOMPLEXER VST offers a sound structure with four layers. All four layers are always saved for each sound. For each bank, 128 sounds with two wavetables are saved. The four layers can be controlled either together via MIDI channel 5 or separately via MIDI channels 1, 2, 3 or 4. Each layer has its own stereo output. In the OPTIONS menu, you can mix all layers together to one stereo output. You can also use this architecture to generate a multimode or surround sound with up to eight channels.
Effects FX1 and FX2 behave as follows: FX1 is available once for each layer, and FX2 is available once for all layers. For each layer, you can define the effect mix for FX2 using the Mix fader.
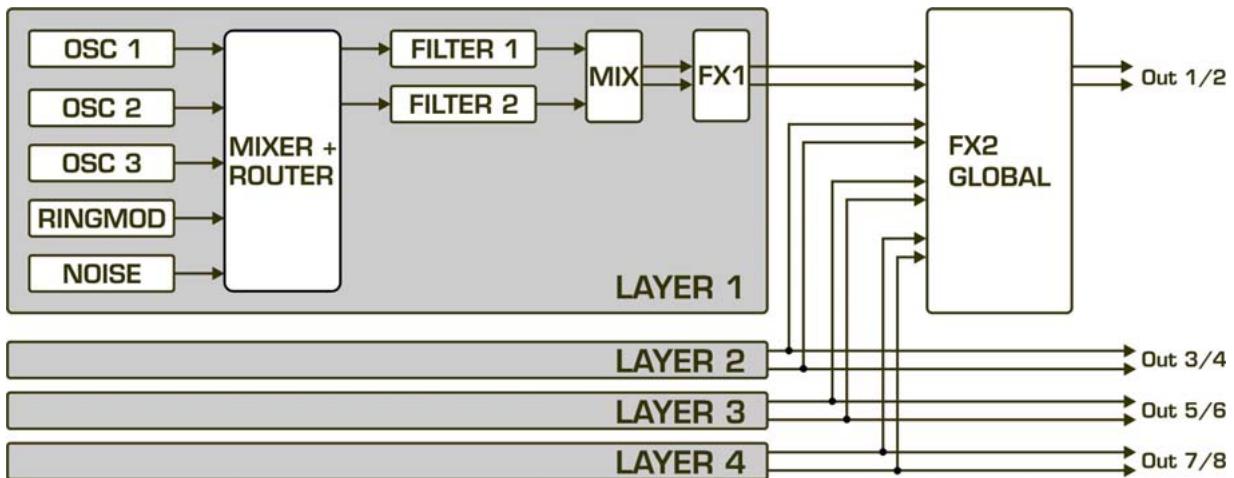
The sound layer structure
General operation
The KOMPLEXER VST has been optimized for a screen resolution of at least 1024x768 pixels. If your resolution is smaller, you either have to scroll or be limited to using the smaller keyboard screen.
The KOMPLEXER VST has various operating elements, the behavior of which differs according to the settings in the specific host used (linear/circular etc.).
Note: The faders can be moved with greater accuracy by simultaneously holding down the Shift key. Clicking the corresponding fader or knob while holding down the Ctrl key resets the parameters to the stored values.

The HEADER

The HEADER is visible on each screen of the KOMPLEXER VST. It provides the global overview and includes the following elements:
- Display and select the current screen: MAIN, ENV/LFO, MATRIX, ARP/FX, KEYBOARD.
- Layer Select indicates which of the four layers you are currently editing.
- Layer On/Off indicates which of the four layers is/are currently active.
- The information display shows parameter information and a brief description of the parameter function. In addition, MIDI controller allocations and the current numerical value of the parameter are displayed. If you hover over a parameter using the mouse, the corresponding information appears in the information display. Due to the smaller size of the KEYBOARD screen, the information display is omitted.
OPTIONS menu
You can reach the Options menu by right-clicking the KOMPLEXER VST logo.
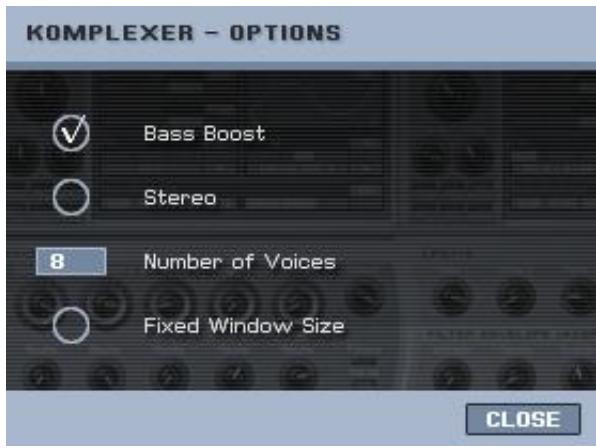
Fixed Window Size - The KOMPLEXER VST keyboard window is smaller than other windows. Some audio programs do not support different window sizes within one plugin. You can select this option to define a fixed window size so that KOMPLEXER VST always appears in full view.
Bass Boost - An adaptive emulation of an analog circuit that emulates the bass behavior of analog synthesizers.
Stereo - Mixes all four stereo outputs of the individual layers to the first stereo output.
Number of Voices - You can set the maximum number of voices of the KOMPLEXER VST here. Depending on your computer's capabilities, you can generate up to 256 voices. If there are problems with the audio signal even at a low number of voices, increase your sound card's latency (buffer size). Also note that sounds in UNISONO mode trigger multiple voices simultaneously as soon as a single key is pressed.
About screen - Clicking the KOMPLEXER VST logo takes you to the About window, which also includes links to optional sound banks. First, however, close the OPTIONS menu using the CLOSE button.
MIDI controller
To allocate a parameter to a certain MIDI Continuous Controller (MIDI CC), click the fader while holding down ALT. The MIDI controller window then opens. Click the number field to
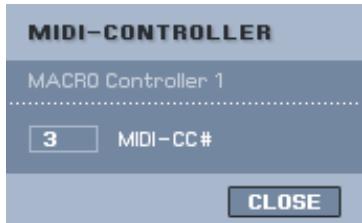
enter a number directly using the computer keyboard or move an operating element on your hardware controller. If the controller outputs a MIDI CC, the number automatically appears in the allocation window (learn function). Click OK to accept the change. If the same MIDI CC has previously been
allocated to another parameter, this allocation is removed or assigned the value OFF. MIDI CC number 0 cannot be used. If you enter 0 as the MIDI CC number, the controller allocation for this parameter is disabled.
Some parameters are assigned fixed MIDI controller numbers. This is for better support of the KOMPLEXER DSP module, which will be available soon. Therefore, these MIDI CC numbers are not available for other parameters. The following parameters have fixed allocations:
| Parameter | MIDI CC No. |
| Volume | 7 |
| MACRO controller [Expression] | 11 |
| MACRO controller [Character] | 6 |
| MACRO controller [Warp] | 8 |
| MACRO controller [Effect] | 9 |
| MACRO controller [Attack] | 3 |
| MACRO controller [Decay] | 62 |
| MACRO controller [Sustain] | 63 |
| MACRO controller [Release] | 119 |
| Effect 1 MIX | 91 |
| Effect 2 MIX | 19 |
KEYBOARD screen
The KEYBOARD screen is smaller than the other windows. If your host program has problems displaying the different window sizes, enable "FIXED WINDOW SIZE" in the OPTIONS menu.
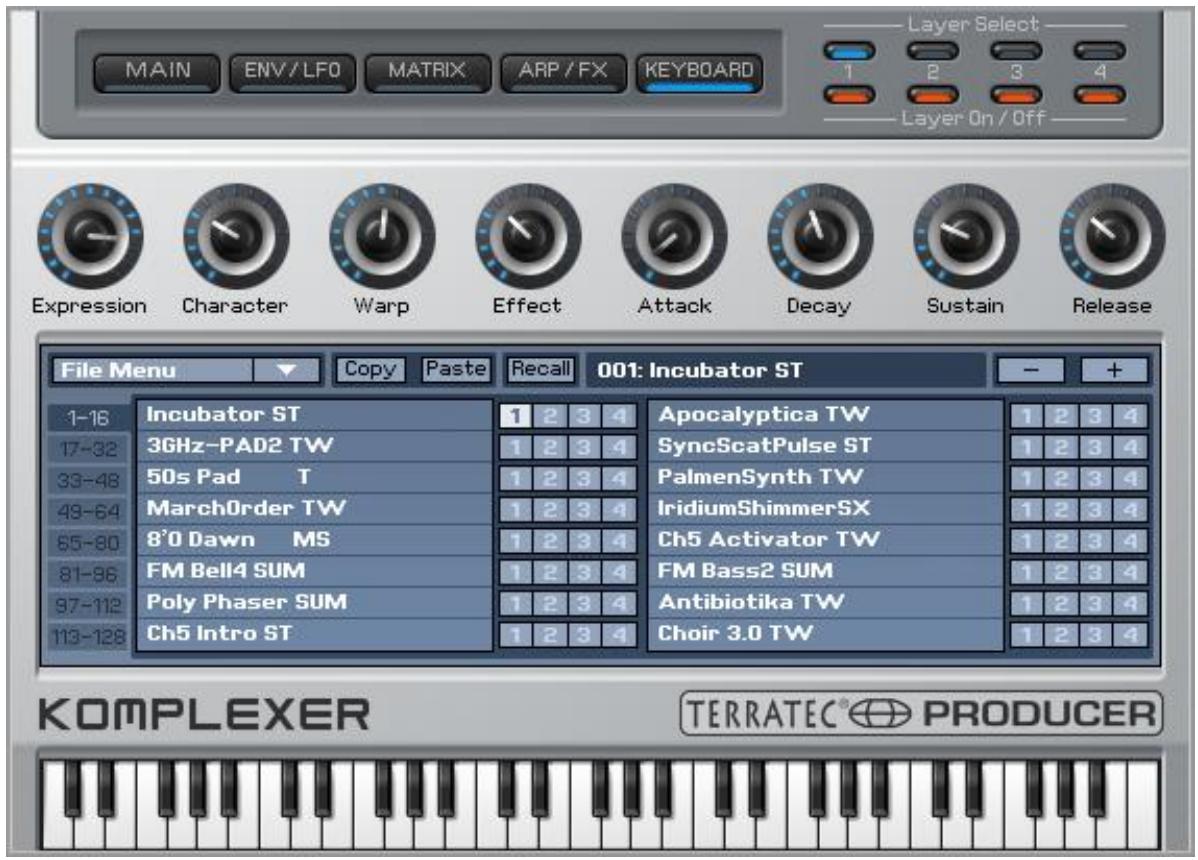
Directly below the HEADER are the eight MACRO controllers, each of which controls up to four parameters of the KOMPLEXER VST simultaneously. This allows you to trigger enormous changes to a sound with just one turn of a knob. The MACRO controllers are particularly helpful to synthesizer novices or preset users; with one hand motion, even inexperienced users can easily and immediately adapt the sound to the requirements of the musical context. Give it a try—just select a sound and turn the MACRO controllers. This is the best way to understand how they work. The specific programming of the MACRO controllers takes place on the MATRIX screen.
The SOUND BROWSER is located in the middle of the KEYBOARD screen. Use it to select the current sound. You always see 16 sounds at once. Toggle between the blocks of 16 using the buttons to their left. You can also navigate through the individual sounds using the + / - buttons. All four layers are always saved along with each sound.

Next to the name of each sound are four fields that represent the layers. Click a field to highlight
it, then press the COPY button to copy it to the clipboard. Then, select the layer field of the same sound program or a new one and click the PASTE button to write the clipboard contents into the new memory position. This also works for complete sounds. Click a sound you want to copy, then "Copy". After selecting the target sound, you can overwrite it
using PASTE. To rename a sound, simply double-click the name in the list of 16 or rename it in the host.
The RECALL button restores the original sound as it is stored in the bank. Thus when changing a sound, you never lose the original sound unless you save the bank.
The FILE menu contains the following entries:
- Load Bank - corresponds to the host function for loading an FXB bank.
- Save Bank - corresponds to the host function for saving an FXB bank.
- Load Sound - corresponds to the host function for loading an FXP sound.
- Save Sound - corresponds to the host function for saving an FXP sound.
- Load WT1 - loads a new wavetable into waveform WT1.
- Load WT2 - loads a new wavetable into waveform WT2.
- Import mQ - imports a Waldorf microQ *.mid bank file.
Waldorf microQ import
The Waldorf microQ has three sound banks A, B and C with 100 sounds each. The KOMPLEXER VST, however, has 128 sounds per bank. At the import, all 300 sounds of the microQ are converted and saved as three KOMPLEXER VST banks. After the conversion, you can load a bank. The last 28 sounds are created as init sounds. As the default setting, only layer 1 is enabled. For each sound, the MACRO controllers are associated with the following parameters:
| MACRO controller | Parameter |
| Expression | Cutoff Filter 1 |
| Character | Resonance Filter 1 |
| Warp | LFO 1 Speed |
| Effect | FX 2 Effect |
| Attack | Amp. Env. Attack |
| Decay | Amp. Env. Decay |
| Sustain | Amp. Env. Sustain |
| Release | Amp. Env. Release |
Because the KOMPLEXER VST represents a more advanced stage of development (optimized oscillators and filters) and many features have been adapted to the current needs of users, not every sound from microQ can be converted on a 1:1 basis. Particularly those sounds that use wavetable oscillators may sometimes sound different due to the different wavables. However, it is also possible to load in other compatible wavables. However, the arpeggior of the microQ also differs slightly from that of the KOMPLEXER VST. Thus imported arpeggior sounds may also sound different compared to microQ.
MAIN screen
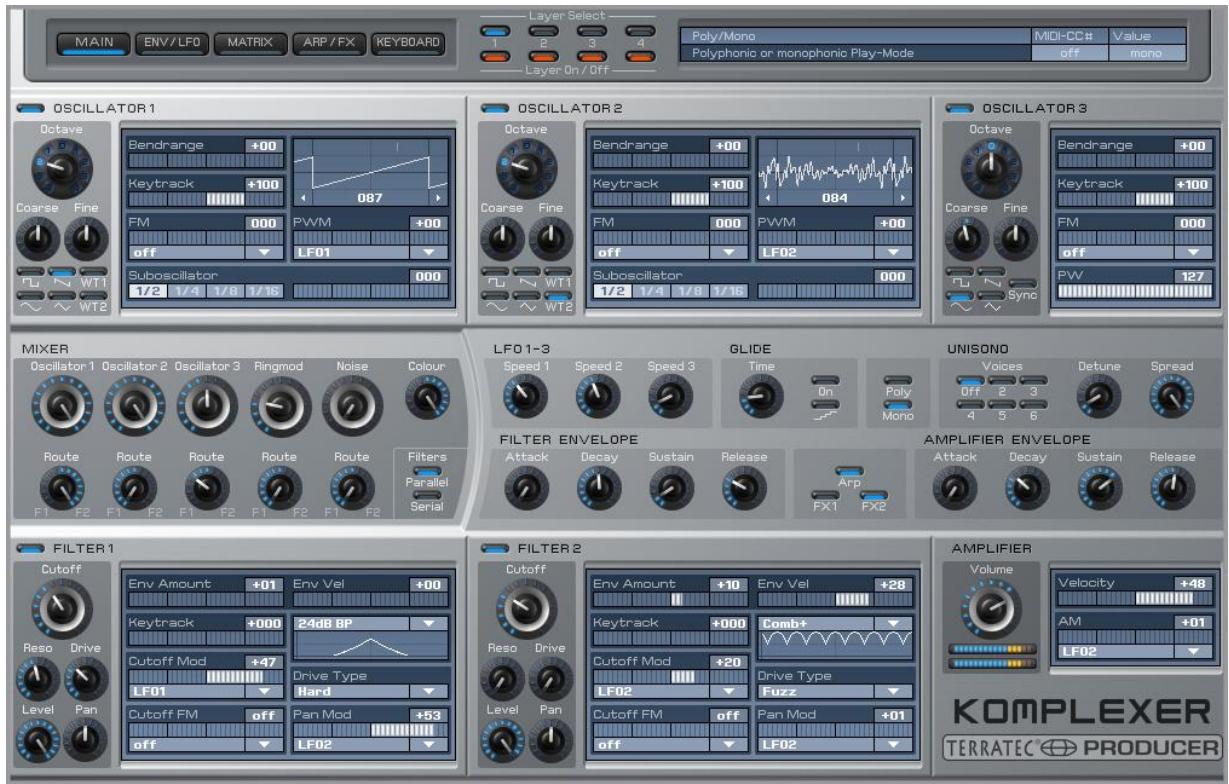
On the MAIN screen, advanced users can intervene more deeply in the sound structure. The three oscillators, the mixer and the two filters are located in this screen. For faster editing, the three LFOs and two envelopes are also placed here. For ease of operation on the MAIN screen, you do not have to constantly switch screens in order to configure the basic settings for a new sound. You can also edit the LFOs and ENVs in greater detail on the ENV/LFO screen.
OSCILLATOR 1+2
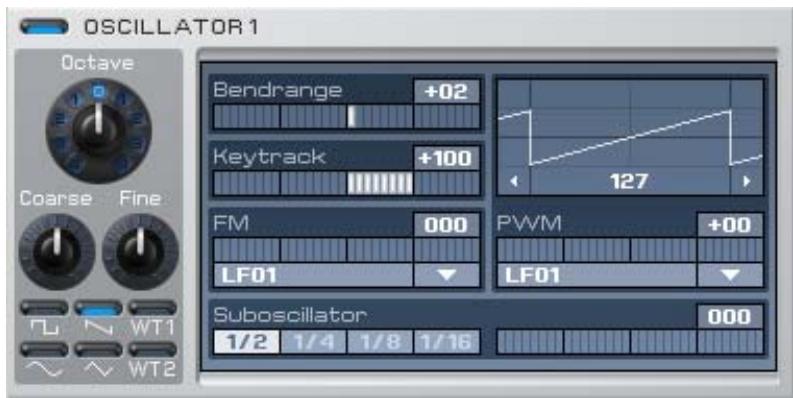
Oscillators 1 + 2 are identical except for a few details. You can determine the basic pitch using Octave, Coarse and Fine. The six buttons for the waveform are located below. For the waveforms Pulse, WT1 and WT2, you can change the pulse width
(Pulse) or wavetable pointer position (WT) by clicking and dragging the waveform display. From the drop-down menu under PWM, select the desired source for pulse width modulation or wavetable. You can also switch off the oscillators using the buttons next to the logo, for example to conserve CPU resources.
Wavetables - WT1 and WT2 are the two wavetables that can be selected for oscillators 1 + 2 . A wavetable consists of 33 waveforms that are smoothly superimposed in real time,
while older Waldorf synthesizers and the PPG changed waveforms in hard steps. This you have the ability to smoothly superimpose two waveforms that are next to each other, which provides an even greater variety of sounds. Click the waveform display to manually cycle through the wavetable or modulate it using PWM. Two wavetables with 33 waveforms each are available for each bank. You can load additional wavetables using the FILE menu on the KEYBOARD screen.
| WT1 | Name |
| 1 [0] | PPG Bass 1 |
| 2 [4] | PPG Bass 2 |
| 3 [8] | PPG Bass 3 |
| 4 [12] | PPG Bass 4 |
| 5 [16] | PPG Bass 5 |
| 6 [20] | Bass 1 |
| 7 [24] | Bass 2 |
| 8 [28] | Piano |
| 9 [32] | E-Piano 1 |
| 10 [36] | E-Piano 2 |
| 11 [40] | E-Piano 3 |
| 12 [44] | E-Piano 4 |
| 13 [48] | Bell 1 |
| 14 [52] | Bell 2 |
| 15 [56] | Bell 3 |
| 16 [60] | Bell 4 |
| 17 [64] | Bell 5 |
| 18 [68] | Bell 6 |
| 19 [72] | Bell 7 |
| 20 [76] | Bell 8 |
| 21 [80] | Bell 9 |
| 22 [84] | Bell 10 |
| 23 [88] | Bell 11 |
| 24 [92] | Spectrum 1 |
| 25 [96] | Spectrum 2 |
| 26 [100] | Spectrum 3 |
| 27 [104] | Spectrum 4 |
| 28 [108] | Spectrum 5 |
| 29 [112] | Spectrum 6 |
| 30 [116] | Spectrum 7 |
| 31 [120] | Spectrum 8 |
| 32 [124] | Spectrum 9 |
| 33 [127] | Spectrum 10 |
| WT2 | Name |
| 1 [0] | Choir |
| 2 [4] | Choir |
| 3 [8] | Choir |
| 4 [12] | Choir |
| 5 [16] | Choir |
| 6 [20] | Choir |
| 7 [24] | Choir |
| 8 [28] | Choir |
| 9 [32] | Choir |
| 10 [36] | Choir |
| 11 [40] | Choir |
| 12 [44] | Choir |
| 13 [48] | Choir |
| 14 [52] | Choir |
| 15 [56] | Choir |
| 16 [60] | Choir |
| 17 [64] | Choir |
| 18 [68] | Choir 2 |
| 19 [72] | Choir 3 |
| 20 [76] | Formant 1 |
| 21 [80] | Formant 2 |
| 22 [84] | Formant 3 |
| 23 [88] | Formant 4 |
| 24 [92] | Organ 1 |
| 25 [96] | Organ 2 |
| 26 [100] | Organ 3 |
| 27 [104] | Organ 4 |
| 28 [108] | Organ 5 |
| 29 [112] | Organ 6 |
| 30 [116] | Organ 7 |
| 31 [120] | Metal 1 |
| 32 [124] | Metal 2 |
| 33 [127] | Metal 3 |
Bendrange - Range of the oscillator using the pitch bend wheel.
Keytrack - At 100% , the oscillator follows the MIDI notes for each octave at twice the frequency, which is the standard for most playable sounds. At 0% , it does not change the pitch depending on the pressed MIDI note (e.g. for drums, effects etc.).
FM - The oscillator can be FM modulated by any source. Select the source from the dropdown menu under FM and use the slider to control the amount.
Suboscillator - You can mix a square oscillator into the selected waveform. Select the octave position using the buttons.
OSCILLATOR 3+2
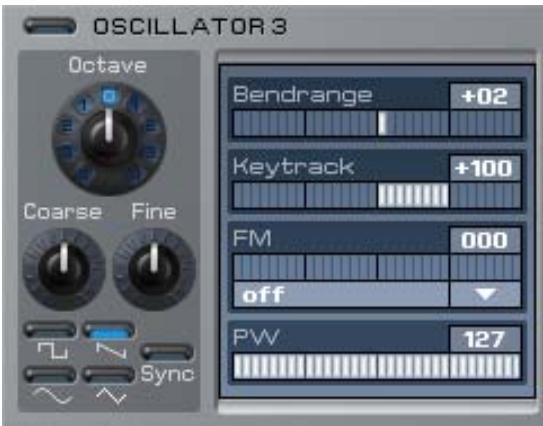
Oscillator 3 does not have any wavetable waveforms, but can be synchronized with oscillator 2. You can set the pulse width of the pulse waveform under PW and modulate it in the modulation matrix on the MATRIX screen. If Sync is activated, oscillator 3 is synchronized with oscillator 2. Experiment with envelope curves or LFOs in oscillator 2 in order to obtain typical sync sounds. To do so, oscillator 3 must be enabled and its level set to >0 in the mixer.
MIXER
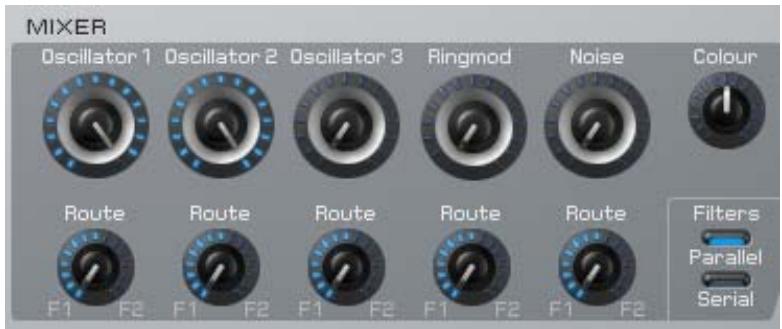
The MIXER mixes together the oscillator, the ring modulator and noise. Use the Route knobs to mix the respective source to Filter 1 and/or Filter 2. The Color parameter changes the color of the noise from brown to white (middle
position) to pink. The two Parallel/Serial filter buttons switch the two filters parallel or in series. Furthermore, the parameters of the mixer can be changed using the modulation matrix.
FILTER 1+2
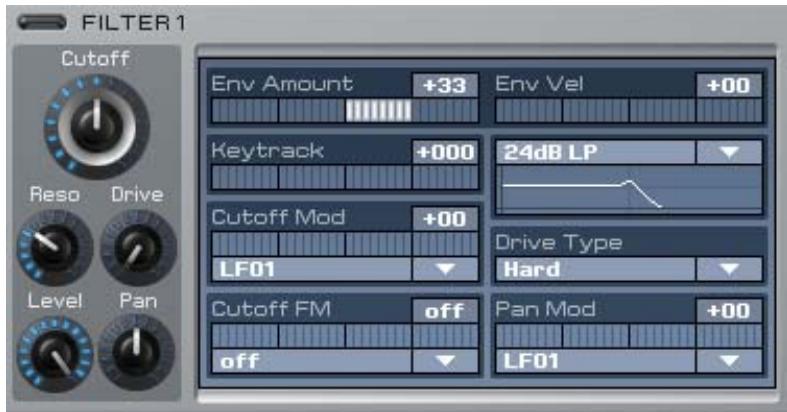
Filters 1+2 have an identical layout and, when not in use, can be disabled using the button next to the label in order to conserve CPU resources. The filters have an especially wide range of functions and feature ten different filter type models.
Downstream of the filter is a distortion unit that has six different distortion modes.
Caution: At high resonance values, the level of the output can increase drastically. To be safe, turn down the output before working with high resonance values.

Filter types
LP24 filters out frequencies above the cutoff frequency. It is particularly well suited to bass and "punchy" sounds.
LP12 has less edge steepness than LP24. Frequencies above the cutoff frequency are thus cut off more softly, which is useful for creating wide pads or bass, for example.
BP12 and BP24 filter above and below the set cutoff frequency and thus are particularly well suited to synthetic sounds. Try a sound with Noise only and play around with the filter resonance!
HP12 and HP24 filter frequencies below the set cutoff frequency and thus have the opposite behavior to LP filters. HP filters are well suited to creating both lead sounds and pads. Modulated with LFO and a little resonance, they have just the right "bite".
- Notch12 and Notch24 filter the narrow range around the cutoff frequencies and thus have the opposite behavior to BP filters. They are suitable for less prominent sounds.
Comb+ and Comb- are resonance-capable comb filters that can also be used as a polyphonic chorus or flanger. A comb filter is actually a very short delay, the length and feedback of which can be changed. The delay times are very short and cannot be perceived directly, but have a perceptible effect on the original signal. Because the individual delays overlap, they have effects of canceling each other out or reinforcing each other. As an illustration, this results in a behavior similar to multiple BP filters (Comb+) or notch filters (Comb-) next to each other. Cutoff adjusts the delay time of the comb filter; Resonance adjusts the delay feedback. Comb filters are used to generate more unnatural sounds and effects.
Drive types
Light, Medium and Hard are different levels of emulation of a transistor amplifier. By using them together with Resonance, you can really make the KOMPLEXER VST scream. Hard mode is selected at the microQ import.
- Tube emulates the behavior of a tube, with soft curves and muted treble. It is especially suitable for bass.
- Shaper changes the signal by means of an approximated sine.
Fuzz emulates classic transistor fuzz distortion.
Env Amount - Defines how strongly the filter envelope curve modulates the cutoff frequency.
Env Vel - Defines how strongly the filter envelope curve modulates the cutoff frequency depending on the velocity at which the key is pressed.
Keytrack - When Keytrack is at 100% , for example, the cutoff frequency follows the MIDI note height. Thus with Resonance and filtered noise, you can also play melodies using the filter.
Cutoff Mod - Here, any desired source can be allocated to the modulation of the cutoff frequency. You can control the modulation strength using Amount.
Cutoff FM - A special feature rarely found in other synthesizers is Cutoff FM. It can be used to create interesting sound spectrums. Experiment and hear for yourself!
Level - Level of the filter output downline of the distortion unit.
Pan - Panning of the filter.
Pan Mod - Modulation of the filter panning.
Other parameters on the main screen
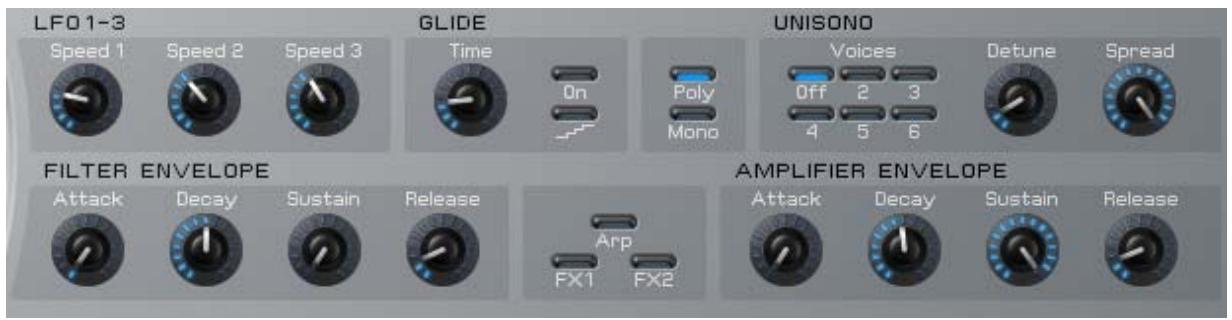
LFO 1-3 - Control the speed of the LFOs (Low Frequency Oscillator); the same parameters are also present on the ENV/LFO screen.
FILTER/AMP Envelope - Control the envelope curve times of the filter and volume (Amp) envelope curves. On the main screen, you can control only Attack, Decay 1, Sustain 1 and Release. If a ADS1DS2R envelope curve is selected, Decay 2 and Sustain 2 are controlled using the ENV/LFO screen. The same parameters are also available on the ENV/LFO screen.
GLIDE - Generates a gliding or sliding transition effect between different notes (portamento). You can select the time until the next note is reached using Time. The bottom button activates a quantization that results in a staircase-shaped glide (glissando).
POLY/MONO - Activates monophonic or polyphonic playing mode.
UNISONO - Depending on the setting, Unisono lets up to six voices sound simultaneously when a single key is pressed. Detune can be used to alter the tuning of one or more voices relative to the other(s). Spread distributes the individual voices in the stereo panorama. Unisono can be used to create extremely wide, dense sounds. This function is particularly ideal for pads and aggressive lead sounds. However, be careful to not overload the processor!
ENV/LFO screen
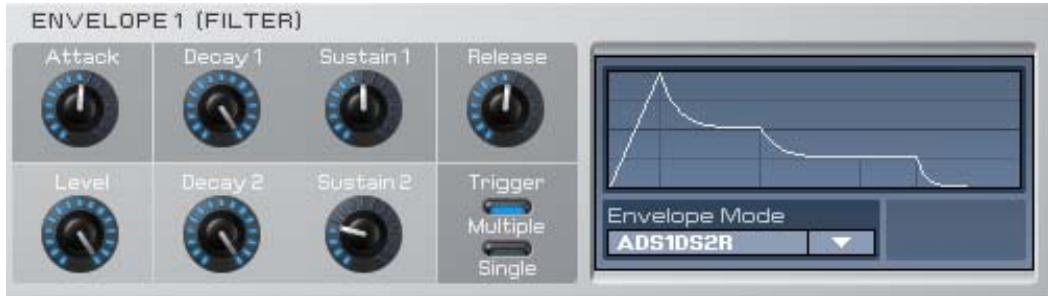
As the name implies, you can edit the four envelope curves and the three LFOs in detail on the ENV/LFO screen. Each of the four envelope curves offers the following modes:
ADSR - Classic Attack, Decay, Sustain and Release envelope curve.
ADS1DS2R - With additional second Decay/Sustain phase. Caution—the Decay and Sustain controllers on the main screen control DS1 and not DS2.
One Shot - ADS1DS2 envelope curve that is cycled through once after the key is pressed.
Loop S1S2 - The envelope curve is endlessly looped between points S (Start) and E (End) for as long as the key is pressed. Here, point S marks the envelope curve after the Attack phase and point E marks the end of the Sustain 1 phase. If the values for Decay 2 and Sustain 2 are zero, the loop endpoint is reached as soon as the Sustain 1 phase ends. The Release phase is initiated after the key is released. The loop points are marked in the envelope curve graphic of the KOMPLEXER VST.
Loop All - The entire envelope curve is repeated for as long as the key is pressed. The Release phase is initiated after the key is released. The loop points are marked in the envelope curve graphic of the KOMPLEXER VST.
Trigger - Both modes have an effect in mono mode only. Multiple restarts the envelope curve from the beginning each time a key is pressed. Single allows the envelope curve to continue until no key is pressed. Therefore, with the single trigger, a melody played legato follows a single envelope curve shape.
LFOs
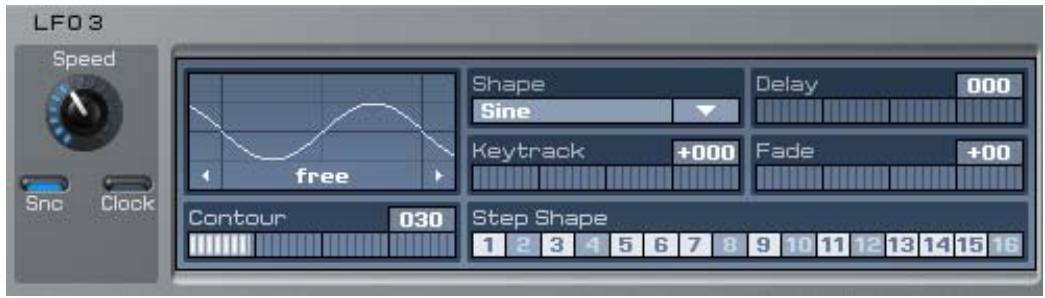
The three LFOs (Low Frequency Oscillators) likewise have an identical layout. LFO 3, however, has an additional Step Shape function.
Delay - Delays application of the LFO after the key is pressed.
Fade - Positive values cause the amplitude of the LFO to increase starting at 0, and the LFO effect is faded in. Negative values, on the other hand, cause the LFO to have its full effect as soon as the key is pressed, after which it is faded out.
Keytrack - Changes the LFO frequency depending on the MIDI note.
Startphase - Click the waveform display of the LFO and drag it to change the start phase of the LFO. This parameter has an effect only if Clock is disabled.
Sync/Clock - The different combinations have the following effect:
Sync Off / Clock Off - LFO of each voice runs free in phase, depends on start phase.
Sync On / Clock Off - LFO of each voice is in one phase, depends on start phase.
Sync Off / Clock On - LFO speed depends on the song tempo, LFO of each voice runs free in phase, depends on start phase.
Sync On / Clock On - LFO speed depends on the song tempo, LFO of each voice in one phase, independent of start phase. Phase is based on the beat position of the song.
Shape - Sine, Triangle, Square, Saw, Random, S&H, the Step Shape can be defined by the user. With Step Shape enabled and Clock On, particularly lively sounds can be created and rhythmically integrated into a song.
Contour - This parameter smooths the envelope curve of the step waveform with falling edges.
MATRIX screen
The MATRIX screen consists of the MODULATION, ARITHMETIC and MACRO controller areas.
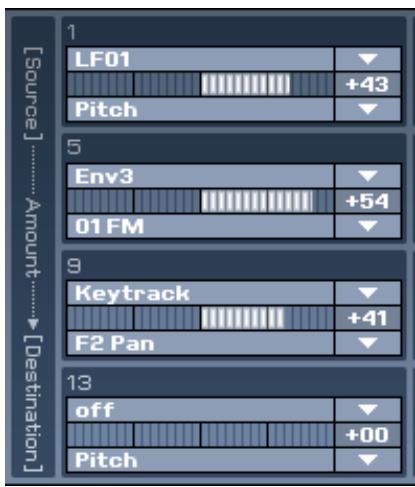
Using the modulation matrix, you can make up to 16 different connections, similar to a modular system. In each modulation cell, you can set a source, amount and destination. Examples of sources include LFOs, envelope curves, Keytrack or Velocity. Almost all parameters of the KOMPLEXER VST are available as destinations, allowing you to fulfill even exotic wishes. Using the modulation matrix, you can adapt the sound architecture completely to your needs. The following sources and destinations are available:
Sources
| off | Control W |
| LF01 | Control X |
| LF01*ModWheel | Control Y |
| LF02 | Control Z |
| LF02*Pressure | Ctrl Delay |
| LF03 | Arithmetic 1 |
| FilterEnv | Arithmetic 2 |
| AmpEnv | Arithmetic 3 |
| Env3 | Arithmetic 4 |
| Env4 | Minimum |
| Keytrack | Maximum |
| Velocity | Voice Num |
| Release Velo | Voice %16 |
| Pressure | Voice %8 |
| Poly Pressure | Voice %4 |
| Pitchbend | Voice %2 |
| Modwheel | Unisono V |
| Sustain Ctrl | U. Detune |
| Foot Ctrl | U. De-Pan |
| Breath Ctrl | U. De-Oct |
Destinations
| Pitch | F1 Cutoff | AE Sustain |
| 01 Pitch | F1 Reson. | AE Release |
| 01 FM | F1 FM | E3 Attack |
| 01 PW | F1 Drive | E3 Decay |
| 02 Pitch | F1 Pan | E3 Sustain |
| 02 FM | F2 Cutoff | E3 Release |
| 02 PW | F2 Reson. | E4 Attack |
| 03 Pitch | F2 FM | E4 Decay |
| 03 FM | F2 Drive | E4 Sustain |
| 03 PW | F2 Pan | E4 Release |
| 01 Level | Volume | M1 Amount |
| 01 Route | LF01 Speed | M2 Amount |
| 02 Level | LF02 Speed | M3 Amount |
| 02 Route | LF03 Speed | M4 Amount |
| 03 Level | FE Attack | 01SubDiv |
| 03 Route | FE Decay | 01SubVol |
| Ring Level | FE Sustain | 02SubDiv |
| Ring Route | FE Release | 02SubVol |
| Noise Level | AE Attack | |
| Noise Route | AE Decay |
ARITHMETIC
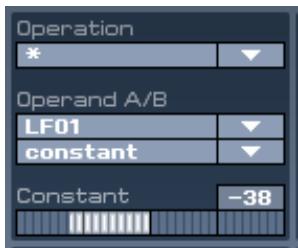
The ARITHMETIC section is really something special. You can use it to link two operands using logical functions. The results are available as modulation sources. A simple example is inverting an LFO waveform. To do so, multiply the LFO by a negative constant value. You can then select the inverted waveform as the source under "Arithmetic 1".
MACRO controller
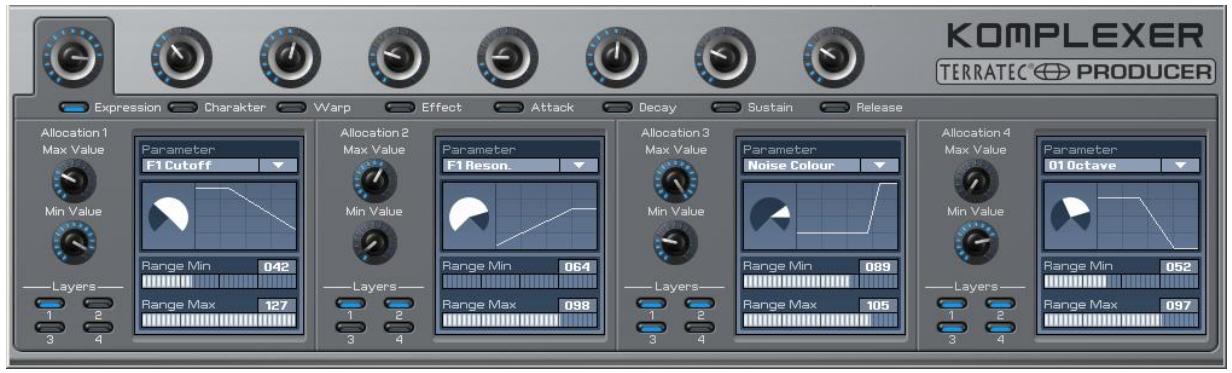
Here, you can program the powerful MACRO controllers. Each MACRO controller can control up to four parameters simultaneously, and each controls all four layers of a sound at once. Thus, for example, the MACRO Expression controller can be used to simultaneously change the Cutoff and LFO speed of Layers 1 and 3. Select the corresponding MACRO controller for programming. The four subsections below always pertain to the currently selected controller and each represent a parameter to be controlled. The MACRO controllers can also be allocated to the parameters of Effects 1 and 2. The tables below describe the allocation:
| Effect 1 | Chorus | Flanger | Phaser | (Over)Drive |
| Parameter 1 | Speed | Speed | Speed | no allocation |
| Parameter 2 | Depth | Depth | Depth | Drive |
| Parameter 3 | no allocation | no allocation | no allocation | Post Gain |
| Parameter 4 | Delay | no allocation | no allocation | no allocation |
| Parameter 5 | no allocation | Feedback | Feedback | no allocation |
| Parameter 6 | no allocation | no allocation | Center | Cutoff |
| Parameter 7 | no allocation | no allocation | Spacing | no allocation |
| Parameter 8 | no allocation | no allocation | no allocation | no allocation |
| Parameter 9 | no allocation | Polarity | Polarity | no allocation |
| Effect 2 | Chorus | Flanger | Phaser | (Over)Drive | Delay | Reverb |
| Parameter 1 | Speed | Speed | Speed | no allocation | no allocation | Size |
| Parameter 2 | Depth | Depth | Depth | Drive | no allocation | Shape |
| Parameter 3 | no allocation | no allocation | no allocation | Post Gain | no allocation | Decay |
| Parameter 4 | Delay | no allocation | no allocation | no allocation | Delay | Predelay |
| Parameter 5 | no allocation | Feedback | Feedback | no allocation | Feedback | no allocation |
| Parameter 6 | no allocation | no allocation | Center | Cutoff | Cutoff | Low Pass |
| Parameter 7 | no allocation | no allocation | Spacing | no allocation | no allocation | High Pass |
| Parameter 8 | no allocation | no allocation | no allocation | no allocation | Clock On/Off | Diffusion |
| Parameter 9 | no allocation | Polarity | Polarity | no allocation | Polarity | Damping |
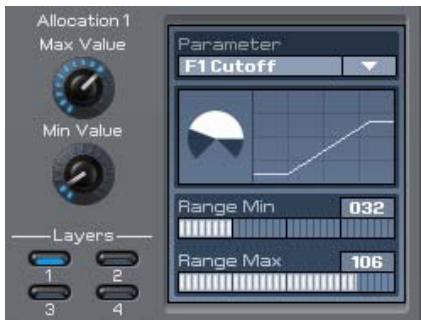
For each parameter, you can now define in which knob range it is affected by the MACRO controller and how strongly it is affected. Here, the Max and Min values define the maximum and minimum values that the parameter can have. It is also possible to create negative directions. Range Min and Range Max define the turning range of the knob in which the parameter is changed.
LAYERS selects the layers to which the selected parameter is applied.
Application example
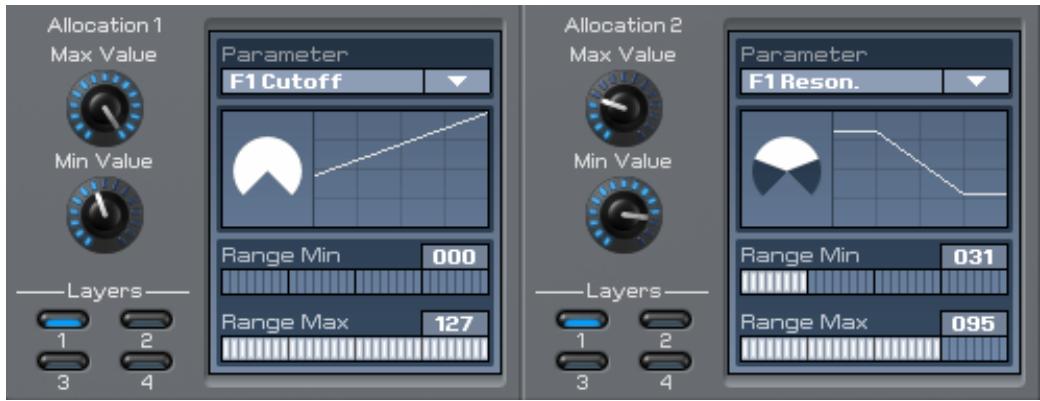
Let's assume you want to use the Expression MACRO controller to increase the resonance of Filter 1 at low cutoff values. Enter Cutoff under Allocation 1, Parameter F1; enter Resonance under Allocation 2, Parameter F1. Layer 1 must be activated for both. Assuming very low cutoff values do not make sense for this sound, set the Min Value to 60. Now, you control the cutoff of Filter 1 from 60 to 127 by turning the Expression MACRO controller by 270^ . To increase the resonance for low cutoff values, set the Max Value in Allocation 2 lower than the Min Value. Then, limit the range in order to control the resonance within the range from 70^ to 140^ only.
ARP/FX screen
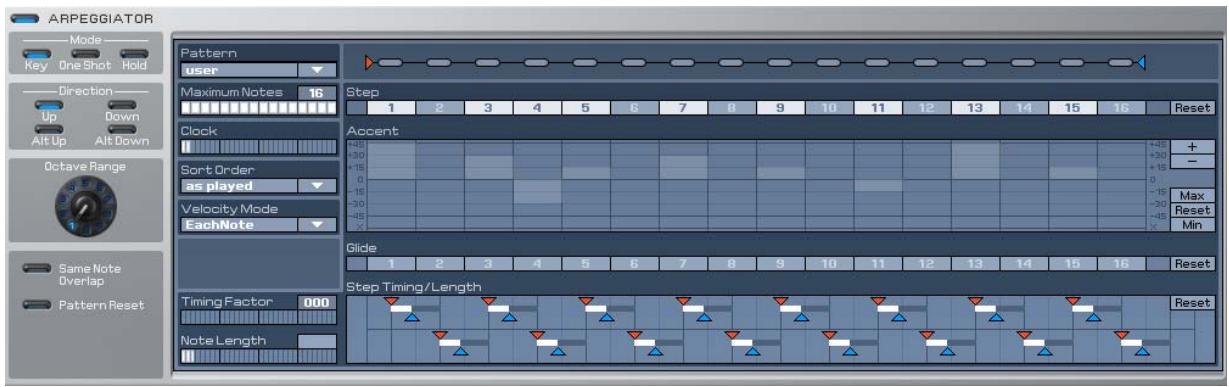
Another highlight of the KOMPLEXER VST is the arpeggiator. You can use it to output certain sequences of notes when a key is pressed.
Mode
Key - The pattern is played for as long as a MIDI note is pressed.
One Shot - The pattern is played through once.
Hold - The pattern is played until the arpeggiator is switched off or switched to another sound.
Direction
The Direction modes function as described if Sort Order Num Lo>Hi is enabled:
Up - All pressed notes are played in a loop from bottom to top.
Down - All pressed notes are played in a loop from top to bottom.
Alt Up - All pressed notes are played in a loop from bottom to top, then from top to bottom.
Alt Down - All pressed notes are played in a loop from top to bottom, then from bottom to top.
Octave Range - The upper range of the pressed notes is extended by adding the set number of octaves.
Pattern - 16 predefined patterns and one user pattern are available. The user pattern can be programmed in the right field.
Pattern length - The long chain of bars next to "Pattern" has a blue triangle at its end with which you can define the number of steps of a pattern.
Step - Here, you can activate the steps to be played.
Accent - Here, you can change the volume of the individual steps. The values set here work in dependence on the Velocity value set on the main screen (Amplifier). If you have set the maximum value for Velocity on the main screen, the Accent effects of the arpeggiator are also at the maximum. If the Accent value of a step is set to X and the Velocity on the main screen is set to maximum, the respective step is played silently. Therefore, unlike Step On/Off, the glide effects around this step are preserved. You can rotate the steps using the + / - buttons on the right edge of the Accent row. Max, Min and Reset pertain to Accent.
Glide - Here, activate the glide effect for each step.
Step Timing/Length - Here, you can determine the note length and timing for each step. Timing and Length are dependent on the values for Timing Factor and Note Length.
FX1
Effect 1 is available once for each layer. The Mix fader functions as a dry/wet fader. At position 0, you hear the dry sound only; at position 64, you hear an equal proportion of
effect and sound. At 127, you only hear the effect. You can switch between Chorus, Flanger, Phaser and Drive using Type.
FX2
Effect 2 is available once (globally) for all four layers. For each layer, you can define the proportion of the effect Mix fader. The Mix fader functions as a dry/wet fader. At position 0, you hear the dry sound only; at position 64, you hear an equal proportion of effect and sound. At 127, you only hear the effect. You can switch between Chorus, Flanger, Phaser, Drive, Delay and Reverb using Type. FX2 is always output at the first stereo output, even if it is used by more than one layer.
Automation
Of course, all parameters of the KOMPLEXER VST are available to the host software, VSTi Automation.
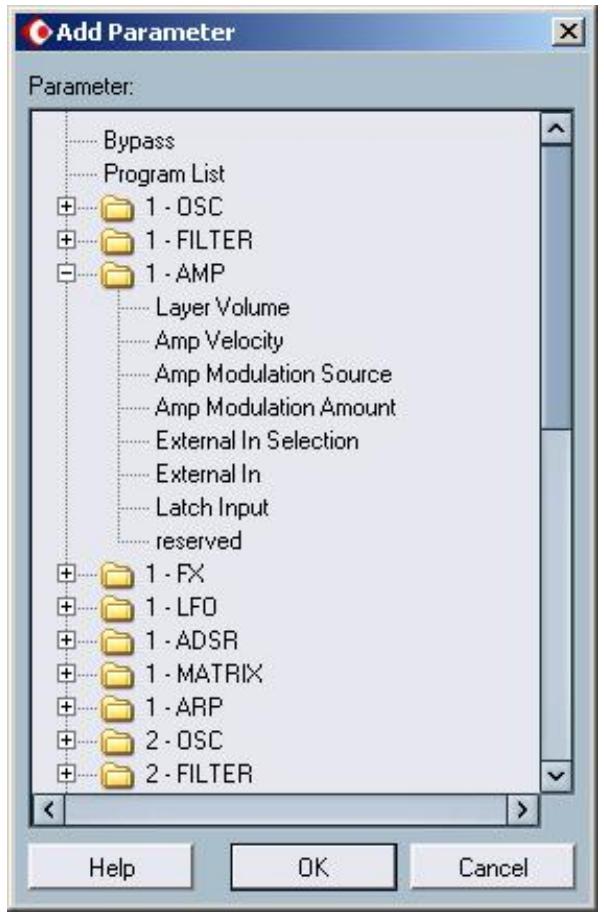
The KOMPLEXER VST automation parameters in Cubase SX
System requirements - PC
Pentium 3, 1000 MHz - AMD Athlon, 800 MHz
512 MB RAM
Windows SE/ME/2000/ XP or higher
System recommendations - PC
Intel Pentium 4, 2800 MHz - AMD Athlon 64, 1800 MHz
1024 MB RAM
Windows XP with Service Pack 1 (SP1) or higher