
DVD5.1 - Lecteur dvd TERRATEC - Notice d'utilisation et mode d'emploi gratuit
Retrouvez gratuitement la notice de l'appareil DVD5.1 TERRATEC au format PDF.


| Type de produit | Lecteur DVD 5.1 |
| Caractéristiques techniques principales | Support DVD, compatible avec les formats DVD-R, DVD-RW, CD, CD-R, CD-RW |
| Alimentation électrique | 220-240 V, 50/60 Hz |
| Dimensions approximatives | Dimensions : 430 x 300 x 50 mm |
| Poids | Environ 2,5 kg |
| Compatibilités | Compatible avec les téléviseurs et systèmes audio équipés d'entrées HDMI, RCA, et optiques |
| Fonctions principales | Lecture de DVD, CD, fonction de lecture aléatoire, répétition, sortie audio 5.1 |
| Entretien et nettoyage | Nettoyer avec un chiffon doux, éviter les produits abrasifs |
| Pièces détachées et réparabilité | Disponibilité des pièces détachées à vérifier auprès du fabricant |
| Sécurité | Ne pas exposer à l'humidité, débrancher lors d'un orage, respecter les consignes de sécurité électrique |
| Informations générales | Garantie de 2 ans, assistance technique disponible |
FOIRE AUX QUESTIONS - DVD5.1 TERRATEC
Questions des utilisateurs sur DVD5.1 TERRATEC
0 question sur cet appareil. Repondez a celles que vous connaissez ou posez la votre.
Poser une nouvelle question sur cet appareil
Téléchargez la notice de votre Lecteur dvd au format PDF gratuitement ! Retrouvez votre notice DVD5.1 - TERRATEC et reprennez votre appareil électronique en main. Sur cette page sont publiés tous les documents nécessaires à l'utilisation de votre appareil DVD5.1 de la marque TERRATEC.
MODE D'EMPLOI DVD5.1 TERRATEC
TerraTec
DVD5.1
English Manual
CE Declaration
We:
TerraTec Electronic GmbH, Herrenpfad 38, D-41334 Nettetal, Germany
hereby declare that the product:
TerraTec DVD 5.1
to which this declaration refers is in compliance with the following standards or standardizing documents:
EN50013
EN50022
EN60065
EN60825-1 + A11
The following are the stipulated operating and environmental conditions for said compliance:
Residential, business and commercial environments and small-company environments.
This declaration is based on:
Test report(s) of the EMC testing laboratory
H. CCC
TerraTec® ProMedia, SoundSystem Gold, SoundSystem Maestro, SoundSystem Base 1, SoundSystem DMX, SoundSystemDMX XFire 1024, AudioSystem EWS®64, AudioSystem EWS88, AudioSystem EWX24/96, XLerate, XLerate Pro, Base2PCI, TerraTec 128iPCI, TerraTec 512i digital, TerraTV+, TerraTV Radio+, TerraTValue, VideoSystem Cameo 600 DV, WaveSystem, TerraCAM USB, TerraCAM USB Pro, TerraCAM iLook, m3po, Phono PreAmp, MIDI Smart and MIDI Master Pro are trademarks registered by TerraTec® Electronic GmbH Nettetal, Germany.
In most cases, the designations used in this handbook for software and hardware are also registered trademarks and are thus subject to the relevant regulations.
©TerraTec® Electronic GmbH, 1994-2002. All rights reserved (o1.02.02).
Meticulous care has been exercised in the preparation of all text passages and illustrations in this User Guide. TerraTec Electronic GmbH and its authors, however, accept no liability, legal or otherwise, for any errors or the consequences of such errors. We reserve the right to technical modifications.
All text passages in this documentation are copyrighted. All rights reserved. No part of this documentation may be reproduced in any form whatsoever, by photography, microfilming or other process or rendered into a language/form usable by computers without the prior, written consent of the authors. All rights for use and propagation by presentation, radio and television are also reserved.
Contents
Setup, safety and care information. 28
Welcome! 29
Package contents. 31
Description of the device. 31
Connecting a TV (picture playback). 33
Playback of (2-channel) stereo audio. 34
Playback of 5.1 surround sound.. 35
AC power. 35
The remote control. 36
Operation. 38
Basic settings (Setup). 39
The functions. 43
Playing MP3 files. 46
Stuff worth knowing. 47
What are DVDs? 47
What do the symbols on the DVD cover mean? 48
Regional restrictions on DVDs 48
Setup, safety and care information.
- Please place the player on an even, dry surface to prevent fire and electrical shock hazards as well as possible damage to the player itself.
- Keep it away from radiators and ensure that the player is at a safe distance from other devices to prevent overheating. Do not stack devices without feet on top of the player and be especially careful not to place objects filled with liquids such as vases or bottles on your DVD 5.1.
- When connecting the device to the power grid, please ensure that your AC outlet has the correct voltage.
- If you are not going to be using the player for an extended period, unplug it from the AC outlet and take the batteries out of the remote control.
- In addition, be sure to unplug the DVD 5.1 from the AC outlet in the event of a thunderstorm.
- To avoid short circuits, never pull on the cable itself. Instead, always pull on the cable's plug when removing it from the socket.
- If the device has been exposed to extreme differences in temperature, allow it to adjust to the room temperature for one hour before plugging it in. Condensation may have formed inside the device which could impair its functionality.
- Use a dry or slightly moistened, lint-free cloth to clean the DVD player. Do not use cleaning products as they may damage the finish of the unit.
- Note: the DVD 5.1 contains a CD drive that uses invisible laser radiation. Do not—under any circumstances—expose your eyes to such bundled light sources!
- Be sure not to annoy any innocent insects by catching them and locking them into the CD tray. Do not insert any objects other than CDs or DVDs into the player.
Welcome!
We're pleased that you have chosen a device from TerraTec and would like to congratulate you on this decision. You've purchased a sophisticated product representing the state of the art of audio/video technology, and we're convinced that the DVD 5.1 will provide you with a great deal of entertainment in the coming years.
This device belongs to a whole new generation of entertainment hardware. It's pretty likely that you already know your way around CD players and VCRs—and as a result, you'll feel right at home with the DVD 5.1. With this manual, we'd like to demonstrate the DVD 5.1 in an informative and entertaining way and introduce its functions step by step.
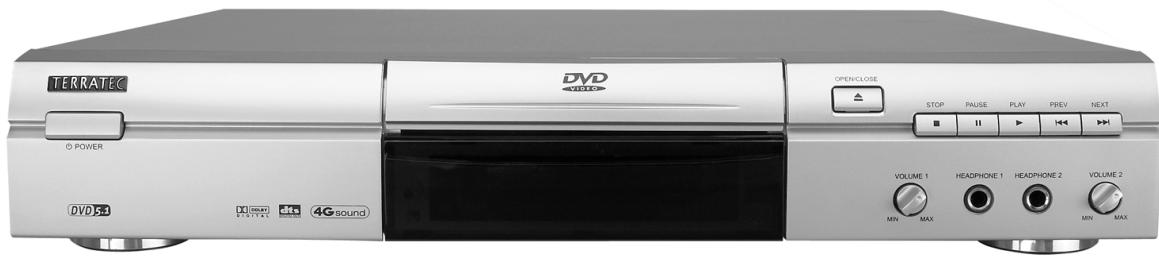
The following will give you a quick overview of the features of your DVD 5.1:
Compatibility.
Your new DVD player is not only suitable for playing standard DVDs with the RC2 region code, it will also "swallow" a wide variety of CD and file formats:
| Abbrev. | Meaning | Note |
| DVD | Digital Versatile Disc | The standard format for video with sound |
| DVD-R | DVD-Recordable | |
| DVD+RW | DVD-ReWritable | |
| VCD | Video CD | |
| SVCD | Super Video CD | |
| DVCD | Digital – Video CD | |
| CVD | China Video Disc | A predecessor of the Super Video CD |
| CD | Compact Disc | The “good old” music CD (Red Book format) |
| CD-R | CD Recordable | A CD burned in your own PC, for example |
| CD-RW | CD-ReWritable | Like a CD-R, but can be erased and rewritten (comparable to an audio cassette) |
| MP3 | MPEG2, Layer 3 | A standard format for compressed audio data. Whether the data is on a CD, CD-R, or other medium doesn't matter. |
High-quality video and crystal-clear sound.
Your new DVD 5.1 has a horizontal resolution of over 500 lines, and YUV output makes the picture sharper and more lifelike. There's pure pleasure in store for your ears as well: the Dolby Digital (AC-3) discrete 5 + 1 channel output delivers theater-quality surround sound. TerraTec's 4Gsound standard also guarantees crisp, dynamic audio playback in genuine 24-bit/96-kHz quality.
Adult content control.
The optional parental control function lets you restrict access to individual sequences or entire DVDs to specific age groups.
Language talent.
The content of DVDs may be available in several languages. The DVD 5.1 can reproduce up to 8 different audio tracks and supports 32 languages for subtitles. What's more, you can choose from several different languages for the user interface.
Flexible picture correction and settings.
The DVD 5.1 features a variety of picture correction settings such as color and brightness. You also have the choice of a number of different picture formats (16:9, etc) to adjust the player to suit your needs.
Debut on DVD: Camera angles.
When playing DVDs that support this feature, you can switch camera angles at the touch of a button. For example, you can experience movies from the perspectives of the individual characters!
Package contents.
Please check that the package is complete and contact your retailer as soon as possible if any of the items listed here are missing.
The player
- A remote control including batteries
This manual
- A registration card with the serial number
- A customer service card
Please return the registration card to TerraTec at the earliest possible opportunity or register online at http://www.terratec.net/register.htm. This is important for services such as support and hotline.
Description of the device.
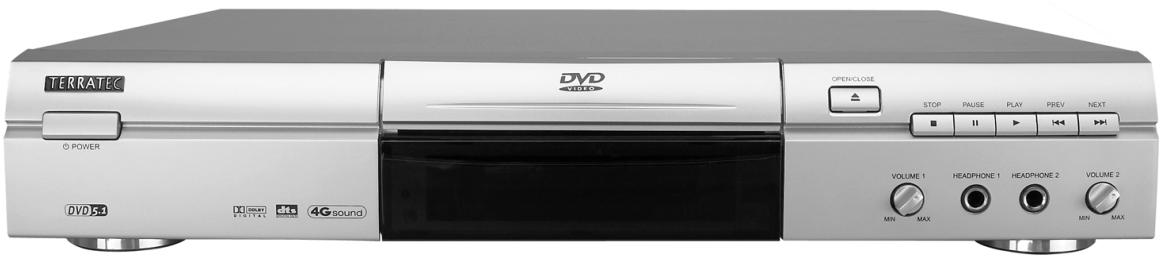
On the front of the TerraTec DVD 5.1 you will find the following connections and controls:
- POWER on/off
The CD tray feed the player with your favorite discs here -
OPEN/CLOSE actuates the CD tray
The display information about important functions -
STOP stops the playback
- PAUSE interrupts the playback
- PLAY starts the playback
- PREV previous title
NEXT next title
Volume 1 volume - Headphone 1 socket
- Headphone 2 socket
Volume 2 volume
Receiver for the IR remote control
On the back of the TerraTec DVD 5.1 you will find the following connections and controls:

Audio playback connectors
- SW subwoofer
C center speaker
SL surround (back) left - FL front left
SE surround (back) right
FR front right
COAXIAL coaxial output for AC-3 and S/PDIF signals - OPTICAL optical output for AC-3 and S/PDIF signals
- L left stereo channel
R right stereo channel
Video playback connectors
COMPONENTY output for discrete luminance signal (Y)
- COMPONENT Pb output for discrete color signal (U)
- COMPONENT Proutput for discrete color signal (V)
VIDEO VHS output
- S-VIDEO Super(S)VHS output
SCART OUTPUT SCART socket to connect a TV (Europe only)
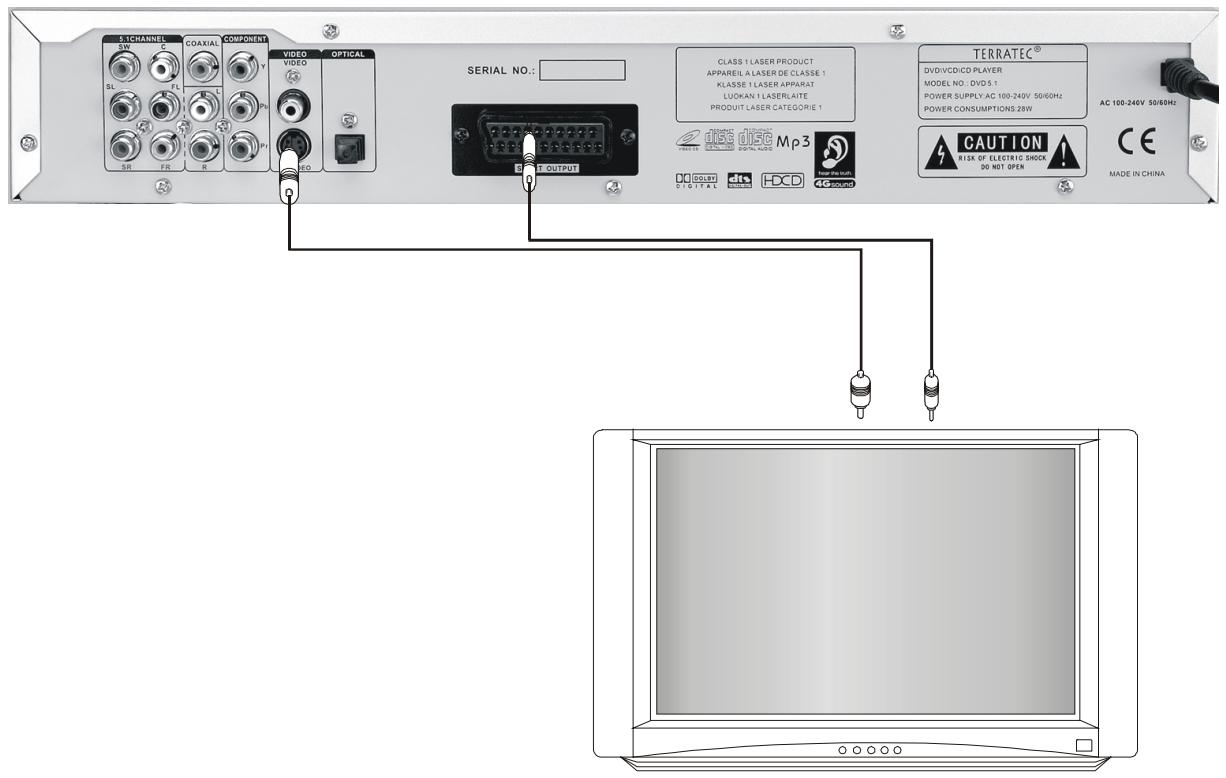
Connecting a TV (picture playback).
There are several ways to connect the DVD 5.1 to a TV for picture playback. For surround sound playback, you will generally use a separate amplifier (see below).
(S) Video. Depending on the sockets available on your TV, you can use either the yellow video, or the 6-pin S video connection. The latter will give you a better picture quality.
Y,U,V. If your TV has an input for separate luminance and color difference signals, you can also use the outputs marked Y, Pb and Pr (corresponding to Y, U and V) for video playback. This provides another visible improvement in quality over S video.
SCART. You can also use the SCART connections of the player and TV. The SCART connection transfers stereo audio in addition to the video signal. You can then control the volume via your TV set.
Tip: TVs generally have a channel (program number) set aside for video playback. Some even have them for separate sources. They usually have designations such as Video 1, Video 2, AUX, VHS or similar. If you are uncertain, please consult the manual of the relevant device.
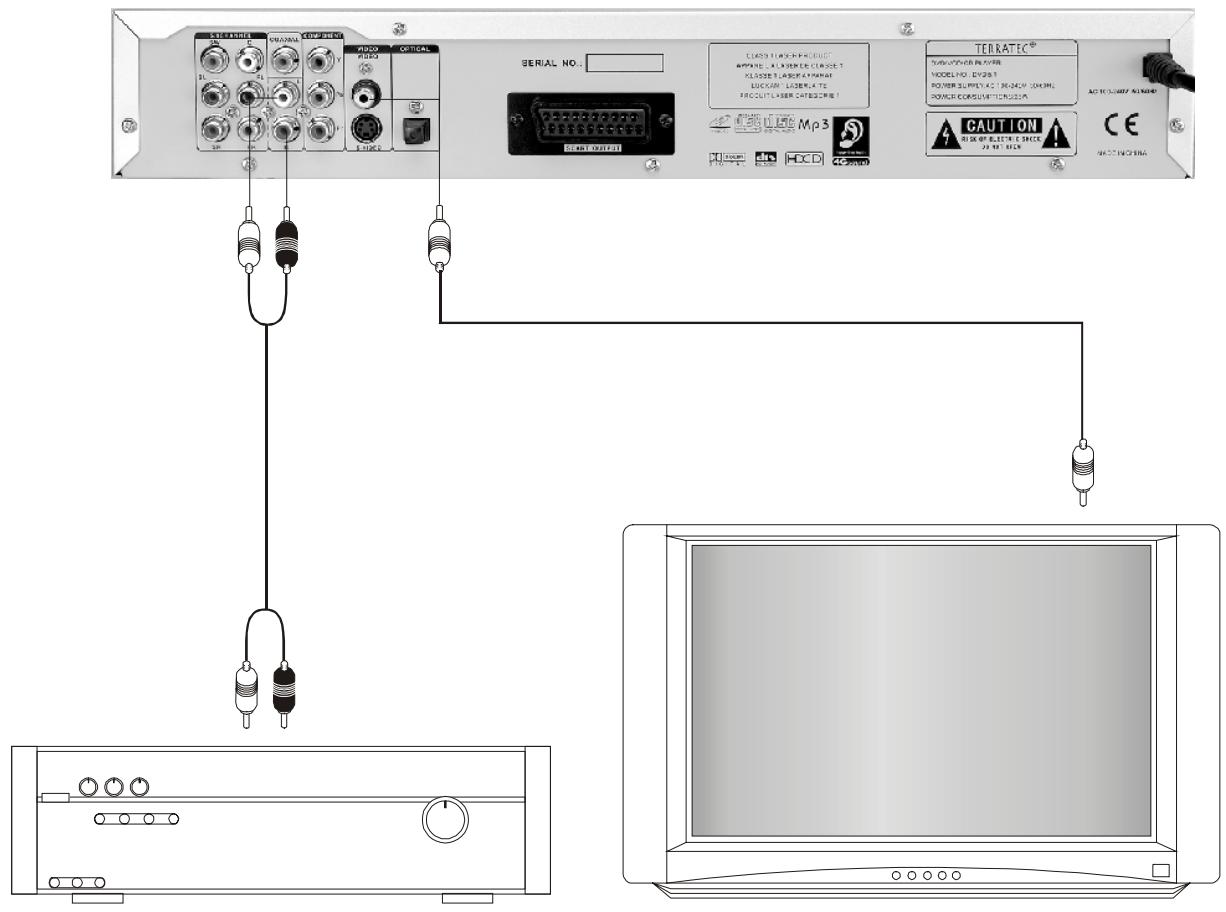
Playback of (2-channel) stereo audio.
Analog. Connect the red and white audio outputs of the DVD 5.1 to the audio inputs of your TV or amplifier. Tip: the input connectors may also be coded red/black or labeled Audio-In, Stereo-In, Left/Right-Input, AUX, or similar.
Digital. Alternatively, you can also connect the digital S/PDIF output of the player to a suitable input of your playback device. If you aren't sure which input on your amplifier is the correct one, please consult its manual.
For your own safety. To prevent damage to the speakers or your hearing, turn down the volume of your amplifier or TV before starting the playback. All of the devices should always be switched off while handling the cabling.
Playback of 5.1 surround sound.
Analog. Connect the analog connections of the DVD 5.1 grouped under "5.1 Channel" to the appropriate inputs of your surround amplifier using 6 audio cables.
Digital. Alternatively, you can also connect the digital AC-3 output of the player to a suitable input of your playback device. If you aren't sure which input on your amplifier is the correct one, please consult its manual.
For your own safety. To prevent damage to the speakers or your hearing, turn down the volume of your amplifier or TV before starting the playback. All of the devices should always be switched off while handling the cabling.
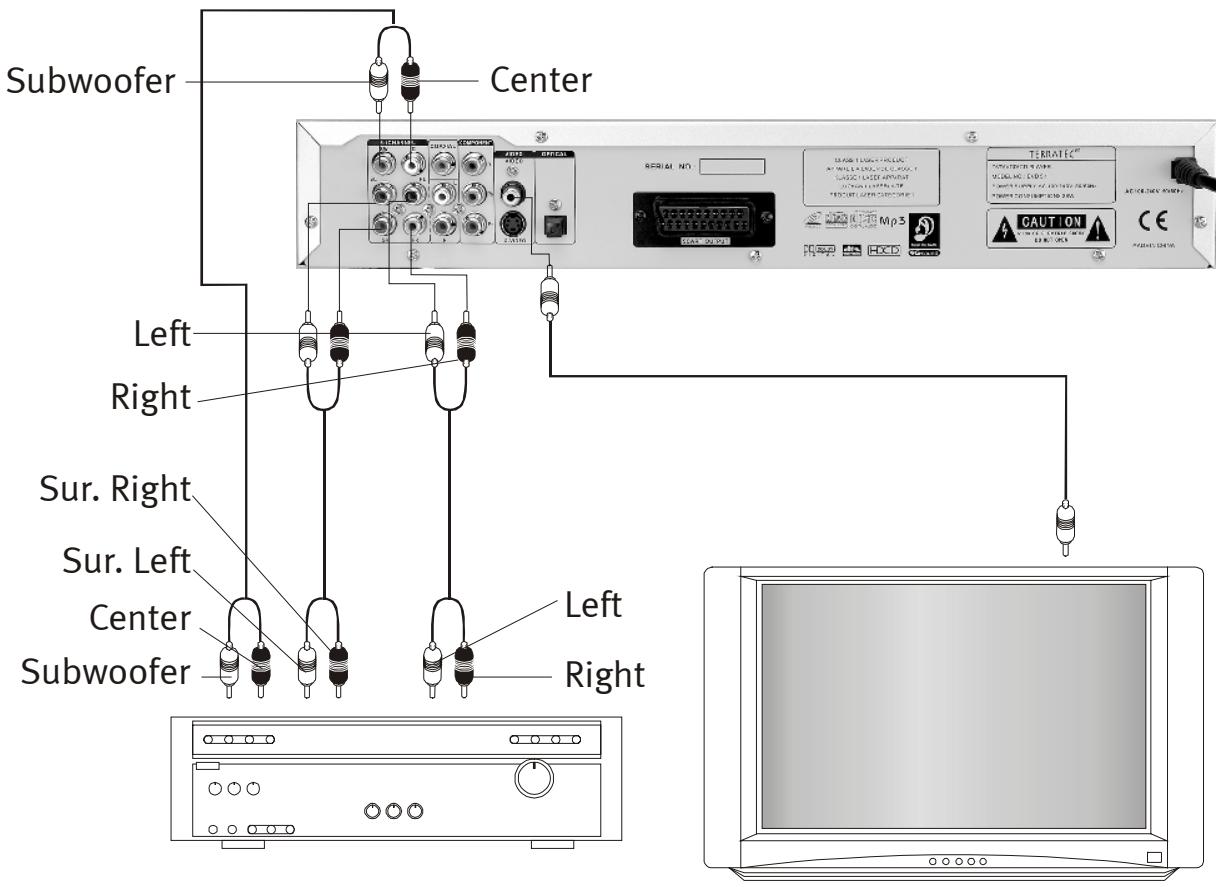
AC power.
Once you've plugged everything in, you should feed the unit a bit of AC power. For once the color isn't relevant. ;-) Switch the DVD 5.1 on and off using the power switch on the left-hand side of the front panel.
Standby. You can also put the player into standby mode—to "sleep", so to speak—with the remote control. You can then "wake" it at any time using the remote control. The player will use several watts of power while in standby mode, however. If you don't intend to use the player for an extended period—while you're on vacation, for example—please unplug it from the AC outlet.
The remote control.
You can control many major functions of the DVD 5.1 from the comfort of your very own sofa. Please be sure that there are no obstructions between the remote control in your hand and the DVD 5.1. Infrared radiation consists of light waves that do not penetrate solid objects—at least not to the knowledge of modern science. ;)
Before use please insert two AAA batteries into the compartment on the back of the remote control. Replace the batteries if the remote control no longer works correctly or only works over short distances. Always replace the batteries together and be sure to dispose of the used batteries properly.
The following graphic describes the individual functions.
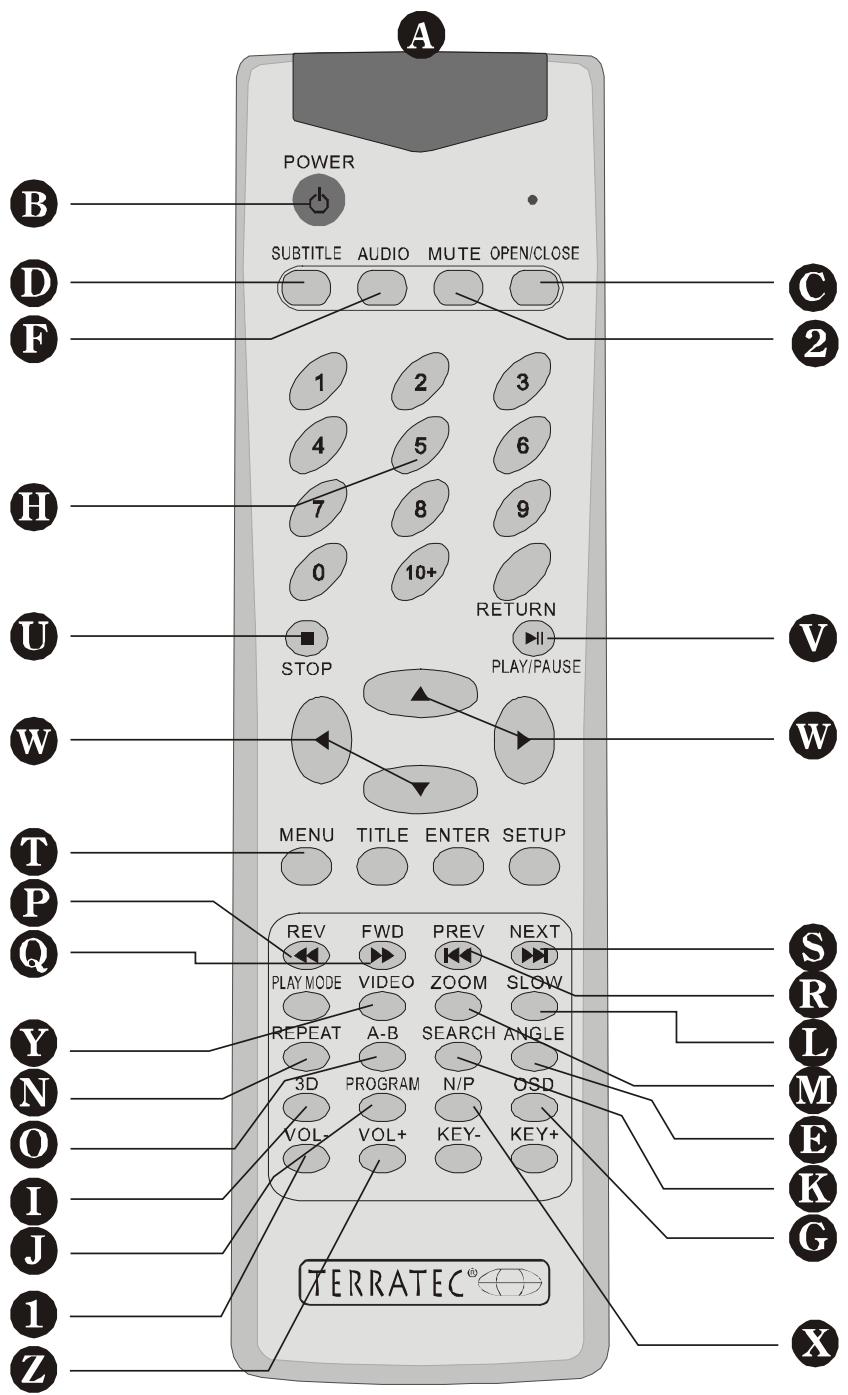
A Infrared transmitter
B On/off
Open and close CD tray
Enable and switch subtitles
Select camera position
F Access to audio settings
Show and hide OSD (on-screen display)
Numeric keypad and enter button (return)
3D-sound button
J Call up programming functions
Search function
Enable slow motion
M Zoom function (enlarge)
Repeat title or chapter
Repeat selected area
P Reverse
Fast-forward
R Select previous title/previous chapter
Select next title/next chapter
Select DVD menu (welcome screen)
Stop all
Playback (play) and pause function with single-frame switching (press again)
Navigation buttons for the OSD (on-screen display)
N/P - Selecting the video playback (PAL, NTSC, auto)
VIDEO - Selecting the video output (RGB, normal, YUV)
±b Increase volume
Decrease volume
Mute sound
Operation.
The DVD 5.1 is controlled partially using the elements on the device itself (basic functions) as well as with the remote control (configuration, DVD navigation, etc.).
When you switch the DVD 5.1 on (see page 35), the TV screen will display the welcome screen (TerraTec logo) and the message ("Loading"). If you have not yet put a CD in the player, it will point this out to you with the words "No disc". Press the button on the device marked CLOSE/OPEN and insert a CD (DVD, etc.) with the writing facing upwards and press the button again to close the tray. The player will start loading again, recognizing the CD contents automatically, and will start the playback after a few seconds.
For some CDs you may have to help the DVD 5.1 with its selection. You may then select the content of the CD.
Navigation/selection of menus and options. Use the arrow buttons on the lower section of the remote control for navigation (i.e. to select an on-screen menu or option). The selected item will then be highlighted in white. Pressing the RETURN button activates the marked position.
Basic settings (Setup).
You should configure a few basic settings before playing your first CD. The DVD 5.1 supports multiple languages to display various kinds of information. Perhaps you would like to choose a different language. The following instructions refer to the English menu which is selected by default.
Press “SETUP” on the remote control. The following menu will now appear on your TV:
SETUP MENU
LANGUAGE SETUP
SCREEN SETUP
AUDIO SETUP
CUSTOM SETUP
EXIT
LANGUAGE SETUP
Language setup.
Use the remote control to select "LANGUAGE SETUP". The following screen will appear:
LANGUAGE SETUP
OSD 》 ENGLISH
FRENCH
AUDIO GERMAN
SUBTITLE ITALIAN
SPANISH
EXIT
OSD LANGUAGE
Move the selection to one of the following areas:
| OSD | This is the language of the on-screen display that you are currently seeing. |
| MENU | This is the standard language for the menus (welcome screens) of DVDs. |
| AUDIO | This is the standard language for the audio playback of DVDs. |
| SUBTITLE | This is the standard language for DVD subtitles. |
Select the language you prefer. You can navigate through the selections using the left-right buttons of the remote control. Select EXIT to close the menu, or confirm your selection with the Return button on your remote control.
Screen setup.
Press SETUP on the remote control and select the display settings. The following screen will appear (enlarged):
SCREEN SETUP
TV TYPE 》
SCRN Saver
TV SYSTEM
BRIGHTNESS
CONTRAST
VIDEO OUT
TV TYPE
4:3PS
4:3LP
16:9
| TV TYPE | You can choose from three different screen formats. Please note that you can only use 16:9 format on TVs that support it. A distorted picture will result if both devices are not using the same setting. When in doubt, select 4:3LB. |
| SCRN Saver | OPEN and CLOSE toggles the screen saver (appears automatically after about 10 minutes of inactivity). |
| TV SYSTEM | Select whether you are using an NTSC or PAL TV system here. In Europe, PAL is used almost exclusively. If you are not sure, select AUTO. |
| BRIGHTNESS | Set the brightness to suit your taste here. |
| CONTRAST | Here you can choose from 9 different contrast levels. |
| VIDEO OUT | Select the video output that you're using to connect the player to your TV set here. RGB corresponds to the SCART connection. |
| RETURN | Closes the menu (if you can't see RETURN, navigate further down with the arrow buttons). |
Audio setup.
Press SETUP on the remote control and select the AUDIO settings. The following screen will appear:
AUDIO SETUP
OUTPUT
CENTER
REAR
SUBWOOFER
2 CH
5.1 CH
SPDIF/PCM
SPDIF/RAW
RETURN
OUTPUT
| OUTPUT | Select your preferred (and already cabled) audio output configuration. 2 CH (stereo analog), 5.1 (for 6-channel playback), SPDIF/PCM (stereo digital) or SPDIF/RAW for AC3 or DTS signals via the digital output. |
| CENTER | Select ON or OFF depending on whether or not you are using a center (front) speaker. |
| REAR | Select ON or OFF depending on whether or not you are using two rear speakers. |
| SUBWOOFER | Select ON or OFF depending on whether or not you are using a subwoofer (LFE). |
| 2CH-5.1CH | Enabling the STEREO2SURROUND function. STEREO2SURROUND converts a stereo audio signal into a virtual 5.1 format. |
| RETURN | Closes the menu. |
Custom setup.
The following menu contains settings such as password protection and camera angles:
CUSTOM SETUP
PARENTAL CONTI 8
CHANGE PASSWORD
ANGLE MARK
DEFAULT
RETURN
PARENTAL CONTROL
| PARENTAL CONTROL | Eight levels of protection against adult content can be selected here. A password is required to change the setting. More on that below. |
| CHANGE PASSWORD | Access to the parental controls of the DVD 5.1 is password-protected. The default password is 8888. Enter it the first time you are prompted to do so and confirm it with the BACK button of the remote control. Next, select a new numerical combination and make a careful note of it. |
| ANGLE MARK | Use OPEN and CLOSE to enable or disable the optional display of different camera angles. For more information on the ANGLE function on your remote control, please see page 43. |
| DEFAULT | Use this item to reset the DVD 5.1 to its factory defaults. Caution: all of your customized settings will be lost. |
| RETURN | Closes the menu. |
The functions.
The following chapter describes the many functions of your DVD 5.1 in detail. While many of these functions can be set on the player itself, in most cases they will only be available via the remote control.
On-off/standby.
Switch the DVD 5.1 on and off using the power switch on the left-hand side of the front panel. You can also put the player into standby mode—to “sleep”, so to speak—with the remote control. You can then “wake” it at any time using the remote control. The player will use several watts of power while in standby mode, however. If you don’t intend to use the player for an extended period—while you’re on vacation, for example—please unplug it from the AC outlet.
Play and pause function.
When you insert a CD (see page 38, "Operation.", your DVD 5.1 will automatically start the playback. If you press the Play button on the player or the PAUSE button on the remote control, the player will pause the playback until you once again press the PLAY button.
STOP.
Press the STOP button on the player or the remote control to stop the playback. The PLAY button will restart the playback of the last title or chapter. Pressing stop again will cause the player to start with title 1 or at the beginning of the DVD the next time you press PLAY.
TITLE and MENU.
A DVD is generally organized in several chapters. In many cases, background information (Making Ofs), the funniest scenes, or music videos related to the movie will be available separately. It's usually possible to select any of these from a main menu that's displayed at the start of a DVD. This start menu can be displayed anytime by pressing the MENU button on the remote control.
You can navigate the start menu of the disc with the arrow buttons as usual. Use the Return button to make your selection.
The ANGLE function (camera angles).
Some DVDs let you view certain scenes from a variety of camera angles. Pressing the ANGLE button on the remote control repeatedly lets you cycle through the available angles. The currently-selected camera and the total number of cameras will be displayed (2/3 indicates the second of three cameras). Please note that this function is only functional for certain DVDs (designated accordingly).
Subtitles.
Many DVDs have subtitles which can be useful for persons with hearing impairments, or for fans of original versions that do not have a sufficient command of the original language. Pressing the SUBTITLE button on the remote control repeatedly lets you cycle through the available subtitles.
Support for multilingual DVDs (LANGUAGE).
DVDs and SVCDs generally contain dialogs in multiple languages (e.g. the English original and the German dubbed version). You can switch from one version to another during playback—if you'd like to polish your foreign-language skills, for example. ;-)
Positioning functions (REW & FWD).
During playback, you can change your position in the title with the (FWD, Forward) and (REV, Reverse) buttons. You can increase the playing speed up to 32x by pressing the buttons repeatedly. Sound will not be available while in fast-forward or reverse, however (except for music CDs). Press PLAY to continue playing the disc at normal speed in a forwards direction.
Select titles with PREV and NEXT.
During playback, you can select the next or previous titles by pressing the NEXT or PREV buttons.
The slow-motion function (SLOW).
During playback, you can reduce the playback speed down to one sixteenth (1/16) of its original speed. Sound will not be available while in slow-motion mode. Press PLAY to continue playing the disc at normal speed.
Calling up the on-screen display (OSD)
Press the OSD button to display a brief technical summary of the CD currently playing. This will inform you, for example, about the CD type (audio, DVD, etc.) or the configuration of the audio output.
Repeating a chapter (REPEAT).
Press the REPEAT button on the remote control to repeat the current chapter (or title on a music CD). Press the button again to repeat the selected DVD title. Press the button a third time, and the entire disc will be repeated until the next power failure. Press it a fourth time to cancel the repeat function.
Repeating between markers (A-B REPEAT).
Would you like to watch a specific scene with your favorite star again and again? No problem: Press the A-B button once during playback. "REPEAT A" will be displayed on the screen. Press the button again to set an end point and the playback will start again from the point at which
you first pressed it. The section you have selected will then be repeated. Pressing A-B a third time will cancel the function.
Selecting titles directly (SEARCH).
If you know the number of a chapter, you can access it directly by pressing the SEARCH button on the remote control. Enter the numbers on the numeric keypad and confirm the entry with RETURN.
The zoom function (ZOOM).
Press the ZOOM button during playback to zoom into the picture in four stages. You can adjust the zoomed area using the arrow buttons.
The surround function (3D).
The 3D function lets you switch between conventional stereo and a virtual surround sound. In this case, the stereo signal is returned via two speakers, but subjectively more spatial.
The 3D function should not be confused with STEREO2SURROUND circuitry in which a stereo signal is played back via 6 speakers (5.1).
Programming title lists (PROGRAM).
The PROGRAM function lets you program your own playlist with up to 9 titles. Here's an example: if you would like to play the titles 3, 8 and 14 in order, first enter a “3” and go one field to the right. Enter an “8” there and continue as needed. Press PLAY to play the list. Note: this function cannot be used with DVDs.
Playing MP3 files.
The DVD 5.1 can also be used to play MP3 files. Insert a CD with MP3 files into the player and a menu with MP3 functions will appear on the TV screen (the menu will vary according to the contents of the CD.
| MP3 | LIST | 01/02 |
| DIR: | CDR01 | 01/09 |
| TRK | 001/93 | 00:40 |
| A01 | A02 | |
| A03 | A04 | |
| A05 | A06 | |
| A07 | A08 | |
| A09 | A10 |
You can navigate this menu in the usual manner with the arrow buttons. Press PLAY to play a title. The NEXT and PRV buttons can also be used to select MP3 titles. RETURN changes to a directory view, which allows you to navigate through subdirectories that may be present on the CD-ROM.
Stuff worth knowing.
What are DVDs?
These days, we can safely say that the DVD is the official "successor" of the successful audio CD. But in which ways does it differ from its predecessor? After all, it's the same size and (nearly) the same color... so what's the secret?
You probably know that the contents of a music CD are purely digital. A DVD can contain a much greater quantity of digital information—depending on the DVD format, 7 to 25 times more—than a conventional CD.
Now there are a number of things one can do with that additional storage capacity: for example, increasing the playback quality of the content, such as storing music with a greater dynamic range or higher resolution. Let's have a closer look at the name: DVD stands for
"Digital Versatile Disc"—with "versatile" being the operative word here. DVDs can not only be used for storing music, but also images, videos and much more. And because the capacity is so high, it can even store everything at once—if the manufacturer would like it.
The following is a simple comparison of the specifications of DVDs and CDs ("music" CDs, the so-called Red Book format).
| DVD | CD (Red Book) | |
| Capacity | 4.7 – 17 Gigabyte | 650 Megabyte |
| Playing time | 133 – 484 minutes | 74 minutes |
| Video subtitles | Up to 32 | - |
| Language support | Up to 8 | 2 |
| Audio quality | 16 to 24-bit, 48 and 96 kHz (4Gsound) | 16-bit/44.1 kHz (stereo) |
| Audio channels | Up to 6 | 2 |
What do the symbols on the DVD cover mean?
As a wide range of data types can be stored on a DVD, a whole selection of symbols are used to visualize the contents and technical options of individual discs for the user. Here are some of the most commonly-used symbols:
Region code—the title can only be played in certain regions (also see page 48).
Dolby Digital surround sound
DTS surround sound
Number of languages on the DVD (also see page 44)
Number of subtitles on the DVD (also see page 44)
Supported picture formats (also see page 40)
Age restrictions/protection options (also see page 30)
Number of camera angles (also see page 42)
Regional restrictions on DVDs.
New technology, new vagaries: DVDs can be restricted to viewers in specified regions at the request of the content providers. This has been made possible by the so-called region code. The planet has been roughly divided into 6 regions for this purpose.
Region 1 USA, Canada
Region 2 Japan, Europe, Near East, South Africa
Region 3 Southeast Asia
Region 4 Australia, Central America, South America, New Zealand
Region 5 Northwest Asia, North Africa
Region 6 China
Yet another code is available for use onboard aircraft. And last but not least, there's the region code o, which is perhaps the most popular. It permits the essentially free use of the DVD.
When buying DVDs, be sure to keep an eye on the region code.