BANG & OLUFSEN BEOCOM 6000 - Casque audio / Communication BANG & OLUFSEN - Notice d'utilisation et mode d'emploi gratuit
Retrouvez gratuitement la notice de l'appareil BANG & OLUFSEN BEOCOM 6000 BANG & OLUFSEN au format PDF.

| Type de produit | Téléphone sans fil |
| Caractéristiques techniques principales | Technologie DECT, son haute définition, écran rétroéclairé |
| Alimentation électrique | Adaptateur secteur inclus, batterie rechargeable |
| Dimensions approximatives | 150 x 50 x 30 mm |
| Poids | 200 g |
| Compatibilités | Compatible avec les systèmes DECT GAP |
| Type de batterie | Batterie lithium-ion |
| Tension | 3.7 V |
| Puissance | Max 250 mW |
| Fonctions principales | Appels mains libres, répertoire intégré, son polyphonique |
| Entretien et nettoyage | Nettoyer avec un chiffon doux, éviter les produits abrasifs |
| Pièces détachées et réparabilité | Disponibilité des pièces détachées limitée, consulter le service client |
| Sécurité | Conforme aux normes de sécurité CE, utilisation en intérieur recommandée |
| Informations générales | Garantie de 2 ans, support technique disponible |
FOIRE AUX QUESTIONS - BANG & OLUFSEN BEOCOM 6000 BANG & OLUFSEN
Questions des utilisateurs sur BANG & OLUFSEN BEOCOM 6000 BANG & OLUFSEN
0 question sur cet appareil. Repondez a celles que vous connaissez ou posez la votre.
Poser une nouvelle question sur cet appareil
Téléchargez la notice de votre Casque audio / Communication au format PDF gratuitement ! Retrouvez votre notice BANG & OLUFSEN BEOCOM 6000 - BANG & OLUFSEN et reprennez votre appareil électronique en main. Sur cette page sont publiés tous les documents nécessaires à l'utilisation de votre appareil BANG & OLUFSEN BEOCOM 6000 de la marque BANG & OLUFSEN.
MODE D'EMPLOI BANG & OLUFSEN BEOCOM 6000 BANG & OLUFSEN
BeoCom 6000
Guide
This Guide contains instructions in how to set up and use the BeoCom 6000 handset with a BeoLine base.
You can also use the handset with other bases, such as a BeoCom 6000 base, a BeoLine PSTN base, or a BeoLine ISDN base. However, note that some functions work differently or are unavailable when you use the handset with one of these bases. Differences are described in this Guide.
Get started, 6
Find out how to connect and set up BeoCom 6000, use the handset keys and the display. You can also find information about maintenance and accessories available from your Bang & Olufsen retailer.
*NOTE! This is only possible if you use the handset with the BeoLine base.
Daily use, 18
Find out how to make and answer calls, adjust the handset volume, make calls from the Phonebook, Caller ID and Redial lists, store a number in the Phonebook after a call, silence the handset ringer and lock the keypad.
Advanced operations, 30
Find out how to enter, edit and delete names and numbers in the Phonebook, store numbers from the Redial and Caller ID lists, delete the content of the Caller ID and Redial lists*, call and store extension numbers, and adjust the volume level of some Bang & Olufsen audio or video products.
Preference settings, 40
This chapter provides an overview of the Settings menu. Find out, for example, how to register a handset to a base, set the time and date, and select settings for the ringer.
System use with several handsets, 43
Find out how to make a handset personal or common, call another handset, forward external calls and make an internal conference call.
Conditions of the guarantee, 48
Index, 49
When getting started, follow this procedure:
1 Connect the charger to the power outlet as described in the charger's Guide
2 Charge the handset battery
3 Connect the BeoLine base as described in the BeoLine Guide
4 Register the handset to the base.

The handset controls the battery charging, so you can always place the handset in the charger after use, even if the battery does not need recharging. Leaving the handset in the charger does not reduce the lifetime of the battery.
Charge the handset battery
If the handset requires charging, this occurs automatically when the handset is placed in the charger. For safety reasons, the battery is not charged prior to shipping. We recommend that you charge the handset for at least one hour before proceeding further with first-time registration of the handset.
About charging ...
- The charger must be connected to the power outlet.
- It takes four hours to fully charge the battery.
- The maximum talk-time per charge is approximately 15 hours.
- Standby time per charge is approximately 200 hours.
Battery status
The battery indicator in the display shows the charge level of the handset battery. If the batteries require charging, you are alerted by a message in the display and a sound signal.
To display the battery status ...
Press while the handset is in standby
OK

OK

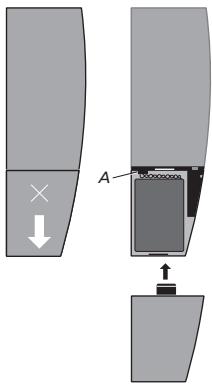
Replace the battery
Remove the battery cover; press the cover lightly and slide it off.
Remove the battery and pull out the battery plug.
Insert the battery plug (A) and place the battery and the cords as shown.
Replace the battery cover. Make sure that the tabs and the slots snap into place correctly at the top and bottom of the cover.
Placement and surroundings
The phone must not be placed in damp, dusty or polluted surroundings and should not be exposed to direct sunlight or liquids. Avoid the handset charging contacts touching metal or greasy parts.
Clean BeoCom 6000
Clean your BeoCom 6000 with a soft, damp cloth with a few drops of mild detergent added. To clean the charging contacts of charger and handset – and only these parts – use a cotton swab and isopropyl alcohol. Do not use isopropyl alcohol to clean any other part of the charger or handset!
If the battery in the handset is replaced with a new battery, please follow the instructions accompanying the new battery. Use only original batteries from your Bang & Olufsen retailer!
The BeoLine base.
*If you use a BeoCom 6000 base, a BeoLine PSTN base or a BeoLine ISDN base, you can only register six handsets.
First-time registration of the handset to a base
For the base and the handset to be able to communicate, the handset must be registered to a base. Up to eight handsets can be registered to the same base*. You can not register a handset to more than one base.
Disconnect the base from the mains for at least two seconds and then reconnect it. The indicator light flashes, and the base is open for registration for five minutes.
When your base is open for registration, follow the procedure on the following page.
Press to switch on the handset. Register handset to base? is shown in the display
OK
Register handset to base?
Press OK. The handset searches for an open base
OK
When a base is located, the PARK number* for the base is shown. Check the number against the number on the base
Base 01/02
36-000077123456
If the numbers do not match, turn the wheel to view the available bases. If your base is not shown, open the base for registration once more and repeat the procedure

Base 02/02
36-000077234567
If the numbers match, press to register the handset to the base
OK
If the base prompts you for a pincode, enter the pincode and press OK. The display tells you when registration is complete. You can now name the handset, as described on page 10
0-9
OK
*Depending on which base you have, the PARK number can be found on a label behind the socket cover, on the socket cover, or on the bottom of the base.
Name the handset
You can name the handset, for example, after the room in which it is placed, or after the person who uses it most frequently.
The functions described on these pages are also accessible via the Settings menu. Please refer to the chapter Preference settings on page 40 for more information.
If you register a previously named handset to the base, this name appears in the display when registration is complete. To use the same name, move the cursor to the symbol and press OK.
When registration is complete, the display prompts you to name the handset. This is practical if you have more than one handset. You can enter this setting at a later date, if you wish.
The display prompts you to enter a name
Press OK to be able to do so, or press C if you wish to skip this step
Turn the wheel to select the letters for the name. Both upper and lower case letters are available
Press to store the selected letter
When the name is complete, turn the wheel to move the cursor to the symbol. Name OK? appears in the display
Press to store the name. You can now set the time and date
Enter handset name?
OK
ABCDEFGHIJKLM...

OK

Living Room 一 Name OK?
OK
Living Room
Stored
Set the time and date
After you have registered the first handset and named it, the display prompts you to set the time and date. The time is shown when the phone is not in use and when there is no new information in the display. Time and date are also shown with Caller ID and Redial information.
*You can register additional handsets in this way only if you use the handset with the BeoLine base.
Set clock? is shown
Set clock?
Press OK to be able to set the clock, or press C if you wish to skip this step
OK
Set year 2005
Turn the wheel to set the year

Press to store and move to the month setting
OK
Set the month, day, hour and minute by turning the wheel and pressing OK

When you have set the time and date, the handset prompts you to register more handsets*.
OK
Press OK If you have more handsets to register. The base is automatically opened for registration. If you do not have more handsets, press C and registration is complete.
Register more handsets?
OK
Base is open for registration
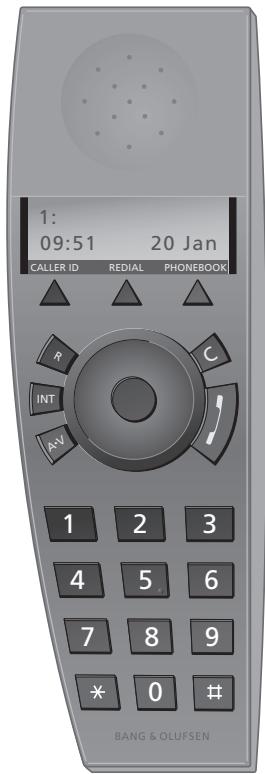
When the phone is idle, the display shows the handset's number (1:) and its name, if you have given it one.
Handset keys
CALLER ID
Access the Caller ID list
REDIAL
Access the Redial list
PHONEBOOK
Access the Phonebook. Also used for storing names and numbers in the Phonebook

Turn the wheel to search in Phonebook, Redial, Caller ID and the phone's menu system. During a call, turn the wheel to adjust the volume
OK (wheel middle)
Accept and store entries or choices in the display
Depending on the state of the phone, pressing OK gives you access to additional functions or options, which you can view by turning the wheel
- Press and hold to switch the handset off, and press once to switch it on again
C
Press to delete the most recent entry. Press and hold to exit a function

Press to make and end a call
A·V
Press to be able to adjust the volume of Bang & Olufsen audio and video systems
INT
Press to be able to call an internal handset. You can then look through the list of handsets with the wheel, or select a handset by pressing that handset's number (1-8*)
R
Used in conjunction with Call Forwarding, Call Waiting and other automated services
0-9
Digit keys for entering telephone numbers
¥
Used in telephone numbers, for Call Forwarding and other automated services
*If you use a BeoCom 6000 base, a BeoLine PSTN base or a BeoLine ISDN base, you can only register six handsets.
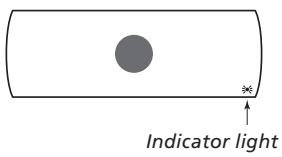
Phone feedback - indicator lights
Indicator light on the handset
The indicator light flashes red when...
- The phone is off the hook
The phone rings - Unanswered calls are registered
- Conditions exist which affect or impede the optimal use of your phone. Refer to page 15 for more information.
The indicator light shines green when the handset is in the charger and none of the situations described above exist.

Indicator light
You can turn off the handset indication of unanswered calls. Refer to the chapter 'Preference settings' on page 40 for more information.
Connect and use a headset
Connect a headset to the socket on the handset as shown. You can then answer incoming calls by pressing or any digit key on the handset keypad. Make a call as described on page 18.
An optional headset can be purchased from your Bang & Olufsen retailer.
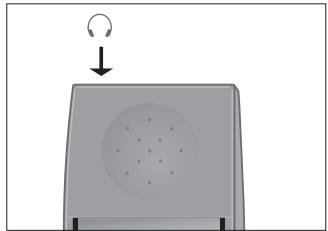
When you connect a headset, 'Headset connected' appears briefly in the display.
98765432
Call?
A black arrow indicates that more options are available if you turn the wheel - clockwise for right, and counter-clockwise for left. A grey arrow indicates that no more options are available.
The handset display
Open the display ...
Press OK while the handset is in standby.
Turn the wheel to view options in the display.
Press OK to select an option.
Options in the main menu
- Lock keypad?... Lock the handset keypad. Refer to page 19.
- Silence?... Mute the handset ringer and battery alarm. Refer to page 20.
Battery status ... See the charge level of the battery. - Delete lists ... Delete the content of the Redial list or Caller ID list. Refer to page 33^* .
- Settings ... Activate, adjust, or deactivate functions. Refer to page 40.
3 new calls
View?
If you do not wish to view new call information, simply turn the wheel.
Display of new, unanswered calls
While the handset is in standby, the display informs you of any unanswered calls you have received. The menu disappears when you have seen the calls, and the call information is moved to the Caller ID list.
'3 new calls' appears in the display ...
Press OK to see the number, the time and the date of the newest call. If the name is stored in the Phonebook, this is shown instead of the number.
Turn the wheel to see the other calls.
When you have seen the new calls, press C to leave the menu.
*This is only possible if you use the handset with the BeoLine base.
Troubleshooting via the display - the Alert menu
If conditions exist which impede or otherwise affect the optimal use of your phone, Alert appears in the display while the handset is in standby and remains as long as the conditions apply.
'Alert' appears in the display ...
Press OK to be able to view the cause of the alert
Turn the wheel to see if other conditions apply
Press OK to be able to adjust relevant settings, if available
Turn the wheel to adjust settings, and press OK to store them
If you do not wish to view the alert, simply turn the wheel.
Other messages in standby:
Register
handset to base?
The handset is not registered to a base. Press OK to start the first-time setup procedure.
1:Living Room
Silenced
The handset is silenced. Press OK to be able to deactivate the silence function.
1:Living Room
Line is busy
The line is busy. Press, then OK to 'break in' on the call. This is only possible if you use the handset with the BeoLine base.
No contact
with base
There is no connection between the base and the handset.
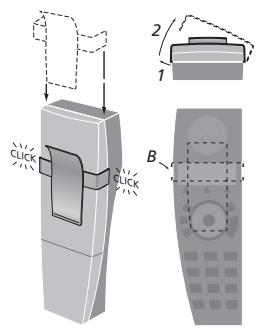
Attach the clip
With the clip you can attach the handset to your pocket. Attach the clip on the back of the handset:
To attach the clip ...
Slide the two flaps down along the two grooves on the sides of the handset.
When the clip is positioned correctly, approximately 4.5cm from the top of the handset, it will click into place. Make sure the clip is firmly attached on both sides of the handset.
To remove the clip ...
Pull the left flap (B) out to the left with a flat object.
When the left flap is clear of the groove, pull the clip back – be careful not to scratch the handset with the clip.
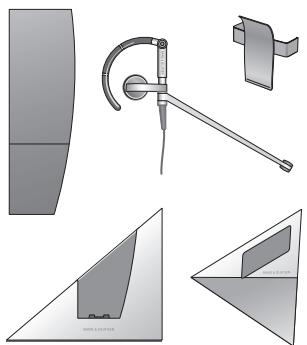
BeoCom 6000 can only be used
with the Bang & Olufsen
accessories shown: Extra handset,
EarSet 1 Home, Clip, Table charger,
Wall charger.
If you end a call to or from a number not previously stored in the Phonebook, the display prompts you to do so. Refer to Store a number after a call on page 22 for more information.
To get a dial tone before entering the number, press
Make and answer calls
The key on the BeoCom 6000 is used to start and end a call. During the call, the phone displays the duration of the call and the number or name of the person called. If you do not wish to answer a call, you can mute the ringing signal.
To make a call ...
| Enter the telephone number | 0-9 |
| 98765432_ | |
| To correct a digit, turn the wheel to move the cursor to the digit in question and press C to delete it | ○ |
| 98765432 | |
| C |
Press to make the call. The call time is shown, and if the name is stored in the Phonebook, this is shown as well
Press to end the call. Alternatively, place the handset in the charger
To answer a call ...
| Press to answer the call | |
| 23456789 | |
| Time: | 0:02 |
Press to end a call. Alternatively, place the handset in the charger
To mute a handset's ringing ...
Press to mute the ringing signal for the incoming call. The indicator light on the handset flashes until the caller hangs up the phone

| 23456789 Time: | 0:02 |

Lock the handset keypad
You can lock the handset keypad to avoid pressing keys when, for example, you carry the handset in a pocket. If you lock the handset keypad, you can still answer calls, but you have to unlock the keypad to make a call.
To lock the handset keypad ...
Press while the handset is in standby
Press OK. Keypad locked appears briefly in the display
To unlock the handset keypad ...
Press to be able to unlock the keypad. Unlock - No? appears in the display
Turn the wheel until Unlock - Yes? is shown and press OK
OK
Lock keypad?
OK
Keypad locked
OK
Unlock No?

Unlock Yes?
OK
You can also lock the handset keypad by pressing and holding the # button.
You can set the handset to lock automatically when not in use. You activate and deactivate this function via the Settings menu. Refer to page 40 for more information.
Silence the handset ringer and battery alert
You can silence the handset ringer if you do not want to be disturbed. While the handset is silenced, the ringer is deactivated, but incoming calls are still registered in the New calls menu, as described on page 14.
To silence the handset ringer ...
Press to bring up the main menu
Turn the wheel until Silence? is shown and press OK. Silence selected appears briefly in the display, and this changes to Silenced when the handset returns to standby
OK

Silence?
OK
Silence selected
1:Living Room Silenced
To reactivate the handset ringer ...
Press to be able to reactivate the ringer. Silence off? appears in the display
OK
Silence off?
Press OK. The ringer is reactivated. Silence off - selected appears briefly in the display, and the handset returns to standby
OK
Silence off selected
1:Living Room 12:15 24 Oct
Volume and the microphone
During a call, you can adjust the volume level using the wheel. You can also switch off the microphone if you do not wish the person on the phone to overhear a conversation you are having with a person in the room.
To turn the handset volume up or down ... Turn the wheel to adjust the handset volume

A selected volume setting – with the exception of the two highest settings – applies to all subsequent calls until the next time you adjust the volume.
If a headset is connected to your handset and you switch the microphone off, the phone does not beep.
To turn the microphone on or off during a call ...
Press to be able to turn the microphone off. Mic. off? appears in the display
OK
Mic. off?
Press OK. Microphone off appears in the display and the handset beeps at short intervals until the microphone is switched back on
OK
Microphone off
To switch on the microphone, press OK twice
OK
Mic. on?
OK
Here are some tips that can help you make Phonebook entries easier to find:
Mary & Robert
When entering couples' names, put first names in alphabetical order;
B&O Michael
When entering names of colleagues, put the company name first;
L Jane
When entering the names of children's friends, start with the child's first initial.
Store a number after a call
After a call, you will be asked whether you want to store the number in the Phonebook, if it is not already there. You can store the number type – home, work, or mobile phone* – and enter a name with the number. You can also add numbers to names already stored in the Phonebook.
After a call ...
The display shows the number and prompts you to store it in the Phonebook. If a name was received with Caller ID information, this name is shown
98765432
Store number?
Press to be able to store the number. New name? appears in the display. If you wish to add a number to a name stored in the Phonebook*, refer to the next page
OK
98765432
New name?
Press if the number belongs to a name not yet stored in the Phonebook. The spelling line appears in the display
OK
ABCDEFGHIJKLM...
Turn the wheel to select the letters for the name and press OK to store the selected letter. Both upper and lower case letters are available
#
OK
D_ abcdefghijklm...
To include digits, press the number keys
0-9
0
David Jones Name OK?
Turn the wheel to move the cursor to the
symbol. Name OK? appears in the display
Press to store the name. The display prompts you to select a number type
OK
Number type Home?
Turn the wheel to select either Home, Mobile or Work and press OK to store it
#
OK
*You can only enter the number type and add a number to a name if you use the handset with the BeoLine base.
To add a number to a name in the
Phonebook ...
When the display prompts you to store a new name, turn the wheel to select Add to name? and press OK. The first letters of names stored in the Phonebook appear in the display
Turn the wheel to select the first letter of a name and press OK. The first name beginning with the selected letter appears in the display
Turn the wheel to select the name and press OK to be able to select a number type
Turn the wheel to select a number type and press OK to store it

98765432
Add to name?
OK
First letter: ADFHJ

First letter: ADFHJ
OK

David Jones
OK
Number type Home?

Work?
OK
David Jones
stored
Search the Phonebook and make a call
If you use the handset with the BeoLine base ...
When you search through the Phonebook, pausing at a name causes the display to alternate between showing the number type and the number itself. Turning the wheel resumes the search.
Names longer than 16 characters are truncated. Pausing at a long name causes the name to scroll slowly back and forth, so that the whole name is shown.
*Number types are only available if you use the handset with the BeoLine base.
When the phone is not in use, you can turn the wheel to search directly from the entire list of names in the Phonebook, along with their number types*.
When the phone is not in use ...
Turn the wheel to search through the Phonebook and press to make a call. This method is quickest if there are very few entries in the Phonebook
If the Phonebook contains many entries, press PHONEBOOK to access it. The letters in the display correspond to the first letters of Phonebook entries
Turn the wheel to select the first letter
Press to be able to search through names beginning with the letter you selected
Turn the wheel to search through the names
Press to make a call

David Jones
Home

PHONEBOOK
First letter: ABDEFHIK

First letter: ABDEFHIK
OK
Dan Smith
Home

David Jones Mobile

You can call the number shown in the display directly by pressing
You can store telephone numbers from the Redial list directly in the Phonebook. Refer to Store Redial and Caller ID numbers on page 36 for more information.
The Redial list is only shared by handsets set up to be 'common'. Refer to Make a handset 'personal' or 'common' on page 45 for more information.
*Number types are only available if you use the handset with the BeoLine base.
Use Redial
The Redial function stores the last 24 telephone numbers you called. In addition to the number called, you can also view the time, date, and duration of the call. If you have entered a name in the Phonebook, this is displayed instead of the number. Internal calls are not registered in the Redial list.
To call from the Redial list ...
Press to access the Redial list
Turn the wheel to select a name or number. If you pause at a number, the display alternates between showing the name and the number type*
Press to be able to select a number type to call. If there is only one number type stored with a name, the display prompts you to make the call. Otherwise ...
... turn the wheel to select a number type and press OK
Press again to make the call.
To see call information for a selected outgoing call ...
Press to view your options
Turn the wheel until Details? appears in the display
Press OK. The phone number and the call duration are shown
REDIAL

David Jones
11:51 10 Dec
OK
David Jones
Call?


David Jones
Home?

OK
OK
OK
David Jones
Call?


David Jones
Details?

OK
David Jones
Time: 1:02:14
To delete a specific Redial number from the list ...
Press to access the Redial list
Turn the wheel to select the name or number
Press to view your options
Turn the wheel until Delete? appears in the display
Press to delete the selected entry
REDIAL

12345678
11:51 10 Dec
OK


OK

This function requires a Caller ID subscription with your telephone company.
You can store telephone numbers from the Caller ID list directly in the Phonebook. Refer to Store Redial and Caller ID numbers on page 36 for more information.
Even if you subscribe to Caller ID, caller information may still be unavailable for a particular call. The following may appear in the display* during an incoming call:
'Anonymous'... Calls from unlisted numbers;
'Caller ID not possible'... Caller ID not supported by the service provider;
- 'International'... Information unavailable for international calls.
*Your service provider may also send information other than that described above.
Use Caller ID
The last 24 numbers you have received calls from are stored in the Caller ID list. If a name is stored with the number in the Phonebook, this name is shown, even if your phone company has provided Caller ID name information. Identical numbers are only stored once in the list – the most recent call.
To call from the Caller ID list ...
Press to access the Caller ID list
Turn the wheel to select a name or number. If you pause at a number, the display alternates between showing the name and the number type
Press to be able to select a number type to call. If there is only one number type stored with a name, the display prompts you to make the call. Otherwise ...
... turn the wheel to select a number type and press OK
Press again to make the call.
To see call information for a selected call .. Press to view your options
Turn the wheel until Details? appears in the display
Press OK. The call duration and number of calls are shown
CALLER ID

David Jones
12:41
12 Dec
OK
David Jones
Call?

David Jones
Home?
OK
OK
OK
David Jones
Call?

David Jones
Details?
OK
David Jones
Time: 1:02:14
To delete a specific Caller ID number from the list ...
Press to access the Caller ID list
CALLER ID
David Jones
12:41 12 Dec
Turn the wheel to select the name or number

John Smith
11:51 10 Dec
Press to view your options
OK
John Smith Call?
Turn the wheel until Delete? appears in the display

John Smith Delete?
Press to delete the selected entry
OK
John Smith deleted
Enter a new name and number in the Phonebook
Names and numbers are shared by all handsets set up to be 'common'. Refer to Make a handset 'personal' or 'common' on page 45 for more information.
If you use a base other than BeoLine ...
Numbers can only contain up to 24 digits
Number types are unavailable
- You cannot add a number to a name stored in the Phonebook
At any time, you can store a new name and number in the Phonebook, or add a new number to an existing name. A number can contain up to 48 digits, and a name up to 25 characters. You can store up to 200 entries.
To enter a new name and number ...
Enter the telephone number and press OK to be able to store the number. Store number? appears in the display
0-9
OK
98765432
Store number?
Press to be able to store the number. New name? appears in the display. If you wish to add a number to a name stored in the Phonebook, refer to the next page
OK
98765432
New name?
Press to be able to store a new name. Thespelling line appears in the display
OK
ABCDEFGHIJKLM
Turn the wheel to select the letters for the name and press to store the selected letter. Both upper and lower case letters are available

OK
D
abcdefghijklm...
To include digits, press the number keys
0-9

David Jones
Name OK?
Turn the wheel to move the cursor to the
symbol. Name OK? appears in the display
Press to store the name. The display prompts you to select a number type
OK
Number type Home?
Turn the wheel to select either Home, Mobile or Work and press OK to store it

OK
To add a number to a name in the
Phonebook ...
When the display prompts you to store a new name, turn the wheel to select Add to name? and press OK. The first letters of names stored in the Phonebook appear in the display
Turn the wheel to select the first letter of a name and press OK. The first name beginning with the selected letter appears in the display
Turn the wheel to select the name and press OK to be able to select a number type
Turn the wheel to select a number type and press OK to store it

98765432
Add to name?
OK
First letter: ADFHJ

First letter: ADFHJ
OK

David Jones
OK
Number type Home?

Work?
OK
David Jones
stored
Delete a name and number in the Phonebook
Provided you use the handset with the BeoLine base, selecting Delete only deletes the number - home, mobile, or work - that you have selected. Other numbers stored with the same name are not affected, nor is the name itself. If, however, there is only one number stored with a name, deleting this number also deletes the name.
You can delete names and numbers stored in the Phonebook.
Press PHONEBOOK
Turn the wheel to select a first letter and press OK
Turn the wheel to select an entry and press OK
Turn the wheel until Delete? appears in the display and press OK to delete the entry
PHONEBOOK

First letter: ADHJK
OK

David Jones Mobile
OK

David Jones Delete?
OK
Delete the content of the Caller ID list or Redial list
You can delete the content of either list at any time.
To delete the content of a list ...
Press to bring up the main menu
Turn the wheel until Delete lists? is shown and press OK
Turn the wheel to select CallerID list? or Redial list? and press OK to delete the content of the list
OK

Delete lists?
OK

Redial list?
OK
Deleted Redial list
If you have set your handset to personal as described on page 45, deleting the content of a list only applies to the handset. If you have set the handset to common, the list is deleted for all handsets set to common.
You can only delete list content in this way if you use the handset with the BeoLine base.
Edit a name or number in the Phonebook
You can only store multiple numbers with a name if you use the handset with the BeoLine base.
You can edit a Phonebook entry – which typically contains a name and at least one number* – at any time.
Edit a number in the Phonebook ...
Turn the wheel to select an entry

David Jones
Home
Press to view your options
OK
Call?
Turn the wheel until Edit? is shown

Edit?
Press to be able to edit the number
OK
98768432
If editing a name only, press OK and skip to the next page. Otherwise ...
OK

98768432
... turn the wheel to select a digit you wish to edit
C
9876432
Press to delete the digit
0-9
98765432
Enter a digit to replace the one you deleted.
Repeat the above three steps for each digit you wish to edit
OK
Press when you are done editing the number. You can now edit the name, as described on the following page
To edit a name ...
The display prompts you to confirm that the number is correct
Press to confirm
The display prompts you to confirm that the name is correct
If the name is correct, press OK. Otherwise ...
... turn the wheel to select the letters for the name
Press to store the selected letter, or ...
... press to delete letters
Finish editing the name
Turn the wheel to move the cursor to the
symbol and press OK to store the name
Turn the wheel to select the number type* and press OK to store it
98765432_
Number OK?
*You can only store the number type if you use the handset with the BeoLine base.
OK
David Jones_ Name OK?
OK
David Jones ABCDEFGHIJKL...
OK
C
David Jones_ Name OK?
OK
David Jones Mobile?
OK
*It is only possible to store the number type if you use the handset together with the BeoLine base.
Store Redial and Caller ID numbers
Telephone numbers from the Redial and Caller ID lists can be stored and named in the Phonebook.
| Press REDIAL or CALLER ID. The last number in the list is shown in the display | REDIAL CALLER ID |
| Turn the wheel to select the desired number | 76543210 |
| Press to view your options | OK 76543210 < Call? > |
| Turn the wheel until Store number? appears in the display and press OK | Store number? >OK |
| Turn the wheel to select characters for the name and press OK to store the selected character | OK - ABCDEFGHIJKLM... OK |
| Turn the wheel to move the cursor to the ◆ symbol and press OK to store the name | Name OK? >OK |
| Turn the wheel to select the number type* and press OK to store the entry | Work? >OK |
Adjust volume level on audio/video products
You can adjust the volume of your Bang & Olufsen audio and video products directly from your handset. First select which sound source, audio or video, you wish to adjust.
To adjust the volume of an audio or video system ...
Press repeatedly until the desired system type appears in the display
A·V
Volume
Audio
A·V
Video
A·V
Link audio
A·V
Link video
While the phone is ringing, you can adjust the volume of a Bang & Olufsen product without pressing the A-V button first. Simply turn the wheel. The product must, however, be the same one on which you last adjusted the volume with the handset.
Turn the wheel to turn the volume up or down

Volume up
Link video
Call and store extension numbers in the Phonebook
If you need to make a call to an extension number, such as those used by banks and other businesses with switchboards, a pause must be inserted before the extension number. Store the main number, the pause and the extension number in the Phonebook. You can then call the number from the Phonebook.
To call an extension number directly ...
Enter the main telephone number 0-9
Press to make the call. Wait for a connection
Enter the extension number 0-9
Press to end the call
To store an extension number in the Phonebook ...
Enter the main telephone number 0-9
98765432
Press to be able to insert a pause
OK
98765432
店 Store number?
Turn the wheel until Insert pause? appears in the display and press OK

98765432
Insert pause?
OK
98765432-
Enter the extension number
0-9
98765432-123
Press twice to store the entry. You can now give the number a name, as described on page 30
OK
OK
To call an extension number from the Phonebook ...
Turn the wheel to search through the entire Phonebook
Press to make a call. The main number is dialled
The display prompts you to continue. Press OK to call the extension number
Continue?
OK
When you browse through the Settings menu, the current settings for each option are shown in the display. For example, when you browse to the Clock option, the current time and date appear on the second line of the display.
The Settings menu contains several options which allow you to adjust BeoCom 6000 functions.
To choose settings in the menu ...
Press to bring up the main menu
Turn the wheel to display Settings and press OK to bring up the menu
Turn the wheel until the desired option is displayed, such as Clock
Press to bring up the menu
Turn the wheel to select a setting and press OK to store it
The Settings menu options
Ringer ... This menu contains three separate ringer settings:
Ringer on/off lets you switch the ringer on or off, and set a time period in which the phone will not ring. If you switch off the ringer, the phone does not ring, but it does register incoming calls in the Caller ID list. The ringer is disconnected until you change the setting.
- Ringer level lets you set the ringer volume. Options are Extra low, Low, Medium or High. The ringing signal selected is played after a moment.
Ringer melody lets you choose from eight melodies. The ringing signal selected is played after a moment.
OK


OK


OK
Clock ... Enter the time and date.
Auto lock ... Options are On and Off. Locking the handset keypad prevents inadvertent operation of the keys. You can still receive calls, but the handset keypad locks again automatically after you end a call.
News indicator ... The news indication – the flashing red light on the handset and the display message indicating new, unanswered calls – is set to On from the factory, so you can see how many new calls you have received. Options are On and Off.
Battery alert ... Alerts you audibly when the handset battery requires charging. Options are On, Off and Timed off. If you select Timed off, you can then use the wheel to set a daily time period during which the battery alert will not occur – for example, at night.
Auto off-hook ... Switch Auto off-hook to On if you want to answer a call as soon as you lift the handset from the charger - that is, without pressing. Auto off-hook is set to Off when you purchase the phone. Auto off-hook can only be used if the handset is placed in the charger. If the handset is not placed in the charger, you must press to answer a call.
Handset ... The Handset menu contains three sub-menus:
- Enter name allows you to give the handset a new name using the wheel and OK key. Note that this menu is called Change name after you enter a name for the handset the first time.
- Register allows you to register the handset to the BeoLine base.
- Handset type allows you to set the handset to be Personal or Common, as described on page 45.
Base... The Base menu contains three sub-menus:
- Remove handset cancels registration of a handset to the base.
- Open base for registration allows you to open the base for registration of additional handsets*.
- Change PIN allows you to enter a new pincode for your base and change the pincode. Use the number keys to enter the pincode and the OK key to store it. The default pincode is 0000.
*This menu is only accessible if you use the handset with the BeoLine base.
*This option is only available if you use the handset with a BeoCom 6000 base, a BeoLine PSTN base, or a BeoLine ISDN base.
Language ... Select the language of the display texts.
Switchboard*... Set BeoCom 6000 for use with a switchboard. Options are Yes and No. If you choose Yes, use the number keys to enter a prefix code and turn the wheel to select a pause length. You can select a pause length between 0 and 12 seconds, or select Wait. Note that you must enter prefix codes manually when entering phone numbers in the Phone-book.
Flash time ... Choose Long, Short or Customized. The correct flash time depends on how you have connected your phone.
With several handsets registered to one base, you can make your own phone system. The handsets can all receive external calls, also during internal calls between handsets. Handsets in the system are numbered 1 - 8^* and can be named as well.
Each handset is initially set up as 'common'. This means that the Phonebook, Caller ID list and Redial list are all updated by the base and shared with other handsets in the system. If you want an independent Phonebook, Caller ID list and Redial list in an individual handset, make the handset 'personal' instead.
For further information about the possibilities a system setup offers, please refer to the following pages.
*If you use a BeoCom 6000 base, a BeoLine PSTN base or a BeoLine ISDN base, you can only register six handsets.
The phone system allows one internal call and one external call to take place at the same time.
If you misplace a handset, you can locate it by making a call to that handset.
If you use a BeoCom 6000 base, a BeoLine PSTN base or a BeoLine ISDN base, you can only register six handsets.
Call another handset
You can call one handset or call all handsets simultaneously. If you call all handsets, the handset that responds first receives the call. If you call one handset, the display shows which handset has been called.
To call a handset ...
Press to make an internal call INT
Press the number of the handset and the call is 1-8 made automatically. Alternatively ...
... turn the wheel to search through the internal listing of handsets and press to make the call. If the internal call can not be made, you will hear a busy signal

3:Kitchen
To call all handsets ...
Press to make an internal call INT
Press to call all handsets
To end a call ...
Press to end a call
Make a handset 'personal' or 'common'
You can set your handset to be 'personal' instead of 'common'. The Phonebook, Redial list and Caller ID list of a personal handset are located in the handset and not the base.
Press to bring up the main menu
Turn the wheel to select the Settings menu and press OK to bring up the menu
Turn the wheel to select the Handset menu and press OK to bring up the menu
Turn the wheel to select Handset type and press OK
Turn the wheel to select Personal or Common and press OK to store the settings
OK

Settings
OK

Handset
OK

Handset type
OK

Common?
OK
If you have a phone system with one or more handsets set to personal and the others set to common, note the following:
- Changing a handset from personal to common causes the personal Phonebook, Caller ID list and Redial list to be replaced, not supplemented, by the common lists. Updating the Phonebook, Caller ID and Redial lists may take a few minutes.
If you use a BeoCom 6000 base, a BeoLine PSTN base or a BeoLine ISDN base, you can only register six handsets.
Transfer external calls
You can transfer an external call to another handset or to all handsets. You can talk with the person answering the internal handset before transferring the call. When you transfer an external call to all handsets, the call goes to the handset which answers first.
Transfer an external call ...
Press to make an internal call
INT
Press the number of the handset and the call is made automatically. Alternatively ...
1-8
... turn the wheel to search through the internal listing of handsets and press to make the call. If the internal call can not be made, you will hear a busy signal

3:Living Room
If the internal call is answered ...
The display prompts you to transfer the call

OK
Press to enter your choice
Retrieve the external call if the internal call is not answered ...
Press OK or to retrieve the external call on hold

OK
Retrieve?
Make an internal conference call
During an external call, you can call another handset in the system to establish a conference call. If one of the participants hangs up, the call continues with those remaining.
If you use a BeoCom 6000 base, a BeoLine PSTN base or a BeoLine ISDN base, you can only register six handsets.
Start a conference call with one internal and one external party ...
Press to make an internal call during an external call
INT
You can also establish an internal conference call by 'breaking in' on a call in progress. For further information, refer to page 15.
Press the number of the handset and the call is made automatically. Alternatively ...
1-8
... turn the wheel to search through the internal listing of handsets and press to make the call. If the internal call can not be made, you will hear a busy signal

3:Kitchen
If the internal call is answered ...
Turn the wheel to select Conference? and press OK to start the conference call

Conference?
OK
Press to end the conference call

Retrieve the external call if the internal call is not answered ...
Press OK or J to retrieve the external call on hold

Retrieve?
OK
Conditions of the guarantee
For the guarantee to be valid, a document is normally required stating the following:
- Name of product and type number
Serial number - Date of purchase/delivery
- Guarantee period
Stamp and signature of an authorised Bang & Olufsen dealer
Each Bang & Olufsen product purchased from an authorised Bang & Olufsen retailer carries a guarantee against defects in workmanship and materials. The guarantor is the authorised Bang & Olufsen retailer or otherwise the national Bang & Olufsen representative. The guarantee period is 36 months.
The guarantee covers the repair costs (i.e. spare parts and labour costs) for the product. The guarantee also covers accessories.
As Bang & Olufsen phone products only function in the country for which they were produced, the guarantee only applies to that country only. This is due to the variations in transmission standards and legal approvals from country to country.
The guarantee does not cover damage due to accidents, including damage by lightning, water, fire, transport, misuse or negligence. Bang & Olufsen is not responsible for any indirect loss or any consequential loss.
The guarantee does not cover transport costs or the replacement of batteries.
The guarantee is void if the product is repaired or modified other than by a person authorised by Bang & Olufsen, or if the serial number has been removed from the product.
Accessories
Attach the clip, 16
BeoCom 6000 accessories, 13
Base
Make a handset 'personal' or 'common', 45
Registration of the handset to a base, 8
The Base menu, 41
The BeoLine base, 8
Battery
Battery status, 6
Charge the handset battery, 6
Replace the battery, 7
Silence the handset ringer and battery alert, 20
The Battery Alert menu, 41
BeoLine
Registration of the handset to a base, 8
The BeoLine base, 8
BeoLink
Adjust volume level on audio/video products, 37
Caller ID
Call from the Caller ID list, 28
Delete a specific Caller ID number from the list, 28
Delete the content of the Caller ID list or Redial list, 33
Store Redial and Caller ID numbers, 36
Use Caller ID, 28
Calls
Call and store extension numbers in the Phonebook, 38
Call another handset, 44
Call from the Caller ID list, 28
Call from the Redial list, 26
Make and answer calls, 18
Make an internal conference call, 47
Search the Phonebook and make a call, 24
Store a number after a call, 22
Transfer external calls, 46
Charging
Battery status, 6
Charge the handset battery, 6
Conference calls
Make an internal conference call, 47
Delete
Delete a name or number in the Phonebook, 32
Delete a specific Caller ID number from the list, 29
Delete a specific Redial number from the list, 27
Delete the content of the Caller ID list or Redial list, 33
Displays and menus
Battery status, 6
Display of new, unanswered calls, 14
Options in the main menu, 14
See call information for a selected outgoing call, 27
The handset display, 14
Troubleshooting via the display - the Alert menu, 15
Edit
Delete a name or number in the Phonebook, 32
Edit a name or number in the Phonebook, 34
Enter a new name and number in the Phonebook, 30
Extension numbers
Call and store extension numbers in the Phonebook, 38
Handset
Call another handset, 44
Charge the handset battery, 6
First-time registration of the handset to a base, 8
Handset keys, 12
Lock the handset keypad, 19
Make a handset 'personal' or 'common', 45
Mute a handset's ringing, 18
Name the handset, 10
Phone feedback - indicator lights, 13
Set the time and date, 11
Silence the handset ringer and battery alert, 20
The handset display, 14
TheHandsetmenu,41
Headset
Connect and use a headset, 13
Indicator lights
Phone feedback -indicator lights, 13
Maintenance
CleanBeoCom6000,7
Replace the battery, 7
Microphone
Volume and the microphone, 21
Phonebook
Call and store extension numbers in the Phonebook, 38
Delete a name and number in the Phonebook, 32
Edit a name or number in the Phonebook, 34
Enter a new name and number in the Phonebook, 30
Search the Phonebook and make a call, 24
Store a number after a call, 22
Store Redial and Caller ID numbers, 36
Placement
Placement and surroundings, 7
Redial
Call from the Redial list, 26
Delete a specific Redial number from the list, 27
Delete the content of the Caller ID list or Redial list, 33
See call information for a selected outgoing call, 28
Store Redial and Caller ID numbers, 36
Use Redial, 26
Registration
Registration of the handset to a base, 8
Ringing signal
Mute a handset's ringing, 18
Silence the handset ringer and battery alert, 20
The Ringer menu, 40
Search
Call from the Caller ID list, 28
Call from the Redial list, 26
Search the Phonebook and make a call, 24
Settings
Adjust volume level on audio/video products, 37
Lock the handset keypad, 19
Make a handset 'personal' or 'common', 45
Name the handset, 10
Set the time and date, 11
Silence the handset ringer and battery alert, 20
The Auto lock menu, 40
The Auto off-hook menu, 41
The Base menu, 41
The Battery Alert menu, 41
TheClockmenu,40
The Flash Time menu, 42
TheHandsetmenu,41
The Language menu, 41
The News Indicator menu, 41
The Ringer menu, 40
Volume and the microphone, 21
System
Call another handset, 44
Make a handset 'personal' or 'common', 45
Make an internal conference call, 47
Transfer external calls, 46
Volume
Adjust volume level on audio/video products, 37
Volume and the microphone, 21

Waste Electrical and Electronic Equipment (WEEE) - Environmental protection
The European Parliament and the Council of the European Union have issued the Waste Electrical and Electronic Equipment Directive. The purpose of the Directive is the prevention of waste of electrical and electronic equipment, and to promote the reuse and recycling and other forms of recovery of such waste. As such the Directive concerns producers, distributors and consumers.
The WEEE directive requires that both manufacturers and end-consumers dispose of electrical and electronic equipment and parts in an environmentally safe manner, and that equipment and waste are reused or recovered for their materials or energy.
Electrical and electronic equipment and parts must not be disposed of with ordinary household refuse; all electrical and electronic equipment and parts must be collected and disposed of separately.
Products and equipment which must be collected for reuse, recycling and other forms of recovery are marked with the pictogram shown.
When disposing of electrical and electronic equipment by use of the collection systems available in your country, you protect the environment, human health and contribute to the prudent and rational use of natural resources. Collecting electrical and electronic equipment and waste prevents the potential contamination of nature with the hazardous substances which may be present in electrical and electronic products and equipment.
Your Bang & Olufsen retailer will assist with and advise you of the correct way of disposal in your country.
CE This product is in conformity with the provisions of the Directives 1999/5/EC and 2006/95/EC.

Technical specifications, features and the use thereof are subject to change without notice!