
TREK 310 - Webcam GENIUS - Notice d'utilisation et mode d'emploi gratuit
Retrouvez gratuitement la notice de l'appareil TREK 310 GENIUS au format PDF.

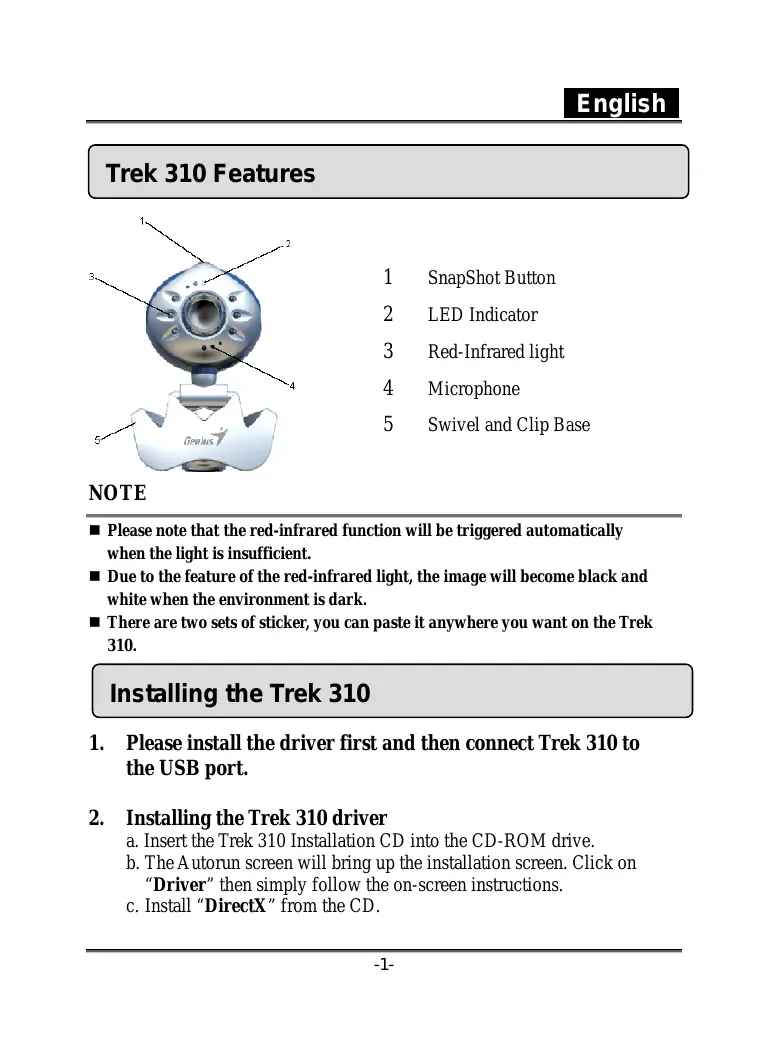

| Type de produit | Webcam |
| Marque | GENIUS |
| Modèle | TREK 310 |
| Résolution maximale | 640 x 480 pixels (RGB24 et I420) |
| Bouton de capture | Oui, bouton snapshot intégré |
| Voyant LED | Oui, indicateur de fonctionnement |
| Lumière infrarouge rouge | Oui, activation automatique en faible luminosité, passage en noir et blanc |
| Microphone intégré | Oui |
| Base pivotante et clip | Oui, pour fixation sur écran ou surface plane |
| Connectique | USB |
| Alimentation | Via port USB |
| Logiciel inclus | Genius Application, DDPlayCam (Windows uniquement) |
| Fonctionnalités logicielles | Capture d'image, enregistrement vidéo, système de surveillance de sécurité, zoom, retournement d'image |
| Compatibilité messagerie | MSN Messenger, Yahoo Messenger, AOL Instant Messenger |
| DDPlayCam | Reconnaissance faciale, suivi de mouvement, morphing, effets interactifs |
| DD PrintCenter | Impression de photos avec modèles de mise en page |
| Entretien et nettoyage | Nettoyer avec un chiffon doux et sec, éviter les liquides |
| Sécurité | Fonction de surveillance avec détection de mouvement et alertes sonores |
| Pièces détachées et réparabilité | Non applicable, appareil non démontable par l'utilisateur |
| Informations générales | 20 pages de notice, support technique en ligne |
FOIRE AUX QUESTIONS - TREK 310 GENIUS
Questions des utilisateurs sur TREK 310 GENIUS
0 question sur cet appareil. Repondez a celles que vous connaissez ou posez la votre.
Poser une nouvelle question sur cet appareil
Téléchargez la notice de votre Webcam au format PDF gratuitement ! Retrouvez votre notice TREK 310 - GENIUS et reprennez votre appareil électronique en main. Sur cette page sont publiés tous les documents nécessaires à l'utilisation de votre appareil TREK 310 de la marque GENIUS.
MODE D'EMPLOI TREK 310 GENIUS
Trek 310 Features
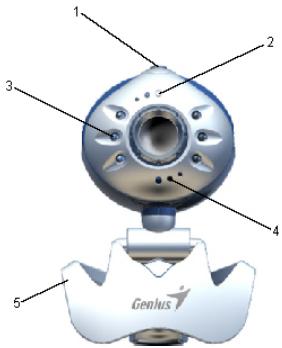
1 SnapShot Button
2 LED Indicator
3 Red-Infrared light
4 Microphone
5 Swivel and Clip Base
NOTE
Please note that the red-infrared function will be triggered automatically when the light is insufficient.
Due to the feature of the red-infrared light, the image will become black and white when the environment is dark.
There are two sets of sticker, you can paste it anywhere you want on the Trek 310.
Installing the Trek 310
- Please install the driver first and then connect Trek 310 to the USB port.
- Installing the Trek 310 driver
a. Insert the Trek 310 Installation CD into the CD-ROM drive.
b. The Autorun screen will bring up the installation screen. Click on "Driver" then simply follow the on-screen instructions.
c. Install "DirectX" from the CD.
Notice: If the Autorun screen doesn't start, please follow these steps:
- Click on "Start Menu".
- Type D : \SETUP.EXE, then click "Enter" key.
(Assume your CD-ROM is in Drive D)
- Insert the Trek 310's USB cable to your desktop's or laptop's USB port.
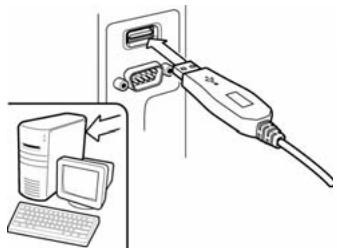
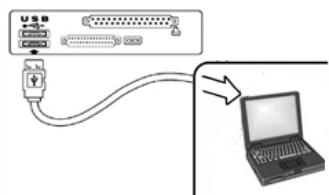
- Complete software and hardware installation. You can install the software you would like for video conferencing or chat with your friends.

NOTE
To remove the driver installation: Please go to the taskbar and follow "Start" "Program" "Trek 310" Click "Uninstall", then follow the on-screen instructions to remove the driver.
Genius Application (Windows Only)
You can use our software to capture the real-time image, record or execute the simply security function.
To run the software, please go to the task bar and follow "Start" Click "Program" Choose "Trek 310" Click "Trek 310". Or you
may execute the software by simply clicking the shortcut of "Trek 310".
NOTE
After installing the driver of Trek 310, the system will automatically create a file (C:\WINDOWS\Album or C:\WINNT\Album) to save the images you take using the Genius Application.
1. Description for the major icon

Preview mode

Snapshot mode

Video Clip Mode

Security monitoring system

Exit

Camera Control
NOTE


In the "camera control section", you can personalize your camera
settings for different circumstances.
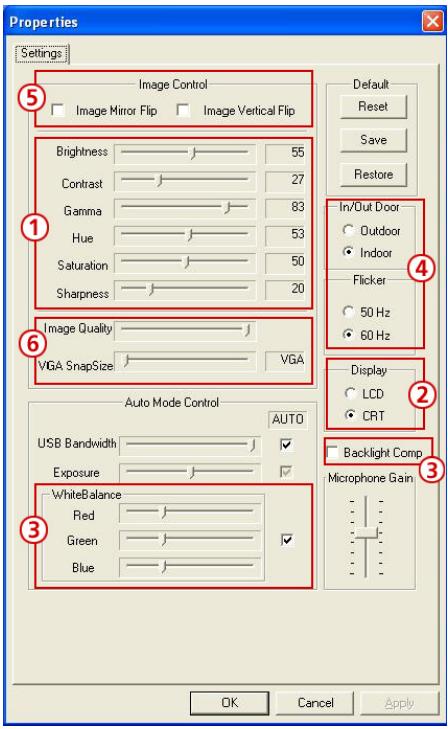
1.You can adjust different values for different circumstances and environment
2. For high quality image, please click the monitor type you are using with the web camera
3. You may adjust the values for different lighting.
4. Select the correct frequency according to the country where you are using the web camera.
5.You can flip the image horizontally or vertically
6. When you want a still image capture, you can select a resolution size you want.
2. Preview Mode

You can use the function buttons on the control panel to zoom in/out and move upward/downward/left/right.
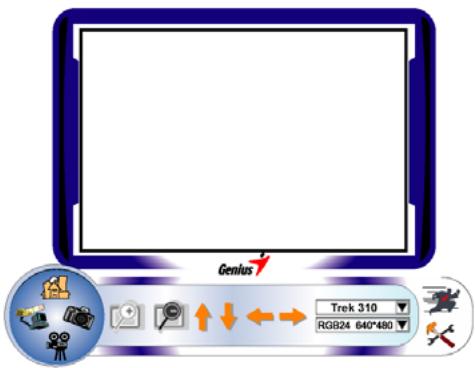

Zoom in the image

Zoom out the image

Move the image upward

Move the image downward

Move the image to the left

Move the image to the right
RGB24 640*480
Resolution Selection
There are 2 categories of resolution: RGB24 and I420. You can select 5 different image resolutions for each of them. The file size of I420 will be smaller than RGB24. So, I420 may be the better choice for transmission.
3. Snapshot Mode

You can press the Snapshot button in the right of the circle to take a picture right away and share with your friends.
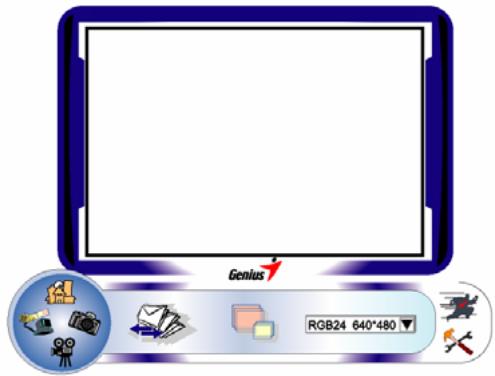

Send photo by e-mail

RGB24 640*480
Shoot continuously
Resolution selection
This section shows the resolution you selected in the "Preview Mode". If you want to change the resolution, please click "..."to go back to the "Preview Mode" to make the changes.
4. Video Clip Mode

You can record real-time image in this section.
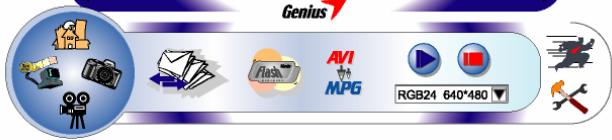

Send photo by e-mail

Convert AVI files into MEPG-1 format

Start recording

Stop recording Exit the Video Clip Mode
To Create animation
Press to start; Press to stop

Press to return to the video recording mode
This function has to be under the resolution of RGB24 320 x 240 or I420 320 x 240. Please make sure the resolution is correct before executing this function.
RGB24 640*480
Resolution selection
This section shows the resolution you selected in the "Preview Mode". If you want to change the resolution, please click " "to go back to the "Preview Mode" to make the changes.
5. Security Monitoring System

This function records any movements that appear in front of your monitor automatically. It can also record anytime until the HD is full. If there's no movement, it will shut down automatically after four seconds otherwise it will be active when detecting new movement. It's a great security
monitoring system at times when you're not around.
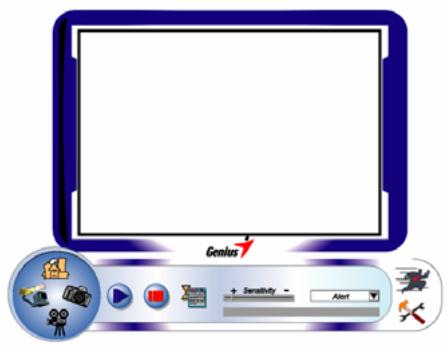

Start recording

Stop recording

Setup time of the security monitoring system
Set up the degree of the variance for every second of recording image. When the differences are over the setup degree, the system will alert you.
Set up the different alerting sound effects

NOTE
In "Security Monitoring System" section, you can record in any size of image resolution. If you want to change the resolution, please click "to go back to the Preview Mode" and make the changes.
MSN Messenger, Yahoo Messenger, AOL
MSN Messenger
a. For live video function, you'll need MSN Messenger version 6 or later. If you don't have it, please refer to the website: http://www.msnmessenger-download.com to download.
b. Now, get to sign onto MSN Messenger service.
c. Choose a friend on the contact list and Click "OK" to confirm.
d. Double-click on your friends, who are available to chat. Click on the web camera icon
e. Your friend will then receive an invitation message. When your friend confirms to talk, the video chat will start.
Yahoo Messenger
a. Download Yahoo Messenger at http://messenger.yahoo.com and finish the registration, if you don't have it.
b. Sign onto Yahoo Messenger.
c. From the main window, click Tools menu, then select "Start My Webcam".
d. Right-click on a name in your Messenger List and choose "View Webcam".
e. Your friend will then receive an invitation message. When your friend clicks YES, the video chat will start.
AOL Instant Messenger
a. You can download AOL Instant Messenger free at http://www.aim.com and finish the registration, if you don't have it.
b. Sign onto AOL Instant Messenger.
c. Click on "Show Messenger Lists" and choose the friend you want to start a video chat with.
d. Your friend will then receive an invitation message. When your friend confirms to talk, the video chat will start.
NOTE
Please make sure you already installed the camera driver and connected the camera to the computer before running video conferencing or video chat programs.
Please make sure you close other webcam programs before running the video conferencing or video chat program.
DDPlayCam Software (Windows Only)
DDPlayCam is an interactive multimedia software. It integrates the most advanced virtual interactive technology: facial recognition and motion tracking, with cartoon characters, figures and amazing visual effects. It allows you to do a virtual role-play, interacting with a virtual environment, morphing yourself into real time.
DDPlayCam includes two parts: DD ThemeParty and DD ThemeParty PrintCenter. DDPlayCam is for virtual role-play. DD ThemeParty PrintCenter is for arranging the pictures you take in DD ThemeParty and printing them out.
- Installing the DDPlayCam Software
a. Insert the Trek 310 Installation CD into the CD-ROM drive.
b. The Autorun screen will bring up the installation screen. Click on "DDPlayCam" then simply follow the on-screen instructions. Once finished, DD ThemeParty and DD PrintCenter are ready to go.
2. Running DD ThemeParty
a. Connect the web camera to the computer
b. Please go to the task bar and follow "Start" Click "Program" Choose "DDPlayCam" Click "DD ThemeParty". Or you may execute the software by simply clicking the shortcut of "DD
ThemeParty"

DD ThemeParty Introduction
To run DD PlayCam DD Theme Party, you should set your camera resolution to 320*240 and also check for your position before the web camera. Please position your face around the center if possible.
Please note that if your camera resolution is not in 320240 , the software will ask you to make the change. Please follow the on-screen instructions to change the resolution to 320240 .
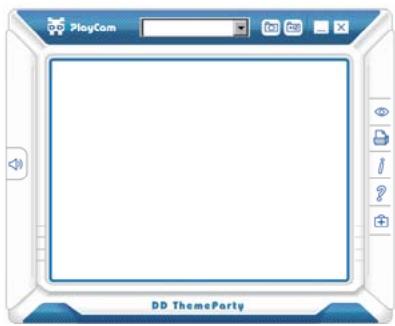

Tool Tip
About DD PlayCam
Function Description
Display DD PlayCam software version
Capture (Enter)
Take a snapshot in process

Sequential Capture
Take 12 snapshots as a GIF animation
DD PrintCenter
Open DD PrintCenter application

Close Windows
Exit application
Help
Call help documentation

Minimize Windows
Minimize skin
Mute
Turn off audio

Technical Support
Connect to technical support web service

View Photo
View photo from captured pictures or animation.
3. Running DD PrintCenter
a. Connect the web camera into the computer
b. Please go to the task bar and follow "Start" Click "Program" Choose "DDPlayCam" Click "DD PrintCenter". Or you may execute the software by simply clicking the shortcut of "DD

DD
PrintCenter"
ThemeParty
PrintCenter
DD PrintCenter Introduction
DD PrintCenter lets you easily print digital photos by using a variety of layout templates. Please note that as an indivisible part of DD PlayCam software, this function allows you only to print photos generated by DD PlayCam software and saved automatically in the DD PlayCam folder within My Pictures.
a. Step 1: Select Paper Size and Layout or Load Document
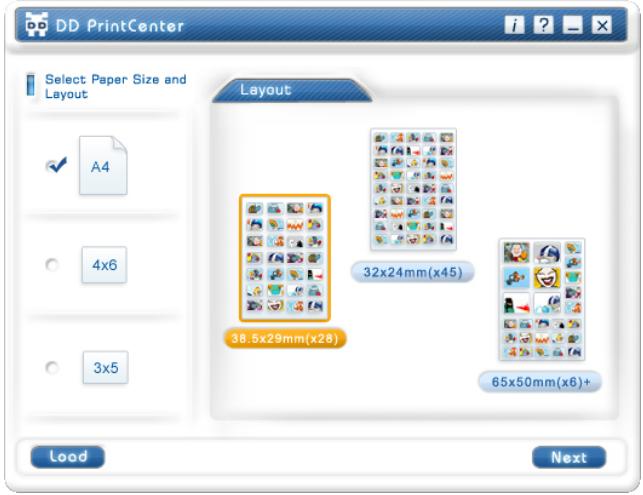
DD PrintCenter provides you three standard paper sizes. They are A4, 46 and 35 inch styles.
Each paper size contains three types of layout templates. First, you select a paper size and you can see three corresponding layout templates on the right part of the window. Each layout template shows you the actual size of a single photo and the number of photos a single paper can print, such as 24mm^*18mm . Select the layout by directly clicking the template, and then click the Next button. Or click Load button to open an existing DD PrintCenter document.
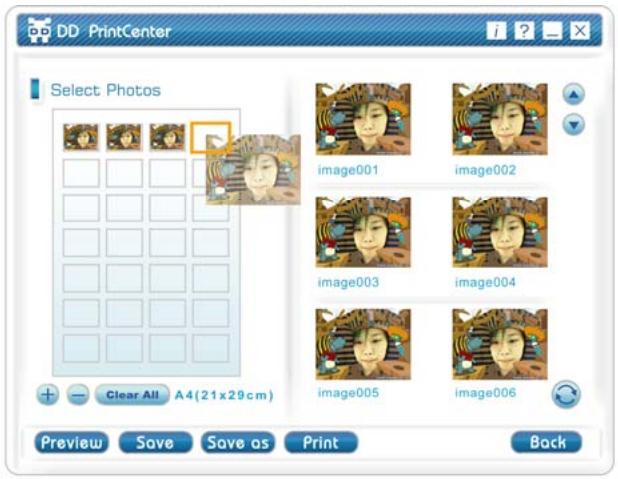
b. Step 2: Choose and Load Photo

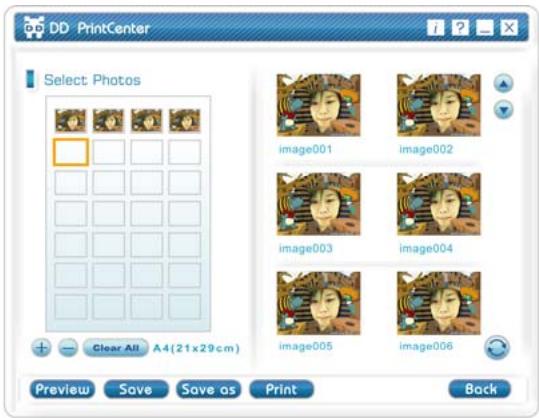
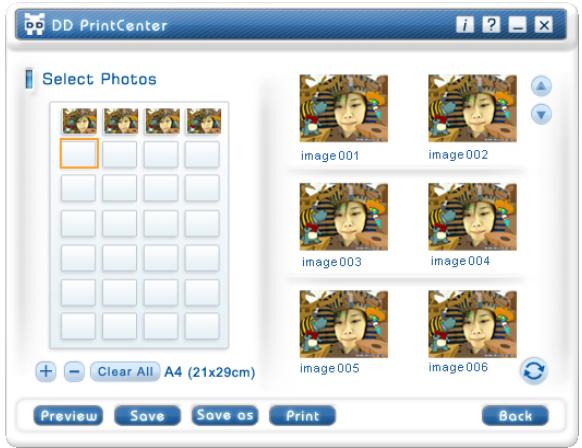
You can see an empty layout template and thumbnail pictures that you captured and saved in the DD PlayCam folder. Roll over any pictures you want to print and drag it directly into an empty position you would like to place it in the template. Or click an empty position first and the frame of the position is marked immediately, double click on the picture you want to print. You will see the picture you have selected appear in that that position.
c. Step 3: Add, Delete and Save

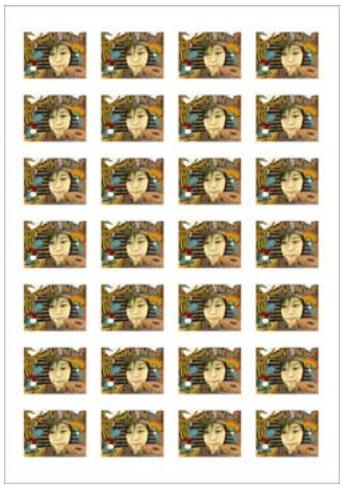
If you want to print several copies from the same picture, you do not have to repeat the steps for dragging. You only need to select the target picture which you have already dragged into template and click the "+" button. The picture will duplicate at the next position automatically. One click, one duplication! If you want to delete the picture that you have already dragged into template, just select the target picture and click the - button. On the other hand, if you want to save the whole template with the selected pictures for printing next time or elsewhere, just click on the "Save" button. The whole template will be saved as a single JPEG file extension. In the save combo box, you can select another file extension called PCF to save the template layout you have edited as a DD PrintCenter document. For the next time, you can use the Load button to open the PCF file for further editing. You can also use Save as a function to save a file as the format you indicated.
d. Step 4: Preview and Print
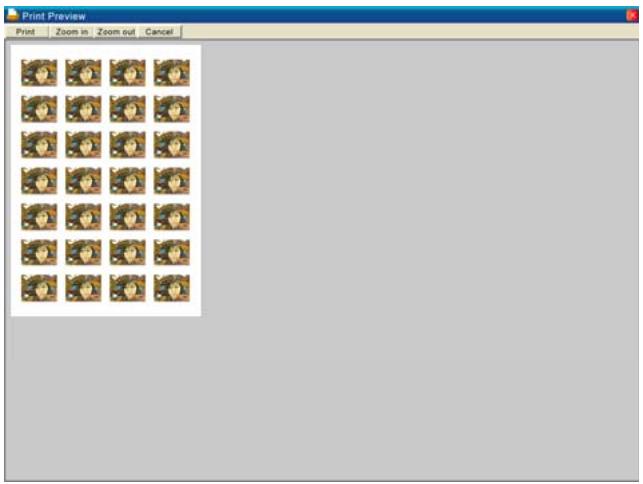
You can click the Preview button, then Print. However, please note that DD PrintCenter does not provide functions for controlling or adjusting any settings of your client printer device. We recommend you should check your printer settings and the paper you have loaded before printing.
NOTE
For further information about the DDPlayCam software, please go to the task bar and follow "Start" Click "Program" Choose "DDPlayCam" You can click "Click "DD ThemeParty Technical Support"; "DD ThemeParty User Guide" or "DD ThemeParty Web Service" depends on your requirement.
To remove the driver installation: Please go to the taskbar and follow "Start" "Program" Choose
"DDPlayCam" Click "DD ThemeParty Uninstallation", then follow the on-screen instructions to remove the driver.
- Trek 310 Features
- NOTE
- Installing the Trek 310
- Genius Application (Windows Only)
- Description for the major icon
- Preview Mode
- Snapshot Mode
- Shoot continuously
- Video Clip Mode
- Security Monitoring System
- MSN Messenger, Yahoo Messenger, AOL
- MSN Messenger
- Yahoo Messenger
- AOL Instant Messenger
- DDPlayCam Software (Windows Only)
- Running DD ThemeParty
- DD ThemeParty Introduction
- Tool Tip
- Function Description
- Running DD PrintCenter
- DD
- DD PrintCenter Introduction
Marque : GENIUS
Modèle : TREK 310
Catégorie : Webcam