
MGP - Tablette graphique GENIUS - Notice d'utilisation et mode d'emploi gratuit
Retrouvez gratuitement la notice de l'appareil MGP GENIUS au format PDF.


| Type de produit | Tablette graphique |
| Marque | Genius |
| Modèle | MGP |
| Interface | USB |
| Stylet | Sans fil, à pile |
| Nombre de boutons du stylet | 2 boutons sur le corps + pointe |
| Sensibilité à la pression | Oui |
| Fonctions de la tablette | Pointage direct, défilement, commandes souris 3 boutons, cellules chaudes |
| Systèmes d'exploitation supportés | Windows 2000, XP, Vista |
| Alimentation de la tablette | Via port USB |
| Alimentation du stylet | Pile (type non spécifié, probablement AAA) |
| Indicateur LED | Oui, témoin de fonctionnement |
| Mode d'économie d'énergie | Oui, veille automatique |
| Contenu du carton | Tablette, stylet, CD driver, manuel |
| Poids (estimation) | Environ 300 g |
| Dimensions (estimation) | Environ 20 x 15 x 1 cm |
| Nettoyage | Chiffon doux et sec, éviter produits abrasifs |
| Réparabilité | Pièces détachées non listées, contacter SAV |
| Numéro de version du pilote | Consultable dans l'onglet Info du panneau de configuration |
FOIRE AUX QUESTIONS - MGP GENIUS
Questions des utilisateurs sur MGP GENIUS
0 question sur cet appareil. Repondez a celles que vous connaissez ou posez la votre.
Poser une nouvelle question sur cet appareil
Téléchargez la notice de votre Tablette graphique au format PDF gratuitement ! Retrouvez votre notice MGP - GENIUS et reprennez votre appareil électronique en main. Sur cette page sont publiés tous les documents nécessaires à l'utilisation de votre appareil MGP de la marque GENIUS.
MODE D'EMPLOI MGP GENIUS
Pen Tablet
User Manual
Windows 2000 / XP / Vista
I. General Information
1. Overview
Welcome to the world of the computing pen! You are able to discover how easy to control your personal computer by using a wireless stylus pen instead of a mouse. The function of the stylus pen lets you draw a line very thin, thick, light or dark (called "pressure sensitivity"). You also can write, sign, and annotate documents, and draw, sketch or paint as easily as you would on normal paper and simulate the functions like pencil, mark pen, brush, or watercolor pen by using commercial software packages such as Adobe® PhotoShop™, Corel® Painter™ and Corel® Paint Shop™.
2. Pen Tablet Functions
After installing the device driver, your pen tablet features the following functions:
- Direct pointing - You can move the cursor to any location on the screen by moving the stylus pen tip over the tablet's surface (the pen tip does not have to touch the surface).
- Three-button mouse commands - Your pen tablet provides all functions of a three- button mouse by using its pen tip and two buttons.
- Pen scrolling - You can scroll documents and Web pages by pressing the middle button of the pen over the tablet's working area.
- Pressure sensitivity - This feature allows you to emulate various brushes and pencils and you can press down the pen tip harder, lighter, stronger or thicker, and subtle pencil lines you will receive.
3. System Requirements
- Pentium III equivalent PC or higher.
Microsoft Windows 2000, XP or Vista.
4. Installing the Driver Software in Windows
Under Windows 2000, XP or Vista:
(Caution! Before installing the driver, do not plug the tablet into your computer, otherwise, the driver install process may have errors)
(1) Insert the Driver CD into the CD-ROM drive, and wait for main menu to appear.
(2) On most systems, the setup program will start automatically. If not, you can start the setup programs manually by selecting 【My Computer】▶【CD/DVD Rom】▶Open the Drive ▷Access【Setup】 to start the installation.
(3) Select Driver Setup and press the Enter key on all subsequent questions. After completing the driver installation, restart the PC.
5. Hardware Installation
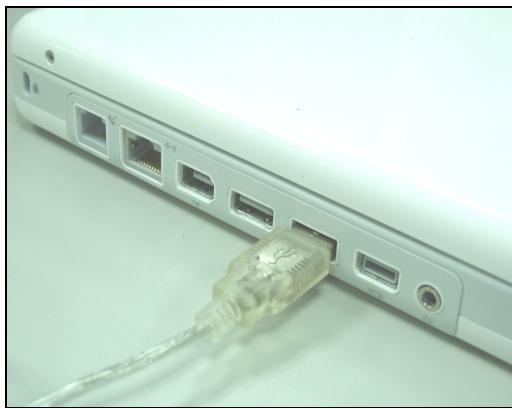
Connecting a tablet with USB interface into the PC after finished the driver installation and restarted the Windows system:
To connect a pen tablet into the PC, you will see a small tablet icon ( ) appears in the system tray, which is normally at the lower right corner of the screen.
Please install the driver first before plug the tablet into your PC.
6. Verifying Hardware and Driver Functions
Follow these steps to ensure that your pen tablet has been installed properly:
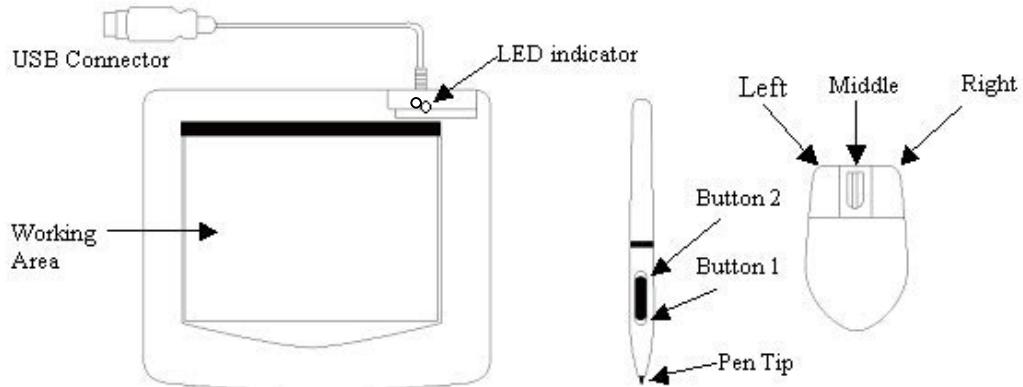
The green LED light on the tablet is the main indicator for hardware operation and depending on your pen tablet model it may be located at a different place than shown in the above diagram. This LED normally stays off, and will only turn on or off in response to various conditions. Watch the state of the LED on the tablet as you go through these test steps:
Note: After the tablet's device driver has been properly installed, a small tablet icon (♀) will appear in the system tray, normally at the lower right corner of the screen.
- Tap on any surface with the tip of the pen, or press the left button of the mouse, to "wake it up" if it has gone into standby mode. A built-in power saving function may have forced the pen or mouse into standby mode if either of them has not used for a period of time.
- As soon as the pen tablet itself activates, the LED will be lit briefly, and will then go and stay off again.
- When the tablet detects the presence of the stylus pen or mouse, the LED will blink slowly. This happens either when pen tip is hovering or placed within the working area above the tablet.
- When you press a button on the pen barrel, or click on a mouse button, the LED will light up.
- Hovering and moving the pen or the mouse in the working area will cause the cursor on the screen to move accordingly.
Note: After the tablet's device driver has been properly installed, a small tablet icon (♂) will appear in the system tray, which is normally at the lower right corner of the screen.
7. Usage Tips
7.1 Pressing left mouse button
If the mouse does not react after you do not use it for a while, press the left button to "wake" it up from the standby mode.
7.2 Tapping before you use the stylus pen
Before you use the pen, or after having not used it for several minutes, tap the pen on any surface of the tablet to "wake" it up from the standby mode.
7.3 Double tapping
For best results, when you double tap with the pen (equivalent to a double click with a mouse), try to keep the tip of the pen on the tablet's surface, or at least try to lift the pen tip as fast as possible before the second tap.
7.4 Storing the pen
To store the pen, make sure the tip does not touch anything, and especially do not let the pen stand in a cup or penholder with the tip down. Even though the possibility is low, pressing the pen tip will cause a constant drain on the pen's battery. Place the pen in a penholder, or turn the pen tip pointing upward or horizontally with the pen tip free of any pressure by other objects.
7.5 Scrolling function of digital pen
The stylus pen has the same function as a mouse for scrolling pages. Press the first button of the stylus pen (same function as mouse's middle click) over the tablet's working area.
7.6 Using a pen without an ordinary mouse
You can work with the pen tablet without using a mouse. When you remove a mouse, make sure you also completely remove its driver. You remove the mouse driver by selecting [Start] [Settings] [Control Panel] [Device Manager], press the "+" sign to show the mouse driver, then select and remove it, and finally restart the computer.
Please do not use more than two devices at the same time in case the screen cursor is jittering or not moving.
II. Pen tablet configuration
You may configure the pen tablet by modifying the functions of the pen tip and the two barrel buttons, tap [Start] > [Settings] > [Control Panel], and double-tap the [Tablet Setting ] icon, or tap on the tablet icon ( ) in the system tray, usually located at the lower right corner of the screen. You may also adjust the pressure sensitivity of the stylus pen by determining the scope of the tablet's working area or (re-) program the hot-cells of your pen tablet by modifying the device driver.
- The Info Tab – The Info tab displays the version number of the driver and Tablet PC function.
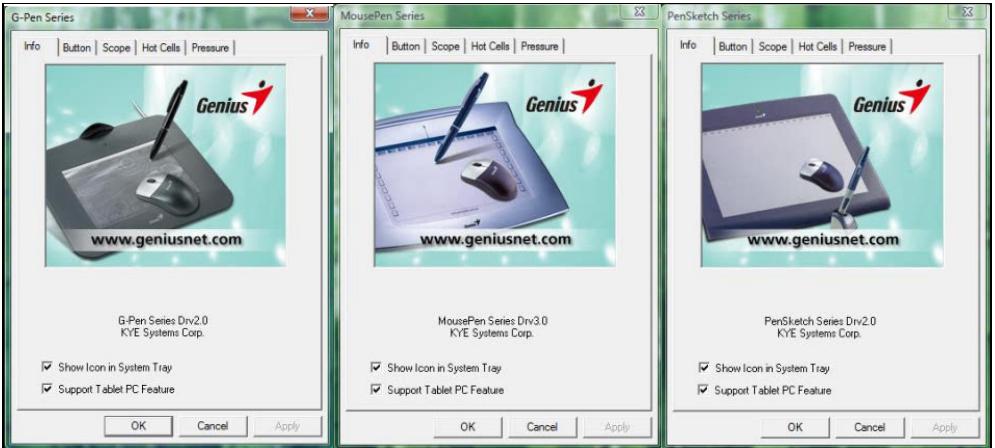
(1) Show Icon in System Tray
You can choose if you want to show the tablet icon in the system tray.
(2) Support Tablet PC Feature
You can select the function of computer pressure sensitivity by checking the box of Support Tablet PC Feature.
☆ After the Tablet driver is installed in the Windows , the Tablet PC function setting will support pressure in MS Journal, OneNote (2003 2007)....etc.
☆ If the Tablet PC setting is disabled, the most of art software's pen pressure (Photoshop, Illustrator, Corel Painter) are still working, but the pen pressure will be disappeared in MS Journal, OneNote(2003、2007) ......etc.
2. The Button Tab
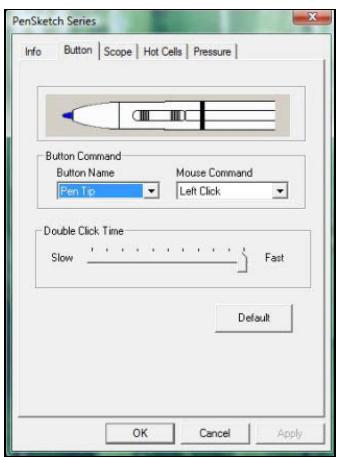
2.1 Button Command
2.1.1 Button Name:
You may re-program the functions of the pen tip and the two-barrel buttons by selecting the button name from the drop down menu and assign a command of a traditional three-button mouse to it.
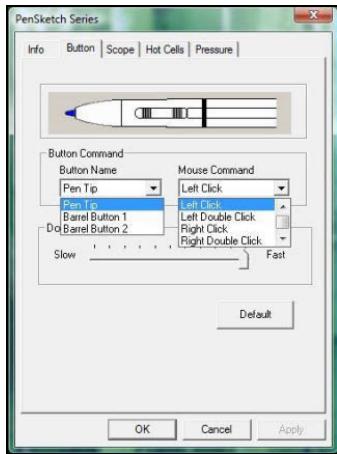
2.1.2 Mouse Command:
According to the mouse function, you can select no action, left click, left double click, middle click, middle double click, right click, or right double click.
2.2 Double Click Time
Move the Speed Slider toward "Slow" if you want more time in double tapping with the Pen Tip or the opposite if you move the Speed Slider toward "Fast". This setting is the same as Double-click Speed on the page displayed by selecting Start Control Panel Mouse Buttons. Changing the speed in one place also changes the other at the same time.
2.3 Default
Tap on the Default button to restore all default settings.
3. The Scope Tab
3.1 Full Area
Tap on the Full Area button to select the largest possibly working area.
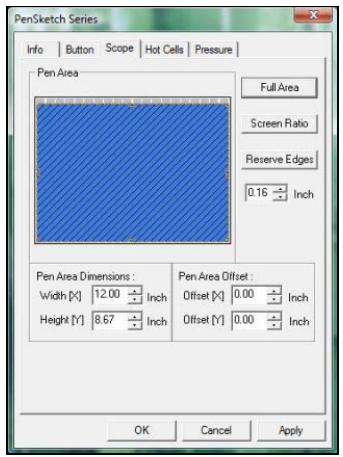
3.2 Screen Ratio
This sets the Pen Area to be the proportional screen size by reducing either the current width or height of the Pen Area.
3.3 Reserve Edges
Tap on the Reserve Edges button to allocate space for the tablet's hot cells.
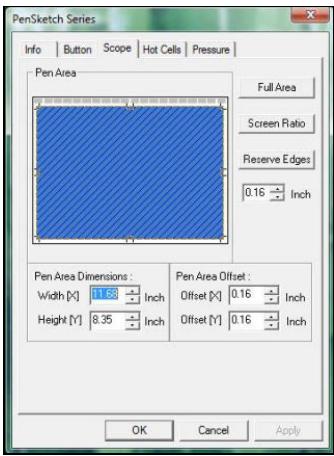
3.4 Pen Area Dimensions
Indicates the current height and width of the pen area dimensions. You may also type in new values here to change them.
3.5 Pen Area Offset
This indicates the horizontal and vertical distances of the upper left corner of the Pen Area from the upper left corner of the maximum Pen Area. You may also set their values by typing in the numerical values here.
4. Hot Cells define page
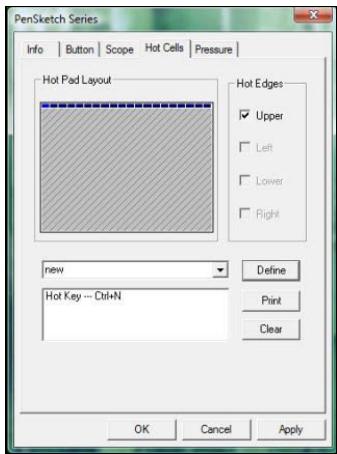
4.1 Hot Pad Layout
In Hot Pad Layout area, you can select any hot key to see the property by clicking the hot key in the blue map that appears in the digital tablet area.
4.2 Hot Edges
There are four areas that you can setup up your hot key location around the tablet.
4.3 Print
Tap on the Print button to print an overview of all hot cell functions.
4.4 Clear
Tapping on this button will clear the definition of the selected Hot Cell, so that no action will be taken when the Hot Cell is tapped later on.
4.5 Define
Press the Define key to set the programs locations, Internet or hot key location.
4.5.1 Define Hot Cell - Run
Run - You may use the browse button to select a file and run, or you may type in a file name with complete path.
Start in - This is the initial folder when the program starts the execution.
Parameters – The string type will be passed to the program as parameters. For example, you may type in a document name here and pass it to a word processing program specified in the Run line above.
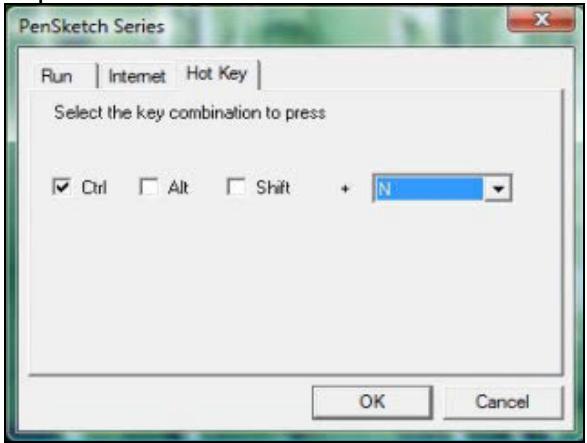
4.5.2 Define Hot Cell - Internet
Kind of Service - You can select some Internet service to start. For example, browsing website, newsgroup, send an E-mail, or using other Internet services. The exact program initiated (for example, the browser program) depends on system settings.
Address - The URL address for the selected service. For example, the Website or e-mail addresses.
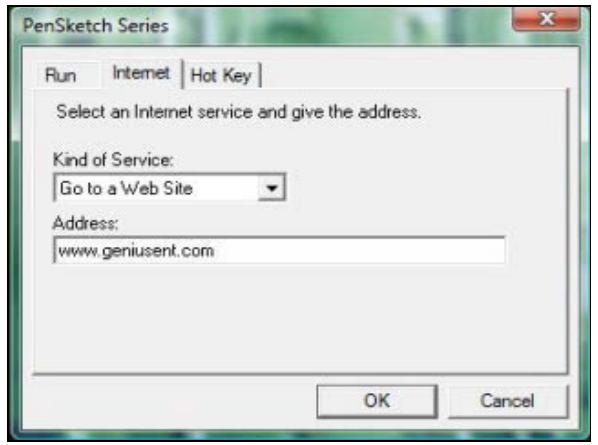
4.5.3 Define Hot Cell - Hot Key
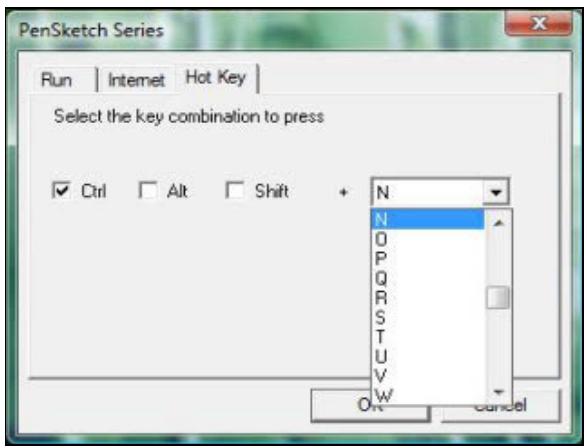
Select the key combination to press - You may select any key such as alphanumeric key or cursor control key, combined with Shift, Ctrl and / or ALT key.
5. The Pressure Tab
5.1 Pressure Test
There are four different colors to select and the pressure sensitivity of the pen tablet can be adjusted in this tab. There is a test area to see the thickness of a line by pressing a certain pressure of pen tip on the tablet pad. The numerical value of the pressure level is shown in the field above the Clear Button.
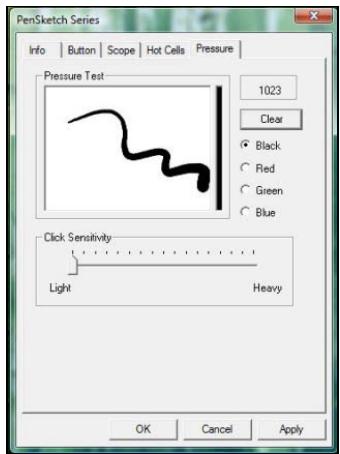
5.2 Clear
Tap on the Clear button to clean the space up in the Pressure Test area.
5.3 Click Sensitivity
By default, tapping with the pen tip is equivalent to a left click of a mouse. Move the slider in the sensitivity bar to adjust the response of the pen tip. Light means pen tip presses will be very quick with slight power, but the heavy function is opposite.
III. Question & Answer
1. How can I get the latest update or uninstall the software?
You can download the latest driver from our website www.geniusnet.com.
- Download the latest version of the driver by clicking on the link and save it to your hard disk.
- Uninstall your driver: Click [Start] [All Programs] [TABLET] [Uninstall].
- Unzip the file in a folder on your hard disk (with Windows Vista's built-in unzip utility or a program like Winzip for instance).
- Double-click the Setup.exe in the folder where you unzipped the file.
2: The tablet does not work. What can I do?
Please follow steps as showing below:
- Please pull off the tablet's USB plug from the computer.
- Uninstall the Tablet driver from the system.
- Re-connect the Tablet's USB to the computer.
3.1 Check whether the tablet's LED is blinking or not? If the LED is unlit, that means your tablet is at fault.
3.2 Test your wireless stylus pen in the tablet working area, if it can work as a mouse, which means the hardware is OK. If it doesn't work, please change the battery with a new one.
3.3 After you changed a new battery for the pen, and it is still not working, that means the hardware is at fault.
- You can download for free the latest version of driver directly from our website www.geniusnet.com
- Setup the new version of driver; and you need to restart your computer.
- After you restart your computer, on bottom right of the screen, you can find the tablet icon ().
6.1 If you can't find the tablet icon ( ) on the bottom right of the screen, it means the driver failed in startup, and there could be an incompatible issue.
6.2 Check [My Computer] [Properties] [Hardware] [Device Manager], if you see an exclamation mark, it means the installed driver of the tablet is incompatible with the Windows system.
- By clicking the tablet icon (✔) on the bottom right of the screen, you can test the pressure sensitivity to see whether the pen pressure function works or not. (Please see the chapters 2, section 5, Pen tablet configuration for more details).

If you do not have pen pressure, it means the pen might be faulty.
3: After installing the driver and connecting the tablet into the PC, why does Windows still ask to install the driver?
If the problem occurs quite often, check Q&A in our web site www.geniusnet.com.
- Pen Tablet
- General Information
- Overview
- Pen Tablet Functions
- System Requirements
- Installing the Driver Software in Windows
- Hardware Installation
- Verifying Hardware and Driver Functions
- Usage Tips
- Pressing left mouse button
- Tapping before you use the stylus pen
- Double tapping
- Storing the pen
- Scrolling function of digital pen
- Using a pen without an ordinary mouse
- Pen tablet configuration
- Button Command
- Button Name:
- Mouse Command:
- Double Click Time
- Default
- The Scope Tab
- Full Area
- Screen Ratio
- Reserve Edges
- Pen Area Dimensions
- Pen Area Offset
- Hot Cells define page
- Hot Pad Layout
- Hot Edges
- Clear
- Define
- Define Hot Cell - Run
- Define Hot Cell - Internet
- Define Hot Cell - Hot Key
- The Pressure Tab
- Pressure Test
- Clear
- Click Sensitivity
- Question & Answer
- How can I get the latest update or uninstall the software?
- 2: The tablet does not work. What can I do?
- 3: After installing the driver and connecting the tablet into the PC, why does Windows still ask to install the driver?
Marque : GENIUS
Modèle : MGP
Catégorie : Tablette graphique